

Page 1
INSTRUCTIONS FOR:
LOW LEVEL OIL DRAINERS
MODELS: AK467D, AK467DXP
Thank you for purchasing a Sealey product. Manufactured to a high standard, this product will, if used according to these instructions
and maintained properly, give you years of trouble free performance.
IMPORTANT: PLEASE READ THESE INSTRUCTIONS CAREFULLY. NOTE THE SAFE OPERATIONAL REQUIREMENTS, WARNINGS & CAUTIONS. USE THE PRODUCT
CORRECTLY AND WITH CARE FOR THE PURPOSE FOR WHICH IT IS INTENDED. FAILURE TO DO SO MAY CAUSE DAMAGE AND/OR PERSONAL INJURY AND WILL
INVALIDATE THE WARRANTY. KEEP THESE INSTRUCTIONS SAFE FOR FUTURE USE.
Refer to instruction
manual
Wear eye
protection
Wear protective
gloves
Wear protective
clothing
1. SAFETY
Replace damaged parts. Use recommended parts only. Unauthorised parts may be dangerous and will invalidate the warranty.
Keep the drainer clean, dry and in good condition for best and safest performance.
Wear appropriate protective clothing and eye protection.
If it is necessary to raise the vehicle ensure that it is properly supported. If the vehicle has been raised with a jack, axle stands must be
put in place before working under the vehicle.
Remove the oil drainer and other tools and equipment from underneath the vehicle before lowering it again.
Use drainer in a suitable work area. Keep area clean and tidy, and free from unrelated materials and ensure that there is adequate
lighting.
The work area should have a flat and level surface capable of supporting the weight of the drainer and it's contents.
DO NOT position the drainer in such a way that it becomes a hazard to others in the work area.
Ensure that the floor is not slippery and wear non-slip shoes.
Keep children and unauthorised persons away from the work area.
Dispose of waste liquids in accordance with local authority regulations.
WARNING! DO NOT allow uncontrolled discharge of fluids which would pollute the environment.
DO NOT use the drainer in wet or damp areas or where condensation is present.
x DO NOT use the drainer near open flames or other sources of heat.
WARNING! If draining the oil whilst hot, take precautions to prevent against burns, particularly hands, wrists and arms.
2. INTRODUCTION
Low level drainers suitable for use on the forecourt and workshop floor. Steel fabricated unit with a capacity of 64ltr. Fitted with gravity drain tap for
manual discharge. Model No. AK467DXP fitted with rotary pump and hose for faster discharge. Fully portable with two castors, two fixed wheels
and handle for manoeuvring around the workshop.
3. SPECIFICATION
Model No: ................................AK467D................... AK467DXP
Capacity:..................................64ltr ............................64ltr
Maximum Pan Height: .......................285mm........................285mm
Gravity Feed: ..............................Yes ..............................Yes
Gravity Discharge: ..........................Yes ..............................Yes
Pump Discharge: ...........................No ..............................Yes
4. ASSEMBLY
4.1. Assembly
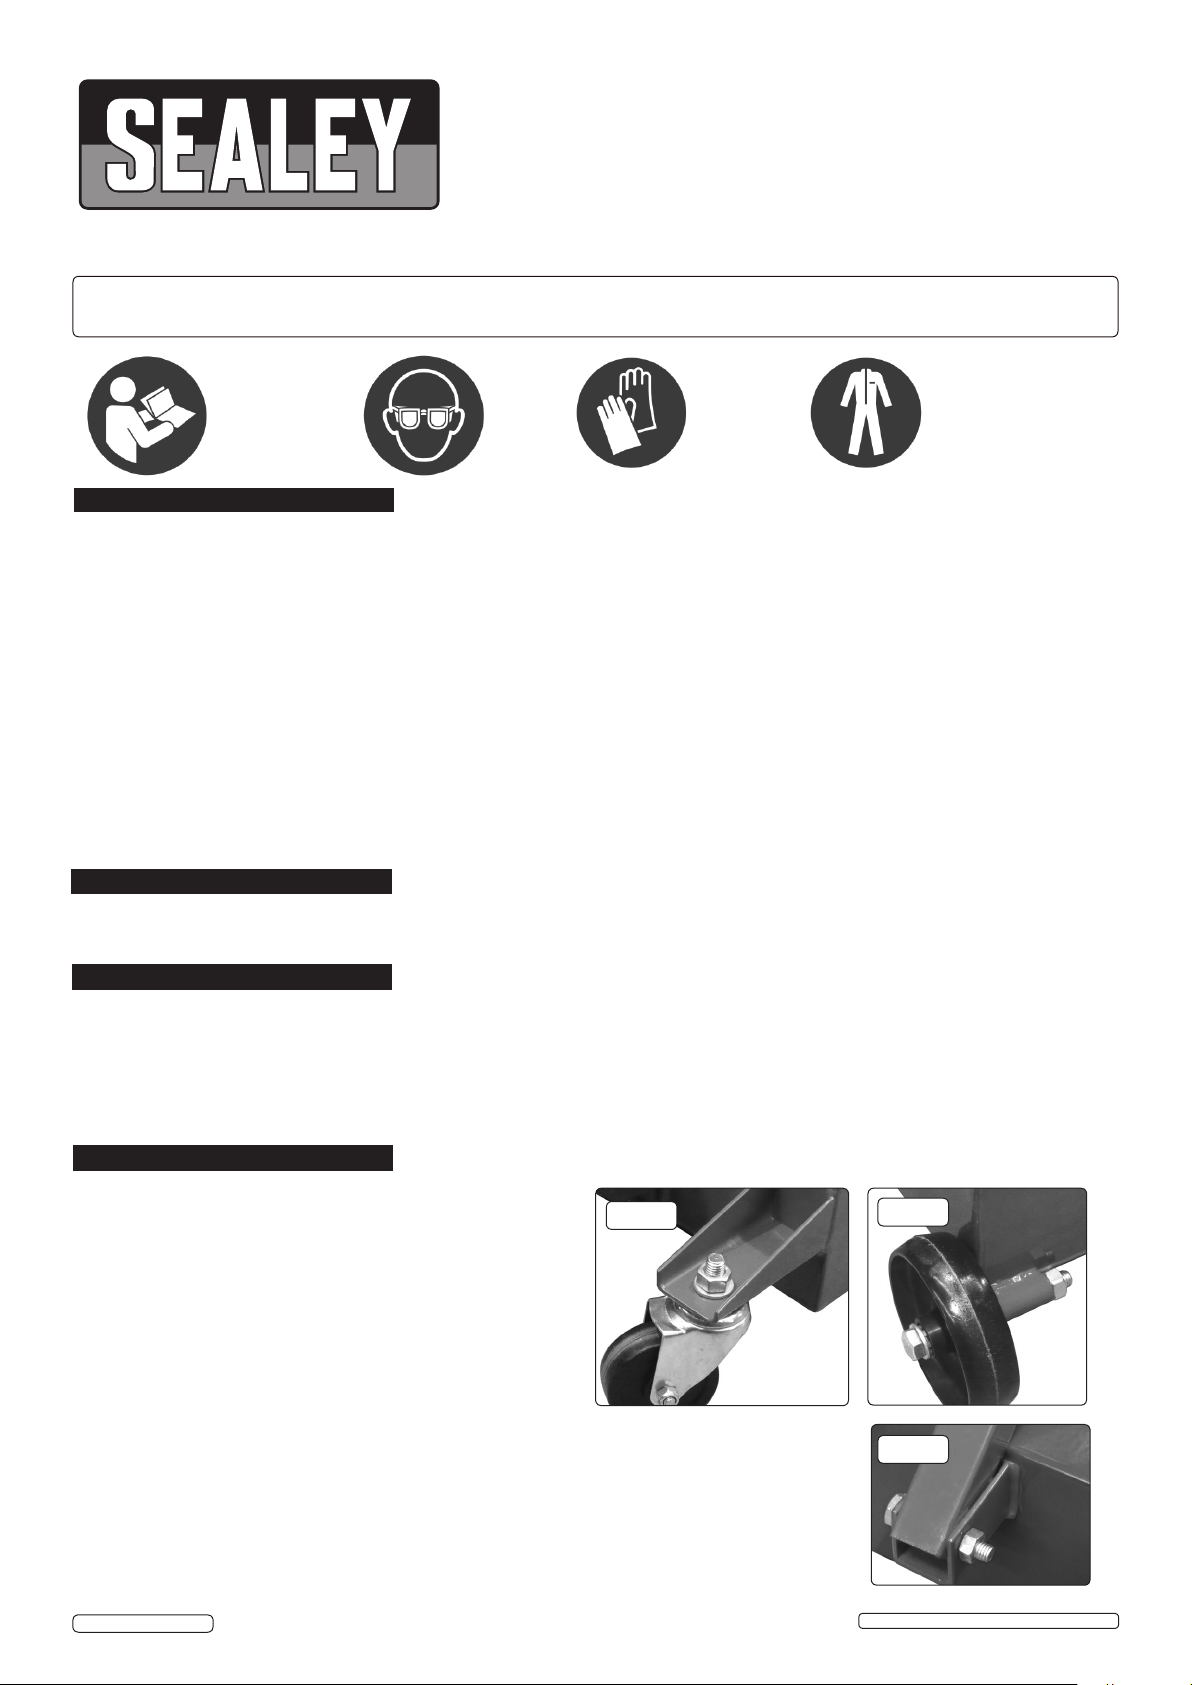
4.1.1. CASTOR WHEELS (fig.1). Bolt a castor wheel to each of the
projecting brackets either side of the handle mount using the
M12 nuts and washers provided.
4.1.2. FIXED WHEELS (fig.2). Insert the special axle bolts through
each wheel so that the wheel is running on the roller bearing.
Mount each wheel by pushing the axle bolt through each of the
tubular axle mounts welded to the back, bottom edge of the
casing. Secure each axle bolt with the M12 lock nuts provided.
DO NOT over tighten.
4.1.3. HANDLE (fig.3). Place the handle into the bracket situated centrally between the two castor
brackets. Align the hole in the end of the handle with the hole in the bracket and insert the
Ø8mm x 40 bolt through both parts. Secure with the M8 nut provided.
fig.1
fig.2
fig.3
© Jack Sealey Limited
Original Language Version
AK467D, AK467DXP Issue: 2 - 12/09/17
Page 2
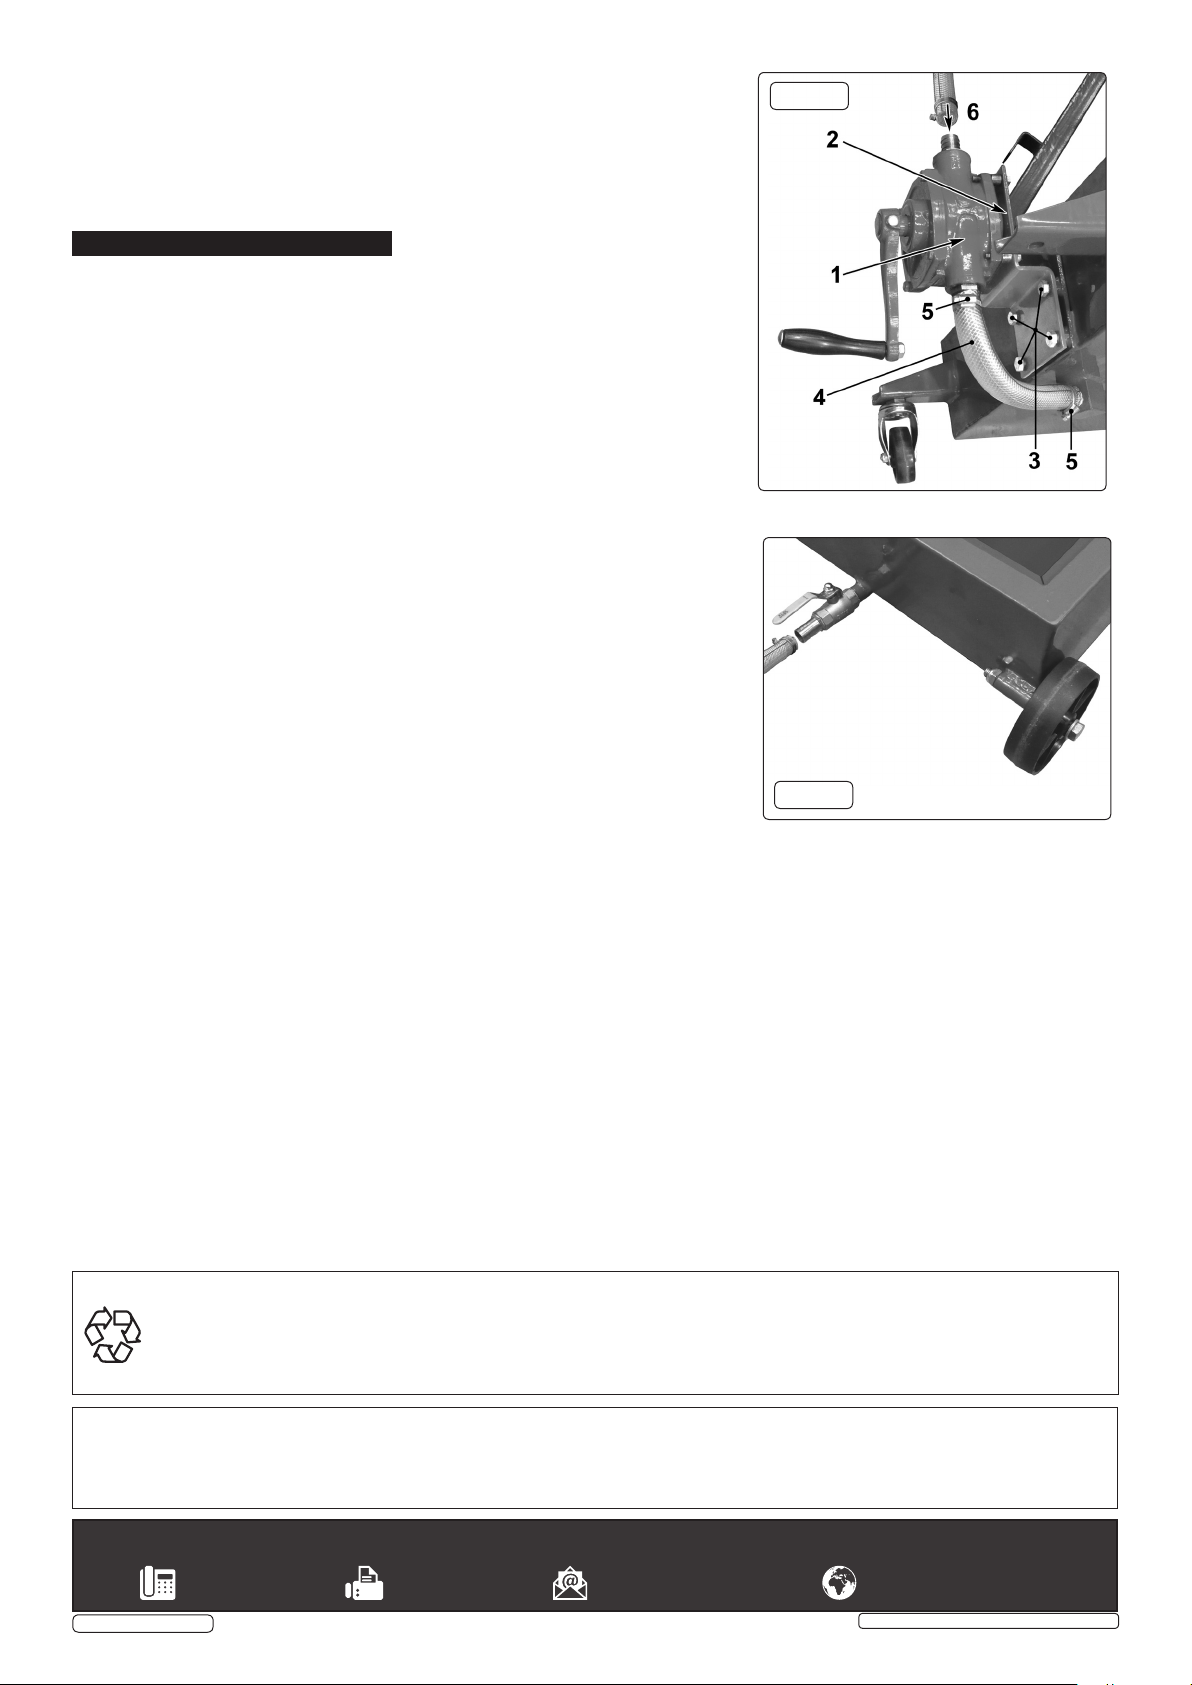
4.1.4. PUMP (AK467DXP ONLY). See fig.5. The pump (1) comes attached to the pump
bracket (2). Attach the pump bracket to the castor end of the oil drainer in the position
indicated above using the four M8 x 16mm bolts (3) provided. Each bolt must have a
split lock washer under the head and should be tightened using a 14mm spanner.
4.1.5. Connect the sump outlet to the underside of the pump using the short length of tube
provided. Slide the worm drive clips provided over the tube first then push the tube onto
the fittings and secure with the worm drive clips (fig.4.6).
4.1.6. Place the black filter screen into the shallow recess in the top of the pan.
5. OPERATION
5.1 Preparation
5.1.1. When positioning the drainer ensure that there are no spills of oil on the floor both
prior to draining and afterwards. All spills should be cleaned up immediately to prevent
them becoming a slipping hazard.
5.1.2. When positioning the drainer beneath the vehicle consideration should be given to
accessing the sump plug. If necessary loosen the plug before siting the drainer.
Remember that once the sump plug has been removed the escaping oil may be hot.
5.2. Collection of waste oil
5.2.1. If unit has been used to drain a previous vehicle check to ensure that there is
sufficient spare capacity within the pan before you drain the next vehicle.
5.2.2. Place the pan under the vehicle’s sump, remove the sump plug and put to one side.
Allow the engine to drain.
5.2.3. When draining is complete, remove the pan and wipe up any spillage. Remember to
replace and tighten the sump plug using a new sump washer.
5.3. Emptying of waste oil from pan unit.
WARNING! Dispose of all waste in accordance with local regulations.
5.3.1. GRAVITY DISCHARGE (AK467D) Attach the discharge hose to the outlet valve at the
rear end of the drainer and secure it with the worm drive clip provided. See fig.5.
Place the other end of the pipe into a suitable container set at a lower level than the
drainer pan and open the outlet valve. When the drainer pan is empty close the valve.
5.3.2. MANUAL PUMP DISCHARGE (AK467DXP) Attach the discharge hose (see fig.4) to
the outlet connection on the top of the pump and secure it with the worm drive clip
provided. Place the other end of the pipe into a suitable container and proceed to turn
the pump handle clockwise until empty.
5.4. After use thoroughly clean the exterior of the drainer and clear up any spills in the
work area. Store the drainer in a suitable clean dry place where it will not be a hazard.
fig.4
fig.5
ENVIRONMENT PROTECTION
Recycle unwanted materials instead of disposing of them as waste. All tools, accessories and packaging should be sorted, taken to
a recycling centre and disposed of in a manner which is compatible with the environment. When the product becomes completely
unserviceable and requires disposal, drain any fluids (if applicable) into approved containers and dispose of the product and fluids
according to local regulations.
Note: It is our policy to continually improve products and as such we reserve the right to alter data, specifications and component parts without prior
notice.
Important: No Liability is accepted for incorrect use of this product.
Warranty: Guarantee is 12 months from purchase date, proof of which is required for any claim.
Sealey Group, Kempson Way, Suffolk Business Park, Bury St Edmunds, Suffolk. IP32 7AR
© Jack Sealey Limited
Original Language Version
AK467D, AK467DXP Issue: 2 - 12/09/17
 Loading...