

Page 1

INSTRUCTIONS FOR
ARC WELDERS
MODEL No's:
180XT
200XTD
220XTD
250XTD
Original Language Version
180XT, 200XTD, 220XTD, 250XTD Issue: 2(L)- 20/06/16© Jack Sealey Limited
Page 2

INSTRUCTIONS FOR
ARC WELDERS
Thank you for purchasing a Sealey Power Welder. Manufactured to a high standard this product will, if used according to these instructions
and properly maintained, give you years of trouble free performance.
IMPORTANT: BEFORE USING THIS PRODUCT, PLEASE READ THE INSTRUCTIONS CAREFULLY. NOTE THE SAFE OPERATIONAL
REQUIREMENTS, WARNINGS, AND CAUTIONS. USE THIS PRODUCT CORRECTLY, AND WITH CARE FOR THE PURPOSE FOR WHICH
IT IS INTENDED. FAILURE TO DO SO MAY CAUSE DAMAGE AND/OR PERSONAL INJURY AND WILL INVALIDATE THE WARRANTY.
INTRODUCTION
This instruction manual contains the information required to prepare your arc welding set for welding. For Individual model specifications refer
to part 2. The instructions are not intended to show you how to become a welder. If you have no experience, we recommend that you seek
training from an expert source. Arc welding is relatively easy to perform, but does require a steady hand and time practising with scrap metal,
as it is only with continued practice that you will achieve the desired results.
1. SAFETY INSTRUCTIONS
1.1. ELECTRICAL SAFETY
WARNING! It is the responsibility of the owner and the operator to read, understand and comply with the following:
You must check all electrical products, before use, to ensure that they are safe. You must inspect power cables, plugs, sockets and any other
connectors for wear or damage. You must ensure that the risk of electric shock is minimised by the installation of appropriate safety devices. A
Residual Current Circuit Breaker (RCCB) should be incorporated in the main distribution board. We also recommend that a Residual Current
Device (RCD) is used. It is particularly important to use an RCD with portable products that are plugged into a supply which is not protected
by an RCCB. If in any doubt consult a qualified electrician. You may obtain a Residual Current Device by contacting your Sealey dealer.
You must also read and understand the following instructions concerning electrical safety.
1.1.1. The Electricity at Work Act 1989 requires that all portable electrical appliances, if used on business premises, are tested by a
qualified electrician, using a Portable Appliance Tester (PAT), at least once a year.
1.1.2. The Health & Safety at Work Act 1974 makes owners of electrical appliances responsible for the safe condition of those appliances
and the safety of the appliance operators. If in any doubt about electrical safety, contact a qualified electrician.
1.1.3. Ensure that the insulation on all cables and on the appliance is safe before connecting it to the power supply. See 1.1.1. and 1.1.2.
and use a Portable Appliance Tester.
1.1.4. Ensure that cables are always protected against short circuit and overload.
1.1.5. Regularly inspect power supply cables and plugs for wear or damage and check all connections to ensure that none is loose.
1.1.6. Important: Ensure that the voltage marked on the appliance matches the power supply to be used and that the plug is fitted with the
correct fuse - see fuse rating at right.
1.1.7. DO NOT pull or carry the appliance by the power cable.
1.1.8. DO NOT pull the plug from the socket by the cable.
1.1.9. DO NOT use worn or damaged cables, plugs or connectors. Immediately have any faulty item repaired or replaced by a qualified
electrician.
1.2 IMPORTANT : THE 180XT AND THE 200XTD CAN BE CONNECTED TO EITHER A 16AMP SINGLE PHASE
SUPPLY OR A PROPERLY INSTALLED 13AMP SUPPLY. TO ACHIEVE MAXIMUM OUTPUT HOWEVER A
16AMP FUSED SUPPLY SHOULD BE USED. WE RECOMMEND YOU DISCUSS THE INSTALLATION OF AN
INDUSTRIAL ROUND PIN PLUG & SOCKET WITH A QUALIFIED ELECTRICIAN.
1.2.1. To fit a 13Amp plug proceed as shown on the right.
Ensure the unit is correctly earthed via a three-pin plug.
a) Connect the green/yellow earth wire to the earth terminal ‘E’.
b) Connect the brown live wire to live terminal ‘L’.
c) Connect the blue neutral wire to the neutral terminal ‘N’.
After wiring, check there are no bare wires, that all wires have been correctly connected and that the
wire restraint is tight.
1.2.2. Cable extension reels. When a cable extension reel is used it should be fully unwound before connection.
A cable reel with an RCD fitted is recommended since any product which is plugged into the cable reel will be
protected. The cross-section of the cable on the cable reel must be suitable for the unit and never lower than the
cross-section of the main cable supplied with unit.
1.3 MODELS 220XTD & 250XTD REQUIRE TO BE CONNECTED TO A 3 PHASE SUPPLY AND
MUST HAVE AN APPROPRIATE PLUG FITTED.
WARNING! Electrical installation of welder to a 3 phase 415Volt supply must only be carried out by a
qualified electrician. Make sure the power supply cable is correctly connected to the Earth.
1.3.1 This product must be fitted with a 3 phase plug as shown on the right, and will require a minimum of
16AMPs per phase, (preferably 32AMP) electrical supply.
You must contact a qualified Electrician to ensure an appropriately fused supply is available.
Connect GREEN/YELLOW wire to Earth ‘E’
Connect BLUE wire to the NEUTRAL Terminal.
Connect BROWN wire to L1 Terminal.
L2 Terminal is in this instance, unused.
Connect the GREY wire to terminal L3.
When completed, check there are no bare wires, that all wires have been connected correctly and the
cable restraint is tight. (NOTE:The cable core colours found in the mains cable on this welder are
consistent with Amendment 2 to BS7671:2001 which harmonised UK cable core colours with those used
in Europe.)
1.3.2 DO NOT use this product with a standard extension cable. Only use ARMOURED extension cable.
Original Language Version
180XT, 200XTD, 220XTD, 250XTD Issue: 2(L)- 20/06/16© Jack Sealey Limited
Page 3

1.4 GENERAL SAFETY WARNING! Arc welding produces sparks, fused metal projectiles and fumes which are dangerous.
WARNING: Unplug from the mains power supply before performing maintenance or service.
Keep the welder and cables in good working order and condition. Take immediate action to repair or replace damaged parts.
Replace or repair damaged parts. Use genuine parts only, unauthorised parts may be dangerous and will invalidate the warranty.
Keep the welder clean for best and safest performance.
Locate welder in a suitable work area. Ensure area has adequate ventilation as welding fumes are harmful.
Keep work area tidy and free from unrelated materials. Also ensure work area has adequate lighting and a fire extinguisher is at hand.
WARNING: You MUST use an appropriate shaded lens welding face mask (contact your Sealey dealer for details). DANGER! Permanent
eye damage may result if you do not use correct protection. Also wear safety welding gauntlets and dry, oil free safety protective clothing
to protect yourself from sparks and hot droplets of fused metal. Cover exposed flesh to avoid potential burns from the ultraviolet rays of the
arc. Use non-reflective welding curtains to protect other people in the area.
Check you have good ventilation and that air can flow freely around the welder.
▲ DANGER! Ensure no flammable or combustible materials are near work area. Welding containers or pipes which hold, or have held dangerous
gases or substances may explode or burn. Materials cleaned with chlorinated solvents, or varnished surfaces pose danger of toxic fumes.
Keep unauthorised persons at a safe distance from the work area. Persons within the work area are subject to the same dangers as the
welder and must take the same precautions.
DO NOT weld on pressurised containers.
Remove ties, watches, rings and other jewellery and contain long hair.
DO NOT use the welder for any purpose other than that for which it is designed.
DO NOT use the welder in damp or wet locations.
DO NOT stand welder on a metal workbench, car bodywork or similar object.
DO NOT touch any live metal parts of the torch or electrode while the machine is switched on.
DO NOT weld without a welding safety head shield, gauntlets, clothing.
DANGER! DO NOT weld near inflammable materials - solids, liquids, or gases.
DO NOT operate welder while under the influence of drugs, alcohol or other medication, or if you are tired.
DO NOT operate the welder if it or the cables are damaged.
DO NOT allow untrained persons to operate the welder.
DO NOT pull welder by the cable, or electrode holder. DO NOT bend or strain cables, protect from sharp or abrasive items. DO NOT stand
on cables or leads. Protect from heat. Long lengths of slack must be gathered and neatly coiled. DO NOT place cables where they
endanger others.
DO NOT touch the electrode holder or workpiece immediately after welding as they will be very hot. Allow to cool.
DO NOT open the cover of the machine. Switch off machine and remove the plug from the power supply after use.
The electromagnetic fields generated by the welding process may interfere with the operation of electrical and electronic equipment.
Users of vital electrical or electronic devices (e.g.pace-makers, respirators etc.) should consult a doctor before entering areas where
welding machines are in use, (see Section 8).
Users of vital electrical or electronic devices should not use any welding machine.
2. DESCRIPTION & SPECIFICATIONS
Model No: 180XT 200XTD 220XTD 250XTD
Welding Current: 66-180A 55-200A 40-180A(230V), 60-220A(415V) 40-180A(230V), 60-250A(415V)
Electrode Capacity: Ø2.0-4.0mm Ø1.6-4.0mm Ø1.6-5.0mm Ø1.6-5.0mm
Cooling: Forced Air Forced Air Forced Air Forced Air
Output Cable 16mm² 25mm² 25mm² 25mm²
No-Load Voltage: 50V 50V 47V, 52V 47V, 55V
Absorbed Power: 10kW 11kW 8.6kW / 12.3kW 8.6kW / 15kW
Supply: 230V - 1ph 230V - 1ph 230V - 1ph, 415V 3ph 230V - 1ph, 415V 3ph
Weight: 23kg 30kg 34kg 34kg
Manufactured to exacting standards these models meet all relevant CE requirements. Fitted with forced air cooling system, these welders have
increased duty cycle and performance. All models feature a vented, wrap-around shell tted to a heavy-duty chassis. Screw type, stepless
welding control allows ne adjustment of current. Each welder is tted with carry handle and wheels. Model No's 220XTD and 250XTD feature
dual voltage input for use on 230V-1ph or, for higher performance, on 415V-3ph. All models supplied with accessory kit including electrode
holder, cables, earth clamp and chipping hammer/wire brush.
IMPORTANT INFORMATION: To operate all welders to their full capacity, you must run them on the correct power supply. To check the
amperage, use the following formula: kVA Rating x 4.35 = Correct Amps Supply
3. ASSEMBLY
3.1. Assembly, 180XT only: (Refer to fig.1)
3.1.1 Lay a protective covering such as some cardboard packaging onto the floor and, with the help of another person, carefully turn the
welder upside down onto it. Place the bent metal foot (6) onto the bottom of the casing just behind the front panel and fix it in place
using three self tapping screws (7).
3.1.2 Assemble the wheels and axle as follows. Attach a circlip (8) to one end of the axle (5). Slide a wheel (3) onto the far end of the axle
and move it across to the circlip ensuring that the recess in the wheel faces outwards. Insert the free end of the axle into the hole in
the side of the casing as shown in fig.1 and guide it through the casing to emerge from the hole on the far side of the casing. Slide the
other wheel (3) onto the axle and retain it with a circlip (8). Push a cap (4) into the recess in each wheel. With the help of another
person, carefully turn the welder the right way up.
3.1.3 Attach the handle extension to the handle as follows. Take the handle extension (1) and push the large recessed spigot on its
underside into the matching hole in the handle (2) as shown in fig.1. Secure the two parts together using the 25mm M5 bolt (9)
provided.
3.1.4 Place the handle assembly onto the top of the casing and align it with the fixing holes. Secure the back end of the handle using an M6
16mm bolt (11), a split washer (12) and a flat washer (13) as shown in fig.1. Secure the front end of the handle using an M6
25mm bolt (10), a split washer (12) and a flat washer (13) as shown in fig.1.
Original Language Version
180XT, 200XTD, 220XTD, 250XTD Issue: 2(L)- 20/06/16© Jack Sealey Limited
Page 4
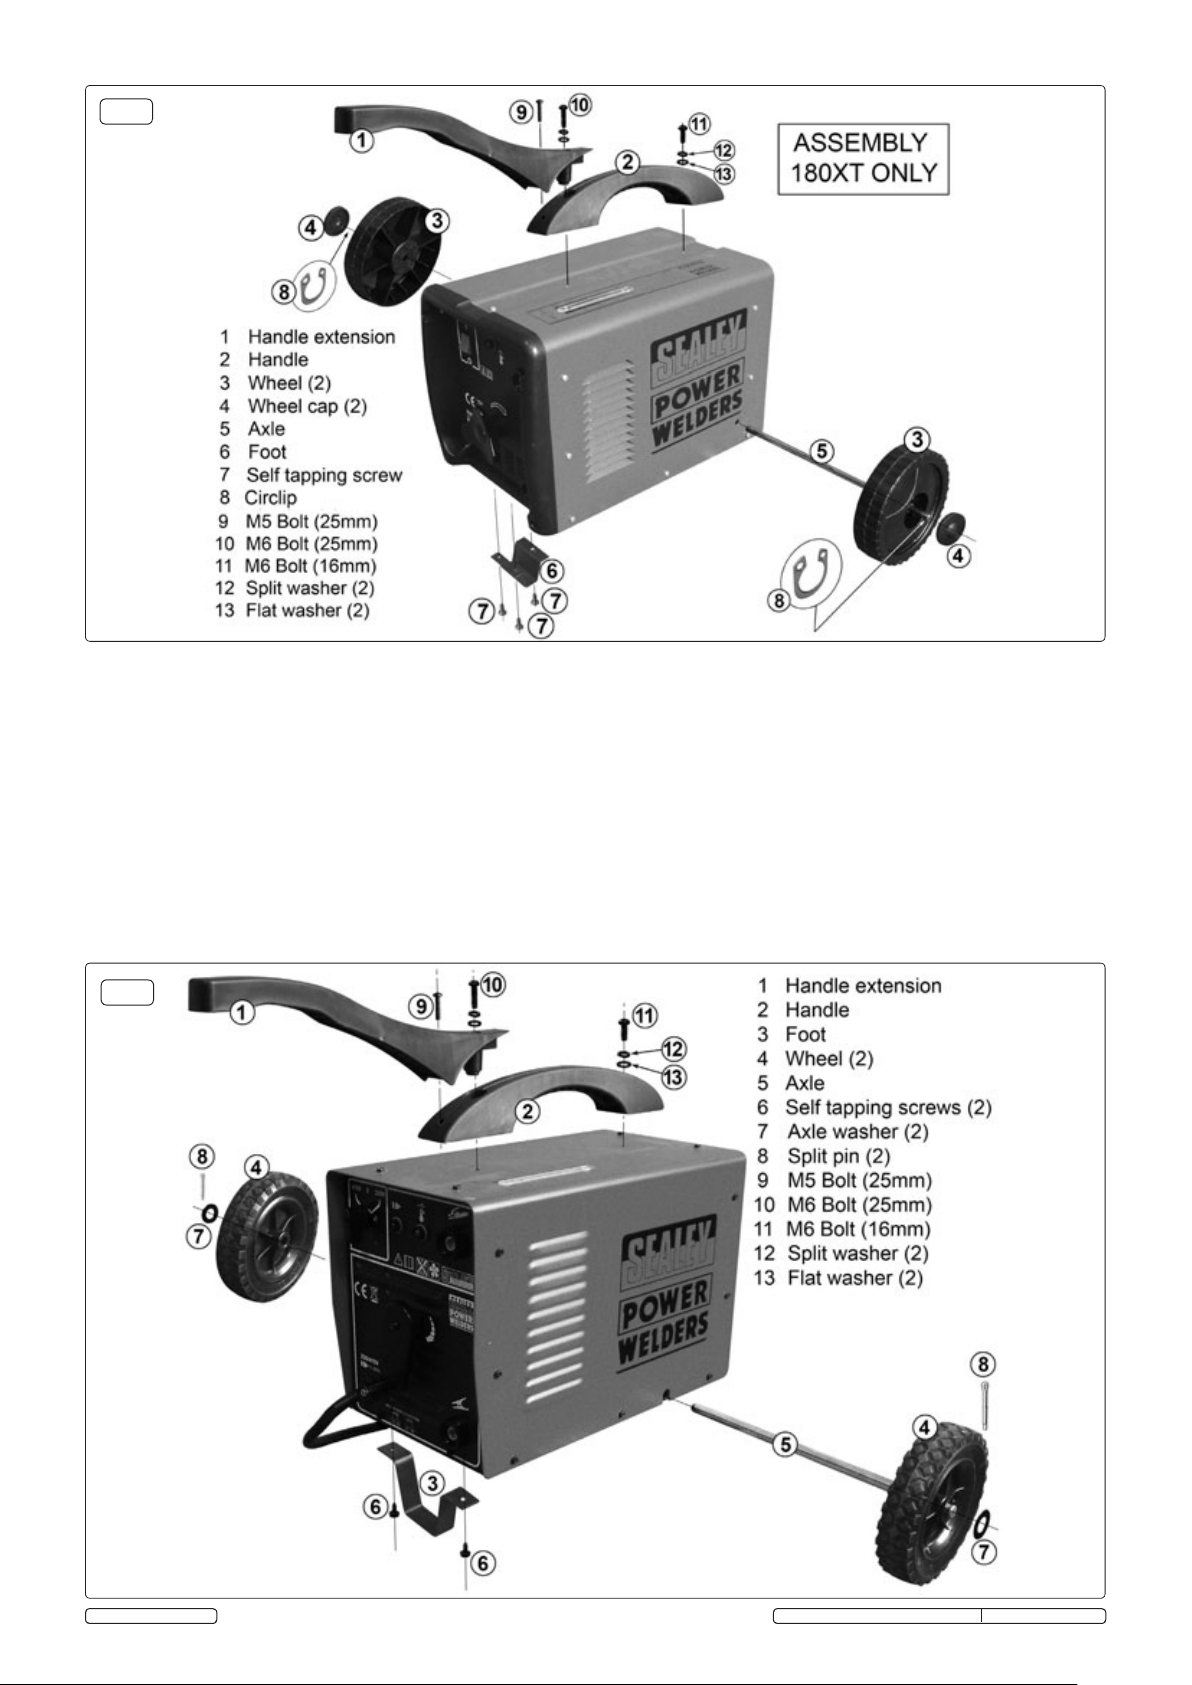
fig.1
3.2. Assembly, 200XTD, 220XTD, 250XTD: (Refer to fig.2)
3.2.1 Lay a protective covering such as some cardboard packaging onto the floor and, with the help of another person, carefully turn the
welder upside down onto it. Place the bent metal foot (3) onto the bottom of the casing just behind the front panel and fix it in place
using two self tapping screws (6).
3.2.2 Assemble the wheels and axle as follows. Slide a wheel (4) onto one end of the axle (5) followed by a large flat washer (7). Insert a
split pin (8) through the hole in the end of the axle (5) and bend the ends over. Insert the free end of the axle/wheel assembly into the
hole in the side of the casing as shown in fig.2 and guide it through the casing to emerge from the hole on the far side of the casing.
Slide the other wheel (4) onto the axle and retain it with a large flat washer (7) and a split pin (8). Bend the ends of the split pin over to
retain the assembly.
3.2.3 Attach the handle extension to the handle as follows. Take the handle extension (1) and push the large recessed spigot on its
underside into the matching hole in the handle (2) as shown in fig.2. Secure the two parts together using the 25mm M5 bolt (9)
provided.
3.2.4 Place the handle assembly onto the top of the casing and align it with the fixing holes. Secure the back end of the handle using an M6
16mm bolt (11), a split washer (12) and a flat washer (13) as shown in fig.2. Secure the front end of the handle using an M6
25mm bolt (10), a split washer (12) and a flat washer (13) as shown in fig.2.
fig.2
Original Language Version
180XT, 200XTD, 220XTD, 250XTD Issue: 2(L)- 20/06/16© Jack Sealey Limited
Page 5
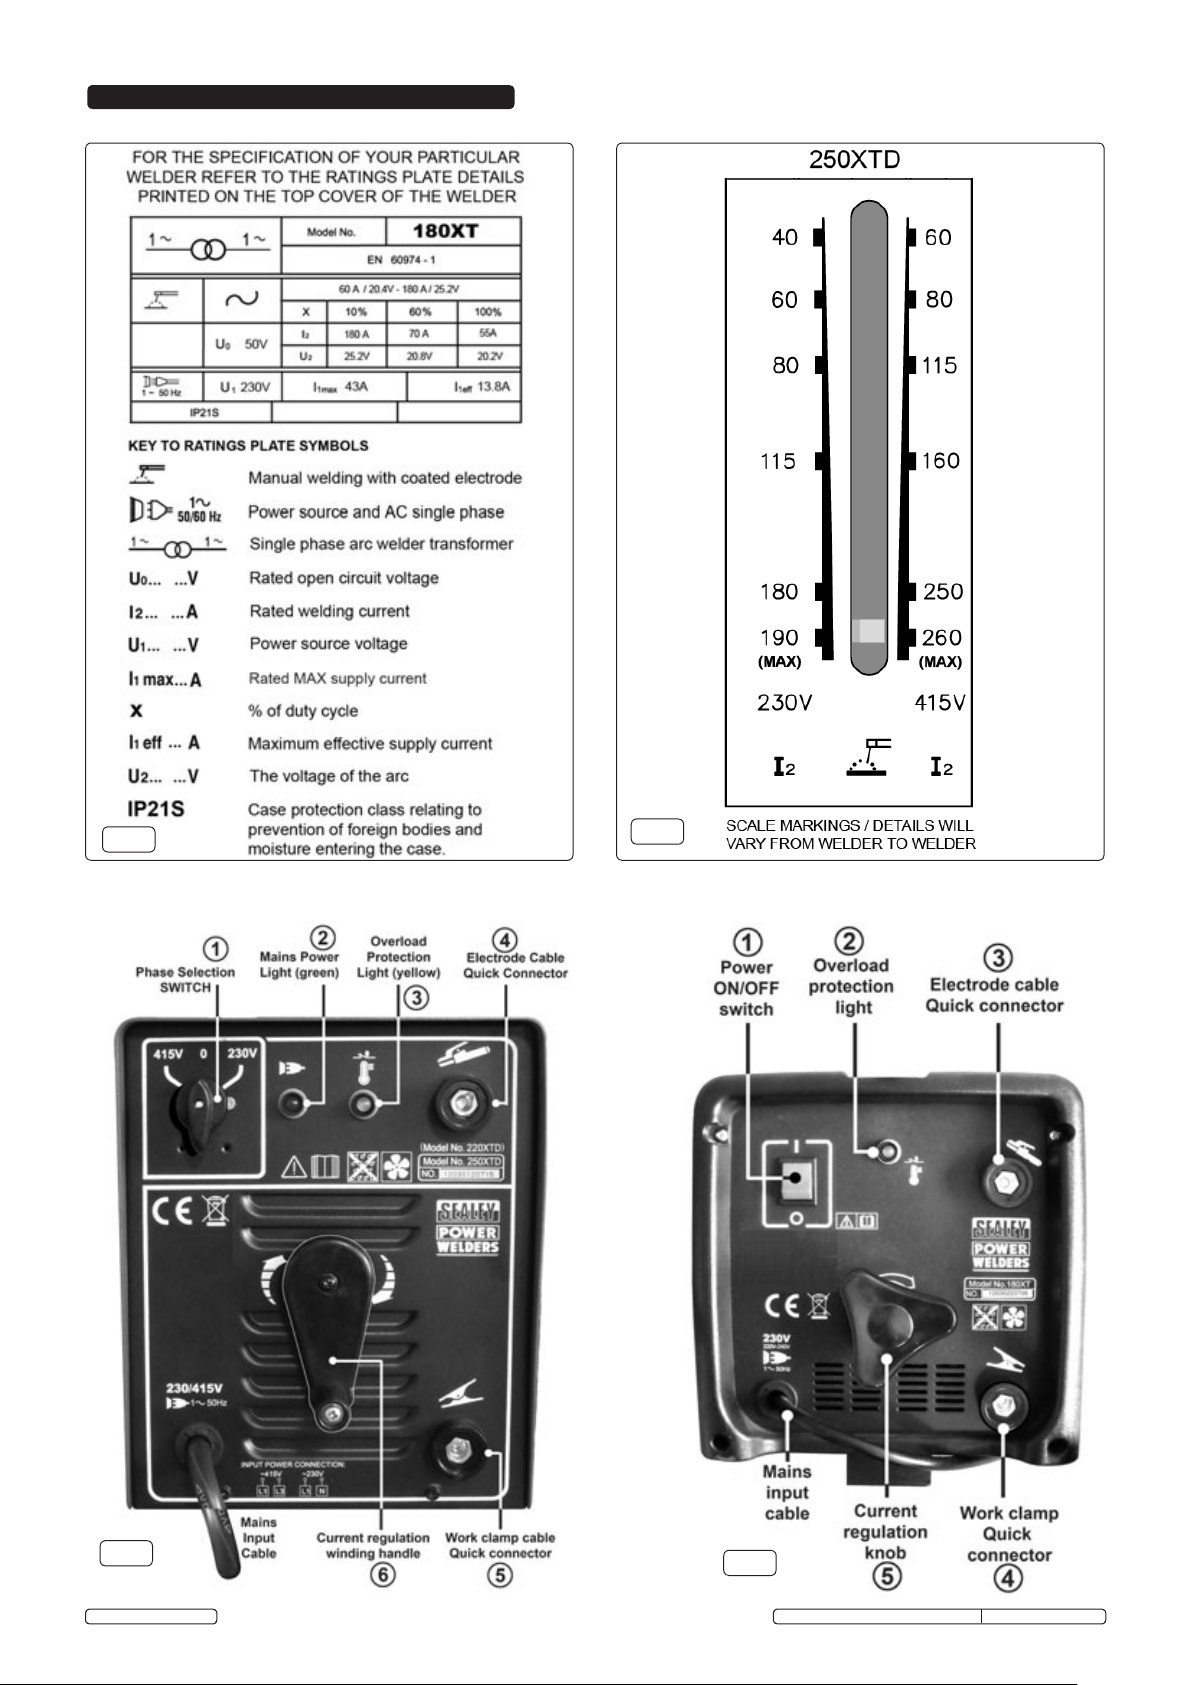
4. CONTROLS & SYMBOLS
fig.3
fig.4
fig.5
Original Language Version
fig.6
180XT, 200XTD, 220XTD, 250XTD Issue: 2(L)- 20/06/16© Jack Sealey Limited
Page 6
5. ENVIRONMENTAL CONDITIONS
5.1. Temperature. When welding, the temperature should not be below -10ºC or above 40ºC. During storage or transit the temperature
should not fall below -25ºC or rise above 55ºC.
5.1.1 Humidity. The relative humidity should be no greater than 50% at 40ºC or 90% at 20ºC.
5.1.2 Altitude. The welder can be used up to 1000 Metres only.
6. OPERATING INSTRUCTIONS
WARNING! If you have no welding experience, we recommend you seek supervised training from an expert source.
6.1 Introduction. Your welder features a single phase transformer with a drooping characteristic suitable for welding with an alternating
current using stick electrodes with diameters from 1.5mm to the highest electrode diameter as shown on the chart below (See fig.9).
6.2 Current regulation. The intensity of the welding current can be adjusted continuously by means of a manually operated magnetic
shunt. See fig.5-6 & fig6-5. The value of the current (I²) may be read in amps on the graduated scale on the top panel of the
welder (See fig.4).
6.3 Thermostatic Protection. When the machine becomes overheated the built in automatic protection cuts off the supply and a yellow
lamp illuminates on the front panel. See fig.5-3 & fig.6-2. When the machine has cooled the light goes out and the supply is
automatically restored. As you use larger welding rods you may experience a temporary current shut off. The larger the welding rod, the
greater the current required, consequently, the hotter the machine will become and the quicker it will cut out.
6.4 Setting up the welder.
6.4.1 Ensure the machine is turned off from the mains power supply. See fig.5-1 & fig.6-1.
6.4.2 Insert the quick connector for the work clamp lead into the socket marked with the work clamp symbol. See fig.5-5 & fig.6-4. Rotate the
connector fully through 180º to ensure a secure connection. Attach the work clamp to a point on the workpiece that has been cleanly
ground to provide good contact. Attach it as close as possible to the joint to be made.
6.4.3. Insert the quick connector for the electrode holder lead into the socket marked with the electrode holder symbol. Rotate the connector
fully through 180º to ensure a secure connection. See fig.5-4 & fig.6-3.
6.4.4 Select the diameter of electrode to be used in relation to the type of joint to be made. Consideration should be given to the
fact that higher current values should be used for flat welding, whereas for vertical or over head welding lower current values are
required. Insert the electrode into the electrode holder. Ensure there is a good connection. Ensure welding surfaces are kept clean and
free from grease, or oil.
6.4.5 Establish the welding current required in relation to the diameter of electrode you are using by making reference to the table below (fig.9.)
6.4.6 Set the current required in amps using the control wheel on the front panel. See fig.5-6 & fig.6-5. Turn the control clockwise to increase the
current, and anti-clockwise to decrease the current. The current set can be read from the graduated scale on the top panel of the machine.
See Fig.4..
6.5 Commencing welding. It is advisable to practice on scrap metal first especially where potentially difficult welds
are to be undertaken.
WARNING! Remember to wear a full face welding mask, gauntlets and protective clothing, and
ensure you have read, understood and apply safety instructions. Wear goggles whilst chipping slag.
6.5.1 DO NOT switch on the power supply until you are fully ready to start welding.
6.5.2 WARNING! (220XTD & 250XTD) DO NOT switch from one voltage to another whilst welding.
6.5.3 Place the face mask in front of your face.
6.5.4 To strike the arc, tap the electrode lightly on the workpiece as if striking a match. DO NOT hit the electrode on
the workpiece as this may damage the stick.
6.5.5 As soon as the arc is struck maintain a steady gap between the end of the electrode and the workpiece
equal to the diameter of the electrode in use (See fig.7). Try to maintain this gap continuously through out
the duration of the weld. The electrode should also be held at an angle of 20° to 30° from the vertical. (See
fig.8).
6.5.6 At the end of the weld bead, move the tip of the electrode backwards in order to fill the weld crater. Quickly
lift the electrode from the weld pool to extinguish the arc. Refer to fig.10 for a welding fault analysis.
6.5.7 If the electrode sticks, you may be holding it too close to the workpiece. Pull sharply to the left, and then to
the right to free the electrode.
6.5.8 After welding, chip off the slag with the chipping hammer provided. Always wear goggles.
6.5.9 Disconnect welder from the mains power supply before resetting the electrode holder.
WARNING! Use pliers to remove the hot consumed electrodes or to move the hot welded pieces.
fig.7
fig.8
Electrode Diameter (mm) ......Welding Current (Amp)
1.6 ................................25min ...............50max
2.0 ................................40min ...............80max
2.5 ................................60min ...............110max
3.2 ................................80min ...............160max
4.0 ................................105min .............185max
5.0 ................................130min .............220max
fig.9 fig.10
7. MAINTENANCE
WARNING! Ensure the welder is disconnected from the electrical mains power supply before attempting any service or
maintenance tasks outlined below.
7.1 Keep the welder clean and dry at all times. Use a dry cloth to clean the unit.
7.2 Keep all electrodes clean and ensure all cables are in good condition.
7.3 Inspect the welder regularly, with a frequency depending on use and the dustiness of the environment. Remove dust deposits from the
transformer using a jet of dry compressed air, (Max 10bar).
7.4 At the same time make sure that the electrical connections are tight and check the wiring for damage to the insulation.
7.5 If necessary use a very thin layer of high temperature grease, to lubricate the moving parts of the regulators (threaded shaft, sliding
surfaces, shunts etc.).
7.6 After these light maintenance operations ensure that the welder covers are replaced and that all fastening screws are fully tightened .
7.7 Use an authorised service agent for any other maintenance or service requirements.
WARNING! Never perform welding operations with the covers removed.
Original Language Version
180XT, 200XTD, 220XTD, 250XTD Issue: 2(L)- 20/06/16© Jack Sealey Limited
Page 7

8. ELECTROMAGNETIC COMPATIBILITY
8.1 THIS EQUIPMENT IS IN CONFORMITY WITH THE EUROPEAN STANDARD ON THE ELECTROMAGNETIC COMPATIBILITY OF
ARC WELDING EQUIPMENT AND SIMILAR PROCESSES (e.g. ARC AND PLASMA CUTTING)
8.2 Protection against interference. (E.M.C.) The emission limits in this standard may not, however, provide full protection
against interference to radio and television reception when the equipment is used closer than 30m to the receiving antenna. In
special cases, when highly susceptible apparatus is being used in close proximity, additional mitigation measures may have to be
employed in order to reduce the electromagnetic emissions. At the same time there could occur some potential difficulties in
having electromagnetic compatibility in a non-industrial environment (e.g. in residential areas). Therefore it is most important that
the equipment is used and installed according to the following instructions.
8.3 Installation and use. The user is responsible for installing and using the equipment according to these instructions. If electromagnetic
disturbances are detected, then it shall be the responsibility of the user of the equipment to resolve the situation with the
technical assistance of the supplier. In some cases this remedial action may be as simple as earthing the circuit (see Note). In
other cases it could involve constructing an electromagnetic screen, enclosing the welding power source and the work, complete with
associated input filters. In all cases the electromagnetic disturbances shall be reduced to the point where they are no longer
troublesome.
Note: The welding/cutting circuit may or may not be earthed for safety reasons. Changing the earthing arrangements should only be
authorised by a person who is competent to assess whether the changes will increase the risk of injury, e.g. by allowing parallel
welding/cutting circuit return paths which may damage the earth circuits of other equipment. Further guidance is given in IEC 974-13
’Arc Welding Equipment - Installation and Use.’
8.4 Assessment of area. Before installing the equipment the user shall make an assessment of potential electromechanical problems in
the surrounding area. The size of the surrounding area to be considered will depend on the structure of the building and other activities
that are taking place. The surrounding area may extend beyond the boundaries of the premises.
The following shall be taken into account :
a) Other supply cables, control cables, signalling and telephone cables, above, below and adjacent to the welding equipment.
b) Radio and television transmitters and receivers.
c) Computer and other control equipment.
d) Safety critical equipment, e.g. security monitoring of industrial equipment.
e) The health of people in the vicinity, e.g. persons fitted with a pacemaker or hearing aid.
f) Equipment used for calibration or measurement.
g) The immunity of other equipment in the environment. The user shall ensure that other equipment being used in the environment is
compatible. This may require additional protective measures.
h) The time of day that welding and other activities are to be carried out.
8.5 Mains supply. The equipment should be connected to the mains supply according to these instructions. If interference occurs, it may be
necessary to take additional precautions such as filtering of the mains supply. Consideration should also be given to shielding the supply
cable of permanently installed equipment in metallic conduit or equivalent. This shielding should be connected to the power source so
that good electrical contact is maintained between the conduit and the welding power source enclosure.
8.6 Maintenance of the equipment. The equipment should be routinely maintained according to these instructions. All access and service
covers should be closed and properly fastened when the welding equipment is in operation. The welding equipment should not be
modified in any way except for those changes and adjustments covered in these instructions. In particular, the spark gaps of any arc
striking and stabilising devices should be adjusted and maintained according to the instructions.
8.7 Cables. The welding/cutting cables should be kept as short as possible and should be positioned close together, running at or close
to the floor level.
8.8 Equipotential bonding. Bonding of all metallic components in the welding/cutting installation and adjacent to it should be considered.
However, metallic components bonded to the workpiece will increase the risk that the operator could receive a shock by touching
these metallic components and the electrode at the same time. The operator should be insulated from all such bonded metallic
components.
8.9 Earthing of the workpiece. It is important that the workpiece is separately bonded to earth in addition to the welder/cutter return
cable. Where the workpiece is not bonded to earth for electrical safety reasons or because of its size and position, e.g. ship’s hull or
building steelwork, a connection bonding the workpiece to earth may reduce emissions in some, but not all instances. Care should be
taken to prevent the earthing of the workpiece increasing the risk of injury to others or damage to other electrical equipment.
Where necessary, the connection of the workpiece to earth should be made by a direct connection to the workpiece, but in some
countries where direct connection is not permitted, the bonding should be achieved by a suitable capacitance, selected according to
national regulations.
8.10 Screening and shielding. Selective screening and shielding of other cables and equipment in the surrounding area may alleviate
problems of interference. Screening of the entire welding/cutting installation may be considered for special applications.
Original Language Version
180XT, 200XTD, 220XTD, 250XTD Issue: 2(L)- 20/06/16© Jack Sealey Limited
Page 8

9. TROUBLESHOOTING
9.1 Machine frequently cuts out: (A) The welder is being overworked causing the thermostatic control to activate. (B) May also be due
to a sticking electrode causing the machine to cut out for up to ten minutes. Cut out will automatically reset when welder has cooled.
9.2 Difficulty in striking an arc:
b). Wrong type of electrode.
PROBLEM CAUSE SOLUTION
Arc becomes unsteady or is
difcult to strike
Welder overheats and cuts out 1. Welder overloaded 1. Wait for welder to cool down, then operate it within
Arc will not strike or is difcult to
strike after the welder is switched
on
Cooling fan not working 1. Faulty start up capacitor 1. Replace capacitor
For all other problems refer to your local supplier
a). The electrode is damp. Heat it up to 60º - 70º before using.
1. Input voltage too low 1. Ensure that the power supply is of the required
specication for the welder.
2. Use of a thinner, non standard Welding cable
2. Use the correct cable as supplied with the machine.
resulting in too much resistance.
3. Welding cable quick connector not properly
tightened resulting in excessive resistance.
3 Ensure that cable quick connector is fully inserted
and turned through 180º.
4. Regulation screw and nut worn out. 4. Replace worn parts.
5. Faulty power switch 5. Replace power switch.
the requirements of the duty cycle.
2. 220/250XTD, ensure that correct input
voltage is selected for the current welding task.
2. To use 415V the welder must be
connected across two phases of a three phase
supply. If in doubt, consult an electrician
3.Cooling fan broken 3. Repair or replace the cooling fan
1. No input voltage from power source 1. Check power source wiring, switch and fuse
2. 220/250XTD, power supply incorrectly
connected
2. To use 415V the welder must be
connected across two phases of a three phase
supply. If in doubt, consult an electrician
3 Partial winding short circuit 3. Return welder to supplier for repair
2. Motor burned out 2. Replace motor
3. Faulty wiring 3. Check wiring
Environmental Protection
Recycle unwanted materials instead of disposing of them as waste. All tools, accessories and packaging should be
sorted, taken to a recycling centre and disposed of in a manner which is compatible with the environment.
When the product becomes completely unserviceable and requires disposal, drain off any fluids (if applicable)
into approved containers and dispose of the product and the fluids according to local regulations.
WEEE Regulations
Dispose of this product at the end of its working life in compliance with the EU Directive on
Waste Electrical and Electronic Equipment (WEEE). When the product is no longer required, it must be disposed
of in an environmentally protective way. Contact your local solid waste authority for recycling information.
NOTE: It is our policy to continually improve products and as such we reserve the right to alter data, specifications and component parts without prior notice.
IMPORTANT: No liability is accepted for incorrect use of this product.
WARRANTY: Guarantee is 12 months from purchase date, proof of which will be required for any claim.
INFORMATION: For a copy of our latest catalogue and promotions call us on 01284 757525 and leave your full name and address, including postcode.
Sole UK Distributor, Sealey Group,
Kempson Way, Suffolk Business Park,
Bury St. Edmunds, Suffolk,
IP32 7AR
Original Language Version
01284 757500
01284 703534
180XT, 200XTD, 220XTD, 250XTD Issue: 2(L)- 20/06/16© Jack Sealey Limited
www.sealey.co.uk
Web
sales@sealey.co.uk
email
 Loading...