

Sealey 150XL.V3,160XTC.V3,150XTC.V3,200XTC.V3 Instructions Manual

INSTRUCTIONS FOR
ARC WELDERS
150XL.V3
150XTC.V3
160XTC.V3
200XTC.V3
Models:
Arc Welders 150XL.V3,150XTC.V3,160XTC.V3,200XTC.V3 - 1 - 200707
INSTRUCTIONS FOR
ARC WELDERS
This instruction manual contains the information required to prepare your arc welding set for welding. For Individual model specifications refer to
part 2. The instructions are not intended to show you how to become a welder. If you have no experience, we recommend that you seek training
from an expert source. Arc welding is relatively easy to perform, but does require a steady hand and time practising with scrap metal, as it is
only with continued practice that you will achieve the desired results.
INTRODUCTION
Thank you for purchasing a Sealey Power Welder. Manufactured to a high standard this product will, if used according to these instructions and
properly maintained, give you years of trouble free performance.
IMPORTANT: BEFORE USING THIS PRODUCT, PLEASE READ THE INSTRUCTIONS CAREFULLY. NOTE THE SAFE OPERATIONAL
REQUIREMENTS, WARNINGS, AND CAUTIONS. USE THIS PRODUCT CORRECTLY, AND WITH CARE FOR THE PURPOSE FOR WHICH
IT IS INTENDED. FAILURE TO DO SO MAY CAUSE DAMAGE AND/OR PERSONAL INJURY AND WILL INVALIDATE THE WARRANTY.
1.2 GENERAL SAFETY!!WARNING! Arc welding produces sparks, fused metal projectiles and fumes which are dangerous.
!!
WARNING: Unplug from the mains power supply before performing maintenance or service.
" Keep the welder and cables in good working order and condition. Take immediate action to repair or replace damaged parts.
" Replace or repair damaged parts. Use genuine parts only, unauthorised parts may be dangerous and will invalidate the warranty.
" Keep the welder clean for best and safest performance.
" Locate welder in a suitable work area. Ensure area has adequate ventilation as welding fumes are harmful.
" Keep work area tidy and free from unrelated materials. Also ensure work area has adequate lighting and a fire extinguisher is at hand.
!!
WARNING: You MUST use an appropriate shaded lens welding face mask (contact your Sealey dealer for details). DANGER! Permanent
eye damage may result if you do not use correct protection. Also wear safety welding gauntlets and dry, oil free safety protective clothing
to protect yourself from sparks and hot droplets of fused metal. Cover exposed flesh to avoid potential burns from the ultraviolet rays of the
arc. Use non-reflective welding curtains to protect other people in the area.
" Check you have good ventilation and that air can flow freely around the welder.
##
DANGER! Ensure no flammable or combustible materials are near work area. Welding containers or pipes which hold, or have held dangerous
1.1. ELECTRICAL SAFETY
! WARNING! It is the responsibility of the owner and the operator to read, understand and comply with the following:
You must check all electrical products, before use, to ensure that they are safe. You must inspect power cables, plugs, sockets and any other
connectors for wear or damage. You must ensure that the risk of electric shock is minimised by the installation of appropriate safety devices.
A Residual Current Circuit Breaker (RCCB) should be incorporated in the main distribution board. We also recommend that a Residual Current
Device (RCD) is used. It is particularly important to use an RCD with portable products that are plugged into a supply which is not protected
by an RCCB. If in any doubt consult a qualified electrician. You may obtain a Residual Current Device by contacting your Sealey dealer.
You must also read and understand the following instructions concerning electrical safety.
1.1.1. The Electricity at Work Act 1989 requires that all portable electrical appliances, if used on business premises, are tested by a qualified
electrician, using a Portable Appliance Tester (PAT), at least once a year.
1.1.2. The Health & Safety at Work Act 1974 makes owners of electrical appliances responsible for the safe condition of those appliances
and the safety of the appliance operators. If in any doubt about electrical safety, contact a qualified electrician.
1.1.3. Ensure that the insulation on all cables and on the appliance is safe before connecting it to the power supply. See 1.1.1. and 1.1.2.
and use a Portable Appliance Tester.
1.1.4. Ensure that cables are always protected against short circuit and overload.
1.1.5. Regularly inspect power supply cables and plugs for wear or damage and check all
connections to ensure that none is loose.
1.1.6. Important: Ensure that the voltage marked on the appliance matches the power supply
to be used and that the plug is fitted with the correct fuse - see fuse rating at right.
1.1.7. DO NOT pull or carry the appliance by the power cable.
1.1.8. DO NOT pull the plug from the socket by the cable.
1.1.9. DO NOT use worn or damaged cables, plugs or connectors. Immediately have any faulty
item repaired or replaced by a qualified electrician. When a BS 1363/A UK 3 pin plug is
damaged, cut the cable just above the plug and dispose of the plug safely.
Fit a new plug according to the following instructions (UK only).
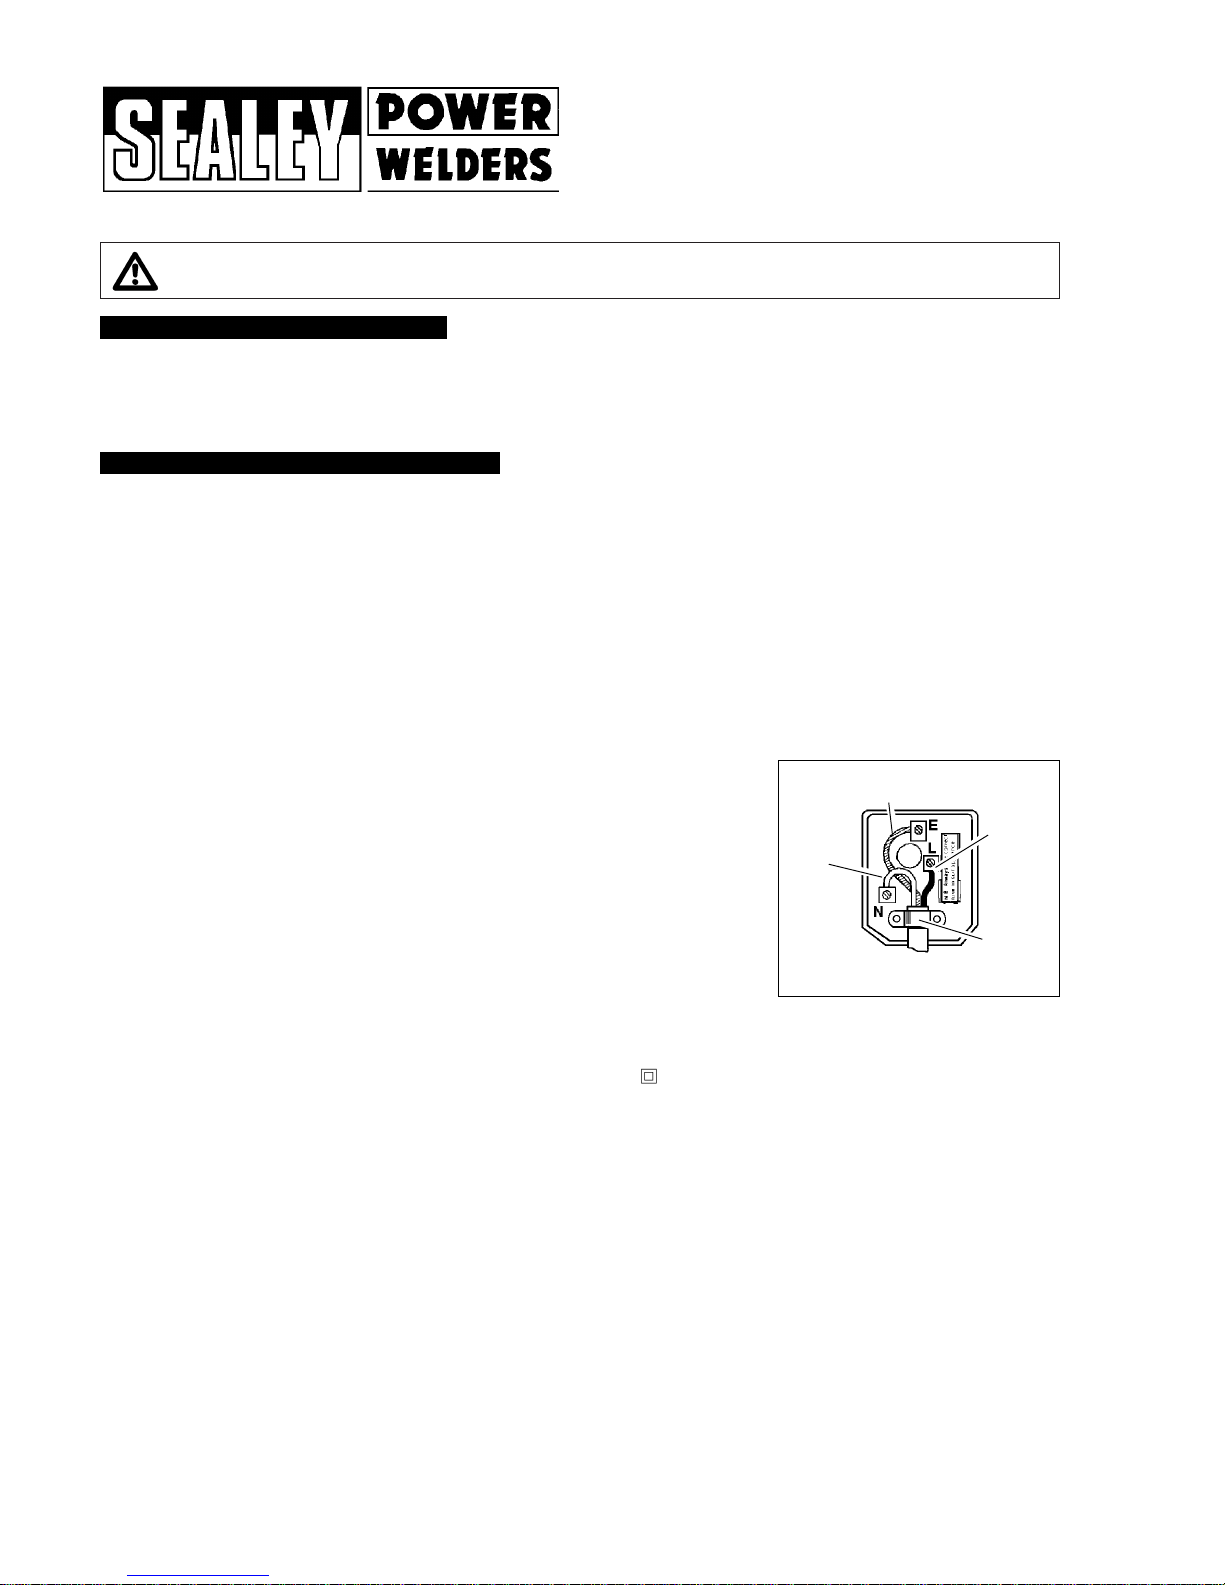
a) Connect the GREEN/YELLOW earth wire to the earth terminal ‘E’.
b) Connect the BROWN live wire to the live terminal ‘L’.
c) Connect the BLUE neutral wire to the neutral terminal ‘N’.
d) After wiring, check that there are no bare wires, that all wires have been correctly connected, that the cable outer insulation
extends beyond the cable restraint and that the restraint is tight.
Double insulated products, which are always marked with this symbol , are fitted with live (brown) and neutral (blue) wires only.
To rewire, connect the wires as indicated above - DO NOT connect either wire to the earth terminal.
1.1.10. Products which require more than 13 amps are supplied without a plug. In this case you must contact a qualified electrician to ensure that a
suitably rated supply is available. We recommend that you discuss the installation of an industrial round pin plug and socket with your electrician.
1.1.11. If an extension reel is used it should be fully unwound before connection. A reel with an RCD fitted is preferred since any appliance
plugged into it will be protected. The cable core section is important and should be at least 1.5mm
2
, but to be absolutely sure that the
capacity of the reel is suitable for this product and for others which may be used in the other output sockets, we recommend the use of
2.5mm2section cable.
1. SAFETY INSTRUCTIONS
FUSE RATING 13 AMP
Blue
Neutral
Wire
Yellow & Green
Earth Wire
Cable
Restraint
Brown
Live
Wire
Arc Welders 150XL.V3,150XTC.V3,160XTC.V3,200XTC.V3 - 1 - 200707
2. DESCRIPTION & SPECIFICATIONS
gases or substances may explode or burn. Materials cleaned with chlorinated solvents, or varnished surfaces pose danger of toxic fumes.
" Keep unauthorised persons at a safe distance from the work area. Persons within the work area are subject to the same dangers as the welder
and must take the same precautions.
% DO NOT weld on pressurised containers.
" Remove ties, watches, rings and other jewellery and contain long hair.
% DO NOT use the welder for any purpose other than that for which it is designed.
% DO NOT use the welder in damp or wet locations.
% DO NOT stand welder on a metal workbench, car bodywork or similar object.
% DO NOT touch any live metal parts of the torch or electrode while the machine is switched on.
% DO NOT weld without a welding safety head shield, gauntlets, clothing.
#
DANGER! DO NOT weld near inflammable materials - solids, liquids, or gases.
% DO NOT operate welder while under the influence of drugs, alcohol or other medication, or if you are tired.
% DO NOT operate the welder if it or the cables are damaged.
% DO NOT allow untrained persons to operate the welder.
% DO NOT pull welder by the cable, or electrode holder. DO NOT bend or strain cables, protect from sharp or abrasive items. DO NOT stand
on cables or leads. Protect from heat. Long lengths of slack must be gathered and neatly coiled. DO NOT place cables where they endanger others.
% DO NOT touch the electrode holder or workpiece immediately after welding as they will be very hot. Allow to cool.
% DO NOT open the cover of the machine. Switch off machine and remove the plug from the power supply after use.
% The electromagnetic fields generated by the welding process may interfere with the operation of electrical and electronic equipment.
" Users of vital electrical or electronic devices (e.g.pace-makers, respirators etc.) should consult a doctor before entering areas where
welding machines are in use.(see Section 8).
" Users of vital electrical or electronic devices should not use any welding machine.
Welding Electrode Cooling Output No-Load Power Input/ Weight
Current Capacity Cable Ø Voltage Efficiency
150XL.V3 . . . . . .40-150A . . . . .Ø1.6-3.2mm Air Cooled . . . .10mm
2
. . . . . . .48V . . . . . .230V 1ph . . .20 kg
3.35 kVA
Welding Electrode Cooling Output No-Load Power Input/ Weight
Current Capacity Cable Ø Voltage Efficiency
150XTC.V3 . . . . .40-150A . . .Ø1.6-3.2mm . . .Turbo Fan . . . . .10mm
2
. . . . . .48V . . . . . .230V 1ph . . .20 kg
3.35 kVA
160XTC.V3 . . . . . .55-160A . . . . .Ø2-4mm . . .Turbo Fan . . . . .16mm
2
. . . . . . .49V . . . . . .230V 1ph . . .21 kg
5.98 kVA
200XTC.V3 . . . . . .55-200A . . . . .Ø2-4mm . . .Turbo Fan . . . . .16mm
2
. . . . . . .52V . . . . . .230V 1ph . . .27 kg
5.98 kVA
HEAVY DUTY TURBO COOLED
ARC WELDERS
Turbo Forced Air Cooling System, the
“XTC” range has increased duty cycle
and performance. Featuring single
vented wrap-around shells fitted to a
heavy duty chassis with wheels and
chassis support and a screw-type
stepless welding current control.
Supplied with carrying handle and
extension bar for easy mobility.
Complete with full accessory kits
including electrode holder, earth clamp
chipping hammer,brush and mask.
IMPORTANT INFORMATION
To operate all welders to their full capacity, you must run them on the correct power supply. To check the amperage,
use the following formula: kVA Rating x 4.35 = Correct Amps Supply
HEAVY DUTY AIR-COOLED ARC
WELDER
The “XL” model is fitted with a heavy
duty air-cooled transformer. Features
include single vented wrap-around shell
fitted on heavy duty chassis, carrying
handle and screw-type stepless welding
current control. Supplied with a full
accessory kit, including electrode
holder, earth clamp hammer/brush,and
mask.
3. ASSEMBLY
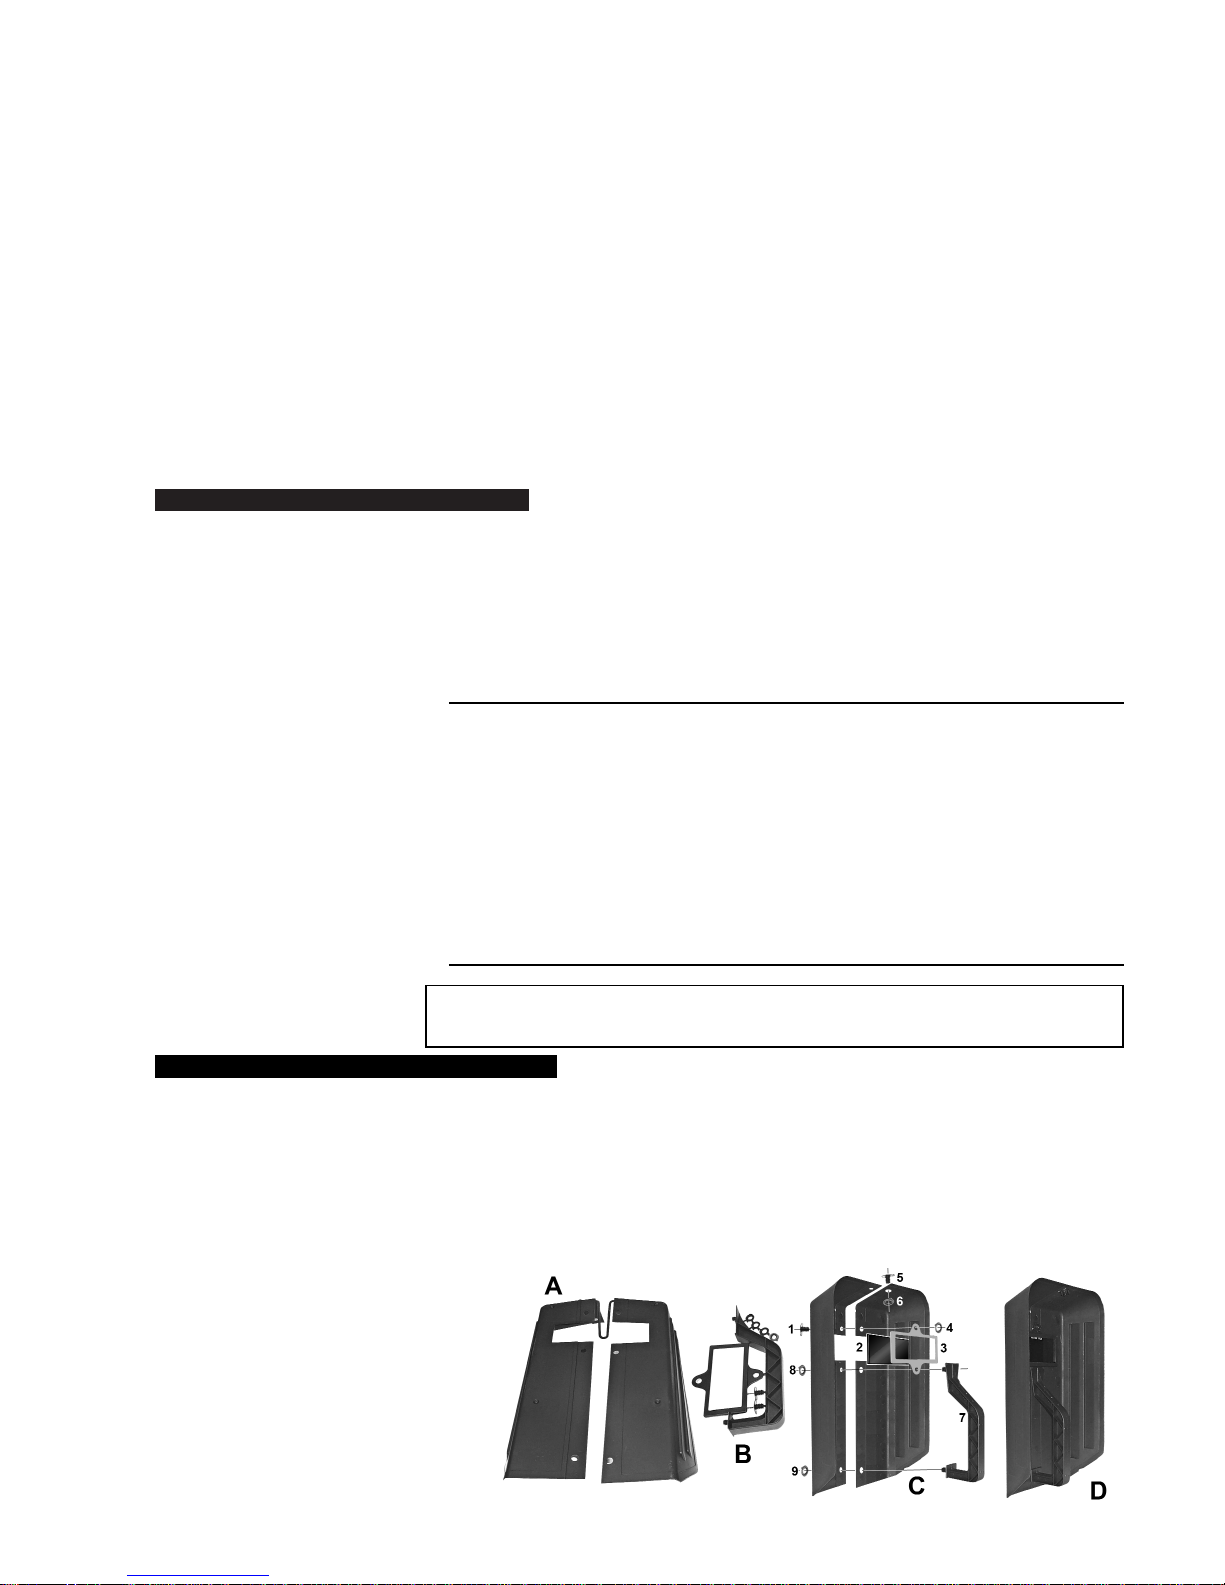
3.1. Assembly: Separate the main components of the mask as shown in A and B below into their separate parts. Trim any spikes and
burrs of excess plastic from the pieces in preparation for assembly.
3.1.1. Overlap the two main halves of the mask so that the fixing holes line up and insert one fixing (1) from the outside into the hole
above the window. Place the assembly face downwards.
3.1.2. Lay the tinted glass window (2) over the window opening and lay the frame (3) over the glass. Screw a plastic retainer ring (4)
onto fixing (1).
3.1.3. Lift up the assembly and insert the handle threads (7) through the two holes below the window. Turn the assembly over and fix the
handle with plastic retaining rings 8 and 9.
3.1.4. Insert fixing (5) through the remaining hole in the top of the mask and fix it with the remaining retaining ring (6).
3.2. Use: Always hold mask close to the
face to provide maximum protection from
radiation and droplets of molten metal.
3.2.1. Before each use check that the mask is
undamaged and that the filter glass is in
position and firmly retained. Remove any
metal droplets that may be on the glass.
Danger! Never use a filter glass that is
chipped, cra cked or other wise faulty
as severe eye damage may result.
Warning! Do not allow the mask to
come into contact with flame as the
fumes produced are harmful.
3.2.3. Clean with soapy water, do not use solvents.
Arc Welders 150XL.V3,150XTC.V3,160XTC.V3,200XTC.V3 - 1 - 200707
 Loading...