


User Guide for the TagMateQC™ Handheld Reader/Starter
Setup and Operating Instructions – Version 1.3
Table of Contents
Overview.................................................................................. 2
TagMateQC™ Basic User Guide: SETUP ..................................... 4
Setting TIME Parameters.......................................................... 4
Setting MODE Parameters ........................................................ 5
Viewing CONFIG Parameters.................................................... 6
TagMateQC™ Basic User Guide: START ..................................... 8
Start-Only Mode ....................................................................... 8
Start-Config Mode (non CFR tags only) .................................... 8
Creating TagMate™ Configuration Tags .................................... 9
TagMateQC™ Basic User Guide: READ..................................... 11
Displaying Further Tag Information ....................................... 12
Restart “Carryover” Operations Performed in READ Mode...... 14
Carryover of “Shelf Life Remaining”....................................... 14
TagMateQC™ Basic User Guide: STATS ................................... 14
TagMateQC™ Basic User Guide: PRINT ................................... 15
TagMateQC™ Basic User Guide: SEND..................................... 17
Infrared Port .......................................................................... 18
Battery Replacement.............................................................. 19
AC Line Powered Operation.................................................... 20
Using the TurboTag™ Shelf Life Function with TagMateQC™ .. 20
Operating Modes of the TagMateQC™ (DIP Switch Settings).. 21
Appendix A - Screen Navigation Overview.............................. 22
Appendix B - Frequently Asked Questions .............................. 24
FCC ID: UPZ-TMX
These devices comply with Part 15 of the FCC Rules. Operation is subject to the following two
rules:
1) This device may not cause harmful interference, and
2) This device must accept any interference received, including interference that may cause
undesired operation.
CAUTION: Any changes or modifications to these devices not expressly authorized by Sealed Air
Corporation may void the user’s authorization to operate the device.
® Reg. U.S. Pat. & TM Off. U. S. Patent 7,165,015. © Sealed Air Corporation 2007. All rights reserved.
The “9 Dot Logo” and “Sealed Air” are registered trademarks of Sealed
Air Corporation (US).
Overview
TagMateQC™ is a comprehensive tool for starting, reading and configuring
TurboTag™ T-700 tags. Various Modes of operation are controlled by DIP switches
inside the device (see section entitled “Operating Modes of the TagMateQC™”). The
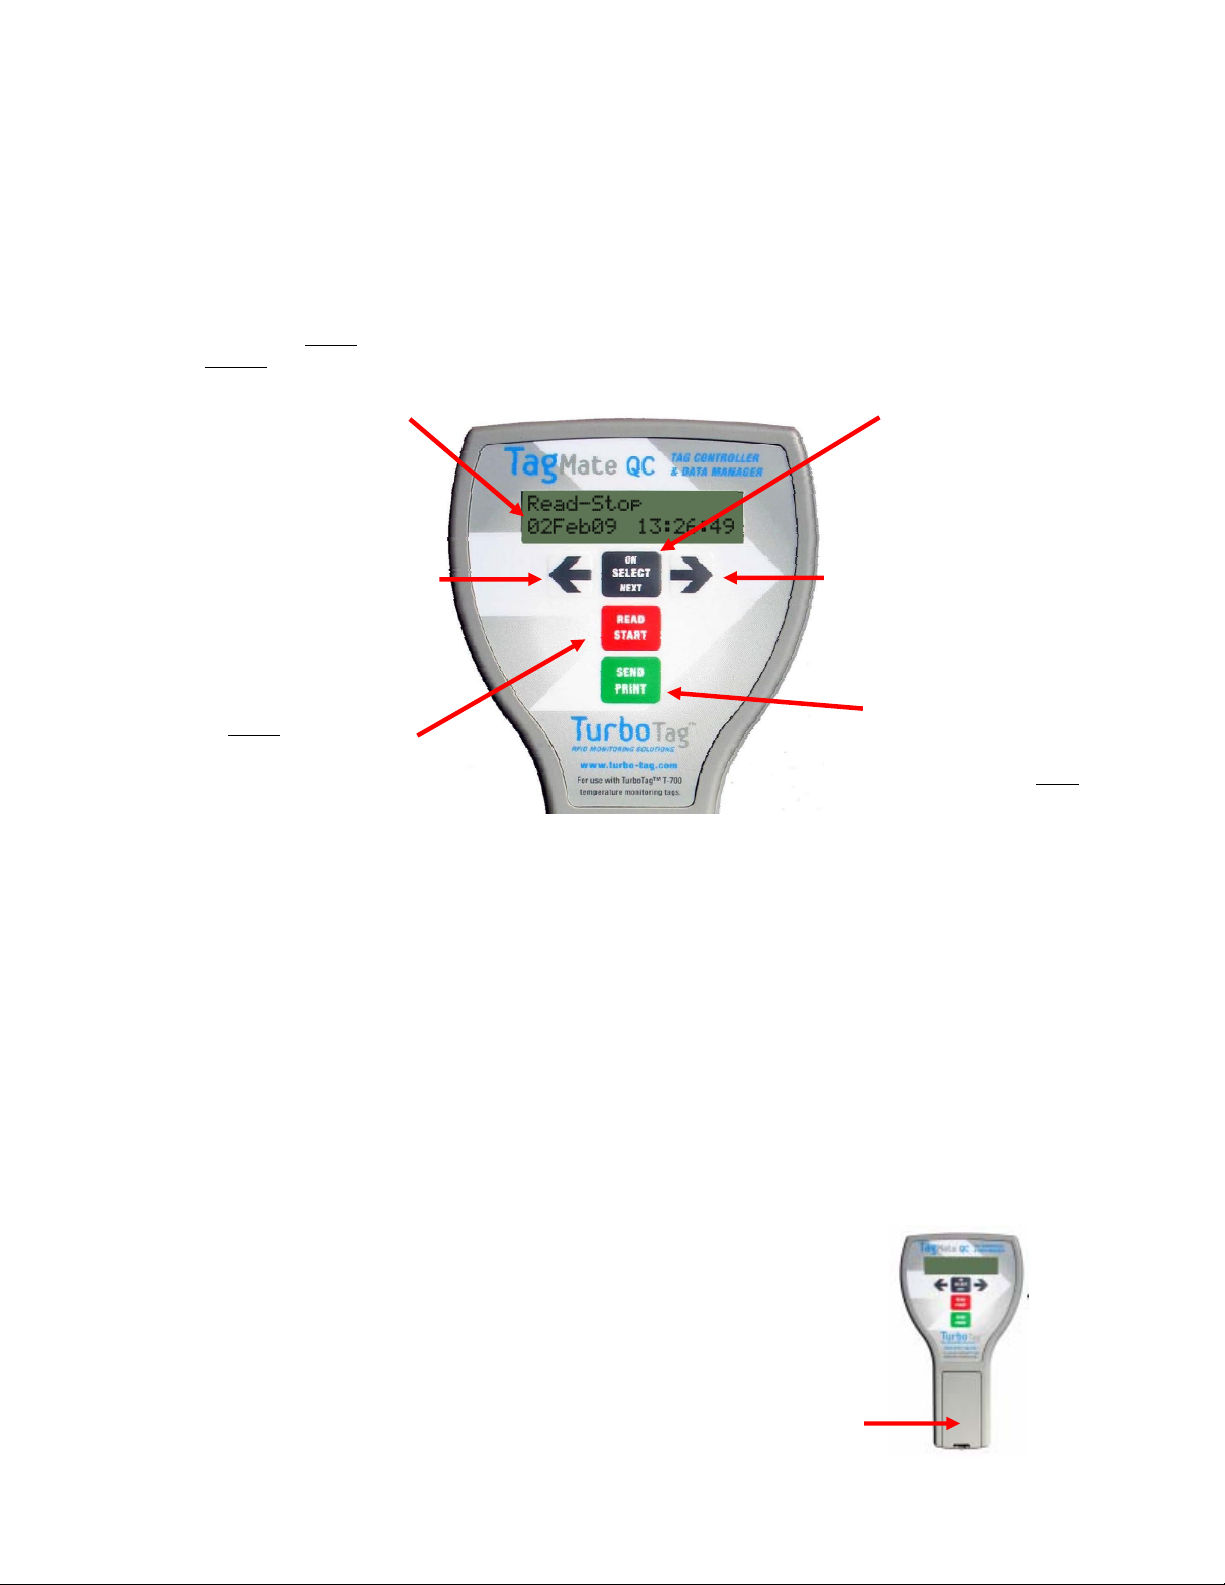
mode of operation will always be displayed on the Home Screen (shown in the image
below, which in this case is “Read-Stop”).
This is the Home
Screen. It is
immediately displayed
after starting the
TagMateQC™. It will
display the Mode
selected; options are
Start-Only, StartConfig, Read-Only and
Read-Stop.
SELECT button turns
TagMateQC™ on. It
also allows scrolling
through different
functions.
LEFT
READ START button
activates an RFID
read or write
sequence for a T-700
Tag placed directly
under
the
TagMateQC™
(opposite the display)
within a distance of
less than three
inches.
RIGHT
SEND button sends
the data from
TurboTag™ readings
to a printer or a
computer – data is
beamed from the front
of the TagMateQC™
The SELECT button functions to turn the TagMateQC™ on and to navigate through
the various setup functions and menus. All reading and starting actions are
triggered by pressing the READ START red button.
The sequence of screens that are displayed is summarized in Appendix A. Please
refer to that section for an understanding of how to set usage modes and how to use
the various menus.
Using TagMateQC™ in its SETUP, START, READ, S TATS, PRINT and SEND operat ions
is described in different chapters in this user guide. The best way to start is to select
a particular operational activity and then read the appropriate section. For example,
if you want to start just reading tags, then go to that section and study the
operational steps. You may wish to first set the Mode of operation
of the TagMateQC™ by making appropriate DIP switch settings (see
section entitled “Operating Modes of the TagMateQC™ (DIP switch
settings)”). The modes that are settable by DIP switches are:
Only, Start-Config, Read-Only and Read-Stop.
The DIP switch is inside the battery compartment of the TagMateQC™.
Start-
Battery
compartment
top
2
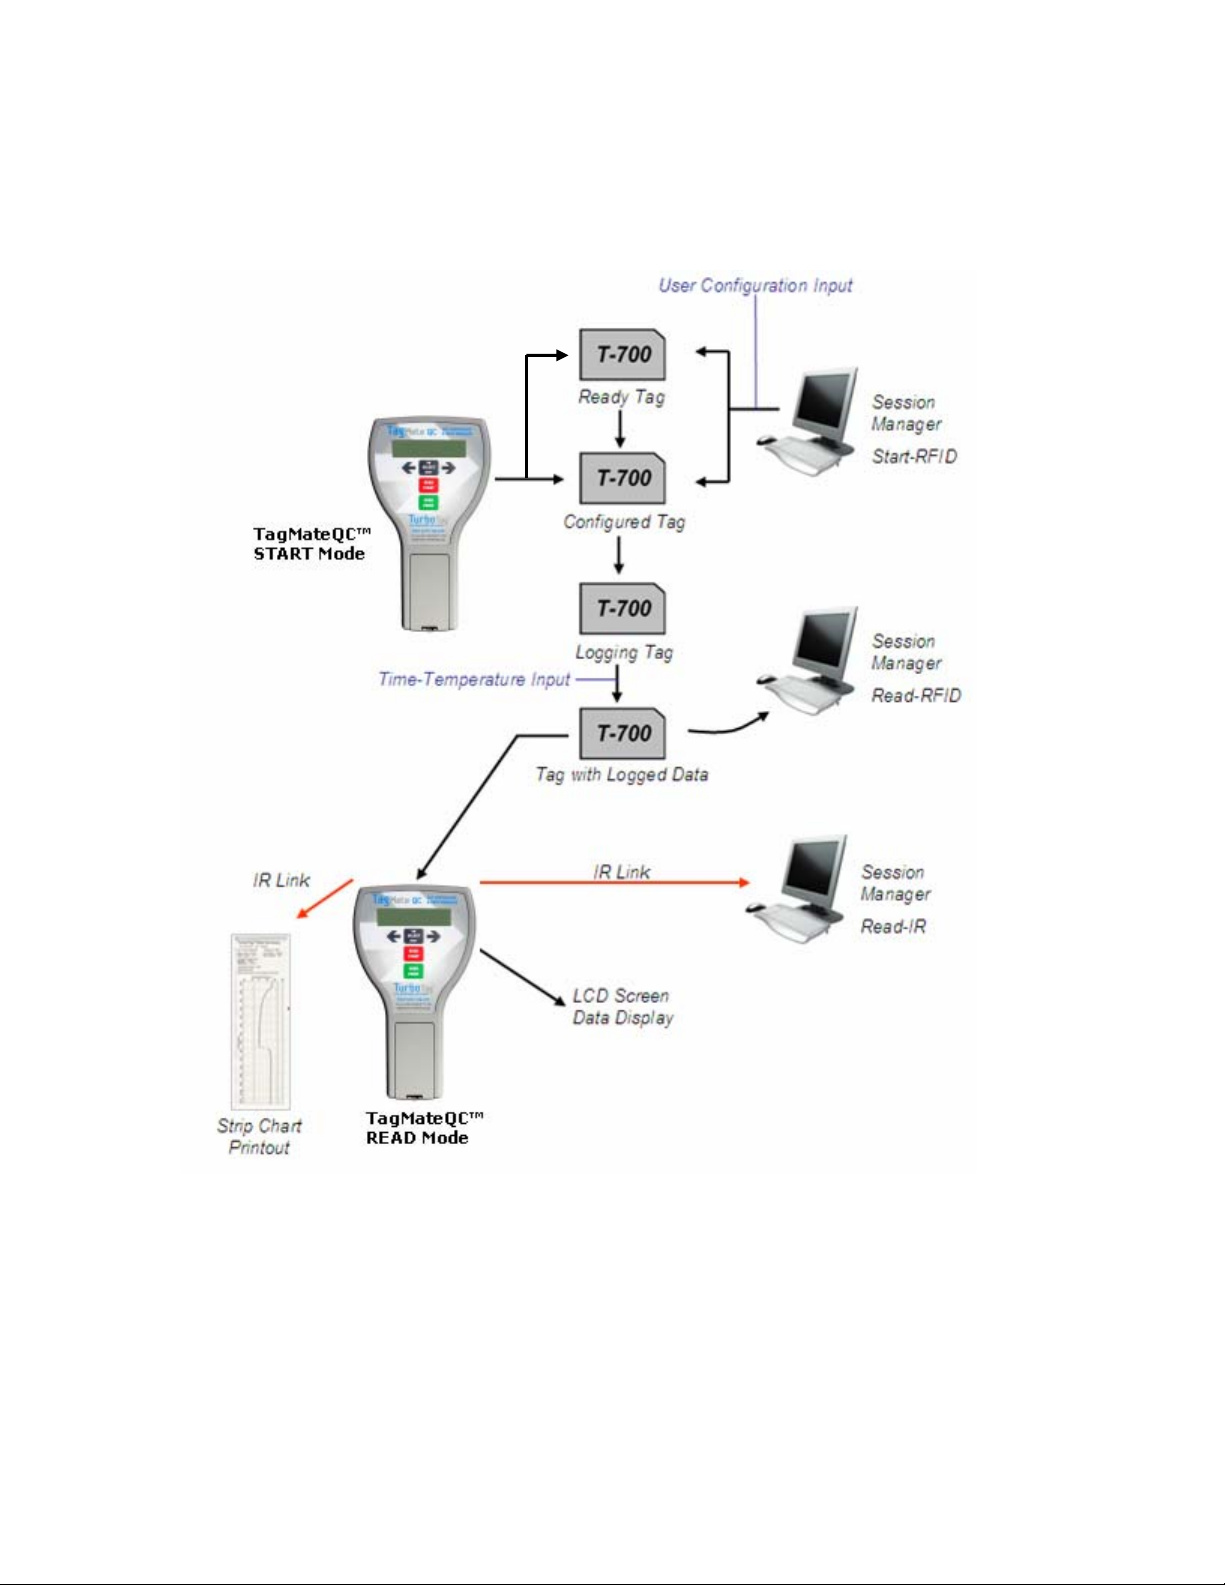
The TagMateQC™ Reader and TagMateQC™ Starter function alongside other
TurboTag™ products as shown in the information flow diagram below. These
handheld devices combine to permit real-time processing of tags in the absence of a
computer system if desired.
TagMateQC™ can control the entire process from tag initiation to final reading and
data storage. Complete software independence can be achieved by using
(1) a TagMateQC™ at START by employing Start-Config Mode, (2) a TagMateQC™ at
READ (Read-Stop or Read-Only) to capture tag data and display alarm and other
summary data. and (3) an MP-1 Portable Printer to view full data record and create a
paper record for filing or other archival purposes.
Ask your sales representative to explain how this system can work for your
operation.
3
TagMateQC™ Basic User Guide: SETUP
The TagMateQC™ Reader allows users to read, start and configure TurboTag™ T-700
Tags anywhere. It is a battery powered RFID reader specifically designed to obtain
data from up to 99 tags (one at a time). It will store the data and display calculated
alarm results. Using an embedded IR port, it can also send a special print file to a
portable printer (TurboTag™ MP-1), or transfer complete tag data sets over an IR
link to a computer running TurboTag™ Session Manager™ Software. A USB-IrDA
adapter can be used with the TagMateQC™, along with the Session Manager™
Software, for this purpose.
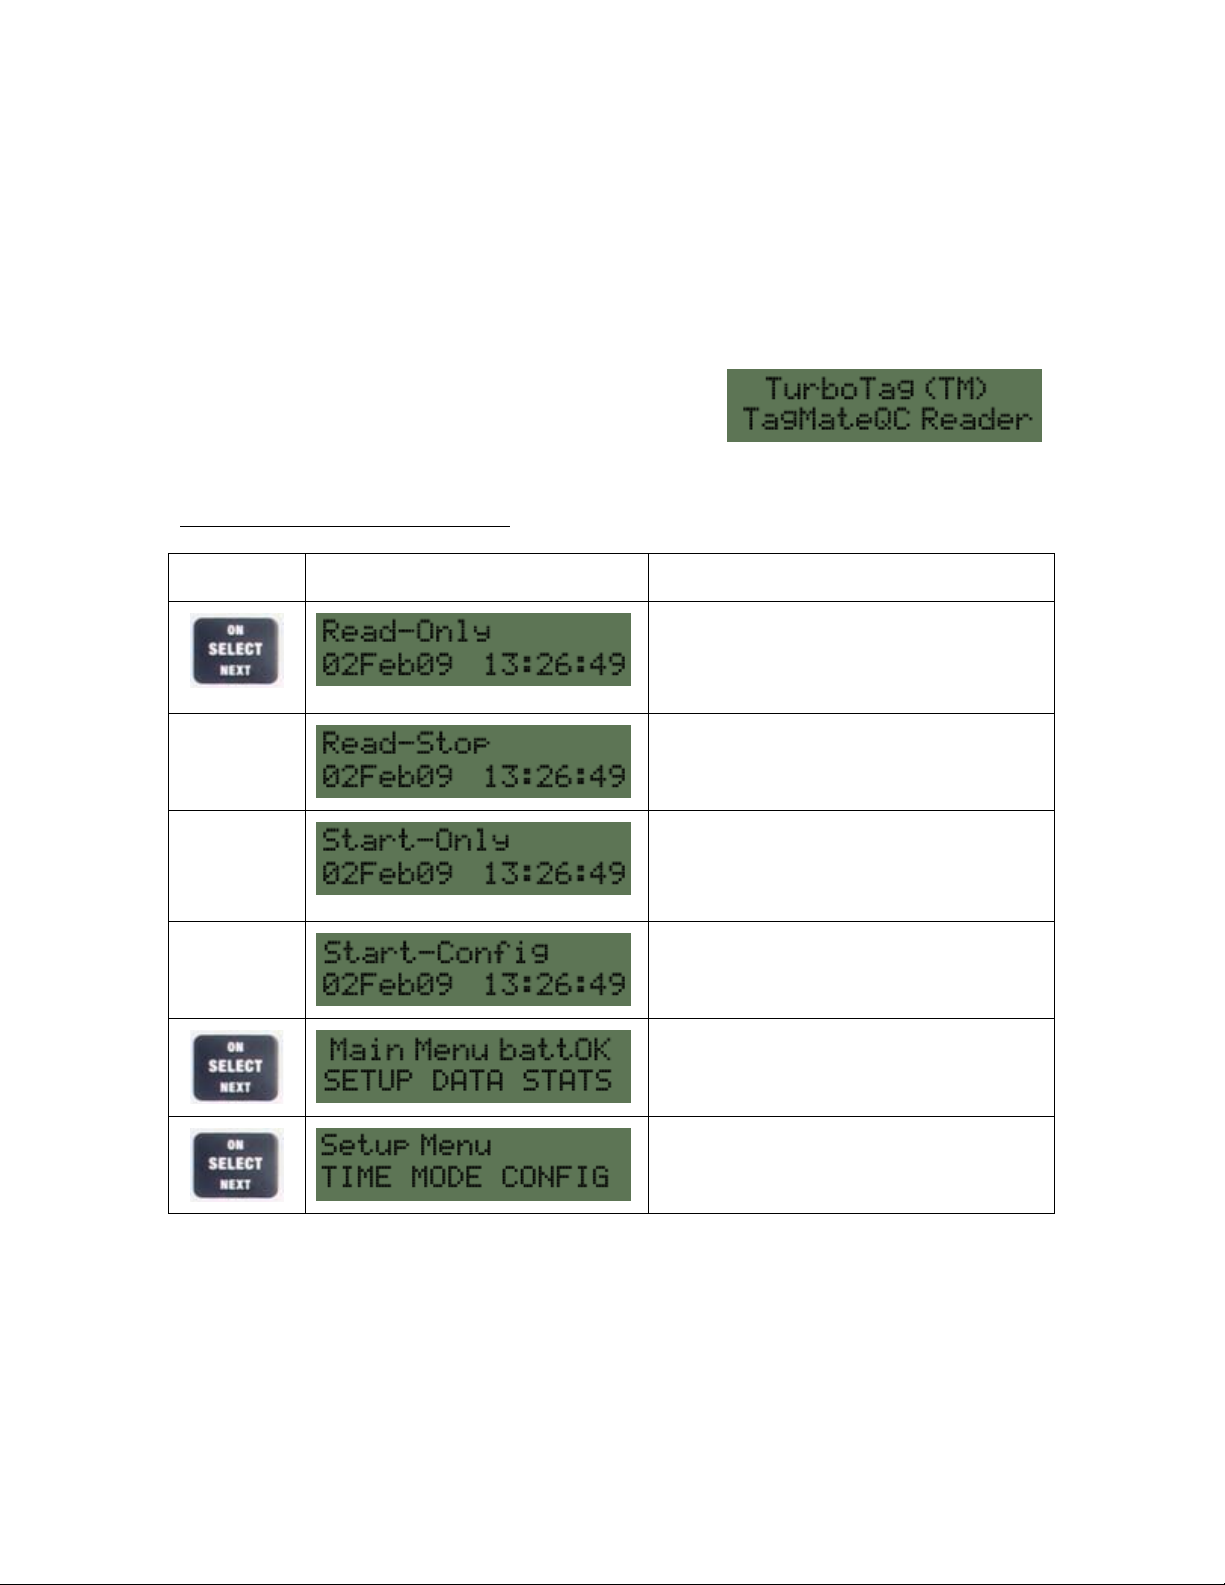
When the TagMateQC™ is first powered up, you will
see the Startup Screen (at right)
On pressing the SELECT button, you will see one of the four displays h ere; these
represent different Modes of TagMateQC™ function. The actual Mode displayed is
controlled by DIP switch settings
Press Screen Display What it Means
inside the device (see “Operating Modes” section).
Read-Only Mode just displays data at the
time of reading; tag is not stopped.
Carryover function accessible from this
mode.
Settable
Option
Mode
Settable
Option
Mode
Settable
Option
Mode
Read-Stop Mode captures data from a tag
and then stops the tag. Carryover
function accessible from this mode.
Start-Only Mode simply starts (or
restarts) the tag and imparts a “real
time” starting time base into the tag
memory.
Start-Config writes a new set of
configuration parameters and Info field to
the tag, and starts it.
The next press of the SELECT button
gives the Main Menu. SETUP DATA and
STATS are selectable with presses
If SETUP is selected by a combination of
pressing and then the SELECT button,
the main SETUP Screen is displayed.
Setting TIME Parameters
The TIME selection sets the time base for the TagMateQC™ when used in either of
the two START Modes (Start-Only and Start-Config). You can enter the TIME
selection sequence by pressing the buttons to highlight TIME and then pressing
SELECT.
An alternative way to set time parameters (excluding time zone and Daylight Saving
Time) is to use a specially configured TagMate™ Clock Setup Tag created in Session
4

Manager™ software. Refer to software instructions for creating such a tag. The IR
data synchronization process with Session Manager™ software (see section on SEND
process) includes an option to update the handheld. If this option is used, in
addition to updating the startup screen, the source computer’s time zone and
Daylight Saving Time settings will update the TagMateQC™ settings.
Here is a summary of the clock setup screens. Changes to the values displayed on all
of these screens can be made by pressing the RIGHT and LEFT ( ) arrow buttons
Press Screen Display Change Settings
Select the time zone that the TagMateQC™ is
being used in…consult GMT tables to find out
your zone.
Turns Daylight Saving Time ON or OFF. Use
the RIGHT and LEFT arrows to change
ONOFF and OFFON.
Reset time of day hours. The buttons
scroll through a complete 24 hour clock
sequence in the AM-PM format.
Reset the time of day minutes. The
buttons allow you to move through all minutes
from 0 to 60 minutes.
Reset the year. The buttons allow you to
move year to year in 4 digit year format.
Reset the month. The buttons allow you
to move from month to month in Jan-FebMar…etc. format (three letters).
Reset the day of the month. The buttons
allow you to move from 1 through 31 as the
numeric day of the month. TagMateQC™ will
not permit an impossible date, such as Feb 30.
These screens cycle with successive pressing of the START button. When you get to
day of the month, pressing the SELECT button returns you to the top of the
sequence: Time Zone.
Setting MODE Parameters
The MODE selection sets various options for the TagMateQC™. You can enter the
MODE selection sequence from the SETUP menu by pressing the buttons to
highlight MODE and then pressing SELECT.
5
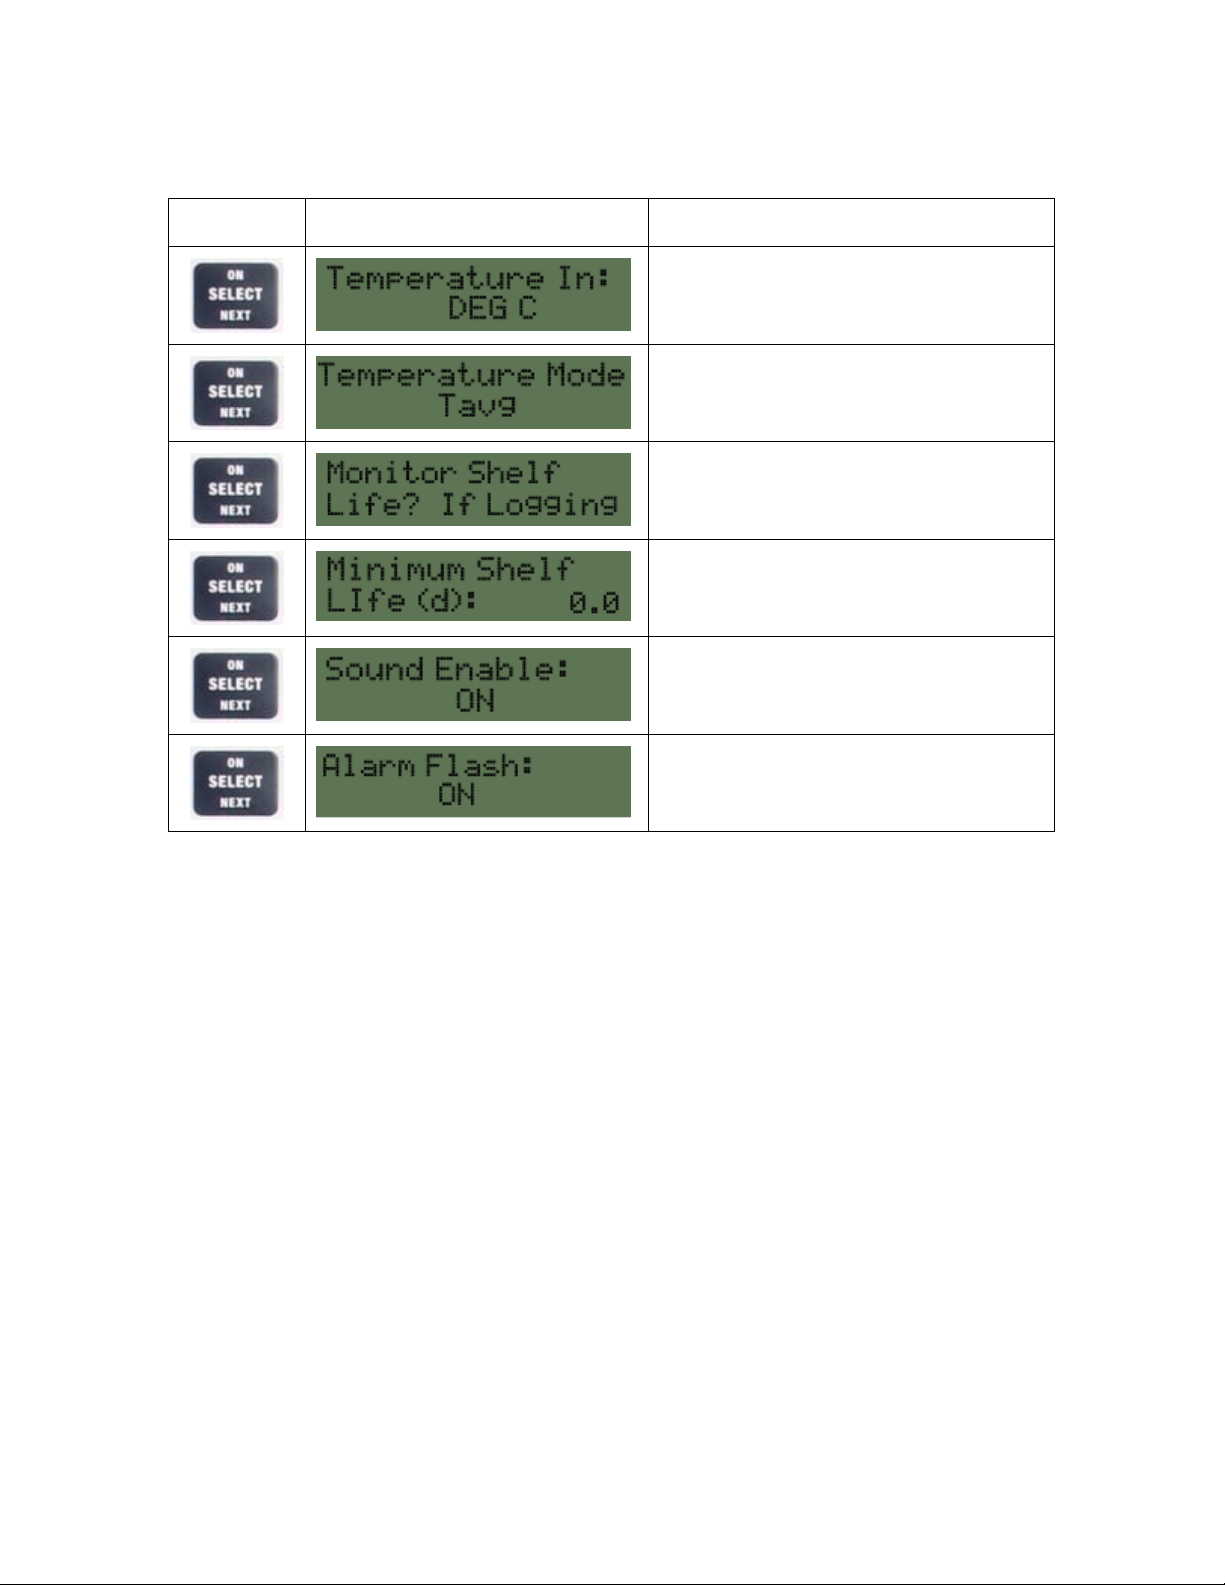
Continue to press the SELECT button to scroll through the MODE screens. At each
screen, you will be able to change the settings by pressing the buttons. The
screens are shown below in the order in which they appear:
Press Screen Display Change Settings
Allows change from °C to °F and from °F to °C.
Use the arrows to change
Allows change from simple mean temperature
(Tavg) to MKT (Mean Kinetic Temperature).
Shelf Life Monitoring Status: Use the RIGHT
and LEFT arrows to change NeverAlwaysIf
Logging
Shelf Life Monitoring alarm level. Up to 5 days,
0.2 day increments are permitted. After 5 days,
whole day increments are permitted.
Turns the beep signal ON or OFF. Use the
arrows to change ONOFF and
OFFON.
Controls display flash. Use the arrows to
change ONOFF and OFFON.
Note that the sequence is a loop. To revisit a setting, just conti nue to press the
SELECT button until the loop returns to the desired position.
Viewing CONFIG Parameters
Configuration parameters are obtained by reading a specially prepared TagMate™
Configuration Tag created in Session Manager™ software. Parameters will be
transferred to the memory of TagMateQC™ when this template tag is read in StartConfig Mode. This process is described in the section on the START function.
The CONFIG settings screens are accessed as the third sub-menu option from the
SETUP menu. The list of screens is given in the table below. You can scroll through
this parameter list, but you cannot edit the viewed parameters (you must use a
TagMate™ Configuration Tag for that putpose). The display is a “loop” similar to
other selections.
6
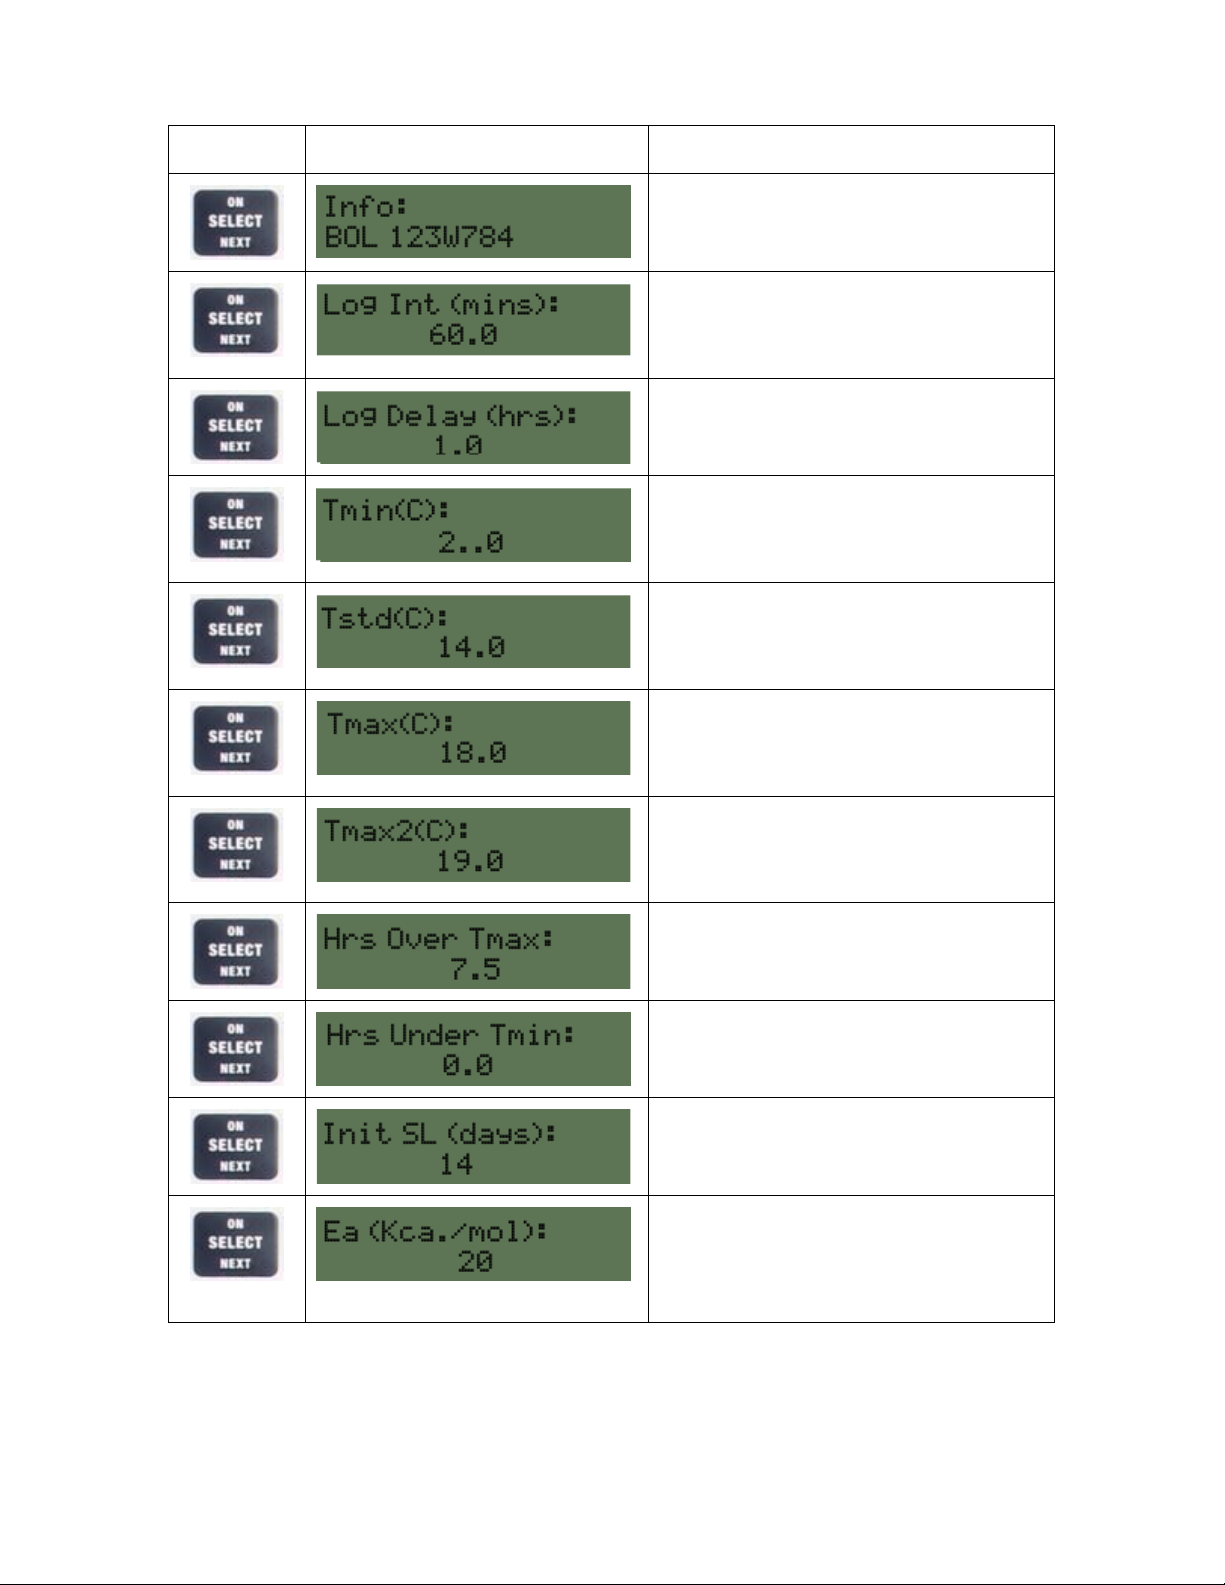
Press Screen Display Comment
The Info field contains a 16 alphanumeric
character message that serves to identify the
recording session. An example is shown here.
Log interval controls the time spacing of
temperature observations. Shorter spacing
yields shorter overall monitoring time and
longer spacing, greater overall monitoring time.
Log Delay is a control parameter for the starting
time of recording. In this case, the delay is for 1
hour..
Tmin is a minimum temperature alarm setting.
Alarms are triggered by Time-UnderTemperature based on this temperature value.
Example shown is 2.0°C.
Tstd is a standard setting for shelf life
monitoring OR an alarm setting for an MKT or
arithmetic mean comparing observed mean to
this setting. Example is 14.0°C.
Tmin is an upper temperature alarm setting.
Alarms are triggered by Time-UnderTemperature based on this temperature value
(example is 18.0°C).
Tmax2 is the maximum temperature alarm. It is
an absolute alarm setting for the highest
temperature recorded in the session. Numbers
are expressed in degrees over Tmax.
This is the alarm setting for Time-OverTemperature for Tmax. Value shown in this
example is 7.5 hours.
This is the alarm setting for Time-UnderTemperature for Tmin. Value shown in this
example is zero hours.
This setting starts the Shelf Life calculation and
represents initial Shelf Life at the Tstd setting.
Ignore if Shelf Life is not used.
This is the temperature sensitivity setting
expressed in Kcal/mol. This value is
operational in the calculation of Shelf Life AND
MKT. The standard setting for MKT should be
20.
7
TagMateQC™ Basic User Guide: START
The Mode of operation in starting tags is based on the two DIP switch selectable
Modes: Start-Only and Start-Config.
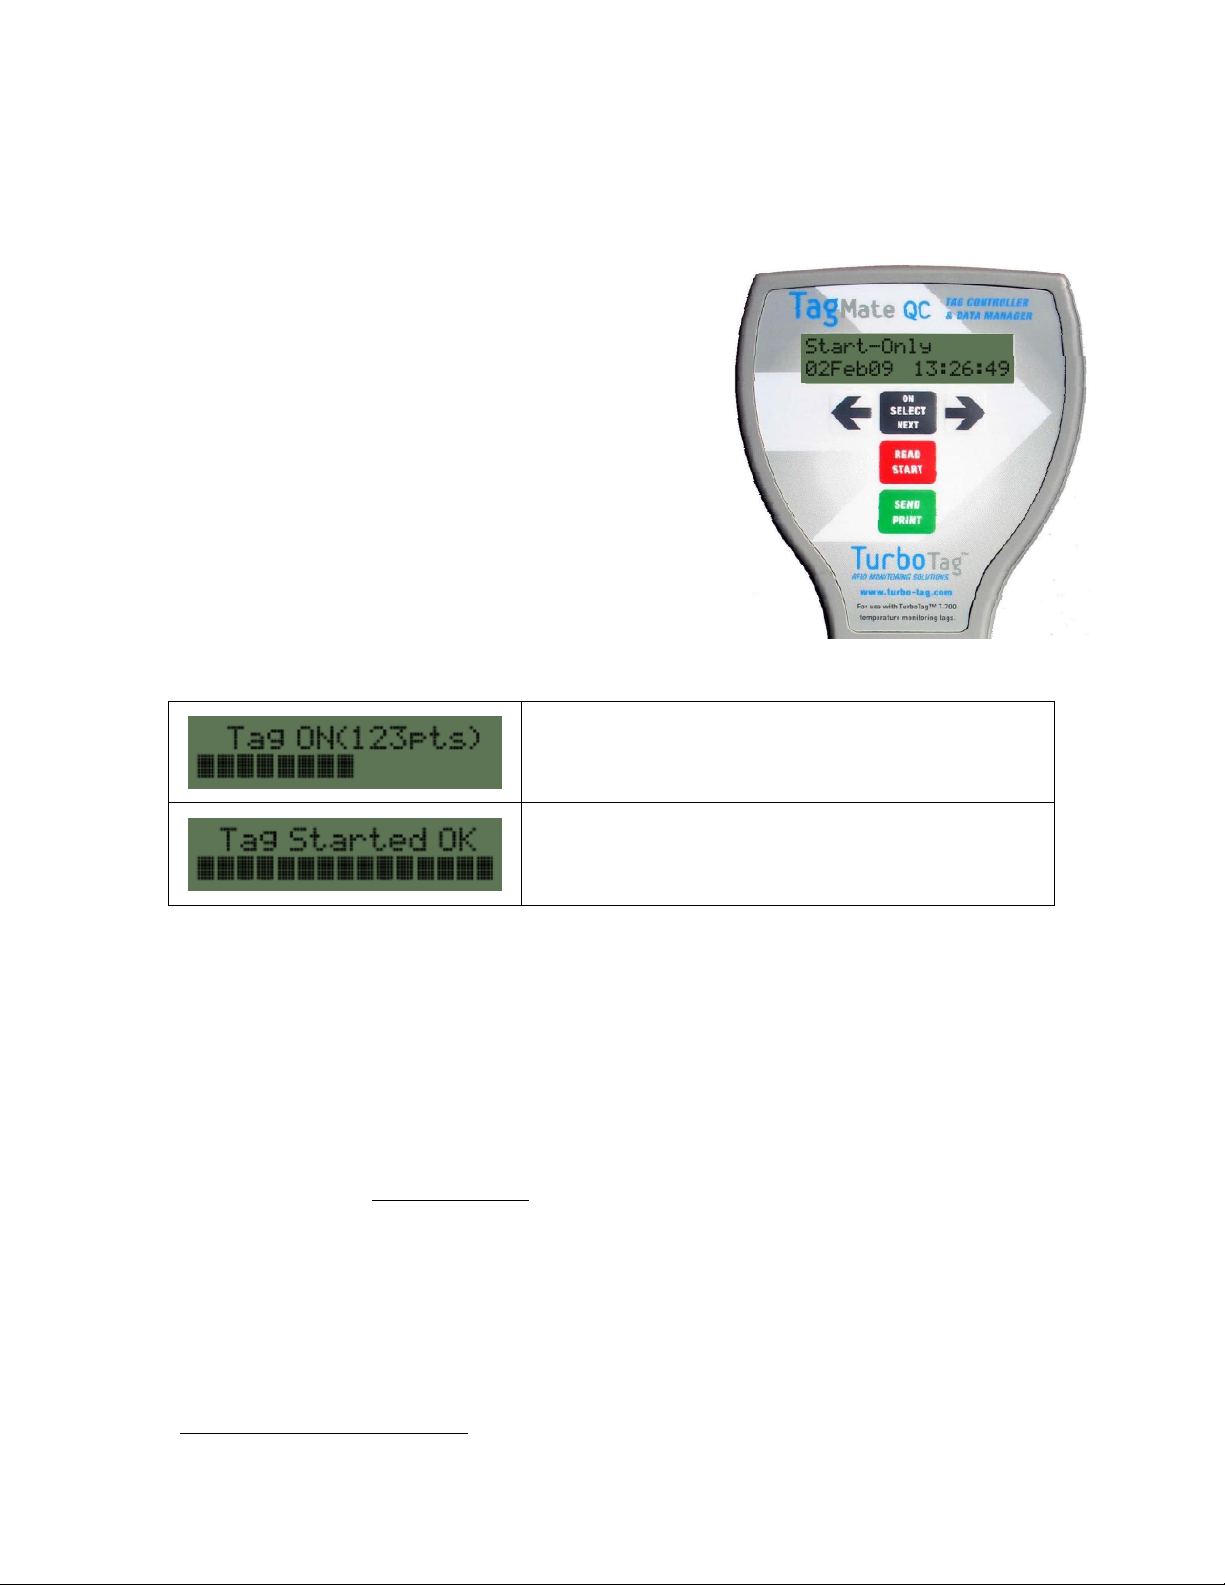
Start-Only Mode
When a configured and ready-to-start T-700 Tag is
placed under the TagMateQC™ (directly opposite
the screen and less than 3.5 inches away) and the
START button is pressed and released, the tag’s
logging process will be started.
Start-Only Mode will work to start any previouslyconfigured tag that is not yet running. It will also
restart a non-CFR
not running. TagMateQC™ in Start-Only Mode will
start tags and record a “real-time” starting time
based on the time entered in the SETUP.
When a tag is started, TagMateQC™ beeps and
displays one the following screens, depending upon
the status of the tag scanned:
1
tag that has stored data and is
This display indicates that an attempt has been made to START
a tag that is already running. . TagMateQC™ cannot START a
tag in this status. Two beeps confirm that the tag is already
running.
This display confirms successful starting of a tag. One beep
accompanies this display.
Start-Config Mode (non CFR tags only)
Start-Config Mode is useful in packing and shipping operations where it would be
inconvenient to have quantities of pre-configured tags on hand for shipments that
require different configurations. With a supply of “ready to run” normal tags and a
complement of TagMate™ Configuration Tags with appropriate configurations, the
need for any software involvement is eliminate d. Combining this “software-free”
type of operation on the initiation of monitoring with operation of TagMateQC™ on
the receiving end, a completely software-free operation is possible.
Non-CFR tags that are not running
Tags will be started and re-configured according to a stored set of configuration
values including the Info field on the TagMateQC™. The diagram below summarizes
the complete Start-Config process, which relies on a special type of tag, called a
TagMate™ Configuration Tag, at the outset:
can be processed using this operating mode.
1
T-700, T-700B or T-700D are the current non-CFR tag types. T-700C and T-700E are CFR tag types.
Ask your TurboTag(TM) sales representative for more information about these types.
8

TagMate™ Configuration Tag
TagMateQC™ in
Start-Config Mode
Normal T-700 Tag(s)
TagMateQC™ in
Start-Config Mode
Normal T-700 Tag(s)
Configured and
Running
A TagMate™ Configuration Tag, abbreviated as a “template tag”, is a speciallyprepared non-running tag that serves to transfer its configuration to the
TagMateQC™. The resulting stored configuration remains in effect until another
template tag is processed. Power-down of the TagMateQC™, which is automatic
after a period of disuse (except when under AC adapter line power), will not affect
the stored configuration. The currently-stored configuration can be checked in
SETUP CONFIG as described above.
Notes:
It is important to be extremely careful when using TagMateQC™ in Start-Config Mode.
This mode should not be confused with Start-Only Mode, as every tag started in StartConfig Mode will automatically be re-configured according to the configuration parameters
stored in the TagMateQC™ memory.
There is a possibility that an intentionally pre-configured normal tag will have its
configuration parameters over-written with TagMateQC™ stored configuration parameters.
Be sure you check which Mode is active. If you just want to start pre-configured tags, use
Start-Only. If you wish to use a TagMate™ Configuration Tag as a configuration tool to
program normal tags, use Start-Config Mode.
The following section describes creation and use of TagMate™ Configuration Tags in
further detail.
Creating TagMate™ Configuration Tags
Creating TagMate™ Configuration Tags is an operation that involves specific steps in
Session Manager™ or Session ManagerDB™ software. In this software, when in
Configure-Only mode, with a protocol active (not “Open” protocol), an option
checkbox appears just below the protocol display to allow the user to activate the
creation of a TagMate™ Configuration Tag.
9

With this option selected, a tag presented to the reader will be specially marked as a
template tag for use with TagMateQC™ in Start-Config mode, and the protocol name
(first 16 characters) will automatically be placed in the Info field. The configuration
parameters that appear in the Time and Temperature panels of the software screen
will be written to the template tag as in a normal configuration operation.
In the above example, the Protocol which served as the source of the configuration
parameters is “3-Day Refrigeration Test”. When the TagMate™ Configuration Tag is
created, this Protocol name is partially stored on the tag as “3-Day Refrigerat” in the
Info field.
Transfer of configuration from the TagMate™
Configuration Tag to the TagMateQC™, as
described above, is immediately confirmed by the
TagMateQC™ screen. The first 16 characters of the
Protocol used (Info field) are displayed, enabling the user to verify the source of the
configuration for SOP compliance. Confirmation of the transferred configuration can
also be performed in detail by going to SETUP CONFIG as described above.
Be sure to put a special mark or label on TagMate™ Configuration Tags. This will
avoid any chance of mixing them in with normal tags.
10

TagMateQC™ Basic User Guide: READ
Turn on the TagMateQC™ with the SELECT button. For READ operations, the
appropriate DIP-switch settings must be in effect. Either Read-Stop or Read-Only
will be displayed. The only difference between Read-Only and Read-Stop is the stop
tag or don’t stop tag action. At the beginning of a READ operation, the Home screen
will be displayed:
To read a T-700 tag, hold the Reader directly over the tag face then press and
release the READ button (note that all button presses, unless otherwise stated, are
press-and-release, not press-and-hold). If the card is at a suitable reading distance
of less than 3 inches, the screen will show a progress bar for about two seconds, and
then emit a short beep accompanied by the following message:
When the processing operation is complete, a second beep will sound and the screen
will change to a DATA SUMMARY screen that indicates:
• The tag’s temporary ID number (Tag 01-99) within the Reader
• How many alarms are active for the tag just read
• The tag’s logging status (ON / OFF).
• The tag’s last temperature reading.
• The count of time-temperature data points retrieved from the tag.
Here is an example DATA SUMMARY screen:
This screen indicates that this is the first tag to be read, with 1 pre-set alarm active;
the tag is no longer running (Off), and has a total of 455 logged points (702 is the
maximum data capacity; if this is true the message displayed is *FULL*). The
display shows the last temperature reading. In this instance, the last reading was
23.1°C.
A blinking alarm display and a second longer beep will accompany any active alarm
conditions, as for the above example. The blinking characters repeatedly appear and
disappear. If no alarms are active (i.e., “0 Alarms” is displayed), there is only a
short beep to signal a successful tag read, and no blinking of the alarm display.
Whenever the DATA SUMMARY screen is displayed, a complete tag data set has been
stored in the TagMateQC™. As indicated in the Information Flow Summary above,
the data from the TagMateQC™ can be sent to a TurboTag™ MP-1 printer for an
immediate strip chart printout (see section on PRINT below). The data from the tag
just read cannot be sent to a computer running TurboTag™ Session Manager™ as an
individual tag record. It must be sent as part of the complete tag data set to the
software in READ-IR Mode (see the latest “Session Manager™ User Guide” document
11

and the SEND process summary below) for computer-based data viewing, printing,
or file management.
Displaying Further Tag Information
With the DATA SUMMARY display shown, press the SELECT button. The next screen
that will be displayed, the ALARM screen, is one that allows you to see the
breakdown of individual alarm status:
This sample display screen identifies which alarm outputs are enabled for the tag just
read. Any alarm that is active will be indicated by a blinking display.
Tmax and Tmin are the most commonly used alarms. Tmax is the alarm relating to a
preset Time over Temperature alarm criterion. Tmin is the alarm relating to the
Time-Under-Temperature of all of the readings. Tavg is an optional alarm relating to
the average of all of the readings. The TagMateQC™ may be configured for
calculation and display of an alarm for MKT (mean kinetic temperature) in place of
the Tavg alarm. Note that MKT will not be calculated if a tag is not running.
In cases where shelf life monitoring is enabled, a fourth alarm indicator “SL” appears
at the far right. (see section “About the TurboTag™ Shelf Life Function”).
When you press SELECT from the ALARM screen, the next screen will indicate the
EPC/Info field. This screen presents whatever data has been entered into the
EPC/Info field when the tag was configured and started. In the example shown here,
the contents of the Info field is “Freds Flowers 3”.
If a UHF EPC tag was used at configuration, then the message “<EPC code>” will
appear. The actual numeric value of the code is not displayed.
At any of the preceding three screens, the buttons allow scrolling through
different stored tag records, scanning for a particular tag record number, Session ID
or alarm status. This and other screen navigation processes are summarized in
Appendix A.
Press the SELECT button more times, and it will display t he individual numeric
results associated with each alarm. Here are examples of how this sequence of all
data detail screens may appear.
12

Press Screen Display What it Means
The Data Summary screen reports current
temperature at the tag, On/Off status, points
recorded and number of alarms.
Alarm screen displays three alarms or four
(“SL” is displayed on the end of the lower line if
Shelf Life is activated in settings). Alarms will
blink if settings have been exceeded.
This screen displays the content of the Info
field. The Info field is a identification means for
each tag.
OPTION: Shelf life result and alarm criterion are
displayed only if Shelf Life is activated in
SETUP
The maximum temperature recorded was
20.3°C. The alarm was set for over 22.0°C
(Tmax + TmaxOvr). An additional screen will
indicate hours over Tmax if the Tmax value was
exceeded.
Additional screen that shows the actual hours
over compared to the setting. The setting is
NOT for the highest temperature but the TimeOver-Temperature criterion.
The minimum temperature recorded was 5.4°C.
The Tmin alarm was set for under 5.0°C. An
additional screen will indicate hours under Tmin
if the alarm is tripped.
Additional screen that shows the actual hours
under compared to the setting.
The average temperature for the full data set
was 14.9°C. The alarm was set for over
20.0°C. MKT or Average as default display is
selected in SETUP.
The logging episode started on 21 September,
2009 at 8:01:05 AM. If the tag is still running,
an additional screen will display the total
elapsed time.
If any of the alarm information screens has an alarm setting that has been exceeded,
the observed Tmax, Tmin, or Tavg number in the upper right of the data detail
screen will blink.
13

Restart “Carryover” Operations Performed in READ Mode
Non-CFR tags can easily be read and then restarted with the same configuration.
This operation is performed in Read-Stop and Read-Only Modes.
The operation is simple: after reading a tag, hold the reader over the same, or
different, tag and press-hold the READ button until a beep is heard (about 1 second),
then release the button. TagMateQC™ will co nfigure and start this tag using the
configuration from the most recently read tag (hence the designation “Carryover”).
Like all starting operations performed by TagMateQC™, the Restart action can only
be performed on stopped tags. If you are in Read-Only mode, the tag just read
cannot be restarted—only a different tag can be started, as a duplicate, or surrogate.
The idea of creating a duplicate tag can be useful when, for example, a monitored
product quantity is split up, and the parts, still in need of monitoring, are now
handled separately.
Carryover of “Shelf Life Remaining”
If a restarted tag was set up for shelf-life monitoring, the remaining shelf life will be
used as the starting shelf life in the Restart process described above. In this way,
shelf life monitoring can be extended beyond a single tag’s duration by restarting at
intermediate way points in a cold chain.
If shelf life monitoring is not activated, Restart simply allows the user to use the tag
again for a new shipment or monitoring episode. This is useful for monitoring
delivery routes, facility monitoring (cold rooms, freezers and refrigerators) and
general environmental monitoring.
TagMateQC™ Basic User Guide: STATS
A summary of the number of
TurboTag™ data sets stored in the
TagMateQC™, and their alarm status
can be quickly reviewed by using the
STATS menu.
Go to the Main Menu screen to start.
You can always get the Main Menu from
the Home Screen by pressing the
SELECT button.
Use the LEFT and RIGHT arrow buttons
to highlight the STATS word on the Main
Menu screen. The word STATS will flash
on and off when you have highlighted
this menu choice.
With the word STATS blinking, press
SELECT, and you will enter a menu
sequence that allows you to access the
following screens:
14

Press Screen Display What it Means
There are 17 TurboTag™ complete data sets in
the TagMateQC™ memory. Two of these show
active alarms.
This screen is only used for reference in issues
involving TurboTag™ Technical Support.
This clears out all TurboTag™ data sets stored
in the TagMateQC™ memory if you
simultaneously press the LEFT and RIGHT (
) keys. The Clear Tag Memory function
permanently erases all records currently stored
in the TagMateQC™. You cannot select
specific TurboTag™ records to erase while
retaining others.
Continuing to press the SELECT button will recycle these function screens in the
same sequence (loop sequence).
TagMateQC™ Basic User Guide: PRINT
The TagMateQC™ can send data directly to the TurboTag™ MP-1 printer
below), avoiding the need for a computer. It takes just seconds to send and print.
On Light (Green Glow)
Paper Scroll Button
ON/OFF Button
Infrared Window
NOTE:
The printer does not
have an “auto off”
Opens Case
function. Be sure to
turn unit OFF when
done printing, or the
battery will discharge.
2
(shown
1) Find the TurboTag™ record that you want to print on the TagMateQC™ screen
by entering the DATA menu from the Main Screen, and navigating to the
desired tag data set using the SELECT and LEF
2) Turn on the printer and point t
he front of the
TagMateQC™ at the Infrared Window on the M
T/RIGHT ( ) buttons.
P-1
from distance of 4-8 inches:
3) Press and release the PRINT b
2
This printer is the MZ 320 printer from Zebra® Technologies. It is also available from outside vendors.
utton.
15

4) The Data Receiving Light will flicker while the data is incoming (Important:
be sure to hold the TagMateQC™ steady and aimed at the MP-1 while the
Data Receiving Light is blinking, or the data stream will be interrupted)
5) As soon as the data is completely received, printing begins.
The printed tape is 10 inches in length, and provides a complete graph of the
TurboTag™ time-temperature data. The header reports a complete set of summary
information shown in the picture here, including the customizable TagMateQC™
Startup Screen (2
nd
line). This permits identification of the source TagMateQC™ unit
on the chart.
16

TagMateQC™ Basic User Guide: SEND
The TagMateQC™ SEND function sends all of the data currently in storage to a
suitably-configured computer. TurboTag™ Session Manager™ Software must be
running on the computer, in READ – IR Mode, for the computer to receive data from
the TagMateQC™ (see the user guide to Session Manager™ software).
The IR screen shown above is obtained whenever a suitable RFID reader is not
available on the computer for discovery by the Session Manager™. It is possible to
enter this Mode of operation by two methods:
• Re-starting the Session Manager™ after disconnecting the reader.
• While running Session Manager™ with an RFID reader connected, open a
second instance of Session Manager™. The second instance of this program
will fail to connect to the reader and will enter the IR screen.
The IR screen is very similar to the READ screen. The upper left now contains
information that pertains to managing the TagMateQC™ Handheld Reader settings,
and the “Stop tag after reading” check box is missing since direct communication
with T-700 tags is not enabled. This screen is strictly for viewing (printing) data that
has previously been retrieved from a T-700 tag. There are two options for viewing
these data:
• Use of the LOAD button to view previously-saved files (same as on READ
screen).
• Linking to the TagMateQC™ Handheld via an IR port, which triggers
downloading of all stored tag data, sequentially displayed on the screen and
saved automatically.
17

Infrared Port
For data retrieval from the TagMateQC™ Handheld Reader, an active infrared port is
required.
• Most laptop computers have built-in infrared ports. If an i
nfrared port is not
already present, or if an additional infrared port is desired,
any USB IrDA adapter can be installed.
®
• The process
for installing the BAFO
IrDA adapter, without
need for the manufacturer’s installation CD, is as follows:
Connect the BAFO
o
®
device to a powered USB port
with or without the USB cable.
®
o From the Windows
Start Menu
, go to Programs
TurboTag IR Port Installer, and the installation program will run.
o Accept all defaults and license terms to complete the
installation.
Go t th
o e Main Menu screen of the TagMateQC™. You can always get the Main Menu
by holding down the SELECT button.
Point the front of the TagMateQC™ at the IR port on the target
computer at a distance of 4-8 inches and press the SEND button
.
he TagMateQC™ display will indicate an act ive IR link, and the
T
computer’s Session Manager™ Software display will indicate
progress of the download. This download may take several minutes dependin
g on
the number of tag data sets transferred. (Important: be sure to keep the
TagMateQC™ steady and aimed at the IR port while the data light is blinking or th
data stream will be interrupted; it is best to place the reader on a desktop rath
e
er
than hold it during data transfer).
hen data transfer is complete, all sent data is erased from the TagMateQC™ but
W
saved as a data file on the computer instead. The last data file downloaded remain
s
displayed on the Session Manager™ screen; all other data files have been saved and
may be loaded for viewing as well.
Notes:
1. The TagMateQC™ must be on the Home Screen or Main Menu when preparing to
SEND data to Session Manager™ or Session ManagerDB™
2. The DR-1 must NOT be plugged into the computer that is running Sessio n
Manager™ or Session ManagerDB™ if an Infrared SEND is to be made. When the
software is started, it looks for a port on the computer that has the DR-1
connected. If it does not find the DR-1, it reverts to IR Mode. In this Mode it
searches for a port with an IR communication link capability. This capability may
be a USB IR adaptor or a built-in IR port.
18

Setting a Custom Startup Screen
The message area of the Control Panel will indicated the loading of files gath ered by
the TagMateQC™ and ported by the IR link. All of the transferred data sets are
copied to the files stored on the computer. Note that you can change the message
that appears on the TagMateQC™ screen any time an IR connection is made between
the PC computer running Session Manager™ software and the TagMateQC™. Just
click the Update Handheld Settings checkbox:
You can set up a custom Startup Screen (this Startup Screen message is saved in
the database when tag records are delivered via the TagMateQC™ to Session
Manager™ DB software). This feature is useful for identifying the user for HACCP and
other regulated programs.
Notes:
The IR beam from the TagMateQC™ reader must be aimed directly (on a straight and
parallel path) at the “window” of the BAFO® device. Hold the alignment steady during the
process as an uninterrupted stream of data must be received by the device for the transfer
from the TagMateQC™ to files (or in some instances, a database) as generated by Session
Manager™.
Battery Replacement
The Main Menu screen will indicate when the TagMateQC™ battery is low. When this
occurs, you must immediately replace the battery. Turn the unit OFF, and look on
the back side for the battery compartment door.
Press the tab in the direction of the lower edge of the unit and pull out. Remove the
door from the compartment and gently ease the battery out of the compartment. It
will have contacts at the end of two wires clipped onto the end of the battery.
The battery used in the TagMateQC™ is a 9VDC alkaline battery. Do not use a
“heavy duty” battery or any other type of battery, even if it will fit the contacts.
Alkaline batteries in 9VDC are available almost everywhere.
Detach the battery contacts from the old battery and dispose of the expired battery
properly. Insert the new, replacement battery into the contacts, and tuck the
19

battery and the wire leads back into the compartment, being sure that the
compartment door can snap back in place without interference.
AC Line Powered Operation
The TagMateQC™ offers user the option hands-free operation (reader always on,
reads when tag presented with no button press). The startup screen displaying
operation Mode will alert the user to AC Line Powered Operation by bracketing the
Mode display with asterisks, as shown below:
With this display, tags may be placed at or near the read surface, and reading will
automatically occur. This option is available in all four operating modes: Read-Only,
Read-Config, Start-Only and Start-Config.
Carryover operating mode is NOT possible with AC Line Powered Operation. All
display menus (DATA, STATS and CONFIG) and IR processes (SEND, PRINT) are
available by pressing keys in AC Line Powered Operation.
Using the TurboTag™ Shelf Life Function with TagMateQC™
Shelf life information will be displayed on the TagM ateQC™ screen if the following
conditions have been met:
1) The Monitor Shelf Life setting on the Reader is set to either “Always” or “If
Logging” (see Changing TagMateQC™ Settings).
2) The tag being read has between 3 and 701 data points (neither empty nor
full).
3) (“If Logging” mode only) The tag being read is still running.
4) The configuration settings of the tag include a nonzero value for the Ea
Temperature Sensitivity parameter.
If these conditions are met, the shelf life alarm
will be displayed in the lower right hand corner of
the Alarms screen. SL will flash if shelf life
minimum criterion is not met according to the
setting programmed into the TagMateQC™
(minimum shelf life).
As you continue to press the SELECT button, an
alarm detail screen on Shelf Life will be displayed
with actual shelf life calculations displayed:
In this instance, the shelf life setting for the Reader was preset to 7.0, and the shelf
life remaining is calculated at 3.1 days. If the shelf life is greater than the minimum
shelf life programmed into the TagMateQC™, the alarm is not tripped. If the shelf
life is less than the minimum the alarm is tripped (flashes).
The ability to configure the TagMateQC™ Reader (and not the T-700 Tag) with a
minimum shelf life setting allows receivers of monitored goods to account for a
needed number of days’ shelf life in order to complete the distribution and sale of
20

products. It would not be possible to set this parameter at the start of the
monitoring process without risking incorrect alarm functioning due to reading of the
tag at an unanticipated time. With a reader-specific setting, it is possible to make
the shelf life alarm much more reliable and meaningful to the recipient of monitored
goods. It is even possible to re-read the same tag by more than one TagMateQC™
reader, each at a different location in the supply chain, and each with its own shelf
life alarm limit.
NOTE:
The screen alarm in the Session Manager™ Software does not allow specification of a
non-zero shelf life limit as an alarm condition (the computer’s visual alarm is always
triggered by a shelf life less than zero.)
Operating Modes of the TagMateQC™ (DIP Switch Settings)
TagMateQC™ Operates in 4 Modes settable by customer-accessible DIP switches,
located inside the battery compartment:
A tool is required to set the DIP switches—they cannot be
set by use of fingers. The simplest tool is a “jumbo” paper
clip, about 5 cm (2 inches) long, bent as shown here.
These DIP switch choices produce the four operating modes
described in this manual (see SETUP section). The
operating mode is verified by the Home Screen. Note that
changes in DIP switch settings take effect only after the next power-on.
The backside label on the TagMateQC™ provides a quick referen ce for switching
operating modes:
21

Appendix A - Screen Navigation Overview
This section gives a brief overview of the entire TagMateQC™ screen navigation
process, highlighting the context-sensitive nature of the five buttons across these
screens.
The diagram below summarizes the complete set of displays available by pressing
SELECT on the TagMateQC™ from startup:
In the above diagram, red arrows display the result of pressing of the SELECT button
in a specific context. The Main Menu and the Setup Menu work by selecting one of
the bottom row options by pressing of the LEFT and RIGHT ( ) buttons. The
Startup Screen is a fixed message that can be customized via an IR link to the PC
(see above). The Main Screen provides an entry point into one of three menus
(SETUP, DATA, and STATS). Each of these menus is explained within its own section
in this guide.
The context-dependent behaviour of each of the five buttons is explained completely
below:
22

SELECT (ON/NEXT) button:
• Used for “downward” and “cycle-up” navigation within all “loops”.
• Press and hold from any screen to go back to the Home Screen, or if from
within a SETUP submenu, back to the SETUP Screen.
• Press and hold from the Home Screen to power off the TagMateQC™.
LEFT and RIGHT ( ) buttons:
• Used for menu selection within the Main Menu and the Setup Menu Screens.
• Used for adjusting of reader settings within the TIME and MODE Sub-menus.
• Used for sideways navigation across different tag data sets within the first
three screens of the DATA menu.
• Simultaneous pressing of both ( ) from the Main Screen powers off the
Reader.
• Simultaneously pressing of both ( ) from the 3
rd
Status screen (“Clear Tag
Memory” screen) erases all tag data from the reader.
READ (START) button:
• Used for reading or starting a T-700 Tag, but only active from within the
Home Screen and Main Menu Screen and the DATA sub-menu
• Note that the READ button also has a navigation effect:
o If a tag is successfully read, the navigation is to the first DATA screen
for the new tag data set. When a tag is re-read, it is assigned the
highest Tag number. For example, if you re-read Tag 3 (out of 5), Tag
3 will become Tag 5, Tag 5 becomes Tag 4, and Tag 4 becomes Tag 3.
In this way, duplicate tag records are avoided, and the tag numbering
always corresponds to chronological ordering of reading events.
o If the read attempt fails, the navigation is to the Home Screen.
SEND (PRINT) button:
• Used to activate an IR link and subsequent data transfer, either to the MP-1
Printer or to a computer running Session Manager™ Software in the READ –
IR Mode. The factor that determines which of these processes is attempted is
the screen from which the button is pressed
:
o The Home Screen OR Main Screen causes a PC connection (as
indicated by the SEND icon in the diagram).
o Any Data menu screen causes an MP-1 printer connection (as indicated
by the PRINT icon in the diagram).
• Note that the SEND button also has a navigation consequnce:
o After printing, the screen reverts to the first DATA screen for the tag
just printed. This navigation permits rapid selection of a different tag
data set by pressing the LEFT or RIGHT ( ) button. In this manner,
it is easy to print a series of tag data sets by alternating SEND and
( ).
o Note also that the data memory and reader settings can be affected by
the action taken…If a PRINT is executed, the tag memory and settings
are unaffected.
If a SEND to PC is executed completely without any errors, the reader self-erases all
stored tag data in order to make room for more reads.
23

Appendix B - Frequently Asked Questions
I am reading TurboTag™ cards OK, but there is no shelf life display. What is happening?
The TagMateQC™ only reports a remaining shelf life when configured to do so, and when
reading a tag that is running, if in the “If Running” mode (see About the TurboTag™ Shelf Life
Function).
I attempted to send data to the printer, the lights on the printer flashed, but there was no
tape printed. What happened?
Several things can cause failure to print.
• Make sure the attempt is made from a DATA menu screen and not the Main Screen.
• Make sure the printer is isolated from any computers having IR ports as they will
interfere with the TagMateQC™ Reader’s transmissions.
• Make sure the printer’s battery is charged and the paper is not jammed.
• Make sure that you hold the TagMateQC™ steady as you point it at the printer IR
window. Wait until the amber light stops flashing (this happens during data transfer)
before changing the “aim” of the TagMateQC™ towards the printer.
I just want to send a single record to my computer. How do I do this?
You cannot send a single record to the computer. The TagMateQC™ is designed to send the
entire current data set in its memory to the computer, and then erase its memory to make
room for more data sets incoming from new tag data sets to be read.
Can I print out all of the records in the TagMateQC™ to the printer in a group?
Not with a single button press. The TagMateQC™ is designed to send only one record at a
time to the MP-1 printer. It is possible to navigate through tag data sets and sequentially
print as many records as desired.
What is the significance of the “minimum shelf life” setting in SETUP?
Some TurboTag™ users prefer to have a criterion for receipt of perishables in terms of
remaining shelf life. The minimum shelf life setting allows users to set this criterion according
to their position within a supply chain, or further time required to sell a product after its
receipt. (see About the TurboTag™ Shelf Life Function)
Do I need a PC computer to use the TagMateQC™?
No. If you do not need to store TurboTag™ data, just use the TagMateQC™ to review
incoming data and alarm conditions, and to print graphic data and summaries using the MP-1
printer.
Can TagMateQC™ store successive “reads” of the same tag as it is running?
Yes. Multiple sessions for same tag can be secured without overwriting the previously stored
data set.
Will TagMateQC™ lock onto the nearest tag?
Yes. TagMateQC™ uses “addressed Mode” to avoid crosstalk between tags.
When TagMateQC™ sends data to the MP-1 printer sometimes the data record consists of
substantially less than the full 702 data points. Will a short reading occupy just the front end
of a mostly blank tape printout?
No. TagMateQC™ auto scales the time axis on MP-1 printout, so the existing data is expanded
to occupy the whole length of the printed chart.
What are the limitations setting shelf life alarm criteria on the TagMateQC™?
Shelf life setting can be to nearest 0.2 days below 5 days.
When setting the Shelf Life Calculation in Settings, what are my options?
Shelf life calculation Mode has three states: Never/Always/If Logging.
What is the read range of the TagMateQC™?
TagMateQC™ reads reliably up to 3.5 inches (9 centimeters) measured from the bottom
reading surface. Note that the unit is designed to read tags using the face on the side
opposite the LCD screen display and button panel.
24
 Loading...