

Page 1
User Guide
Seagate® X8 Accelerator for Windows
Powered by Virident
ST2200FS0000
ST1100FS0000
ST1100FR0000
ST550FR0000
100728273
Rev. A
June 2013
Page 2

Document Revision History
Revision Date Description of changes
Rev. A 06/18/2013 Initial release.
© 2013 Seagate Technology LLC. All rights reserved.
Publication number: 100728273, Rev. A June 2013
Seagate, Seagate Technology and the Wave logo are registered trademarks of Seagate Technology LLC in the United States and/or
other countries. Seagate X8 Accelerator and SeaTools are either trademarks or registered trademarks of Seagate Technology LLC or
one of its affiliated companies in the United States and/or other countries. The FIPS logo is a certification mark of NIST, which does
not imply product endorsement by NIST, the U.S., or Canadian governments.All other trademarks or registered trademarks are the
property of their respective owners.
No part of this publication may be reproduced in any form without written permission of Seagate Technology LLC.
Call 877-PUB-TEK1 (877-782-8351) to request permission.
When referring to drive capacity, one gigabyte, or GB, equals one billion bytes and one terabyte, or TB, equals one trillion bytes. Your
computer’s operating system may use a different standard of measurement and report a lower capacity. In addition, some of the listed
capacity is used for formatting and other functions, and thus will not be available for data storage. Actual quantities will vary based on
various factors, including file size, file format, features and application software. Actual data rates may vary depending on operating
environment and other factors. The export or re-export of hardware or software containing encryption may be regulated by the U.S.
Department of Commerce, Bureau of Industry and Security (for more information, visit www.bis.doc.gov), and controlled for import
and use outside of the U.S. Seagate reserves the right to change, without notice, product offerings or specifications.
Page 3
Contents
End User License Agreement for Seagate® Software . . . . . . . . . . . . . . . . . . . . . . . . . . . . . . . . . . . . . . 1
1.0 Introduction. . . . . . . . . . . . . . . . . . . . . . . . . . . . . . . . . . . . . . . . . . . . . . . . . . . . . . . . . . . . . . . . . . . 4
2.0 System Requirements . . . . . . . . . . . . . . . . . . . . . . . . . . . . . . . . . . . . . . . . . . . . . . . . . . . . . . . . . . 4
3.0 Hardware Installation . . . . . . . . . . . . . . . . . . . . . . . . . . . . . . . . . . . . . . . . . . . . . . . . . . . . . . . . . . . 5
3.1 Bracket Installation . . . . . . . . . . . . . . . . . . . . . . . . . . . . . . . . . . . . . . . . . . . . . . . . . . . . . . . 5
3.2 PCI Slot Selection . . . . . . . . . . . . . . . . . . . . . . . . . . . . . . . . . . . . . . . . . . . . . . . . . . . . . . . . 5
4.0 System BIOS Settings . . . . . . . . . . . . . . . . . . . . . . . . . . . . . . . . . . . . . . . . . . . . . . . . . . . . . . . . . . 6
4.1 Fan Speed Settings in BIOS . . . . . . . . . . . . . . . . . . . . . . . . . . . . . . . . . . . . . . . . . . . . . . . . 6
4.2 Processor Settings in BIOS . . . . . . . . . . . . . . . . . . . . . . . . . . . . . . . . . . . . . . . . . . . . . . . . . 6
5.0 Installing X8 Accelerator Driver and Utilities . . . . . . . . . . . . . . . . . . . . . . . . . . . . . . . . . . . . . . . . 7
5.1 Installing the Device Driver . . . . . . . . . . . . . . . . . . . . . . . . . . . . . . . . . . . . . . . . . . . . . . . . . 7
5.2 Windows Power Modes for Performance . . . . . . . . . . . . . . . . . . . . . . . . . . . . . . . . . . . . . . 9
5.3 Verify the Device Driver is Loaded and Functioning . . . . . . . . . . . . . . . . . . . . . . . . . . . . . . 9
6.0 Configuration and Management of the X8 Accelerator Device . . . . . . . . . . . . . . . . . . . . . . . . 10
6.1 Seagate X8 Accelerator Manager . . . . . . . . . . . . . . . . . . . . . . . . . . . . . . . . . . . . . . . . . . . 10
6.1.1 Details Displayed: . . . . . . . . . . . . . . . . . . . . . . . . . . . . . . . . . . . . . . . . . . . . . . . 11
6.2 X8 Accelerator Device Details . . . . . . . . . . . . . . . . . . . . . . . . . . . . . . . . . . . . . . . . . . . . . . 12
6.3 Device Mappings. . . . . . . . . . . . . . . . . . . . . . . . . . . . . . . . . . . . . . . . . . . . . . . . . . . . . . . . 13
6.3.1 Creating a Logical Drive. . . . . . . . . . . . . . . . . . . . . . . . . . . . . . . . . . . . . . . . . . . 13
6.4 Device Configuration . . . . . . . . . . . . . . . . . . . . . . . . . . . . . . . . . . . . . . . . . . . . . . . . . . . . . 15
6.4.1 Reset (to factory defaults) . . . . . . . . . . . . . . . . . . . . . . . . . . . . . . . . . . . . . . . . . 15
6.4.2 Creating a New Partition . . . . . . . . . . . . . . . . . . . . . . . . . . . . . . . . . . . . . . . . . . 17
6.4.3 Modify Existing Partition . . . . . . . . . . . . . . . . . . . . . . . . . . . . . . . . . . . . . . . . . . 19
7.0 Verifying Performance . . . . . . . . . . . . . . . . . . . . . . . . . . . . . . . . . . . . . . . . . . . . . . . . . . . . . . . . . 21
8.0 Command Line Utilities . . . . . . . . . . . . . . . . . . . . . . . . . . . . . . . . . . . . . . . . . . . . . . . . . . . . . . . . 23
8.1 Partitioning and Configuring with vgc-config . . . . . . . . . . . . . . . . . . . . . . . . . . . . . . . . . . 23
8.2 vgc-config Options . . . . . . . . . . . . . . . . . . . . . . . . . . . . . . . . . . . . . . . . . . . . . . . . . . . . . . 23
8.2.1 vgc-config Drive Settings. . . . . . . . . . . . . . . . . . . . . . . . . . . . . . . . . . . . . . . . . . 24
8.2.2 vgc-config Partition Settings . . . . . . . . . . . . . . . . . . . . . . . . . . . . . . . . . . . . . . . 24
8.3 Usable Space vs. Write Performance Trade-offs . . . . . . . . . . . . . . . . . . . . . . . . . . . . . . . 25
8.4 Configuring Multiple Partitions . . . . . . . . . . . . . . . . . . . . . . . . . . . . . . . . . . . . . . . . . . . . . 25
8.5 vgc-monitor . . . . . . . . . . . . . . . . . . . . . . . . . . . . . . . . . . . . . . . . . . . . . . . . . . . . . . . . . . . . 26
8.6 vgc-secure-erase. . . . . . . . . . . . . . . . . . . . . . . . . . . . . . . . . . . . . . . . . . . . . . . . . . . . . . . . 27
9.0 Dynamic Throttling . . . . . . . . . . . . . . . . . . . . . . . . . . . . . . . . . . . . . . . . . . . . . . . . . . . . . . . . . . . . 28
9.1 Thermal Throttling . . . . . . . . . . . . . . . . . . . . . . . . . . . . . . . . . . . . . . . . . . . . . . . . . . . . . . . 28
9.2 Power Throttling . . . . . . . . . . . . . . . . . . . . . . . . . . . . . . . . . . . . . . . . . . . . . . . . . . . . . . . . 28
10.0 Application Notes . . . . . . . . . . . . . . . . . . . . . . . . . . . . . . . . . . . . . . . . . . . . . . . . . . . . . . . . . . . . . 30
10.1 Data Block Sizes and Alignments . . . . . . . . . . . . . . . . . . . . . . . . . . . . . . . . . . . . . . . . . . . 30
10.2 IOMeter . . . . . . . . . . . . . . . . . . . . . . . . . . . . . . . . . . . . . . . . . . . . . . . . . . . . . . . . . . . . . . . 30
iii Seagate X8 Accelerator for Windows User Guide, Rev. A
Page 4

Contents
11.0 Troubleshooting . . . . . . . . . . . . . . . . . . . . . . . . . . . . . . . . . . . . . . . . . . . . . . . . . . . . . . . . . . . . . . 32
11.1 Cannot Find Block Device /dev/vgca0 . . . . . . . . . . . . . . . . . . . . . . . . . . . . . . . . . . . . . . . 32
11.2 Performance is Lower than Expected . . . . . . . . . . . . . . . . . . . . . . . . . . . . . . . . . . . . . . . . 33
11.3 Driver Crash on System Boot . . . . . . . . . . . . . . . . . . . . . . . . . . . . . . . . . . . . . . . . . . . . . . 33
11.4 IOs are not Being Processed because the Driver is Hung . . . . . . . . . . . . . . . . . . . . . . . . 33
12.0 Onboard Diagnostic LEDs . . . . . . . . . . . . . . . . . . . . . . . . . . . . . . . . . . . . . . . . . . . . . . . . . . . . . . 33
13.0 Contacting Support . . . . . . . . . . . . . . . . . . . . . . . . . . . . . . . . . . . . . . . . . . . . . . . . . . . . . . . . . . . 33
iv Seagate X8 Accelerator for Windows User Guide, Rev. A
Page 5

End User License Agreement for Seagate® Software
PLEASE READ THIS END USER LICENSE AGREEMENT (“EULA”) CAREFULLY. BY CLICKING “I AGREE” OR TAKING ANY
STEP TO DOWNLOAD, SET-UP, INSTALL OR USE ALL OR ANY PORTION OF THIS PRODUCT (INCLUDING, BUT NOT
LIMITED TO, THE SOFTWARE AND ASSOCIATED FILES (THE “SOFTWARE”), HARDWARE (“HARDWARE”), DISK (S), CDROMS, OR OTHER MEDIA) (COLLECTIVELY, THE “PRODUCT”) YOU AND YOUR COMPANY ACCEPT ALL THE TERMS
AND CONDITIONS OF THIS EULA. IF YOU ACQUIRE THIS PRODUCT FOR YOUR COMPANY'S USE, YOU REPRESENT
THAT YOU ARE AN AUTHORIZED REPRESENTATIVE WHO HAS THE AUTHORITY TO LEGALLY BIND YOUR COMPANY
TO THIS EULA. IF YOU DO NOT AGREE, DO NOT CLICK “I AGREE” AND DO NOT DOWNLOAD, SET-UP, INSTALL OR
USE THE SOFTWARE.
1. Ownership
Seagate Technology LLC (“Seagate”) and its suppliers own all right, title, and interest in and to the Software, including all
intellectual property rights therein. The Software is licensed, not sold. The structure, organization, and code of the Software are
the valuable trade secrets and confidential information of Seagate and its suppliers. The Software is protected by copyright and
other intellectual property laws and treaties, including, without limitation, the copyright laws of the United States and other
countries. The term “Software” does not refer to or include “Third-Party Software”. “Third-Party Software” means certain
software licensed by Seagate from third parties that may be provided with the specific version of Software that you have
licensed. The Third-Party Software is generally not governed by the terms set forth below but is subject to different terms and
conditions imposed by the licensors of such Third-Party Software. The terms of your use of the Third-Party Software are subject
to and governed by the respective license terms, except that this Section 1 and Sections 5 and 6 of this Agreement also govern
your use of the Third-Party Software. You may identify and view the relevant licenses and/or notices for such Third-Party
Software for the Software you have received pursuant to this EULA at
You agree to comply with the terms and conditions contained in all such Third-Party Software licenses with respect to the
applicable Third-Party Software. Where applicable, the URLs for sites where you may obtain source code for the Third Party
Software can be found at
http://www. seagate. com/www I en-us/ support/ downloads/.
http://www.seagate.com/www/en-us/support/downloads/.
2. Product License.
Subject to your compliance with the terms of this EULA, Seagate grants you a personal, non-exclusive, non-transferable, limited
license to install and use one (1) copy of the Software on one (1) device residing on your premises, internally and only for the
purposes described in the associated documentation. Use of some third party software included on the CD or other media
provided with the Product may be subject to terms and conditions of a separate license agreement; this license agreement may
be contained in a “Read Me” file located on the CD or other media that accompanies that Product. The Software includes
components that enable you to link to and use certain services provided by third parties (“Third Party Services”). Your use of the
Third Party Services is subject to your agreement with the applicable third party service provider. Except as expressly stated
herein, this EULA does not grant you any intellectual property rights in the Product. Seagate and its suppliers reserve all rights
not expressly granted to you. There are no implied rights.
2.1 Software
You must not reverse engineer or decompile the Program(s) except to the extent permitted by applicable law despite any
contractual prohibition. If you wish to obtain interface information relating to the Program, to achieve interoperability, a request
should be made in writing to Seagate.
3. Restrictions
You are not licensed to do any of the following:
a Create derivative works based on the Product or any part or component thereof, including, but not limited to, the Soft-
ware;
b Reproduce the Product, in whole or in part;
c Except as expressly authorized by Section 11 below, sell, assign, license, disclose, or otherwise transfer or make avail-
able the Product, in whole or in part, to any third party;
d Alter, translate, decompile, or attempt to reverse engineer the Product or any part or component thereof, except and
only to the extent that such activity is expressly permitted by applicable law notwithstanding this contractual prohibition;
e Use the Product to provide services to third parties;
f Take any actions that would cause the Software to become subject to any open source license agreement if it is not
already subject to such an agreement; and
g Remove or alter any proprietary notices or marks on the Product.
Seagate X8 Accelerator for Windows User Guide, Rev. A 1
Page 6

4. Updates
If you receive an update or an upgrade to, or a new version of, any Software (“Update”) you must possess a valid license to the
previous version in order to use the Update. All Updates provided to you shall be subject to the terms and conditions of this
EULA. If you receive an Update, you may continue to use the previous version(s) of the Software in your possession, custody or
control. Seagate shall have no obligation to support the previous versions of the Software upon availability of an Update.
Seagate has no obligation to provide support, maintenance, Updates, or modifications under this EULA.
5. NO WARRANTY.
THE PRODUCT AND THE THIRD-PARTY SOFTWARE ARE OFFERED ON AN “AS-IS” BASIS AND NO WARRANTY,
EITHER EXPRESS OR IMPLIED, IS GIVEN. SEAGATE AND ITS SUPPLIERS EXPRESSLY DISCLAIM ALL WARRANTIES
OF ANY KIND, WHETHER STATUTORY, EXPRESS OR IMPLIED, INCLUDING, BUT NOT LIMITED TO, IMPLIED
WARRANTIES OF MERCHANTABILITY, FITNESS FOR A PARTICULAR PURPOSE AND NON-INFRINGEMENT. SEAGATE
DOES NOT PROVIDE THE THIRD PARTY SERVICES AND MAKES NO WARRANTIES WITH RESPECT TO THE THIRD
PARTY SERVICES. YOUR USE OF THE THIRD PARTY SERVICES IS AT YOUR RISK.
6. EXCLUSION OF INCIDENTAL, CONSEQUENTIAL, AND CERTAIN OTHER DAMAGES.
TO THE MAXIMUM EXTENT PERMITTED BY APPLICABLE LAW, IN NO EVENT SHALL SEAGATE OR ITS LICENSORS OR
SUPPLIERS BE LIABLE FOR ANY SPECIAL, INCIDENTAL, PUNITIVE, INDIRECT, OR CONSEQUENTIAL DAMAGES
WHATSOEVER (INCLUDING, BUT NOT LIMITED TO, DAMAGES FOR LOSS OF PROFITS OR CONFIDENTIAL OR OTHER
INFORMATION, FOR BUSINESS INTERRUPTION, FOR PERSONAL INJURY, FOR LOSS OF PRIVACY, FOR F AlLURE TO
MEET ANY DUTY INCLUDING OF GOOD FAITH OR REASONABLE CARE, FOR NEGLIGENCE, AND FOR ANY OTHER
PECUNIARY OR OTHER LOSS WHATSOEVER) ARISING OUT OF OR IN ANYWAY RELATED TO THE USE OF OR
INABILITY TO USE THE PRODUCT OR ANY PART OR COMPONENT THEREOF OR RELATED SERVICE OR ANY THIRD
PARTY SERVICES, OR OTHERWISE UNDER OR IN CONNECTION WITH ANY PROVISION OF THE EULA, EVEN IN THE
EVENT OF THE FAULT, TORT (INCLUDING NEGLIGENCE), MISREPRESENTATION, STRICT LIABILITY, BREACH OF
CONTRACT, OR BREACH OF WARRANTY OF SEAGATE OR ITS LICENSORS OR SUPPLIERS, AND EVEN IF SEAGATE
OR ITS LICENSOR OR SUPPLIER HAS BEEN ADVISED OF THE POSSIBILITY OF SUCH DAMAGES AND
NOTWITHSTANDING ANY FAlLURE OF THE ESSENTIAL PURPOSE OF THIS AGREEMENT OR ANY REMEDY.
7. LIMITATION OF LIABILITY.
NOTWITHSTANDING ANY DAMAGES THAT YOU MIGHT INCUR FOR ANY REASON WHATSOEVER, THE ENTIRE
LIABILITY OF SEAGATE UNDER ANY PROVISION OF THIS EULA AND YOUR EXCLUSIVE REMEDY HEREUNDER SHALL
BE LIMITED TO, AND IN NO EVENT WILL SEAGATE'S TOTAL CUMULATIVE DAMAGES EXCEED, THE FEES PAID BY
LICENSEE TO SEAGATE FOR THE PRODUCT. ADDITIONALLY, IN NO EVENT SHALL SEAGATE'S LICENSORS OR
SUPPLIERS BE LIABLE FOR ANY DAMAGES OF ANY KIND.
8. Privacy.
Seagate's collection, use and disclosure of personally identifiable information in connection with your use of the Product is
governed by Seagate's Privacy Policy which is located at
http://www.seagate.com/about/legal-privacy/privacy-statement/.
9. Indemnification
By accepting the EULA, you agree to indemnify and otherwise hold harmless Seagate, its officers, employees, agents,
subsidiaries, affiliates, and other partners from any direct, indirect, incidental, special, consequential or exemplary damages
arising out of, relating to, or resulting from your use of the Product or any other matter relating to the Product, including, without
limitation, use of any of the Third Party Services.
10. International Trade Compliance.
The Software and any related technical data made available for download under this EULA are subject to the customs and
export control laws and regulations of the United States (“U.S.”) and may also be subject to the customs and export laws and
regulations of the country in which the download is contemplated. Further, under U.S. law, the Software and any related
technical data made available for download under this EULA may not be sold, leased or otherwise transferred to restricted
countries, or used by a restricted end-user (as determined on any one of the U.S. government restricted parties lists, found at
http://www.bis.doc.gov/complianceandenforcement/liststocheck.htrn) or an end-user engaged in activities related to weapons of
mass destruction including, without limitation, activities related to designing, developing, producing or using nuclear weapons,
materials, or facilities, missiles or supporting missile projects, or chemical or biological weapons. You acknowledge that you are
not a citizen, national, or resident of, and are not under control of the governments of Cuba, Iran, North Korea, Sudan or Syria;
are not otherwise a restricted end-user as defined by U.S. export control laws; and are not engaged in proliferation activities.
Further, you acknowledge that you will not Miscellaneous download or otherwise export or re-export the Software or any related
technical data directly or indirectly to the above-mentioned countries or to citizens, nationals, or residents of those countries, or
to any other restricted end user or for any restricted end-use.
Seagate X8 Accelerator for Windows User Guide, Rev. A 2
Page 7

11. General.
This EULA between Licensee and Seagate is governed by and construed in accordance with the laws of the State of California
without regard to conflict of laws principles. The EULA constitutes the entire agreement between Seagate and you relating to
the Product and governs your use of the Product, superseding any prior agreement between you and Seagate relating to the
subject matter hereof. If any provision of this EULA is held by a court of competent jurisdiction to be contrary to law, such
provision will be changed and interpreted so as to best accomplish the objectives of the original provision to the fullest extent
allowed by law and the remaining provisions of the EULA will remain in force and effect. The Product and any related technical
data are provided with restricted rights. Use, duplication, or disclosure by the U.S. government is subject to the restrictions as
set forth in subparagraph (c)(l)(iii) of DFARS 252.227-7013 (The Rights in Technical Data and Computer Product) or
subparagraphs (c)(1) and (2) of 48 CFR 52.227-19 (Commercial Computer Product- Restricted Rights), as applicable. The
manufacturer is Seagate. You may not transfer or assign this EULA or any rights under this EULA, except that you may make a
one-time, permanent transfer of this EULA and the Software to another end user, provided that (i) you do not retain any copies
of the Software, the Hardware, the media and printed materials, Upgrades (if any), and this EULA, and (ii) prior to the transfer,
the end user receiving this EULA and the Software agrees to all the EULA terms. Any attempted assignment in violation of this
Section is void. Seagate, the Seagate logo, and other Seagate names and logos are the trademarks of Seagate.
Seagate X8 Accelerator for Windows User Guide, Rev. A 3
Page 8
1.0 Introduction
The Seagate® X8 Accelerator line of solid state storage devices is a revolutionary product family that utilizes the industry
standard PCIe bus interface, along with an innovative hardware and software architecture to deliver highest sustained
application performance over its life time and enterprise-class reliability. Seagate X8 Accelerator enables enterprises to
tackle performance-intensive applications such as databases, business analytics, virtualization and high-performance
computing applications. This document explains how to install, configure, and manage Seagate X8 Accelerator devices with
software version 3.2 on Windows based systems.
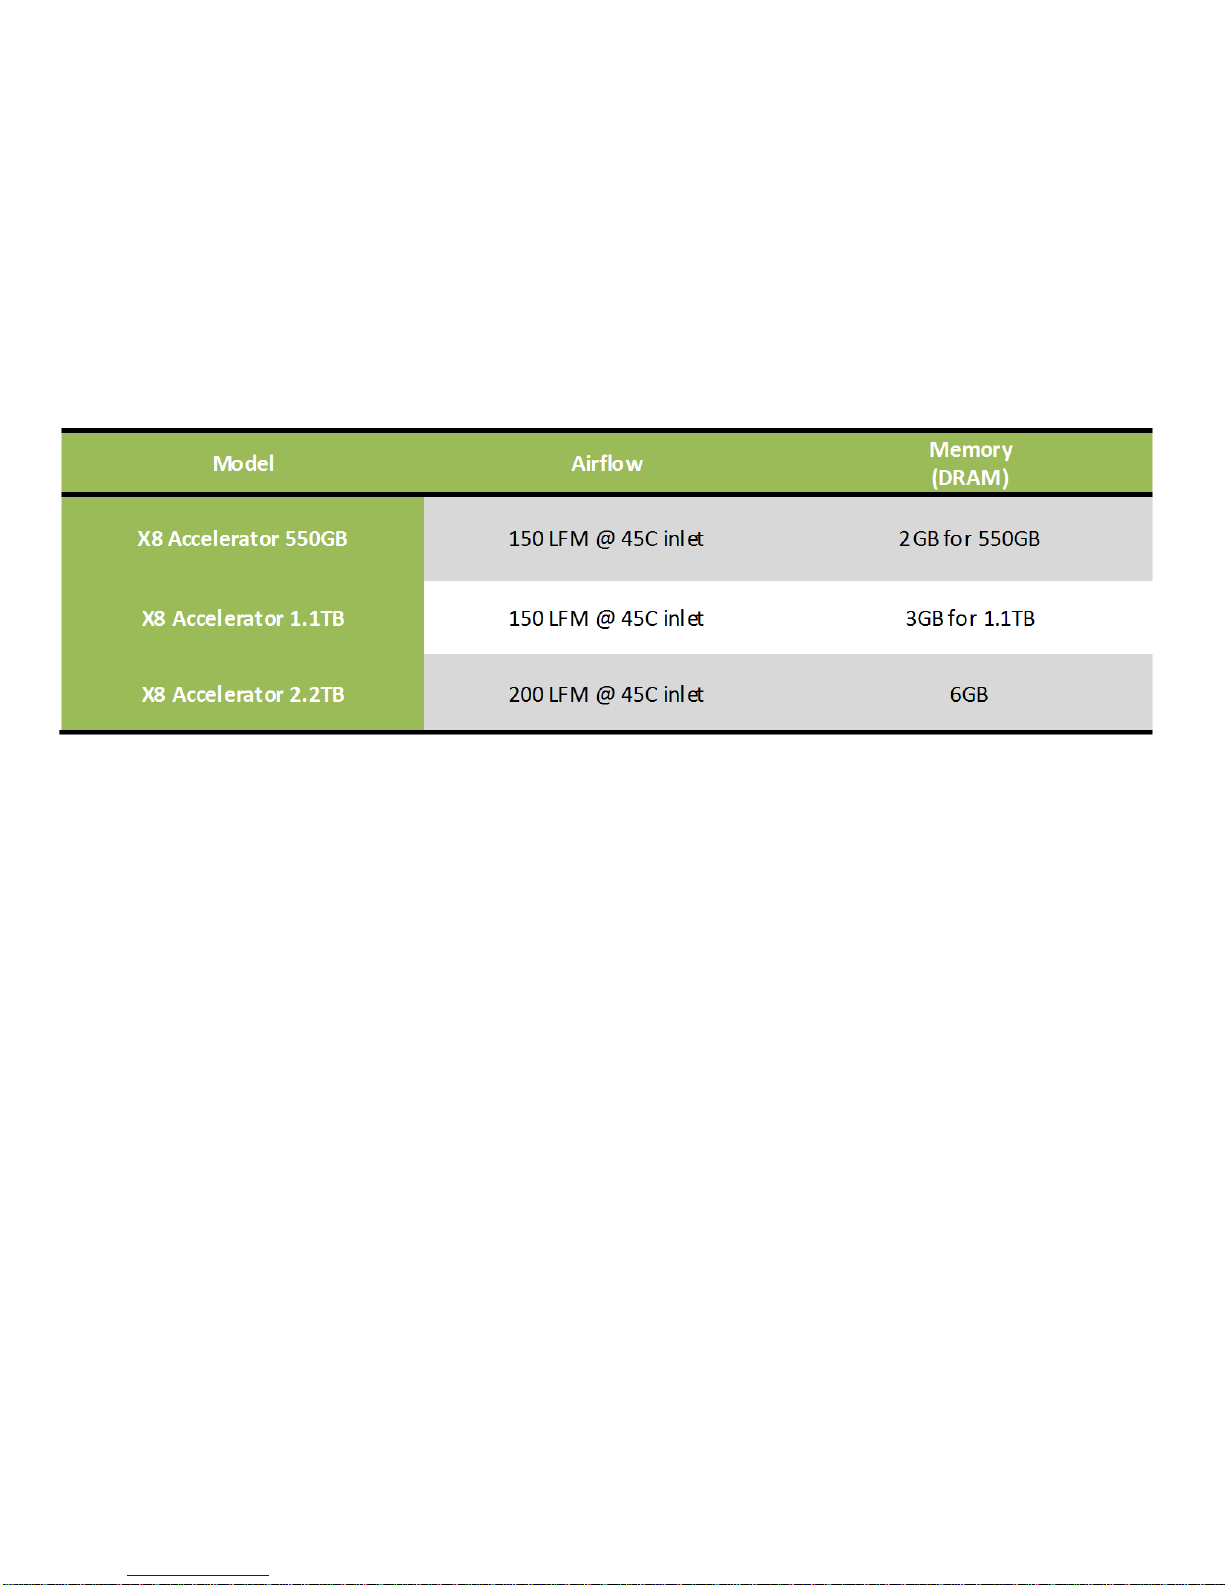
2.0 SYSTEM REQUIREMENTS
To achieve full performance the X8 Accelerator requires a multicore processor system with an 8 lane Gen2 PCIe slot and
good air movement. The table below shows host memory the X8 Accelerator will use based on capacity.
The DRAM requirements mentioned above are only meant for each X8 Accelerator device. OS and other applications will
need additional DRAM.
SEAGATE X8 ACCELERATOR FOR WINDOWS USER GUIDE, REV. A 4
Page 9
3.0 HARDWARE INSTALLATION
NOTE
NOTE
Please observe Electrostatic Discharge (ESD) precautions while installing or handling
an X8 Accelerator device. ESD can damage server and/or device components.
Make sure to power down the system before installing an X8 Accelerator device.
Disconnect the server from the AC power to ensure no dangerous voltages are present.
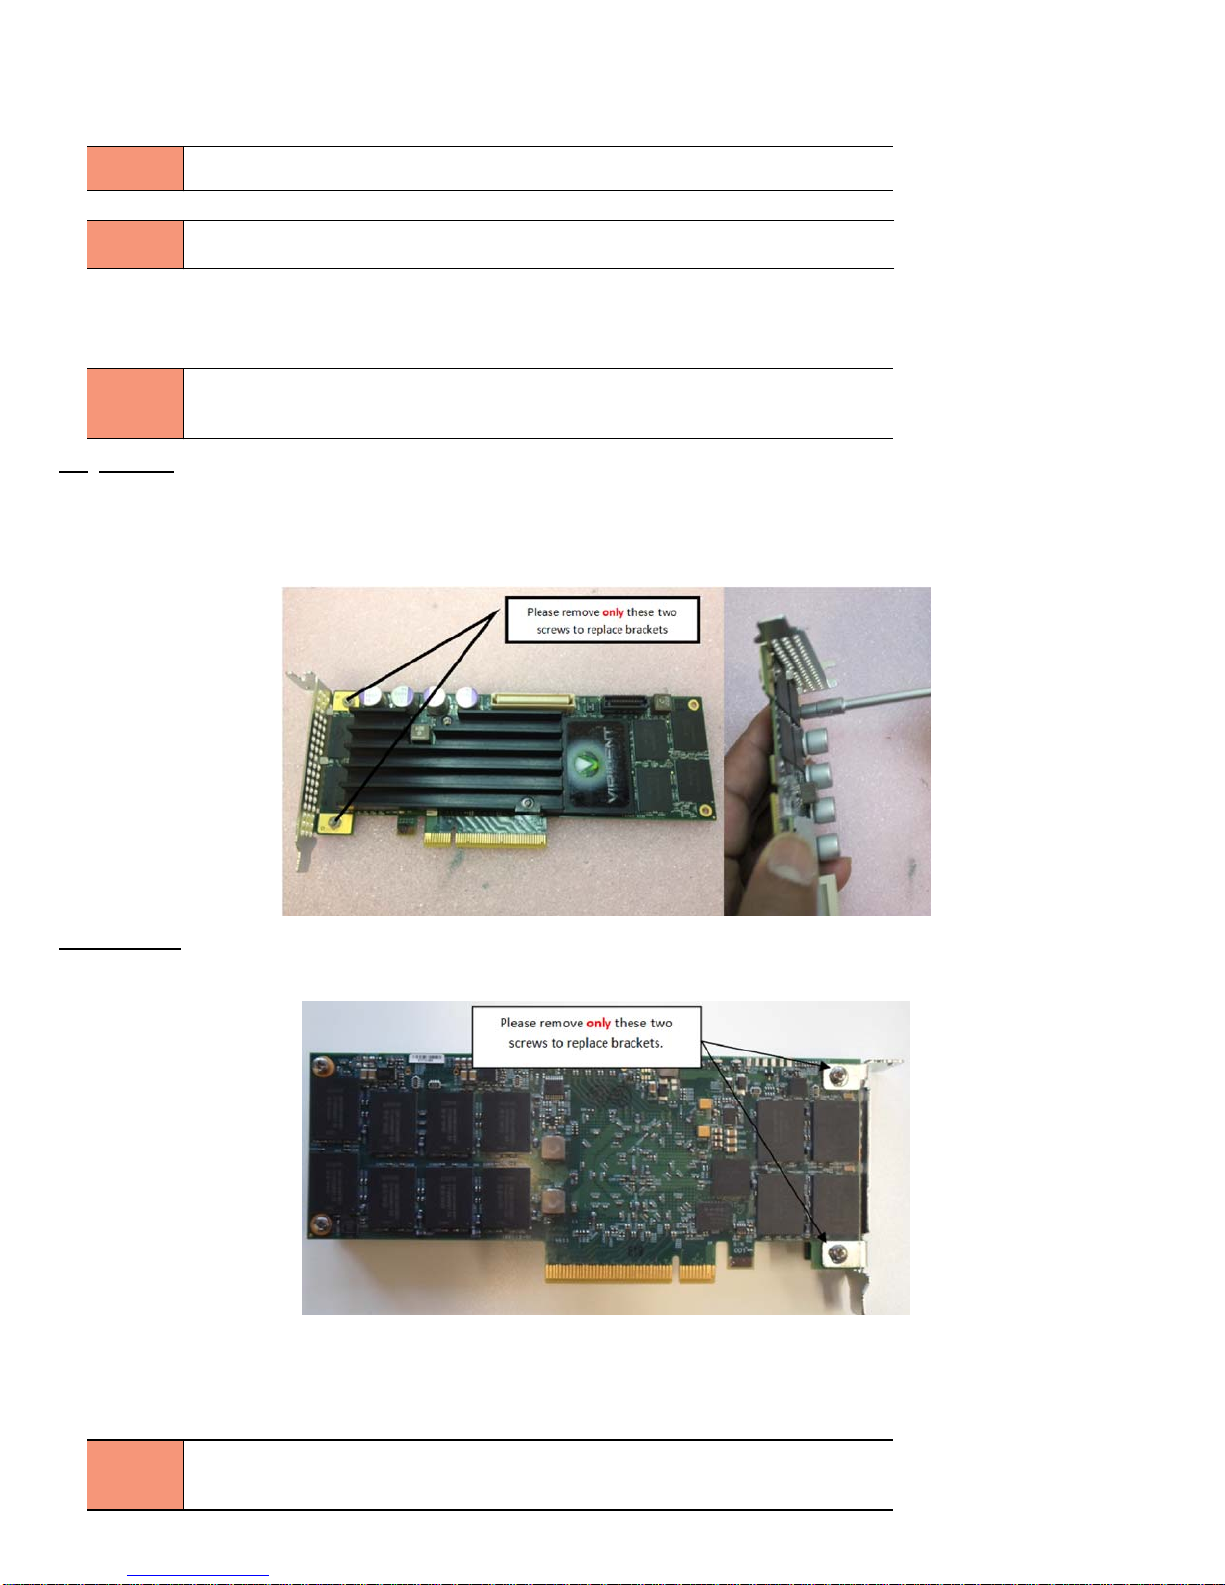
3.1 BRACKET INSTALLATION
If necessary, install the appropriate bracket on the Seagate X8 Accelerator device.
Please use only brackets supplied with the device. Also, do not remove the heat sinks
NOTE
Single Board: If your single board device has nuts like the one in the picture below then, follow the single board instructions.
If your single board device does not have any nuts, please follow the double board instructions.
To replace brackets for a single board device, please remove only the two screws closest to the bracket (see picture below).
Please slide the bracket in horizontally to line up with the screw holes. You will need an 'm 2.5' screw driver and an 'm 2.5'
nut driver. The screws need to be tightened to 4lb-in (0.45Nm).
during the bracket replacement process as doing so could incur damage to the device
and void the warranty.
Double Board: To replace brackets for a double board device, or a single board device without retaining nuts, please remove
only the two screws nearest the bracket (see picture below). Please slide the bracket in horizontally to line up with the screw
holes. You will need an 'm 2.5' screw driver. The screws need to be tightened to 4lb-in (0.45Nm).
3.2 PCI SLOT SELECTION
Seagate X8 Accelerator devices need to be installed in x8 or x16 PCIe Gen 2 slots. If no PCIe x8/x16 slots are available, x4
slots can be used. However, using an x4 slot may result in up to 50% reduction in performance.
Some systems have PCIe slots with x8 physical connectors but only provide x4
NOTE
electrical connectivity. From a performance point of view these slots behave like an x4
slot. Check your system documentation for PCIe slot specifications.
SEAGATE X8 ACCELERATOR FOR WINDOWS USER GUIDE, REV. A 5
Page 10

4.0 SYSTEM BIOS SETTINGS
After a system restart, prior to booting the operating system, enter the system BIOS setup to verify several important
settings. Note that each BIOS often has its own nomenclature for these settings, so the exact wording of the configuration
parameters may not match the examples. Not all BIOS’s will have all of these options.
4.1 FAN SPEED SETTINGS IN BIOS
If your system has BIOS settings for configuring system fan speeds, select options that maximize the airflow.
On HP systems: BIOS -> Advanced Options -> Thermal Configuration -> Increased/Maximum Cooling
On Dell systems: System Settings -> iDRAC Settings -> Thermal
• Maximum Performance
• Fan Speed Offset
• High Fan Speed Offset
4.2 PROCESSOR SETTINGS IN BIOS
The following settings are often found under the "Advanced: Processor/Chipset Control" BIOS menus.
Disable the following optional settings:
• Processor Performance States / C States / C-State Tech / EIST
• C1E States / C1 Enhanced States
• (Link) Active State Power Management
Enable the following on Intel™ based systems:
• Hyperthreading / Logical Processors
• Turbo Mode
Finally, if there are performance profiles (System Power Modes) available, set them to "Maximum Performance."
Intel has identified an issue in Xeon E5-2600 series processors that may result
NOTE
in severe drops of PCIe and X8 Accelerator bandwidth when running workloads
that have low CPU consumption. To avoid this issue, C2 and C1E processor
power states must be disabled.
For details, please see Erratum BT160 in the document at the URL below:
http://www.intel.com/content/dam/www/public/us/en/documents/specification-updates/xeon-e5-family-spec-update.pdf
SEAGATE X8 ACCELERATOR FOR WINDOWS USER GUIDE, REV. A 6
Page 11
5.0 Installing X8 Accelerator Driver and Utilities
Installation driver is found on the USB drive shipped with the X8 Accelerator or at http://www.seagate.com/support/
downloads/ for the supported Operating Systems versions
All of the following installation instructions need to be executed as an Administrator. A reboot of the system is required to
enable certain boot parameter changes therefore an appropriate amount of scheduled downtime will be required for these
operations.
5.1 Installing the Device Driver
For Win 7 with SP1, please Right click on the command prompt, “Run as
NOTE
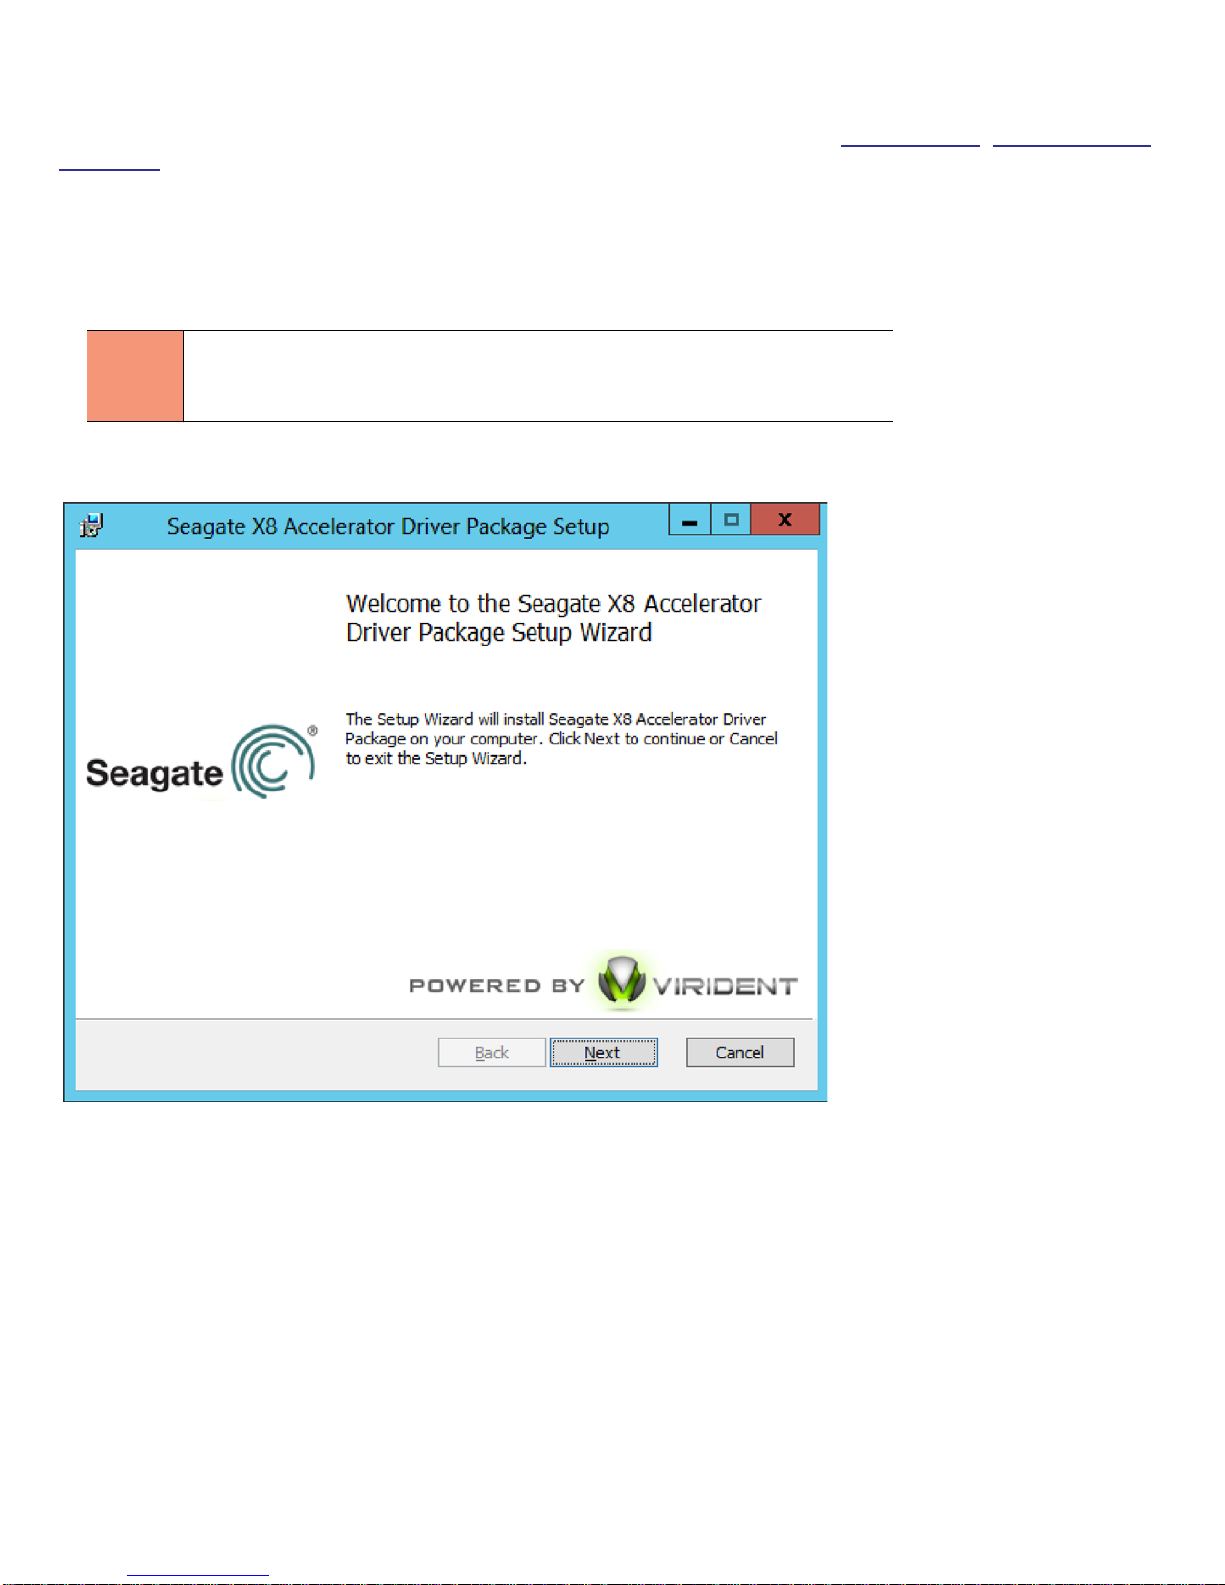
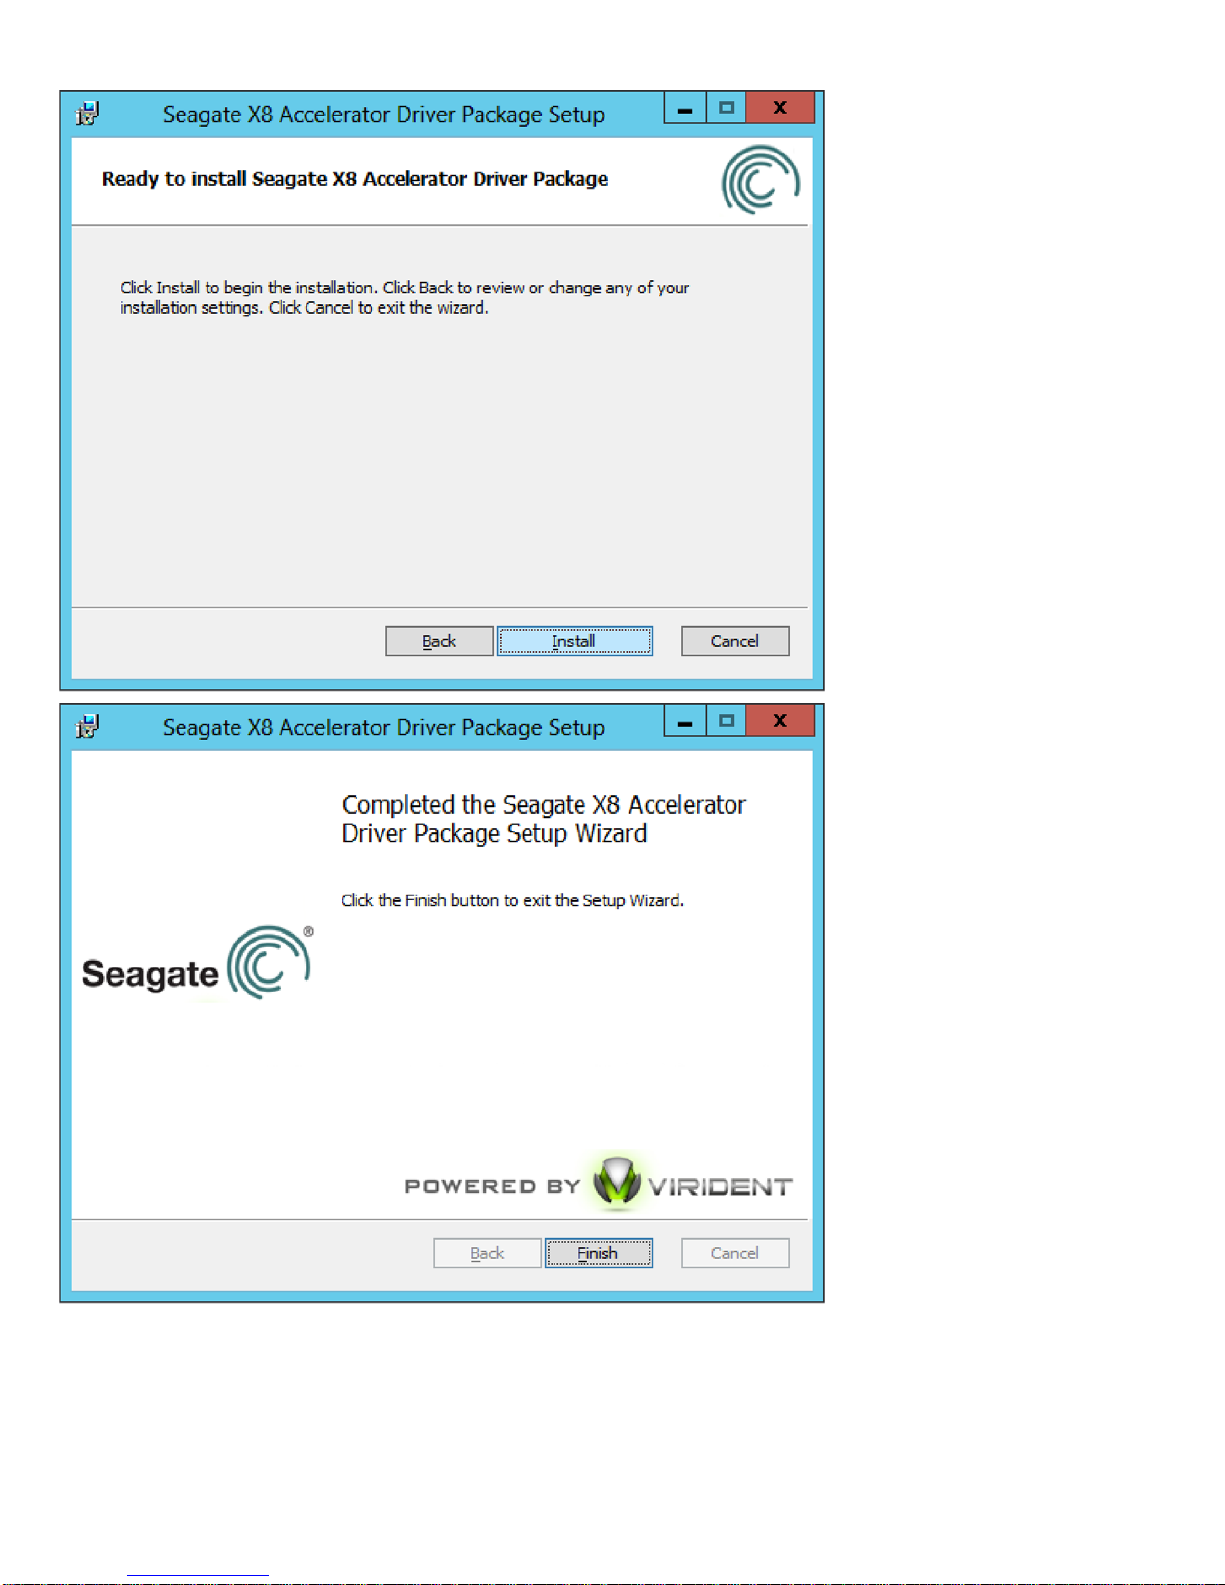
Seagate X8 Accelerator drivers for Windows are provided as a standard “MSI” installation package.
Double-click on the file to begin, and follow the prompts.
Administrator” and for Windows Hyper-V 2008 R2 SP1 run the command
msiexec /i “Path to X8 Accelerator.msi” to launch the installer.
SEAGATE X8 ACCELERATOR FOR WINDOWS USER GUIDE, REV. A 7
Page 12
SEAGATE X8 ACCELERATOR FOR WINDOWS USER GUIDE, REV. A 8
Page 13

5.2 Windows Power Modes for Performance
To achieve the highest possible performance from the Seagate X8 Accelerator Drive, the Windows power saving mode
should be set to “High Performance”. In Windows 2008 R2 this can be turned on at Control Panel ->Hardware ->Power
Options panel and select the scheme as shown below:
5.3 Verify the Device Driver is Loaded and Functioning
After the system has rebooted, the Seagate X8 Accelerator Drive should be visible in the device manager in the following
sections: Also, please use the X8 Accelerator Manager to configure and manage the device (Section 5.0).
To verify if device is loaded check:
Under System Devices as “Seagate X8 Accelerator X8 Accelerator Controller”
Under Storage Controllers as “Seagate X8 Accelerator card”
And, when the drive is brought online (covered in the following section), under Disk Drives as “Seagate X8 Accelerator SCSI
Disk Device”.
SEAGATE X8 ACCELERATOR FOR WINDOWS USER GUIDE, REV. A 9
Page 14
6.0 Configuration and Management of the X8 Accelerator Device
Seagate X8 Accelerator Manager is the Seagate Management GUI to configure and monitor Seagate X8 Accelerator
devices in the system. Seagate X8 Accelerator Manager is a combination of other CLI utilities such as vgc-beacon, vgcconfig, and vgc-monitor. All the information and details of the devices can be accessed via the Seagate X8 Accelerator
Manager. Seagate X8 Accelerator Manager is a part of the installation package.
To launch the X8 Accelerator Manager, go to Start -> X8 Accelerator Manager.
6.1 Seagate X8 Accelerator Manager
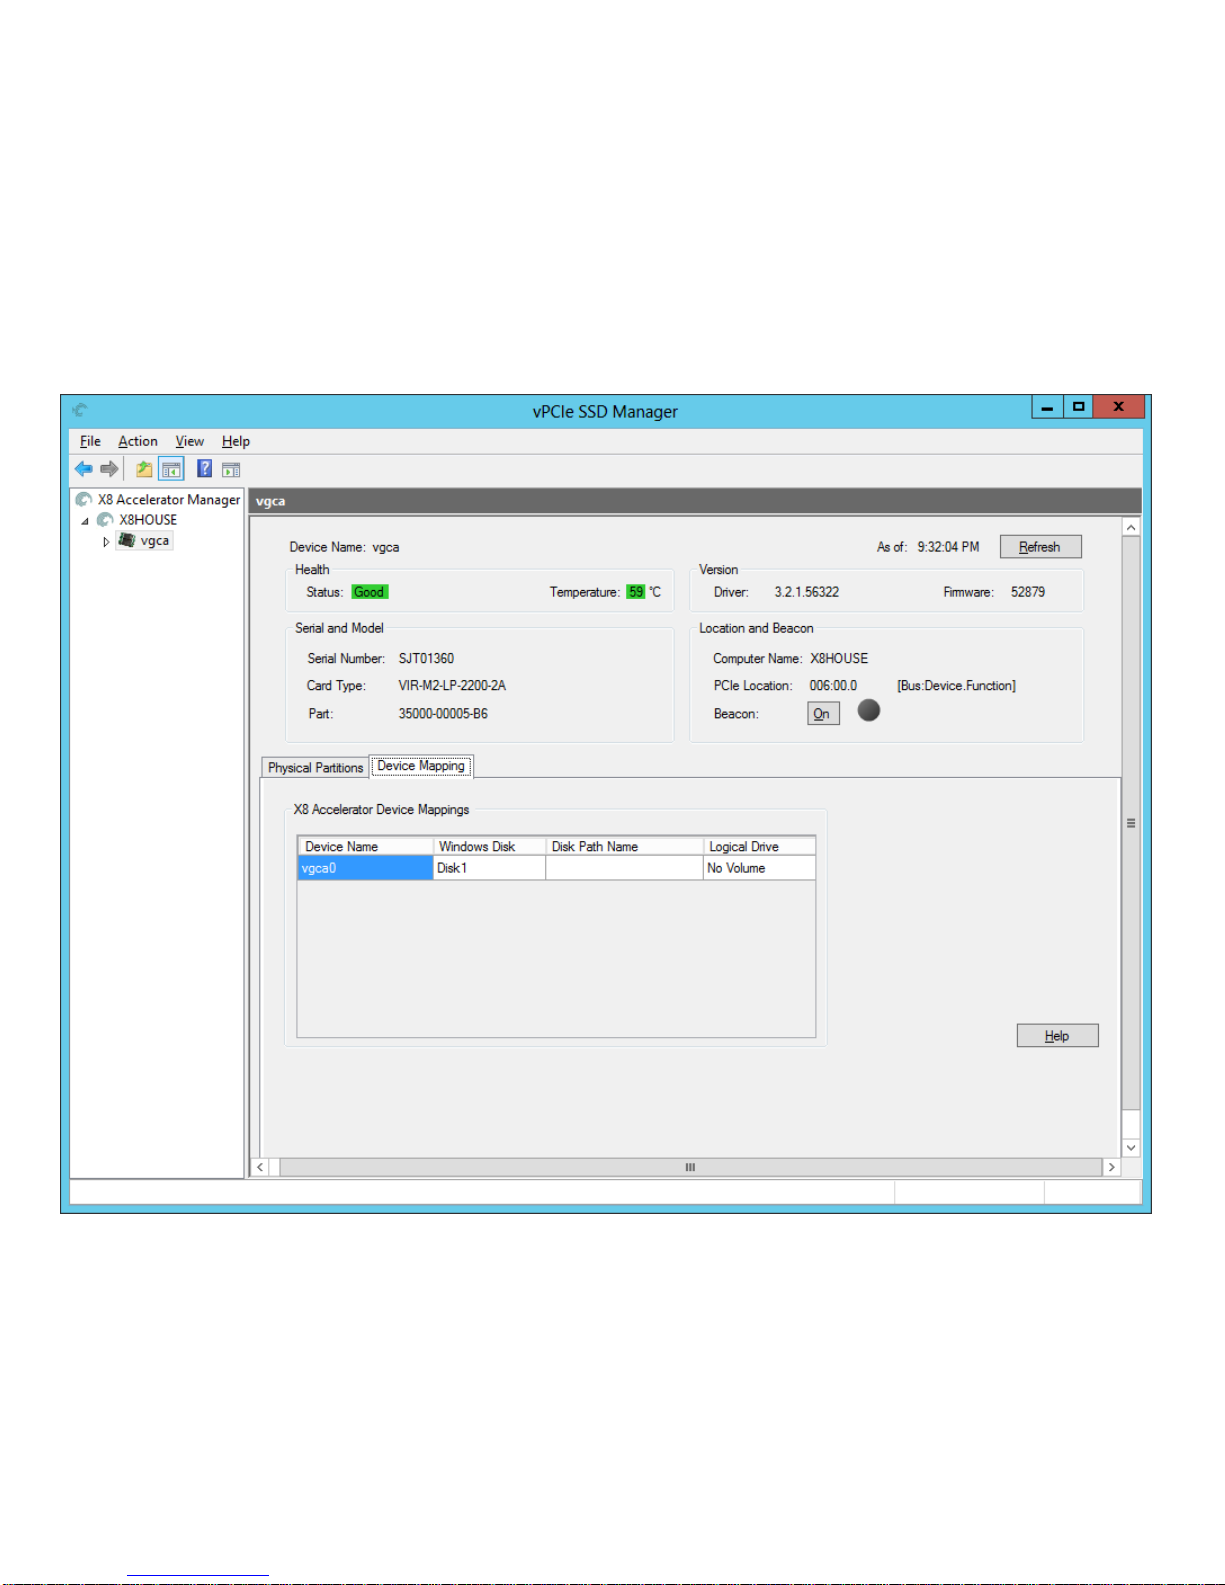
The landing panel of the Seagate X8 Accelerator Manager is shown below. This panel displays the top level information
about all Seagate devices present in the system.
In the above example, the Seagate X8 Accelerator device in the system is vgca. The device name always starts with ‘vgc’.
The top half of this panel displays the Health information, Version information, Serial and Model numbers, and Location and
Beacon information.
The latter half of the panel displays the Device Name, Status, Temperature, Remaining Life, Serial Number, Model and
Usable Capacity of the X8 Accelerator device.
SEAGATE X8 ACCELERATOR FOR WINDOWS USER GUIDE, REV. A 10
Page 15

6.1.1 Details Displayed:
SEAGATE X8 ACCELERATOR FOR WINDOWS USER GUIDE, REV. A 11
Page 16

6.2 X8 Accelerator Device Details
To check the details of any specific X8 Accelerator device, click on the device name listed on the left panel of the snapin. In
the following example, the details of the device vgca are displayed.
Beacon can be switched on or off as shown above. Beacon can be used to identify a particular device in a system with
multiple devices.
SEAGATE X8 ACCELERATOR FOR WINDOWS USER GUIDE, REV. A 12
Page 17

6.3 Device Mappings
Each Partition on the X8 Accelerator device is mapped to a Windows Disk as shown below. The following example has two
partitions mapped to two Windows disks; disk4 and disk5. To use the X8 Accelerator device, create a Logical Drive. Eg, E:
and H: etc.
6.3.1 Creating a Logical Drive
Use the Disk Management interface to bring the device online for use by windows.
This is a mandatory step to ensure device mapping.
SEAGATE X8 ACCELERATOR FOR WINDOWS USER GUIDE, REV. A 13
Page 18

Right Click on the Offline Disk and Choose “Online”.
To initialize the disks, Right Click and Select “initialize Disk”.
NOTE
When prompted, please select "GPT."
If you select "MBR" the maximum size will only be 2 TB.
GPT is recommended for 2.2TB devices if the max capacity of the device needs to be utilized.
SEAGATE X8 ACCELERATOR FOR WINDOWS USER GUIDE, REV. A 14
Page 19

Once the device is online and initialized, you may create partitions and assign drive letters or mount points as you would with
any other volume.
6.4 Device Configuration
This section will show you how to ‘Reset’ your device to factory defaults, Create a new partition, Modify the
existing partition.
6.4.1 Reset (to factory defaults)
Factory default will return the device to “Max Capacity” mode and revert to single partition, wiping all existing
partitions.
NOTE
Before changing any settings please back up your data since changing settings
will lead to data loss.
The following example walks you through a reset.
To Reset the X8 Accelerator device, click the reset button vgc[a, b, c, ---].
SEAGATE X8 ACCELERATOR FOR WINDOWS USER GUIDE, REV. A 15
Page 20

Click OK to confirm.
Choose Yes to confirm.
Reset commences.
SEAGATE X8 ACCELERATOR FOR WINDOWS USER GUIDE, REV. A 16
Page 21

Confirmation of completion of the reset.
6.4.2 Creating a New Partition
To create a new partition on Seagate X8 Accelerator device, click on Split vgc[a, b, c, ---] at the bottom of the device page.
This will create a new partition on device vgc[a, b, c, ---]. Split Partition allows you to change mode.
NOTE
500GB and 1100GB devices do not support split partition.
The following example shows how to create a new partition on the device vgca0.
Choose either Maximum Capacity or Maximum Performance mode.
SEAGATE X8 ACCELERATOR FOR WINDOWS USER GUIDE, REV. A 17
Page 22

Choose either Maximum Capacity or Maximum Performance
Choose Yes to proceed.
SEAGATE X8 ACCELERATOR FOR WINDOWS USER GUIDE, REV. A 18
Page 23

Confirmation of configuration complete
Once new partition is created, user can check the new partition in Physical Partitions tab. The following example below
shows new partition vgca1.
6.4.3 Modify Existing Partition
To modify existing partition on Seagate X8 Accelerator device, click on Modify vgc[a, b, c, ---][0-1] Physical Partition layout.
The only setting that can be modified on the partition is Mode. Mode can be changed to either Max Performance or Max
Capacity.
The following example shows modifying partition vgca0:
SEAGATE X8 ACCELERATOR FOR WINDOWS USER GUIDE, REV. A 19
Page 24

Choose the mode using the radio button.
Confirm by selecting Yes.
Modify configuration complete in progress.
Modify configuration is complete
Once the partition is modified, user can check the new settings of partition under Physical Partition tab.
SEAGATE X8 ACCELERATOR FOR WINDOWS USER GUIDE, REV. A 20
Page 25

7.0 Verifying Performance
Before beginning application deployment on the Seagate X8 Accelerator drive, it is useful to benchmark the raw
performance of the entire system to ensure proper setup.
X8 Accelerator has been designed from ground-up to deliver highest enterprise
NOTE
Download a sample test utility called TEST.EXE from the driver download section of Support Site. This application verifies
the driver installation, system configuration, and maximum read and write performance with a simple command line option.
NOTE
To run, open a command window (as a Local Administrator) and change to the directory containing the TEST.EXE file.
Execute “test X”, where X is replaced with the drive letter assigned to the Seagate X8 Accelerator drive. The test will create
a 4GB test file and exercise reads and writes to that file.
Should any performance or configuration problems be noted, please check the Troubleshooting and Performance
Optimization sections of this guide or contact Seagate Support.
class reliability with built-in RAID and end to end data protection. However,
when used in DAS use case, Seagate recommends the use of application level
replication or backup strategies to ensure high data availability.
Please be sure to install the driver, create a file system, and assign a drive letter
to the device before running.
SEAGATE X8 ACCELERATOR FOR WINDOWS USER GUIDE, REV. A 21
Page 26

SEAGATE X8 ACCELERATOR FOR WINDOWS USER GUIDE, REV. A 22
Page 27

8.0 Command Line Utilities
8.1 Partitioning and Configuring with vgc-config
Most Administrative tasks for the Seagate X8 Accelerator devices are handled by the “vgc-config” utility. This
utility can be used to show the current partitioning and write acceleration modes on an existing drive.
NOTE
Once configuration changes have been made with vgc-config, the configuration
needs to be committed to the device.
8.2 vgc-config Options
The usage information for vgc-config is listed below. While additional options are available within the utility, most
users will only need to select a number of partitions (“-n XX”) and a write performance profile (“-m YYY”) to set up
the Seagate X8 Accelerator devices for use.
NOTE
IMPORTANT: Changing the partitioning of the X8 Accelerator drive will erase
existing data.
SEAGATE X8 ACCELERATOR FOR WINDOWS USER GUIDE, REV. A 23
Page 28

8.2.1 vgc-config Drive Settings
NOTE
The entire drive is modified when "-d vgca" is specified, and the following
options may be used.
For more discussion and examples using the following options see the subsequent sections in this document.
Following example shows “Creating Partitions”.
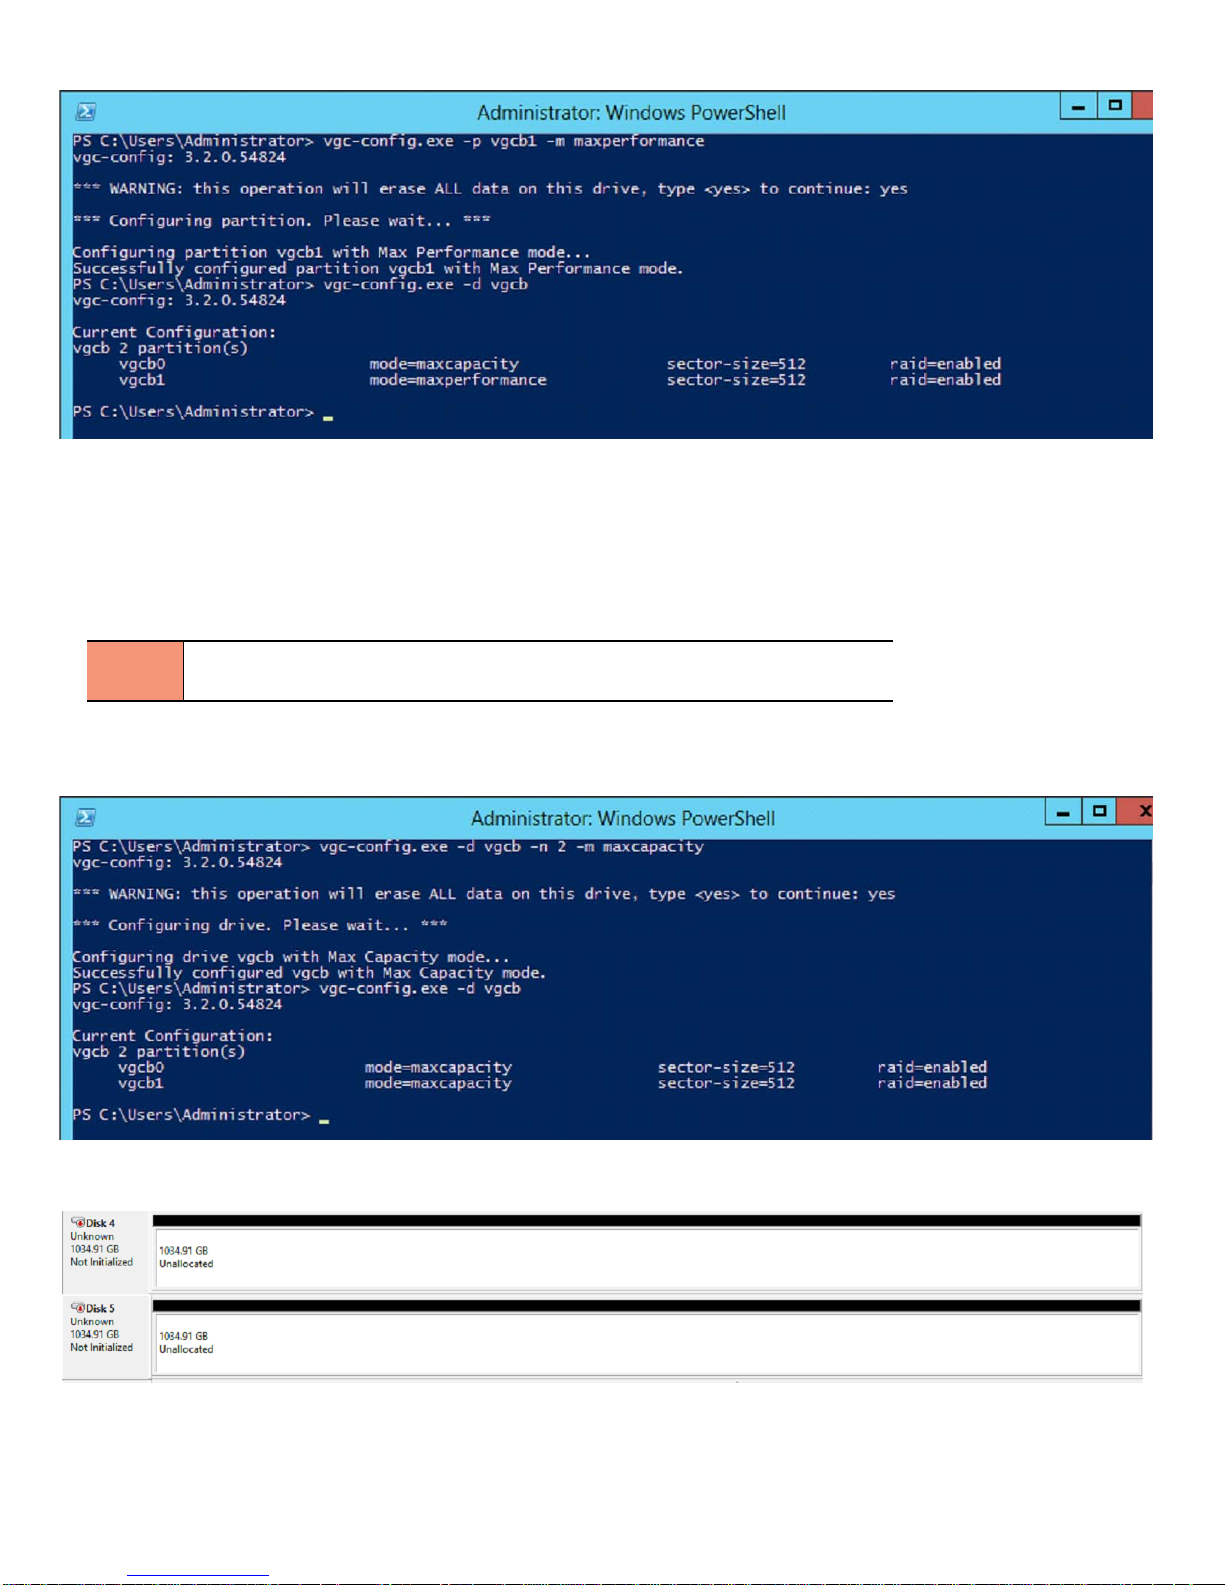
8.2.2 vgc-config Partition Settings
Individual partitions may be customized using “-p vgca[0|1]” to change write acceleration mode. Only the following options
may be specified in this mode:
Following example shows “Modifying Partition” info for Partition vgcb1
SEAGATE X8 ACCELERATOR FOR WINDOWS USER GUIDE, REV. A 24
Page 29
.
8.3 USABLE SPACE VS. WRITE PERFORMANCE TRADE-OFFS
To refine application performance, Seagate allows customizing the ratio of usable data to write acceleration area. By
increasing the amount set aside for writes in “maxperformance” mode, the Seagate X8 Accelerator drive is able to sustain an
even higher write workload at the cost of reduced usable capacity. Conversely, by decreasing the amount set aside for write
acceleration in “maxcapacity” mode it is possible to allow more user data to be stored on the device but with lower sustained
write performance..
NOTE
X8 Accelerator partitioning reduces the attainable performance for each
individual partition to one-half of the maximum drive performance.
8.4 CONFIGURING MULTIPLE PARTITIONS
The example below shows how you would use the vgc-config.exe utility to create partitions.
Once you create the partitions the Device Manager will automatically refresh itself to display the new partition information as
follows:
Note that once you create the partitions they are in the ‘Offline’ state, as depicted in the Disk Manager display above. You
can then use the Disk Manager to bring the disk online and to initialize it. Also, 500GB and 1100GB devices do not support
split partition. To set SAN policy you could use “SAN command in disk part”. If SAN policy of system set as “OnlineAll”, it will
automatically bring the volumes online. See the following screen shots for an example.
SEAGATE X8 ACCELERATOR FOR WINDOWS USER GUIDE, REV. A 25
Page 30

Right-Click and select ‘Online’:
After bringing disk Online, right-click and select ‘Initialize’:
Once you have executed these steps, the disk will be ready to use by any application.
8.5 VGC-MONITOR
The Seagate X8 Accelerator device driver records both performance data and device state. To access this information, use
the vgc-monitor utility.
To display more detailed information about a specific device, specify the device using the ‘-d’ parameter as follows:
The first section of the monitor output shows physical characteristics of the Seagate X8 Accelerator drive such as raw device
size, serial numbers, and overall device health.
SEAGATE X8 ACCELERATOR FOR WINDOWS USER GUIDE, REV. A 26
Page 31

Following this is per-partition information. Each partition has its own raw and usable capacity, operations count, garbage
collection impact, and expected lifetime prediction. As the state of the device changes, status is updated from “GOOD” to
“Action required”. This error code can be used by Seagate support to identify the issue and administer corrective actions
(such as replacement or reformatting).
8.6 vgc-secure-erase
The ‘secure erase’ feature ensures all user data is removed from flash media. The usage model is that if a device needs to
be returned to the factory for repair/replacement, or is being leveraged for a new project by the customer, all potentially
sensitive data needs to be securely removed prior to leaving the facility or redeployment for another project.
The standards call this process ‘sanitization’. The sanitization standards are different depending upon what type of media is
being used. For example, the standards for magnetic disk media are different than what is required for flash memory.
Seagate has a Secure Erase Utility that will perform this function for customers who need to securely erase data from a
device.
Data Sanitization Standards
There are different levels of Sanitization specified in the standards: Clear and Purge. In most cases, the Clear level of
Sanitization will suffice for most use cases, but in some cases Purge will be required. Both types of sanitization are
supported by the Seagate Secure Erase Utility.
The Seagate Secure Erase Utility complies with the Clear and Purge levels of Sanitization in accordance with the following
Government standards:
• DOD 5220.22-M – Complies with sanitization requirements for Flash EPROM
(http://www.dss.mil/documents/pressroom/isl_2007_01_oct_11_2007_final_agreement.pdf)
• NIST SP800-88 – Complies with instructions for Flash EPROM
(http://csrc.nist.gov/publications/drafts/800-88-rev1/sp800_88_r1_draft.pdf)
The specifications state the following requirements for the two levels of Sanitization:
• Clear (directly quoting from NIST and DOD publication): Perform a full chip purge as per manufacturer’s data sheets
• Purge (directly quoting from NIST and DOD publication): Overwrite all addressable locations with a single character,
followed by performing a full chip erase as per manufacturer’s data sheets.
Operation
The device needs to be in a minimally operative state in order to use the Secure Erase Utility. The Secure Erase Utility will
attempt to erase all user data from the device according to which ever method is chosen by the user (Clear or Purge). If it is
not successful due to the fact that some blocks that contain user data are no longer accessible due to media failure, error
messages will be produced. There are some cases where a block is not usable from the start and is marked bad when the
device is shipped from the factory, and therefore never receives any user data. These blocks cannot be ‘sanitized’ either, but
since they are guaranteed never to receive user data the tool can successfully sanitize a device when these blocks are
present.
SEAGATE X8 ACCELERATOR FOR WINDOWS USER GUIDE, REV. A 27
Page 32

Command syntax:
Example:
9.0 DYNAMIC THROTTLING
Dynamic throttling prevents unplanned or abrupt device shutdowns by lowering the IO performance of devices if power
consumption and/ or temperature of increases. Dynamic throttling is split into parts: thermal and power throttling.
9.1 THERMAL THROTTLING
Thermal throttling reduces IO performance of X8 Accelerator devices if temperature goes above the default threshold
(T[throttle], default: 78°C). If temperature continues to increase and reaches 83°C the device is brought down to the lowest
IO performance. If temperature reaches 85°C (T[offline]), the device completely shuts down. However, if device cools down
and stays below T[throttle], the IO performance increases and brought back to maximum level.
9.2 POWER THROTTLING
Power throttling reduces IO performance of X8 Accelerator devices if power consumption goes above the default threshold
of 24W. It comes in 2 modes: turbo and compliant mode. In turbo mode throttling is disabled while in compliant mode the
device is brought down to lower IO if power consumption exceeds threshold of 24W and stays above the threshold. When
power consumption stays below the threshold value, IO performance increases and brought back – if possible, up to the
maximum level.
NOTE
The throttling default settings: T[throttle], T[warning], T[offline], Turbo/
Compliant, Power Threshold, and IO Performance levels are done at factory.
SEAGATE X8 ACCELERATOR FOR WINDOWS USER GUIDE, REV. A 28
Page 33

vgc-monitor.exe -d vgca
You can also refer to X8 Accelerator Manager to verify the status of Temperature Throttling.
SEAGATE X8 ACCELERATOR FOR WINDOWS USER GUIDE, REV. A 29
Page 34

10.0 APPLICATION NOTES
10.1 DATA BLOCK SIZES AND ALIGNMENTS
The Seagate X8 Accelerator drive exposes 512 byte sectors, but is internally organized in 4K byte sectors (similar to the new
Advanced Format hard drives). This means data writes of blocks smaller than 4096 will involve read-modify-write cycles on
the flash and be correspondingly slower than access of native-block size and above. Reads will be impacted, but at a much
smaller performance penalty.
In addition to using data sizes of 4K bytes or larger, the data blocks themselves should be aligned at 4K boundaries for best
performance.
For most applications which use the NTFS file system, both of these prior
NOTE
10.2 IOMETER
Seagate recommends using the 2010 version of IOMeter. It is available from the standard IOMeter repository at
Sourceforge.net:
constraints are automatically met by the file system itself. By default Windows
2008 R2 generates partitions which are properly aligned i.e. on 4KB boundaries,
and NTFS uses 4K allocation units.
http://sourceforge.net/projects/iometer/files/iometer-devel/1.1.0-rc1/
Other versions of Iometer have limitations which don’t affect hard drive testing but do have a negative impact on the much
higher performing Seagate X8 Accelerator Drive.
SEAGATE X8 ACCELERATOR FOR WINDOWS USER GUIDE, REV. A 30
Page 35

Ensure the test data alignment is set to 4K bytes for tested Access Specifications. By default, accesses are sector (512b)
aligned and, as discussed previously, this can result in lower than expected performance. The required option is highlighted
below:
SEAGATE X8 ACCELERATOR FOR WINDOWS USER GUIDE, REV. A 31
Page 36

11.0 TROUBLESHOOTING
11.1 CANNOT FIND BLOCK DEVICE /dev/vgca0
Step 1. Ensure the device is detected on the PCIe bus.
# lspci -d 1a78:
82:00.0 FLASH memory: Virident Systems Inc. Virident FlashMAX Drive V2 (rev 01)
If the device is not listed, please power down the system and check whether the device is seated correctly in the PCIe slot. If
the device is seated correctly, but is still undetected by lspci, please try a different slot. If the device is still not detected after
changing the PCIe slot, please contact support.
Step 2. If the device is detected by lspci, check that correct driver and utils RPMs are installed.
# rpm -aq | grep vgc
vgc-utils-3.2-54323.C7.x86_64
kmod-vgc-redhat6.1+-3.2-54323.C7.x86_64
If the running kernel version is not compatible with X8 Accelerator driver that is installed, then the device driver will not load.
Step 3. Ensure the vgcd service is started.
# service vgcd status
INFO: kernel modules are loaded
If the kernel modules are not loaded, then manually start the service with "service vgcd start".
# service vgcd start
Loading kernel modules... [ OK ]
Rescanning SW RAID volumes... [ OK ]
Rescanning LVM volumes... [ OK ]
Enabling swap devices... [ OK ]
Rescanning mount points... [ OK ]
Step 4. If manually starting the service with "service vgcd start" fails, then please check syslog for "VGC" error messages.
# cat /var/log/messages | grep -i vgc
If you see one of these messages, please follow the solution listed below.
1) “Firmware Version Mismatch Found (GRTL) 45801 Expected 52879. The firmware for drive 'a',PCIe 0000:82:00.0 does
not match the installed driver. Please install vgc-firmware bundle from support site to upgrade the firmware.”
Solution: Update the firmware using instructions in Section 6 “Updating Controller Firmware”.
2) “vgcd: Not loading kernel modules because the previous load was unsuccessful. Check the system logs for details. To
force load, remove /var/lib/vgc/loading.lck”
Solution: Remove the “loading.lck” file and issue a “service vgcd start”. In case you are not sure how lck file is created,
please contact Seagate support.
3) “vgcd: FATAL: Module vgcdrive not found.”
Solution: Uninstall the rpms (driver and utilities) by running “rpm -aq | grep vgc | xargs rpm –ev”. And then re-install the rpms.
Please refer to section 5.2 “Installing drivers and utilities packages”.
Step 5. Check whether the device is healthy by running the following command:
# vgc-monitor -d vgc[a, b, c---]
If device status is "Critical" or "Warning", then check "Action Required" field in the output of vgc-monitor for instructions on
the next steps.
SEAGATE X8 ACCELERATOR FOR WINDOWS USER GUIDE, REV. A 32
Page 37

11.2 PERFORMANCE IS LOWER THAN EXPECTED
If the initial test script reports lower than expected performance, or your own application is seeing lower than expected IO
performance, verify that the device is installed in a PCIe slot which is x8 electrical. Certain motherboards provide x8 slots
which are physically the right size but only connect four PCIe lanes. Also, check BIOS settings to ensure that you have
setting for maximum performance selected. Your motherboard manual or the motherboard itself is the best reference for this.
Often the electrical connections are listed in white lettering next to the slot on motherboards.
Finally, file systems can have a large impact on performance. Review the Section 9, "Creating File Systems", for more
information on the recommended options for XFS and EXT3.
11.3 DRIVER CRASH ON SYSTEM BOOT
If this condition occurs when the driver attempts to load on system boot, run "chkconfig vgcd off" to ensure that the driver
does not load automatically on boot. When the system has been debugged and the issue fixed, to set the device to load
automatically on boot by running "chkconfig vgcd on".
11.4 IOS ARE NOT BEING PROCESSED BECAUSE THE DRIVER IS HUNG
If this condition occurs a message similar to the following will be logged:
kernel: INFO: task vgc_mtwa0:13866 blocked for more than 120 seconds.
If this condition is encountered, run vgc-diags to collect debugging information for Seagate support personnel and then reboot the system.
# vgc-diags
vgc-diags: 3.2.55402.C7
Creating vgc.diags.tar
Collecting diagnostic data...
Send the "vgc.diags.tar" file to Seagate support.
NOTE
For all other errors, please check the output of "vgc-monitor"
and follow the steps listed in "Action Required" to fix the problem.
12.0 ONBOARD DIAGNOSTIC LEDS
There are two onboard LEDS on the Seagate X8 Accelerator device. They are visible through the back bracket and always
indicate the state of the system. The following table explains what each combination of these LEDs indicates:
13.0 CONTACTING SUPPORT
• Email: Support.seagate.com
• Phone: 1-800-SEAGATE (1-800-732-4238)
• Website: http://www.seagate.com/internal-hard-drives/enterprise-hard-drives/ssd/x8-accelerator/
SEAGATE X8 ACCELERATOR FOR WINDOWS USER GUIDE, REV. A 33
Page 38

INDEX
A
Application Notes 30
B
Bracket Installation 5
C
Cannot Find Block Device /dev/vgca0 32
Command Line Utilities 23
Command syntax
28
Configuration and Management of the Device 10
Configuring Multiple Partitions 25
Contacting Support 33
Creating a Logical Drive 13
Creating a New Partition 17
D
Data Block Sizes and Alignments 30
Data Sanitization Standards 27
Details Displayed 11
Device Configuration 15
Double Board 5
Driver Crash on System Boot 33
Dynamic Throttling 28
R
Reset (to factory defaults) 15
S
Seagate X8 Accelerator Manager 10
Single Board 5
Software EULA 1
System BIOS Settings 6
System Requirements 4
T
Thermal Throttling 28
Troubleshooting 32
U
Usable Space vs. Write Performance Trade-offs 25
V
Verify the Device Driver is Loaded and Functioning 9
Verifying Performance 21
vgc-config Drive Settings 24
vgc-config Options 23
vgc-config Partition Settings 24
vgc-monitor 26
vgc-secure-erase 27
F
Fan Speed Settings in BIOS 6
H
Hardware Installation 5
I
Install Device Driver 7
Install Software 7
Introduction 4
IOMeter 30
IOs are not Being Processed because the Driver is Hung 33
M
Modify Existing Partition 19
O
Onboard Diagnostic LEDs 33
Operation 27
P
Partitioning and Configuring with vgc-config 23
PCI Slot Selection 5
Performance is Lower than Expected 33
Power Throttling 28
Processor Settings in BIOS 6
W
Windows Power Modes for Performance 9
X
X8 Accelerator Device Details 12
SEAGATE X8 ACCELERATOR FOR WINDOWS USER GUIDE, REV. A 34
Page 39

Seagate Technology LLC
AMERICAS Seagate Technology LLC 10200 South De Anza Boulevard, Cupertino, California 95014, United States, 408-658-1000
ASIA/PACIFIC Seagate Singapore International Headquarters Pte. Ltd. 7000 Ang Mo Kio Avenue 5, Singapore 569877, 65-6485-3888
EUROPE, MIDDLE EAST AND AFRICA Seagate Technology SAS 16-18 rue du Dôme, 92100 Boulogne-Billancourt, France, 33 1-4186 10 00
Publication Number: 100728273, Rev. A
June 2013
 Loading...