

Page 1

Toolkit User Manual
Click here to access an up-to-date online version
of this document. You will also fin d the most recent content as well as expandable illustrations, easier
navigation, and search capability.
Model:
Page 2

. . . . . . . . . . . . . . . . . . . . . . . . . . . . . . . . . . . . . . . . . . . . . . . . . . . . . . . . . . . . . . . . . . . . . . . . . . . . . . . . . . . . . . . . . . . . . . . . . . . . . . . . . . . . . . . . . . . . . . . . . . . . . . . . . . . . . . . . . . . . . . . . . . . . . . . . . . . . . . . . . . . . . . . . . . . . . . . . . . . . . . . . . . . . . . . . . . . . . . . . . . . . . . . . . . . . . . . . . . . . . . . . . . . . . . . . . . . . . . . . . . . . . . . . . . . . . . . . . . . . . . . . . . . . . . . . . . . . . . . .
. . . . . . . . . . . . . . . . . . . . . . . . . . . . . . . . . . . . . . . . . . . . . . . . . . . . . . . . . . . . . . . . . . . . . . . . . . . . . . . . . . . . . . . . . . . . . . . . . . . . . . . . . . . . . . . . . . . . . . . . . . . . . . . . . . . . . . . . . . . . . . . . . . . . . . . . . . . . . . . . . . . . . . . . . . . . . . . . . . . . . . . . . . . . . . . . . . . . . . . . . . . . . . . . . . . . . . . . . . . . . . . . . . . . . . . . . . . . . . . . . . . . . . . . . . . . . . . . . . . . . . . . . . . . . . . . . . . . . . . .
. . . . . . . . . . . . . . . . . . . . . . . . . . . . . . . . . . . . . . . . . . . . . . . . . . . . . . . . . . . . . . . . . . . . . . . . . . . . . . . . . . . . . . . . . . . . . . . . . . . . . . . . . . . . . . . . . . . . . . . . . . . . . . . . . . . . . . . . . . . . . . . . . . . . . . . . . . . . . . . . . . . . . . . . . . . . . . . . . . . . . . . . . . . . . . . . . . . . . . . . . . . . . . . . . . . . . . . . . . . . . . . . . . . . . . . . . . . . . . . . . . . . . . . . . . . . . . . . . . . . . . . . . . . . . . . . . . . . . . . .
. . . . . . . . . . . . . . . . . . . . . . . . . . . . . . . . . . . . . . . . . . . . . . . . . . . . . . . . . . . . . . . . . . . . . . . . . . . . . . . . . . . . . . . . . . . . . . . . . . . . . . . . . . . . . . . . . . . . . . . . . . . . . . . . . . . . . . . . . . . . . . . . . . . . . . . . . . . . . . . . . . . . . . . . . . . . . . . . . . . . . . . . . . . . . . . . . . . . . . . . . . . . . . . . . . . . . . . . . . . . . . . . . . . . . . . . . . . . . . . . . . . . . . . . . . . . . . . . . . . . . . . . . . . . . . . . . . . . . . . .
. . . . . . . . . . . . . . . . . . . . . . . . . . . . . . . . . . . . . . . . . . . . . . . . . . . . . . . . . . . . . . . . . . . . . . . . . . . . . . . . . . . . . . . . . . . . . . . . . . . . . . . . . . . . . . . . . . . . . . . . . . . . . . . . . . . . . . . . . . . . . . . . . . . . . . . . . . . . . . . . . . . . . . . . . . . . . . . . . . . . . . . . . . . . . . . . . . . . . . . . . . . . . . . . . . . . . . . . . . . . . . . . . . . . . . . . . . . . . . . . . . . . . . . . . . . . . . . . . . . . . . . . . . . . . . . . . . . . . . . .
. . . . . . . . . . . . . . . . . . . . . . . . . . . . . . . . . . . . . . . . . . . . . . . . . . . . . . . . . . . . . . . . . . . . . . . . . . . . . . . . . . . . . . . . . . . . . . . . . . . . . . . . . . . . . . . . . . . . . . . . . . . . . . . . . . . . . . . . . . . . . . . . . . . . . . . . . . . . . . . . . . . . . . . . . . . . . . . . . . . . . . . . . . . . . . . . . . . . . . . . . . . . . . . . . . . . . . . . . . . . . . . . . . . . . . . . . . . . . . . . . . . . . . . . . . . . . . . . . . . . . . . . . . . . . . . . . . . . . . . .
. . . . . . . . . . . . . . . . . . . . . . . . . . . . . . . . . . . . . . . . . . . . . . . . . . . . . . . . . . . . . . . . . . . . . . . . . . . . . . . . . . . . . . . . . . . . . . . . . . . . . . . . . . . . . . . . . . . . . . . . . . . . . . . . . . . . . . . . . . . . . . . . . . . . . . . . . . . . . . . . . . . . . . . . . . . . . . . . . . . . . . . . . . . . . . . . . . . . . . . . . . . . . . . . . . . . . . . . . . . . . . . . . . . . . . . . . . . . . . . . . . . . . . . . . . . . . . . . . . . . . . . . . . . . . . . . . . . . . . . .
. . . . . . . . . . . . . . . . . . . . . . . . . . . . . . . . . . . . . . . . . . . . . . . . . . . . . . . . . . . . . . . . . . . . . . . . . . . . . . . . . . . . . . . . . . . . . . . . . . . . . . . . . . . . . . . . . . . . . . . . . . . . . . . . . . . . . . . . . . . . . . . . . . . . . . . . . . . . . . . . . . . . . . . . . . . . . . . . . . . . . . . . . . . . . . . . . . . . . . . . . . . . . . . . . . . . . . . . . . . . . . . . . . . . . . . . . . . . . . . . . . . . . . . . . . . . . . . . . . . . . . . . . . . . . . . . . . . . . . . .
. . . . . . . . . . . . . . . . . . . . . . . . . . . . . . . . . . . . . . . . . . . . . . . . . . . . . . . . . . . . . . . . . . . . . . . . . . . . . . . . . . . . . . . . . . . . . . . . . . . . . . . . . . . . . . . . . . . . . . . . . . . . . . . . . . . . . . . . . . . . . . . . . . . . . . . . . . . . . . . . . . . . . . . . . . . . . . . . . . . . . . . . . . . . . . . . . . . . . . . . . . . . . . . . . . . . . . . . . . . . . . . . . . . . . . . . . . . . . . . . . . . . . . . . . . . . . . . . . . . . . . . . . . . . . . . . . . . . . . . .
. . . . . . . . . . . . . . . . . . . . . . . . . . . . . . . . . . . . . . . . . . . . . . . . . . . . . . . . . . . . . . . . . . . . . . . . . . . . . . . . . . . . . . . . . . . . . . . . . . . . . . . . . . . . . . . . . . . . . . . . . . . . . . . . . . . . . . . . . . . . . . . . . . . . . . . . . . . . . . . . . . . . . . . . . . . . . . . . . . . . . . . . . . . . . . . . . . . . . . . . . . . . . . . . . . . . . . . . . . . . . . . . . . . . . . . . . . . . . . . . . . . . . . . . . . . . . . . . . . . . . . . . . . . . . . . . . . . . . . . .
. . . . . . . . . . . . . . . . . . . . . . . . . . . . . . . . . . . . . . . . . . . . . . . . . . . . . . . . . . . . . . . . . . . . . . . . . . . . . . . . . . . . . . . . . . . . . . . . . . . . . . . . . . . . . . . . . . . . . . . . . . . . . . . . . . . . . . . . . . . . . . . . . . . . . . . . . . . . . . . . . . . . . . . . . . . . . . . . . . . . . . . . . . . . . . . . . . . . . . . . . . . . . . . . . . . . . . . . . . . . . . . . . . . . . . . . . . . . . . . . . . . . . . . . . . . . . . . . . . . . . . . . . . . . . . . . . . . . . . . .
. . . . . . . . . . . . . . . . . . . . . . . . . . . . . . . . . . . . . . . . . . . . . . . . . . . . . . . . . . . . . . . . . . . . . . . . . . . . . . . . . . . . . . . . . . . . . . . . . . . . . . . . . . . . . . . . . . . . . . . . . . . . . . . . . . . . . . . . . . . . . . . . . . . . . . . . . . . . . . . . . . . . . . . . . . . . . . . . . . . . . . . . . . . . . . . . . . . . . . . . . . . . . . . . . . . . . . . . . . . . . . . . . . . . . . . . . . . . . . . . . . . . . . . . . . . . . . . . . . . . . . . . . . . . . . . . . . . . . . . .
. . . . . . . . . . . . . . . . . . . . . . . . . . . . . . . . . . . . . . . . . . . . . . . . . . . . . . . . . . . . . . . . . . . . . . . . . . . . . . . . . . . . . . . . . . . . . . . . . . . . . . . . . . . . . . . . . . . . . . . . . . . . . . . . . . . . . . . . . . . . . . . . . . . . . . . . . . . . . . . . . . . . . . . . . . . . . . . . . . . . . . . . . . . . . . . . . . . . . . . . . . . . . . . . . . . . . . . . . . . . . . . . . . . . . . . . . . . . . . . . . . . . . . . . . . . . . . . . . . . . . . . . . . . . . . . . . . . . . . . .
. . . . . . . . . . . . . . . . . . . . . . . . . . . . . . . . . . . . . . . . . . . . . . . . . . . . . . . . . . . . . . . . . . . . . . . . . . . . . . . . . . . . . . . . . . . . . . . . . . . . . . . . . . . . . . . . . . . . . . . . . . . . . . . . . . . . . . . . . . . . . . . . . . . . . . . . . . . . . . . . . . . . . . . . . . . . . . . . . . . . . . . . . . . . . . . . . . . . . . . . . . . . . . . . . . . . . . . . . . . . . . . . . . . . . . . . . . . . . . . . . . . . . . . . . . . . . . . . . . . . . . . . . . . . . . . . . . . . . . . .
. . . . . . . . . . . . . . . . . . . . . . . . . . . . . . . . . . . . . . . . . . . . . . . . . . . . . . . . . . . . . . . . . . . . . . . . . . . . . . . . . . . . . . . . . . . . . . . . . . . . . . . . . . . . . . . . . . . . . . . . . . . . . . . . . . . . . . . . . . . . . . . . . . . . . . . . . . . . . . . . . . . . . . . . . . . . . . . . . . . . . . . . . . . . . . . . . . . . . . . . . . . . . . . . . . . . . . . . . . . . . . . . . . . . . . . . . . . . . . . . . . . . . . . . . . . . . . . . . . . . . . . . . . . . . . . . . . . . . . . .
. . . . . . . . . . . . . . . . . . . . . . . . . . . . . . . . . . . . . . . . . . . . . . . . . . . . . . . . . . . . . . . . . . . . . . . . . . . . . . . . . . . . . . . . . . . . . . . . . . . . . . . . . . . . . . . . . . . . . . . . . . . . . . . . . . . . . . . . . . . . . . . . . . . . . . . . . . . . . . . . . . . . . . . . . . . . . . . . . . . . . . . . . . . . . . . . . . . . . . . . . . . . . . . . . . . . . . . . . . . . . . . . . . . . . . . . . . . . . . . . . . . . . . . . . . . . . . . . . . . . . . . . . . . . . . . . . . . . . . . .
. . . . . . . . . . . . . . . . . . . . . . . . . . . . . . . . . . . . . . . . . . . . . . . . . . . . . . . . . . . . . . . . . . . . . . . . . . . . . . . . . . . . . . . . . . . . . . . . . . . . . . . . . . . . . . . . . . . . . . . . . . . . . . . . . . . . . . . . . . . . . . . . . . . . . . . . . . . . . . . . . . . . . . . . . . . . . . . . . . . . . . . . . . . . . . . . . . . . . . . . . . . . . . . . . . . . . . . . . . . . . . . . . . . . . . . . . . . . . . . . . . . . . . . . . . . . . . . . . . . . . . . . . . . . . . . . . . . . . . . .
. . . . . . . . . . . . . . . . . . . . . . . . . . . . . . . . . . . . . . . . . . . . . . . . . . . . . . . . . . . . . . . . . . . . . . . . . . . . . . . . . . . . . . . . . . . . . . . . . . . . . . . . . . . . . . . . . . . . . . . . . . . . . . . . . . . . . . . . . . . . . . . . . . . . . . . . . . . . . . . . . . . . . . . . . . . . . . . . . . . . . . . . . . . . . . . . . . . . . . . . . . . . . . . . . . . . . . . . . . . . . . . . . . . . . . . . . . . . . . . . . . . . . . . . . . . . . . . . . . . . . . . . . . . . . . . . . . . . . . . .
. . . . . . . . . . . . . . . . . . . . . . . . . . . . . . . . . . . . . . . . . . . . . . . . . . . . . . . . . . . . . . . . . . . . . . . . . . . . . . . . . . . . . . . . . . . . . . . . . . . . . . . . . . . . . . . . . . . . . . . . . . . . . . . . . . . . . . . . . . . . . . . . . . . . . . . . . . . . . . . . . . . . . . . . . . . . . . . . . . . . . . . . . . . . . . . . . . . . . . . . . . . . . . . . . . . . . . . . . . . . . . . . . . . . . . . . . . . . . . . . . . . . . . . . . . . . . . . . . . . . . . . . . . . . . . . . . . . . . . . .
. . . . . . . . . . . . . . . . . . . . . . . . . . . . . . . . . . . . . . . . . . . . . . . . . . . . . . . . . . . . . . . . . . . . . . . . . . . . . . . . . . . . . . . . . . . . . . . . . . . . . . . . . . . . . . . . . . . . . . . . . . . . . . . . . . . . . . . . . . . . . . . . . . . . . . . . . . . . . . . . . . . . . . . . . . . . . . . . . . . . . . . . . . . . . . . . . . . . . . . . . . . . . . . . . . . . . . . . . . . . . . . . . . . . . . . . . . . . . . . . . . . . . . . . . . . . . . . . . . . . . . . . . . . . . . . . . . . . . . . .
. . . . . . . . . . . . . . . . . . . . . . . . . . . . . . . . . . . . . . . . . . . . . . . . . . . . . . . . . . . . . . . . . . . . . . . . . . . . . . . . . . . . . . . . . . . . . . . . . . . . . . . . . . . . . . . . . . . . . . . . . . . . . . . . . . . . . . . . . . . . . . . . . . . . . . . . . . . . . . . . . . . . . . . . . . . . . . . . . . . . . . . . . . . . . . . . . . . . . . . . . . . . . . . . . . . . . . . . . . . . . . . . . . . . . . . . . . . . . . . . . . . . . . . . . . . . . . . . . . . . . . . . . . . . . . . . . . . . . . . .
. . . . . . . . . . . . . . . . . . . . . . . . . . . . . . . . . . . . . . . . . . . . . . . . . . . . . . . . . . . . . . . . . . . . . . . . . . . . . . . . . . . . . . . . . . . . . . . . . . . . . . . . . . . . . . . . . . . . . . . . . . . . . . . . . . . . . . . . . . . . . . . . . . . . . . . . . . . . . . . . . . . . . . . . . . . . . . . . . . . . . . . . . . . . . . . . . . . . . . . . . . . . . . . . . . . . . . . . . . . . . . . . . . . . . . . . . . . . . . . . . . . . . . . . . . . . . . . . . . . . . . . . . . . . . . . . . . . . . . . .
. . . . . . . . . . . . . . . . . . . . . . . . . . . . . . . . . . . . . . . . . . . . . . . . . . . . . . . . . . . . . . . . . . . . . . . . . . . . . . . . . . . . . . . . . . . . . . . . . . . . . . . . . . . . . . . . . . . . . . . . . . . . . . . . . . . . . . . . . . . . . . . . . . . . . . . . . . . . . . . . . . . . . . . . . . . . . . . . . . . . . . . . . . . . . . . . . . . . . . . . . . . . . . . . . . . . . . . . . . . . . . . . . . . . . . . . . . . . . . . . . . . . . . . . . . . . . . . . . . . . . . . . . . . . . . . . . . . . . . . .
. . . . . . . . . . . . . . . . . . . . . . . . . . . . . . . . . . . . . . . . . . . . . . . . . . . . . . . . . . . . . . . . . . . . . . . . . . . . . . . . . . . . . . . . . . . . . . . . . . . . . . . . . . . . . . . . . . . . . . . . . . . . . . . . . . . . . . . . . . . . . . . . . . . . . . . . . . . . . . . . . . . . . . . . . . . . . . . . . . . . . . . . . . . . . . . . . . . . . . . . . . . . . . . . . . . . . . . . . . . . . . . . . . . . . . . . . . . . . . . . . . . . . . . . . . . . . . . . . . . . . . . . . . . . . . . . . . . . . . . .
. . . . . . . . . . . . . . . . . . . . . . . . . . . . . . . . . . . . . . . . . . . . . . . . . . . . . . . . . . . . . . . . . . . . . . . . . . . . . . . . . . . . . . . . . . . . . . . . . . . . . . . . . . . . . . . . . . . . . . . . . . . . . . . . . . . . . . . . . . . . . . . . . . . . . . . . . . . . . . . . . . . . . . . . . . . . . . . . . . . . . . . . . . . . . . . . . . . . . . . . . . . . . . . . . . . . . . . . . . . . . . . . . . . . . . . . . . . . . . . . . . . . . . . . . . . . . . . . . . . . . . . . . . . . . . . . . . . . . . . .
. . . . . . . . . . . . . . . . . . . . . . . . . . . . . . . . . . . . . . . . . . . . . . . . . . . . . . . . . . . . . . . . . . . . . . . . . . . . . . . . . . . . . . . . . . . . . . . . . . . . . . . . . . . . . . . . . . . . . . . . . . . . . . . . . . . . . . . . . . . . . . . . . . . . . . . . . . . . . . . . . . . . . . . . . . . . . . . . . . . . . . . . . . . . . . . . . . . . . . . . . . . . . . . . . . . . . . . . . . . . . . . . . . . . . . . . . . . . . . . . . . . . . . . . . . . . . . . . . . . . . . . . . . . . . . . . . . . . . . . .
. . . . . . . . . . . . . . . . . . . . . . . . . . . . . . . . . . . . . . . . . . . . . . . . . . . . . . . . . . . . . . . . . . . . . . . . . . . . . . . . . . . . . . . . . . . . . . . . . . . . . . . . . . . . . . . . . . . . . . . . . . . . . . . . . . . . . . . . . . . . . . . . . . . . . . . . . . . . . . . . . . . . . . . . . . . . . . . . . . . . . . . . . . . . . . . . . . . . . . . . . . . . . . . . . . . . . . . . . . . . . . . . . . . . . . . . . . . . . . . . . . . . . . . . . . . . . . . . . . . . . . . . . . . . . . . . . . . . . . . .
. . . . . . . . . . . . . . . . . . . . . . . . . . . . . . . . . . . . . . . . . . . . . . . . . . . . . . . . . . . . . . . . . . . . . . . . . . . . . . . . . . . . . . . . . . . . . . . . . . . . . . . . . . . . . . . . . . . . . . . . . . . . . . . . . . . . . . . . . . . . . . . . . . . . . . . . . . . . . . . . . . . . . . . . . . . . . . . . . . . . . . . . . . . . . . . . . . . . . . . . . . . . . . . . . . . . . . . . . . . . . . . . . . . . . . . . . . . . . . . . . . . . . . . . . . . . . . . . . . . . . . . . . . . . . . . . . . . . . . . .
. . . . . . . . . . . . . . . . . . . . . . . . . . . . . . . . . . . . . . . . . . . . . . . . . . . . . . . . . . . . . . . . . . . . . . . . . . . . . . . . . . . . . . . . . . . . . . . . . . . . . . . . . . . . . . . . . . . . . . . . . . . . . . . . . . . . . . . . . . . . . . . . . . . . . . . . . . . . . . . . . . . . . . . . . . . . . . . . . . . . . . . . . . . . . . . . . . . . . . . . . . . . . . . . . . . . . . . . . . . . . . . . . . . . . . . . . . . . . . . . . . . . . . . . . . . . . . . . . . . . . . . . . . . . . . . . . . . . . . . .
. . . . . . . . . . . . . . . . . . . . . . . . . . . . . . . . . . . . . . . . . . . . . . . . . . . . . . . . . . . . . . . . . . . . . . . . . . . . . . . . . . . . . . . . . . . . . . . . . . . . . . . . . . . . . . . . . . . . . . . . . . . . . . . . . . . . . . . . . . . . . . . . . . . . . . . . . . . . . . . . . . . . . . . . . . . . . . . . . . . . . . . . . . . . . . . . . . . . . . . . . . . . . . . . . . . . . . . . . . . . . . . . . . . . . . . . . . . . . . . . . . . . . . . . . . . . . . . . . . . . . . . . . . . . . . . . . . . . . . . .
Cont entsCont ents
1 Getting Started with Toolkit
System requirements
Download and install Toolkit
Open Toolkit
Main m enu
2 Mirror Activity
Create a mirror plan
Pause/resum e a mirror plan
Edit a mirror plan
Delete a mirror plan
View report
3 Backup Activity (Windows Only)
File types and procedure
Set up a quick backup
Create a custom backup plan
Edit a backup plan
Define your backup plan
Pause/resum e a backup plan
Delete a backup plan
Restore files
View report
4 Sync Plus Activity
Set up a quick sync
Create a custom Sync Plus plan
Pause/resum e a Sync Plus plan
View synced folders and archive
Edit a Sync Plus plan
Delete a Sync Plus plan
Restore files
Files and folders excluded from syncing
. . . . . . . . . . . . . . . . . . . . . . . . . . . . . . . . . . . . . . . . . . . . . . . . . . . . . . . . . . . . . . . . . . . . . . . . . . . . . . . . . . . . . . . . . . . . . . . . . . . . . . . . . . . . . . . . . . . . . . . . . . . . . . . . . . . . . . . . . . . . . . . . . . . . . . . . . . . . . . . . . . . . . . . . . . . . . . . . . . . . . . . . . . . . . . . . . . . . . . . . . . . . . . . . . . . . . . . . . . . . . . . . . . . . . . . . . . . . . . . . . . . . . . . . . . . . . . . . . . . . . . . . . . . . . . . . . . . . . . . .Quick s etup
. . . . . . . . . . . . . . . . . . . . . . . . . . . . . . . . . . . . . . . . . . . . . . . . . . . . . . . . . . . . . . . . . . . . . . . . . . . . . . . . . . . . . . . . . . . . . . . . . . . . . . . . . . . . . . . . . . . . . . . . . . . . . . . . . . . . . . . . . . . . . . . . . . . . . . . . . . . . . . . . . . . . . . . . . . . . . . . . . . . . . . . . . . . . . . . . . . . . . . . . . . . . . . . . . . . . . . . . . . . . . . . . . . . . . . . . . . . . . . . . . . . . . . . . . . . . . . . . . . . . . . . . . . . . . . . . . . . . . . . .Custom setup
. . . . . . . . . . . . . . . . . . . . . . . . . . . . . . . . . . . . . . . . . . . . . . . . . . . . . . . . . . . . . . . . . . . . . . . . . . . . . . . . . . . . . . . . . . . . . . . . . . . . . . . . . . . . . . . . . . . . . . . . . . . . . . . . . . . . . . . . . . . . . . . . . . . . . . . . . . . . . . . . . . . . . . . . . . . . . . . . . . . . . . . . . . . . . . . . . . . . . . . . . . . . . . . . . . . . . . . . . . . . . . . . . . . . . . . . . . . . . . . . . . . . . . . . . . . . . . . . . . . . . . . . . . . . . . . . . . . . . . . .Adding files to mirr o r folde rs
. . . . . . . . . . . . . . . . . . . . . . . . . . . . . . . . . . . . . . . . . . . . . . . . . . . . . . . . . . . . . . . . . . . . . . . . . . . . . . . . . . . . . . . . . . . . . . . . . . . . . . . . . . . . . . . . . . . . . . . . . . . . . . . . . . . . . . . . . . . . . . . . . . . . . . . . . . . . . . . . . . . . . . . . . . . . . . . . . . . . . . . . . . . . . . . . . . . . . . . . . . . . . . . . . . . . . . . . . . . . . . . . . . . . . . . . . . . . . . . . . . . . . . . . . . . . . . . . . . . . . . . . . . . . . . . . . . . . . . . .Step 1: Select content
. . . . . . . . . . . . . . . . . . . . . . . . . . . . . . . . . . . . . . . . . . . . . . . . . . . . . . . . . . . . . . . . . . . . . . . . . . . . . . . . . . . . . . . . . . . . . . . . . . . . . . . . . . . . . . . . . . . . . . . . . . . . . . . . . . . . . . . . . . . . . . . . . . . . . . . . . . . . . . . . . . . . . . . . . . . . . . . . . . . . . . . . . . . . . . . . . . . . . . . . . . . . . . . . . . . . . . . . . . . . . . . . . . . . . . . . . . . . . . . . . . . . . . . . . . . . . . . . . . . . . . . . . . . . . . . . . . . . . . . .Bas ic
. . . . . . . . . . . . . . . . . . . . . . . . . . . . . . . . . . . . . . . . . . . . . . . . . . . . . . . . . . . . . . . . . . . . . . . . . . . . . . . . . . . . . . . . . . . . . . . . . . . . . . . . . . . . . . . . . . . . . . . . . . . . . . . . . . . . . . . . . . . . . . . . . . . . . . . . . . . . . . . . . . . . . . . . . . . . . . . . . . . . . . . . . . . . . . . . . . . . . . . . . . . . . . . . . . . . . . . . . . . . . . . . . . . . . . . . . . . . . . . . . . . . . . . . . . . . . . . . . . . . . . . . . . . . . . . . . . . . . . . .Advanced
. . . . . . . . . . . . . . . . . . . . . . . . . . . . . . . . . . . . . . . . . . . . . . . . . . . . . . . . . . . . . . . . . . . . . . . . . . . . . . . . . . . . . . . . . . . . . . . . . . . . . . . . . . . . . . . . . . . . . . . . . . . . . . . . . . . . . . . . . . . . . . . . . . . . . . . . . . . . . . . . . . . . . . . . . . . . . . . . . . . . . . . . . . . . . . . . . . . . . . . . . . . . . . . . . . . . . . . . . . . . . . . . . . . . . . . . . . . . . . . . . . . . . . . . . . . . . . . . . . . . . . . . . . . . . . . . . . . . . . . .Step 2: Select the des tination drive
. . . . . . . . . . . . . . . . . . . . . . . . . . . . . . . . . . . . . . . . . . . . . . . . . . . . . . . . . . . . . . . . . . . . . . . . . . . . . . . . . . . . . . . . . . . . . . . . . . . . . . . . . . . . . . . . . . . . . . . . . . . . . . . . . . . . . . . . . . . . . . . . . . . . . . . . . . . . . . . . . . . . . . . . . . . . . . . . . . . . . . . . . . . . . . . . . . . . . . . . . . . . . . . . . . . . . . . . . . . . . . . . . . . . . . . . . . . . . . . . . . . . . . . . . . . . . . . . . . . . . . . . . . . . . . . . . . . . . . . .Step 3: Sche dule backups
5
6
6
8
8
10
10
10
10
11
11
11
11
12
13
13
13
13
14
14
14
14
14
15
15
15
16
16
16
18
18
19
20
20
20
20
20
21
Page 3

. . . . . . . . . . . . . . . . . . . . . . . . . . . . . . . . . . . . . . . . . . . . . . . . . . . . . . . . . . . . . . . . . . . . . . . . . . . . . . . . . . . . . . . . . . . . . . . . . . . . . . . . . . . . . . . . . . . . . . . . . . . . . . . . . . . . . . . . . . . . . . . . . . . . . . . . . . . . . . . . . . . . . . . . . . . . . . . . . . . . . . . . . . . . . . . . . . . . . . . . . . . . . . . . . . . . . . . . . . . . . . . . . . . . . . . . . . . . . . . . . . . . . . . . . . . . . . . . . . . . . . . . . . . . . . . . . . . . . . . .
. . . . . . . . . . . . . . . . . . . . . . . . . . . . . . . . . . . . . . . . . . . . . . . . . . . . . . . . . . . . . . . . . . . . . . . . . . . . . . . . . . . . . . . . . . . . . . . . . . . . . . . . . . . . . . . . . . . . . . . . . . . . . . . . . . . . . . . . . . . . . . . . . . . . . . . . . . . . . . . . . . . . . . . . . . . . . . . . . . . . . . . . . . . . . . . . . . . . . . . . . . . . . . . . . . . . . . . . . . . . . . . . . . . . . . . . . . . . . . . . . . . . . . . . . . . . . . . . . . . . . . . . . . . . . . . . . . . . . . . .
. . . . . . . . . . . . . . . . . . . . . . . . . . . . . . . . . . . . . . . . . . . . . . . . . . . . . . . . . . . . . . . . . . . . . . . . . . . . . . . . . . . . . . . . . . . . . . . . . . . . . . . . . . . . . . . . . . . . . . . . . . . . . . . . . . . . . . . . . . . . . . . . . . . . . . . . . . . . . . . . . . . . . . . . . . . . . . . . . . . . . . . . . . . . . . . . . . . . . . . . . . . . . . . . . . . . . . . . . . . . . . . . . . . . . . . . . . . . . . . . . . . . . . . . . . . . . . . . . . . . . . . . . . . . . . . . . . . . . . . .
. . . . . . . . . . . . . . . . . . . . . . . . . . . . . . . . . . . . . . . . . . . . . . . . . . . . . . . . . . . . . . . . . . . . . . . . . . . . . . . . . . . . . . . . . . . . . . . . . . . . . . . . . . . . . . . . . . . . . . . . . . . . . . . . . . . . . . . . . . . . . . . . . . . . . . . . . . . . . . . . . . . . . . . . . . . . . . . . . . . . . . . . . . . . . . . . . . . . . . . . . . . . . . . . . . . . . . . . . . . . . . . . . . . . . . . . . . . . . . . . . . . . . . . . . . . . . . . . . . . . . . . . . . . . . . . . . . . . . . . .
. . . . . . . . . . . . . . . . . . . . . . . . . . . . . . . . . . . . . . . . . . . . . . . . . . . . . . . . . . . . . . . . . . . . . . . . . . . . . . . . . . . . . . . . . . . . . . . . . . . . . . . . . . . . . . . . . . . . . . . . . . . . . . . . . . . . . . . . . . . . . . . . . . . . . . . . . . . . . . . . . . . . . . . . . . . . . . . . . . . . . . . . . . . . . . . . . . . . . . . . . . . . . . . . . . . . . . . . . . . . . . . . . . . . . . . . . . . . . . . . . . . . . . . . . . . . . . . . . . . . . . . . . . . . . . . . . . . . . . . .
. . . . . . . . . . . . . . . . . . . . . . . . . . . . . . . . . . . . . . . . . . . . . . . . . . . . . . . . . . . . . . . . . . . . . . . . . . . . . . . . . . . . . . . . . . . . . . . . . . . . . . . . . . . . . . . . . . . . . . . . . . . . . . . . . . . . . . . . . . . . . . . . . . . . . . . . . . . . . . . . . . . . . . . . . . . . . . . . . . . . . . . . . . . . . . . . . . . . . . . . . . . . . . . . . . . . . . . . . . . . . . . . . . . . . . . . . . . . . . . . . . . . . . . . . . . . . . . . . . . . . . . . . . . . . . . . . . . . . . . .
. . . . . . . . . . . . . . . . . . . . . . . . . . . . . . . . . . . . . . . . . . . . . . . . . . . . . . . . . . . . . . . . . . . . . . . . . . . . . . . . . . . . . . . . . . . . . . . . . . . . . . . . . . . . . . . . . . . . . . . . . . . . . . . . . . . . . . . . . . . . . . . . . . . . . . . . . . . . . . . . . . . . . . . . . . . . . . . . . . . . . . . . . . . . . . . . . . . . . . . . . . . . . . . . . . . . . . . . . . . . . . . . . . . . . . . . . . . . . . . . . . . . . . . . . . . . . . . . . . . . . . . . . . . . . . . . . . . . . . . .
. . . . . . . . . . . . . . . . . . . . . . . . . . . . . . . . . . . . . . . . . . . . . . . . . . . . . . . . . . . . . . . . . . . . . . . . . . . . . . . . . . . . . . . . . . . . . . . . . . . . . . . . . . . . . . . . . . . . . . . . . . . . . . . . . . . . . . . . . . . . . . . . . . . . . . . . . . . . . . . . . . . . . . . . . . . . . . . . . . . . . . . . . . . . . . . . . . . . . . . . . . . . . . . . . . . . . . . . . . . . . . . . . . . . . . . . . . . . . . . . . . . . . . . . . . . . . . . . . . . . . . . . . . . . . . . . . . . . . . . .
. . . . . . . . . . . . . . . . . . . . . . . . . . . . . . . . . . . . . . . . . . . . . . . . . . . . . . . . . . . . . . . . . . . . . . . . . . . . . . . . . . . . . . . . . . . . . . . . . . . . . . . . . . . . . . . . . . . . . . . . . . . . . . . . . . . . . . . . . . . . . . . . . . . . . . . . . . . . . . . . . . . . . . . . . . . . . . . . . . . . . . . . . . . . . . . . . . . . . . . . . . . . . . . . . . . . . . . . . . . . . . . . . . . . . . . . . . . . . . . . . . . . . . . . . . . . . . . . . . . . . . . . . . . . . . . . . . . . . . . .
. . . . . . . . . . . . . . . . . . . . . . . . . . . . . . . . . . . . . . . . . . . . . . . . . . . . . . . . . . . . . . . . . . . . . . . . . . . . . . . . . . . . . . . . . . . . . . . . . . . . . . . . . . . . . . . . . . . . . . . . . . . . . . . . . . . . . . . . . . . . . . . . . . . . . . . . . . . . . . . . . . . . . . . . . . . . . . . . . . . . . . . . . . . . . . . . . . . . . . . . . . . . . . . . . . . . . . . . . . . . . . . . . . . . . . . . . . . . . . . . . . . . . . . . . . . . . . . . . . . . . . . . . . . . . . . . . . . . . . . .
. . . . . . . . . . . . . . . . . . . . . . . . . . . . . . . . . . . . . . . . . . . . . . . . . . . . . . . . . . . . . . . . . . . . . . . . . . . . . . . . . . . . . . . . . . . . . . . . . . . . . . . . . . . . . . . . . . . . . . . . . . . . . . . . . . . . . . . . . . . . . . . . . . . . . . . . . . . . . . . . . . . . . . . . . . . . . . . . . . . . . . . . . . . . . . . . . . . . . . . . . . . . . . . . . . . . . . . . . . . . . . . . . . . . . . . . . . . . . . . . . . . . . . . . . . . . . . . . . . . . . . . . . . . . . . . . . . . . . . . .
. . . . . . . . . . . . . . . . . . . . . . . . . . . . . . . . . . . . . . . . . . . . . . . . . . . . . . . . . . . . . . . . . . . . . . . . . . . . . . . . . . . . . . . . . . . . . . . . . . . . . . . . . . . . . . . . . . . . . . . . . . . . . . . . . . . . . . . . . . . . . . . . . . . . . . . . . . . . . . . . . . . . . . . . . . . . . . . . . . . . . . . . . . . . . . . . . . . . . . . . . . . . . . . . . . . . . . . . . . . . . . . . . . . . . . . . . . . . . . . . . . . . . . . . . . . . . . . . . . . . . . . . . . . . . . . . . . . . . . . .
. . . . . . . . . . . . . . . . . . . . . . . . . . . . . . . . . . . . . . . . . . . . . . . . . . . . . . . . . . . . . . . . . . . . . . . . . . . . . . . . . . . . . . . . . . . . . . . . . . . . . . . . . . . . . . . . . . . . . . . . . . . . . . . . . . . . . . . . . . . . . . . . . . . . . . . . . . . . . . . . . . . . . . . . . . . . . . . . . . . . . . . . . . . . . . . . . . . . . . . . . . . . . . . . . . . . . . . . . . . . . . . . . . . . . . . . . . . . . . . . . . . . . . . . . . . . . . . . . . . . . . . . . . . . . . . . . . . . . . . .
. . . . . . . . . . . . . . . . . . . . . . . . . . . . . . . . . . . . . . . . . . . . . . . . . . . . . . . . . . . . . . . . . . . . . . . . . . . . . . . . . . . . . . . . . . . . . . . . . . . . . . . . . . . . . . . . . . . . . . . . . . . . . . . . . . . . . . . . . . . . . . . . . . . . . . . . . . . . . . . . . . . . . . . . . . . . . . . . . . . . . . . . . . . . . . . . . . . . . . . . . . . . . . . . . . . . . . . . . . . . . . . . . . . . . . . . . . . . . . . . . . . . . . . . . . . . . . . . . . . . . . . . . . . . . . . . . . . . . . . .
. . . . . . . . . . . . . . . . . . . . . . . . . . . . . . . . . . . . . . . . . . . . . . . . . . . . . . . . . . . . . . . . . . . . . . . . . . . . . . . . . . . . . . . . . . . . . . . . . . . . . . . . . . . . . . . . . . . . . . . . . . . . . . . . . . . . . . . . . . . . . . . . . . . . . . . . . . . . . . . . . . . . . . . . . . . . . . . . . . . . . . . . . . . . . . . . . . . . . . . . . . . . . . . . . . . . . . . . . . . . . . . . . . . . . . . . . . . . . . . . . . . . . . . . . . . . . . . . . . . . . . . . . . . . . . . . . . . . . . . .
. . . . . . . . . . . . . . . . . . . . . . . . . . . . . . . . . . . . . . . . . . . . . . . . . . . . . . . . . . . . . . . . . . . . . . . . . . . . . . . . . . . . . . . . . . . . . . . . . . . . . . . . . . . . . . . . . . . . . . . . . . . . . . . . . . . . . . . . . . . . . . . . . . . . . . . . . . . . . . . . . . . . . . . . . . . . . . . . . . . . . . . . . . . . . . . . . . . . . . . . . . . . . . . . . . . . . . . . . . . . . . . . . . . . . . . . . . . . . . . . . . . . . . . . . . . . . . . . . . . . . . . . . . . . . . . . . . . . . . . .
. . . . . . . . . . . . . . . . . . . . . . . . . . . . . . . . . . . . . . . . . . . . . . . . . . . . . . . . . . . . . . . . . . . . . . . . . . . . . . . . . . . . . . . . . . . . . . . . . . . . . . . . . . . . . . . . . . . . . . . . . . . . . . . . . . . . . . . . . . . . . . . . . . . . . . . . . . . . . . . . . . . . . . . . . . . . . . . . . . . . . . . . . . . . . . . . . . . . . . . . . . . . . . . . . . . . . . . . . . . . . . . . . . . . . . . . . . . . . . . . . . . . . . . . . . . . . . . . . . . . . . . . . . . . . . . . . . . . . . . .
. . . . . . . . . . . . . . . . . . . . . . . . . . . . . . . . . . . . . . . . . . . . . . . . . . . . . . . . . . . . . . . . . . . . . . . . . . . . . . . . . . . . . . . . . . . . . . . . . . . . . . . . . . . . . . . . . . . . . . . . . . . . . . . . . . . . . . . . . . . . . . . . . . . . . . . . . . . . . . . . . . . . . . . . . . . . . . . . . . . . . . . . . . . . . . . . . . . . . . . . . . . . . . . . . . . . . . . . . . . . . . . . . . . . . . . . . . . . . . . . . . . . . . . . . . . . . . . . . . . . . . . . . . . . . . . . . . . . . . . .
. . . . . . . . . . . . . . . . . . . . . . . . . . . . . . . . . . . . . . . . . . . . . . . . . . . . . . . . . . . . . . . . . . . . . . . . . . . . . . . . . . . . . . . . . . . . . . . . . . . . . . . . . . . . . . . . . . . . . . . . . . . . . . . . . . . . . . . . . . . . . . . . . . . . . . . . . . . . . . . . . . . . . . . . . . . . . . . . . . . . . . . . . . . . . . . . . . . . . . . . . . . . . . . . . . . . . . . . . . . . . . . . . . . . . . . . . . . . . . . . . . . . . . . . . . . . . . . . . . . . . . . . . . . . . . . . . . . . . . . .
. . . . . . . . . . . . . . . . . . . . . . . . . . . . . . . . . . . . . . . . . . . . . . . . . . . . . . . . . . . . . . . . . . . . . . . . . . . . . . . . . . . . . . . . . . . . . . . . . . . . . . . . . . . . . . . . . . . . . . . . . . . . . . . . . . . . . . . . . . . . . . . . . . . . . . . . . . . . . . . . . . . . . . . . . . . . . . . . . . . . . . . . . . . . . . . . . . . . . . . . . . . . . . . . . . . . . . . . . . . . . . . . . . . . . . . . . . . . . . . . . . . . . . . . . . . . . . . . . . . . . . . . . . . . . . . . . . . . . . . .
. . . . . . . . . . . . . . . . . . . . . . . . . . . . . . . . . . . . . . . . . . . . . . . . . . . . . . . . . . . . . . . . . . . . . . . . . . . . . . . . . . . . . . . . . . . . . . . . . . . . . . . . . . . . . . . . . . . . . . . . . . . . . . . . . . . . . . . . . . . . . . . . . . . . . . . . . . . . . . . . . . . . . . . . . . . . . . . . . . . . . . . . . . . . . . . . . . . . . . . . . . . . . . . . . . . . . . . . . . . . . . . . . . . . . . . . . . . . . . . . . . . . . . . . . . . . . . . . . . . . . . . . . . . . . . . . . . . . . . . .
. . . . . . . . . . . . . . . . . . . . . . . . . . . . . . . . . . . . . . . . . . . . . . . . . . . . . . . . . . . . . . . . . . . . . . . . . . . . . . . . . . . . . . . . . . . . . . . . . . . . . . . . . . . . . . . . . . . . . . . . . . . . . . . . . . . . . . . . . . . . . . . . . . . . . . . . . . . . . . . . . . . . . . . . . . . . . . . . . . . . . . . . . . . . . . . . . . . . . . . . . . . . . . . . . . . . . . . . . . . . . . . . . . . . . . . . . . . . . . . . . . . . . . . . . . . . . . . . . . . . . . . . . . . . . . . . . . . . . . . .
. . . . . . . . . . . . . . . . . . . . . . . . . . . . . . . . . . . . . . . . . . . . . . . . . . . . . . . . . . . . . . . . . . . . . . . . . . . . . . . . . . . . . . . . . . . . . . . . . . . . . . . . . . . . . . . . . . . . . . . . . . . . . . . . . . . . . . . . . . . . . . . . . . . . . . . . . . . . . . . . . . . . . . . . . . . . . . . . . . . . . . . . . . . . . . . . . . . . . . . . . . . . . . . . . . . . . . . . . . . . . . . . . . . . . . . . . . . . . . . . . . . . . . . . . . . . . . . . . . . . . . . . . . . . . . . . . . . . . . . .
. . . . . . . . . . . . . . . . . . . . . . . . . . . . . . . . . . . . . . . . . . . . . . . . . . . . . . . . . . . . . . . . . . . . . . . . . . . . . . . . . . . . . . . . . . . . . . . . . . . . . . . . . . . . . . . . . . . . . . . . . . . . . . . . . . . . . . . . . . . . . . . . . . . . . . . . . . . . . . . . . . . . . . . . . . . . . . . . . . . . . . . . . . . . . . . . . . . . . . . . . . . . . . . . . . . . . . . . . . . . . . . . . . . . . . . . . . . . . . . . . . . . . . . . . . . . . . . . . . . . . . . . . . . . . . . . . . . . . . . .
. . . . . . . . . . . . . . . . . . . . . . . . . . . . . . . . . . . . . . . . . . . . . . . . . . . . . . . . . . . . . . . . . . . . . . . . . . . . . . . . . . . . . . . . . . . . . . . . . . . . . . . . . . . . . . . . . . . . . . . . . . . . . . . . . . . . . . . . . . . . . . . . . . . . . . . . . . . . . . . . . . . . . . . . . . . . . . . . . . . . . . . . . . . . . . . . . . . . . . . . . . . . . . . . . . . . . . . . . . . . . . . . . . . . . . . . . . . . . . . . . . . . . . . . . . . . . . . . . . . . . . . . . . . . . . . . . . . . . . . .
5 Seagate Secure
Enable security with Toolkit
Unlock the drive
Lock the drive
Change your password
Trusted computers
Disable security
Re-enable security
Multi-user access
Crypto-erase the drive
Reset the drive to factory settings
6 Optimize
About file system form ats
Toolkit Optimize
7 Import
Install Import
Activate/deactivate Im port
Frequently Asked Questions for Import
8 RAID Setup
Additional resources from LaCie RAID Manager
RAID explained
Setting RAID level and form atting with Toolkit
9 RGB and Status LED Management
Disable/enable the status LED
Edit RGB illum ination patterns
. . . . . . . . . . . . . . . . . . . . . . . . . . . . . . . . . . . . . . . . . . . . . . . . . . . . . . . . . . . . . . . . . . . . . . . . . . . . . . . . . . . . . . . . . . . . . . . . . . . . . . . . . . . . . . . . . . . . . . . . . . . . . . . . . . . . . . . . . . . . . . . . . . . . . . . . . . . . . . . . . . . . . . . . . . . . . . . . . . . . . . . . . . . . . . . . . . . . . . . . . . . . . . . . . . . . . . . . . . . . . . . . . . . . . . . . . . . . . . . . . . . . . . . . . . . . . . . . . . . . . . . . . . . . . . . . . . . . . . . .Entering yo ur pas sword with Too lkit
. . . . . . . . . . . . . . . . . . . . . . . . . . . . . . . . . . . . . . . . . . . . . . . . . . . . . . . . . . . . . . . . . . . . . . . . . . . . . . . . . . . . . . . . . . . . . . . . . . . . . . . . . . . . . . . . . . . . . . . . . . . . . . . . . . . . . . . . . . . . . . . . . . . . . . . . . . . . . . . . . . . . . . . . . . . . . . . . . . . . . . . . . . . . . . . . . . . . . . . . . . . . . . . . . . . . . . . . . . . . . . . . . . . . . . . . . . . . . . . . . . . . . . . . . . . . . . . . . . . . . . . . . . . . . . . . . . . . . . . .Entering yo ur pas sword with the Unlo ck Drive app
. . . . . . . . . . . . . . . . . . . . . . . . . . . . . . . . . . . . . . . . . . . . . . . . . . . . . . . . . . . . . . . . . . . . . . . . . . . . . . . . . . . . . . . . . . . . . . . . . . . . . . . . . . . . . . . . . . . . . . . . . . . . . . . . . . . . . . . . . . . . . . . . . . . . . . . . . . . . . . . . . . . . . . . . . . . . . . . . . . . . . . . . . . . . . . . . . . . . . . . . . . . . . . . . . . . . . . . . . . . . . . . . . . . . . . . . . . . . . . . . . . . . . . . . . . . . . . . . . . . . . . . . . . . . . . . . . . . . . . . .Exceeding the maximum number of failed passwo r d attempts
. . . . . . . . . . . . . . . . . . . . . . . . . . . . . . . . . . . . . . . . . . . . . . . . . . . . . . . . . . . . . . . . . . . . . . . . . . . . . . . . . . . . . . . . . . . . . . . . . . . . . . . . . . . . . . . . . . . . . . . . . . . . . . . . . . . . . . . . . . . . . . . . . . . . . . . . . . . . . . . . . . . . . . . . . . . . . . . . . . . . . . . . . . . . . . . . . . . . . . . . . . . . . . . . . . . . . . . . . . . . . . . . . . . . . . . . . . . . . . . . . . . . . . . . . . . . . . . . . . . . . . . . . . . . . . . . . . . . . . . .Removing trus ted co mputer status
. . . . . . . . . . . . . . . . . . . . . . . . . . . . . . . . . . . . . . . . . . . . . . . . . . . . . . . . . . . . . . . . . . . . . . . . . . . . . . . . . . . . . . . . . . . . . . . . . . . . . . . . . . . . . . . . . . . . . . . . . . . . . . . . . . . . . . . . . . . . . . . . . . . . . . . . . . . . . . . . . . . . . . . . . . . . . . . . . . . . . . . . . . . . . . . . . . . . . . . . . . . . . . . . . . . . . . . . . . . . . . . . . . . . . . . . . . . . . . . . . . . . . . . . . . . . . . . . . . . . . . . . . . . . . . . . . . . . . . . .Editing the second user
. . . . . . . . . . . . . . . . . . . . . . . . . . . . . . . . . . . . . . . . . . . . . . . . . . . . . . . . . . . . . . . . . . . . . . . . . . . . . . . . . . . . . . . . . . . . . . . . . . . . . . . . . . . . . . . . . . . . . . . . . . . . . . . . . . . . . . . . . . . . . . . . . . . . . . . . . . . . . . . . . . . . . . . . . . . . . . . . . . . . . . . . . . . . . . . . . . . . . . . . . . . . . . . . . . . . . . . . . . . . . . . . . . . . . . . . . . . . . . . . . . . . . . . . . . . . . . . . . . . . . . . . . . . . . . . . . . . . . . . .Disabling the second us er
. . . . . . . . . . . . . . . . . . . . . . . . . . . . . . . . . . . . . . . . . . . . . . . . . . . . . . . . . . . . . . . . . . . . . . . . . . . . . . . . . . . . . . . . . . . . . . . . . . . . . . . . . . . . . . . . . . . . . . . . . . . . . . . . . . . . . . . . . . . . . . . . . . . . . . . . . . . . . . . . . . . . . . . . . . . . . . . . . . . . . . . . . . . . . . . . . . . . . . . . . . . . . . . . . . . . . . . . . . . . . . . . . . . . . . . . . . . . . . . . . . . . . . . . . . . . . . . . . . . . . . . . . . . . . . . . . . . . . . . .Deleting the seco nd us er
. . . . . . . . . . . . . . . . . . . . . . . . . . . . . . . . . . . . . . . . . . . . . . . . . . . . . . . . . . . . . . . . . . . . . . . . . . . . . . . . . . . . . . . . . . . . . . . . . . . . . . . . . . . . . . . . . . . . . . . . . . . . . . . . . . . . . . . . . . . . . . . . . . . . . . . . . . . . . . . . . . . . . . . . . . . . . . . . . . . . . . . . . . . . . . . . . . . . . . . . . . . . . . . . . . . . . . . . . . . . . . . . . . . . . . . . . . . . . . . . . . . . . . . . . . . . . . . . . . . . . . . . . . . . . . . . . . . . . . . .Q: Do es Impo rt delete the content o n my memor y car d after it has finished impo rting content to my drive?
. . . . . . . . . . . . . . . . . . . . . . . . . . . . . . . . . . . . . . . . . . . . . . . . . . . . . . . . . . . . . . . . . . . . . . . . . . . . . . . . . . . . . . . . . . . . . . . . . . . . . . . . . . . . . . . . . . . . . . . . . . . . . . . . . . . . . . . . . . . . . . . . . . . . . . . . . . . . . . . . . . . . . . . . . . . . . . . . . . . . . . . . . . . . . . . . . . . . . . . . . . . . . . . . . . . . . . . . . . . . . . . . . . . . . . . . . . . . . . . . . . . . . . . . . . . . . . . . . . . . . . . . . . . . . . . . . . . . . . . .Q: C an I us e Impo r t with an external car d reader ?
. . . . . . . . . . . . . . . . . . . . . . . . . . . . . . . . . . . . . . . . . . . . . . . . . . . . . . . . . . . . . . . . . . . . . . . . . . . . . . . . . . . . . . . . . . . . . . . . . . . . . . . . . . . . . . . . . . . . . . . . . . . . . . . . . . . . . . . . . . . . . . . . . . . . . . . . . . . . . . . . . . . . . . . . . . . . . . . . . . . . . . . . . . . . . . . . . . . . . . . . . . . . . . . . . . . . . . . . . . . . . . . . . . . . . . . . . . . . . . . . . . . . . . . . . . . . . . . . . . . . . . . . . . . . . . . . . . . . . . . .RAID and data security
. . . . . . . . . . . . . . . . . . . . . . . . . . . . . . . . . . . . . . . . . . . . . . . . . . . . . . . . . . . . . . . . . . . . . . . . . . . . . . . . . . . . . . . . . . . . . . . . . . . . . . . . . . . . . . . . . . . . . . . . . . . . . . . . . . . . . . . . . . . . . . . . . . . . . . . . . . . . . . . . . . . . . . . . . . . . . . . . . . . . . . . . . . . . . . . . . . . . . . . . . . . . . . . . . . . . . . . . . . . . . . . . . . . . . . . . . . . . . . . . . . . . . . . . . . . . . . . . . . . . . . . . . . . . . . . . . . . . . . . .Access RGB activity
. . . . . . . . . . . . . . . . . . . . . . . . . . . . . . . . . . . . . . . . . . . . . . . . . . . . . . . . . . . . . . . . . . . . . . . . . . . . . . . . . . . . . . . . . . . . . . . . . . . . . . . . . . . . . . . . . . . . . . . . . . . . . . . . . . . . . . . . . . . . . . . . . . . . . . . . . . . . . . . . . . . . . . . . . . . . . . . . . . . . . . . . . . . . . . . . . . . . . . . . . . . . . . . . . . . . . . . . . . . . . . . . . . . . . . . . . . . . . . . . . . . . . . . . . . . . . . . . . . . . . . . . . . . . . . . . . . . . . . . .RGB illuminatio n s ettings
22
22
23
24
24
25
25
25
26
26
27
27
27
29
29
29
30
30
32
32
32
34
34
35
35
36
36
37
37
37
38
39
40
40
40
41
41
Page 4

. . . . . . . . . . . . . . . . . . . . . . . . . . . . . . . . . . . . . . . . . . . . . . . . . . . . . . . . . . . . . . . . . . . . . . . . . . . . . . . . . . . . . . . . . . . . . . . . . . . . . . . . . . . . . . . . . . . . . . . . . . . . . . . . . . . . . . . . . . . . . . . . . . . . . . . . . . . . . . . . . . . . . . . . . . . . . . . . . . . . . . . . . . . . . . . . . . . . . . . . . . . . . . . . . . . . . . . . . . . . . . . . . . . . . . . . . . . . . . . . . . . . . . . . . . . . . . . . . . . . . . . . . . . . . . . . . . . . . . . .
. . . . . . . . . . . . . . . . . . . . . . . . . . . . . . . . . . . . . . . . . . . . . . . . . . . . . . . . . . . . . . . . . . . . . . . . . . . . . . . . . . . . . . . . . . . . . . . . . . . . . . . . . . . . . . . . . . . . . . . . . . . . . . . . . . . . . . . . . . . . . . . . . . . . . . . . . . . . . . . . . . . . . . . . . . . . . . . . . . . . . . . . . . . . . . . . . . . . . . . . . . . . . . . . . . . . . . . . . . . . . . . . . . . . . . . . . . . . . . . . . . . . . . . . . . . . . . . . . . . . . . . . . . . . . . . . . . . . . . . .
. . . . . . . . . . . . . . . . . . . . . . . . . . . . . . . . . . . . . . . . . . . . . . . . . . . . . . . . . . . . . . . . . . . . . . . . . . . . . . . . . . . . . . . . . . . . . . . . . . . . . . . . . . . . . . . . . . . . . . . . . . . . . . . . . . . . . . . . . . . . . . . . . . . . . . . . . . . . . . . . . . . . . . . . . . . . . . . . . . . . . . . . . . . . . . . . . . . . . . . . . . . . . . . . . . . . . . . . . . . . . . . . . . . . . . . . . . . . . . . . . . . . . . . . . . . . . . . . . . . . . . . . . . . . . . . . . . . . . . . .
10 Settings
Toolkit updates
11 Toolkit and Thunderbolt Daisy Chaining
. . . . . . . . . . . . . . . . . . . . . . . . . . . . . . . . . . . . . . . . . . . . . . . . . . . . . . . . . . . . . . . . . . . . . . . . . . . . . . . . . . . . . . . . . . . . . . . . . . . . . . . . . . . . . . . . . . . . . . . . . . . . . . . . . . . . . . . . . . . . . . . . . . . . . . . . . . . . . . . . . . . . . . . . . . . . . . . . . . . . . . . . . . . . . . . . . . . . . . . . . . . . . . . . . . . . . . . . . . . . . . . . . . . . . . . . . . . . . . . . . . . . . . . . . . . . . . . . . . . . . . . . . . . . . . . . . . . . . . . .Razer Chroma via Razer Synapse 3 app (Windo ws only)
. . . . . . . . . . . . . . . . . . . . . . . . . . . . . . . . . . . . . . . . . . . . . . . . . . . . . . . . . . . . . . . . . . . . . . . . . . . . . . . . . . . . . . . . . . . . . . . . . . . . . . . . . . . . . . . . . . . . . . . . . . . . . . . . . . . . . . . . . . . . . . . . . . . . . . . . . . . . . . . . . . . . . . . . . . . . . . . . . . . . . . . . . . . . . . . . . . . . . . . . . . . . . . . . . . . . . . . . . . . . . . . . . . . . . . . . . . . . . . . . . . . . . . . . . . . . . . . . . . . . . . . . . . . . . . . . . . . . . . . .Requirements for Razer Chr o ma
. . . . . . . . . . . . . . . . . . . . . . . . . . . . . . . . . . . . . . . . . . . . . . . . . . . . . . . . . . . . . . . . . . . . . . . . . . . . . . . . . . . . . . . . . . . . . . . . . . . . . . . . . . . . . . . . . . . . . . . . . . . . . . . . . . . . . . . . . . . . . . . . . . . . . . . . . . . . . . . . . . . . . . . . . . . . . . . . . . . . . . . . . . . . . . . . . . . . . . . . . . . . . . . . . . . . . . . . . . . . . . . . . . . . . . . . . . . . . . . . . . . . . . . . . . . . . . . . . . . . . . . . . . . . . . . . . . . . . . . .Use Razer Chr o ma
. . . . . . . . . . . . . . . . . . . . . . . . . . . . . . . . . . . . . . . . . . . . . . . . . . . . . . . . . . . . . . . . . . . . . . . . . . . . . . . . . . . . . . . . . . . . . . . . . . . . . . . . . . . . . . . . . . . . . . . . . . . . . . . . . . . . . . . . . . . . . . . . . . . . . . . . . . . . . . . . . . . . . . . . . . . . . . . . . . . . . . . . . . . . . . . . . . . . . . . . . . . . . . . . . . . . . . . . . . . . . . . . . . . . . . . . . . . . . . . . . . . . . . . . . . . . . . . . . . . . . . . . . . . . . . . . . . . . . . . .FireCuda RGB app
. . . . . . . . . . . . . . . . . . . . . . . . . . . . . . . . . . . . . . . . . . . . . . . . . . . . . . . . . . . . . . . . . . . . . . . . . . . . . . . . . . . . . . . . . . . . . . . . . . . . . . . . . . . . . . . . . . . . . . . . . . . . . . . . . . . . . . . . . . . . . . . . . . . . . . . . . . . . . . . . . . . . . . . . . . . . . . . . . . . . . . . . . . . . . . . . . . . . . . . . . . . . . . . . . . . . . . . . . . . . . . . . . . . . . . . . . . . . . . . . . . . . . . . . . . . . . . . . . . . . . . . . . . . . . . . . . . . . . . . .Edit Pattern LED se ttings
. . . . . . . . . . . . . . . . . . . . . . . . . . . . . . . . . . . . . . . . . . . . . . . . . . . . . . . . . . . . . . . . . . . . . . . . . . . . . . . . . . . . . . . . . . . . . . . . . . . . . . . . . . . . . . . . . . . . . . . . . . . . . . . . . . . . . . . . . . . . . . . . . . . . . . . . . . . . . . . . . . . . . . . . . . . . . . . . . . . . . . . . . . . . . . . . . . . . . . . . . . . . . . . . . . . . . . . . . . . . . . . . . . . . . . . . . . . . . . . . . . . . . . . . . . . . . . . . . . . . . . . . . . . . . . . . . . . . . . . .Se lect a pattern
. . . . . . . . . . . . . . . . . . . . . . . . . . . . . . . . . . . . . . . . . . . . . . . . . . . . . . . . . . . . . . . . . . . . . . . . . . . . . . . . . . . . . . . . . . . . . . . . . . . . . . . . . . . . . . . . . . . . . . . . . . . . . . . . . . . . . . . . . . . . . . . . . . . . . . . . . . . . . . . . . . . . . . . . . . . . . . . . . . . . . . . . . . . . . . . . . . . . . . . . . . . . . . . . . . . . . . . . . . . . . . . . . . . . . . . . . . . . . . . . . . . . . . . . . . . . . . . . . . . . . . . . . . . . . . . . . . . . . . . .Preview selected pattern
. . . . . . . . . . . . . . . . . . . . . . . . . . . . . . . . . . . . . . . . . . . . . . . . . . . . . . . . . . . . . . . . . . . . . . . . . . . . . . . . . . . . . . . . . . . . . . . . . . . . . . . . . . . . . . . . . . . . . . . . . . . . . . . . . . . . . . . . . . . . . . . . . . . . . . . . . . . . . . . . . . . . . . . . . . . . . . . . . . . . . . . . . . . . . . . . . . . . . . . . . . . . . . . . . . . . . . . . . . . . . . . . . . . . . . . . . . . . . . . . . . . . . . . . . . . . . . . . . . . . . . . . . . . . . . . . . . . . . . . .Timing controls
. . . . . . . . . . . . . . . . . . . . . . . . . . . . . . . . . . . . . . . . . . . . . . . . . . . . . . . . . . . . . . . . . . . . . . . . . . . . . . . . . . . . . . . . . . . . . . . . . . . . . . . . . . . . . . . . . . . . . . . . . . . . . . . . . . . . . . . . . . . . . . . . . . . . . . . . . . . . . . . . . . . . . . . . . . . . . . . . . . . . . . . . . . . . . . . . . . . . . . . . . . . . . . . . . . . . . . . . . . . . . . . . . . . . . . . . . . . . . . . . . . . . . . . . . . . . . . . . . . . . . . . . . . . . . . . . . . . . . . . .Breathe
. . . . . . . . . . . . . . . . . . . . . . . . . . . . . . . . . . . . . . . . . . . . . . . . . . . . . . . . . . . . . . . . . . . . . . . . . . . . . . . . . . . . . . . . . . . . . . . . . . . . . . . . . . . . . . . . . . . . . . . . . . . . . . . . . . . . . . . . . . . . . . . . . . . . . . . . . . . . . . . . . . . . . . . . . . . . . . . . . . . . . . . . . . . . . . . . . . . . . . . . . . . . . . . . . . . . . . . . . . . . . . . . . . . . . . . . . . . . . . . . . . . . . . . . . . . . . . . . . . . . . . . . . . . . . . . . . . . . . . . .Spectrum
. . . . . . . . . . . . . . . . . . . . . . . . . . . . . . . . . . . . . . . . . . . . . . . . . . . . . . . . . . . . . . . . . . . . . . . . . . . . . . . . . . . . . . . . . . . . . . . . . . . . . . . . . . . . . . . . . . . . . . . . . . . . . . . . . . . . . . . . . . . . . . . . . . . . . . . . . . . . . . . . . . . . . . . . . . . . . . . . . . . . . . . . . . . . . . . . . . . . . . . . . . . . . . . . . . . . . . . . . . . . . . . . . . . . . . . . . . . . . . . . . . . . . . . . . . . . . . . . . . . . . . . . . . . . . . . . . . . . . . . .Custom
. . . . . . . . . . . . . . . . . . . . . . . . . . . . . . . . . . . . . . . . . . . . . . . . . . . . . . . . . . . . . . . . . . . . . . . . . . . . . . . . . . . . . . . . . . . . . . . . . . . . . . . . . . . . . . . . . . . . . . . . . . . . . . . . . . . . . . . . . . . . . . . . . . . . . . . . . . . . . . . . . . . . . . . . . . . . . . . . . . . . . . . . . . . . . . . . . . . . . . . . . . . . . . . . . . . . . . . . . . . . . . . . . . . . . . . . . . . . . . . . . . . . . . . . . . . . . . . . . . . . . . . . . . . . . . . . . . . . . . . .Change co lo r s
. . . . . . . . . . . . . . . . . . . . . . . . . . . . . . . . . . . . . . . . . . . . . . . . . . . . . . . . . . . . . . . . . . . . . . . . . . . . . . . . . . . . . . . . . . . . . . . . . . . . . . . . . . . . . . . . . . . . . . . . . . . . . . . . . . . . . . . . . . . . . . . . . . . . . . . . . . . . . . . . . . . . . . . . . . . . . . . . . . . . . . . . . . . . . . . . . . . . . . . . . . . . . . . . . . . . . . . . . . . . . . . . . . . . . . . . . . . . . . . . . . . . . . . . . . . . . . . . . . . . . . . . . . . . . . . . . . . . . . . .Single colo r patterns
. . . . . . . . . . . . . . . . . . . . . . . . . . . . . . . . . . . . . . . . . . . . . . . . . . . . . . . . . . . . . . . . . . . . . . . . . . . . . . . . . . . . . . . . . . . . . . . . . . . . . . . . . . . . . . . . . . . . . . . . . . . . . . . . . . . . . . . . . . . . . . . . . . . . . . . . . . . . . . . . . . . . . . . . . . . . . . . . . . . . . . . . . . . . . . . . . . . . . . . . . . . . . . . . . . . . . . . . . . . . . . . . . . . . . . . . . . . . . . . . . . . . . . . . . . . . . . . . . . . . . . . . . . . . . . . . . . . . . . . .Custom patterns
. . . . . . . . . . . . . . . . . . . . . . . . . . . . . . . . . . . . . . . . . . . . . . . . . . . . . . . . . . . . . . . . . . . . . . . . . . . . . . . . . . . . . . . . . . . . . . . . . . . . . . . . . . . . . . . . . . . . . . . . . . . . . . . . . . . . . . . . . . . . . . . . . . . . . . . . . . . . . . . . . . . . . . . . . . . . . . . . . . . . . . . . . . . . . . . . . . . . . . . . . . . . . . . . . . . . . . . . . . . . . . . . . . . . . . . . . . . . . . . . . . . . . . . . . . . . . . . . . . . . . . . . . . . . . . . . . . . . . . . .Change glo bal se ttings
41
41
41
42
42
43
43
44
44
45
45
45
45
46
46
48
48
49
Page 5

Geng Started with Toolkit
Toolkit helps you get the most out of your storage solution with easy-to-use tools for backing up your files,
managing security, and much more. Toolkit activities and features include:
Protecting your data with automated backups. Create folders
on your drive that mirror folders on your computer, so your
files are always available in both places.
Optimizing your drive’s performance with just a few simple
clicks. Let Toolkit format the drive in the native file system for
your operating system.
Managing security for Seagate and LaCie self-encrypting
drives. Use Toolkit to enable security, create a password, and
rest easy knowing your data is protected with Seagate Secure
AES 256-bit encryption technology.
Setting up RAID. Toolkit helps you easily configure the initial
RAID level and formatting for compatible Seagate and LaCie
dual-drive device s.
5To o lkit
1/5/21
Page 6
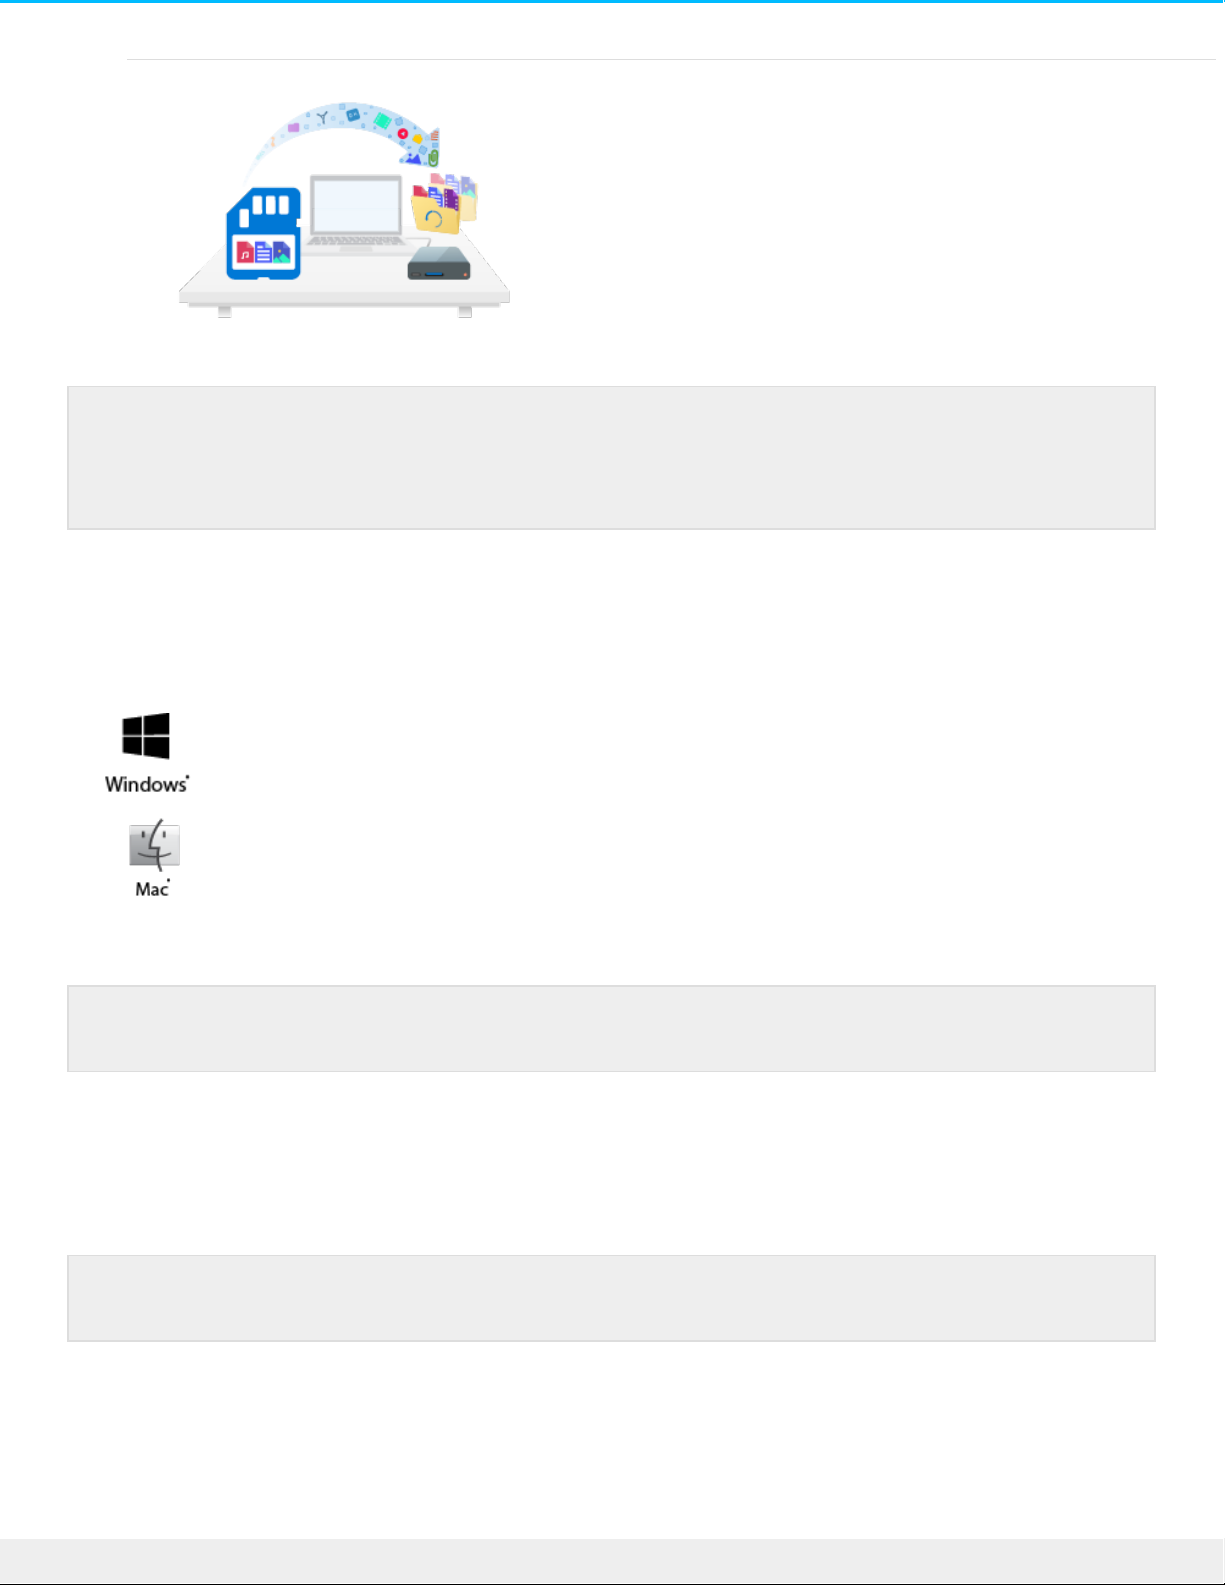
Quickly importing files from memory cards. Simply insert a
me mory card into the drive’s integrated card reader and
Toolkit automatically copies your files to the drive —no need to
open folders and drag files.
System requirements
Toolkit runs on Windows and Mac computers that meet the following requirements:
Windows® 7 Service Pack 1 or higher
1 GB RAM
macOS® 10.10 or higher
The Sync Plus activity requires macOS® 10.11 or higher
Download and install Toolkit
Use the Start Here app on your storage drive to quickly download and install Toolkit.
1. Using a file manager such as Finder or File Explorer, ope n your device and launch Start Here Win or Start
Here Mac.
2. On the Register page, enter your information and click Register.
Some Toolkit activities and features are available only for supported Seagate and LaCie drives.
See the chapters in this user manual to learn more about the drives supported by a given activity
or feature.
The system requirements for your storage device hardware may be different.
Your computer must be connected to the internet to install and run Toolkit.
6To o lkit
1/5/21
Page 7

3. On the Download page, click the Download button.
4. Using a file manager such as Finder or File Explorer, go to the folder where you receive downloads.
Click on the
SeagateToolkit.exe
file to launch the application.
Ope n the
SeagateToolkit.zip
file. Click on the
Seagate Toolkit Installer
to launch the application.
7To o lkit
1/5/21
Page 8

Open Toolkit
Ope n Toolkit using any of the following methods:
Double-click the Toolkit icon on your de sktop. For easy access, you can add the Toolkit icon
to your taskbar.
Click in the Search Windows bar and type Toolkit, then select the app.
Click on the Start menu and select Toolkit from the menu.
Click in the Spotlight bar and type Toolkit, then select the app.
Using Finder, open your Applications folder and double-click Toolkit.
Main menu
When you open Toolkit, the Main Menu appears.
If your drive doesn’t include the Start Here app, you can download the Toolkit installer at Toolkit
Support.
8To o lkit
1/5/21
Page 9
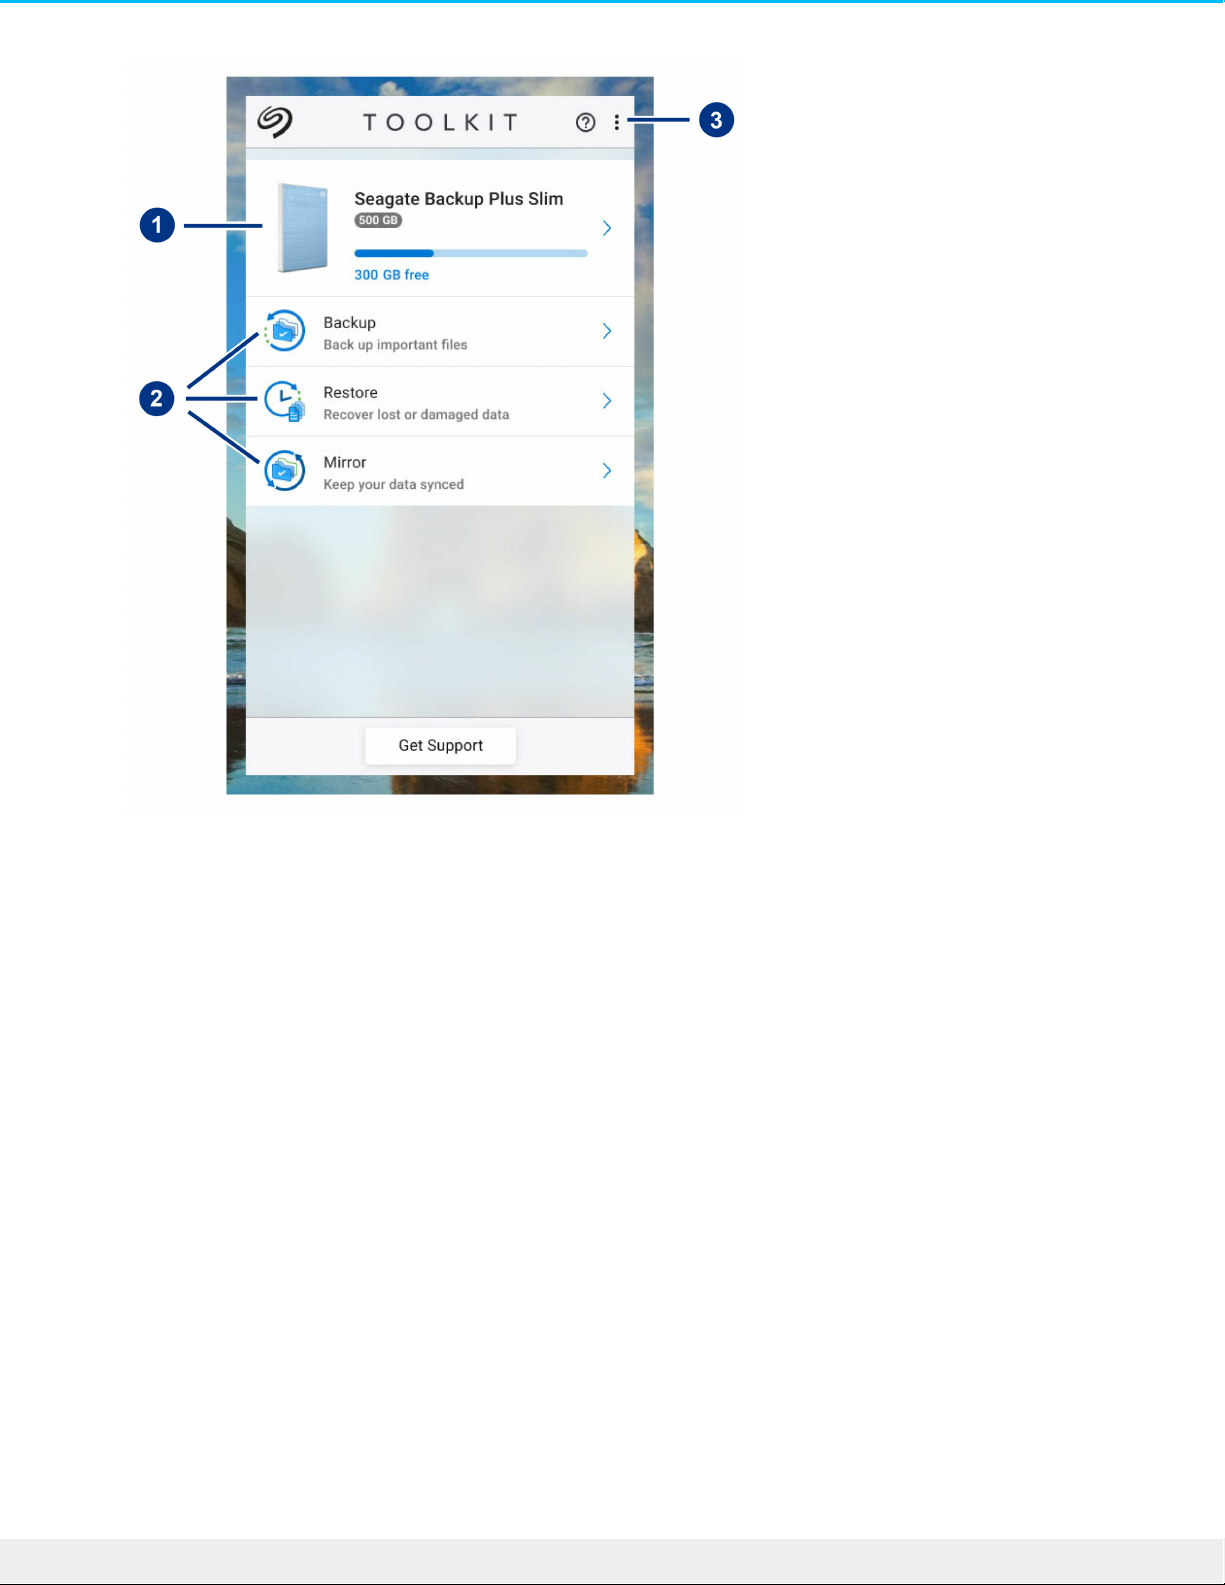
1. Drives—Click to view details about the device .
2. Activities—Click to se t up or edit an activity. Note: Some Toolkit activities are available only for
supported Seagate and LaCie drives. See the chapters in this user manual to learn more about the drives
supported by a given activity or feature.
3. More—Click on the icon to change settings or quit Toolkit.
9To o lkit
1/5/21
Page 10

Mirror Acvity
The Mirror activity lets you create a Mirror folder on your PC or Mac that is synced to your storage device .
Whenever you add, edit, or delete files in one folder, Toolkit automatically updates the other folder with
your changes.
Create a mirror plan
Quick setup
Toolkit can quickly set up a mirror folde r in your computer's user folder.
1. Ope n Toolkit.
2. On the Main Menu, click on the Mirror activity.
3. Click Mirror Now.
Toolkit performs the following actions:
Adds a folder named "Mirror" in your user folder on the computer.
Adds a folder named "Mirror" to your storage device. The default location is in the Toolkit folder.
Custom setup
A custom se tup lets you choose the location of the mirror folder on your computer.
1. Ope n Toolkit.
2. On the Main Menu, click on the Mirror activity.
3. Click Custom.
4. Click on the Mirror to... card.
5. Select a location on your computer for the mirror folder.
6. Click Create.
10To o lkit
1/5/21
Page 11
Toolkit performs the following actions:
Adds a folder named "Mirror" to the selected location on your computer.
Adds a folder named "Mirror" to your storage device. The default location is in the Toolkit folder.
Adding files to mirror folders
To add content, drag files to e ither Mirror folder. Whenever you add, edit, or delete files in one Mirror
folder, Toolkit automatically updates the other Mirror folder with your changes.
Pause/resume a mirror plan
1. Ope n Toolkit.
2. On the Main Menu, click on the Mirror activity.
3. Click on the More icon ( ) and select Pause.
To resume the Mirror plan, click on the More icon ( ) and select Resume.
Edit a mirror plan
1. On the Main Menu, click on the Mirror activity.
2. Click on More icon ( ) and select Edit.
3. Select a new location for the Mirror folder on your computer.
4. Click Create.
The new Mirror folder is now synced with the Mirror folder on your storage de vice.
Delete a mirror plan
1. On the Main Menu, click on the Mirror activity.
2. Click on the More icon ( ) and select Delete.
3. Click OK to confirm.
The Mirror folders must each be name d “Mirror” in orde r to sync. Do not rename the folders.
When Toolkit creates the new Mirror folder, it does not delete the previous folder. The
previous folder is no longer synced with your storage device and can be deleted.
11Too lkit
1/5/21
Page 12
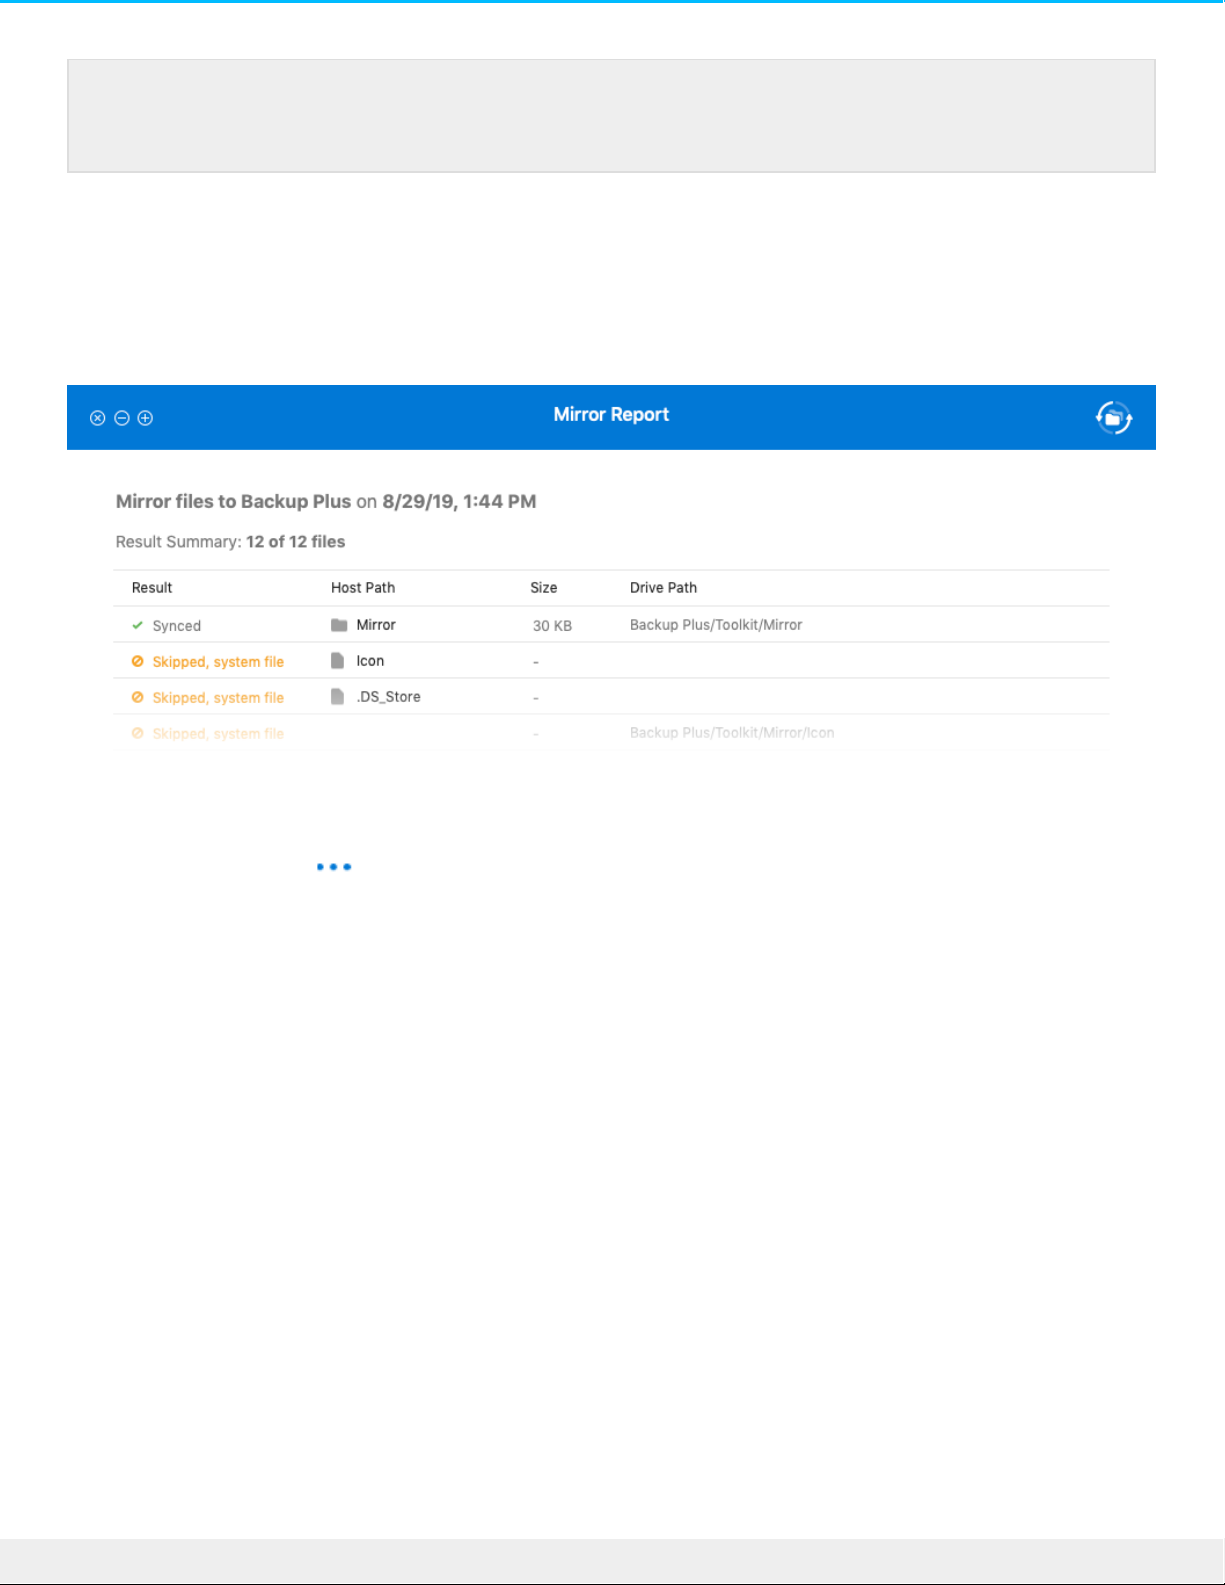
View report
You can review a report of mirror activity. The report lists files that were not synced, and includes details on
the cause as well as file paths on the host computer and backup drive.
1. Ope n Toolkit.
2. On the Main Menu, click on the Mirror activity.
3. Click the More icon ( ) and select Report.
Toolkit deletes the mirror plan but does not remove the Mirror folder on your computer or your
storage device. The contents of the folders are also preserved.
12Too lkit
1/5/21
Page 13

Backup Acvity (Windows Only)
The Backup activity lets you create a plan customized for the content, storage device, and schedule of your
choosing. Backup is available for the Windows ve rsion of Toolkit.
File types and procedure
Toolkit backs up your data but excludes program files, application data, temporary files, and other types of
system files and folders. Toolkit initially saves a full backup of the selected data to your storage device when
a Backup plan is created. With successive backups, Seagate only saves the data that has changed since the
preceding backup. This helps reduce the time and space required for each scheduled backup.
Set up a quick backup
You can quickly back up pe rsonal files with just a few clicks. Your personal files include all non-system files
on Windows.
1. Ope n Toolkit.
2. On the Main Menu, click Backup.
3. Click Back Up Now.
Toolkit backs up your personal files and creates a new backup plan. The plan is se t to continuously back up
pe rsonal files to the storage device whenever files are added to your computer or changed. You can change
de tails of the auto-generated plan—see Edit a backup plan.
Create a custom backup plan
A custom Backup plan lets you choose the content, device, and schedule for your backups.
1. Ope n Toolkit.
2. On the Main Menu, click on the Backup activity.
3. Click Custom.
4. Proceed through the steps in Define your Backup plan.
Back Up Now is not an available option if you’ve already created a Backup plan.
13Too lkit
1/5/21
Page 14

Edit a backup plan
You can change the content, destination, and schedule of your Backup plan.
1. Ope n Toolkit.
2. On the Main Menu, click on the Backup activity.
3. Click on the More icon ( ) and select Edit.
4. Proceed through the steps in Define your Backup plan.
Define your backup plan
Toolkit guides you through the steps nee ded to define your Backup plan.
Step 1: Select content
There are two ways to select the content to include in your backups: Basic and Advanced.
Basic
1. Click the checkboxes to include the following non-system content:
All files Windows root drive
Personal files User folder
Documents Documents library
Music Music library
Pictures Pictures library
Videos Videos library
2. When you’re finished selecting content, click Next.
Advanced
1. To select content with greater control, click Advanced.
2. Use the sidebar and the content window to manually select folders.
Selecting multiple items
14To o lkit
1/5/21
Page 15

You can select (highlight) multiple items using the Shift or Ctrl key on your keyboard.
To select a serie s of items in a list:
1. Click on the first folder.
2. Hold down the Shift key on your keyboard.
3. Click on the last folder.
To select multiple, non-consecutive items anywhere on the computer:
1. Click on a folder.
2. Hold down the Ctrl key on your keyboard.
3. Continue to click on folders.
When you’re finished selecting content, click
Next
.
Step 2: Select the desnaon drive
1. Click the de stination drive for your backup.
2. Once you’ve selected a de vice, click Next.
Step 3: Schedule backups
1. Click on a time period to se lect how often you want to back up your content.
2. Adjust settings for the selected time period, for example, se lecting a specific hour or day.
3. Click Start Backup.
Your changes are save d. Toolkit backs up selected folders at the scheduled time when:
Your PC is on.
Your storage device is connected to the PC.
Toolkit is running.
Pause/resume a backup plan
You can pause your scheduled backups.
1. Ope n Toolkit.
A continuous backup plan saves a file wheneve r you add or remove content or update a file.
While continuous backups provide greater flexibility to restore specific data, it uses more
system resources.
15Too lkit
1/5/21
Page 16

2. On the Main Menu, click on the Backup activity.
3. Click Pause on your drive.
To resume the backup plan, return to the Backup scree n and click Resume.
Delete a backup plan
1. Ope n Toolkit.
2. On the Main Menu, click on the Backup activity.
3. Click the More icon ( ) and select Delete.
4. (optional) If you want to remove all files that have be en backed up to the device, select the checkbox
next to Delete all files backed up to the device.
5. Click Delete to confirm.
Restore files
1. Ope n Toolkit.
2. On the Main Menu, click on the Backup activity.
3. Click the More icon ( ) select Restore.
4. Proceed through the steps.
View report
You can review a report of backup activity. The report lists files that we re not backed up or only partially
backed up, and includes details on the cause as well as file paths on the host computer and backup drive.
1. Ope n Toolkit.
2. On the Main Menu, click on the Backup activity.
3. Click the More icon ( ) and select Report.
16Too lkit
1/5/21
Page 17

17Too lkit
1/5/21
Page 18

Sync Plus Acvity
The Sync Plus activity provides a continual sync of data between your computer and
your drive, ensuring your files are available in both places.
Stay in sync Sync folders on your PC or Mac with folde rs on your
drive. Whenever you add, e dit, or delete files on one
de vice, Sync Plus automatically updates the files on
the other.
Archive deleted
files
Automatically copy files you’ve deleted to the archive
folder on your drive.
Sync Plus is available for the following premium products:
Supported devices Product support page User manual
LaCie 1big Dock Product Docume ntation
LaCie 1big Dock SSD Pro Product Docume ntation
LaCie Rugged SSD Pro Product Docume ntation
Seagate Barracuda Fast SSD Product Docume ntation
Seagate FireCuda Gaming SSD Product Docume ntation
Seagate One Touch SSD Product Docume ntation
Seagate Ultra Touch SSD Product Documentation
Set up a quick sync
You can quickly create a plan to sync your PC or Mac’s user folder. Toolkit performs the following actions in a
quick sync:
Creates a default plan syncing your PC or Mac’s user folder with your drive.
Toolkit will not sync some types of data. See Files and folders excluded
from syncing.
18Too lkit
1/5/21
Page 19

Files and folde rs you delete are automatically copie d to the archive folder on the drive.
To create a quick sync:
1. Ope n Toolkit.
2. On the Main Menu, click on the Sync Plus activity.
3. Click Sync.
4. Review settings and click Got It.
Create a custom Sync Plus plan
A custom Sync Plus plan lets you:
Choose folders to sync with your drive .
Customize your sync and archive se ttings.
To set up your custom Sync Plus plan:
1. Ope n Toolkit.
2. On the Main Menu, click on a drive .
3. Click Create a new Sync Plus plan.
4. Click Next.
5. Select the computer folde rs you want to sync. Click Next.
6. Select the destination on your drive for the synced folder(s). Click Next.
7. Click on the toggle switches to change the following se ttings:
Setting On Off
2-way sync Changes made to files on your computer
are synced with your drive, and vice
versa.
Your drive stays synced to changes
made to files on your computer.
Howe ver, changes made to files on
your drive are not synced to your
computer.
Files de leted from your computer
are not deleted from your drive.
Turning off 2-way sync disables
the Archive deleted files
option.
Archive deleted
files
Files and folde rs deleted from your
computer or drive are saved to the
archive folder. Turning off 2-way sync
disables the Archive deleted files
option.
Deleted files and folders are not saved.
Turning off 2-way sync disables the
Archive deleted files option.
19Too lkit
1/5/21
Page 20

8. Click Create.
9. Review settings and click Got It.
Pause/resume a Sync Plus plan
To pause a Sync Plus plan:
1. Ope n Toolkit.
2. On the Main Menu, click on a drive .
3. On the Sync Plus plan, click Pause.
To resume the Sync Plus plan, click Resume.
View synced folders and archive
To vie w synced folders and archives in your file manager:
1. Ope n Toolkit.
2. On the Main Menu, click on a drive .
3. On the Sync Plus plan, click View.
Edit a Sync Plus plan
To edit a Sync Plus plan:
1. Ope n Toolkit.
2. On the Main Menu, click on a drive .
3. On the Sync Plus Plan, click on the More icon ( ) and select Edit.
4. Select source and destination folders, and change sync and archive settings as needed.
Delete a Sync Plus plan
To delete a Sync Plus plan:
1. Ope n Toolkit.
2. On the Main Menu, click on a drive .
3. On the Sync Plus Plan, click on the More icon ( ) and select Delete.
4. Click OK to confirm.
Restore files
To restore files from the archive:
20To o lkit
1/5/21
Page 21

1. Ope n Toolkit.
2. On the Main Menu, click on a drive .
3. On the Sync Plus Plan, click on the More icon ( ) and select Restore.
4. Toolkit ope ns a file browsing window so you can copy data from the archive folder to another location.
Files and folders excluded from syncing
Toolkit will not sync program files, application data, temporary files, and other types of system files and
folders. A full listing of items exclude d from syncing can be found in this knowledge base article.
21Too lkit
1/5/21
Page 22

Seagate Secure
The Seagate Se cure activity lets you manage security for Seagate and LaCie selfencrypting drives. Use Toolkit to e nable security, create a password, and rest
easy knowing your data is protected with AES 256-bit encryption technology.
Supported devices Product support page User manual
LaCie Rugged RAID
Shuttle
Product Documentation
LaCie Rugged Secure Product Documentation
LaCie Rugged SSD Product Documentation
Seagate Backup Plus Ultra
Touch
Product Documentation
Enable security with Toolkit
Toolkit is required to enable security for self-encrypting drives.
1. Connect the de vice to your computer.
2. Ope n Toolkit.
3. On the Main Menu, click on the Se agate Secure activity.
4. Click Enable.
macOS 10.13 or later
A driver needs to be installed. At the prompt, use the Finder to eject the drive, and then
disconnect the cable from the computer. Toolkit will prompt you to enable a system extension.
Click Next to navigate to your Security & Privacy System Preferences and enable the system
extension signed by “Seagate Technologies LLC”.
5. A notice appears informing you that you will create a password that you must remember or keep safe, as
22Too lkit
1/5/21
Page 23

it can’t be recovered. Click the checkbox to acknowledge the notification, and then click Next.
6. Enter the 8-character secure code (SID) listed on the insert that was included in your device packaging.
Note that the secure code is case-se nsitive, meaning that it distinguishes between upper-case and
lower-case letters. Click Next.
7. Click Next.
8. Create a password that you will use to unlock the drive on any computer. In the upper field, enter a
password that’s easy to remember but difficult to guess. Note that the password you create is case sensitive, meaning that it distinguishes between upper-case and lowe r-case letters. Enter the same
password in the lower field to confirm, and click Next.
9. (optional) Create a password hint. In the event you forget your password, you can view your hint to help
you remembe r it. Enter your password hint and click Next.
10. Click Done.
Unlock the drive
To access data on the drive, you must enter the password you created with the Toolkit app. You can enter
your password using Toolkit. If Toolkit is not installed on the computer, you can run the appropriate Unlock
If you no longer have the insert, you can find the secure code (SID) on a sticker on the drive
enclosure. Note for LaCie Rugged Secure and Rugged RAID Shuttle drives—the sticker is located
under the protective bumper.
Incorrect code error? If you receive an Incorrect code error and can no longer enter the se cure
code (SID), safely eject the hard drive and then disconnect it from the computer. Locate the
correct SID, reconnect the drive, and try again. This error could also occur if you enabled security
for the device at some point in the past and the password you created is still active. Try e ntering
the last password you created for the drive.
Keep your password in a safe place. Similar to mobile phones, your password cannot be
recovered, not even by Seagate or LaCie .
Because personal details can limit data security, use a hint that only you understand. Note that
your hint is stored on your computer—the hint does not travel with the drive.
23Too lkit
1/5/21
Page 24

Drive app for your operating system located on the drive .
Entering your password with Toolkit
Each time you connect your drive to a computer with Toolkit installed, you’ll be prompted to enter your
password.
1. At the prompt, enter the password you created when you enabled se curity.
2. Click Continue.
If the prompt doesn’t appe ar automatically when you connect the drive:
1. Ope n Toolkit.
2. On the Main Menu, click on the device.
3. Click Unlock.
4. At the prompt, enter your password.
5. Click Continue.
Entering your password with the Unlock Drive app
If you connect the device to a computer that does not have Toolkit installed, you can enter your password
using the Unlock Drive app located on the drive.
1. Using a file manager such as File Explorer or Finder, ope n the DriveLocked volume.
2. Click on Unlock Drive for Windows or Unlock Drive for Mac.
macOS 10.13 or later
A driver needs to be installed. At the prompt, use the Finder to eject the drive, and then
disconnect the cable from the computer. Toolkit will prompt you to enable a system extension.
Click Next to navigate to your Security & Privacy System Preferences and enable the system
extension signed by “Seagate Technologies LLC”.
3. Enter the password you created for the drive .
Remember, the password you created is case -sensitive, meaning that it distinguishes betwee n
upper-case and lower-case letters.
24To o lkit
1/5/21
Page 25

4. Click OK.
Exceeding the maximum number of failed password aempts
If you reach the maximum number of consecutive failed password attempts, your drive will be temporarily
disabled. Disconnect and reconnect your drive, and then retry with the correct password.
Lock the drive
The drive is locked automatically whenever it is e jected or disconnected from your computer. You must
enter your password again when you reconnect the drive.
You can also manually lock the drive while it’s connected to a computer.
1. Ope n Toolkit.
2. On the Main Menu, click on the device.
3. Click Lock.
4. Enter your password and click Continue.
Change your password
Use Toolkit to change your password.
1. Ope n Toolkit.
2. On the Main Menu, click on the device.
3. Click on the More icon ( ) and select Change Password.
4. A notice appears informing you that you will create a password that cannot be recovered. Click Next.
5. In the upper field, enter your current password.
6. Enter your new password in the middle field, and then enter the same new password in the lowe r field
to confirm.
7. (Optional) You can create a password hint, which you can view later in the e ve nt you've forgotten your
password. Enter the password hint in the field.
Remember, the password you created is case -sensitive, meaning that it distinguishes betwee n
upper-case and lower-case letters.
Remember, the password you created is case -sensitive, meaning that it distinguishes betwee n
upper-case and lower-case letters.
25Too lkit
1/5/21
Page 26

8. Click Next.
9. You’ve now secured the drive with a new password. Click Done.
Trusted computers
You can configure Toolkit to automatically unlock a drive when it's connected to a computer that you've
de signated as "trusted". Use this setting only on a computer that no one e lse use s. You'll still need a
password to unlock the drive when connected to other computers.
1. Connect your drive to a computer installed with Toolkit.
2. At the prompt, enter the password you created when you enabled se curity.
3. Check the Trust this computer checkbox.
4. Click Continue.
If the prompt doesn’t appe ar automatically when you connect the drive:
1. Ope n Toolkit.
2. On the Main Menu, click on the device.
3. Click Unlock.
4. At the prompt, enter your password.
5. Check the Trust this computer checkbox.
6. Click Continue.
If your connected drive is already unlocked, do the following:
1. Ope n Toolkit.
2. On the Main Menu, click on the device.
3. Click on the More icon ( ) and select Trusted Computer.
4. Click the Trust this computer toggle to enable the setting.
5. At the prompt, enter your password and click Continue.
6. Click Done.
Removing trusted computer status
Because personal details can limit data security, use a hint that only you understand. Note that
your hint is stored on your computer—the hint does not travel with the drive. If you do not want
a hint, leave the field blank.
Remember, the password you created is case -sensitive, meaning that it distinguishes betwee n
upper-case and lower-case letters.
26Too lkit
1/5/21
Page 27

To remove trusted computer status from a computer:
1. Connect your drive to the trusted computer.
2. Ope n Toolkit.
3. On the Main Menu, click on the device.
4. Click on the More icon ( ) and select Trusted Computer.
5. Click the Trust this computer toggle to disable the setting.
6. Click Done.
Disable security
You can disable security so that a password is no longer nee ded to unlock the device. It will function as an
unsecured drive with no password protection. You can always re-enable security again at a later date using
the password you created.
1. Ope n Toolkit.
2. On the Main Menu, click on the device.
3. Click on the More icon ( ) and then click Disable.
4. A notification appears informing you that you will disable security. Enter your password to confirm, and
then click Continue.
Re-enable security
If you disabled se curity at some point, you can re-enable it using the password you created.
1. Ope n Toolkit.
2. On the Main Menu, click Enable.
3. Enter the password you created when you first enabled security.
4. Click Continue.
Mul-user access
You can provide a se cond user with secure access to your storage device.
Adding another user changes the unlock prompt when connecting the se cure drive to a computer. When
only a single user is enabled, the se cure drive requires a single password for the owner or 'admin' of the
drive:
Remember, the password you created is case -sensitive, meaning that it distinguishes betwee n
upper-case and lower-case letters.
27Too lkit
1/5/21
Page 28

With multi-user enabled, the user unlocking the drive must enter both their username and password.
As the owner of the secure drive, your username is "Admin" and you continue to enter the same password.
You'll provide the second user with a use rname and an initial password. The second use r can access content
on the drive but cannot perform all security actions:
Secure Actions Admin User
Change Password ✓ ✓
Disable ✓ ✗
Trusted Computer ✓ ✓
Manage Multi-User ✓ ✗
Crypto-Erase ✓ ✗
Reset Anyone with the PSID can rese t the drive
1. Ope n Toolkit.
2. On the Main Menu, click on the device.
3. Click on the More icon ( ) and select Manage Multi-User.
28Too lkit
1/5/21
Page 29

4. Click the Multi-user radio button, and then click Next.
5. You're prompted to confirm your administrator password. Enter your password and click Next.
6. Click Add User. A dialog box appears.
7. Enter a username for the second user. This is the username the se cond user will enter when unlocking
the drive.
8. Enter a password for the second user. This is the password the second user will enter when unlocking
the drive. Choose a password that’s easy to remembe r but difficult to guess. Note that the password
you create is case-sensitive , meaning that it distinguishes betwe en upper-case and lower-case letters.
9. Enter the same password in the lower field to confirm.
10. (optional) Create a password hint. You can create a hint to help you remember the password you
created for the second user.
11. Click Save.
Eding the second user
The administrator can edit the second user's username and password.
1. Ope n Toolkit.
2. On the Main Menu, click on the device.
3. Click on the More icon ( ) and select Manage Multi-User.
4. At the prompt, enter your admin password and click Continue.
5. In the user listing, click on the More icon ( ) and select Edit.
6. Edit the user's de tails and click Save.
7. Click Done.
Disabling the second user
The administrator can disable the second user but maintain their details so they can be re-e nabled later.
1. Ope n Toolkit.
2. On the Main Menu, click on the device.
3. Click on the More icon ( ) and select Manage Multi-User.
4. At the prompt, enter your admin password and click Continue.
5. In the user listing, click on the More icon ( ) and select Disable.
6. At the prompt, click Disable to confirm.
7. Click Done.
Deleng the second user
The administrator can delete the second user.
Note that your hint is stored on your computer—the hint does not travel with the drive.
29Too lkit
1/5/21
Page 30

1. Ope n Toolkit.
2. On the Main Menu, click on the device.
3. Click on the More icon ( ) and select Manage Multi-User.
4. In the user listing, click on the More icon ( ) and select Delete.
5. At the prompt, click Delete to confirm.
6. Click Done.
Crypto-erase the drive
A crypto-erase securely de letes all data on the drive —it can never be recovered—while keeping your
security se ttings in place. Your password remains the same.
1. Ope n Toolkit.
2. On the Main Menu, click on the device.
3. Click on the More icon ( ) and then click Crypto Erase.
4. A notification appears informing you that you will erase all the data on the drive but maintain your
security se ttings. Click Erase.
5. A dialog box appears. Enter your password to confirm, and then click Continue.
If you are logged in to your computer as an admin user, confirm that you want to allow Toolkit to
make this change. If you are logged in as a standard user, e nter the system password for your
computer to confirm the crypto-erase .
Your system prompts you to allow Toolkit to make this change. Enter the system password for
your computer to confirm the crypto-erase.
Reset the drive to factory sengs
A factory reset deletes all data on the drive and removes all security settings, including your password. The
drive reve rts to its original factory settings.
1. Ope n Toolkit.
2. On the Main Menu, click on the device.
3. Click on the More icon ( ) and then click Reset.
4. A notification appears informing you that you will erase all the data on the drive and remove your
security se ttings. Click Reset.
5. You’re prompted to enter your PSID. This is the 32-character reset code listed on the inse rt that was
included in your device packaging. Enter the 32-character PSID. (Toolkit will automatically change lowercase letters to upper-case.)
No longer have the insert with the PSID?
You can also find the PSID on a sticker on the hard drive . Note for LaCie Rugged Secure and Rugged RAID
Shuttle drives—the sticker is located under the protective bumper.
30To o lkit
1/5/21
Page 31

6. Click Continue.
If you are logged in to your computer as an admin user, confirm that you want to allow Toolkit to
make this change. If you are logged in as a standard user, e nter the system password for your
computer to confirm the factory reset.
Your system prompts you to allow Toolkit to make this change. Enter the system password for
your computer to confirm the factory reset.
31Too lkit
1/5/21
Page 32

Opmize
Many Seagate and LaCie drives are preformatted exFAT for compatibility with both Mac and Windows
computers. If you use the drive with only one type of computer, you can optimize file copy performance by
formatting the drive in the native file system for your ope rating system—NTFS for Windows or HFS+ for
Macs. There are two ways you can optimize performance:
Toolkit Optimize Format your drive for optimal pe rformance with just a few simple clicks. Only
available when initially setting up Toolkit for your drive .
Manual formatting Use Disk Management (Windows) or Disk Utility (Mac) to format your drive in non-
native formats.
About file system formats
NTFS—The native file system for Windows. macOS can read NTFS volumes but cannot natively write to
them.
Mac OS Extended (HFS+)—The native hard drive file system for macOS. Windows cannot native ly read or
write to HFS+ (journaled) volumes. This is the be st format if you intend to use your drive with Time
Machine.
exFAT—Compatible with Mac and Windows. e xFAT is not a journaled file system which means it can be
more susceptible to data corruption when errors occur or the drive is not disconnected properly from the
computer.
Toolkit Opmize
Toolkit is designed to help you initially choose the appropriate drive format for your storage needs.
1. Follow the instructions in your product use r manual for setting up your device and installing Toolkit.
2. Toolkit will prompt you to choose be tween formatting the drive for compatibility with both Windows
and macOS, or optimal performance with your computer's ope rating system.
3. Follow any additional onscreen instructions to complete the setup.
32Too lkit
1/5/21
Page 33

Formatting erases everything on the storage device. It's highly recomme nde d that you back up
all data on your storage device before performing the steps below. Seagate and LaCie are not
responsible for any data lost due to formatting, partitioning, or using a storage device .
33Too lkit
1/5/21
Page 34

Import
Import lets you quickly import files from Secure Digital (SD) and microSD memory cards to compatible
Seagate and LaCie storage solutions with integrated card readers. Simply inse rt a memory card and Toolkit
automatically copies your files to your device—no nee d to open folders and drag files.
Unlike other features in Toolkit, Import is not available as an activity on the home page. Instructions are
available in this section to access Import.
Supported devices Product support page User manual
LaCie 1big Dock Product Documentation
LaCie 1big Dock SSD Pro Product Documentation
LaCie Rugged RAID Pro Product Documentation
Seagate DJI Fly Drive Product Documentation
Install Import
Your computer must be connected to the internet to install Import.
To install Import:
1. Connect your supported Seagate or LaCie device to your computer. Make certain to follow the
instructions in your device’s user manual.
2. Ope n Toolkit. Toolkit automatically detects the supported device and adds Import to Toolkit.
3. Insert an SD or microSD memory card containing files into your device’s card reade r. Toolkit asks you
whether you want to automatically import the content of inserted cards to your storage drive.
4. Click Import to confirm that you want Toolkit to automatically copy content from a memory card to your
drive whenever Toolkit detects that a card has been inse rted. If you prefer to activate Import at a later
34To o lkit
1/5/21
Page 35

time , click Skip.
When Import is activated, Toolkit will automatically copy content from the me mory card to your device’s
storage.
Toolkit creates the following folders for all of your imports: DriveName > Toolkit > Import. During an import,
Toolkit adds a uniquely named folde r containing the imported files. The following naming conve ntion is use d:
YYYY-MM-DD_HH.MM.SS_CardName
YYYY
Year
MM
Month
DD
Day
HH
Hour (24-hour clock)
MM
Minutes
SS
Seconds
The name of your memory card
When Import is activated, Toolkit initiates an automated import whenever it de tects that a card has bee n
inse rted in the de vice, regardless of whether the files are duplicates of content in a previous import folde r.
For example, it’s possible to create import folders containing duplicate files if you:
Eject the me mory card, remove the card from the device, and then reinsert the card.
Eject the drive and then reconnect the device while the me mory card is still inserted.
Restart your computer while the device is connected and the memory card is inserted.
Quit Toolkit and restart the app while the device is connected and the memory card is inse rted.
Acvate/deacvate Import
To activate or deactivate the automated Import:
1. Ope n Toolkit.
2. Click on the More icon and select Settings.
3. Click on the Import switch.
Frequently Asked Quesons for Import
35Too lkit
1/5/21
Page 36

Q: Does Import delete the content on my memory card aer it has finished
imporng content to my drive?
A: No. Files are not removed from the memory card while importing.
Q: Can I use Import with an external card reader?
A: No. Import is de signed for use with select Seagate and LaCie devices featuring integrated card readers.
See Supported devices above.
36Too lkit
1/5/21
Page 37

RAID Setup
Toolkit helps you e asily configure the initial RAID level and formatting for compatible drives.
Supported devices Product support page User manual
LaCie 2big RAID Product Documentation
LaCie Rugged RAID Pro Product Documentation
LaCie Rugged RAID Shuttle Product Documentation
Addional resources from LaCie RAID Manager
Toolkit is designed for quick configuration of your initial RAID level. Toolkit will not launch the RAID Setup
wizard once the RAID level or drive format was changed from its factory setting.
Use LaCie RAID Manager if you need to make further changes to your RAID or drive format. LaCie RAID
Manager helps you configure and manage arrays, se t up important email alerts, measure the health of hard
drives, and more.
Learn more about LaCie RAID Manager
LaCie RAID Manager for 2-Bay Devices
Download LaCie RAID Manager
Supported operating systems
RAID explained
37Too lkit
1/5/21
Page 38

RAID stands for redundant array of independent disks. RAID contains the word array, and the two terms are
often used interchangably. An array is a combination of two or more physical disks that are presented to the
operating system as a single volume.
Disks are combined into different RAID configurations known as RAID levels. The RAID level you choose
de pends on which storage attributes are most important to you:
Capacity The total amount of data you can store
Performance The speed at which data is copied
Protection The number of disks that can fail before data is lost
Toolkit RAID helps you initially configure se lect LaCie and Seagate RAID storage de vices with two drives.
Available levels are RAID 0 and RAID 1:
RAID 0—Data is not duplicated on both drives. This results in faster transfers and more storage, since the full
capacity of both drives can be use d to store unique data. Howe ve r, RAID 0 lacks data protection. If a single
drive fails, all data in the array is lost.
RAID 1—Data is duplicated on each disk in the array. If a drive fails, the data remains available on the other
drive. However, this comes at a cost—since the same data is written to each drive, copying data takes longer
and overall storage capacity is reduced by 50%. RAID 1 is a good choice when protecting your data is more
important than performance or ove rall storage space.
To summarize, each RAID level has its own advantages:
RAID level Capacity Performance Protection Factory default
RAID 0 100% Excellent None Yes
RAID 1 50% Good Excellent No
RAID and data security
While RAID 1 can protect data in case of a single drive failure, it cannot guarantee complete data protection
for all cases of hardware failure or data corruption. To help prevent data loss due to any extreme event, it’s
reccommended that you maintain copies of your files on more than one de vice—for example, keep one
copy on your 2-bay de vice and another copy on one of the following:
Another direct-attached storage (DAS) de vice
A network attached storage (NAS) device
Some form of removable or archival storage
38Too lkit
1/5/21
Page 39

Any loss, corruption or destruction of data while using a Seagate or LaCie hard drive or hard drive system is
the sole responsibility of the user. Under no circumstances will Seagate or LaCie be held liable for the
recovery or restoration of data.
Seng RAID level and formang with Toolkit
1. Follow the instructions in your product use r manual for setting up your device and installing Toolkit.
2. Toolkit will prompt you to set the RAID level for the newly detected RAID de vice. (If you don’t see the
prompt—or you rejected it in the past—click on the RAID device on the Toolkit Main Menu.)
Full Capacity and Better
Transfers (RAID 0)
Configures the device as RAID 0. Full storage capacity is
available for your files and your data transfers are faster.
Howe ver, RAID 0 lacks an important feature: data protection.
If a hard drive fails, all data in the array is lost.
File Protection (RAID 1) Configures the device as RAID 1. Each file is stored on both
drives in the array, which means your data is still available if a
single drive fails. However, storage space is cut by 50% and
data transfers are not as fast as RAID 0.
3. Follow any additional onscreen instructions to complete the setup.
Toolkit will not launch the RAID Setup wizard if the RAID level or drive format was previously
changed from its factory setting. See Additional resources from LaCie RAID Manager.
39Too lkit
1/5/21
Page 40

RGB and Status LED Management
Toolkit has options for managing the RGB and Status LED illumination on applicable storage devices.
Pattern RGB Choose from preset patterns or create custom patterns of
your own. Select colors that complement your work or play
environme nt.
Status LED Enable/disable status LED.
Storage device RGB and LED options:
Supported devices Status
LED
Pattern
RGB
Product support
page
User manual
LaCie 1big Dock Yes No Product Documentation
LaCie 1big Dock SSD Pro Yes No Product Documentation
LaCie 2big RAID Yes No Product Documentation
Seagate FireCuda Gaming
Dock
Yes Yes Product Documentation
Seagate FireCuda Gaming
SSD
Yes Yes Product Documentation
Disable/enable the status LED
The status LED is enabled by default. To disable or enable the status LED for your storage device:
1. Connect your storage device to your computer.
2. Ope n Toolkit.
3. On the Home page, click on your storage de vice.
4. Click the Status LED switch to disable/enable the status LED.
Edit RGB illuminaon paerns
The Toolkit RGB activity supports the following RGB pattern controls:
Razer Chroma
40Too lkit
1/5/21
Page 41

FireCuda RGB (default)
Access RGB acvity
To access the RGB activity:
1. Connect your compatible storage device to your computer.
2. Ope n Toolkit.
3. On the Home page, click on the RGB Activity. The RGB Activity scree n appears.
RGB illuminaon sengs
The following settings at the top of the RGB activity screen apply to all RGB pattern controls
Intensity—Move the slider to the right to add more brightness to the RGB and to the left to decrease
brightness.
On—Click the switch to turn the RGB off/on.
Sync Seagate compatible devices—This option is only available if there are two or more compatible
Seagate RGB storage devices. If you have two or more compatible de vices connected to your PC, you
can click the switch to sync the RGB patterns for all devices. Once enabled on any of the connected RGB
storage devices, all RGBs act in unison with changes to the patterns. Disabling this option reverts all
de vices to the de fault FireCuda orange.
Razer Chroma via Razer Synapse 3 app (Windows only)
Razer Chroma is a popular RGB vide o game software management protocol with a rich set of pattern and ingame options. All management is pe rformed in the Razer Synapse application. You can use Razer Synapse for
preconfigured RGB patterns or create new ones. Razer Synapse also supports a growing number vide o
games for RGB illumination that activates with colors matching in-game play. For further information about
supported patterns and games as well as how to download the Razer Synapse application, go to the Razer
Synapse website.
Requirements for Razer Chroma
The latest ve rsion of Toolkit.
Razer Synapse 3 software must be installed and running.
Chroma Connect must be enabled in Razer Synapse 3.
Use Razer Chroma
To use Razer Chroma as the RGB controller, click Enable on the Razer Chroma activity card.
Important—Toolkit RGB control is compatible with Razer Synapse 3 or higher. Razer Synapse 2
cannot control Seagate RGB storage device LEDs.
41Toolkit
1/5/21
Page 42

FireCuda RGB app
FireCuda RGB is the native Toolkit RGB management protocol. It is enabled by default.
Edit Paern LED sengs
The pattern LED settings let you:
Select a pattern type .
Choose colors for the selected pattern.
Control animation times.
Change global se ttings.
To edit Pattern LED settings, click on the Edit icon ( ) on the FireCuda RGB activity. The LED Settings
screen appears:
A. Select Pattern— Se lect a pattern type.
B. Preview—Preview the current pattern. Specify animation times for applicable patterns (se e table below).
C. Change Color—Add/remove colors for applicable patterns (se e table below).
D. Global Settings—Change global settings.
E. Done—Confirm changes to pattern settings.
42Toolkit
1/5/21
Page 43

Select a paern
Select from the following pattern types:
Pattern Description Total animation time User selections
Solid Displays a single color
continuously.
100% color hold Single color
Blink Turns a single color of
your choosing on/off.
6s
50% color hold
50% off
Single color
Breathe Fades a single color of
your choosing on/off.
User selected
(de fault=6s)
25% color hold
25% fade off
25% off
25% fade on
Single color
Total animation time
Spectrum Transitions betwe en six
colors: red, orange,
yellow, gree n, blue, and
violet.
User selected
(de fault=18s)
50% color holds
(8.33% pe r color)
50% color
transitions (8.33%
pe r transition)
Total animation time
Custom
1
Displays a custom pattern
you've created.
User selected
(de fault=6s)
Multiple colors
Color hold time
Color transition time
Custom
2
Displays a custom pattern
you've created.
User selected
(de fault=21s)
Multiple colors
Color hold time
Color transition time
Custom
3
Displays a custom pattern
you've created.
User selected
(de fault=2s)
Multiple colors
Color hold time
Color transition time
Preview selected paern
The Previe w window lets you view the colors, transitions, and timing of the selected pattern.
43Toolkit
1/5/21
Page 44

The total animation time (the time it takes for one cycle of the pattern to be completed) appears below the
Preview window:
For longer total animation times (starting at 15 seconds), the Preview window will automatically speed up the
playback animation so that you can see your changes faster. The current playback speed is displayed next to
the total animation time.
Timing controls
Timing controls are displayed in the Preview section for the following pattern types:
Breathe
Spectrum
Custom
Breathe
Use the slider to set the total animation time:
The total animation time is broken down e ve nly betwe en color holds and transitions:
44Too lkit
1/5/21
Page 45

25% color hold
25% fade off
25% off
25% fade on
Spectrum
Use the slider to set the total animation time:
The total animation time is broken down e ve nly betwe en color holds and transitions:
50% color holds (8.33% per color)
50% color transitions (8.33% per transition)
Custom
Use the sliders to control color hold and transition time s:
A. Color hold setting—Represents the total time spent spe nt holding on colors. The total time is divided by
the number of colors in the pattern.
B. Color transition setting—Represents the total time spent transitioning from one color to the next color.
The total time is divided by the number of transitions in the pattern.
Note that the color hold se tting and color transition setting together de termine the total animation time.
Change colors
Single color paerns
Solid, Blink, and Breathe patterns only allow one color to be selected:
45Toolkit
1/5/21
Page 46

A. Click on a color to select it.
B. Click on the Rese t icon to se lect the default orange color.
Custom paerns
Custom patterns allow you to select up to six colors:
A. Click on the Add icon to add a color to the sequence.
B. Click to select a color in the sequence.
C. Click on the Grid icon to drag the selected color to a different position in the se quence.
D. Click on the Remove icon to remove the selected color from the sequence.
E. Click to change the selected color.
F. Click on the Rese t icon to select the default colors and se ttings for the custom pattern.
Change global sengs
Use the following settings to control your storage device's pattern LED:
46Toolkit
1/5/21
Page 47

Setting Description
Brightness Move the slider to control pattern LED brightness. The default setting
is 100%.
Always on When enabled, the pattern LED is illuminated whenever the storage
de vice is powered on. Enabling Always on disables Sleep with display.
Sleep with display When enabled, the pattern LED is not illuminated when the host
computer is asleep or powered off. Enabling Sleep with display
disables Always on.
47Toolkit
1/5/21
Page 48

Sengs
To vie w app settings as well as support, documentation, and software information, click the More icon ( )
on the Main Menu and se lect Settings.
Start Toolkit automatically at startup When enabled, Toolkit opens automatically
when the computer is started. Note that Toolkit
must be open in orde r to run scheduled
backups.
Toolkit updates
Toolkit checks for updates provide d the app is open and the computer is connected to the internet. Toolkit
will automatically check for updates in the following events:
The computer restarts and Toolkit is relaunched.
You quit Toolkit and relaunch Toolkit.
24-hours have elapsed since the last check.
48Toolkit
1/5/21
Page 49

Toolkit and Thunderbolt Daisy Chaining
Toolkit doe s not currently support daisy chaining.
Toolkit lists only the drive directly connected to your computer, and not the other drives in the daisy
chain.
The listed drive shows a capacity equal to all the drives on the Thunde rbolt daisy chain.
For more information, see this knowledge base article at Seagate Support.
49Toolkit
1/5/21
 Loading...