

Seagate STCEA101-RK - FreeAgent Theater - Digital AV Player,FreeAgent Theater User Manual
FreeAgent® | Theater
™
User Guide

FreeAgent® | Theater™ User Guide
© 2008 Seagate Technology LLC. All rights reserved. Seagate, Seagate Technology, the Wave
logo, and FreeAgent are trademarks or registered trademarks of Seagate Technology LLC, or one
of its affiliates. All other trademarks or registered trademarks are the property of their respective
owners. When referring to hard drive capacity, one gigabyte, or GB, equals one billion bytes and
one terabyte, or TB, equals one thousand billion bytes when referring to hard drive capacity. In
addition, some of the listed capacity is used for formatting and other functions, and thus will not be
available for data storage. Quantitative usage examples for various applications are for illustrative
purposes. Actual quantities will vary based on various factors including file size, file format, features,
and application software. Seagate reserves the right to change, without notice, product offerings or
specifications.
Seagate Technology LLC
920 Disc Drive
Scotts Valley CA 95066 U.S.A.

Contents
1. Overview . . . . . . . . . . . . . . . . . . . . . . . . . . . . . . . . . . . . . . . . . . . . . . . 5
Using FreeAgent | Theater . . . . . . . . . . . . . . . . . . . . . . . . . . . . . . . . . . . . . . 5
FreeAgent | Theater Components . . . . . . . . . . . . . . . . . . . . . . . . . . . . . . 6
Navigating the FreeAgent | Theater Menus . . . . . . . . . . . . . . . . . . . . . . . . . 10
Selecting a Storage Drive . . . . . . . . . . . . . . . . . . . . . . . . . . . . . . . . . . . . . . 10
Organizing Media Files and Folders . . . . . . . . . . . . . . . . . . . . . . . . . . . . . . 10
Preparing Background Music Files for Slideshows . . . . . . . . . . . . . . . . 11
2. Setting Up FreeAgent | Theater . . . . . . . . . . . . . . . . . . . . . . . . . . . . 12
Selecting a Screen Language . . . . . . . . . . . . . . . . . . . . . . . . . . . . . . . . . . . 12
Configuring Your Media Player . . . . . . . . . . . . . . . . . . . . . . . . . . . . . . . . . . 12
Audio Setup . . . . . . . . . . . . . . . . . . . . . . . . . . . . . . . . . . . . . . . . . . . . . . 13
Video Setup . . . . . . . . . . . . . . . . . . . . . . . . . . . . . . . . . . . . . . . . . . . . . . 13
Resetting Your Media Player . . . . . . . . . . . . . . . . . . . . . . . . . . . . . . . . . 17
System Setup . . . . . . . . . . . . . . . . . . . . . . . . . . . . . . . . . . . . . . . . . . . . 17
Photo Slideshow Setup . . . . . . . . . . . . . . . . . . . . . . . . . . . . . . . . . . . . . 18
Movie Setup . . . . . . . . . . . . . . . . . . . . . . . . . . . . . . . . . . . . . . . . . . . . . . 20
Contents
3. Playing Music . . . . . . . . . . . . . . . . . . . . . . . . . . . . . . . . . . . . . . . . . . 22
Supported Audio File Types . . . . . . . . . . . . . . . . . . . . . . . . . . . . . . . . . . . . 23
Playback Options . . . . . . . . . . . . . . . . . . . . . . . . . . . . . . . . . . . . . . . . . . . . 23
4. Playing Videos . . . . . . . . . . . . . . . . . . . . . . . . . . . . . . . . . . . . . . . . . . 24
Supported Video File Types . . . . . . . . . . . . . . . . . . . . . . . . . . . . . . . . . . . . 25
Video Display . . . . . . . . . . . . . . . . . . . . . . . . . . . . . . . . . . . . . . . . . . . . . . . 25
Subtitle Formats . . . . . . . . . . . . . . . . . . . . . . . . . . . . . . . . . . . . . . . . . . 25
Video Playback Features . . . . . . . . . . . . . . . . . . . . . . . . . . . . . . . . . . . . 26
5. Viewing Photos . . . . . . . . . . . . . . . . . . . . . . . . . . . . . . . . . . . . . . . . . 27
Viewing Individual Photos . . . . . . . . . . . . . . . . . . . . . . . . . . . . . . . . . . . . . . 27
Browsing Photo Thumbnails . . . . . . . . . . . . . . . . . . . . . . . . . . . . . . . . . . . . 28
Rotating Photos . . . . . . . . . . . . . . . . . . . . . . . . . . . . . . . . . . . . . . . . . . . . . . 29
Playing Photos and Videos from Compatible Digital Cameras . . . . . . . . . . 30
Playing a Slideshow . . . . . . . . . . . . . . . . . . . . . . . . . . . . . . . . . . . . . . . . . . 31
FreeAgent® | Theater™ User Guide 3

Contents
Slideshow Features . . . . . . . . . . . . . . . . . . . . . . . . . . . . . . . . . . . . . . . . 32
6. Using the FreeAgent | Theater Desktop Application . . . . . . . . . . . 33
Installing the FreeAgent | Theater Software . . . . . . . . . . . . . . . . . . . . . . . . 33
Using the FreeAgent | Theater Application . . . . . . . . . . . . . . . . . . . . . . . . . 34
Accessing the FreeAgent Drive Features . . . . . . . . . . . . . . . . . . . . . . . 34
Using the System Tray Status Icon . . . . . . . . . . . . . . . . . . . . . . . . . . . . 35
Restoring the System Tray Status Icon . . . . . . . . . . . . . . . . . . . . . . . . . 36
7. Using Media Sync . . . . . . . . . . . . . . . . . . . . . . . . . . . . . . . . . . . . . . . 38
Using Simple Sync . . . . . . . . . . . . . . . . . . . . . . . . . . . . . . . . . . . . . . . . . . . 39
Using Custom Sync . . . . . . . . . . . . . . . . . . . . . . . . . . . . . . . . . . . . . . . . . . . 39
Managing Media Sync Settings . . . . . . . . . . . . . . . . . . . . . . . . . . . . . . . . . . 40
Editing Media Sync Settings . . . . . . . . . . . . . . . . . . . . . . . . . . . . . . . . . 40
Checking Sync Status . . . . . . . . . . . . . . . . . . . . . . . . . . . . . . . . . . . . . . 40
Deleting Media Sync Settings . . . . . . . . . . . . . . . . . . . . . . . . . . . . . . . . 41
Using Automatic Sync . . . . . . . . . . . . . . . . . . . . . . . . . . . . . . . . . . . . . . . . . 41
Turning Off Automatic Sync . . . . . . . . . . . . . . . . . . . . . . . . . . . . . . . . . . 41
8. About DivX® Certification . . . . . . . . . . . . . . . . . . . . . . . . . . . . . . . . 42
About DivX . . . . . . . . . . . . . . . . . . . . . . . . . . . . . . . . . . . . . . . . . . . . . . . . . 42
Index . . . . . . . . . . . . . . . . . . . . . . . . . . . . . . . . . . . . . . . . . . . . . . . . . . . . 43
FreeAgent® | Theater™ User Guide 4
1. Overview Using FreeAgent | Theater
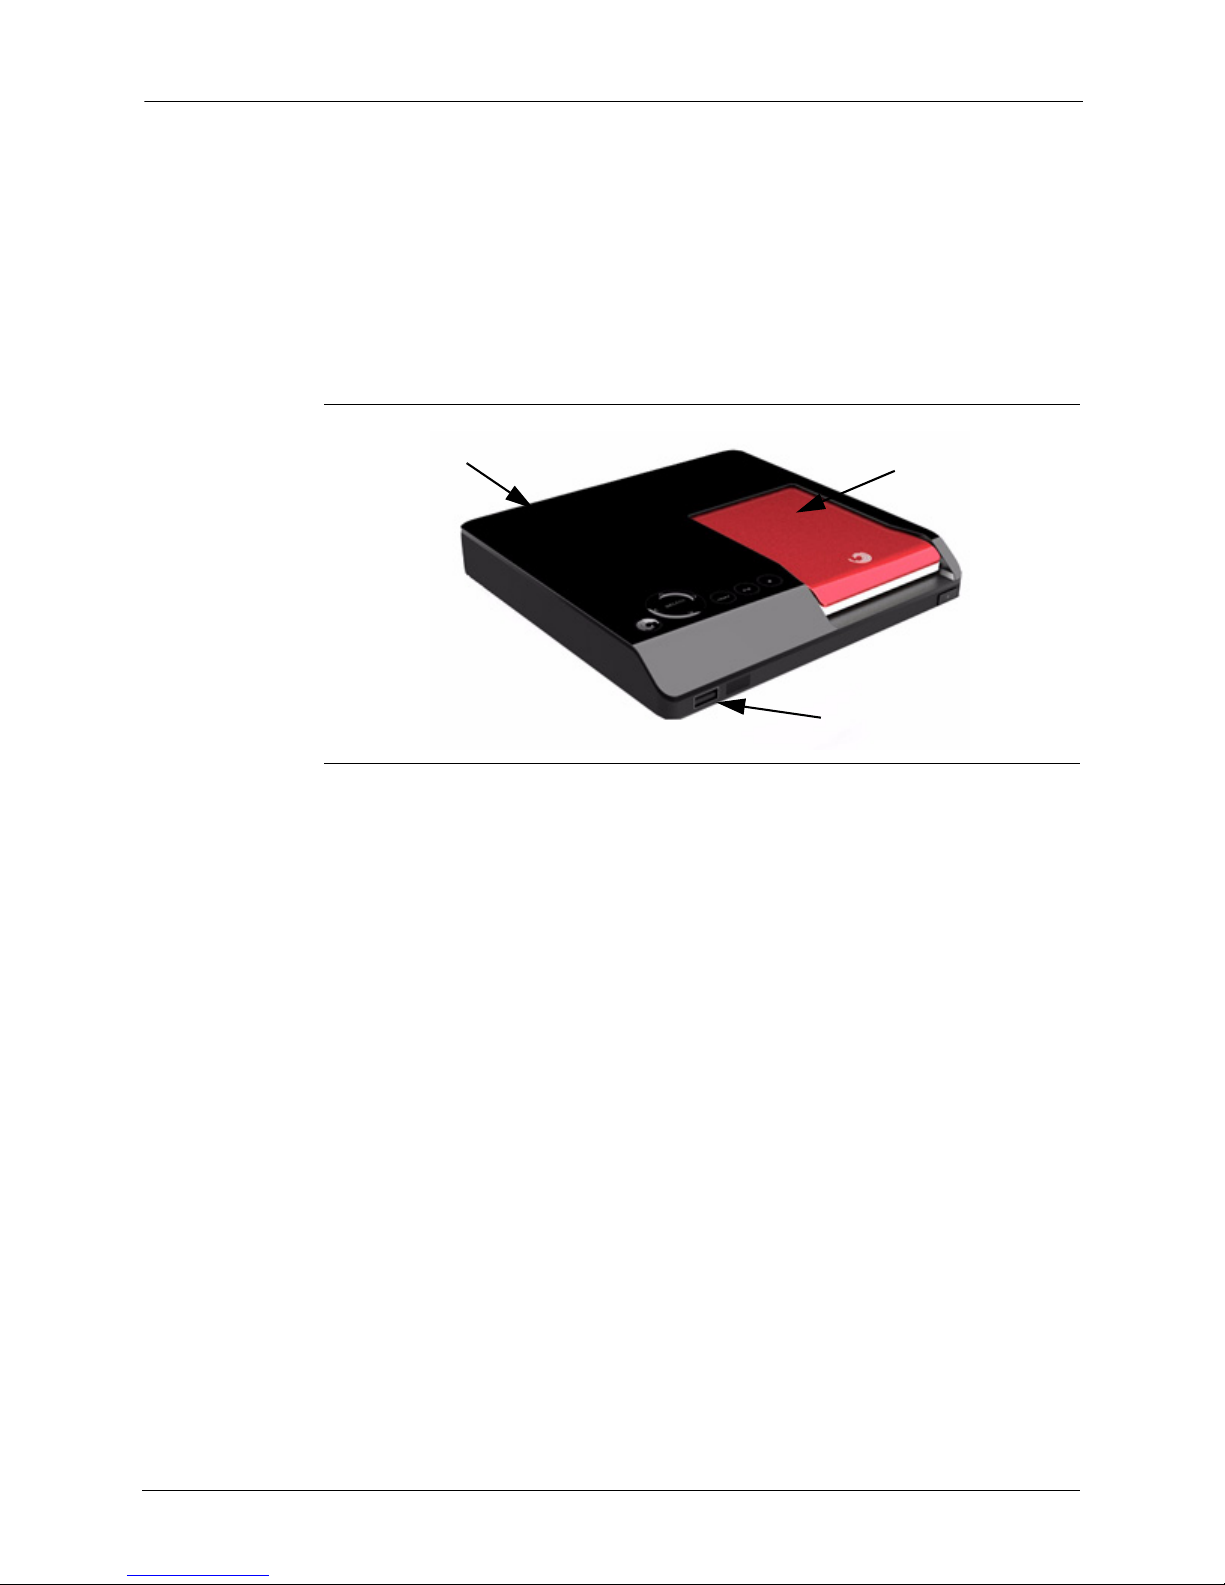
USB Port
FreeAgent | Go Drive
FreeAgent | Theater Media Player
1. Overview
The FreeAgent | Theater media player lets you use your TV to play digital
media files copied from your compute. You use the FreeAgent | Go drive to
collect videos, photos, and music from your computer and the FreeAgent |
Theater media player to play them on your TV.
Using FreeAgent | Theater
Figure 1: FreeAgent | Theater with FreeAgent | Go Drive
In addition to using the FreeAgent | Go drive with your media player, you can
use the USB port on the front of the media player to connect any NTFS- or
FAT32-formatted USB external storage device to the media player. You can
also play images and videos directly from compatible digital cameras via a
USB cable.
You can use the FreeAgent | Theater media player without installing the
FreeAgent | Theater application software by dragging media files from your
computer to your FreeAgent drive and using the media player to play them on
your TV. However, the FreeAgent | Theater application allows you to access
your external drive features and to synchronize media folders on your drive
with those on your PC.
To use the FreeAgent | Theater with a FreeAgent | Go drive,
1. If you want to use the FreeAgent | Theater application to manage and sync
your media files, install the software on your computer from the FreeAgent
| Theater Installation CD included with the FreeAgent | Theater.
2. Connect the PC dock to your computer and insert your FreeAgent | Go
drive.
FreeAgent® | Theater™ User Guide 5

1. Overview Using FreeAgent | Theater
3. If you’ve installed the software, use the FreeAgent | Theater desktop
application to select the media files you want to play on your TV and follow
the on-screen instructions to copy those files onto your FreeAgent drive.
— OR —
If you’ve chosen not to install the FreeAgent | Theater software, drag media
files from your PC to your FreeAgent drive.
4. Remove the FreeAgent drive from the PC dock and insert it in the media
player connected to your TV.
Note: If you haven’t connected the media player to your TV yet, follow the steps in
the Setup Guide included in your shipping carton to connect the components.
5. Use the remote control to navigate through the media player menus to
access and play your videos, photos, and music on your TV.
Note: The FreeAgent | Theater media player works with any NTFS- or FAT32-
formatted USB external storage device or compatible digital camera
connected to the USB port on the front of the media player.
FreeAgent | Theater Components
FreeAgent | Theater consists of these components:
• A media player that connects to your TV and works with both standard
definition and high definition TVs
• A PC dock that connects to your computer
• A FreeAgent | Go external drive that connects directly to both the media
player and the PC dock for easy transport of media files between
computer and TV
• A remote control to navigate the FreeAgent | Theater TV interface
• A CD containing the FreeAgent | Theater application software and this
FreeAgent | Theater User Guide
FreeAgent® | Theater™ User Guide 6
1. Overview Using FreeAgent | Theater
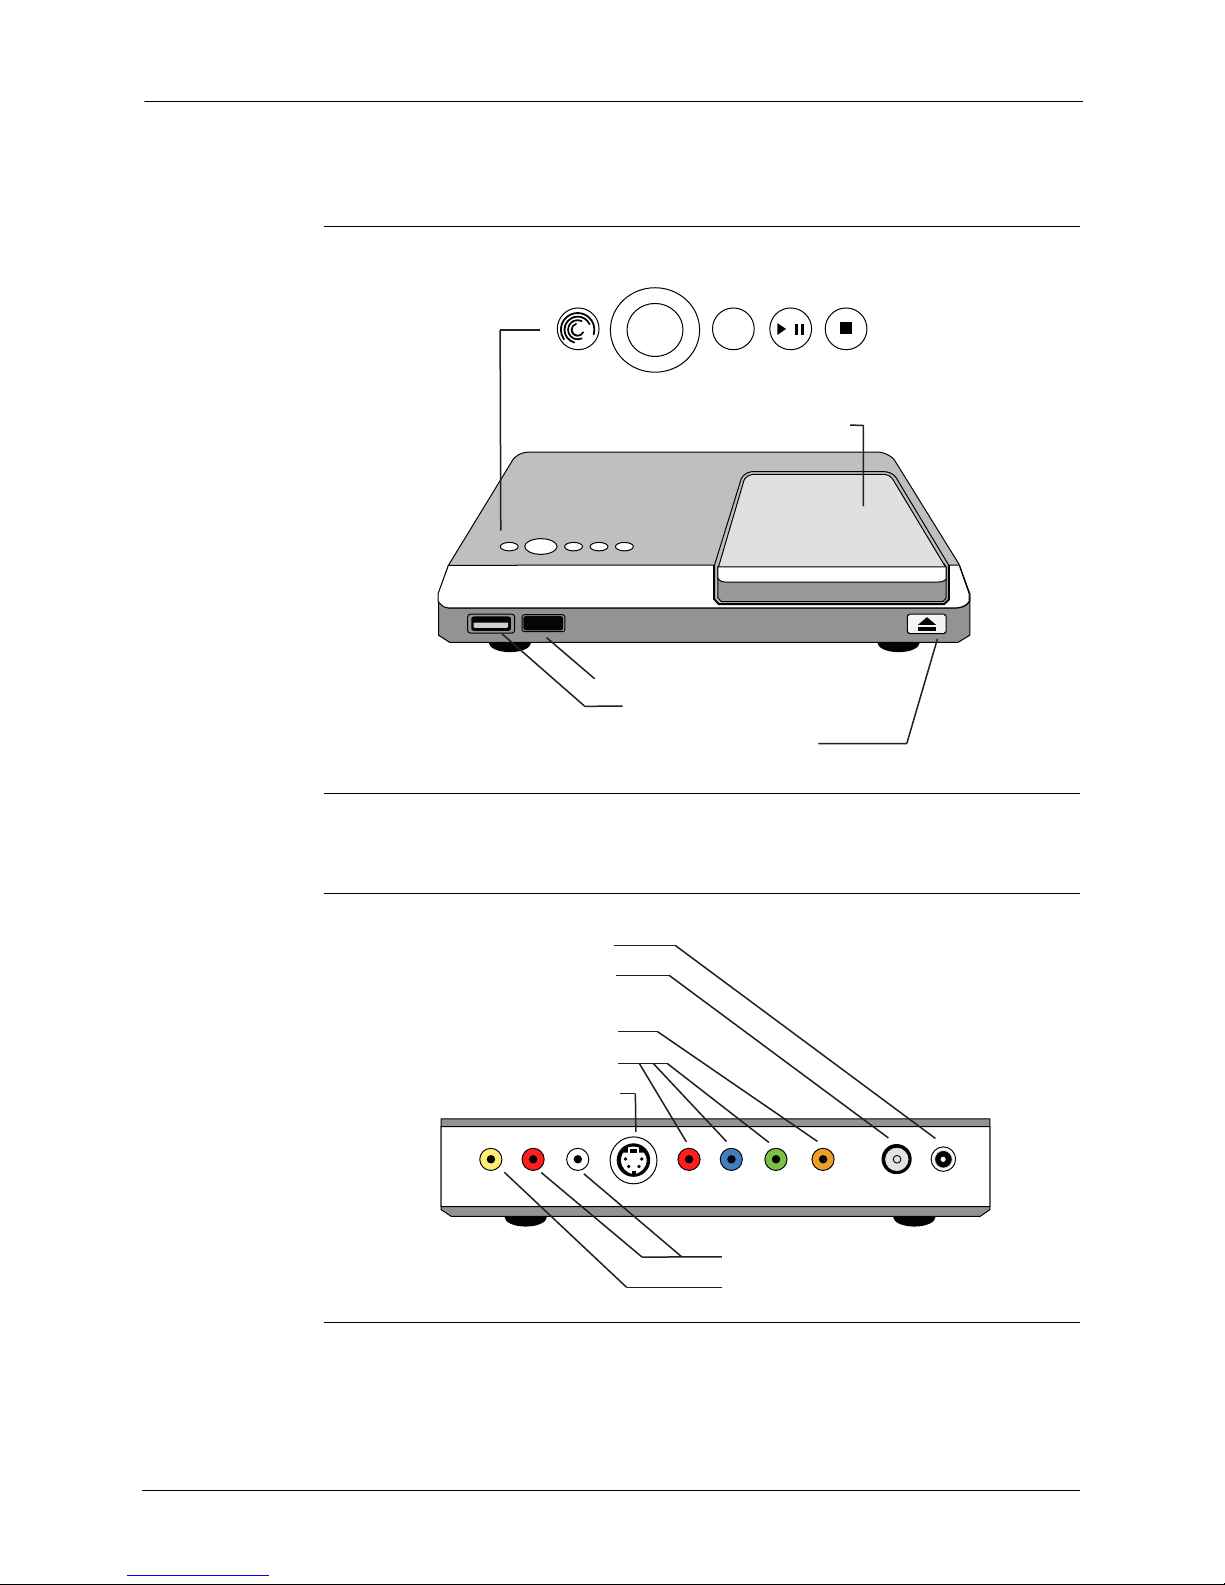
SELECT MENU /
>
>
>
>
Navigate
Play/Pause StopPower
Eject button
IR lens
FreeAgent™ | Go drive in play po sition
USB port
Composite video
S-Video co nnecto r
Component video
AC3 coax audio
co nnecto r
DC connector
Reset button
Analog audio
PrPbY
FreeAgent | Theater Media Player
Figure 2: FreeAgent | Theater Media Player: Front View
Figure 3: FreeAgent | Theater Media Player: Rear View
FreeAgent® | Theater™ User Guide 7
1. Overview Using FreeAgent | Theater
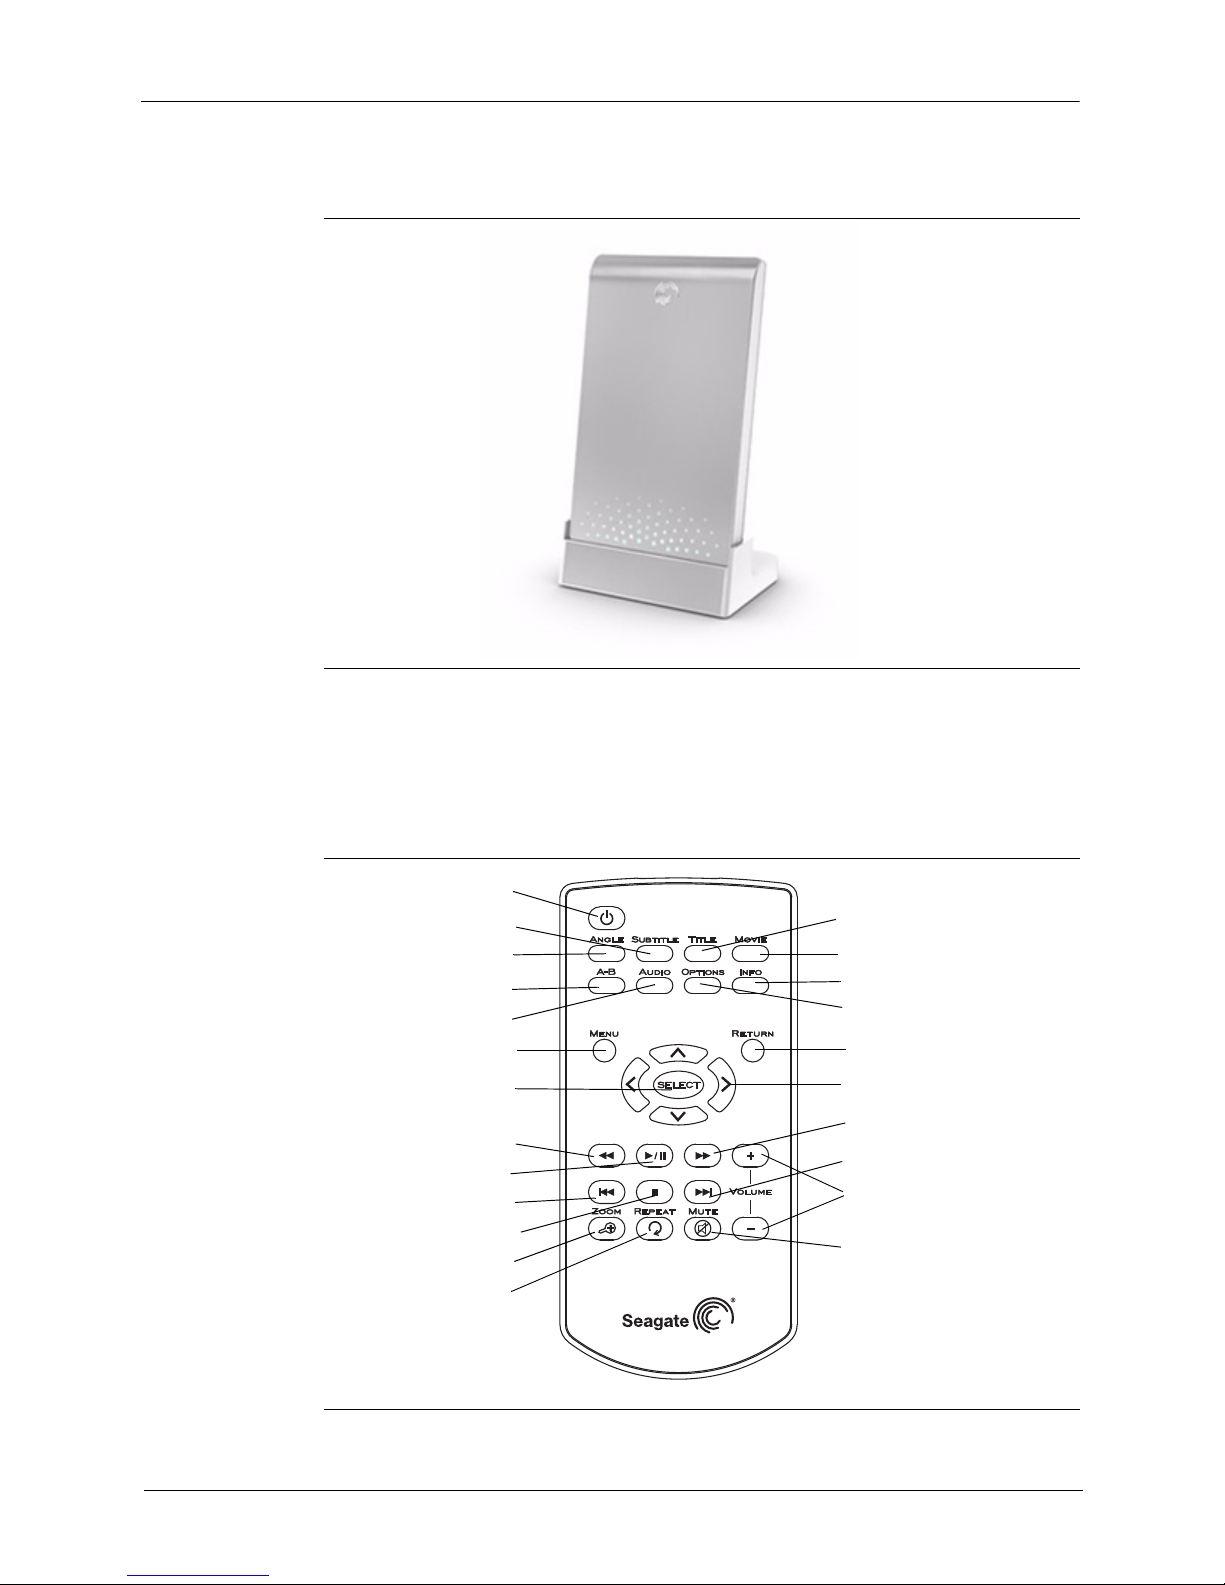
ANGLE
SUBTITLE
On/Off
A-B
AUDIO
TITLE
MOVIE
INFORMATION
OPTIONS
MENU
RETURN
SELECT
PLAY/PAUSE
FORWARD
STOP
ZOOM
REPEAT
Navigation Buttons
REVERSE
PREVIOUS
NEXT
VOLUME+/VOLUME-
MUTE
FreeAgent | Go Drive and PC Dock
Figure 4: PC Dock with FreeAgent | Go Drive Inserted
Remote Control
All media player features can be controlled using the remote control buttons.
Certain functions can also be completed using the controls on the front of the
media player.
Figure 5: Remote Control
FreeAgent® | Theater™ User Guide 8

1. Overview Using FreeAgent | Theater
Table 1: Remote Control Buttons
On/Off: Turn FreeAgent | Theater on and off. Navigation Buttons: Press the arrow buttons to
navigate the menus.
ANGLE: Switch a movie angle or rotate a photo. << (REVERSE): Press to fast reverse the current
playback.
Press repeatedly to select faster reverse speeds.
SUBTITLE: Activate available subtitles when playing
®
DivX
files.
|| (PLAY/PAUSE): Play or pause movies, music,
> /
and photos.
Supported subtitle formats: SRT, SMI, SUB, SSA
TITLE: Open the movie title menu. >> (FORWARD): Press to fast forward the current
playback.
Press repeatedly to select faster forward speeds.
MOVIE: Open the movie main menu. VOLUME+/VOLUME-: Increase or decrease volume.
A-B: Select a start (A) and end (B) point in a video and
replay that portion.
|<< (PREVIOUS): Return to the previous file when
playing music or viewing photos or to the previous
chapter in a video.
Page up in a file list.
AUDIO: Select a language for an audio track in a file.
OPTIONS: Search Title/Chapter/Time.
Change from list to thumbnail view when viewing photos.
(STOP): Stop playback.
>>| (NEXT): Go to the next file when playing music
or viewing photos or to the next chapter in a video.
Page down in a file list.
INFORMATION: Display media information such as file
properties or elapsed time.
ZOOM: Zoom in or out when playing photos or
movies. Press repeatedly to select higher zoom
levels.
Photo zoom levels: 2x ,4x, 8x, 16x
Movie zoom levels: 2x, 4x, 8x
MENU: Open the main menu for FreeAgent | Theater. REPEAT: Repeat a music selection or slideshow.
RETURN: Return to the previous screen when navigating
menus.
Change from thumbnail to list view when viewing photos.
SELECT: Confirm a menu selection or play the selected
music, video, or photo file.
FreeAgent® | Theater™ User Guide 9
MUTE: Press to mute audio output; press again to
resume audio.
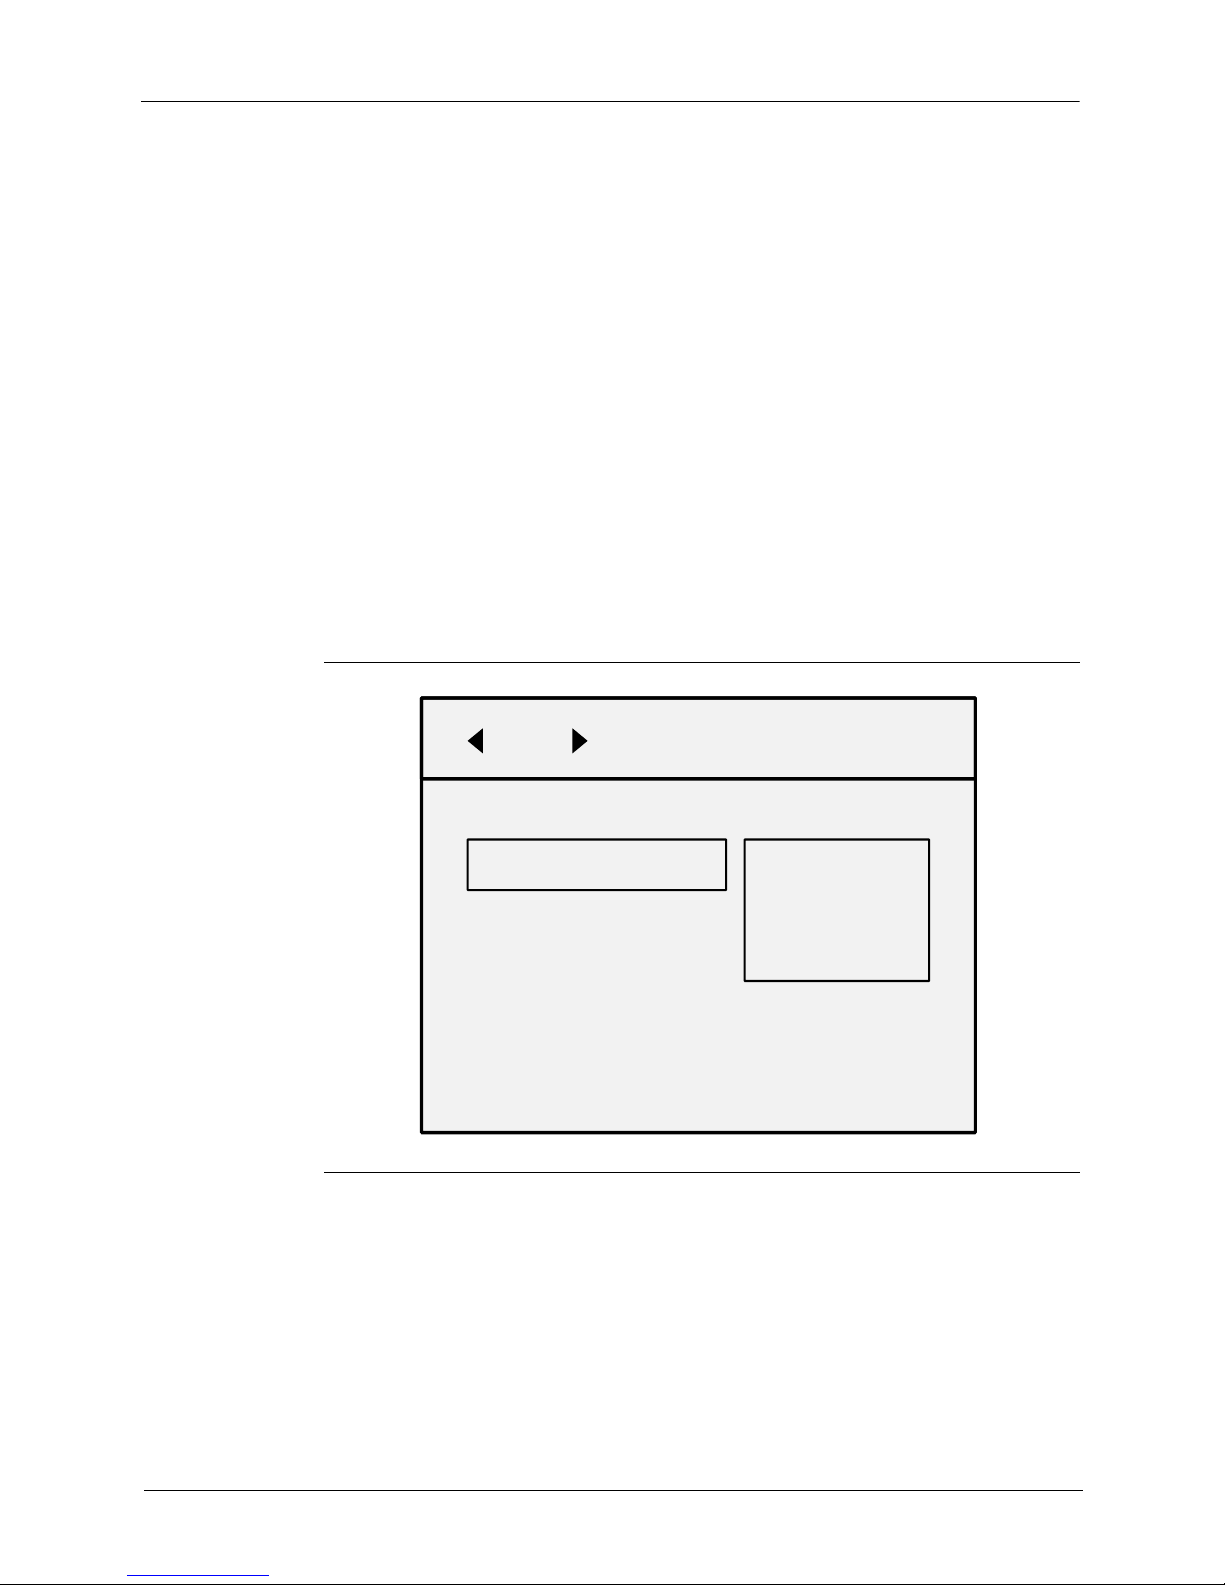
1. Overview Navigating the FreeAgent | Theater Menus
ALL VIDEOS PHOTOS MUSIC
FreeAgent Go
External Storage
Setup
Navigating the FreeAgent | Theater Menus
Use the buttons and arrow keys on the remote control to navigate among the
FreeAgent | Theater media player menus. Each media type has its own set of
submenus that allow you to set up and control the playback of selected files.
See the video, music, and photo sections of this user guide for detailed
information about using those menus.
Selecting a Storage Drive
You can use the media player to play videos, music, and photos you’ve stored
on either a FreeAgent | Go drive or another USB external storage device.
Step 1. On the main menu, select the device (FreeAgent Go or External Storage)
containing the media you want to play on your TV.
If you select External Storage, make sure the external drive is connected to
the USB port on the front of the media player.
Step 2. Navigate through the specific video, photo, and music menus to access fea-
FreeAgent® | Theater™ User Guide 10
Organizing Media Files and Folders
Figure 6: Main Menu
tures available for each media type.
The FreeAgent | Theater stores all the media files and folders you’ve copied
from your computer and displays your files in a structure similar to that seen

1. Overview Organizing Media Files and Folders
on your computer. So before you copy media from your computer, it’s a good
idea to take the time to organize your files in folders and sub-folders whose
names tell you clearly what’s inside.
For example, you can create sub-folders in your My Pictures folder for each
month or for important events, or create sub-folders in your My Music folder
for various genres. Any system will work as long as you give your folders
names that make sense to you and allow you to find the media files you’re
looking for quickly and easily.
Preparing Background Music Files for Slideshows
If you want to be able to play background music with a slideshow of your
pictures on your TV, you must put the desired music files in the same folder as
the photos to be played in the slideshow before you copy your media files
from your PC. The Setup menu on the media player will allow you to turn the
Background Music option on or off, but you must prepare the slideshow folder
on your computer.
For more suggestions on how to organize and label your media files, go to the
Knowledge Base at www.seagate.com.
FreeAgent® | Theater™ User Guide 11
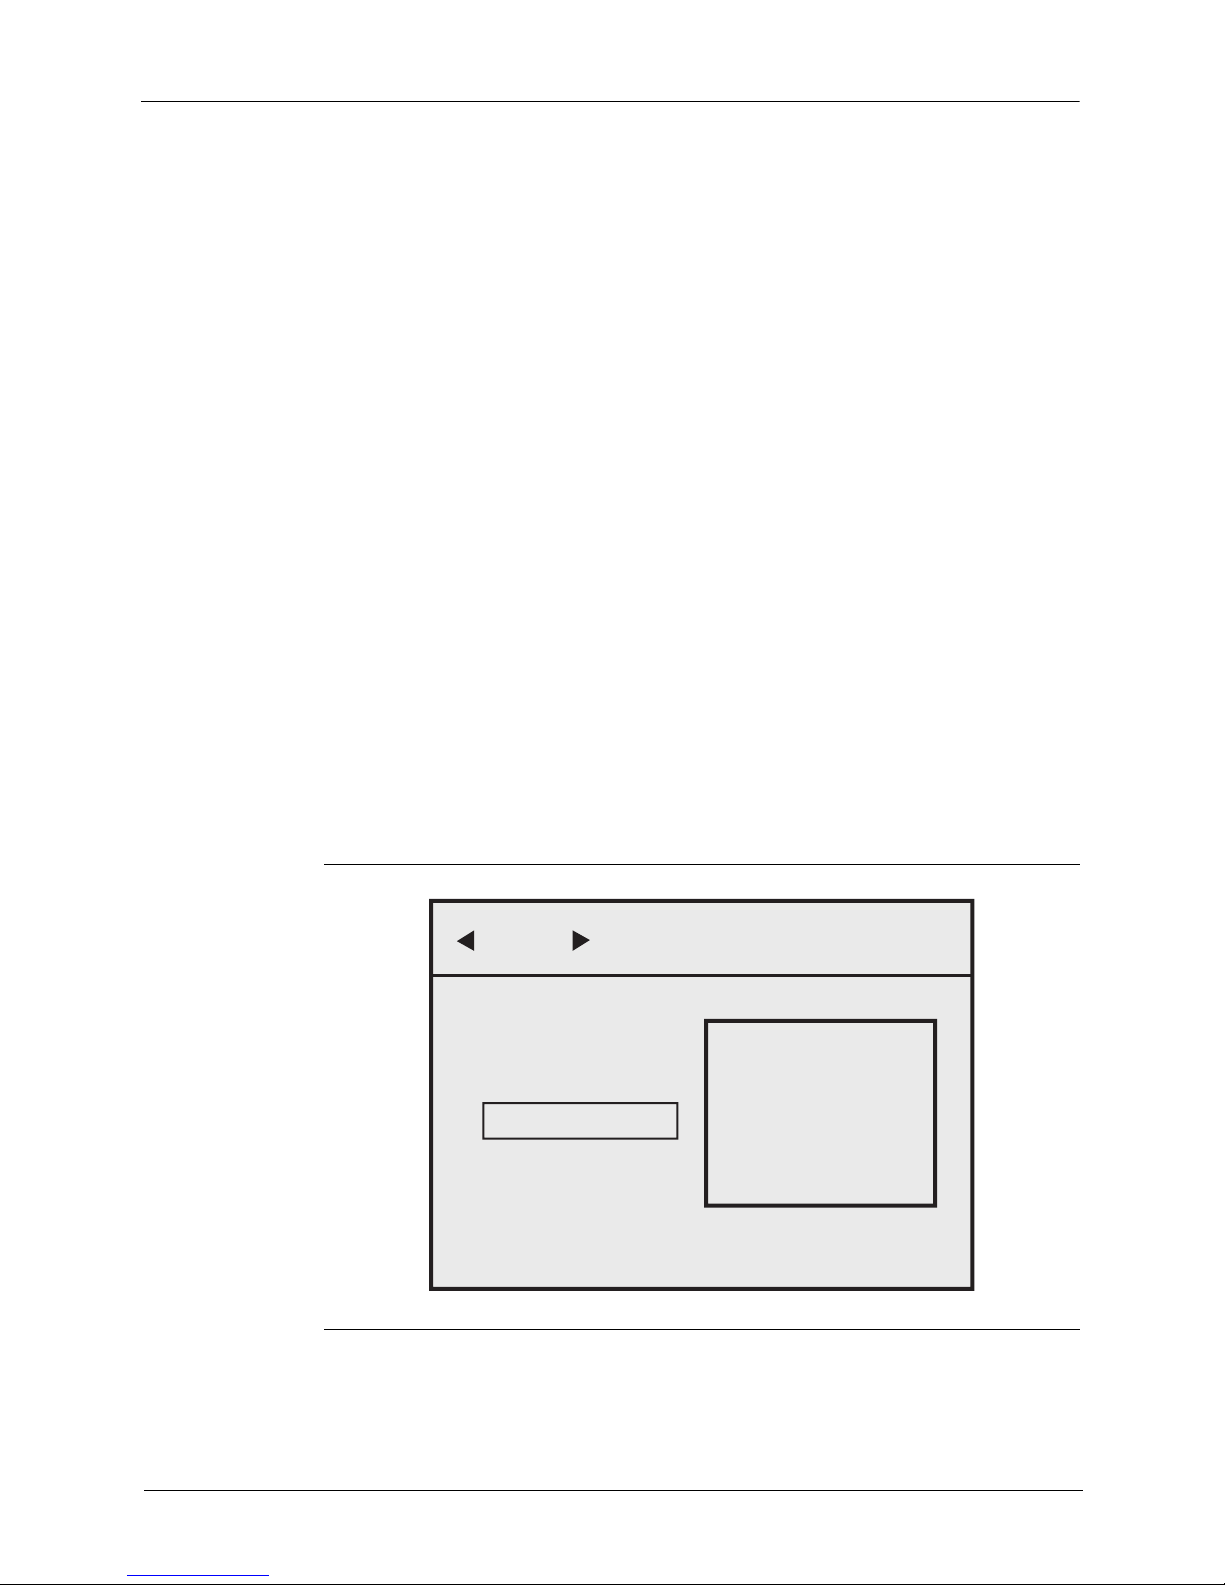
2. Setting Up FreeAgent | Theater Selecting a Screen Language
ALL VIDEOS PHOTOS MUSIC
FreeAgent Go
External Storage
Setup
2. Setting Up FreeAgent | Theater
Although the FreeAgent | Theater media player is ready for use as soon as
you plug it in, you can adjust the audio, video, system, photo, and movie
settings for optimal use with your TV.
See the FreeAgent | Theater Setup Guide included in your product carton for
instructions on how to connect the components.
Selecting a Screen Language
The first time you connect your media player to your TV, a language selection
screen asks you to select your on-screen language from a list of available
languages. You won’t see this screen again unless you reset your media
player to the factory default settings.
Configuring Your Media Player
Use the Setup menu to configure the audio, video, system, photo, and movie
settings for your media player.
To open the Setup menu,
Step 1. Select Setup on the main menu.
FreeAgent® | Theater™ User Guide 12
Figure 7: Main Menu
The Setup menu opens.

2. Setting Up FreeAgent | Theater Configuring Your Media Player
Step 2. In the menu bar at the top of the screen, select the feature whose settings you
want to adjust.
Step 3. To exit the Setup menu, press Return.
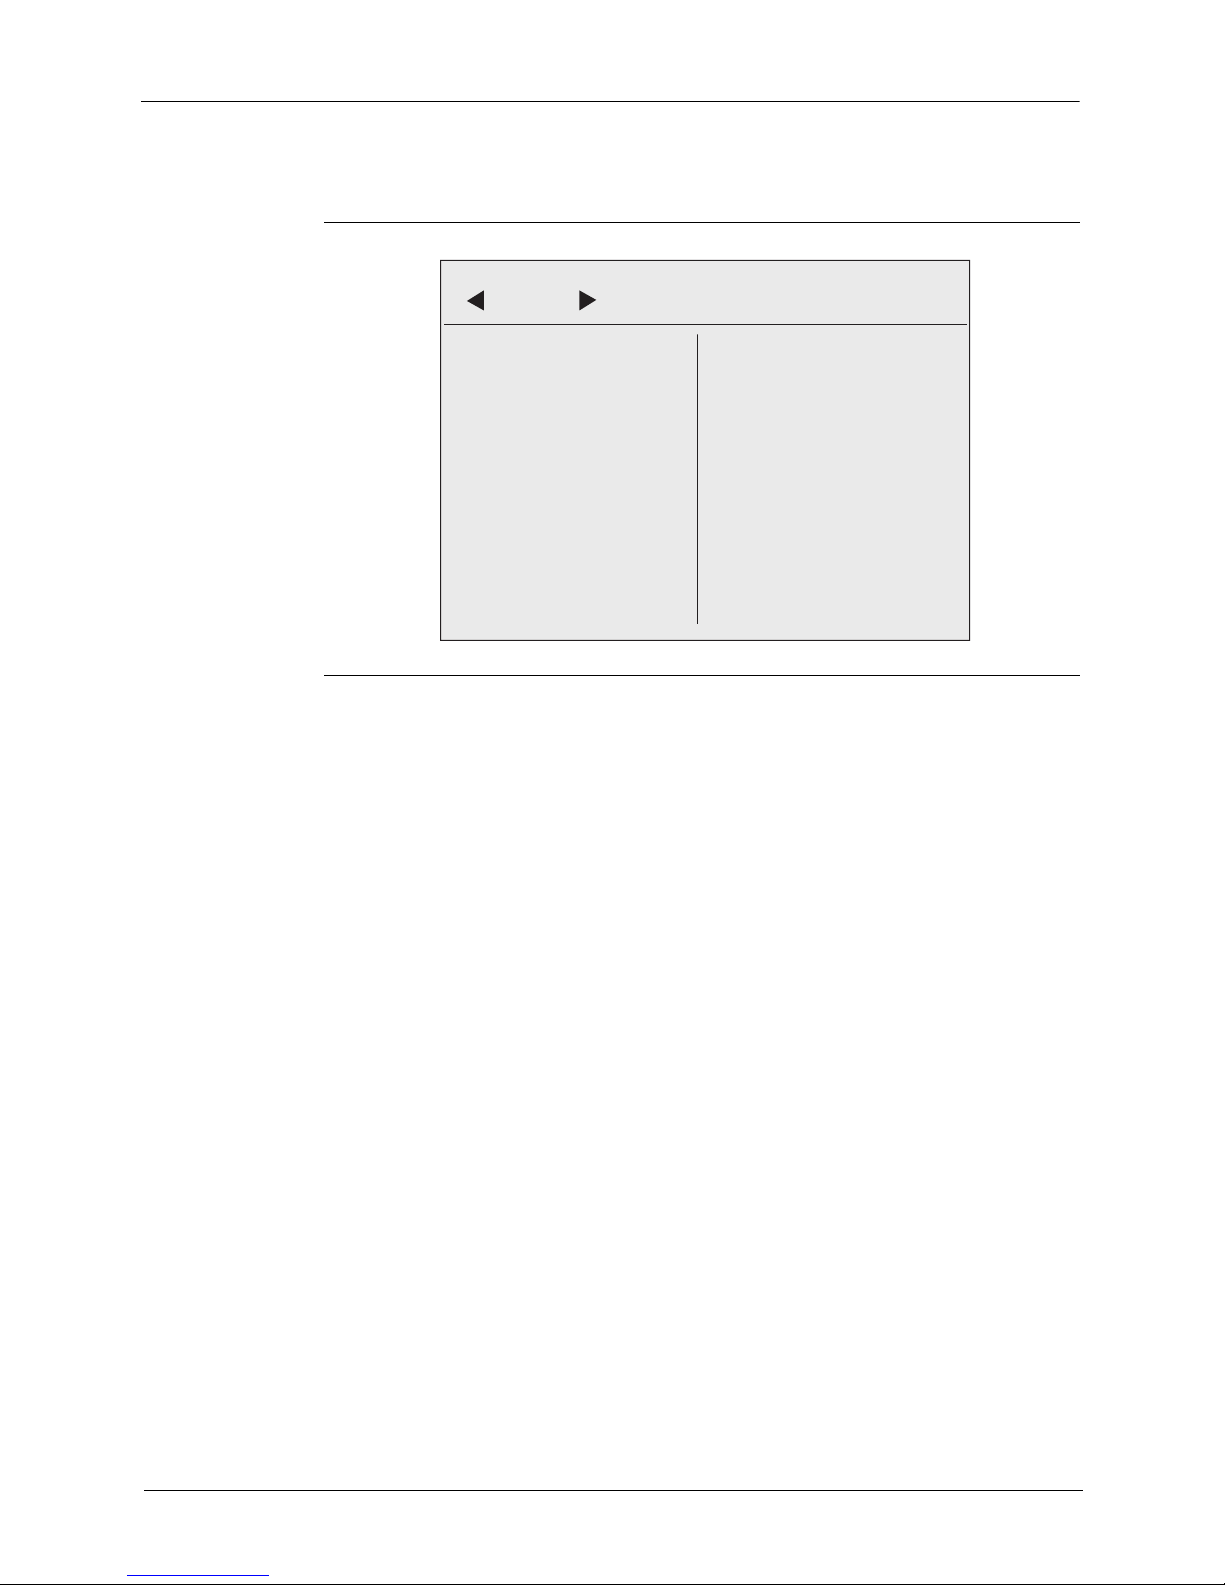
Audio Setup
To set up the way the audio portion of media files is played,
• Click Audio in the menu bar.
AUDIO VIDEO SYSTEM PHOTOS MOVIE
Digital Output SPDIF LPCM
SPDIF RAW
Figure 8: Audio Setup Menu
Audio Digital Output
SPDIF LPCM: Convert the multi-channel audio output into stereo.
SPDIF RAW: Play the digital audio without decoding.
Video Setup
To set up the way images are displayed on your TV,
FreeAgent® | Theater™ User Guide 13
2. Setting Up FreeAgent | Theater Configuring Your Media Player
VIDEO SYSTEM PHOTOS MOVIE AUDIO
Aspect Ratio 16 : 9
Brightness 25
Contrast 25
TV System NTSC
Video Resolution 1080i
• Click Video in the menu bar.
Figure 9: Video Setup Menu
Aspect Ratio
Standard definition TVs display in a 4:3 aspect ratio; high definition TVs
display in a 16:9 aspect ratio.
PAN SCAN 4:3: The standard definition broadcast television format.
Letter Box 4:3: Transfers a wide screen film to a 4:3 video display while
maintaining the film’s original aspect ratio.
16:9: The same viewing area as a movie theater screen.
Brightness
Adjust the picture brightness to the desired level.
Contrast
Adjust the picture contrast to the desired level.
TV System
NTSC: American television standard
PAL: European television standard
Video Resolution
The media player transmits an analog video signal in both standard definition
(SD) and high definition (HD) resolutions for American NTSC- and European
PAL- compatible televisions.
FreeAgent® | Theater™ User Guide 14
You have four video resolution options, which are explained below:
 Loading...