

Seagate Business Storage 4-Bay NAS, STBP100, STBP12000100, STBP16000100, STBP8000100 Quick Start Manual [en, es, fr]
...Page 1
3
1 2
4
4 Bay PANAM
NAS 4 Bay PANAM
Part Numbe r: 100710 043
Folded Size: 120mm W x 150mm H
Trim Size: mm 240W X 450mm H
Colors: 2C/2C
NAS Blue
K
Business
Storage
COVER
Business
Storage
COVER
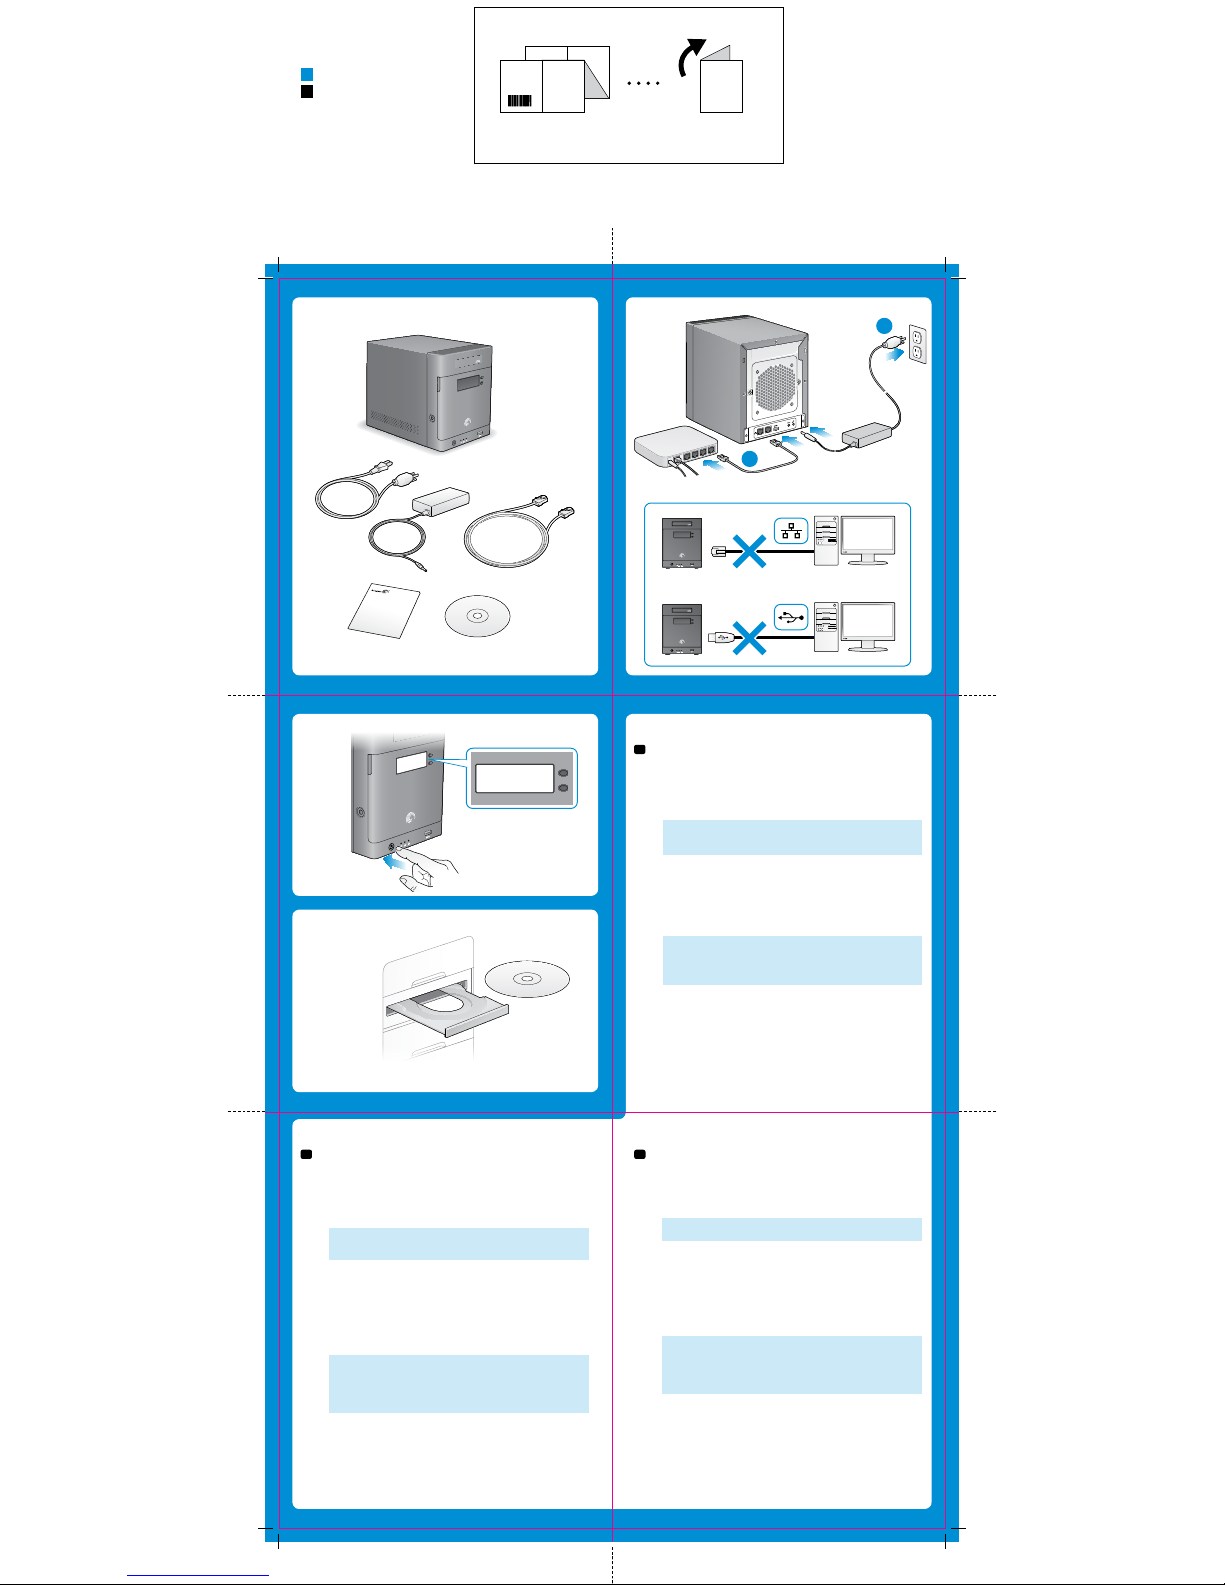
1. Unpack the box.
2. Connect the Seagate NAS.
a. Connect the Ethernet cable from the Se agate NAS to
your router.
b. Connect the power adapter from the Seagate NAS to a
power outlet.
NOTE: Do not connect the Seagate NAS directly to your
computer; connect the computer through a router to the
Seagate NAS.
3. Press the power button on the NAS. Wait for the LCD scre en on
the front panel to display the message “Seagate BlackArmor”. This
may take a couple of minutes.
4 Insert the DVD.
a. Windows: The installation wizard opens automatically.
Windows 7: Click Run Setup.exe in the AutoPlay window.
NOTE: If the installation do es not begin automatically, launch i t manually
by clicking Start and then Run ( Windows). Type d:\setup.e xe when the
Run dialog box display s (where “d” is the drive letter of your com puter’s
CD drive). For Windows 7, click Star t > Computer > Device s with
Removable St orage > BlackA rmor.
b. Follow the on-screen instructions to complete the ins tallation.
Install both Discovery and Ba ckup software unless you are
already using another backup software program.
c. Open Discovery by double-cli cking the icon on your desktop
(Windows) or in your Applications folder (Mac).
EN
4-BAY NAS
Business
Storage
QUICK START GUIDE
a
b
Seagate BlackArmor
FR
1. Desembale la caja.
2. Conecte Seagate NAS.
a. Conecte el cable Ethernet desde Se agate NAS al enrutador.
b. Conecte el adaptador de corriente desde Seagate NAS a un
tomacorrie nte.
NOTA: No conecte Seagate NAS directamente a la computadora;
conecte la computadora a Seagate NAS mediante un enrutador.
3. Presione el botón de encendido de NAS. Es pere que la pantalla
LCD en el panel frontal mues tre el mensaje “Seagate BlackAr mor”.
Esto puede demorar algunos minutos.
4. Inserte el DVD.
a. Windows: El asistente de instalación se inicia
automáticamente. Windows 7: Haga clic en Ejecutar Setup.
exe en la ventana de Reproduc ción automática.
NOTA: Si la instalación no comienza automáticamente, iníciela de forma
manual haciendo clic en Inicio y luego en Ejecutar (Windows). Cuando
aparezca el cuadro de diálogo de Ejecutar, escriba d:\setup.exe (la letra
de unidad “d” hace referencia a la unidad de CD de la computadora).
Para Windows 7, haga clic en Inicio > Equipo > Dispositivos con
almacenamiento extraíble > BlackArmor.
b. Siga las instrucciones en pantalla para completar la instalación.
Instale los software Back up y Discovery a menos que esté
utilizando otro programa de software de copia de resguardo.
c. Para abrir el software Discover y, haga doble clic en el ícono de
su escritorio (Wi ndows) o en la carpeta de Aplicaciones (Mac).
1. Déballez le produit.
2. Connectez le serveur NAS Seaga te.
a. Connectez le câble Ethernet du ser veur NAS Seagate à votre
rou teur.
b. Branchez le cordon d’alimentation du serveur NAS Se agate sur
une prise de courant.
REMARQUE : Ne connectez pas le serveur NAS Seagate directement à
votre ordinateur. Utilisez votre routeur comme intermédiaire entre votre
ordinateur et le serveur NAS.
3. Appuyez sur le bouton de marche/arrêt du se rveur NAS. Attendez
que l’écran LCD du panneau avant affich e le message « Seagate
BlackArmor ». Cet af fichage peut demander quelques m inutes.
4. Insérez le DVD.
a. Windows : L’assista nt d’installation s’ouvre automatiquement.
Sous Windows 7 : Sélectionnez Exécuter Set up.exe dans la
fenêtre Exécution automati que.
REMARQUE : Si l’installation ne démarre pas automatiquement, lancezla manuellement en cliquant sur Démarrer, puis sur Exécuter (Windows).
Saisissez d:\setup.exe dans la boîte de dialogue Exécuter qui s’affiche
(« d » étant la lettre associée au lecteur de CD de votre ordinateur). Pour
Windows 7, cliquez sur Démarrer > Ordinateur > Périphérique de
stockage amovible > BlackArmor.
b. Suivez les instructions à l’écran pour réaliser l’insta llation.
Installez à la fois le logiciel Discovery et le logiciel Backup à moins
que vous n’utilisiez déjà un autre progra mme de sauvegarde.
c. Ouvrez Discovery en double -cliquant sur son icône sur le bureau
(Windows) ou dans le dossier Applications (Mac).
ES
Page 2
1
54
3
6
2
EN
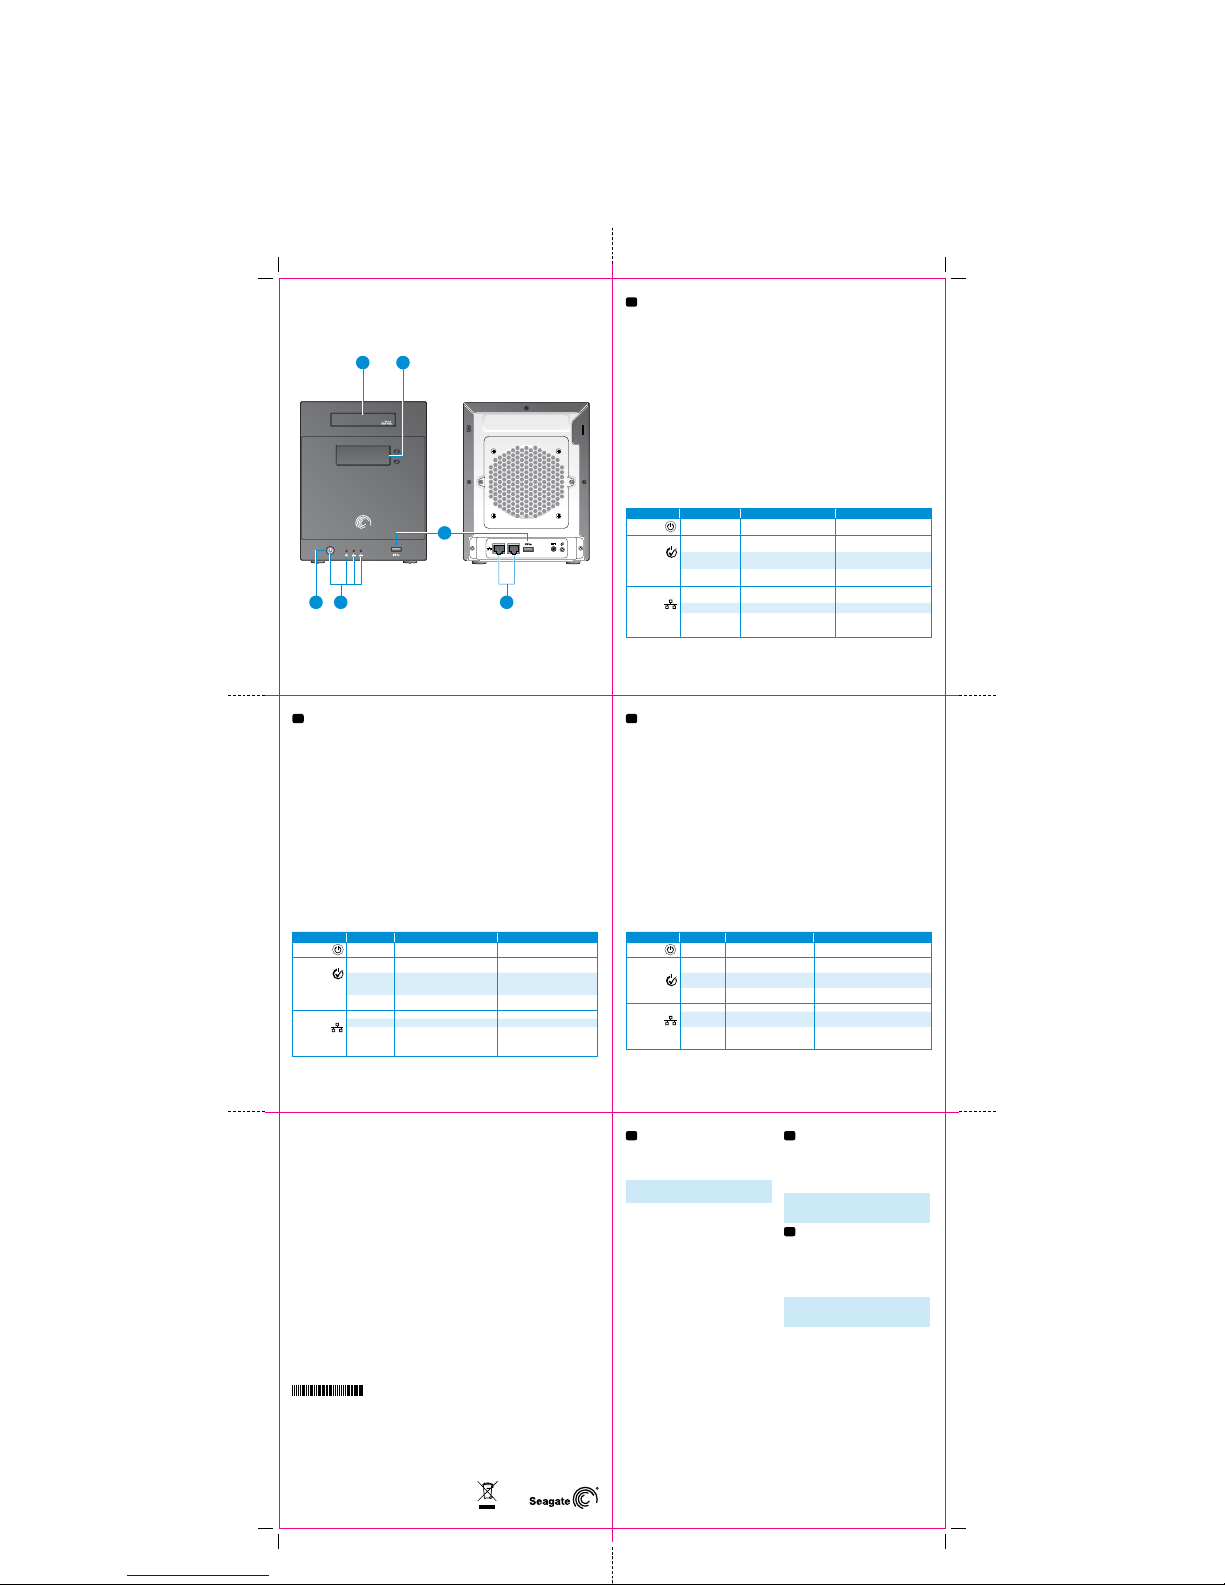
1 USM S lot
The Universal S torage Module (USM) sl ot provides a convenien t way to transfer data to and
from your Seagate N AS. The USM slot is approx imately 17 times faster than a st andard USB 2.0
port. Slide a US M-compatible Sea gate drive into the USM slot to qu ickly move files betwe en the
Seagate drive and t he Seagate NAS.
The OneTouch
®
Transfer feature make s it easy to transfer data t o or from a USM slot and your
Seagate NAS. From yo ur LCD screen, select a di rection to transfer da ta and the contents are
automatically transferred.
2 LCD Sc reen
The LCD screen dis plays current NAS set tings and status infor mation, including eve nt messages
that appear whe n a problem occurs. Us e the buttons on the side of t he LCD screen to scroll up a nd
down for basic navi gation without having to lo g into a computer. Press and ho ld either button to
reveal more detai l about the displayed me ssage.
3 USB 3 .0 Ports
Your Seagate NAS has two U SB 3.0 ports. The por ts are backwards co mpatible with USB 2.0
devices. The po rts also suppor t the OneTouch Transfer feature.
4 Power B utton
The power button i s located on the front pan el of the Sea gate NAS.
5 LED Signals
The LEDs on the fron t and back of your Seagate N AS indicate server st atus and network acti vity,
as described i n this table:
LED State Indication Action to Take
Power
Solid blue
NAS is powered on and ready
for use.
No action required.
System Status
Solid blue button
NAS is powered on and ready
for use.
No action required.
Blinking blue NAS is powering on.
Wait until the LED stops blinking
before accessing the NAS.
Solid amber
NAS has a system or hard drive
error.
Contact Seagate Support.
Network Activity
Solid blue
Network connection is
detected.
No action required.
Blinking blue Network is active. No action required.
Off
No network connection
is detected.
Check Ethernet cables, switch/
router and Internet connection
for disruption.
6 Eth ernet Ports
Your Seagate NAS has two Et hernet ports for co nnecting to one or two lo cal networks.
If you have more questi ons, review the Help and do cumentation provid ed with your Seagate NAS .
FR
1 Emplacement USM
L’emplacement USM (Univers al Storage Module) est un m oyen pratique de trans férer des données
à partir de votre se rveur NAS Seagate et ve rs celui-ci. Cet emp lacement est envir on 17 fois
plus rapide qu’un po rt USB 2.0 classique. In sérez un disque Seaga te compatible USM dans
l’emplacement pou r transférer rapid ement des fichier s entre le disque et le ser veur NAS Seagate.
La fonction OneTouch
®
permet de transférer facilement des données entre un emplacement USM
et votre serveur NAS Seagate. Depuis l’écran LCD, sélectionnez la destination des données.
Celles-ci sont automatiquement transférées.
2 Écr an LCD
L’écran LCD affiche les param ètres actuels du ser veur NAS et les informa tions d’état, comme les
messages qui s’af fichent en cas de prob lème. Utilisez les bou tons qui se trouvent sur le c ôté de
l’écran LCD pour faire d éfiler l’affichage ver s le haut et vers le bas san s avoir à vous connecter
à un ordinateur. Appuy ez sur un bouton et mainten ez-le enfoncé pour voir pl us de détails sur le
message affiché.
3 Por ts USB 3.0
Votre serveur NAS S eagate est doté de deux po rts USB 3.0. Ces por ts sont rétrocompati bles avec
les appareils U SB 2.0. Ils sont égalemen t compatibles avec la fon ction de transfert O neTouch.
4 Bouton de marche/arrêt
Le bouton de march e/arrêt se trouve sur le pan neau avant du serveur N AS Seagate.
5 Voyant s
Les voyants situés à l ’avant et à l’arrière du serveur N AS Seagate indiquent l’éta t du serveur et
l’activité du réseau, c omme décrit dans le ta bleau suivant :
Voyant État Signification Action
Marche/arrêt
Bleu fixe
Le serveur NAS est allumé et prêt
à être utilisé.
Aucune action requise.
État du système
Bleu fixe
Le serveur NAS est allumé et prêt
à être utilisé.
Aucune action requise.
Bleu clignotant
Le serveur NAS est en cours de
démarrage.
Attendez que le voyant s’arrête
de clignoter avant d’accéder au
serveur NAS.
Orange fixe
Le serveur NAS a détecté une
erreur système ou de disque dur.
Contactez le support Seagate.
Activité réseau
Bleu fixe La connexion réseau est détectée. Aucune action requise.
Bleu clignotant Le réseau est actif. Aucune action requise.
Éteint
Aucune connexion réseau n’est
détectée.
Vérifiez les câbles Ethernet, le
commutateur/routeur et assurezvous que la connexion à Internet
n’a pas été interrompue.
6 Por ts Ethernet
Votre serveur NAS S eagate comporte de ux ports Ethernet p our la connexion à un ou deu x réseaux
locaux.
Pour toute questio n, consultez l’aide et la docu mentation fournies a vec votre serveur NAS Se agate.
ES
1 Ranura USM
La ranura Módu lo universal de almac enamiento (USM) ofre ce una manera convenie nte de transferir
datos desde y a Seag ate NAS. La ranura USM e s aproximadamente 17 veces má s veloz que un
puerto USB 2.0 est ándar. Coloque una unida d Seagate compatible c on USM en la ranura USM
para mover rápid amente los archivos ent re la unidad Seagate y Sea gate NAS.
La función de transferencia OneTouch
®
facilita la tran sferencia de datos des de o a una ranura
USM y Seagate NAS. S eleccione una direc ción para transfer ir los datos en la pantall a LCD y los
contenidos se transferirán automáticamente.
2 Pant alla LCD
La pantalla LCD muestra la información de estado y configuraciones actuales de NAS, incluso los
mensajes de eventos que aparecen cuando ocurre algún problema. Utilice los botones al lado de
la pantalla LCD para desplazarse hacia arriba y abajo y poder acceder a una navegación básica sin
tener que iniciar sesión en una computadora. Presione y mantenga presionado cualquiera de los
botones para co nocer más detalles a cerca del mensaje en p antalla.
3 Pue rtos USB 3.0
Seagate NAS pose e dos puertos USB 3.0. L os puertos son com patibles con dispos itivos anteriores
con puertos US B 2.0. Además, los puer tos poseen la funci ón de transferencia O neTouch.
4 Botó n de encendido
El botón de encend ido se encuentra ubic ado en el panel fronta l de Seagate NAS.
5 Ind icadores LED
Los indicadore s LED en la parte fronta l y posterior de Seaga te NAS indican el estado d el servidor y
la actividad de re d, tal como se describ e en la siguiente tabla:
LED Estado Interpretación Medidas por tomar
Encendido
Azul sólido
NAS está encendido y listo
para su uso.
No es necesario tomar medidas.
Estado del
sistema
Botón azul
sólido
NAS está encendido y listo
para su uso.
No es necesario tomar medidas.
La luz azul
parpadea
NAS se está encendiendo.
Espere a que el indicador LED termine
de parpadear para acceder a NAS.
Ámbar sólido
Existe un error en el sistema o
unidad de disco duro de NAS.
Comuníquese con el Soporte de
Seagate.
Actividad de red
Azul sólido Se detecta la conexión de red. No es necesario tomar medidas.
La luz azul
parpadea
La red está funcionando. No es necesario tomar medidas.
Desactivado
No se detecta la conexión
de red.
Controle que no existan irregularidades
en los cables Ethernet, el conmutador/
enrutador y la conexión a Internet.
6 Pue rtos Ethernet
Seagate NAS pose e dos puertos Ether net para efectuar la co nexión a una o dos redes lo cales.
Si tiene preguntas adicionales, consulte la sección de Ayuda y la documentación proporcionada
con Seagate NAS.
© 2012 Seagate Technology LLC. All rights reserved. Seagate, Seagate Technology, and the Wave logo are
trademarks or registered trademarks of Seagate Technology LLC or one of its affiliated companies in the United
States and/or ot her countries. A ll other tradema rks or registere d trademarks ar e the property o f their respect ive
owners. When re ferring to hard dr ive capacity, one gi gabyte, or GB, equ als one billion by tes and one teraby te, or TB,
equals one thou sand billion by tes. Your computer’s ope rating system may u se a different st andard of measur ement
and report a low er capacity. In addi tion, some of the lis ted capacity is u sed for formatt ing and other func tions and
will not be availab le for data storage . The export or re -export of har dware or softwar e containing en cryption may
be regulated by th e U.S. Departmen t of Commerce, Bur eau of Industry a nd Security (fo r more informati on, visit
www.bis.doc.gov). Seagate reserves the right to change, without notice, product offerings or specifications.
Seagate Technology LLC
10200 S. De Anza Blvd .
Cupertino, CA 95014
U.S.A.
PN: 100710 043 06/ 12
EN
WWW.SE AGATE.COM
Visit us at our Sup port pages for a ssistance with:
•Installat ion: Additional instructions and
troubleshooting assistance
•Warranty Information
To contact suppor t, visit us at our Contact Us page.
NOTE: To protect your dat a, always follow the sa fe
removal procedures for your operating system
when disconnecting your product.
FCC DECLARATION OF CONFORMANCE
This device com plies with Part 15 of the FCC R ules.
Operation is su bject to the followin g two conditions:
(1) this device may not cau se harmful inter ference,
and (2) this device mu st accept any inter ference
received, incl uding interfere nce that may cause
undesired operation.
CLASS B
This equipmen t has been tested an d found to
comply with the li mits for a Class B digi tal device,
pursuant to Par t 15 of the FCC Rules. Thes e limits
are designed to provide reasonable protection
against harmful interference in residential
installation . This equipment g enerates, uses, a nd
can radiate radi o frequency ener gy and, if not
installed and u sed in accordan ce with the
instructions, may cause harmful interference to radio
communications.
However, there is no guar antee that interf erence will
not occur in a par ticular instal lation. If this equip ment
does cause har mful interfere nce to radio or televi sion
reception, whi ch can be determin ed by turning the
equipment of f and on, the user is enc ouraged to try
to correct the in terference by one o r more of the
following measures:
•R eorientorrelo catethereceivin gantenna.
•I ncreasethesepa rationbetwee ntheequipment
and receiver.
•C onnecttheequip mentintoanoutleto nacircuit
different fr om that to which the rec eiver is
connected.
•C onsultthedeale roranexperienc edradio/T V
technician for help.
CAUTION: Any changes or modifications made to
this equipmen t may void the user’s autho rity to
operate this equipment.
FR
WWW.SE AGATE.COM
Consultez les pa ges de support te chnique de notre
site pour toute que stion relative aux p oints suivants :
•Installat ion : Instructions supplémentaires et
assistance dépannage
•Informations sur la garantie
Pour contacter le support technique, consultez la
page Nous contacter.
REMARQUE : Pour protéger vos données,
suivez toujours l es procédures d e retrait sécuri sé
correspond ant à votre système d’exploi tation lors
de la déconnexion du produit.
ES
WWW.SE AGATE.COM
Consulte nuestras páginas de asistencia técnica
para recibir ay uda sobre:
•Instalación: Instrucciones adicionales y
asistencia para la resolución de problemas
•Información de garantías
Para ponerse e n contacto con el se rvicio de
asistencia técnica, consulte nuestra página
Contacto.
NOTA: Para proteger sus dato s, asegúrese de
seguir los procedimientos de extracción segura
de su sistema ope rativo siempre que d esconecte
el producto.
100710043
 Loading...