

Seagate ST3160026A-RK Start Manual

Quick Start
Guide
External Hard Drive
ENGLISH FRANÇAIS DEUTSCH NEDERLANDS ITALIANO ESPAÑOL
Print Date:2005-May-10 12:38:44 MDT Released; Prod Rel; A; D0000115888 Seagate Confidential

External Hard Drive
Quick Start
Guide
Print Date:2005-May-10 12:38:44 MDT Released; Prod Rel; A; D0000115888 Seagate Confidential
Your new Seagate®external hard drive is a state-of-theart unit: solid, safe, quiet, cool, versatile and portable,
ready to go from one location to another – an ideal
backup device for multiple systems, or simply a safe
and dependable place to store your important files.
Your new Seagate hard drive kit also includes awardwinning BounceBack Express backup software for both
Windows and Mac operating systems. See page 12 for
more information about BounceBack Express.
Dual-interface and USB-only kits
Seagate ships two external hard drive kits:
• A dual-interface kit, with a USB 2.0 interface,
an IEEE 1394a (also known as FireWire and iLink)
interface and full backup capability that includes
a pushbutton backup feature
• A USB-only kit, with a USB 2.0 interface and full
backup capability
This guide uses the terms “dual-interface” and
“USB-only” to differentiate between these two kits
wherever something applies to one kit but not the other.
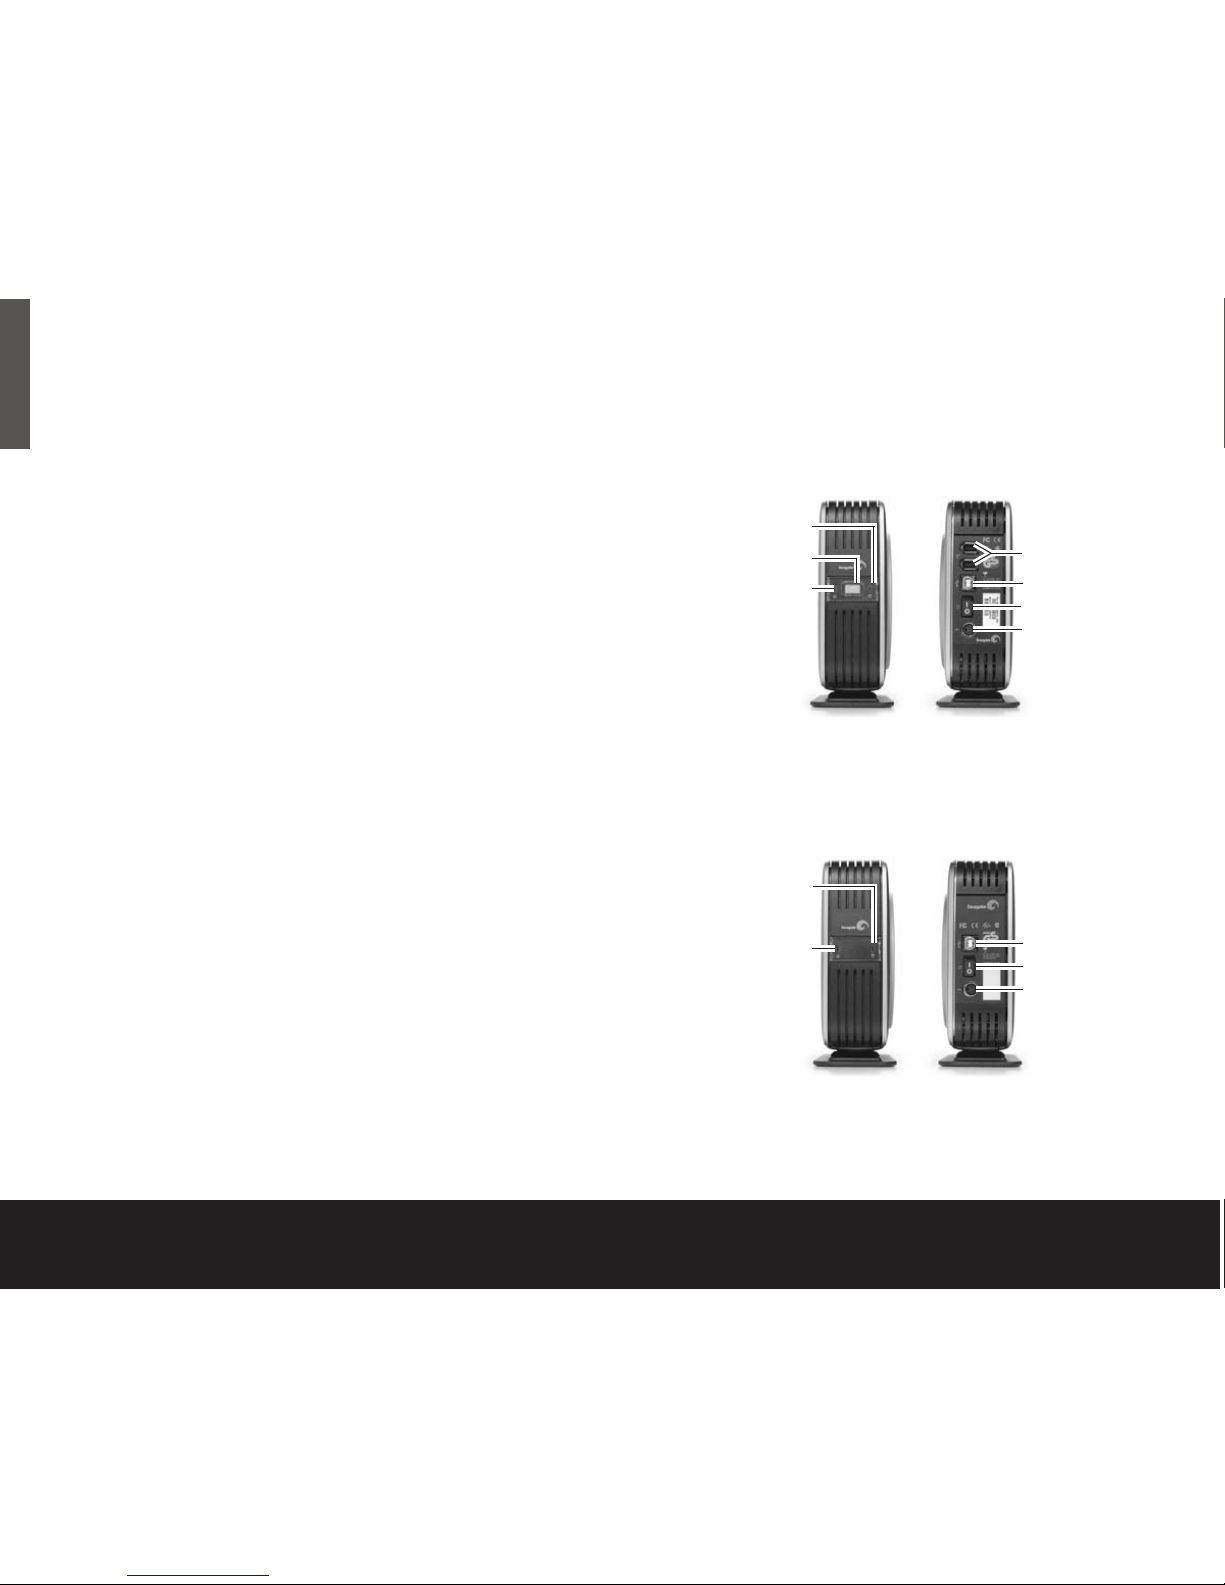
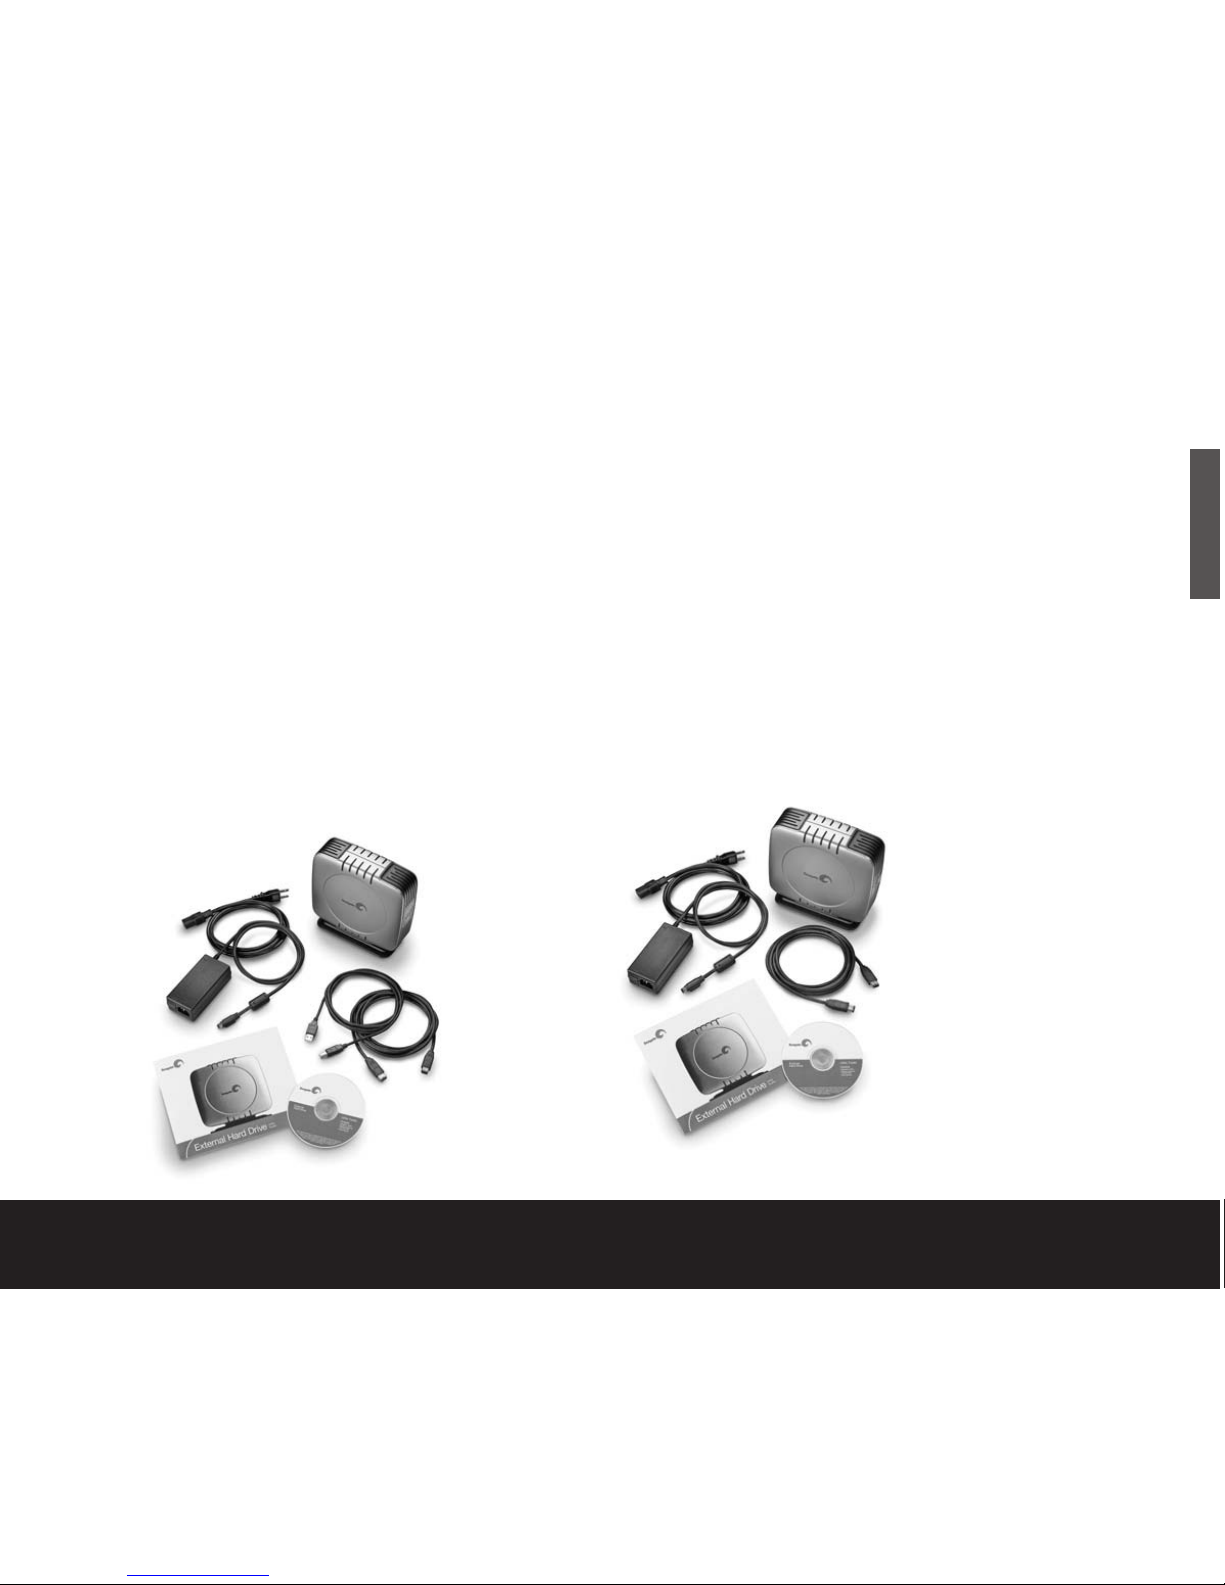
Dual-interface external hard drive
USB-only external hard drive kit
2 Quick Start Guide
ENGLISH
Disc-activity LED
Backup button
Power LED
Disc-activity LED
Power LED
USB 2.0 port
Power switch
Power connector
Front Back
IEEE 1394a
(FireWire) ports
USB 2.0 port
Power switch
Power connector
Front Back
Print Date:2005-May-10 12:38:44 MDT Released; Prod Rel; A; D0000115888 Seagate Confidential
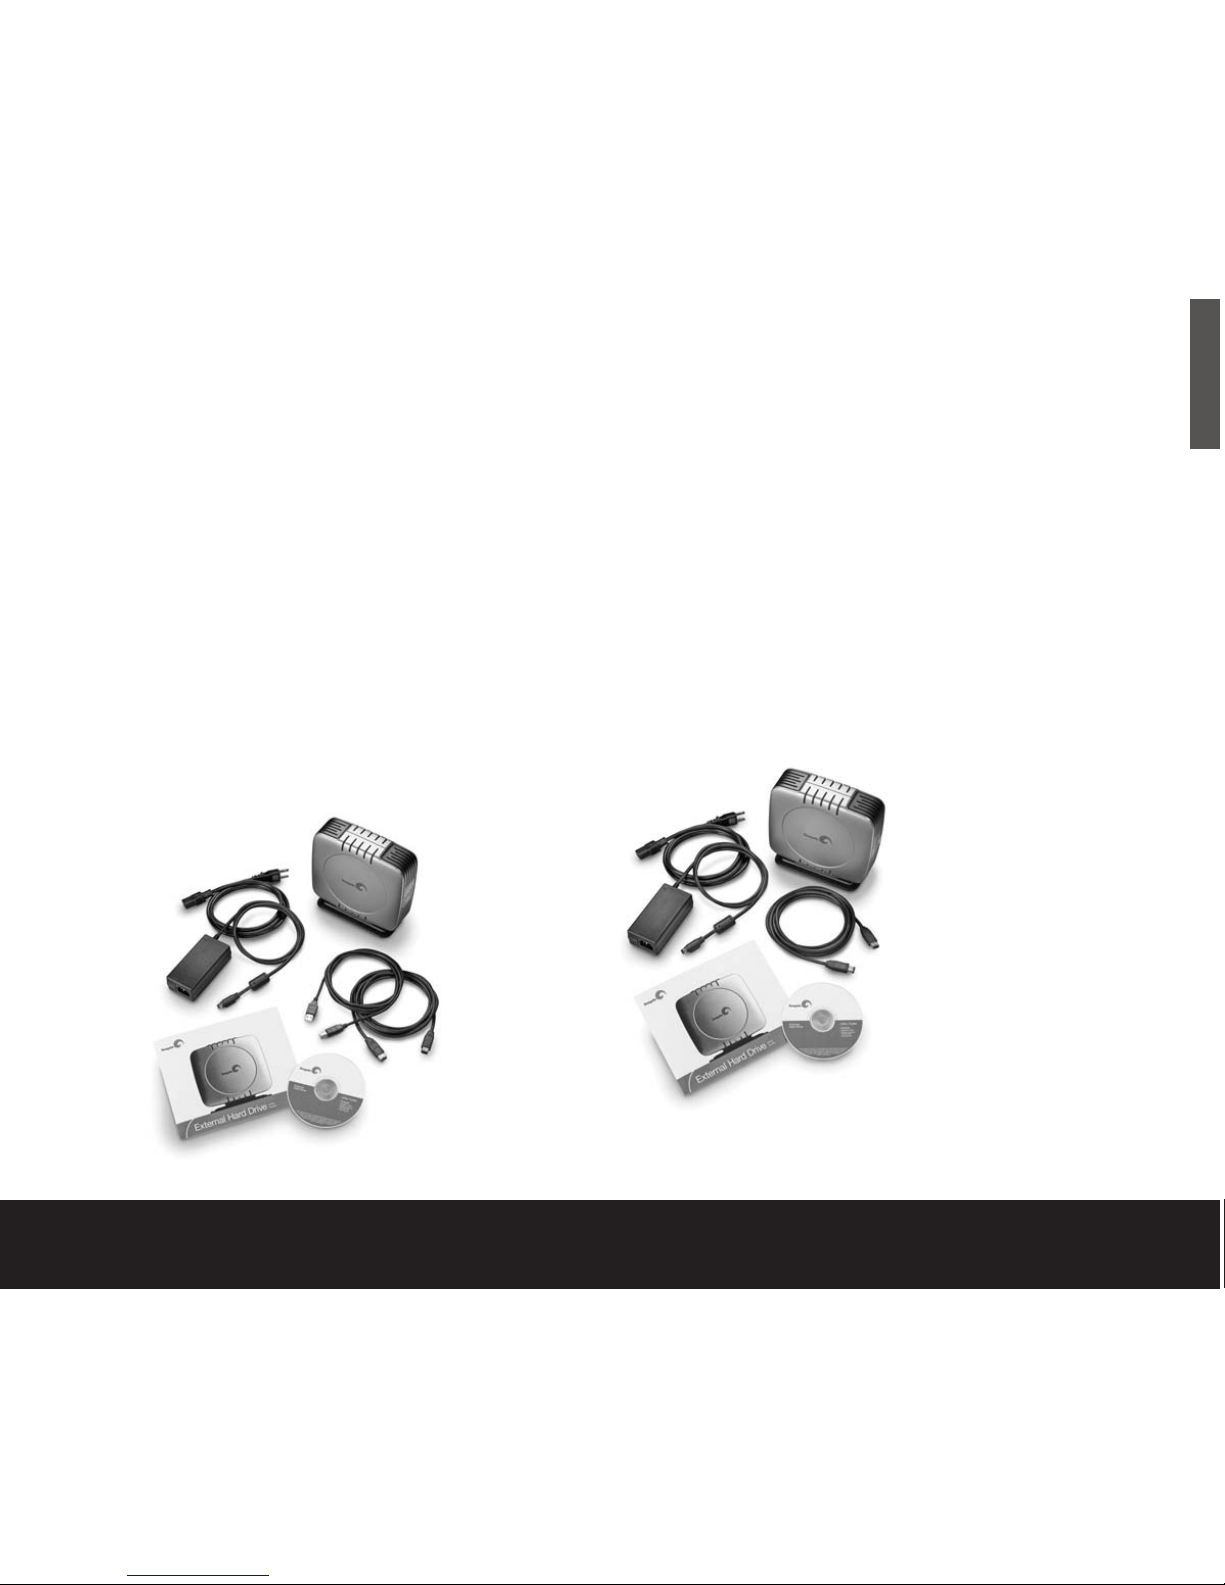
The USB-only external hard drive
kit includes:
• Seagate external hard drive with a USB 2.0 interface
• A pedestal for vertical drive-orientation
• A USB 2.0 cable
• An AC-to-DC converter
• A country-specific power cord
• This guide
• The Seagate Extra Value CD
External Hard Drive 3
Contents
The dual-interface external hard drive
kit includes:
• A Seagate external hard drive with a USB 2.0
interface, an IEEE 1394a (FireWire) interface,
plus a pushbutton backup feature
• A pedestal for vertical drive-orientation
• USB 2.0 and IEEE 1394a (FireWire) cables
• An AC-to-DC converter
• A country-specific power cord
• This guide
• The Seagate Extra Value CD
ENGLISH
Print Date:2005-May-10 12:38:44 MDT Released; Prod Rel; A; D0000115888 Seagate Confidential

Requirements
Windows 98SE or later operating system with:
• a USB connector
or
• for a dual-interface kit, a Windows-certified,
OHCI-compliant IEEE 1394a controller
Microsoft maintains a list of Windows-certified
IEEE 1394a controller suppliers at
http://www.microsoft.com/windows/catalog/.
Click the Hardware tab, and then select Other
Hardware/1394 controller for the complete list.
Macintosh System 9.2.2 (or higher) or Mac OS X with:
• a USB connector
or
• for a dual-interface kit, an OHCI-compliant
FireWire connector
Cautions
If your drive is turned on, don’t move it.
You can safely move your drive when the power LED
is OFF. If the power LED is lit when you move your
drive, you risk excessive wear, reduced reliability, and
possible data loss.
Dual-interface kit: Use only one interface
at a time.
Do not simultaneously connect USB and the IEEE 1394a
(FireWire) cables to your drive. However, you can
connect two IEEE 1394a (FireWire) cables to your
drive at the same time to daisy-chain FireWire devices.
4 Quick Start Guide
ENGLISH
Print Date:2005-May-10 12:38:44 MDT Released; Prod Rel; A; D0000115888 Seagate Confidential

Hardware setup
For a dual-interface kit:
1. Plug the AC-power adaptor into the hard drive and
the wall outlet.
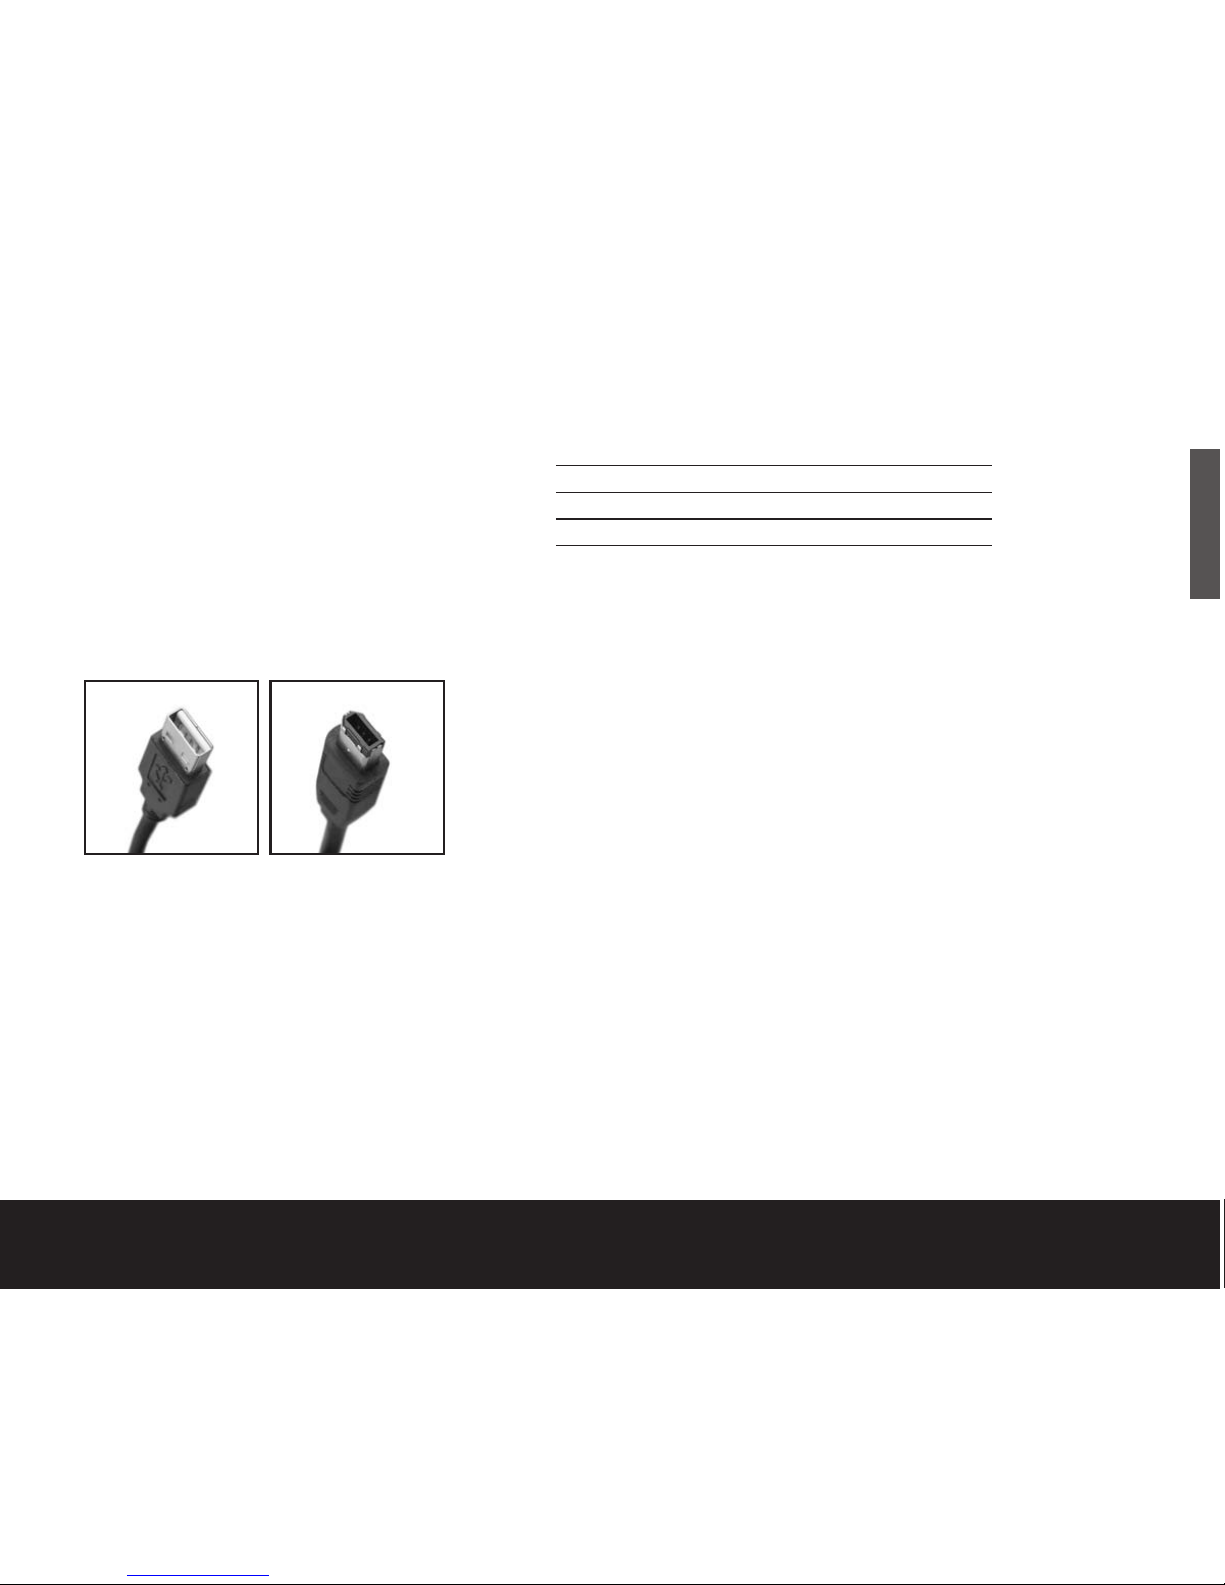
2. Refer to the table opposite to select the fastest
interface that is supported by your computer,
and use that cable to connect the drive to your
computer. USB and IEEE 1394a (FireWire)
connectors have unique shapes, and each
connector is shaped to allow only one way
to connect.
Caution. Use only one interface at a time. If you connect both
the USB and the IEEE 1394a (FireWire) cables to the same
external drive at the same time, you could damage the drive.
However, it is OK to connect two IEEE 1394a (FireWire) cables
to the same drive at the same time to daisy-chain devices.
External Hard Drive 5
ENGLISH
USB IEEE 1394a
(FireWire)
Interface Transfer rate
USB 1.1 12 Mbits/sec
USB 2.0 480 Mbits/sec
IEEE 1394a (FireWire) 400 Mbits/sec
If you are a Macintosh user and you intend to use the
pushbutton-backup feature, you must use the FireWire
interface. BounceBack Express does not support the
pushbutton-backup feature for Mac OS that is using
a USB interface.
Continue to step 3 on page 6.
For a USB-only kit:
1. Plug the AC power adaptor into the hard drive
and the wall outlet.
2. Use the USB cable to connect the drive to
your computer.
Continue to step 3 on page 6.
Print Date:2005-May-10 12:38:44 MDT Released; Prod Rel; A; D0000115888 Seagate Confidential

For both dual-interface and USB-only kits:
3. Use the power switch on the back of the drive to
turn on power to the drive.
4. Turn on the power to your computer.
5. See page 7 for Windows OS information, or page 9
for Macintosh OS information, including installing
drivers, reformatting and partitioning, and
dismounting your drive.
6. See page 12 to install and configure BounceBack
Express software to allow backups.
Note. For dual-interface kits, you must install and configure
BounceBack Express software to enable the pushbutton-backup
feature on your drive.
6 Quick Start Guide
ENGLISH
You don’t need to follow this hardware setup
sequence. Hardware setup steps 1 to 4 are a good
way to connect your new drive to your computer,
but you don’t always need to follow this sequence.
For example, if you want to attach your drive after your
computer has already booted, you can simply connect
the interface cable, turn on power to the drive, and
your OS automatically detects and mounts the drive.
This is known as hot-plugging.
In a hot-plug situation, it's a good idea to connect all
power and interface cables to your drive, and to place
the drive where you want it to remain, before you turn
it on. This helps ensure that you won’t need to move
your drive after it’s running.
Print Date:2005-May-10 12:38:44 MDT Released; Prod Rel; A; D0000115888 Seagate Confidential

Windows OS
Installing drivers for your operating
system (OS)
Windows XP/2000/Me operating systems have built-in,
up-to-date drivers for both USB and IEEE 1394a
interfaces. You don’t need to install any drivers if you
are using one of these operating systems, but make
sure you have downloaded and installed the latest
service packs from Microsoft to ensure that you have
the latest drivers available for your OS.
Windows 98SE using a USB interface: When you
connect the drive to your computer and turn it on,
Windows 98SE displays the Add New Hardware
wizard. This means the wizard needs to find USB
drivers, which are included on the Seagate Extra
Value CD.
Follow these steps to install the drivers:
1. Insert the Seagate Extra Value CD in your
computer’s CD-ROM drive.
2. Click the Next button. The wizard displays a
screen with two options.
3. Select the Search for the best driver for
your device option. The wizard displays four
check boxes.
4. Select the CD-ROM and Specify location
options. Locate the drivers in the Drivers USB
Win98 directory.
5. Click the Next button. The wizard installs the
appropriate drivers on your computer and tells you
when it has finished.
6. Click the Finish button to complete the installation.
7. Restart your computer, and your new drive is ready
to use.
Windows 98SE using a IEEE 1394a interface
(dual-interface kit only): To use the IEEE 1394a
interface, you must download the Microsoft Windows
98 system update from Microsoft.
How to reformat and/or partition your drive
Your drive is factory-formatted for a FAT32 file system
and no further formatting is needed for Windows
operating systems. However, if you are using Windows
2000 or Windows XP and you prefer to use an NTFS
file system, you can reformat with either the built-in Disk
Management application provided by Microsoft, or the
Seagate DiscWizard
™
for Windows application located
in the Files directory of the Seagate Extra Value CD.
Caution. Reformatting destroys all data on the drive. Back up any
data that you want to keep before you reformat the drive. Also,
if you reformat to NTFS, you must always log in to BounceBack
Express (see page 12) as an Administrator to ensure access to
your backup files.
External Hard Drive 7
ENGLISH
What is partitioning?
Partitioning divides the
disc into separate
volumes. It does not
increase the capacity of
the drive. Creating more
than one partition can
be helpful in organising
your information. For
example, you might
want one volume
(partition) to store your
backups and one
volume for applications
or other information.
Each volume receives
its own drive letter, so
each volume appears to
be a separate disc drive
in Windows Explorer.
Print Date:2005-May-10 12:38:44 MDT Released; Prod Rel; A; D0000115888 Seagate Confidential

To use the Disk Management application:
1. Click Start, click Run, type compmgmt.msc
and then click OK.
2. In the console tree, click Disk Management.
The Disk Management window appears.
Your discs and volumes are displayed.
3. Right-click on the drive you want to reformat
(or partition) and use the options provided to
reformat or partition the drive.
To use the DiscWizard for Windows
application
Launch the DiscWizard for Windows application in the
Files directory on the Seagate Extra Value CD, and
follow the easy-to-use on-screen instructions.
Data-sharing between Windows and
Macintosh systems
Seagate does not recommend that you use your
external hard drive to share data between Windows
and Macintosh operating systems. This is primarily due
to all of the variables in OS types and versions, formats
and partitions, interfaces, and third-party connectivity
software packages. If you absolutely must use your
external hard drive to share data between Windows
and Macintosh systems, initialise your drive (before you
use it!) for a Macintosh OS, as described below, and
then purchase and install – on your Windows system –
available third-party software that allows your Windows
system to read from and write to a drive that is formatted
for a Mac OS.
Also, for dual-interface kits, the two IEEE 1394a
(FireWire) ports are designed for daisy-chaining
IEEE 1394a (FireWire) devices, not for connecting
two computers to the drive at the same time.
Caution: Do not leave your drive in its pre-formatted FAT32, single
partition condition if you intend to transfer data between Mac and
Windows systems. Doing so will result in data loss.
8 Quick Start Guide
ENGLISH
Print Date:2005-May-10 12:38:44 MDT Released; Prod Rel; A; D0000115888 Seagate Confidential

Dismounting your drive with Windows OS
Mounting is the beginning and dismounting is the end
of the conversation between your computer and your
external hard drive. Mounting occurs automatically
when you connect and turn on your drive, but you must
initiate the dismounting action yourself. If you disconnect
or turn off the drive before you dismount it, neither your
drive nor your OS understands that the conversation is
finished. It’s like hanging up without saying goodbye.
Caution: Never turn off power to the drive or physically disconnect
any cable attached to the drive when the disc activity LED (located
to the right of the backup button) indicates disc activity. That’s like
hanging up in mid-sentence, and it will probably result in data loss.
How to dismount the drive
1. Close all windows and quit all running applications
that are stored on the drive or that are using data
stored on the drive.
2. Click the icon in your system tray that represents the
Safely Remove Hardware function, and then select
the Seagate external drive.
Note: The system tray is the area in the lower right portion of your
desktop near the clock.
Windows OS displays a message when it is safe to
disconnect the interface cable or turn off the drive.
Macintosh OS
Format (initialise) for Macintosh OS
Your new Seagate external hard drive is factoryformatted with a FAT32 file format. Although your
Macintosh operating system may recognise and
mount your new drive with this format, FAT32 is not
recommended for use with a Macintosh OS. You must
format your drive using one of the Mac OS format
types before you use it with your Macintosh
operating system. Reformatting takes only a few
seconds using Apple's Disk Utility, which comes with
your Mac OS.
Caution: Formatting destroys all data on the drive. If you have
data that you want to keep, back up the data before formatting
the drive. Seagate is not responsible for lost data.
How to reformat and/or partition
your drive
1. Open Disk Utility, which is located in
Applications/Utilities. In Mac OS 9, this utility is
named Drive Setup.
2. Select the disc that you want to reformat and/or
partition in the left column. Be sure to select the
new drive, and not an existing drive that may contain
data, because reformatting and/or partitioning erases
all data on the selected drive.
External Hard Drive 9
ENGLISH
Print Date:2005-May-10 12:38:44 MDT Released; Prod Rel; A; D0000115888 Seagate Confidential

3. Click Partition if you want to partition your drive, or
click Initialise to reformat the drive as one volume.
Partitioning is not required; if you select Partition,
continue to the next step. That’s the Initialise
stage finished!
4. Choose the number of partitions from the Volume
Scheme pop-up menu. Click each partition and enter
a name, select a format, and enter a size for each
partition. (You can also drag the partitions to change
the size.) Select the Mac OS Extended format for
each partition unless you have a specific need to
select any other available Volume Format option.
5. Click Partition, and then click Partition again.
Your drive appears on your desktop with the volume
label(s) you entered in the steps above. If you elected
to partition the drive to create two or more volumes,
each volume will have a drive icon and label.
Data-sharing between Windows and
Macintosh systems
Seagate does not recommend that you use your
external hard drive to share data between Windows
and Macintosh operating systems. This is primarily due
to all of the variables in OS types and versions, formats
and partitions, interfaces, and third-party connectivity
software packages. If you absolutely must use your
external hard drive to share data between Windows
and Macintosh systems, initialise your drive (before you
use it!) for a Macintosh OS, as described above, and
then purchase and install – on your Windows system –
available third-party software that allows your Windows
system to read from and write to a drive that is
formatted for a Mac OS.
Also, for dual-interface kits, the two IEEE 1394a
(FireWire) ports are designed for daisy-chaining IEEE
1394a (FireWire) devices, not for connecting two
computers to the drive at the same time.
Caution: Do not leave your drive in its pre-formatted FAT32, single
partition condition if you intend to transfer data between Mac and
Windows systems. Doing so will result in data loss.
10 Quick Start Guide
ENGLISH
What is partitioning?
Partitioning divides the
disc into separate
volumes. It does not
increase the capacity of
the drive. Creating more
than one partition can
be helpful in organising
your information. For
example, you might
want one volume
(partition) to store your
backups and one
volume for applications
or other information.
Each volume receives
its own volume icon, so
each volume appears to
be a separate disc drive
on your Macintosh
desktop. Partitioning is
not required if you use
the Apple-provided
Disk Utility to create
a Mac OS Extended
format volume.
Print Date:2005-May-10 12:38:44 MDT Released; Prod Rel; A; D0000115888 Seagate Confidential

Macintosh OS interface drivers
Macintosh OS X and OS 9 have built-in, up-to-date
drivers for both USB and FireWire interfaces.
You don’t need to install any drivers if you are using
a Macintosh OS.
Dismounting your drive with Mac OS
Mounting is the beginning and dismounting is the end
of the conversation between your computer and your
external hard drive. Mounting occurs automatically
when you connect and turn on your drive, but you
must initiate the dismounting action yourself. If you
disconnect or turn off the drive before you dismount it,
neither your drive nor your OS understands that the
conversation is finished. It’s like hanging up without
saying goodbye.
Caution. Never turn off power to the drive or physically disconnect
any cable attached to the drive when the disc activity LED (located
to the right of the backup button) indicates disc activity. That’s like
hanging up in mid-sentence, and it will probably result in data loss.
How to dismount the drive in Mac OS X
and Mac OS 9
1. Close all windows and quit all running applications
that are stored on the drive or that are using data
that is stored on the drive.
2. In Mac OS X, drag the Seagate external-drive icon to
the trash icon in your Dock area. In Mac OS 9, drag
the Seagate external-drive icon to the trash icon.
3. You can safely disconnect or turn off your hard drive
when the drive icon disappears from your desktop
and the disc-activity LED is not lit.
External Hard Drive 11
ENGLISH
Print Date:2005-May-10 12:38:44 MDT Released; Prod Rel; A; D0000115888 Seagate Confidential

BounceBack Express backup software
BounceBack Express allows you to automatically
copy files from your hard drive to your external drive.
It supports Windows 98SE/2000/XE and Macintosh
OS X. For more details about BounceBack Express,
see the user’s manual on the Seagate Extra Value CD.
Before you install BounceBack Express
• Disable all virus-protection programmes.
• For Windows 2000 or XP users in a corporate
environment, log on as a local administrator. Check
with your system administrator for details.
• For Macintosh OS users in a corporate environment,
log on as a user who has administrative rights to all
drives that are involved in the backup process (which,
in this case, means your internal drive and your new
external Seagate drive). You must do this because
BounceBack Express for Mac OS X copies only those
files that a logged-in user can access.
• If you are backing up to an external device, make
sure the external device is connected to and working
properly with your operating system.
• Disconnect all other external storage devices (for
example, hard disc drives, DVD, CDR, MP3 players,
memory card readers, and so forth) that are not
involved in the backup.
• For dual-interface kits, you must use the same
interface for all backups that you use for the original
BounceBack Express installation. For example,
if you install BounceBack Express while your drive
is connected to your computer’s USB interface, you
must use the USB interface for subsequent backups.
• For Macintosh users with dual-interface kits, you
must use the FireWire interface if you want to use
the pushbutton backup feature.
Installing BounceBack Express software
1. Insert the Seagate Extra Value CD.
The BounceBack Express menu appears.
Note: If the BounceBack Express menu fails to appear:
Windows OS users: Double-click the CD icon, and
then click BBSetup.exe.
Mac OS users: Double-click the CD icon, and then
click BBEMAC.sit. That file will self-extract to a .dmg
file, which you can double-click to install the software.
2. Click Install on the BounceBack Express menu.
3. Follow the on-screen instructions to install the
software. Several applications are installed.
12 Quick Start Guide
ENGLISH
Print Date:2005-May-10 12:38:44 MDT Released; Prod Rel; A; D0000115888 Seagate Confidential

You should become familiar with at least these two:
• BounceBack Express Backup
To launch the backup application, double-click the
BBBackup.exe icon. If you have a dual-interface kit,
you can also press the backup button to start a backup.
• BB Settings
If you want to add, edit, remove, disable, or schedule
backup sets, launch the BBSettings.exe application.
You can also use this application to exclude specific
files from backups and to view information about the
backup device being used to store your data.
Configuring your first backup
When the software installation is complete,
BounceBack Express leads you through configuration
for your first backup. It prompts you to identify the
target location of your first backup, the timing for it,
and so forth.
Follow the BounceBack Express instructions, or see
below for details.
1. In the configuration menu, click yes to direct your
backup to any hard drive other than your primary
(internal) hard drive. Click no to direct your backup
to your primary hard drive.
2. If you click yes, BounceBack Express detects all
other hard drives connected to your system and
prompts you to select one for your backup. Select
the drive of your choice. BounceBack Express scans
your hard drive to determine the size of and estimated
time for the backup. The source drive and backup
size, time estimate, and target location are displayed.
3. You can select View Settings if you want to launch
the BounceBack Express Settings programme. This
allows you to change the default backup settings to
customise your backup. Otherwise, you can accept
the default settings and choose between starting
your backup now or later.
Subsequent backups
With a dual-interface kit, you can start a subsequent
backup by simply pushing the backup button.
This automatically launches either the default or the
customised backup that you created. The duration of
a subsequent backup is very short; only those files that
are either new or changed since the last backup are
backed up.
With a USB-only kit, you can start a subsequent
backup by clicking on the BounceBack icon. The
backup behaviour and duration is the same with or
without the pushbutton backup feature.
External Hard Drive 13
ENGLISH
Print Date:2005-May-10 12:38:44 MDT Released; Prod Rel; A; D0000115888 Seagate Confidential

BounceBack Express
File restore
BounceBack Express backs up data in the operating
system’s native file format and uses the same directory
structure (folders and files) as the original data. This
makes it easy to find and restore files from the backup
drive using Windows Explorer in Windows OS or Finder
in Mac OS.
Note: BounceBack Express automatically preserves your files,
but it does not provide automatic disaster recovery. You must
participate in the restoration of files that BounceBack Express
has automatically preserved for you. Disaster recovery is available
as the “advanced restore” feature in BounceBack Professional.
See Want advanced features? opposite for details.
To restore files using Windows OS:
1. Start Windows Explorer.
2. In the left panel of Windows Explorer, click the drive
letter associated with the backup drive. Windows
Explorer displays the folders and files stored on the
backup drive.
3. Using your Windows Explorer navigation tools, select
the folders or files on the backup drive that you want
to restore (copy) to another drive.
4. Drag the folders and files you want to restore by leftclicking and dragging the files and folders to your
system drive.
14 Quick Start Guide
ENGLISH
Print Date:2005-May-10 12:38:44 MDT Released; Prod Rel; A; D0000115888 Seagate Confidential

To restore data using Mac OS:
1. Double-click the system drive, or the drive to
which you want to restore files.
2. Double-click the backup drive.
3. Drag and drop the files and/or folders from the
backup drive to the system drive or the drive of
your choice.
Additional documentation
A detailed user’s manual is included as a PDF on the
Seagate Extra Value CD. Click Manual to access it. You
can also find it online at www.cmsproducts.com/support.
Help documentation is also integrated within the
BounceBack Express software.
Want advanced features?
As a BounceBack Express user, you can upgrade to
BounceBack Professional, an extended version of
BounceBack Express, with advanced features that provide
an all-inclusive disaster-recovery and backup solution.
Special features include bootability, advanced restore,
synchronisation, and versioning.
• The bootability feature creates a bootable drive image
that enables users to instantly recover from a disaster
by either using the rescue CD or by exchanging the
internal PC hard drive with the backup drive.
• The advanced restore function provides a graphical
user interface to compare and manage information on
the source drive and backup drive, allowing users to
restore lost or corrupted data.
• The synchronisation feature automatically scans both
the computer and the backup drive for changed files,
and synchronises out-of-date versions with updated
versions of the files.
• The versioning feature provides users an innovative
backup process that allows access to older versions
of files from any date a backup was performed.
For more information about the BounceBack Professional software
upgrade, contact CMS or, to purchase BounceBack Professional,
visit the CMS website at www.cmsproducts.com/seagate/upgrade,
or call CMS Products Sales at (714) 424-5520 or 800-327-5773.
External Hard Drive 15
ENGLISH
Print Date:2005-May-10 12:38:44 MDT Released; Prod Rel; A; D0000115888 Seagate Confidential

Troubleshooting
PROBLEM
I purchased a 160-Gbyte drive and my operating
system reports the capacity as much less than that.
RESOLUTION
Disc drive manufacturers consider 1 Gbyte to equal
1,000,000,000 bytes. However, your computer
operates at a binary level, which considers 1 Gbyte
to equal 2
30
, which equals 1,073,741,824 bytes.
So, even though a 160-Gbyte drive stores 160 Gbytes
of data, when you think in terms of 1 Gbyte =
1,000,000,000 bytes, your system will report a lower
capacity due to the operating system’s method of
calculating the value of each gigabyte. This means your
operating system may report that your 160-Gbyte drive
has a capacity of approximately 149 Gbytes, the binary
equivalent of 160,000,000,000 bytes.
Windows-specific problems
First, make sure you have the latest Microsoft operating
system service packs and other Windows updates
installed on your system before you spend time looking
for a drive problem. These service packs are issued to
fix bugs, add drivers, and enhance the security features
of your system. See http://support.microsoft.com for
details of how to install service packs and Windows
updates in your system. Contact Microsoft Customer
Service for information about obtaining these system
enhancements if you don’t have Internet access.
PROBLEM
The drive is connected to the USB port, but the
computer does not recognise the drive.
RESOLUTION
Check Power. Confirm the drive has power and that
the power LED is glowing on the drive and power
converter. If the light is not lit, check to ensure that the
power switch on the back of the drive is in the ON
position. Then check to ensure that all the connections
are tight (power cable to wall, power cable to power
supply, power supply to drive). If it still does not light
up, temporarily remove any surge protectors and plug
the drive into the wall outlet.
Confirm that the USB cable is plugged into the
computer and the drive. For dual-interface kits, the
USB port and IEEE 1394a (FireWire) port on the hard
drive cannot be plugged in at the same time. Remove
any hubs and plug the drive directly into the USB port
on the computer.
16 Quick Start Guide
ENGLISH
Print Date:2005-May-10 12:38:44 MDT Released; Prod Rel; A; D0000115888 Seagate Confidential

Check Device Manager to confirm the USB host
controller is properly configured. To open Device
Manager (Windows XP/Windows 2000), right-click
My Computer, choose Manage, and then choose
the Device Manager icon from the tree.
If the host controller is in “Other Devices”, then
additional drivers are required for the host. Check with
the PCI card vendor or motherboard vendor for the
appropriate drivers. USB 2.0 controllers usually require
a service pack to operate properly. Windows XP added
support for USB 2.0 in Service Pack 1; Windows 2000
added support for USB 2.0 in Service Pack 3 and
improved the support in Service Pack 4. Windows Me
does not include native support for USB 2.0, so you
should use the latest drivers provided by the USB
host adaptor manufacturer. If the USB port is on
the motherboard, you should use the latest drivers
provided by the motherboard manufacturer.
If the host controller is not seen in Device Manager,
it is probably disabled in the computer BIOS.
Check Device Manager to confirm the USB hard drive
is detected and configured properly. If not, disconnect
and reconnect the drive using a different USB port.
Try another cable and host adaptor. If, after following
the steps above, you still have a problem, try another
cable and another USB port.
PROBLEM
The drive doesn’t operate in high-speed mode
when connected with the USB cable.
RESOLUTION
Windows XP added USB 2.0 support with Service
Pack 1 or higher installed. For information on obtaining
the latest Service Pack, visit Microsoft’s support website.
Windows 2000 has a patch to support USB 2.0.
Download this patch through the Windows Update
feature in the operating system. Service Pack 4 for
Windows 2000 also addresses several issues that
you might experience with USB 2.0, so applying
the service pack may be the best way to gain the
maximum performance from your USB 2.0 drive.
Microsoft document number 319973
http://support.microsoft.com describes how to apply
the updates. Also see Microsoft Knowledgebase Article
260910 for more information.
Windows Me does not have native support for USB
2.0, so you should use the latest drivers for your USB
host adaptor. These drivers must be provided by your
host adaptor manufacturer (or motherboard
manufacturer if the USB ports are on the motherboard).
External Hard Drive 17
ENGLISH
Print Date:2005-May-10 12:38:44 MDT Released; Prod Rel; A; D0000115888 Seagate Confidential

Windows 98 does not have native support for USB
2.0, so you should use the latest drivers for your USB
host adaptor. These drivers must be provided by your
host adaptor manufacturer (or motherboard
manufacturer if the USB ports are on the motherboard).
You will also need drivers for your Seagate hard drive
if you are using the USB port in Windows 98 see
http://www.seagate.com/support/kb/disc/faq/external_
usb_drivers.html
PROBLEM
Dual-interface kits only: The drive is connected
using the IEEE 1394 cable and the system is
running Windows 98SE, but Windows 98SE fails
to detect it.
RESOLUTION
From Device Manager, click 1394 Bus Controller,
and then click Settings. Select the Support Non-
Compliant Devices check box, and then reboot
your computer. See Microsoft Knowledgebase
Article 221823 for more information
http://support.microsoft.com
Macintosh-specific problems
First make sure you have the latest Apple operating
system software updates installed on your computer
before you spend time looking for a drive problem.
These updates are issued to fix bugs, add drivers, and
enhance the security features of your computer. To
check for software updates using Mac OS X, open the
Software Update system-preference panel and click the
Check Now button. You must be connected to the
Internet to check for and download a software update.
PROBLEM
The drive does not mount at all, and no error
message appears on my screen when I connect
the drive.
RESOLUTION
Use Apple’s Disk Utility to locate, initialise, and mount
the drive.
PROBLEM
The Macintosh OS displays the following message
when I connect the drive to my system: “Unable to
read volume – must initialise.”
RESOLUTION
Your Mac OS does not recognise the drive format.
Use Apple’s Disk Utility to initialise the drive with
a Mac OS Extended format.
18 Quick Start Guide
ENGLISH
Print Date:2005-May-10 12:38:44 MDT Released; Prod Rel; A; D0000115888 Seagate Confidential

PROBLEM
For dual-interface kits only: My system doesn’t
have a 6-pin FireWire connector. It has a 4-pin
IEEE 1394a (FireWire) connector, so the cables
don’t match the connector.
RESOLUTION
Purchase a 4-pin to 6-pin IEEE 1394a (FireWire) cable
to connect the drive to your system.
Note. A 4-pin to 6-pin IEEE 1394a (FireWire) cable is not included
with the drive because 4-pin IEEE 1394a (FireWire) connectors are
not provided on most systems.
PROBLEM
BounceBack Express version 4.1 is not working
with Mac OS 10.3 (Jaguar).
RESOLUTION
Check your version of BounceBack Express by
selecting the application in your Finder (click the icon or
file name) and then select Get Info from the File menu.
BounceBack Express version 4.1 for Mac OS X does
not work with Mac OS X 10.3. An update is available
that includes support for Mac OS 10.3. Download the
update from the CMS website at:
http://www.cmsproducts.com/seagate/bbmac/
External Hard Drive 19
ENGLISH
Print Date:2005-May-10 12:38:44 MDT Released; Prod Rel; A; D0000115888 Seagate Confidential

Seagate offers the following technical support
services. These services are free, however long
distance telephone rates may apply.
Web support
For answers to many common technical support
and warranty questions, see the Seagate web site
at www.seagate.com
E-mail support
Send messages to discsupport@seagate.com
Warranty service
If your drive appears to be defective, run SeaTools
(from the Disc Utility CD) before contacting Seagate
at 00.800.4732.4289 for warranty service.
Seagate technical support
In Europe please call Toll Free 00.800.4732.4283 for
Seagate technical support.
Please register your new drive at:
www.seagate.com/products/registration/index.html
Please note the Toll Free numbers are only applicable to
the following countries: Belgium, Denmark, France,
Germany, Ireland, Italy, Netherlands, Norway, Spain,
Sweden, Switzerland and the United Kingdom.
Support for all other EMEA countries is handled
through the following direct dial Toll numbers:
Technical support: 405.324.4714
Warranty support: 31.20.653.3513
20 Quick Start Guide
ENGLISH
Print Date:2005-May-10 12:38:44 MDT Released; Prod Rel; A; D0000115888 Seagate Confidential

© 2005 Seagate Technology LLC. All rights reserved. Seagate and Seagate Technology are registered trademarks of Seagate Technology LLC. DiscWizard and the Wave logo are
registered trademarks or trademarks of Seagate Technology LLC. Other product names are registered trademarks or trademarks of their owners. Seagate reserves the right to
change, without notice, product offerings or specifications. No part of this publication may be reproduced in any form without written permission of Seagate Technology LLC.
Publication Number: 100337195, 2005
Seagate Technology
www.seagate.com
External Hard Drive 21
ENGLISH
Print Date:2005-May-10 12:38:44 MDT Released; Prod Rel; A; D0000115888 Seagate Confidential

Declaration of Conformity for
European Union
This DECLARATION OF CONFORMITY is intended to
comply with the Electromagnetic Compatibility Directive
89/336/EEC of 03 May 1989, on the approximation
of the laws of the Member States Relating to
Electromagnetic Compatibility (EMC), as amended
by Council Directive 92/31/EEC of 28 April 1992 and
Council Directive 93/68/EEC of 22 July 1993. This
declaration also intends to comply with the Low Voltage
Directive 73/23/EC as amended with 93/68 EEC.
Standards to which conformity
is declared:
EN 55022 Class B Limits and Methods of
Measurement of Radio Interference
Characteristics of Information
Technology Equipment, 1998.
EN 55024 Information Technology Equipment,
Immunity Characteristics, Limits
and Methods of Measurement, 1998.
EN 61000-3-2 Mains Harmonics, Equipment up
to 16 A, 1998.
EN 61000-3-3 Voltage Fluctuations, Equipment
up to 16 A, 1995.
EN 60950 Product Safety Information
Technology Equipment.
IEC 60950 Product Safety Information
Technology Equipment.
Manufacturer’s Name: Seagate Technology,
Incorporated
Manufacturer’s Address: 920 Disc Drive
(And Importer) P.O Box 66360
Scotts Valley, California
95067-0360 USA
European Contact: Director of Operations
Seagate Technology
International
Koolhovenlaan 1
1119 NB Schiphol Rijk
The Netherlands.
Type of Equipment: External Drive
Product Name: Seagate External Hard
Drive Kit
Model Numbers: ST3120027A-RK,
ST3160024A-RK,
ST3160026A-RK,
ST3200823A-RK,
ST3200824A-RK,
ST3300801A-RK,
ST3400801A-RK
Seagate Technology, Incorporated hereby declares
that the equipment specified above conforms with the
protection requirements of the above named Directive(s)
and Standards.
Location: Longmont, CO
Date: June 2004
Full Printed Name: Michael Verzuh
Position: Sr. Director of Produce Assurance
22 Quick Start Guide
ENGLISH
Print Date:2005-May-10 12:38:44 MDT Released; Prod Rel; A; D0000115888 Seagate Confidential
Lecteur de disque dur Externe
Guide de
démarrage rapide
Print Date:2005-May-10 12:38:44 MDT Released; Prod Rel; A; D0000115888 Seagate Confidential
Le lecteur de disque dur externe Seagate®est
un périphérique de pointe : solide, sûr, silencieux,
élégant, polyvalent et portable, pouvant être facilement
déplacé. Bref, un périphérique de sauvegarde idéal
compatible avec de multiples systèmes ou tout
simplement un dispositif sûr et fiable pour stocker
vos fichiers importants.
Votre nouveau kit de disque dur Seagate comprend
également le très prisé logiciel de sauvegarde
BounceBack Express pour les systèmes d’exploitation
Windows et Mac. Voir page 12 pour plus d’informations
sur le BounceBack Express.
Kits double interface et uniquement USB
Seagate fournit deux kits pour lecteur
de disque dur externe :
• Un kit double interface offrant une interface USB 2.0
et une interface IEEE 1394a (également appelée
FireWire et iLink), ainsi qu’une fonctionnalité de
sauvegarde complète incluant une fonction de
sauvegarde par bouton poussoir
• Un kit uniquement USB offrant une interface USB
2.0 et une fonctionnalité de sauvegarde complète
Ce guide utilise les termes « double-interface » et « USB
uniquement » pour différencier entre ces deux kits quand
quelque chose s’applique à l’un mais pas à l’autre.
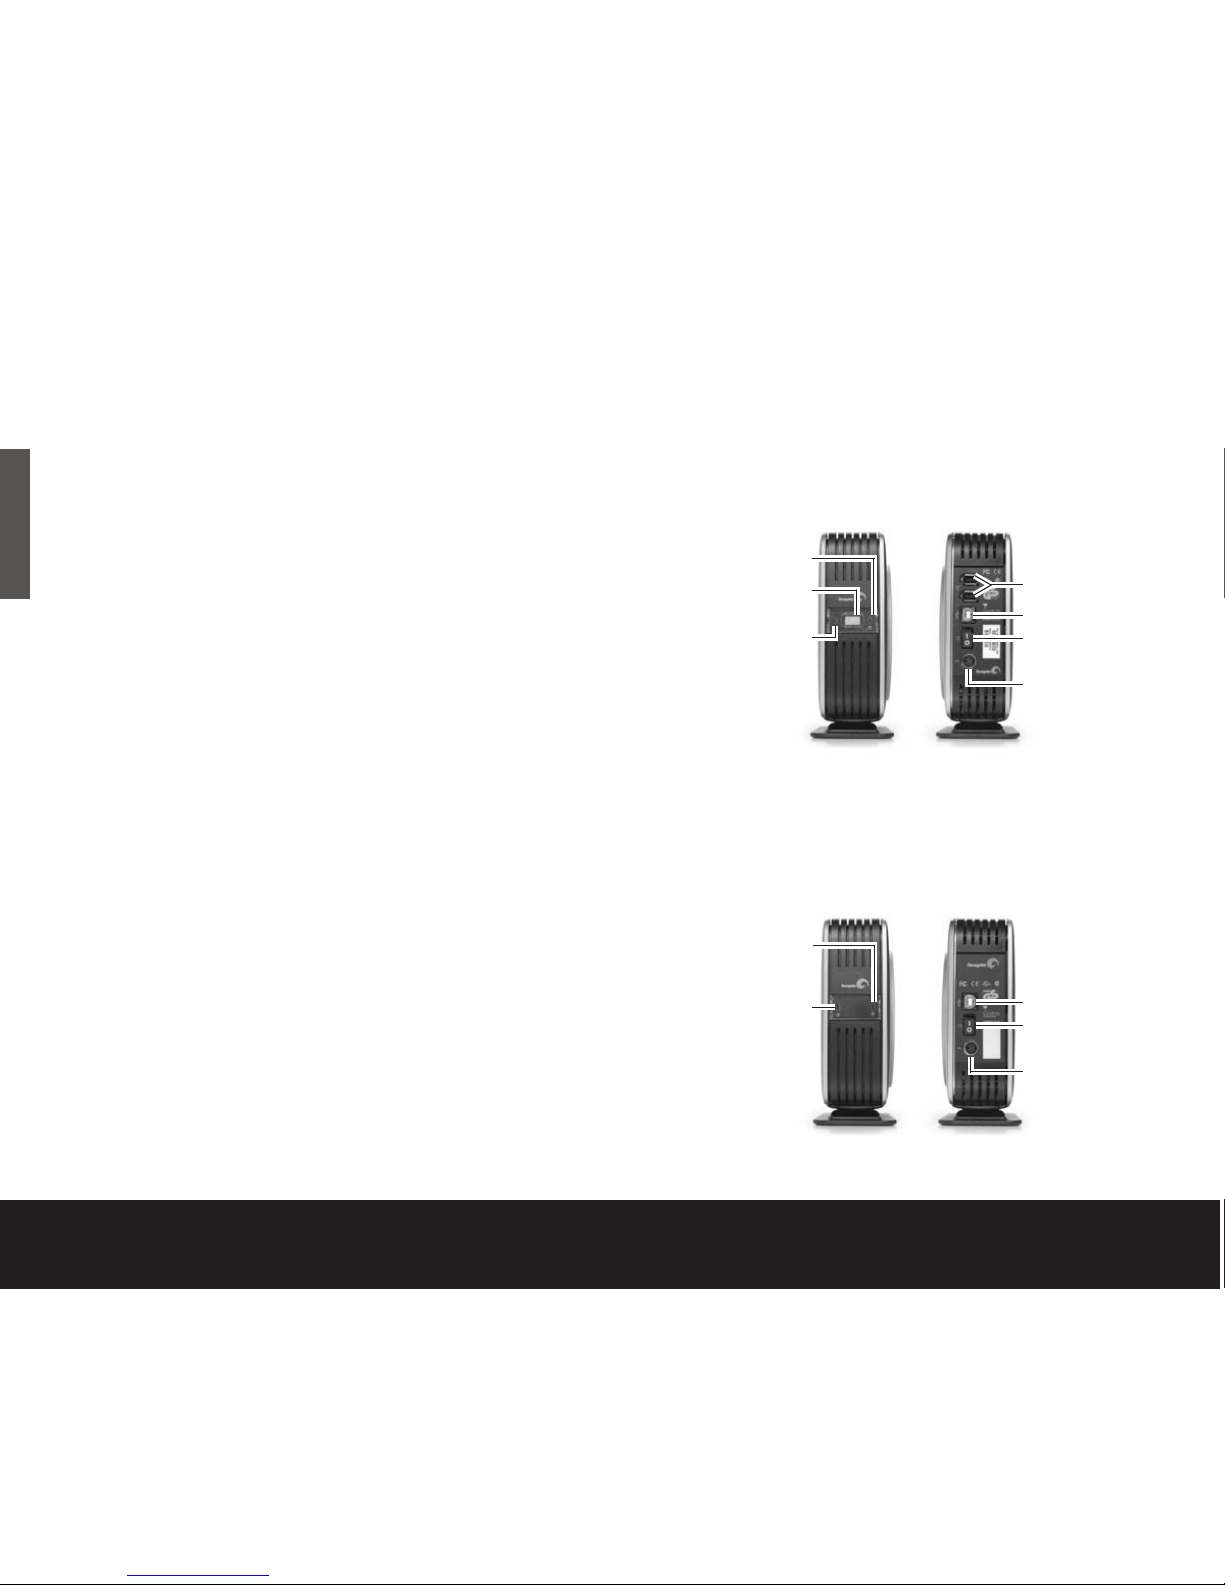
Lecteur de disque dur externe
double interface
Lecteur de disque dur externe
uniquement USB
2
Guide de démarrage rapide
DEL témoin
d’activité du disque
Bouton de
sauvegarde
DEL témoin de
mise sous tension
DEL témoin
d’activité du disque
DEL témoin de
mise sous tension
Ports USB 2.0
Commutateur
d’alimentation
Connecteur
d’alimentation
Avant Arrière
Ports IEEE 1394a
(FireWire)
Ports USB 2.0
Commutateur
d’alimentation
Connecteur
d’alimentation
Avant Arrière
FRANÇAIS
Print Date:2005-May-10 12:38:44 MDT Released; Prod Rel; A; D0000115888 Seagate Confidential
Lecteur de disque dur externe 3
Éléments contenus
Le kit du lecteur de disque dur externe
double interface contient :
• Un lecteur de disque dur externe Seagate équipé
d’une interface USB 2.0 et d’une interface IEEE
1394a (FireWire), ainsi que d’une fonction de
sauvegarde par bouton poussoir
• Un support permettant de placer le lecteur en
position verticale
• Des câbles USB 2.0 et IEEE 1394a (FireWire)
• Un convertisseur CA-CC
• Un cordon d’alimentation adapté pour votre pays
• Ce guide
• Le CD Extra Value de Seagate
Le kit du lecteur de disque dur externe
uniquement USB contient :
• Un lecteur de disque dur externe Seagate équipé
d’une interface USB 2.0
• Un support permettant de placer le lecteur en
position verticale
• Un câble USB 2.0
• Un convertisseur CA-CC
• Un cordon d’alimentation adapté pour votre pays
• Ce guide
• Le CD Extra Value de Seagate
FRANÇAIS
Print Date:2005-May-10 12:38:44 MDT Released; Prod Rel; A; D0000115888 Seagate Confidential

Configuration requise
Windows 98SE ou système d’exploitation plus
récent avec :
• un connecteur USB
ou
• pour le kit double interface, un contrôleur IEEE 1394a
conforme à la norme OHCI, homologué pour Windows
Microsoft tient à jour une liste des fournisseurs de
contrôleur IEEE 1394a homologués pour Windows
sur le site http://www.microsoft.com/windows/catalog/.
Cliquez sur l’onglet Hardware, puis sélectionnez
successivement Other Hardware, 1394 Controllers
pour accéder à la liste complète.
Système Macintosh 9.2.2 (ou version postérieure)
ou Mac OS X avec :
• un connecteur USB
ou
• pour le kit double interface, un connecteur
FireWire conforme à la norme OHCI
Précautions
Si le lecteur est sous tension,
ne le déplacez pas.
Vous pouvez déplacer le lecteur en toute sécurité
lorsque le DEL témoin est éteint. Si le DEL témoin est
allumé lorsque vous déplacez le lecteur, vous risquez
d’user ce dernier prématurément, de perdre des
données ou d’affecter la fiabilité des données.
Kit double interface : N’utilisez qu’une
seule interface à la fois.
Ne connectez pas simultanément des câbles USB
et IEEE 1394a (FireWire) au lecteur. Vous pouvez en
revanche connecter deux câbles IEEE 1394a (FireWire)
en même temps pour les périphériques FireWire
montables en chaîne.
4 Guide de démarrage rapide
FRANÇAIS
Print Date:2005-May-10 12:38:44 MDT Released; Prod Rel; A; D0000115888 Seagate Confidential
Configuration matérielle
Pour le kit double interface :
1. Branchez le transformateur de CA au disque dur
et à la prise murale.
2. Consultez le tableau ci-dessous pour sélectionner
l’interface la plus rapide prise en charge par
l’ordinateur et utilisez ce câble pour connecter le
lecteur à l’ordinateur. Les connecteurs USB et IEEE
1394a (FireWire) ont des formes spécifiques. Il n’est
possible de les connecter que d’une seule manière.
Attention : N’utilisez qu’une seule interface à la fois. Si vous
connectez les deux câbles, USB et IEEE 1394a (FireWire)
au même lecteur externe en même temps, vous risquez
d’endommager celui-ci. Vous pouvez en revanche connecter
deux câbles IEEE 1394a (FireWire) au même lecteur s’il s’agit
d’un périphérique montable en chaîne.
USB IEEE 1394a
(FireWire)
Interface Taux de transfert
USB 1.1 12 Mbits/sec
USB 2.0 480 Mbits/sec
IEEE 1394a (FireWire) 400 Mbits/sec
Si vous utilisez un Macintosh et avez l’intention d’utiliser la
fonction de sauvegarde par bouton poussoir, vous devez
utiliser l’interface FireWire. BounceBack Express ne prend
pas en charge la fonction de sauvegarde par bouton
poussoir pour un SE Mac équipé d’une interface USB.
Passez à l’étape 3 de la page 6.
Pour le kit uniquement USB :
1. Branchez le transformateur de CA au disque dur
et à la prise murale.
2. Utilisez le câble USB pour connecter le lecteur
à l’ordinateur.
Passez à l’étape 3 de la page 6.
Lecteur de disque dur externe 5
FRANÇAIS
Print Date:2005-May-10 12:38:44 MDT Released; Prod Rel; A; D0000115888 Seagate Confidential

Pour les deux kits double interface
et uniquement USB :
3. Utilisez le commutateur d’alimentation à l’arrière
du lecteur pour mettre le lecteur sous tension.
4. Mettez l’ordinateur sous tension.
5. Consultez la page 7 pour obtenir des informations sur
le SE Windows et la page 9 pour des informations
sur le SE Macintosh, en relation notamment avec
l’installation des pilotes, le reformatage et le
partitionnement, ainsi que le démontage du lecteur.
6. Consultez la page 12 pour obtenir des informations sur
l’installation et la configuration du logiciel BounceBack
Express afin d’effectuer des sauvegardes.
Remarque :
Pour les kits double interface, vous devez installer
et configurer le logiciel BounceBack Express pour activer la fonction
de sauvegarde par bouton poussoir sur le lecteur.
6 Guide de démarrage rapide
Vous ne devez pas suivre cette procédure de
configuration du matériel. Les opérations de
configuration du matériel 1 à 4 sont une bonne méthode
pour connecter le nouveau lecteur à l’ordinateur, mais il
n’est pas toujours nécessaire de suivre cette procédure.
Par exemple, si vous souhaitez connecter le lecteur
après l’amorçage de l’ordinateur, connectez simplement
le câble d’interface et mettez le lecteur sous tension ;
le SE détecte et monte automatiquement le lecteur.
C’est ce qu’on appelle une « connexion à chaud ».
En cas de connexion à chaud, il est conseillé de
connecter tous les câbles d’alimentation et d’interface
au lecteur, puis de placer ce dernier à l’endroit souhaité
avant de l’allumer. De cette façon, vous n’aurez pas à
déplacer le lecteur après l’avoir allumé.
FRANÇAIS
Print Date:2005-May-10 12:38:44 MDT Released; Prod Rel; A; D0000115888 Seagate Confidential

SE Windows
Installation des pilotes appropriés à
chaque système d’exploitation (SE)
Les systèmes d’exploitation Windows XP/2000/Me
disposent de pilotes intégrés et à jour pour les
interfaces USB et IEEE 1394a. Il est inutile d’installer
des pilotes si vous utilisez l’un de ces systèmes
d’exploitation. En revanche, assurez-vous d’avoir
téléchargé et installé le dernier Service Pack de
Microsoft afin d’être certain de disposer des derniers
pilotes disponibles pour le SE.
SE Windows 98 utilisant une interface USB : Après
avoir connecté le lecteur à l’ordinateur et l’avoir mis
sous tension, Windows 98SE affiche l’Assistant Ajout
de nouveau matériel. Cela signifie que l’assistant doit
trouver les pilotes USB qui figurent sur le CD Extra
Value de Seagate.
Procédez comme suit pour installer les pilotes :
1. Insérez le CD Extra Value de Seagate dans le lecteur
de CD-ROM de l’ordinateur.
2. Cliquez sur le bouton Suivant. L’assistant affiche un
écran proposant deux options.
3. Sélectionnez l’option Rechercher le meilleur pilote
pour le périphérique. L’assistant affiche quatre
cases à cocher.
4. Activez les options CD-ROM et Spécifier un
emplacement. Sélectionnez les pilotes dans le
répertoire Drivers USB Win98.
Qu’est-ce que le
partitionnement ?
Un partitionnement
consiste à diviser un
disque en plusieurs
volumes distincts. Cette
opération n’augmente
pas la capacité du
lecteur. La création de
plusieurs partitions sur
un disque peut être utile
pour organiser les
informations qu’il
contient. Par exemple,
vous pouvez créer un
volume (partition) pour
stocker vos copies de
sauvegarde et un autre
pour vos applications
ou d’autres informations.
Une lettre de lecteur est
attribuée à chaque
volume, de sorte qu’il
s’affiche comme un
lecteur distinct dans
l’explorateur Windows.
Lecteur de disque dur externe 7
5. Cliquez sur le bouton Suivant. L’assistant installe les
pilotes appropriés sur l’ordinateur et vous informe
quand il a terminé.
6. Cliquez sur le bouton Terminer pour achever
l’installation.
7. Après redémarrage de l’ordinateur, le nouveau pilote
est prêt à l’emploi.
SE Windows 98 utilisant une interface IEEE 1394a
(kit double interface uniquement) : Pour pouvoir
utiliser l’interface IEEE 1394a, vous devez télécharger la
mise à jour du système Microsoft Windows 98 à partir
du site de Microsoft.
Comment reformater et/ou partitionner le lecteur de
disque dur Votre lecteur vous a été livré pré-formaté
pour un système de fichiers FAT32, de sorte qu’aucune
opération de formatage supplémentaire n’est
nécessaire si vous utilisez un système d’exploitation
Windows. En revanche, si vous utilisez Windows 2000
ou Windows XP et préférez opter pour un système de
fichiers NTFS, vous pouvez reformater le disque à l’aide
soit de l’application Gestion des disques intégrée
fournie par Microsoft, soit de l’application DiscWizard
™
for Windows de Seagate qui figure dans le répertoire
Files du CD Extra Value de Seagate.
Attention : Le reformatage détruit toutes les données figurant sur
le lecteur. Sauvegardez toutes les données que vous souhaitez
conserver avant de reformater le lecteur. De même, si vous reformatez
en NTFS, vous devez toujours lancer BounceBack Express (voir page
12) en vous identifiant comme Administrateur pour être certain de
pouvoir accéder ultérieurement aux fichiers de sauvegarde.
FRANÇAIS
Print Date:2005-May-10 12:38:44 MDT Released; Prod Rel; A; D0000115888 Seagate Confidential
 Loading...