

Seagate WSS NAS 2-Bay | 4-Bay | 6-Bay Use r Manual
このドキュメントのオンライン最新版にアクセスするにはこのドキュメントのオンライン最新版にアクセスするには
ここをクリックしてください。最新のコンテンツ、展開可能な図解、分かりやすいナビゲーション、検索機
能もあります。
モデル: SRPS20 / SRPS40 / SRPS60

. . . . . . . . . . . . . . . . . . . . . . . . . . . . . . . . . . . . . . . . . . . . . . . . . . . . . . . . . . . . . . . . . . . . . . . . . . . . . . . . . . . . . . . . . . . . . . . . . . . . . . . . . . . . . . . . . . . . . . . . . . . . . . . . . . . . . . . . . . . . . . . . . . . . . . . . . . . . . . . . . . . . . . . . . . . . . . . . . . . . . . . . . . . . . . . . . . . . . . . . . . . . . . . . . . . . . . . . . . . . . . . . . . . . . . . . . . . . . . . . . . . . . . . . . . . . . . . . . . . . . . . . . . . . . . . . . . . . . . . .
. . . . . . . . . . . . . . . . . . . . . . . . . . . . . . . . . . . . . . . . . . . . . . . . . . . . . . . . . . . . . . . . . . . . . . . . . . . . . . . . . . . . . . . . . . . . . . . . . . . . . . . . . . . . . . . . . . . . . . . . . . . . . . . . . . . . . . . . . . . . . . . . . . . . . . . . . . . . . . . . . . . . . . . . . . . . . . . . . . . . . . . . . . . . . . . . . . . . . . . . . . . . . . . . . . . . . . . . . . . . . . . . . . . . . . . . . . . . . . . . . . . . . . . . . . . . . . . . . . . . . . . . . . . . . . . . . . . . . . . .
. . . . . . . . . . . . . . . . . . . . . . . . . . . . . . . . . . . . . . . . . . . . . . . . . . . . . . . . . . . . . . . . . . . . . . . . . . . . . . . . . . . . . . . . . . . . . . . . . . . . . . . . . . . . . . . . . . . . . . . . . . . . . . . . . . . . . . . . . . . . . . . . . . . . . . . . . . . . . . . . . . . . . . . . . . . . . . . . . . . . . . . . . . . . . . . . . . . . . . . . . . . . . . . . . . . . . . . . . . . . . . . . . . . . . . . . . . . . . . . . . . . . . . . . . . . . . . . . . . . . . . . . . . . . . . . . . . . . . . . .
. . . . . . . . . . . . . . . . . . . . . . . . . . . . . . . . . . . . . . . . . . . . . . . . . . . . . . . . . . . . . . . . . . . . . . . . . . . . . . . . . . . . . . . . . . . . . . . . . . . . . . . . . . . . . . . . . . . . . . . . . . . . . . . . . . . . . . . . . . . . . . . . . . . . . . . . . . . . . . . . . . . . . . . . . . . . . . . . . . . . . . . . . . . . . . . . . . . . . . . . . . . . . . . . . . . . . . . . . . . . . . . . . . . . . . . . . . . . . . . . . . . . . . . . . . . . . . . . . . . . . . . . . . . . . . . . . . . . . . . .
. . . . . . . . . . . . . . . . . . . . . . . . . . . . . . . . . . . . . . . . . . . . . . . . . . . . . . . . . . . . . . . . . . . . . . . . . . . . . . . . . . . . . . . . . . . . . . . . . . . . . . . . . . . . . . . . . . . . . . . . . . . . . . . . . . . . . . . . . . . . . . . . . . . . . . . . . . . . . . . . . . . . . . . . . . . . . . . . . . . . . . . . . . . . . . . . . . . . . . . . . . . . . . . . . . . . . . . . . . . . . . . . . . . . . . . . . . . . . . . . . . . . . . . . . . . . . . . . . . . . . . . . . . . . . . . . . . . . . . . .
. . . . . . . . . . . . . . . . . . . . . . . . . . . . . . . . . . . . . . . . . . . . . . . . . . . . . . . . . . . . . . . . . . . . . . . . . . . . . . . . . . . . . . . . . . . . . . . . . . . . . . . . . . . . . . . . . . . . . . . . . . . . . . . . . . . . . . . . . . . . . . . . . . . . . . . . . . . . . . . . . . . . . . . . . . . . . . . . . . . . . . . . . . . . . . . . . . . . . . . . . . . . . . . . . . . . . . . . . . . . . . . . . . . . . . . . . . . . . . . . . . . . . . . . . . . . . . . . . . . . . . . . . . . . . . . . . . . . . . . .
. . . . . . . . . . . . . . . . . . . . . . . . . . . . . . . . . . . . . . . . . . . . . . . . . . . . . . . . . . . . . . . . . . . . . . . . . . . . . . . . . . . . . . . . . . . . . . . . . . . . . . . . . . . . . . . . . . . . . . . . . . . . . . . . . . . . . . . . . . . . . . . . . . . . . . . . . . . . . . . . . . . . . . . . . . . . . . . . . . . . . . . . . . . . . . . . . . . . . . . . . . . . . . . . . . . . . . . . . . . . . . . . . . . . . . . . . . . . . . . . . . . . . . . . . . . . . . . . . . . . . . . . . . . . . . . . . . . . . . . .
. . . . . . . . . . . . . . . . . . . . . . . . . . . . . . . . . . . . . . . . . . . . . . . . . . . . . . . . . . . . . . . . . . . . . . . . . . . . . . . . . . . . . . . . . . . . . . . . . . . . . . . . . . . . . . . . . . . . . . . . . . . . . . . . . . . . . . . . . . . . . . . . . . . . . . . . . . . . . . . . . . . . . . . . . . . . . . . . . . . . . . . . . . . . . . . . . . . . . . . . . . . . . . . . . . . . . . . . . . . . . . . . . . . . . . . . . . . . . . . . . . . . . . . . . . . . . . . . . . . . . . . . . . . . . . . . . . . . . . . .
. . . . . . . . . . . . . . . . . . . . . . . . . . . . . . . . . . . . . . . . . . . . . . . . . . . . . . . . . . . . . . . . . . . . . . . . . . . . . . . . . . . . . . . . . . . . . . . . . . . . . . . . . . . . . . . . . . . . . . . . . . . . . . . . . . . . . . . . . . . . . . . . . . . . . . . . . . . . . . . . . . . . . . . . . . . . . . . . . . . . . . . . . . . . . . . . . . . . . . . . . . . . . . . . . . . . . . . . . . . . . . . . . . . . . . . . . . . . . . . . . . . . . . . . . . . . . . . . . . . . . . . . . . . . . . . . . . . . . . . .
. . . . . . . . . . . . . . . . . . . . . . . . . . . . . . . . . . . . . . . . . . . . . . . . . . . . . . . . . . . . . . . . . . . . . . . . . . . . . . . . . . . . . . . . . . . . . . . . . . . . . . . . . . . . . . . . . . . . . . . . . . . . . . . . . . . . . . . . . . . . . . . . . . . . . . . . . . . . . . . . . . . . . . . . . . . . . . . . . . . . . . . . . . . . . . . . . . . . . . . . . . . . . . . . . . . . . . . . . . . . . . . . . . . . . . . . . . . . . . . . . . . . . . . . . . . . . . . . . . . . . . . . . . . . . . . . . . . . . . . .
. . . . . . . . . . . . . . . . . . . . . . . . . . . . . . . . . . . . . . . . . . . . . . . . . . . . . . . . . . . . . . . . . . . . . . . . . . . . . . . . . . . . . . . . . . . . . . . . . . . . . . . . . . . . . . . . . . . . . . . . . . . . . . . . . . . . . . . . . . . . . . . . . . . . . . . . . . . . . . . . . . . . . . . . . . . . . . . . . . . . . . . . . . . . . . . . . . . . . . . . . . . . . . . . . . . . . . . . . . . . . . . . . . . . . . . . . . . . . . . . . . . . . . . . . . . . . . . . . . . . . . . . . . . . . . . . . . . . . . . .
. . . . . . . . . . . . . . . . . . . . . . . . . . . . . . . . . . . . . . . . . . . . . . . . . . . . . . . . . . . . . . . . . . . . . . . . . . . . . . . . . . . . . . . . . . . . . . . . . . . . . . . . . . . . . . . . . . . . . . . . . . . . . . . . . . . . . . . . . . . . . . . . . . . . . . . . . . . . . . . . . . . . . . . . . . . . . . . . . . . . . . . . . . . . . . . . . . . . . . . . . . . . . . . . . . . . . . . . . . . . . . . . . . . . . . . . . . . . . . . . . . . . . . . . . . . . . . . . . . . . . . . . . . . . . . . . . . . . . . . .
. . . . . . . . . . . . . . . . . . . . . . . . . . . . . . . . . . . . . . . . . . . . . . . . . . . . . . . . . . . . . . . . . . . . . . . . . . . . . . . . . . . . . . . . . . . . . . . . . . . . . . . . . . . . . . . . . . . . . . . . . . . . . . . . . . . . . . . . . . . . . . . . . . . . . . . . . . . . . . . . . . . . . . . . . . . . . . . . . . . . . . . . . . . . . . . . . . . . . . . . . . . . . . . . . . . . . . . . . . . . . . . . . . . . . . . . . . . . . . . . . . . . . . . . . . . . . . . . . . . . . . . . . . . . . . . . . . . . . . . .
. . . . . . . . . . . . . . . . . . . . . . . . . . . . . . . . . . . . . . . . . . . . . . . . . . . . . . . . . . . . . . . . . . . . . . . . . . . . . . . . . . . . . . . . . . . . . . . . . . . . . . . . . . . . . . . . . . . . . . . . . . . . . . . . . . . . . . . . . . . . . . . . . . . . . . . . . . . . . . . . . . . . . . . . . . . . . . . . . . . . . . . . . . . . . . . . . . . . . . . . . . . . . . . . . . . . . . . . . . . . . . . . . . . . . . . . . . . . . . . . . . . . . . . . . . . . . . . . . . . . . . . . . . . . . . . . . . . . . . . .
. . . . . . . . . . . . . . . . . . . . . . . . . . . . . . . . . . . . . . . . . . . . . . . . . . . . . . . . . . . . . . . . . . . . . . . . . . . . . . . . . . . . . . . . . . . . . . . . . . . . . . . . . . . . . . . . . . . . . . . . . . . . . . . . . . . . . . . . . . . . . . . . . . . . . . . . . . . . . . . . . . . . . . . . . . . . . . . . . . . . . . . . . . . . . . . . . . . . . . . . . . . . . . . . . . . . . . . . . . . . . . . . . . . . . . . . . . . . . . . . . . . . . . . . . . . . . . . . . . . . . . . . . . . . . . . . . . . . . . . .
. . . . . . . . . . . . . . . . . . . . . . . . . . . . . . . . . . . . . . . . . . . . . . . . . . . . . . . . . . . . . . . . . . . . . . . . . . . . . . . . . . . . . . . . . . . . . . . . . . . . . . . . . . . . . . . . . . . . . . . . . . . . . . . . . . . . . . . . . . . . . . . . . . . . . . . . . . . . . . . . . . . . . . . . . . . . . . . . . . . . . . . . . . . . . . . . . . . . . . . . . . . . . . . . . . . . . . . . . . . . . . . . . . . . . . . . . . . . . . . . . . . . . . . . . . . . . . . . . . . . . . . . . . . . . . . . . . . . . . . .
. . . . . . . . . . . . . . . . . . . . . . . . . . . . . . . . . . . . . . . . . . . . . . . . . . . . . . . . . . . . . . . . . . . . . . . . . . . . . . . . . . . . . . . . . . . . . . . . . . . . . . . . . . . . . . . . . . . . . . . . . . . . . . . . . . . . . . . . . . . . . . . . . . . . . . . . . . . . . . . . . . . . . . . . . . . . . . . . . . . . . . . . . . . . . . . . . . . . . . . . . . . . . . . . . . . . . . . . . . . . . . . . . . . . . . . . . . . . . . . . . . . . . . . . . . . . . . . . . . . . . . . . . . . . . . . . . . . . . . . .
. . . . . . . . . . . . . . . . . . . . . . . . . . . . . . . . . . . . . . . . . . . . . . . . . . . . . . . . . . . . . . . . . . . . . . . . . . . . . . . . . . . . . . . . . . . . . . . . . . . . . . . . . . . . . . . . . . . . . . . . . . . . . . . . . . . . . . . . . . . . . . . . . . . . . . . . . . . . . . . . . . . . . . . . . . . . . . . . . . . . . . . . . . . . . . . . . . . . . . . . . . . . . . . . . . . . . . . . . . . . . . . . . . . . . . . . . . . . . . . . . . . . . . . . . . . . . . . . . . . . . . . . . . . . . . . . . . . . . . . .
. . . . . . . . . . . . . . . . . . . . . . . . . . . . . . . . . . . . . . . . . . . . . . . . . . . . . . . . . . . . . . . . . . . . . . . . . . . . . . . . . . . . . . . . . . . . . . . . . . . . . . . . . . . . . . . . . . . . . . . . . . . . . . . . . . . . . . . . . . . . . . . . . . . . . . . . . . . . . . . . . . . . . . . . . . . . . . . . . . . . . . . . . . . . . . . . . . . . . . . . . . . . . . . . . . . . . . . . . . . . . . . . . . . . . . . . . . . . . . . . . . . . . . . . . . . . . . . . . . . . . . . . . . . . . . . . . . . . . . . .
ContentsContents
1 Regulatory Compliance
FCC DECLARATION OF CONFORMANCE
FCC Class A Information
Industry Canada
Europe – EU Declaration of Conform ity
Power source
2 Safety Guidelines
Safe handling
Safety
Environm ent
Equipment handling precautions
Data security
3 Introduction
Who should use this manual
Box contents
Seagate WSS NAS features
4 System Overview
Specifications
Front panel view
. . . . . . . . . . . . . . . . . . . . . . . . . . . . . . . . . . . . . . . . . . . . . . . . . . . . . . . . . . . . . . . . . . . . . . . . . . . . . . . . . . . . . . . . . . . . . . . . . . . . . . . . . . . . . . . . . . . . . . . . . . . . . . . . . . . . . . . . . . . . . . . . . . . . . . . . . . . . . . . . . . . . . . . . . . . . . . . . . . . . . . . . . . . . . . . . . . . . . . . . . . . . . . . . . . . . . . . . . . . . . . . . . . . . . . . . . . . . . . . . . . . . . . . . . . . . . . . . . . . . . . . . . . . . . . . . . . . . . . . .FCC Cautio n
. . . . . . . . . . . . . . . . . . . . . . . . . . . . . . . . . . . . . . . . . . . . . . . . . . . . . . . . . . . . . . . . . . . . . . . . . . . . . . . . . . . . . . . . . . . . . . . . . . . . . . . . . . . . . . . . . . . . . . . . . . . . . . . . . . . . . . . . . . . . . . . . . . . . . . . . . . . . . . . . . . . . . . . . . . . . . . . . . . . . . . . . . . . . . . . . . . . . . . . . . . . . . . . . . . . . . . . . . . . . . . . . . . . . . . . . . . . . . . . . . . . . . . . . . . . . . . . . . . . . . . . . . . . . . . . . . . . . . . . .IMPORTANT NOTE: FCC Radiation Expo sure State ment
. . . . . . . . . . . . . . . . . . . . . . . . . . . . . . . . . . . . . . . . . . . . . . . . . . . . . . . . . . . . . . . . . . . . . . . . . . . . . . . . . . . . . . . . . . . . . . . . . . . . . . . . . . . . . . . . . . . . . . . . . . . . . . . . . . . . . . . . . . . . . . . . . . . . . . . . . . . . . . . . . . . . . . . . . . . . . . . . . . . . . . . . . . . . . . . . . . . . . . . . . . . . . . . . . . . . . . . . . . . . . . . . . . . . . . . . . . . . . . . . . . . . . . . . . . . . . . . . . . . . . . . . . . . . . . . . . . . . . . . .IMPORTANT NOTE fo r mobile device use
. . . . . . . . . . . . . . . . . . . . . . . . . . . . . . . . . . . . . . . . . . . . . . . . . . . . . . . . . . . . . . . . . . . . . . . . . . . . . . . . . . . . . . . . . . . . . . . . . . . . . . . . . . . . . . . . . . . . . . . . . . . . . . . . . . . . . . . . . . . . . . . . . . . . . . . . . . . . . . . . . . . . . . . . . . . . . . . . . . . . . . . . . . . . . . . . . . . . . . . . . . . . . . . . . . . . . . . . . . . . . . . . . . . . . . . . . . . . . . . . . . . . . . . . . . . . . . . . . . . . . . . . . . . . . . . . . . . . . . . .NOTE IMPORTANTE po ur l' utilisation de dispo sitifs mobile s
. . . . . . . . . . . . . . . . . . . . . . . . . . . . . . . . . . . . . . . . . . . . . . . . . . . . . . . . . . . . . . . . . . . . . . . . . . . . . . . . . . . . . . . . . . . . . . . . . . . . . . . . . . . . . . . . . . . . . . . . . . . . . . . . . . . . . . . . . . . . . . . . . . . . . . . . . . . . . . . . . . . . . . . . . . . . . . . . . . . . . . . . . . . . . . . . . . . . . . . . . . . . . . . . . . . . . . . . . . . . . . . . . . . . . . . . . . . . . . . . . . . . . . . . . . . . . . . . . . . . . . . . . . . . . . . . . . . . . . . .Po wer supply
. . . . . . . . . . . . . . . . . . . . . . . . . . . . . . . . . . . . . . . . . . . . . . . . . . . . . . . . . . . . . . . . . . . . . . . . . . . . . . . . . . . . . . . . . . . . . . . . . . . . . . . . . . . . . . . . . . . . . . . . . . . . . . . . . . . . . . . . . . . . . . . . . . . . . . . . . . . . . . . . . . . . . . . . . . . . . . . . . . . . . . . . . . . . . . . . . . . . . . . . . . . . . . . . . . . . . . . . . . . . . . . . . . . . . . . . . . . . . . . . . . . . . . . . . . . . . . . . . . . . . . . . . . . . . . . . . . . . . . . .Battery
. . . . . . . . . . . . . . . . . . . . . . . . . . . . . . . . . . . . . . . . . . . . . . . . . . . . . . . . . . . . . . . . . . . . . . . . . . . . . . . . . . . . . . . . . . . . . . . . . . . . . . . . . . . . . . . . . . . . . . . . . . . . . . . . . . . . . . . . . . . . . . . . . . . . . . . . . . . . . . . . . . . . . . . . . . . . . . . . . . . . . . . . . . . . . . . . . . . . . . . . . . . . . . . . . . . . . . . . . . . . . . . . . . . . . . . . . . . . . . . . . . . . . . . . . . . . . . . . . . . . . . . . . . . . . . . . . . . . . . . .NAS placement
. . . . . . . . . . . . . . . . . . . . . . . . . . . . . . . . . . . . . . . . . . . . . . . . . . . . . . . . . . . . . . . . . . . . . . . . . . . . . . . . . . . . . . . . . . . . . . . . . . . . . . . . . . . . . . . . . . . . . . . . . . . . . . . . . . . . . . . . . . . . . . . . . . . . . . . . . . . . . . . . . . . . . . . . . . . . . . . . . . . . . . . . . . . . . . . . . . . . . . . . . . . . . . . . . . . . . . . . . . . . . . . . . . . . . . . . . . . . . . . . . . . . . . . . . . . . . . . . . . . . . . . . . . . . . . . . . . . . . . . .Clie nt types
. . . . . . . . . . . . . . . . . . . . . . . . . . . . . . . . . . . . . . . . . . . . . . . . . . . . . . . . . . . . . . . . . . . . . . . . . . . . . . . . . . . . . . . . . . . . . . . . . . . . . . . . . . . . . . . . . . . . . . . . . . . . . . . . . . . . . . . . . . . . . . . . . . . . . . . . . . . . . . . . . . . . . . . . . . . . . . . . . . . . . . . . . . . . . . . . . . . . . . . . . . . . . . . . . . . . . . . . . . . . . . . . . . . . . . . . . . . . . . . . . . . . . . . . . . . . . . . . . . . . . . . . . . . . . . . . . . . . . . . .Networking
. . . . . . . . . . . . . . . . . . . . . . . . . . . . . . . . . . . . . . . . . . . . . . . . . . . . . . . . . . . . . . . . . . . . . . . . . . . . . . . . . . . . . . . . . . . . . . . . . . . . . . . . . . . . . . . . . . . . . . . . . . . . . . . . . . . . . . . . . . . . . . . . . . . . . . . . . . . . . . . . . . . . . . . . . . . . . . . . . . . . . . . . . . . . . . . . . . . . . . . . . . . . . . . . . . . . . . . . . . . . . . . . . . . . . . . . . . . . . . . . . . . . . . . . . . . . . . . . . . . . . . . . . . . . . . . . . . . . . . . .Storage file fo rmats
. . . . . . . . . . . . . . . . . . . . . . . . . . . . . . . . . . . . . . . . . . . . . . . . . . . . . . . . . . . . . . . . . . . . . . . . . . . . . . . . . . . . . . . . . . . . . . . . . . . . . . . . . . . . . . . . . . . . . . . . . . . . . . . . . . . . . . . . . . . . . . . . . . . . . . . . . . . . . . . . . . . . . . . . . . . . . . . . . . . . . . . . . . . . . . . . . . . . . . . . . . . . . . . . . . . . . . . . . . . . . . . . . . . . . . . . . . . . . . . . . . . . . . . . . . . . . . . . . . . . . . . . . . . . . . . . . . . . . . . .Lice nsing
. . . . . . . . . . . . . . . . . . . . . . . . . . . . . . . . . . . . . . . . . . . . . . . . . . . . . . . . . . . . . . . . . . . . . . . . . . . . . . . . . . . . . . . . . . . . . . . . . . . . . . . . . . . . . . . . . . . . . . . . . . . . . . . . . . . . . . . . . . . . . . . . . . . . . . . . . . . . . . . . . . . . . . . . . . . . . . . . . . . . . . . . . . . . . . . . . . . . . . . . . . . . . . . . . . . . . . . . . . . . . . . . . . . . . . . . . . . . . . . . . . . . . . . . . . . . . . . . . . . . . . . . . . . . . . . . . . . . . . . .Data Management
. . . . . . . . . . . . . . . . . . . . . . . . . . . . . . . . . . . . . . . . . . . . . . . . . . . . . . . . . . . . . . . . . . . . . . . . . . . . . . . . . . . . . . . . . . . . . . . . . . . . . . . . . . . . . . . . . . . . . . . . . . . . . . . . . . . . . . . . . . . . . . . . . . . . . . . . . . . . . . . . . . . . . . . . . . . . . . . . . . . . . . . . . . . . . . . . . . . . . . . . . . . . . . . . . . . . . . . . . . . . . . . . . . . . . . . . . . . . . . . . . . . . . . . . . . . . . . . . . . . . . . . . . . . . . . . . . . . . . . . .Storage management
. . . . . . . . . . . . . . . . . . . . . . . . . . . . . . . . . . . . . . . . . . . . . . . . . . . . . . . . . . . . . . . . . . . . . . . . . . . . . . . . . . . . . . . . . . . . . . . . . . . . . . . . . . . . . . . . . . . . . . . . . . . . . . . . . . . . . . . . . . . . . . . . . . . . . . . . . . . . . . . . . . . . . . . . . . . . . . . . . . . . . . . . . . . . . . . . . . . . . . . . . . . . . . . . . . . . . . . . . . . . . . . . . . . . . . . . . . . . . . . . . . . . . . . . . . . . . . . . . . . . . . . . . . . . . . . . . . . . . . . .Enclo s ure dimens ions
. . . . . . . . . . . . . . . . . . . . . . . . . . . . . . . . . . . . . . . . . . . . . . . . . . . . . . . . . . . . . . . . . . . . . . . . . . . . . . . . . . . . . . . . . . . . . . . . . . . . . . . . . . . . . . . . . . . . . . . . . . . . . . . . . . . . . . . . . . . . . . . . . . . . . . . . . . . . . . . . . . . . . . . . . . . . . . . . . . . . . . . . . . . . . . . . . . . . . . . . . . . . . . . . . . . . . . . . . . . . . . . . . . . . . . . . . . . . . . . . . . . . . . . . . . . . . . . . . . . . . . . . . . . . . . . . . . . . . . . .Enclo s ure weight
. . . . . . . . . . . . . . . . . . . . . . . . . . . . . . . . . . . . . . . . . . . . . . . . . . . . . . . . . . . . . . . . . . . . . . . . . . . . . . . . . . . . . . . . . . . . . . . . . . . . . . . . . . . . . . . . . . . . . . . . . . . . . . . . . . . . . . . . . . . . . . . . . . . . . . . . . . . . . . . . . . . . . . . . . . . . . . . . . . . . . . . . . . . . . . . . . . . . . . . . . . . . . . . . . . . . . . . . . . . . . . . . . . . . . . . . . . . . . . . . . . . . . . . . . . . . . . . . . . . . . . . . . . . . . . . . . . . . . . . .Temperature ranges
. . . . . . . . . . . . . . . . . . . . . . . . . . . . . . . . . . . . . . . . . . . . . . . . . . . . . . . . . . . . . . . . . . . . . . . . . . . . . . . . . . . . . . . . . . . . . . . . . . . . . . . . . . . . . . . . . . . . . . . . . . . . . . . . . . . . . . . . . . . . . . . . . . . . . . . . . . . . . . . . . . . . . . . . . . . . . . . . . . . . . . . . . . . . . . . . . . . . . . . . . . . . . . . . . . . . . . . . . . . . . . . . . . . . . . . . . . . . . . . . . . . . . . . . . . . . . . . . . . . . . . . . . . . . . . . . . . . . . . . .Humidity
. . . . . . . . . . . . . . . . . . . . . . . . . . . . . . . . . . . . . . . . . . . . . . . . . . . . . . . . . . . . . . . . . . . . . . . . . . . . . . . . . . . . . . . . . . . . . . . . . . . . . . . . . . . . . . . . . . . . . . . . . . . . . . . . . . . . . . . . . . . . . . . . . . . . . . . . . . . . . . . . . . . . . . . . . . . . . . . . . . . . . . . . . . . . . . . . . . . . . . . . . . . . . . . . . . . . . . . . . . . . . . . . . . . . . . . . . . . . . . . . . . . . . . . . . . . . . . . . . . . . . . . . . . . . . . . . . . . . . . . .Electrical
. . . . . . . . . . . . . . . . . . . . . . . . . . . . . . . . . . . . . . . . . . . . . . . . . . . . . . . . . . . . . . . . . . . . . . . . . . . . . . . . . . . . . . . . . . . . . . . . . . . . . . . . . . . . . . . . . . . . . . . . . . . . . . . . . . . . . . . . . . . . . . . . . . . . . . . . . . . . . . . . . . . . . . . . . . . . . . . . . . . . . . . . . . . . . . . . . . . . . . . . . . . . . . . . . . . . . . . . . . . . . . . . . . . . . . . . . . . . . . . . . . . . . . . . . . . . . . . . . . . . . . . . . . . . . . . . . . . . . . . .Aco us tics
5
5
5
5
5
6
6
6
6
8
9
9
9
9
9
10
10
10
11
12
12
12
13
14
14
14
14
14
15
15
15
15
21
22
23
23
23
24

. . . . . . . . . . . . . . . . . . . . . . . . . . . . . . . . . . . . . . . . . . . . . . . . . . . . . . . . . . . . . . . . . . . . . . . . . . . . . . . . . . . . . . . . . . . . . . . . . . . . . . . . . . . . . . . . . . . . . . . . . . . . . . . . . . . . . . . . . . . . . . . . . . . . . . . . . . . . . . . . . . . . . . . . . . . . . . . . . . . . . . . . . . . . . . . . . . . . . . . . . . . . . . . . . . . . . . . . . . . . . . . . . . . . . . . . . . . . . . . . . . . . . . . . . . . . . . . . . . . . . . . . . . . . . . . . . . . . . . . .
. . . . . . . . . . . . . . . . . . . . . . . . . . . . . . . . . . . . . . . . . . . . . . . . . . . . . . . . . . . . . . . . . . . . . . . . . . . . . . . . . . . . . . . . . . . . . . . . . . . . . . . . . . . . . . . . . . . . . . . . . . . . . . . . . . . . . . . . . . . . . . . . . . . . . . . . . . . . . . . . . . . . . . . . . . . . . . . . . . . . . . . . . . . . . . . . . . . . . . . . . . . . . . . . . . . . . . . . . . . . . . . . . . . . . . . . . . . . . . . . . . . . . . . . . . . . . . . . . . . . . . . . . . . . . . . . . . . . . . . .
. . . . . . . . . . . . . . . . . . . . . . . . . . . . . . . . . . . . . . . . . . . . . . . . . . . . . . . . . . . . . . . . . . . . . . . . . . . . . . . . . . . . . . . . . . . . . . . . . . . . . . . . . . . . . . . . . . . . . . . . . . . . . . . . . . . . . . . . . . . . . . . . . . . . . . . . . . . . . . . . . . . . . . . . . . . . . . . . . . . . . . . . . . . . . . . . . . . . . . . . . . . . . . . . . . . . . . . . . . . . . . . . . . . . . . . . . . . . . . . . . . . . . . . . . . . . . . . . . . . . . . . . . . . . . . . . . . . . . . . .
. . . . . . . . . . . . . . . . . . . . . . . . . . . . . . . . . . . . . . . . . . . . . . . . . . . . . . . . . . . . . . . . . . . . . . . . . . . . . . . . . . . . . . . . . . . . . . . . . . . . . . . . . . . . . . . . . . . . . . . . . . . . . . . . . . . . . . . . . . . . . . . . . . . . . . . . . . . . . . . . . . . . . . . . . . . . . . . . . . . . . . . . . . . . . . . . . . . . . . . . . . . . . . . . . . . . . . . . . . . . . . . . . . . . . . . . . . . . . . . . . . . . . . . . . . . . . . . . . . . . . . . . . . . . . . . . . . . . . . . .
. . . . . . . . . . . . . . . . . . . . . . . . . . . . . . . . . . . . . . . . . . . . . . . . . . . . . . . . . . . . . . . . . . . . . . . . . . . . . . . . . . . . . . . . . . . . . . . . . . . . . . . . . . . . . . . . . . . . . . . . . . . . . . . . . . . . . . . . . . . . . . . . . . . . . . . . . . . . . . . . . . . . . . . . . . . . . . . . . . . . . . . . . . . . . . . . . . . . . . . . . . . . . . . . . . . . . . . . . . . . . . . . . . . . . . . . . . . . . . . . . . . . . . . . . . . . . . . . . . . . . . . . . . . . . . . . . . . . . . . .
. . . . . . . . . . . . . . . . . . . . . . . . . . . . . . . . . . . . . . . . . . . . . . . . . . . . . . . . . . . . . . . . . . . . . . . . . . . . . . . . . . . . . . . . . . . . . . . . . . . . . . . . . . . . . . . . . . . . . . . . . . . . . . . . . . . . . . . . . . . . . . . . . . . . . . . . . . . . . . . . . . . . . . . . . . . . . . . . . . . . . . . . . . . . . . . . . . . . . . . . . . . . . . . . . . . . . . . . . . . . . . . . . . . . . . . . . . . . . . . . . . . . . . . . . . . . . . . . . . . . . . . . . . . . . . . . . . . . . . . .
. . . . . . . . . . . . . . . . . . . . . . . . . . . . . . . . . . . . . . . . . . . . . . . . . . . . . . . . . . . . . . . . . . . . . . . . . . . . . . . . . . . . . . . . . . . . . . . . . . . . . . . . . . . . . . . . . . . . . . . . . . . . . . . . . . . . . . . . . . . . . . . . . . . . . . . . . . . . . . . . . . . . . . . . . . . . . . . . . . . . . . . . . . . . . . . . . . . . . . . . . . . . . . . . . . . . . . . . . . . . . . . . . . . . . . . . . . . . . . . . . . . . . . . . . . . . . . . . . . . . . . . . . . . . . . . . . . . . . . . .
. . . . . . . . . . . . . . . . . . . . . . . . . . . . . . . . . . . . . . . . . . . . . . . . . . . . . . . . . . . . . . . . . . . . . . . . . . . . . . . . . . . . . . . . . . . . . . . . . . . . . . . . . . . . . . . . . . . . . . . . . . . . . . . . . . . . . . . . . . . . . . . . . . . . . . . . . . . . . . . . . . . . . . . . . . . . . . . . . . . . . . . . . . . . . . . . . . . . . . . . . . . . . . . . . . . . . . . . . . . . . . . . . . . . . . . . . . . . . . . . . . . . . . . . . . . . . . . . . . . . . . . . . . . . . . . . . . . . . . . .
. . . . . . . . . . . . . . . . . . . . . . . . . . . . . . . . . . . . . . . . . . . . . . . . . . . . . . . . . . . . . . . . . . . . . . . . . . . . . . . . . . . . . . . . . . . . . . . . . . . . . . . . . . . . . . . . . . . . . . . . . . . . . . . . . . . . . . . . . . . . . . . . . . . . . . . . . . . . . . . . . . . . . . . . . . . . . . . . . . . . . . . . . . . . . . . . . . . . . . . . . . . . . . . . . . . . . . . . . . . . . . . . . . . . . . . . . . . . . . . . . . . . . . . . . . . . . . . . . . . . . . . . . . . . . . . . . . . . . . . .
. . . . . . . . . . . . . . . . . . . . . . . . . . . . . . . . . . . . . . . . . . . . . . . . . . . . . . . . . . . . . . . . . . . . . . . . . . . . . . . . . . . . . . . . . . . . . . . . . . . . . . . . . . . . . . . . . . . . . . . . . . . . . . . . . . . . . . . . . . . . . . . . . . . . . . . . . . . . . . . . . . . . . . . . . . . . . . . . . . . . . . . . . . . . . . . . . . . . . . . . . . . . . . . . . . . . . . . . . . . . . . . . . . . . . . . . . . . . . . . . . . . . . . . . . . . . . . . . . . . . . . . . . . . . . . . . . . . . . . . .
. . . . . . . . . . . . . . . . . . . . . . . . . . . . . . . . . . . . . . . . . . . . . . . . . . . . . . . . . . . . . . . . . . . . . . . . . . . . . . . . . . . . . . . . . . . . . . . . . . . . . . . . . . . . . . . . . . . . . . . . . . . . . . . . . . . . . . . . . . . . . . . . . . . . . . . . . . . . . . . . . . . . . . . . . . . . . . . . . . . . . . . . . . . . . . . . . . . . . . . . . . . . . . . . . . . . . . . . . . . . . . . . . . . . . . . . . . . . . . . . . . . . . . . . . . . . . . . . . . . . . . . . . . . . . . . . . . . . . . . .
. . . . . . . . . . . . . . . . . . . . . . . . . . . . . . . . . . . . . . . . . . . . . . . . . . . . . . . . . . . . . . . . . . . . . . . . . . . . . . . . . . . . . . . . . . . . . . . . . . . . . . . . . . . . . . . . . . . . . . . . . . . . . . . . . . . . . . . . . . . . . . . . . . . . . . . . . . . . . . . . . . . . . . . . . . . . . . . . . . . . . . . . . . . . . . . . . . . . . . . . . . . . . . . . . . . . . . . . . . . . . . . . . . . . . . . . . . . . . . . . . . . . . . . . . . . . . . . . . . . . . . . . . . . . . . . . . . . . . . . .
. . . . . . . . . . . . . . . . . . . . . . . . . . . . . . . . . . . . . . . . . . . . . . . . . . . . . . . . . . . . . . . . . . . . . . . . . . . . . . . . . . . . . . . . . . . . . . . . . . . . . . . . . . . . . . . . . . . . . . . . . . . . . . . . . . . . . . . . . . . . . . . . . . . . . . . . . . . . . . . . . . . . . . . . . . . . . . . . . . . . . . . . . . . . . . . . . . . . . . . . . . . . . . . . . . . . . . . . . . . . . . . . . . . . . . . . . . . . . . . . . . . . . . . . . . . . . . . . . . . . . . . . . . . . . . . . . . . . . . . .
. . . . . . . . . . . . . . . . . . . . . . . . . . . . . . . . . . . . . . . . . . . . . . . . . . . . . . . . . . . . . . . . . . . . . . . . . . . . . . . . . . . . . . . . . . . . . . . . . . . . . . . . . . . . . . . . . . . . . . . . . . . . . . . . . . . . . . . . . . . . . . . . . . . . . . . . . . . . . . . . . . . . . . . . . . . . . . . . . . . . . . . . . . . . . . . . . . . . . . . . . . . . . . . . . . . . . . . . . . . . . . . . . . . . . . . . . . . . . . . . . . . . . . . . . . . . . . . . . . . . . . . . . . . . . . . . . . . . . . . .
Rear panel view
USB ports
5 System LEDs
WSS NAS LEDs
LED behavior
6 Setup
NAS: With hard drives
NAS: Diskless enclosure
7 Operation
Powering on/off the product
Powering on the NAS
Powering off the NAS
8 LCD Menu (4-Bay and 6-Bay)
Access the LCD display menu
. . . . . . . . . . . . . . . . . . . . . . . . . . . . . . . . . . . . . . . . . . . . . . . . . . . . . . . . . . . . . . . . . . . . . . . . . . . . . . . . . . . . . . . . . . . . . . . . . . . . . . . . . . . . . . . . . . . . . . . . . . . . . . . . . . . . . . . . . . . . . . . . . . . . . . . . . . . . . . . . . . . . . . . . . . . . . . . . . . . . . . . . . . . . . . . . . . . . . . . . . . . . . . . . . . . . . . . . . . . . . . . . . . . . . . . . . . . . . . . . . . . . . . . . . . . . . . . . . . . . . . . . . . . . . . . . . . . . . . . .WSS NAS 2-Bay
. . . . . . . . . . . . . . . . . . . . . . . . . . . . . . . . . . . . . . . . . . . . . . . . . . . . . . . . . . . . . . . . . . . . . . . . . . . . . . . . . . . . . . . . . . . . . . . . . . . . . . . . . . . . . . . . . . . . . . . . . . . . . . . . . . . . . . . . . . . . . . . . . . . . . . . . . . . . . . . . . . . . . . . . . . . . . . . . . . . . . . . . . . . . . . . . . . . . . . . . . . . . . . . . . . . . . . . . . . . . . . . . . . . . . . . . . . . . . . . . . . . . . . . . . . . . . . . . . . . . . . . . . . . . . . . . . . . . . . . .WSS NAS 4-Bay
. . . . . . . . . . . . . . . . . . . . . . . . . . . . . . . . . . . . . . . . . . . . . . . . . . . . . . . . . . . . . . . . . . . . . . . . . . . . . . . . . . . . . . . . . . . . . . . . . . . . . . . . . . . . . . . . . . . . . . . . . . . . . . . . . . . . . . . . . . . . . . . . . . . . . . . . . . . . . . . . . . . . . . . . . . . . . . . . . . . . . . . . . . . . . . . . . . . . . . . . . . . . . . . . . . . . . . . . . . . . . . . . . . . . . . . . . . . . . . . . . . . . . . . . . . . . . . . . . . . . . . . . . . . . . . . . . . . . . . . .WSS NAS 6 -Bay
. . . . . . . . . . . . . . . . . . . . . . . . . . . . . . . . . . . . . . . . . . . . . . . . . . . . . . . . . . . . . . . . . . . . . . . . . . . . . . . . . . . . . . . . . . . . . . . . . . . . . . . . . . . . . . . . . . . . . . . . . . . . . . . . . . . . . . . . . . . . . . . . . . . . . . . . . . . . . . . . . . . . . . . . . . . . . . . . . . . . . . . . . . . . . . . . . . . . . . . . . . . . . . . . . . . . . . . . . . . . . . . . . . . . . . . . . . . . . . . . . . . . . . . . . . . . . . . . . . . . . . . . . . . . . . . . . . . . . . . .Status and drive LEDs
. . . . . . . . . . . . . . . . . . . . . . . . . . . . . . . . . . . . . . . . . . . . . . . . . . . . . . . . . . . . . . . . . . . . . . . . . . . . . . . . . . . . . . . . . . . . . . . . . . . . . . . . . . . . . . . . . . . . . . . . . . . . . . . . . . . . . . . . . . . . . . . . . . . . . . . . . . . . . . . . . . . . . . . . . . . . . . . . . . . . . . . . . . . . . . . . . . . . . . . . . . . . . . . . . . . . . . . . . . . . . . . . . . . . . . . . . . . . . . . . . . . . . . . . . . . . . . . . . . . . . . . . . . . . . . . . . . . . . . . .WSS NAS Ethernet LEDs
. . . . . . . . . . . . . . . . . . . . . . . . . . . . . . . . . . . . . . . . . . . . . . . . . . . . . . . . . . . . . . . . . . . . . . . . . . . . . . . . . . . . . . . . . . . . . . . . . . . . . . . . . . . . . . . . . . . . . . . . . . . . . . . . . . . . . . . . . . . . . . . . . . . . . . . . . . . . . . . . . . . . . . . . . . . . . . . . . . . . . . . . . . . . . . . . . . . . . . . . . . . . . . . . . . . . . . . . . . . . . . . . . . . . . . . . . . . . . . . . . . . . . . . . . . . . . . . . . . . . . . . . . . . . . . . . . . . . . . . .Status LED
. . . . . . . . . . . . . . . . . . . . . . . . . . . . . . . . . . . . . . . . . . . . . . . . . . . . . . . . . . . . . . . . . . . . . . . . . . . . . . . . . . . . . . . . . . . . . . . . . . . . . . . . . . . . . . . . . . . . . . . . . . . . . . . . . . . . . . . . . . . . . . . . . . . . . . . . . . . . . . . . . . . . . . . . . . . . . . . . . . . . . . . . . . . . . . . . . . . . . . . . . . . . . . . . . . . . . . . . . . . . . . . . . . . . . . . . . . . . . . . . . . . . . . . . . . . . . . . . . . . . . . . . . . . . . . . . . . . . . . . .Hard dr ive LEDs
. . . . . . . . . . . . . . . . . . . . . . . . . . . . . . . . . . . . . . . . . . . . . . . . . . . . . . . . . . . . . . . . . . . . . . . . . . . . . . . . . . . . . . . . . . . . . . . . . . . . . . . . . . . . . . . . . . . . . . . . . . . . . . . . . . . . . . . . . . . . . . . . . . . . . . . . . . . . . . . . . . . . . . . . . . . . . . . . . . . . . . . . . . . . . . . . . . . . . . . . . . . . . . . . . . . . . . . . . . . . . . . . . . . . . . . . . . . . . . . . . . . . . . . . . . . . . . . . . . . . . . . . . . . . . . . . . . . . . . . .Function LED
. . . . . . . . . . . . . . . . . . . . . . . . . . . . . . . . . . . . . . . . . . . . . . . . . . . . . . . . . . . . . . . . . . . . . . . . . . . . . . . . . . . . . . . . . . . . . . . . . . . . . . . . . . . . . . . . . . . . . . . . . . . . . . . . . . . . . . . . . . . . . . . . . . . . . . . . . . . . . . . . . . . . . . . . . . . . . . . . . . . . . . . . . . . . . . . . . . . . . . . . . . . . . . . . . . . . . . . . . . . . . . . . . . . . . . . . . . . . . . . . . . . . . . . . . . . . . . . . . . . . . . . . . . . . . . . . . . . . . . . .Etherne t activity LED
. . . . . . . . . . . . . . . . . . . . . . . . . . . . . . . . . . . . . . . . . . . . . . . . . . . . . . . . . . . . . . . . . . . . . . . . . . . . . . . . . . . . . . . . . . . . . . . . . . . . . . . . . . . . . . . . . . . . . . . . . . . . . . . . . . . . . . . . . . . . . . . . . . . . . . . . . . . . . . . . . . . . . . . . . . . . . . . . . . . . . . . . . . . . . . . . . . . . . . . . . . . . . . . . . . . . . . . . . . . . . . . . . . . . . . . . . . . . . . . . . . . . . . . . . . . . . . . . . . . . . . . . . . . . . . . . . . . . . . . .Etherne t spe ed LED
. . . . . . . . . . . . . . . . . . . . . . . . . . . . . . . . . . . . . . . . . . . . . . . . . . . . . . . . . . . . . . . . . . . . . . . . . . . . . . . . . . . . . . . . . . . . . . . . . . . . . . . . . . . . . . . . . . . . . . . . . . . . . . . . . . . . . . . . . . . . . . . . . . . . . . . . . . . . . . . . . . . . . . . . . . . . . . . . . . . . . . . . . . . . . . . . . . . . . . . . . . . . . . . . . . . . . . . . . . . . . . . . . . . . . . . . . . . . . . . . . . . . . . . . . . . . . . . . . . . . . . . . . . . . . . . . . . . . . . . .Step 1 - Cables
. . . . . . . . . . . . . . . . . . . . . . . . . . . . . . . . . . . . . . . . . . . . . . . . . . . . . . . . . . . . . . . . . . . . . . . . . . . . . . . . . . . . . . . . . . . . . . . . . . . . . . . . . . . . . . . . . . . . . . . . . . . . . . . . . . . . . . . . . . . . . . . . . . . . . . . . . . . . . . . . . . . . . . . . . . . . . . . . . . . . . . . . . . . . . . . . . . . . . . . . . . . . . . . . . . . . . . . . . . . . . . . . . . . . . . . . . . . . . . . . . . . . . . . . . . . . . . . . . . . . . . . . . . . . . . . . . . . . . . . .Connections
. . . . . . . . . . . . . . . . . . . . . . . . . . . . . . . . . . . . . . . . . . . . . . . . . . . . . . . . . . . . . . . . . . . . . . . . . . . . . . . . . . . . . . . . . . . . . . . . . . . . . . . . . . . . . . . . . . . . . . . . . . . . . . . . . . . . . . . . . . . . . . . . . . . . . . . . . . . . . . . . . . . . . . . . . . . . . . . . . . . . . . . . . . . . . . . . . . . . . . . . . . . . . . . . . . . . . . . . . . . . . . . . . . . . . . . . . . . . . . . . . . . . . . . . . . . . . . . . . . . . . . . . . . . . . . . . . . . . . . . .Step 2 – Powe r o n the WSS NAS
. . . . . . . . . . . . . . . . . . . . . . . . . . . . . . . . . . . . . . . . . . . . . . . . . . . . . . . . . . . . . . . . . . . . . . . . . . . . . . . . . . . . . . . . . . . . . . . . . . . . . . . . . . . . . . . . . . . . . . . . . . . . . . . . . . . . . . . . . . . . . . . . . . . . . . . . . . . . . . . . . . . . . . . . . . . . . . . . . . . . . . . . . . . . . . . . . . . . . . . . . . . . . . . . . . . . . . . . . . . . . . . . . . . . . . . . . . . . . . . . . . . . . . . . . . . . . . . . . . . . . . . . . . . . . . . . . . . . . . . .Step 3 - Co nnect via Remote Des ktop Co nnection
. . . . . . . . . . . . . . . . . . . . . . . . . . . . . . . . . . . . . . . . . . . . . . . . . . . . . . . . . . . . . . . . . . . . . . . . . . . . . . . . . . . . . . . . . . . . . . . . . . . . . . . . . . . . . . . . . . . . . . . . . . . . . . . . . . . . . . . . . . . . . . . . . . . . . . . . . . . . . . . . . . . . . . . . . . . . . . . . . . . . . . . . . . . . . . . . . . . . . . . . . . . . . . . . . . . . . . . . . . . . . . . . . . . . . . . . . . . . . . . . . . . . . . . . . . . . . . . . . . . . . . . . . . . . . . . . . . . . . . . .Step 1 - Cables
. . . . . . . . . . . . . . . . . . . . . . . . . . . . . . . . . . . . . . . . . . . . . . . . . . . . . . . . . . . . . . . . . . . . . . . . . . . . . . . . . . . . . . . . . . . . . . . . . . . . . . . . . . . . . . . . . . . . . . . . . . . . . . . . . . . . . . . . . . . . . . . . . . . . . . . . . . . . . . . . . . . . . . . . . . . . . . . . . . . . . . . . . . . . . . . . . . . . . . . . . . . . . . . . . . . . . . . . . . . . . . . . . . . . . . . . . . . . . . . . . . . . . . . . . . . . . . . . . . . . . . . . . . . . . . . . . . . . . . . .Connections
. . . . . . . . . . . . . . . . . . . . . . . . . . . . . . . . . . . . . . . . . . . . . . . . . . . . . . . . . . . . . . . . . . . . . . . . . . . . . . . . . . . . . . . . . . . . . . . . . . . . . . . . . . . . . . . . . . . . . . . . . . . . . . . . . . . . . . . . . . . . . . . . . . . . . . . . . . . . . . . . . . . . . . . . . . . . . . . . . . . . . . . . . . . . . . . . . . . . . . . . . . . . . . . . . . . . . . . . . . . . . . . . . . . . . . . . . . . . . . . . . . . . . . . . . . . . . . . . . . . . . . . . . . . . . . . . . . . . . . . .Step 2 - Insert hard drives
. . . . . . . . . . . . . . . . . . . . . . . . . . . . . . . . . . . . . . . . . . . . . . . . . . . . . . . . . . . . . . . . . . . . . . . . . . . . . . . . . . . . . . . . . . . . . . . . . . . . . . . . . . . . . . . . . . . . . . . . . . . . . . . . . . . . . . . . . . . . . . . . . . . . . . . . . . . . . . . . . . . . . . . . . . . . . . . . . . . . . . . . . . . . . . . . . . . . . . . . . . . . . . . . . . . . . . . . . . . . . . . . . . . . . . . . . . . . . . . . . . . . . . . . . . . . . . . . . . . . . . . . . . . . . . . . . . . . . . . .Step 3 – Powe r o n the NAS ( r eco very mode)
. . . . . . . . . . . . . . . . . . . . . . . . . . . . . . . . . . . . . . . . . . . . . . . . . . . . . . . . . . . . . . . . . . . . . . . . . . . . . . . . . . . . . . . . . . . . . . . . . . . . . . . . . . . . . . . . . . . . . . . . . . . . . . . . . . . . . . . . . . . . . . . . . . . . . . . . . . . . . . . . . . . . . . . . . . . . . . . . . . . . . . . . . . . . . . . . . . . . . . . . . . . . . . . . . . . . . . . . . . . . . . . . . . . . . . . . . . . . . . . . . . . . . . . . . . . . . . . . . . . . . . . . . . . . . . . . . . . . . . . .Step 4 - Install Windo ws Storage Se rver 2012 R2 Ess e ntials
. . . . . . . . . . . . . . . . . . . . . . . . . . . . . . . . . . . . . . . . . . . . . . . . . . . . . . . . . . . . . . . . . . . . . . . . . . . . . . . . . . . . . . . . . . . . . . . . . . . . . . . . . . . . . . . . . . . . . . . . . . . . . . . . . . . . . . . . . . . . . . . . . . . . . . . . . . . . . . . . . . . . . . . . . . . . . . . . . . . . . . . . . . . . . . . . . . . . . . . . . . . . . . . . . . . . . . . . . . . . . . . . . . . . . . . . . . . . . . . . . . . . . . . . . . . . . . . . . . . . . . . . . . . . . . . . . . . . . . . .Step 5 - Co nnect via Remote Des ktop Co nnection
. . . . . . . . . . . . . . . . . . . . . . . . . . . . . . . . . . . . . . . . . . . . . . . . . . . . . . . . . . . . . . . . . . . . . . . . . . . . . . . . . . . . . . . . . . . . . . . . . . . . . . . . . . . . . . . . . . . . . . . . . . . . . . . . . . . . . . . . . . . . . . . . . . . . . . . . . . . . . . . . . . . . . . . . . . . . . . . . . . . . . . . . . . . . . . . . . . . . . . . . . . . . . . . . . . . . . . . . . . . . . . . . . . . . . . . . . . . . . . . . . . . . . . . . . . . . . . . . . . . . . . . . . . . . . . . . . . . . . . . .Sho rt push
. . . . . . . . . . . . . . . . . . . . . . . . . . . . . . . . . . . . . . . . . . . . . . . . . . . . . . . . . . . . . . . . . . . . . . . . . . . . . . . . . . . . . . . . . . . . . . . . . . . . . . . . . . . . . . . . . . . . . . . . . . . . . . . . . . . . . . . . . . . . . . . . . . . . . . . . . . . . . . . . . . . . . . . . . . . . . . . . . . . . . . . . . . . . . . . . . . . . . . . . . . . . . . . . . . . . . . . . . . . . . . . . . . . . . . . . . . . . . . . . . . . . . . . . . . . . . . . . . . . . . . . . . . . . . . . . . . . . . . . .Long pus h
24
25
26
27
27
28
28
29
31
31
31
31
32
32
33
33
33
34
35
35
35
35
36
38
39
40
40
40
42
43
44
47
47
47
48
48
49
50
50

. . . . . . . . . . . . . . . . . . . . . . . . . . . . . . . . . . . . . . . . . . . . . . . . . . . . . . . . . . . . . . . . . . . . . . . . . . . . . . . . . . . . . . . . . . . . . . . . . . . . . . . . . . . . . . . . . . . . . . . . . . . . . . . . . . . . . . . . . . . . . . . . . . . . . . . . . . . . . . . . . . . . . . . . . . . . . . . . . . . . . . . . . . . . . . . . . . . . . . . . . . . . . . . . . . . . . . . . . . . . . . . . . . . . . . . . . . . . . . . . . . . . . . . . . . . . . . . . . . . . . . . . . . . . . . . . . . . . . . . .
. . . . . . . . . . . . . . . . . . . . . . . . . . . . . . . . . . . . . . . . . . . . . . . . . . . . . . . . . . . . . . . . . . . . . . . . . . . . . . . . . . . . . . . . . . . . . . . . . . . . . . . . . . . . . . . . . . . . . . . . . . . . . . . . . . . . . . . . . . . . . . . . . . . . . . . . . . . . . . . . . . . . . . . . . . . . . . . . . . . . . . . . . . . . . . . . . . . . . . . . . . . . . . . . . . . . . . . . . . . . . . . . . . . . . . . . . . . . . . . . . . . . . . . . . . . . . . . . . . . . . . . . . . . . . . . . . . . . . . . .
. . . . . . . . . . . . . . . . . . . . . . . . . . . . . . . . . . . . . . . . . . . . . . . . . . . . . . . . . . . . . . . . . . . . . . . . . . . . . . . . . . . . . . . . . . . . . . . . . . . . . . . . . . . . . . . . . . . . . . . . . . . . . . . . . . . . . . . . . . . . . . . . . . . . . . . . . . . . . . . . . . . . . . . . . . . . . . . . . . . . . . . . . . . . . . . . . . . . . . . . . . . . . . . . . . . . . . . . . . . . . . . . . . . . . . . . . . . . . . . . . . . . . . . . . . . . . . . . . . . . . . . . . . . . . . . . . . . . . . . .
. . . . . . . . . . . . . . . . . . . . . . . . . . . . . . . . . . . . . . . . . . . . . . . . . . . . . . . . . . . . . . . . . . . . . . . . . . . . . . . . . . . . . . . . . . . . . . . . . . . . . . . . . . . . . . . . . . . . . . . . . . . . . . . . . . . . . . . . . . . . . . . . . . . . . . . . . . . . . . . . . . . . . . . . . . . . . . . . . . . . . . . . . . . . . . . . . . . . . . . . . . . . . . . . . . . . . . . . . . . . . . . . . . . . . . . . . . . . . . . . . . . . . . . . . . . . . . . . . . . . . . . . . . . . . . . . . . . . . . . .
. . . . . . . . . . . . . . . . . . . . . . . . . . . . . . . . . . . . . . . . . . . . . . . . . . . . . . . . . . . . . . . . . . . . . . . . . . . . . . . . . . . . . . . . . . . . . . . . . . . . . . . . . . . . . . . . . . . . . . . . . . . . . . . . . . . . . . . . . . . . . . . . . . . . . . . . . . . . . . . . . . . . . . . . . . . . . . . . . . . . . . . . . . . . . . . . . . . . . . . . . . . . . . . . . . . . . . . . . . . . . . . . . . . . . . . . . . . . . . . . . . . . . . . . . . . . . . . . . . . . . . . . . . . . . . . . . . . . . . . .
. . . . . . . . . . . . . . . . . . . . . . . . . . . . . . . . . . . . . . . . . . . . . . . . . . . . . . . . . . . . . . . . . . . . . . . . . . . . . . . . . . . . . . . . . . . . . . . . . . . . . . . . . . . . . . . . . . . . . . . . . . . . . . . . . . . . . . . . . . . . . . . . . . . . . . . . . . . . . . . . . . . . . . . . . . . . . . . . . . . . . . . . . . . . . . . . . . . . . . . . . . . . . . . . . . . . . . . . . . . . . . . . . . . . . . . . . . . . . . . . . . . . . . . . . . . . . . . . . . . . . . . . . . . . . . . . . . . . . . . .
. . . . . . . . . . . . . . . . . . . . . . . . . . . . . . . . . . . . . . . . . . . . . . . . . . . . . . . . . . . . . . . . . . . . . . . . . . . . . . . . . . . . . . . . . . . . . . . . . . . . . . . . . . . . . . . . . . . . . . . . . . . . . . . . . . . . . . . . . . . . . . . . . . . . . . . . . . . . . . . . . . . . . . . . . . . . . . . . . . . . . . . . . . . . . . . . . . . . . . . . . . . . . . . . . . . . . . . . . . . . . . . . . . . . . . . . . . . . . . . . . . . . . . . . . . . . . . . . . . . . . . . . . . . . . . . . . . . . . . . .
. . . . . . . . . . . . . . . . . . . . . . . . . . . . . . . . . . . . . . . . . . . . . . . . . . . . . . . . . . . . . . . . . . . . . . . . . . . . . . . . . . . . . . . . . . . . . . . . . . . . . . . . . . . . . . . . . . . . . . . . . . . . . . . . . . . . . . . . . . . . . . . . . . . . . . . . . . . . . . . . . . . . . . . . . . . . . . . . . . . . . . . . . . . . . . . . . . . . . . . . . . . . . . . . . . . . . . . . . . . . . . . . . . . . . . . . . . . . . . . . . . . . . . . . . . . . . . . . . . . . . . . . . . . . . . . . . . . . . . . .
. . . . . . . . . . . . . . . . . . . . . . . . . . . . . . . . . . . . . . . . . . . . . . . . . . . . . . . . . . . . . . . . . . . . . . . . . . . . . . . . . . . . . . . . . . . . . . . . . . . . . . . . . . . . . . . . . . . . . . . . . . . . . . . . . . . . . . . . . . . . . . . . . . . . . . . . . . . . . . . . . . . . . . . . . . . . . . . . . . . . . . . . . . . . . . . . . . . . . . . . . . . . . . . . . . . . . . . . . . . . . . . . . . . . . . . . . . . . . . . . . . . . . . . . . . . . . . . . . . . . . . . . . . . . . . . . . . . . . . . .
. . . . . . . . . . . . . . . . . . . . . . . . . . . . . . . . . . . . . . . . . . . . . . . . . . . . . . . . . . . . . . . . . . . . . . . . . . . . . . . . . . . . . . . . . . . . . . . . . . . . . . . . . . . . . . . . . . . . . . . . . . . . . . . . . . . . . . . . . . . . . . . . . . . . . . . . . . . . . . . . . . . . . . . . . . . . . . . . . . . . . . . . . . . . . . . . . . . . . . . . . . . . . . . . . . . . . . . . . . . . . . . . . . . . . . . . . . . . . . . . . . . . . . . . . . . . . . . . . . . . . . . . . . . . . . . . . . . . . . . .
. . . . . . . . . . . . . . . . . . . . . . . . . . . . . . . . . . . . . . . . . . . . . . . . . . . . . . . . . . . . . . . . . . . . . . . . . . . . . . . . . . . . . . . . . . . . . . . . . . . . . . . . . . . . . . . . . . . . . . . . . . . . . . . . . . . . . . . . . . . . . . . . . . . . . . . . . . . . . . . . . . . . . . . . . . . . . . . . . . . . . . . . . . . . . . . . . . . . . . . . . . . . . . . . . . . . . . . . . . . . . . . . . . . . . . . . . . . . . . . . . . . . . . . . . . . . . . . . . . . . . . . . . . . . . . . . . . . . . . . .
9 Software
10 Hard Drive Maintenance
Precautions
Adding/replacing a hard drive
3.5-inch hard drive
2.5-inch hard drive/SSD
11 Getting Help
Troubleshooting topics
12 Seagate WSS NAS Recovery
Prepare for a recovery
Perform a recovery
. . . . . . . . . . . . . . . . . . . . . . . . . . . . . . . . . . . . . . . . . . . . . . . . . . . . . . . . . . . . . . . . . . . . . . . . . . . . . . . . . . . . . . . . . . . . . . . . . . . . . . . . . . . . . . . . . . . . . . . . . . . . . . . . . . . . . . . . . . . . . . . . . . . . . . . . . . . . . . . . . . . . . . . . . . . . . . . . . . . . . . . . . . . . . . . . . . . . . . . . . . . . . . . . . . . . . . . . . . . . . . . . . . . . . . . . . . . . . . . . . . . . . . . . . . . . . . . . . . . . . . . . . . . . . . . . . . . . . . . .Image A
. . . . . . . . . . . . . . . . . . . . . . . . . . . . . . . . . . . . . . . . . . . . . . . . . . . . . . . . . . . . . . . . . . . . . . . . . . . . . . . . . . . . . . . . . . . . . . . . . . . . . . . . . . . . . . . . . . . . . . . . . . . . . . . . . . . . . . . . . . . . . . . . . . . . . . . . . . . . . . . . . . . . . . . . . . . . . . . . . . . . . . . . . . . . . . . . . . . . . . . . . . . . . . . . . . . . . . . . . . . . . . . . . . . . . . . . . . . . . . . . . . . . . . . . . . . . . . . . . . . . . . . . . . . . . . . . . . . . . . . .Image B
. . . . . . . . . . . . . . . . . . . . . . . . . . . . . . . . . . . . . . . . . . . . . . . . . . . . . . . . . . . . . . . . . . . . . . . . . . . . . . . . . . . . . . . . . . . . . . . . . . . . . . . . . . . . . . . . . . . . . . . . . . . . . . . . . . . . . . . . . . . . . . . . . . . . . . . . . . . . . . . . . . . . . . . . . . . . . . . . . . . . . . . . . . . . . . . . . . . . . . . . . . . . . . . . . . . . . . . . . . . . . . . . . . . . . . . . . . . . . . . . . . . . . . . . . . . . . . . . . . . . . . . . . . . . . . . . . . . . . . . .Back up the WSS NAS
. . . . . . . . . . . . . . . . . . . . . . . . . . . . . . . . . . . . . . . . . . . . . . . . . . . . . . . . . . . . . . . . . . . . . . . . . . . . . . . . . . . . . . . . . . . . . . . . . . . . . . . . . . . . . . . . . . . . . . . . . . . . . . . . . . . . . . . . . . . . . . . . . . . . . . . . . . . . . . . . . . . . . . . . . . . . . . . . . . . . . . . . . . . . . . . . . . . . . . . . . . . . . . . . . . . . . . . . . . . . . . . . . . . . . . . . . . . . . . . . . . . . . . . . . . . . . . . . . . . . . . . . . . . . . . . . . . . . . . . .Po wer off the WSS NAS
. . . . . . . . . . . . . . . . . . . . . . . . . . . . . . . . . . . . . . . . . . . . . . . . . . . . . . . . . . . . . . . . . . . . . . . . . . . . . . . . . . . . . . . . . . . . . . . . . . . . . . . . . . . . . . . . . . . . . . . . . . . . . . . . . . . . . . . . . . . . . . . . . . . . . . . . . . . . . . . . . . . . . . . . . . . . . . . . . . . . . . . . . . . . . . . . . . . . . . . . . . . . . . . . . . . . . . . . . . . . . . . . . . . . . . . . . . . . . . . . . . . . . . . . . . . . . . . . . . . . . . . . . . . . . . . . . . . . . . . .Locate the reco very butto n
52
53
53
53
54
56
58
58
62
62
64
65
65
65
65
65

Regulatory Compliance
FCC DECLARATION OF CONFORMANCE
This device complies with Part 15 of the FCC Rules. Operation is subject to the following two conditions: (1)
this device may not cause harmful interference, and (2) this device must accept any interference received,
including interference that may cause undesired operation.
FCC Class A Informaon
This equipment has been tested and found to comply with the limits for a Class A digital device, pursuant to
Part 15 of the FCC Rules. These limits are designed to provide reasonable protection against harmful
interference in a residential installation. This equipment generates, uses and can radiate radio frequency
energy and, if not installed and used in accordance with the instructions, may cause harmful interference to
radio communications. Operation of this equipment in a residential area is likely to cause harmful
interference in which case the user will be required to correct the interference at his own expense.
If this equipment does cause harmful interference to radio or television reception, which can be determined
by turning the equipment off and on, the user is encouraged to try to correct the interference by one of the
following measures:
Reorient or relocate the receiving antenna.
Increase the separation between the equipment and receiver.
Connect the equipment into an outlet on a circuit different from that to which the receiver is connected.
Consult the dealer or an experienced radio/TV technician for help.
This device complies with Part 15 of the FCC Rules. Operation is subject to the following two conditions: (1)
This device may not cause harmful interference, and (2) this device must accept any interference received,
including interference that may cause undesired operation.
FCC Cauon
Any changes or modifications not expressly approved by the party responsible for compliance could void
the user's authority to operate this equipment.
IMPORTANT NOTE: FCC Radiaon Exposure Statement
This equipment complies with FCC radiation exposure limits set forth for an uncontrolled environment. This
equipment should be installed and operated with minimum distance 20cm between the radiator & your
body. This transmitter must not be co-located or operating in conjunction with any other antenna or
transmitter.
5Se agate WSS NAS 2-Bay | 4-Bay | 6 -Bay
4/13/15

The availability of some specific channels and/or operational frequency bands are country dependent and
are firmware programmed at the factory to match the intended destination. The firmware setting is not
accessible by the end user.
Note to US model owner: To comply with US FCC regulation, the country selection function has been
completely removed from all US models. The above function is for non-US models only.
Industry Canada
This device complies with RSS-210 of the Industry Canada Rules. Operation is subject to the following two
conditions: (1) This device may not cause harmful interference, and (2) this device must accept any
interference received, including interference that may cause undesired operation.
Ce dispositif est conforme à la norme CNR-210 d'Industrie Canada applicable aux appareils radio exempts
de licence. Son fonctionnement est sujet aux deux conditions suivantes: (1) le dispositif ne doit pas
produire de brouillage préjudiciable, et (2) ce dispositif doit accepter tout brouillage reçu, y compris un
brouillage susceptible de provoquer un fonctionnement indésirable.
IMPORTANT NOTE for mobile device use
Radiation Exposure Statement:
This equipment complies with IC radiation exposure limits set forth for an uncontrolled environment. This
equipment should be installed and operated with minimum distance 20cm between the radiator & your
body.
NOTE IMPORTANTE pour l'ulisaon de disposifs mobiles
Déclaration d'exposition aux radiations:
Cet équipement est conforme aux limites d'exposition aux rayonnements IC établies pour un
environnement non contrôlé. Cet équipement doit être installé et utilisé avec un minimum de 20 cm de
distance entre la source de rayonnement et votre corps.
Europe – EU Declaraon of Conformity
This device complies with the essential requirements of the EMC Directive 2004/108/EC. The following test
methods have been applied in order to prove presumption of conformity with the essential requirements
of the EMC Directive 2004/108/EC:
EN 60950-1:2006/AC:2011: Information technology equipment - Safety - Part 1: General requirements
EN 55022: 2010/AC:2011: Information technology equipment - Radio disturbance characteristics
Limits and methods of measurement
6Se agate WSS NAS 2-Bay | 4-Bay | 6 -Bay
4/13/15

EN 55024: 2010: Information technology equipment - Immunity characteristics - Limits and methods of
measurement
Cesky
[Czech]
Seagate tímto prohlašuje že tento Desktop NAS je ve shodě se základními požadavky a
dalšími příslušnými ustanoveními směrnice 2004/5/ES.
Dansk
[Danish]
Undertegnede Seagate erklærer herved at følgende udstyr Desktop NAS overholder de
væsentlige krav og øvrige relevante krav i direktiv 2004/5/EF.
Deutsch
[German]
Hiermit erklärt Seagate, dass sich das Gerät Desktop NAS in Übereinstimmung mit den
grundlegenden Anforderungen und den übrigen einschlägigen Bestimmungen der Richtlinie
2004/5/EG befindet.
Eesti
[Estonian]
Käesolevaga kinnitab Seagate seadme Desktop NAS vastavust direktiivi 2004/5/EÜ
põhinõuetele ja nimetatud direktiivist tulenevatele teistele asjakohastele sätetele.
English Hereby, Seagate, declares that this Desktop NAS is in compliance with the essential
requirements and other relevant provisions of Directive 2004/5/EC.
Español
[Spanish]
Por medio de la presente Seagate declara que el Desktop NAS cumple con los requisitos
esenciales y cualesquiera otras disposiciones aplicables o exigibles de la Directiva
2004/5/CE.
Ελληνική
[Greek]
ΜΕ ΤΗΝ ΠΑΡΟΥΣΑ Seagate ΔΗΛΩΝΕΙ ΟΤΙ Desktop NAS ΣΥΜΜΟΡΦΩΝΕΤΑΙ ΠΡΟΣ ΤΙΣ
ΟΥΣΙΩΔΕΙΣ ΑΠΑΙΤΗΣΕΙΣ ΚΑΙ ΤΙΣ ΛΟΙΠΕΣ ΣΧΕΤΙΚΕΣ ΔΙΑΤΑΞΕΙΣ ΤΗΣ ΟΔΗΓΙΑΣ
2004/5/ΕΚ.
Français
[French]
Par la présente Seagate déclare que l'appareil Desktop NAS est conforme aux exigences
essentielles et aux autres dispositions pertinentes de la directive 2004/5/CE.
Italiano
[Italian]
Con la presente Seagate dichiara che questo Desktop NAS è conforme ai requisiti
essenziali ed alle altre disposizioni pertinenti stabilite dalla direttiva 2004/5/CE.
Latviski
[Latvian]
Ar šo Seagate deklarē, ka Desktop NAS atbilst Direktīvas 2004/104/EK būtiskajām prasībām
un citiem ar to saistītajiem noteikumiem.
Lietuviu
[Lithuanian]
Šiuo Seagate deklaruoja, kad šis Desktop NAS atitinka esminius reikalavimus ir kitas
2004/104/EB Direktyvos nuostatas.
7Se agate WSS NAS 2-Bay | 4-Bay | 6 -Bay
4/13/15

Nederlands
[Dutch]
Hierbij verklaart Seagate dat het toestel Desktop NAS in overeenstemming is met de
essentiële eisen en de andere relevante bepalingen van richtlijn 2004/104/EG.
Malti
[Maltese]
Hawnhekk, Seagate, jiddikjara li dan Desktop NAS jikkonforma mal-ħtiġijiet essenzjali u ma
provvedimenti oħrajn relevanti li hemm fid-Dirrettiva 2004/104/EC.
Magyar
[Hungarian]
Alulírott, Seagate nyilatkozom, hogy a Desktop NAS megfelel a vonatkozó alapvetõ
követelményeknek és az 2004/104/EC irányelv egyéb elõírásainak.
Polski
[Polish]
Niniejszym Seagate oswiadcza, ze Desktop NAS jest zgodny z zasadniczymi wymogami oraz
pozostalymi stosownymi postanowieniami Dyrektywy 2004/104/EC.
Português
[Portuguese]
Seagate declara que este Desktop NAS está conforme com os requisitos essenciais e
outras disposições da Directiva 2004/104/CE.
Slovensko
[Slovenian]
Seagate izjavlja, da je ta Desktop NAS v skladu z bistvenimi zahtevami in ostalimi
relevantnimi določili direktive 2004/104/ES.
Slovensky
[Slovak]
Seagate týmto vyhlasuje, že Desktop NAS spĺňa základné požiadavky a všetky príslušné
ustanovenia Smernice 2004/104/ES.
Suomi
[Finnish]
Seagate vakuuttaa täten että Desktop NAS tyyppinen laite on direktiivin 2004/104/EY
oleellisten vaatimusten ja sitä koskevien direktiivin muiden ehtojen mukainen.
Svenska
[Swedish]
Härmed intygar Seagate att denna Desktop NAS står I överensstämmelse med de
väsentliga egenskapskrav och övriga relevanta bestämmelser som framgår av direktiv
2004/104/EG.
Power source
Caution: Use the product with the provided power supply only.
Note: To protect your data, always follow the safe removal procedures for your operating
system when disconnecting your product.
8Se agate WSS NAS 2-Bay | 4-Bay | 6 -Bay
4/13/15

Safety Guidelines
Safe handling
The Seagate WSS NAS 2-Bay | 4-Bay | 6-Bay must run with all of its parts and units in place. In order to
comply with applicable safety, emission, and thermal requirements, the cover should not be removed and
all drives and/or empty drive trays must be installed according to the instructions (see Setup).
Permanently unplug the unit if you think that it has become damaged in any way.
With the sole exception of "hot-swapping" compatible hard drives from protected volumes (see Hard Drive
Maintenance), you must shut down and disconnect power from the NAS before maintenance or physical
troubleshooting is performed on the device. Only qualified technical service personnel should be allowed to
maintain the NAS.
Shut down and unplug the unit before moving it.
Safety
Power supply
The Seagate WSS NAS must only be operated from a power supply input voltage range of 100 - 240 VAC, 50
to 60 Hz.
Make sure that the socket outlets are located near the equipment and are easily accessible.
The power supply on this unit is not serviceable or field replaceable. If Seagate technical support determines
that the power supply is faulty or has failed and the unit is under warranty, return the NAS to Seagate per the
instructions provided by the Seagate technician.
Baery
The battery in the Seagate WSS NAS is not field-replaceable. If Seagate technical support determines that
the battery is faulty or has failed and the unit is under warranty, return the NAS to Seagate per the
instructions provided by the Seagate technician. If you attempt to remove or replace the battery:
There is a strong risk of explosion when using an incorrect type.
You will void the device warranty.
Important info: Refer to Warranty before performing any hardware repairs or maintenance that
is not described in this manual.
9Se agate WSS NAS 2-Bay | 4-Bay | 6 -Bay
4/13/15

Environment
A safe electrical ground connection must be provided to the power cord. Check the grounding of the
enclosure before applying power.
Provide a suitable power source with electrical overload protection to meet the requirements laid down in
the technical specification.
Never expose your device to rain, or use it near water, or in damp or wet conditions. Never place objects
containing liquids on the enclosure, as they may spill into its openings. Doing so increases the risk of
electrical shock, short-circuiting, fire, or personal injury.
Always unplug the device from the electrical outlet if there is a risk of lightning or if it will be unused for an
extended period of time. Otherwise, there is an increased risk of electrical shock, short-circuiting, or fire.
DO NOT remove the chassis cover. Doing so will:
Void the product’s warranty
Expose hot surfaces (heat sinks)
The NAS must never be used as a shelf to support any other object.
NAS placement
Place your Seagate WSS NAS on a surface that is capable of supporting its total weight, including all the hard
drives and any accessories attached to the NAS's ports. The design of the surface area should incorporate
stabilizing features suitable to prevent the NAS from tipping or being pushed over during installation or in
normal use.
Do not add any load onto the Seagate WSS NAS when it is placed onto the surface. Doing so can prevent
proper airflow and affect operation.
The maximum ambient temperature during operation is 40°C.
The power connection must have a safe electrical distribution system and provide overcurrent protection.
When addressing these concerns, consider the electrical power consumption rating shown on the product.
The electrical distribution system must provide a reliable ground for this unit.
The power supply unit has a ground leakage current of 3.5mA. The design of the electrical distribution
system must take into consideration the total ground leakage current from all the power supplies in all the
units.
Equipment handling precauons
10Se agate WSS NAS 2-Bay | 4-Bay | 6 -Bay
4/13/15

Observe all conventional ESD precautions when handling the Seagate WSS NAS and its hard drives.
Hard drives are fragile and must be handled with care during removal/replacement.
Data security
Any loss, corruption, or destruction of data while using a Seagate hard drive or a Seagate hard drive system
is the sole responsibility of the user, and under no circumstances will Seagate be held liable for the recovery
or restoration of this data. To help prevent the loss of your data, Seagate highly recommends that you keep
TWO copies of your data: one copy on your NAS; and, a second copy on one of the following:
Direct-attached storage (DAS)
A second NAS
Cloud storage
Some form of removable storage or archival media
Important info: 1GB = 1,000,000,000 bytes. 1TB = 1,000,000,000,000 bytes. Once formatted, the
actual available storage capacity varies depending upon the operating environment (typically 1015% less).
11Se agate WSS NAS 2-Bay | 4-Bay | 6- Bay
4/13/15
Introducon
Thank you for purchasing a Seagate WSS NAS 2-Bay | 4-Bay | 6-Bay. Powered by Windows Storage Server
2012 R2 Essentials, your Seagate WSS NAS gives you the advanced file sharing and network security tools to
manage your company’s data.
Use this manual for step-by-step instructions on installation, hardware maintenance, and troubleshooting. If
you encounter problems, check Getting Help.
Who should use this manual
This user manual assumes that you have a working knowledge of Windows Server environments, networks,
NAS (network-attached storage), and storage products. If you do not have these skills or, are not confident
with the instructions in this guide, do not proceed with the installation or component replacement.
Box contents
Note: Refer to Warranty before performing any hardware repairs or maintenance that is not
described in this manual.
12Se agate WSS NAS 2-Bay | 4-Bay | 6- Bay
4/13/15
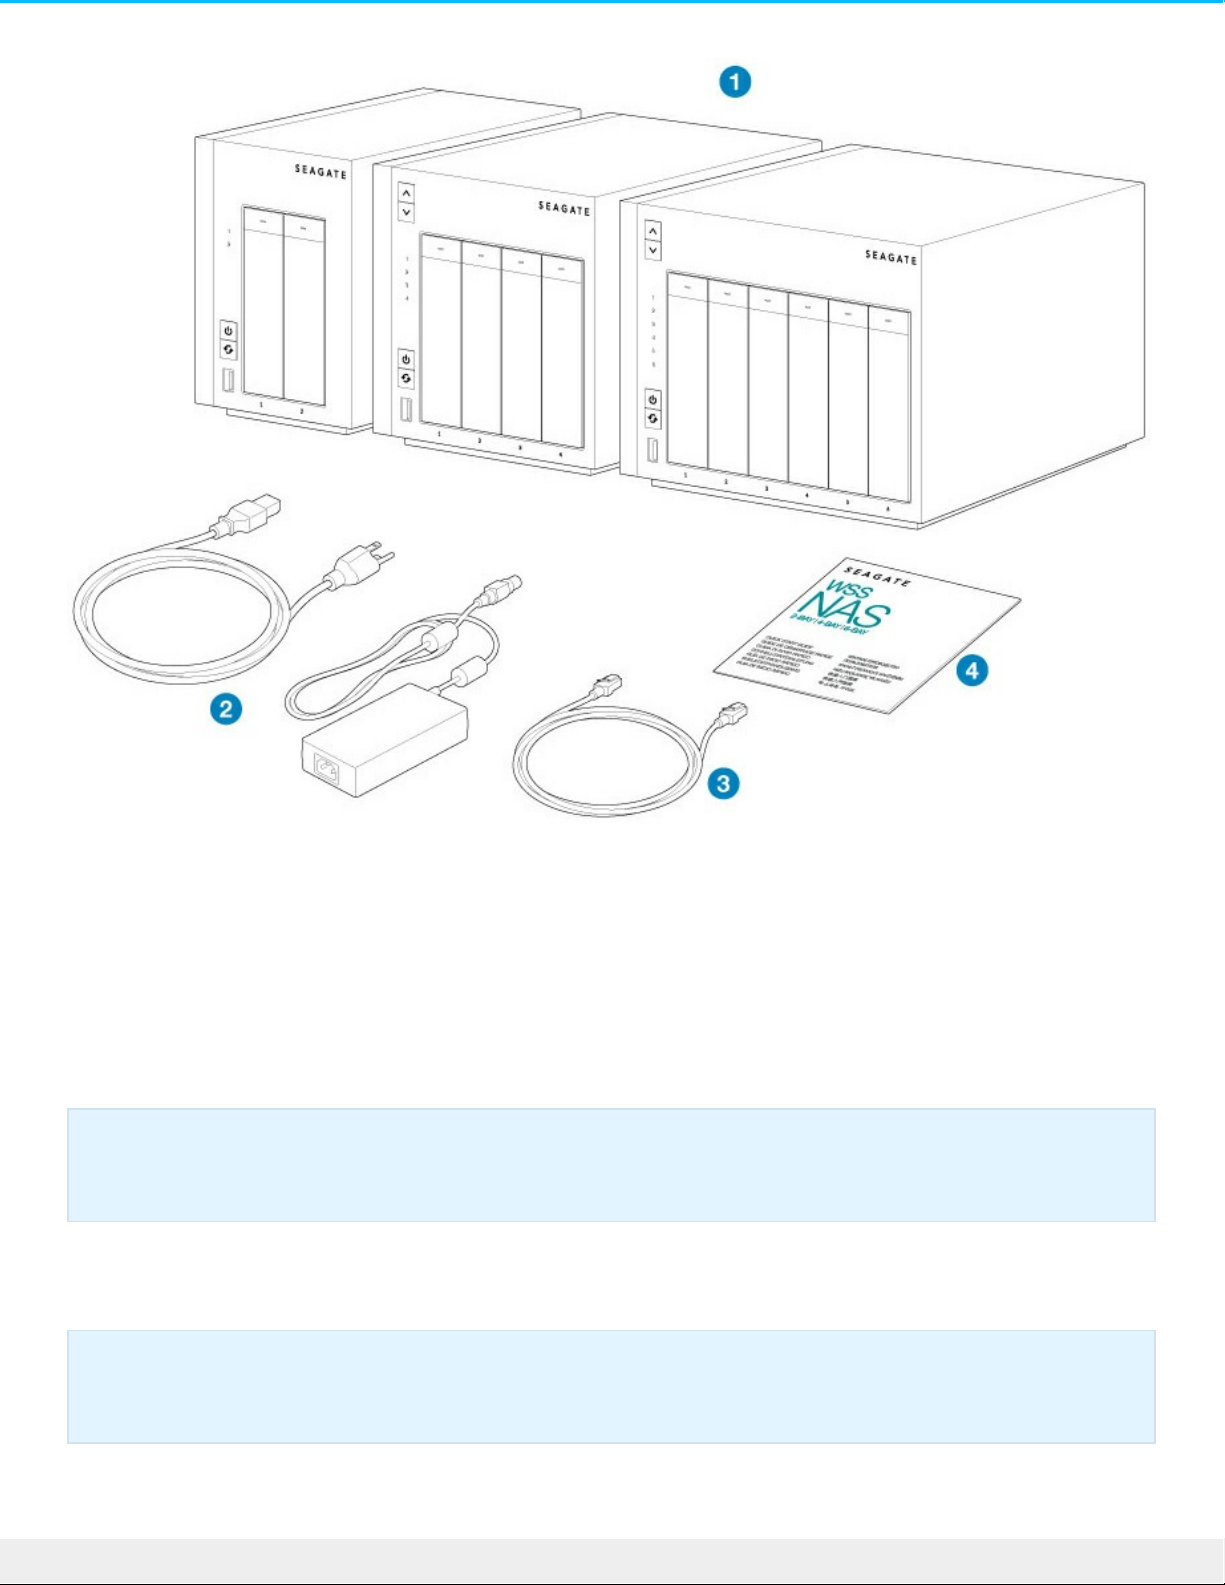
1. Seagate WSS NAS 2-Bay | 4-Bay | 6-Bay
2. Power supply cable
3. Ethernet cable
4. Quick Start Guide
The packaging also includes screws to mount 2.5-inch hard drives to the hard drive trays. See Hard Drive
Maintenance for instructions on how to install hard drives into the NAS enclosure.
Seagate WSS NAS features
Important info: Save your packaging. In the event that the product requires repair or service, it
must be returned in its original packaging.
Important info: Your Seagate WSS NAS must be connected to a DHCP server to allow proper
automatic remote server setup.
13Se agate WSS NAS 2-Bay | 4-Bay | 6- Bay
4/13/15

Client types
Windows Vista™, Windows 7, Windows 8
Windows Server 2008, Windows Server 2008 R2, Windows Server 2012, Windows Server 2012 R2
Networking
Dual gigabit failover and link aggregation
IPv4/IPv6
DHCP server and client
WINS server
DNS server
Subnet
VPN
Storage file formats
Internal: NTFS, ReFS
External: NTFS, exFAT, FAT32
Licensing
Supports up to 50 user sessions and 50 devices for backup
Data Management
Storage Spaces with mirror or parity redundancy
Supports hot spare
Thin provisioning
Data deduplicaiton
NTFS online scan and repair (CHKDSK)
For optimal performance, use Gigabit Ethernet equipment.
Important info: External forces such as network activity, hardware, distance, and setup can affect
your Seagate product’s performance.
14Se agate WSS NAS 2-Bay | 4-Bay | 6 -Bay
4/13/15

System Overview
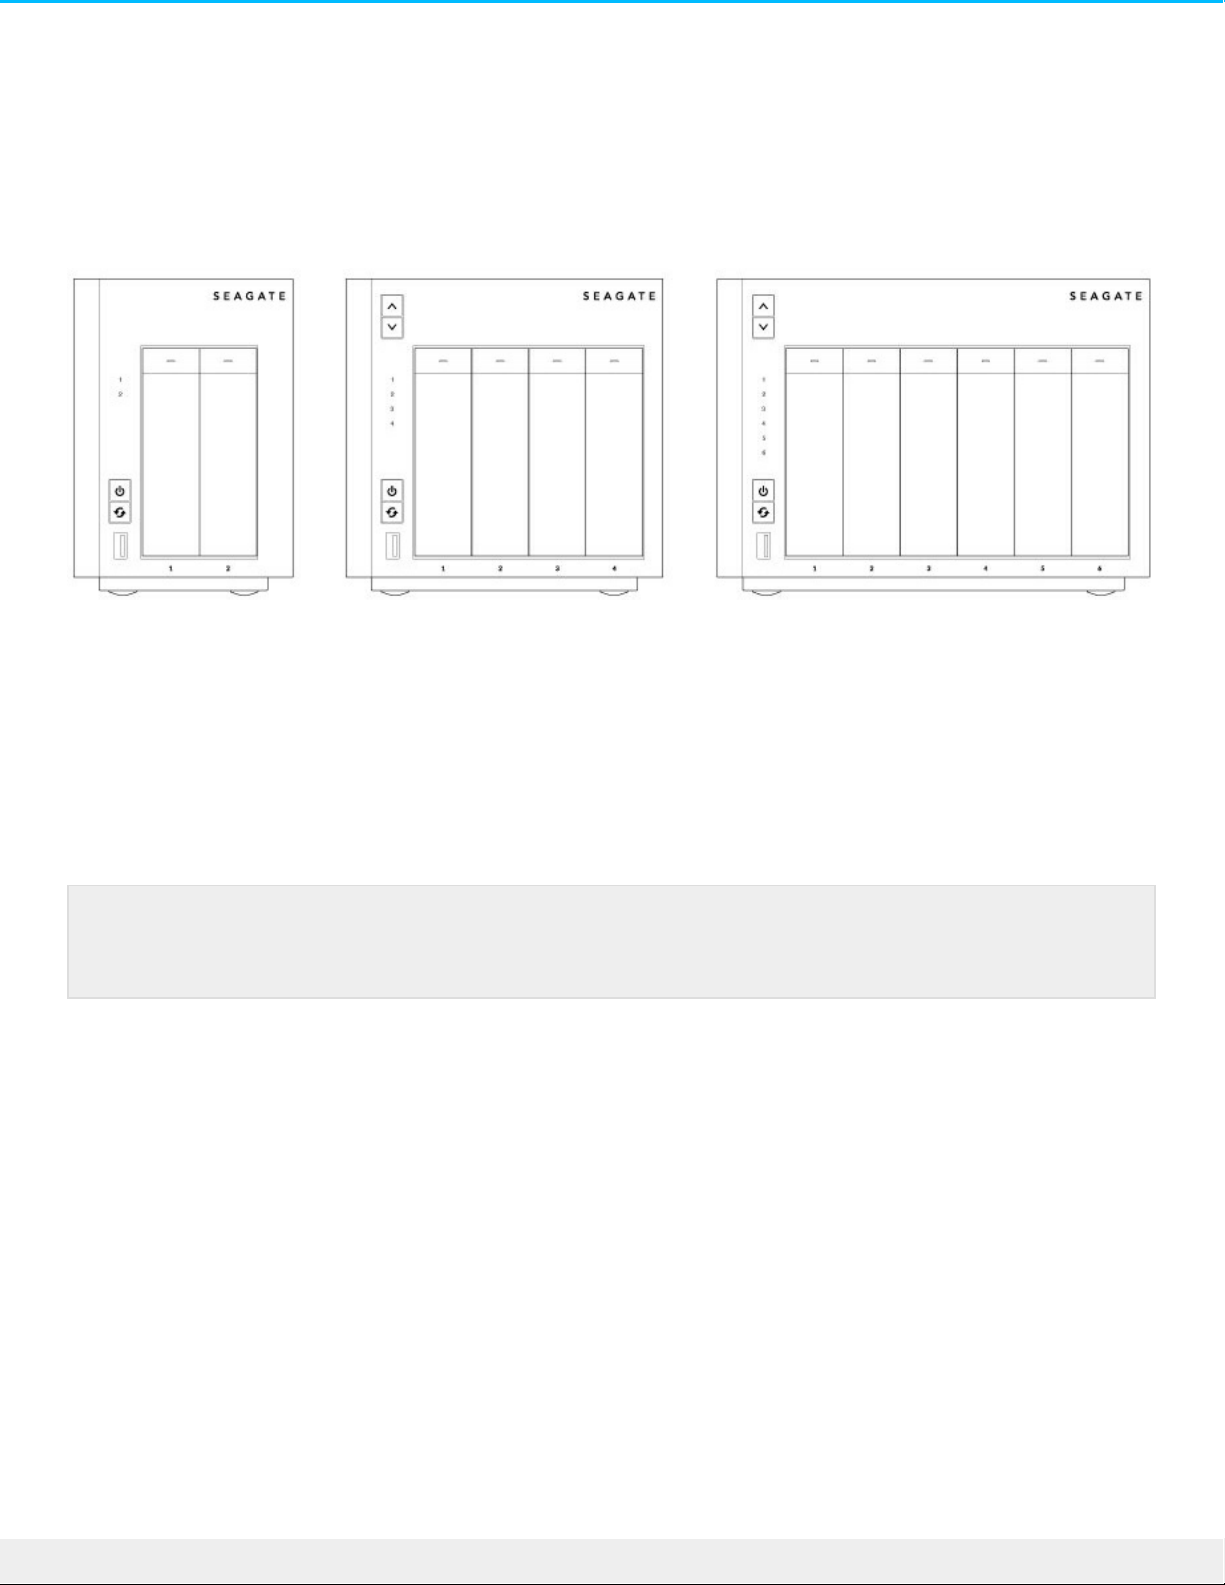
The Seagate WSS NAS is a hard drive enclosure available in three models:
Seagate WSS NAS 2-Bay (up to two 3.5 inch/2.5 inch hard drives)
Seagate WSS NAS 4-Bay (up to four 3.5 inch/2.5 inch hard drives)
Seagate WSS NAS 6-Bay (up to six 3.5 inch/2.5 inch hard drives)
Each individual hard drive is swappable and field replaceable. When installing hard drives into the Seagate
WSS NAS, Seagate recommends 3.0 Gb/s SATA hard drives up to 7200 RPM. For optimal performance, use
Seagate NAS HDD.
Specificaons
Storage management
The Seagate WSS NAS is powered by Windows Storage Server 2012 R2 Essentials. Use the Windows
Storage Server 2012 R2 Essentials dashboard to manage your Seagate NAS. You can create volumes,
configure data protection, add users and much more.
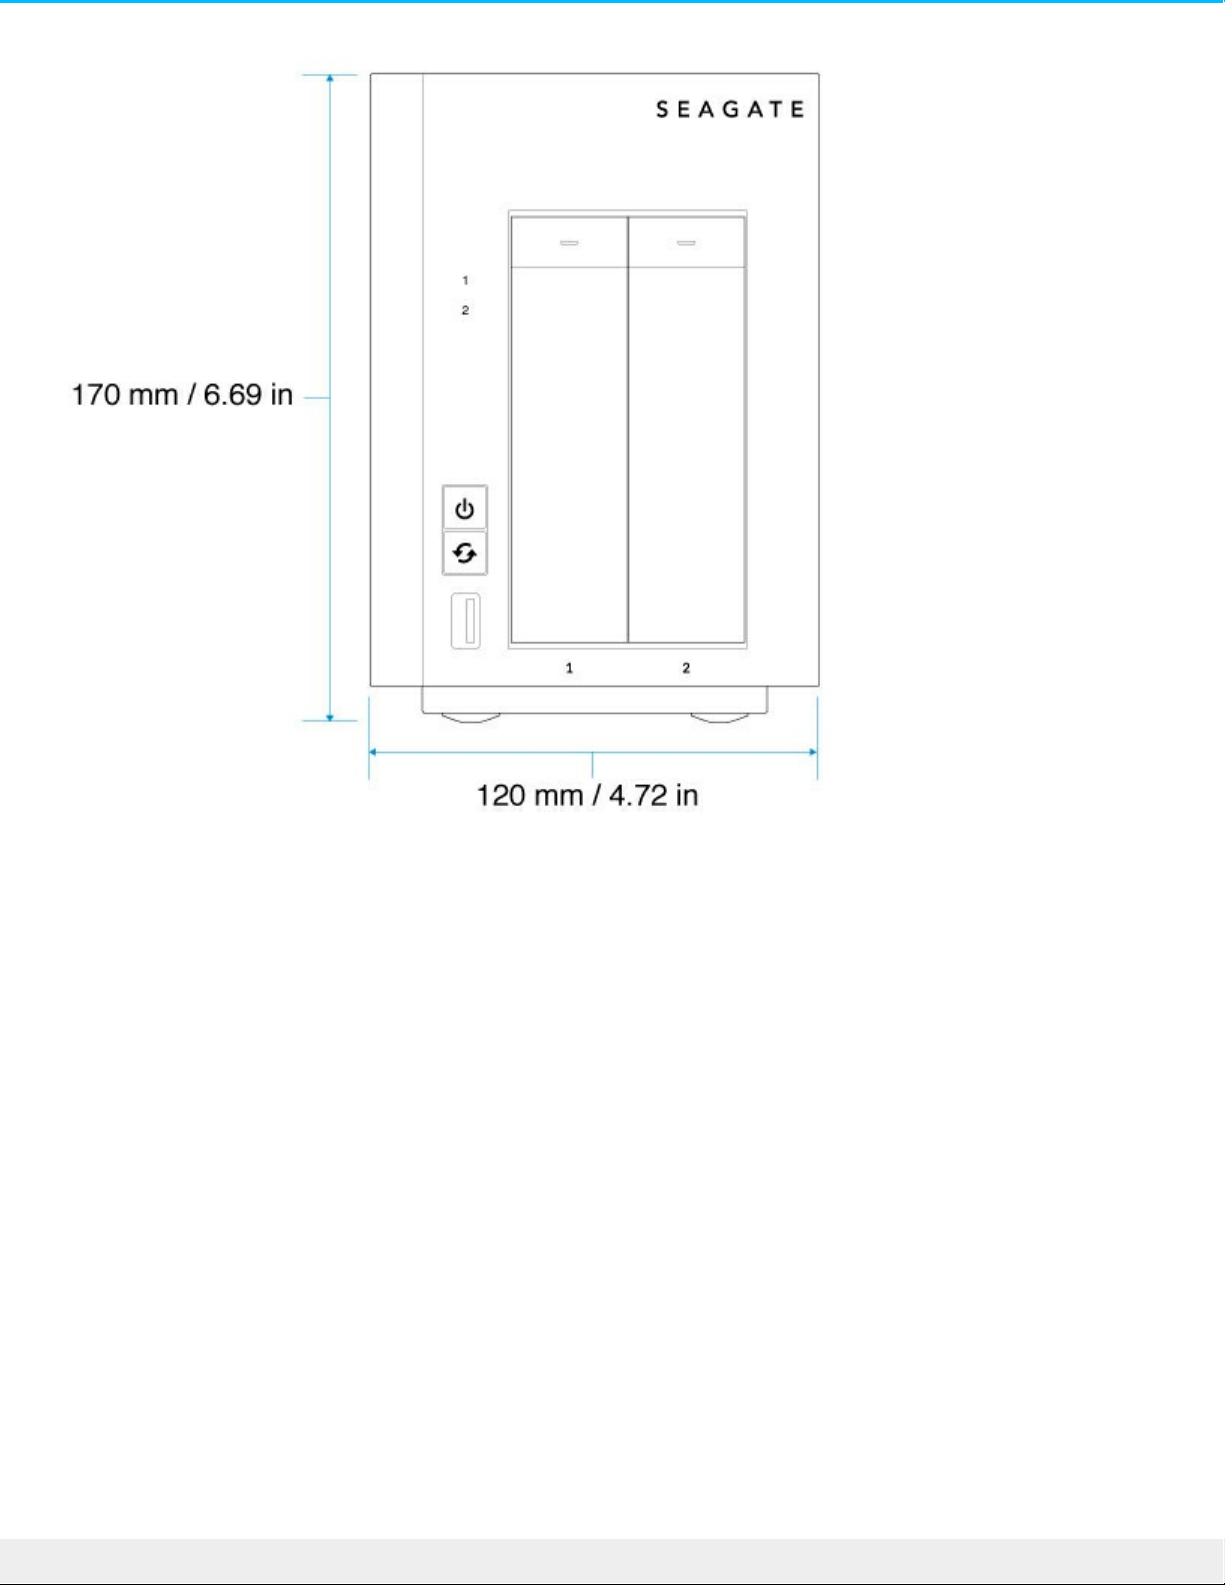
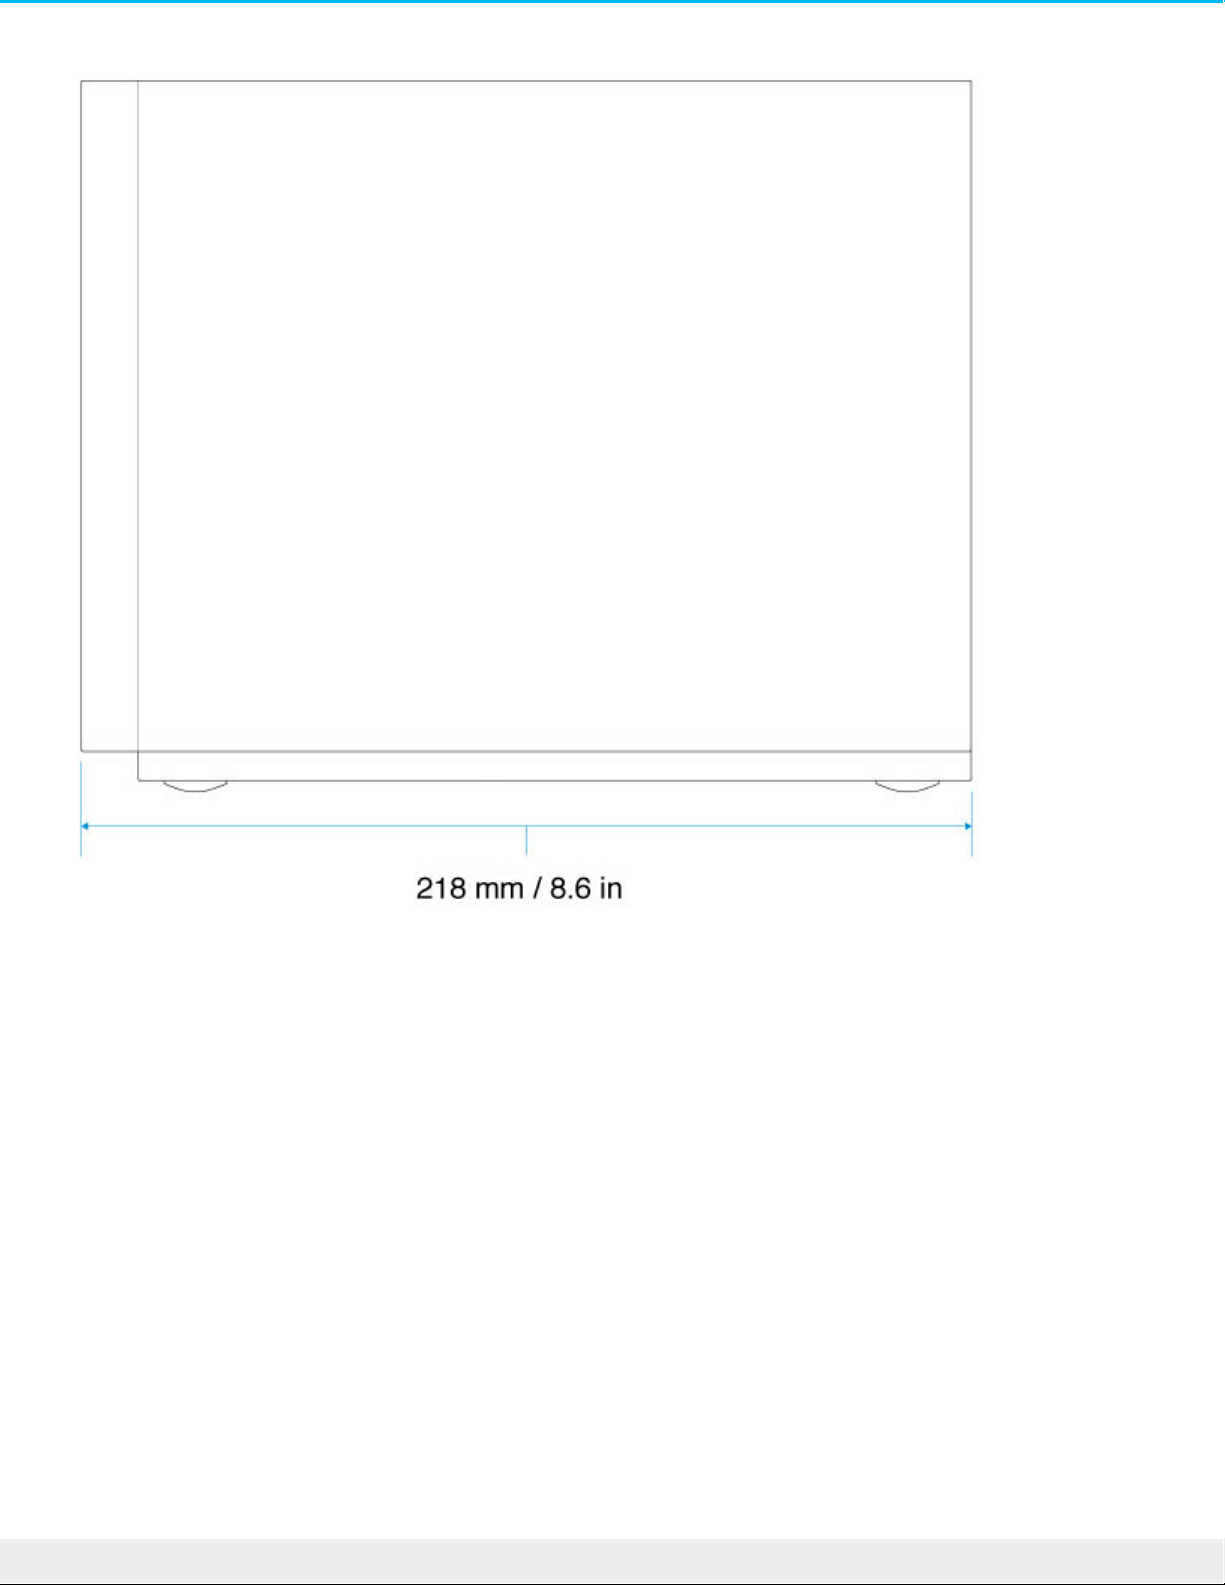
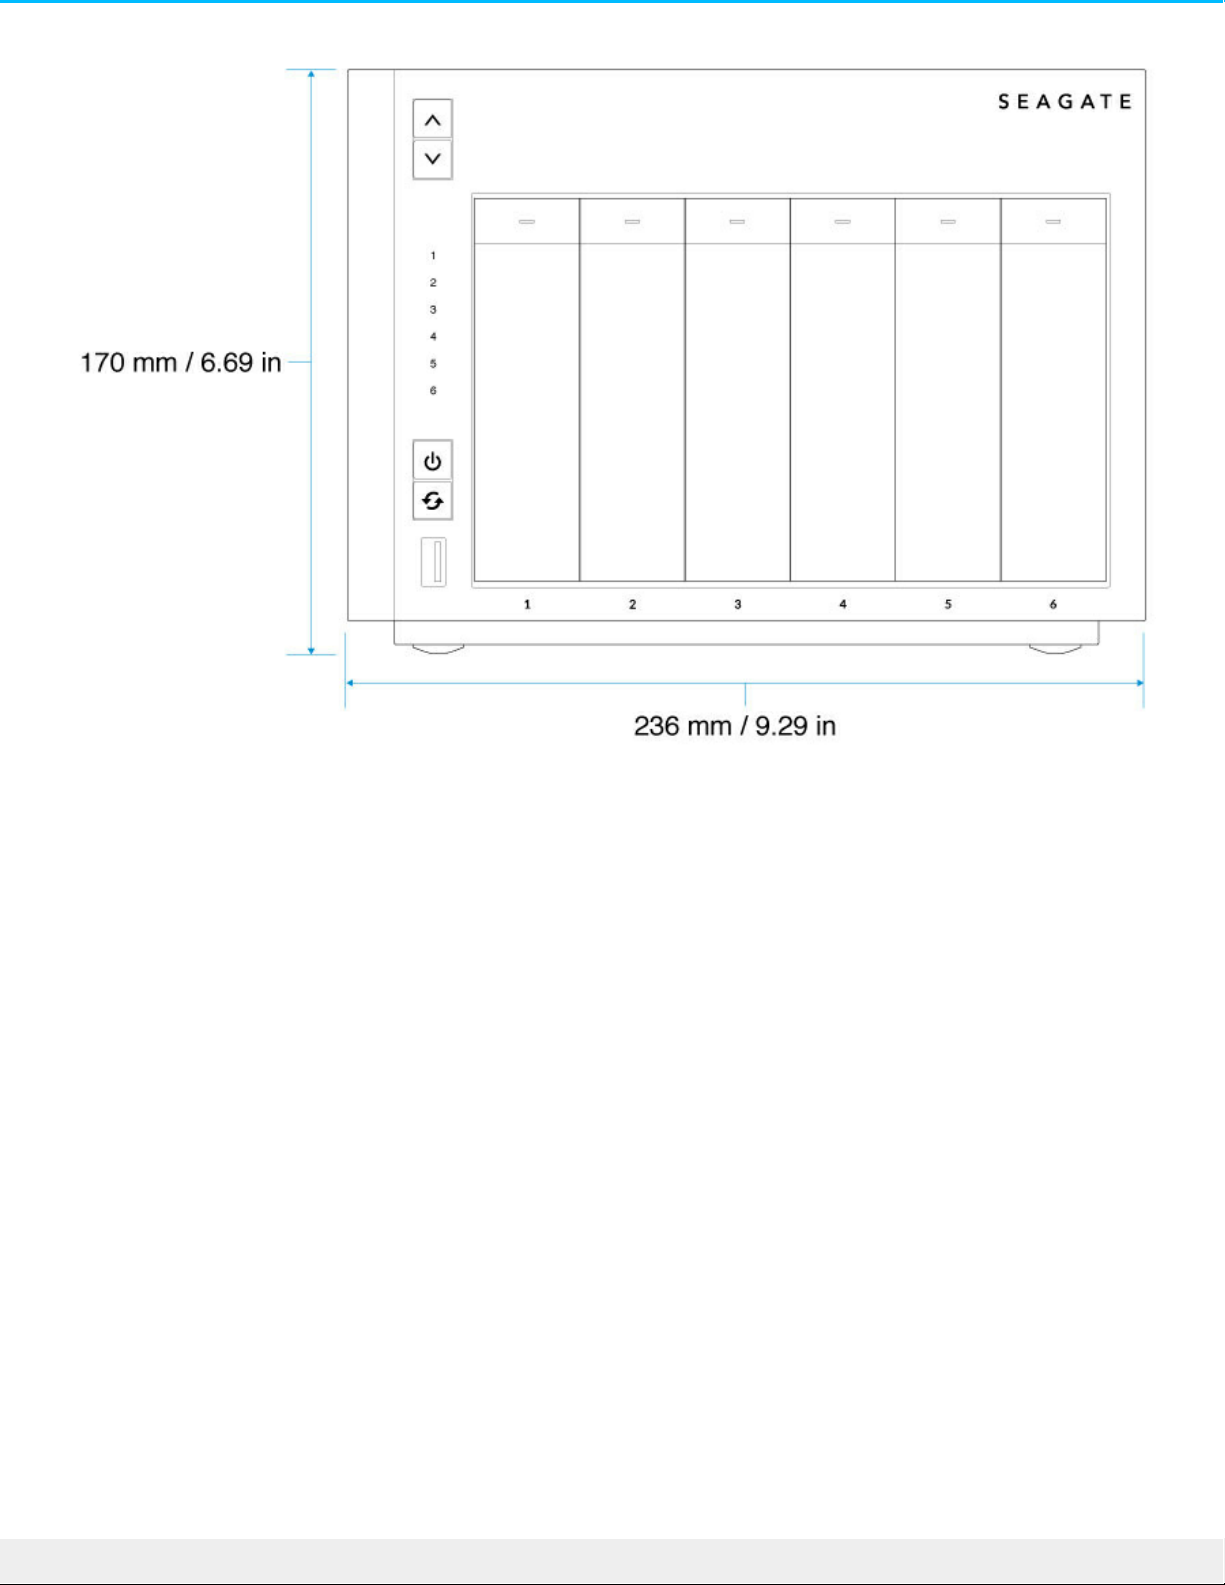
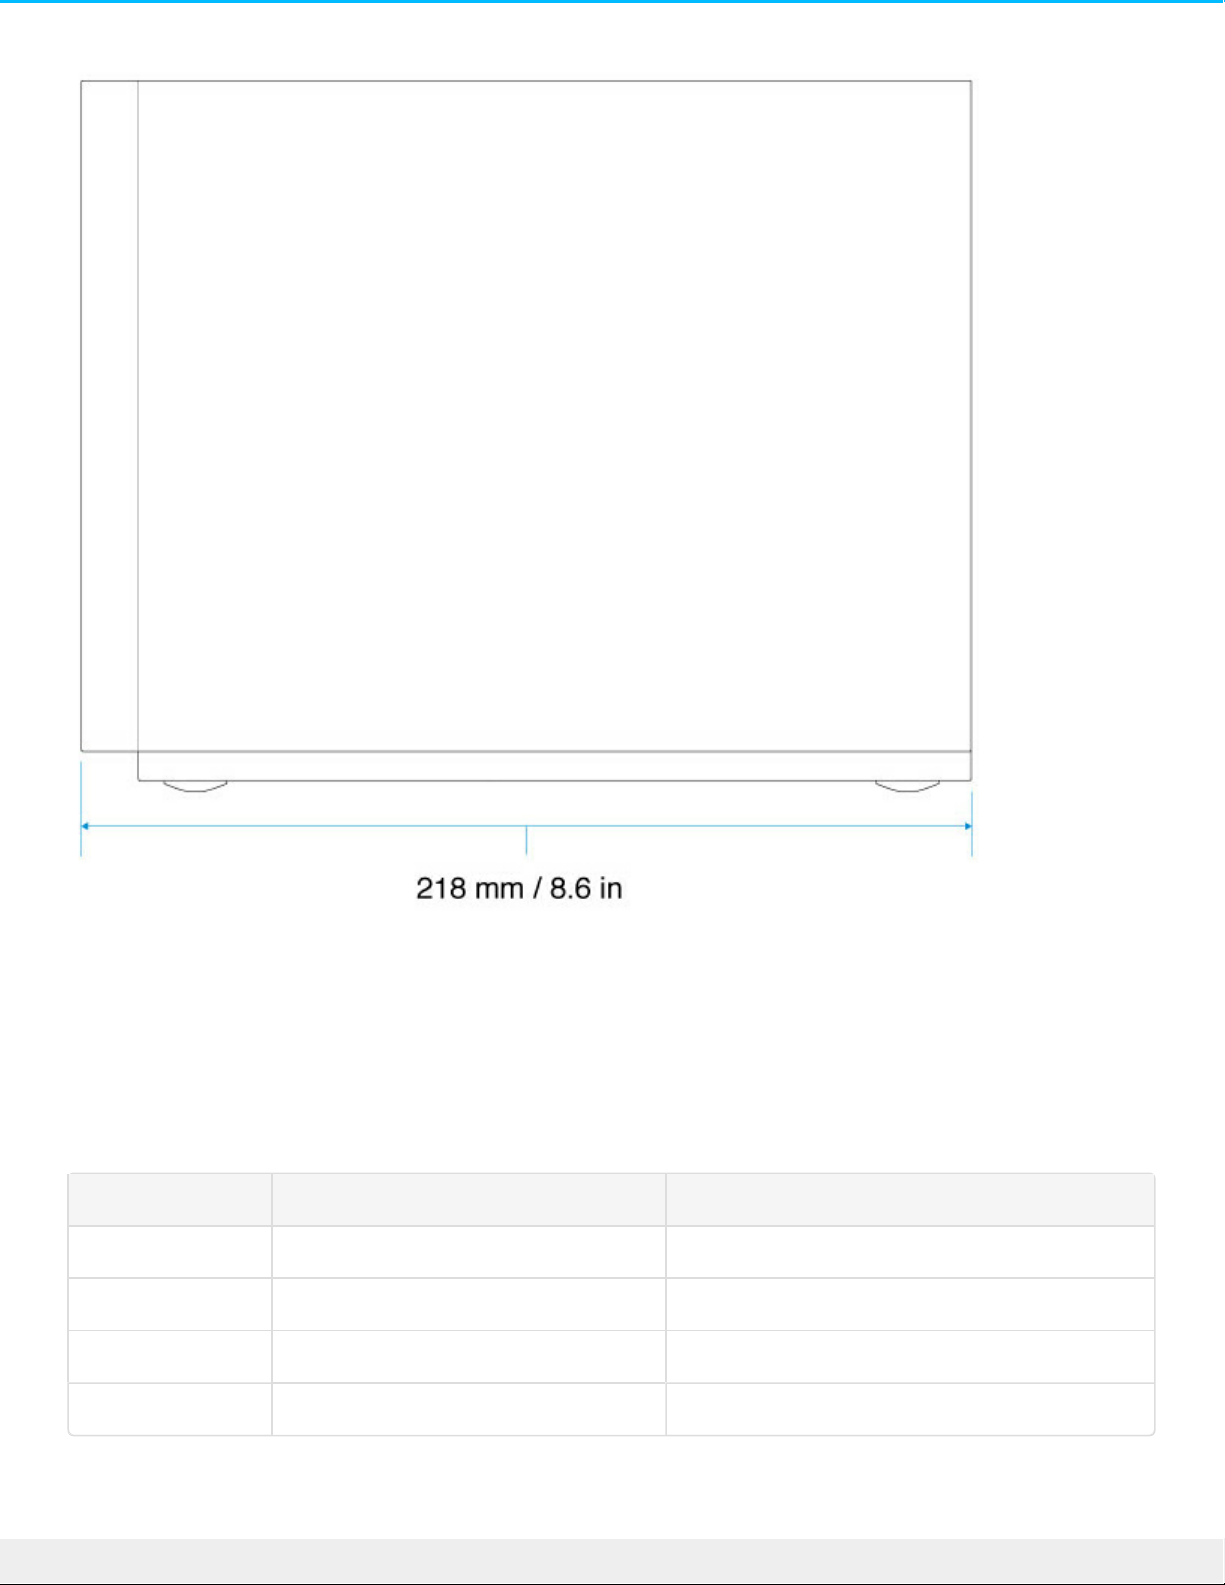
Enclosure dimensions
WSS NAS 2-Bay
Note: Your Seagate NAS is shipped with screws to mount 2.5-inch hard drives to the hard drive
trays.
15Se agate WSS NAS 2-Bay | 4-Bay | 6- Bay
4/13/15
16Se agate WSS NAS 2-Bay | 4-Bay | 6- Bay
4/13/15
WSS NAS 4-Bay
17Se agate WSS NAS 2-Bay | 4-Bay | 6- Bay
4/13/15

18Se agate WSS NAS 2-Bay | 4-Bay | 6- Bay
4/13/15

WSS NAS 6-Bay
19Se agate WSS NAS 2-Bay | 4-Bay | 6- Bay
4/13/15
20Se agate WSS NAS 2-Bay | 4-Bay | 6 -Bay
4/13/15
Enclosure weight
WSS NAS 2-Bay
Disks Disk capacity Weight (Kg / lbs)
0 N/A 1.75 / 3.86
2 2TB 2.81 / 6.19
2 4TB 2.82 / 6.22
2 5TB 2.83 / 6.24
21Se agate WSS NAS 2-Bay | 4-Bay | 6- Bay
4/13/15

WSS NAS 4-Bay
Disks Disk capacity Weight (Kg / lbs)
0 N/A 2.45 / 5.40
2 2TB 3.51 / 7.74
2 4TB 3.52 / 7.76
2 5TB 3.53 / 7.78
4 2TB 4.57 / 10.08
4 4TB 4.59 / 10.12
4 5TB 4.61 / 10.16
WSS NAS 6-Bay
Disks Disk capacity Weight (Kg / lbs)
0 N/A 3.0 / 6.60
2 2TB 4.06 / 8.95
2 4TB 4.07 / 8.97
2 5TB 4.08 / 8.99
4 2TB 5.12 / 11.29
4 4TB 5.14 / 11.33
4 5TB 5.16 / 11.38
6 2TB 6.18 / 13.62
6 4TB 6.21 / 13.69
6 5TB 6.24 / 13.76
Temperature ranges
22Se agate WSS NAS 2-Bay | 4-Bay | 6- Bay
4/13/15

Ambient environment Temperature range
Standard (operating) +0ºC to +40ºC
Storage (non-operating) -20ºC to +60ºC
Humidity
Environment Humidity range
Standard (operating) 0% to 90% non-condensing
Storage (non-operating) 0% to 95% non-condensing
Electrical
The included power supply is meant for use with the Seagate WSS NAS. It is not compatible with power
supplies provided with other hard drive enclosures produced by Seagate, an affiliate of Seagate or a third
party.
WSS NAS 2-Bay
External power supply: 100 - 240 VAC, 50 / 60 Hz, 12 V / 48 W
WSS NAS 4-Bay
External power supply: 100 - 240 VAC, 50 / 60 Hz, 19 V / 120 W
WSS NAS 6-Bay
External power supply: 100 - 240 VAC, 50 / 60 Hz, 19 V / 150 W
Acouscs
WSS NAS 2-Bay
Operational: 20-32 dBA @ 1m
23Se agate WSS NAS 2-Bay | 4-Bay | 6- Bay
4/13/15

WSS NAS 4-Bay
Operational: 22-32 dBA @ 1
WSS NAS 6-Bay
Operational: 24-32 dBA @ 1
Front panel view
WSS NAS 2-Bay
1. Hard drive LEDS: The LEDs blink to indicate activity for the drive.
2. Power button and status LED: Turn the NAS on/off (see Operation).
3. Function button: Push the button to initiate the installation of the operating system (diskless models)
24Se agate WSS NAS 2-Bay | 4-Bay | 6 -Bay
4/13/15

and the recovery.
4. SuperSpeed USB 3.0 Port: Connect a compatible USB storage device to the port.
5. Hard drive bays: Bays for the hard drives.
For details on LED behavior, see System LEDs.
WSS NAS 4-Bay
1. LCD up/down buttons: Push the up/down buttons to navigate the LCD menu.
2. LCD menu: Review the WSS NAS’s settings (see LCD Menu (NAS Pro 4-Bay and 6-Bay).
3. Hard drive LEDs: Activity LEDs for the hard drives.
4. Power button and status LED: Turn the NAS on/off (see Operation).
25Se agate WSS NAS 2-Bay | 4-Bay | 6- Bay
4/13/15

5. Function button: Push the button to initiate the installation of the operating system (diskless models)
and the recovery.
6. SuperSpeed USB 3.0 Port: Connect a compatible USB storage device to the port.
7. Hard drive bays: Bays for the hard drives.
For details on LED behavior, see System LEDs.
WSS NAS 6-Bay
1. LCD up/down buttons: Push the up/down buttons to navigate the LCD menu.
2. LCD menu: Review the WSS NAS’s settings (see LCD Menu (NAS Pro 4-Bay and 6-Bay)).
3. Hard drive LEDs: Activity LEDs for the hard drives.
4. Power button and status LED: Turn the NAS on/off (see Operation).
5. Function button: Push the button to initiate the installation of the operating system (diskless models)
26Se agate WSS NAS 2-Bay | 4-Bay | 6- Bay
4/13/15

and the recovery.
6. SuperSpeed USB 3.0 Port: Connect a compatible USB storage device to the port.
7. Hard drive bays: Bays for the hard drives.
For details on LED behavior, see System LEDs.
Rear panel view
WSS NAS 2-Bay
1. Recovery button: The recovery button, when pushed at the same time as the power button, is used to
perform a Windows Storage Server 2012 R2 Essentials recovery. Use a pointed instrument to gently
push the button within the cavity. See Seagate WSS NAS Recovery.
2. SuperSpeed USB 3.0 port: Connect a compatible USB storage device to the port.
3. Hi-Speed USB 2.0 port: Connect a compatible USB storage device to the port.
4. Gigabit Ethernet ports (x2): Connect the Ethernet cable from the device to your network. See Setup.
5. Power input: Plug in the AC adapter supplied with the NAS. See Setup.
6. Ventilation: Keeps your NAS's power supply unit cool during operation. Be sure not to block the fan
exhaust when using the product.
7. Kensington lock: Secure the NAS to a desk using a compatible cable.
27Se agate WSS NAS 2-Bay | 4-Bay | 6- Bay
4/13/15

WSS NAS 4-Bay
1. Recovery button: The recovery button, when pushed at the same time as the power button, is used to
perform a Windows Storage Server 2012 R2 Essentials recovery. Use a pointed instrument to gently
push the button within the cavity. See Seagate WSS NAS Recovery.
2. SuperSpeed USB 3.0 port: Connect a compatible USB storage device to the port.
3. Hi-Speed USB 2.0 port: Connect a compatible USB storage device to the port.
4. Gigabit Ethernet ports (x2): Connect the Ethernet cable from the device to your network. See Setup.
5. Power input: Plug in the AC adapter supplied with the NAS. See Setup.
6. Ventilation: Keeps your NAS's power supply unit cool during operation. Be sure not to block the fan
exhaust when using the product.
7. Kensington lock: Secure the NAS to a desk using a compatible cable.
WSS NAS 6-Bay
28Se agate WSS NAS 2-Bay | 4-Bay | 6- Bay
4/13/15

1. Recovery button: The recovery button, when pushed at the same time as the power button, is used to
perform a Windows Storage Server 2012 R2 Essentials recovery. Use a pointed instrument to gently
push the button within the cavity. See Seagate WSS NAS Recovery.
2. SuperSpeed USB 3.0 port: Connect a compatible USB storage device to the port.
3. Hi-Speed USB 2.0 port: Connect a compatible USB storage device to the port.
4. Gigabit Ethernet ports (x2): Connect the Ethernet cable from the device to your network. See Setup.
5. Power input: Plug in the AC adapter supplied with the NAS. See Setup.
6. Ventilation: Keeps your NAS's power supply unit cool during operation. Be sure not to block the fan
exhaust when using the product.
7. Kensington lock: Secure the NAS to a desk using a compatible cable.
USB ports
The Seagate WSS NAS has:
Two USB 3.0 ports (front and rear)
One USB 2.0 port (rear)
Connect USB direct-attached storage (DAS) devices to the Seagate WSS NAS for backups. Compatible file
formats for DAS include: NTFS, exFAT and FAT32. Other storage formats are not recognized by the WSS
NAS. Capacity limitations do not apply.
29Se agate WSS NAS 2-Bay | 4-Bay | 6- Bay
4/13/15

30Se agate WSS NAS 2-Bay | 4-Bay | 6 -Bay
4/13/15

System LEDs
The Seagate WSS NAS 2-Bay | 4-Bay | 6-Bay features LEDs that provide information on the system's status.
Review the illustrations below for the LED locations on the chassis.
WSS NAS LEDs
Status and drive LEDs
1. Hard drives (The number of hard drive LEDs differs by model.)
2. Status (Power button)
3. Function
WSS NAS Ethernet LEDs
31Se agate WSS NAS 2-Bay | 4-Bay | 6- Bay
4/13/15

1. Activity
2. Speed
LED behavior
Status LED
The list of colors below helps you identify the general status of your NAS.
Color Status
Solid white Ready
Blinking white Startup; recovery
Alternating red and white Fan error
Blinking red Warning or notice
Solid red Error; no system disk
32Se agate WSS NAS 2-Bay | 4-Bay | 6- Bay
4/13/15

Hard drive LEDs
The list of colors below helps you identify the status of the NAS's hard drive:
Color Status
Solid white Ready
Blinking white (steady) RAID rebuild
Blinking white (intermittent) Activity
Alternating red and white SMART errors; high
temperature; failed
redundancy
Blinking red Error
Solid red Disk not recognized
Funcon LED
The NAS's function LED is only active during a recovery:
Color Status
Solid white Ready for recovery
Blinking white Performing recovery
Ethernet acvity LED
The NAS's Ethernet activity LED indicates access to the device:
Color Status
Steady amber No activity
Blinking amber Activity; Wake on LAN is
enabled
33Se agate WSS NAS 2-Bay | 4-Bay | 6- Bay
4/13/15

Ethernet speed LED
The NAS Ethernet speed LED indicates the speed of your network connection:
Color Status
Off 10Mb/s
Amber 100Mb/s
Green 1Gb/s
34Se agate WSS NAS 2-Bay | 4-Bay | 6 -Bay
4/13/15

Setup
The Seagate WSS NAS 2-Bay | 4-Bay | 6-Bay is available with hard drives or without hard drives. Models
without hard drives are also known as diskless enclosures. Refer to the links below for instructions on how
to set up your Seagate WSS NAS.
NAS WSS with disks: Seagate NAS WSS sold with hard drives are preconfigured for use out of the box.
Go to NAS: With hard drives
Empty NAS WSS enclosure: Seagate WSS NAS sold as diskless enclosures can be configured using
compatible hard drives. Go to NAS: Diskless enclosure
The instructions below can be found in the Quick Start Guide included with the NAS.
NAS: With hard drives
Step 1 - Cables
Connecons
35Se agate WSS NAS 2-Bay | 4-Bay | 6- Bay
4/13/15

1. Connect the Ethernet cable to the NAS and the router.
2. Connect the power cable to the NAS and an active power outlet.
You can also connect:
A second Ethernet cable for redundancy or performance.
Step 2 – Power on the WSS NAS
1. Push the power button on the front of the WSS NAS.
Cable management: Careful management of cables is recommended for optimal operation. It
prevents potential hazards and allows for easier maintenance.
36Se agate WSS NAS 2-Bay | 4-Bay | 6- Bay
4/13/15

2. The WSS NAS can take a few minutes to boot. Wait a minimum of three minutes for the LED to turn
solid before moving to the next step.
37Se agate WSS NAS 2-Bay | 4-Bay | 6- Bay
4/13/15

Step 3 - Connect via Remote Desktop Connecon
38Se agate WSS NAS 2-Bay | 4-Bay | 6- Bay
4/13/15

Log in to the NAS WSS from a PC on the network:
1. Launch Microsoft Remote Desktop.
2. Enter the default name of the NAS WSS: seagate-wss-nas
3. Choose Connect.
4. Enter the default login, administrator, and password, admin
5. Choose OK.
Upon login, review the Seagate Setup Assistant for recommendations on how to configure your WSS NAS.
NAS: Diskless enclosure
39Se agate WSS NAS 2-Bay | 4-Bay | 6- Bay
4/13/15

Step 1 - Cables
Connecons
1. Connect the Ethernet cable to the NAS and the router.
2. Connect the power cable to the NAS and the outlet.
You can also connect:
A second Ethernet cable for redundancy or performance.
Step 2 - Insert hard drives
Consider the following before inserting hard drives into the enclosure:
Seagate recommends installing the hard drives into the diskless enclosure from left to right.
Cable management: Careful management of cables is recommended for optimal operation. It
prevents potential hazards and allows for easier maintenance.
40Seagate WSS NAS 2-Bay | 4-Bay | 6-Bay
4/13/15

Empty trays must stay in the bays for proper airflow.
Make certain that you are properly grounded before touching the hard drives.
Make certain that the hard drive’s SATA connection is at the rear of the tray.
The hard drive is fastened to the tray with pins.
The WSS NAS is shipped with screws to mount 2.5-inch hard drives to the hard drive trays.
1. Remove empty hard drive trays from the WSS NAS.
2. Gently bend the left side of the tray and connect the hard drive to the two pins on the right.
3. Release the left side of the tray and connect the remaining two pins to the hard drive.
41Se agate WSS NAS 2-Bay | 4-Bay | 6- Bay
4/13/15

4. Insert the hard drives into the WSS NAS’s bays. Push each hard drive tray into the bay as far as it will go
before closing the tray handle.
Step 3 – Power on the NAS (recovery mode)
42Se agate WSS NAS 2-Bay | 4-Bay | 6- Bay
4/13/15

When first booting a diskless Seagate WSS NAS, the device must be placed into recovery mode to install
the operating system on Disk 1.
1. Use a thin pointed object (e.g. paperclip, thin screwdriver, etc.) to push the recovery button. Hold the
recovery button while applying a short push on the power button on the front of the WSS NAS. To make
certain that the WSS NAS enters recovery mode, continue to push the recovery button for five seconds
after releasing the front power button.
2. The status LED blinks for approximately 5 minutes. Wait for the status and function LEDs to turn solid
before moving to the next step.
Step 4 - Install Windows Storage Server 2012 R2 Essenals
43Se agate WSS NAS 2-Bay | 4-Bay | 6- Bay
4/13/15

The installer for the operating system is pre-built on the motherboard flash drive. Once the status and
function LEDs turn solid, push the function button to install Windows Storage Server 2012 R2 Essentials.
The installation can take approximately 20 minutes. Wait for the status LED to turn solid before moving to
the next step.
Step 5 - Connect via Remote Desktop Connecon
44Seagate WSS NAS 2-Bay | 4-Bay | 6-Bay
4/13/15

Log in to the WSS NAS from a PC on the network:
1. Launch Microsoft Remote Desktop.
2. Enter the default name of the NAS WSS: seagate-wss-nas
3. Choose Connect.
4. Enter the default login, administrator, and password, admin
5. Choose OK.
Upon login, review the Seagate Setup Assistant for recommendations on how to configure your WSS NAS.
45Se agate WSS NAS 2-Bay | 4-Bay | 6- Bay
4/13/15

46Se agate WSS NAS 2-Bay | 4-Bay | 6- Bay
4/13/15

Operaon
Powering on/off the product
Powering on the NAS
1. Confirm that the NAS is connected to an active power source.
2. Make certain that all hard drive trays are securely attached to the enclosure.
3. Apply a short push to the product's power button. See the note below regarding a short push and a long
push.
Caution: Do not operate the product until the ambient temperature is within the specified
operating range (see System Overview). Confirm that newly installed hard drives are
acclimatized before operating them.
47Se agate WSS NAS 2-Bay | 4-Bay | 6- Bay
4/13/15

Powering off the NAS
1. Make certain that users on the network are not accessing the NAS.
2. Use Windows Storage Server 2012 R2 Essentials to power off the NAS or, apply a short push to the
power button. See the note below regarding a short push and a long push.
The LEDs turn off once the system has shut down.
Short push
A short push is a manual depression on the power button that lasts no longer than two seconds. When the
product is operating, a short push on the power button turns off the WSS NAS.
48Se agate WSS NAS 2-Bay | 4-Bay | 6- Bay
4/13/15

Long push
A long push is a manual depression on the power button that lasts more than four seconds. When the
product is operating, a long push cuts the power from the NAS, forcing it to shut down immediately. A long
push is not recommended since it can result in data loss. Use it only when troubleshooting a problem.
49Se agate WSS NAS 2-Bay | 4-Bay | 6- Bay
4/13/15

LCD Menu (4-Bay and 6-Bay)
The Seagate WSS NAS 4-Bay and 6-Bay include an LCD menu. You can check general hardware and operating
system settings while the WSS NAS is powered on. Review the table below for further details on the LCD
menu.
See System Overview for the locations of the LCD menu and the up/down arrows.
Menu Sub-menu
Network See the IP addresses assigned to the WSS NAS.
Storage See the percent of storage used: globally and per volume.
Alerts Up to five alerts are listed on the sub-menu. Alerts include: temperature; casing; fan; and
storage.
Temperature Check the temperatures for the WSS NAS's: hard drives; CPU; and motherboard.
Fan Review the fan’s rotational speed.
Date Review the date, time and uptime. Uptime refers to the amount of time that the WSS NAS has
been powered on.
Software
Information
Check the version of the Seagate Monitor tab in the Windows Storage Server 2012 R2
Essentials dashboard.
Access the LCD display menu
1. Apply a short push on the WSS NAS’s up or down arrow to turn the LCD on.
2. Apply a long push on the WSS NAS’s up or down arrow to enter the main menu.
3. Push the WSS NAS’s up or down arrow to search the menu selections. Each screen reveals two
selections.
4. Use the WSS NAS’s up or down arrow to highlight your selection. A horizontal arrow points to the
selection.
5. Apply a long push on the WSS NAS’s up or down arrow to enter the sub-menu for that selection.
6. If applicable, push the WSS NAS’s up or down arrow to search through the sub-menu selections.
Each menu and sub-menu remains on the LCD display for 30 seconds. To exit a sub-menu, apply a long push
to the WSS NAS’s up or down arrow.
50Se agate WSS NAS 2-Bay | 4-Bay | 6 -Bay
4/13/15

51Se agate WSS NAS 2-Bay | 4-Bay | 6- Bay
4/13/15

Soware
Your Seagate WSS NAS 2-Bay | 4-Bay | 6-Bay is powered by Windows Storage Server 2012 R2 Essentials.
Use the Windows Storage Server 2012 R2 Essentials dashboard to:
Configure storage spaces and volumes
Create users and groups for access rights to data
Set up the network and Ethernet ports
Schedule centralized client Windows PC backups
Configure Windows Server backup
Set up remote access
Check the health of the NAS
See the Seagate WSS NAS Administration User Manual for instructions on how to manage all the features
available to the WSS NAS.
52Se agate WSS NAS 2-Bay | 4-Bay | 6- Bay
4/13/15

Hard Drive Maintenance
The Seagate WSS NAS 2-Bay | 4-Bay | 6-Bay is a desktop hard drive enclosure. Review the details below for
hard drive tray locations and, where applicable, replacement.
Precauons
The hard drives for the Seagate WSS NAS 2-Bay | 4-Bay | 6-Bay are hot swappable. However, performing
other types of hardware maintenance within the enclosure is not supported and can void your product’s
warranty.
During operation, all provided hardware (including the hard drives in their frames) should remain in place
for optimal airflow.
Observe all conventional ESD precautions when handling the NAS’s parts.
Avoid contact with backplane components and connectors.
Never remove the WSS NAS’s enclosure cover. Potential hazards of opening the cover while the product
is operating include, but are not limited to, rotating fans and hot surfaces. Removing the cover can void
your product’s warranty.
Adding/replacing a hard drive
Follow the instructions below to perform one of the following:
Insert a new hard drive into an empty bay.
Expand storage space with a higher-capacity hard drive.
Replace a failed hard drive.
Hard drives in protected volumes are hot swappable. However, it is not possible to hot-swap more than
one hard drive at a time. If you are replacing more than one hard drive in a volume, wait for synchronization
to successfully complete before moving to the next hard drive.
Always confirm that the hard drive you are replacing can be removed without harming an array. For example,
you want to expand a hard drive from 2TB to 3TB. You know that the 2TB hard drive is part of a RAID 5 array
composed of four hard drives. You will lose data if you remove the 2TB hard drive and another hard drive in
the array has failed. Therefore, use Windows Storage Server 2012 R2 Essentials to check the health of all the
hard drives in the RAID array. In this example, you can replace the 2TB hard drive if it is the only hard drive in
the array that has failed and/or the other hard drives in the array are healthy.
Important info: Refer to the product's Warranty before performing any hardware repairs or
maintenance that is not described in this manual.
53Se agate WSS NAS 2-Bay | 4-Bay | 6- Bay
4/13/15

Consider the points below before following the instructions:
Replace an existing or faulty hard drive with a hard drive of equal or greater capacity.
When handling hard drives, make sure that they are placed (and stored) on a cushioned surface.
If you are replacing a 3.5-inch hard drive with a 2.5-inch hard drive, make certain to use the screws
included with the NAS.
3.5-inch hard drive
1. Push the hard drive tray’s lock button to open the latch and remove the hard drive tray. Important: Make
certain that you remove the correct hard drive tray.
2. Insert a new hard drive or replace the current hard drive.
Empty tray: gently bend the left side of the tray and connect the hard drive to the two pins on the
right.
Important info: The WSS NAS only accepts internal 3.5-inch SATA hard drives. Do not use 3.5inch hard drives built for external storage or SAS hard drives. Seagate hard drives are optimized
for use with your NAS. See Seagate NAS HDD for further information.
54Se agate WSS NAS 2-Bay | 4-Bay | 6 -Bay
4/13/15

Full tray: Unfasten the four pins and remove the hard drive from the tray. To insert the new hard
drive, gently bend the left side of the tray and connect it to the two pins on the right.
3. Release the left side of the tray and connect the remaining two pins to the hard drive.
4. Insert the hard drive tray into the WSS NAS’s bay. Push it into the bay as far as it will go before closing
the tray handle.
55Se agate WSS NAS 2-Bay | 4-Bay | 6- Bay
4/13/15

5. If necessary, power on the NAS.
6. Manage the new storage using Windows Storage Server 2012 R2 Essentials.
2.5-inch hard drive/SSD
Installing a 2.5-inch hard drive/SSD requires the following:
Screws included with your Seagate WSS NAS.
A 2.5-inch hard drive or SSD.
A standard Philips head screwdriver.
Important info: The WSS NAS only accepts internal 2.5-inch SATA hard drives. Do not use 2.5inch hard drives built for external storage or SAS hard drives.
56Se agate WSS NAS 2-Bay | 4-Bay | 6- Bay
4/13/15

You can add the 2.5-inch hard drive or SSD to an empty hard drive tray or replace an existing disk. Make
certain that the capacity of the 2.5-inch hard drive is equal to or greater than the disk you are replacing.
1. Remove a hard drive tray from the Seagate WSS NAS. It can be empty or filled with a hard drive you
want to replace.
2. If applicable, remove the hard drive by unfastening the four pins and extracting it from the tray
3. The hard drive tray has a 2.5-inch hard drive/SSD adapter switch on the bottom right (Image A). Push it
down (Image B).
57Se agate WSS NAS 2-Bay | 4-Bay | 6- Bay
4/13/15

Image A
Image B
4. Align the screw holes on the hard drive tray with the screw holes on the bottom of the 2.5-inch hard
drive or SSD.
58Se agate WSS NAS 2-Bay | 4-Bay | 6- Bay
4/13/15

5. Use the included screws to fix the 2.5-inch hard drive or SSD to the hard drive tray. Use all four screws.
59Se agate WSS NAS 2-Bay | 4-Bay | 6- Bay
4/13/15

6. Insert the hard drive tray into the empty slot.
60Se agate WSS NAS 2-Bay | 4-Bay | 6- Bay
4/13/15

7. Run Windows Storage Server 2012 R2 Essentials to manage the new storage.
61Se agate WSS NAS 2-Bay | 4-Bay | 6-Bay
4/13/15

Geng Help
If you are having issues with your product, first consult the troubleshooting topics below. If the problem
persists, refer to the Warranty to understand your warranty rights and responsibilities.
Troubleshoong topics
The Seagate WSS NAS will not turn on.
Q: Can you confirm that the WSS NAS is receiving power?
A: Make sure the power cable is properly connected, then apply a short push to the power button.
Q: Is there a problem with the power supply?
A: Confirm that the outlet is receiving power.
The Seagate WSS NAS is unresponsive.
Q: Have you tried to restart the system?
A: Shut down the WSS NAS using Windows Storage Server 2012 R2 Essentials or, if you cannot access the
operating system, apply a short push to the front power button. If nothing happens after a few minutes,
force the WSS NAS to turn off by pressing and holding the front button for more than four seconds (long
push). Once off, restart the product by applying a short push to the front button. Note that this is not
recommended under standard conditions as it can result in data loss.
The Seagate WSS NAS is overheating.
Q: Is the ambient temperature too high? Is the air output blocked? Are several fans malfunctioning?
A: If the ambient temperature is below 104°F/40°C and the ventilation is cleared, you may have one or
several malfunctioning fans. Contact Seagate technical support for confirmation.
The new hard drive that I inserted is not recognized. The hard drive's LED is red.
Q: Is the hard drive's SATA connector clean and free of dust or other material? Did you insert the hard drive
all the way into its slot?
A: If the hard drive is properly inserted in its slot, go to Dashboard > Monitor > Internal Disks and choose
Rescan Disks in Disk Tasks.
Note: Seagate is dedicated to providing high quality products that enrich the lives of our
customers. To help Seagate offer the best customer support, we encourage you to create an
account and register your product at https://www.onlineregister.com/seagate/. You can give us
important feedback as well as receive updated information on your Seagate device.
62Se agate WSS NAS 2-Bay | 4-Bay | 6-Bay
4/13/15

I am not certain if the WSS NAS's firmware should be updated.
Q: Where can I check the firmware version?
A: Navigate to the Monitor tab on the Windows Storage Server 2012 R2 Essentials page or, check the
firmware version on the NAS's LCD (4-Bay and 6-Bay only).
Q: How do I know if the firmware is the latest version?
A: The Seagate Monitor tab automatically checks for updates and prompts you when new firmware is
available.
63Se agate WSS NAS 2-Bay | 4-Bay | 6-Bay
4/13/15

Seagate WSS NAS Recovery
Your Seagate WSS NAS features a flash drive on its motherboard. The flash drive has a dedicated recovery
that installs Windows Storage Server 2012 R2 Essentials on Disk 1. You can use the Seagate WSS NAS
Recovery to:
Install Windows Storage Server 2012 R2 Essentials on a diskless Seagate WSS NAS when first configuring
the device.
Install Windows Storage Server 2012 R2 Essentials on a replacement hard drive for Disk 1. Disk 1 is
located in the first bay on the far left.
Troubleshoot problems with the operating system.
Disk 1 is the hard drive in the far left hard drive bay.
When booting the WSS NAS in recovery mode, the Seagate WSS NAS Recovery automatically checks Disk 1
for the operating system partition. Review the table below for recovery behavior following the search for
the operating system.
64Se agate WSS NAS 2-Bay | 4-Bay | 6- Bay
4/13/15

Operating
system
partition
Recovery action
Found The partition is reformatted and a new version of the operating system is installed on the
same partition. Data stored on other partitions on Disk 1 is not affected.
Not found Disk 1 is formatted and a new version of the operating system is installed on a dedicated
partition. If applicable, data stored on other partitions on Disk 1 is erased.
Prepare for a recovery
Back up the WSS NAS
The Seagate WSS NAS Recovery installs a new version of Windows Storage Server 2012 R2 Essentials on
Disk 1. It is designed to leave the remaining hard drives untouched. However, to guarantee that data stored
on the NAS is preserved, Seagate recommends that you back up the NAS's volumes before moving forward
with the recovery.
Power off the WSS NAS
Following the backup (if applicable), use the operating system to power off the NAS. If you cannot access the
operating system, apply a short push to the power button.
Locate the recovery buon
The Seagate WSS NAS Recovery is enabled by simultaneously pushing the recovery and power buttons. The
recovery button is located on the back of the NAS within a small recessed niche. To push the recovery
button, you will need a thin pointed object such as a paperclip or a small screwdriver. See System Overview
to review an illustration of recovery button.
Perform a recovery
Confirm that users on the network are not accessing the WSS NAS.
If it is powered on, use the operating system to shut down the NAS. If you cannot access the operating
system, apply a short push to the power button. In extreme cases where the WSS NAS does not
respond to a short push, apply a long push to the power button (see Operation).
If you are replacing the system hard drive (Disk 1), remove its tray and insert the new hard drive. Disk 1
is located in the hard drive bay on the far left. For a full explanation on how to install a hard drive, see
Hard Drive Maintenance.
1. Use a thin pointed object (e.g. paperclip, thin screwdriver, etc.) to push the recovery button. Hold the
recovery button while applying a short push on the power button on the front of the WSS NAS. To make
certain that the WSS NAS enters recovery mode, continue to push the recovery button for five seconds
65Se agate WSS NAS 2-Bay | 4-Bay | 6-Bay
4/13/15

after releasing the front power button. See System Overview for the location of the recovery button.
2. The status LED blinks for approximately 5 minutes. Wait for the status and function LEDs to turn solid
before moving to the next step.
3. Push the function button to install Windows Storage Server 2012 R2 Essentials.
66Se agate WSS NAS 2-Bay | 4-Bay | 6-Bay
4/13/15

4. Depending upon the speed of the hard drive inserted into the Disk 1 tray, the installation can take up to
20 minutes. Wait for the status LED to turn solid before moving to the next step.
67Se agate WSS NAS 2-Bay | 4-Bay | 6-Bay
4/13/15

5. Log in to the WSS NAS from a PC on the network:
1. Launch Microsoft Remote Desktop.
2. Enter the default name of the NAS WSS: seagate-wss-nas
3. Choose Connect.
4. Enter the default login, administrator, and password, admin
Review the options presented by the Seagate Setup Assistant. To better manage your WSS NAS, make
certain to follow the instructions to install the Windows Storage Server 2012 R2 Essentials dashboard.
68Se agate WSS NAS 2-Bay | 4-Bay | 6-Bay
4/13/15
 Loading...