

Page 1
Page 2

Maxtor Product Warranty
Maxtor’s warranty obligations are limited to the terms set forth: Maxtor
warrants only to the original consumer purchaser that new Maxtor
products will be free from defects in material and workmanship for 1 year
from the date of original purchase.
For a replacement product, the warranty on the replacement device is the
remainder of the warranty on the original device or 90 days, whichever is
longer. If you discover a defect, Maxtor will, at its option, repair or replace
the product at no charge to you, provided you return it during the
warranty period, with transportation charges prepaid, to Maxtor in Ireland,
Singapore or the USA.
Products must be properly packaged in Maxtor packaging or Maxtor
approved packaging to obtain warranty service. Before returning a
Maxtor product, please contact Maxtor at: +353 1 204 1111 (in Europe)
or 1-800-2MAXTOR (in U.S.) to obtain a Return Material
Authorization (RMA) number. A copy of the receipt or a bill of sale
bearing the appropriate Maxtor serial number and model number may be
required for warranty service. The warranty applies only to the Maxtor
products that can be identified by the Maxtor trademark, trade name,
serial number or logo affixed to them. Maxtor does not warrant any
product that is not manufactured by, for or with permission from Maxtor.
This warranty is not applicable to: Abnormal wear and tear; Abuse,
unreasonable use, mistreatment, or neglect; Damage caused during
installation of the Product; Damage caused by the equipment or system
with which the product is used; Damage caused by modification or repair
not made or authorized by Maxtor; Product whose Maxtor Serial
Number has been removed or defaced; Damage caused by liquids in the
product case; Damage to the products’ interface or power connectors;
Damage caused by use of non-Maxtor packaging; Damage caused by
improper or improperly used packaging; Products that are determined
to be stolen.
THIS WARRANTY AND REMEDIES SET FORTH ABOVE ARE
EXCLUSIVE AND IN LIEU OF ALL OTHERS, WHETHER ORAL
OR WRITTEN, EXPRESSED OR IMPLIED. MAXTOR
SPECIFICALLY DISCLAIMS ANY AND ALL IMPLIED
WARRANTIES, INCLUDING, WITHOUT LIMITATION,
WARRANTIES OF MERCHANTABILITY AND FITNESS FOR A
PARTICULAR PURPOSE AND AGAINST INFRINGEMENT.
Additionally, Maxtor does not warrant that the installation software for
Macintosh OS and Windows OS will meet your requirements nor the
performance or results that the operation of the program will be
uninterrupted or error free. No Maxtor dealer, agent or employee is
authorized to make any modification, extension or addition to this warranty.
MAXTOR IS NOT RESPONSIBLE FOR SPECIAL, INCIDENTAL,
INDIRECT OR CONSEQUENTIAL DAMAGES RESULTING
FROM ANY BREACH OF WARRANTY, OR UNDER ANY
OTHER LEGAL THEORY, INCLUDING BUT NOT LIMITED TO
LOSS OF DATA, LOSS OF PROFITS, DOWNTIME, GOODWILL,
DAMAGE OR REPLACEMENT OF EQUIPMENT AND
PROPERTY, AND ANY COSTS OF RECOVERING,
PROGRAMMING OR REPRODUCING ANY PROGRAM OR
DATA STORED IN OR USED WITH MAXTOR DISK DRIVES
OR MAXTOR PRODUCTS CONTAINING MAXTOR DISK
DRIVES or any software product distributed therewith.
Some states/jurisdictions do not allow the exclusion or limitation of
incidental or consequential damages or exclusions of implied warranties,
so the above limitations or exclusions may not apply to you. This
warranty gives you specific legal rights, and you may also have other
rights that vary from jurisdiction to jurisdiction.
Changes are periodically made to the information herein – which will be
incorporated in revised editions of the publication. Maxtor may make
changes or improvements in the product(s) described in this publication
at any time and without notice. This product tested to comply with FCC
standards for home or office use.
Page 3

Contents
1 Introduction
Maxtor Personal Storage 5000 Components
System Requirements
Handling Precautions
About this Guide
Where to Go for Help
2 Installing the Drive
Step 1. Installing the Software
Step 2. Connecting the Drive
Step 3. Setting Up the Maxtor OneTouch™ Feature
Formatting Your Drive
Installing Drivers Only
3 Using Your Drive
Using Retrospect® Express
Restoring Files . . . . . . . . . . . . . . . . . . . . . . . . . . . . . . . . . . . . . . . . . . . . . . . . .20
Changing Your Maxtor OneTouch Settings
Adding Maxtor OneTouch Advance Features
Connecting and Disconnecting the Drive
Moving Data Between Two Systems
Installing Applications on Your Drive
Editing Video
Playing Games
Storing Audio
Using Power Management
Using Large Capacity Drives with Windows
Using Security Lock
4 Troubleshooting and FAQs
5 Glossary
Index
. . . . . . . . . . . . . . . . . . . . . . . . . . . . . . . . . . . . . . . . . . . . . . . . . .
Maxtor Product Warranty
. . . . . . . . . . . . . . . . . . . . . . . . . . . . . . . . . . . . . . . . . . . .
. . . . . . . . . . . . . . . . . . . . . . . . . .
. . . . . . . . . . . . . . . . . . . . . . . . . . . . . . . . . . . . . . . . .
. . . . . . . . . . . . . . . . . . . . . . . . . . . . . . . . . . . . . . . . .
. . . . . . . . . . . . . . . . . . . . . . . . . . . . . . . . . . . . . . . . . . . .
. . . . . . . . . . . . . . . . . . . . . . . . . . . . . . . . . . . . . . . .
. . . . . . . . . . . . . . . . . . . . . . . . . . . . . . . . . . . . .
. . . . . . . . . . . . . . . . . . . . . . . . . . . . . . . . . . .
. . . . . . . . . . . . . . . . . . . . . . . . . . . . . . . . . . .
. . . . . . . . . . . . . . . . . . .
. . . . . . . . . . . . . . . . . . . . . . . . . . . . . . . . . . . . . . .
. . . . . . . . . . . . . . . . . . . . . . . . . . . . . . . . . . . . . . .
. . . . . . . . . . . . . . . . . . . . . . . . . . . . . . . . . . . . . .
. . . . . . . . . . . . . . . . . . . . . . . . . . . . . . . . . . . .
. . . . . . . . . . . . . . . . . . . . . . . . .
. . . . . . . . . . . . . . . . . . . . . . . .
. . . . . . . . . . . . . . . . . . . . . . . . . . .
. . . . . . . . . . . . . . . . . . . . . . . . . . . . . .
. . . . . . . . . . . . . . . . . . . . . . . . . . . . .
. . . . . . . . . . . . . . . . . . . . . . . . . . . . . . . . . . . . . . . . . . . . .
. . . . . . . . . . . . . . . . . . . . . . . . . . . . . . . . . . . . . . . . . . . . .
. . . . . . . . . . . . . . . . . . . . . . . . . . . . . . . . . . . . . . . . . . . . .
. . . . . . . . . . . . . . . . . . . . . . . . . . . . . . . . . . . .
. . . . . . . . . . . . . . . . . . . . . . . . .
. . . . . . . . . . . . . . . . . . . . . . . . . . . . . . . . . . . . . . . . .
. . . . . . . . . . . . . . . . . . . . . . . . . . . .
. . . . . . . . . . . . . . . . . . . . . . . . . . . . . . . . . . . . . . . . . . . . . . .
. . . . . . . . . . . . . . . . . .
inside front cover
1
2
3
3
4
4
5
5
7
11
14
17
19
19
21
21
21
22
23
23
24
24
25
26
26
27
33
35
Page 4

intentionally blank page
Page 5

1
Introduction
1
Thank you for selecting a Maxtor product.Your Maxtor Personal
™
Storage
add storage to your computer to hold and organize your documents, videos, music, photos, graphics, and more.
You can also use your new drive to make copies of critical files
as a part of your overall backup solution. By using the Maxtor
OneTouch
of your important files with a touch of a button.
Whether you use the drive for additional storage, to create a copy
of your files, or both, this guide will get you up and running and
provide helpful tips for using your drive.
5000 product is an external hard drive that allows you to
™
feature, your drive can create and store a copy
The Maxtor Personal Storage 5000 drive has the
following features:
• Large capacity
•Maxtor OneTouch feature, the easy way to make
a backup copy of your files
• Plug and Play installation
•High-speed performance
•USB 1.1 and 2.0
®
• FireWire
(available with 5000DV and 5000XT)
• Stacks and stands upright to fit on your desk
• Expandable so you can connect up to 62 drives via FireWire
(5000DV and 5000XT models) or 129 USB 2.0 drives with
USB 2.0 hubs
•Hot-swappable to move the drive between computers
•Compatible with security locking cables, including
those offered by Kensington
/1394/i.LINK
®
®
Introduction 1
Page 6
1
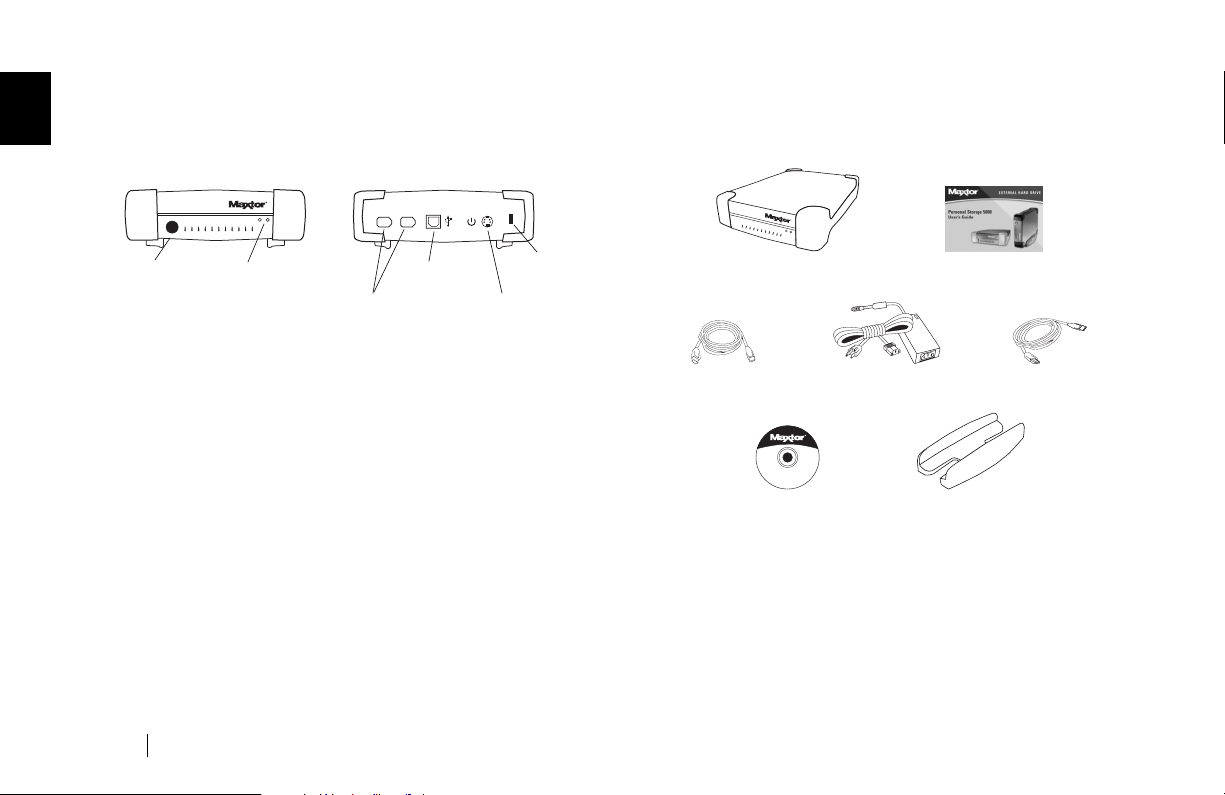
Power Adapter USB CableFireWire Cable
(5000DV, 5000XT only)
User’s GuideMaxtor Personal Storage 5000
External Hard Drive
Vertical Stand
Installation CD
Personal Storage 5000 Components
Before installing your new drive, review the features shown
in Figure 1.
Front
Back
Included in this Kit
The Maxtor Personal Storage 5000 drive comes complete with
the components shown in Figure 2. Familiarize yourself with each
of these items prior to installation.
Maxtor
OneTouch
Button
2 Introduction
Status Lights
Green - Power
Amber - Activity
Figure 1.
USB Port
FireWire Ports
(5000DV, 5000XT only)
Power
Connector
Personal Storage 5000 Features
Security
Locking Slot
Figure 2.
Included in this Kit
Page 7

System Requirements
The following are the minimum system requirements.
Windows System Requirements
W
•Pentium II-class equivalent processor or later
•Windows
• CD-ROM drive
• 32 MB RAM or more as required by Windows
•Available FireWire/1394/i.LINK (OHCI-compliant) or
USB 1.1 or 2.0 port (only for 5000DV, 5000XT)
•Available USB 1.1 or 2.0 port (5000LE)
• Internet connection (for system updates)
For faster operation, upgrade from USB 1.1 to high-speed USB 2.0
with a Maxtor USB 2.0 PCI Card for Windows or add a FireWire
port to your PC with Maxtor’s 1394/FireWire PCI Card. Both are
available at www.maxtordirect.com in North America.
M
• iMac®, Power Macintosh® G3 (Blue and White), or later model
•Mac OS 9.1 or higher or Mac OS X version 10.1.2 or higher
• CD-ROM drive
• 32 MB RAM or more as required by Mac OS
•Available FireWire/1394/i.LINK (OHCI-compliant) or
USB 1.1 or 2.0 port (only for 5000DV, 5000XT)
•Available USB 1.1 or 2.0 port (5000LE)
• Internet connection (for system updates)
®
98SE, Me, 2000, or XP
Macintosh System Requirements
Handling Precautions
Handle your drive with care! Follow the precautions listed here
or damage to the drive may result and your warranty may become
void. Review the “Maxtor Product Warranty” on the inside front
cover for more information.
The following precautions can prevent loss of data:
•Do not bump, jar, or drop the drive.
•Do not stack drives more than three high.
•Do not set the drive on its side without using the vertical
stand as it may fall over and cause damage.
•Do not remove any cables or power cords without properly
disconnecting the drive through the operating system.
•Do not set any liquids or drinks on the drive. Liquids will
damage the internal electronics.
•Do not attempt to open the drive’s case. This will void
your warranty.
1
Introduction 3
Page 8

1
About this Guide
The following symbols and conventions are used in this guide:
Bold
Used for menu, command, and keyboard
selections you make and screens you will see.
Italics
Used for emphasis and to identify new terms,
which may also be defined in the Glossary.
Information or instructions relating specifically
W
to systems running Windows.
Information or instructions relating specifically
M
to Macintosh systems.
Helpful information about a particular topic.
"
Important information to prevent problems and
ensure that you are successful in using the drive.
Critical information to help prevent loss of your
data or damage to your computer system.
Where to Go for Help
For additional help with your drive, its installation and the
software, contact one of the following:
Maxtor Support
Maxtor provides a comprehensive product support section
on its web site, including the latest drivers, user guides, and
the Knowledge Base at www.maxtorkb.com (answers to common
questions and problems).
On the Web: http://www.maxtorsupport.com
Check the Maxtor support web site under
additional support phone numbers outside the USA.
For technical support in Asia Pacific regions, please e-mail to
ApacTech_Assistance@Maxtor.com
If you do not have Internet access, you can call:
1-800-2-MAXTOR (in the United States)
+1 303 678 2015 (Outside the continental United States)
Dantz Support
Contact Dantz® Development Corporation for help with
Retrospect
OneTouch, or restoring files. Dantz provides free telephone support for the first 30 days and a comprehensive support section on
its web site, including the latest software downloads, Knowledge
Base (answers to common questions and problems), hardware
compatibility and contact information.
On the Web: http://www.dantz.com
Check the Dantz web site for additional support phone numbers
outside the USA.
If you do not have Internet access, you can call:
®
Express software, backup copies made with Maxtor
Select the link labeled
1-888-777-5664 (in the United States)
+1 925 253 3050 (Outside the continental United States)
Support & Hardware
Contact Us
for
.
4 Introduction
Page 9

Installing the Drive
2
This chapter describes how to install the Maxtor Personal
Storage 5000 drive, the Dantz Retrospect Express backup
software, and activate the Maxtor OneTouch button. Install the
software and hardware in the order presented in this chapter to
ensure a successful installation process.
Do not connect the drive to your computer until you
have installed the software.
Follow these steps to install your drive
Step 1.
If you do not wish to install the Retrospect Express software
at this time, you can install just the Maxtor drivers. For
instructions, see “Installing Drivers Only” on page 17.
Step 2.
Reformat the drive, if appropriate for your system.
Step 3.
Install the software.
Connect the drive to your computer.
Set up the Maxtor OneTouch button.
Step 1. Installing the Software
Installing the software on a Windows system
W
Windows 2000 and XP
"
message regarding Administrator pr iviledges, refer to
“Administrator Privilege for Windows” on page 32.
1.
With your computer running, insert the Maxtor
Installation CD into your CD-ROM drive.
2.
From the menu that appears, select the option to
Install storage drivers and Retrospect Express
You may be asked to restart your computer to
continue the installation, select restart if prompted to
do so.
3.
A
Welcome
4.
The
Review the agreement and click the “
button, then click
5.
The next screen prompts you for
information
click
screen appears, click
Retrospect License Agreement
Next
Next
. Enter the requested information and
to continue.
: If you get an error
Next
to continue.
customer
.
appears.
I Accept
2
.
…”
Installing the Drive 5
Page 10

2
6.
The
Setup Type
select the folder to install the Retrospect software,
select the
Next
click
7.
The
Ready to Install
to install the Retrospect software, click
begin installing the software on your system.
Windows XP only
the message: “The software you are installing has not
passed Windows logo testing…”. This is normal.
Continue Anyway
Click
8.
After the software is installed on your system, a message
is displayed “
signifying that your installation was successful.
a.
Click the
b.
Click
c.
Remove the Maxtor Install CD from your
computer.
Make sure that you have exited Retrospect Express
and the Installation CD menu at this point.
The software may ask you to restart your system at this
time, select restart to continue setting up your drive.
Now proceed to “Step 2. Connecting the Drive” on
page 7.
screen is displayed. If you wish to
Custom
Exit
option on this screen. To continue,
.
screen appears. If you’re ready
: A Windows Alert appears with
.
InstallShield Wizard completed
Finish
button.
from the remaining menu screen.
Install
to
”
Installing the software on a Macintosh computer
M
1.
With your computer running, insert the Maxtor
Installation CD into your CD-ROM drive.
2.
Open the CD’s icon and double click on the
Retrospect Express
For Mac OS X, you will need to provide your
Administrator password in order to install the necessary
files.
3.
The Retrospect Express introduction screen appears,
Continue
click
4.
The Retrospect license agreement is presented, click
Accept
to continue.
5.
On this screen, you may select an installation option
and select the folder you wish to store this software on.
Install
Click
6.
After the software is installed on your system, a
message is displayed confirming that your installation
was successful. The software will ask you to restart your
system at this time. Restart to continue setting up your
drive.
to continue.
icon.
.
Install
6 Installing the Drive
Page 11
Step 2. Connecting the Drive
Once the registration process is complete, you are ready to
connect the drive to your computer.
Do not connect the drive to your computer until you
have installed the software. (Disregard for Installing
Drivers Only.)
The drive will not operate with more than one computer
at a time.
Maxtor does not support using the dr ive as a start-up
M
disk for the Macintosh.
The Maxtor Personal Storage 5000LE connects to your
computer using the USB interface. The 5000DV and 5000XT
can connect with either the USB or FireWire interface. Check
your computer to determine which interface is available.
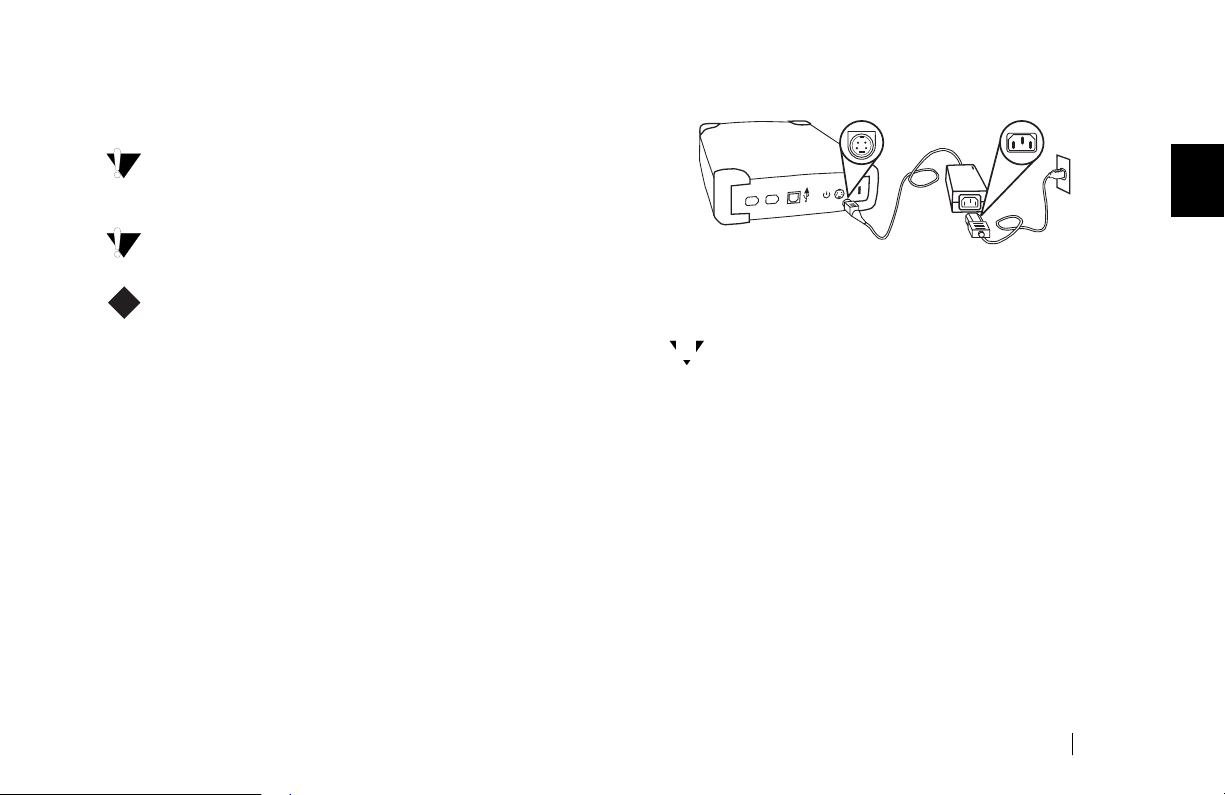
Connecting the Power
1.
Unpack the drive, cables, and power adapter, and save the
packing materials.
2.
Plug the four-pin male connector from the power adapter
with the flat side facing up into the dr ive’s power connector.
3.
Plug the three-pin female connector on the power cord
into the power adapter.
Figure 3.
4.
Plug the male electrical plug from the power adapter into
your power source.
In North America, additional Maxtor power adapters
"
can be purchased from http://www.maxtordirect.com.
5.
Determine whether you have USB or FireWire ports available
on your system. If you are connecting your drive with
FireWire, proceed to “Connecting with the FireWire Cable”
on page 9.
Connecting the Power
2
Installing the Drive 7
Page 12
2
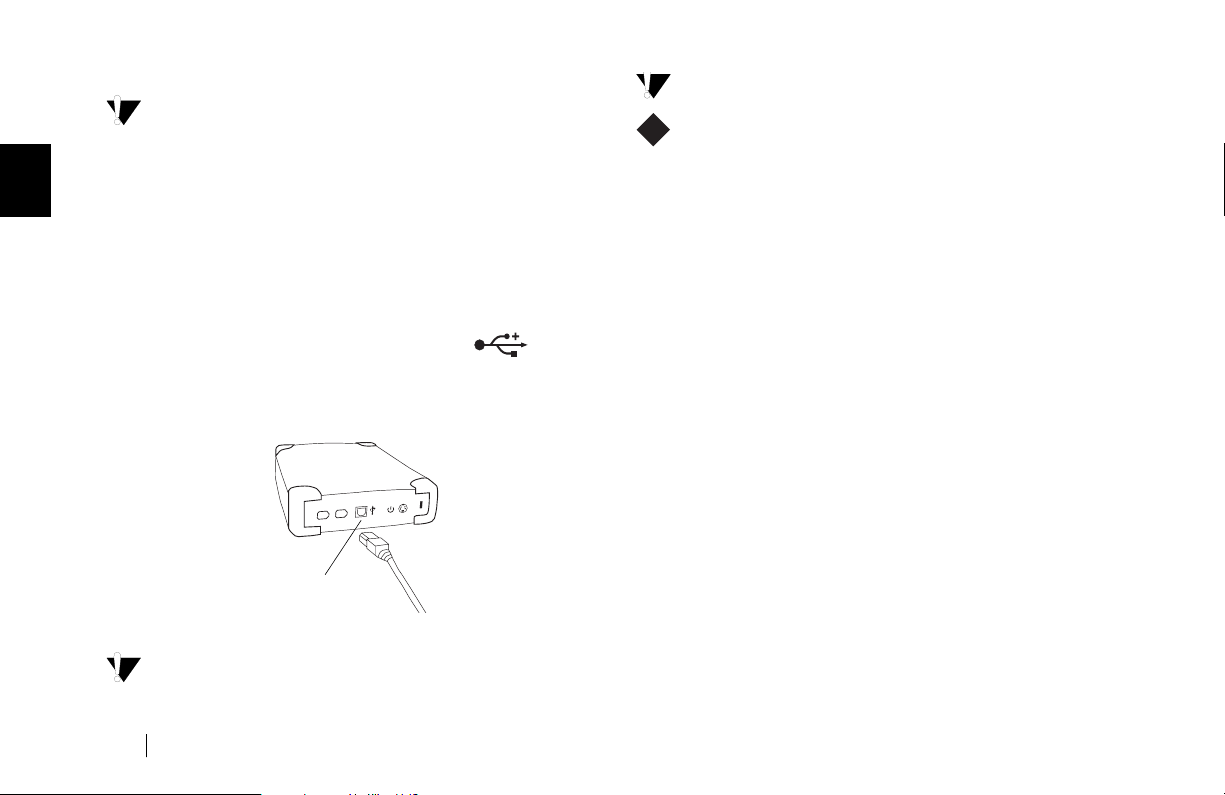
Connecting with the USB Cable
Do not plug a USB cable into the drive when a FireWire
cable is already connected to the drive. This drive will only
operate on one interface at a time.
The Maxtor Personal Storage 5000 drive is also compatible with
computers equipped with built-in USB 1.1 ports. To achieve
high-speed USB 2.0
2.0 Adapter Card for Windows is required. For more
information about the USB interface, go to http://
www.usb.org and select the link to the USB FAQ section.
To connect the USB cable
1.
Plug the larger end of the USB cable into any available
USB port on your computer. This USB logo
may help you identify a USB port.
2.
Plug the smaller end of the USB cable into the USB
connection on the drive.
Figure 4.
Allow up to 2 minutes for your computer
to recognize the drive.
data transfer rates
USB Port
Connecting to the USB Port
, a USB 2.0 port or USB
™
Windows XP:
interface, follow these steps:
1.
W
Attach the drive to your computer and the power
adapter as instructed in this section.
When you connect your drive to a Windows XP
system a window may appear with the message “
Disk (X:)
type of content. What do you want Windows to do?”
You can disregard this window and close it.
2.
Remove and re-insert the Maxtor Install CD back into
your computer.
3.
From the menu that appears, select the option to
Install Storage Drivers
4.
A
Welcome
5.
The
Repair
6.
The
click
7.
A
Windows Alert
software you are installing has not passed Windows logo
testing…”. This is normal. Click
8.
The
signifying that your installation was successful. Remove
the Maxtor Install CD from your computer and click
the
To install your drive, using the USB
This disk or device contains more than one
Program Maintenance
option, click
Ready to Repair the Program
Install
InstallShield Wizard completed
Finish
button.
and
Retrospect Express
screen appears, click
Next
.
appears with the message: “The
Next
screen appears. Select the
.
Continue Anyway
Local
.
.
screen appears,
.
screen appears,
8 Installing the Drive
Page 13

All Windows:
W
your other drives with the name New Volume and a drive
letter assigned by the operating system. The assigned letter
will vary depending upon the number of other storage
devices connected to your computer.
If you’re running Windows 2000 or XP, Maxtor suggests reformatting your drive for best performance and operation.
If you plan to connect this drive to a computer running
Windows 98 or ME, you will need to keep the drive in its
original format. Further information is provided in
“Formatting Your Drive” on page 14.
Now proceed to “Step 3. Setting Up the Maxtor
OneTouch Feature” on page 11.
It may take several minutes to mount the dr ive on your
Macintosh.
Mac OS 9:
M
with the Mac OS Extended format (also called HFS Plus)
for proper operation with Retrospect Express software and
the OneTouch button. Further information is provided in
“Formatting Your Drive” on page 14.
Your new drive appears on your desktop with the name
untitled. If you receive a message: “This disk is unreadable
by this computer. Do you want to initialize the disk?”, refer
to the section titled: “My computer reports the drive is
“unreadable” (Mac OS 9)” on page 30.
Mac OS X:
unreadable. See “To format the drive for Mac OS X” on
page 16.
Now proceed to “Step 3. Setting Up the Maxtor
OneTouch Feature” on page 11.
Your new drive appears in the same way as
Maxtor requires that you re-format your drive
An Alert box will appear saying the drive is
Connecting with the FireWire Cable
This section describes how to connect your Personal Storage
5000DV and 5000XT drive using the FireWire cable. For more
information about the FireWire interface, go to http://
www.askfor1394.com.
Windows 98SE:
Windows 98SE 1394 Storage Supplement. See “I want to
install the Windows 98SE Storage Supplement” on page 31
W
for more information.
Do not plug a FireWire cable into the drive when a USB
cable is already connected to the drive. This drive will only
operate on one interface at a time.
You can use both FireWire connectors at the same time to
connect several FireWire devices to your computer in a
daisychain
your computer and the second FireWire cable to another
FireWire-compatible device, such as a camcorder or an exter nal
CD-R recorder.
To connect the FireWire cable
1.
"
. For example, you can connect one FireWire cable to
Plug one end of the FireWire cable into any available
FireWire port on your computer.
Laptop Users
camcorders, have a smaller 4-pin FireWire port requiring
a special 4-pin to 6-pin FireWire cable (not included).
This cable is available at most computer stores or at
www.maxtordirect.com in North America.
make sure you have first installed the
– Many laptop computers, and most
2
Installing the Drive 9
Page 14

2
2.
Plug the other end of the FireWire cable into either
of the FireWire ports on the back of the drive.
FireWire Ports
Figure 5.
Allow up to 2 minutes for your computer
to recognize the drive.
For Windows 98 and FireWire only
A window titled
(3) times. Click Ye s to keep the current file each time.
For Windows XP and FireWire only
When you attach the drive to your computer for the
first time using the FireWire interface, the Windows
W
Hardware Wizard will appear.
Click Next to automatically install the correct driver.
Connecting to a FireWire port
Ve rsion Conflict will appear three
The Completing the Found Hardware Wizard screen
appears with the message that it has finished installing
software. Click Finish.
When you connect your drive to a Windows XP
"
system a window may appear with the message “Local
Disk (X:) This disk or device contains more than one
type of content. What do you want Windows to do?”
You can disregard this window and close it.
All Windows: Your new drive appears in the same way as
W
your other drives with the name New Volume and a drive
letter assigned by the operating system. The assigned letter
will vary depending upon the number of other storage
devices connected to your computer.
If you’re running Windows 2000 or XP, Maxtor suggests
re-formatting your drive for best performance and
operation. If you plan to connect this drive to a computer
running Windows 98 or ME, you will need to keep the
drive in its original format. Further information is provided
in “Formatting Your Drive” on page 14.
Now proceed to “Step 3. Setting Up the Maxtor
OneTouch Feature” on page 11.
10 Installing the Drive
Page 15

Mac OS 9: Maxtor requires that you re-format your drive
with the Mac OS Extended format (also called HFS Plus)
for proper operation with Retrospect Express software and
M
the OneTouch button. Further information is provided in
“Formatting Your Drive” on page 14.
Mac OS 9: Your new drive appears on your desktop with
the name untitled. If you receive a message: “This disk is
unreadable by this computer. Do you want to initialize the
disk?”, refer to the section titled: “My computer reports the
drive is “unreadable” (Mac OS 9)” on page 30.
Mac OS X: An Alert box will appear saying the drive is
unreadable. See “To format the drive for Mac OS X” on
page 16 page.
Step 3. Setting Up the Maxtor
OneTouch Feature
Once the drive is recognized by your computer, you can set up
the Maxtor OneTouch feature to automatically make a backup
copy of your selected files each time you press the button.
Windows XP: you may see an alert box regarding a
requirement for administrator privileges. Proceed with
your installation. For further information, refer to
W
“Administrator Privilege for Windows” on page 32.
To set up the Maxtor OneTouch button feature
1. Push the button on the front of your drive.
Proceed to #2
M
The Retrospect License Code screen appears. A license
W
code is automatically entered for you, do not change this
code. Click OK to proceed.
The next screen will ask you to personalize your copy.
Enter your name and a company name if appropriate.
Click OK to continue. A confirmation box will appear.
If your entries are correct, click OK.
2. You are now asked to register Retrospect Express, click
Register Now.
The Retrospect Express Registration screen appears.
2
Installing the Drive 11
Page 16

2
3. Complete the registration information requested, then
click E-mail to e-mail your information or click Print
to print the information.
By registering your new drive, you will have the
"
option of receiving product updates, special offers,
and important information about other data storage
solutions from Maxtor.
From the pull-down File menu, select Exit to quit
W
"
Retrospect.
Push the button again on the front of your dr ive.
1. Your registration information is collected and maintained
according to the Dantz and Maxtor privacy policies located on
their respective web sites.
If you choose to E-mail the information, make sure you are
connected to the Internet.
If you choose to print the information, you can fax the form to
Dantz Corporation at +1 925 253 9099.
1
4. At the Welcome screen, click Next.
W
M
5. The Step 1 screen appears, select the drive to copy files
from and click Next.
6. The Step 2 screen is displayed. Choose the type of files
to copy and click Next.
Just Documents copies only documents you have created,
including your favorite files, bookmarks, and cookies. This
selection is ideal for most users.
Applications and Documents
addition to documents. This selection allows you to restore
an application file if it has become damaged. Refer to the
copies application files in
12 Installing the Drive
Page 17

Retrospect User’s Guide for instructions on how to make
a complete system backup copy.
This selection does not copy your operating system,
"
registry (Windows) files, or Internet cache files.
7. The Step 3 screen is displayed. Select the Maxtor Personal
Storage 5000 drive or other drive on your computer as the
location to store the copy of your files. Click Next.
The setup wizard will not let you select the same drive to
"
be both the source and destination for your files. The source
and destination drives must be different.
8. The “Congratulations... now ready” screen appears. To
complete the Maxtor OneTouch setup, click Finish. Select
Exit (Windows) or Quit (Mac) from the pull down File
menu, to quit Retrospect Express.
You are now ready to use the Maxtor OneTouch feature. Just
touch the button on the front panel of your drive and
Retrospect Express will automatically make a backup copy of
your files. It’s that easy!
How to use the Maxtor OneTouch button
Each time you touch the button, Retrospect Express makes a
copy of the folders and files on your source drive exactly as
they exist at that time.
The OneTouch button may not function when Retrospect
Express is already running. To correct the problem, from the
File pull-down menu in Retrospect, select the Exit
(Windows) or Quit (Macintosh) option. After Retrospect
Express has stopped running, the Maxtor OneTouch button
will operate.
Only the current versions of your files are saved. Backup
"
copies made with the default Maxtor OneTouch feature
does not keep earlier versions of files you have deleted since
the last time you pressed the Maxtor OneTouch button.
Any files that are currently open are not saved, so close any
files you wish copied.
You may customize Retrospect Express to create backup
copies of your files which will include revisions made on a
daily basis.
Your hardware and software installation is now complete. See
“Using Your Drive” on page 19 for infor mation on using your
drive for common applications and on using Retrospect Express
to make copies of your important files and restore copied files.
2
Installing the Drive 13
Page 18

2
Formatting Your Drive
Optional for Windows 98/2000/Me/XP
Your Maxtor Personal Storage 5000 drive was formatted at the
factory with the Windows FAT32 file system. This file system is
compatible with Mac OS 9 and recent versions of the Windows
operating system.
The FAT32 file system limits any file to a maximum size
W
of 4 GB. If you are running Windows 98 or Me, consider
upgrading to Windows 2000 or XP to take advantage of
the NTFS file system.
If you are running either the Windows 2000 or XP
operating system, consider reformatting your drive to the
NTFS file system. The NTFS file system provides several
advantages, including support for very large files. See
“Formatting Your Drive with NTFS” on page 14.
If you plan to share data between two Windows systems,
review “Moving Data Between Two Systems” on page 22.
We require that you for mat your drive to the Mac OS
M
Extended format (also called HFS Plus) once it is installed on
your Macintosh computer. See “Formatting Your Drive for
Mac OS” on page 15.
You new drive will display a drive capacity that is slightly less
"
than the capacity stated on the box. This is normal. For a
complete explanation, see page 29 of “Troubleshooting and
FAQs.”
Formatting Your Drive with NTFS
W
This section describes how to format your drive with the
NTFS file system for Windows 2000 or XP.
Formatting the drive destroys all data contained on
that drive. Make a backup copy of all your data
before formatting your drive.
To format the drive for NTFS
1. Select Start ➔ Settings ➔ Control Panel.
2. Double-click Administrative Tools.
3. Double-click Computer Management.
4. Double-click Disk Management (located under the
Storage icon).
To format into two or more logical partitions, use the
"
partitioning feature in the Disk Management utility.
For more information, press F1 to access Help and
enter partition in the keyword field.
5. Right-click on the icon for your new drive in the
window that appears.
FAT32 should be listed in the column labeled
File System.
6. Select Format from the menu.
7. Select NTFS in the File System field.
8. Click OK when you are ready to format your drive.
Formatting time varies based on your system speed,
the interface used, and the drive’s capacity.
14 Installing the Drive
Page 19

Formatting Your Drive for Mac OS
M
Formatting the drive destroys all data contained on
that drive. Make a backup copy of all your data
before formatting.
To format the drive for Mac OS 9
1. Plug the drive into the Macintosh computer using
either the FireWire or USB cable.
The drive icon appears on your desktop.
2. Disable the File Exchange control panel.
a. From the Apple () menu, select Control Panels ➔
Extensions Manager.
b. From the list that appears, clear the check box next
to the File Exchange control panel.
c. Click Restart.
As the computer restarts, a message appears saying the
drive is unreadable and asks you to initialize the drive.
2
3. Enter a name for the drive in the Name field.
4. Select Mac OS Extended from the Format pop-up
menu and click Initialize.
You will receive an Alert: “Initializing will erase all
information on your drive.” Click Continue.
The new drive appears on your desktop as a
Macintosh drive with the name you assigned.
To confirm the drive is formatted properly, select the
drive and then select File ➔ Get Info ➔ General
Information. The drive format should read Mac OS
Extended.
5. Enable the File Exchange control panel.
a. From the Apple menu, select Control Panels ➔
Extensions Manager.
b. Select the check box next to the File Exchange
control panel.
c. Under Special (top menu bar), click Restart.
Installing the Drive 15
Page 20

2
To format the drive for Mac OS X
1. Plug your drive into the Macintosh using either
the FireWire or USB interface.
2. An alert box appears saying the new drive is
unreadable and asks you to initialize the drive.
5. Select the Erase tab at the top of the window.
3. Click Initialize.
If you see another message, click OK.
The Disk Utility menu appears.
4. Select your new drive from the list on the left.
Make sure you select your new drive.
This utility will erase all data on a drive.
A description of the dr ive appears in the window.
16 Installing the Drive
6. Select Mac OS Extended from the Volume Format
drop-down list.
7. Enter a name for your drive in the Name field.
8. Select the check box next to Install Mac OS 9 Drivers.
This will allow your disk to be recognized if you start
your system in Mac OS 9.
9. Click Erase to continue.
An alert dialog appears to confirm the Erase process.
10. Click Erase to start the formatting process.
After a few minutes, your drive will be formatted with the
Mac OS Extended format.
You can now begin using your new drive. If you wish to
partition the drive into two or more volumes, you can select
the Partition tab in the Disk Utility program and follow the
instructions.
Page 21

Installing Drivers Only
This section describes how to install your new drive without
installing Retrospect Express software.
The Maxtor OneTouch button feature will not function if
"
you choose to install under this option.
Locate your operating system and the interface you plan to use
in the following table and follow the corresponding installation
procedure in this section.
OS USB FireWire
Windows 98SE
Windows Me
Windows 2000
Windows XP
Mac OS 9 and X
Install A
1. Install your drive as described in “Step 2. Connecting the
Drive” on page 7. When you connect the drive to your
computer, the Add New Hardware wizard appears,
click Next.
2. Select the option to Search for a Driver, click Next.
3. Insert the Maxtor Install CD into your computer’s
CD-ROM dr ive
4. Select the option to Specify a location and click the
Browse button.
5. A new window appears called Browse for Folder.
Install A Install B
Install C Install F
Install C Install D
Install C Install E
Install C Install C
• Double click on the Maxtor CD icon in this window
showing the drives and folders on your system.
• Open the folder titled Drivers located on the Maxtor
Install CD and select the USB folder inside this folder.
Click the OK button at the bottom of this window.
•Now click the Next button on the Add New Hardware
Wizard screen.
6. Your system will search the CD for the proper driver. To
install this driver, click Next.
7. After a few moments your system will finish the driver
installation, click Finish.
Your drive is now ready to use.
Install B
1. Install Microsoft’s 1394 Storage Supplement as descr ibed in
“I want to install the Windows 98SE Storage Supplement”
on page 31.
2. Install your drive as described in “Step 2. Connecting the
Drive” on page 7.
Your drive is now ready to use.
Install C
1. Install your drive as described in “Step 2. Connecting the
Drive” on page 7.
Your drive is now ready to use.
2
Installing the Drive 17
Page 22

2
Install D
1. Install your drive as described in “Step 2. Connecting the Drive”
on page 7. When you connect the drive to your computer, the
Add New Hardware wizard appears, click Next.
2. The Install Hardware Device Drivers screen appears.
Select the option to search for a driver, click Next.
3. The Locate Driver Files screen appears. Clear all options
and click Next.
You are asked if you want to disable this device. This option
is referring to the Maxtor OneTouch feature. Select the
Disable Device option and click Next or Finish.
4. Finish the driver install.
Your drive is now ready to use.
When using the unplug/eject icon on the taskbar, a reference
to the Maxtor 1394 Storage Front Panel will appear under
hardware devices. You can ignore this reference when you
disconnect your drive from the Windows operating system.
Install E
1. Install your drive as described in “Step 2. Connecting the
Drive” on page 7.
When you connect the drive to your computer, the
Add New Hardware wizard appears.
2. Select the option to Install software automatically and
click Next.
You may see a message “Connect and search for the
software on the Internet.” Select No, do not connect to
the Internet now. Then click Next.
The next screen will tell you it cannot install the hardware.
3. Select the Don’t prompt again option and click Finish.
4. Disregard the warning message that appears.
5. If a window appears “Help & Support Center,” disregard
this screen and close the window.
Your drive is now ready to use.
Install F
1. Install your drive as described in “Step 2. Connecting the
Drive” on page 7. When you connect the drive to your
computer, the Add New Hardware wizard appears.
Select the option Automatic search.
2. Insert the Maxtor Install CD into your computer’s CD-ROM
drive.
3. The wizard will locate the proper driver. Click Finish.
Your drive is now ready to use.
To Install Retrospect at a Later Time
If you wish to install a complete copy of Retrospect Express
software and the Maxtor OneTouch feature at a later time, you
can do so by following the original installation instructions
provided in this guide – Steps 1 – 3 on pages 5 – 13.
18 Installing the Drive
Page 23

Using Your Drive
3
Once installed, you can use your new Maxtor Personal
Storage 5000 drive in the same way you use the other drives
on your computer. Some of the basic ways you can use your
new drive are:
•Move or copy
ROMs, or other storage devices.
•Within virtually any application, save files to and open files
from the new drive.
• Store video files, games, spreadsheets, and other commonly
used files.
• Store copies of important files from your desktop or laptop
computer.
This chapter offers additional suggestions on how to use your
new drive.
files or folders from your other drives, CD-
Using Retrospect Express
Your Maxtor Personal Storage 5000 drive includes a full copy
of the Dantz Retrospect Express software. The Retrospect
Express software includes many powerful and convenient
features. In addition to enabling the Maxtor OneTouch
feature, you can:
• Automatically make copies of your most important files.
• Make copies of your data onto other popular storage devices,
including CD-R, DVD-R, and selected tape drives.
• Recover lost work easily – restore a single file or the
contents of an entire drive in one easy step.
•Save time and minimize storage space needs by copying only
new and changed files using IncrementalPLUS technology.
If you installed your drive with the Maxtor OneTouch feature,
the Retrospect Express software is already installed. A complete
electronic guide to this software is located on your Maxtor
Installation CD.
Retrospect Express backup files may be limited to 4GB.
Refer to “My Retrospect® backup files seem to be limited
to 4GB” on page 32 of the Troubleshooting and FAQs
Using Your Drive 19
3
Page 24

3
section for an explanation of this problem and a suggested
solution.
To access the electronic guide:
W
1.
Insert the Maxtor Installation CD into your
CD-ROM dr ive.
2.
If you already have Adobe’s Acrobat Reader installed
on your system, skip to Step 4.
3.
From the install wizard, select the
Acrobat Reader Software
instructions.
4.
Select the
option and follow the instructions.
To access the electronic guide:
M
1.
Insert the Maxtor Installation CD into your CDROM dr ive.
2.
This electronic guide requires the Acrobat Reader from
Adobe. If you do not have Acrobat installed on your
system, a free copy is available at: www.adobe.com
3.
Open the Retrospect Express User’s Guide file located
on your Maxtor CD-ROM with the Acrobat software.
Dantz Retrospect Express User’s Guide
Install Adobe
option and follow the
Restoring Files
It is easy to restore files that have been backed up using the
Maxtor OneTouch feature.
To restore files
1.
Select the drive containing the copy of your files.
2.
Open the
that contains your backup copy.
W
M
3.
Drag the file or group of files you wish to restore to the
desired folder as you would to move or copy any other file.
If you are not sure where the files you want to restore are
located, use your operating system’s Find or Search command
to search the drive containing the backup data.
Retrospect Backup
The folder named Backup copy of Drive X, where X is the
drive letter assigned by Windows.
The folder named Backup copy of
first 9 characters of this name will be used).
folder and then the folder
your_disk_name
(Only the
20 Using Your Drive
Page 25

Changing Your Maxtor OneTouch Settings
Unplug or Eject
Hardware icon
1.
Start the
2.
Click on the
3.
Select the
a.
b.
c.
Retrospect Express
Automate
Maxtor OneTouch
Click the ‘x’ delete button in the
W
Pull down the
M
and select the
Push the button on the front of the drive.
The Maxtor OneTouch setup wizard will start and you
can proceed as described in “Step 3. Setting Up the
Maxtor OneTouch Feature” on page 11.
software.
tab and click the
script.
Scripts
menu at the top of the screen
Forget
option. Click OK to confirm.
Scripts
Scripts
button.
dialog box.
Adding Maxtor OneTouch Advance Features
You can customize the Maxtor OneTouch feature with
Retrospect Express advanced features. To learn more about
these advanced features, refer to the electronic Retrospect
Express User’s Guide included on the Maxtor Installation CD.
1.
Start the
2.
Click on the
3.
Select the
4.
Click on the
Retrospect’s script options, refer to the Retrospect Express
Guide located on the Installation CD.
Retrospect Express
Automate
Maxtor OneTouch
Edit
tab and click the
button. For further details about
software.
script.
Scripts
button.
Connecting and Disconnecting the Drive
The FireWire and USB interfaces allow you to
new Maxtor Personal Storage 5000 drive; that is, connect and
disconnect the drive while the computer and your drive are
running.
Removing the drive from your computer without
disconnecting it properly through the operating system can
result in lost or damaged files.
To disconnect the drive from a Windows system
W
1.
Click the Windows Unplug or Eject Hardware icon in
your system icon tray located at the bottom right
corner of your desktop.
A list of device choices appears.
2.
Select the Maxtor drive.
The system displays a message saying that you can safely
remove the dr ive.
Your system may not allow you to disconnect the
drive. In this case, you may need to close all open
applications and documents or shut down your
system completely to disconnect the drive safely.
hot swap
your
3
Using Your Drive 21
Page 26

3
To disconnect the drive from a Macintosh
M
1.
From the desktop, drag the drive icon to the Trash.
The drive disappears from the desktop.
2.
Disconnect your drive from the computer.
To connect the drive to a Windows system or
Macintosh computer
1.
Make sure the drive is getting power and the green power
light is on.
Connecting your computer to a drive that is not powered
on can cause your computer to behave erratically or freeze.
2.
Insert either the FireWire or USB cable into the drive and
your computer.
After a moment, the computer will recognize that your drive is
connected and the drive icon will appear in the My Computer
window or on your Macintosh desktop.
Moving Data Between Two Systems
Your Maxtor Personal Storage 5000 drive provides a great tool
for moving large amounts of data between two systems. This
section presents a few tips to remember.
Moving Data between Two Windows Computers
W
Your drive is formatted with the FAT32 file system and
is supported under four Windows operating system
versions: 98SE, Me, 2000, and XP. Windows 98SE and
Me use the FAT32 file system. Windows 2000 and XP
support both the FAT32 and NTFS file systems.
If you leave the dr ive in the FAT32 format, you can
move files between any of these four Windows operating
systems. However, the FAT32 format limits any file to a
maximum size of 4 GB. If you choose to reformat to the
NTFS file system, you cannot use the drive to move files
to or from a computer running Windows 98SE or Me.
22 Using Your Drive
Page 27

Installing Applications on Your Drive
You may install and run applications from your Maxtor
Per sonal Storage 5000 drive like any other drive on your
system.
If you connect the drive to your system using a USB 1.1
interface, the data transfer rate is approximately 1 MB per
Because of this, installing applications on a drive
second.
using the USB 1.1 interface is not recommended.
you can store the data for many applications and then access the
data over a USB 1.1 interface.
Most Windows-based and some Macintosh-based
applications installed on your drive will only run on the
computer where the application was installed. If you move
your drive to any other computer, the application may no
longer function. Once the drive is reconnected to the
computer where the application was originally installed, the
application will function properly.
Important Note for Windows 98SE and Me
The Windows operating system expects applications to
remain at the same drive letter location at all times. When
W
your drive is removed from the system and plugged back in
at a later time, Windows 98SE and Me operating systems
may assign the drive a different drive letter. This can happen
when another storage device is added to or removed from
your computer while the drive is not connected to your
system. If Windows has assigned a different letter to your
drive than it had previously, any applications installed on the
drive may no longer operate properly.
However,
:
Editing Video
Using a computer to capture and edit video recorded with a
digital camcorder is quickly becoming popular. Digital video
files are typically very large, using about 13 GB per hour of
video content. Maxtor recommends connecting your drive
using the FireWire interface for best results when working
with video.
The FAT32 file system limits any single file, including a
W
digital video file, to a maximum size of 4 GB. If you are
running the Windows 98 or Me operating system, you
should consider upgrading to Windows 2000 or XP to take
advantage of the NTFS file system’s larger allowable file size
and many other features.
If you are running either the Windows 2000 or XP
operating system with a video editing application, you
should consider re-formatting your drive to the NTFS file
system. See “Formatting Your Drive with NTFS” on
page 14 for instructions.
Reformatting the drive will destroy any data stored on
that drive.
3
Using Your Drive 23
Page 28

3
Playing Games
CD-ROM-based games typically r un faster when they are
installed on a hard drive rather than running them from the
CD. You can use your Maxtor Personal Storage 5000 drive to
store and play CD-ROM games. See “Installing Applications
on Your Drive” on page 23 for more information.
To install a CD-ROM game
1.
Start the install program on your game CD.
2.
Select
Maximum Install
how to install the game on your system.
This option installs most or all of the game’s software onto
your drive.
3.
When asked for the location to install the software, specify an
existing folder or create a new folder on your drive.
Due to limited transfer rates of USB 1.1, Maxtor does not
"
recommend running games from drives connected through
USB 1.1.
(if supported), if you are asked
Storing Audio
Using your computer as an audio jukebox is a very popular
application. This allows you to store and play thousands of your
favorite songs. You can also create and manage an audio library
on your Maxtor Personal Storage 5000 drive. A popular web
site to learn more about these audio applications is at http://
www.mp3.com.
To use your drive to store your audio library, you need to
specify a folder on the drive as the default location for audio
files in your audio jukebox software.
24 Using Your Drive
Page 29

Using Power Management
This feature is only supported using the FireWire interface.
To minimize the power consumption of your drive while your
computer is on, you can take advantage of the power
management feature supported on the FireWire interface and
Windows 2000, XP, and Mac OS. Table 1 shows where to find
the power management feature in each operating system
version.
Table 1: Accessing the Power Management Feature
OS Do the following:
Windows XP
Windows 2000
Windows Me
Windows 98SE
Mac OS X From the Apple Menu, select
Mac OS 9 Power management of external hard drives not
The power management feature sets the drive to automatically
use less power after a predetermined per iod of time of
inactivity. This is sometimes referred to as
drive’s internal mechanical disks stop spinning. When the drive
is in the spin down mode, the green power light will remain on
and the amber activity light will be off.
Select
Start ➔ Settings ➔ Control Panel
Select
Power Options
Power management of external hard drives not
supported.
Preferences
supported.
➔
.
Energy Saver
spin down
System
.
since the
.
When your computer is powered off, you can choose to do
one of the following:
• Leave the drive plugged in all the time. The device is
designed to run with the power on at all times.
• Plug the drive’s power supply into a power strip with an on/
off switch so you can turn your drive’s power off to further
conserve power.
Make sure you remove the drive from your computer
through the operating system before you disconnect it or
turn off the drive’s power. Shutting off the drive’s power
while your computer is running can cause the loss or
corruption of data.
3
Using Your Drive 25
Page 30

3
Using Large Capacity Drives with Windows
When using Windows with drives that have capacities higher than
W
64 GB, there are special considerations. Table 2 gives some
information about how the Windows file systems and certain
Table 2: Considerations for drive capacities greater than 64 GB
Windows 98SE Windows Me Windows 2000, XP
FAT32 and
NTFS
FDISK and
FORMAT
Defrag and
ScanDisk
Note 1:
and FORMAT function properly, but will display an incorrect disk size on the
screen. A similar problem can occur with Windows Me at larger disk sizes
(starting above 80 GB).
Further information is available on Microsoft’s Web site at
http://support.microsoft.com. Search their Support Knowledge Base for
articles Q263044 and Q263045.
Note 2:
disconnected and reconnected. Rebooting the computer before running
FDISK is recommended.
Note 3:
than 127 GB. Further information is available on Microsoft’s Web site at
http://support.microsoft.com. Search their Support Knowledge Base for
article Q184006. Third party utilities can be used to replace the functionality
of the ScanDisk and Defrag utilities.
FAT32 operates properly with
partition
Tw o known bugs,
see Notes 1 and 2
Limited to partitions
< 127 GB, see Note 3
On disks larger than 64 GB running Windows 98SE, both FDISK
FDISK may not run properly after an external drive has been
Neither ScanDisk nor Defrag will operate on drive partitions larger
≤
320 GB
FAT32 operates properly with
partition ≤ 320 GB
One known bug,
see Note 1
Operates properly with partition
up to 320 GB
Microsoft utilities behave when used on drives with capacities
greater than 64 GB.
≤
FAT32 and NTFS operate properly with partitions
NTFS operates properly with partitions ≤ 320 GB, FAT32 cannot
format partitions > 32 GB
Operates properly with partitions ≤ 320 GB
320 GB
Using Security Lock
Your new drive includes a security locking slot on the back of the
drive. Refer to Figure 1 on page 2 for the exact location of the
slot. The security locking slot is compatible with most security
locking cables, including those offered by Kensington.
26 Using Your Drive
Page 31

4
Troubleshooting and FAQs
This chapter provides troubleshooting tips and answers
frequently asked questions about installing your Maxtor
Per sonal Storage 5000 drive.
You can find additional information in the Maxtor Knowledge
Base at www.maxtorkb.com or contact Maxtor at
www.maxtor.com.
Chapter Contents
General Troubleshooting
1. Drive does not appear on my system 28
2. My drive appears to read files significantly faster than it writes files 29
3. My computer shows less drive capacity than on the box label 29
4. Maxtor OneTouch function does not work 30
5. My drive is not copying or backing up a network drive 30
6. My system reports the drive is “unreadable” (Mac OS 9) 30
7. I want to install the Windows 98SE Storage Supplement 31
USB Troubleshooting
8. My applications run slowly using the USB 1.1 interface 31
9. I get a message stating that I have a high-speed device 31
connected to a low-speed port (Windows XP) 31
10. I’m having data transfer performance problems with my 31
USB 2.0 adapter card
Application Troubleshooting
11. Applications installed on the drive stopped running 32
12. My Retrospect backup files seem to be limited to 4GB 32
13. My computer drops frames when I capture video from my 32
Canon camcorder
14. Administrator Privilege for Windows 32
Troubleshooting and FAQs 27
4
Page 32

4
General Troubleshooting
1. Drive does not appear on my system
• Is the drive running?
The green light on the front of the drive should be
illuminated, and you should be able to feel the hum of the
drive when you place your hand on it. In addition, the green
light on the power adapter should be lit.
Make sure all power connectors on the drive and power
adapter are securely plugged in. If the drive is plugged into a
power strip, try plugging it directly into the wall outlet.
• Are the FireWire/USB cables connected properly?
Ve r ify that the cables are connected according to the
installation instructions in “Step 2. Connecting the Drive” on
page 7.
• Have you tried cycling the power for the drive?
a.
While your computer is running, unplug the FireWire/
USB cable from the drive, then unplug the drive’s power
cord.
b.
Wait ten seconds, plug the power cable back into the
drive.
c.
Wait another ten seconds, plug the FireWire/USB cable
in. See if the dr ive appears on your system.
• Is the amber light on steady?
If so, try cycling the drive’s power again.
If the drive still does not appear on your system, visit the
Product Support area of the Maxtor web site at
www.maxtorsupport.com for further assistance.
Tips for Windows Only
W
•Have you installed the 1394 Storage Supplement
for Windows 98SE?
If not, refer to “I want to install the Windows 98SE
Storage Supplement” on page 31 for details.
• Is your FireWire or USB interface card recognized
and working properly in the
To open the
a.
Select
b.
Double-click the
Properties
Device Manager
Start ➔ Settings ➔ Control Panel
System
dialog box appears.
• 98SE and Me: Select the
• 2000 or XP: Select the
Device Manager
click
c.
Double-click the entry for
Universal Serial Bus Controller
Device Manager
:
icon. The
System
Device Manager
Hardware
tab and then
.
1394 Bus Controller
(which ever
.
interface you're using). Also for FireWire / 1394: an
entry appears with a name that contains the words
OHCI compliant IEEE 1394
.
If you see a yellow ‘!’ exclamation point next to the
entry, the interface card is not installed properly. Consult
the documentation that came with the card or contact
the card’s manufacturer.
?
tab.
or
28 Troubleshooting and FAQs
Page 33

Tips for Macintosh Only
M
• Do you have the most current Maxtor software?
If not, visit the Product Support area at:
www.maxtorsupport.com.
• Can you see the drive in the
Volumes
If no, try cycling the power again.
• Do you have
turned on?
If yes, turn them off.
If, after rebooting, the drive still does not mount, try
cycling the drive’s power again.
If all of the suggestions above fail to mount your drive, visit
the Product Support area at: www.maxtorsupport.com.
2. My drive appears to read files significantly faster than it
writes files
Your drive includes a special data protection function, which
automatically verifies all data written to the drive during the
first few uses of the product. It’s similar to the break-in period
for a new car. The verification process is performed while data
is being written, causing reduced write performance.
This verification function is automatically turned off after your
drive has been powered on and off ten times (you need to leave
the drive running for 15 seconds before powering it off and
leave it off for 15 seconds before powering on again). After this
tab of the
AppleTalk
Apple System Profiler
Devices
or
File Sharing
and
?
break-in period, you should see approximately the same
performance for reading and writing data.
3. My computer shows less drive capacity than on the
box label
Hard drive capacity is defined in terms of decimal (base 10)
capacity. In decimal notation, one megabyte (MB) is equal to
one million bytes and one gigabyte (GB) is equal to one billion
bytes. We are most accustomed to the decimal system in
everyday life. However, computers use the binary (base 2)
numbering system. In the binary numbering system, one
megabyte is equal to 1,048,576 bytes, and one gigabyte is equal
to 1,073,741,824 bytes.
Both Windows and Mac OS use the binary numbering system.
When you use your system to check your drive’s capacity,
multiply the value shown (displayed in base 2 megabytes) by
1,048,576 to determine the decimal equivalent for the hard
drive's capacity.
Here is an example using a 160 GB drive on a system running
Windows (all versions):
• Right-click the
This opens a new window listing all the disk drives on your
system.
• Right-click on the
Properties
An information dialog box appears displaying the drive’s
capacity in both numbering systems showing 152 GB and
163,921,571,840 bytes (assuming this model is labeled 160 GB).
My Computer
external hard drive
.
icon and select
and select
Explore
.
4
Troubleshooting and FAQs 29
Page 34

4
4. Maxtor OneTouch function does not work
Here are a few items you can quickly check if your Maxtor
OneTouch feature does not operate.
The Maxtor OneTouch button may not function when
Retrospect Express is already running. To correct the problem,
select from the
(Macintosh) option. After Retrospect has stopped r unning, the
Maxtor OneTouch button will operate.
The OneTouch backup copy will not run if the Retrospect
software cannot locate either the source drive or the destination
drive. To check this problem:
a.
Start the
b.
Click the
c.
You should find a file called
If you do not see this file, follow the instructions in “Step 3.
Setting Up the Maxtor OneTouch Feature” on page 11.
d.
Select the
Edit
e.
Confirm that both the source and destination dr ives
(volumes) are defined and are currently running on your
system.
For example, if you rename your drive (on a Macintosh) or a new
letter is assigned to the drive (on a Windows system) after the
script was defined, it will not operate properly.
f.
You can also click on the checkmark icon on this window
to test the definition of the currently selected script.
File
menu, the
Retrospect Express
Scripts
button on the
Maxtor OneTouch
button.
Exit
(Windows) or
program.
Automate
Maxtor OneTouch
entry and then click the
Quit
tab.
.
5. My drive is not copying or backing up a network drive
Your Maxtor Personal Storage 5000 drive and Retrospect Express
software are not supported for the purpose of copying or making
backup copies of network drives available from your computer.
You may encounter Microsoft Windows errors (Windows Error
Event ID: 9, 11, 15, 50 and 51). For further information, check
the Maxtor Knowledge Base at: www.maxtorkb.com or look up
“network drive” using the Windows Help feature.
6. My computer reports the drive is “unreadable” (Mac OS 9)
M
After connecting the Maxtor drive to a Macintosh computer
running OS 9, a message is displayed “This disk is unreadable by
this computer. Do you want to initialize the disk?”
To re-format your drive, follow the steps outlined on page 15,
starting with # 3: “Enter a name for the drive in the
field”. After you complete # 3-5, proceed to “Step 3. Setting
Up the Maxtor OneTouch Feature” on page 11.
Name
30 Troubleshooting and FAQs
Page 35

7. I want to install the Windows 98SE Storage Supplement
W
This Microsoft supplement installs a Safe Removal utility that
allows you to safely stop a Plug and Play storage device prior to
physically unplugging the device. This supplement also includes
an update for the FireWire/1394 drivers.
Once your drive is installed, look in the System Tray, located at
the bottom right of your desktop, for the icon shown in the
following figure.
If the icon is not displayed, you need to install the 1394 Storage
Supplement.
a.
While connected to the internet, go to the Microsoft
Support web site at http://support.microsoft.com.
b.
In the upper left corner, select
Search the Knowledge Base
click the
c.
Select the option to search
“Q242975” in the field labeled
containing
d.
The search should return an item called:
1394 Storage Peripherals in Windows 98 Second
Edition
Show options
...
(Q242975)
. Click this link and go to the article.
Windows 98
drop-down menu and
item.
Article ID
For solutions
from the
and enter
Update for
e.
Inside this article, click on the link:
www.microsoft.com/windows98/downloads/
contents/WURecommended/S_WUFeatured/
1394/Default.asp
f.
Download and install this Windows update as instructed.
g.
Later, when you connect the drive to your computer, a
window will appear three (3) times called “Version
Conflict.” Click
.
Ye s
each time to keep the existing files.
http://
USB Troubleshooting
8. My applications run slowly using the USB 1.1 interface
When you connect the drive to your system using the
USB 1.1 interface, the data transfer rate is approximately
1 MB per second. Maxtor does not recommend installing
applications on a drive using the USB 1.1 interface. You can
however use your drive to store the data for many applications
over a USB 1.1 interface.
9. I get a message stating that I have a high-speed device
W
connected to a low-speed port (Windows XP)
This is normal. Windows XP is letting you know that you have
connected your USB 2.0 drive to a USB 1.1 port and you will
not have the high-speed capabilities that you would have with a
USB 2.0 port.
10. I’m having data transfer performance problems with my
USB 2.0 adapter card
Maxtor drives will run as fast as the host adapter card will allow
(up to the maximum burst rate of 480 Mb per second). If you
are having performance issues, make sure the card’s drivers are
the most current available and that they are installed properly.
4
Troubleshooting and FAQs 31
Page 36

4
Application Troubleshooting
11. Applications installed on the drive stopped running
See “Installing Applications on Your Drive” on page 23 for an
explanation of possible reasons for and solutions to this problem.
®
12. My Retrospect
Backup files created by Retrospect Express may be limited to a
file size of 4GB. This limitation is due to the file size restriction
imposed by the FAT32 file system. You can remove this
limitation for Windows 2000 / XP and the Macintosh by
reformatting your drive to another file system. See
“Formatting Your Drive” on page 14 for additional
information.
13. My computer drops frames when I capture video from my
Canon camcorder
Some models of Canon camcorders produced in 1998 and
1999 have trouble transferring DV data over the 1394 interface.
For the latest information and a solution for this problem,
search the Maxtor Knowledge Base at www.maxtorkb.com
with the key word “Canon.”
backup files seem to be limited to 4GB
14. Administrator Privilege for Windows
W
During software installation, the Windows operating system
may display a message regarding a requirement for
Administrator Privilege
software. To check if you have
for the account you use to “Logon” into Windows, follow
these steps:
a.
Click the Windows
b.
Double click the
c.
If your account Logon is displayed at the bottom of this
window with the description:
you have the correct administrator privileges to install and
run this software.
If your system shows another type of account status, contact
your IS / Computer Manager for further assistance.
to install and run the Retrospect
Administrator Privilege
Start
button, choose
User Accounts
Computer Administrator
Control Panel
icon.
.
,
32 Troubleshooting and FAQs
Page 37

Glossary
Byte –
A unit of storage on a drive that holds a single
character. A byte is equal to 8 bits.
Capacity –
that can be stored on a drive. Also known as
Daisy chain –
devices are connected to each other in a series. The FireWire
interface, for example, supports a daisy chain of up to 62
drives.
Data Transfer Rate –
and from the drive.
Defrag –
for each file physically contiguous on the drive, which can
enhance your drive’s performance.
Device Driver –
communicate with peripheral devices such as hard drives and
CD-ROM dr ives. Each type of device requires a different
driver. Device driver programs are stored on a computer’s hard
drive and are loaded into memory when the computer is
started or when a device is plugged into the computer.
External Hard Drive –
containing a hard drive mechanism connected to a computer
via a FireWire or USB interface.
The amount of information, measured in bytes,
A hardware configuration in which peripheral
The speed at which data transfers to
(or defragment) A software utility that keeps the data
A software program that enables a PC to
A external peripheral device
storage capacity
.
FAT32 –
This file system is standard for Windows 98SE and Me, and is
supported under Windows 2000 and XP. A single file is limited
in size to 4 GB.
FDISK –
Me operating systems used to partition a hard drive.
FireWire –
i.LINK, is a high-perfor mance, serial bus defined by the
Institute of Electrical and Electronics Engineers (IEEE) as a
standard for connecting digital devices together. It is ideal for
connecting computers and hard drives to digital video and
audio equipment.
Format –
and sets up the file system for storing and retrieving files. On
Macintosh systems, high-level formatting is often referred to as
initialization. Low-level for matting sets up the locations of
sectors on the drive. Your drive was formatted with the FAT32
file system at the factory.
GB –
detailed explanation, refer to page 29.
Hard Drive –
information storage and retrieval, incorporating one or more
rotating disks on which data is recorded, stored, and read
magnetically.
A file system that organizes files on the computer.
A software utility included with the Windows 98 and
The FireWire interface, also known as 1394 and
Formatting erases all information on a hard dr ive
(Gigabyte) Equal to 1,000,000,000 (billion) bytes. For a
An electromechanical device used for
Glossary 33
5
Page 38

5
Hot-Swap –
This feature allows you to connect and
disconnect external devices while the computer and the
devices are running. Exter nal drives, such as the Maxtor
Per sonal Storage 5000 can be hot-swapped.
KB –
(Kilobyte) Equal to 1,000 (thousand) bytes.
MB –
(Megabyte) Equal to 1,000,000 (million) bytes.
Mb –
(Megabit) When used to descr ibe data storage, equal to
one million bits.
Mbps –
(Megabits per second) When used to descr ibed data
transfer rates, it refers to one million bits per second.
NTFS –
The primary file system for Windows 2000 and XP
operating system that organizes files on your computer.
Supports large capacity hard drives up to 2 TB.
Operating System –
Software that allows the user and
programs installed on your system to communicate with
computer hardware such as a hard drive and processor.
Script –
A saved backup procedure for Retrospect that you can
schedule to run at some future date and time or on a repeating
schedule, such as daily. You may create as many scripts as you
wish.
Spin Down –
Refers to the actually spinning of the disk
mechanism. When a disk spins down, it stops spinning, thus
conserving power.
Startup Disk –
The drive from which the operating system
loads to start up your computer.
(Terabyte) Equal to 1,000,000,000,000 (trillion) bytes.
TB –
USB –
Universal Serial Bus, a standard for connecting external
devices to your computer.
Volume –
A fixed amount of storage on a hard drive. The
term volume is often used as a synonym for the drive itself, but
it is possible for a single drive to contain more than one volume
or for a volume to span more than one drive.
Partition –
A way to logically divide a hard drive so that an
operating system treats each partition as if it were a separate
hard drive. Each partition is assigned a unique dr ive letter
(Windows) or icon (Mac OS).
Port –
A connection or socket on the motherboard, controller
card, case, or chassis for connecting peripheral devices, such as
a USB socket or FireWire socket.
ScanDisk –
A utility for Windows 98SE and Me that finds
and corrects errors in the file system on a hard drive.
34 Glossary
Page 39

Index
Symbols
symbols 4
Numerics
1394 (FireWire) interface
connecting 9
C
Canon video camcorders 32
compatibility
USB 8
connecting
the power 7
with USB cable 8
with FireWire cable 9
D
data
restoring 20
drive
components 2
handling precautions 3
installing on Windows 5
installing on Macintosh 6
registering 11
using 19
drive capacity 14
F
FAQs 27
FAT32 file system
considerations 14
files
restoring 20
formatting
considerations 14
with Mac OS 9 15
with NTFS 14
H
handling precautions 3
hardware
installing 7
hot swap 1, 21
HFS Plus 14
I
installing
Maxtor OneTouch feature 11
the drive 7
the software - Windows 5
the software - Macintosh 6
M
Mac OS
extended format 14
formatting with OS 9.x 15
Macintosh
format considerations 14
system requirements 3
Maxtor OneTouch
adding advanced features 21
changing settings for 21
installing 11
installing at a later time 18
N
NTFS
considerations 14
formatting with 14
R
requirements, system 3
restoring files 20
Retrospect Express
installing the software 5
registering 11
scripts 21
using 19
S
Service and Support
Dantz 4
Maxtor 4
software
installing 5
registering 11
system requirements 3
T
troubleshooting 27
U
USB
2.0 upgrade 3
compatibility 8
connecting 7
USB 2.0 7
W
Warranty inside front cover
Windows
formatting considerations 14
system requirements 3
Index 35
Page 40

Copyright
© 2002 Maxtor Corporation. All rights reserved.
Maxtor and the Maxtor logo are registered trademarks of Maxtor Corporation. Maxtor Personal Storage and Maxtor OneTouch are
trademarks of Maxtor Corporation. Dantz, the Dantz logo, and Retrospect are registered trademarks and Retrospect Express is a
trademark of Dantz Development Corporation. Mac, the Mac logo, iMac, Power Macintosh, FireWire, and the FireWire logo are
trademarks of Apple Computer, Inc., registered in the U.S. and other countr ies. Microsoft, Windows, and the Windows logo are either
registered trademarks or trademarks of Microsoft Cor poration in the U.S. and other countr ies. i.LINK and the i.LINK logo are
trademarks of Sony Corporation. All other brands or products are trademarks or registered trademarks of their respective holders.
Product specifications are subject to change without notice. Actual products may vary from photos shown.
Patents
Dantz Development Corporation: U.S. patents 5,150,473 and 5,966,730. Other patents pending.
FCC Declaration of Conformance
This device complies with part 15 of the FCC Rules. Operation is subject to the following two conditions: (1) this device may not cause
harmful interference, and (2) this device must accept any interference received including interference that may cause undesired operation.
Maxtor Corporation
500 McCarthy Blvd.
Milpitas, CA 95035
www.maxtor.com
7/02 P/N: 20193500
 Loading...