

Seagate Nytro XP6500-8A1536,Nytro XP6500-8A4096 User Manual

Seagate® Nytro™ XP6500
Flash Accelerator Cards
User Guide
Nytro XP6500-8A1536
Nytro XP6500-8A4096
100766305, Rev. B
July 2015
Revision History
Version and Date Description of Changes
Rev. B, July 2015 Changed the following sections:
Section 1.1, Overview, added information for 4-TB products.
Section 2.3.2.4.1, Installing UEK Oracle Linux 6 on a Nytro XP6500 Disk, added UEK to the section title.
Section 2.3.2.6, VMware ESXi5.1, removed ESXi 5.5 from the section title.
Section 2.4.1, BIOS and System Configuration, removed invalid link.
Section 3.1.4, Thermal Considerations, changed “Operating altitude” to “Maximum operating altitude.”
Section 3.1.4.1, Maximum Sensor Temperature, replaced “The maximum sensor temperature for the Nytro
XP6500 cards is 76 °C” with “The maximum sensor temperature for the Flash modules on the Nytro XP6500
cards is 76 °C.”
Rev. A, June 2015 First release of the document.
Electromagnetic Compatibility Notices
This device complies with Part 15 of the FCC Rules. Operation is subject to the following two conditions:
1. This device may not cause harmful interference, and
2. This device must accept any interference received, including interference that may cause undesired operation.
This equipment has been tested and found to comply with the limits for a Class B digital device, pursuant to part 15 of the FCC Rules. These limits are designed to provide reasonable
protection against harmful interference in a residential installation. This equipment generates, uses, and can radiate radio frequency energy and, if not installed and used in accordance
with the instructions, may cause harmful interference to radio communications. However, there is no guarantee that interference will not occur in a particular installation. If this
equipment does cause harmful interference to radio or television reception, which can be determined by turning the equipment off and on, the user is encouraged to try to correct the
interference by one or more of the following measures:
· Reorient or relocate the receiving antenna.
· Increase the separation between the equipment and the receiver.
· Connect the equipment into an outlet on a circuit different from that to which the receiver is connected.
· Consult the dealer or an experienced radio/TV technician for help.
Shielded cables for SCSI connection external to the cabinet are used in the compliance testing of this Product. Seagate is not responsible for any radio or television interference caused
by unauthorized modification of this equipment or the substitution or attachment of connecting cables and equipment other than those specified by Seagate Technology LLC. The
correction of interferences caused by such unauthorized modification, substitution, or attachment will be the responsibility of the user.
The Nytro WarpDrive Application Acceleration Card is tested to comply with FCC standards for home or office use.
This Class B digital apparatus meets all requirements of the Canadian Interference-Causing Equipment Regulations.
Cet appareil numérique de la classe B respecte toutes les exigences du Règlement sur le matériel brouilleur du Canada.
This is a Class B product based on the standard of the Voluntary Control Council for Interference from Information Technology Equipment (VCCI). If this is used near a radio or television
receiver in a domestic environment, it may cause radio interference. Install and use the equipment according to the instruction guide.
© 2015, Seagate Technology LLC All rights reserved.
Publication number: 100766305, Rev. B, July 2015
Seagate reserves the right to change, without notice, product offerings or specifications
Seagate, Seagate Technology and the Spiral logo are registered trademarks of Seagate Technology LLC in the United States and/or other countries. Nytro, Nytro WarpDrive and SeaTools are either trademarks or registered
trademarks of Seagate Technology LLC or one of its affiliated companies in the United States and/or other countries. All other trademarks or registered trademarks are the property of their respective owners.
No part of this publication may be reproduced in any form without written permission of Seagate Technology LLC. Call 877-PUB-TEK1(877-782-8351) to request permission.
When referring to drive capacity, one gigabyte, or GB, equals one billion bytes and one terabyte, or TB, equals one trillion bytes. Your computer’s operating system may use a different standard of measurement and report
a lower capacity. In addition, some of the listed capacity is used for formatt ing and other func tions, and thus w ill not be available for data storage. Actual quantities will vary based on various factors, including file size, file
format, features and application software. Actual data rates may vary depending on operating environment and other factors. The export or re-expor t of hardware or software containing encryption may be regulated by
the U.S. Department of Commerce, Bureau of Industry and Security (for more information, visit www.bis.doc.gov), and controlled for import and use outside of the U.S. Seagate reserves the right to change, without notice,

Contents
Seagate Technology Support Services . . . . . . . . . . . . . . . . . . . . . . . . . . . . . . . . . . . . . . . . . . . . . . . . . . . . . . . . . . . . . . . . . . . . . . . . . . . . . . . . . . . . . . . . . . . 4
Chapter 1: Introduction . . . . . . . . . . . . . . . . . . . . . . . . . . . . . . . . . . . . . . . . . . . . . . . . . . . . . . . . . . . . . . . . . . . . . . . . . . . . . . . . . . . . . . . . . . . . . . . . . . . . . . . . . 5
1.1 Overview . . . . . . . . . . . . . . . . . . . . . . . . . . . . . . . . . . . . . . . . . . . . . . . . . . . . . . . . . . . . . . . . . . . . . . . . . . . . . . . . . . . . . . . . . . . . . . . . . . . . . . . . . . . . . . . . . . . . . . . . . . . 5
1.2 Related Documents . . . . . . . . . . . . . . . . . . . . . . . . . . . . . . . . . . . . . . . . . . . . . . . . . . . . . . . . . . . . . . . . . . . . . . . . . . . . . . . . . . . . . . . . . . . . . . . . . . . . . . . . . . . . . . . . . 6
Chapter 2: Installation . . . . . . . . . . . . . . . . . . . . . . . . . . . . . . . . . . . . . . . . . . . . . . . . . . . . . . . . . . . . . . . . . . . . . . . . . . . . . . . . . . . . . . . . . . . . . . . . . . . . . . . . . . 7
2.1 Quick Installation Instructions . . . . . . . . . . . . . . . . . . . . . . . . . . . . . . . . . . . . . . . . . . . . . . . . . . . . . . . . . . . . . . . . . . . . . . . . . . . . . . . . . . . . . . . . . . . . . . . . . . . . . . . 7
2.2 Hardware Installation Instructions . . . . . . . . . . . . . . . . . . . . . . . . . . . . . . . . . . . . . . . . . . . . . . . . . . . . . . . . . . . . . . . . . . . . . . . . . . . . . . . . . . . . . . . . . . . . . . . . . . . 7
2.2.1 Card Retention, Shipping, and the PCIe Specification . . . . . . . . . . . . . . . . . . . . . . . . . . . . . . . . . . . . . . . . . . . . . . . . . . . . . . . . . . . . . . . . . . . . . . . . . . 7
2.2.2 Hardware Installation Steps . . . . . . . . . . . . . . . . . . . . . . . . . . . . . . . . . . . . . . . . . . . . . . . . . . . . . . . . . . . . . . . . . . . . . . . . . . . . . . . . . . . . . . . . . . . . . . . . . . 7
2.3 Software Installation Instructions . . . . . . . . . . . . . . . . . . . . . . . . . . . . . . . . . . . . . . . . . . . . . . . . . . . . . . . . . . . . . . . . . . . . . . . . . . . . . . . . . . . . . . . . . . . . . . . . . . . . 9
2.3.1 Windows Driver Installation . . . . . . . . . . . . . . . . . . . . . . . . . . . . . . . . . . . . . . . . . . . . . . . . . . . . . . . . . . . . . . . . . . . . . . . . . . . . . . . . . . . . . . . . . . . . . . . . . . 9
2.3.2 Linux Driver Installation . . . . . . . . . . . . . . . . . . . . . . . . . . . . . . . . . . . . . . . . . . . . . . . . . . . . . . . . . . . . . . . . . . . . . . . . . . . . . . . . . . . . . . . . . . . . . . . . . . . . . . 9
2.3.2.1 Downloading the Drivers . . . . . . . . . . . . . . . . . . . . . . . . . . . . . . . . . . . . . . . . . . . . . . . . . . . . . . . . . . . . . . . . . . . . . . . . . . . . . . . . . . . . . . . . . . . . . . 9
2.3.2.2 Ultra Low Latency Driver (ULLD) for Linux . . . . . . . . . . . . . . . . . . . . . . . . . . . . . . . . . . . . . . . . . . . . . . . . . . . . . . . . . . . . . . . . . . . . . . . . . . . . . 10
2.3.2.3 Creating a Driver Update Disk (DUD) on a USB drive . . . . . . . . . . . . . . . . . . . . . . . . . . . . . . . . . . . . . . . . . . . . . . . . . . . . . . . . . . . . . . . . . . . 10
2.3.2.4 Installing a Linux Operating System on a Nytro XP6500 Virtual Disk . . . . . . . . . . . . . . . . . . . . . . . . . . . . . . . . . . . . . . . . . . . . . . . . . . . . 10
2.3.2.5 Build Driver for Mainline Kernels 2.6.38 and Later Kernels . . . . . . . . . . . . . . . . . . . . . . . . . . . . . . . . . . . . . . . . . . . . . . . . . . . . . . . . . . . . . . 17
2.3.2.6 VMware ESXi5.1 . . . . . . . . . . . . . . . . . . . . . . . . . . . . . . . . . . . . . . . . . . . . . . . . . . . . . . . . . . . . . . . . . . . . . . . . . . . . . . . . . . . . . . . . . . . . . . . . . . . . . . 17
2.4 Performance Tuning Guidelines . . . . . . . . . . . . . . . . . . . . . . . . . . . . . . . . . . . . . . . . . . . . . . . . . . . . . . . . . . . . . . . . . . . . . . . . . . . . . . . . . . . . . . . . . . . . . . . . . . . . 18
2.4.1 BIOS and System Configuration . . . . . . . . . . . . . . . . . . . . . . . . . . . . . . . . . . . . . . . . . . . . . . . . . . . . . . . . . . . . . . . . . . . . . . . . . . . . . . . . . . . . . . . . . . . . . . 18
2.4.2 Linux System Configuration . . . . . . . . . . . . . . . . . . . . . . . . . . . . . . . . . . . . . . . . . . . . . . . . . . . . . . . . . . . . . . . . . . . . . . . . . . . . . . . . . . . . . . . . . . . . . . . . . 18
2.4.3 File System Configuration . . . . . . . . . . . . . . . . . . . . . . . . . . . . . . . . . . . . . . . . . . . . . . . . . . . . . . . . . . . . . . . . . . . . . . . . . . . . . . . . . . . . . . . . . . . . . . . . . . . 18
2.5 BIOS Boot Support Settings . . . . . . . . . . . . . . . . . . . . . . . . . . . . . . . . . . . . . . . . . . . . . . . . . . . . . . . . . . . . . . . . . . . . . . . . . . . . . . . . . . . . . . . . . . . . . . . . . . . . . . . . 19
2.5.1 Changing the BIOS Settings . . . . . . . . . . . . . . . . . . . . . . . . . . . . . . . . . . . . . . . . . . . . . . . . . . . . . . . . . . . . . . . . . . . . . . . . . . . . . . . . . . . . . . . . . . . . . . . . . 19
2.6 Managing the Nytro XP6500 Card . . . . . . . . . . . . . . . . . . . . . . . . . . . . . . . . . . . . . . . . . . . . . . . . . . . . . . . . . . . . . . . . . . . . . . . . . . . . . . . . . . . . . . . . . . . . . . . . . . 19
Chapter 3: Characteristics . . . . . . . . . . . . . . . . . . . . . . . . . . . . . . . . . . . . . . . . . . . . . . . . . . . . . . . . . . . . . . . . . . . . . . . . . . . . . . . . . . . . . . . . . . . . . . . . . . . . . . 20
3.1 Nytro XP6500 Card Characteristics . . . . . . . . . . . . . . . . . . . . . . . . . . . . . . . . . . . . . . . . . . . . . . . . . . . . . . . . . . . . . . . . . . . . . . . . . . . . . . . . . . . . . . . . . . . . . . . . . 20
3.1.1 LEDs . . . . . . . . . . . . . . . . . . . . . . . . . . . . . . . . . . . . . . . . . . . . . . . . . . . . . . . . . . . . . . . . . . . . . . . . . . . . . . . . . . . . . . . . . . . . . . . . . . . . . . . . . . . . . . . . . . . . . . . . 20
3.1.2 Troubleshooting the Nytro XP6500 Card . . . . . . . . . . . . . . . . . . . . . . . . . . . . . . . . . . . . . . . . . . . . . . . . . . . . . . . . . . . . . . . . . . . . . . . . . . . . . . . . . . . . . 20
3.1.3 Power Consumption for the Nytro XP6500 Card . . . . . . . . . . . . . . . . . . . . . . . . . . . . . . . . . . . . . . . . . . . . . . . . . . . . . . . . . . . . . . . . . . . . . . . . . . . . . . 22
3.1.4 Thermal Considerations . . . . . . . . . . . . . . . . . . . . . . . . . . . . . . . . . . . . . . . . . . . . . . . . . . . . . . . . . . . . . . . . . . . . . . . . . . . . . . . . . . . . . . . . . . . . . . . . . . . . . 22
3.1.4.1 Maximum Sensor Temperature . . . . . . . . . . . . . . . . . . . . . . . . . . . . . . . . . . . . . . . . . . . . . . . . . . . . . . . . . . . . . . . . . . . . . . . . . . . . . . . . . . . . . . . 22
3.2 Electromagnetic and Environmental Specifications . . . . . . . . . . . . . . . . . . . . . . . . . . . . . . . . . . . . . . . . . . . . . . . . . . . . . . . . . . . . . . . . . . . . . . . . . . . . . . . . . 23
3.3 Safety Characteristics . . . . . . . . . . . . . . . . . . . . . . . . . . . . . . . . . . . . . . . . . . . . . . . . . . . . . . . . . . . . . . . . . . . . . . . . . . . . . . . . . . . . . . . . . . . . . . . . . . . . . . . . . . . . . . 23
3.4 China Restriction of Hazardous Substances (RoHS) Directive . . . . . . . . . . . . . . . . . . . . . . . . . . . . . . . . . . . . . . . . . . . . . . . . . . . . . . . . . . . . . . . . . . . . . . . . 23
Seagate Nytro XP6500 Flash Accelerator Cards User Guide, Rev. B 3

Seagate Technology Support Services
For Nytro Support, visit: http://www.seagate.com/products/solid-state-flash-storage/accelerator-cards/
For information regarding online support and services, visit: http://www.seagate.com/about/contact-us/technical-support/
Available services include:
Presales & Technical support
Global Support Services telephone numbers & business hours
Authorized Service Centers
For information regarding Warranty Support, visit: http://www.seagate.com/support/warranty-and-replacements/
For information regarding data recovery services, visit: http://www.seagate.com/services-software/data-recovery-services/
For Seagate OEM and Distribution partner portal, visit: http://www.seagate.com/partners
For Seagate reseller portal, visit: http://www.seagate.com/partners/my-spp-dashboard/
Seagate Nytro XP6500 Flash Accelerator Cards User Guide, Rev. B 4

www.seagate.com Overview
Chapter 1: Introduction
1.1 Overview
This document provides general information and tells you how to use the Seagate® Nytro™ XP6500 Flash Accelerator
card. To configure, monitor, and maintain the card using the software tools provided, refer to the Seagate® Nytro™
XP6500 Software User Guide.
The Nytro XP6500 card addresses the move toward hyper-convergence where vast computing and storage resources
come together to process massive information loads from the cloud, big data, and hyperscale data centers.
The Nytro XP6500 card combines Flash technology with Seagate’s industry-leading RAID-on-Chip (ROC)
implementation with the advantage of on-board Dynamic Random Access Memory (DRAM). The Nytro XP6500 card
offers the lowest latency flash in the Nytro product portfolio providing consistent, low-response times, even under
heavy I/O loads. The Nytro XP6500 card provides shared writes and chaining of I/Os queued for back end to provide
benefits of serializing back-to-back writes when the back-end port is busy. The shared writes also permit serving write
hits more efficiently by reducing the back-end traffic for updates to same pages.
The Nytro XP6500 card’s buffered fast-path provides ultra-low latency writes through a simple, semi-automatic store
(into DRAM) and forward mechanism. The Nytro XP6500 card includes a virtual drive (VD) with Write Back, no read
ahead, and direct IO policy. RAID 0 with Write Back mode and Write Through mode is supported with Direct I/O (DIO).
The Nytro XP6500 card includes an eight-lane PCI Express® (PCIe®) 3.0 host interface and ROC-based controller with a
DRAM buffer which provides consistent, ultra-low latency.
The following table shows characteristics of the Nytro XP6500 card models.
Table 1 Seagate Nytro XP6500 Card Characteristics Summary
Device Name Model Number Raw Capacity Connector Flash Controller NAND Type Card Style Controller
Nytro XP6500 XP6500-8A1536LP 1536 GB X8 PCIe 3.0 SF2582 Enterprise
Multi-Level Cell
(eMLC)
Nytro XP6500 XP6500-8A1536FH 1536 GB X8 PCIe 3.0 SF2582 eMLC Full Height, Half
Nytro XP6500 XP6500-8A4096LP 4096 GB X8 PCIe 3.0 SF2582 MLC HHHL SAS3108
Nytro XP6500 XP6500-8A4096FH 4096 GB X8 PCIe 3.0 SF2582 MLC FHHL SAS3108
Half Height, Half
Length (HHHL)
Length (FHHL)
SAS3108
SAS3108
Features
High performance
— DRAM buffer for ultra-low write latency and consistent latency over a wide range of I/OPs.
— High bandwidth and high random-read I/OPs for enhanced system responsiveness and an improved user
experience.
— Eight on-board Nytro Flash modules present themselves to the operating system as one drive.
— 6Gb/s Nytro Flash module interfaces.
— TRIM feature support.
Cost-effective
— Servers can use the Nytro XP6500 as a boot volume, eliminating the need for separate boot drives.
— Supercaps remove the need for battery maintenance.
Ease-of-use
Seagate Nytro XP6500 Flash Accelerator Cards User Guide, Rev. B 5

www.seagate.com Related Documents
— Easy to install and manage.
— Operating System Support for Windows®, Linux®, VMware®, and FreeBSD® operating systems.
— Eight-lane, PCIe 3.0 host interface.
— GUI and CLI-based management utilities - featuring an online controller firmware upgrade.
— LED indicators for life and status.
Enhanced data protection
— DDR Offload uses the external SuperCap kit to protect the DRAM content during power failure, if DDR3 Write
Back is enabled.
— 2-GB DRAM Cache offload support onto an on-board Open NAND Flash Interface (ONFi).
— Secure Erase protects the Nytro card from unauthorized access
— The Automatic Region Lock feature protects from data corruption by restricting any I/O operations before the
back-end host write operations are completed.
1.2 Related Documents
Refer to the following documents for more information on the Nytro XP6500 card and related tools.
Seagate® Nytro™ XP6500 Flash Accelerator Cards Software User Guide
Seagate® NytroCLI ™ Release Notes
Seagate® Nytro™ XP6500 Flash Accelerator Cards Quick Installation Guide
Seagate Nytro XP6500 Flash Accelerator Cards User Guide, Rev. B 6

www.seagate.com Quick Installation Instructions
Chapter 2: Installation
2.1 Quick Installation Instructions
You can use the quick installation instructions to install your Nytro XP6500 card, or you can see the next section if you
need more detailed installation instructions.
To quickly install your Nytro XP6500 card, follow these instructions.
1. Unpack the Nytro XP6500 card and inspect it for damage.
2. Turn off the server, and remove the power cord.
3. Remove the cover from the server.
4. Insert the card in an available PCIe slot that supports at least 41.9 W of power.
5. Secure the bracket to the system’s chassis.
6. Replace the cover and the power cord, then turn on the server.
The Nytro XP6500 card hardware installation is complete.
2.2 Hardware Installation Instructions
2.2.1 Card Retention, Shipping, and the PCIe Specification
The PCIe specification requires that add-in cards with a mass of greater than 350 grams must have additional card
retention at the server level. Neither the connector nor the optional hockey stick feature described in the PCIe
specification provides the required retention.
Server OEMs and ODMs are solely responsible for choosing and qualifying their own server and rack shipping
solution. Seagate does not qualify the server and rack shipping solution and is not responsible for such solution or any
impact to Seagate products.
Seagate will make available mechanical design collateral for its products, which may be used by server OEMs and
ODMs to design retention features for their server products. Seagate information is provided AS IS only and Seagate
does not certify any design retention features used by OEMs and ODMs.
Seagate does not perform server and rack shock and vibration testing of OEM and ODM products. OEMs and ODMs
are solely responsible for any server and rack shock and vibration testing.
2.2.2 Hardware Installation Steps
1. Unpack the Nytro XP6500 card and inspect it for damage. Unpack the card in a static-free environment and
follow good antistatic grounding procedures. Remove the Nytro XP6500 card from the antistatic bag, and
carefully inspect it for damage. If you notice any damage, contact Seagate, or your reseller support representative.
NOTE Back up your data before changing your system configuration.
2. Prepare the computer. Turn off the server, and disconnect the power cords from the power supply. Remove the
cover from the chassis.
WAR NIN G To avoid electrical shock, disconnect the server from the main power and from
any networks before you install the card.
Seagate Nytro XP6500 Flash Accelerator Cards User Guide, Rev. B 7
www.seagate.com Hardware Installation Instructions
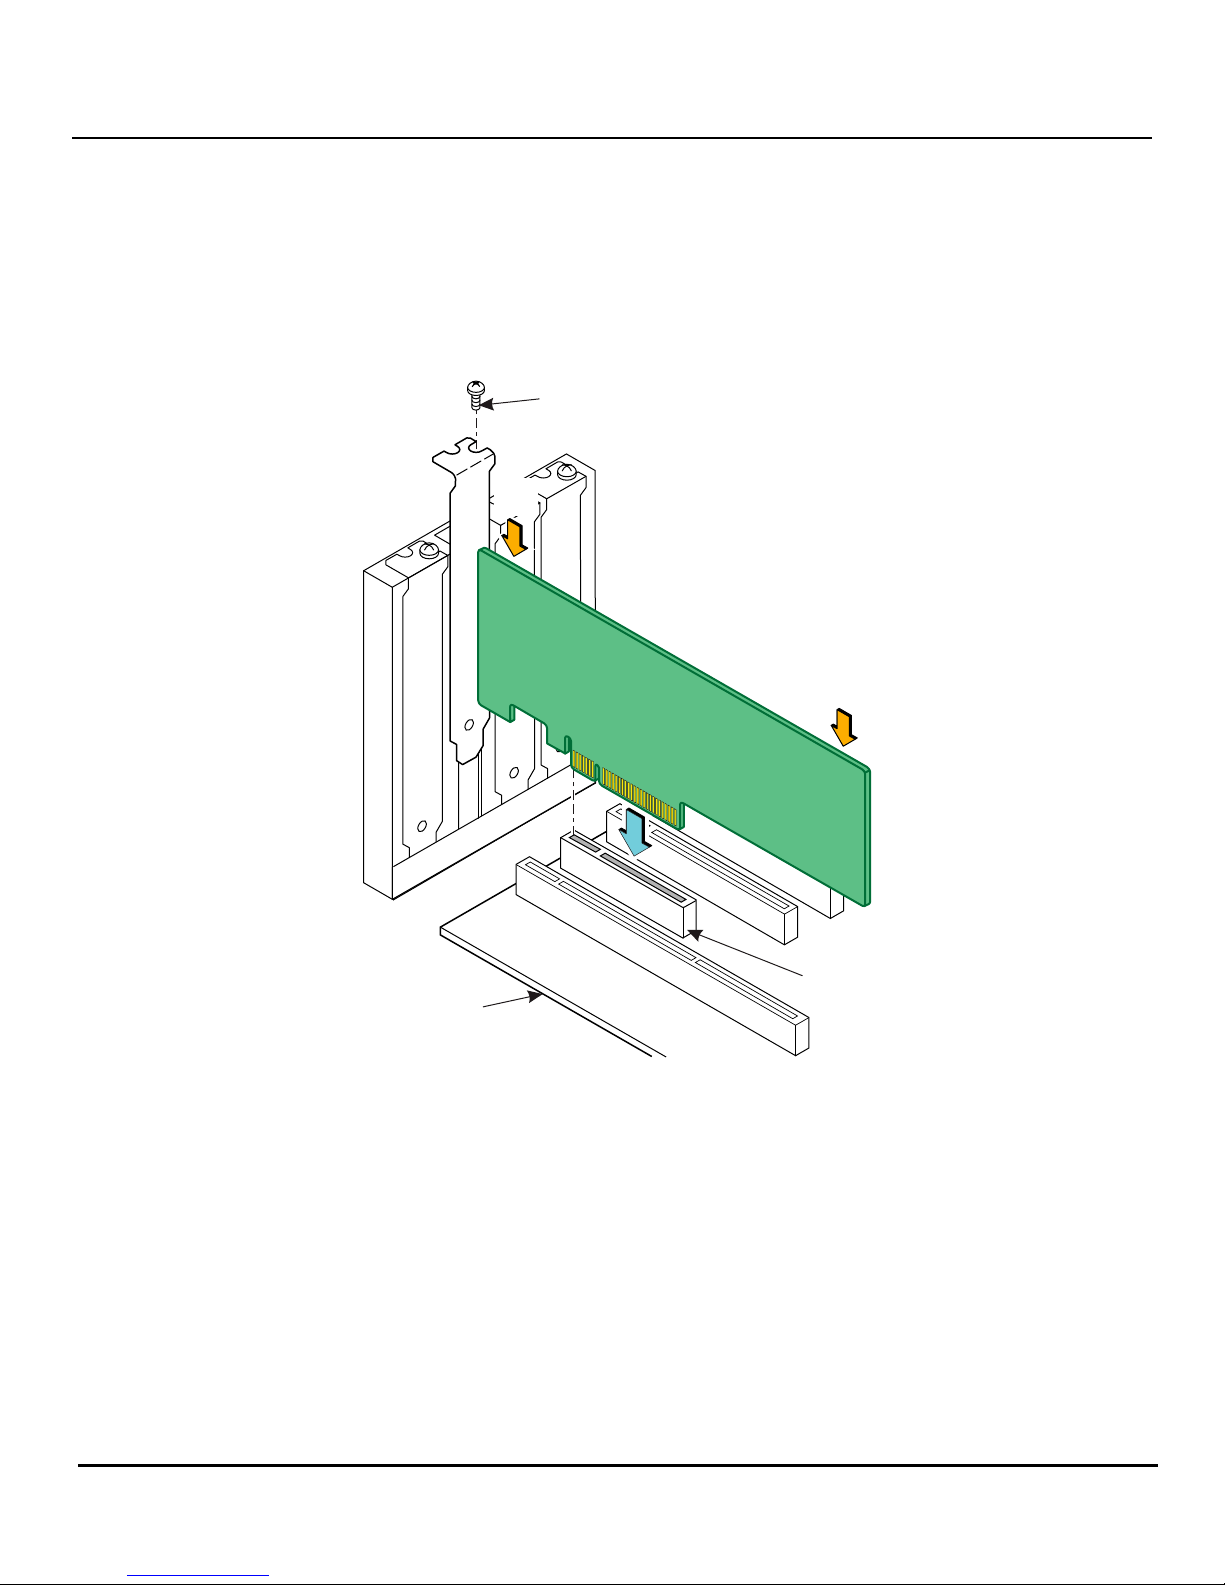
3. Insert the Nytro XP6500 card in an available PCIe slot that provides at least 41.9 W of power. Locate an
empty PCIe slot. Make sure the PCIe slot provides at least 41.9 W of power. Without sufficient power the Nytro
XP6500 card may be damaged or run at less than optimal performance. Remove the blank bracket panel on the
server chassis that aligns with the empty PCIe slot. Save the bracket screw, if applicable. Align the card to the PCIe
slot. Press down gently, but firmly, to properly seat the card in the slot. The following figure shows how to insert
the card in a PCIe slot.
Figure 1 Card Installation for the Nytro XP6500
%UDFNHW
6FUHZ
3UHVV
+HUH
3UHVV
+HUH
B
(GJHRI
+RVW%RDUG
3&,H6ORW
NOTE Your card shape, size, and component locations might vary from this drawing.
CAUTION For highest performance, make sure that the PCIe slot is PCIe 3.0 and make sure
that it has an active width of dedicated eight lanes.
CAUTION The Nytro XP6500-8A1536LP card comes with an external supercap. You must
connect this supercap to the Nytro XP6500 card as part of card installation in
the PCIe slot.
CAUTION To operate this card, your server environment must meet the 550 LFM (linear
feet/minute) minimum airflow requirement.
4. Secure the bracket to the system’s chassis. Install the bracket screw, if applicable, or engage the system
retention mechanism to secure the card to the system’s chassis.
5. Replace the cover, reconnect the power cords, and power up the system. Replace the server’s cover,
reconnect the power cords, and reconnect any network cables. Turn on the power.
Seagate Nytro XP6500 Flash Accelerator Cards User Guide, Rev. B 8
 Loading...