

Seagate NWD-WLP4-200, NWD-WLP4-400, NWD-BLP4-400, NWD-BLP4-800, NWD-BLP4-1600 User Manual
...
User Guide
Seagate® Nytro® WarpDrive® and
Nytro XP6000
Flash Accelerator Cards
NWD-WLP4-200
NWD-WLP4-400
NWD-BLP4-400
NWD-BLP4-800
NWD-BLP4-1600
XP6209-4A1024
XP6209-4B2048
XP6210-4A2048
XP6210-4B2048
NWD-BFH6-1200
NWD-BFH8-1600
NWD-BFH8-3200
DB15-000652-14
Version 1.12
December 2017

Revision History
Version and Date Description of Changes
Version 1.12, December 2017 Added Section 3.6, Safety, Standards, and Compliance.
For a comprehensive list of changes to this document, see Revision History on page 34.
© 2017, Seagate Technology LLC All rights reserved.
Publication number: DB15-000652-14, December 2017
Seagate, Seagate Technology and the Wave logo are registered trademarks of Seagate Technology LLC in the United States and/or other countries. Nytro, Nytro WarpDrive, and SeaTools are either trademarks or registered
trademarks of Seagate Technology LLC or one of its affiliated companies in the United States and/or other countri es. All other trademarks or registered trademarks are the property of their respective owners.
No part of this publication may be reproduced in any form without written permission of Seagate Technology LLC. Call 877-PUB-TEK1(877-782-8351) to request permission.
When referring to drive capacity, one gigabyte, or GB, equals one billion bytes and one terabyte, or TB, equals one trillion bytes. Your computer’s operating system may use a different standard of measurement and report
a lower capacity. In addition, some of the listed capacity is used for formatt ing and other func tions, and thus wil l not be available for data storage. Actual quantities will vary based on various factors, including file size, file
format, features and application software. Actual data rates may vary depending on operating environment and other factors. The export or re-export of hardware or software containing encryption may be regulated by
the U.S. Department of Commerce, Bureau of Industry and Security (for more information, visit www.bis.doc.gov), and controlled for import and use outside of the U.S. Seagate reserves the right to change, without notice,
product offerings or specifications.

Contents
Seagate Technology Support Services . . . . . . . . . . . . . . . . . . . . . . . . . . . . . . . . . . . . . . . . . . . . . . . . . . . . . . . . . . . . . . . . . . . . . . . . . . . . . . . . . . . . . . . . . . . 5
Chapter 1: Introduction . . . . . . . . . . . . . . . . . . . . . . . . . . . . . . . . . . . . . . . . . . . . . . . . . . . . . . . . . . . . . . . . . . . . . . . . . . . . . . . . . . . . . . . . . . . . . . . . . . . . . . . . . 6
1.1 Overview . . . . . . . . . . . . . . . . . . . . . . . . . . . . . . . . . . . . . . . . . . . . . . . . . . . . . . . . . . . . . . . . . . . . . . . . . . . . . . . . . . . . . . . . . . . . . . . . . . . . . . . . . . . . . . . . . . . . . . . . . . . 6
1.2 Related Documents . . . . . . . . . . . . . . . . . . . . . . . . . . . . . . . . . . . . . . . . . . . . . . . . . . . . . . . . . . . . . . . . . . . . . . . . . . . . . . . . . . . . . . . . . . . . . . . . . . . . . . . . . . . . . . . . . 6
1.3 Features . . . . . . . . . . . . . . . . . . . . . . . . . . . . . . . . . . . . . . . . . . . . . . . . . . . . . . . . . . . . . . . . . . . . . . . . . . . . . . . . . . . . . . . . . . . . . . . . . . . . . . . . . . . . . . . . . . . . . . . . . . . . 6
1.4 Nytro WarpDrive and Nytro XP6000 Card Characteristics Summary . . . . . . . . . . . . . . . . . . . . . . . . . . . . . . . . . . . . . . . . . . . . . . . . . . . . . . . . . . . . . . . . . . . 7
Chapter 2: Installation . . . . . . . . . . . . . . . . . . . . . . . . . . . . . . . . . . . . . . . . . . . . . . . . . . . . . . . . . . . . . . . . . . . . . . . . . . . . . . . . . . . . . . . . . . . . . . . . . . . . . . . . . . 8
2.1 Quick Installation Instructions . . . . . . . . . . . . . . . . . . . . . . . . . . . . . . . . . . . . . . . . . . . . . . . . . . . . . . . . . . . . . . . . . . . . . . . . . . . . . . . . . . . . . . . . . . . . . . . . . . . . . . . 8
2.2 Hardware Installation Instructions . . . . . . . . . . . . . . . . . . . . . . . . . . . . . . . . . . . . . . . . . . . . . . . . . . . . . . . . . . . . . . . . . . . . . . . . . . . . . . . . . . . . . . . . . . . . . . . . . . . 8
2.2.1 Card Retention, Shipping, and the PCIe Specification . . . . . . . . . . . . . . . . . . . . . . . . . . . . . . . . . . . . . . . . . . . . . . . . . . . . . . . . . . . . . . . . . . . . . . . . . . 8
2.2.2 Hardware Installation for the Nytro WarpDrive 6203, Nytro XP6209, Nytro XP6210 Cards . . . . . . . . . . . . . . . . . . . . . . . . . . . . . . . . . . . . . . . 8
2.2.3 Hardware Installation for the Nytro WarpDrive 6301 Card . . . . . . . . . . . . . . . . . . . . . . . . . . . . . . . . . . . . . . . . . . . . . . . . . . . . . . . . . . . . . . . . . . . . . 10
2.3 Software Installation Instructions . . . . . . . . . . . . . . . . . . . . . . . . . . . . . . . . . . . . . . . . . . . . . . . . . . . . . . . . . . . . . . . . . . . . . . . . . . . . . . . . . . . . . . . . . . . . . . . . . . . 11
2.3.1 Windows Driver Installation . . . . . . . . . . . . . . . . . . . . . . . . . . . . . . . . . . . . . . . . . . . . . . . . . . . . . . . . . . . . . . . . . . . . . . . . . . . . . . . . . . . . . . . . . . . . . . . . . 11
2.3.2 Linux Driver Installation . . . . . . . . . . . . . . . . . . . . . . . . . . . . . . . . . . . . . . . . . . . . . . . . . . . . . . . . . . . . . . . . . . . . . . . . . . . . . . . . . . . . . . . . . . . . . . . . . . . . . 11
2.3.3 FreeBSD Driver Installation . . . . . . . . . . . . . . . . . . . . . . . . . . . . . . . . . . . . . . . . . . . . . . . . . . . . . . . . . . . . . . . . . . . . . . . . . . . . . . . . . . . . . . . . . . . . . . . . . . 12
2.3.4 VMware Driver Installation . . . . . . . . . . . . . . . . . . . . . . . . . . . . . . . . . . . . . . . . . . . . . . . . . . . . . . . . . . . . . . . . . . . . . . . . . . . . . . . . . . . . . . . . . . . . . . . . . . 12
2.3.4.1 VMware ESXi5.0, ESXi5.1, ESXi5.5 . . . . . . . . . . . . . . . . . . . . . . . . . . . . . . . . . . . . . . . . . . . . . . . . . . . . . . . . . . . . . . . . . . . . . . . . . . . . . . . . . . . . . . 12
2.4 BIOS Boot Support Settings . . . . . . . . . . . . . . . . . . . . . . . . . . . . . . . . . . . . . . . . . . . . . . . . . . . . . . . . . . . . . . . . . . . . . . . . . . . . . . . . . . . . . . . . . . . . . . . . . . . . . . . . 12
2.4.1 Changing the BIOS Settings . . . . . . . . . . . . . . . . . . . . . . . . . . . . . . . . . . . . . . . . . . . . . . . . . . . . . . . . . . . . . . . . . . . . . . . . . . . . . . . . . . . . . . . . . . . . . . . . . 12
2.5 Managing the Nytro WarpDrive Card . . . . . . . . . . . . . . . . . . . . . . . . . . . . . . . . . . . . . . . . . . . . . . . . . . . . . . . . . . . . . . . . . . . . . . . . . . . . . . . . . . . . . . . . . . . . . . . 15
Chapter 3: Characteristics . . . . . . . . . . . . . . . . . . . . . . . . . . . . . . . . . . . . . . . . . . . . . . . . . . . . . . . . . . . . . . . . . . . . . . . . . . . . . . . . . . . . . . . . . . . . . . . . . . . . . . 16
3.1 Nytro WarpDrive 6203 Card Characteristics . . . . . . . . . . . . . . . . . . . . . . . . . . . . . . . . . . . . . . . . . . . . . . . . . . . . . . . . . . . . . . . . . . . . . . . . . . . . . . . . . . . . . . . . . 16
3.1.1 LEDs . . . . . . . . . . . . . . . . . . . . . . . . . . . . . . . . . . . . . . . . . . . . . . . . . . . . . . . . . . . . . . . . . . . . . . . . . . . . . . . . . . . . . . . . . . . . . . . . . . . . . . . . . . . . . . . . . . . . . . . . 16
3.1.2 Troubleshooting the Nytro WarpDrive Card . . . . . . . . . . . . . . . . . . . . . . . . . . . . . . . . . . . . . . . . . . . . . . . . . . . . . . . . . . . . . . . . . . . . . . . . . . . . . . . . . . 16
3.1.3 Power Consumption for the Nytro WarpDrive 6203 Card . . . . . . . . . . . . . . . . . . . . . . . . . . . . . . . . . . . . . . . . . . . . . . . . . . . . . . . . . . . . . . . . . . . . . 18
3.2 Nytro XP6209 Card Characteristics . . . . . . . . . . . . . . . . . . . . . . . . . . . . . . . . . . . . . . . . . . . . . . . . . . . . . . . . . . . . . . . . . . . . . . . . . . . . . . . . . . . . . . . . . . . . . . . . . 18
3.2.1 LEDs . . . . . . . . . . . . . . . . . . . . . . . . . . . . . . . . . . . . . . . . . . . . . . . . . . . . . . . . . . . . . . . . . . . . . . . . . . . . . . . . . . . . . . . . . . . . . . . . . . . . . . . . . . . . . . . . . . . . . . . . 19
3.2.2 Troubleshooting the Nytro WarpDrive 6209 Card . . . . . . . . . . . . . . . . . . . . . . . . . . . . . . . . . . . . . . . . . . . . . . . . . . . . . . . . . . . . . . . . . . . . . . . . . . . . . 19
3.2.3 Power Consumption for the Nytro XP6209 Card . . . . . . . . . . . . . . . . . . . . . . . . . . . . . . . . . . . . . . . . . . . . . . . . . . . . . . . . . . . . . . . . . . . . . . . . . . . . . . 20
3.2.4 Thermal Considerations . . . . . . . . . . . . . . . . . . . . . . . . . . . . . . . . . . . . . . . . . . . . . . . . . . . . . . . . . . . . . . . . . . . . . . . . . . . . . . . . . . . . . . . . . . . . . . . . . . . . . 21
3.2.4.1 Maximum Sensor Temperature . . . . . . . . . . . . . . . . . . . . . . . . . . . . . . . . . . . . . . . . . . . . . . . . . . . . . . . . . . . . . . . . . . . . . . . . . . . . . . . . . . . . . . . 21
3.3 Nytro XP6210 Card Characteristics . . . . . . . . . . . . . . . . . . . . . . . . . . . . . . . . . . . . . . . . . . . . . . . . . . . . . . . . . . . . . . . . . . . . . . . . . . . . . . . . . . . . . . . . . . . . . . . . . 22
3.3.1 Bracket LEDs . . . . . . . . . . . . . . . . . . . . . . . . . . . . . . . . . . . . . . . . . . . . . . . . . . . . . . . . . . . . . . . . . . . . . . . . . . . . . . . . . . . . . . . . . . . . . . . . . . . . . . . . . . . . . . . . 22
3.3.2 Troubleshooting the Nytro XP6210 Card . . . . . . . . . . . . . . . . . . . . . . . . . . . . . . . . . . . . . . . . . . . . . . . . . . . . . . . . . . . . . . . . . . . . . . . . . . . . . . . . . . . . . 23
3.3.3 Power Consumption for the Nytro XP6210 Card . . . . . . . . . . . . . . . . . . . . . . . . . . . . . . . . . . . . . . . . . . . . . . . . . . . . . . . . . . . . . . . . . . . . . . . . . . . . . . 24
3.4 Nytro WarpDrive 6301 Card Characteristics . . . . . . . . . . . . . . . . . . . . . . . . . . . . . . . . . . . . . . . . . . . . . . . . . . . . . . . . . . . . . . . . . . . . . . . . . . . . . . . . . . . . . . . . . 25
3.4.1 Shipping . . . . . . . . . . . . . . . . . . . . . . . . . . . . . . . . . . . . . . . . . . . . . . . . . . . . . . . . . . . . . . . . . . . . . . . . . . . . . . . . . . . . . . . . . . . . . . . . . . . . . . . . . . . . . . . . . . . . 25
3.4.2 LEDs . . . . . . . . . . . . . . . . . . . . . . . . . . . . . . . . . . . . . . . . . . . . . . . . . . . . . . . . . . . . . . . . . . . . . . . . . . . . . . . . . . . . . . . . . . . . . . . . . . . . . . . . . . . . . . . . . . . . . . . . 26
3.4.3 Troubleshooting the Nytro WarpDrive 6301 Card . . . . . . . . . . . . . . . . . . . . . . . . . . . . . . . . . . . . . . . . . . . . . . . . . . . . . . . . . . . . . . . . . . . . . . . . . . . . . 26
3.4.4 Power Consumption for the Nytro WarpDrive 6301 Card . . . . . . . . . . . . . . . . . . . . . . . . . . . . . . . . . . . . . . . . . . . . . . . . . . . . . . . . . . . . . . . . . . . . . 27
3.4.5 Qualified Servers for the Nytro WarpDrive 6301 Card . . . . . . . . . . . . . . . . . . . . . . . . . . . . . . . . . . . . . . . . . . . . . . . . . . . . . . . . . . . . . . . . . . . . . . . . . 28
3.4.6 Drivers for the Nytro WarpDrive 6301 Card . . . . . . . . . . . . . . . . . . . . . . . . . . . . . . . . . . . . . . . . . . . . . . . . . . . . . . . . . . . . . . . . . . . . . . . . . . . . . . . . . . . 28
3.5 Thermal and Atmospheric Characteristics . . . . . . . . . . . . . . . . . . . . . . . . . . . . . . . . . . . . . . . . . . . . . . . . . . . . . . . . . . . . . . . . . . . . . . . . . . . . . . . . . . . . . . . . . . 28
3.6 Safety, Standards, and Compliance . . . . . . . . . . . . . . . . . . . . . . . . . . . . . . . . . . . . . . . . . . . . . . . . . . . . . . . . . . . . . . . . . . . . . . . . . . . . . . . . . . . . . . . . . . . . . . . . . 29
3.6.1 Regulatory and Model Numbers . . . . . . . . . . . . . . . . . . . . . . . . . . . . . . . . . . . . . . . . . . . . . . . . . . . . . . . . . . . . . . . . . . . . . . . . . . . . . . . . . . . . . . . . . . . . . 29
3.6.2 Agency and Safety Certifications . . . . . . . . . . . . . . . . . . . . . . . . . . . . . . . . . . . . . . . . . . . . . . . . . . . . . . . . . . . . . . . . . . . . . . . . . . . . . . . . . . . . . . . . . . . . . 29
3.6.2.1 Safety certification . . . . . . . . . . . . . . . . . . . . . . . . . . . . . . . . . . . . . . . . . . . . . . . . . . . . . . . . . . . . . . . . . . . . . . . . . . . . . . . . . . . . . . . . . . . . . . . . . . . . 29
3.6.2.2 European Union (EU) CE Marking Requirements . . . . . . . . . . . . . . . . . . . . . . . . . . . . . . . . . . . . . . . . . . . . . . . . . . . . . . . . . . . . . . . . . . . . . . . 29
3.6.2.3 Australian RCM Compliance Mark . . . . . . . . . . . . . . . . . . . . . . . . . . . . . . . . . . . . . . . . . . . . . . . . . . . . . . . . . . . . . . . . . . . . . . . . . . . . . . . . . . . . . 30
3.6.2.4 Canada ICES-003 . . . . . . . . . . . . . . . . . . . . . . . . . . . . . . . . . . . . . . . . . . . . . . . . . . . . . . . . . . . . . . . . . . . . . . . . . . . . . . . . . . . . . . . . . . . . . . . . . . . . . 30
3.6.2.5 South Korean KC Certification Mark . . . . . . . . . . . . . . . . . . . . . . . . . . . . . . . . . . . . . . . . . . . . . . . . . . . . . . . . . . . . . . . . . . . . . . . . . . . . . . . . . . . 30
3.6.2.6 Morocco Commodity Mark . . . . . . . . . . . . . . . . . . . . . . . . . . . . . . . . . . . . . . . . . . . . . . . . . . . . . . . . . . . . . . . . . . . . . . . . . . . . . . . . . . . . . . . . . . . . 30
3.6.2.7 Taiwanese BSMI . . . . . . . . . . . . . . . . . . . . . . . . . . . . . . . . . . . . . . . . . . . . . . . . . . . . . . . . . . . . . . . . . . . . . . . . . . . . . . . . . . . . . . . . . . . . . . . . . . . . . . 30
3.6.2.8 FCC verification . . . . . . . . . . . . . . . . . . . . . . . . . . . . . . . . . . . . . . . . . . . . . . . . . . . . . . . . . . . . . . . . . . . . . . . . . . . . . . . . . . . . . . . . . . . . . . . . . . . . . . . 30
Seagate Nytro WarpDrive and Nytro XP6000, Rev. 1.12 3

3.6.2.9 Japan VCCI . . . . . . . . . . . . . . . . . . . . . . . . . . . . . . . . . . . . . . . . . . . . . . . . . . . . . . . . . . . . . . . . . . . . . . . . . . . . . . . . . . . . . . . . . . . . . . . . . . . . . . . . . . . 31
3.6.3 Environmental protection . . . . . . . . . . . . . . . . . . . . . . . . . . . . . . . . . . . . . . . . . . . . . . . . . . . . . . . . . . . . . . . . . . . . . . . . . . . . . . . . . . . . . . . . . . . . . . . . . . . 31
3.6.3.1 European Union Restriction of Hazardous Substance Law . . . . . . . . . . . . . . . . . . . . . . . . . . . . . . . . . . . . . . . . . . . . . . . . . . . . . . . . . . . . . . 31
3.6.3.2 China Requirements—China RoHS 2 . . . . . . . . . . . . . . . . . . . . . . . . . . . . . . . . . . . . . . . . . . . . . . . . . . . . . . . . . . . . . . . . . . . . . . . . . . . . . . . . . . 32
3.6.3.3 Taiwan Requirements—Taiwan RoHS . . . . . . . . . . . . . . . . . . . . . . . . . . . . . . . . . . . . . . . . . . . . . . . . . . . . . . . . . . . . . . . . . . . . . . . . . . . . . . . . . 33
Revision History . . . . . . . . . . . . . . . . . . . . . . . . . . . . . . . . . . . . . . . . . . . . . . . . . . . . . . . . . . . . . . . . . . . . . . . . . . . . . . . . . . . . . . . . . . . . . . . . . . . . . . . . . . . . . . 34
Seagate Nytro WarpDrive and Nytro XP6000, Rev. 1.12 4

Seagate Technology Support Services
For information regarding online support and services, visit: http://www.seagate.com/support/by-product/ssd-and-pcie-flash/
For information regarding online support and services, visit: http://www.seagate.com/contacts/
Available services include:
Presales & Technical support
Global Support Services telephone numbers & business hours
Authorized Service Centers
For information regarding Warranty Support, visit: http://www.seagate.com/support/warranty-and-replacements/
For information regarding data recovery services, visit: http://www.seagate.com/services-software/data-recovery-services/
For Seagate OEM and Distribution partner portal, visit: http://www.seagate.com/partners
Seagate Nytro WarpDrive and Nytro XP6000, Rev. 1.12 5

www.seagate.com Overview
Chapter 1: Introduction
1.1 Overview
The Seagate® Nytro® WarpDrive® Acceleration Application cards are block storage devices. The cards present
themselves to the operating system through a Fusion-MPT™ interface as single or multiple drives that require minimal
user configuration. You can use these cards for either nonpersistent (for example, cache) or persistent (for example,
database files) data.
The Nytro WarpDrive cards have Flash ROM for storing the BIOS and firmware, and NVRAM for storing nonvolatile user
data. The cards have three LEDs on the PCI bracket to indicate activity, drive life, and status. The Nytro WarpDrive cards
have a PCI Express® (PCIe®) interface that complies with the PCI Express Specification 2.0 or PCI Express Specification 3.0.
The functionality of the Nytro WarpDrive cards comes from a SAS2008 or SAS2308 I/O controller with Nytro WarpDrive
firmware that runs on the internal processor..
1.2 Related Documents
Refer to the following documents for more information on the Nytro WarpDrive card and related tools.
Seagate® Nytro® WarpDrive® and Nytro XP6000 Application Acceleration Card r112.00.51.00 Release Notes
Seagate® Nytro® WarpDrive® Application Acceleration Card Management Utility User Guide
Seagate® Nytro® WarpDrive® 6203 Application Acceleration Card Quick Installation Guide
Seagate® Nytro® XP6209 Application Acceleration Card User Guide
Seagate® Nytro® XP6209 Application Acceleration Card Quick Installation Guide
Seagate® Nytro® XP6210 Application Acceleration Card Quick Installation Guide
Seagate® Nytro® WarpDrive® 6301 Application Acceleration Card Quick Installation Guide
1.3 Features
This section lists the features of the Nytro WarpDrive and Nytro XP6000 cards.
Proven enterprise firmware stack
Best-in-class read and write performance
Average latency of less than 50 ms
Low host burden – No static CPU and memory overhead
Support for Windows®, Linux® VMware®, and FreeBSD® operating systems
Bootable
PCIe 2.0, x8 (for the Nytro WarpDrive 6203, Nytro XP6209, and Nytro XP6210 cards)
PCIe 3.0 x 8 (for the Nytro WarpDrive 6301 card)
Profile and form factor varies
PCIe standard or low-profile bracket
LEDs for data activity, drive life, and drive status
High reliability with block-level, page-level, and die-level failure protection
Seagate Nytro WarpDrive and Nytro XP6000, Rev. 1.12 6

www.seagate.com Nytro WarpDrive and Nytro XP6000 Card Characteristics Summary
1.4 Nytro WarpDrive and Nytro XP6000 Card Characteristics Summary
The Nytro WarpDrive and Nytro XP6000 cards contain Flash ROM for storing the BIOS and firmware. Three LEDs are
located on the PCI bracket to indicate activity, drive life, and status.
The following table shows the characteristics of each Nytro WarpDrive and Nytro XP6000 card model.
Table 1 Nytro WarpDrive Card and Nytro XP6000 Characteristics Summary
Device Name Model Name Capacity Connector
Nytro WarpDrive 6203 NWD-WLP4-200 200 GB X8 PCIe 2.0 SF2582 SLC
Nytro WarpDrive 6203 NWD-WLP4-400 400 GB X8 PCIe 2.0 SF2582 SLC HHHL SAS2008
Nytro WarpDrive 6203 NWD-BLP4-400 400 GB X8 PCIe 2.0 SF2582 MLC
Nytro WarpDrive 6203 NWD-BLP4-800 800 GB X8 PCIe 2.0 SF2582 MLC HHHL SAS2008
Nytro WarpDrive 6203 NWD-BLP4-1600 1600 GB X8 PCIe 2.0 SF2582 MLC HHHL SAS2008
Nytro XP6209 XP6209-4A1024 930 GB X8 PCIe 2.0 SF2582 MLC HHHL SAS2008
Nytro XP6209 XP6209-4B2048 1796 GB X8 PCIe 2.0 SF2582 MLC HHHL SAS2008
Nytro XP6210 XP6210-4A2048 1860 GB X8 PCIe 2.0 SF 2582 MLC Full Height Half
Nytro XP6210 XP6210-4B2048 1860 GB X8 PCIe 2.0 SF 2582 MLC FHHL SAS2008
Nytro WarpDrive 6301 NWD-BFH6-1200 1200 GB X8 PCIe 3.0 SF2582 MLC FHHL SAS2308
Nytro WarpDrive 6301 NWD-BFH8-1600 1600 GB X8 PCIe 3.0 SF2582 MLC FHHL SAS2308
Nytro WarpDrive 6301 NWD-BFH8-3200 3200 GB X8 PCIe 3.0 SF2582 MLC FHHL SAS2308
Flash
Controller
NAND Type Card Style Controller
(single-level
cell)
(multi-level
cell)
HHHL
(Half-Height
Half-Length)
HHHL SAS2008
Length (FHHL)
SAS2008
SAS2008
Seagate Nytro WarpDrive and Nytro XP6000, Rev. 1.12 7

www.seagate.com Quick Installation Instructions
Chapter 2: Installation
2.1 Quick Installation Instructions
You can use the quick installation instructions to install your Nytro WarpDrive card, or you can see the next section if
you need more detailed installation instructions.
To quickly install your Nytro WarpDrive card, follow these instructions.
1. Unpack the Nytro WarpDrive card and inspect it for damage.
2. Turn off the server, and remove the power cord.
3. Remove the cover from the server.
4. Insert the card in an available PCIe slot.
5. Secure the bracket to the system’s chassis.
6. Replace the cover and the power cord, then turn on the server.
The Nytro WarpDrive card hardware installation is complete.
2.2 Hardware Installation Instructions
2.2.1 Card Retention, Shipping, and the PCIe Specification
The PCIe specification requires that add-in cards with a mass of greater than 350 grams must have additional card
retention at the server level. Neither the connector nor the optional hockey stick feature described in the PCIe
specification provides the required retention.
Server OEMs and ODMs are solely responsible for choosing and qualifying their own server and rack shipping
solution. Seagate does not qualify the server and rack shipping solution and is not responsible for such solution or any
impact to Seagate products.
Seagate will make available mechanical design collateral for its products, which may be used by server OEMs and
ODMs to design retention features for their server products. Seagate information is provided AS IS only and Seagate
does not certify any design retention features used by OEMs and ODMs.
Seagate does not perform server and rack shock and vibration testing of OEM and ODM products. OEMs and ODMs
are solely responsible for any server and rack shock and vibration testing.
2.2.2 Hardware Installation for the Nytro WarpDrive 6203, Nytro XP6209, Nytro XP6210 Cards
1. Unpack the Nytro WarpDrive card and inspect it for damage. Unpack the card in a static-free environment and
follow good antistatic grounding procedures. Remove the Nytro WarpDrive card from the antistatic bag, and
carefully inspect it for damage. If you notice any damage, contact Seagate, or your reseller support representative.
NOTE Back up your data before changing your system configuration.
2. Prepare the computer. Turn off the server, and disconnect the power cords from the power supply. Remove the
cover from the chassis.
WAR NIN G To avoid electrical shock, disconnect the server from the main power
Seagate Nytro WarpDrive and Nytro XP6000, Rev. 1.12 8
and from any networks before you install the card.
www.seagate.com Hardware Installation Instructions
3_00200-00
64-bit Slot
(3.3 V Only)
32-bit Slot
(3.3 V Only)
Press
Here
Press
Here
Bracket
Screw
Edge of
Host Board
PCI Express x8 Slot
3. Replace the PCI mounting bracket (system dependent). If required for your system, replace the shorter PCI
mounting bracket that ships on the Nytro WarpDrive card with the full-height bracket supplied. Save the two
screws from the short bracket and use the screws to attach the full-height bracket.
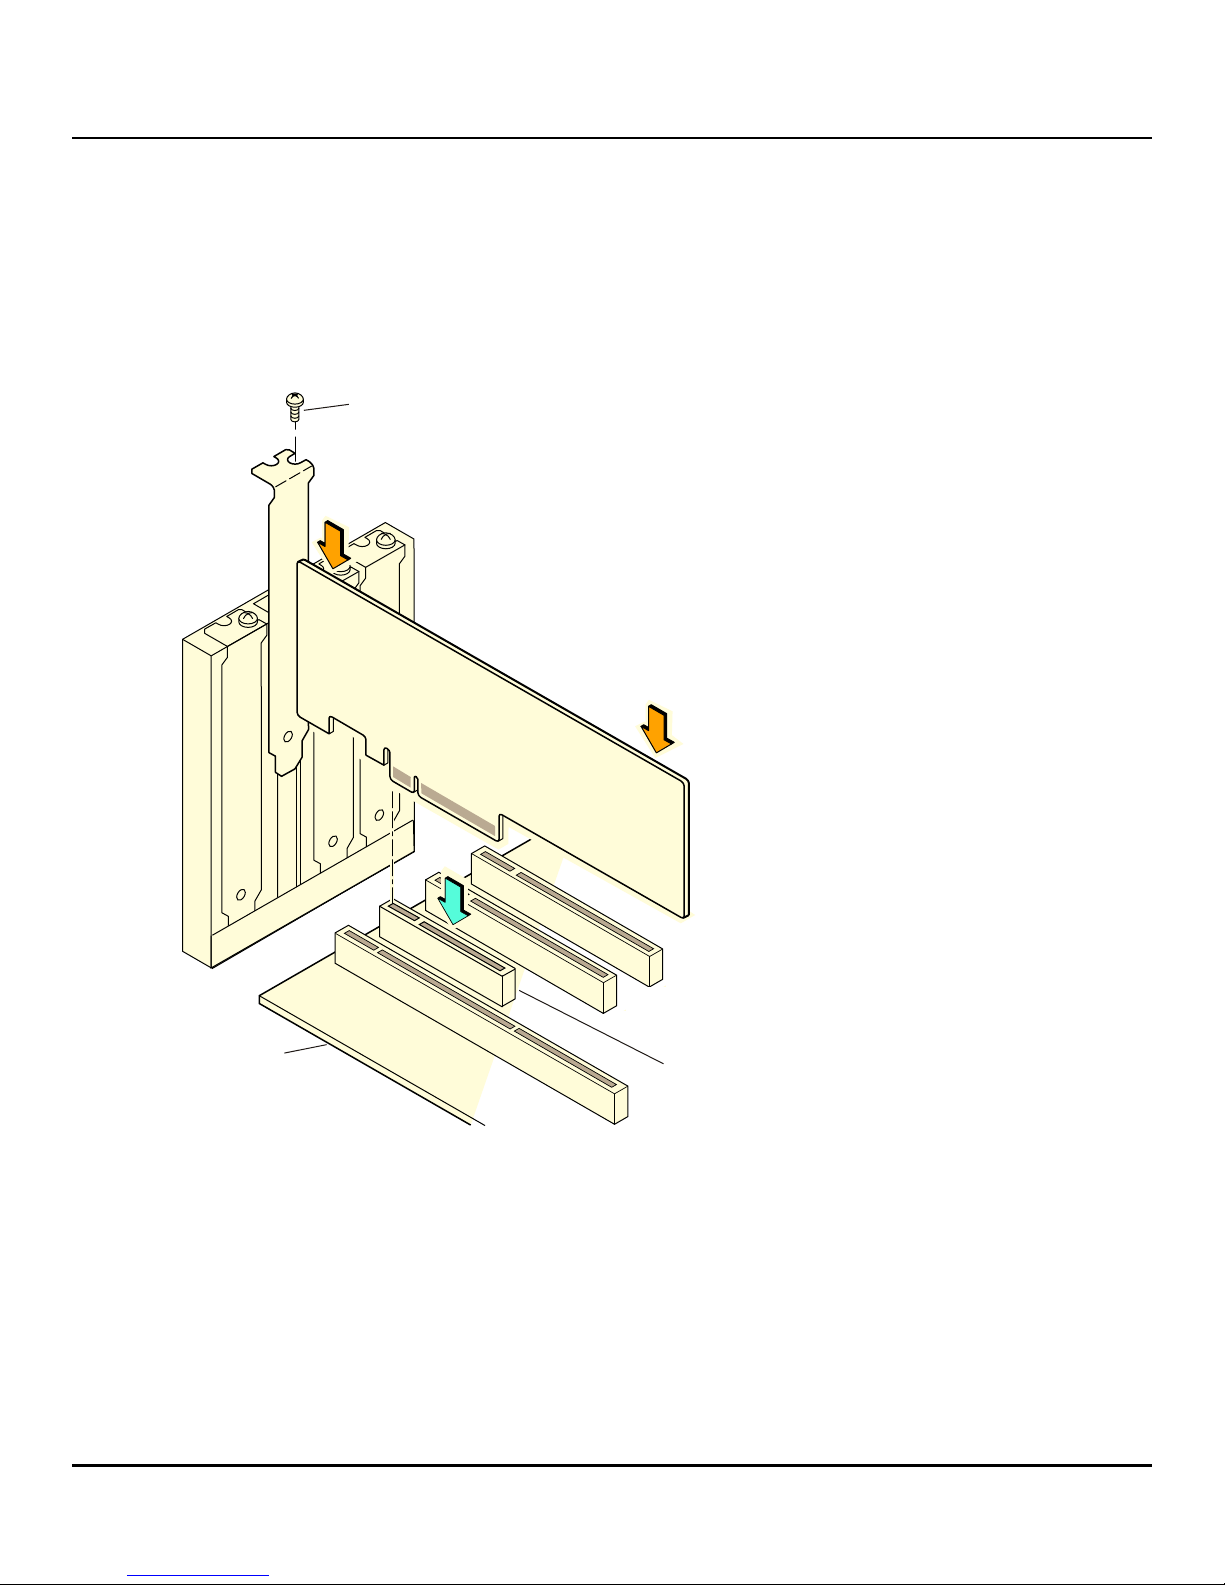
4. Insert the Nytro WarpDrive card in an available PCIe slot. Locate an empty PCIe slot. Remove the blank
bracket panel on the server chassis that aligns with the empty PCIe slot. Save the bracket screw, if applicable.
Align the card to the PCIe slot. Press down gently, but firmly, to properly seat the card in the slot. The following
figure shows how to insert the card in a PCIe slot.
Figure 1 Card Installation for the Nytro WarpDrive 6203, Nytro XP6209, and the Nytro XP6210 Cards
NOTE The shape, size, and locations of components on your Nytro WarpDrive
card might vary from this illustration.
5. For highest performance, make sure that the PCIe slot is PCIe 2.0 and make sure that it has an active width of
dedicated eight lanes. The Nytro WarpDrive card functions with an active width of four lanes or two lanes, but
with reduced performance.
CAUTION The location must meet the 300 LFM (linear feet/minute) minimum
airflow requirement.
6. Secure the bracket to the system’s chassis. Install the bracket screw, if applicable, or engage the system
retention mechanism to secure the card to the system’s chassis.
Seagate Nytro WarpDrive and Nytro XP6000, Rev. 1.12 9

www.seagate.com Hardware Installation Instructions
B
3UHVV
+HUH
(GJHRI
+RVW%RDUG
%UDFNHW
6FUHZ
3UHVV
+HUH
ELW6ORW
92QO\
ELW6ORW
92QO\
3&,([SUHVV[6ORW
$X[LOLDU\
&DEOH
7. Replace the cover, reconnect the power cords, and power up the system. Replace the server’s cover,
reconnect the power cords, and reconnect any network cables. Turn on the power.
The Nytro WarpDrive card hardware installation is complete.
2.2.3 Hardware Installation for the Nytro WarpDrive 6301 Card
1. Unpack the Nytro WarpDrive card and inspect it for damage. Unpack the card in a static-free environment and
follow good antistatic grounding procedures. Remove the Nytro WarpDrive card from the antistatic bag, and
carefully inspect it for damage. If you notice any damage, contact Seagate, or your reseller support representative.
NOTE Back up your data before changing your system configuration.
2. Prepare the computer. Turn off the server, and disconnect the power cords from the power supply. Remove the
cover from the chassis.
WAR NIN G To avoid electrical shock, disconnect the server from the main power
and from any networks before you install the card.
3. Insert the Nytro WarpDrive card in an available PCIe slot. Locate an empty PCIe slot. Remove the blank
bracket panel on the server chassis that aligns with the empty PCIe slot. Save the bracket screw, if applicable.
Align the card to the PCIe slot. Press down gently, but firmly, to properly seat the card in the slot. The following
figure shows how to insert the card in a PCIe slot.
NOTE Make sure that the PCIe slot is capable of providing 75 W of power.
Otherwise, install the auxiliary power cable shown in the
following figure. The auxiliary power cable connects to an auxiliary
power supply.
Figure 2 Card Installation for the Nytro WarpDrive 6301 Card
Seagate Nytro WarpDrive and Nytro XP6000, Rev. 1.12 10

www.seagate.com Software Installation Instructions
NOTE The shape, size, and locations of components on your Nytro WarpDrive
card might vary from this illustration.
4. For highest performance, make sure that the PCIe slot is PCIe 3.0 and make sure that it has an active width of eight
lanes or sixteen lanes. The Nytro WarpDrive card functions with an active width of four lanes or two lanes, but
with reduced performance.
CAUTION The location must meet the 300 LFM (linear feet/minute) minimum
airflow requirement.
5. Secure the bracket to the system’s chassis. Install the bracket screw, if applicable, or engage the system
retention mechanism to secure the card to the system’s chassis.
6. Replace the cover, reconnect the power cords, and power up the system. Replace the server’s cover,
reconnect the power cords, and reconnect any network cables. Turn on the power.
The Nytro WarpDrive card hardware installation is complete.
NOTE For all server types, do not ship the 6301 card installed or mounted
inside a server. Ship the card separately and install the card into the
server at its final destination. This prevents potential damage during
shipment. If the card is shipped installed in a server and is damaged
during shipment, the applicable warranty is void.
2.3 Software Installation Instructions
2.3.1 Windows Driver Installation
Download the latest Windows Server® 2012 R2 drivers from the Seagate website. To install the appropriate device
driver, follow these steps:
1. Go to this website:
https://www.seagate.com/support/solid-state-flash-storage/accelerator-cards/nytro-warpdrive-accelerator-card/
downloads/
2. Click the driver you need.
3. Open the Windows Driver Configuration Utility file and follow the instructions to install the driver.
2.3.2 Linux Driver Installation
Seagate provides open source drivers in the following ways:
Precompiled binaries to add to an existing installation using driver update disks or RPMs for
selected distributions.
Fusion-MPT™ source to add or update any distribution.
Download the latest Linux® drivers from the Seagate website. To install the appropriate device driver, follow these
steps:
1. Go to this website:
https://www.seagate.com/support/solid-state-flash-storage/accelerator-cards/nytro-warpdrive-accelerator-card/
downloads/
2. Click the driver you need.
3. Download the driver files and install the RPM files.
Seagate Nytro WarpDrive and Nytro XP6000, Rev. 1.12 11
 Loading...