

Page 1

GoFlex Cinema™ Multimedia Drive
User Guide
Page 2

GoFlex Cinema™ Multimedia Drive User Guide
© 2011 Seagate Technology LLC. All rights reserved. Seagate, Seagate Technology, the Wave
logo, GoFlex, GoFlex Cinema, and FreeAgent are trademarks or registered trademarks of Seagate
Technology LLC, or one of its affiliates. All other trademarks or registered trademarks are the
property of their respective owners. When referring to hard drive capacity, one gigabyte, or GB,
equals one billion bytes and one terabyte, or TB, equals one thousand billion bytes when referring to
hard drive capacity. In addition, some of the listed capacity is used for formatting and other
functions, and thus will not be available for data storage. Quantitative usage examples for various
applications are for illustrative purposes. Actual quantities will vary based on various factors
including file size, file format, features, and application software. Seagate reserves the right to
change, without notice, product offerings or specifications.
Manufactured under license from Dolby Laboratories. Dolby and the double-D symbol are registered
trademarks of Dolby Laboratories.
HDMI, the HDMI Logo and High-Definition Multimedia Interface are trademarks or registered
trademarks of HDMI Licensing LLC.
Seagate Technology LLC
10200 S. De Anza Blvd.
Cupertino, CA 95014
USA
Page 3

Contents
About the Seagate GoFlex Cinema™ Multimedia Drive . . . . . . . . . . . 6
GoFlex Cinema Multimedia Drive Features . . . . . . . . . . . . . . . . . . . . . . . . . . 6
What You Can Do With the GoFlex Cinema™ Multimedia Drive . . . . . . . . . 7
What’s in the Box? . . . . . . . . . . . . . . . . . . . . . . . . . . . . . . . . . . . . . . . . . . . . . 8
What Else You’ll Need . . . . . . . . . . . . . . . . . . . . . . . . . . . . . . . . . . . . . . . . . . 8
Getting Started . . . . . . . . . . . . . . . . . . . . . . . . . . . . . . . . . . . . . . . . . . . . 9
Copying Files onto the GoFlex Cinema™ Multimedia Drive . . . . . . . . . . . . . 9
Powering On . . . . . . . . . . . . . . . . . . . . . . . . . . . . . . . . . . . . . . . . . . . . . . . . 10
Connecting External USB Devices . . . . . . . . . . . . . . . . . . . . . . . . . . . . . . . 11
Navigating GoFlex Cinema™ Screens and Menus . . . . . . . . . . . . . . . . . . . 12
Next Steps . . . . . . . . . . . . . . . . . . . . . . . . . . . . . . . . . . . . . . . . . . . . . . . . . . 17
Powering Off . . . . . . . . . . . . . . . . . . . . . . . . . . . . . . . . . . . . . . . . . . . . . . . . 18
Finding More Help . . . . . . . . . . . . . . . . . . . . . . . . . . . . . . . . . . . . . . . . . . . . 18
Managing Files on the GoFlex Cinema™ Multimedia Drive . . . . . . . 19
Finding the Files You’re Looking For . . . . . . . . . . . . . . . . . . . . . . . . . . . . . . 19
Moving or Copying Files with the GoFlex Cinema™ Multimedia Drive . . . . 20
Suspending and Restarting a File Transfer . . . . . . . . . . . . . . . . . . . . . . . . . 21
Re-indexing Files on the GoFlex Cinema™ Multimedia Drive . . . . . . . . . . 22
Avoiding Duplicate Files on the Multimedia Drive . . . . . . . . . . . . . . . . . . . . 22
Deleting Files from the Multimedia Drive . . . . . . . . . . . . . . . . . . . . . . . . . . . 23
Watching Videos . . . . . . . . . . . . . . . . . . . . . . . . . . . . . . . . . . . . . . . . . . 24
Before You Begin . . . . . . . . . . . . . . . . . . . . . . . . . . . . . . . . . . . . . . . . . . . . 24
Playing a Video . . . . . . . . . . . . . . . . . . . . . . . . . . . . . . . . . . . . . . . . . . . . . . 25
Controlling a Video’s DVD Features . . . . . . . . . . . . . . . . . . . . . . . . . . . . . . 26
Displaying Video Thumbnails on the Videos Screen . . . . . . . . . . . . . . . . . . 27
Playing a Personal Video from a Digital Camcorder . . . . . . . . . . . . . . . . . . 27
Listening to Music . . . . . . . . . . . . . . . . . . . . . . . . . . . . . . . . . . . . . . . . . 28
GoFlex Cinema™ Multimedia Drive User Guide 3
Page 4

Before You Begin . . . . . . . . . . . . . . . . . . . . . . . . . . . . . . . . . . . . . . . . . . . . 28
Playing Music . . . . . . . . . . . . . . . . . . . . . . . . . . . . . . . . . . . . . . . . . . . . . . . 29
Setting Up Continuous Play and Shuffling . . . . . . . . . . . . . . . . . . . . . . . . . . 29
Displaying Album Art on the Music Screen . . . . . . . . . . . . . . . . . . . . . . . . . 30
Viewing Photos . . . . . . . . . . . . . . . . . . . . . . . . . . . . . . . . . . . . . . . . . . . 31
Before You Begin . . . . . . . . . . . . . . . . . . . . . . . . . . . . . . . . . . . . . . . . . . . . 31
Viewing Your Photos . . . . . . . . . . . . . . . . . . . . . . . . . . . . . . . . . . . . . . . . . . 31
Viewing Photos in a Slideshow . . . . . . . . . . . . . . . . . . . . . . . . . . . . . . . . . . 32
Viewing Photos from a Digital Camera . . . . . . . . . . . . . . . . . . . . . . . . . . . . 33
Managing the GoFlex Cinema™ Multimedia Drive . . . . . . . . . . . . . . . 34
Understanding the Multimedia Drive’s LEDs . . . . . . . . . . . . . . . . . . . . . . . . 34
Disconnecting a USB Drive, Camera, or Camcorder . . . . . . . . . . . . . . . . . 35
Disconnecting the GoFlex Cinema™ Drive from the GoFlex Cinema Dock 35
Disconnecting the Multimedia Drive from Your TV . . . . . . . . . . . . . . . . . . . 36
Disconnecting the Multimedia Drive from Your Computer . . . . . . . . . . . . . . 36
Updating the GoFlex Cinema™ Multimedia Drive Firmware . . . . . . . . . . . . 37
Adding More Storage Capacity to the GoFlex Cinema™ Multimedia Drive 38
Rebooting the Multimedia Drive . . . . . . . . . . . . . . . . . . . . . . . . . . . . . . . . . 38
Returning the Multimedia Drive to Its Factory Default Settings . . . . . . . . . . 39
Customizing the GoFlex Cinema™ Multimedia Drive . . . . . . . . . . . . 41
Changing the Menu Language . . . . . . . . . . . . . . . . . . . . . . . . . . . . . . . . . . 41
Changing the Automatic USB Imports Destination . . . . . . . . . . . . . . . . . . . 42
Setting the Wait Time Before the Screen Saver Starts . . . . . . . . . . . . . . . . 42
Customizing the Video Settings . . . . . . . . . . . . . . . . . . . . . . . . . . . . . . . . . . 42
Customizing the Audio Settings . . . . . . . . . . . . . . . . . . . . . . . . . . . . . . . . . . 43
Adjusting the Wait Time Before Automatic Power-off . . . . . . . . . . . . . . . . . 45
Adjusting the Wait Time Before Indexing Begins . . . . . . . . . . . . . . . . . . . . 45
Setting the Multimedia Drive for TVs in Other Countries . . . . . . . . . . . . . . . 45
Solving Problems . . . . . . . . . . . . . . . . . . . . . . . . . . . . . . . . . . . . . . . . . 47
General Troubleshooting Tips . . . . . . . . . . . . . . . . . . . . . . . . . . . . . . . . . . . 47
GoFlex Cinema™ Multimedia Drive User Guide 4
Page 5

Common Problems and Solutions . . . . . . . . . . . . . . . . . . . . . . . . . . . . . . . . 47
Recovering After a Firmware Update Failure . . . . . . . . . . . . . . . . . . . . . . . 51
Manually Returning the Multimedia Drive to its Factory Default Settings . . 52
Finding More Help . . . . . . . . . . . . . . . . . . . . . . . . . . . . . . . . . . . . . . . . . . . . 52
Index . . . . . . . . . . . . . . . . . . . . . . . . . . . . . . . . . . . . . . . . . . . . . . . . . . . . 53
GoFlex Cinema™ Multimedia Drive User Guide 5
Page 6
GoFlex Cinema Multimedia Drive Features
1. About the Seagate GoFlex
Cinema
This User Guide is for the Seagate GoFlex Cinema multimedia drive.
This chapter describes:
• The features of the GoFlex Cinema multimedia drive (see next section).
• What you can do with the GoFlex Cinema multimedia drive (see page 7).
• What’s included with the GoFlex Cinema multimedia drive (see page 8).
• What else you need (see page 8).
™
Multimedia Drive
GoFlex Cinema Multimedia Drive Features
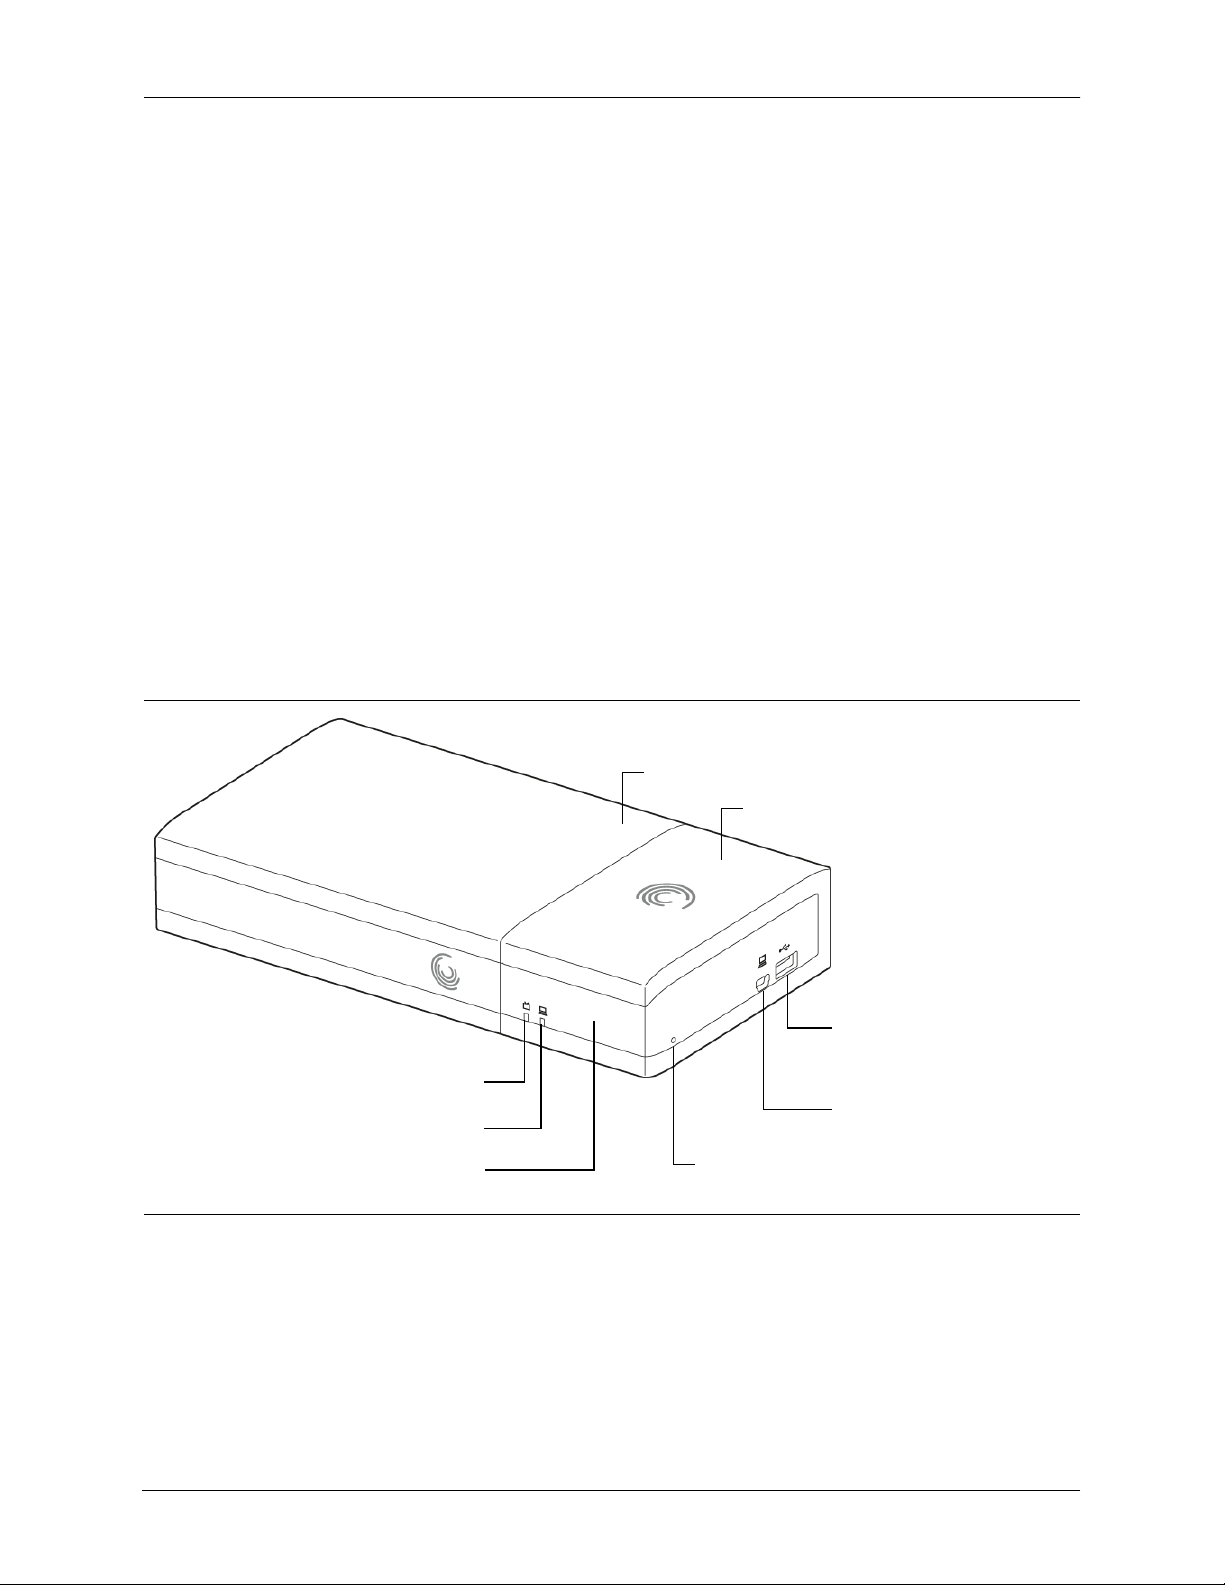
First, familiarize yourself with the features of your new GoFlex Cinema multimedia drive.
GoFlex Cinema drive connected to...
...GoFlex Cinema dock
USB: Connect to USB Device
Drive LED
Connection LED
Remote Signal Receiver
Figure 1: GoFlex Cinema Multimedia Drive—Front View
For more information about these features, see:
• “Understanding the Multimedia Drive’s LEDs” on page 34.
• “Connecting External USB Devices” on page 11.
• “Returning the Multimedia Drive to Its Factory Default Settings” on page 39.
GoFlex Cinema™ Multimedia Drive User Guide 6
Factory Default Button
USB: Connect to Computer
Page 7
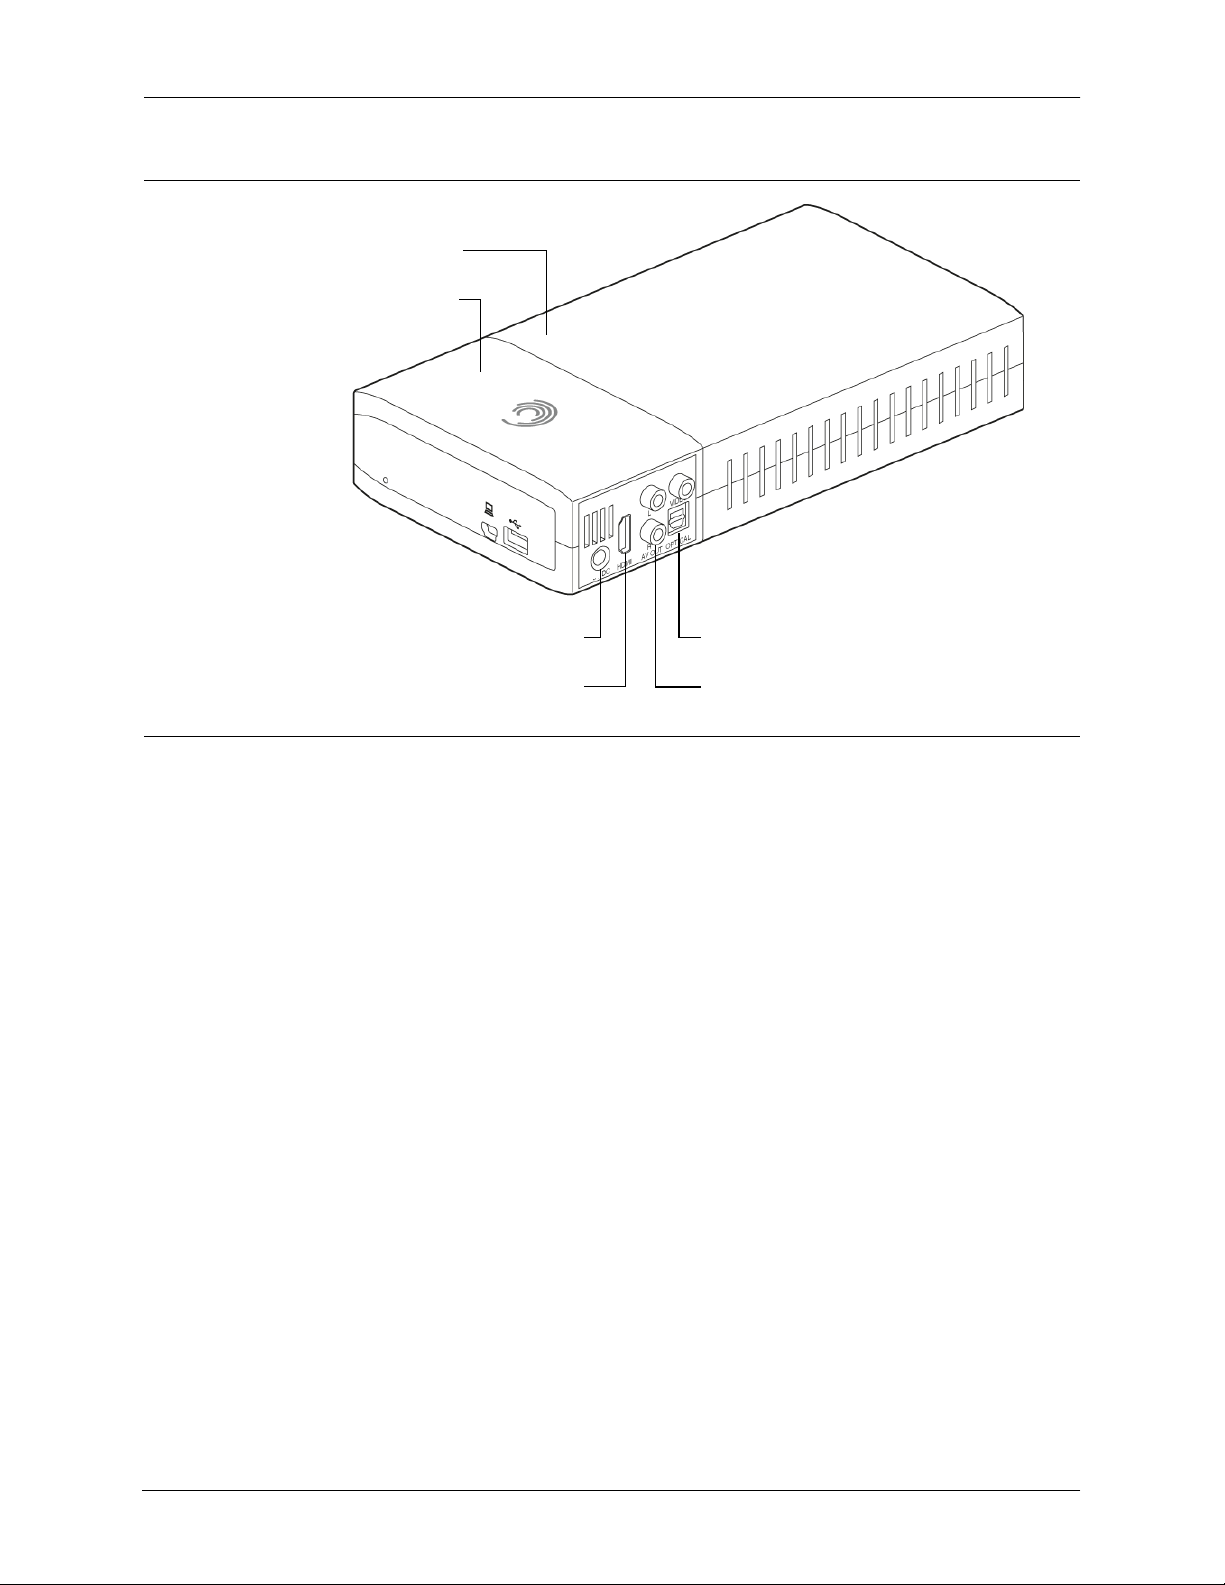
GoFlex Cinema drive connected to...
...GoFlex Cinema dock
What You Can Do With the GoFlex Cinema™ Multimedia Drive
Power Port
Figure 2: GoFlex Cinema Multimedia Drive—Rear View
Caution: To avoid overheating the multimedia drive, do not place anything on top of it (such as
a cable box or USB device). Always place the multimedia drive on a flat surface, never
on top of any other electronic device.
Optical Audio Port
Composite Ports (3)HDMI Port
What You Can Do With the GoFlex Cinema™
Multimedia Drive
With the GoFlex Cinema multimedia drive, you can:
• Enjoy your digital videos, photos, and music files on your TV.
• Play media files stored on an external USB storage device, like a flash drive or thumb
drive.
• Enjoy your digital photos and videos straight from your camera or camcorder.
• Browse and search your media files from a single location.
GoFlex Cinema™ Multimedia Drive User Guide 7
Page 8

What’s in the Box?
What’s in the Box?
These components are included with the GoFlex Cinema™ multimedia drive:
• GoFlex Cinema multimedia drive
• Remote control with 2 AAA batteries
• AC power adapter with changeable plugs
• USB cable
• Extra rubber feet to use when adding more storage to GoFlex Cinema (see “Adding More
Storage Capacity to the GoFlex Cinema™ Multimedia Drive” on page 38)
• Quick Start Guide and Warranty
Caution: Use GoFlex Cinema with the provided power supply only.
What Else You’ll Need
In addition to the components listed in the previous section, you also need:
• Television with:
• Available HDMI connectors
• Video resolution PAL 576i/576p, 720p, 1080i/1080p, or NTSC 480i/480p
• Computer with an available USB port and running:
®
• Windows
• Mac
• Audio/video cables, such as an HDMI cable, composite cable, or optical cable
• Video, music, and/or photo files in supported formats (see page 49 for a complete list)
• (Optional) GoFlex
thumb drive) containing video, music, and/or photo files
• (Optional) Digital camera or camcorder containing photos or videos
®
XP, Windows Vista, or Windows 7 OR
OS X 10.5.6+, Mac OS X 10.5.8+, or Mac OS X 10.6.7+ or later
®
drive or other external USB storage device (such as a flash drive or
OR composite video connectors
GoFlex Cinema™ Multimedia Drive User Guide 8
Page 9

Copying Files onto the GoFlex Cinema™ Multimedia Drive
2. Getting Started
This chapter explains how to get started with the GoFlex Cinema multimedia drive. This
chapter describes:
• How to copy media files from your computer to the multimedia drive (see next section).
• What happens when you power on the GoFlex Cinema multimedia drive (see page 10).
• How to connect an external USB device (see page 11).
• How to navigate GoFlex Cinema screens and menus (see page 12).
• What your next steps are (see page 17).
• How to find more help (see page 18).
Copying Files onto the GoFlex Cinema™ Multimedia
Drive
Follow the instructions in this section to copy media files from your computer to the
multimedia drive. You can also follow these steps to reorganize or delete files on the GoFlex
Cinema multimedia drive the same way you would any other disk drive connected to your
computer.
Note: If the GoFlex Cinema multimedia drive is currently connected to your TV, disconnect it before
starting. See “Disconnecting the Multimedia Drive from Your TV” on page 36 to disconnect
safely.
1. Connect the GoFlex Cinema multimedia drive to your computer using the included USB
cable, then connect it to a power source using the power adapter with the correct plug.
Note: You can also copy files to the multimedia drive using a Seagate GoFlex® Desk dock. See
“Copying Files Using a GoFlex® Desk External Drive Dock” on page 10.
The Connection LED illuminates.
Caution: To avoid overheating the multimedia drive, do not place anything on top of it (such as
a cable box or USB device). Always place the multimedia drive on a flat surface, never
on top of any other electronic device.
2. On your computer, drag and drop your media files to the multimedia drive.
3. On your computer, safely eject the multimedia drive from your computer, following the
instructions for your operating system.
4. Disconnect the multimedia drive from your computer and the power source.
GoFlex Cinema™ Multimedia Drive User Guide 9
Page 10

Powering On
5. Connect the multimedia drive to your TV, using either an HDMI or Composite cable (not
included). If your television has an open HDMI port, this is the best way to connect your
multimedia drive.
6. Reconnect the multimedia drive to a power source.
The multimedia drive powers on automatically, and the Drive LED illuminates.
You can now start enjoying your videos, music, and photos.
Copying Files Using a GoFlex® Desk External Drive Dock
If you have a GoFlex Desk external drive, you can also copy files to the GoFlex Cinema™
multimedia drive using the GoFlex Desk dock. (You would do this instead of connecting the
multimedia drive to your computer with the USB cable.)
You can also follow these steps to reorganize or delete files on the GoFlex Cinema
multimedia drive the same way you would any other disk drive connected to your computer.
Note: If the GoFlex Cinema multimedia drive is currently connected to your TV, disconnect it before
starting. See “Disconnecting the Multimedia Drive from Your TV” on page 36 to disconnect
safely.
1. Power off the multimedia drive, then disconnect the GoFlex Cinema drive from the GoFlex
Cinema dock, following the instructions on page 35.
2. Dock the GoFlex Cinema drive in your GoFlex Desk dock.
3. On your computer, drag and drop your media files to the GoFlex Cinema drive.
4. Safely disconnect the GoFlex Cinema drive from the GoFlex Desk dock, following the
instructions that came with your GoFlex Desk external drive.
5. Reconnect the GoFlex Cinema drive to the GoFlex Cinema dock by aligning the connectors
and carefully sliding them together until they’re fully seated.
6. Connect the multimedia drive to a power source, then press Power on the remote to start
enjoying your videos, music, and photos.
Powering On
When you power on the
stops flashing and turns white when it is ready to use. (A solid amber Drive LED means that the
screen saver is on. To learn more, see “Understanding the Multimedia Drive’s LEDs” on
page 34.)
GoFlex Cinema
multimedia drive, its Drive LED flashes amber, then
On your TV, the Home screen opens and the multimedia drive automatically begins indexing
the video, photo, and music files you transferred to it. This may take a few moments,
depending on how many files are on the device; an Indexing message appears while the
index is built.
GoFlex Cinema™ Multimedia Drive User Guide 10
Page 11
Connecting External USB Devices
Note: The GoFlex Cinema multimedia drive indexes newly added media files each time it’s powered
on. If you’ve added only a few new files, indexing will happen quickly. If you’ve added a lot of
new files, indexing will take longer.
You can start browsing and enjoying your media files right away, even if the indexing process
isn’t complete yet. See the chapters on watching videos (page 24), viewing photos (page 31),
and listening to music (page 28) for help getting started.
Note: If the on-screen menus are not in your preferred language, see “Changing the Menu
Language” on page 41 for assistance.
Connecting External USB Devices
You can enjoy media files stored on a digital camera, digital camcorder, or external USB drive
®
(like a GoFlex
Cinema multimedia drive. (See the figure on page 6 for help finding the USB port.)
drive, flash drive, or thumb drive) by connecting the device to the GoFlex
Note: You can connect only one external USB device at a time to the multimedia drive. Using a USB
hub to connect multiple devices won’t work.
When you connect a USB device to the multimedia drive, the Home screen opens and the
device appears as an icon.
Caution: To avoid overheating the multimedia drive, do not place anything on top of it (such as
a cable box or USB device). Always place the multimedia drive on a flat surface, never
on top of any other electronic device.
The GoFlex Cinema multimedia drive prompts you to select either Continue or Cancel to
transfer your files. Whichever choice you make, GoFlex Cinema remembers your preference
and does not prompt you the next time you connect that particular USB device.
• Select Continue, then click OK to have the multimedia drive automatically search the
device, then copy and index the media files it finds. This may take a few moments, but
you can start browsing and enjoying your media files right away, even before indexing is
complete.
Note: The GoFlex Cinema multimedia drive does not ignore duplicate file names. See “Avoiding
Duplicate Files on the Multimedia Drive” on page 22 for more information.)
The files are placed in a new folder within the USB Imports folder, and organized as
Videos, Photos, and Music. The new folder name is based on the creation date and time
of the most recent file.
GoFlex Cinema™ Multimedia Drive User Guide 11
Page 12

Navigating GoFlex Cinema™ Screens and Menus
The folder structure looks like this:
USB Imports > [Folder named with date and time] > Videos > [Copied video files]
USB Imports > [Folder named with date and time] > Music > [Copied music files]
USB Imports > [Folder named with date and time] > Photos > [Copied photo files]
For example:
USB Imports > 2011-07-01 12:00 > Videos > OurTriptoAfrica.mpg
• Select Cancel, then click OK to transfer your files manually, using the Copy and Move
features of the multimedia drive. This way you can retain the original folder structure so
that your files appear the same way they’re organized on your USB device (for instance,
with digital videos and photos contained in the same folder).
See “Moving or Copying Files with the GoFlex Cinema™ Multimedia Drive” on page 20 for
more information.
One helpful guideline is to use automatic transfer for digital cameras and camcorders, and
manual transfer for external USB drives.
For help viewing photos and videos from your digital camera or camcorder, see “Playing a
Personal Video from a Digital Camcorder” on page 27 or “Viewing Photos from a Digital
Camera” on page 33.
Navigating GoFlex Cinema™ Screens and Menus
The GoFlex Cinema user interface (UI) is easy to navigate using the included remote control.
This section describes the main screens, how to use the remote, and how to find the screens
you’re looking for.
Note: In this User Guide, all instructions refer to the remote. For instance, “Press Menu, select
Photos, then press OK” means to press the Menu button on the remote, use the arrow
buttons to select Photos on the on-screen menu, then press the OK button.
GoFlex Cinema™ Multimedia Drive User Guide 12
Page 13

Navigating GoFlex Cinema™ Screens and Menus
The Home Screen
To go to the Home screen from any other screen, press Home on the remote.
Main screen icons
Shortcuts to recently
accessed files
Figure 3: Multimedia Drive Home Screen
Shortcuts to multimedia drive and
any connected USB device
Resume icon
(appears only when file
transfer has been suspended)
From the Home screen, you can:
• Select Videos, Photos, or Music, then press OK to view your files by category.
• Select Browse, then press OK to search and manage your files as they are stored on the
multimedia drive and any USB device connected to it.
• Select the multimedia drive icon or the icon for a connected USB device, then press OK
to browse the files on that particular device.
• Access the most recently played files by selecting their thumbnails in the Recent box,
then pressing OK.
• Select Settings, then press OK to manage your multimedia drive settings. (See
“Managing the GoFlex Cinema™ Multimedia Drive” on page 34.)
• Select the Resume icon, then press OK to restart file transfers. (See “Suspending and
Restarting a File Transfer” on page 21.)
GoFlex Cinema™ Multimedia Drive User Guide 13
Page 14
Navigating GoFlex Cinema™ Screens and Menus
The Menus
Some screens, like the Videos, Photos, Music, and Browse screens, have special menus that
open when you press Menu on the remote. The menu opens across the top of the screen,
like the example shown in Figure 4.
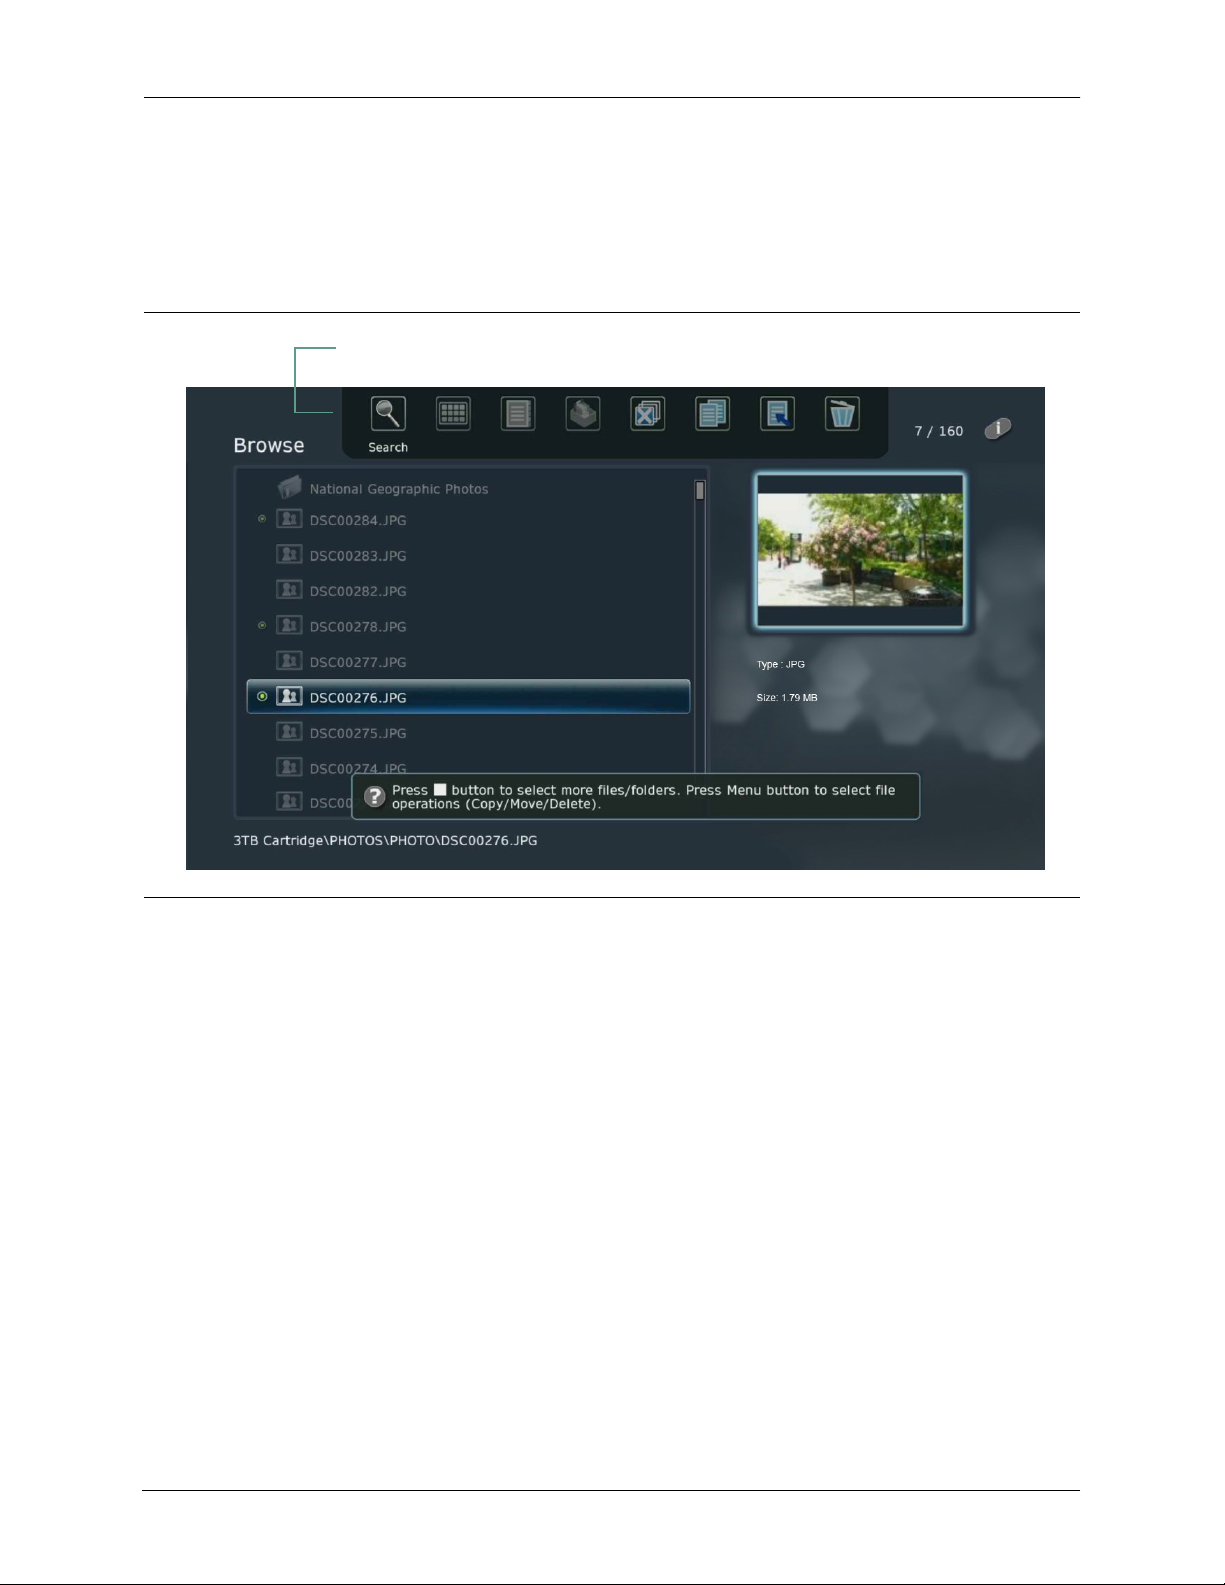
Menu for Browse Screen
Figure 4: Browse Screen with Menu Open
Different screens have different menus. For example, if you press Menu while viewing a
photo, the Photo menu opens, as shown in Figure 5 on page 15.
GoFlex Cinema™ Multimedia Drive User Guide 14
Page 15
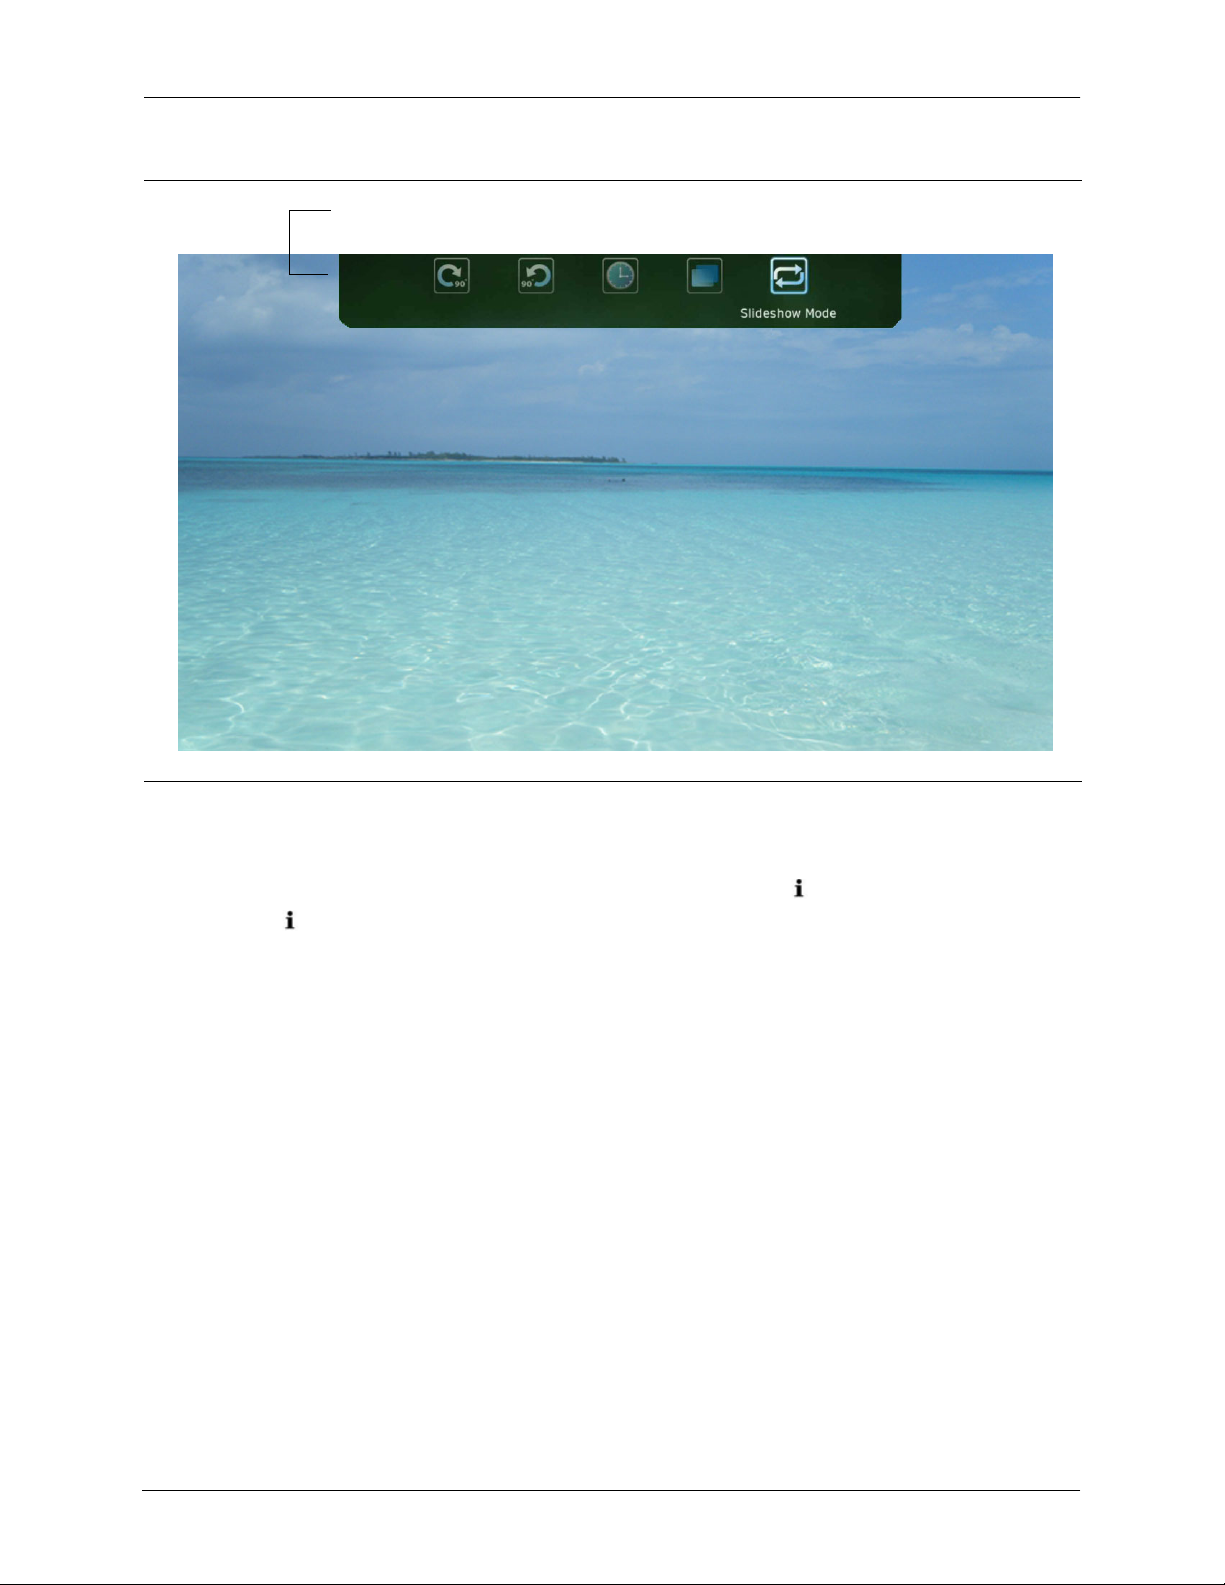
Photo Menu
Navigating GoFlex Cinema™ Screens and Menus
Figure 5: Photo Menu (Example Only)
Finding On-screen Information
Almost every GoFlex Cinema screen includes an Information icon in the top right corner.
Press the
at any time to find on-screen help for the screen you’re viewing.
GoFlex Cinema™ Multimedia Drive User Guide 15
Page 16
Navigating GoFlex Cinema™ Screens and Menus
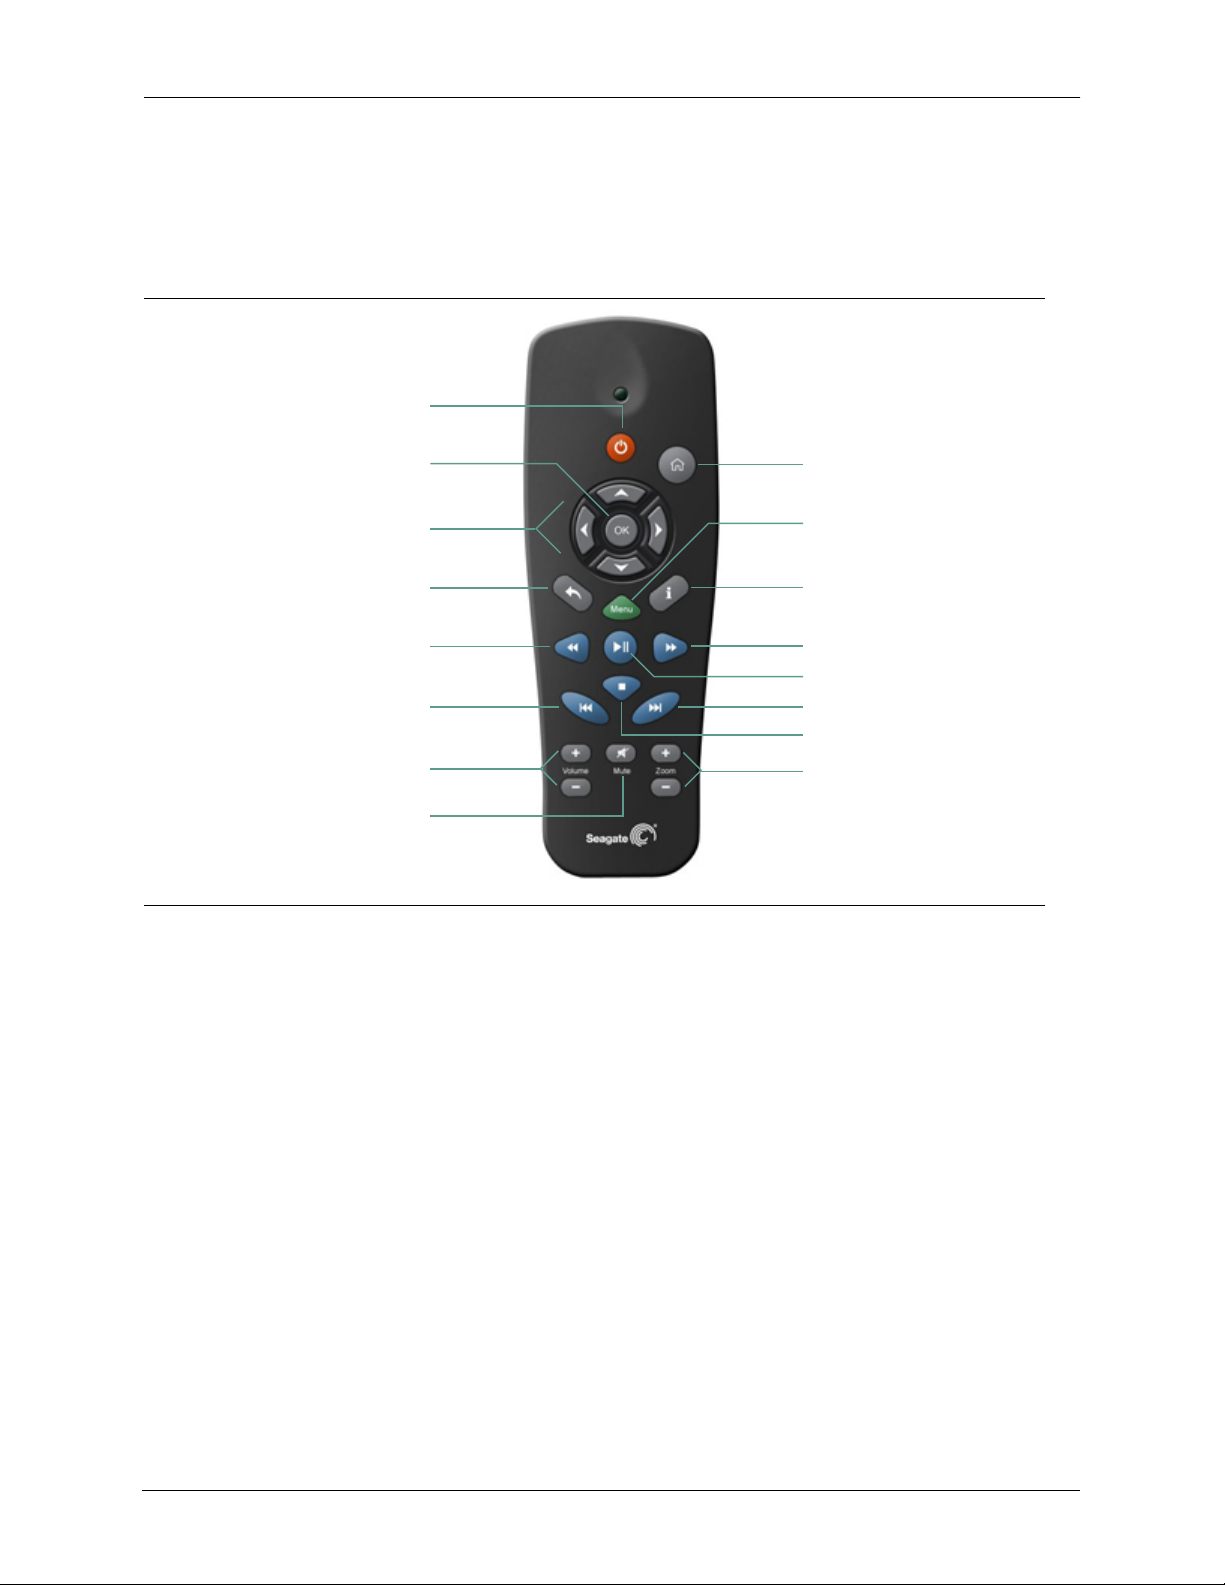
Using the Remote
The only way to navigate the GoFlex Cinema screens is with the included remote.
This section describes the functions of the remote control.
Power
OK
Arrow Buttons
Back
Reverse
Backward Skip
Volume Up and Down
Mute
Figure 6: Multimedia Drive Remote
Quick Navigation Tips
In general, navigate the GoFlex Cinema screens and menus by:
Home
Menu
Information
Fast Forward
Play / Pause
Forward Skip
Stop
Zoom In and Out
• Using the arrow buttons to move through the menus and screens.
• Pressing OK to complete a selected action or open a selected screen.
• Pressing the Stop button to select and deselect files on the Browse screen.
• Pressing Menu to display the current screen’s menu (if any), and pressing Menu again to
close it.
GoFlex Cinema™ Multimedia Drive User Guide 16
Page 17
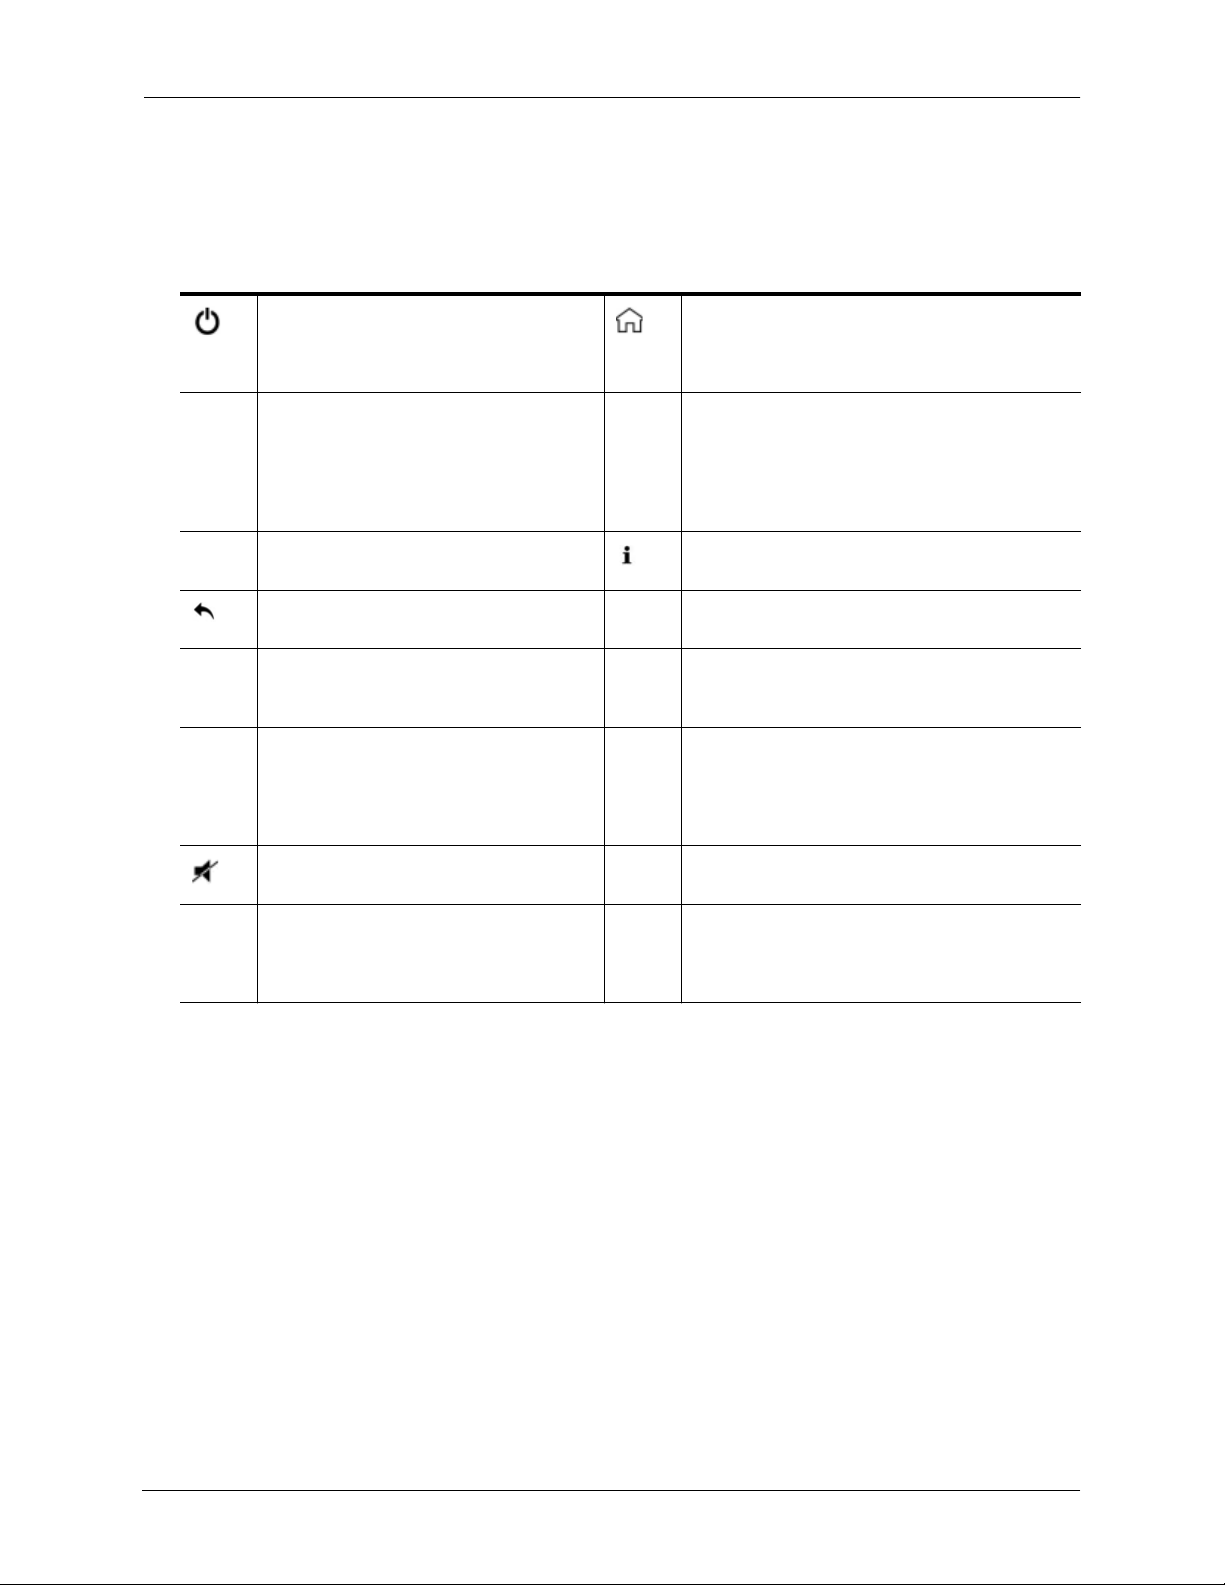
Remote Control Buttons
This section describes the basic function of each button on the remote. More information
about special button functions are described in the chapters on videos, photos, and music.
Next Steps
OK
Power—Turn the multimedia drive on
and off. Press once to optimize files then
shut down. Press twice to shut down
immediately.
Arrow Buttons—Navigate left, right, up,
and down through the menus and
screens.
When a video is playing, the right and left
arrow buttons jump the video forward
(right) or back (left) 20 minutes.
OK—Confirm a menu selection. Information—Get information about the current
Back—Move back to the previous
screen.
Reverse—Reverse the current playback.
Press repeatedly to select faster reverse
speeds.
Skip Back—Return to the previous file
when playing music or viewing photos or
to the previous chapter in a video. (See
“Jumping Ahead or Back in a Video” on
page 25 for more information.)
Mute—Press to mute the sound; press
again to unmute.
Menu Menu—Display the menu for the current
Home—Return to the Home screen from any
other screen.
screen.
Choose an action (such as Copy, Move, or
Delete) for a selected file.
screen.
Play / Pause—Play or pause a video, song, or
photo slideshow.
Fast Forward—Fast forward the current
playback. Press repeatedly to select faster
forward speeds.
Skip Forward—Go to the next file when playing
music or viewing photos or to the next chapter
in a video. (See “Jumping Ahead or Back in a
Video” on page 25 for more information.)
Stop—Stop playback. Select and deselect
menu items when in Browse mode.
Volume
+ -
Volume—Increase or decrease volume.
Zoom
+ -
Zoom—Zoom in or out when viewing photos or
videos.
Press repeatedly to select higher zoom levels.
For video playback, press to switch aspect ratio.
Next Steps
Now that the GoFlex Cinema multimedia drive is set up and you understand how to navigate
its screens and menus, it’s time to start enjoying your media files. The remainder of this User
Guide describes how to:
• Transfer, organize, and search your media files (see page 19).
• Watch videos and personal videos (see page 24).
• Look at digital photos (see page 31).
• Listen to music (see page 28).
• Managing the multimedia drive (see page 34).
• Customize the multimedia drive settings (see page 41).
GoFlex Cinema™ Multimedia Drive User Guide 17
Page 18

Powering Off
• Solve any problems you might encounter (see page 47).
Powering Off
To power off the GoFlex Cinema™ multimedia drive, press the Power button on the remote.
Finding More Help
Seagate Support provides a broad range of resources (including FAQs, a knowledge base
and a community forum) to help you solve any problem you might have while using the
GoFlex Cinema multimedia drive. Go to www.seagate.com/support, then click Support and
Downloads.
GoFlex Cinema™ Multimedia Drive User Guide 18
Page 19

Finding the Files You’re Looking For
3. Managing Files on the GoFlex Cinema™ Multimedia Drive
Once you have copied files to the multimedia drive—either by connecting it to you computer
like you did during setup or by connecting a USB device (such as a thumb drive or digital
camera) to it—you can use the multimedia drive to search for and organize your files.
Follow the instructions in this chapter to:
• Find the files you’re looking for (see the next section).
• Move and copy files on the multimedia drive (see page 20).
• Suspend and restart a file transfer to the multimedia drive (see page 21).
• Re-index the multimedia drive files (see page 22).
• Avoid copying duplicate files to the multimedia drive (see page 22).
• Delete files from the multimedia drive (see page 23).
Finding the Files You’re Looking For
You can search your media files three ways:
• By browsing through the full list of videos (see page 25), photos (see page 31), or music
(see page 29).
• By browsing through your files as they are stored on the multimedia drive and any USB
device connected to it (see page 20).
• By searching the index compiled by the multimedia drive (see the next section).
Searching for a Specific File
1. On the Home screen, select Browse, then press OK.
2. Press Menu, select Search, then press OK.
The Search screen opens.
3. Using the on-screen keyboard, enter the name of the file you’re looking for. (Select a letter
then press OK to enter it.) The full file name is not required; a partial name also works.
4. Select Done, then press OK.
The multimedia drive lists all files with matching titles. If no files appear in the list, no file
name matched the word(s) you entered.
GoFlex Cinema™ Multimedia Drive User Guide 19
Page 20

Moving or Copying Files with the GoFlex Cinema™ Multimedia Drive
Browsing for Files by Device
You can find the files you’re looking for by looking at them in their folders on the multimedia
drive and any USB device connected to it. Your files appear in folders and sub-folder, the
same way they would if you were browsing them on your computer.
To search all your files for one particular file, see “Searching for a Specific File” on page 19.
To browse your files:
1. On the Home screen, select Browse, then press OK.
The Browse screen opens.
2. Select the device you want to browse, then press OK.
3. Press Menu, select Category, select one of these options to narrow down the number of files
you have to browse, then press OK:
• Show All Media
• Show Videos
• Show Photos
• Show Music
4. Navigate through your files and folders to find what you’re looking for.
Moving or Copying Files with the GoFlex Cinema™
Multimedia Drive
To reorganize your files once they’ve been copied to the multimedia drive, you can move or
copy them one of two ways:
• By connecting the multimedia drive to your computer using the included USB cable, then
managing your files and folders the same way you would on any disk drive.
OR
• By following the instructions in this section to manage your files from the GoFlex Cinema
screens.
Note: You can also follow the instructions in this section to transfer your files manually from a USB
device to the multimedia drive (see “Connecting External USB Devices” on page 11).
To manage your files from the GoFlex Cinema screens:
1. From the Home screen, find the files you want by browsing or searching (as described in
“Finding the Files You’re Looking For” on page 19).
GoFlex Cinema™ Multimedia Drive User Guide 20
Page 21

Suspending and Restarting a File Transfer
2. Use the arrow keys to navigate to a file, then press the Stop button to select it. (Press Stop
again to deselect a file.) Continue to select files until you have all the files you want to
move or copy.
OR
Press Menu, select Select All, then press OK.
3. Press Menu, select either Copy or Move, then press OK.
• Select Copy to place a copy of the file(s) in another folder.
• Select Move to move the selected file(s) from the current folder to another folder.
4. Browse for the destination folder you want, then press Stop to select it.
5. Press Menu to copy or move the files you selected, then press OK.
The selected files are copied or moved to the destination folder. The multimedia drive
automatically begins to index the files stored on it to reflect the changes. This may take a few
moments, depending on how many files you copied or moved.
Note: It is the user’s responsibility to comply with applicable copyright laws and to respect owners’
rights in content usage.
Suspending and Restarting a File Transfer
If you are transferring a large number of files (or one large file) from a USB device to the
multimedia drive, or if you are moving or copying those files from one folder to another on the
multimedia drive, you may need to suspend the transfer—for instance, if someone else
needs to access a file on the multimedia drive.
When a file transfer is suspended, the multimedia drive remembers which files it has already
fully copied; then, when the transfer is resumed, the multimedia drive continues with the next
file. If a file was only partially copied when the transfer was paused, the multimedia drive
restarts the transfer of that file from the beginning. No partial files are left on the multimedia
drive.
While the files are being transferred, a message appears on-screen showing the status of the
transfer. To pause and restart a file transfer:
1. Select Suspend, then click OK.
The transfer is paused. The Resume icon appears on the Home screen (see Figure on
page 13). This icon only appears when a transfer has been suspended.
2. When you are ready to resume the transfer, press Home, select the Resume icon, then click
OK.
The transfer resumes.
GoFlex Cinema™ Multimedia Drive User Guide 21
Page 22

Re-indexing Files on the GoFlex Cinema™ Multimedia Drive
Re-indexing Files on the GoFlex Cinema™ Multimedia
Drive
If you’ve moved a lot of files around, you might want to re-index the multimedia drive to
ensure that all your files are easy to find and searchable.
To start indexing:
1. Press Home.
2. Select the GoFlex Cinema multimedia drive icon.
3. Press Menu, select Index, then click OK.
The multimedia drive re-indexes all of its files.
Avoiding Duplicate Files on the Multimedia Drive
As described in “Connecting External USB Devices” on page 11, you can choose to have the
multimedia drive automatically transfer and index the files stored on the connected USB
device.
However, the multimedia drive does not ignore duplicate file names. When you select
automatic transfer, the multimedia drive transfers all the video, photo, and music files stored
on the device—even if some of those files were transferred previously.
Without some care, you could unintentionally transfer the same file or set of files to the
multimedia drive multiple times. This can create a lot of confusion as you search for specific
files, and, if what you are transferring are large files (like full-length feature films), may quickly
fill up the multimedia drive’s storage capacity.
To avoid transferring multiple copies of the same files:
• Before you connect your USB device to the multimedia drive, remove any files on the
device that were copied previously. For instance, delete old photos from your digital
camera’s memory card to ensure it contains your new photos only—not your new photos
plus the 300 older photos from your last holiday.
OR
• Follow the instructions in “Moving or Copying Files with the GoFlex Cinema™ Multimedia
Drive” on page 20.
GoFlex Cinema™ Multimedia Drive User Guide 22
Page 23

Deleting Files from the Multimedia Drive
Deleting Files from the Multimedia Drive
You can delete files from the multimedia drive one of two ways:
• By connecting the multimedia drive to your computer using the included USB cable, then
deleting your files the same way you would on any disk drive.
• By following the instructions in this section to delete files from the GoFlex Cinema
screens.
Note: When you delete a file, it is permanently removed from the multimedia drive. However,
although there is no undo function, if the file is still stored on your computer or USB device,
you can recopy it to the multimedia drive at any time. Be careful not to delete any important file
if the only copy you have is on the multimedia drive.
To delete files from the multimedia drive:
1. From the Home screen, find the files you want by browsing or searching (as described in
“Finding the Files You’re Looking For” on page 19).
2. Select a file, then press the Stop button to select it. (Press Stop again to deselect a file.)
Continue to select files until you have all the files you want to delete.
OR
Press Menu, select Select All, then press OK.
Caution: Be sure you are not deleting the only copy of an important file.
3. Press Menu, select Delete, then press OK.
You are prompted to confirm the deletion.
4. Select OK, then press OK.
The selected files are deleted. The multimedia drive automatically begins to index the files
stored on it to reflect the changes. This may take a few moments, depending on how many
files you deleted.
GoFlex Cinema™ Multimedia Drive User Guide 23
Page 24

Before You Begin
4. Watching Videos
This chapter explains how to find and play your digital videos from the GoFlex Cinema™
multimedia drive. Follow the instructions in this chapter to:
• Get started watching videos (see "Before You Begin" below).
• Play a video (see page 25).
• Control a video’s DVD features (see page 26).
• Display video thumbnails on the Videos screen (see page 27).
• Play a personal video from a digital camcorder (see page 27).
Before You Begin
You can use the multimedia drive to watch digital videos and DVD files in supported formats
stored on:
• The GoFlex Cinema multimedia drive
• An external USB drive connected to the multimedia drive’s USB port
• A digital camera or camcorder connected to the multimedia drive’s USB port
Supported Video Formats
The multimedia drive supports videos in these formats:
.3G2 (.3GPP2) .FLV .MOD .VOB
.3GP (.3GPP) H.264 .MOV
.ASF .ISO .M4V .MP4 .TP
.AVI .MKV .MPEG .TRP
.DAT .M2TS .MPG .TS
Note: The GoFlex Cinema multimedia drive does not support DTS® audio. If a video you want to
watch has DTS audio, you need an external DTS audio decoder.
For a list of supported file extensions and codecs (compressor/decompressor technologies,
such as MPEG), see “Supported video file formats:” on page 50.
GoFlex Cinema™ Multimedia Drive User Guide 24
Page 25

Playing a Video
Supported Video Subtitle Formats
The multimedia drive supports subtitles in these formats:
.ASS .SAMI .SSA .SUB .SRT
If a video has subtitles, make them viewable by ensuring that the video file and subtitle file
have identical names. Also, ensure that the video file and subtitle file are stored in the same
folder.
Playing a Video
1. On the Home screen, select Videos, then press OK.
The Videos screen opens. The Videos screen lists all the videos discovered on the multimedia
drive and any USB device connected to it.
Note: You can also find videos by browsing the multimedia drive and any connected USB device, or
by doing a search. See “Finding the Files You’re Looking For” on page 19 for more
information.
2. Use the arrow buttons to scroll through the list, or press Menu to quickly sort the video files to
suit your needs:
• Select View Mode, select Show Thumbnails or Show List, then press OK to change
your view of the videos.
• Select Sort, select a new order, then press OK to reorganize the video list.
• You can also choose to view DVD files only by selecting Show DVDs, then pressing OK.
TIP: See “Finding the Files You’re Looking For” on page 19 for more ways to find a
particular video.
3. Select the video you want, then press Play/Pause
The video begins.
TIP: While a video is playing, press Information
bar. Press
4. Use the remote to control playback just as you would on a DVD player. (See “Using the
Remote” on page 16 for more information.)
again to hide the information.
() to start the video.
to display the video title and progress
Jumping Ahead or Back in a Video
To jump a playing video ahead in 20-minute increments, press the right arrow button. To move
the video backwards in 20-minute increments, press the left arrow button.
GoFlex Cinema™ Multimedia Drive User Guide 25
Page 26

Controlling a Video’s DVD Features
Controlling a Video’s DVD Features
If you are watching a DVD file, you can turn the video’s subtitles on and off or listen to the
video’s dialog in another language, if those features are available.
Note: You can’t access digitized Blu-Ray video menus from the multimedia drive.
Viewing Subtitles
To turn on a video’s subtitles:
1. While watching a DVD file, press Menu.
The video pauses and the Videos menu opens.
2. Select Subtitle....
3. Select the language you want, then press OK.
To turn off a video’s subtitles, repeat steps 1 and 2, select Off, then press OK.
Listening to the Video in Another Language
To select a different language for the video dialog:
1. While watching a DVD file, press Menu.
The video pauses and the Videos menu opens.
2. Select Audio....
3. Select the language you want, then press OK.
GoFlex Cinema™ Multimedia Drive User Guide 26
Page 27

Displaying Video Thumbnails on the Videos Screen
Displaying Video Thumbnails on the Videos Screen
The multimedia drive will use artwork provided on your DVD or Blu-Ray disc in thumbnail
view on the Videos screen if the image is in the proper place. If no artwork is available, the
first frame of the on-screen preview is used instead.
To display video artwork in thumbnail view:
1. On your computer, find the artwork you want.
Drag the image into the folder that contains the matching DVD or Blu-Ray video. In the
video’s folder, put the image in the same folder as the Audio_TS and Video_TS sub-folders.
2. Drag that video folder onto an external USB device and connect it to the multimedia drive,
then transfer the folder from the USB device to the multimedia drive. (See “Connecting
External USB Devices” on page 11 for more information.)
3. Navigate to the Videos screen (see “Playing a Video” on page 25).
The artwork appears in thumbnail view on the Videos screen.
Playing a Personal Video from a Digital Camcorder
If you have a digital camcorder (or camera), you may be able to view your personal videos by
connecting your camera to the multimedia drive.
To view a personal video:
1. Connect your camcorder to the multimedia drive using your camera’s USB cable.
2. Power on your camcorder.
The camcorder appears as an icon on the Home screen, and you are prompted to start an
automatic or manual file transfer. See “Connecting External USB Devices” on page 11 for
more information. (If your camcorder doesn’t appear in the list of devices, it’s incompatible for
use with the multimedia drive.)
3. Once your files have been transferred, on the Home screen, select your camcorder, then
press OK.
4. Navigate to the video you want to watch, then press Play/Pause
video. (If a file on your camcorder won’t open, it’s in an incompatible format.)
() or OK to start the
GoFlex Cinema™ Multimedia Drive User Guide 27
Page 28

Before You Begin
5. Listening to Music
This chapter explains how to find and play your digital music from the GoFlex Cinema™
multimedia drive. Follow the instructions in this chapter to:
• Get started listening to music (see "Before You Begin" below).
• Play music (see page 29).
• Set up continuous play and shuffling (see page 29).
• Display album cover art on the Music screen (see page 30).
Before You Begin
You can use the multimedia drive to listen to music in supported formats stored on:
• The GoFlex Cinema multimedia drive
• An external USB drive connected to the multimedia drive’s USB port
Supported Audio File Formats
The multimedia drive supports these songs in these formats:
.AAC .M4A .MP2 .OGG
.APE .M4R .MP3 .WAV
.FLAC .MKA .MPA .WMA
Note: Some Digital Rights Management (DRM) protected content may not be supported on the
GoFlex Cinema multimedia drive.
For a list of supported file extensions and codecs (compressor/decompressor technologies,
such as MPEG), see “Supported audio file formats:” on page 49.
Supported Playlist Formats
The multimedia drive supports playlists in these formats:
.M3U .PLS .WPL (static only)
GoFlex Cinema™ Multimedia Drive User Guide 28
Page 29

Playing Music
Playing Music
1. On the Home screen, select Music, then press OK.
The Music screen opens. The Music screen lists all the music files discovered on the
multimedia drive and any USB device connected to it.
2. Use the arrow buttons to scroll through the list, or press Menu to quickly sort the music files
to suit your needs:
• Select Category, select one of the menu options, then press OK to list your music by a
category other than song title.
• Select View Mode, then select Show Thumbnails or Show List, then press OK to
change your view of the music files.
Note: The multimedia drive will use album cover art in thumbnail view if the image is stored in
the proper place. See “Displaying Album Art on the Music Screen” on page 30 for more
information.
• Select Sort, select a new order, then press OK to reorganize the music list.
TIP: See “Finding the Files You’re Looking For” on page 19 for more ways to find a
particular song.
3. Select the song you want, then press Play/Pause
4. Use the remote to control playback just as you would on a CD or digital music player. (See
“Using the Remote” on page 16 for more information.)
5. Press the Volume buttons on the remote to adjust the sound.
() or OK to start the song.
Setting Up Continuous Play and Shuffling
While music is playing, you can set the multimedia drive to play your songs in a continuous
loop, shuffle your songs into random order, or repeat the same song.
To customize playback:
1. Navigate to the music you want to hear (see “Playing Music” on page 29).
2. Press Play/Pause () or OK to start the music.
3. To customize the playback, press Menu, select Playback Mode, then press OK.
• To play the same song over and over, select Repeat One, then press OK.
• To play all the songs in the folder once, select Play All, then press OK.
• To continuously play all songs in the folder, select Continuous Play, then press OK.
• To play all the songs in a random order, select Shuffle Loop, then press OK.
GoFlex Cinema™ Multimedia Drive User Guide 29
Page 30

Displaying Album Art on the Music Screen
Displaying Album Art on the Music Screen
The multimedia drive uses the album art encoded in a music file to create a thumbnail for a
song on the Music screen. If no image can be decoded from a file, the multimedia drive will
use album art stored with the file, if the image is in the proper place.
To display album art in thumbnail view:
1. On your computer, find the album art you want.
2. Drag the image into the folder that contains the matching digital music album.
3. Drag that album folder onto an external USB device and connect it to the multimedia drive,
then transfer the files from the USB device to the multimedia drive. (See “Connecting
External USB Devices” on page 11 for more information.)
4. Navigate to the Music screen (see “Playing Music” on page 29).
The album art appears in thumbnail view on the Music screen.
GoFlex Cinema™ Multimedia Drive User Guide 30
Page 31

Before You Begin
6. Viewing Photos
This chapter explains how to find and view your digital photos on the GoFlex Cinema™
multimedia drive. Follow the instructions in this chapter to:
• Get started viewing photos (see "Before You Begin" below).
• View your photos (see "Viewing Your Photos" below).
• View your photos in a slideshow (see page 32).
• View photos from a digital camera (see page 33).
Before You Begin
You can use the multimedia drive to view digital photos in supported formats stored on:
• The GoFlex Cinema multimedia drive
• An external USB drive connected to the multimedia drive’s USB port
• A digital camera connected to the multimedia drive’s USB port
Supported Photo File Formats
.BMP .GIF .JPG/JPEG .PNG .TIFF
Viewing Your Photos
You can use the multimedia drive to view individual photos or move through a folder of photos
at your own pace.
To view photos:
1. On the Home screen, select Photos, then press OK.
The Photos screen opens. The Photos screen lists all the photo folders discovered on the
multimedia drive and any USB device connected to it.
2. Use the arrow buttons to scroll through the list, or press Menu to quickly sort the files:
• Select View Mode, select Show Thumbnails or Show List, then press OK to change
your view of the photos.
• Select Category, select Show Folders, Show All Photos, or Show Albums, then press
OK to fine-tune the photo list.
• Select Sort, select a new order, then press OK to reorganize the photo list.
TIP: See “Finding the Files You’re Looking For” on page 19 for more ways to find a
particular photo.
GoFlex Cinema™ Multimedia Drive User Guide 31
Page 32

Viewing Photos in a Slideshow
3. Select a folder, then press OK to view the photos it contains.
4. Select a photo, then press OK to view it.
5. Press the right arrow button to move to the next photo, or press the left arrow button to move
to the previous photo.
TIP: To view photos in a folder as a slideshow, see page 32.
6. If a photo is not right side up, press Menu, then select Rotate Right 90° or Rotate Left 90°.
Press OK to rotate the photo.
7. To enlarge the photo, press Zoom +, then use the arrow buttons to move the photo side to
side or up and down. Press Zoom - to shrink the photo again.
8. Press Back
to return to the Photos screen at any time.
Listening to Music While Looking at Photos
You don’t have to turn off your music before you can look at photos. The music you’re listening
to continues to play even if you change to the Photos screen and begin looking at photos.
Viewing Photos in a Slideshow
The multimedia drive can play your photos in a slideshow. You can customize the slideshow by
adjusting the timing and transition between photos, or setting the slideshow to play as a
continuous or shuffle loop. You can also add music to the slideshow.
To view your photos as a slideshow:
1. Navigate to the photo folder you want (see “Viewing Your Photos” on page 31), select the first
photo in the list, then press OK.
2. Press Play/Pause
3. To customize the slideshow, press Menu.
• To adjust the timing between photos, select Slide Timing..., then press OK. Select the
interval you want (from 2 to 20 seconds), press OK, then press Play/Pause () to
resume the slideshow.
() to start a slideshow of all photos in the folder.
• To adjust the style of transition between photos, select Slide Transition..., then press
OK. Select the transition style you want, press OK, then press Play/Pause
resume the slideshow.
• To start a continuous slideshow, select Slideshow Mode, select Continuous Play, press
OK, then press Play/Pause
• To play the photos in random order and in a continuous slideshow, select Slideshow
Mode, select Shuffle Loop, then press OK, then press Play/Pause
slideshow.
4. Press Stop to stop the slideshow and return to the Photos screen.
GoFlex Cinema™ Multimedia Drive User Guide 32
() to resume the slideshow.
() to resume the
() to
Page 33

Viewing Photos from a Digital Camera
Playing Music with a Slideshow
1. Navigate to and start music on the multimedia drive (see page 29).
2. Navigate to and start the slideshow (see the previous section).
Viewing Photos from a Digital Camera
If you have a digital camera, you may be able to view your photos by connecting your camera
to the multimedia drive.
To view photos from a camera:
1. Connect your camera to the multimedia drive using a USB cable.
2. Power on your camera.
The camera appears as an icon on the Home screen, and you are prompted to start an
automatic or manual file transfer. See “Connecting External USB Devices” on page 11 for
more information.
3. On the Home screen, select your camera, then press OK.
4. Navigate to the photos you want to see, then press OK to open an individual photo, or press
Play/Pause
incompatible format.)
() to start a slideshow. (If a file on your camera won’t open, it’s in an
GoFlex Cinema™ Multimedia Drive User Guide 33
Page 34

Understanding the Multimedia Drive’s LEDs
7. Managing the GoFlex Cinema™
Multimedia Drive
This chapter explains how to manage and maintain the multimedia drive and any USB
devices you connect to it.
Follow the instructions in this chapter to:
• Understand the status LEDs on the multimedia drive (see next section).
• Disconnect a USB drive, camera, or camcorder (see page 35).
• Disconnect the GoFlex drive from the GoFlex Cinema™ dock (see page 35).
• Disconnect the multimedia drive from your TV (see page 36).
• Disconnect the multimedia drive from your computer (see page 36).
• Update the GoFlex Cinema multimedia drive firmware (see page 37).
• Add storage capacity to the GoFlex Cinema multimedia drive (see page 38).
• Reboot the multimedia drive (see page 38).
• Return the multimedia drive to its factory default settings (see page 39).
Understanding the Multimedia Drive’s LEDs
This section describes how the two LEDs on the multimedia drive (see Figure 1 on page 6)
indicate status.
• The Drive LED shows the status of the multimedia drive.
When the Drive LED is... The multimedia drive is...
Blinking amber Starting up
Solid amber On standby / Ready for use
Solid white On
Off Off
• The Connection LED shows the status of any USB device that is connected to the
multimedia drive.
When the Connection LED is... The USB device is...
Solid white Connected and ready for use
Off Off / Device not connected
GoFlex Cinema™ Multimedia Drive User Guide 34
Page 35

Disconnecting a USB Drive, Camera, or Camcorder
Disconnecting a USB Drive, Camera, or Camcorder
To disconnect a USB storage device:
1. On the Home screen, select the USB drive.
2. Press Menu and then select Eject.
It is now safe to remove the USB drive.
To disconnect a camera or camcorder:
1. Stop play and close all active video, photo, or music files on the multimedia drive.
2. Turn off your camera or camcorder,
On the Home screen, select the USB drive icon, press Menu, select Eject, then press OK.
3. Carefully unplug the device from the multimedia drive’s USB port.
OR
Disconnecting the GoFlex Cinema™ Drive from the GoFlex Cinema Dock
The GoFlex Cinema multimedia drive has two main parts—the GoFlex Cinema dock and the
GoFlex Cinema drive. (See Figure 1 on page 6.)
To disconnect the GoFlex Cinema drive from the GoFlex Cinema dock:
1. Turn off the multimedia drive by pressing Power on the remote.
Caution: You may damage the contents of the drive if you do not turn off the media player
before you remove the drive.
2. Sit the multimedia drive on a flat surface.
GoFlex Cinema™ Multimedia Drive User Guide 35
Page 36

Disconnecting the Multimedia Drive from Your TV
3. Separate the two parts by carefully pulling the GoFlex Cinema dock straight out from the
GoFlex Cinema drive.
Figure 7: Disconnecting the GoFlex Cinema Dock from the GoFlex Cinema Drive
To reconnect the GoFlex Cinema drive to the GoFlex Cinema dock, align the connectors and
carefully slide them together until they’re fully seated.
Disconnecting the Multimedia Drive from Your TV
1. Turn off the multimedia drive by pressing Power on the remote.
2. Disconnect the cables from the TV.
3. Unplug the power cable.
To reconnect the multimedia drive, refer to “Copying Files onto the GoFlex Cinema™
Multimedia Drive” on page 9.
Disconnecting the Multimedia Drive from Your Computer
1. On your computer, safely eject the multimedia drive, following the instructions for your
operating system.
2. Turn off the multimedia drive by pressing Power
on the remote.
3. Disconnect the USB cable from the computer and the multimedia drive.
4. Unplug the power cable.
To reconnect the multimedia drive, refer to “Copying Files onto the GoFlex Cinema™
Multimedia Drive” on page 9.
GoFlex Cinema™ Multimedia Drive User Guide 36
Page 37

Updating the GoFlex Cinema™ Multimedia Drive Firmware
Updating the GoFlex Cinema™ Multimedia Drive
Firmware
Follow the instructions in this section to update the firmware on the GoFlex Cinema
multimedia drive. For the best experience with the multimedia drive, update its firmware
whenever a new version becomes available. Go to Seagate Support at www.seagate.com/
support to check for firmware updates.
Checking the Current Firmware Version
To see what firmware is currently running on the multimedia drive:
1. On the Home screen, select Settings, then press OK.
2. Scroll right or left to find the System screen.
3. Select Firmware Version Information, then press OK.
The firmware version number displays.
4. Press OK to close.
Updating the Firmware
To update the multimedia drive firmware, you will need an external USB drive formatted with
FAT32, and a computer that is connected to the Internet.
To update the firmware:
1. On your computer, go to Seagate Support at www.seagate.com/support
2. Follow the on-screen instructions to download the new the multimedia drive firmware to your
computer.
3. Copy the new firmware to a external USB drive, then properly disconnect the USB drive from
your computer.
Note: Put the firmware file in the top-most level (or root level) of the USB drive. Don’t put the
firmware file into a folder.
4. Plug the USB drive into the USB port on the multimedia drive.
5. On the Home screen, select Settings, then press OK.
6. Scroll right or left to find the System screen.
7. Select Firmware Upgrade, then press OK.
The multimedia drive recognizes the new firmware file.
8. Select OK, then press OK.
The firmware is updated. This may take a few moments.
GoFlex Cinema™ Multimedia Drive User Guide 37
Page 38

Adding More Storage Capacity to the GoFlex Cinema™ Multimedia Drive
Caution: Do not power off the multimedia drive while the firmware update is in progress.
9. When prompted, click OK to restart the multimedia drive.
Adding More Storage Capacity to the GoFlex Cinema™
Multimedia Drive
If you need additional storage capacity on GoFlex Cinema multimedia drive in the future, you
can upgrade to a new or larger-capacity GoFlex® Desk drive.
To replace the existing GoFlex Cinema drive with a new or larger-capacity GoFlex Desk drive:
1. Disconnect the GoFlex Cinema dock from the GoFlex Cinema drive, then reconnect the dock
to the new drive, following the instructions in “Disconnecting the GoFlex Cinema™ Drive from
the GoFlex Cinema Dock” on page 35.
2. Extra rubber feet were included with the GoFlex Cinema multimedia drive (see “What’s in the
Box?” on page 8). Stick them to the bottom of your new GoFlex Desk drive to ensure that the
drive remains horizontal and properly connected to the GoFlex Cinema dock.
3. Copy your media files, following the instructions in “Copying Files onto the GoFlex Cinema™
Multimedia Drive” on page 9, then continue using your multimedia drive as usual.
TIP: You can store the original GoFlex
For more information about additional GoFlex Desk drives for your GoFlex Cinema, visit the
Seagate Web site at www.seagate.com
Cinema™ drive as an archive of your media files.
Rebooting the Multimedia Drive
If you are having minor problems with the multimedia drive—for instance, if the screen has
frozen—you can try refreshing it by rebooting. To reboot your multimedia drive:
1. With the multimedia drive powered on, unplug the power adapter.
2. Wait a few seconds for the multimedia drive to fully shut down, then plug in the power
adapter.
The multimedia drive restarts.
GoFlex Cinema™ Multimedia Drive User Guide 38
Page 39

Returning the Multimedia Drive to Its Factory Default Settings
Returning the Multimedia Drive to Its Factory Default
Settings
If necessary, you can return the multimedia drive to its factory default settings, listed below.
You might want to do this as a last resort if the multimedia drive isn’t performing well, or if you
want to reset all your custom settings.
System Settings Sound Settings Display Settings
Menu Language English Volume 100% Aspect Ratio Original
Subtitle Text Encoding Unicode Night Mode Off Brightness 50%
Idle Time Before
Screen Saver
USB Imports
Destination Folder
Idle Time Before
Starting Indexing
Idle Time Before Auto
Power Off
Note: All custom settings are lost when you return the multimedia drive to its factory default settings.
However, files stored on the multimedia drive are not deleted or affected.
5 Minutes Digital Output HDMI PCM Contrast 50%
FreeAgent
GoFlex Drive
5 Seconds
30 Minutes
TV System HDMI Auto
You can return the multimedia drive to its factory default settings two ways:
• From the GoFlex Cinema™ menus (see page 39)
• Pressing the manual
FACTORY DEFAULT button on the GoFlex Cinema multimedia drive
(see page 40)
Returning to the Factory Default Settings from the Menus
1. On the Home screen, select Settings, then press OK.
2. Scroll right or left to find the System screen.
3. Select Reset to Factory Defaults, then press OK.
You are prompted to confirm. Remember that all your custom settings—including menu
language—are lost when you return the multimedia drive to its factory default settings. Stored
files are not deleted or affected.
4. Select Continue, then press OK.
Factory default settings are restored.
GoFlex Cinema™ Multimedia Drive User Guide 39
Page 40

Returning the Multimedia Drive to Its Factory Default Settings
Returning to the Factory Default Settings Manually
1. Find the FACTORY DEFAULT button on the multimedia drive.
FACTORY DEFAULT button is on the left beside the USB ports. See Figure 1 on page 6 for
The
help locating the
FACTORY DEFAULT button.
Using the end of a paperclip, press and hold the
FACTORY DEFAULT button for 5–8 seconds.
Factory default settings are restored.
Note: If you hold the FACTORY DEFAULT button for longer than 10 seconds, the TV System setting
on the multimedia drive toggles among PAL, NTSC and HDMI. See “Setting the Multimedia
Drive for TVs in Other Countries” on page 45 for more information.
If you accidentally change the multimedia drive’s TV System setting, press and hold the
FACTORY DEFAULT button again for more than 10 seconds to change it back.
GoFlex Cinema™ Multimedia Drive User Guide 40
Page 41

Changing the Menu Language
8. Customizing the GoFlex Cinema™
Multimedia Drive
The multimedia drive is ready for use as soon as you plug it in. However, you can customize
its settings for your specific TV. For example, you can change the language of the on-screen
menus, change the aspect ratio of videos to wide screen, or set up a night mode for the
sound.
Follow the instructions in these sections to:
• Change the menu language (see the next section).
• Change the automatic USB Imports destination folder (see page 42).
• Customize the video settings (see page 42).
• Customize the audio settings (see page 43).
• Adjust the wait time before automatic power-off (see page 45).
• Adjust the wait time before the multimedia drive starts indexing (see page 45).
• Set the multimedia drive for TVs in other countries (see page 45).
Note: You can restore the multimedia drive to its factory default settings, if necessary. See
“Returning the Multimedia Drive to Its Factory Default Settings” on page 39 for instructions.
Changing the Menu Language
1. On the Home screen, select Settings, then press OK.
2. Scroll right or left to find the System screen.
3. Select Menu Language, then press OK.
4. Select the language you want, then press OK.
The menu language changes.
GoFlex Cinema™ Multimedia Drive User Guide 41
Page 42

Changing the Automatic USB Imports Destination
Changing the Automatic USB Imports Destination
By default, when the multimedia drive copies files from connected USB devices, the files are
placed in the USB Imports folder and organized as Videos, Photos, and Music.
If you prefer, you can create another folder on the multimedia drive or rename the USB
Imports folder to suit your needs. (Create new folders on the multimedia drive by connecting
it to your computer and managing its folders just like any other hard drive.)
To change the destination folder for the files copied from connected USB devices:
1. Create a new folder on the multimedia drive, or rename the USB Imports folder, as required.
2. On the Home screen, select Settings, then press OK.
3. Scroll right or left to find the System screen.
4. Select USB Imports Destination Folder, then press OK.
5. Navigate to the folder you want to use, press the Stop button to select it, then press Menu.
The destination folder is changed.
Setting the Wait Time Before the Screen Saver Starts
By default, the screen saver starts after five minutes of no activity on the multimedia drive. To
adjust that setting:
1. On the Home screen, select Settings, then press OK.
2. Scroll right or left to find the System screen.
3. Select Idle Time Before Screen Saver, then click OK.
4. Select 2 Minutes, 5 Minutes, or 10 Minutes, then click OK.
The setting is changed.
Customizing the Video Settings
You can change these the multimedia drive video settings to suit your preferences:
• Aspect Ratio—The proportional size and shape of the viewing area on your TV, like
wide-screen or standard (see page 42)
• Brightness and Contrast (see page 43)
Adjusting the Aspect Ratio
To adjust the aspect ratio:
1. On the Home screen, select Settings, then press OK.
2. Scroll right or left to find the Display screen.
GoFlex Cinema™ Multimedia Drive User Guide 42
Page 43

Customizing the Audio Settings
3. Select Aspect Ratio, then press OK.
4. Select one of these options:
• Original—Displays the original aspect ratio of the video.
• 16:9—Provides the same viewing area as a video theater screen.
• Letter Box—Displays original widescreen aspect ratio video in standard width format by
adding black bars above and below the video.
• Pan Scan—Adjusts widescreen video to fit within a standard definition 4:3 aspect ratio
television screen.
Note: Standard definition TVs display in a 4:3 aspect ratio; high definition TVs display in a 16:9
aspect ratio.
5. Press OK.
The aspect ratio is changed.
Adjusting the Brightness and Contrast
1. On the Home screen, select Settings, then press OK.
2. Scroll right or left to find the Display screen.
3. Select Brightness, then press OK.
4. Press the up and down arrow buttons to adjust the setting, then press OK.
5. Select Contrast, then press OK.
6. Press the up and down arrow buttons to adjust the setting, then press OK.
The settings are changed.
Customizing the Audio Settings
You can change these the multimedia drive audio settings to suit your preferences:
• Volume—Sets the upper limit of volume for the multimedia player
• Night Mode—Automatically lowers the intensity of bass sounds so that others are not
disturbed when you use the multimedia drive
• Digital Output Settings—Controls how audio is delivered to the speakers
Controlling the Volume on the Multimedia Drive
1. On the Home screen, select Settings, then press OK.
2. Scroll right or left to find the Sound screen.
GoFlex Cinema™ Multimedia Drive User Guide 43
Page 44

Customizing the Audio Settings
3. Select Volume, then press OK.
4. Press the up and down arrow buttons to adjust the setting, then press OK.
The volume on GoFlex Home is changed.
Ensuring Softer Sound at Night
To ensure that sound is softer and controlled at night:
1. On the Home screen, select Settings, then press OK.
2. Scroll right or left to find the Sound screen.
3. Select Night Mode, then press OK.
4. Select On to activate Night Mode, then press OK.
Night Mode is activated.
Adjusting the Digital Output Settings
To adjust the digital output settings to meet the needs of your audio equipment:
1. On the Home screen, select Settings, then press OK.
2. Scroll right or left to find the Sound screen.
3. Select Digital Output, then press OK.
4. Select the setting you want:
• HDMI PCM—Supports all-digital audio and video, including standard, enhanced, and
high-definition video.
• HDMI Raw—Is not decoded by the multimedia drive. When you use this setting, you must
connect the multimedia drive to a receiver with decoding capabilities.
• S/PDIF (Optical) PCM—Converts multi-channel audio into stereo.
• S/PDIF (Optical) RAW—Plays digital audio without decoding.
The setting is changed.
GoFlex Cinema™ Multimedia Drive User Guide 44
Page 45

Adjusting the Wait Time Before Automatic Power-off
Adjusting the Wait Time Before Automatic Power-off
By default, the multimedia drive powers itself off after 60 minutes of inactivity.
To adjust the wait time before automatic power-off:
1. On the Home screen, select Settings, then press OK.
2. Scroll right or left to find the System screen.
3. Select Idle Time Before Auto Power Off, then press OK.
4. Select 30 Minutes, 60 Minutes, or Never, then press OK.
The wait time is changed.
Adjusting the Wait Time Before Indexing Begins
By default, the multimedia drive automatically begins indexing new files after 5 seconds.
To adjust the wait time before indexing begins:
1. On the Home screen, select Settings, then press OK.
2. Scroll right or left to find the System screen.
3. Select Idle Time Before Starting Indexing, then press OK.
4. Select the time interval you want, then press OK.
The wait time is changed.
Setting the Multimedia Drive for TVs in Other Countries
TVs in different parts of the world have different image resolution standards. If you have
moved the multimedia drive from one geographical area to the other, or if the current photo
resolution does not work well with your TV, adjust the TV System setting.
To set the multimedia drive for the resolution your TV:
1. On the Home screen, select Settings, then press OK.
2. Scroll right or left to find the Display screen.
3. Select TV System, then press OK.
GoFlex Cinema™ Multimedia Drive User Guide 45
Page 46

Setting the Multimedia Drive for TVs in Other Countries
4. Select the setting you want. This table shows which resolutions are supported by which
connectors:
HDMI Connector Composite Connector
480i 480p
576i 576p
720i 720p
1080i 1080p
480i (NTSC)
576i (PAL)
Note: PAL (576i, 50 Hz)—Standard European television resolution
NTSC (480i, 60 Hz)—Standard North American television resolution
5. Press OK to change the setting.
Note: If the TV System settings are grayed out on the multimedia drive, you can toggle among PAL,
NTSC and HDMI settings by pressing and holding the FACTORY DEFAULT button for more
than 10 seconds.
GoFlex Cinema™ Multimedia Drive User Guide 46
Page 47

General Troubleshooting Tips
9. Solving Problems
This chapter provides solutions to the most common problems you may encounter while
setting up and using the GoFlex Cinema™ multimedia drive.
General Troubleshooting Tips
If you have problems setting up or using the multimedia drive, check these things first:
• Are the remote batteries working?
• Is something blocking the remote signal receiver on the front of the multimedia drive?
• Are all the multimedia drive’s cables connected properly? Are the multimedia drive and
TV plugged into an active power source? Are any of the cables damaged or faulty?
• Do you have the multimedia drive connected to your computer and your TV at the same
time? (The media player function does not operate as long as the multimedia drive is
connected to your computer.)
• Is the multimedia device placed on top of or underneath another electronic device?
Caution: To avoid overheating the multimedia drive, do not place anything on top of it (such
as a cable box or USB device). Always place the multimedia drive on a flat surface,
never on top of any other electronic device.
• Is the volume on your TV or A/V receiver turned down or muted? Is the volume on the
multimedia drive turned down or muted (see page 43)?
• Is the TV set to the wrong input type?
• Are there video, photo, or music files on your connected device?
Common Problems and Solutions
This section provides solutions to some common problems you may encounter while using
the multimedia drive.
Subtitles don’t appear on my video.
Check to see if the video file and subtitle file have identical names. Also, ensure that the
video file and subtitle file are stored in the same folder.
If the subtitles still don’t appear, the file format of the subtitles may not be supported by the
multimedia drive. The multimedia drive supports subtitles in these formats:
.ASS .SAMI .SSA .SUB .SRT
GoFlex Cinema™ Multimedia Drive User Guide 47
Page 48

Common Problems and Solutions
The subtitles on my video are illegible/corrupted.
Your multimedia drive may not be set to the correct character set for your chosen subtitle
language. To set the multimedia drive to the correct character set:
1. On the Home screen, select Settings, then press OK.
2. Scroll right or left to find the System screen.
3. Select Subtitle Text Encoding, then press OK.
4. Select the correct character set for your chosen subtitle language, then press OK.
For example, if you are using Russian subtitles, select Cyrillic, then press OK.
The subtitles should now be legible.
On the Videos screen, my Blu-Ray video appears with a DVD icon. Will it play as a Blu-Ray video (in high definition)?
Even if a Blu-Ray video appears with a DVD icon, it will still play as a Blu-Ray video, in high
definition.
The multimedia drive doesn’t recognize my external USB drive.
Your USB drive may not be formatted correctly. Only FAT, FAT32, NTFS and Mac HFS+
formatted external USB storage devices are supported by the multimedia drive.
The multimedia drive doesn’t recognize my digital camera or camcorder.
Your digital camera or camcorder may not be compatible with the multimedia drive. If your
camera or camcorder doesn’t appear in the list of devices on your Home screen when you
connect it to the multimedia drive, it’s incompatible for use.
I moved my multimedia drive to another country and the picture quality is bad.
TVs in different parts of the world have different image resolution standards. If you have
moved the multimedia drive from one geographic area to the other, you can return the device
to the default settings for your new location. (See “Setting the Multimedia Drive for TVs in
Other Countries” on page 45 for more information.)
To toggle the standard default settings for the multimedia drive between PAL (Europe) and
NTSC (other areas, including North America):
1. Find the
Default Settings Manually” on page 40 for help.)
FACTORY DEFAULT button on the multimedia drive. (See “Returning to the Factory
2. Press and hold the
If the multimedia drive was originally set to PAL, it switches to default NTSC settings. If the
multimedia drive was set to NTSC, it switches to default PAL settings.
GoFlex Cinema™ Multimedia Drive User Guide 48
FACTORY DEFAULT button for more than 10 seconds.
Page 49

Common Problems and Solutions
One of my media files won’t open.
The file format may not be supported by the multimedia drive. Check to see if the file’s
extension and codec (compressor/decompressor technology, such as MPEG) is listed here.
Supported photo and photo file formats:
.BMP .GIF .JPG/JPEG .PNG .TIFF
Note: The multimedia drive doesn’t support JPG files over 20 megapixels.
Supported audio file formats:
File Extension Audio Codec(s)
.AAC AAC-LC
.APE Monkey’s Audio
.FLAC FLAC
.M4A AAC-LC
.M4B AAC-LC
.MP3 Layer1, Layer2, Layer3, MPEG2.5
.MPA Layer2
.OGG OGG, Vorbis
.WAV PCM, LPCM, ADPCM
.WMA WMA v2
Supported music playlist file formats:
.M3U .PLS .WPL (static only)
GoFlex Cinema™ Multimedia Drive User Guide 49
Page 50

Supported video file formats:
File Extension Video Codec(s) Audio Codec(s)
.3G2 (.3GPP2) MPEG-4, AAC
.3GP MPEG-4, H.263 AMR NB
.ASF WMV3, WVC1 WMA, WMAPRO
Common Problems and Solutions
.AVI Xvid, MPG1, MPG2, AVC (H.264), MJPEG-AMPEG, MP2, MP3, LPCM, PCM, Dolby
.DAT MPEG-1 MPEG
.FLV H.263, FLV4 (VP6F/VP6A), AVC MP3, AAC
.ISO MPEG-2 (DVD) MPEG, LPCM, PCM, Dolby Digital
.M2TS MPEG-2 PCM, Dolby Digital
.M4V AVC Dolby Digital
.MKV Xvid, RV40 (RealVideo), AVC (H.264),
AVC1, MPEG-4, MPEG-2
.MOD MPEG-2 Dolby Digital
.MOV MJPEG-A/MJPA, MJPG, H.263, AVC
(H.264)
.MP4 MPEG-1, MPEG-4, MP4V, AVC (H.264),
S263
.MPG, .MPEG MPEG-1, MPEG-2 MPEG, MP3, MP2, PCM, Dolby Digital
.TP MPEG-2 MP2, Dolby Digital
.TRP MPEG-2 MP2
Digital, Vorbis, AAC, AAC-LC, WMA
AAC, AAC-LC, MP3, Cooker, Vorbis, Dolby
Digital, FLAC, WMA
ADPCM, U-LAW, AAC-LC, AAC, PCM
AAC-LC
.TS MPEG-2, AVC (H.264), WVC1 MPEG, MP3, MP2, PCM, Dolby Digital
.VOB MPEG-2 (DVD) MPEG, LPCM, PCM, Dolby Digital
I returned the multimedia drive to its original settings by pressing the
FACTORY DEFAULT button, but now the picture quality is bad.
If you hold the FACTORY DEFAULT button for longer than 10 seconds, the TV System setting on
the multimedia drive toggles among PAL, NTSC and HDMI. See “Setting the Multimedia
Drive for TVs in Other Countries” on page 45 for more information.
If you accidentally change the multimedia drive’s TV System setting, press and hold the
FACTORY DEFAULT button again for more than 10 seconds to change it back.
GoFlex Cinema™ Multimedia Drive User Guide 50
Page 51

Recovering After a Firmware Update Failure
My video’s sound track is not playing.
The GoFlex Cinema multimedia drive does not support DTS audio. If the main language on
the video you are playing is in DTS audio, no sound will play. You need an external DTS
audio decoder (sold separately).
Note: Languages on a video sound track other than the main language are often recorded in Dolby
Digital and are supported by the multimedia drive.
The thumbnail view of my song doesn’t show the album art.
For album art to display as a thumbnail, the image has to be stored in the album folder. See
“Displaying Album Art on the Music Screen” on page 30 for more information.
The thumbnail view of my video doesn’t show the right photo.
For a DVD image to display as a thumbnail, the image has to be stored in the right place. In
the DVD file’s folder, put the image in the same folder as the Audio_TS and Video_TS subfolders.
I suspended a file transfer and now the multimedia player won’t play my file.
If you suspend a file transfer, it may take a few minutes before the multimedia player is
available to play your media files. Wait several minutes, then try playing your file again. If the
file still won’t play, try rebooting the multimedia drive (see “Rebooting the Multimedia Drive”
on page 38).
Recovering After a Firmware Update Failure
If a power failure or power surge happens while you’re updating the firmware on the GoFlex
Cinema™ multimedia drive, the update fails. (See “Updating the GoFlex Cinema™
Multimedia Drive Firmware” on page 37 for more information.)
To recover after an update failure, you need an external USB drive (also known as a flash
drive or thumb drive) and a computer that is connected to the Internet.
TIP: For best results, read all the steps in this section before you start.
To recover after a firmware update failure:
1. If you haven’t already, go to the Seagate Support at www.seagate.com/support.
2. Follow the on-screen instructions to download the new firmware to your computer.
3. Copy the new firmware to the USB drive, then properly disconnect the drive from your
computer.
Note: Put the firmware file in the top-most level (or root level) of the USB drive. Don’t put the
firmware file into a folder.
GoFlex Cinema™ Multimedia Drive User Guide 51
Page 52

Manually Returning the Multimedia Drive to its Factory Default Settings
4. Unplug the multimedia drive’s power cord.
5. Connect your USB drive to the multimedia drive.
6. Turn on your TV.
7. Press and hold the multimedia drive’s
DEFAULT
8. Plug in the multimedia drive’s power cord.
9. When the Seagate logo appears on the TV, release the
The Updating screen opens. Don’t use the multimedia drive until the update is complete.
button.
FACTORY DEFAULT button. Don’t release the FACTORY
FACTORY DEFAULT button.
Manually Returning the Multimedia Drive to its Factory
Default Settings
As a last resort, try returning the multimedia drive to its factory default settings. See
“Returning to the Factory Default Settings Manually” on page 40 for complete instructions.
Finding More Help
Seagate Support provides a broad range of resources (including FAQs, a knowledge base
and a community forum) to help you solve any problem you might have while using the
GoFlex Cinema multimedia drive. Go to the Seagate Web site at www.seagate.com.
GoFlex Cinema™ Multimedia Drive User Guide 52
Page 53

Index
A
adding storage capacity
album cover art 30, 51
Arrow buttons
aspect ratio (definition)
Aspect Ratio setting 43
audio settings
adjusting
automatically copying files 11
B
Back button 16, 17
Backward Skip button 16
Brightness setting 43
browsing for files 20
C
camcorders
playing videos from 27
problem-solving 48
cameras
problem-solving 48
viewing photos from 33
component connectors 46
composite connectors 46
composite ports (illustration) 7
connecting a USB device 11
Connection LED 34
illustration 6
Continuous Play setting
music 29
photo slideshows 32
Contrast setting 43
copying media files 20
avoiding duplicates 22
suspending and restarting a file transfer 21
USB imports destination folder 42
customizing the multimedia drive 41–46
16, 17
43, 44
44
38
42
D
default settings for multimedia drive
deleting media files
devices
shortcuts to 13
supported USB devices 8
troubleshooting 48
digital camcorders
playing videos from a camcorder 27
troubleshooting 48
digital cameras
troubleshooting 48
viewing photos from 33
Digital Output setting 44
Digital Rights Management (DRM) 28
digitized DVDs 26
disconnecting
GoFlex Cinema drive from GoFlex Cinema dock
35
multimedia drive from computer 36
multimedia drive from TV 36
USB device from multimedia drive 35
Display screen
Aspect Ratio setting 43
Brightness setting 43
Contrast setting 43
TV System setting 45
Drive LED 34
illustration 6
drives
connecting to the multimedia drive 9
copying files using a GoFlex Desk dock 10
destination folder for imported files 42
disconnecting from multimedia drive 35
disconnecting the GoFlex Cinema drive 35
solving problems 48
DTS audio support 24
duplicate media files, avoiding 22
E
enlarging photos 32
external USB devices 8
copying files to the multimedia drive
automatically 11
23
39
GoFlex Cinema™ Multimedia Drive User Guide 53
Page 54

copying files to the multimedia drive manually 12
folder structure 12
solving problems 48
F
factory default button 40, 52
illustration 6
factory default settings for multimedia drive
Fast Forward button
fast forwarding a video 25
files. See media files
firmware
finding the current version 37
recovering after an upgrade failure 51
updating 37
Firmware Upgrade setting 37
Firmware Version Information 37
flash drives 8
folder structure on multimedia drive 12
USB destination folder 42
Forward Skip button 16
G
GoFlex Cinema
See multimedia drive
GoFlex Cinema dock (illustration) 6
GoFlex Cinema drive
illustrated 6
GoFlex Desk dock 10
H
HDMI connectors 46
HDMI MultiChannel setting (definition) 44
HDMI PCM setting (definition) 44
HDMI port (illustration) 7
HDMI Raw setting (definition) 44
help 18, 47–52
Home button 16, 17
Home screen 11
illustration 13
I
Idle Time Before Auto Power Off setting 45
Idle Time Before Screen Saver setting 42
16, 17
39
Idle Time Before Starting Indexing setting 45
indexing media files
adjusting the wait time
Information 15
Information button 16, 17, 25
L
language
fixing subtitle problems 47
for menus 41
for videos 26
supported subtitle formats 24
LEDs
illustration 6
understanding what the colors mean 34
listening to music. See music
M
manually copying files to the multimedia drive 12
media files 20
avoiding duplicate files 22
browsing devices 20
browsing for a file 20
copying automatically 11
copying manually 12
copying onto the multimedia drive 9
copying using GoFlex Desk dock 10
deleting from the multimedia drive 9, 23
destination folder for USB imports 42
folder structure 12
indexing 10
indexing wait time 45
moving 20
music file formats 28
music thumbnails 51
photo formats 31
playlist formats 28
re-indexing 22
reorganizing 9
searching for a file 19
supported file types 49
suspending and restarting file transfer 21
USB imports destination folder 42
video formats 24
video subtitle formats 25
video thumbnails 51
Menu button 16, 17
10, 22
45
GoFlex Cinema™ Multimedia Drive User Guide 54
Page 55

Menu Language 41
menus
movies. See videos
moving media files 20
multimedia drive
12
Audio
26
Category (all files) 20
Category (music) 29
Category (photos) 31
changing the language 41
Copy 21
Home screen 13
illustration 14, 15
Index 22
Information 15
Move 21
Music 29
Photos 31
Playback Mode 29
Resume icon 21
Rotate Right/Left 90 degrees 32
Search 19
Select All 21, 23
Settings 37
Show DVDs 25
Slide Timing 32
Slide Transition 32
Slideshow Mode 32
Slideshow Mode setting 32
Sort (music) 29
Sort (photos) 31
Sort (videos) 25
Subtitle 26
Videos 25
View Mode (music) 29
View Mode (photos) 31
View Mode (videos) 25
adding storage capacity 38
Aspect Ratio setting 43
audio settings 43
Brightness setting 43
changing picture resolution for other countries 45
components list 8
composite ports (illustration) 7
connecting a USB device 11
Connection LED (illustration) 6
Contrast setting 43
copying files automatically 11
copying files from your computer 9
copying files manually 12
copying files using GoFlex Desk dock 10
copying media files 20
customizing the settings 41–46
deleting media files 9, 23
Digital Output setting 44
disconnecting 36
disconnecting a device 35
disconnecting from your computer 36
disconnecting the GoFlex Cinema drive 35
Drive LED (illustration) 6
factory default button 52
factory default button (illustration) 6
factory default settings 39
features 6
finding more help 18
Firmware Upgrade setting 37
Firmware Version Information 37
fixing picture quality 48
folder structure 12
front view (illustration) 6
HDMI port (illustration) 7
Idle Time Before Auto Power Off setting 45
Idle Time Before Screen Saver setting 42
Idle Time Before Starting Indexing setting 45
imported files, destination folder 42
increasing storage capacity 38
indexing media files 10
indexing wait time 45
listening to music 28–30
menu language 41
Menu Language setting 41
menus 12
moving media files 20
music 28–30
navigating the screens 12
Night Mode setting 44
NTSC resolution setting 45
optical audio port (illustration) 7
other requirements 8
overview 6
PAL resolution setting 45
power port (illustration) 7
powering off 18
powering off after inactivity 45
powering on 10
GoFlex Cinema™ Multimedia Drive User Guide 55
Page 56

rear view (illustration) 7
rebooting the multimedia drive 38
re-indexing files 22
remote signal receiver (illustration) 6
reorganizing media files 9
Reset to Factory Defaults setting 39
resetting to factory defaults manually 52
resolution settings 45
restoring original settings 39
screens 12
screensaver timing 42
starting 9
Subtitle Text Encoding setting 48
subtitles 47
supported music formats 28
supported operating systems 8
supported photo formats 31
supported picture resolutions 8
supported playlist formats 28
supported subtitle formats 25
supported video formats 24
suspending and restarting file transfer 21
television connectors 8
troubleshooting 47–52
TV System setting 45
understanding the LEDs 34
updating the firmware 37
USB connectors (illustration) 6
USB Imports Destination Folder setting 42
using the remote 12
video settings 42
videos 24–27
viewing photos 31–33
Volume setting 44
wait time before automatic power off 45
watching videos 24–27
music 28–30
adding to a slideshow of photos 33
browsing for music 20
Continuous Play setting 29
displaying album cover art 30
listening to music while viewing photos 32
Play All setting 29
playing music 29
playing music continuously 29
Repeat One setting 29
searching for a song 19
Shuffle Loop setting 29
shuffling songs 29
sorting the music list 29
supported music file formats 28
supported playlist formats 28
troubleshooting thumbnails 51
viewing thumbnails 29
Music screen
Mute button
N
navigating the multimedia drive screens 12
quick navigation tips 16
remote buttons 16
Night Mode setting 44
NTSC
definition 46
resolution setting 45
O
OK button 16, 17
operating systems 8
optical audio port (illustration) 7
original settings for multimedia drive 39
P
PAL
definition 46
resolution setting 45
personal videos 27
photos 31–33
adding music to a slideshow 33
Aspect Ratio setting 43
browsing for photos 20
Continuous Play setting 32
enlarging a photo 32
listening to music while viewing photos 32
rotating a photo 32
searching for a photo 19
Shuffle Loop setting 32
Slide Timing setting 32
Slide Transition setting 32
Slideshow Mode 32
Slideshow Mode setting 32
sorting the photo folders 31
sorting the photo list 31
supported photo file formats 31
thumbnails 31
29
16, 17
GoFlex Cinema™ Multimedia Drive User Guide 56
Page 57

viewing 31
viewing as thumbnails 31
viewing from your camera 33
viewing in a slideshow 32
zooming 32
Photos screen 31
picture resolutions (onscreen)
pictures. See photos
Play All setting for music
Play/Pause button
Power button
power port (illustration) 7
powering off 18
powering off after inactivity 45
powering on 10
problem-solving 47–52
cameras and camcorders 48
drive not recognized 48
fixing subtitle problems 47
general 47
recovering after an upgrade failure 51
video picture quality 48
R
rebooting the multimedia drive 38
Recent icons 13
recently viewed files 13
re-indexing media files 22
remote
button descriptions 17
buttons 16
Home button 13
illustration 16
navigating the screens 12
signal receiver (illustration) 6
Repeat One setting for music 29
Reset to Factory Defaults setting 39
restarting a file transfer 21
restoring the multimedia drive 39
Resume icon 21
Resume icon (illustration) 13
Reverse button 16, 17
reversing a video 25
16, 17
16, 17
8, 46
29
rotating photos 32
S
S/PDIF (Optical) PCM setting (definition) 44
S/PDIF (Optical) RAW setting (definition)
screen icons (illustration)
screens 12
Seagate Web site
Seagate Support
Search screen 19
searching media files 19
Settings icon 37
Shuffle Loop setting for music 29
Shuffle Loop setting for slideshows 32
Skip Back button 17
Skip Forward button 17
Slide Timing setting 32
Slide Transition setting 32
Slideshow Mode 32
Slideshow Mode setting 32
slideshow of photos 32
adding music 33
songs. See music
sorting media files
sorting the music list 29
sorting the photo folders 31
sorting the photo list 31
sorting the video list 25
Sound screen 44
Stop button 16, 17
storage capacity, adding 38
Subtitle Text Encoding setting 48
subtitles
solving problems 47
viewing 26
support from Seagate 18
suspending a file transfer 21
System screen 37
Firmware Upgrade setting 37
Firmware Version Information 37
Idle Time Before Auto Power Off 45
Idle Time Before Screen Saver 42
18
13
18
44
GoFlex Cinema™ Multimedia Drive User Guide 57
Page 58

Idle Time Before Starting Indexing 45
Menu Language 41
Reset to Factory Defaults setting 39
Subtitle Text Encoding 48
USB Imports Destination Folder 42
T
television connectors 8
supported picture resolutions 46
thumb drives 8
thumbnails
music 30
photos 31
videos 25, 27, 29
transferring media files 21
troubleshooting 47–52
cameras and camcorders 48
drive not recognized 48
fixing subtitle problems 47
general 47
rebooting the multimedia drive 38
recovering after an upgrade failure 51
restoring factory default settings 39
video picture quality problems 48
TV System setting 45
U
updating the firmware 37
recovering after an upgrade failure 51
USB connectors (illustration) 6
USB devices
connecting 11
copying files to the multimedia drive
automatically 11
copying files to the multimedia drive manually 12
destination folder for imported files 42
folder structure 12
solving problems 48
supported devices 8
USB Imports Destination Folder setting 42
V
video settings 42
adjusting brightness and contrast 43
adjusting the aspect ratio 42
videos 24–27
Aspect Ratio setting 43
browsing for videos 20
controlling DVD features 26
displaying video thumbnails 27
fast forwarding a video 25
finding information about a video 25
Information button 25
jumping ahead or back in a video 25
language options 26
listening in another language 26
picture quality 48
picture resolutions 46
playing a video 25
playing videos from your camcorder 27
reversing a video 25
searching for a video 19
sorting the video list 25
supported subtitle formats 25
supported video formats 24
thumbnail view 51
viewing subtitles 26
viewing video thumbnails 25
Videos screen 25
Volume 44
Volume buttons 16, 17
W
watching videos. See videos
Z
Zoom buttons 16, 17
zooming photos 32
GoFlex Cinema™ Multimedia Drive User Guide 58
 Loading...