

Page 1
External Hard Drive
Quick Start
Guide
Page 2
Your new Seagate®external hard drive is a stateof-the-art unit: solid, safe, quiet, cool, versatile
and portable, ready to go from one location to
another—an ideal backup device for multiple
systems, or simply a safe and dependable place
to store your important files.
Your new Seagate hard-drive kit also includes
award-winning BounceBack Express backup
software for both Windows and Mac operating
systems. See page 12 for more information
about BounceBack Express.
Dual-interface and USB-only kits
Seagate ships two external hard drive kits:
•A dual-interface kit, with a USB 2.0 interface,
a FireWire (also known as IEEE 1394a and iLink)
interface and full backup capability that includes
a pushbutton backup feature
•A USB-only kit, with a USB 2.0 interface and
full backup capability that includes a pushbutton
backup feature.
Note. BounceBack Express does not support the pushbutton
backup feature for a Mac OS that is using a USB interface.
This guide uses the terms “dual-interface” and
“USB-only” to differentiate between these two
kits wherever something applies to one kit but
not the other.
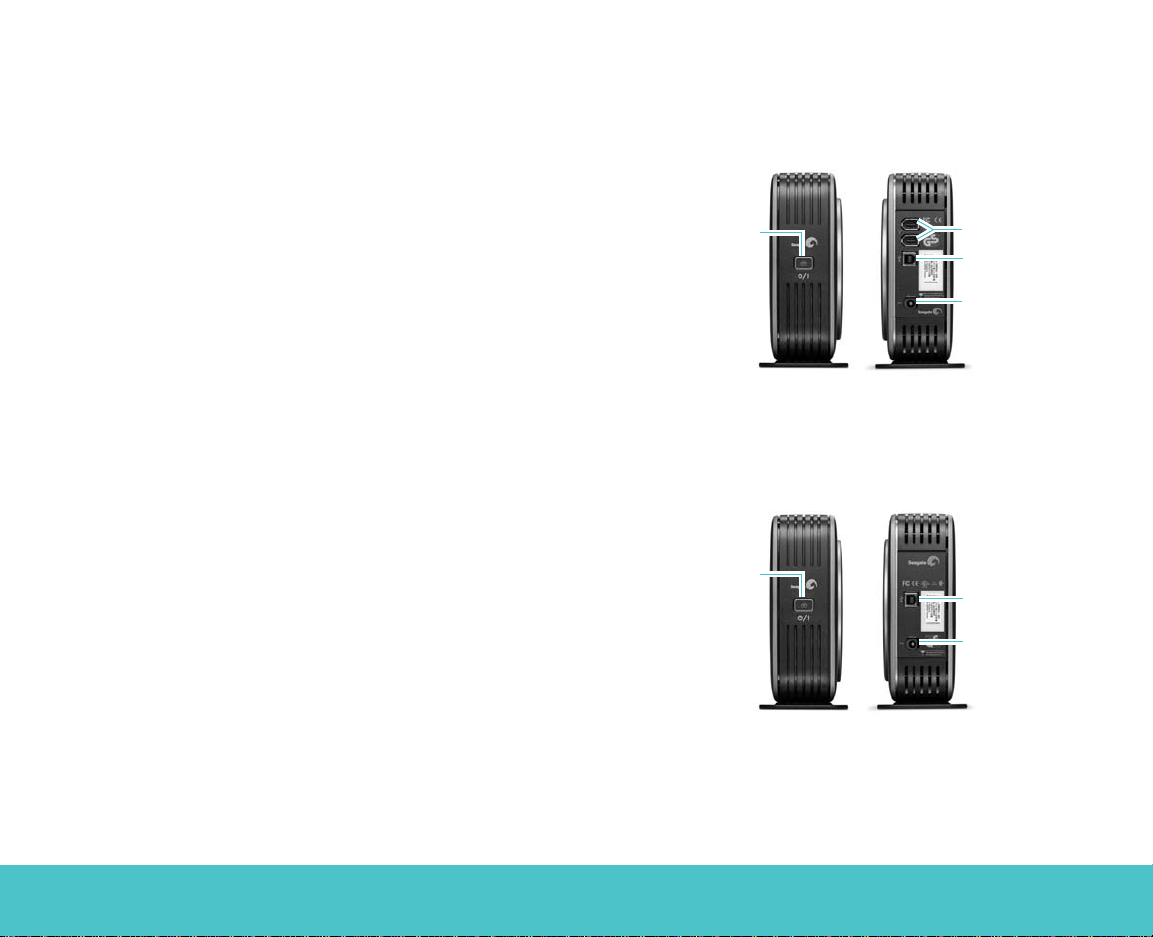
Dual-interface external hard drive
USB-only external hard drive kit
2
Quick Start Guide
Multi-function
push button
USB 2.0 port
Power connector
Front Back
Multi-function
push button
Front Back
FireWire
(IEEE 1394a) ports
USB 2.0 port
Power connector
Multi-function push
button operations:
• Press and hold
button until LED
comes on
– 1st Power On
occurs.
• After Power On,
press button
– Initiates backup.
• Press and hold
button until LED
shuts off
– Power Down
occurs.
Note. BounceBack
Express does not
support the pushbutton
backup feature for a
Mac OS that is using
a USB interface.
Page 3
Contents
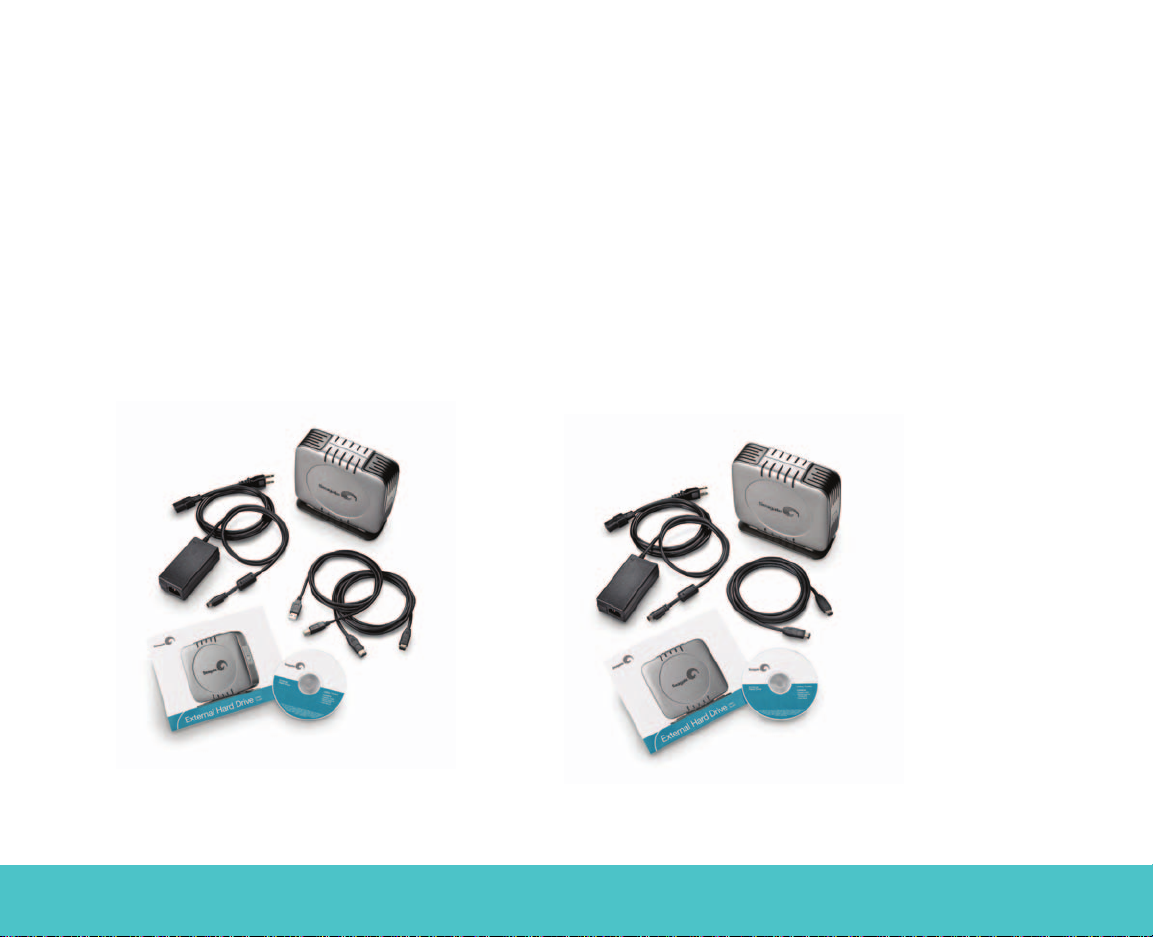
The dual-interface external hard-drive kit
includes
• A Seagate external hard drive with a USB 2.0
interface, a FireWire (IEEE 1394a) interface, plus
a pushbutton backup feature
• A pedestal for vertical drive-orientation
• USB 2.0 and FireWire (IEEE 1394a) cables
• An AC-to-DC converter
• A country-specific power cord
• This guide
• The Seagate Disc Utility CD
The USB-only external hard-drive kit includes
• Seagate external hard drive with a USB 2.0
interface, plus a pushbutton backup feature.
Note. BounceBack Express does not support the pushbutton
backup feature for a Mac OS that is using a USB interface.
• A pedestal for vertical drive-orientation
• A USB 2.0 cable
• An AC-to-DC converter
• A country-specific power cord
• This guide
• The Seagate Disc Utility CD
3
External Hard Drive
Page 4

4
Quick Start Guide
Requirements
Windows 98SE or later operating system with:
• a USB connector
or
• for a dual-interface kit, a Windows-certified,
OHCI-compliant FireWire (IEEE 1394a) controller
Microsoft maintains a list of Windows-certified
FireWire (IEEE 1394a) controller suppliers at
http://www.microsoft.com/windows/catalog/.
Click the Hardware tab, and then select Other
Hardware/1394 controller for the complete list.
Macintosh System 9.2.2 (or higher) or
Mac OS X with:
• a USB connector
or
• for a dual-interface kit, an OHCI-compliant
FireWire connector
• Macintosh format (initialization) required.
See Mac format section on page 9
Note. BounceBack Express does not support the pushbutton
backup feature for a Mac OS that is using a USB interface.
Cautions
If your drive is turned on, don’t move it.
You can safely move your drive when the power LED
is OFF. If the power LED is lit when you move your
drive, you risk excessive wear, reduced reliability,
and possible data loss.
Dual-interface kit: Use only one interface
at a time.
Do not simultaneously connect USB and the FireWire
(IEEE 1394a) cables to your drive. However, you can
connect two FireWire cables to your drive at the same
time to daisy-chain FireWire devices.
Note. When using the FireWire (IEEE 1394a) connectors in
a daisy chain configuration, the drive must be powered on
for the pass through connection to function.
Multi-function push button operations.
• Press and hold button until LED comes on—
1st Power On occurs.
• After Power On, press button—initiates backup.
• Press and hold button until LED shuts off—
Power Down occurs.
Page 5
5
External Hard Drive
Hardware setup
For a dual-interface kit
1. Plug the AC-power adapter into the hard drive
and the wall outlet.
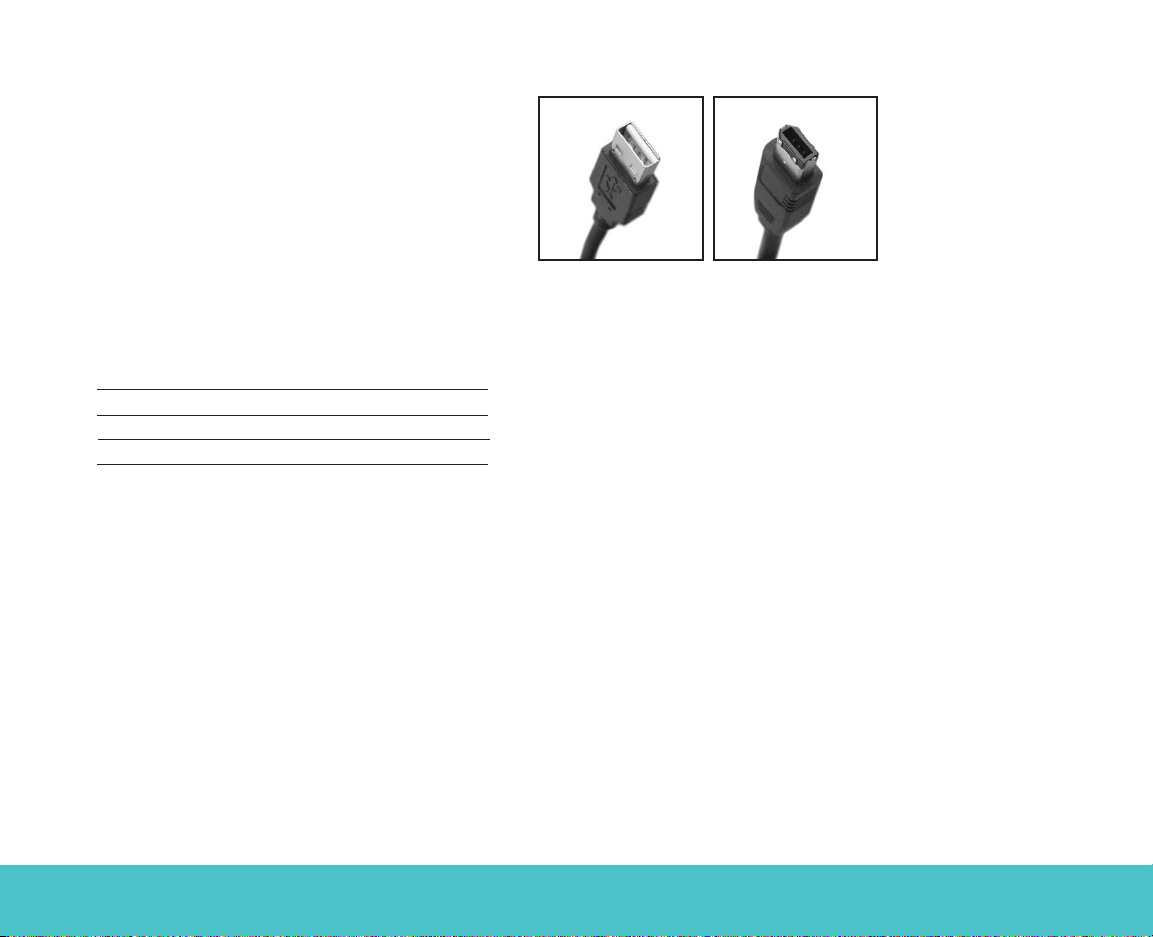
2. Refer to the table below to select the fastest
interface that is supported by your computer,
and use that cable to connect the drive to
your computer. USB and FireWire (IEEE 1394a)
connectors have unique shapes, and each
connector is shaped to allow only one way
to connect.
Interface Transfer rate
USB 1.1 12 Mbits/sec
USB 2.0 480 Mbits/sec
FireWire (IEEE 1394a) 400 Mbits/sec
Note. When using the FireWire (IEEE 1394a) connectors in
a daisy chain configuration, the drive must be powered on
for the pass through connection to function.
Caution. Use only one interface at a time. If you
connect both the USB and the FireWire (IEEE 1394a)
cables to the same external drive at the same time,
you could damage the drive. However, it is OK to
connect two FireWire cables to the same drive at
the same time to daisy chain devices.
If you are a Macintosh user and you intend to use
the pushbutton-backup feature, you must use the
FireWire interface. BounceBack Express does not
support a Mac OS that is using a USB interface.
Continue to step 3 on page 6.
For a USB-only kit
1. Plug the AC power adapter into the hard drive
and the wall outlet.
2. Use the USB cable to connect the drive to
your computer.
Continue to step 3 on page 6.
USB
FireWire
(IEEE 1394a)
Page 6

6
Quick Start Guide
For both dual-interface and USB-only kits
3. Press and hold the button on the front of the drive
until LED lights, to turn on power to the drive.
4. Turn on the power to your computer.
5. See page 7 for Windows OS information, or
page 9 for Macintosh OS information, including
installing drivers, reformatting and partitioning,
and dismounting your drive.
6. See page 12 to install and configure BounceBack
Express software to allow backups.
Note. For dual-interface kits, you must install and configure
BounceBack Express software to enable the pushbutton-backup
feature on your drive.
You don’t need to follow this hardware setup
sequence. Hardware setup steps 1 through 4
are a good way to connect your new drive to your
computer, but you don’t always need to follow this
sequence. For example, if you want to attach your
drive after your computer has already booted, you
can simply connect the interface cable, turn on
power to the drive, and your OS automatically
detects and mounts the drive. This is known
as hot-plugging.
In a hot-plug situation, it’s a good idea to connect
all power and interface cables to your drive, and to
place the drive where you want it to remain, before
you turn it on. This helps ensure that you won’t
need to move your drive after it’s running.
Page 7

7
External Hard Drive
Windows OS
Installing drivers for your operating
system (OS)
Windows XP/Me/2000 Pro operating systems have
built-in, up-to-date drivers for both USB and FireWire
(IEEE 1394a) interfaces. You don’t need to install
any drivers if you are using one of these operating
systems, but make sure you have downloaded and
installed the latest service packs from Microsoft to
ensure that you have the latest drivers available for
your OS.
Windows 98SE using a USB interface: When
you connect the drive to your computer and turn
it on, Windows 98SE displays the Add New
Hardware wizard. This means the wizard needs
to find USB drivers, which are included on the
Seagate Disc Utility CD.
Follow these steps to install the drivers:
1. Insert the Seagate Disc Utility CD in your
computer’s CD-ROM drive.
2. Click the Next button. The wizard displays a
screen with two options.
3. Select the Search for the best driver for
your device option. The wizard displays four
check boxes.
4. Select the CD-ROM and Specify location
options. Locate the drivers in the Drivers USB
Win98 directory.
5. Click the Next button. The wizard installs the
appropriate drivers on your computer and tells
you when it has finished.
6. Click the Finish button to complete the installation.
7. Restart your computer, and your new drive is ready
to use.
Windows 98SE using a FireWire (IEEE 1394a)
interface (dual-interface kit only):
To use the
FireWire interface, you must download the Microsoft
Windows 98SE system update from Microsoft.
How to reformat and/or partition your drive
Your drive is factory-formatted for a FAT32 file
system and no further formatting is needed for
Windows operating systems. However, if you are
using Windows 2000 Pro or Windows XP and you
prefer to use an NTFS file system, you can reformat
with either the built-in Disk Management application
provided by Microsoft, or the Seagate DiscWizard™
for Windows application located in the Files directory
of the Seagate Disc Utility CD.
Caution. Reformatting destroys all data on the drive.
Back up any data that you want to keep before you
reformat the drive. Also, if you reformat to NTFS,
you must always log in to BounceBack Express
(see page 12) as an Administrator to ensure access
to your backup files.
What is partitioning?
Partitioning divides
the disc into separate
volumes. It does not
increase the capacity
of the drive. Creating
more than one partition
can be helpful in
organizing your information. For example,
you might want one
volume (partition) to
store your backups
and one volume for
applications or other
information. Each
volume receives its
own drive letter, so
each volume appears
to be a separate disc
drive in Windows
Explorer.
Page 8

8
Quick Start Guide
To use the Disk Management application
1. Click Start, click Run, type compmgmt.msc, and
then click OK.
2. In the console tree, click Disk Management. The
Disk Management window appears. Your discs and
volumes are displayed.
3. Right-click on the drive you want to reformat (or
partition) and use the options provided to reformat
or partition the drive.
To use the DiscWizard for Windows
application
Launch the DiscWizard for Windows application in
the Files directory on the Seagate Disc Utility CD,
and follow the easy-to-use, on-screen instructions.
Data-sharing between Windows
and Macintosh systems
Seagate does not recommend that you use your
external hard drive to share data between Windows
and Macintosh operating systems. This is primarily
due to all of the variables in OS types and versions,
formats and partitions, interfaces, and third-party
connectivity software packages. If you absolutely
must use your external hard drive to share data
between Windows and Macintosh systems, initialize
your drive (before you use it!) for a Macintosh OS, as
described below, and then purchase and install—on
your Windows system—available third-party software
that allows your Windows system to read from and
write to a drive that is formatted for a Mac OS.
Also, for dual-interface kits, the two FireWire
(IEEE 1394a) ports are designed for daisy chaining
FireWire devices, not for connecting two computers
to the drive at the same time.
Caution. Do not leave your drive in its pre-formatted
FAT32, single-partition condition if you intend to
transfer data between Mac and Windows systems.
Doing so will result in data loss.
Note. When using the FireWire (IEEE 1394a) connectors in
a daisy chain configuration, the drive must be powered on
for the pass through connection to function.
Page 9

9
External Hard Drive
Dismounting your drive with Windows OS
Mounting is the beginning and dismounting is the end
of the conversation between your computer and your
external hard drive. Mounting occurs automatically
when you connect and turn on your drive, but you
must initiate the dismounting action yourself. If you
disconnect or turn off the drive before you dismount
it, neither your drive nor your OS understands that the
conversation is finished. It’s like hanging up without
saying goodbye.
Caution. Never turn off power to the drive or physically
disconnect any cable attached to the drive when
the disc activity LED indicates disc activity. That’s like
hanging up in mid-sentence, and it will probably result
in data loss.
How to dismount the drive
1. Close all windows and quit all running applications
that are stored on the drive or that are using data
stored on the drive.
2. Click the icon in your system tray that represents
the Safely Remove Hardware function, and then
select the Seagate external drive.
Note. The system tray is the area in the lower right portion of
your desktop near the clock.
Windows OS displays a message when it is safe to
disconnect the interface cable or turn off the drive.
Macintosh OS
Format (initialize) for Macintosh OS
Your new Seagate external hard drive is factoryformatted with a FAT32 file format. Although your
Macintosh operating system may recognize and
mount your new drive with this format, FAT32 is
not recommended for use with a Macintosh OS.
You must format your drive using one of the
Mac OS format types before you use it with
your Macintosh operating system. Reformatting
takes only a few seconds using Apple’s Disk Utility,
which comes with your Mac OS.
Caution. Formatting destroys all data on the drive.
If you have data that you want to keep, back up
the data before formatting the drive. Seagate is not
responsible for lost data.
Multi-function push button operations.
• Press and hold button until LED comes on—
1st Power On occurs.
• After Power On, press button—initiates backup
(FireWire only).
• Press and hold button until LED shuts off—
Power Down occurs.
Page 10

10
Quick Start Guide
How to reformat and/or partition your drive
1. Open Disk Utility, which is located in
Applications/Utilities. In Mac OS 9, this utility
is named Drive Setup.
2. Select the disc that you want to reformat and/or
partition in the left column. Be sure to select
the new drive, and not an existing drive that
may contain data, because reformatting and/or
partitioning erases all data on the selected drive.
3. Click Partition if you want to partition your drive,
or click Erase to reformat the drive as one
volume. Partitioning is not required; if you select
Partition, continue to the next step. For Erase,
you’re done!
4. Choose the number of partitions from the Volume
Scheme pop-up menu. Click each partition and
enter a name, select a format, and enter a size
for each partition. (You can also drag the partitions
to change the size.) Select the Mac OS Extended
format for each partition unless you have a
specific need to select any other available
Volume Format option.
5. Click Partition, and then click Partition again.
Your drive appears on your desktop with the
volume label(s) you entered in the steps above.
If you elected to partition the drive to create two
or more volumes, each volume will have a drive
icon and label.
Data-sharing between Windows
and Macintosh systems
Seagate does not recommend that you use your
external hard drive to share data between Windows
and Macintosh operating systems. This is primarily
due to all of the variables in OS types and versions,
formats and partitions, interfaces, and third-party
connectivity software packages. If you absolutely
must use your external hard drive to share data
between Windows and Macintosh systems, initialize
your drive (before you use it!) for a Macintosh OS, as
described above, and then purchase and install—on
your Windows system—available third-party software
that allows your Windows system to read from and
write to a drive that is formatted for a Mac OS.
Also, for dual-interface kits, the two FireWire
(IEEE 1394a) ports are designed for daisy chaining
FireWire devices, not for connecting two computers
to the drive at the same time.
Caution. Do not leave your drive in its pre-formatted
FAT32, single-partition condition if you intend to
transfer data between Mac and Windows systems.
Doing so will result in data loss.
What is partitioning?
Partitioning divides
the disc into separate
volumes. It does not
increase the capacity
of the drive. Creating
more than one partition
can be helpful in
organizing your information. For example,
you might want one
volume (partition) to
store your backups
and one volume for
applications or other
information. Each
volume receives its
own volume icon, so
each volume appears
to be a separate
disc drive on your
Macintosh desktop.
Partitioning is not
required if you use
the Apple-provided
Disk Utility to create
a Mac OS Extended
format volume.
Page 11

11
External Hard Drive
Macintosh OS interface drivers
Macintosh OS X and OS 9 have built-in, up-to-date
drivers for both USB and FireWire interfaces. You
don’t need to install any drivers if you are using a
Macintosh OS.
Dismounting your drive with Mac OS
Mounting is the beginning and dismounting is the end
of the conversation between your computer and your
external hard drive. Mounting occurs automatically
when you connect and turn on your drive, but you
must initiate the dismounting action yourself. If you
disconnect or turn off the drive before you dismount
it, neither your drive nor your OS understands that the
conversation is finished. It’s like hanging up without
saying goodbye.
Caution. Never turn off power to the drive or physically
disconnect any cable attached to the drive when
the disc activity LED indicates disc activity. That’s
like hanging up in mid-sentence, and it will probably
result in data loss.
How to dismount the drive in Mac OS X and
Mac OS 9
1. Close all windows and quit all running applications
that are stored on the drive or that are using data
that is stored on the drive.
2. In Mac OS X, drag the Seagate external-drive
icon to the trash icon in your Dock area.
In Mac OS 9, drag the Seagate external-drive
icon to the trash icon.
3. You can safely disconnect or turn off your hard
drive when the drive icon disappears from your
desktop and the disc-activity LED is not lit.
4. To turn off the drive, press and hold the push button
until the LED shuts off.
Page 12

12
Quick Start Guide
BounceBack Express
BounceBack Express allows you to automatically
copy files from your hard drive to your external drive.
It supports Windows 2000 Pro and Macintosh OS X
(or higher).
Before you install BounceBack Express
• Disable all virus-protection programs.
• For Windows 2000 Pro or XP users in a corporate
environment, log on as a local administrator.
Check with your system administrator for details.
• For Macintosh OS X (or higher) users in a corporate
environment, log on as a user who has administrative rights to all drives that are involved in the backup process (which, in this case, means your internal
drive and your new external Seagate drive). You
must do this because BounceBack Express for
Mac OS X copies only those files that a logged-in
user can access.
• If you are backing up to an external device, make
sure the external device is connected to and
working properly with your operating system.
• Disconnect all other external storage devices (for
example, hard disc drives, DVD, CDR, MP3 players,
memory card readers, and so forth) that are not
involved in the backup.
Note. For detailed BounceBack Express installation and usage,
click the ? button on the BounceBack ControlCenter main menu,
or launch the BBHelp.chm file in the CMS folder on the CD.
Installing BounceBack Express software
1. Insert the Seagate Disc Utility CD.
Install BounceBack Express from the menu.
Note. If the BounceBack ControlCenter fails to appear:
Windows OS users: Double-click the CD icon,
open the CMS folder, and then click BBSetup.exe.
Mac OS users: Double-click the CD icon, open
the Mac folder, then open the BBEMac.dmg file.
That file will self-extract to a .dmg file to your
desktop. Double-click the BlueBB icon to launch
the installation menu.
2. Click Install on the BounceBack Express menu.
3. Follow the on-screen instructions to install the
software. Several applications are installed.
4. Once the InstallShield Wizard has started the installation process, several screens will be displayed in
quick succession.
5. On the License Agreement screen, click I accept
the terms of the license agreement to indicate
that you agree to the terms of the License and to
continue the installation.
6. On the Choose Destination Location screen, click
Next to accept the default location for installing
BounceBack or use the Browse button to select
another location.
Note. BounceBack
Express software for
Mac OS is limited to
versions 10.2 (or higher)
and only supports
FireWire (IEEE 1394a)
interface. It does not
support USB.
For dual-interface
kits, you must use
the same interface for
all backups that you
use for the original
BounceBack Express
installation. For
example, if you install
BounceBack Express
while your drive is
connected to your
computer’s USB interface, you must use
the USB interface for
subsequent backups.
Note. BounceBack
Express software
(version 7.0 or higher)
is not backward
compatible with earlier
Seagate External Hard
Drive models. You
should only use the
software on the CD
that is provided with
the drive.
Page 13

13
External Hard Drive
7. Click Ye s to create the default folder or your own
folder name. On the Choose Destination Location
screen, click Next to continue. This displays a
screen showing the installation’s Setup Status.
8. Registering your product enables CMS to provide
you with more effective technical support.
Upgrade Info takes you to the CMS web site and
provides the latest information on BounceBack
software.
Register Now takes you to the CMS web site to
register your copy of BounceBack Express.
Register Later continues with the installation.
After returning from the CMS Products registration
website, click OK to continue the installation
process.
A splash screen will be displayed for a few seconds
while the BounceBack Control Center is loaded.
Configuring your first backup
9. When the BounceBack Control Center displays,
you are offered 3 choices for your first backup Full
System, My Documents, and Let Me Choose.
Full System will setup a backup set that includes
all files and folders on your computer. This setting
requires a backup device be connected to the
computer.
Backup Device List identifies available hard drives
for backup use and allows you to select an available device for the full system backup.
Backup Set Schedule allows you to manually
launch a backup operation or to schedule backups to be launched.
Backup Sizing scans the folders and files on the
system drive and determines the total size of the
files to be backed up.
Note. The size shown will start at 0 and increment, as the size of
each file in the backup set is determined.
10. The BounceBack Installation screen will then
show the estimated time it will take for your first
backup to run completely. Click Backup Now to
continue with the next step.
Clicking Backup Later halts the installation
process with a data set created but no backup
having taken place. If you want to make use of
any of the advanced settings features for the
backup, select Backup Later, and then select
Settings from the BounceBack Control Center.
Note. The sooner you run your first backup, the sooner your
data is protected!
11. After clicking Backup Now, the Backup Scan
and Backup in Progress screens display the
progress of the initial backup.
Note. An option exists on this screen to allow you to view a
detailed file by file progress as the backup process is running.
If the View Detailed Progress option is clicked, the speed of the
backup process will be slowed down substantially.
12. Click OK to use other BounceBack functions—
such as associating a password with a backup
device or creating Backup Sets—or close the
application.
Page 14

14
Quick Start Guide
Subsequent backups
After the initial system backup, you have a number of
backup options including:
• Manual Backups. To run a manual backup using
the default Backup Set, click the BounceBack
icon in the system tray and select BounceBack
ControlCenter and click the Backup button on the
BounceBack Control Center.
• Auto Launch. Any time you connect a configured
and supported external backup device to your
computer, this feature scans your system disk for
new or modified files and automatically backs them
up to the backup device.
To temporarily turn off the Auto Launch feature, click
on the BounceBack icon in the system tray, and
select Disable BounceBack Launcher.
• Scheduled Backups. Use the Settings function
from the BounceBack ControlCenter to create or
modify Backup Sets and schedule their run times.
File restore
BounceBack Express backs up data in the
operating system’s native file format and uses
the same directory structure (folders and files) as
the original data. This makes it easy to find and
restore files from the backup drive using Windows
Explorer in Windows OS or Finder in Mac OS.
To restore data using Mac OS
1. Double-click the system drive, or the drive to
which you want to restore files.
2. Double-click the backup drive.
3. Drag and drop the files and/or folders from the
backup drive to the system drive or the drive of
your choice.
Page 15

15
External Hard Drive
BounceBack QuickRestore for
Windows 2000 Pro and XP
BounceBack QuickRestore can restore files and
folders from the backup drive quickly and easily.
Note: The BounceBack QuickRestore feature does not function
with Mac OS.
The steps to restore data are as follows:
1. Start BounceBack ControlCenter and select
Restore.
2. In the left side of the BounceBack QuickRestore
box, navigate to the backup that contains the file(s)
you want to restore. You will see the file details on
the right side of the screen.
3. Note the Status information for the files.
Unchanged—the file on the backup drive unit is
the same as the file on your hard drive.
Older—the file on the backup drive unit is older
than the file on your hard drive.
Newer—the file on the backup drive unit is newer
than file on your hard drive.
Deleted—the file on the backup drive unit
represents a file that has been deleted on your
hard drive.
4. Click on the file(s) you want to restore.
5. Select the Restore Path:
• Select Restore to original location.
6. Click the Restore button.
7. Select the Restore Option you want and click OK:
• Overwrite Existing Files without Asking
• Prompt before Overwriting
• Do Not Overwrite Existing Files
8. BounceBack QuickRestore scans and verifies that
the hard drive has enough space to accept the
restore. Click Continue on the Statistics screen.
9. BounceBack restores the file(s) and reports under
Restore Totals. Click OK to return to BounceBack.
Folder to restore
Restore button Restore location Restore options
Page 16

16
Quick Start Guide
Additional documentation
A detailed BounceBack Express user’s manual
is included on the Seagate Disc Utility CD.
Click (?) icon on BounceBack ControlCenter
menu to access it. You can also find it online at
www.cmsproducts.com/support. Help documentation
is also integrated within the BounceBack Express
software.
Want advanced features?
As a BounceBack Express user, you can upgrade
to BounceBack Professional, an extended version
of BounceBack Express, with advanced features
that provide an all-inclusive disaster-recovery and
backup solution.
Special features include bootability, advanced
restore, synchronization, and versioning.
• The bootability feature creates a bootable drive
image that enables users to instantly recover from
a disaster by either using the rescue CD or by
exchanging the internal PC hard drive with the
backup drive.
• The advanced restore function provides a
graphical user interface to compare and manage
information on the source drive and backup drive,
allowing users to restore lost or corrupted data.
• The synchronization feature automatically scans
both the computer and the backup drive for
changed files, and synchronizes out-of-date
versions with updated versions of the files.
• The versioning feature provides users an
innovative backup process that allows access
to older versions of files from any date a backup
was performed.
For more information about the BounceBack Professional
software upgrade, contact CMS or, to purchase BounceBack
Professional, visit the CMS website at www.cmsproducts.com/
seagate/upgrade, or call CMS Products Sales at 714-424-5520
or 800-327-5773.
Page 17

17
External Hard Drive
Troubleshooting
PROBLEM
I purchased a 160-Gbyte drive and my operating
system reports the capacity as much less
than that.
RESOLUTION
Disc drive manufacturers consider 1 Gbyte to equal
1,000,000,000 bytes. However, your computer
operates at a binary level, which considers 1 Gbyte
to equal 2
30
, which equals 1,073,741,824 bytes.
So, even though a 160-Gbyte drive stores
160 Gbytes of data, when you think in terms
of 1 Gbyte = 1,000,000,000 bytes, your system
will report a lower capacity due to the operating
system’s method of calculating the value of each
gigabyte. This means your operating system may
report that your 160-Gbyte drive has a capacity
of approximately 149 Gbytes, the binary equivalent
of 160,000,000,000 bytes.
Windows-specific problems
First, make sure you have the latest Microsoft operating
system service packs and other Windows updates
installed on your system before you spend time looking
for a drive problem. These service packs are issued to
fix bugs, add drivers, and enhance the security features
of your system. See http://support.microsoft.com for
details about how to install service packs and Windows
updates in your system. Contact Microsoft Customer
Service for information about obtaining these system
enhancements if you don’t have Internet access.
PROBLEM
The drive is connected to the USB port, but
the computer does not recognize the drive.
RESOLUTION
Check power. Confirm the drive has power and
that the power LED is glowing on the drive and
power converter. If the light is not lit, press the
push button on the front of the drive to power
the drive on. Then check to ensure that all the
connections are tight (power cable to wall, power
cable to power supply, power supply to drive). If it
still does not light up, temporarily remove any surge
protectors and plug the drive into the wall outlet.
Confirm that the USB cable is plugged in to the
computer and the drive. For dual-interface kits, the
USB port and FireWire (IEEE 1394a) port on the hard
drive cannot be plugged in at the same time. Remove
any hubs and plug the drive directly into the USB port
on the computer.
Page 18

18
Quick Start Guide
Check Device Manager to confirm the USB host
controller is properly configured. To open Device
Manager (Windows XP/Windows 2000 Pro), rightclick My Computer, choose Manage, and then
choose the Device Manager icon from the tree.
If the host controller is in “Other Devices,” then
additional drivers are required for the host. Check
with the PCI card vendor or motherboard vendor for
the appropriate drivers. USB 2.0 controllers usually
require a service pack to operate properly. Windows
XP added support for USB 2.0 in Service Pack 1;
Windows 2000 Pro added support for USB 2.0 in
Service Pack 3 and improved the support in Service
Pack 4. Windows Me does not include native support
for USB 2.0, so you should use the latest drivers
provided by the USB host adapter manufacturer.
If the USB port is on the motherboard, you should
use the latest drivers provided by the motherboard
manufacturer.
If the host controller is not seen in Device Manager,
it is probably disabled in the computer BIOS.
Check Device Manager to confirm the USB hard drive
is detected and configured properly. If not, disconnect
and reconnect the drive using a different USB port.
Try another cable and host adapter. If, after
following the steps above, you still have a problem,
try another cable and another USB port.
PROBLEM
The drive doesn’t operate in high-speed mode
when connected with the USB cable.
RESOLUTION
Windows XP added USB 2.0 support with
Service Pack 1 or higher installed. For information
on obtaining the latest Service Pack, visit Microsoft’s
support web site.
Windows 2000 Pro has a patch to support USB 2.0.
Download this patch through the Windows Update
feature in the operating system. Service Pack 4 for
Windows 2000 pro also addresses several issues
that you might experience with USB 2.0, so applying
the service pack may be the best way to gain
the maximum performance from your USB 2.0
drive. Microsoft document number 319973
(http://support.microsoft.com) describes
how to apply the updates. Also see Microsoft
Knowledgebase Article 260910 for more information.
Windows Me does not have native support for
USB 2.0, so you should use the latest drivers
for your USB host adapter. These drivers must
be provided by your host adapter manufacturer
(or motherboard manufacturer if the USB ports
are on the motherboard).
Page 19

19
External Hard Drive
Windows 98SE does not have native support for
USB 2.0, so you should use the latest drivers for
your USB host adapter. These drivers must be
provided by your host adapter manufacturer (or
motherboard manufacturer if the USB ports are on
the motherboard). You will also need drivers for your
Seagate hard drive if you are using the USB port in
Windows 98SE (see http://www.seagate.com/
support/kb/disc/faq/external_usb_drivers.html).
PROBLEM
Dual-interface kits only: The drive is connected
using the FireWire (IEEE 1394a) cable and the
system is running Windows 98SE, but Windows
98SE fails to detect it.
RESOLUTION
From Device Manager, click 1394 Bus Controller,
and then click Settings. Select the Support Non-
Compliant Devices check box, and then reboot
your computer. See Microsoft Knowledgebase
Article 221823 for more information
(http://support.microsoft.com).
Macintosh-specific problems
First make sure you have the latest Apple operating
system software updates installed on your computer
before you spend time looking for a drive problem.
These updates are issued to fix bugs, add drivers,
and enhance the security features of your computer.
To check for software updates using Mac OS X,
open the Software Update system-preference panel
and click the Check Now button. You must be
connected to the Internet to check for and download
a software update.
PROBLEM
The drive does not mount at all, and no
error message appears on my screen
when I connect the drive.
RESOLUTION
Use Apple’s Disk Utility to locate, initialize, and
mount the drive.
Page 20

20
Quick Start Guide
PROBLEM
The Macintosh OS displays the following message
when I connect the drive to my system: “Unable
to read volume—must initialize.”
RESOLUTION
Your Mac OS does not recognize the drive format.
Use Apple’s Disk Utility to initialize the drive with a
Mac OS Extended format.
PROBLEM
For dual-interface kits only: My system doesn’t
have a 6-pin FireWire (IEEE 1394a) connector.
It has a 4-pin FireWire connector, so the cables
don’t match the connector.
RESOLUTION
Purchase a 4-pin to 6-pin FireWire (IEEE 1394a)
cable to connect the drive to your system.
Note. A 4-pin to 6-pin FireWire (IEEE 1394a) cable is not included
with the drive because 4-pin FireWire connectors are not provided
on most systems.
PROBLEM
Daisy-chained device does not work when
plugged into second FireWire (IEEE 1394a)
port on my External Hard Drive.
RESOLUTION
Make sure FireWire (IEEE 1394a) cables are used
throughout the entire daisy-chain connection to
the computer. Make sure all External drives are
powered on. Power is required on all units that
the data passes through.
Page 21

Copyright © 2006 Seagate Technology LLC. All rights reserved. Seagate, Seagate Technology and the Wave logo are registered trademarks of Seagate Technology LLC. DiscWizard and
SeaTools are registered trademarks or trademarks of Seagate Technology LLC. Other product names are registered trademarks or trademarks of their owners. Seagate reserves the right
to change, without notice, product offerings or specifications. One gigabyte, or GB, equals one billion bytes when referring to hard drive capacity. Accessible capacity may vary depending
on operating environment and formatting. Quantitative usage examples for various applications are for illustrative purposes. Actual quantities will vary based on various factors, including file
size, file format, features and application software. No part of this publication may be reproduced in any form without written permission of Seagate Technology LLC. P/N: 100410824 04/06
Seagate Technology
www.seagate.com
 Loading...