

Page 1

. . . . . . . . . . . . . . . . . . . . . . . . .. . . . . . .
Medalist SL Family
. . . . . . . . . . . . . . . . . . . . . . . . .. . . . .
540sl, 851sl
. . . . . . . . . . . . . . . . . . . . . . . . .. . . .
1080sl, 1270sl
. . . . . . . . . . . . . . . . . . . . . . . . .. . . . .
ATA Interface Drives
. . . . . . . . . . . . . . . . . . . . . . . . .. . . . .
Installation Guide
. . . . . . . . . . . . . . . . . . . . . . . . .. . . . . . . .
Page 2

Contents
Introduction . . . . . . . . . . . . . . . . . . . . . . . . . 1
Before y ou begin.. . . . . . . . . . . . . . . . . . . . . . . 3
Configuring the drive . . . . . . . . . . . . . . . . . . . . 5
Attachin g the cables . . . . . . . . . . . . . . . . . . . . 8
Mounting the drive . . . . . . . . . . . . . . . . . . . . . 10
Transferring the software from the drive . . . . . . . . . 11
Configuring the computer . . . . . . . . . . . . . . . . . 13
Determining whether your BIOS accepts more tha n
528 Mbytes . . . . . . . . . . . . . . . . . . . . . . . . 14
Solutions for su rpassing the 528-M byte ba rrier . . . . . . 14
Using the EZ-Drive installat ion so ftware . . . . . . . . . 15
Standard setup . . . . . . . . . . . . . . . . . . . . . . 20
Partitioning and formatting t he dr ive . . . . . . . . . . . 21
Windows 32- bit disk access . . . . . . . . . . . . . . . . 23
Basic troubleshooting . . . . . . . . . . . . . . . . . . . 25
Advanced t roubleshootin g . . . . . . . . . . . . . . . . 26
Technical suppo rt ser vices . . . . . . . . . . . . . . . . . 34
Storing and shipping your drive . . . . . . . . . . . . . . 37
© 1995 Seagate Technology, Inc. All rights reserved
Publication Number: 36342-101, Rev. A, November 1995
Supersedes Publication Number 36309Seagate, Seagate Technology, SeaFAX, SeaFONE, SeaBOARD and the Seagate
logo are registered trademarks of Seagate Technology, Inc. Medalist and SeaTDD
are trademarks of Seagate Technology, Inc. EZ-Drive
are trademarks of Micro House International, Inc. Other product names are
registered trademarks or trademarks of their owners.
Seagate reserves the right to change, without notice, product offerings or
specifications. No part of this publication may be reproduced in any form without
written permission from Seagate Technology, Inc.
xxx
and Maximum Overdrive
Page 3

Medalist SL Family I nstallat io n Guide, November 1995 1
Introduction
Thank you for choosing a Seagate® drive. The purpose of this
guide is to assist you with installing your new hard drive. Its
organizatio n ou tlines t he complet e installat ion p ro cess f rom handling the drive in “Before you begin.. .” to offering trou bleshootin g
suggestions and technical support information. The topics discussed are:
• Handling your dr ive (see “ Bef or e you be gin. ..” on pag e 3)
• Configuring the dr ive
• Attaching cables t o the dr ive
• Mounting the drive
• Configuring the co m put er
• Troubleshoo ting
• Where to call for Seagat e technica l suppor t
Seagate provides installation software, EZ-Drive, and a 32-bit
disk access driver for Windows, SEG32BIT.386, that allows the
computer to surpass the 528-Mbyte barrier when it is imposed.
The software is store d on the drive an d must be tra nsf er r ed to a
diskette in Drive A before you partition and format the drive. A
program ca lled Seam ove is prov id ed t o make t he t ransfer easy.
We hope your installation goes smoothly, but if complications
arise, a list of co mmon sy mptom s and solutions is provided in the
troubleshooting section. If the problem persists, contact your
dealer first. Y our dealer is familiar with system integrat ion and the
conflicts that m ay arise. If you need additiona l help or informat ion
about Seagate produc ts, number s for Seagate technica l support
services are listed on pages 34–36.
Page 4
2 Med al ist SL Family Installat ion G uide, Novem ber 1995
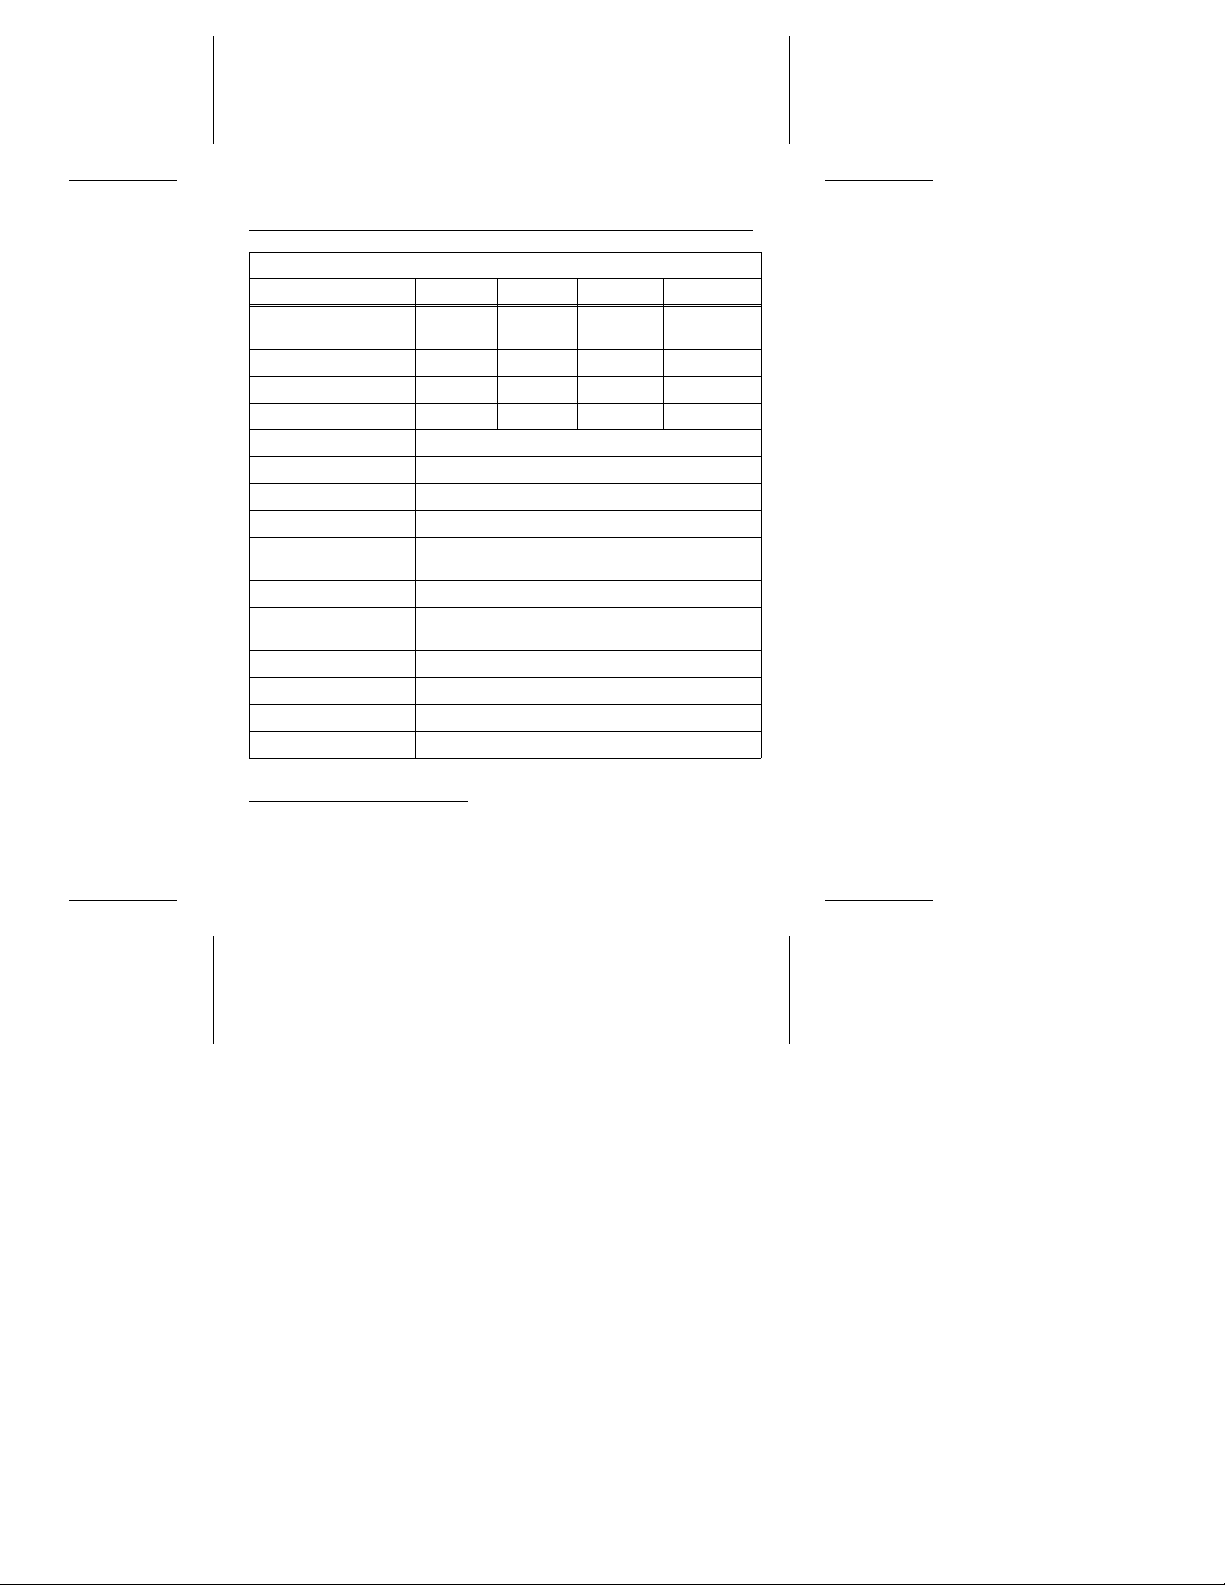
Drive features
Model ST5540A ST5851A ST51080A ST512 70 A
Formatted Capacity
Mbytes
Cylinders 1,050 1,656 2,100 2,485
Heads 16 16 16 16
Sectors 63 63 63 63
Average seek time 10.5 msec
Cache (segmented) 128 Kbytes
Spindle speed 5,376 RPM
External transfer rate 16.6
Average sustained
transfer rate
LBA Supported
Multiple block
read/write
PIO modes 0, 1, 2, 3, 4
Multiword DMA 0, 1, 2
Power-management Supported
Data streaming Supported
541 854.6 1,083 1,282
1
Mbytes per second max.
1
Mbytes per second
3.5
Supported
1. To achieve optimal performance, your computer must support PI O
mode 4 or multiword DMA mode 2. If these modes are not supported,
you can upgrade your system with a host adapter that supp orts them.
Ask your computer reseller for details.
Page 5

Medalist SL Family I nstallat io n Guide, November 1995 3
Before you begin...
The drives in this manual are refer red to by their model number s:
ST5540A for the M edalist 540sl, ST5851A for the M edalist 851sl,
ST51080A for the Medalist 1080sl and ST51 270A for the Medalist
1270sl.
Applicati on. Your Seagate drive is designed for IBM AT and
compatible personal computers. It uses the ATA interface. It is
intended for use with UL-list ed comp ut ers or similar produc ts.
Drive handling. Your drive is vulnerable to damage from rough
handling and static discharge. Do not drop your drive. Do not
remove the seals and labels on the drive. The drive warranty is
voided if the seals and labels are removed.
Static discharge. Your drive contains components that can be
damaged by static discharge. Static damage can be cumulative
and may not manif est imme diat ely. Ob ser ve thes e pr ecau tion s:
• Ground yourself before handling the drive. Wear a ground
strap that is properly connect ed to ea rth gr ou nd, or tou ch th e
metal of a power supply that is plugged int o a wall outlet while
handling the drive.
• Keep the drive in its antistatic bag until you are ready to install
it. Do not attach any cab les to the drive while it is in its bag.
• Handle the drive gently an d on ly by its edge s or fr ame. Place
it on an antistat ic sur f ace un til you ar e r ead y to insta ll it.
• Do not touch the drive ’s connector p ins or print ed circuit board.
Inspection. Use the handling precaut ions listed above whe n you
inspect the d rive. If it appear s to be damag ed, call y our dist ributor
or dealer imm ediately.
Page 6

4 Med al ist SL Family Installat ion G uide, Novem ber 1995
Warranty. Your drive comes with a three- ye ar limite d war ra nt y.
Note. W ith regards to the EZ-Drive and SEG32BI T.386 software,
there are no war r ant ies, expr ess or im pl ied, including, but
not implied, warranties of merchantability or fitness for a
particular purpose. All such warranties are expressly and
specifically disclaime d.
Maintena nce and r epair. Seagat e drives do not require maint enance. The head/disc assembly is sealed; a broken seal voids
the warranty. Seagate customer service centers are the only
facilities authorized to repair Seagate drives. Seagate does not
sanction any thir d- par ty re pair facilitie s.
Sicherhei tsan le itu n g
1. Das Gerrät ist ein Einbaugerät , das für eine maximale Um ge-
bungstempera tu r von 55°C vorges ehen ist.
2. Zur Befestigung des Laufwerks werden 4 Schrauben 6-32
UNC-2A benötigt . Bei seitlicher Befest igung darf die maxim ale
Länge der Schrau ben im Chass is nicht mehr als 3,3 mm und
bei Befestigung an der Unterseite nicht mehr als 5,08 mm
betragen.
3. Als Versor gun gssp annu gen wer de n benö tigt :
+5V æ 5% 0,6A
+12V æ 5% 0,8A (1,9A fur ca. 30 Sek. fur æ 10%)
4. Die Versorgun gssp annu ng m uss SELV ent spr ech en.
5. Alle Arbeiten auf dem Festplatte dürfen nur von Ausgebilde-
tem Service personal dur chgeführt werden. Bitte scha ffen Sie
Festplatteetiketten nicht weg.
6. Der Einbaudes Dr ives muss de n Anforder ungen gem äss DIN
IEC 950V DC 0805/05. 90 ent sp re chen .
Page 7

Medalist SL Family I nstallat io n Guide, November 1995 5
Warning.Turn off the computer before you remove its cover.
Turn off the power before you install or remove any
adapter card or the drive.
Caution. Special training or tools may be required to service
laptop compu ters . Remov in g the cover may void your
warranty. Review the terms and conditions of your
warranty bef or e rem ov ing th e cover.
Configuring the drive
Required materials:
• 2-mm jumper connector (supplied as spar e jumpers)
Your Seagate dr ive is con figu re d usin g the opt ions jumper block
shown in Figure 1 on page 6. The option settings are shown in
Figure 2 on page 7. You can conf igur e the dr ive:
• For one- or two-drive oper at ion.
• To be the master or slave drive.
• To operate as the master with drives that use a different
master/slav e timing pr otoc ol.
• For comput er s that use cab le -select .
• To use a remote drive- act ivity LED.
To configur e the drive, attac h a jumper to the pins on the op tions
jumper block for the des ired option. The configuration opt ions are:
Spare jumper. Spar e jumpers are pro vided on pins 2 and 4 an d
on pins 6 and 8 for configuring yo ur driv e. These sett ings are not
used to configure the drive. The jumper is a 2-mm connector. If
you use a larger connector, you may damage the jumper-block
pins.
Page 8
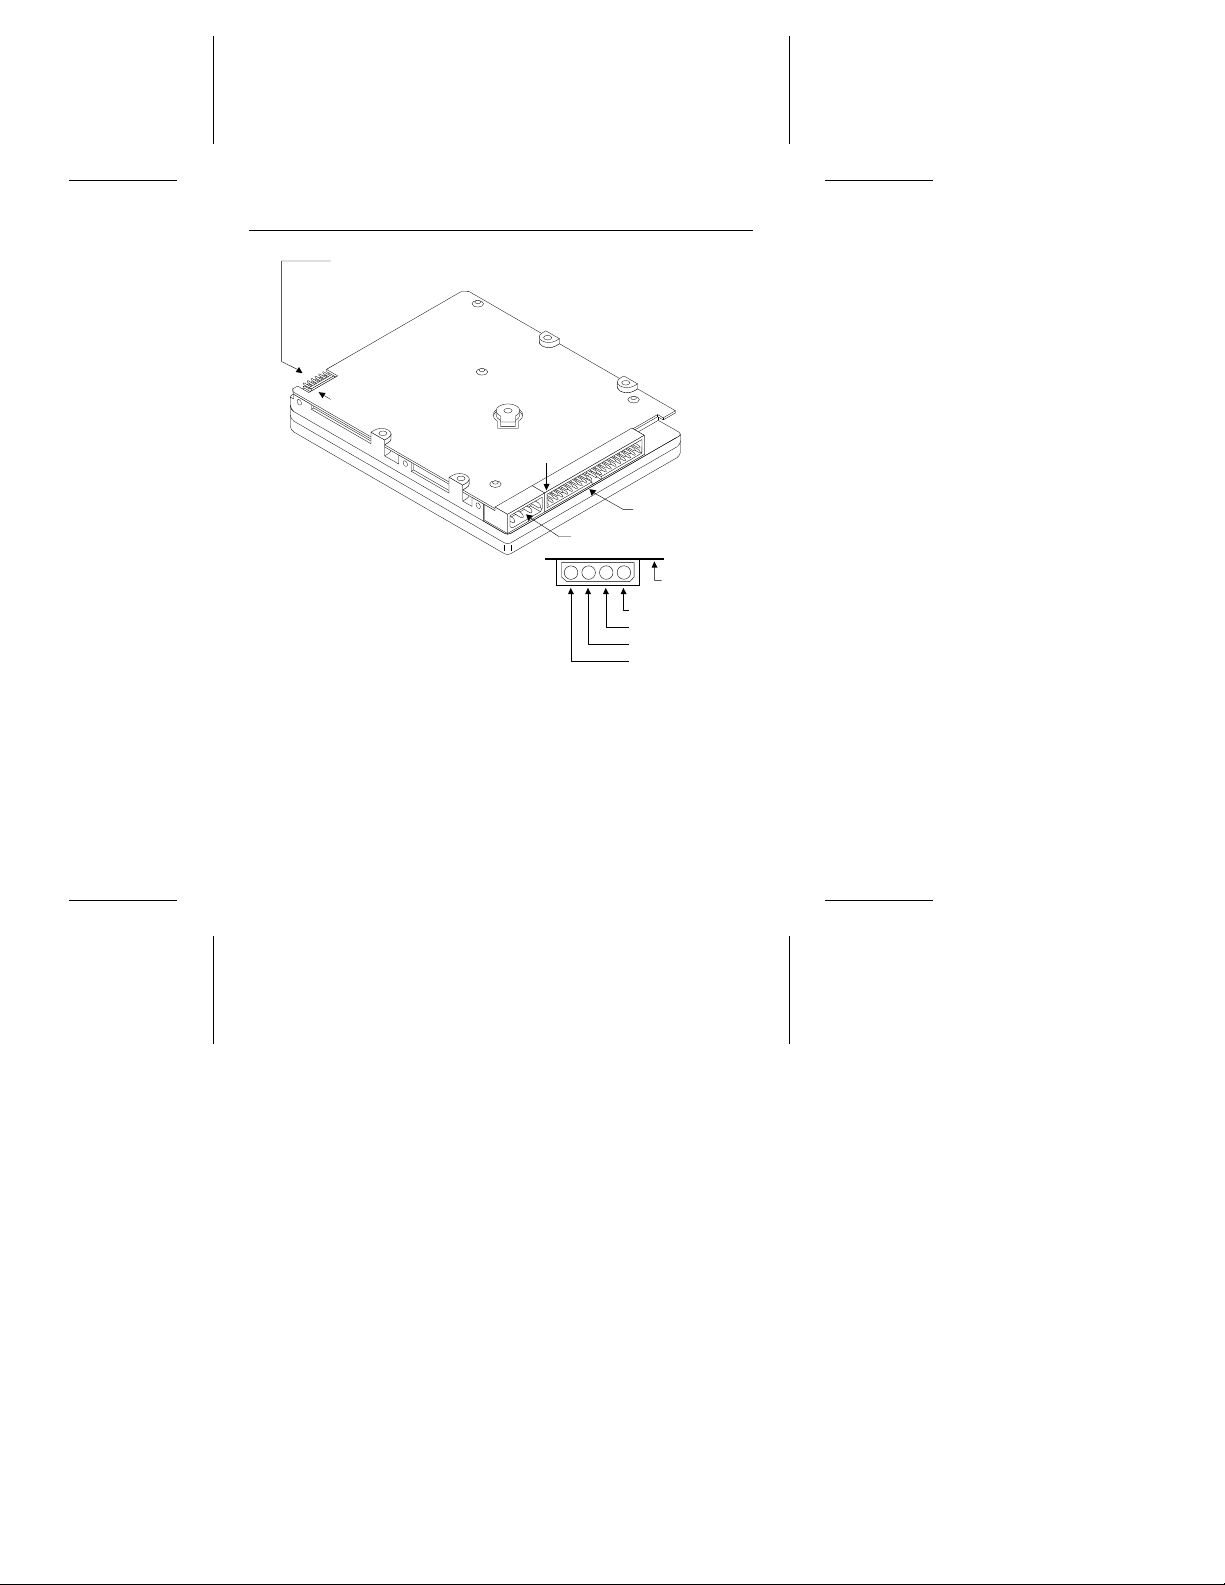
6 Med al ist SL Family Installat ion G uide, Novem ber 1995
Options jumper block
pin 1
pin 1
Interface
2
3
4
connector
Circuit
board
+5V
+5V return
+12V return
+12V
Standard
power connector
1
Figure 1. Drive c on nect or s
One-dri ve only. Use this co nfiguration if the re are no other drives
attached to the hard disc con troller .
Master w ith s la ve pr es e nt . Use this configur atio n if the dr ive is
the first of t wo drives in your syst em. The master drive is Drive 0
in the System Set up record.
Slave. Us e this configur ation if the drive is the sec ond drive in the
system. The slave is Dr ive 1 in the System Set up recor d.
Page 9
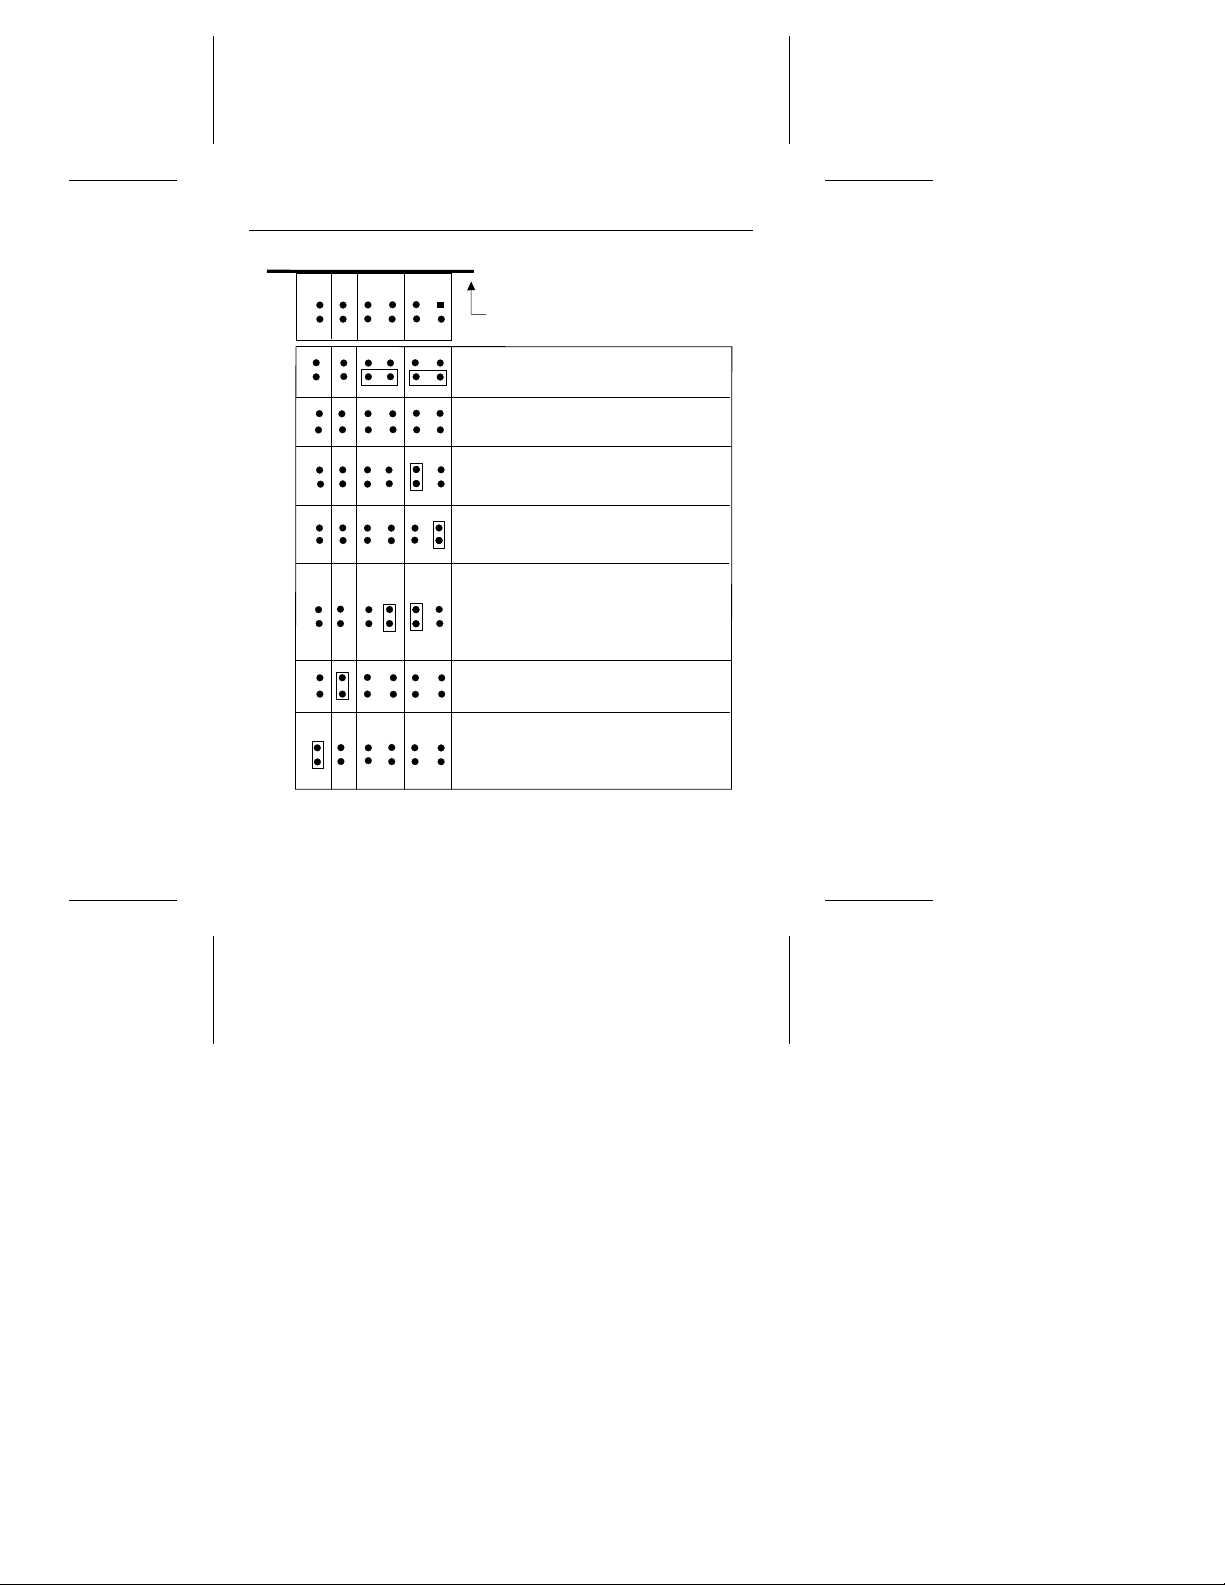
Medalist SL Family I nstallat io n Guide, November 1995 7
11
12
10
7
9
8
1
3
6
4
Circuit
board
2
side up
5
Spares
One drive only
Drive is master;
slave is present
Drive is slave when
another drive is master
Master/slave timing protocol.
Drive waits up to 30
seconds for slave to
respond.
Cable select
Remote LED
connection
pin 11 (–), pin 12 (+)
Figur e 2. Op ti o n s ju m p er bl o c k se t t in g s
Page 10

8 Med al ist SL Family Installat ion G uide, Novem ber 1995
Master/slave timing protocol. This protocol involves the com-
munication betwee n the compu ter and the disc drives dur ing the
boot cycle only. The computer queries the master drive for the
status of both drives. The slave must report its status to the
master within a certain time period. If it does not respond, a
timeout error is issued and the computer does not identify the
slave. Place a jumper on pins 3 and 4 and on pins 5 and 6 to
extend the time period to 30 seconds that the Seagate master
waits for the slave to respond.
Cable-sele ct. Use this configuration if your computer uses cable-select. Refer to your computer user’s ma nual.
Remote LED. Place the grou nd wire sid e of the rem ote dr ive-activity LED co nnector, u sually t he blac k wir e, o n pin 11 ( –) a nd the
other side on pin 12 (+) of the option s jumper block. The LED may
be damaged if the cable is att ache d incor r ect ly.
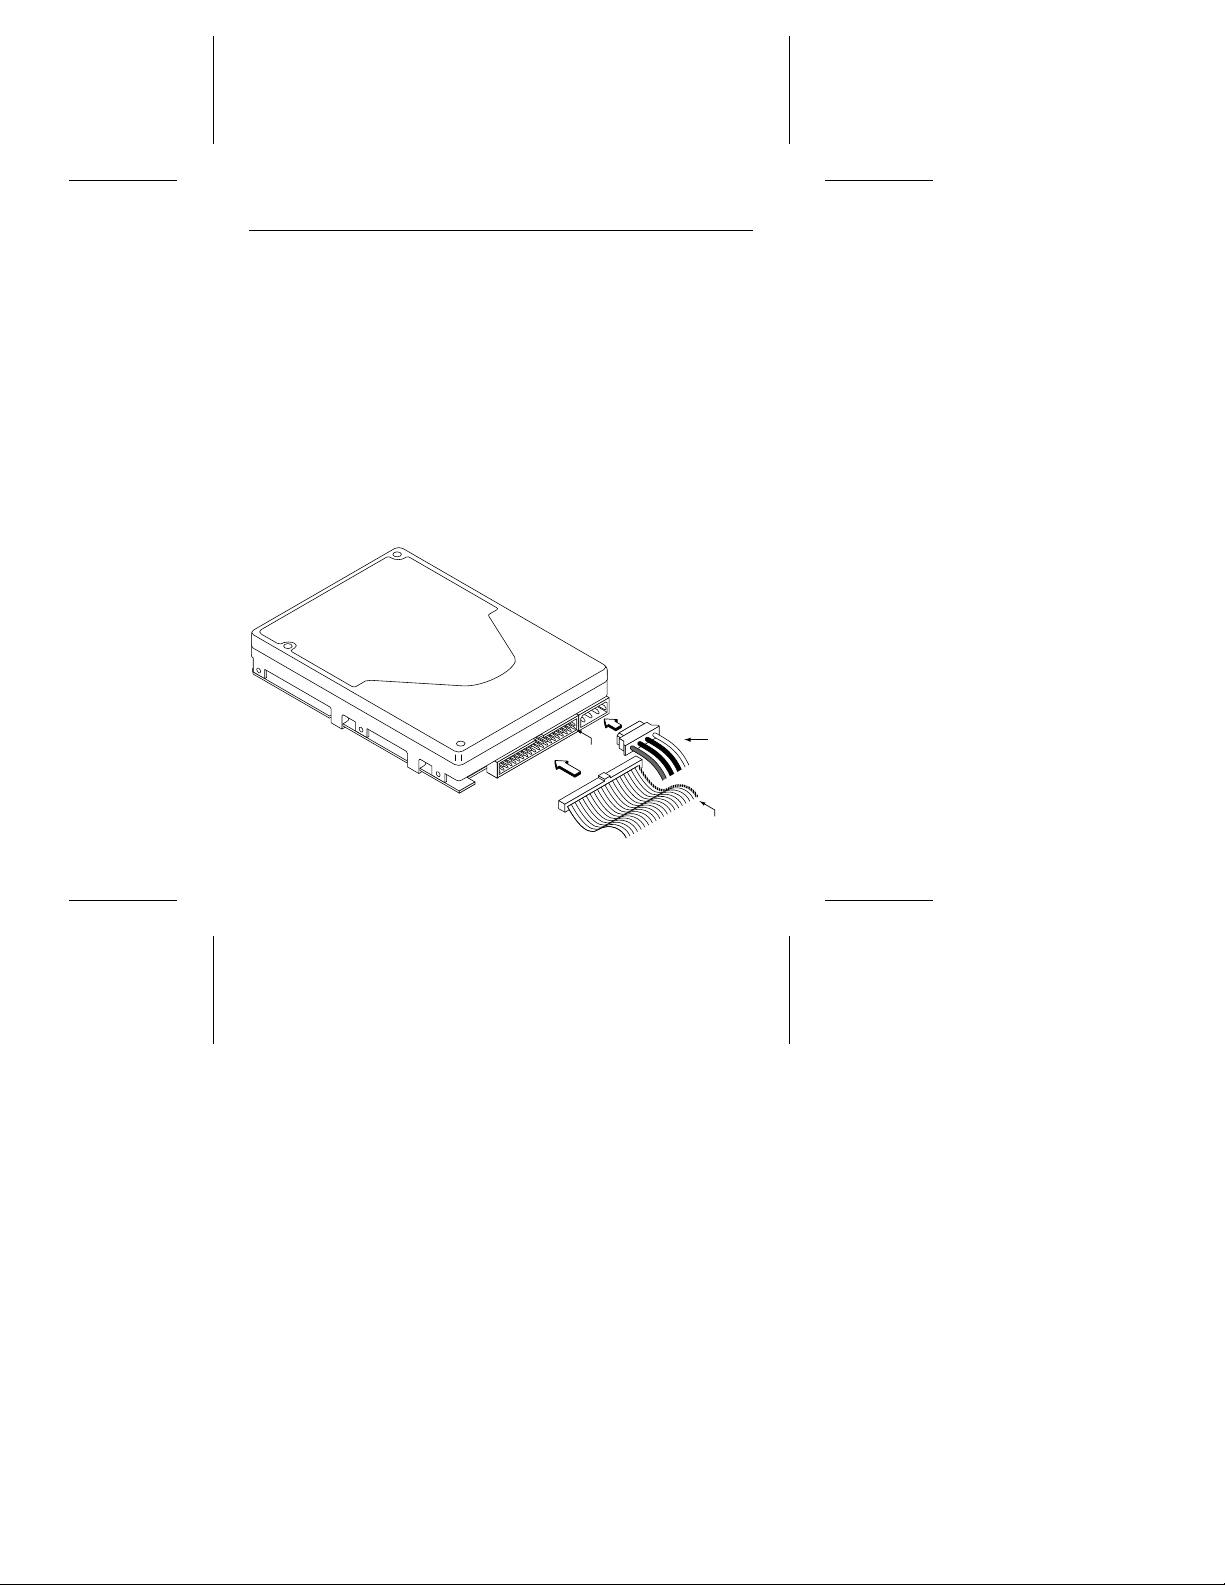
Attaching the c ables
Required materials:
• A four-conductor power- supp ly cable
• A 40-conductor interface c able with a 40 -pin, fem ale inte rface
connector for each drive you want to atta ch.
Note. To ensure the inte gr ity of your dat a, use a no nshielde d
cable with a maximum length of 18 inches (46
centimeters).
1. Attach the i nterface cabl e. Pin 1 on the drive must align with
pin 1 of the har d-disc contro ller connector. Use the edge-str ipe
on the cable to d enote pin 1. Pin 1 on t he dr ive is locat ed next
to the four-pin power conn ector .
Page 11
Medalist SL Family I nstallat io n Guide, November 1995 9
Caution. The cable and connector bond is delicate. Pulling the
cable to remove th e connector may dam age the cable.
Attach an interface connector to the drive. If your interface connector has a key, it will plug into the drive only one way. Make
sure that you do not bend the pins when you at ta ch the cab le.
Attach an inte rface- connect or to the h ard- disc cont roller conn ector on the motherboard or host adapter (see your system user’s
guide or host adapter user’s guide to determine the location of
pin 1). Make sure that pin 1 is aligned with pin 1 on the dr ive.
Cable-select installation: If your computer uses cable-select for
connection, ref er to its user ’s gu id e to de te rmin e which in te rfac e
connector is used f or the master and which is used for the slave.
2. Attach a power-suppl y cabl e to t he dr ive.
Power
Pin 1
cable
Figur e 3. Att aching c ables to the dri v e
Cable
stripe
Page 12
10 Medalist SL Family Installation Guide, Nove mber 1995
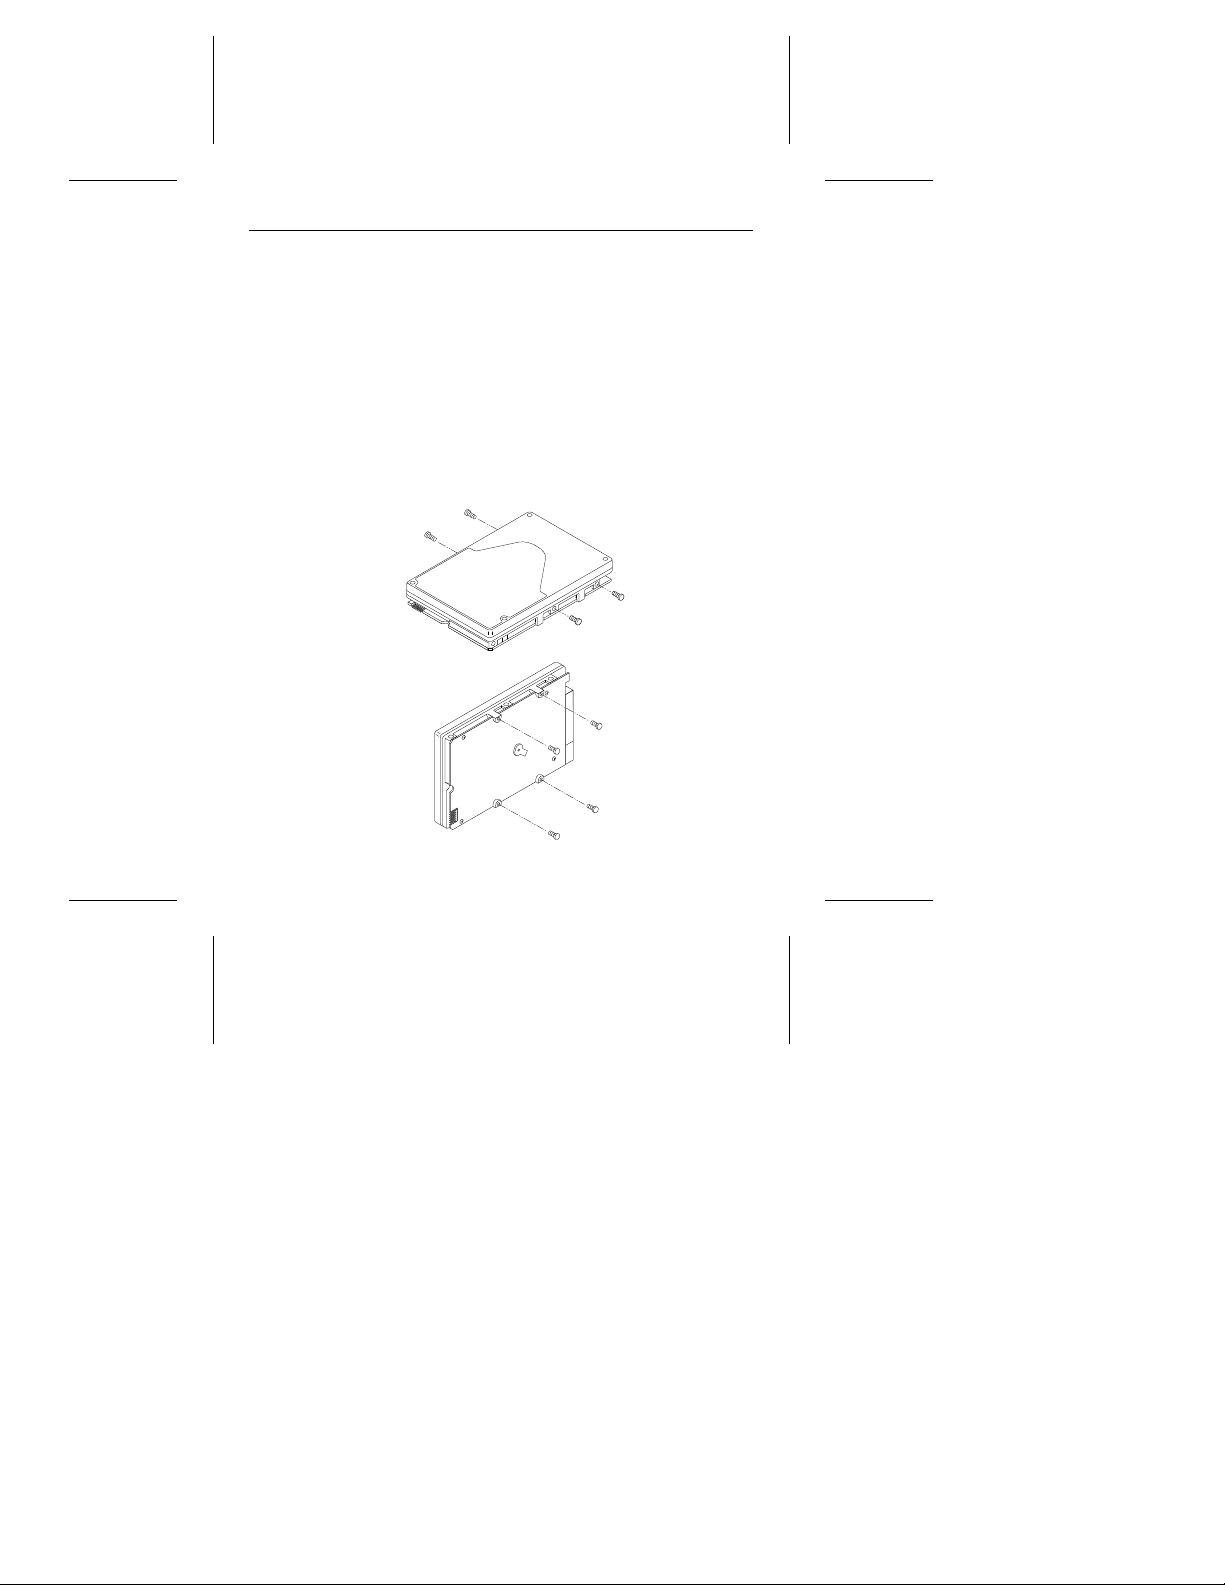
Mounting the drive
Required materials:
• Four 6-32 UNC-2A scre ws (n ot included)
The drive fits in a standard 3.5-inch bay and can be mounted in
any orientation. Position the drive so that the cables are not
strained or crimpe d. Secure it with four mounting screws no t more
than 6 full turns (0.20 inches) into the drive fram e (see Figure 4) .
Caution. To prevent drive mount ing- hole da m age, use only the
type of screws specif ied.
This completes t he har dware installation.
Figure 4. Mount i ng ho le s
Page 13

Medalist SL Family I nstallat io n Guide, November 1995 11
Transferring the software from the drive
Required materials:
• Diskette Drive A
• A bootable, blank, 1.2 -Mb yte or large r diskette for Driv e A
• A bootable disket t e w ith the Fo rma t com m and
Recent developments in drive technology have pushed drive
capacities beyond the limits that many older computers using
DOS can address. Seagate provides software that allows these
computers to surpass the address limit and access your new
drive’s full capacity. The software is stored on the drive at the
factory and must be transferred to a diskette in Drive A before
you partition and format the drive. The files stored on the drive
include:
• EZ-Drive. This is drive installation so ftware that e nables com-
puters with BIOSs that restrict the hard disc capacity to 528
Mbytes to sur pass the 528- Mbyt e ba rrier .
• SEG32BIT.38 6. This is a 32-bit disk access driver to replace
the native Windows 32- bit disk access driver. It extends 32 -bit
disk access support to drive capacities above 528 Mbytes,
multiple block read /write and PIO modes 3 and 4.
• Seamove. This is a program that automatically copies the
software and README files to a bootable diskette in Drive A.
It removes the f actor y- inst alled par tition and f orm at when t he
files are copied.
• README. This is a text file that contains information about
the Seam ove t ransfer program.
Page 14

12 Medalist SL Family Installation Guide, Nove mber 1995
To tra nsfer the software, you must put a b la nk, boot able dis kette
into Drive A. To create a boot able disk ette :
1. Insert your DO S disket t e into Drive A.
2. Type fo rmat a: /s.
The drive reads the DOS diskette and prompts you to insert
the diskette you want to form at int o Drive A.
3. Insert the blank diskette. Press
ENTER. When the format is
complete , you can transfer the installation sof tware files to the
diskette.
To transfer the sof t war e f iles :
1. Boot the computer with the diskette to which you want to
transfer the sof t war e files.
2. Enter t he System Set up. (Refer to your comput er user’s g uide.
System Setup may be called Setup, BIOS Setup or CMOS
Setup.) I f your computer uses an automatic setup system, go
to step 5.
3. Find the hard disc conf igur at ion in the Syst em Set up screen.
4. Select drive type 2 for your new Seagate drive. If your com-
puter does n ot offer drive t ype 2, use the f ollowing va lues: 615
cylinders, 4 heads and 17 secto rs.
Note. These are interim drive-type values that allow you to
access the drive f or extr act ing t he inst allat ion files.
5. Activat e the pr ompt for the Se agat e drive.
6. Type seamo v e and pr ess
ENTER.
This command tr ansfers the files from the drive to the diskette
in Drive A. When the transfer is complete, the Seamove
program erases the files and the drive partition and reboots
Page 15

Medalist SL Family I nstallat io n Guide, November 1995 13
the computer. The computer returns an invalid drive specification error if you try to access t he drive.
Caution. Do not write-protect the Seagate soft ware diskette with
EZ-Dri ve. Th e EZ-Dri ve pr ogram wri tes im portan t informatio n back to the disk et te dur ing th e inst al lation .
Configuring the computer
Configuring the com pute r involves updating the co mputer ’s System Setup records with the new drive’s translation geometry
(cylinder, head and sector information) and partitioning and formatting the dr ive. The tra nslation geo metry is kept on the CM OS
chip and is used by the BIOS to assign locations for the da ta on
the drive. Many older BIOSs place limits on the translation
geometry parameter values that do not allow it to assign data
locations for more than 528 Mbytes when DOS is used. If your
computer uses such a BIOS, it can not acce ss the ful l capacity of
your new drive.
This section covers the f ollowing issues involved wit h configuring
your computer :
• How to determine whether your computer can access your
new drive’s full capacity
• Solutions you can use to sur pass the 528- M byt e ba rrier
• Installing the drive using the EZ-Drive sof t war e
• Installing the drive using the Standar d set up
• Replacing the Windows 32- bit disk acc ess dr iver
Page 16

14 Medalist SL Family Installation Guide, Nove mber 1995
Determining whether yo ur BIOS accep ts more th an
528 Mbytes
The following suggestions can help you to determine whether
your BIOS limit s the driv e capacity to 528 Mbytes.
• If you are using a 286 or 386 computer , the native BIOS cannot
recognize mor e than 528 Mbyt es .
• If the copyrigh t date of the BIOS is ear lier than 1994, the BIO S
probably will not recognize more tha n 52 8 Mbyte s. Th e BIOS
copyright date, manufacturer and version number appear on
your screen at the beg in ning of power- on or reboo t.
• Install the drive using the Standard setup described on page
20. (Transf er the free software st ored on the drive to a diskette
before you start the installation. See page 11 for transfer
instructions .) When the installation is complet e, type dir
the new drive, and check the number of bytes free. The
number should be close to the fo rmatted capacity of your drive.
If the number is less than 528 Mbytes, you need to consider
some altern atives for surpassin g the 528-Mbyte bar rier. Some
alternatives are listed below.
d
: for
Solutions for surpassin g the 528-Mbyt e barrier
• Use the free installation software, EZ-Drive, that is stored on
the drive at the factory or equiva lent softwa re. Instruct ions for
transfer ring the softwa re to a diskette are on page 11 . Instructions for using EZ-Dr ive ar e on pa ge 15.
• Upgrade the BIOS to one that su pports more than 528 M bytes.
Such BIOSs incorporate logical block addressing (LBA) and
extended cyl inder-head-sector (CHS) add re ssing.
• Use a host adapter that supp or ts mo re than 528 Mby te s.
Page 17

Medalist SL Family I nstallat io n Guide, November 1995 15
Using the EZ-Drive installation software
Note. The EZ-Drive software is authorized for installation only
with the drive on which it is shipped.
EZ-Drive allows your computer to access your Seagate drive’s
full formatted capacity. It bypasses the BIOS during the boot
sequence and uses information it creates on Drive C to identify
the drive befo re DO S is load ed. D uring the inst allat ion, EZ-Dr ive:
• Determines ho w many dr ives are inst alled
• Enters a drive type in Syst em Setup for t he new dri ve
• Modifies the Dr ive C boot record with tran slatio n geomet ry for
the new drive
• Partitions and for mat s the new drive
• Copies the boot files to the new dr ive if it is Drive C
• Enables Maximum Overdrive, which enables read/write mul-
tiple in drives that have this feature. The Change Installed
Features o ption that appea rs in the dialog box wh en the format
is complete allows you to disable Maximu m Over drive.
EZ-Drive is easy an d safe to use. You can choos e the fully- automatic installation, which puts a single partition on the drive, or you
can install the d rive with multiple par titions of equal size (see page
18 for instruct ions on crea ting multiple p artitions o f unequ al size)
and other custom features. O nline help is available in t he Select
Installation Type menu as Inf orm at ion Help.
If you already have a drive ins talled, EZ -Drive will not har m y our
data unless you instruct it to override that drive’s partition and
format. EZ-Drive automatically arranges the drive-type position
in System Setup t o ref le ct how you have set the dr ive jum per s.
Page 18

16 Medalist SL Family Installation Guide, Nove mber 1995
Note. EZ-Drive is designed for DOS installations. It supports
Microsoft MS-DOS Version 5.0 or later.
EZ-Drive does not support:
• Toshiba laptops, XT or Micr o Chann el com put ers
• Non-ATA hard drives (SCSI, ESDI, M FM and RLL)
• Some Local Bus adapt er s that use 32- bit mode
• Some systems t hat have PIO m ode 3 or 4 active
• OS/2 and NT
Caution. Some older virus-detection programs may misidentify
the EZ-Drive infor mat ion st or ed in conv ent ional mem ory as a virus. If all 640 Kbytes of convent ional memory
are not f r ee, such pr o grams assume a virus is pr esent
and clean and restore the memory. If this happens,
information about the EZ-Drive installed drive is destroyed, and the comput er cannot ident ify the drive. Do
not use these programs.
Note. The Seagate version of EZ-Drive can not install a non-Se a-
gate drive without a Seagat e drive pr esen t.
1. Boot your computer with the Seagate software diskette. This
is a precaution to ensure that the EZ-Drive installation does
not conflict with any terminate-and-stay resident (TSR) programs that may be in memory.
2. Type ez and pre ss
ENTER.
3. Disregard the Notice dialog box. The EZ-Drive software is
authorized for installation only with the drive on which it is
shipped. Press
ENTER to continue.
Page 19

Medalist SL Family I nstallat io n Guide, November 1995 17
4. Locate the bottom box on the screen. The model number of
each drive EZ-Drive ident ifies is listed in this bo x. If a drive you
have installed is not listed or the drive order (Drive 0 is the
master, Drive 1 is the slave) is incorrect or there is a driv e not
identified message , make sure the master and slave jumper s
are set correctly on the drives and the I/O and power cables
are properly co nnec te d.
Note. Ot her tro ublesh oot ing t ips ar e ava ilable in t he I nfor m atio n
Help menu.
Caution. Turn off your compu ter bef ore resetting the jum pers or
removing the cables.
5. If the drives are correctly identified, select Select Fully Automatic Installation in the Select Installation Type dialog box.
This creates a single partition and f orm ats th e drive.
If you are installing the drive as Drive C, EZ-Drive automatically writes the syst em files t o the dr ive to m ake it bootable.
6. When the format is complet e, the Option s dialog box appear s.
Select and read Important Information. This instruction tells
you how retain the use of the EZ-Drive-installed drive when
you boot to Drive A.
7. Select Reboot to reboot the computer and save the installation. Remove the EZ- Drive diskette and put it away. It contain s
informat ion abou t the drive se tu p.
Toward the end of the boot sequenc e, your screen should display
a prompt for booting with a diskett e followed quickly by the Micr o
House banner and the C: prompt. If the boot prompt and the
banner fail to appear, your computer has not recognized the
EZ-Drive inst al led driv e. Re try the inst allat ion.
Page 20

18 Medalist SL Family Installation Guide, Nove mber 1995
Booting wit h a disket te af ter EZ- Dr ive is insta lled
When you boot with a diskette, you must allow the EZ-Drive
informatio n about the drive to load into mem ory before the system
information on the diskette loads. The diskette accesses the
BIOS directly, which does not recognize the EZ-Drive-installed
drive. To boot your comput er with a diskett e:
1. Boot the com p ut er wit h the diske tte- drive door open.
2. Press th e
CTRL key when the following message appears near
the end of the boot seque nce:
Hold the CTRL key down to boot from a floppy
3. Insert th e boot diskette. The computer boo ts to Drive A.
Installing multiple partitions
The custom installat ion option in the instal lation menu allows you
to create up to nine partitions of equal s ize on the drive . To create
partitions of unequal size on your EZ-Drive installed drive, use
the FDISK and FORM AT command s on a DOS diskette. Refer to
your DOS manual if you need assistance deleting, creating and
formatting par titions. Th is instru ct ion ass um es y ou ha ve alr ead y
installed the drive with EZ-Dr ive.
1. Boot you r co m puter from Drive C.
2. Insert a bootable diskette that contains the FDISK and FOR-
MAT program s into Drive A and ch ange the prom pt .
3. Type fdisk.
Caution. If you have two drives, be sure you choose the
correct drive befor e deleting t he par tition. Delet in g
the pa rtit ion er ase s ev ery thin g on t he driv e. Opt io n
5 allows you to select the drive you want to use.
Page 21

Medalist SL Family I nstallat io n Guide, November 1995 19
4. Select option 3 to delete the primary partition from the EZDriv e in stal le d drive.
Note. EZ-Drive puts a volume lab el on the par tition it creat es.
You must enter the label nam e to delet e the par tition.
5. Repartition the drive in the partition sizes you want. Refer to
your DOS manual if you need assistance creating partitions.
Remember to make th e Drive C primar y par tition activ e.
The computer will reboot whe n the partition proce ss is complet e.
However, you must make sure the EZ-Drive installed drive is
present to continue with the format. (The EZ-Drive banner appears when the dr ive is recogn iz ed. )
1. Remove the diskette while the computer reboots. Press the
CTRL key when the follo win g messa ge app ear s:
Hold the
CTRL key down to boot from a floppy
The message is ve ry quick and yo u may n eed to boot severa l
times before you succeed. (Some computers allow you to
press the
CTRL key early.) If you get an Invalid OS error
message, the computer has not found the EZ-Drive installed
drive, and you must star t the bo ot process again.
2. Reinsert the diske tte.
3. Type format
drive
drive :
for each par tit ion you have crea te d.
represents the letter assign ed to the par t ition.
Note. DOS automatically assigns a letter to each partition.
Use the appropr iat e lett er in th e forma t stat em e nt .
If you are formatting Drive C, type format c : / s to make the
drive bootable.
4. Reboot the computer when you are done form a tting.
Page 22
20 Medalist SL Family Installation Guide, Nove mber 1995
Standard setup
If your comput er accepts the full capacity of the new dr ive, System
Setup must be co nfig ur ed to r ec ognize the d rive . Som e c om put ers automatically detect the new drive and configure System
Setup. This section tells you how to manually configure System
Setup. When t he setup is comple te, partition and for mat the drive.
1. Turn t he computer on.
2. Enter System Setup. (Refer to your computer user’s guide.
System Setup may be called Setup, BIOS Setup or CMOS
Setup.)
3. Find the hard disc conf igur at ion in the Syst em Set up screen.
4. Select a dr ive type that ma tches the drive translation geom etry
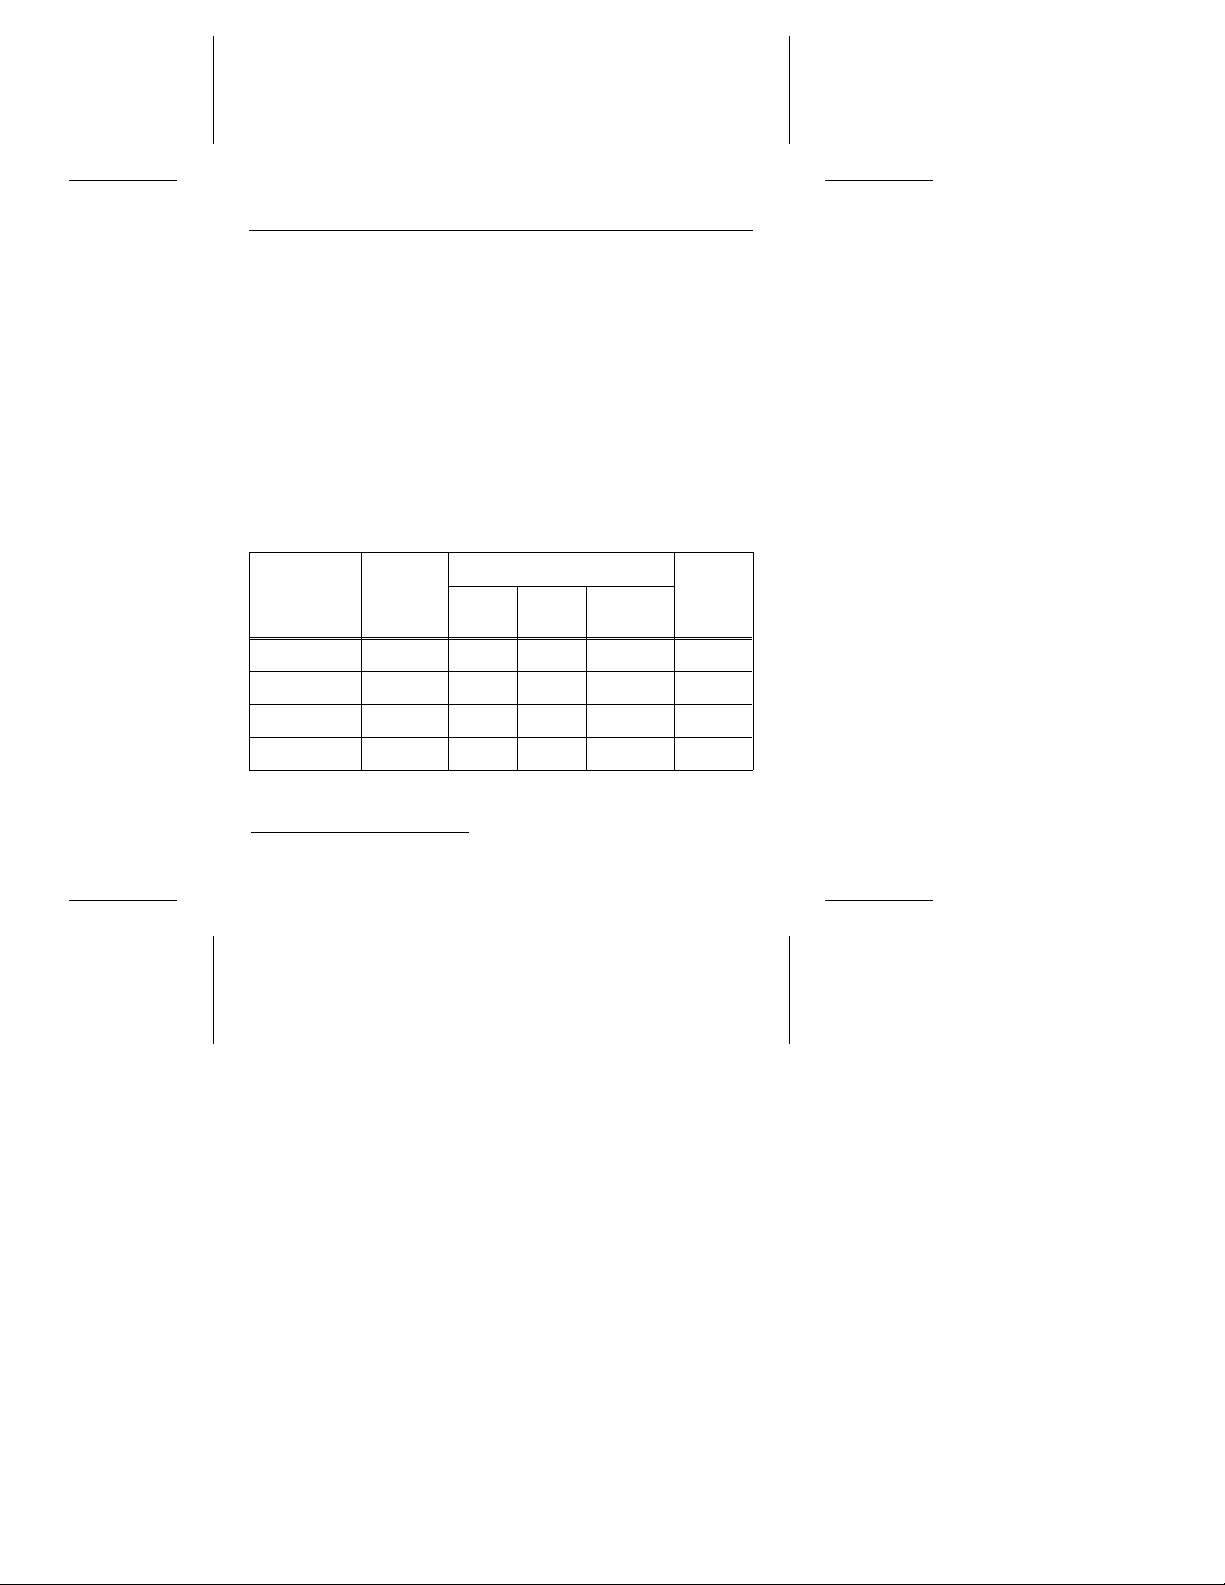
for your drive as shown in the table.
Model
CHKDSK
Mbytes
Translat io n geomet r y
2
Cyl Heads
Sectors
per track
CMOS
(Setup)
Mbytes
ST5540A 541.9 1,050 16 63 51 7
ST5851A 854.6 1,656 16 63 81 5
ST51080A 1,083.8 2,100 16 63 1,034
ST51270A 1,282.4 2,485 16 63 1,223
Note. CHKDSK and CMOS capacities are approximations.
The capacities your com puter repo rts m ay vary slight ly.
2. One Mbyte equals 1,000,000 bytes.
3. One Mbyte equals 1,048,576 bytes.
3
Page 23

Medalist SL Family I nstallat io n Guide, November 1995 21
Select the user-defined or custom drive-type option, if available, and enter your drive’s tr anslation geom etry.
If a user-defined drive type is not offered, select the drive type
with the largest translation geometry. This is the maximum
drive capacity your computer can recognize in its current
configuration. To access the full capacity of your drive, you
must upgrade your computer with a BIOS or host adapter
capable of accessing mor e t han 528 Mbyt es .
Note. The drive does not use write prec omp and landing zone.
If these paramet er s are list ed, make t heir values zer o.
If you upgrade your system at a later date to achieve the
drive’s full capacity , you must repa rtition and refor mat the disc.
Be sure to back up your data first.
5. When you have completed sett ing the translation g eometry for
your drive, save the values and exit System Setup. Reboot
your computer . Partit io n and for mat the dr ive.
Partitioning and fo rmatti ng th e drive
Before you can use your Seagate drive, you must partition and
format it. In this guide we discus s partitioning and formatting your
drive with DOS—refer to your DOS user’s guide for assistance.
If you are using another operating syst em, consult your oper ating
system user’s guide f or par titioning and for m atting instruc tion s.
Note. If you have not copied the free installation software to a
diskette, your compu ter wi ll detect a partition on the dr ive.
You must erase this partition before you can access the
full drive capacity. When you transfer the files to a disket te
using Seamove (see pag e 11 for instructions), the partition
is automatically er ase d when the t ransf er is com plet e.
Page 24

22 Medalist SL Family Installation Guide, Nove mber 1995
Low-level formatting
The drive is low-le vel formatte d at the factory using 512 byt es per
sector. Low-leve l for m at t in g is not required.
Partitioni n g
You must part ition the drive into one or more logical driv es before
you can use it.
Caution. Partitioning or formatting a dr ive at any level erase s all
data on it. Make a bac kup copy of your ex isting files on
another drive before you repartition or reformat. Seagate assumes no liabilit y if you erase you r data.
You can partition a drive as follows:
1. Insert a bootable diskette in to Drive A. Turn th e computer on.
2. After the computer has completed booting, remove the boot
diskette from Drive A. Insert a diskette that has the FDISK
utility into Drive A and type fdisk. Press
ENTER.
Note. If you have two drives in your syst em, the menu displays
five options. Option five allows you to select the drive
you want to partition. Make sur e you selec t the cor r ect
drive.
3. Select
4. Select
create DOS par tition or logical DOS drive
create prim ary DOS pa rtit ion
. Use the maximum avail-
. Press ENTER.
able size for your primary partition and make the partition
active for Drive C. This puts the entire drive on one partition
and allows you to lo ad the DOS boot inf orm ation on t he dr ive.
Press
ENTER for each subsequent select ion.
After all of the appropriate selections are made, the computer
reboots itself. You must place a bo otable diske tte int o Driv e A.
Page 25

Medalist SL Family I nstallat io n Guide, November 1995 23
High-level format ting
High-level form atting (henc eforth re ferred to as formatting) builds
the file allocation table (FAT) DOS uses to access files on the
drive. If you put more than one partition on the drive, you must
format each pa rtitio n. Use the DOS F ORMAT ut ility to for mat the
drive as follows:
1. Type the following command at the DOS prompt:
format
drive
drive:
/v /s
: designates the drive you are formatting. If you are
formatting the boot drive or if your system contains only one
drive, type c:. To form a t a second drive , type d:.
/v tells th e computer to create a volume label for the partit ion
after it is formatted. Labeling can prevent someone from
accidentally delet ing t he par tition and losing yo ur data.
/s tells the computer to copy the system files to the drive to
make it bootable.
2. When the computer prompts you for a volume label, you can
assign a name to the drive volume of up to eleven cha racter s
or leave it blank. Press
ENTER.
Windows 32-bit disk access
If Windows enables the 32 -b it disk ac cess durin g its installat ion,
an error message appears when Windows loads after you have
installed a drive with more than 528 Mbytes. The W indows 32-bit
disk access driver must be turned off for you to open and use
Windows. Use the Sea gat e r eplace ment dr iver , SEG32 BIT .3 86,
to restore 32-bit disk access capability. To open Windows and
restore 32- bit disk acc ess:
1. Press
ENTER to open Windows.
Page 26

24 Medalist SL Family Installation Guide, Nove mber 1995
2. Open the Mai n men u .
3. Open the Control Panel.
4. Open Enhanced.386.
5. Select Virt ua l Memory.
6. Select Change.
7. Select 32-Bit Disk Access at the bottom of the screen to
change its stat us.
8. Select OK. Follow the screen instructions to reboot.
You can re-establish the 32-bit disk access capability using the
SEG32BIT.3 8 6 sof twar e as f ol lows:
1. Load Windows.
2. Open the Prog ram Manage r men u and se lect File.
3. Select Run.
4. Load the Seagate softwa re diskette.
5. In th e com m and line box, type: dri v e :s ts etup
6. Read the license agree ment that appears on the screen. If you
agree to the ter m s, select
ACCEPT AGREEMENT to continue.
7. The next screen lists the features the SEG32BIT.386 driver
supports. If your computer supports these features, they will
be active in 32-bit disk access mode with SEG32BIT.386 for
all drives that support them. Select Instal l Driver to continue.
8. Once the driver is installed, you must enable the 32-bit disk
access opt ion in th e Windows con trol p anel t o make it o per ational. You can choose to enable the option now or later. If you
choose to enable the driver now, the program opens the
Windows main menu. Repeat steps 3 through 7 to enable
SEG32BIT.3 8 6 32-bit disk acce ss.
Page 27

Medalist SL Family I nstallat io n Guide, November 1995 25
Basic troubleshooting
Warning.Always turn off the comp uter befor e changing jump ers
or unplugging cables and card s.
Caution. Your drive and computer contain static-sensitive de-
vices. Wear a ground strap or use other antistatic
precaution while handling your d rive .
If you have installed y our drive and it d oes n ot f unct ion pr oper ly,
perform the following basic checks:
• Verify compatibility. Verify that the host adapter and the
drive are appropriately matched to each other and to your
computer . Refe r to relevan t docum en tation for details.
• Check all cards. Ver if y that a ll car ds a re seate d in th e ir slot s
on the mother boar d an d are secu re d w ith mou ntin g screws.
• Check all cables. Make sure all rib bon and po wer cables are
securely connected. Ribbon cables are easily damaged, especially at the connector. Try a new cable or a known good
cable. Make sure no socket pins were bent when the cable
was inserted. For each cable, verify that cable-connector pin
1 is aligned with equipm ent -conn ect or pin 1. The edge- st ri pe
on the ribbon cable is used to denote pin 1.
Caution. Do not reverse-plug connectors. This will damage
your drive if the power is applied.
• Verify equipment configuration. Review the instructions in
this guide and the host adapter installation guide and make
sure that all appropriat e jumpers ar e installed, or removed, to
suit your application.
Page 28

26 Medalist SL Family Installation Guide, Nove mber 1995
• Check the power-supply specifications. If n ew de vices are
installed, your computer’s power supply may not support the
new total power requireme nt . Consult your dealer .
• Verify the drive type setting in System Setup. The drive-
type values used to conf igur e Sy stem Set up must no t exce ed
the physical specifications of your drive (see the translation
geometry t able on page 20). Also, if you have an older BIOS,
the translation geometry values must not exceed the limitations set by the BIOS.
• Check for viruses.
Before you use someone else’s diskette
in your system for the f irs t time, scan the disk et te for viruses .
Advanced tro ubl eshooting
If you have performed the preceding basic checks but the problem has not bee n solved, follow these guidelines f or troubleshooting specific cases:
The system does not recogni ze the dr ive.
• Check all cables.
• Make sure the power sup ply is adequ ate for sy stem needs.
• Reboot the computer and make sure the drive motor runs. If
your drive is ver y quiet, it may be dif ficult to hear its d iscs reach
operating speed. Recheck all drive cables if the drive is not
running.
• Verify the System Setup drive type values. Each drive present
must be rep re sent ed in Sys te m Se tup.
• Try a warm bo ot (a reboot wit hout turning o ff computer power).
To do this, press
If the drive is recognized after the warm boot, the computer
CTRL, ALT, and DELETE at the same time.
Page 29

Medalist SL Family I nstallat io n Guide, November 1995 27
BIOS’ setup t est may be com pleting bef ore the drive is r eady.
One possible solution is to slow your computer’s processor
speed during start up. I f your comput er has a turbo switc h, set
it to slow speed before tur ning t he compu te r on. If ther e is n o
turbo switch, yo u may b e able to u se keybo ar d co mm ands to
slow the processor speed; see your computer manual for
details. After the computer is up and running, return the
processor to th e fast speed.
Another solution is to warm-boot your computer after every
power-on.
• Check for I/O address conflicts. To isolate the conflict, first
verify that the drive and host adapter are compatible w ith your
computer by removing all the periphe ral adapter cards (power
must be off) except for the video card. Then reinst all the drive
and host adapt er card. If this is succes sf ul, reinst all th e other
peripherals one at a time unt il the con flict reoccu rs .
After you have isolated the source of the address conflicts,
you can reso lve the conflict by chan ging the I/O address of the
peripheral that app ear s to cause th e conflict.
• If your d rive was inst alled with EZ- Drive, the special instru ction
in the boot sequence on Drive C may have been bypassed.
Remove th e disket t e and re boot . The sec tion “Boo ting with a
diskette after EZ-Drive is installed” o n page 18 de scribes h ow
to boot with a diskette.
• If the computer does not recognize the slave drive following
power-on, the slave may not be communicating with the
master during the boot cycle. Try reconfiguring the master/slave tim in g prot ocol jum per s discussed on page 8.
Page 30

28 Medalist SL Family Installation Guide, Nove mber 1995
The deale r partitio ned and high-level formatted t he drive f or
you in the store. Later , you install ed the drive and i t does not
respond.
• Reboot the comput er and make sur e the dr ive sp in s up.
• Check all cables.
• Make sure the power sup ply is adequ ate for sy stem needs.
• Use the same ver sion of DO S wit hin all par titions . Ma ke s ure
the DOS version the dealer used to partition and format the
drive is the same as the version you installed on your computer. If it isn ’t, see your dealer.
• Verify the System Setup drive type value. You must install the
drive using the same drive type or translation geometry that
your dealer used to partit io n the driv e.
• Check for I/O address conflicts between peripher al car ds.
• Check for viruses.
The screen re ma in s bl ank wh e n you po w er up the syst em .
• Make sure the monit or is plugged in and turne d on.
• Check all cards. Make sur e the video card is seat ed in its slot
and secured w ith mou nt ing scr ews.
• Check all cables. Make sure the video-card cables are securely attached.
• While the computer is powered down, remove the drive host
adapter. If the screen turns on after you reboot, the host
adapter may be incompatible or defective. If so, see your
dealer.
Page 31

Medalist SL Family I nstallat io n Guide, November 1995 29
The system hangs in FDISK or fails to create or save the
partition r ecor d.
• Check all cables.
• The DOS ut ilitie s d isket t e ma y b e c orru pt ed. T ry yo ur b acku p
DOS diskette.
• Make the partitions smaller.
• Try another drive ty pe or translation geometr y. The computer’s
BIOS may not accept a particular translation geometry for
writing into the CMOS setup mem or y.
• Change the inter ru pt jump er setting on the host adapt er.
• Check for media defects at the beginning of the drive. Use a
third-par t y sur face sc an ut i lity.
• Some BIOSs have a Track 0 protection feature that protects
Track 0 from viruses. This can cause FDISK to hang the
system. You mus t disa ble this fea ture in Sys tem Se tup befor e
you can use FDISK. See your computer reference guide for
assistance. Be sure to re-enable this important feature when
FDISK is done.
System error me ssag e, “Dri ve no t Rea dy, ” app ear s.
• Check all cable connections . For each ribbon cable, verify that
pin 1 of the cable is matched to pin 1 of the connector. Pin 1
is usually denoted by the edge-s tripe on the ribbon cable.
• Make sure the power sup ply is adequ ate fo r system needs.
• Reboot the comput er and ma ke sure the dr ive sp in s up.
The FDISK error mess age, “No Fixed Disk Pr esent,” appear s.
• Check all cables.
• Make sure the power sup ply is adequ ate for sy stem needs.
Page 32

30 Medalist SL Family Installation Guide, Nove mber 1995
• Reboot the comput er and ma ke sure the dr ive sp in s up.
• Verify the Syst em Setup drive type valu es.
• Check for I/O address conflicts.
The drive does not form at t o fu ll capacity.
• Verify your computer’s Syst em Setu p drive- type valu es. On e
of the following problems may have occurred: 1) the values
may be set for a n incorrec t drive type or translat ion geom e try;
2) you may have ente red a parameter value that exceeded the
physical capacity of the drive; 3) you selected a translation
geometr y or drive type that does no t take full advanta ge of the
drive’s capacity; or 4) the drive’s physical specifications exceed the translation geometry limits imposed by the BIOS.
Refer to “ Standard set up” on page 20 if any of these cases is
true.
If you reset the System Setup drive-type value, you must
partition and high-leve l form at the dr ive again.
• If you partitioned the drive into individual logical drives, you
may need to make the partitions sm aller so that the com puter
can use all of the drive’s capac ity.
• If your c omputer supports LBA mod e, you m ay nee d to ena ble
an LBA mode function in System Setup to get the drive’s full
capacity. Ref er to your computer’s ref erence guide.
• You can use the EZ-Dr ive sof t war e to inst a ll the drive.
DOS messages “Disk Boot Failure,” “Non-System Disk,” or
“No ROM Basic - SYSTEM HALTED,” appear .
• Reinstall the DOS system files using the DO S SYS utility .
• Check all cables.
Page 33

Medalist SL Family I nstallat io n Guide, November 1995 31
• Use FDISK to verify that the pr im ary par t ition is active.
• Check for viruses.
System error message, “HDD controller fa ilure,” appears.
• Confirm the jumper setting s on the dr ive.
• Verify the Syst em Setup drive type valu es.
The error message “Microsoft Windows 32-bit disk driver
(WDCTRL) phase 03, 3f” appears whe n you op en W in dow s.
• A device conflict occurs between the native Windows 32-bit
disk access driver an d drives that have capacit ies greater than
528 Mbytes. To get the adva ntages of 32 -bit disk a ccess and
more, install the SEG32BIT.386 32-bit disk access driver.
Installation inst ruct ions are on page 23 .
Disabling EZ- Dr iv e
Required materials:
• A bootable dis ket t e
• A diskette that has FDI SK. EX E
To disable EZ-Drive, use the DOS uti lity FDISK/M BR. This utilit y
replaces the EZ-Dr ive bo ot info rma tion on Drive C with th e DOS
master boot record. The DOS master boot record uses the
informat ion in Syst em Setup t o ac cess the dr ive. Your co m put er
will stop accessing EZ-Dr iv e- inst al led driv es that ar e larg er than
528 Mbytes. To access your drive’s full capacity, you must
reconfigure System Setup with the translation geometry shown
for your drive in the table on page 20. You must also partit ion and
form at your drive.
Caution.Partitioning and formatting erases the data on the
drive. Back up your data b e fore you d is able EZ-Drive.
Page 34

32 Medalist SL Family Installation Guide, Nove mber 1995
1. Turn t he computer off.
2. Insert a bootable diskette into Drive A and turn the computer
on. Your computer must boot to Drive A without loading
EZ-Drive into the system memory.
3. When the boo t cycle is complete, place a disk ette that has the
FDISK utility in Drive A.
4. Type fdis k/ m b r and press
ENTER. This command erases the
EZ-Drive-modified master boot record on Drive C and replaces it with the standard DOS master boot record. The
computer can no longer identify drives that have capacities
greater than 528 Mbytes installed using EZ-Drive. You must
partition and format the drive to make it accessible (see
Partitioning and formatting the drive on page 21).
Disabling M ax imum O ver dr ive
Maximum Overdrive enables the drive’s read/write multiple feature. You can disab le M aximum O v e rdrive during the inst allation
process or anyt im e aft er war d.
To disable it during the installation, select the Change Install
Features optio n in the Options dialog box that appears when the
format completes. This feature allows you to enable or disable
Maximum O verdrive.
To disable it after the drive has been inst alle d:
1. Insert the Seagate software diskette with EZ-Drive into the
diskette drive.
2. Type ez at th e com m a n d lin e .
3. Go to the Main menu and select Installation Options. Press
ENTER.
4. Select Change I nstall Feat ur es an d press ENTER.
Page 35

Medalist SL Family I nstallat io n Guide, November 1995 33
5. Select Disable M ax imum Overdr ive.
6. Press the
7. Use th e down-arrow key to select Save Changes. Pr ess
ENTER key to change the stat us .
ENTER
to save.
Additional EZ-Drive troubles hooting and help information is ava ilable when you select Information Help in the main menu. Answers to frequently asked troubleshooting questions are
available in the EZ-HELP.EXE file on the diskette.
Page 36

34 Medalist SL Family Installation Guide, Nove mber 1995
Technical support services
If you need assistance inst al ling your drive, consult your dealer.
Your dealer is familiar with system configurations and can help
you with system confl icts and other techn ic al issues.
If you need additional assistan ce with your Seagate drive or ot her
Seagate products, you can call SeaBOARD
gate Technical Suppo rt FAX, SeaFONE
technical support information is also available on CompuServe
and throu gh the I nt er net .
SeaBOARD
Using a mod em, you can acc ess docum entat ion, dr ive s pecifi cations and jumper settings for Seagate’s entire product line. You
can also download software for installing and analyzing your
drive.
SeaBOARD is available 24 hours daily. It supports communications up to 9,600 baud. Set your communications software to
eight data bits, no parity and one stop bit (8-N-1). SeaBOARD
phone number s are listed in the following table.
Location Modem number
United States 408-438-87 71
England 44-1-62-847- 80 11
France (+33 1) 48 25 35 95
Germany 49-89-140-9 3 31
Singapore 65-292-6973
®
Sea
,
®
or SeaTDD. Seag ate
FAX
®
,
Sea-
Page 37

Medalist SL Family I nstallat io n Guide, November 1995 35
Location Modem number
Thailand 662-531-8111
Australia 61-2-7 56-2359
Korea 82-2-556-7294
SeaFAX
You can use a touch-tone telephone to access Seagate’s
automate d FAX system to receive technical supp or t infor mation by return FAX. This ser vice is ava ilab le 24 hour s daily.
Locat ion
United States
England
Telephone number
408-438-262 0
44-1-62 -8 47-7080
Seagate Technical Support FAX. 408/438 -8137
You can FAX questions or comments to technical support
specialists 24 hours daily. Responses are sent between
A.M. and 5:00 P.M. (Pacif ic tim e) M onday through Fr iday.
8:00
SeaFONE. 408/438- 82 22
You can talk to a technical support specialist between
8:00
A.M. and 5:00 P.M. (Pacific time) Monda y through Friday.
SeaFONE provides recorded technical information on selected Seagate products while you are on hold. You can
access the reco rdings 24 hours daily. Before calling, note your
system configuration and drive model num be r (S T
xxxx
).
Page 38

36 Medalist SL Family Installation Guide, Nove mber 1995
SeaTDD. 408/438- 53 82
Using a telecommunications device for the deaf (TDD), you
can send questions or comm ents 24 hours daily and exchang e
messages with a technical support specialist between 8:00
A.M. a nd 5: 00 P.M. (Pac ific time) Monday t hro ug h Fr iday.
Seagate CompuServe for um
Online technical suppor t for Seaga te produ cts is a vailable o n
CompuSer ve. To acc ess our technical suppo rt forum , type go
seagate. This f orum provides inform ation similar to that foun d
on SeaBOARD.
Seagate’s Internet connec tions
Technical information for Seagate drives is available on the
internet from Seagate’s World Wide Web home page
(http://www.seagate.com) or Seagate’s ftp server
(ftp://ftp.seagate.com). The ftp server contains information
similar to that found on SeaBO ARD.
Page 39

Medalist SL Family I nstallat io n Guide, November 1995 37
Storing and shi pping y our drive
Keep your original box and packing materials for storing or
shipping your drive. The box has a
label. Shipping a drive in an unapproved container voids the
warranty. Call y our authorized Seagate distributor to purchase
additional boxes.
The following figure shows how a drive fits in an approved
single-pack box, including the packing mat eria ls.
Foam
Foam
Antistatic bag
Antistatic bag
Drive
Drive
Foam
Foam
Seagate Approved Package
Figure 5. A drive in an ap pro ved p a ckag e
Page 40

Seagate Technology , Inc.
920 Disc Drive, Scott s Val ley, CA 95066, US A
Publication Number: 36342-101, November 1995, Printed in USA
 Loading...