

Page 1

Seagate Wireless
Installation and Setup
Model 1AYBA5
Page 2

Regulatory Compliance
FCC Class B Information
This equipment has been tested and found to comply with the limits for a Class B digital device, pursuant to Part 15 of the FCC Rules. These limits are designed to provide reasonable
protection against harmful interference in a residential installation. This equipment generates, uses and can radiate radio frequency energy and, if not installed and used in accordance with the instructions, may cause harmful interference to radio communications. However, there is no guarantee that interference will not occur in a particular installation. If this
equipment does cause harmful interference to radio or television reception, which can be
determined by turning the equipment off and on, the user is encouraged to try to correct the
interference by one of the following measures:
• Reorient or relocate the receiving antenna.
• Increase the separation between the equipment and receiver.
• Connect the equipment into an outlet on a circuit different from that to which the receiver
is connected.
• Consult the dealer or an experienced radio/TV technician for help.
This device complies with Part 15 of the FCC Rules. Operation is subject to the following
two conditions: (1) This device may not cause harmful interference, and (2) this device must
accept any interference received, including interference that may cause undesired operation.
FCC Caution: Any changes or modifications not expressly approved by the party responsible for compliance could void the user's authority to operate this equipment.
IMPORTANT NOTE: FCC Radiation Exposure Statement
This equipment complies with FCC radiation exposure limits set forth for an uncontrolled environment. This equipment should be installed and operated with minimum distance 20cm
between the radiator & your body.
This transmitter must not be co-located or operating in conjunction with any other antenna or
transmitter.
The availability of some specific channels and/or operational frequency bands are country
dependent and are firmware programmed at the factory to match the intended destination.
The firmware setting is not accessible by the end user.
Note to US model owner: To comply with US FCC regulation, the country selection function
has been completely removed from all US models. The above function is for non-US models
only.
Industry Canada
This device complies with RSS-210 of the Industry Canada Rules. Operation is subject to
Page 3

the following two conditions: (1) This device may not cause harmful interference, and (2) this
device must accept any interference received, including interference that may cause undesired operation.
Ce dispositif est conforme à la norme CNR-210 d'Industrie Canada applicable aux appareils
radio exempts de licence. Son fonctionnement est sujet aux deux conditions suivantes: (1)
le dispositif ne doit pas produire de brouillage préjudiciable, et (2) ce dispositif doit accepter
tout brouillage reçu, y compris un brouillage susceptible de provoquer un fonctionnement
indésirable.
IMPORTANT NOTE: (For mobile device use)
Radiation Exposure Statement:
This equipment complies with IC radiation exposure limits set forth for an uncontrolled environment. This equipment should be installed and operated with minimum distance 20cm between the radiator & your body.
NOTE IMPORTANTE: (Pour l'utilisation de dispositifs mobiles)
Déclaration d'exposition aux radiations:
Cet équipement est conforme aux limites d'exposition aux rayonnements IC établies pour un
environnement non contrôlé. Cet équipement doit être installé et utilisé avec un minimum de
20 cm de distance entre la source de rayonnement et votre corps.
Battery Safety
This product contains a lithium-ion battery that must be disposed of properly.
Please follow the battery safety items below:
• Do not dismantle, open or shred secondary cells or batteries.
• Do not expose cells or batteries to heat or fire. Avoid storage in direct sunlight.
• Do not short-circuit a cell or a battery. Do not store cells or batteries haphazardly in a
box or drawer where they may short-circuit each other or be short-circuited by, other
metal objects.
• Do not use any charger other than that specifically provided for use with the equipment.
• Do not use any cell or battery that is not designed for use with the equipment.
• Do not mix cells of different manufacture, capacity, size or type within a device.
• Seek medical advice immediately if a cell or a battery has been swallowed.
• Do not subject cells or batteries to mechanical shock.
• In the event of a cell leaking, do not allow the liquid to come in contact with the skin or
eyes. If contact has been made, wash the affected area with copious amounts of water
and seek medical advice.
Page 4

• Keep cells and batteries out of the reach of children.
• Keep cells and batteries clean and dry.
• Secondary cells and batteries need to be charged before use. Always use the correct
charger and refer to the manufacturer's instructions or equipment manual for proper
charging instructions.
• Do not leave a battery on prolonged charge when not in use.
• After extended periods of storage, it may be necessary to charge and discharge the cells
or batteries several times to obtain maximum performance.
• Secondary cells and batteries give their best performance when they are operated at
normal room temperature (20°C+5 °C).
• Retain the original product literature for future reference.
• Use only the cell or battery in the application for which it was intended.
• Dispose of properly.
The Seagate Wireless device is not intended for office use.
Page 5

TABLE OF CONTENTS
SEAGATE WIRELESS INSTALLATION AND SETUP 1
INTRODUCTION 6
PRODUCT SPECIFICATIONS 6
SUPPORTED DEVICES 6
SUPPORTED WEB BROWSERS 7
SUPPORTED FILE TYPES 7
HARDWARE SPECIFICATIONS 7
SETTING UP AND USING YOUR SEAGATE WIRELESS 9
INSTALLING THE SEAGATE MEDIA APP 9
ESTABLISHING A WIRELESS CONNECTION 9
LOADING MEDIA ONTO THE SEAGATE WIRELESS 10
SYNCHRONIZING CONTENT 11
SAFELY DISCONNECTING YOUR DEVICE 11
SETTING A PASSWORD FOR YOUR SEAGATE WIRELESS 11
CONNECTING TO THE INTERNET THROUGH YOUR SEAGATE WIRELESS 12
STREAMING MEDIA 12
UNDERSTANDING YOUR SEAGATE WIRELESS 14
UNDERSTANDING WI-FI MODE 14
CONNECTING THE DEVICE TO YOUR COMPUTER 14
WORKING WITH THE BATTERY 15
CHARGING THE BATTERY 15
RECYCLING THE BATTERY 15
RESETTING YOUR DEVICE TO ITS FACTORY SETTINGS 15
GETTING HELP 16
FINDING MORE HELP 16
COMMON PROBLEMS AND SOLUTIONS 16
Page 6

Introduction
Congratulations on the purchase of your Seagate Wireless. Using this device, you can take
your digital media anywhere and stream it to your Wi-Fi enabled tablet, smartphone, or
computer. Imagine listening to your favorite music while hiking through the Swiss Alps. You
can do that with the Seagate Wireless.
This guide shows you how to set up your Seagate Wireless so that you can begin enjoying
your videos, photos, and music wherever you are.
What’s in the Box?
Unpack the box and ensure you have all of these items.
Product Specifications
Supported Devices
• iPad, iPhone, iPod touch running iOS 4 or later
• Android-based tablets and smartphones running Android release 2.1 or later
• Other Wi-Fi-enabled tablets and smartphones
Page 7

• Windows computer running Windows 8.1, Windows 7, or Windows Vista
• Mac computer running Mac OS X 10.5.8 or later
Supported Web Browsers
• Safari 5 or later (Mac OS)
• WebKit (Android)
• Internet Explorer 8 or later (Windows)
• Firefox
• Google Chrome
Supported File Types
For iPads
• Video: H.264 video, MPEG-4, Motion-JPEG
• Audio: AAC, MP3, M4a, Audible (formats 2, 3, 4), Apple Lossless, AIFF, WAV
• Documents: Microsoft Office, iWork, PDF
• Certain files supported by third-party apps
For Laptops, Tablets, and Smartphones
• Any files supported by your device applications
Hardware Specifications
• Drive Capacity: 500GB
The Wireless can store over 150 high-definition movies (1.5GB MP4 H.264), 62,500
songs, or 50,000 photos.
• USB 2.0 port
• Battery: Non-user replaceable, rechargeable lithium-ion battery
• Battery Life: Up to 8 hours of continuous streaming (1 user), or stream photos, songs,
and documents with up to 3 users. The Seagate Wireless battery life is up to 20 hours in
standby mode.
• Maximum Wi-Fi range: 45 meters (147 feet)
• Drive Format: NTFS
The Paragon NTFS driver is available to enable read/write access using the Mac OS.
The software is available on your Seagate Wireless.
Page 8

Page 9

Setting up and Using Your Seagate Wireless
This chapter explains each step of the setup process in more detail than what is described
in the Quick Start Guide. An online version of the Seagate Wireless Quick Start Guide is
available at http://www.seagate.com/www/wireless-support.
Installing the Seagate Media app
Use the Seagate Media app on your mobile devices to organize and stream the media
stored on the Seagate Wireless.
• On your mobile device, go to the Apple App Store, Google Play Store, or the Amazon
website, and then find and install the Seagate Media app.
The same functionality is available on your computer through a Web browser after it is
wirelessly connected to the Seagate Wireless.
Establishing a Wireless Connection
Your Seagate Wireless comes partially charged and runs for about 20 minutes. Consider fully charging it (see Charging the Battery) before connecting other devices.
You can wirelessly connect up to eight devices to your Seagate Wireless.
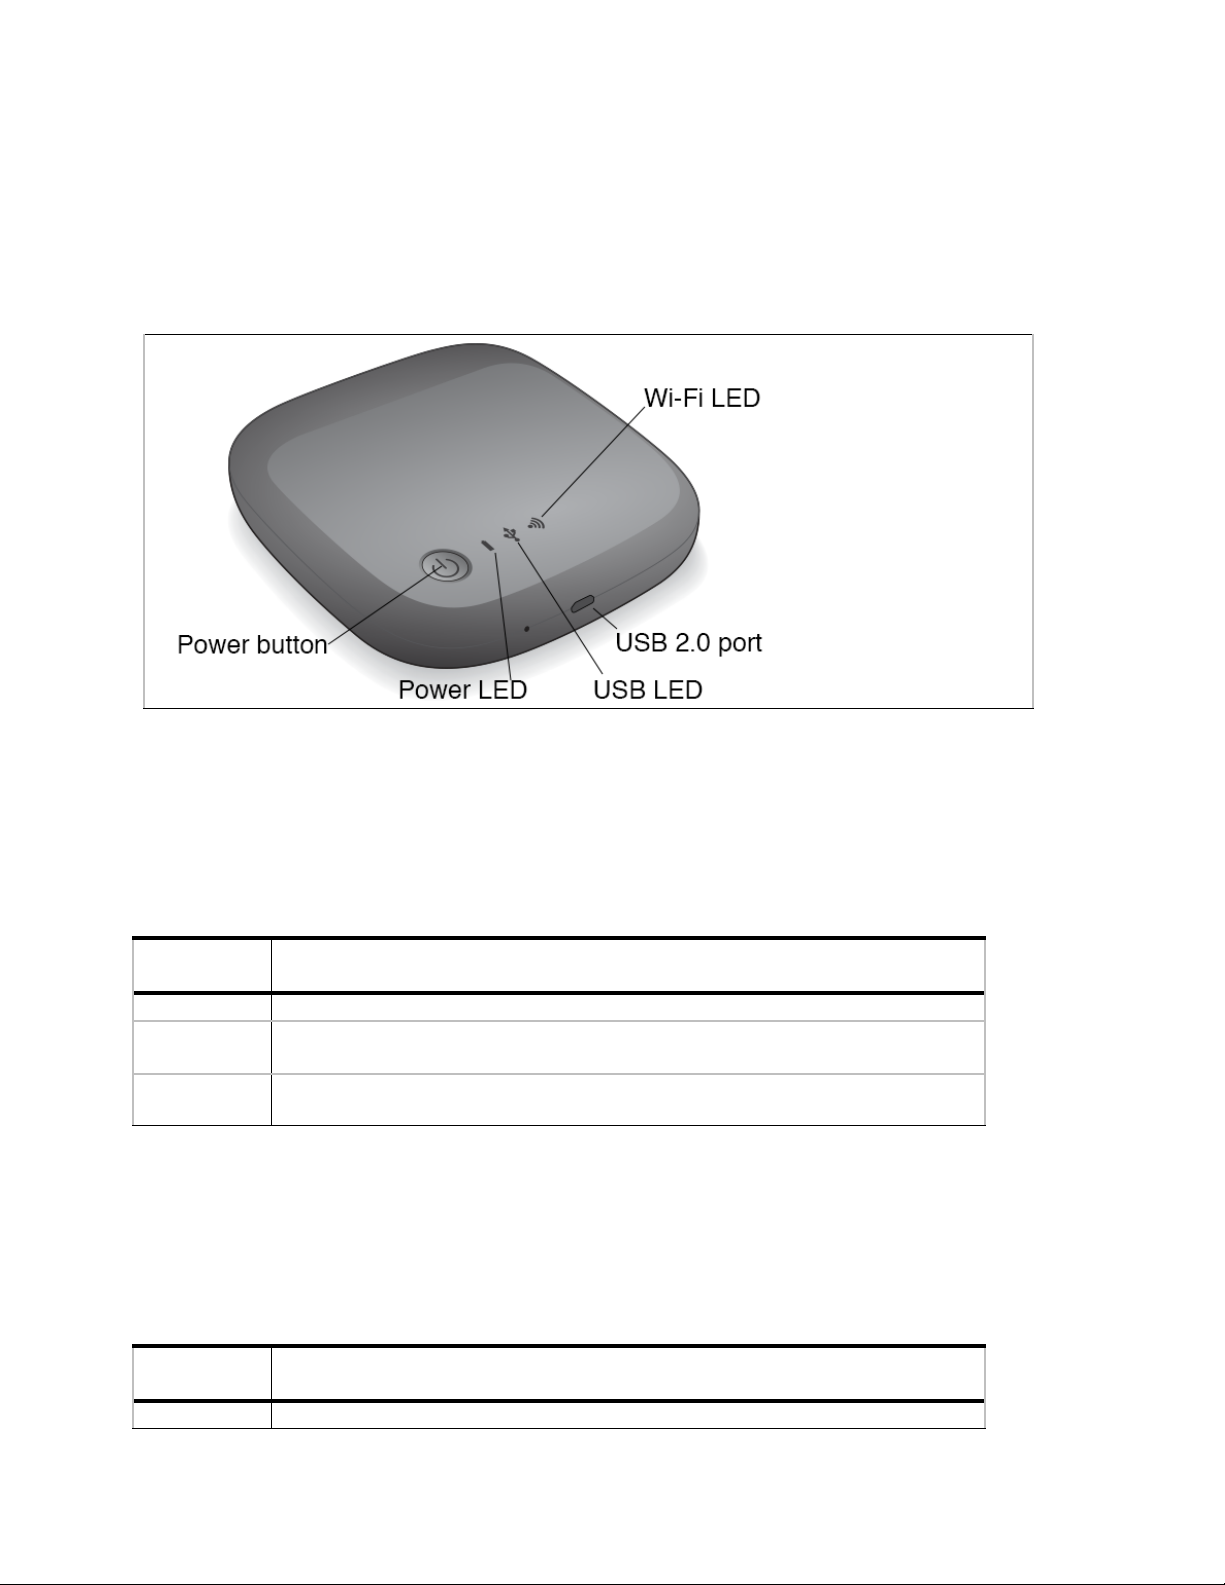
1. Press the power button on the top of the Seagate Wireless.
2. The Wi-Fi LED blinks as the device starts up. When the Wi-Fi light is solid blue, your device is Wi-Fi enabled and ready to accept other device connections.
3. Open the network or wireless settings on your computer or mobile device.
See the user documentation for your computer or mobile device for the most up-to-date
Page 10

instructions on connecting to a wireless network.
• Apple devices—choose Settings > Wi-Fi.
• Android devices—choose Settings > Wireless & Networks > Wi-Fi.
• Mac Computer—select Apple > System Preferences and then select Network.
• PC—enable the wireless connection.
4. Select SeagateWireless from the list of networks.
This establishes a wireless connection between your device and the Seagate Wireless.
5. Open the Seagate Media app.
• On the home page of your mobile device, tap the Seagate Media app icon.
• On your computer, open a browser and type any URL in the address bar.
The Seagate Wireless main page appears with the Getting Started tutorial ready for
viewing.
• Follow the steps in the Getting Started tutorial to verify that you can view a video and
connect to the Internet.
Your devices are now ready to stream the sample media packaged with your Seagate
Wireless.
Loading Media onto the Seagate Wireless
1. Connect the supplied USB 2.0 cable to the Seagate Wireless and the USB 3.0 or 2.0
port on your computer.
Note: If you are connecting to a Mac, do not allow Time Machine to use the Seagate
Wireless for backup because it will attempt to reformat the drive. If your device has been
reformatted, see I mistakenly reformatted the drive for my Mac.
2. The device’s name appears on your computer as SeagateWireless.
Important: To copy content to your Seagate Wireless, after you connect it to your computer with the USB provided cable, you must power off the device. If you do not power
off the device, your computer will continue to broadcast a Wi-Fi signal, and you will not
be able to detect the device on your computer.
3. (Mac only) If the device is connected to your Mac, install MacInstaller.dmg (located on
your Seagate Wireless) to allow file copying.
4. Choose one of the following method to copy media:
• Copy media to your device by dragging and dropping files from your computer to
your device.
• Install Seagate Dashboard on your computer and create a Smart Copy plan to copy
Page 11

all media files to your Seagate Wireless. For more information, go to
www.seagate.com/support/software/dashboard/.
Important: It is the user’s responsibility to comply with applicable copyright laws and to
respect owner’s rights in content usage. The time it takes to copy data to your Seagate
Wireless depends on the amount you are copying. If you have a lot of media files, consider copying the files overnight. Your Apple, Android, or other Wi-Fi device plays files
only in the formats that it supports. See your device’s specifications for details. You cannot copy files from your Seagate Wireless to your computer when your Wireless is directly attached to your computer. You can copy files to and from your mobile device and
your Seagate Wireless while in Wi-Fi mode.
Synchronizing Content
You can also install Seagate Media Sync software to help you copy your files and synchronize them after they are on your Seagate Wireless.
Note: Seagate does not recommend that you use Seagate Dashboard Smart Copy and
Seagate Media Sync at the same time to help you manage your media files.
Download the software to learn more:
• Windows
• Mac
Safely Disconnecting Your Device
You must safely disconnect your device from your computer to prevent damage to your
Wireless device:
• Windows. In the notification area at the far right of the taskbar, you should see the
Safely Remove Hardware icon ( ). Click the icon, and
then in the list of devices that displays, click the device that you want to remove.
Windows displays a notification when it’s safe to remove your device.
If you can’t find the Safely Remove Hardware icon, click the Show hidden icons button to display all icons in the notification area.
• Mac. Drag the Seagate Wireless icon into your trash can or open Finder and click
the Eject button that displays next to your Seagate Wireless.
Setting a Password for Your Seagate Wireless
When you set a password for your Seagate Wireless, only those who know the password
can connect their devices to the wireless device.
Page 12

1. Establish a wireless connection from your mobile device or computer to the Seagate
Wireless.
2. Open the Seagate Media app on your mobile device or in a Web browser on your computer.
3. Tap or click the Settings icon.
4. Tap or select Network.
5. Tap or select Turn on password (or Off to the right of Enable Password on some de-
vices).
6. Type a password of at least 8 alphanumeric characters in the window that opens, and
then tap or click OK.
Connecting to the Internet Through Your Seagate
Wireless
To stream media from the device and browse other websites at the same time, connect to
the Internet through your Seagate Wireless.
Note: We do not recommend streaming a movie from the Internet while connected to the
Seagate Wireless network.
1. Establish a wireless connection from your mobile device or computer to the Seagate
Wireless.
2. Open the Seagate Media app on your mobile device or in a Web browser on your computer.
3. Tap or click the Wi-Fi icon (on most devices) near the top of the app or page.
4. Select the wireless network you want and tap or click Join Network.
Streaming Media
Use the Seagate Media app to stream media from the Seagate Wireless to your mobile device or computer.
1. Power on the Seagate Wireless.
• Establish a wireless connection between the Seagate Wireless and your mobile device
or computer.
• Open the Seagate Media app on your mobile device or in a Web browser on your computer.
• Select the media you want to play, and enjoy.
You can connect up to three devices to the Seagate Wireless.
Page 13

• For details on using the Seagate Media app, view the Seagate Media App User’s Guide.
Page 14
Understanding Your Seagate Wireless
Understanding how your Seagate Wireless operates helps keep your device charged and
ready to stream your media library.
P
Understanding Wi-Fi Mode
The Seagate Wireless serves as a Wi-Fi network allowing you to stream your media to other
devices.
Wi-Fi LED
Color
Description
No color
Seagate Wireless Wi-Fi is off.
Flashing
blue
Seagate Wireless Wi-Fi is starting up but not yet ready.
Solid blue
Seagate Wireless Wi-Fi is ready to connect to your computer or mobile
device.
Connecting the device to your computer
To disable Wi-Fi mode when connected to your computer, you must power off Seagate
Wireless. Your computer provides power to Seagate Wireless while it is connected.
USB LED
Color
Description
No color
Seagate Wireless is not connected to a computer with a USB cable.
Page 15

White
Seagate Wireless is connected to a computer with a USB cable.
Working with the Battery
The Seagate Wireless uses a rechargeable lithium-ion battery.
Charging the Battery
To charge the battery, connect the device to your computer using the included USB cable.
Power LED
Color
Description
No color
Power is off.
Green
Seagate Wireless is powered on and the battery has a greater than
25% charge.
Amber
Seagate Wireless is on and the battery is charging.
Flashing
Amber
Seagate Wireless is charging to recovery from low power.
Flashing
Red
Seagate Wireless is trying to charge to power on, but is not getting
enough power.
Recycling the Battery
The battery is not user-replaceable and is affected by the number of charge cycles. It must
be disposed of properly.
Resetting Your Device to Its Factory Settings
For a variety of reasons, you might need to reset your Seagate Wireless back to its original
factory settings.
1. Press and release the button located on the top of your device. No data is lost during
this process, and you do not need to reconfigure the device.
Page 16

Getting Help
The Seagate Wireless is a plug-and-play device. However, in certain situations, the setup
process and product usage might require extra attention.
Finding More Help
Visit the Seagate Wireless support page where you will find:
• How-to videos
• Firmware updates (when available)
• Software updates (when available)
• FAQs
Common Problems and Solutions
I can’t connect wirelessly to the Seagate Wireless
• Make sure that the Seagate Wireless is physically disconnected from your computer,
powered on, and that the Wi-Fi LED is a steady blue. A steady blue indicates that the
device is Wi-Fi ready and broadcasting.
• Make sure to select SeagateWireless from your device’s wireless network list. If you
leave the Seagate Wireless range (150 feet), your device disconnects from the signal.
Any obstructions, such as walls between your device and Seagate Wireless, might affect
the strength of the signal.
• If you know that the Seagate Wireless is broadcasting, but your device can’t connect, the
upper limit of three devices might already be connected to it. Try disconnecting one of
the other devices.
• If you are attempting to stream using a browser, make sure that your device’s wireless
connection is enabled. Go to any URL to be redirected to the Seagate Wireless main
page.
I mistakenly reformatted the drive for my Mac
If you mistakenly allowed Time Machine to use the Seagate Wireless as its backup drive, it
reformatted the drive for backup purposes. You must return the Seagate Wireless to the
NTFS format.
Important: Reformatting erases all of the data on the Seagate Wireless.
1. Copy any data that you want to keep from the Seagate Wireless to another device.
2. Eject and disconnect any other USB drives from your Mac.
Page 17

3. Attach the Seagate Wireless to your Mac.
4. Install the NTFS driver included on the Seagate Wireless device.
You can also find this driver on the Seagate download page.
5. On your Mac, open Finder, click Go, and then click Utilities.
6. Double-click Disk Utility.
7. Select the Seagate Wireless drive or Seagate USB.
8. Click the Erase button.
9. For Format type, select Windows NT File System (do not select the compressed op-
tion).
10. Enter a recognizable name, for example, Seagate Wireless drive.
This is the name that appears on the Desktop when you connect the Seagate Wireless
to your Mac.
The Seagate Wireless should be ready to use within a few minutes. You may need to eject
the device by dragging it to the trash can and then disconnect and reconnect it to gain full
read and write capability.
You can now set up the Seagate Wireless for your use.
Important: If you are using Time Machine, do not allow the program to use the Seagate
Wireless drive for backup.
The Seagate Wireless shuts down by itself
Your Seagate Wireless includes a power-save feature, which means that it enters a standby
state after 5 minutes of inactivity. Your device automatically returns to active mode whenever someone attempts to access it.
I know the Seagate Wireless is broadcasting, but I can’t stream from it
Up to three wireless-enabled devices can stream from the Seagate Wireless at one time. To
see how many devices are currently connected to the Seagate Wireless, open the Seagate
Media app on a connected device and tap Users.
The Seagate Wireless beeps when I plug it in to my computer
The battery is low. Keep your Seagate Wireless connected to your computer to charge the
device.
 Loading...