

Page 1
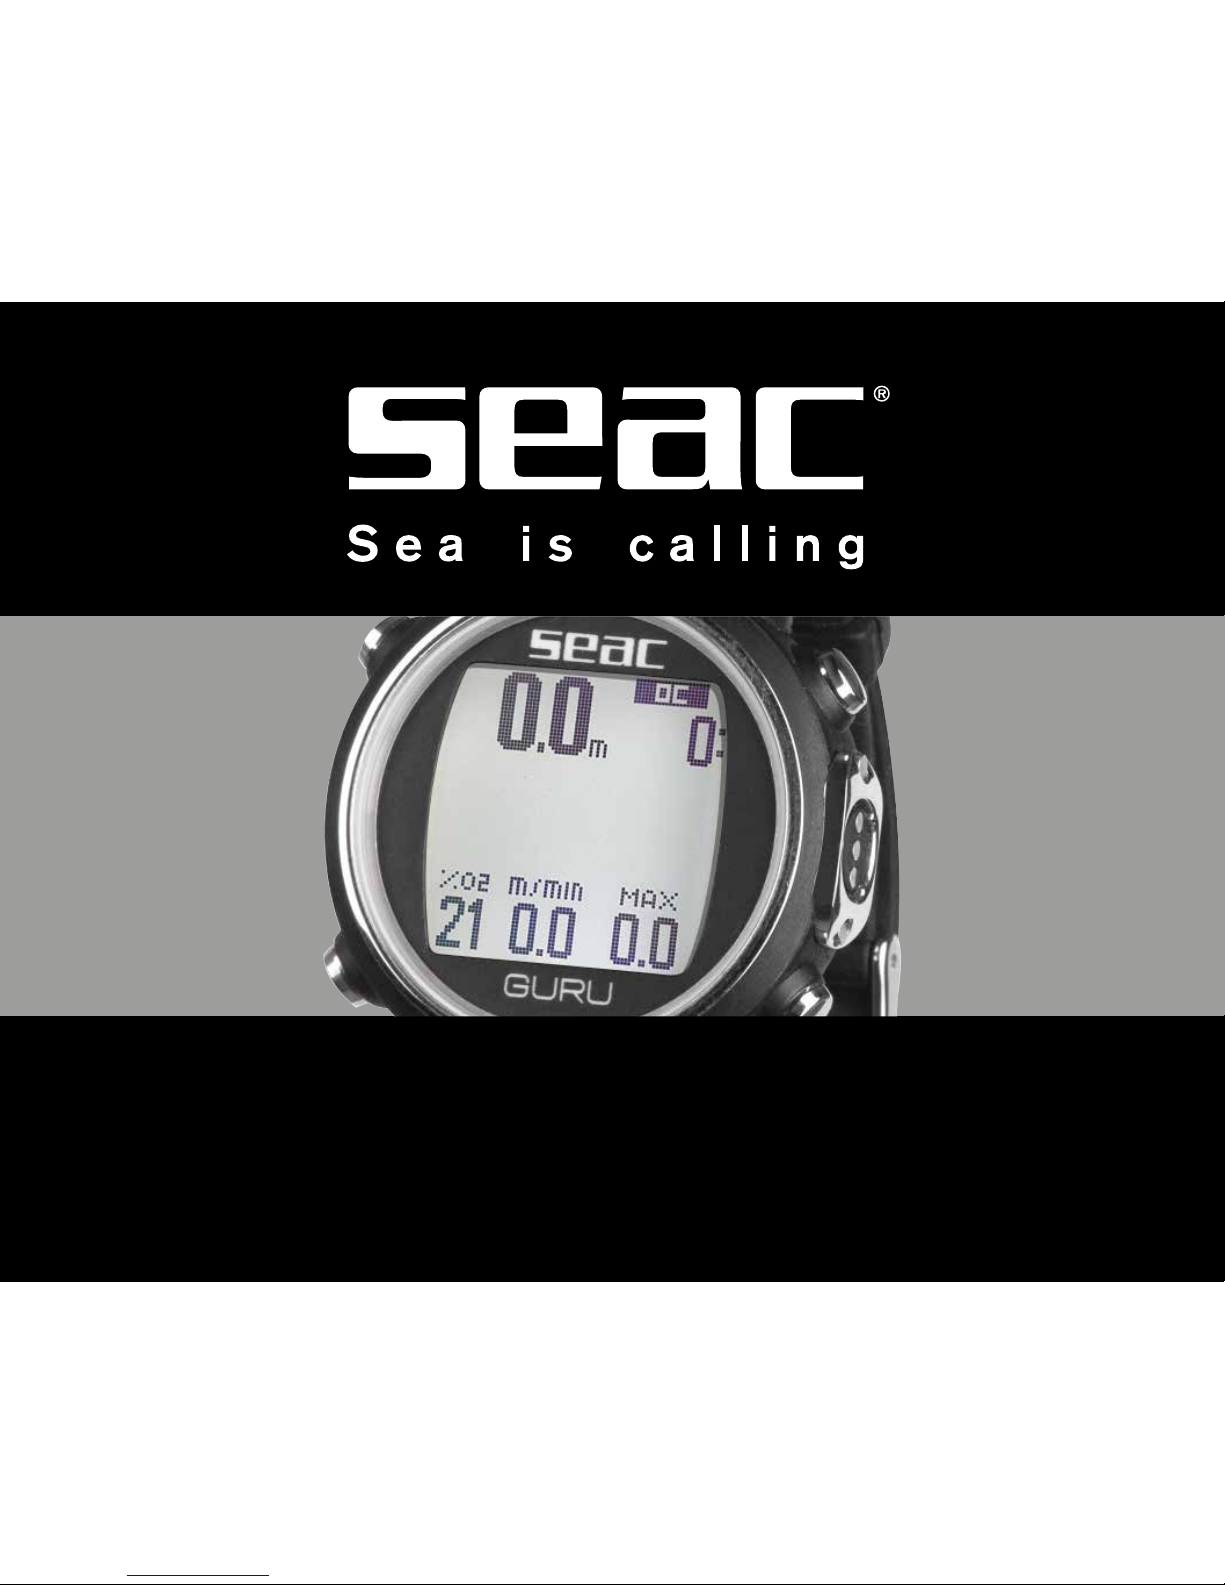
User Manual Ver. 1.0 Made in Italy
GURU
Dive Computer
Page 2

2
English
Page 3

IMPORTANT WARNINGS 4
GENERAL WARNINGS 4
WARNINGS 5
Dives with Nitrox mixtures. 6
Before the dive 7
Limits of dive computers 7
Care and maintenance 7
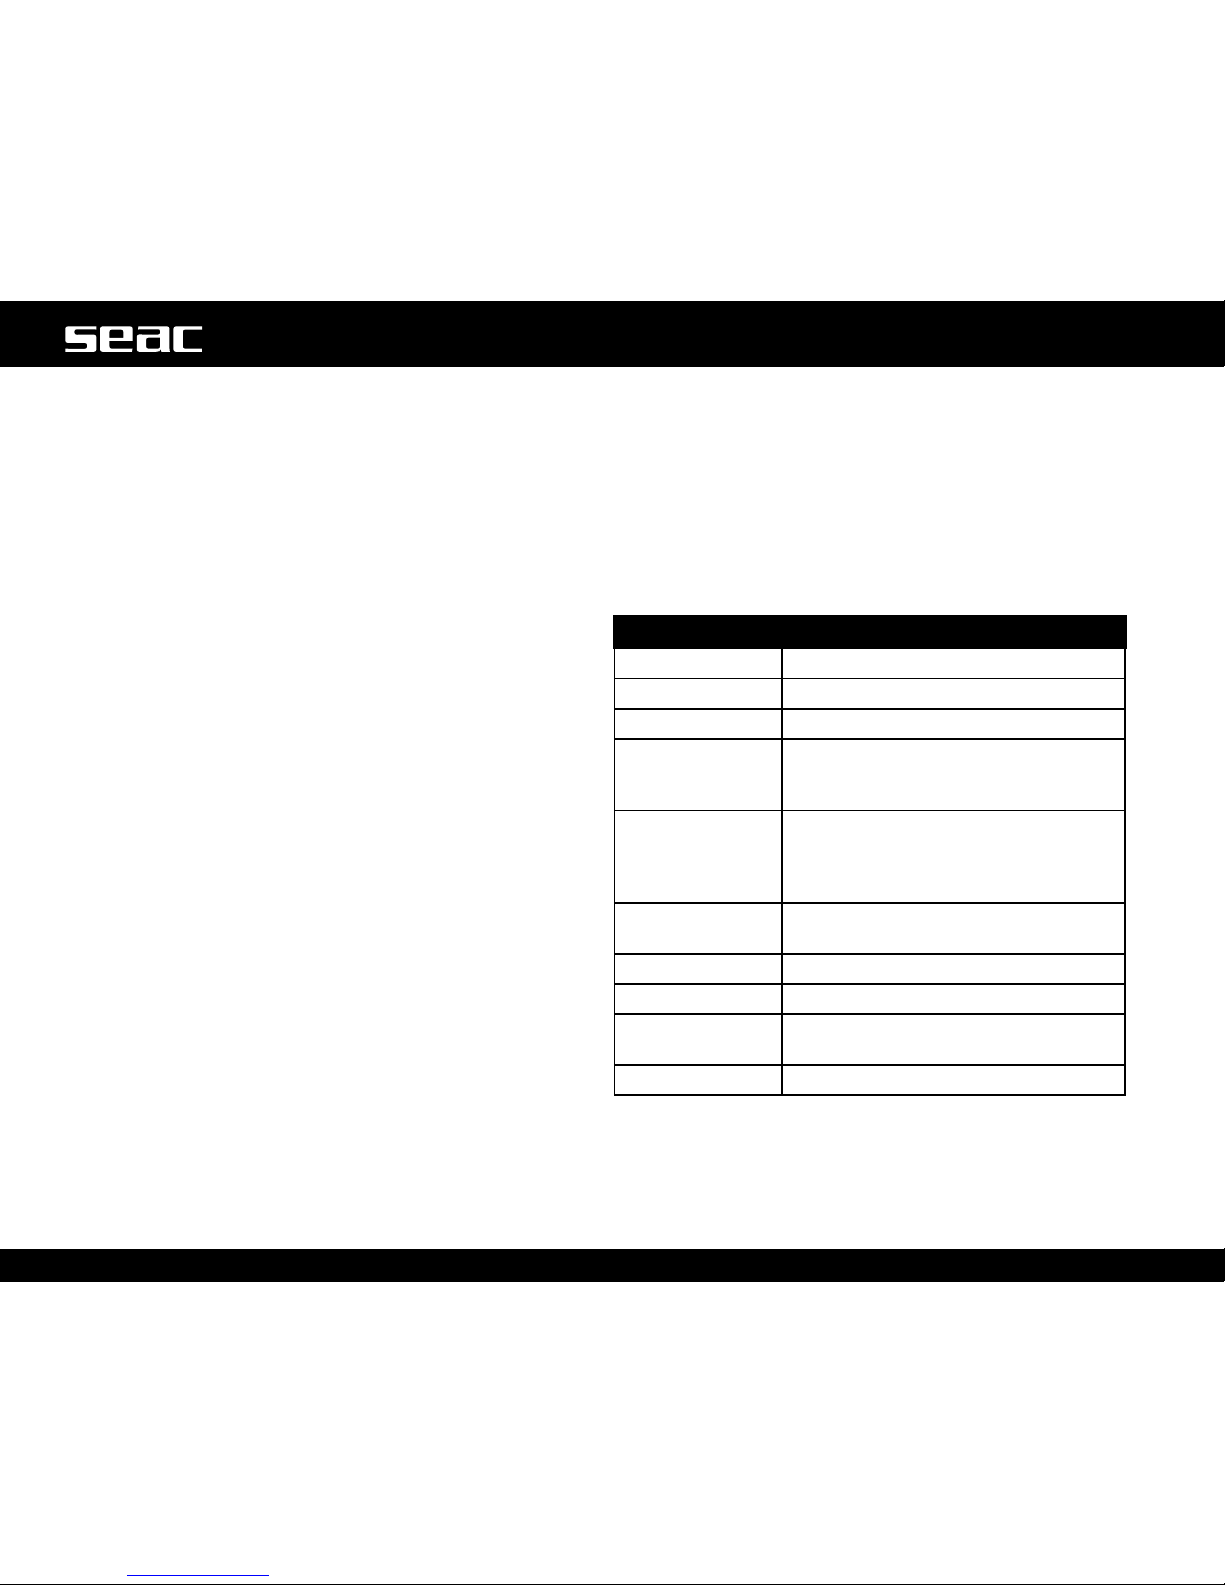
TECHNICAL CHARACTERISTICS OF THE COMPUTER 8
Hardware 8
Certication: 8
Software 8
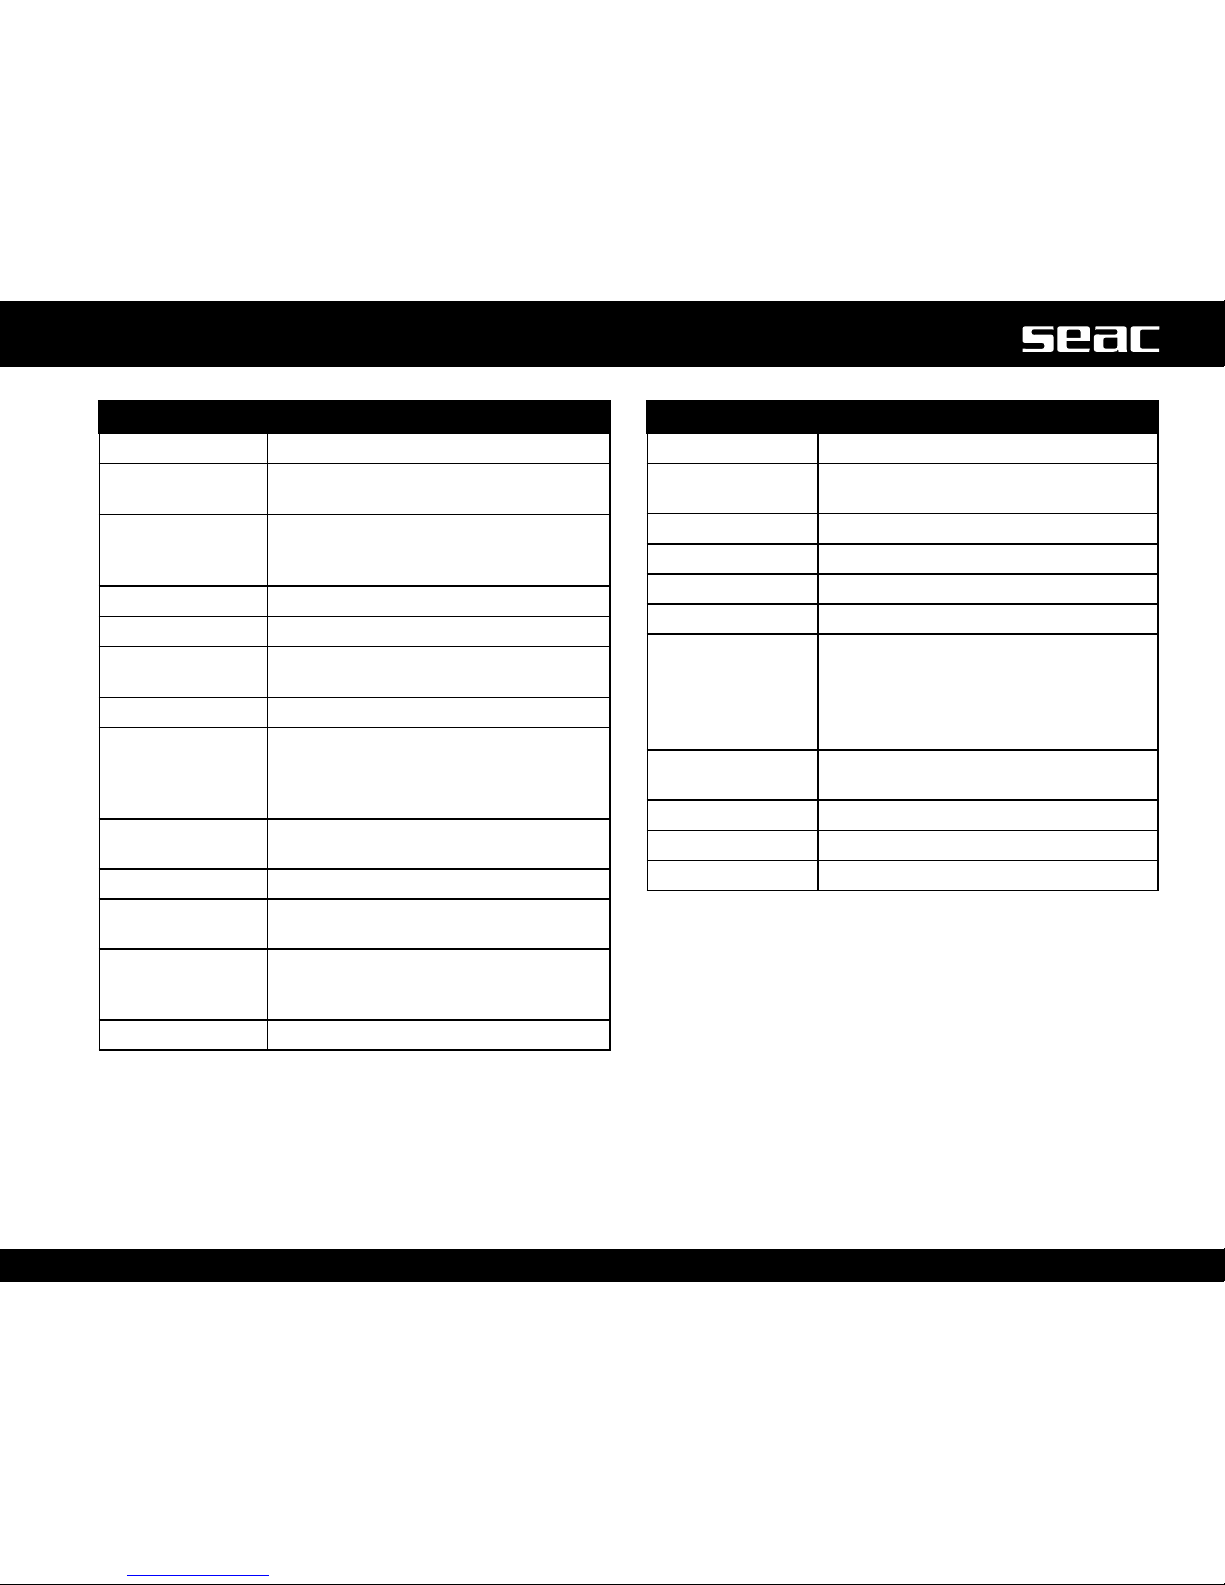
Brief summary of Technical Characteristics 8
Recharging the battery 10
Dives in especially cold water (<3 °C) 11
GURU OUT OF THE WATER: 12
Sleep Mode 12
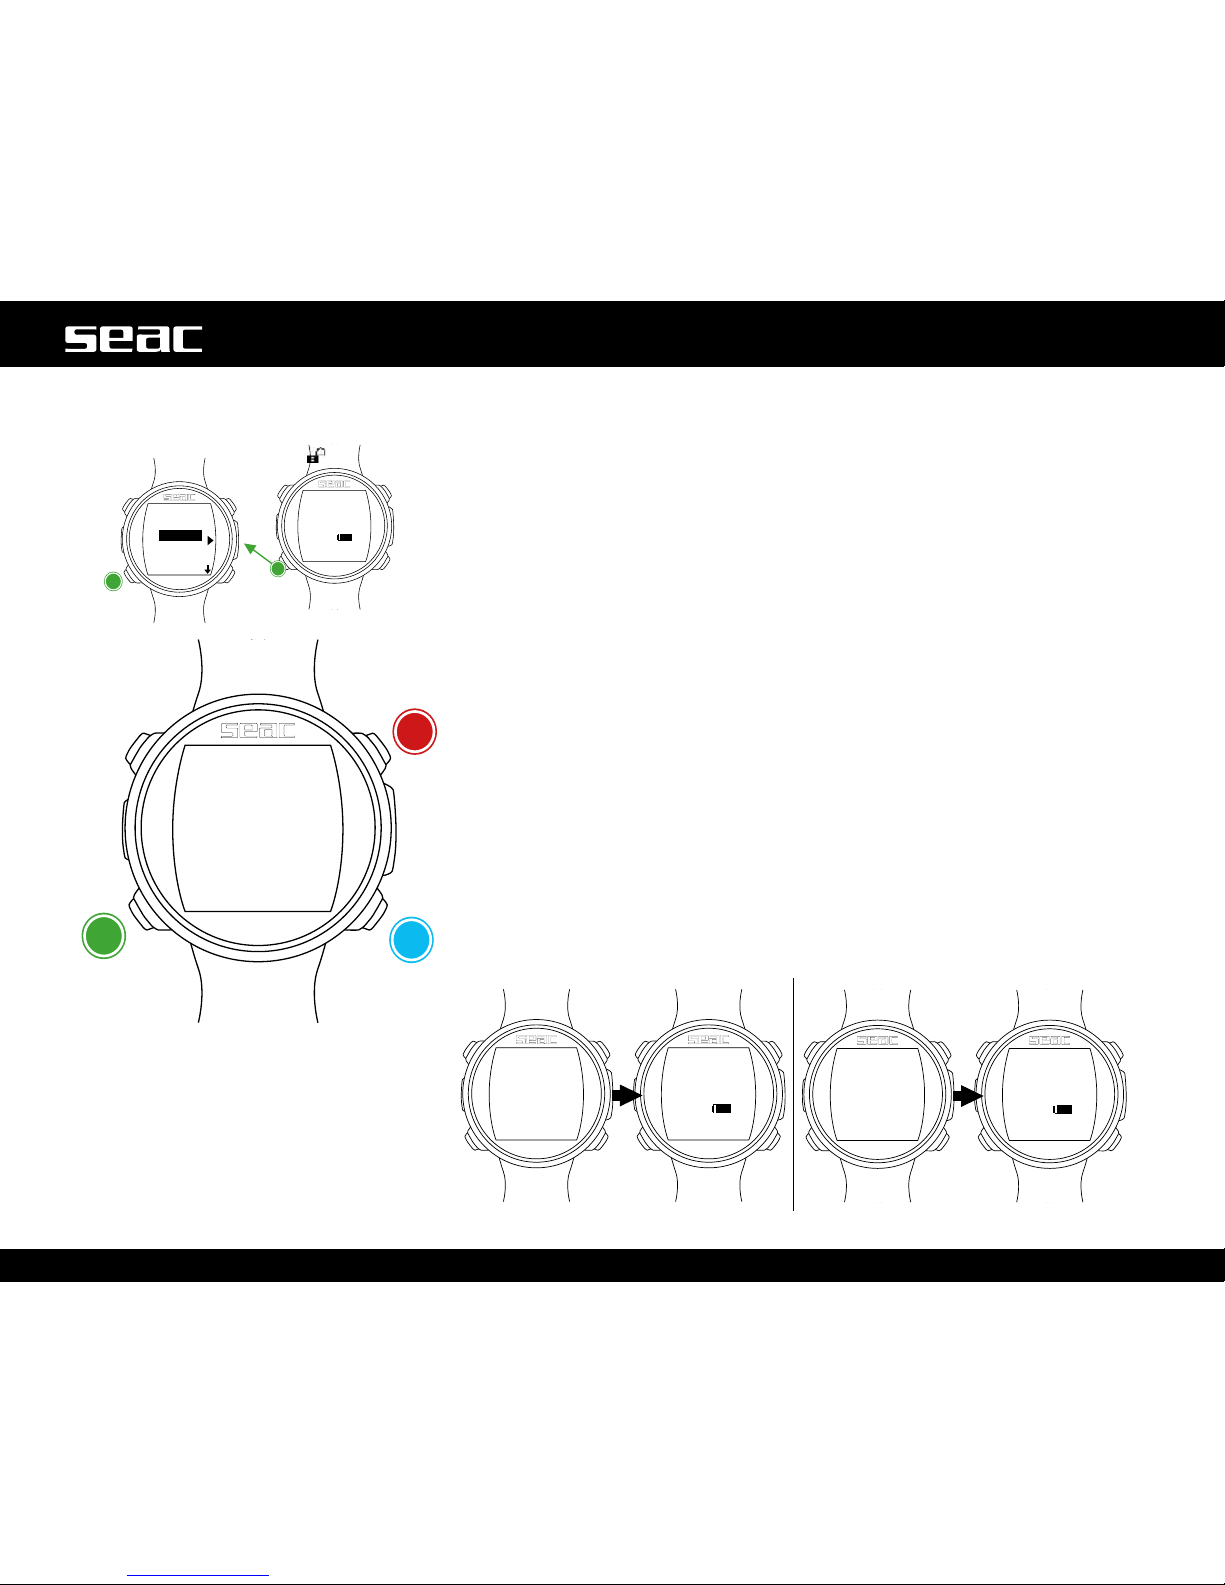
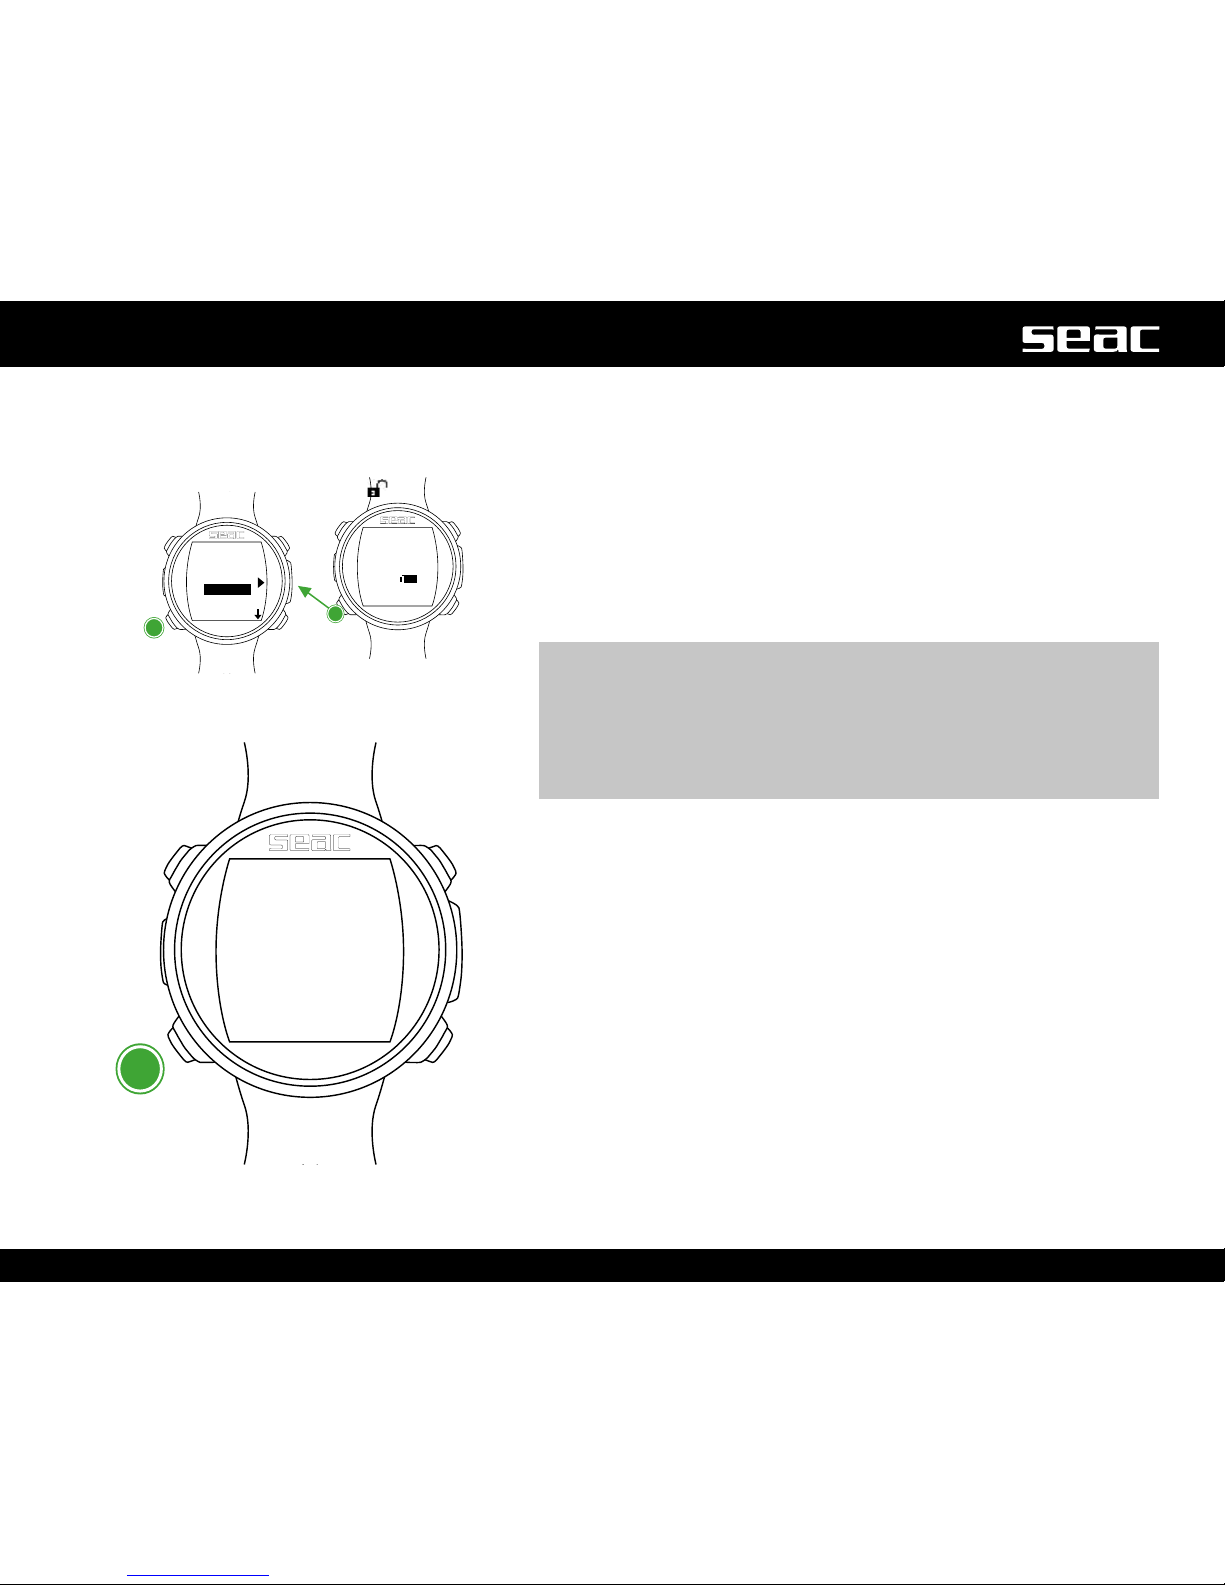
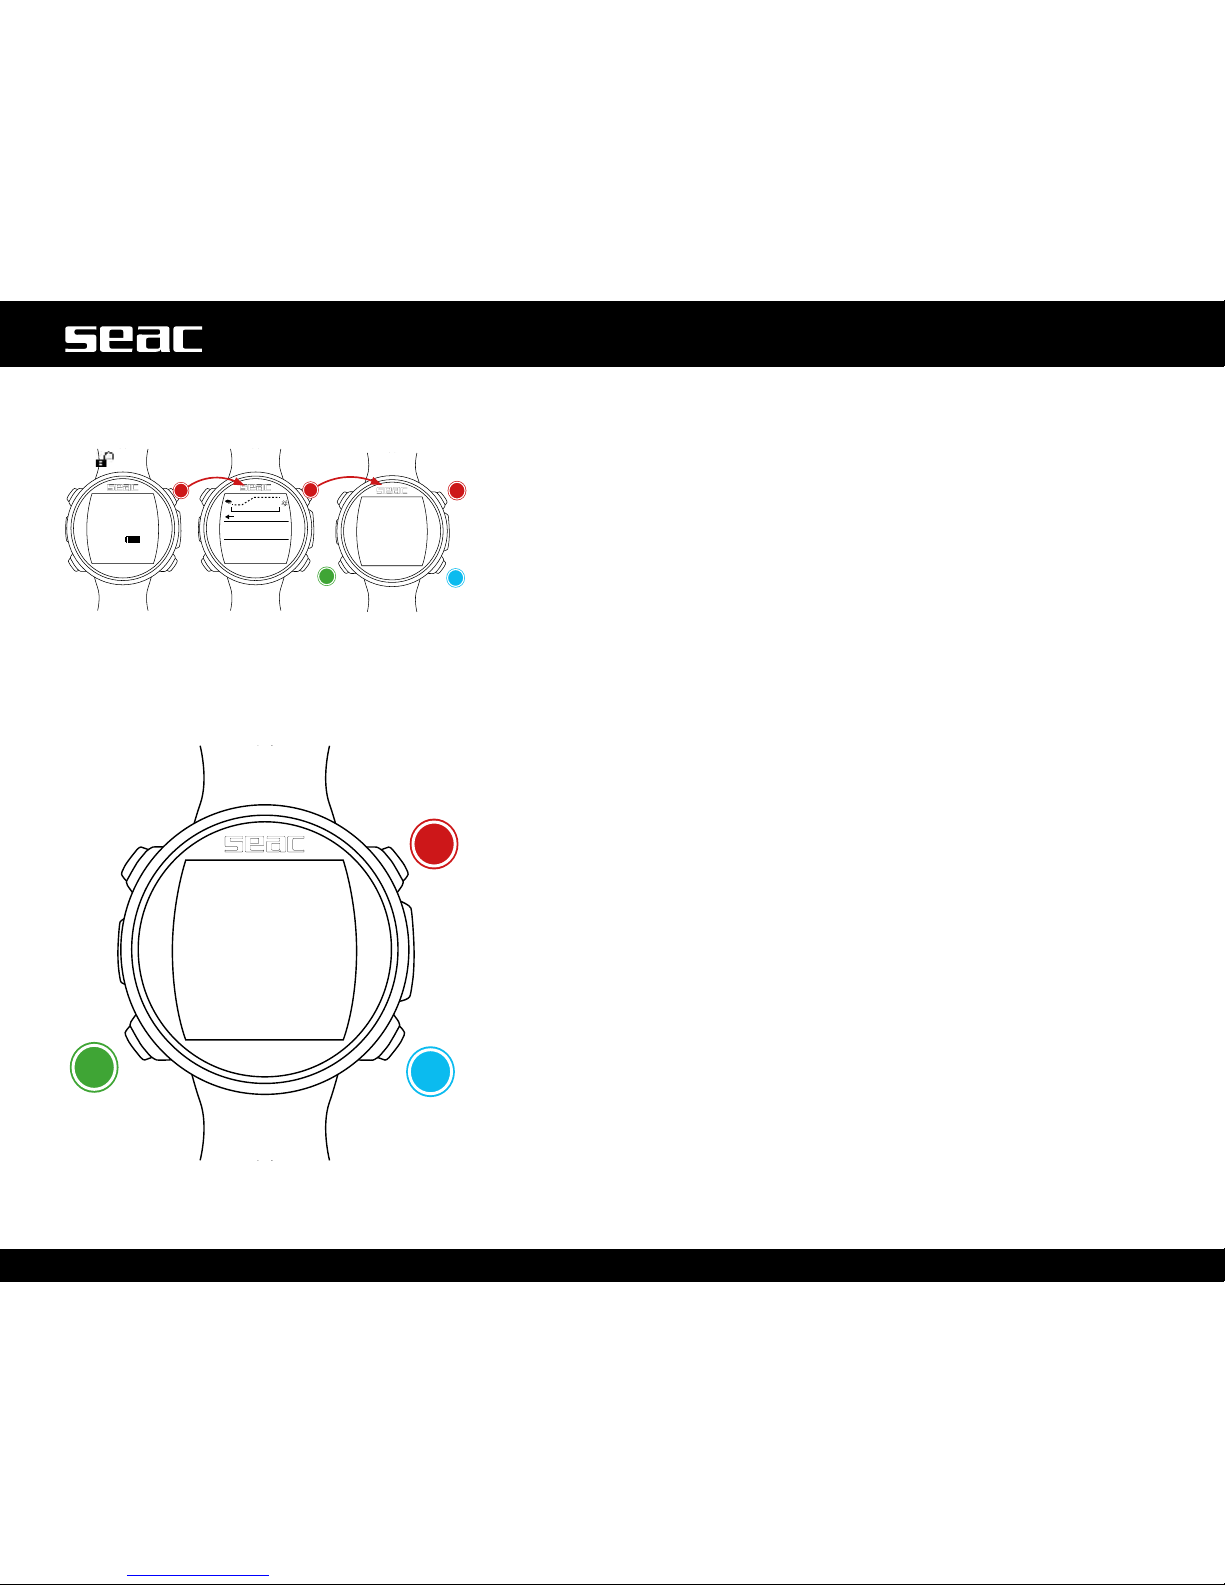
Lock screen 13
GURU menu structure 14
Watch screen 15
Watch Menu 16
DISPLAY (Screen settings) 17
SYS SET (date and time) 18
PC MODE (connected to PC or Mac) 19
Connecting the Transmitter to GURU 20
Changing the Transmitter communications channel 21
COMPASS (Compass Settings) 22
Reset to Default (reset to factory defaults) 23
INFO (GURU information) 24
Dive menu 25
DIVE SET 1 (Dive settings 1) 26
DIVE SET 2 (Dive settings 2) 28
MIX 29
Multimix Dives 30
PLANNER (within no-deco limits) 31
PLANNER (deco planner) 32
LOGBOOK 33
ALARM (Open Circuit Alarms) 34
The Compass 35
Weather Forecast 36
Altimeter, Barometer, Thermometer 37
Apps for GURU Free 38
GURU DURING THE DIVE 39
Dive in SCUBA mode (OC) 40
Other information during the dive 42
Deco table during the dive 44
Mix Change during the dive 45
Force the Mix Change During the Dive 46
TRANSMITTER DURING THE DIVE 47
BAR / Psi 47
RBT and TANK RESERVE 48
RBT during a no-decompression dive 48
RBT in a DECO dive 49
Dive in GAUGE mode 50
Diving in FREE mode 51
Compass during the dive 52
Apps during the dive 53
GURU AFTER THE DIVE 54
No-Fly 54
Desaturation information 55
App Menu 56
CHRONO: Stopwatch 57
PITCH-ROLL (Pitch & Roll) 57
MOON: Phases of the Moon 58
MAGMETER (Magnetometer) 58
FITNESS: Step counter 59
CLOCK ALARM Alarm clock 60
Connect your GURU computer to your Mac or PC. 61
Updating your GURU Dive Computer 61
CERTIFICATE OF GUARANTEE 62
3
English
Page 4
4
English
Congratulations on your purchase of a SEAC dive computer.
Your SEAC dive computer is a technologically advanced
instrument equipped with unique and innovative software for
diving with a respirator. It can manage two different gasses,
with oxygen percentages from 21% to 99%.
The GURU has many other functions:
GAUGE function, useful above all for people who take technical
dives; FREE function for freedives, as well as numerous
outdoors and tness functions, making the GURU ideal for use
even when you're not diving.
Check www.seacsub.com for any updates to this manual.
IMPORTANT WARNINGS
GENERAL WARNINGS
m WARNING!
Read the user manual fully before using the SEAC
computer.
Using the computer incorrectly will void the warranty and
can permanently damage the computer.
m WARNING!
Only use the dive computer after you have read all sections
of the instruction manual and you have understood how it
works.
m WARNING!
The dive computer is not a substitute for diver training
and should only be used by divers who have been properly
trained and who have earned the appropriate license
issued by a Certified Teaching Association.
m WARNING!
The SEAC computer is an auxiliary device during a dive.
Therefore, it is crucial that each diver always carry with
them a suitable table that will enable them to conduct the
decompression phase if the unit should malfunction.
m WARNING!
The computer does not replace an understanding of
decompression tables, which divers must always carry with
them for safety, along with a depth gauge and a dive watch.
Page 5

5
English
m WARNING!
Freediving entails the risk of syncope, taravana, pulmonary
edema, and hemoptysis, while diving with scuba equipment
entails the risk of decompression sickness, oxygen toxicity,
and other risks generally related to diving: even careful
reading of this manual and correct use of the instrument
does not exclude potential dangers.
Anyone unfamiliar with these risks or who does not knowingly
accept them must not dive with a SEAC computer.
m WARNING!
Underwater diving entails certain risks that can never be
completely eliminated, either while freediving or diving with
scuba equipment. No freediving computer can guarantee
that there will be no risk of syncope, taravana, pulmonary
edema, or hemoptysis, and in the case of diving with scuba
equipment, no computer or dive table can guarantee that
there is no risk of decompression sickness or oxygen
toxicity to the central nervous system, even if the diver
follows the indications from the computer or the table
diligently and correctly.
m WARNING!
The computer cannot take into account individual
physiological changes that can change from one day to the
next. For this reason it's good practice to use the device
conservatively and cautiously, remaining within the limits
shown by the computer in order to minimize the risks.
m WARNING!
Two divers may not share a single computer while diving.
Each diver must have their own device on their wrist to
provide information and store data exclusively for the
wearer.
m WARNING!
Do not dive with a computer that does not have records of
recent previous dives, since its calculations cannot account
for data that it has not stored.
m WARNING!
For safety reasons, it is NOT possible to set FREE mode
as the main mode unless 12 hours have elapsed since the
most recent SCUBA or GAUGE dive.
m WARNING!
It is strictly forbidden to freedive in the 12 hours after
diving with scuba equipment!
Breaking this rule could increase the risk of decompression
sickness!
WARNINGS
• This computer is NOT intended for professional use! It
is intended exclusively for recreational use.
• Any use that does not comply with the above could expose
the diver to an increased risk of decompression sickness.
Therefore it is not recommended for use in professional or
commercial dives.
• Check the battery status before every dive. Do NOT dive with
the battery at 30% or lower. Check that the display shows
no signs of malfunction and that it is clearly legible.
• Always check that the settings are correct for your dive, and
never allow anyone else to tamper with the computer before
the dive. If anyone else handles your computer, check that
the settings are correct.
• It is important to keep in mind that our bodies undergo
changes, even daily changes, that a computer cannot
account for. If your physical condition is not excellent, or if
you feel any physical problems, do not dive!
• It is important to avoid all behaviors that increase the risks
associated with decompression sickness, such as rapid
Page 6

6
English
ascents, yo-yo dives, skipping mandatory decompression
stops, dives with surface intervals that are too close
together, and any other behavior that goes against common
sense or your training.
• In any event, the instrument may not be used without
sufcient preparation earned through specic training.
Failure to observe the basic rules of scuba diving exposes to the
diver to life-threatening risk.
We recommend dives within the safety curve in order to reduce
the risks associated with decompression sickness.
• We recommend dives of no deeper than 40 meters, or
depending on the percentage of oxygen in the tank, ppO
2
max 1.4 BAR. Exposure to higher values puts the diver's life
in danger.
• Abide by the ascent rate recommended by the computer.
Excessive ascent speeds put the diver's life at risk.
• The computer calculates the total ascent time, but this
could be longer than the time shown depending on certain
parameters that the computer calculates throughout the
dive. Trying to ascend at the correct speed and abiding by
the depths of the stops shown will help respect this duration.
• Always respect the NO FLY time: absolutely do not board
an airplane if the NO FLY icon is still shown on the display.
Remember to plan your last dive in the series keeping in
mind the recommendations provided by DAN (Divers Alert
Network).
• Even if you abide by all the intervals dictated by hyperbaric
medicine, the occurrence of decompression sickness on
board a plane cannot be excluded after dives.
Dives with Nitrox mixtures.
When setting the gas fraction in the tank, the computer will
only accept whole numbers, so in the case of a veried gas
fraction of 32.8, the next lower whole number must be set,
and thus 32 in this case.
Do not round up to the next higher number because this would
underestimate the nitrogen calculations.
• Check the ppO
2
max setting, and never exceed 1.4 BAR.
• NEVER DIVE without rst checking the contents of the tanks
with instruments that have been declared reliable.
• Check that the gas set on the computer corresponds to
what is in the tank you'll be diving with.
• Dives with Nitrox-Trimix-CCR require specic training. Do
NOT dive without the appropriate training.
• Exceeding the maximum recommended ppO
2
limit set
dictates an ascent to lower levels, and in the case of a
CNS (Central Nervous System) value approaching the limit,
reduced exposure to oxygen is recommended.
• Only use the dive computer after you have read all sections
of the instruction manual and you have understood how it
works. If you have any doubts or questions, contact your
instructor or dealer before you dive.
Page 7

7
English
Before the dive
• It is crucial to understand that every diver is completely
responsible for their own safety.
• Dives using gas mixtures entail risks other than those
associated with dives using standard air. Adequate training
is necessary in order to learn to understand and avoid these
risks, which are not immediately obvious. These risks include
serious injury or death.
Limits of dive computers
The computer reects the most up-to-date guidelines on
dive safety, but it must be stressed that the studies should
be considered theoretical. Their aim is to reduce risk, but
they cannot prevent the possibility of contracting illnesses
associated with underwater activities: decompression sickness
when scuba diving, and syncope/taravana/hemoptysis when
freediving.
Care and maintenance
• Keep your computer clean and dry. Do not expose the
computer to chemical agents, including alcohol.
Use only fresh water to clean your computer, removing all
saline deposits. Leave the computer to dry naturally; do not
use jets of hot or cold air.
• Do not expose the computer to direct sunlight or sources
of heat higher than 50°C. Store the computer in a cool
(5°C-25°C) and dry place.
• Do not place the computer in a hyperbaric chamber.
The computer is designed for reading precision of +/- 2%
(European standards require precision levels of +/- 3.5%).
European standards require that the unit be checked periodically
to monitor the precision of its depth and time readings.
• The warranty will be forfeited if the computer is opened by
an unauthorized service center.
• The GURU computer is built to withstand use in sea water, but
after the dive it must be rinsed thoroughly in fresh water and
not exposed directly to sunlight or sources of heat to dry it.
• Check that there are no traces of humidity on the inside of
the display.
• Do not attempt to open, modify, or repair the computer
yourself. Always contact an Authorized Center or SEAC
directly.
Page 8
8
English
TECHNICAL CHARACTERISTICS OF THE
COMPUTER
Hardware
The computer is made of a number of materials: Highperformance technopolymer, Stainless steel, Mineral glass.
The screen features a 100% dot matrix display with 80x80
pixel resolution and "SuperBright" LED backlighting.
Special focus went into developing a navigation system that
allows divers to access settings easily and intuitively.
• Sensor precision guarantee: 130 mt.
• Maximum depth: 150 mt / 500 ft
• Precision of the Absolute Pressure Measurement.
min max
p = 0 .. 5 bar -20 mbar +20 mbar
p = 0 .. 10 bar -40 mbar +20 mbar
p = 0 .. 14 bar -100 mbar +20 mbar
Maximum sensor error in the Temperature measurement:
-2 / +6°C.
When worn on the wrist, temperature detection out of the
water is affected by body heat. For an accurate temperature
reading, immerse the device in water or leave the device away
from any sources of heat for a few minutes.
Certication:
The computer's hardware has obtained EC and EN13319
certications.
Software
Algorithm: The computer uses the Bühlmann ZHL-16B model
for scuba dives.
Brief summary of Technical Characteristics
SEAC GURU
Dive mode
Air/Nitrox - Gauge - Apnea
Mixes Managed
2 Mixes (O
2
: 21% - 99%)
Algorithm
Buhlmann ZHL-16 B
Personal
Algorithm
Adaptations
6 Levels of Conservatism
RDM
(Advanced
Management of
Repetitives)
Yes
Gas switch and
Gas break
Yes
PO
2
1.2 - 1.6
CNS Calculation
Yes
Altitude
adaptation
Automatic
Water adaptation
Manual (salt or fresh)
Page 9
9
English
SEAC GURU
Deep Stop
Yes
Safety Stop
personalization
Yes, time and depth
Last deco
stop depth
personalization
Yes (from 6m to 1m)
Alarms
Acoustic + visual
Planner
NDL + Deco Planner
Wireless
Transmitter
Compatible, up to 2 simultaneously
Compass
3D self-equalizing, 1° resolution
Freediving
Functions
Surf time, depth, dive time, dive
number, speed, max depth, water
temperature, time, summary of current
session
Outdoor functions
Altimeter, Barometer, Temperature,
Weather forecast
Step counter
Yes
Fitness Functions
Step counter, distance, speed, calories
burned
Other special
functions
Stopwatch, Level, Magnetometer,
Phases of the Moon, Alarm clock,
Double time zones
Oxygen analyzer
Yes (optional)
SEAC GURU
Backlighting
SuperBright LEDs
Backlighting mode
Timer, Manual on/off, Always on
during the dive.
Display
100% dot matrix | 80x80 pixel
Case
Composite
Lens
Mineral
Extension cord
Included
Battery
Lithium ion USB rechargeable
~ 40 hours (dive time)
~ 2-3 months (watch)
~ 6-7 months (stand-by)
Logbook
~ 160 hr scuba
(10 sec sample rate)
Max depth
150 mt / 500 ft
PC/Mac Connect.
Yes, USB interface included
Updates
Manual updates
Page 10
10
English
Recharging the battery
GURU has a rechargeable Li-ion battery with no memory effect.
The burn-time data provided may vary up to +/-15% depending
on ambient temperature, device settings, applications installed,
version of the operating system, backlight settings, and usage.
m WARNING!
Always fully charge the battery before using the computer
the first time.
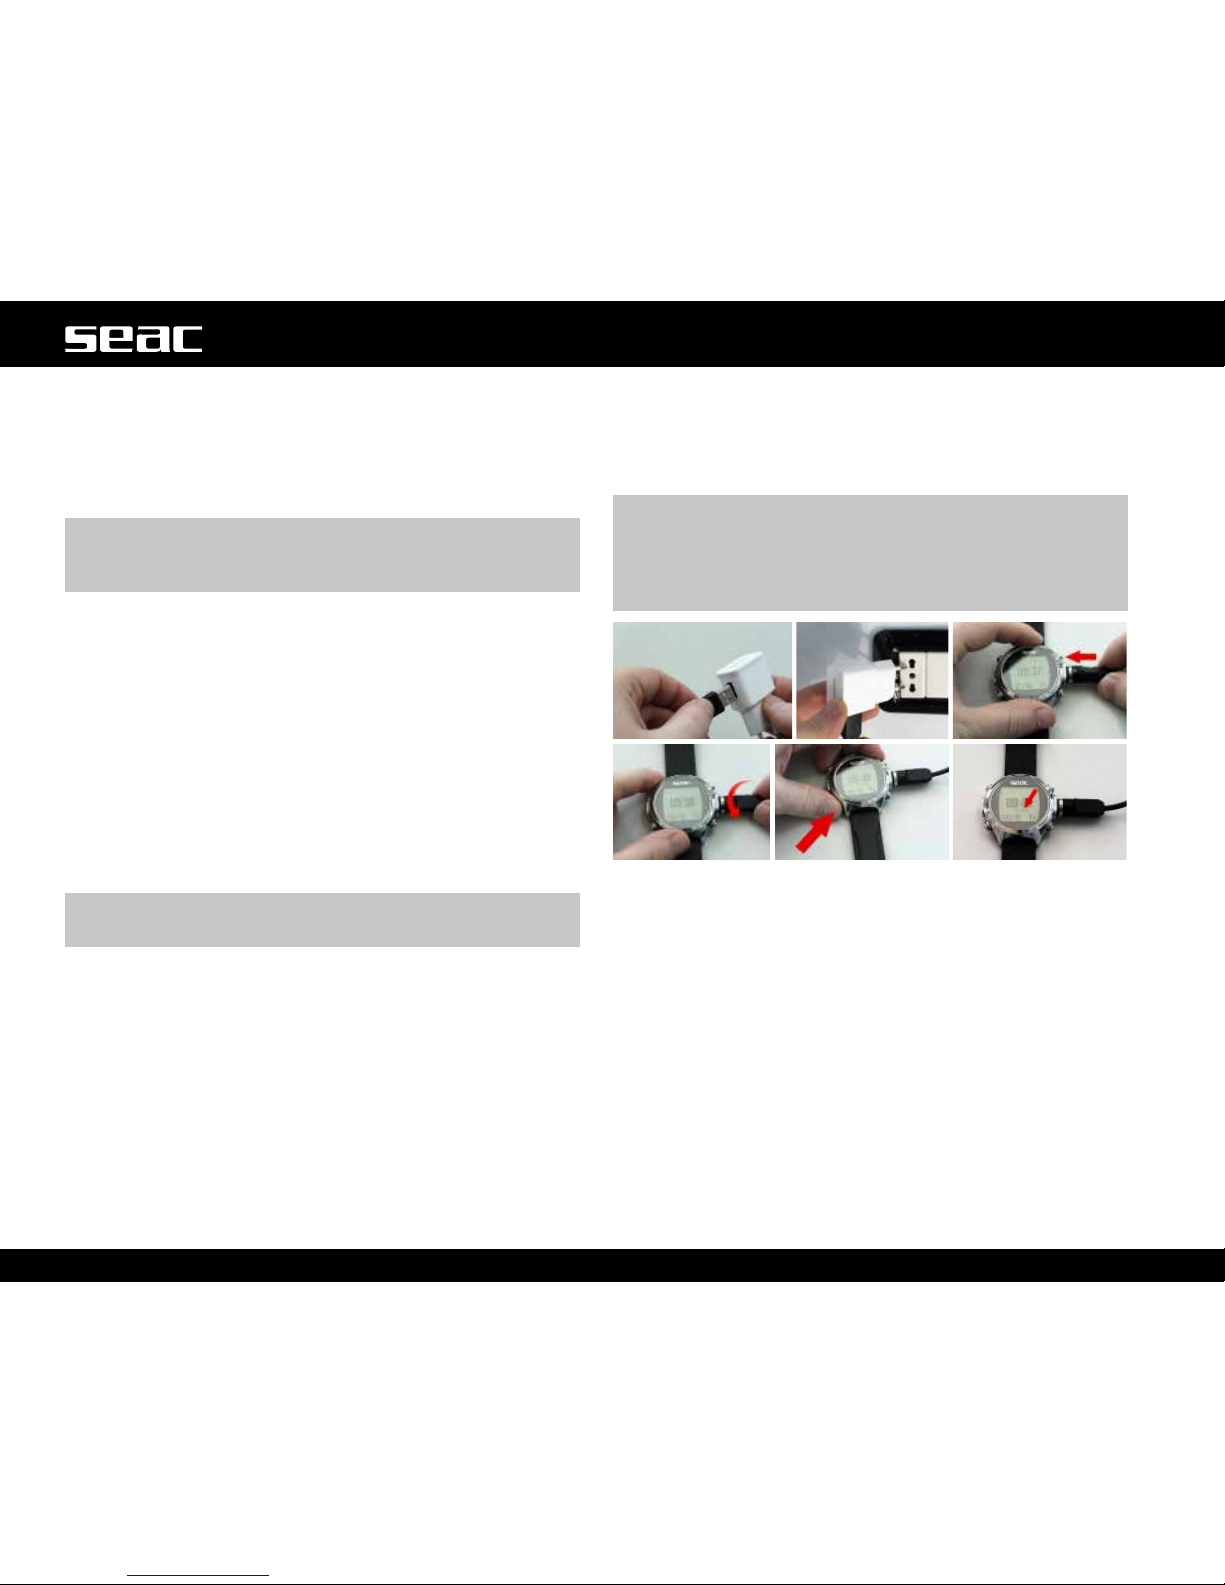
Charge the battery by connecting GURU to a USB wall charger
(not included) using the USB cable provided.
We recommend using a USB wall plug (like those for
smartphones/tablets) for charging GURU.
If you decided to use a USB port on a computer, make sure
that the computer does not suspend power when it switches
to stand-by mode. Charging GURU from a computer is not
recommended because the device might not charge fully.
Even if GURU's next-generation battery has no memory effect,
we still recommend charging the battery completely.
Average charging time is 3-5 hours depending on the residual
charge level.
m WARNING!
Never dive if the computer shows a charge of 30% or less.
When you connect the USB charging cable, within 45 seconds
the <= charging symbol will appear on the watch screen.
Charging is complete when the battery symbol disappears from
the watch screen and sleep mode activates.
Once the battery has charged, even if the device is left
connected to electrical power, GURU automatically interrupts
the ow of power. If you leave the computer charging longer
than necessary (e.g., overnight), you may nd it has switched
to sleep mode.
You can check the charge % of your GURU by pressing any
button on the watch screen.
If the charge cycle doesn't nish, the battery indicator might not
be exact until the next full charge.
After installing an app or updating the operating system, we
recommend that you run a full charging cycle.
m WARNING!
Don't leave the GURU with a fully dead battery for a long
time (e.g. 3 months); this can damage the battery. GURU
will record an alarm if it is left uncharged for long periods,
and this eventuality is not covered by the guarantee.
Page 11
11
English
Dives in especially cold water (<3 °C)
GURU can also be used for dives in especially cold water
(<3 °C). However, exposure to especially low temperatures
can negatively affect the voltage remaining in the battery,
decreasing the computer's burn-time.
If you dive in especially cold water, the battery voltage can run
out much faster than normal. Therefore it's always a good idea
to recharge the battery before diving in extreme conditions.
m WARNING!
In the case of dives in especially cold water (<3°C),
recharge the computer to 100% or ensure that you have
at least a 50% charge.
m WARNING!
Dives in especially cold water (<3°C) require specific
training.
Page 12
12:30
01/01 Th
B
C
A
D
12
English
Vibration or
movement
Lock
screen
Unlock Unlock
Unlock
Unlock
GURU OUT OF THE WATER:
Sleep Mode
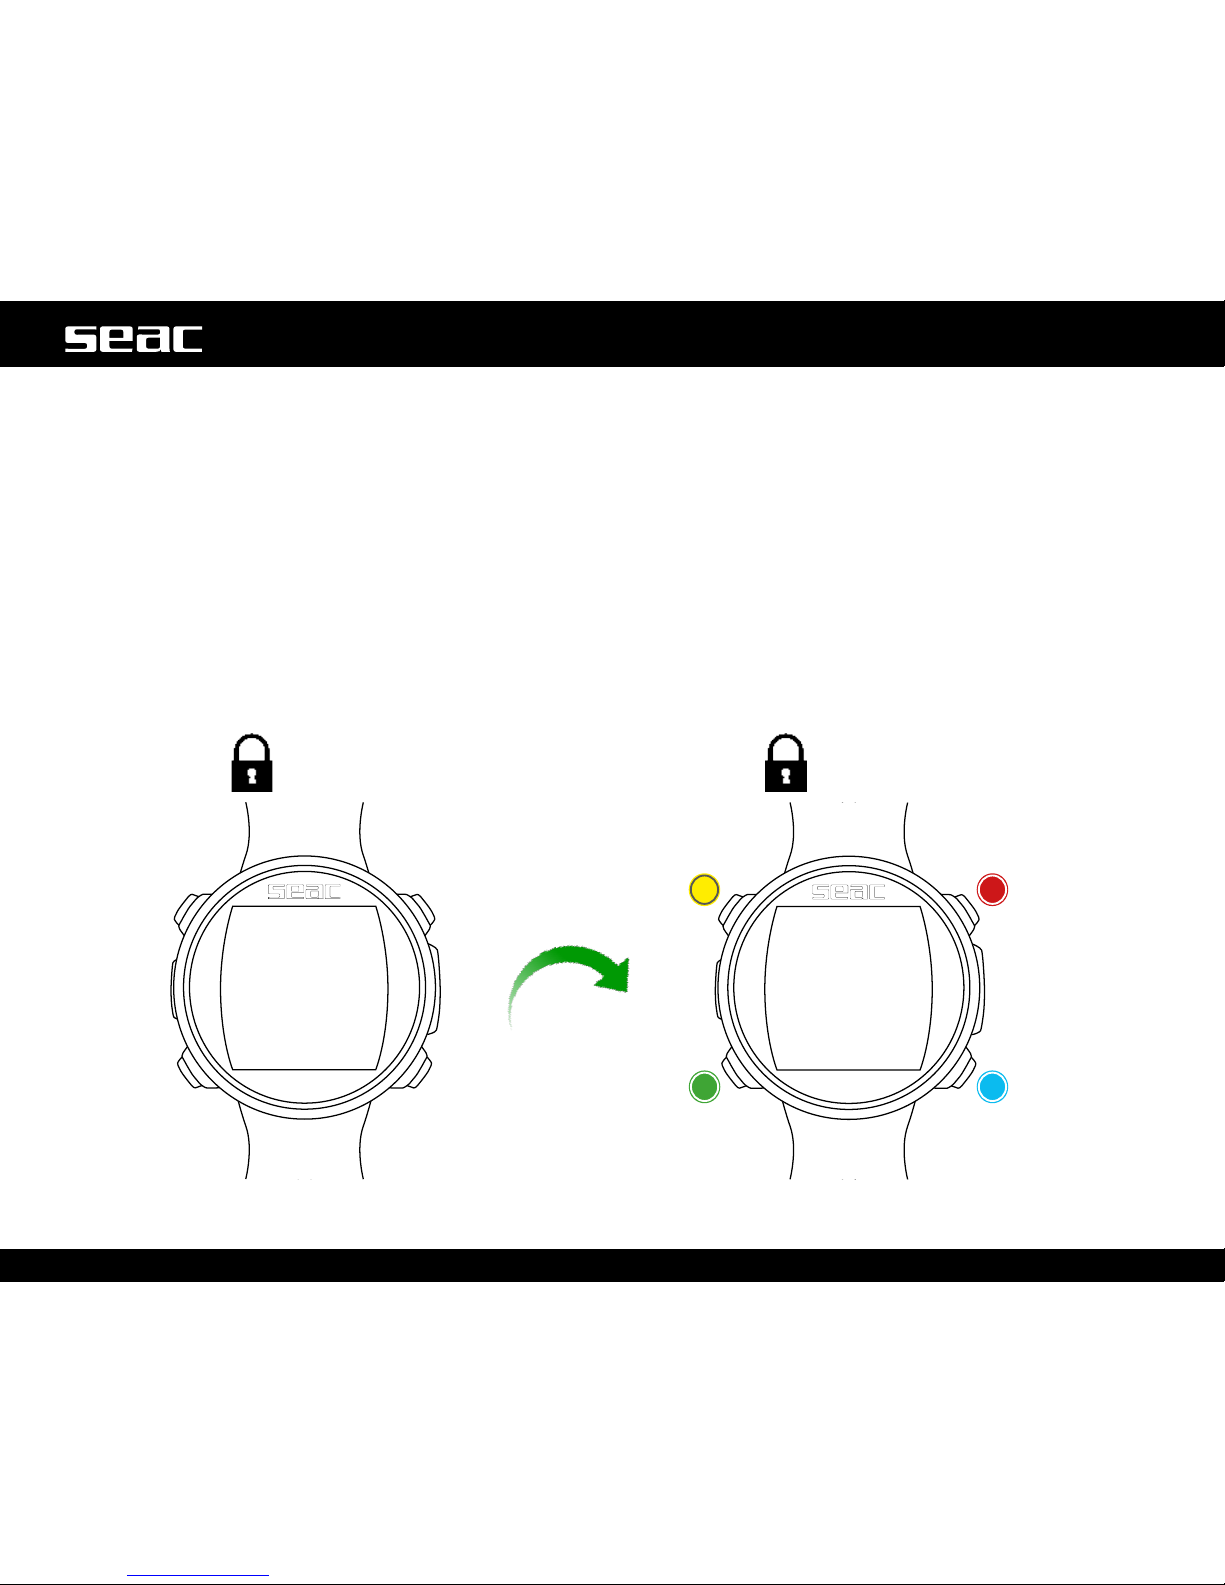
The GURU computer features a Sleep Mode function.
After 1 minute of complete immobility (such as when set aside for the night), GURU will turn off its screen automatically to save
battery. All the functions of the computer continue to function normally: alarm, desaturation (when needed), time, etc.
Thanks to the built-in accelerometer, the screen will turn on automatically as soon as the computer detects any vibration or
movement (no button need be pressed to turn on the screen).
Sleep mode can be deactivated (not recommended) from the DISPLAY menu (see the dedicated section in this manual).
Sleep
mode
Page 13
12:30
01/01 Th
B B
C
A
C
A
D D
95%
12:30
01/01 Th
13
English
Lock screen
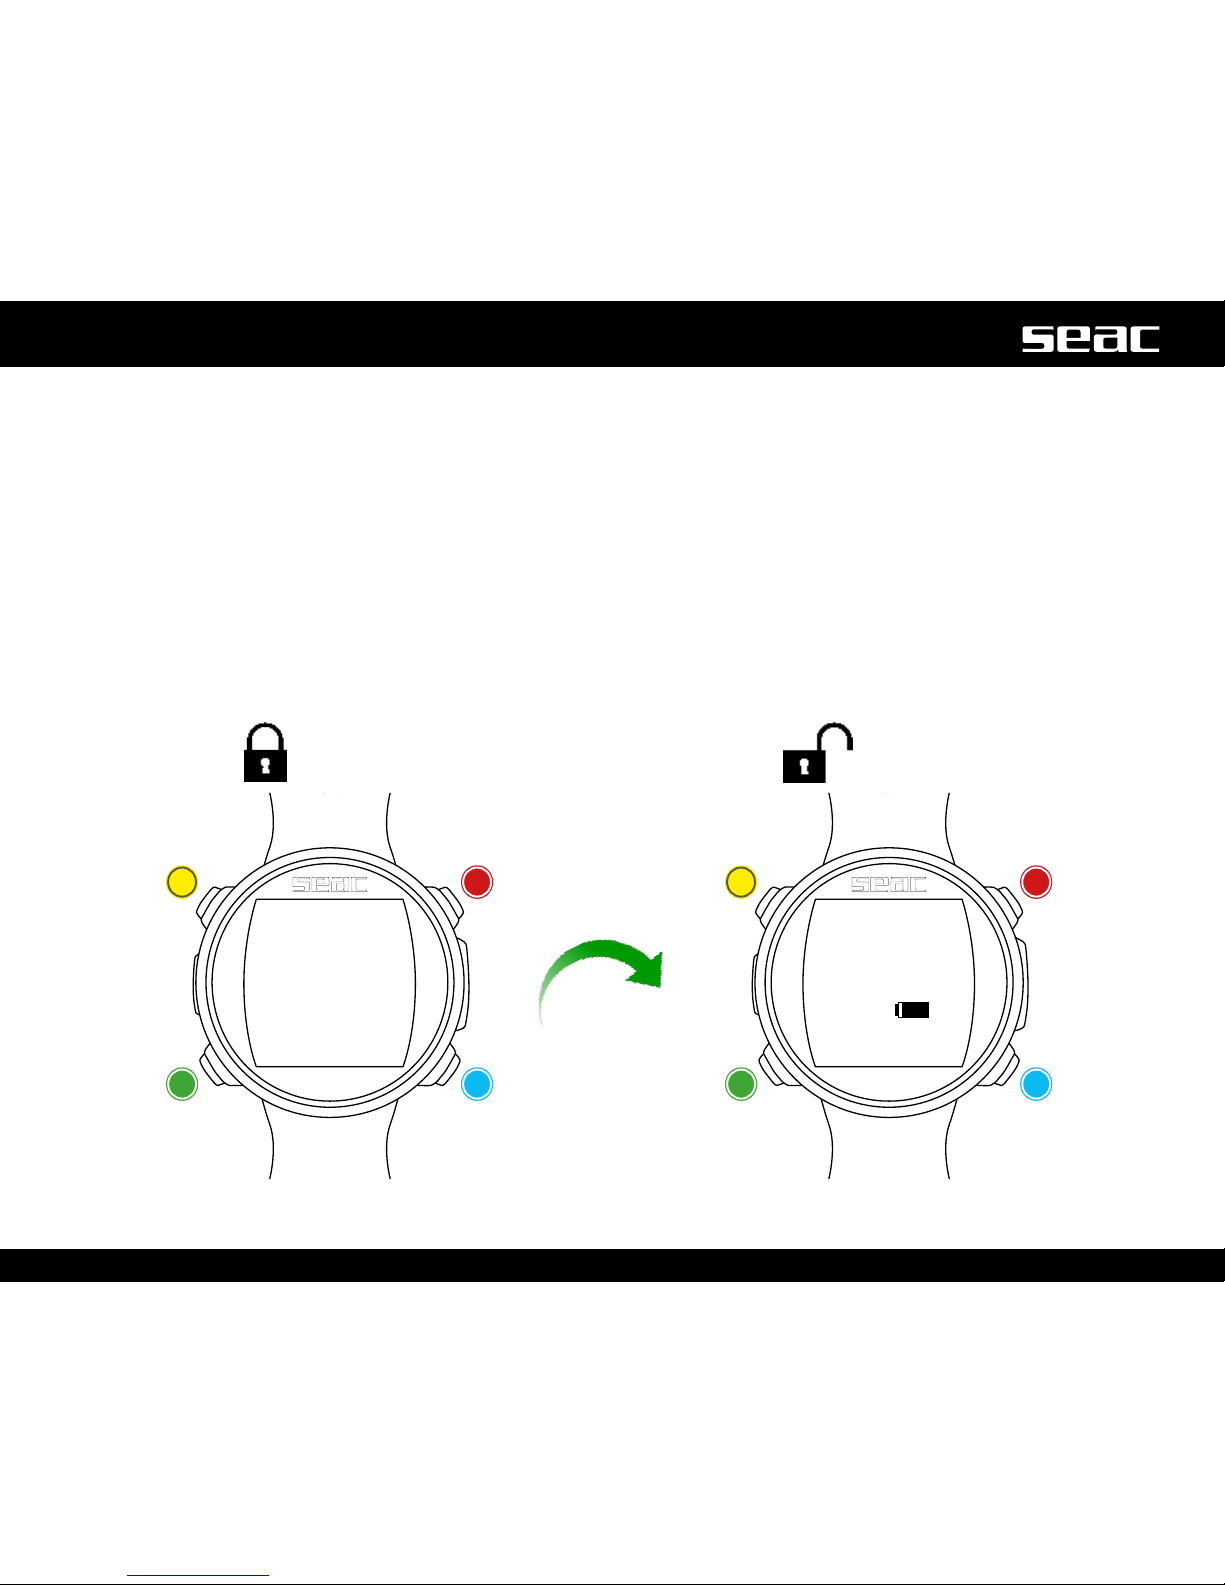
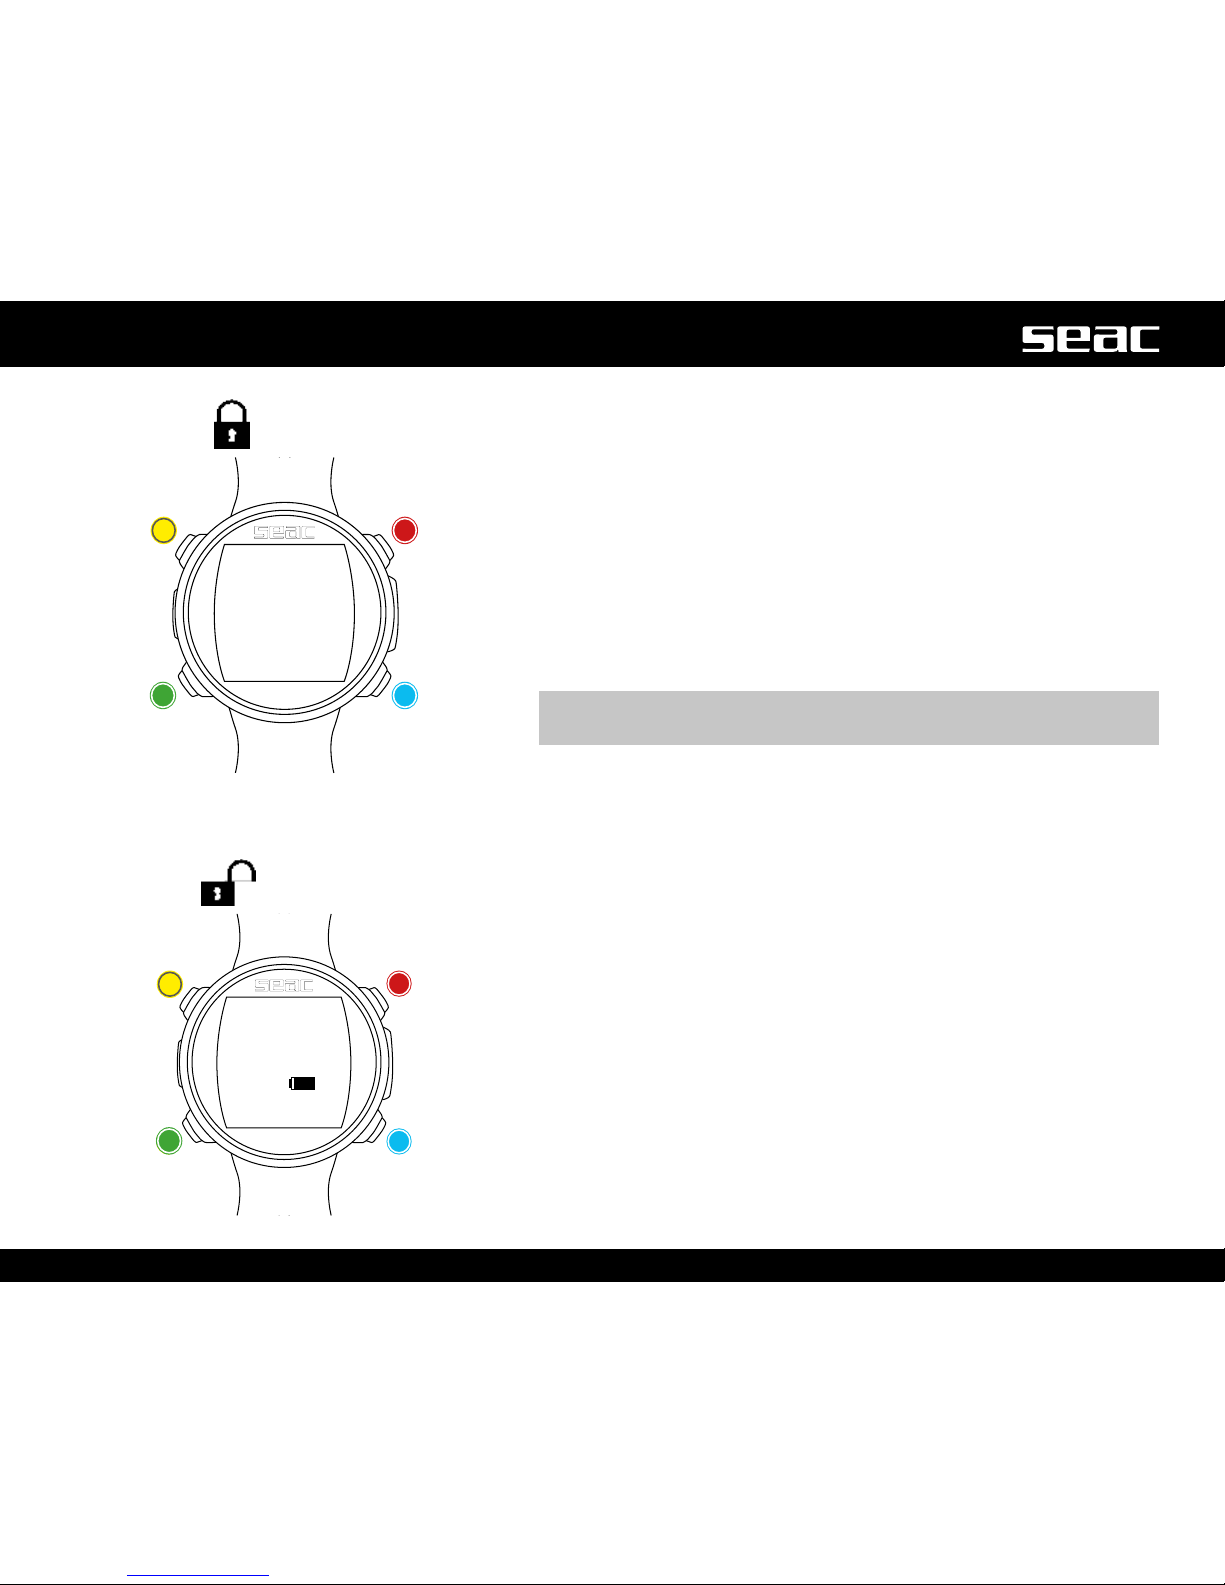
After 60 seconds of inactivity in watch mode, the computer automatically activates “lock” mode.
Push any button to unlock GURU.
The computer is unlocked when the battery % is shown below the time screen.
Lock screen GURU
unlocked
Unlock
Backlighting
Unlock
Compass
and App
Unlock Dive mode
Unlock
Watch mode menu
Page 14
B
B
B
B
B
B
C
C
A
D
D
NE-E-SE-S
200m
+27°C
990mb
54°
CHRONO
MIX CHECK
PITCH&ROLL
MOON
MAGMETER
FITNESS
CLOCK ALARM
Exit
DISPLAY
SYS SET
PC MODE
TRANSMIT
DIVE SET 1
DIVE SET 2
MIX
PLANNER
LOGBOOK
ALARM
COMPASS
DEFAULT
INFO
0.0
0
:00
0 0.0 0.0
OC
DIVE m/min DEPTH
0.0
0
:00
0 0.0 0.0
GAUGE
DIVE m/min DEPTH
0.0
0
:00
0 0.0 0.0
FREE
DIVE m/sec DEPTH
B
C
D
B
B
C
C
D
D
B
C
D
C
C
C
D
D
D
12:30
01/01 Th
95%
14
English
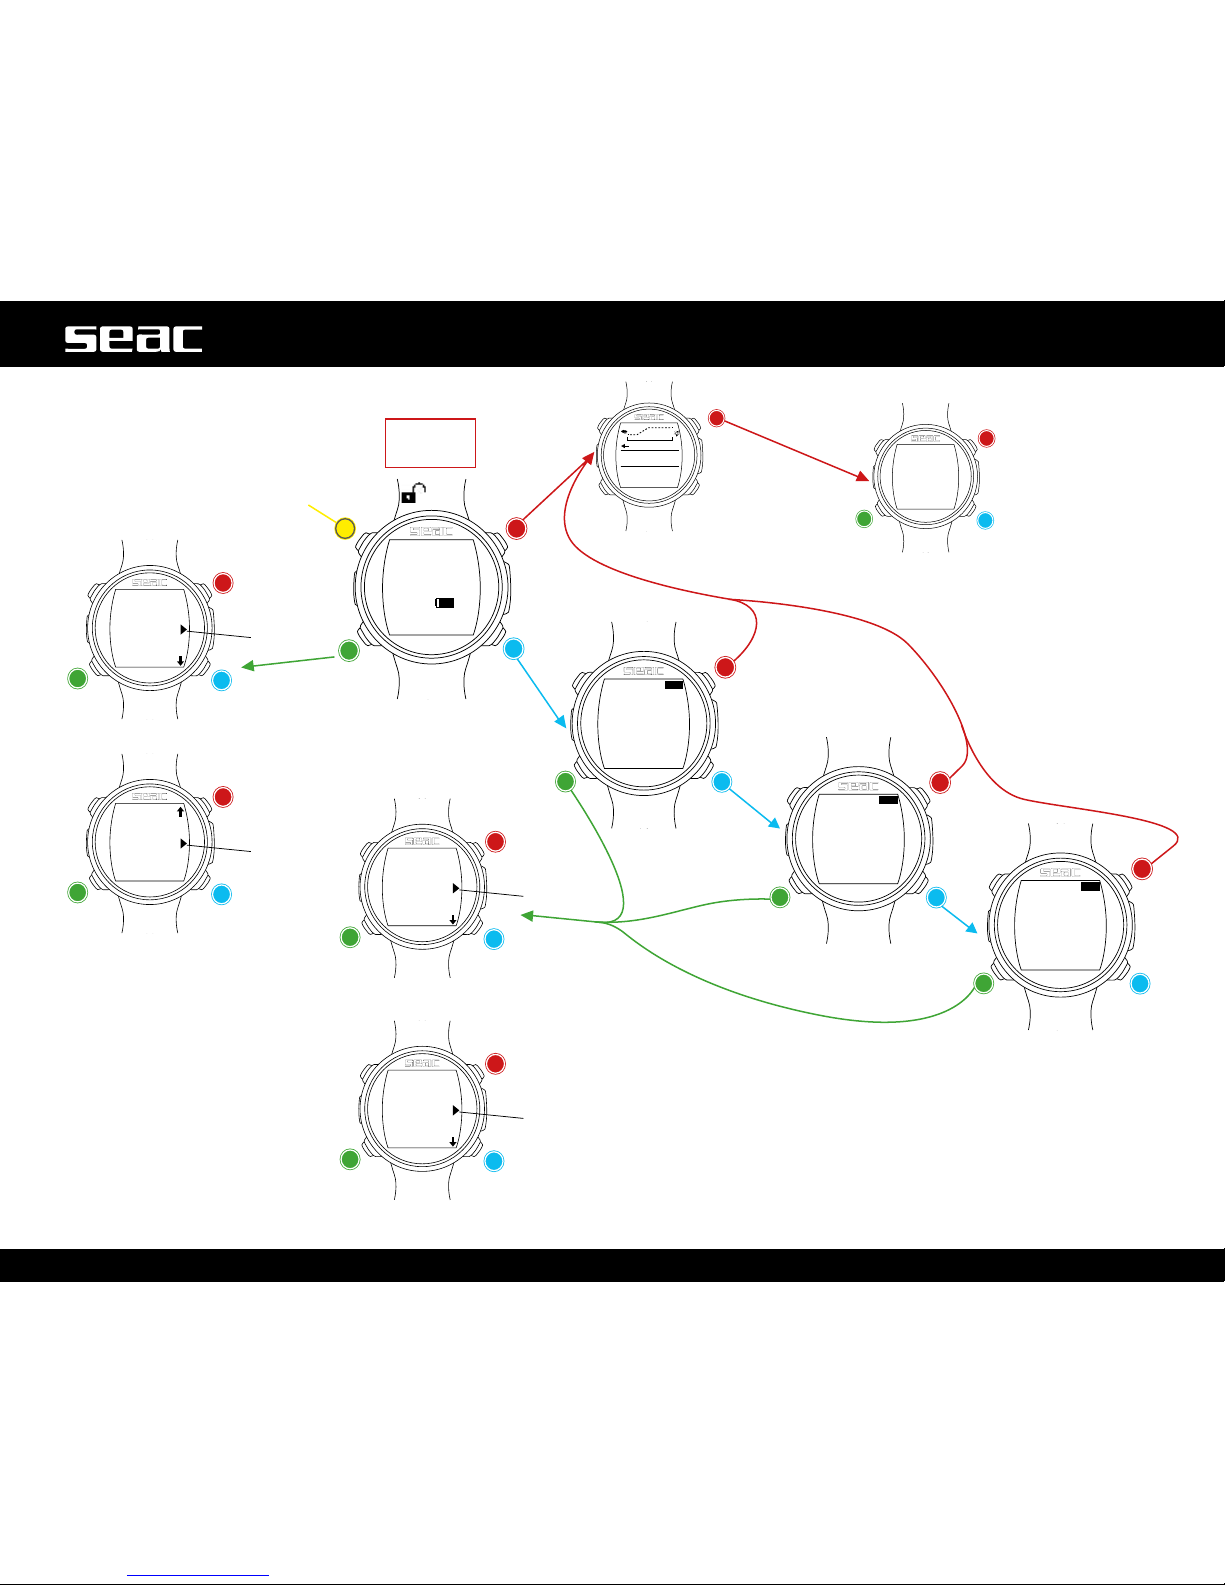
GURU menu structure
Start
here.
Compass and
Outdoor
App
UP/exit/
Up
Up
Exit
Exit
Down
Down
Down
Select
Select
Select
Watch
Watch
Menu
Dive menu
Dive menu
Watch
Menu
Scuba
mode
Gauge
mode
Freedive
mode
Back to
watch
Activate backlight
(only
function of this button)
Up
Exit
Exit
Down
Down
Select
Select
GURU
unlocked
Up
Page 15
12:30
01/01 Th
95%
B
C D
12:30
01/01 Th
B
C
A
D
C
A
Mo => Monday
Tu => Tuesday
We => Wednesday
Th => Thursday
Fr => Friday
Sa => Saturday
Su => Sunday
15
English
Watch screen
When not diving, watch mode is considered the main screen for GURU.
When navigating the menu, the computer will return automatically to the
watch screen if no button is pressed for 60 seconds.
Watch mode displays the following:
Large, in the center: Time in 24 hr or 12 hr format (the date format can
be set from the SYS SET menu).
Small, in the center: % battery.
m WARNING!
Do not dive if the battery charge is lower than 30%.
At lower left: date in dd/mm format (the date format can be changed to
mm/dd in the DIVE SET 1 menu by selecting the Imperial system).
At lower right: Day of the week.
GURU
unlocked
Backlighting
Compass
and App
Dive mode
Watch mode
menu
Lock screen
Unlock Unlock
UnlockUnlock
Page 16
B
C
C
A
D
DISPLAY
SYS SET
PC MODE
TRANSMIT
12:30
01/01 Th
95%
COMPASS
DEFAULT
INFO
B
C
D
16
English
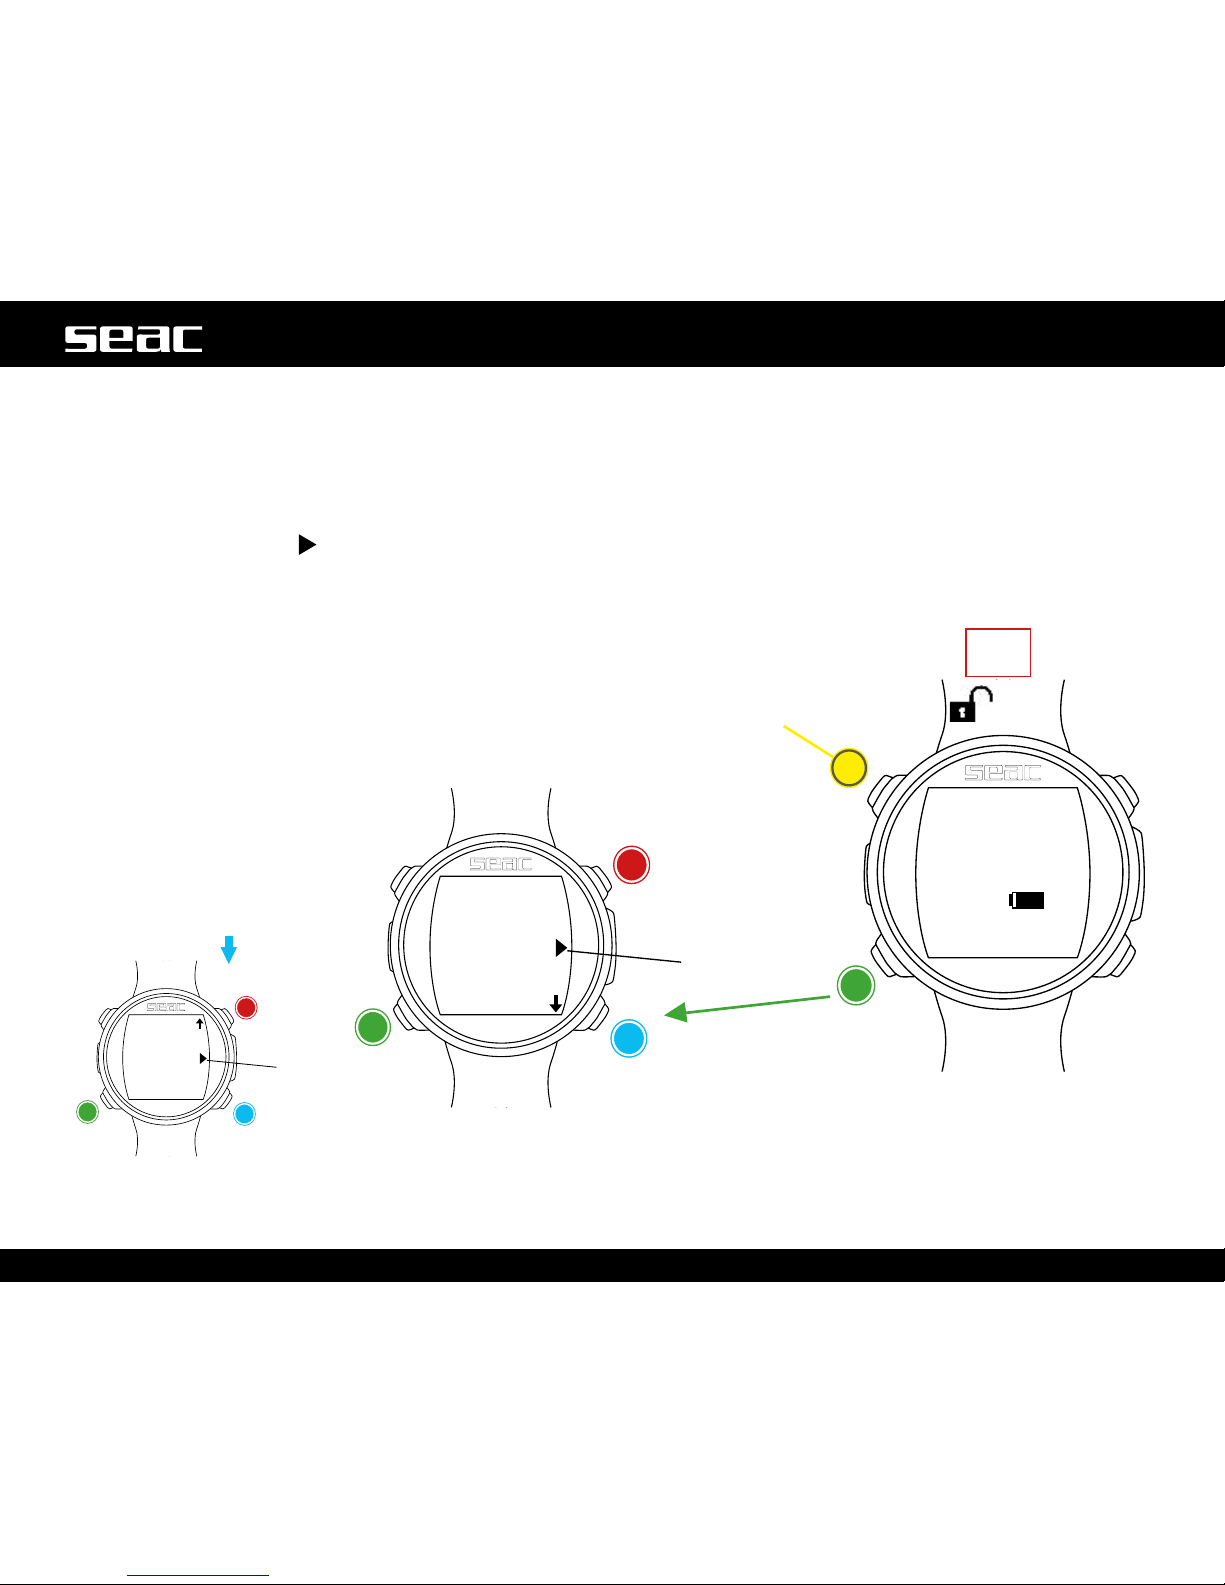
Watch Menu
The watch menu contains all settings not directly related to diving.
To access the Watch Menu, unlock GURU by pressing any button, and press the C button from the watch screen. Press the B and
D buttons to scroll through the menu items, and press C to select the desired option.
Keep pressing D to display the second menu page.
To exit the menu, select the
symbol, or simply don't press any buttons for 60 seconds.
Watch
Watch Menu
Up
Exit
Down
Select
Activate backlight (only
function of this button)
GURU
unlocked
Start
here.
Watch
Menu
Up
Exit
Down
Select
Page 17
C
12:30
01/01 Th
95%
C
DISPLAY
SYS SET
PC MODE
TRANSMIT
BKL LEVEL:
BKL TIME:
BKL MODE:
CONTRAST:
SLEEP:
B
C
D
5
3
MAN
0
1
EXIT
17
English
DISPLAY (Screen settings)
The settings for the GURU screen can be changed from the DISPLAY menu.
Refer to the gure at left to navigate the DISPLAY menu.
BKL LEVEL: (0-10). Adjust the backlight power.
m WARNING!
Setting a very high value reduces GURU's battery time.
BKL TIME: (0-60). Adjust the duration of backlighting in minutes for AUTO mode.
BKL MODE: (AUTO-MAN-DIVE). Set the backlighting mode.
AUTO: Backlighting deactivates automatically after a few minutes (BKL TIME).
MAN: Backlighting is managed manually (one press to activate and one
to deactivate).
DIVE: Backlighting activates automatically and remains active throughout
the entire dive.
When not diving, it uses the AUTO settings.
m WARNING!
In the watch screen, regardless of the BKL MODE and BKL TIME
settings, backlighting is deactivated after 3 seconds.
CONTRAST: (0-7) Sets the intensity of the font contrast.
m WARNING!
Setting a very high value reduces GURU's battery time.
SLEEP: (0-60) In minutes, indicates the elapsed time after which GURU
activates SLEEP mode when immobile (a value of 0 deactivates the Sleep
function).
m WARNING!
Deactivating the Sleep function drastically reduces the computer's burntime.
To exit, select EXIT (or wait 60 seconds without pressing any button).
Select
GURU
unlocked
Increase
value
Decrease
value
Next value
Page 18
UTC:
UTC 2:
TIME:
FORMAT:
DATE:
UTC:
UTC 2:
TIME:
FORMAT:
DATE:
1:00
1:00
12:30
24
01.01.17
1:00
4:00
12:30
24
01.01.17
EXIT
EXIT
12:30
01/01 Th
95%
01/01 Th
95%
15:3012:30
C
12:30
01/01 Th
95%
C
DISPLAY
SYS SET
PC MODE
UTC:
UTC 2:
TIME:
FORMAT:
DATE:
B
C
D
1:00
1:00
12:30
24
01.01.17
EXIT
18
English
SYS SET (date and time)
Date and time settings can be changed from the SYS SET Menu.
UTC (Coordinated Universal Time): Adjusts the rst “home” time zone.
UTC 2 (Coordinated Universal Time): Adjusts the second time zone.
Set UTC and UTC 2 with two different values to display double time zones on
the GURU watch screen. Set the same UTC value to display a single time.
TIME: Sets the time (24hr format).
FORMAT: Sets the time format displayed (24hr or 12 hr).
To exit, select EXIT (or wait 60 seconds without pressing any button).
UTC 2 = UTC
UTC 2 ≠ UTC
Select
GURU
unlocked
Increase
value
Decrease
value
Next value
Page 19
C
12:30
01/01 Th
95%
C
DISPLAY
SYS SET
PC MODE
PC MODE
S/N 000000
READY
C
EXIT
19
English
PC MODE (connected to PC or Mac)
PC MODE is used to connect to your Mac or PC using DiveLogger.
To download DiveLogger and connect GURU to your Mac or PC in order to
download dives and run updates, connect to:
http://www.seacsub.com
An internet connection is required to download the program and download
updates.
m WARNING!
DiveLogger and updates are completely free.
However, you will need an internet connection in order to download
the software. If you use a metered connection, your internet service
provider could charge you for the data traffic generated. We always
recommend an ADSL Flat connection for accessing the Internet.
Contact your Internet provider for more information.
To exit, press the C button (automatic exit after 60 seconds is not active
in PC MODE).
Select
GURU
unlocked
Exit
Page 20
TX ID:
TANK RES:
B
C
D
OFF
30
EXIT
RESET
0.0
0
:00
21 ---
---
OC
MIX RBT
BAR
20
English
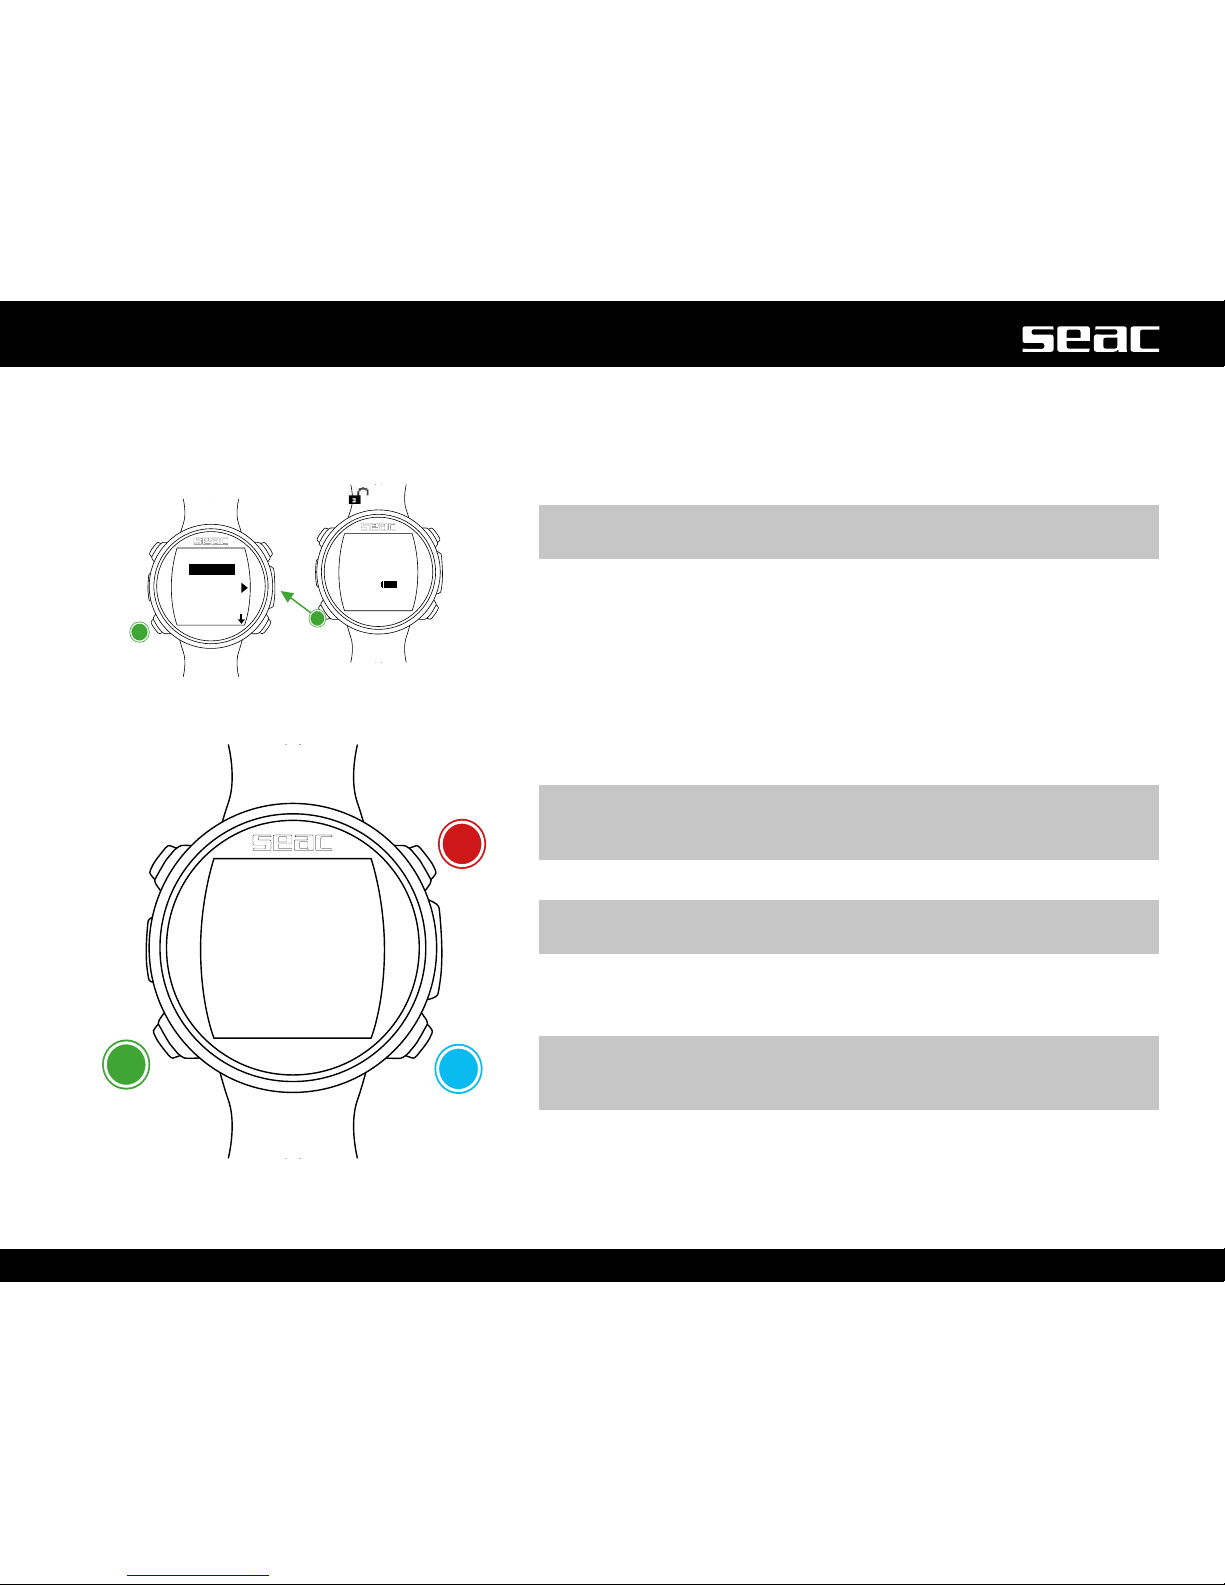
Connecting the Transmitter to GURU
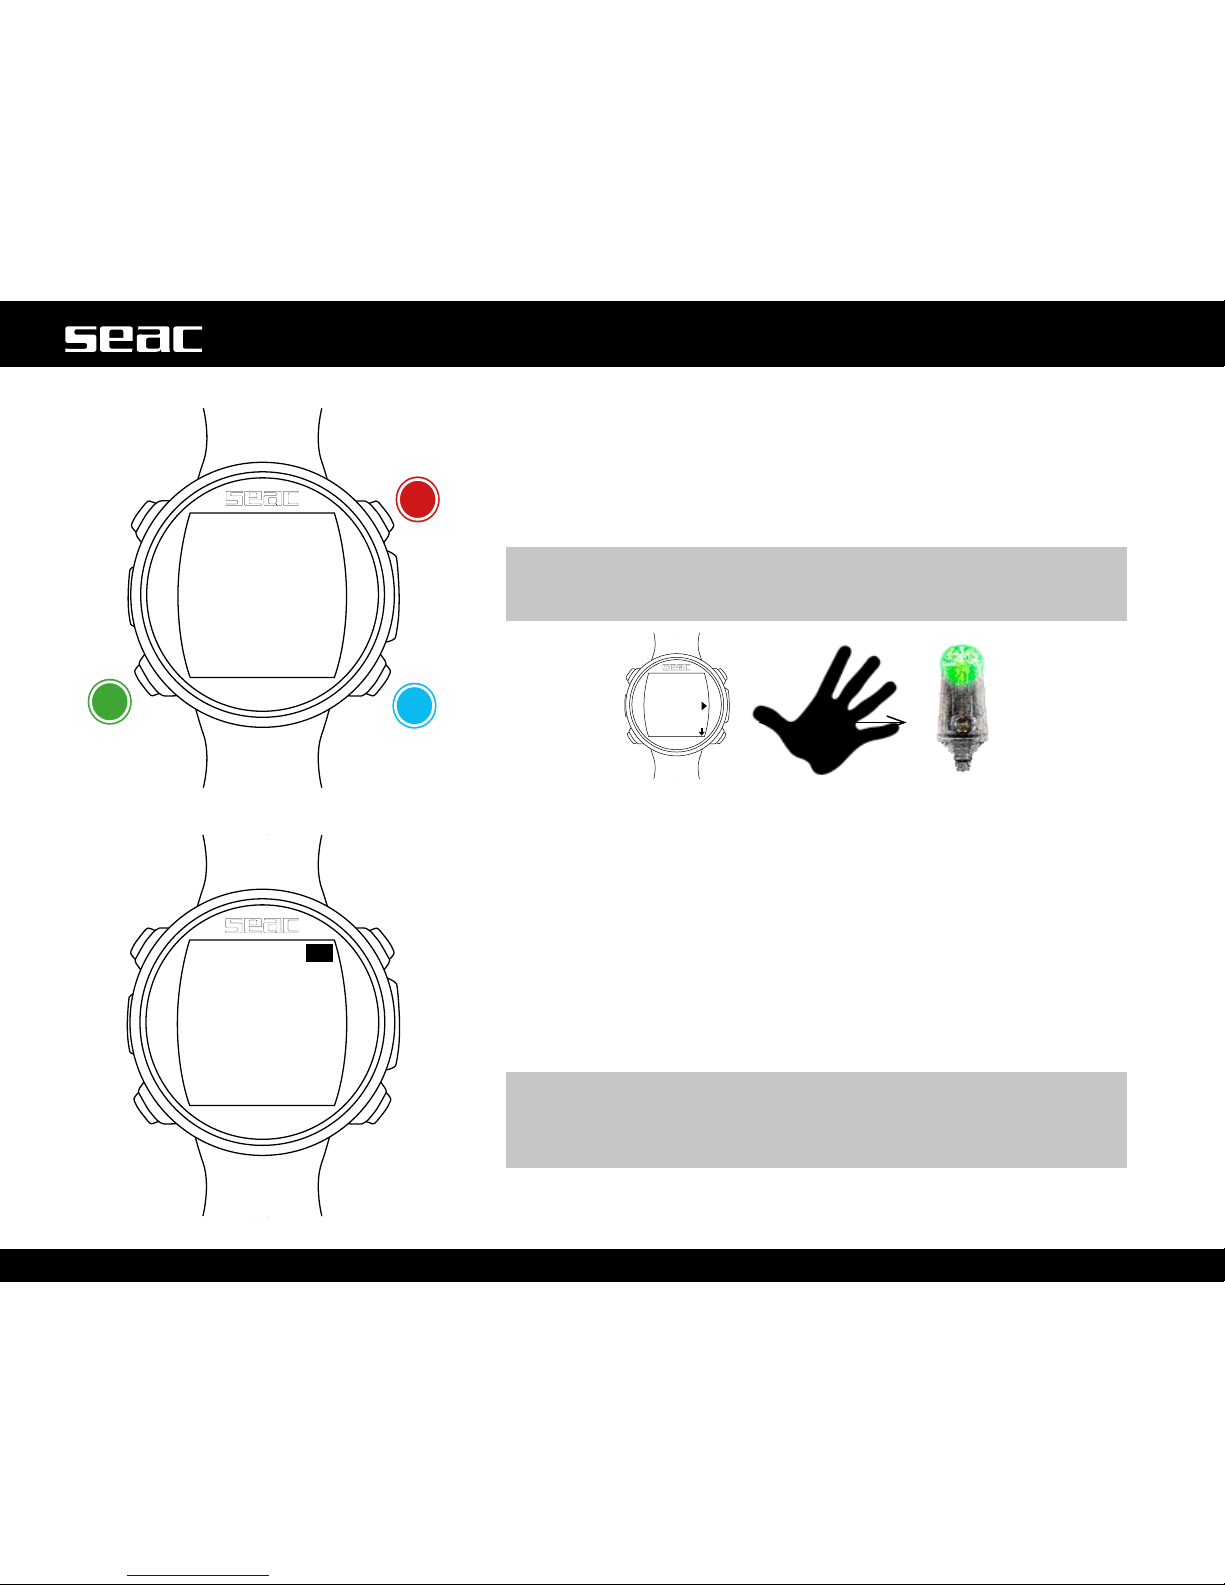
Once you've turned on the Transmitter, access the TRANSMIT menu on
the GURU (pressing the button on the lower left of the watch screen and
scrolling through the menu options).
To pair with the Transmitter for the rst time, position the GURU
approximately 20-30 cm from the Transmitter.
m WARNING!
Placing the GURU too close to the Transmitter could prevent them from
pairing correctly.
DISPLAY
SYS SET
PC MODE
TRANSMIT
20-30cm
Press the B button to begin searching for the Transmitter (SRC). When
pairing is complete, the Transmitter's TX ID will be displayed on the screen.
(Each Transmitter has 31 TX ID communications channels. The TX ID is
assigned to the Transmitter randomly. You can change the Transmitter TX ID
if there is interference with another Transmitter; see the dedicated section
in this manual.)
To check that the GURU has paired correctly with the Transmitter, activate
dive mode. Within 30 seconds, the tank pressure will be displayed in the
lower right part of the screen (BAR). (The RBT value will only be displayed
during the dive; see the dedicated section in this manual.)
Once paired, the GURU and Transmitter will connect automatically as soon
as the GURU activates OC (Open Circuit) dive mode.
m WARNING!
Using the Transmitter reduces the GURU's battery time to
approximately 20 hours of dive time. Set the TX ID to "OFF" if you are
not using the Transmitter.
SRC
Decrease
value
Next value
Page 21
21
English
Changing the Transmitter communications channel
If interference with other Transmitters occurs, you will need to change the communications channel (TX ID).
Each Transmitter has 31 channels. The channel is assigned randomly, and the channel assigned is saved to memory. It is not
changed until the Transmitter's battery dies or you perform the following procedure to change the TX ID.
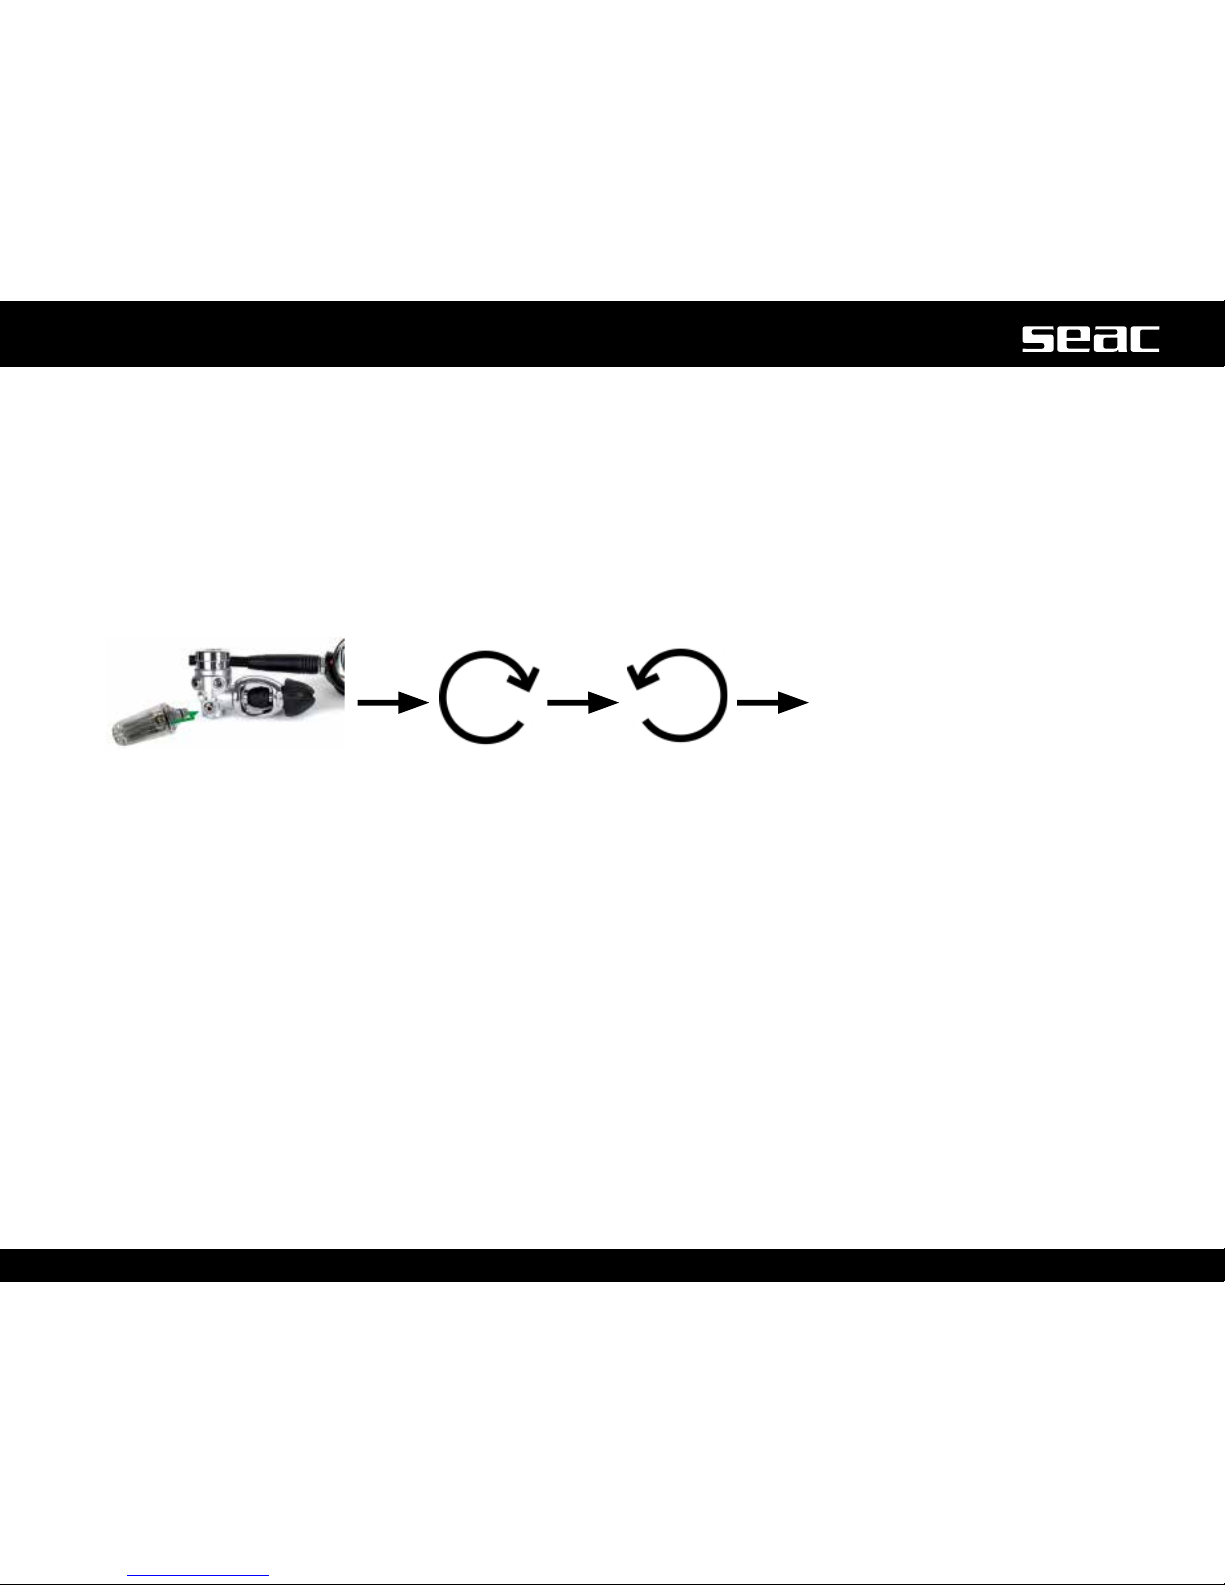
PROCEDURE:
Connect the Transmitter
(off) to a rst stage.
Open the tank. Close the tank.
Press the second stage purge button
and completely drain all pressure from
the Transmitter before it completes
the start-up phase. Wait 30 seconds
before turning the Transmitter on
again.
After you change the TX ID, you will need to pair the devices again, after selecting the RESET command on the GURU.
Select RESET (the TX ID is set automatically to OFF). Then pair the devices again as described in the correct chapter in this manual.
Page 22
12:30
01/01 Th
95%
DISPLAY
SYS SET
PC MODE
COMPASS
DEFAULT
INFO
DECLIN:
DIR:
CALIB:
B
C
D
0.0
EAST
START
EXIT
C C
D
22
English
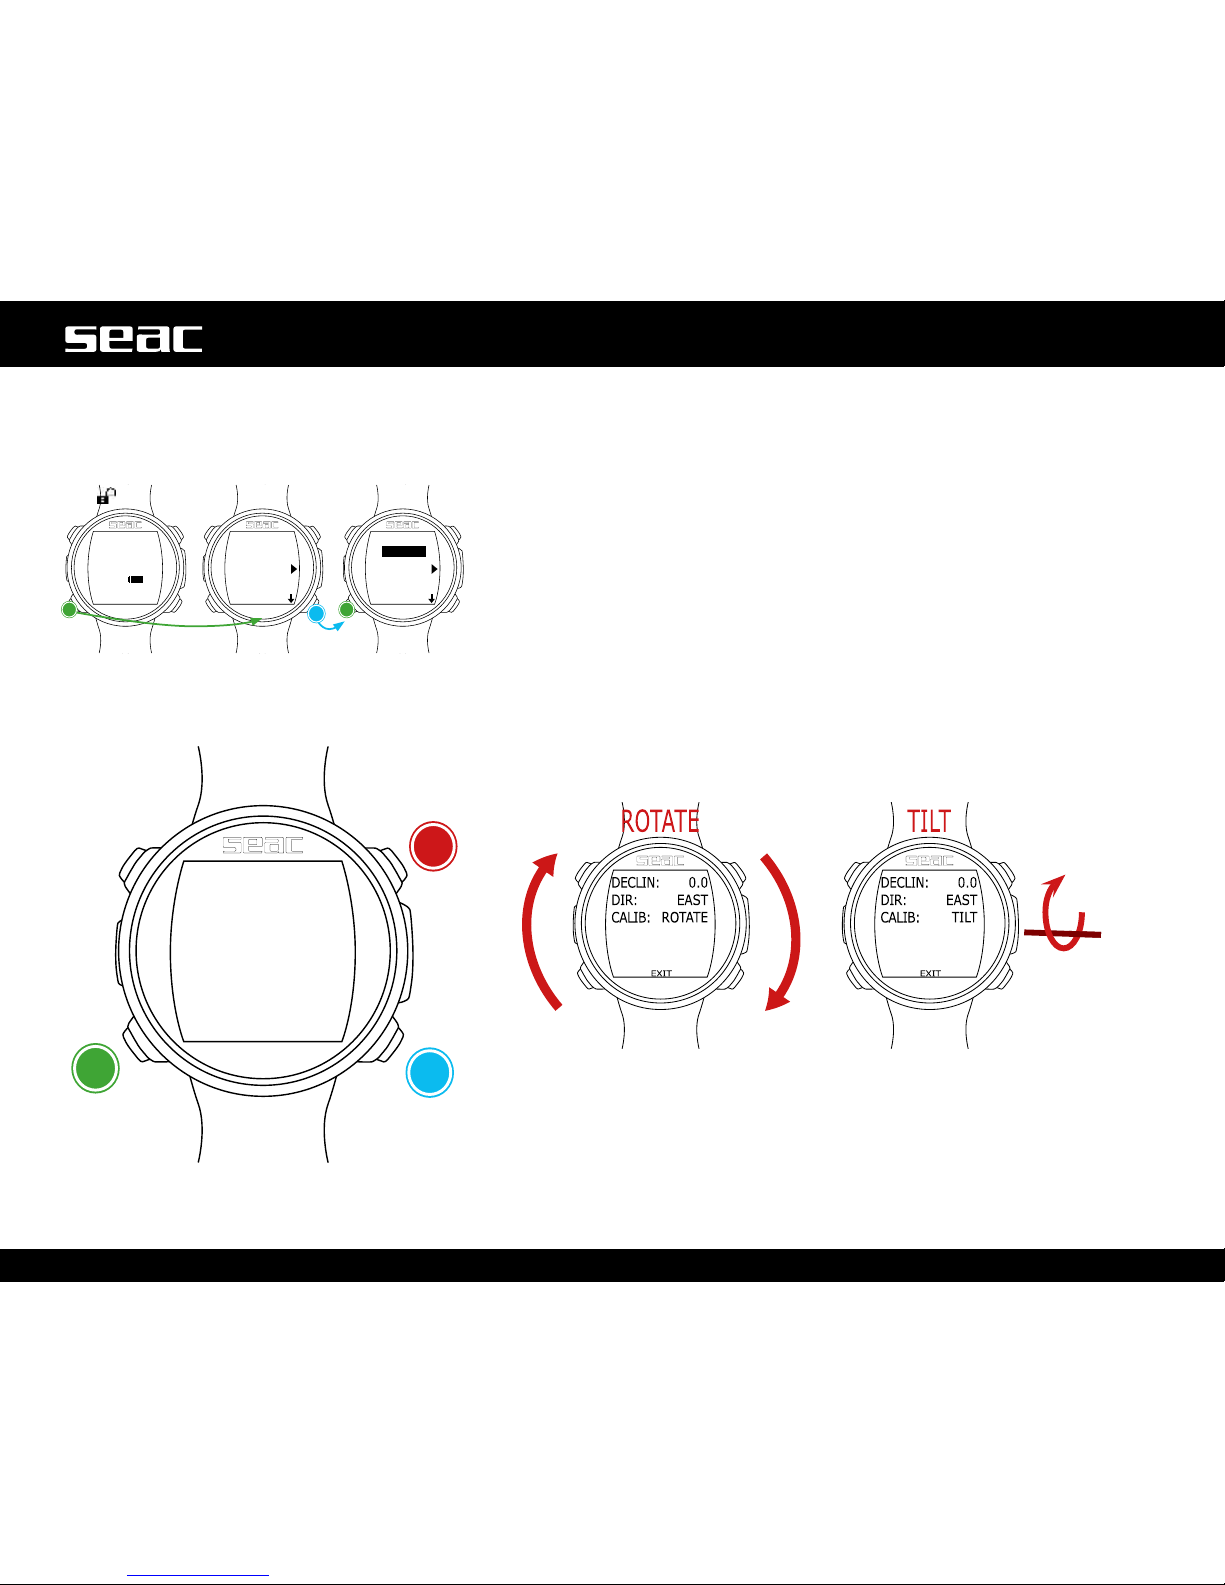
COMPASS (Compass Settings)
Compass settings can be changed from the COMPASS Menu.
DECLIN: Declination is used to compensate for the difference between
geographic north and magnetic north. You can obtain this information from
special websites.
(If you don't know how to set the DECLIN value, leave it at 0.0).
DIR: (EAST or WEST) The direction is used to indicate the direction of the
declination of earth's magnetic eld. (If you don't know how to set the DIR
value, leave it set to EAST).
CALIB: (Calibration) Press B or D to start calibrating the compass. To
calibrate correctly, stay away from sources of magnetic elds (computers,
televisions, light poles, etc.).
Rotate on a at surface, slowly
and constantly.
Rotate on the horizontal axis,
slowly and constantly.
To exit, select EXIT (or wait 60 seconds without pressing any button).
GURU
unlocked
Conrm
ConrmNext value
Page 23
12:30
01/01 Th
95%
DISPLAY
SYS SET
PC MODE
COMPASS
DEFAULT
INFO
WARNING!!!
RESET ?
SETTINGS: NO
TISSUES: NO
EXECUTE
B
C
D
C C
D
23
English
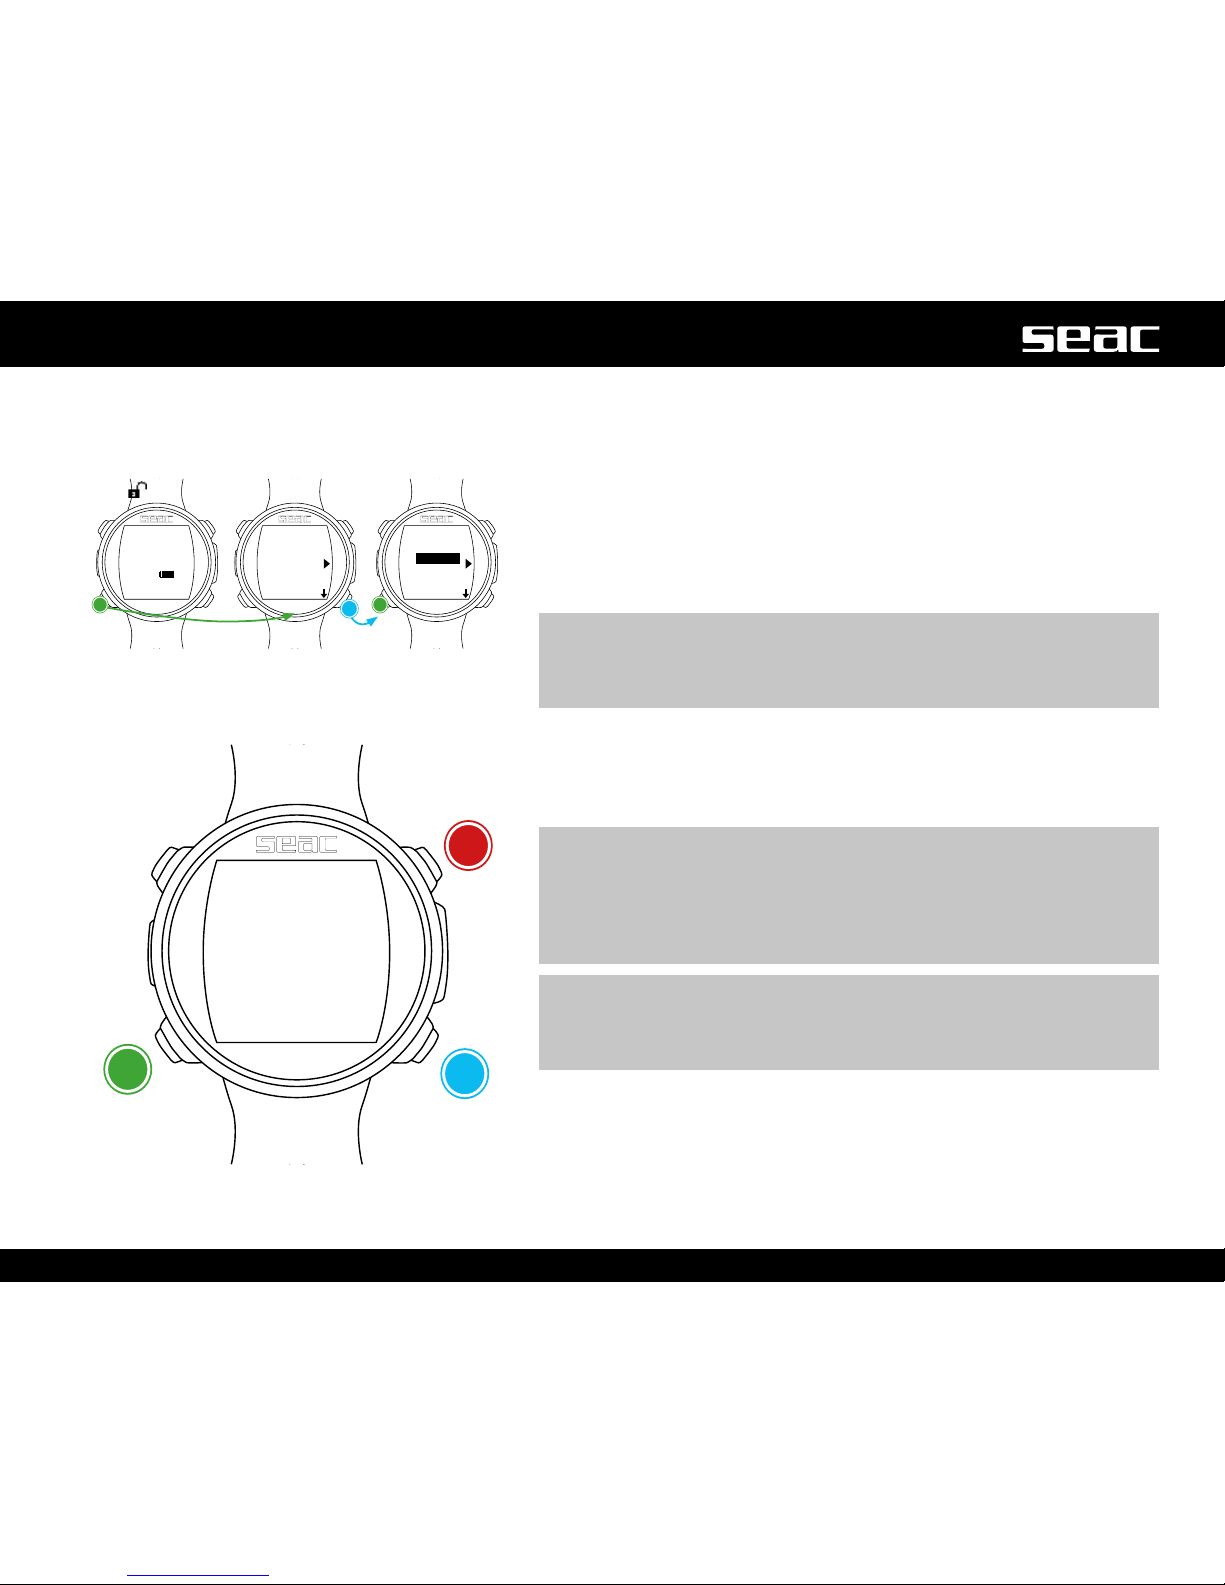
Reset to Default (reset to factory defaults)
To navigate the menu, follow the instructions in the gure at left.
SETTINGS: Yes/No. Reset all menu items to factory defaults. The
SETTING command resets all menus and settings (MIX, Alarms, etc.). It
does not reset the diver's tissue saturation.
TISSUES: Yes/No. Resets the diver's tissue saturation.
m WARNING!
Do not reset the tissue saturation for ANY REASON if the device is
being used by the same person. This prevents GURU from running the
correct decompression calculation.
EXECUTE: Resets all items set to YES. (Select the EXECUTE function and
press the C button to run the reset).
m WARNING! DANGER!
Do NOT perform the tissue saturation reset (TISSUES=YES) if the device
will be used by the same person!
This can lead to the risk of accidents, including fatal ones.
The tissues can only be reset if the GURU device will be used by a
person who has not taken any dives in the previous 48 hours.
m WARNING!
Any tissue reset is recorded permanently in GURU's dive logbook.
The user takes full and complete responsibility for a tissue saturation
reset.
GURU
unlocked
YES/NO
YES/NO
Conrm
Page 24
12:30
01/01 Th
95%
DISPLAY
SYS SET
PC MODE
COMPASS
DEFAULT
INFO
SEAC
GURU
S/N:000000
APOS 4.0.0/011
Made in Italy
C
C C
D
24
English
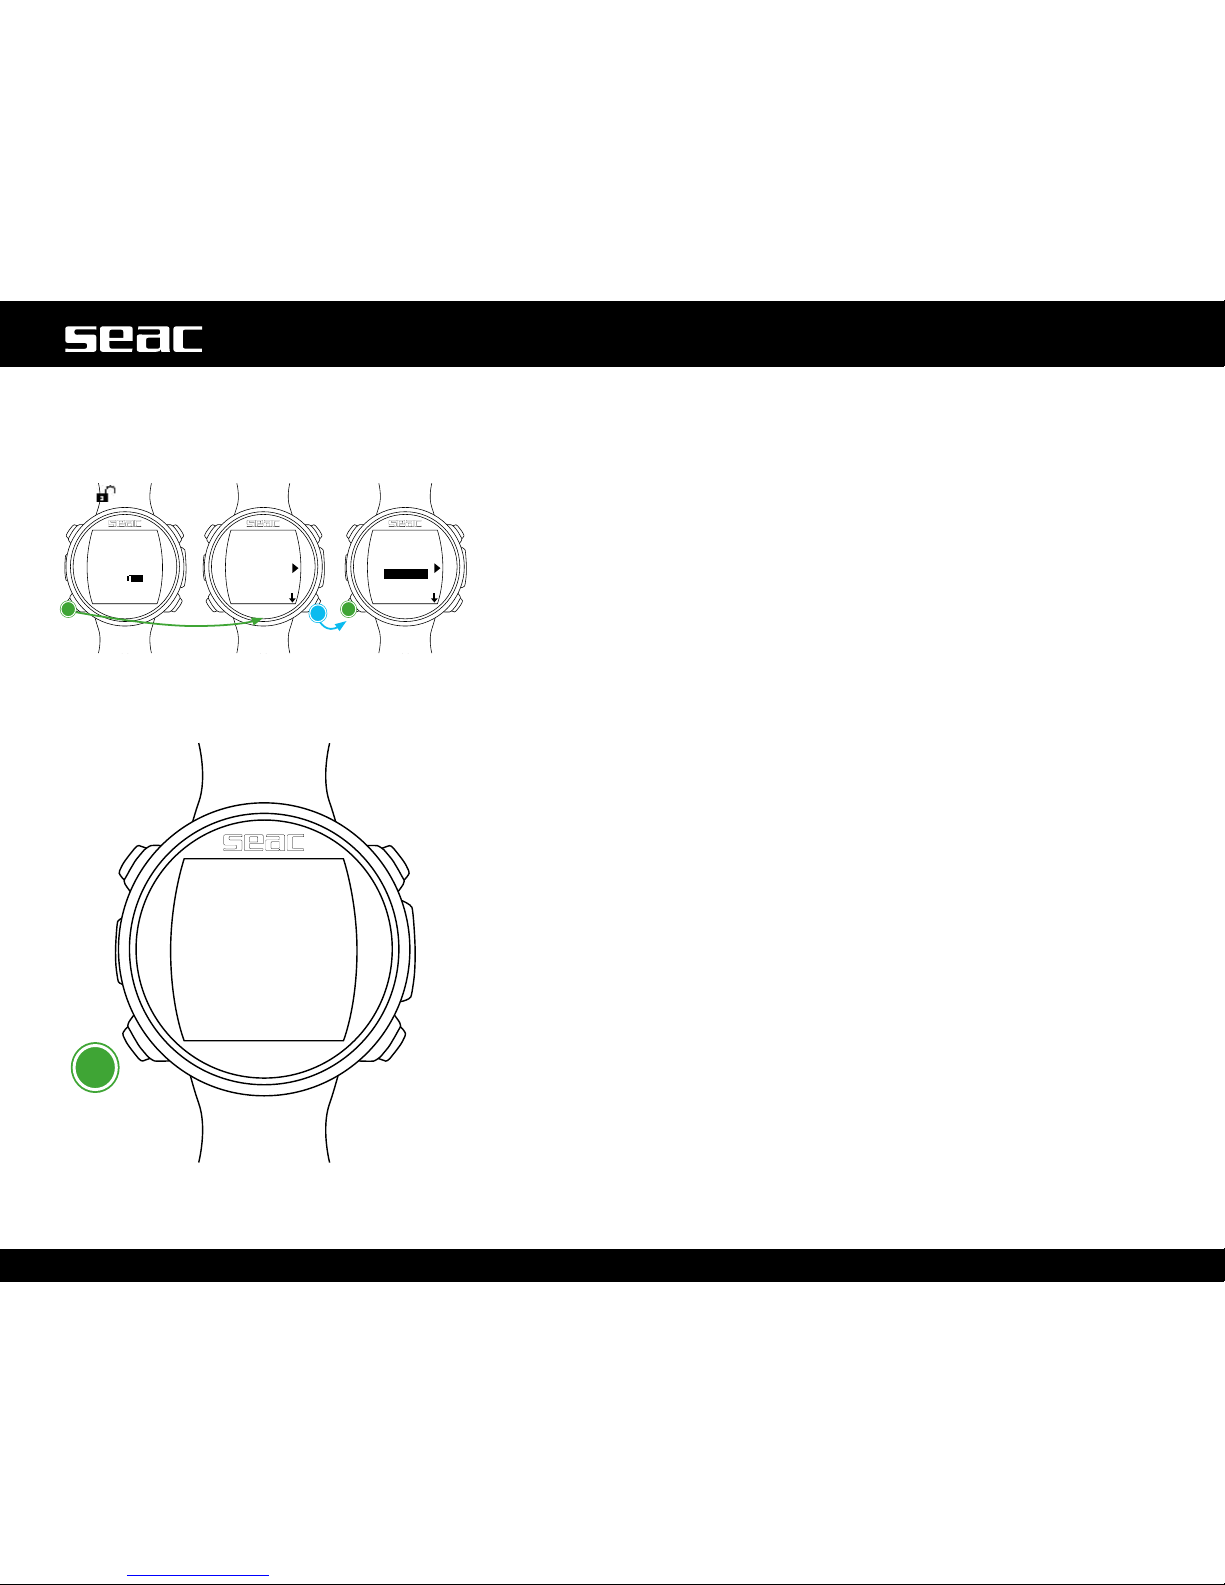
INFO (GURU information)
The INFO Menu shows information about the GURU unit.
Full model name: SEAC - GURU.
Y/N: Unit serial number.
APOS: Version of the operating system installed on the unit.
To exit, select C (or wait at least 120 seconds without pressing any buttons).
GURU
unlocked
Exit
Page 25
12:30
01/01 Th
95%
D
DIVE SET1
DIVE SET2
MIX
C
0.0
0
:00
0 0.0
0.0
OC
DIVE m/min
DEPTH
C
B
D
PLANNER
LOGBOOK
ALARM
B
C
D
25
English
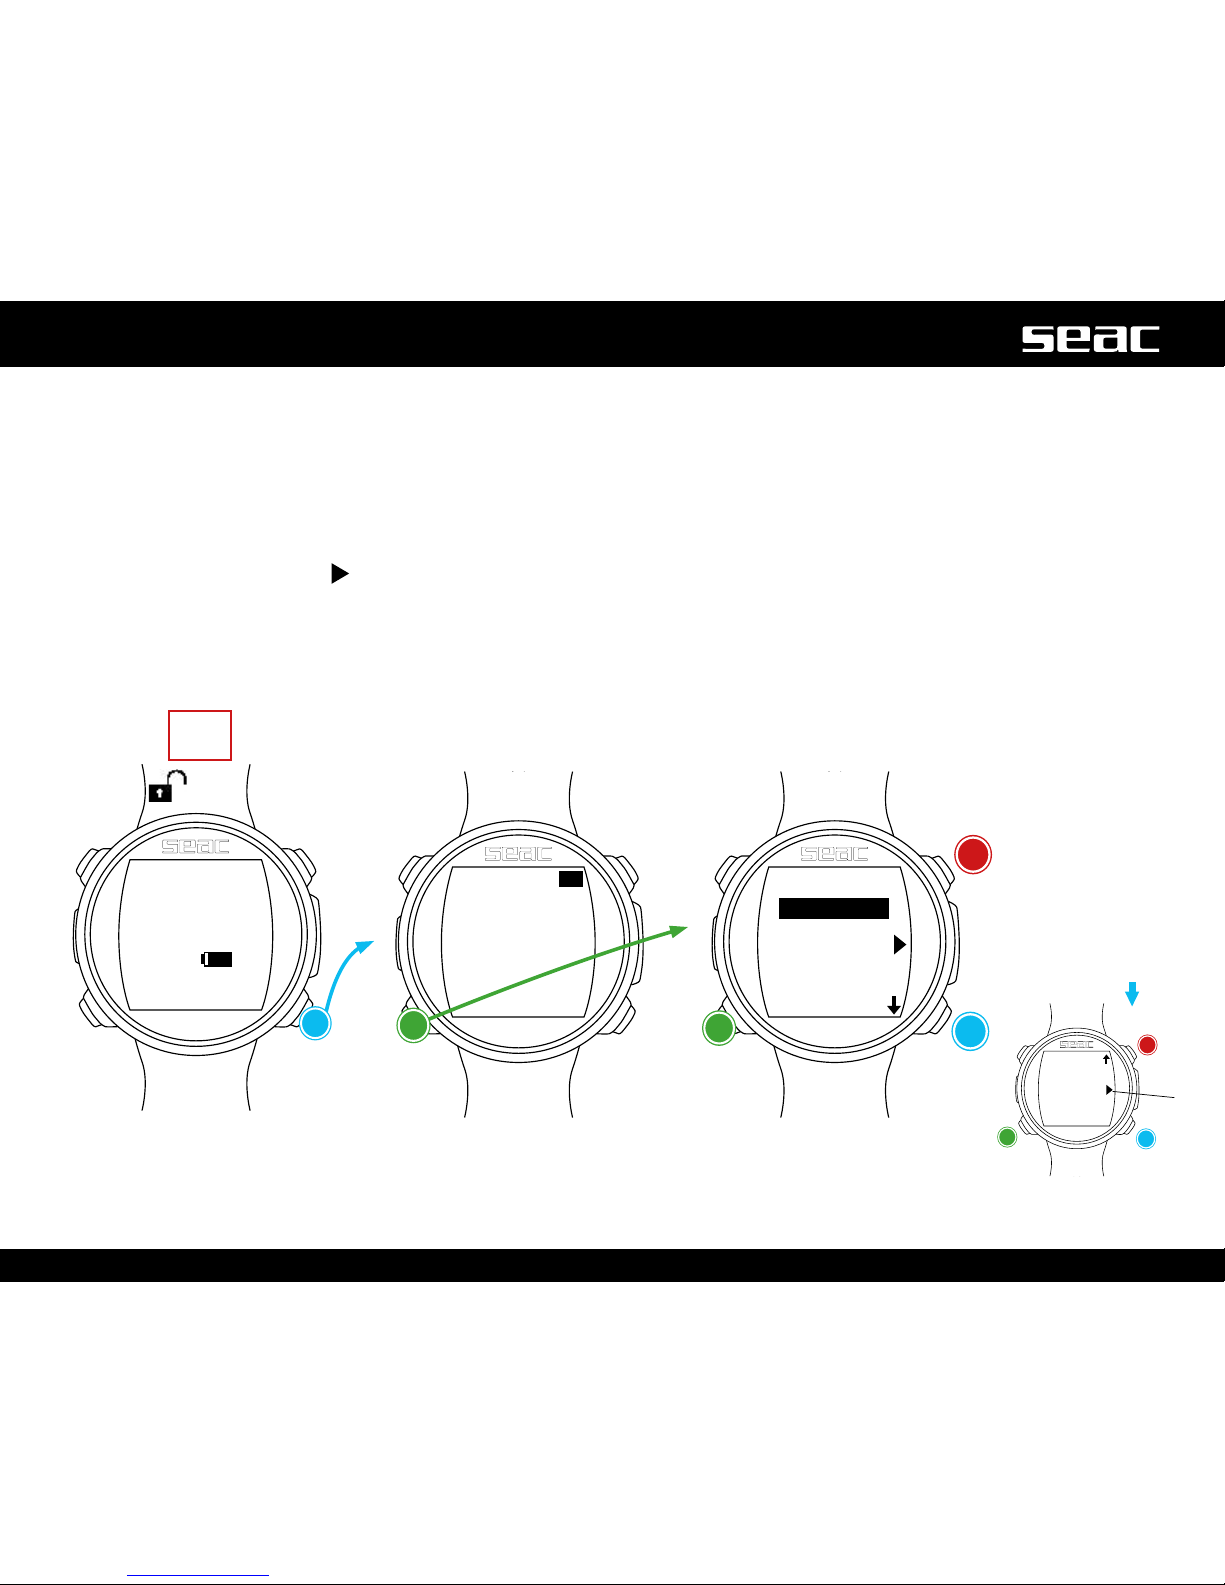
Dive menu
The Dive menu contains all the settings directly related to the dive.
To access the Dive Menu, unlock the GURU by pressing any button, and from the watch screen press the D button to access the
dive screen. Then press the C button to access the dive menu.
Press the B and D buttons to scroll through the menu items, and press the C button to select the desired option.
Keep pressing D to display the second menu page.
To exit the menu, select the
symbol, or simply don't press any buttons for 60 seconds.
UP
DownSelectDive menu
Dive menu
Dive menu
Up
Exit
Down
Select
Watch
GURU
unlocked
Start
here.
Page 26
12:30
01/01 Th
95%
DIVE SET1
DIVE SET2
MIX
C
C
D
0.0
0
:00
0 0.0
0.0
OC
DIVE m/min
DEPTH
WATER:
UNITS:
MODE:
P.SAFE:
B
C
D
SALT
m/°C
FREE
0
EXIT
26
English
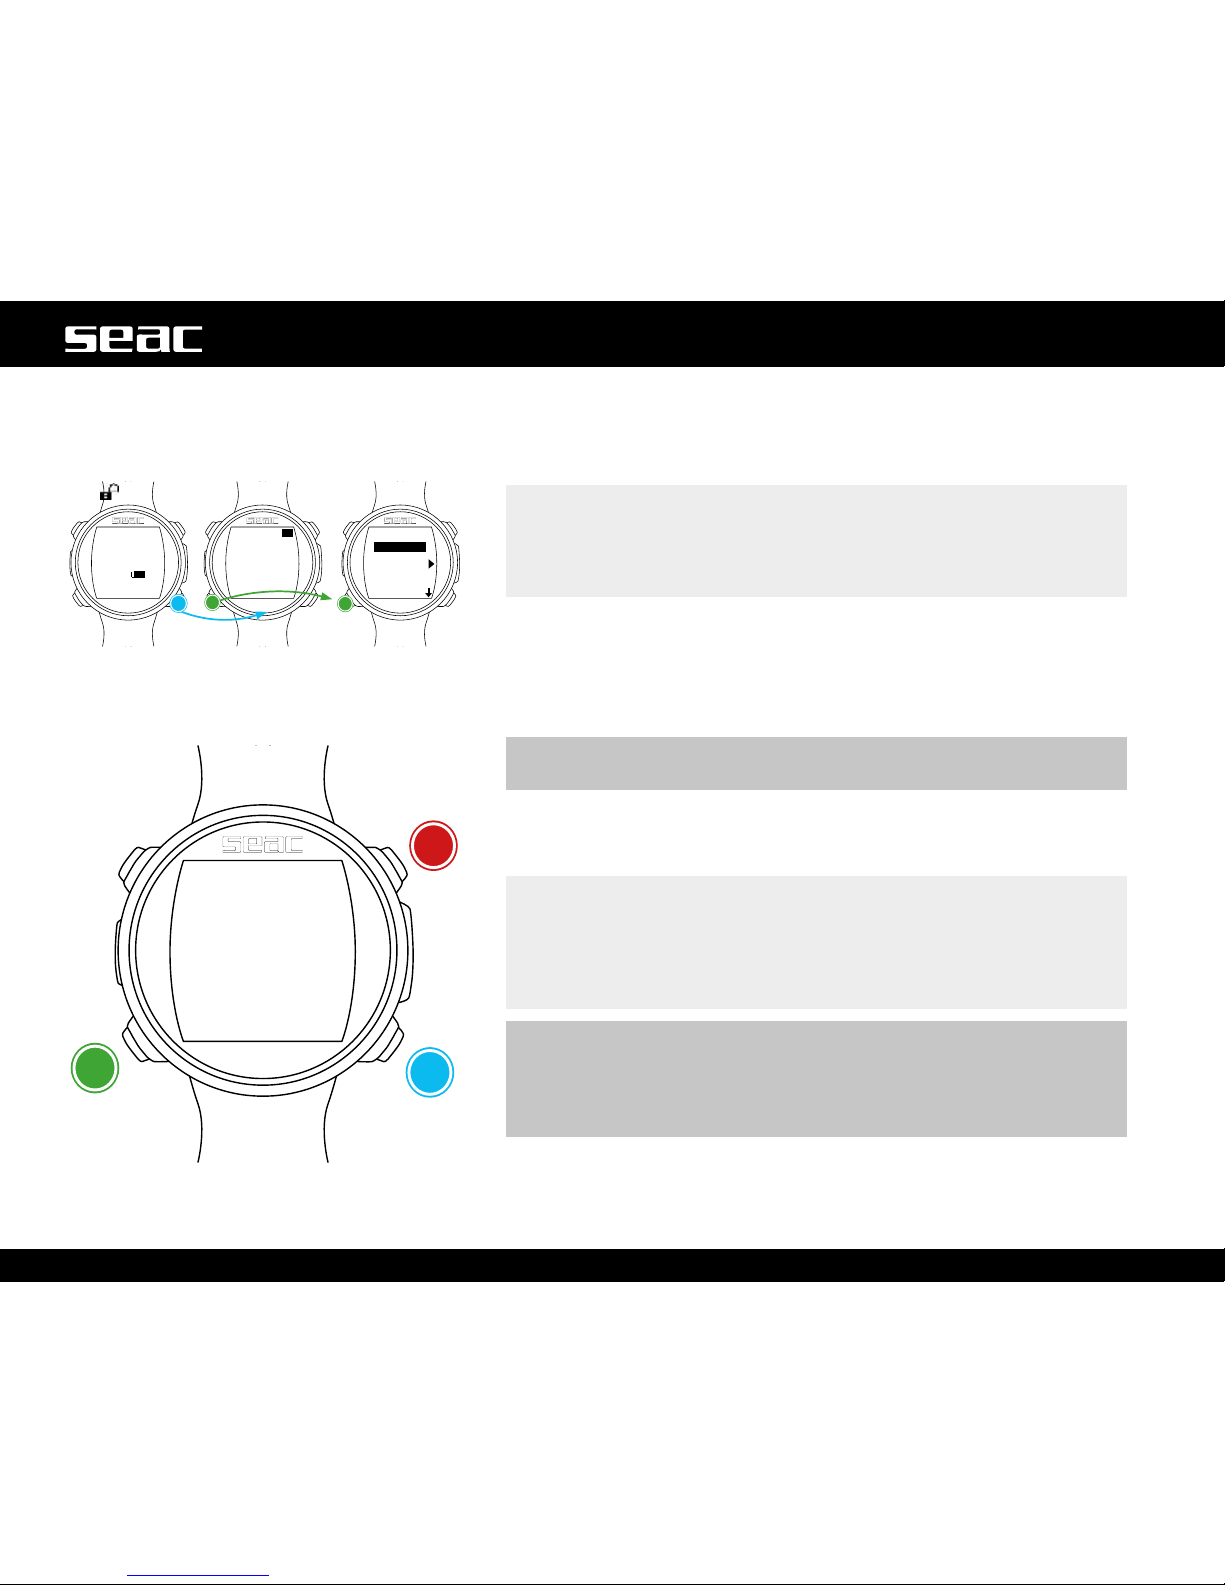
DIVE SET 1 (Dive settings 1)
The DIVE SET 1 Menu displays the rst part of the GURU dive settings.
WATER: (SALT/FRESH): Select the water type (SALT/FRESH).
NOTE
Dive computers measure pressure and convert it to depth using water
density as a constant. Without the WATER adjustment, a depth of 10 m
in salt water is detected as 10.3 m in fresh water. Without the SALT/
FRESH setting, the depth reading could be distorted.
UNITS: Select the unit of measure you want to use:
m/°C = meters and degrees Celsius (date format dd/mm/yy).
ft/°F = feet and degrees Fahrenheit (date format mm/dd/yy).
MODE: Set the preferred dive type that GURU will activate upon entering
the water.
m WARNING!
Always check that the dive type matches the dive actually being taken.
SCUBA: GURU begins a dive in scuba mode with tanks.
GAUGE: GURU begins a dive in gauge mode with tanks.
FREE: GURU begins a dive in freedive mode.
NOTE
If you should wish to use a different mode without changing the MODE
parameter, you can enter the desired mode by pressing the D button
from the watch screen and taking a dive deeper than 2 m. This way,
GURU will activate the mode that you selected without changing the
MODE value for that one dive.
m WARNING!
For safety reasons, it is NOT possible to set FREE mode as the main
mode unless 12 hours have elapsed since the most recent SCUBA or
GAUGE dive. GURU automatically resets SCUBA mode if you attempt to
force an exit with the main mode set to FREE.
GURU
unlocked
Change
value
Change
value
Conrm
value
Page 27
12:30
01/01 Th
DIVE SET1
DIVE SET2
MIX
C
C
D
0.0
0
:00
0 0.0
0.0
OC
DIVE m/min
DEPTH
WATER:
UNITS:
MODE:
P.SAFE:
B
D
SALT
m/°C
FREE
0
EXIT
C
27
English
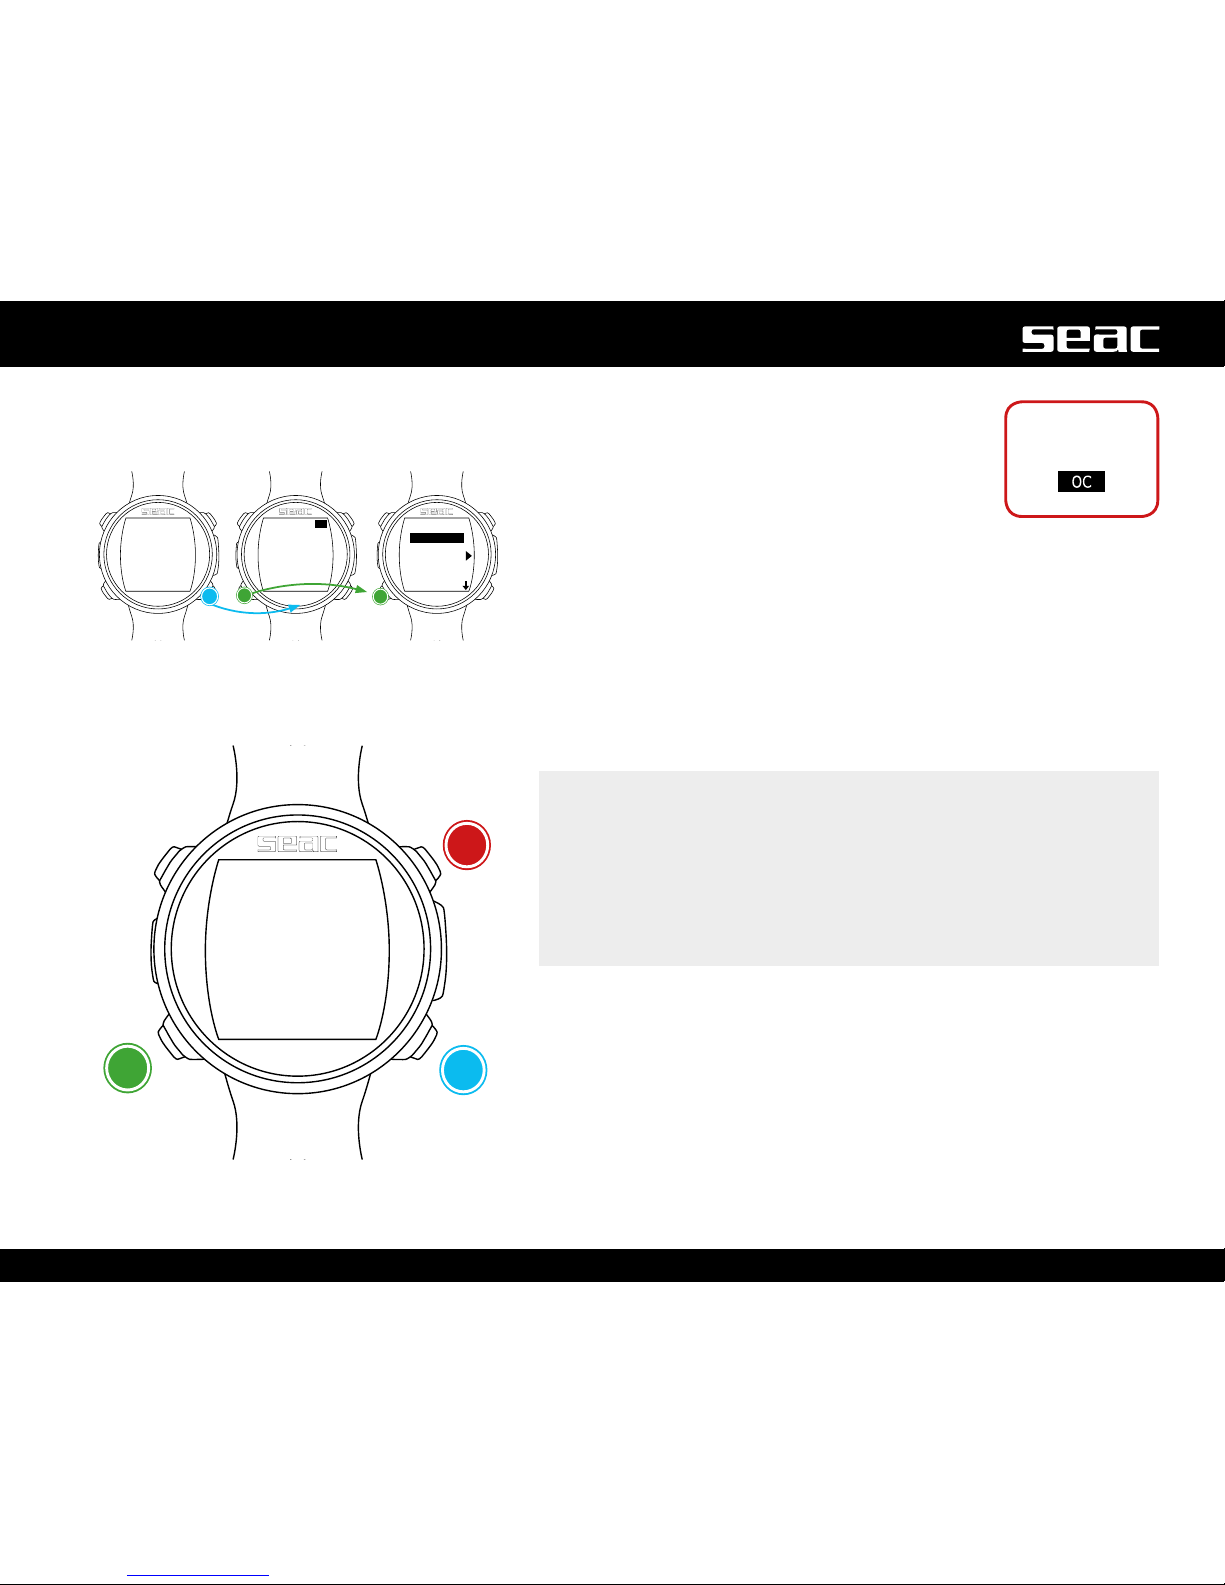
P.SAFE: Level of conservativism (OC = Open Circuit
Dive).
The GURU (in OC mode) uses the Bühlmann ZHL-
16B algorithm for the decompression calculation.
The GURU's conservatism can be changed among
preset levels from 0 to 5. The levels correspond to
the following values:
Bühlmann ZHL-16 B (gradients)
GFL/GFH
0 = 93/93
1 = 90/90 standard conservatism
2 = 80/80
3 = 75/75
4 = 30/90 max linear conservatism
5 = 20/89
NOTE
Higher conservatism will ensure that the computer will perform
calculations more cautiously, decreasing the time that can pass between
a given depth without exiting the safety curve (or by extending the
decompression time in the case of dives with deco stops).
In general it is a good idea to increase the conservatism if you noticed
excessive fatigue after your most recent dive.
A hyperbaric physician can recommend how to set the conservatism,
depending on your clinical status.
Change
value
Change
value
Use only in
scuba mode
Conrm
value
Page 28
12:30
01/01 Th
95%
DIVE SET1
DIVE SET2
MIX
C
C
D
0.0
0
:00
0 0.0
0.0
OC
DIVE m/min
DEPTH
S.S. DPT:
S.S. TIME:
DEEP STOP:
LAST STP:
DECO CTRL:
B
C
D
3
5
OFF
3
ON
EXIT
28
English
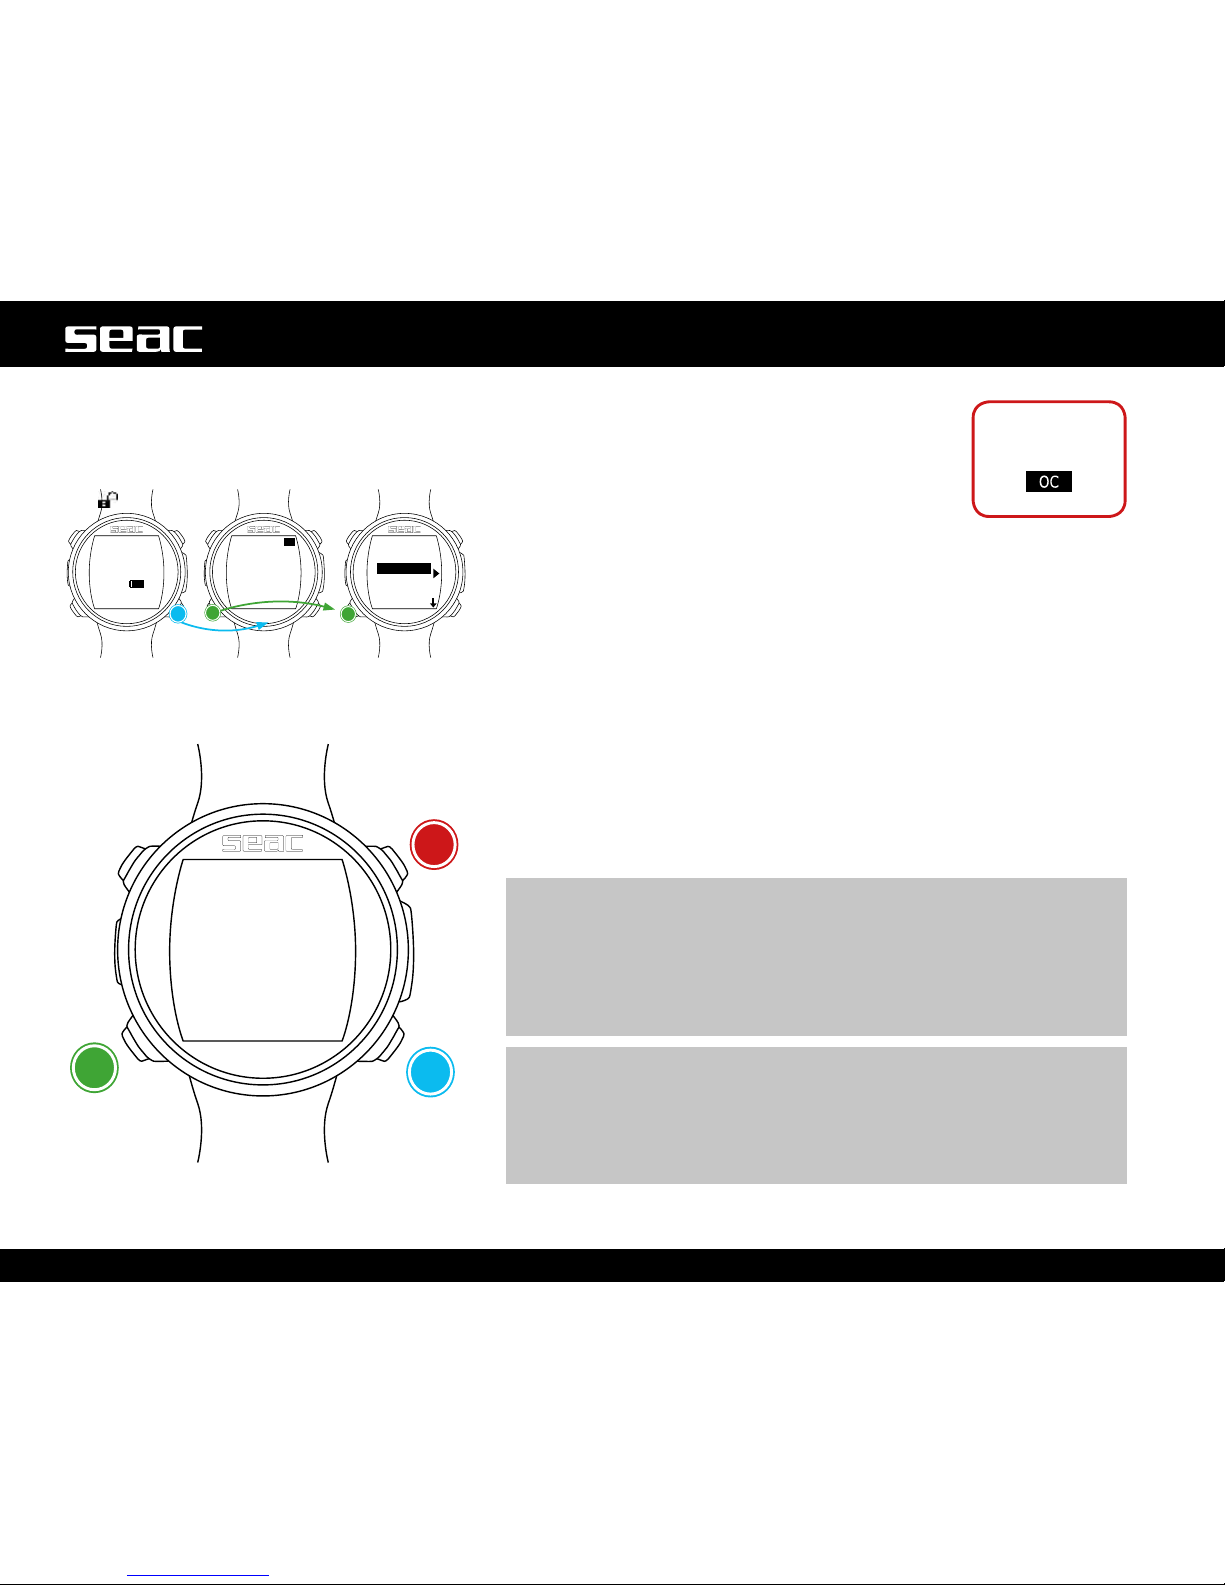
DIVE SET 2 (Dive settings 2)
The DIVE SET 2 Menu shows the second part of the
GURU dive settings.
S.S. DPT: (Safety Stop Depth) (3-9): Depth at which
you want to do your Safety Stop.
S.S. TIME: (Safety Stop Time) (OFF-9): Duration of
the Safety Stop in minutes.
Although it is always recommended that you perform a Safety Stop for all
dives taken within the no-decompression limits, you can deactivate the Safety
Stop by setting the value S.S. Time to OFF).
DEEP STOP (OFF/STD): If enabled, this introduces an additional nonobligatory stop with the Standard method (STD) (half of the maximum depth
for 2.5 minutes).
LAST STP: (Last Stop) (1-10): Depth at which you wish to take the last
decompression stop (only if the dive is outside the no-deco limit and requires
deco stops).
DECO CTRL: (ON/OFF): If enabled (ON), GURU will not permit any new
dives in the 12 hours following a dive in which any signicant deco violations
occurred. Disabling (OFF) the DECO CTRL is not recommended, and will be
permanently recorded in the GURU Logbook.
m WARNING!
The Safety Stop is considered a NON obligatory stop to be taken during
dives within the no-deco limits. Violating the Safety Stop does not entail
decompression penalties for subsequent dives and is not considered a
“deco violation”.
Therefore, DO NOT disable the DECO CTRL if you intend to skip the
Safety Stop.
m WARNING!
The Safety Stop is omitted automatically if the decompression profile
falls outside the no-decompression limits. Even if any decompression
that may have been accumulated is cleared before the safety stop
depth, the dive is still not considered to be within the no-deco limits, and
thus GURU will not offer the Safety Stop.
+
-Next value
GURU
unlocked
Use only in
scuba mode
Page 29
12:30
01/01 Th
95%
DIVE SET 1
DIVE SET 2
MIX
C
C
D
D
0.0
0:00
0 0.0
0.0
OC
DIVE m/min
DEPTH
MIX:
PPO2
MOD:
B
C
D
21
1.40
56
EXIT
MIX 1
29
English
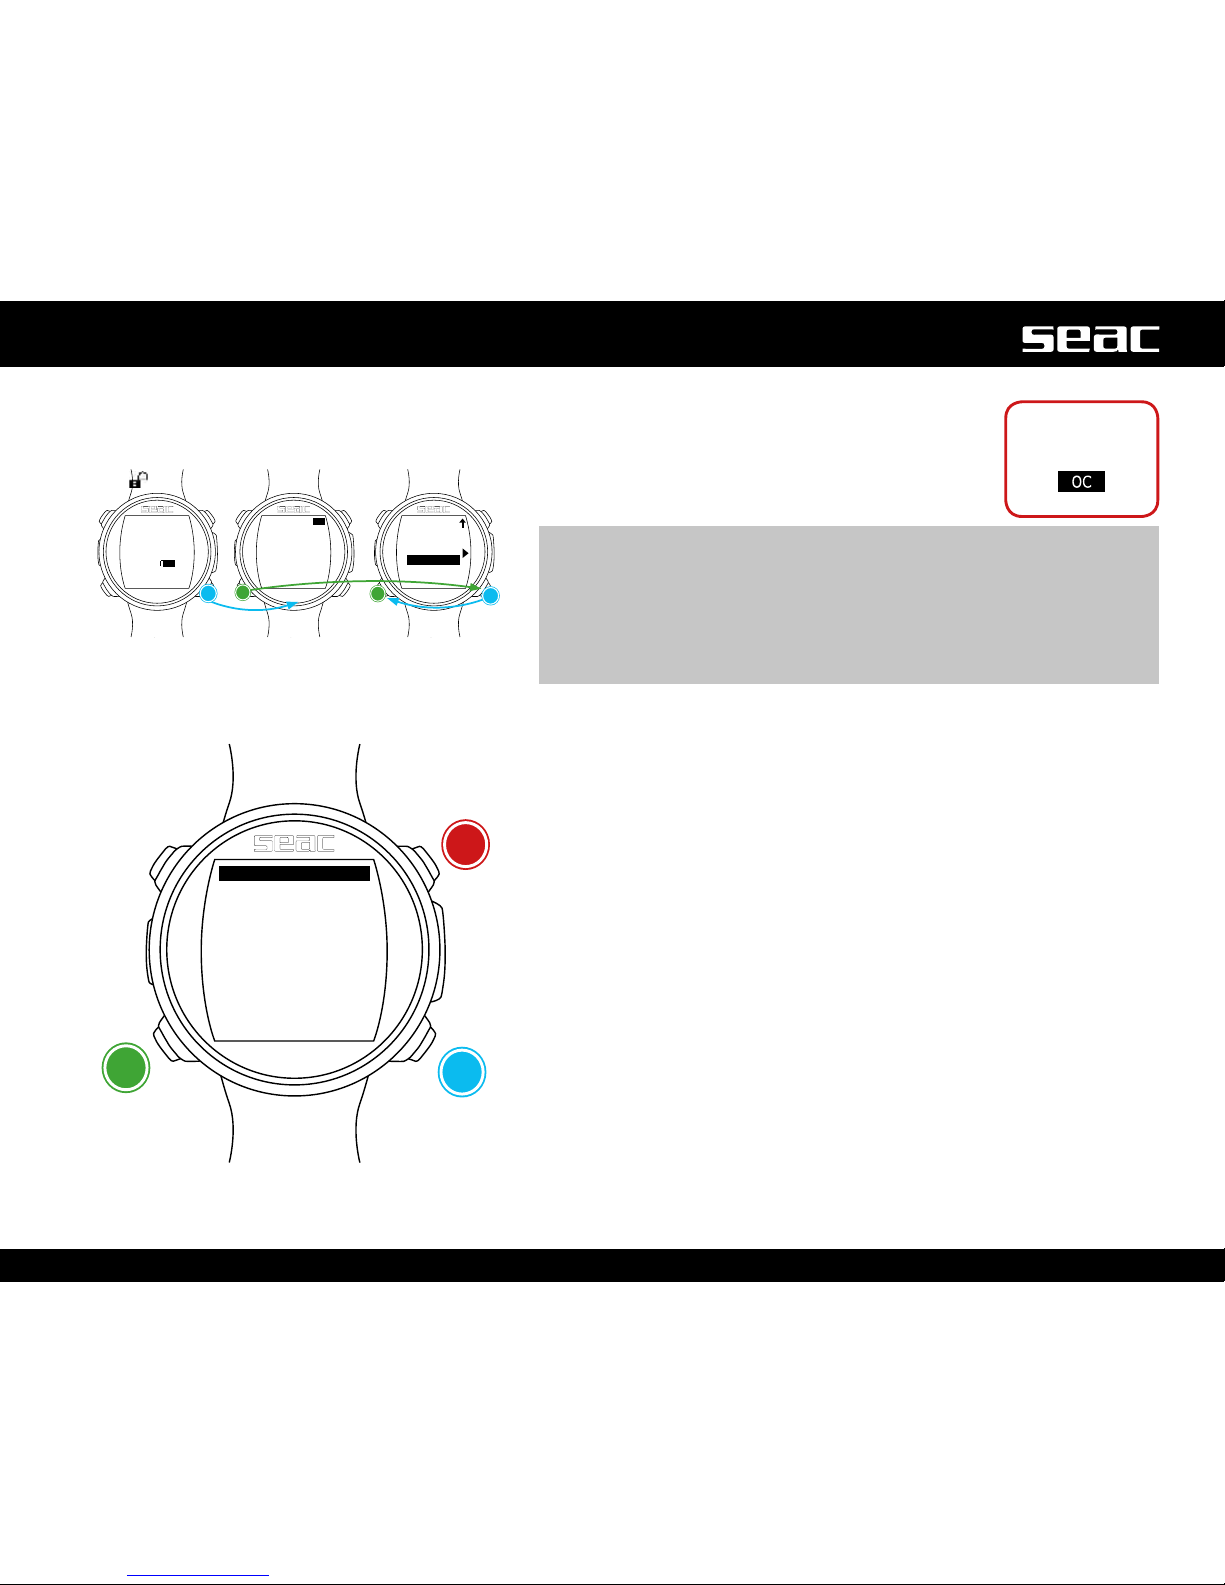
MIX
The MIX Menu shows the mix settings that will be
used during the dive.
Two Mixes are available, with Oxygen percentages
from 21 to 99%
m WARNING!
Changing these settings requires special training on the use of enriched
breathing mixes. If you have not received this training, do not dive with
enriched breathing mixes!
Do not dive using breathing mixes other than those set in your diving
computer. Using mixes other than those set makes it impossible to
calculate the decompression correctly!
MIX: (21-99): Indicates the oxygen % in the mix inside the tank.
PPO
2
: (Oxygen partial pressure) (1.20 - 1.60): Indicates the maximum ppO2
with which you intend to use the mix.
MOD: Maximum operating depth for the mix currently created.
The MOD is recalculated automatically every time the MIX, or ppO
2
value, is
modied. The MOD cannot be changed manually.
During the dive, an auditory alarm will be activated upon reaching the MOD
depth.
GURU
unlocked
+
increase
-
decrease
Next value
Use only in
scuba mode
Page 30
MIX:
PPO2
MOD:
DECO:
B
C
D
50
1.60
22
NO
EXIT NEXT
MIX 2
30
English
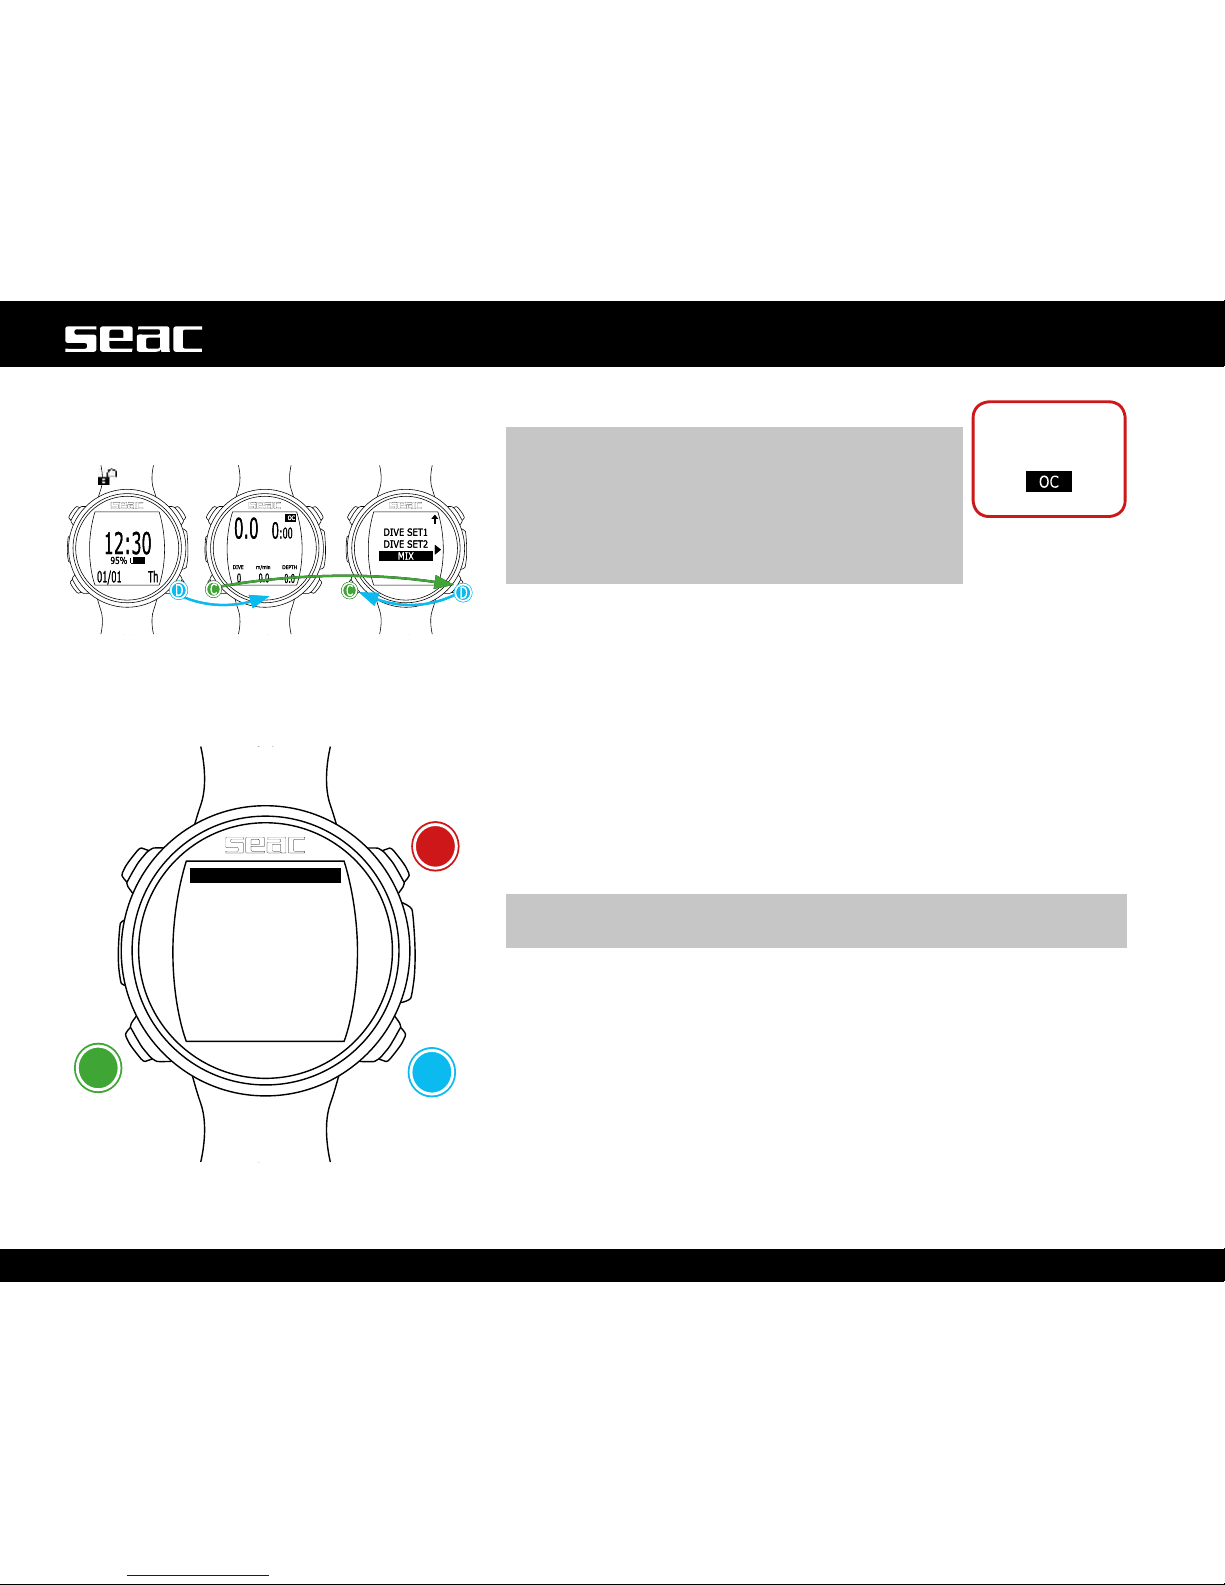
Multimix Dives
m WARNING!
You must have special training to dive with more
than one mix. If you have not received this training,
do not dive with more than one mix, and do not alter
these settings!
The GURU will display the TTX taking into account all
the active MIXES (DECO=YES) for the dive.
MIX: Indicates the oxygen % in the Mix.
PPO
2
: (Oxygen partial pressure): Indicates the maximum ppO2 with which you
intend to use the mix. (for GURU: 1.2-1.6;).
MOD: Maximum operating depth for the mix currently created. The MOD is
recalculated automatically every time the MIX, or ppO
2
value, is modied. The
MOD cannot be changed manually.
During the dive, an auditory alarm will be activated upon reaching the MOD
depth.
DECO: Indicates whether or not the mix should be used during the dive.
If set to YES the device considers the change of mix at the depth indicated
by the MOD when calculating the decompression. If set to NO the Mix is
disabled.
m WARNING!
MIX1 is always the starting mix.
The GURU automatically proposes a Gas change as soon as a gas that is
more suitable for decompression can be used considering the mix MOD,
regardless of the mix numbering.
(See the section in this manual dedicated to the gas change during the dive.)
The GURU always offers the best available mix, during both the descent and
the ascent.
If you want to use the bottom gas during the descent as well, ignore the gas
change suggestion. The GURU will automatically adapt its decompression
calculations without requiring any intervention from the diver, and without
any penalty to the deco phase.
Use only in
scuba mode
GURU
unlocked
Next value
-
decrease
+
increase
Select NEXT to set the various
MIXES
Page 31
12:30
01/01 Th
95%
PLANNER
LOGBOOK
ALARM
C
C
D
D
0.0
0
:00
0 0.0
0.0
OC
DIVE m/min
DEPTH
DEPTH:
TIME:
NDL:
CNS:
OTU:
OC PLANNER
OC PLANNER
EVALUATE
MIX QT: 560L
B
C
C
D
18
10
43
0
2
EXIT
31
English
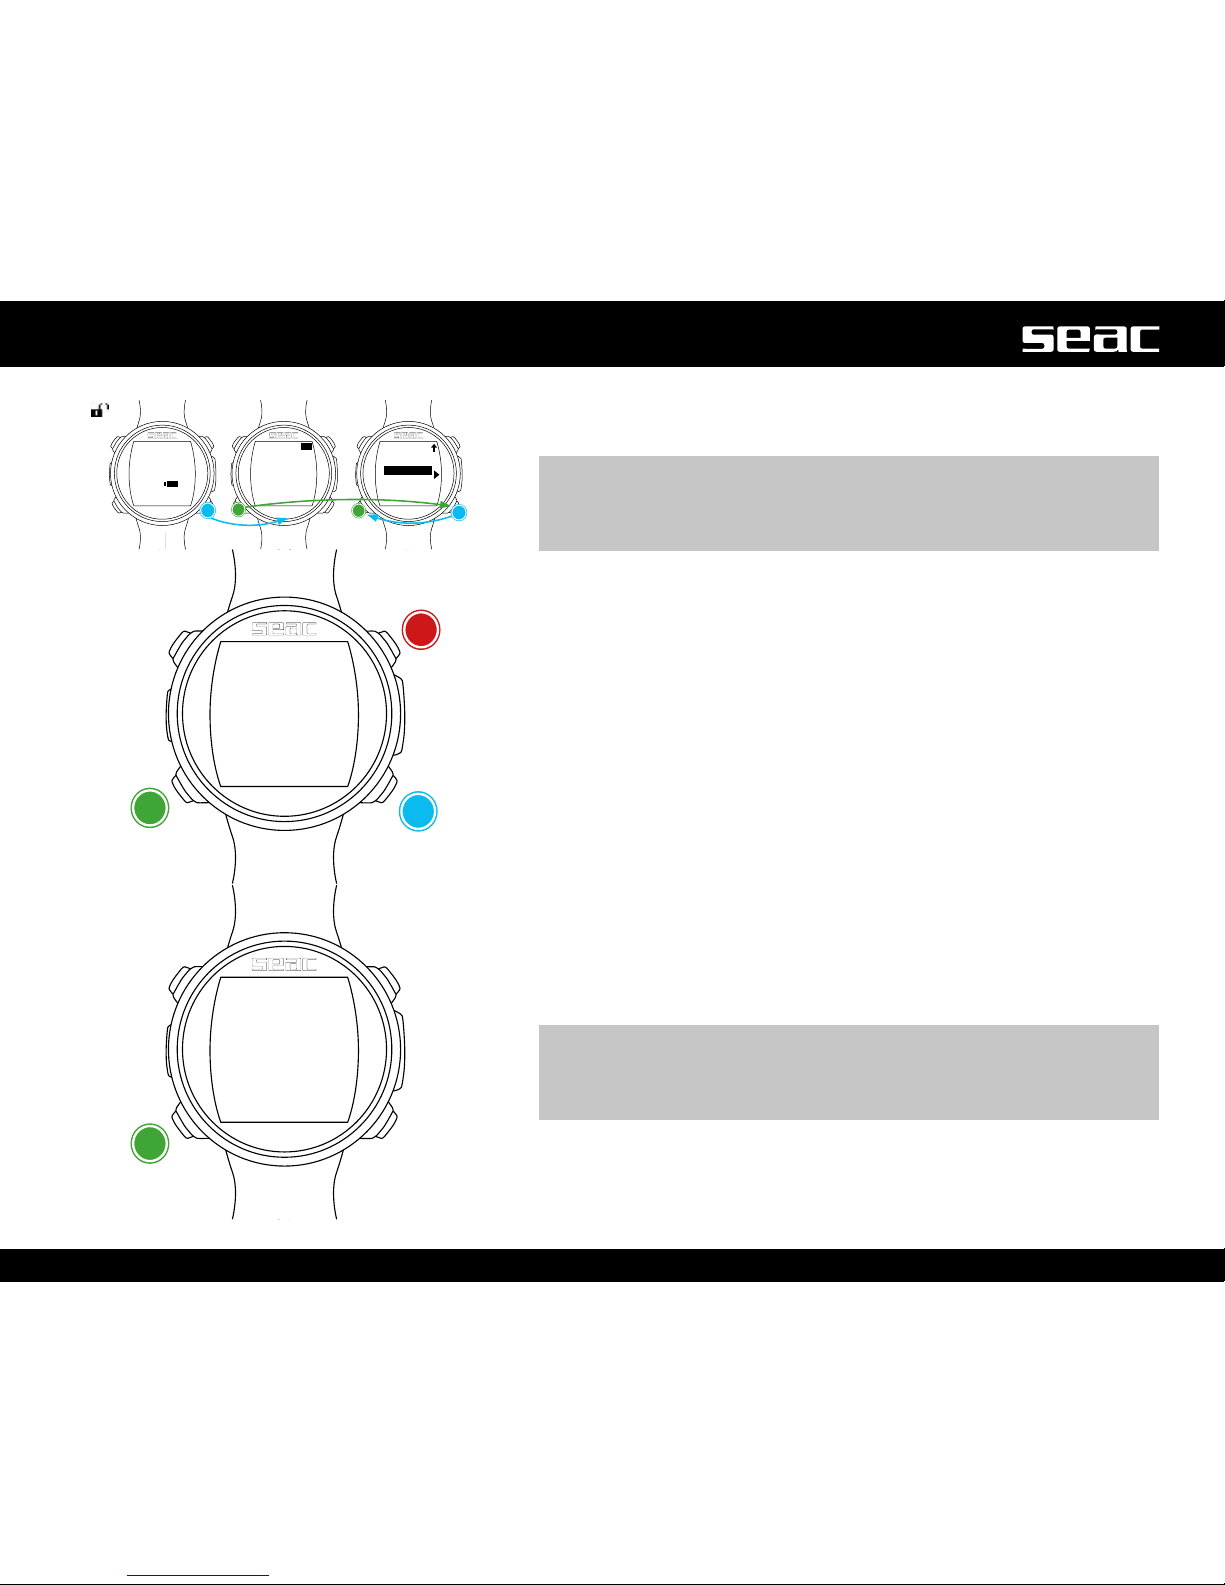
PLANNER (within no-deco limits)
GURU integrates a complete planner for square prole dives.
m WARNING!
To change the dive parameters, set up GURU as desired from the DIVE
SET menu and the MIX menu; the computer will simulate the dive using
the settings currently in place.
DEPTH: Enter the maximum planned depth for the dive.
TIME: Enter the bottom time for the dive in minutes.
EVALUATE: Launch the dive simulation (select with C and press D).
If the dive is within the no-decompression limits (no deco stops required).
NDL: No decompression time left (after the bottom time set).
CNS: % of accumulated CNS (after the bottom time set).
OTU: % of OTU accumulated (after the bottom time set).
MIX QT: Mix volume in liters anticipated to be required for the dive.
m WARNING!
The amount of gas consumed is only approximate, and refers to
standard consumption. Work from the instructions provided in your own
training about the amount of gas you need during the dive.
GURU unlocked
+
-
Next value
Exit
Page 32
12:30
01/01 Th
95%
PLANNER
LOGBOOK
ALARM
C
C
D
D
0.0
0
:00
0 0.0
0.0
OC
DIVE m/min
DEPTH
DEPTH:
TIME:
OC PLANNER
DPT DT RT MIX
0
3
6
35
0
7
5
25
40
33
28
25
21|0
21|0
21|0
21|0
EVALUATE
B
B
C
C
D
D
35
25
EXIT
32
English
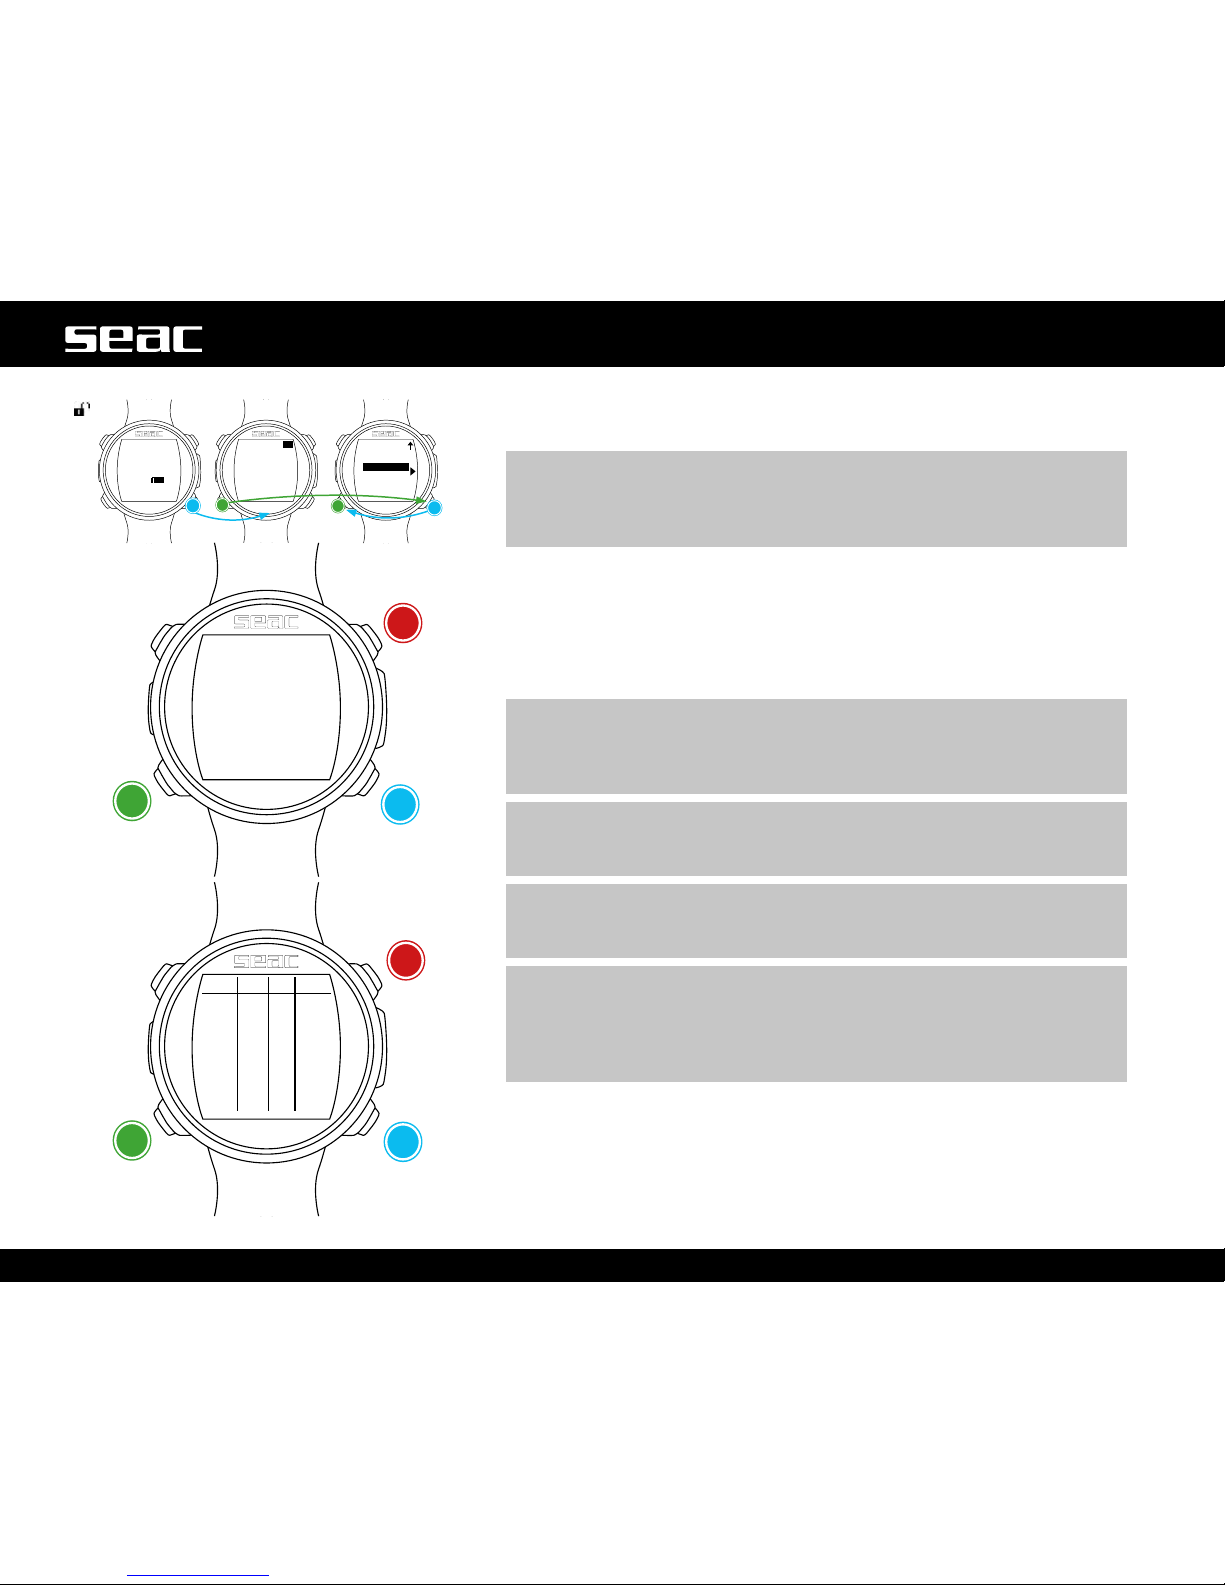
PLANNER (deco planner)
GURU integrates a complete planner for square prole dives.
m WARNING!
In order to change the dive parameters, set up the computer the way
you want it in the DIVE SET menu and the MIX menu. GURU will simulate
the dive using the current settings.
For DEPTH, Time and Evaluate refer to “No-Deco Planner” (previous page).
If the dive is NOT within no-decompression limits (deco stops called for):
DPT: Depth of the decompression stop in meters (in feet if Imperial units
are set).
DT: Stop time, expressed in minutes.
RT: Time elapsed from the beginning of the dive to the deco stop.
MIX: Mix used during the deco stop.
m WARNING!
In addition to the deco stops, the final value shown will always be the
information about the end of the bottom time (in the example at left, 35
| 25 | 25 | 21/0).
m WARNING!
Press B and D to scroll through the pages if there are more than 3
deco stops.
m WARNING!
The planner assumes 18 m/min as the descent rate and 9 m/min for
ascent rate in decompression calculations.
m WARNING!
The Planner function does not run the “validation” of the profile,
that is, it does not take into account a possible excess of CNS,
limitations on the volumetric availability of the mixes, a possible isobaric
counterdiffusion due to a change of mixes or the MOD of a mix used.
Adequate training is necessary in order to best plan a technical dive. Consult
your instructor or your training agency if you have any questions about
planning.
For graphic formatting reasons for the Planner, the maximum DT displayed is
99 minutes. If an individual decompression stop turns out to be longer than
99 minutes, it will be shown in the planner as “99”. During the dive however,
the stop will be shown with the time displayed in full (e.g. 120 min).
GURU unlocked
+
Next page
-
Previous
page
Next value
Exit
Page 33
12:30
01/01 Th
95%
MIX
PLANNER
LOGBOOK
ALARM
C
C
D
D
0.0
0:00
0 0.0
0.0
OC
DIVE m/min
DEPTH
#10 PS1 #10 +20°C
25.4m +20°C 55: 25.4m DT 1:21
01.01.16 11:10 01.01.16 11:10
21%O2 6%CNS FREE ST 3:20
B B
C C
D D
33
English
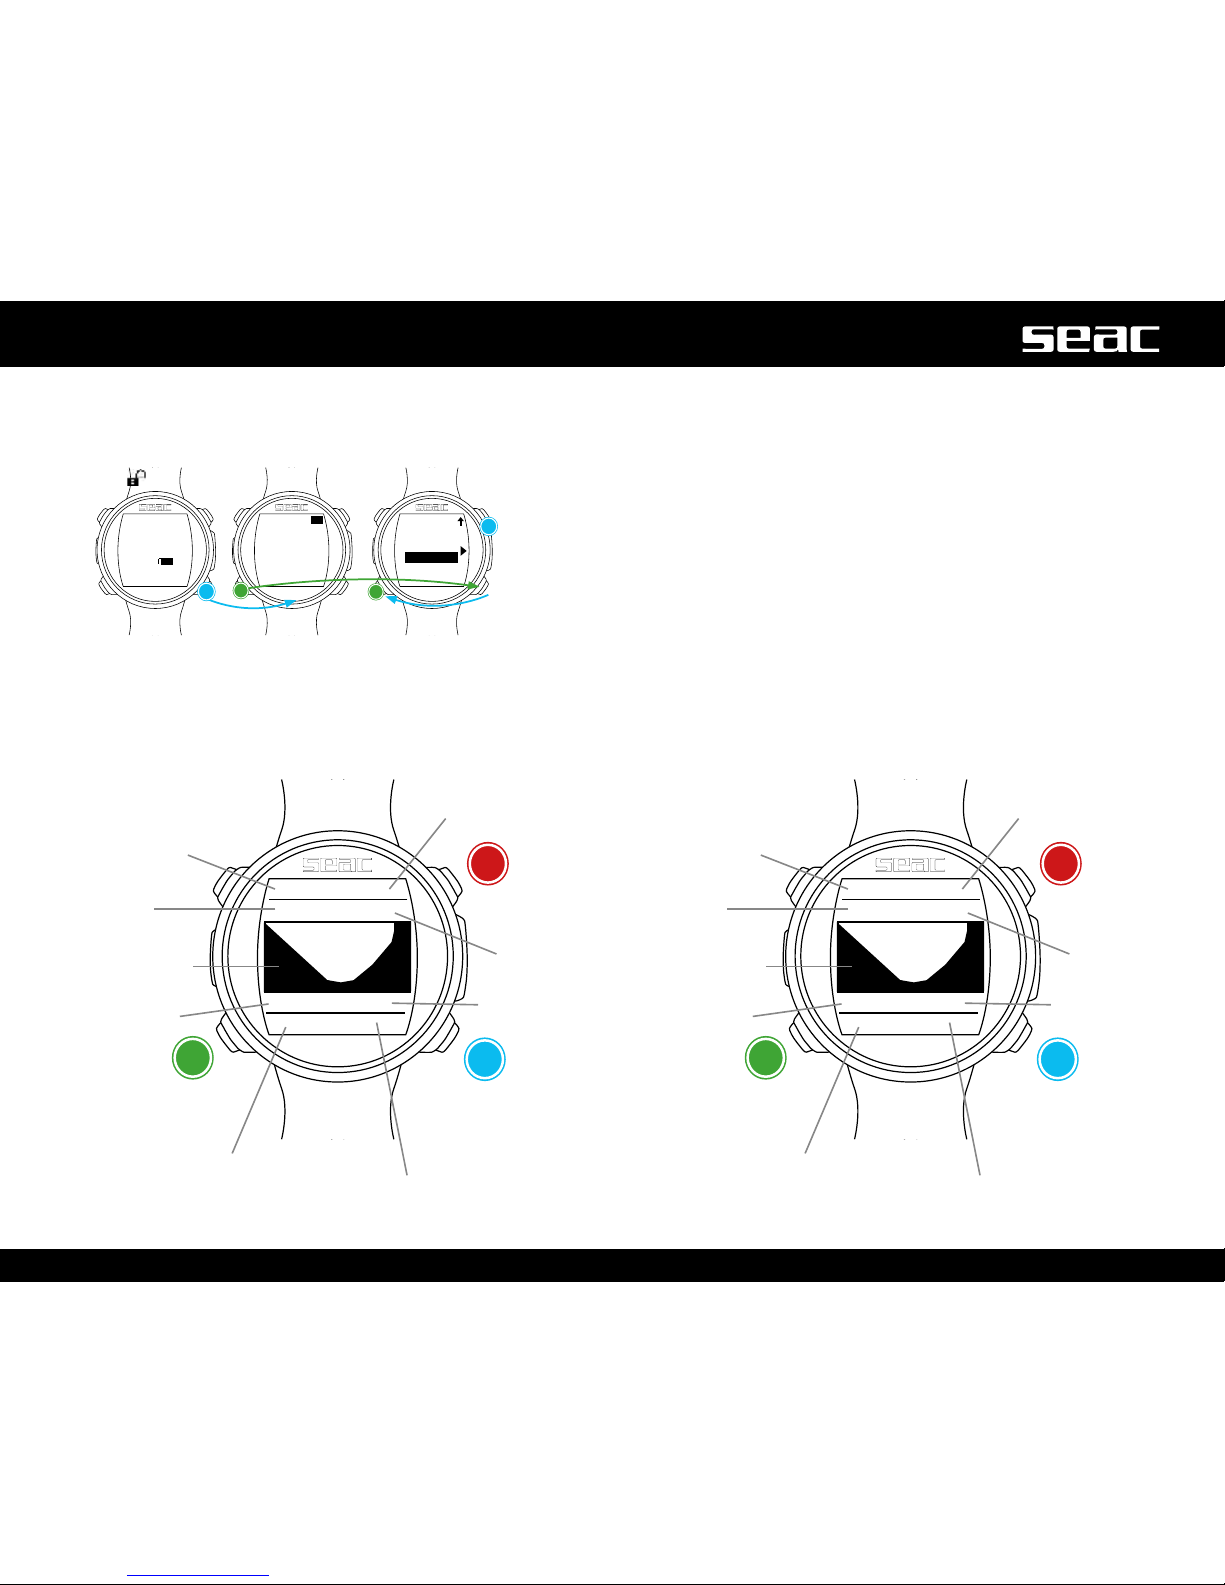
LOGBOOK
The GURU Computer can store approximately 18 hours of dives in freedive
mode (about 600 dives), with a sample rate of 1 second, or approximately
160 hours of diving in open circuit mode (sample rate 10 seconds).
The data saved in GURU's Logbook can be downloaded to a Mac or PC using
the USB cable included in the package and the DiveLogger software, which
can be downloaded from www.seacsub.com (see the dedicated chapter).
GURU
unlocked
Previous log Previous log
Log number Log number
Date
Date
Graphic prole
Graphic prole
Maximum
depth
Maximum
depth
Mix used Dive type
% CNS
Surface time before
the dive
Dive
duration
Dive duration
Dive start
time
Session
start time
Level of
conservativism
Water
temperature
LOGBOOK
Scuba type dive
LOGBOOK
Freedive type dive
Next log Next log
Exit Exit
Page 34
12:30
01/01 Th
95%
MIX
PLANNER
LOGBOOK
ALARM
C
C
D
D
0.0
0
:00
0 0.0
0.0
OC
DIVE m/min
DEPTH
ASC SPEED:
MAX DEPTH:
DECO VIOL:
TIME:
DEPTH:
B
C
D
YES
YES
YES
0
0
EXIT
34
English
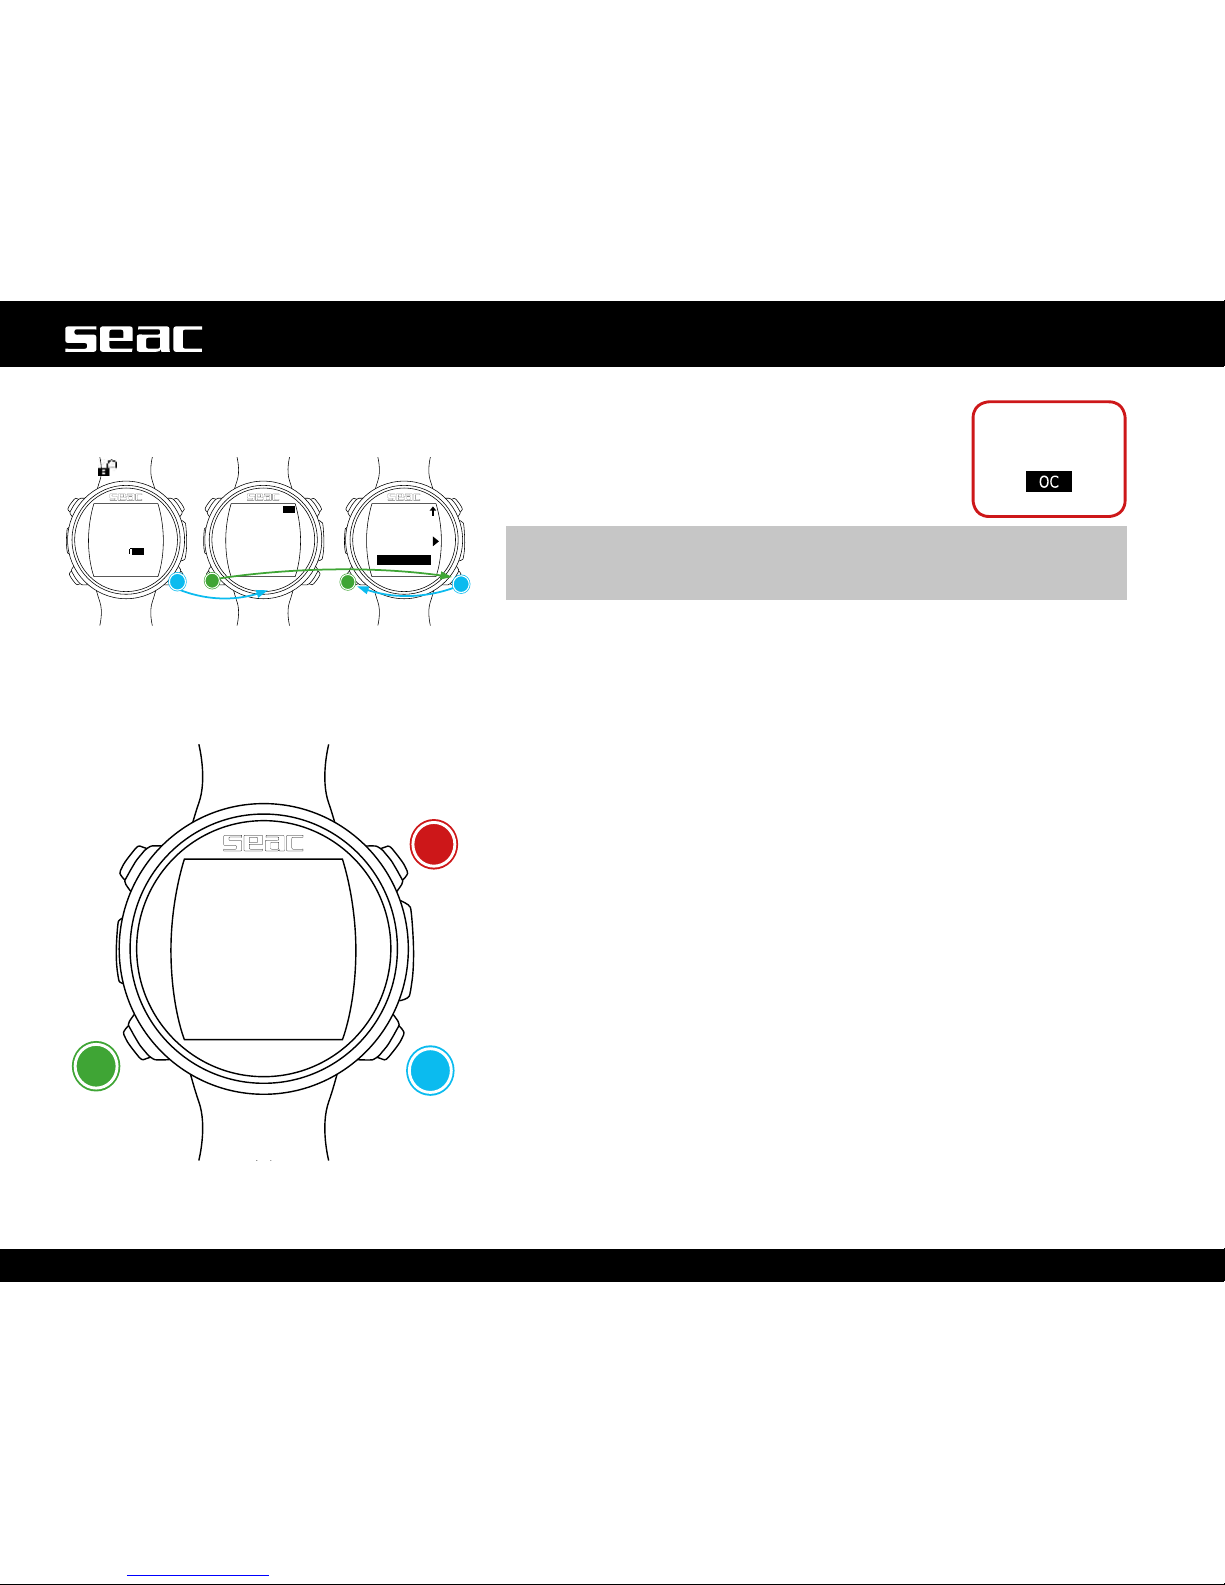
ALARM (Open Circuit Alarms)
The ALARM Menu allows you to enable (YES) or
disable (NO) GURU's auditory alarms in open circuit
mode.
m WARNING!
Except for special situations, we do not recommend disabling auditory
alarms. We recommend leaving all values set to YES.
ASC SPEED: (YES/NO): Alarm that signals an excessive ascent rate.
MAX DEPTH: (YES/NO): Alarm that signals that the MOD has been
exceeded (depth beyond which you should not proceed, based on the ppO
2
of the breathing mix in use).
DECO VIOL: (YES/NO): Alarm that signals a violation of the mandatory
decompression stop.
(The Safety Stops and Deep Stops are not considered mandatory
decompression stops. Violating Safety Stops or Deep Stops does not activate
the alarm).
TIME: Alarm that signals that the dive time set has been exceeded (in
minutes).
DEPTH: Alarm that signals that the depth set has been exceeded (in meters
or feet - see the DIVE SET menu).
GURU
unlocked
+
-Next value
Use only in
scuba mode
Page 35
12:30
01/01 Th
95%
B
B
D
NE-E-SE-S
200m
+27°C
990mb
54°
NE-E-SE-S
200m
+27°C
990mb
54°
35
English
The Compass
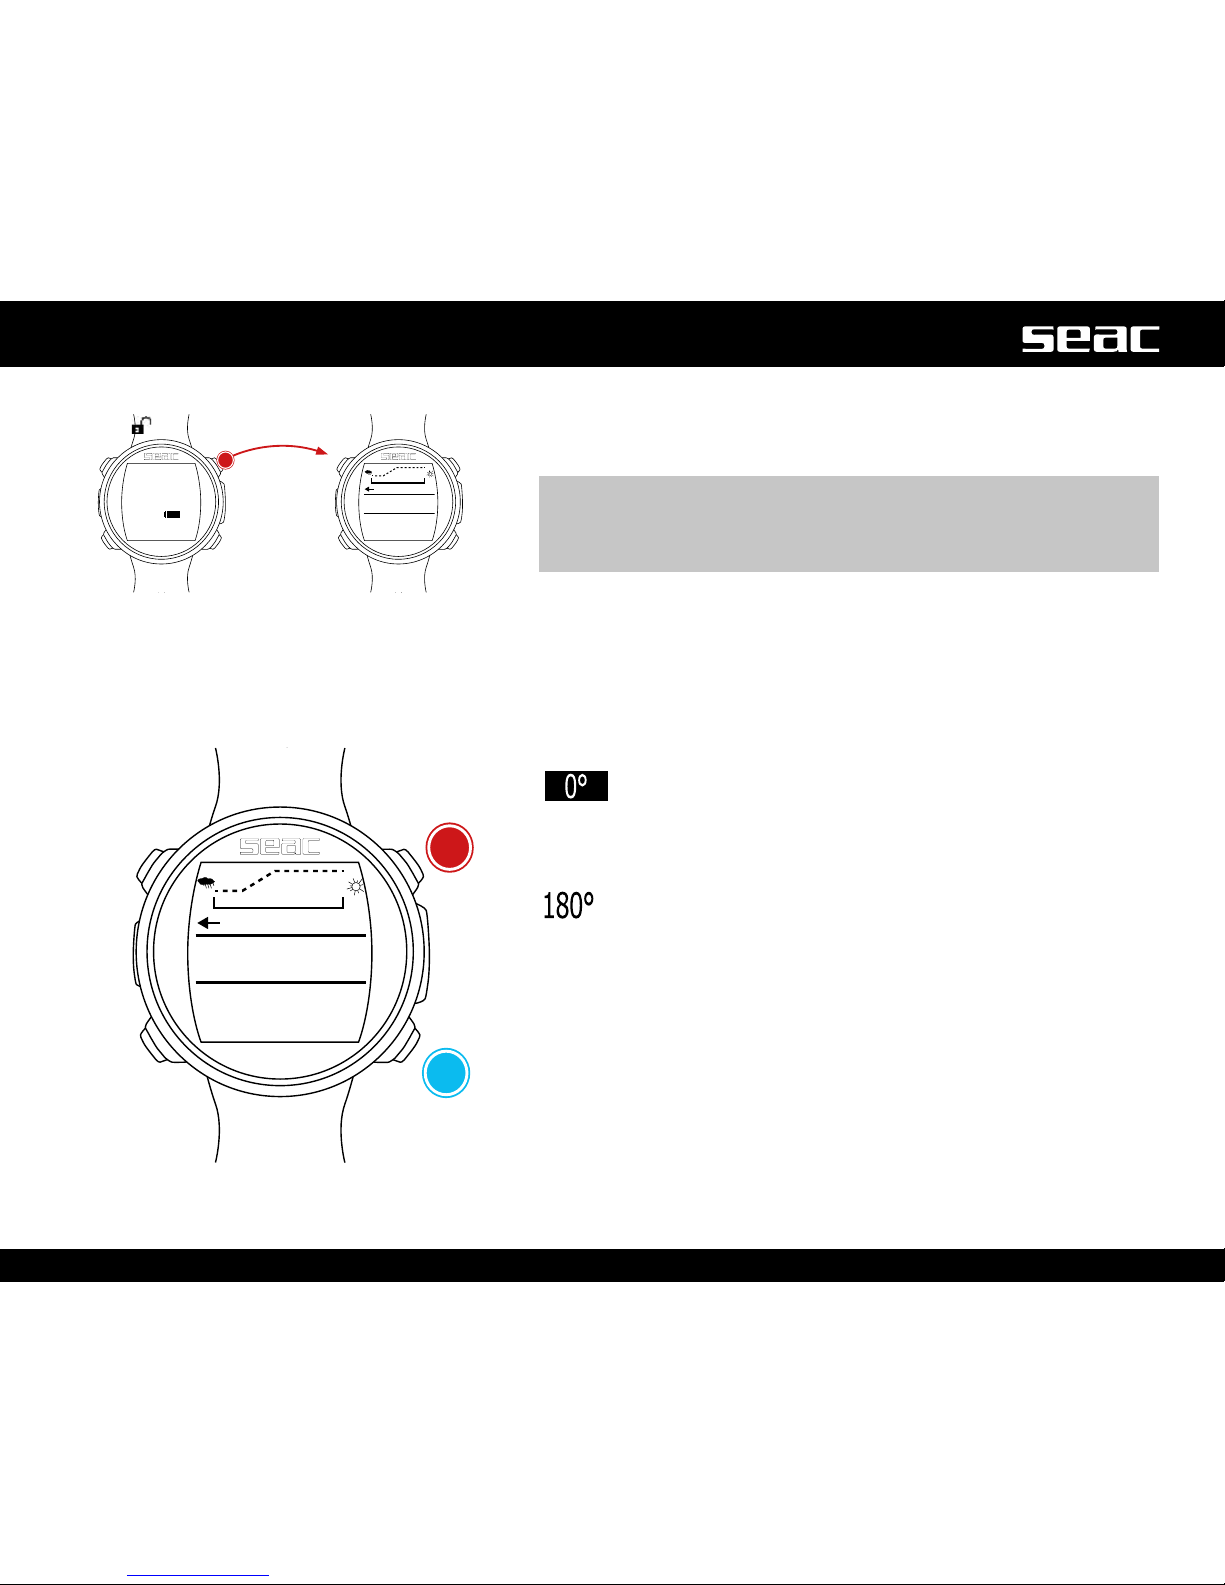
In order to access the compass screen, press the B button. The compass
is also available during the dive.
m WARNING!
If the “CALIBRATE” message appears, or if the compass is not fluid or
functioning correctly, the compass needs to be calibrated. To calibrate
the compass, refer to the COMPASS section of this manual.
The GURU compass has a resolution of 1° and an accuracy of +/- 1°. The
tilt is compensated automatically up to 85°. After rotating your arm, it may
take a few seconds for the compass to nd the correct alignment again.
To set the route, press the D button.
While navigating, GURU considers the direction to be “on route” if the
desired route diverges no more than 5° from the direction set.
To exit the compass, press the B button twice.
(Direction in degrees highlighted in black): Direction on route
(+/-5° with respect to the value set with D).
<=
=>
(Direction in degrees not highlighted): Indicates which
direction to go to nd the route set.
(Direction in degrees not highlighted, no arrow shown): Exact
inverse of the direction set.
Compass graphics legend:
N: North
S: South
W: West
E: East
NE: Northeast
NW: Northwest
SE: Southeast
SW: Southwest
GURU
unlocked
App / exit
Set the route
Page 36
12:30
01/01 Th
95%
B
B
NE-E-SE-S
200m
+27°C
990mb
54°
NE-E-SE-S
200m
+27°C
990mb
54°
36
English
Weather Forecast
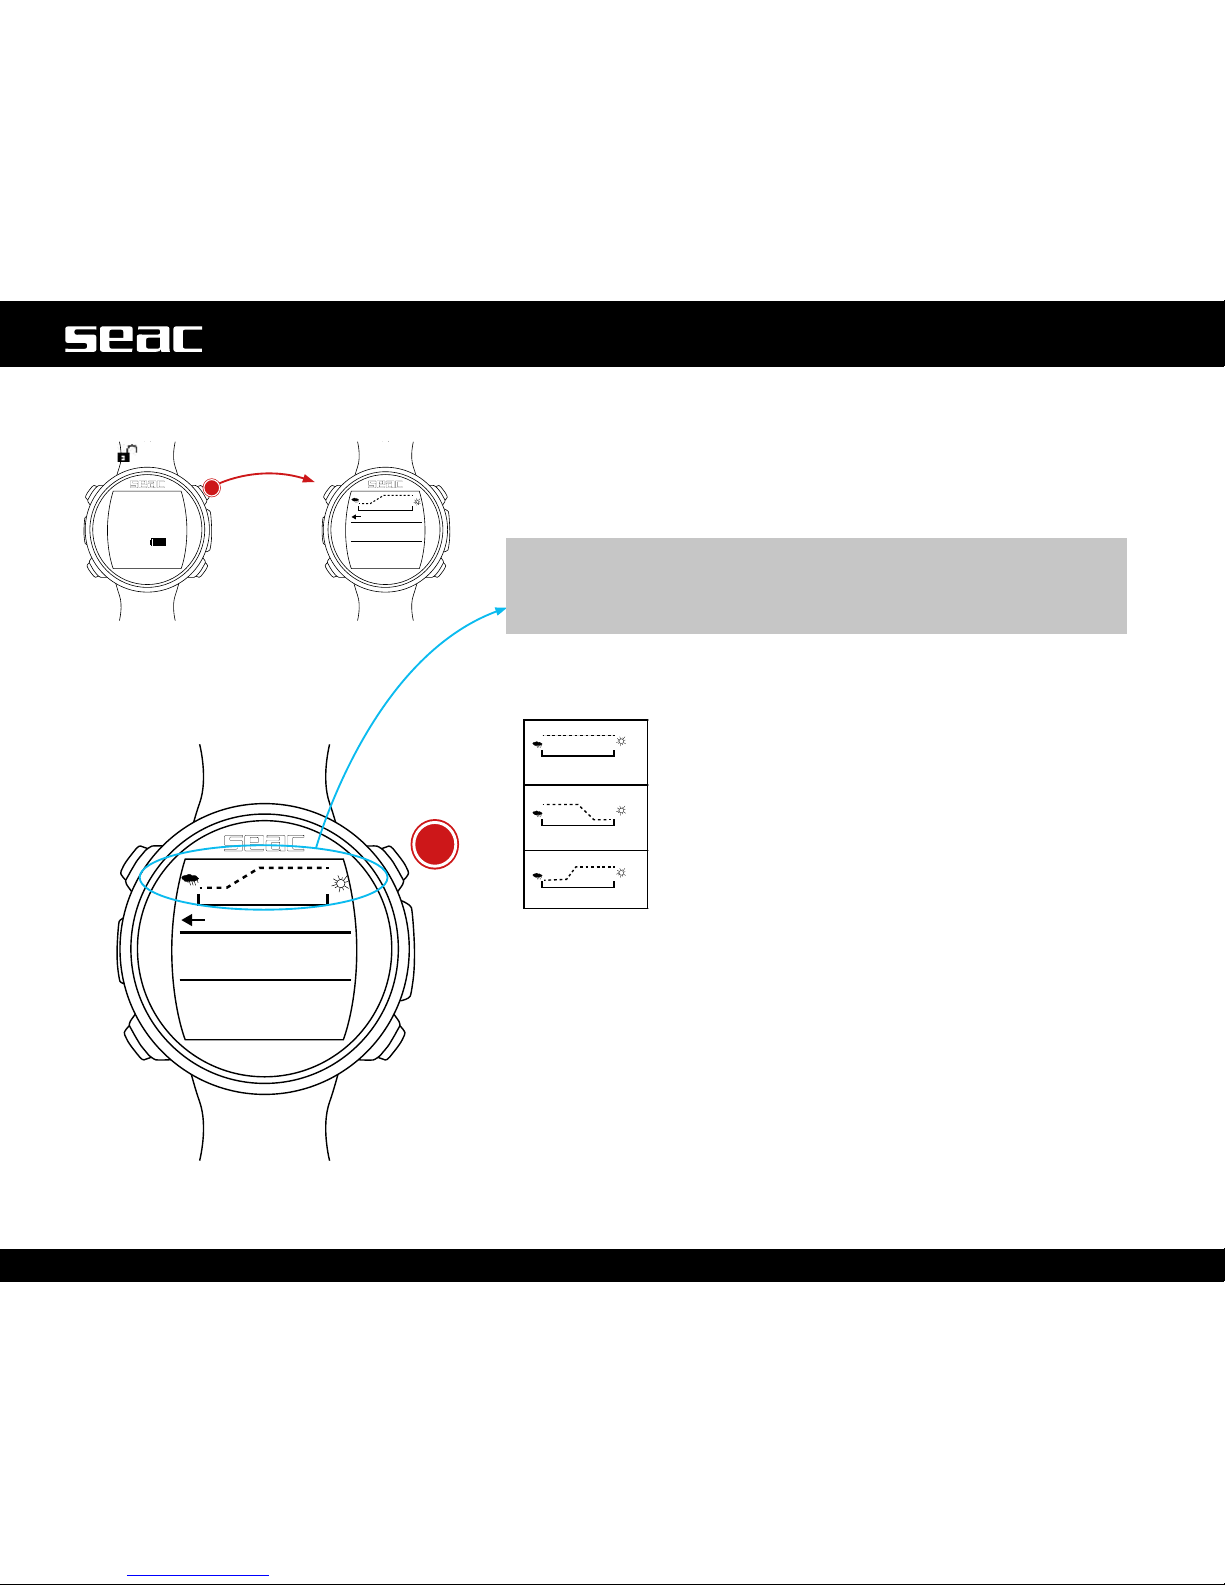
The weather forecast is based on monitoring atmospheric pressure in
the previous 18 hours using the built-in barometer. For a reliable weather
forecast, no changes in elevation should be made. Otherwise the change
in atmospheric pressure due to the change in altitude could introduce
inaccuracies into the weather forecast.
m WARNING!
After the dive, because of humidity in the sensor area, the pressure
actually read could be lower than the true pressure, which could
compromise the correct weather forecast.
After an altitude change of approx. 50 m, the weather forecast will be
reliable again after a period ranging from 3 to 5 hours.
stabile
in peggioramento
in miglioramento
Weather stable at current conditions
Possible deterioration
Possible improvement
GURU
unlocked
App / exit
Page 37
12:30
01/01 Th
95%
B
B
NE-E-SE-S
200m
+27°C
990mb
54°
NE-E-SE-S
200m
+27°C
990mb
54°
37
English
GURU
unlocked
App / exit
Altimeter, Barometer, Thermometer
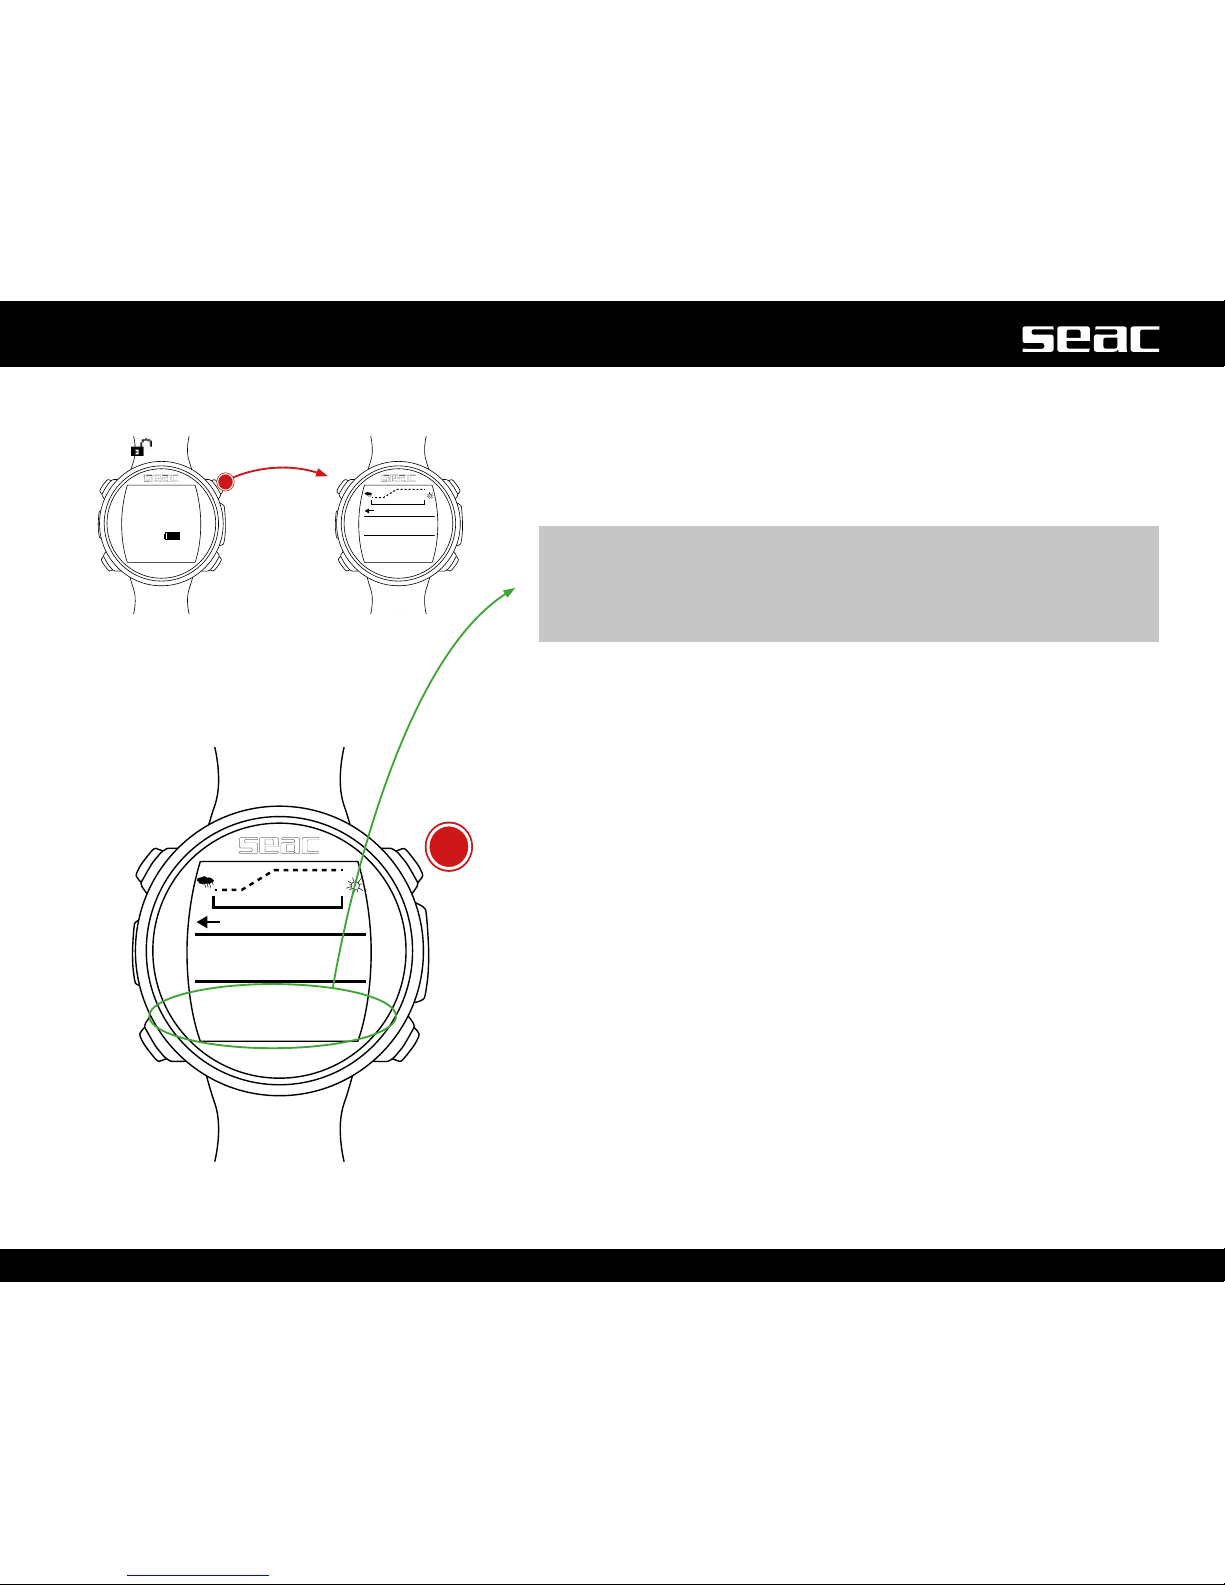
Altimeter: (In the center, expressed in meters or feet) Indicates the altitude
above sea level.
The value of the height above sea level is calculated based on atmospheric
pressure.
m WARNING!
The accuracy of the altitude measurement depends directly on the
atmospheric pressure and humidity present in the sensor location.
Therefore, in the event of bad weather, or after a dive, the error could
be as much as +/-80m.
Thermometer: (At lower left, expressed in °C or °F): Indicates the
temperature of the GURU case.
The temperature measured by GURU is the temperature of the watch case
itself. Therefore, when worn on your wrist it will measure a temperature
higher than the outside temperature. To measure the ambient temperature,
remove the watch from your wrist and wait at least 5-6 minutes. The
temperature reading will be accurate in the water after 3-4 minutes.
Barometer: (At lower right, expressed in millibars) Indicates the atmospheric
pressure (the pressure present at any point in earth's atmosphere).
The barometer reading is used to automatically adapt the decompression
calculation for dives at altitude. Therefore it isn't necessary to enter the
dive altitude in the settings (which the calculator would use to calculate a
hypothetical atmospheric pressure to use in adapting the decompression
calculation), because GURU automatically detects the true barometric
pressure regardless of the altitude.
Page 38
12:30
01/01 Th
95%
B
NE-E-SE-S
200m
+27°C
990mb
54°
CHRONO
MIX CHECK
PITCH&ROLL
MOON
MAGMETER
FITNESS
CLOCK ALARM
CHRONO
MIX CHECK
PITCH&ROLL
MOON
MAGMETER
FITNESS
CLOCK ALARM
Exit
B
B
C
C
D
D
B
38
English
Apps for GURU Free
GURU has some applications installed.
To access them, press the B button (after you have navigated to the
compass screen).
Select Exit to leave the App menu, or press the B button with the rst
available app selected.
GURU
unlocked
UP /exit/
UP /exit/
Down
Down
Select
Select
Page 39
39
English
GURU DURING THE DIVE
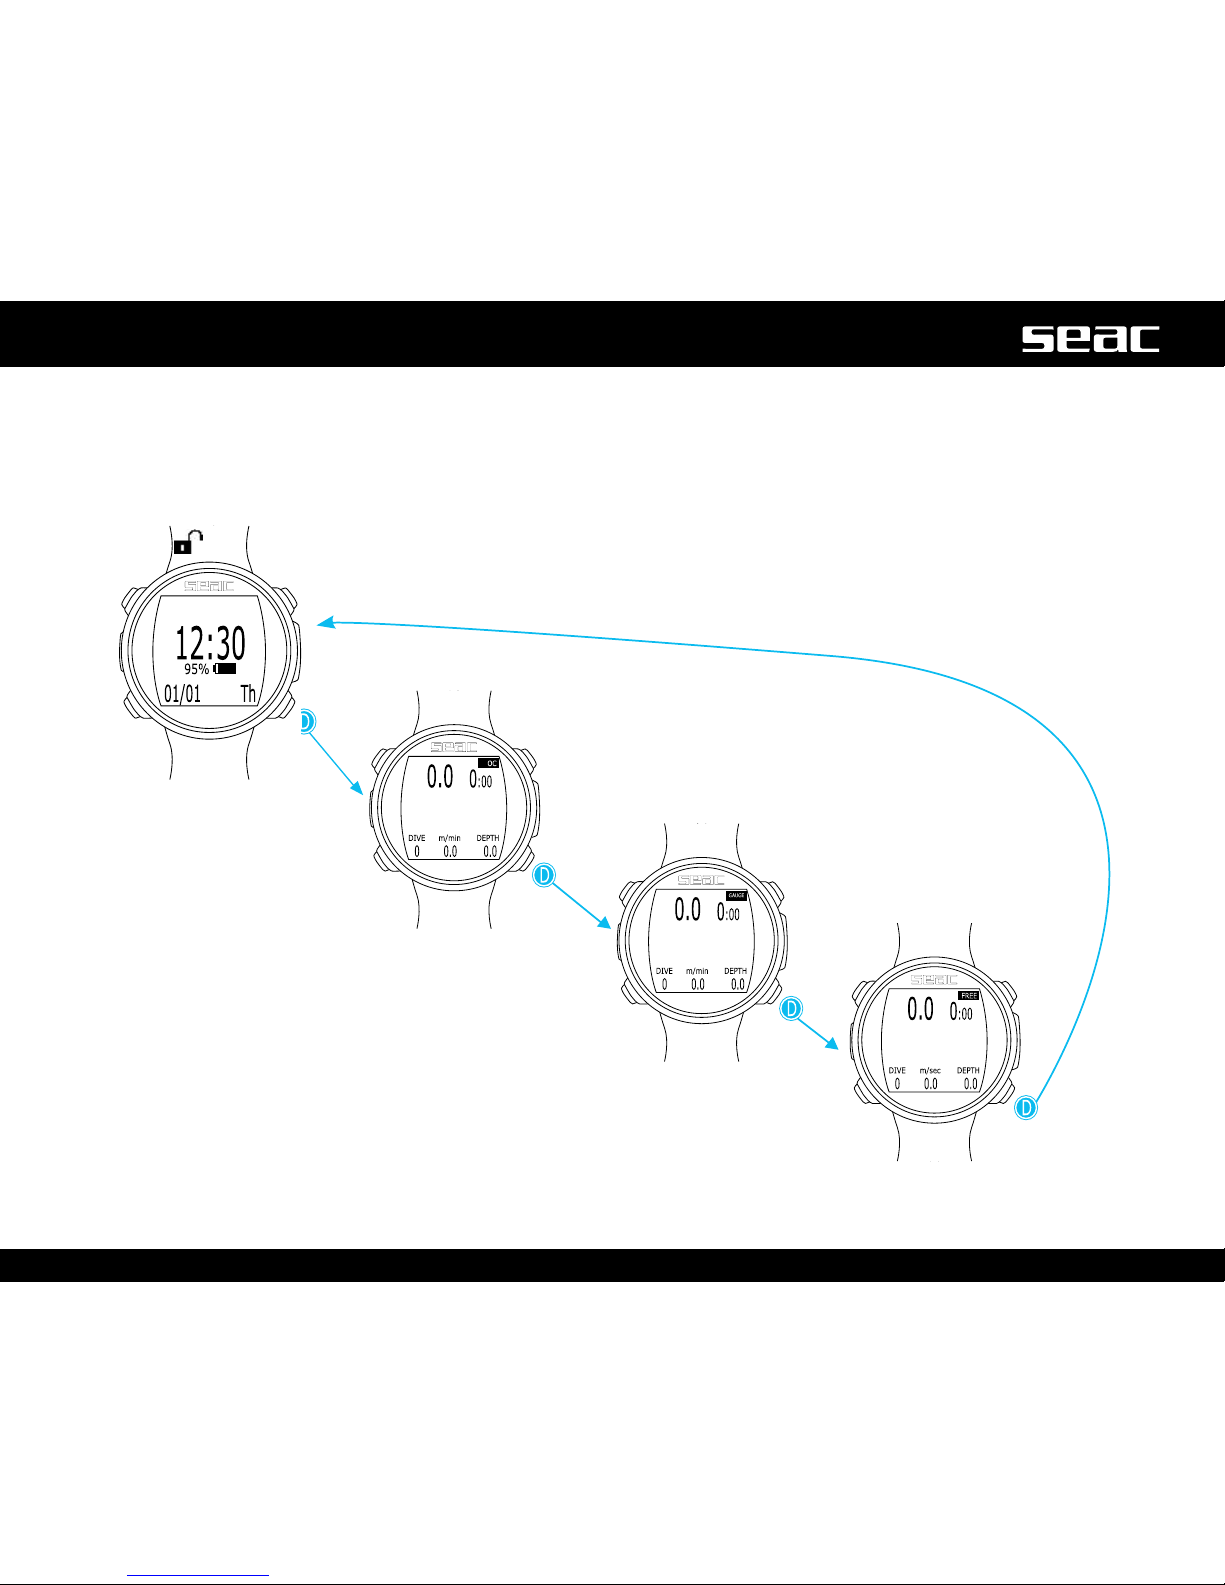
GURU automatically activates dive mode when the diver moves past 1.5 m in depth. The factory setting for GURU is OC dive mode,
but you can select the mode to be activated in the DIVE SET 1 menu.
GURU
unlocked
Watch
Scuba mode
Gauge mode
Freedive mode
Page 40
OC
20.0m
5
:25
21 2.1 37.4
%O2 m/min MAX
36
:
NDL
OC
9.0m
30
:15
21 37.4
%O2 MAX
3
:
TIME
{
{
{
3
:
STOP
4
:
TTS
40
English
Dive in SCUBA mode (OC)
m WARNING!
This manual does NOT replace adequate training!
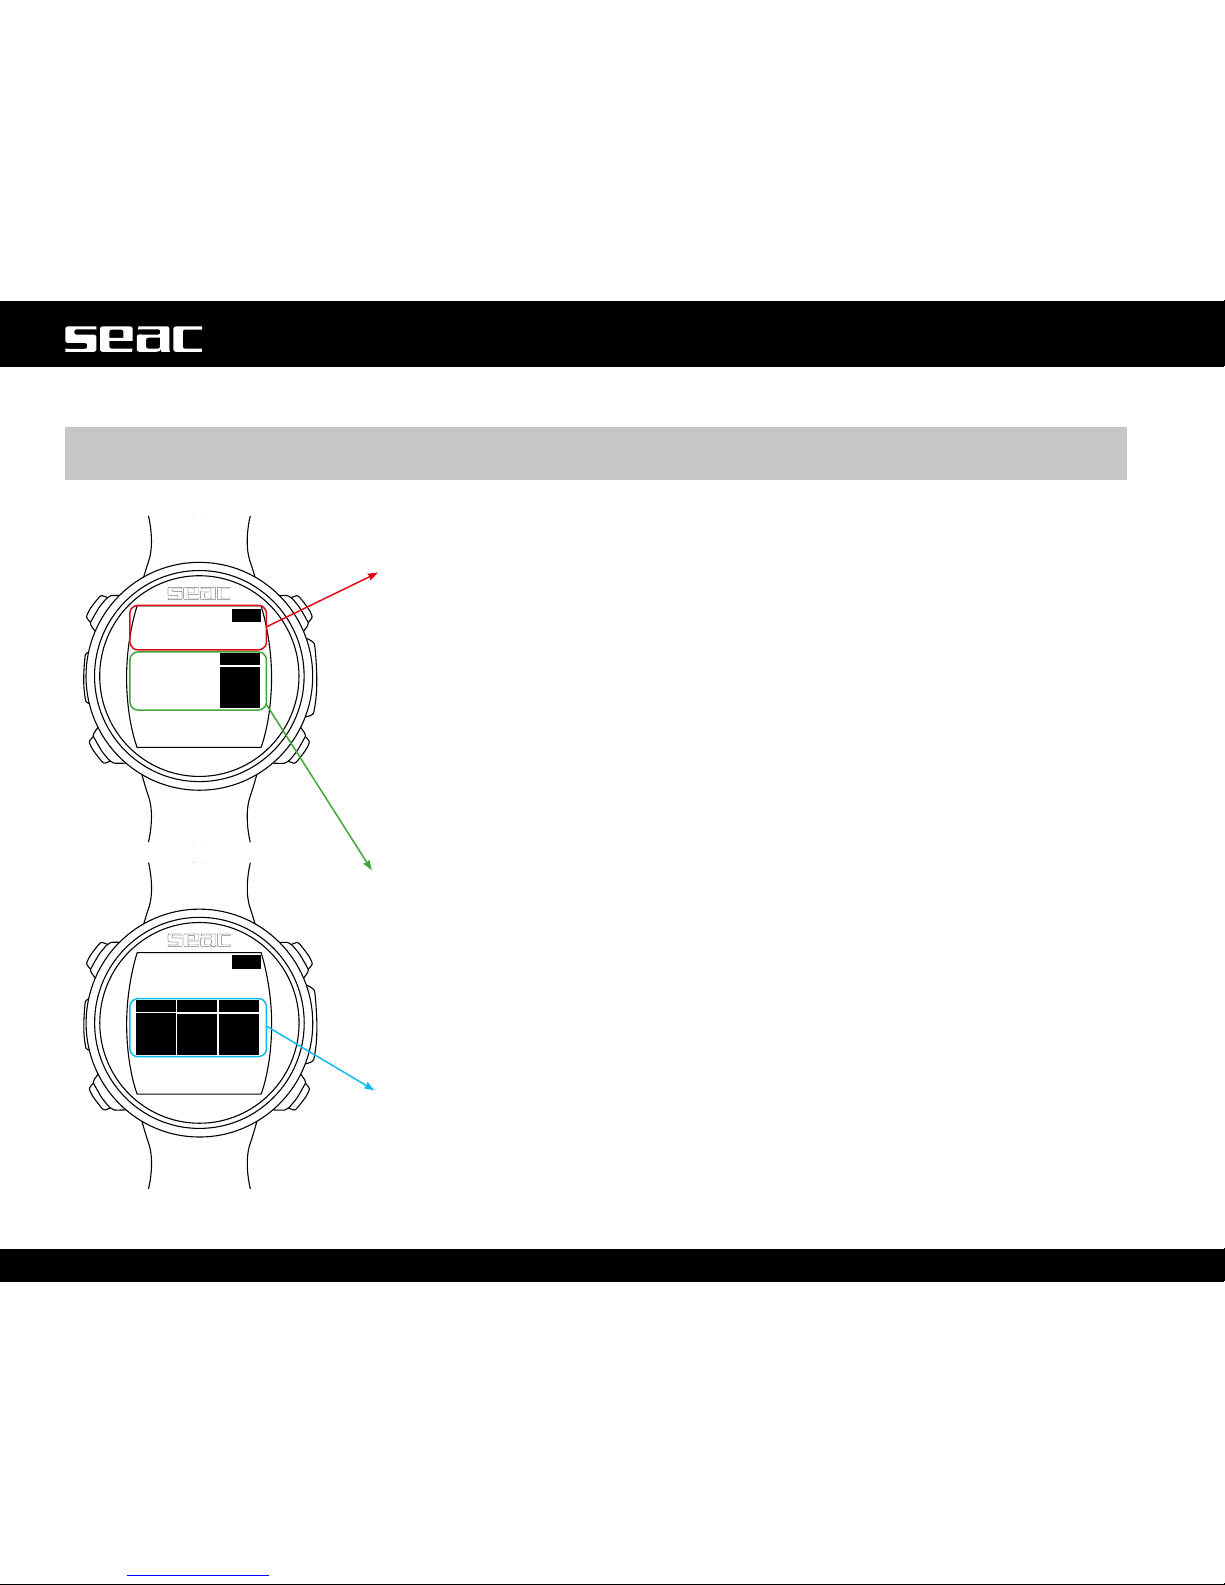
The diagram below shows the information shown during a dive with scuba equipment:
Principal information
Current depth (at left): Expressed in meters or feet.
Run time (at right): Dive time in minutes: seconds.
Dive mode (at upper right): OC = Open Circuit.
If within limits:
NDL: (No Decompression Limit) Time in minutes it's possible to stay at
the current level without exceeding the no decompression limits and make
mandatory deco stops necessary. As a general rule of thumb, it's always
a good idea to remain within the no-decompression limits.
If you exceed the limits:
TTS: (Left) Time-to-surface. Total ascent time.
STOP: (Center) Depth of the next mandatory stop.
TIME: (Right) Minutes relative to the next safety stop.
Page 41
OC
OC
OC
19.2
m
20.2
m
5.9
m
28
:15
30
:15
30
:15
21
21
21
30.4
38.4
37.4
%O2
%O2
%O2
MAX
MAX
MAX
10
:
2
:
99
:
NDL
STOP
NDL
{
{
{
15
:
19
:
5
:
STOP
DEEP
STOP
2
:
DEEP
6
:
TTS
3
:
SFT
41
English
m WARNING!
This manual does NOT replace adequate training!
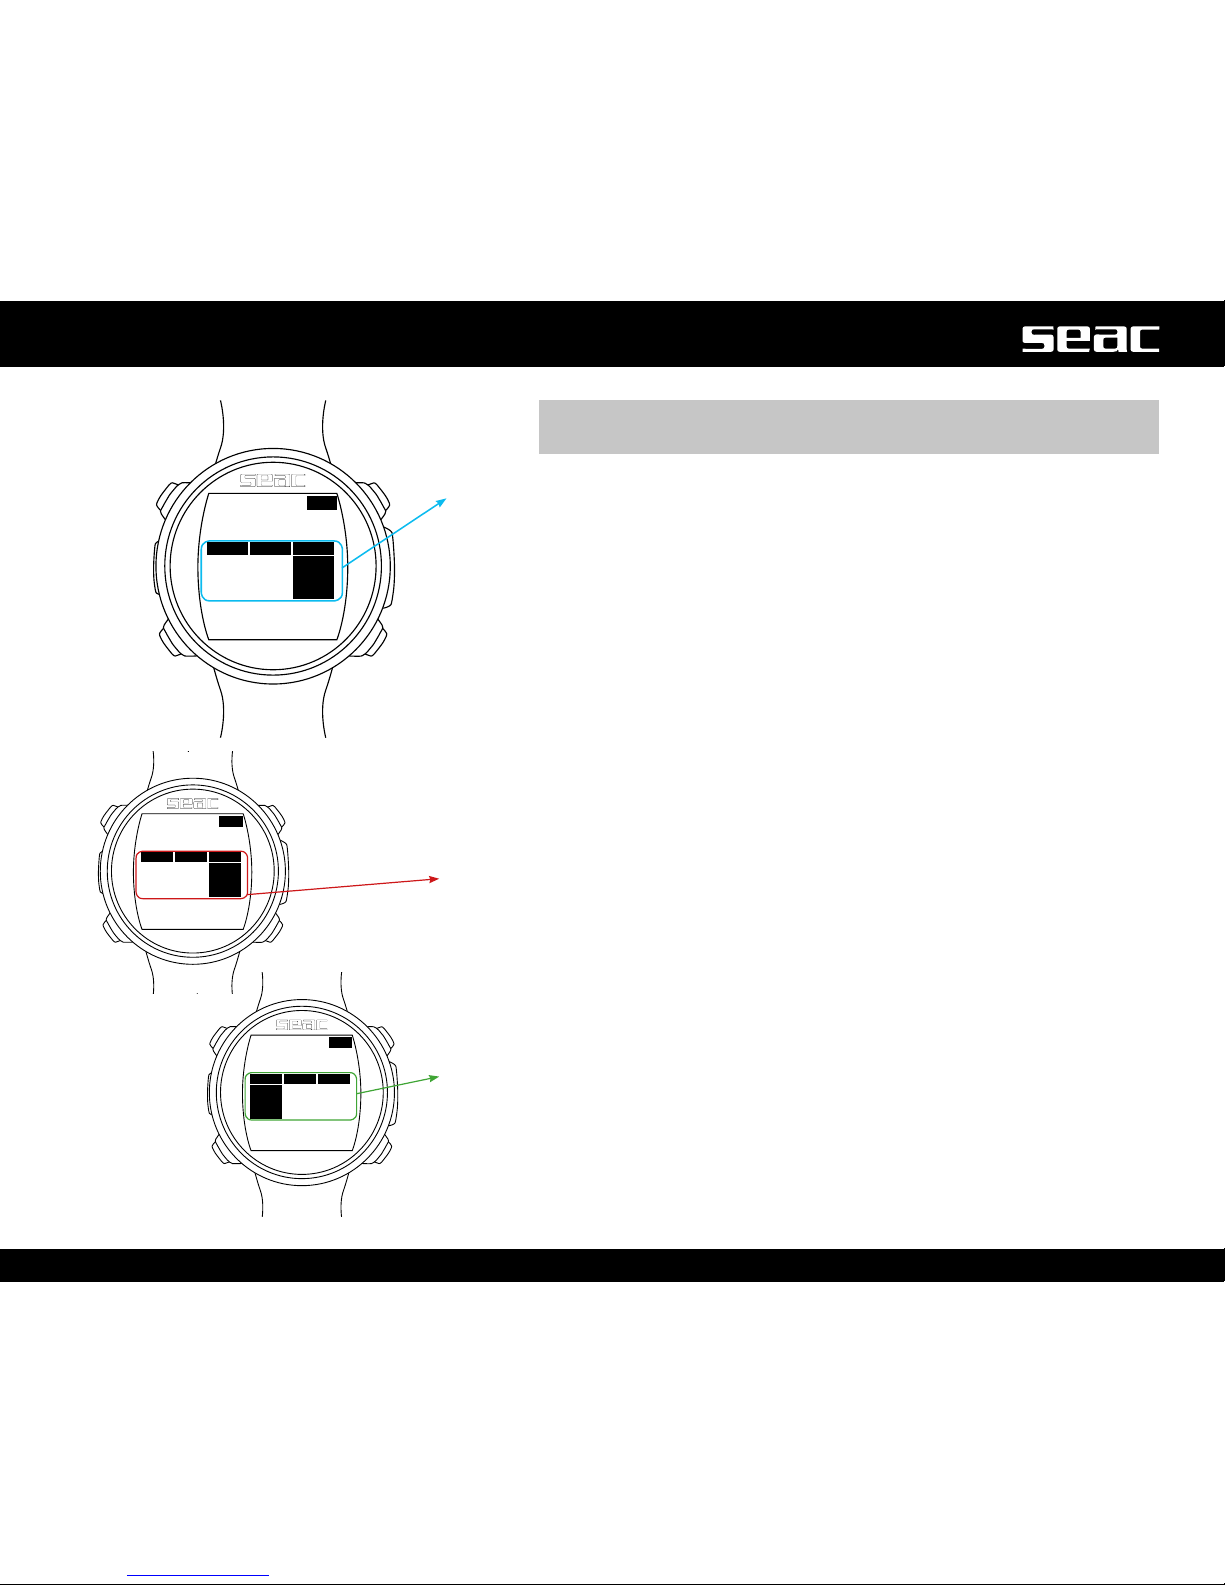
Safety Stop: In the event that a Safety Stop has been set (recommended),
it will be shown on the display in the center line of the computer during the
ascent, beginning at a depth of 9 m. (The safety stop is omitted automatically
when the dive exceeds the no-decompression limits).
You can change the time and depth of the safety stop in the DIVE SET 2
menu.
SFT: (Left) Time left to spend in the safety stop.
STOP: (Center) Depth of the stop.
NDL: (Right) No Decompression Limit.
If the Deep Stop is enabled: If you set the Deep Stop function, it will be
displayed 5 m before the actual depth required in the central line on the
display, and will be removed (if not performed) 5 m after the depth required.
If the Deep Stop is performed during a dive within the no-decompression
limits, the NDL time will remain visible on the right side of the display against
a black background.
The DEEP info is shown to the left in minutes. In the middle, STOP indicates
the depth.
If the Deep Stop is done in a dive with mandatory decompression stops, the
Deep Stop information will be shown against a neutral background in place
of the STOP and TIME values, leaving the TTS value visible against a black
background.
Page 42
OC
20.0
m
5
:25
21 2.1 37.4
%O2 m/min MAX
36
:
NDL
OC
0.0
m
25
:25
21
0.21
+20
%O2 PPO2 TEMP
°C
99
:
NDL
{
{
D
D
42
English
Other information during the dive
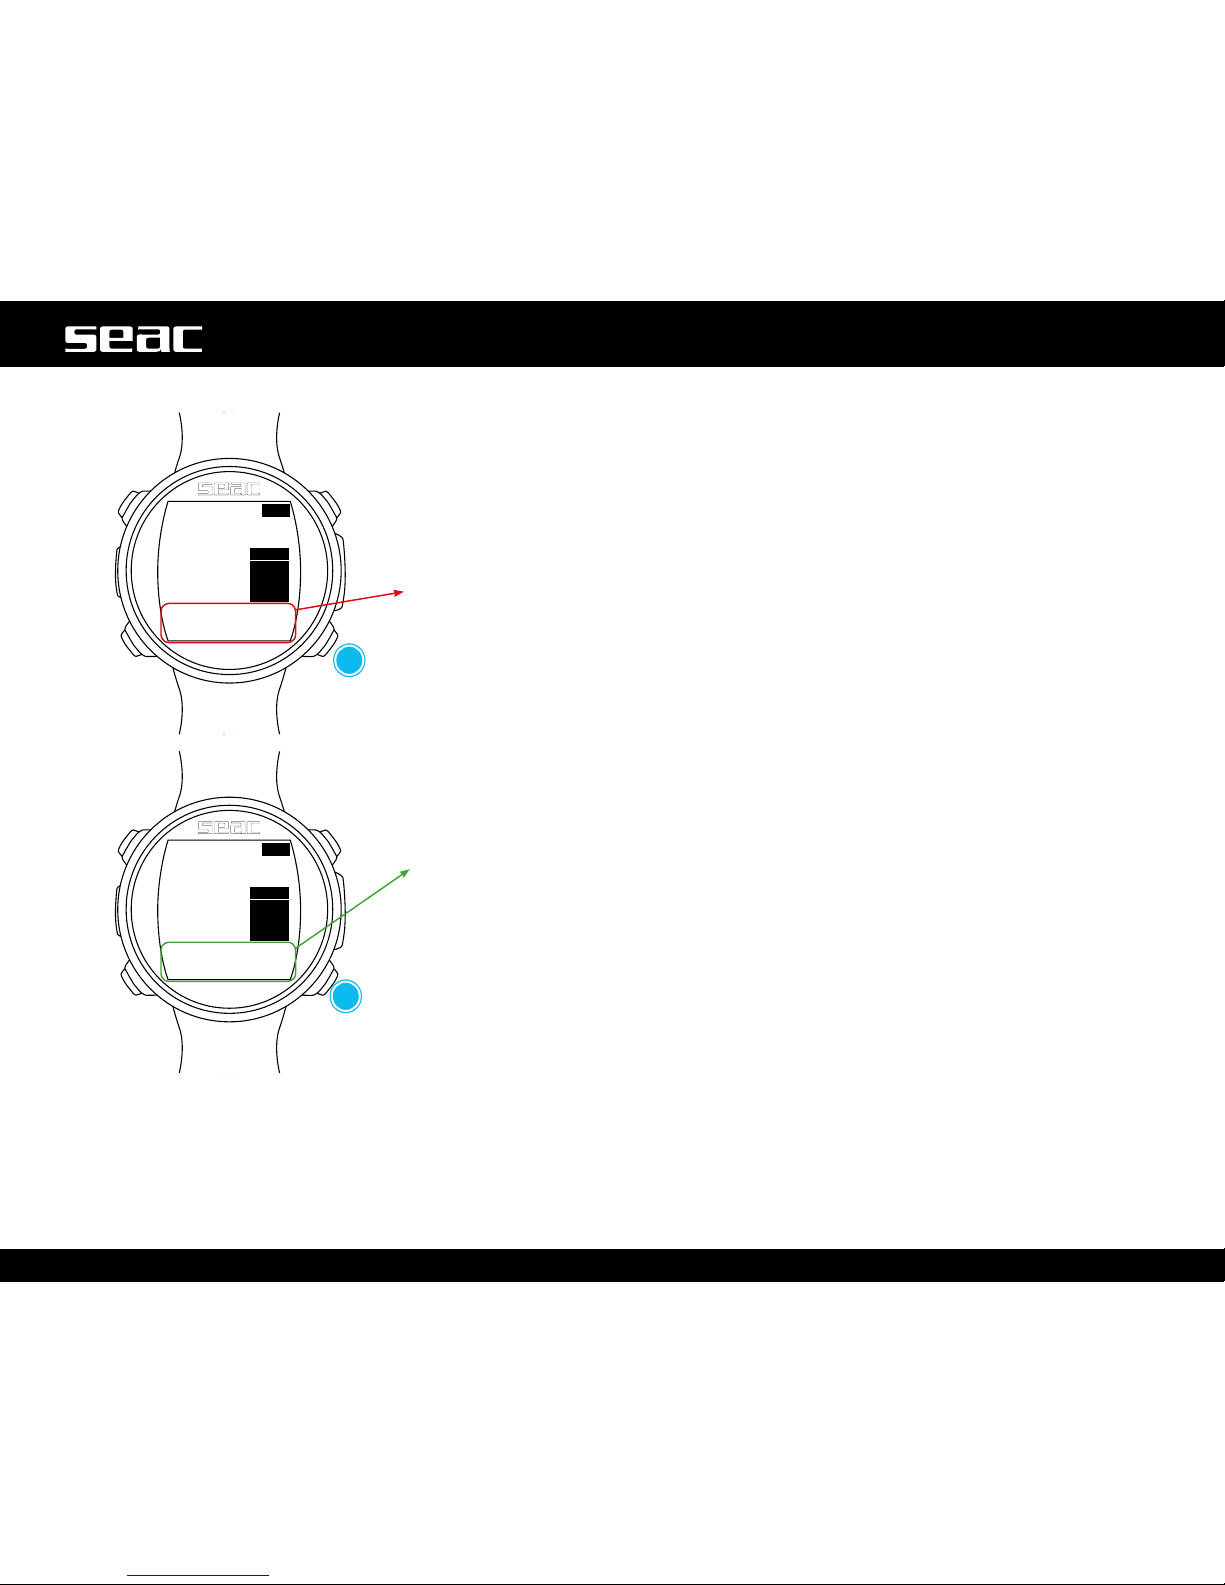
During an open circuit dive you can see additional information by pressing
the D button.
To return to the dive screen, continue to press the D button or wait a few
seconds.
Oxygen % (at left): Oxygen Percentage in the mix that GURU is using for the
decompression calculation.
Ascent speed (in the center): Speed in real time (in meters/minute or
feet/minute).
Maximum Depth (at right): Maximum depth reached during the dive.
Oxygen % (at left): Oxygen Percentage in the mix that GURU is using for the
decompression calculation.
Oxygen Partial Pressure (at center): The current oxygen partial pressure.
Temperature (at right): Current temperature in °C or °F.
Page 43
OC
20.0m
5
:25
PS0 2 12.4
ALG CNS AVG
36
:
NDL
OC
20.1m
25
:25
11:30
{
{
D
D
TIME
43
English
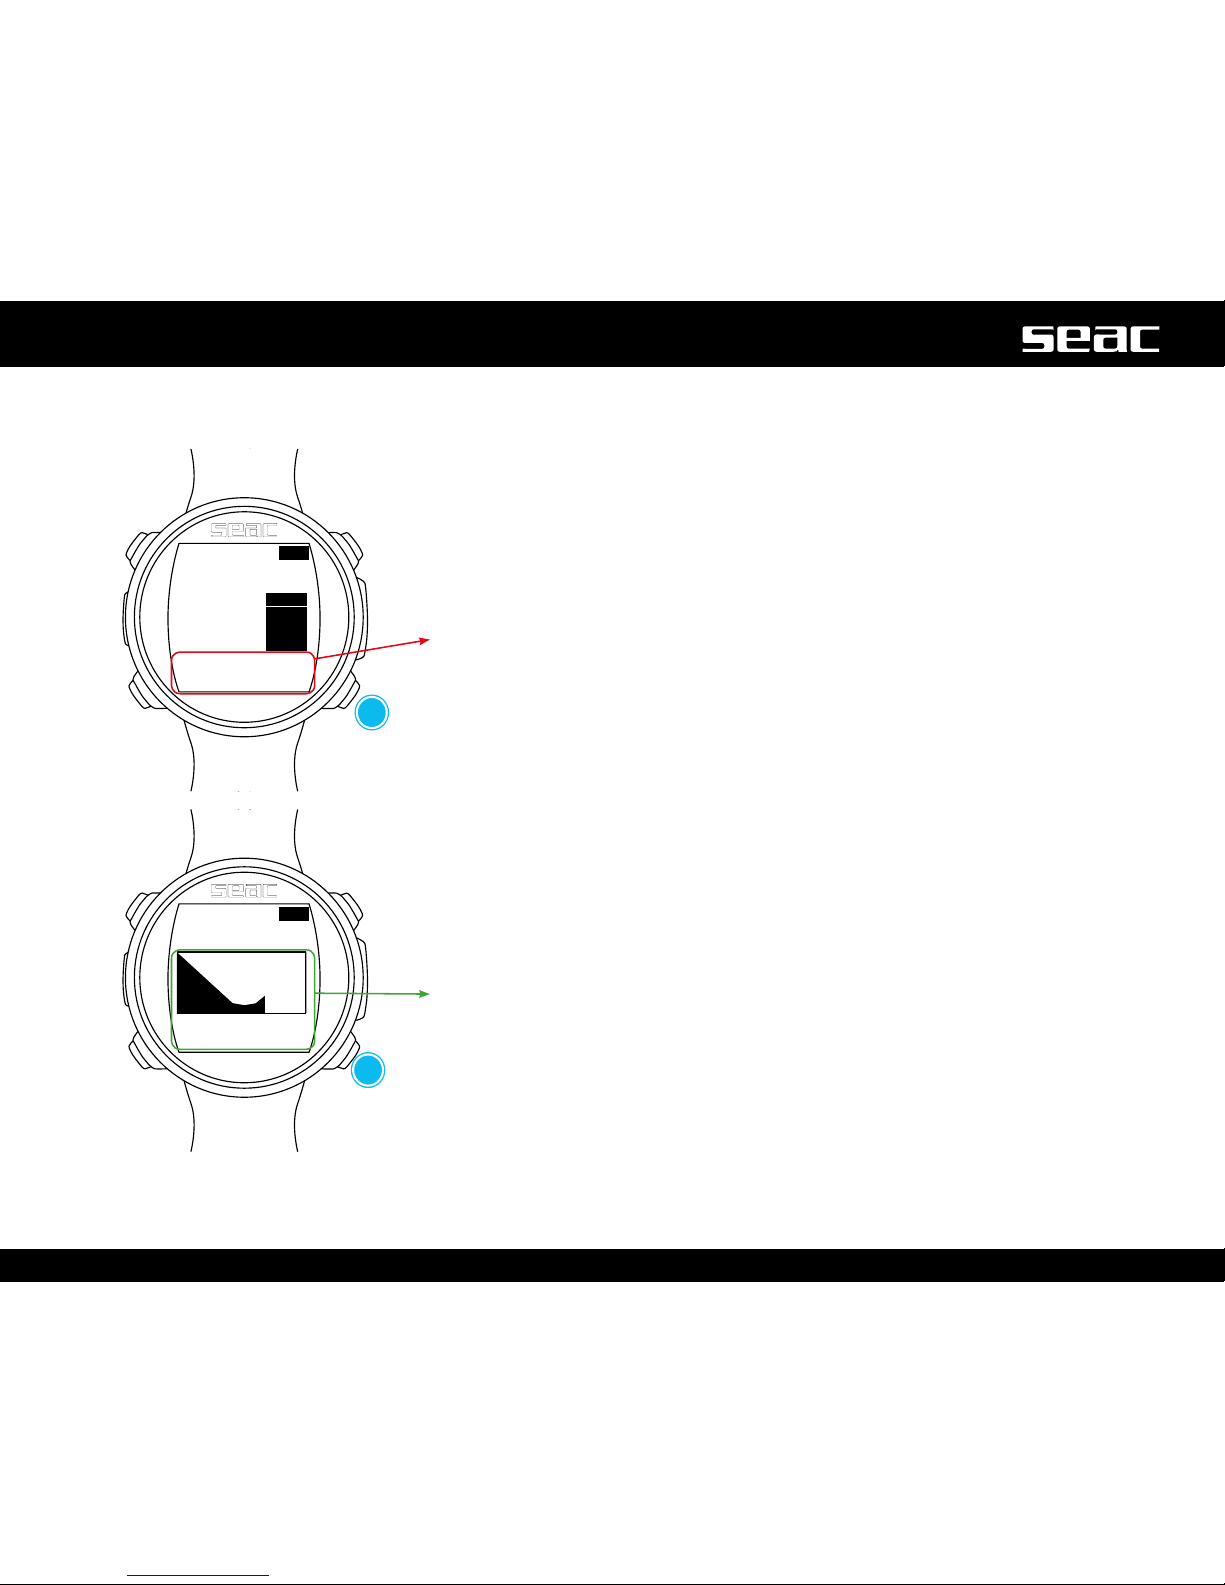
Next set
of data
Next set
of data
Algorithm conservativism level (at left): Level of conservativism applied to
the decompression algorithm.
CNS (at center): % of CNS accumulated up to that point.
Maximum Depth (at right): Maximum depth reached during the dive.
Graphic prole (at center): Real time dive prole.
Standard Time (at lower right) standard time expressed in hh:mm.
Page 44
OC
30.1
m
13
:54
D
3m
6m
9m
12m
15m
2:
2:
1:
1:
1:
50/0
50/0
50/0
50/0
50/0
44
English
Deco table during the dive
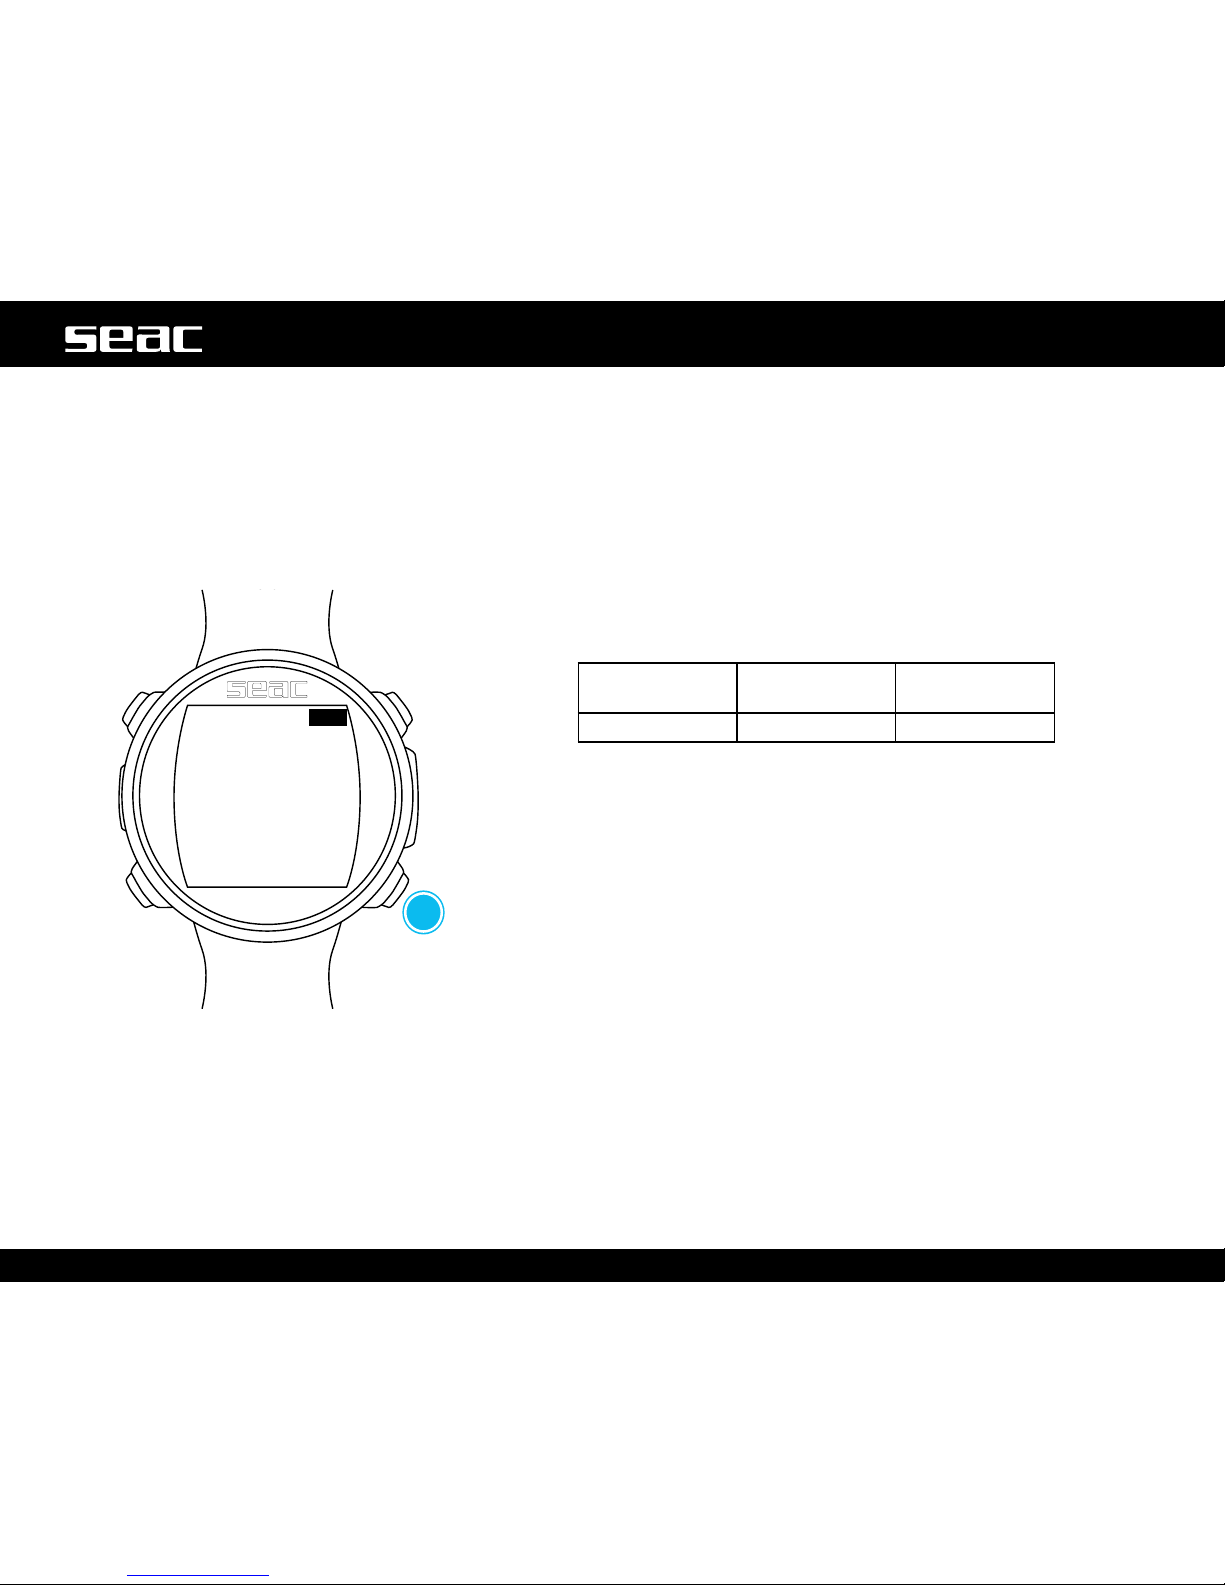
This table is only available if deco has accumulated during the dive, pressing
the D button. To return to the dive screen, continue to press the D button
or wait a few seconds.
In the case of dives with many deco stops, you may need to press D to move
to the next page.
This menu shows all the decompression stops and the Mix to be used that
are anticipated for the current status of the current dive.
The decompression stops are updated in real time.
For every mandatory decompression stop, the GURU will show:
Depth of the
stop
Duration of the
stop
Suggested mix
12m 1: 50/0
Because they are not mandatory, any Safety Stops and Deep Stops are not
shown in the decompression table, even though they will be presented to the
diver during the dive.
next page
Page 45
21
50
21
%O2
%O2
%O2
C
C
D
CHANGE MIX
EAN 50
YES NO
45
English
Mix Change during the dive
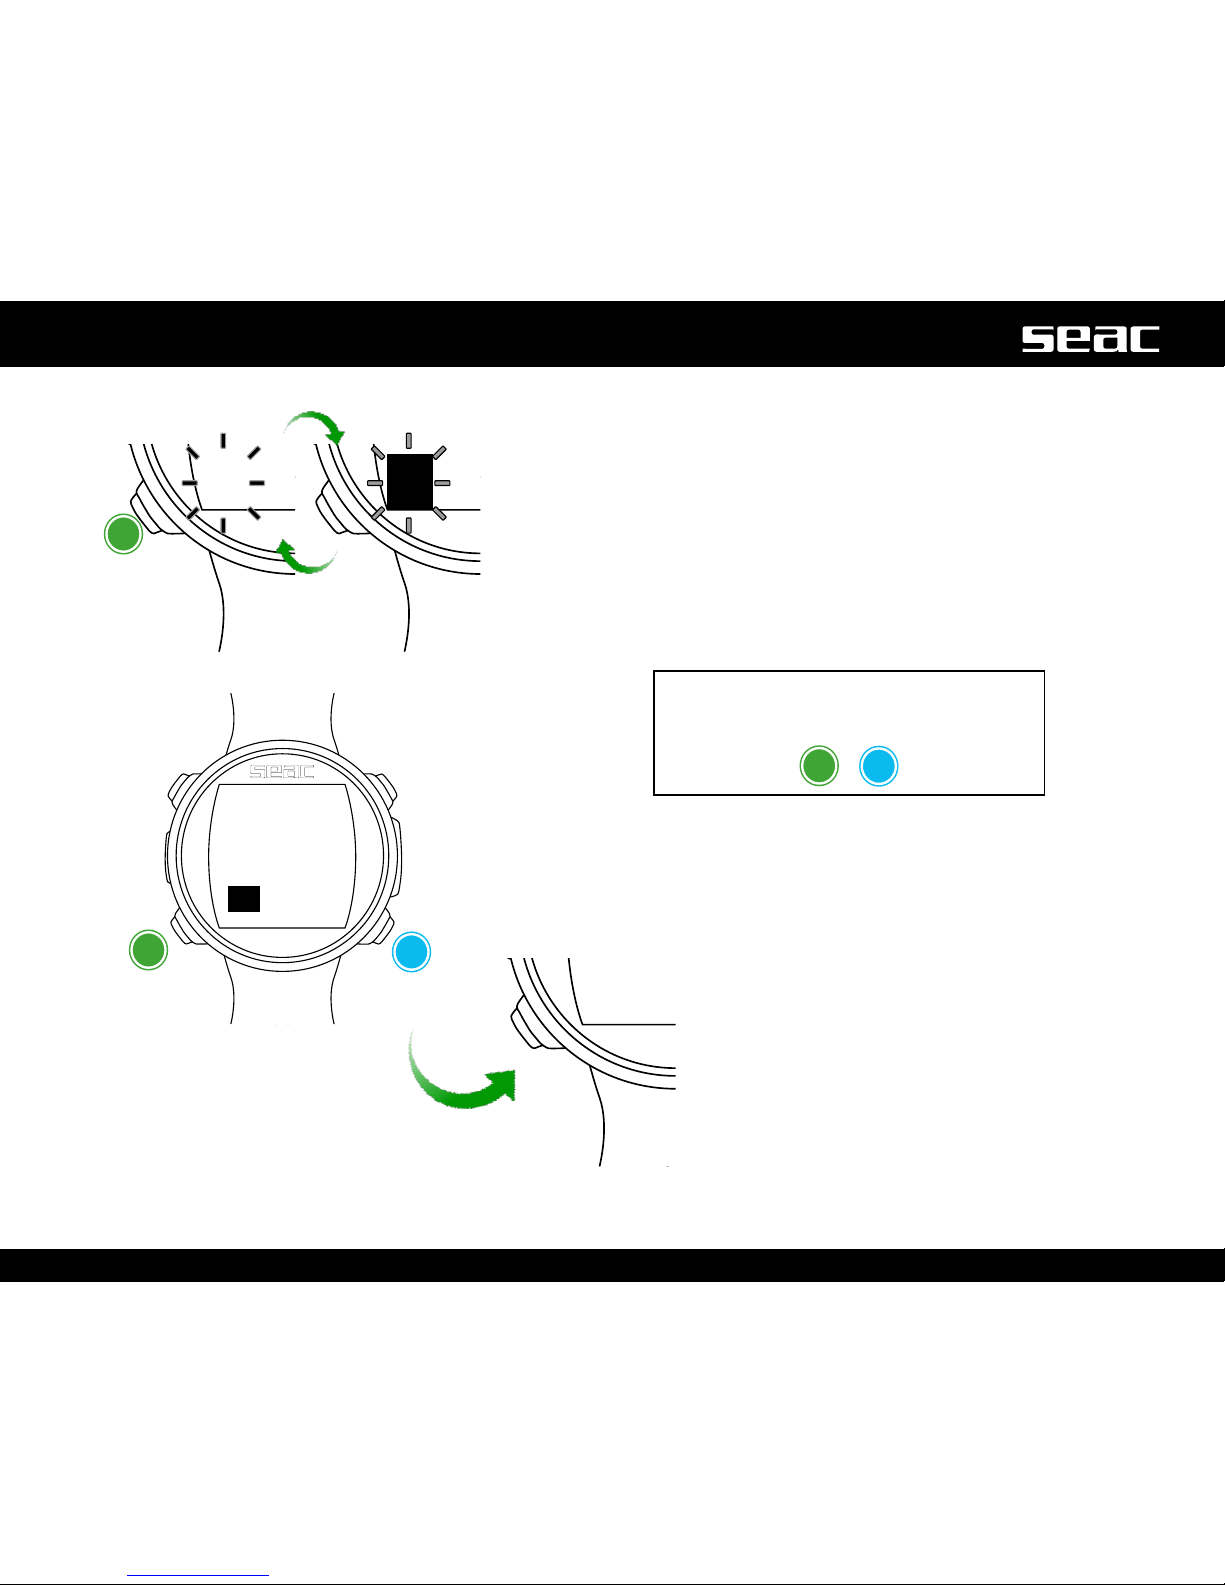
If decompression mixes are set in addition to the bottom mix, the computer
will alert the user at the most suitable time to change the mix, ashing the
%O2 eld on the lower left on the main dive screen.
Press the C button to access the CHANGE MIX screen.
(Only if a better mix is available and the MIX parameter is ashing.)
To conrm the mix change, select YES by pressing D.
To reject the mix change, select NO with C and press D.
Once the change is made, the new Mix will be displayed in the lower left
corner.
To conrm the mix change, press the C and
D buttons in sequence from the dive screen
when the word MIX ashes.
C
D
Because they are not mandatory, any Safety Stops and Deep Stops are not
shown in the decompression table, even though they will be presented to the
diver during the dive.
Mix Change not possible
If for any reason you are unable to change the gas
breathed during the dive (for example, loss of the phase
tank), do not change the Mix on GURU.
The GURU continues to deduct the decompression stop
time using the gas set (while displaying the time you
would have using the best mix). The stop time begins to
decrease as soon as the value of the gas used reaches
that of the best mix.
Conrm
change
value from
YES to NO
change MIX
Page 46
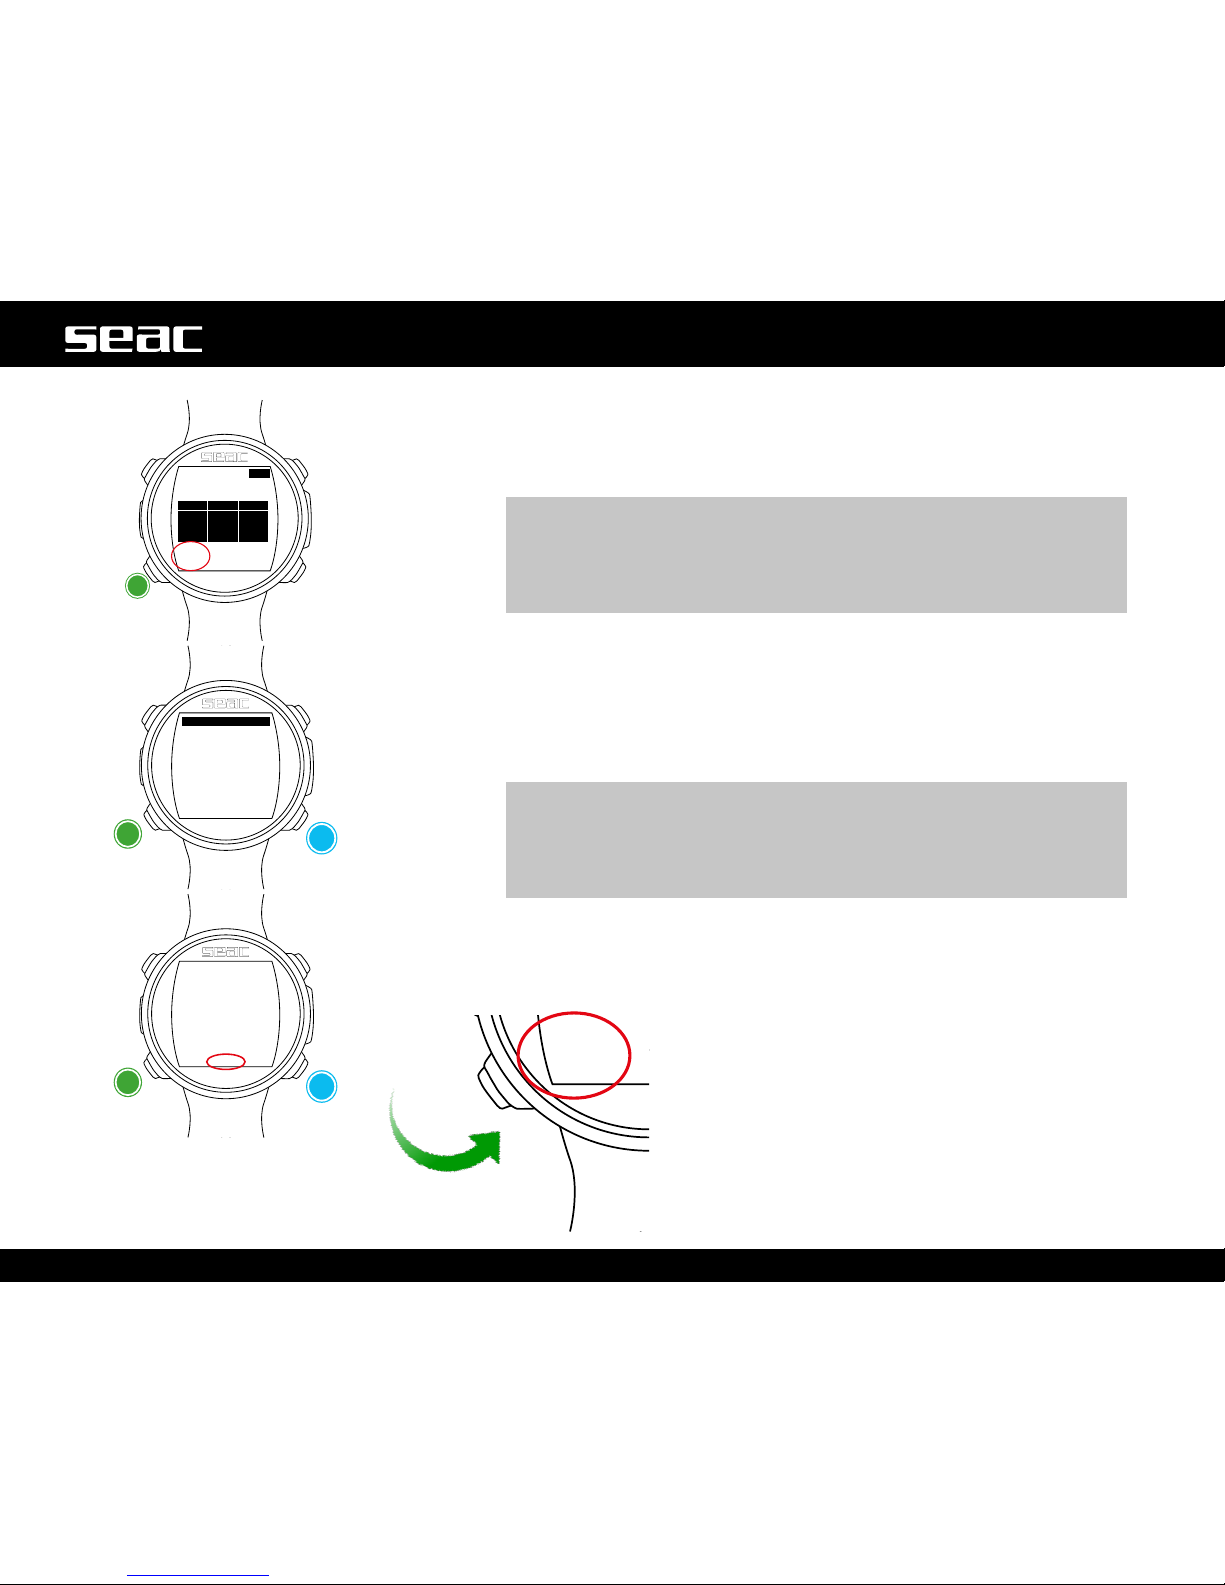
OC
25.0
m 30
:15
21 37.4
%O2 MAX
2
:
TIME
6
:
STOP
15
:
TTS
C
MIX:
MIX:
C
C
21/0
50/0
EXIT
EXIT
OC SET
D
D
50
%O2
46
English
Force the Mix Change During the Dive
During the dive you can change the mix even if the GURU has not
recommended it. The GURU automatically updates the decompression
calculation.
m WARNING!
You can also force the MIX change, even beyond the MOD of the MIX
itself.
A suitable theoretical basis is required to force the MIX. Do NOT force
the MIX if it's not necessary.
During the dive, press the C button to access the gas change menu.
Press D to select the Mix you want from those that are active during the
dive. (It's not possible to select a mix that was not enabled before the dive;
if there are no other mixes enabled, the current value won't be changed.)
Press the C button to select EXIT and press the D button to conrm.
m WARNING!
To reduce the risk of accidental Mix changes, you must always select
EXIT and press D to confirm the gas change.
When 60 seconds pass and no button is pressed, the GURU will switch
back to the dive screen without making any gas change.
Mix Menu
Next item
Next item
Change value/
Conrm
Change value/
Conrm
Page 47
0.0
0
:00
21 ---
---
OC
MIX RBT
BAR
47
English
TRANSMITTER DURING THE DIVE
BAR / Psi
m WARNING!
The following information is only available and viewable if the Guru is connected wirelessly to a SEAC Transmitter, which can be
purchased separately.
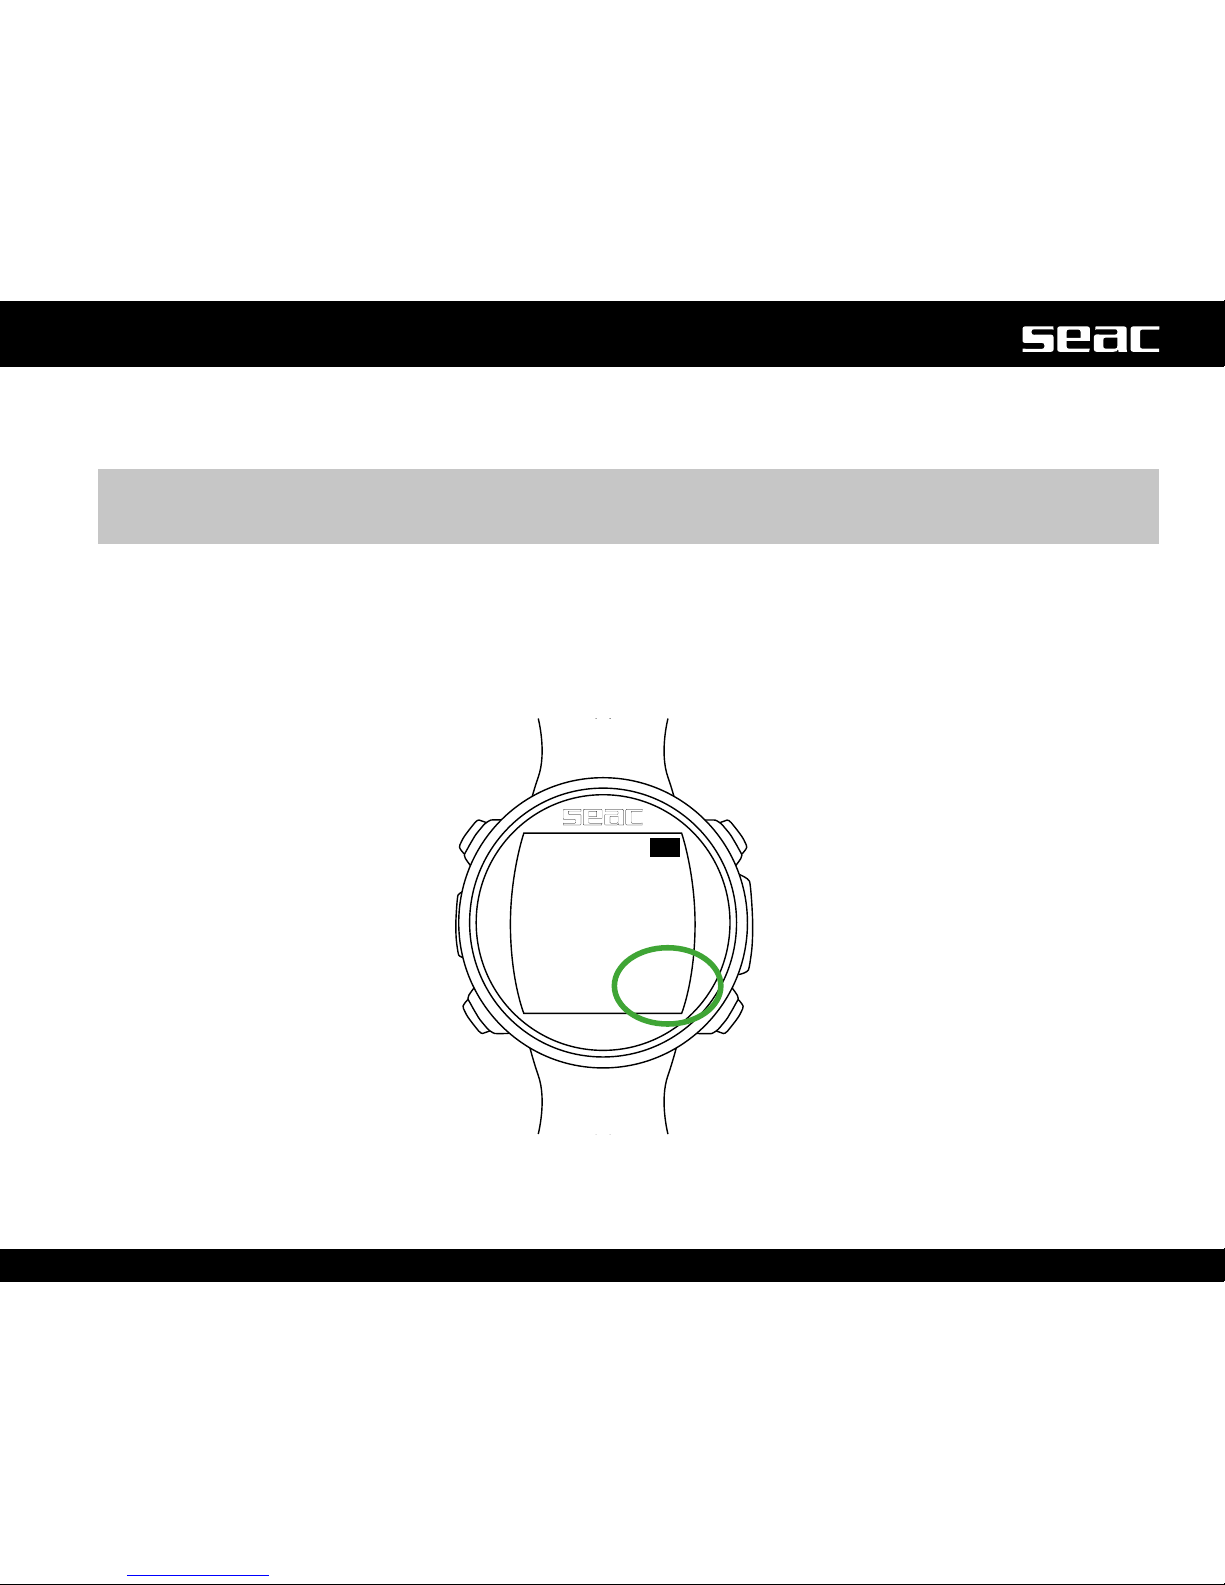
The lower right part of the GURU screen will display the BAR value (PSI if Imperial units of measure are set). The BAR value
indicates the pressure remaining in the tank.
The BAR value will be displayed about 30 seconds after the Transmitter is switched on. The BAR value is updated every 5 seconds.
If data transmission is interrupted, or is unstable for more than 1 minute, the BAR value will be hidden (“---”). The BAR value will be
restored as soon as communications are stable again for at least 1 minute.
Page 48

48
English
RBT and TANK RESERVE
The RBT value (Remaining Bottom Time) is shown in the lower part of the GURU screen.
The RBT value is calculated based on the current breathing rate. The GURU may need from 2-5 minutes of diving in order to acquire
sufcient data to calculate the RBT. Until a reliable RBT value is available, the RBT value is not displayed (“---”). The RBT value differs
from person to person, even at the same depth and tank pressure.
RBT during a no-decompression dive
If the dive remains within the no-decompression limits, the RBT value indicates the anticipated time remaining - given the current
depth and breathing rate - before the tank reaches reserve pressure (TANK RES, which can be set from the TRANSMITTER menu).
E.g. (If TANK RES. = 30 in the TRANSMITTER menu)
In a no-decompression dive, the RBT value will be “0” when there is 30 BAR of pressure left in the tank.
The TANK RES. value can be changed from GURU's TRANSMITTER menu. The minimum value of TANK RES. is 10 BAR and the
maximum is 50 BAR.
m WARNING!
The RBT is a purely mathematic-statistical value based on the information acquired by the Transmitter. It cannot in any way
anticipate behaviors that increase gas consumption such as overbreathing or similar.
It must be used solely and exclusively as a generic statistical indication. It cannot in any way replace proper dive planning or an
awareness of your own physical and mental faculties.
Do not use the RBT value to extend the dive beyond the value established during planning. If you have any questions about how
to correctly program a dive, contact your instructor.
Page 49

49
English
RBT in a DECO dive
If anticipated mandatory deco stops are expected (warning, Safety Stops and Deep Stops are not considered mandatory
safety stops) the RBT value indicates the remaining bottom time expected, given the current depth and breathing rate, so that
once the mandatory deco stops are complete, the tank pressure will reach the reserve pressure (TANK RES, which can be set
from the TRANSMITTER menu).
E.g. (If TANK RES. = 30 in the TRANSMITTER menu and dive with DECO stops)
In a DECO dive, the RBT value will be “0” when there is sufcient pressure left in the tank so that, if the ascent begins immediately
and the correct speed and mandatory deco stops are respected (the Deep Stop is not considered a mandatory stop), there will be
30 BAR of pressure remaining once the nal deco stop is complete.
The TANK RES. value can be. changed from the TRANSMITTER menu. The minimum value of TANK RES. is 10 BAR and the
maximum is 50 BAR.
m WARNING!
The RBT is a purely mathematic-statistical value based on the information acquired by the Transmitter. It cannot in any way
anticipate behaviors that increase gas consumption such as overbreathing or similar.
It must be used solely and exclusively as a generic statistical indication. It cannot in any way replace proper dive planning or an
awareness of your own physical and mental faculties.
Do not use the RBT value to extend the dive beyond the value established during planning. If you have any questions about how
to correctly program a dive, contact your instructor.
Page 50
GAUGE
20.0
m
15
:25
0.0 37.4
m/min MAX
2:35
Timer
+20
TEMP
°C
GAUGE
20.0
m
15
:25
0.0 37.4
m/min MAX
15.2
AVG Depth
+20
TEMP
°C
C
D
C
D
B
B
50
English
Dive in GAUGE mode
m WARNING!
This manual does NOT replace adequate training!
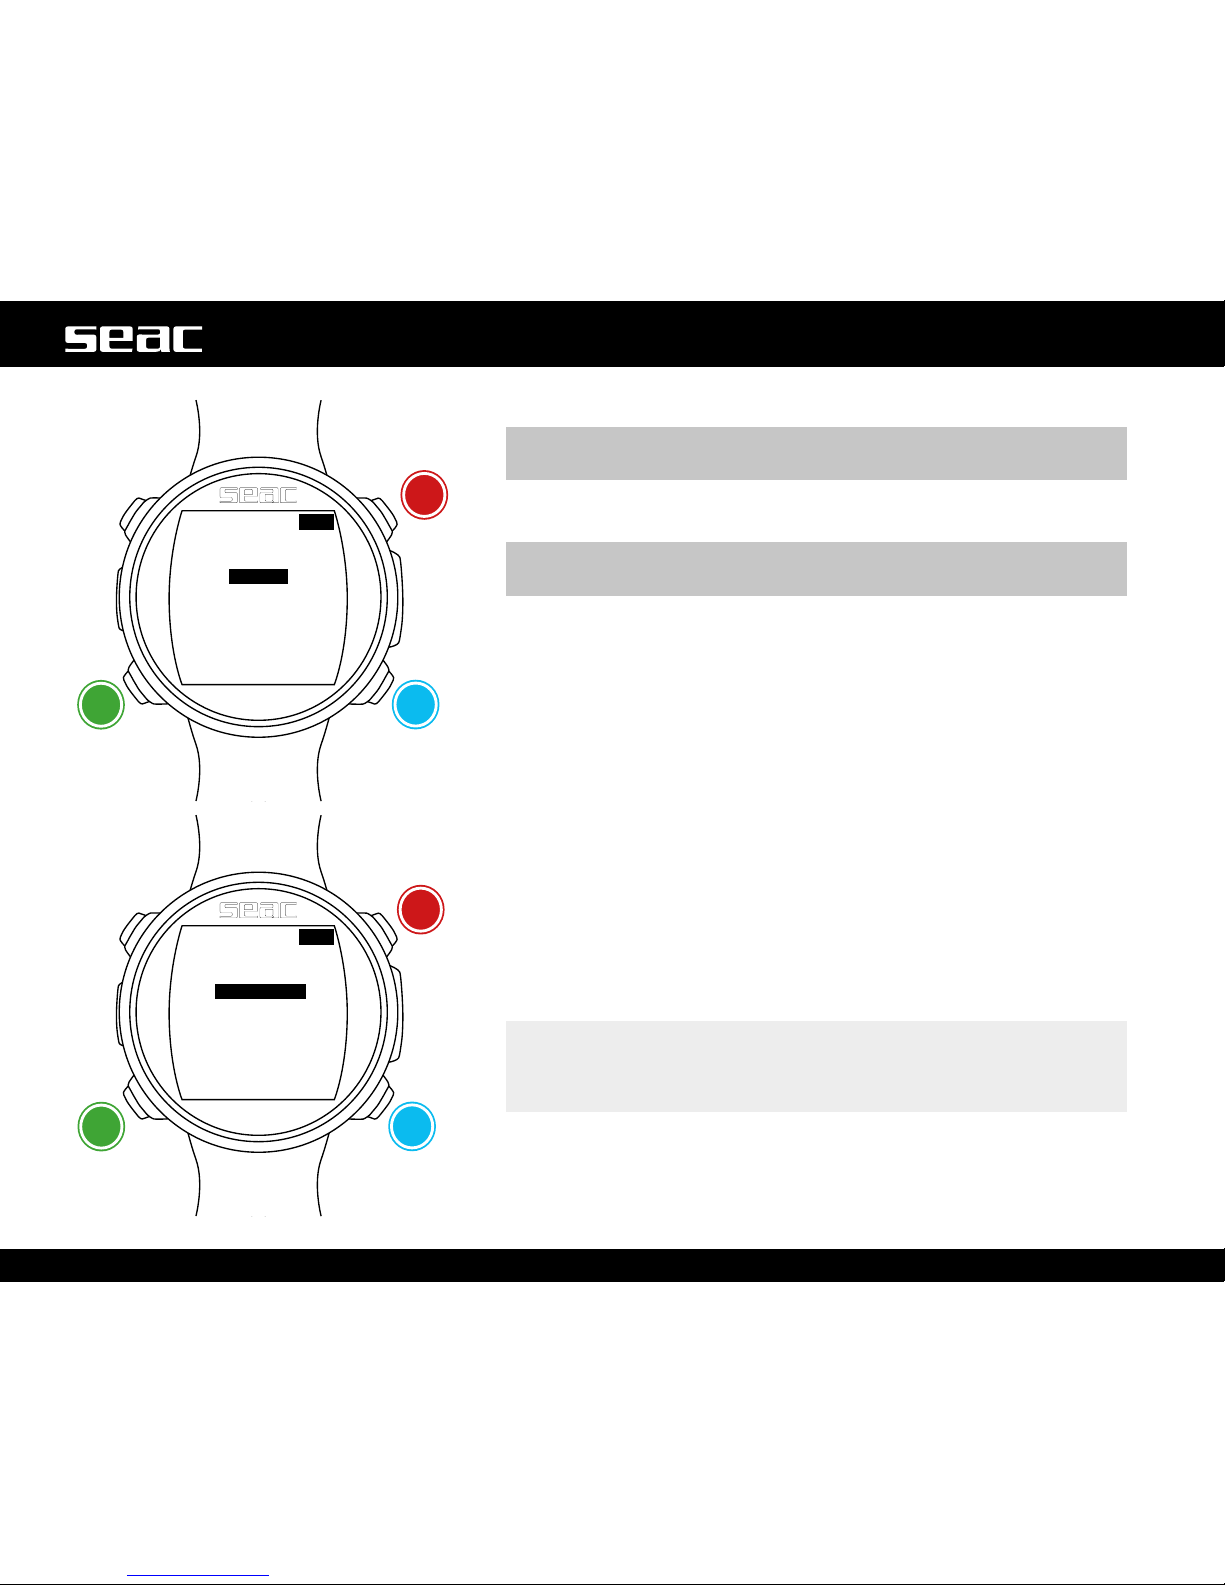
The next diagram shows the information displayed when diving in gauge
mode:
m WARNING!
Adequate training is required to use GURU in GAUGE mode.
In Gauge mode, GURU shows:
Current depth (at upper left): Expressed in meters or feet.
Run Time (at upper right): Time elapsed since the beginning of the dive.
Resettable timer (at center): Timer in mm:ss that can be reset by pressing
the C button. Press the D button to move from Timer to AVG Depth (average
depth).
AVG Depth (at center): Average depth, resettable by pressing the C button.
Temperature (at lower left): Current temperature.
Ascent rate (at center bottom): Current ascent rate in m/min (or ft/min)
Maximum depth (at lower right): Maximum dive depth.
GURU also calculates tissue saturation and desaturation in GAUGE mode
using an imaginary MIX with a high content of inert gases (10/60, recorded
in the LogBook). If after a dive in GAUGE mode you want to take a dive in OC
using the decompression calculations, GURU will consider the new dive to be
the next repetitive dive of the day.
PLEASE NOTE
Even if GURU performs the decompression calculations in the background,
they will not be displayed on screen, and they also have no effect in
GAUGE mode.
Move to
AVG Depth
Reset
Timer
Move to
Timer
Reset AVG
Depth
Compass
Compass
Page 51
FREE
FREE
0.0
m
0.0
m
1
:25
1
:25
0.0
5
0.0
17.4
25.4
m/sec
DIVE
m/sec
DEPTH
MAX
2:35
2
:
35
Surf
time
Surf
time
+20
TEMP
°C
D
D
B
B
{
{
{
{
51
English
Diving in FREE mode
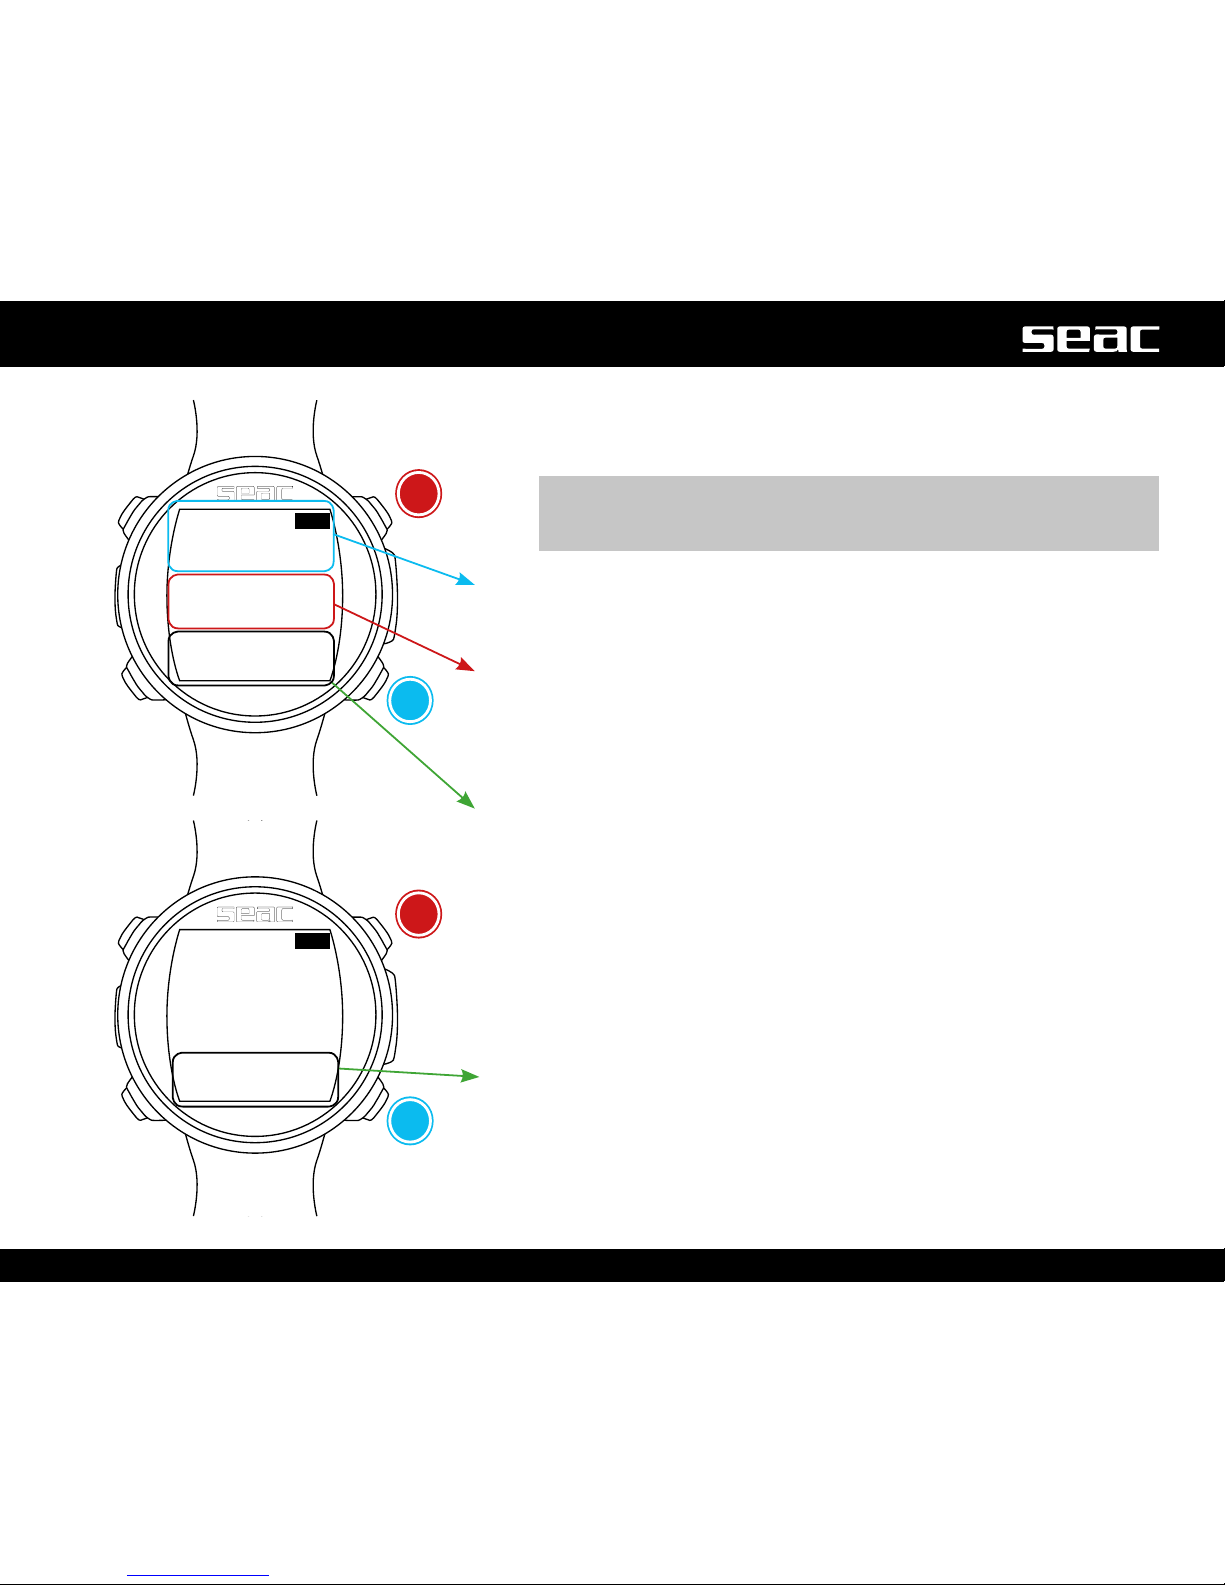
The diagram below shows the information displayed when diving in freedive
mode (FREE):
m WARNING!
For safety reasons, Free mode cannot be selected unless at least 12
hours have passed since the most recent dive in OC or GAUGE mode.
In Free mode, GURU shows:
Current depth (at upper left): Expressed in meters or feet.
Run Time (at upper left): Duration of the latest dive
Surf Time (in the center): Surface time elapsed since the last dive.
DIVE: (at lower left): Number of dives taken in the session.
m/sec (at center bottom): Descent and ascent speed in m/sec (or ft/sec).
DEPTH (at lower right): Maximum depth of the latest dive.
Press D to move to the next screen.
TEMP: (at lower left): Temperature in °C (or °F).
m/sec (at center bottom): Descent and ascent speed in m/sec (or ft/sec).
MAX (at lower right): Maximum depth of the session.
next screen
next screen
Compass
Compass
Page 52
B
D
NE-E-SE-S
54°
20.2
+20
DEPTHTEMP
°C
52
English
Compass during the dive
To access the compass screen, press the B button which is available during
the dive (OC, FREE, GAUGE).
m WARNING!
If the “CALIBRATE” message appears, or if the compass is not fluid or
functioning correctly, the compass needs to be calibrated.
To calibrate the compass, refer to the COMPASS section of this manual.
To set the route, press the D button.
While navigating, GURU considers the direction to be “on route” if the
desired route diverges no more than 5° from the direction set.
The current depth is shown on the lower right. The current temperature is
on the lower left.
To exit the compass, press the B button twice.
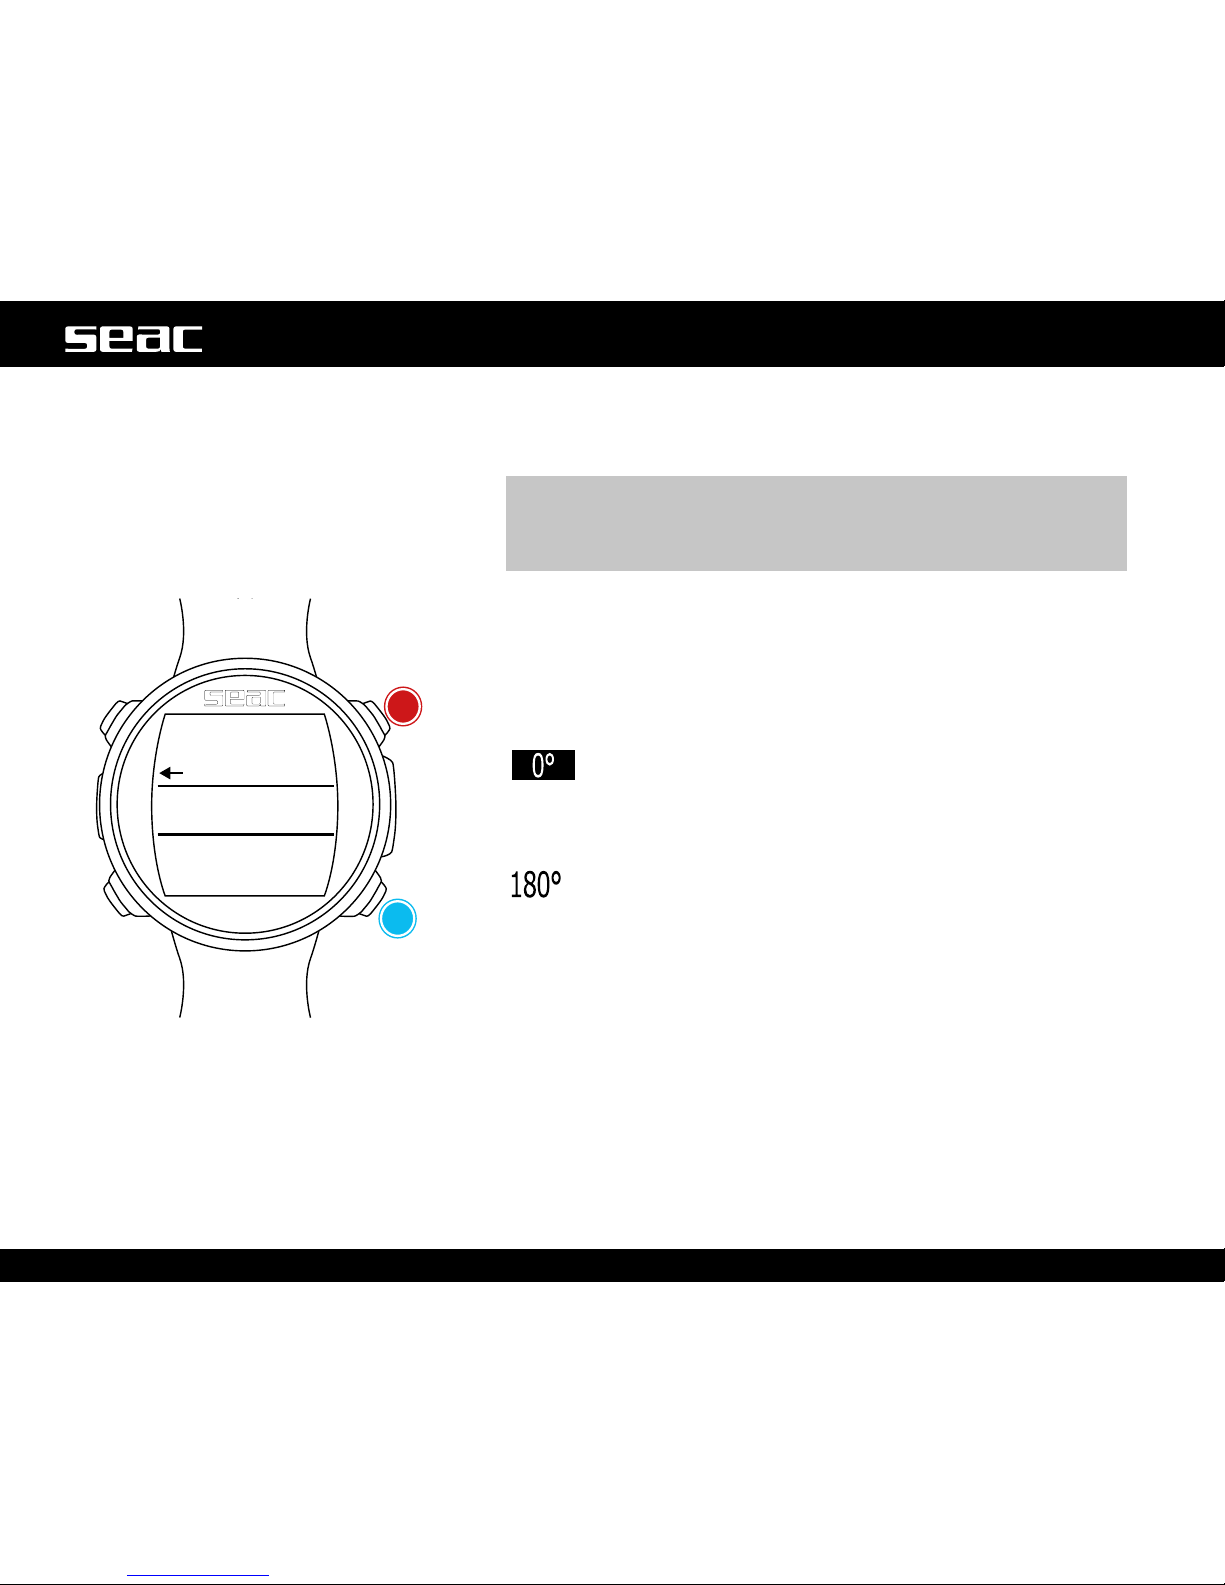
(Direction in degrees highlighted in black): Direction on route
(+/-5° with respect to the value set with D).
<=
=>
(Direction in degrees not highlighted): Indicates which
direction to go to nd the route set.
(Direction in degrees not highlighted, no arrow shown): Exact
inverse of the direction set.
Compass graphics legend:
N: North
S: South
W: West
E: East
NE: Northeast
NW: Northwest
SE: Southeast
SW: Southwest
App / exit
Set the
route
Page 53
12:30
01/01 Th
95%
B
NE-E-SE-S
200m
+27°C
990mb
54°
CHRONO
MIX CHECK
PITCH&ROLL
MOON
MAGMETER
FITNESS
CLOCK ALARM
CHRONO
MIX CHECK
PITCH&ROLL
MOON
MAGMETER
FITNESS
CLOCK ALARM
B
B
C
C
D
D
B
53
English
Apps during the dive
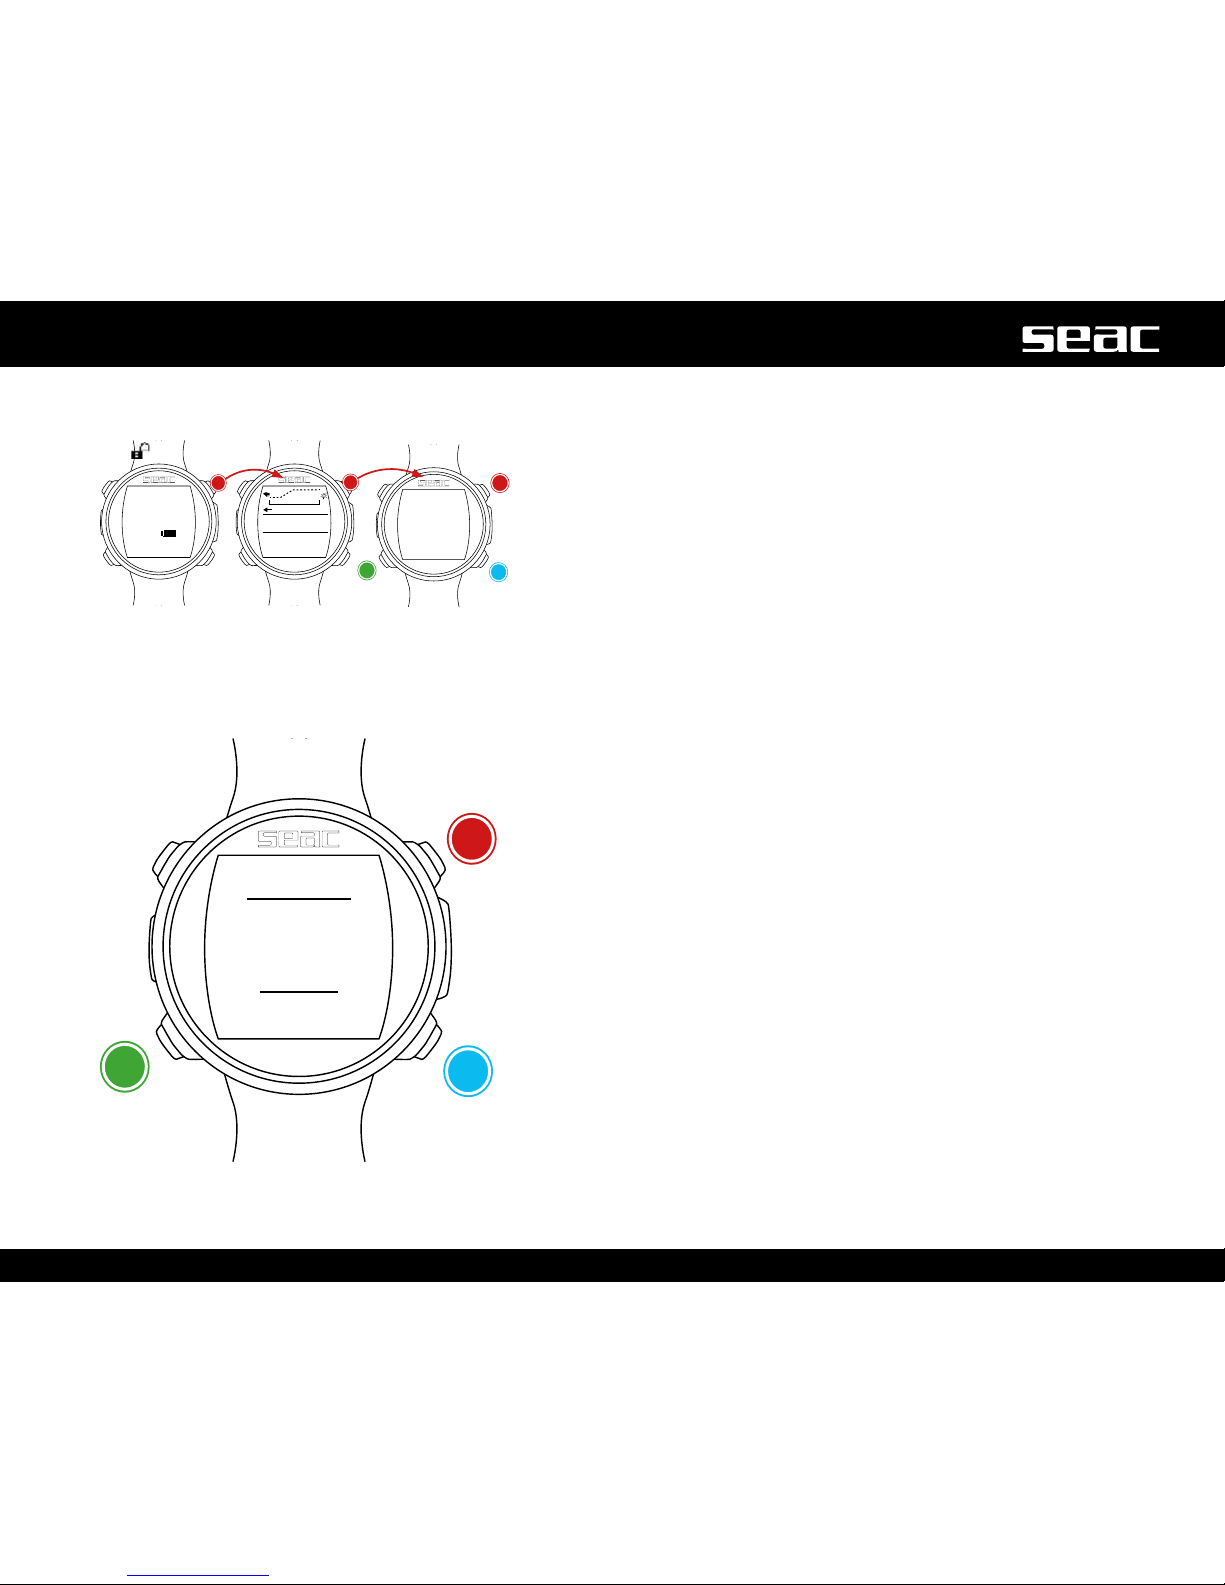
The applications on GURU can be used both during freedive sessions and
during open circuit or gauge dives.
To access them, press the B button (after you have navigated to the
compass screen).
Select Exit to leave the App menu, or press the B button with the rst
available app selected.
GURU
unlocked
UP /exit/
UP /exit/
Down
Down
Select
Select
Page 54
12:30
01/01 Th
95%
NO
D
54
English
GURU AFTER THE DIVE
No-Fly
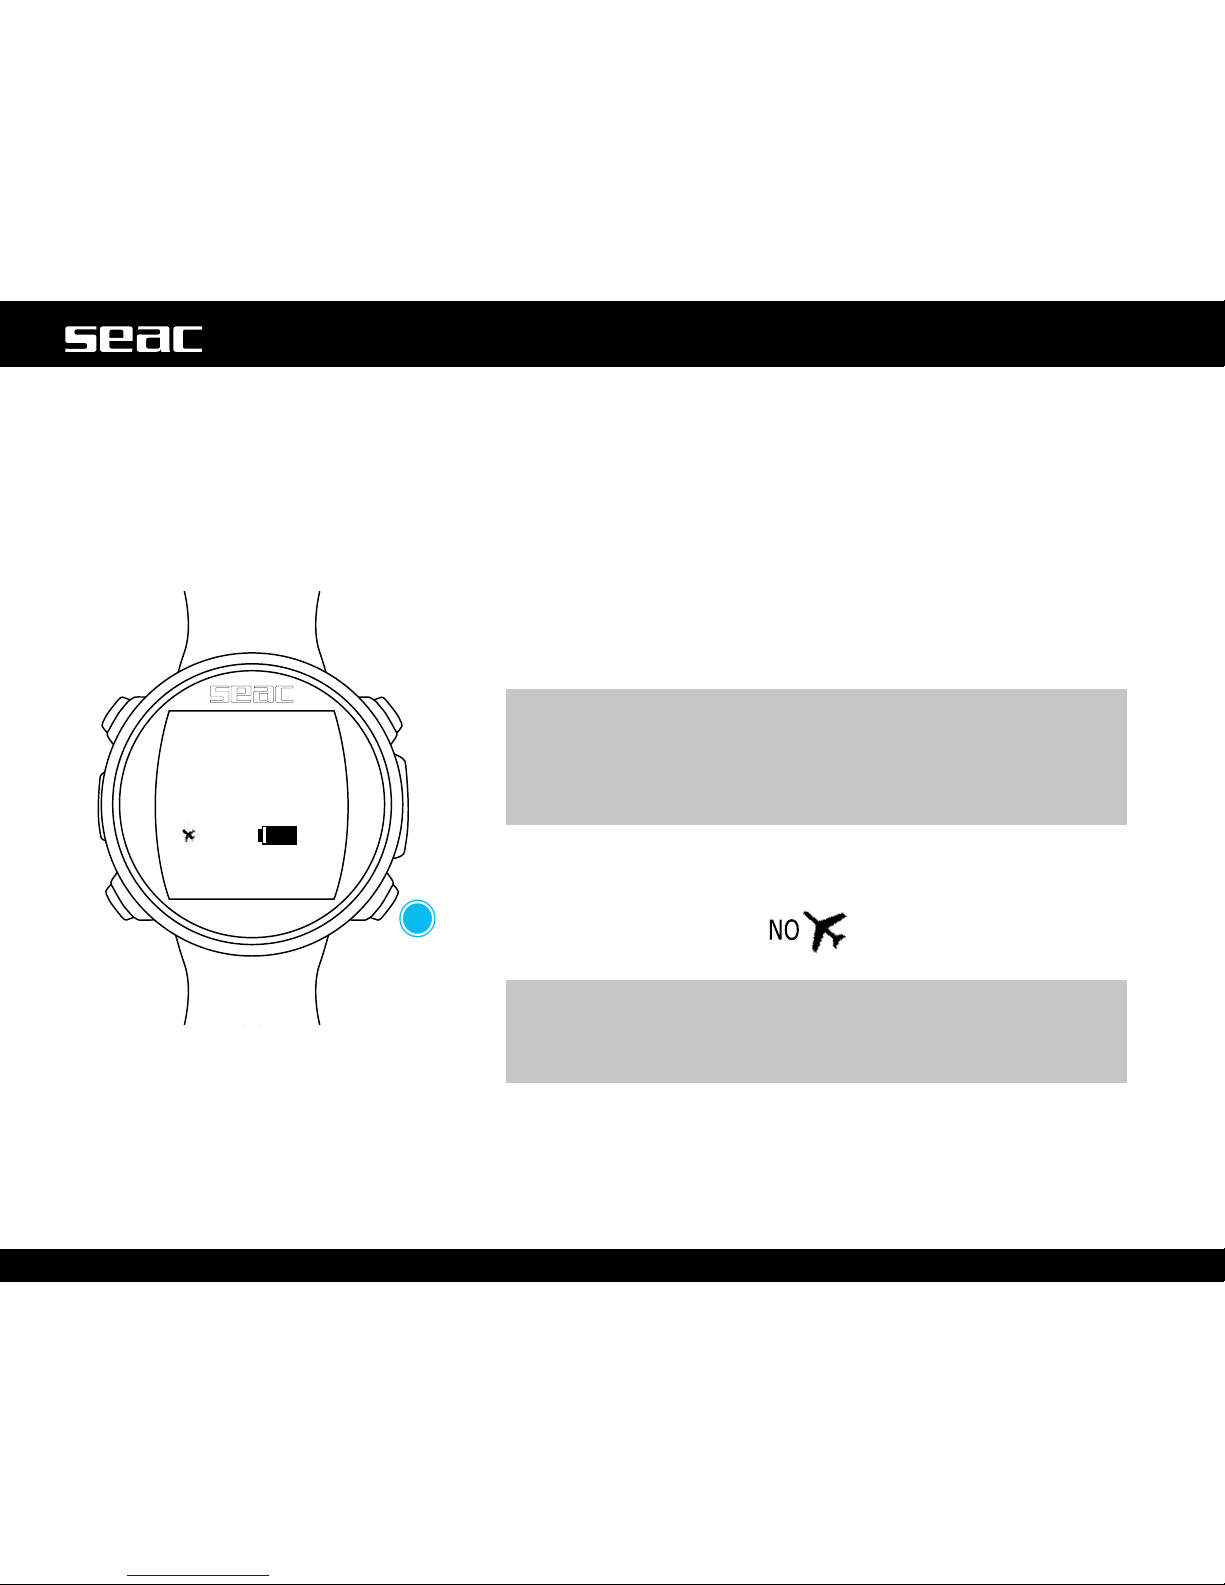
After every dive using scuba equipment (open circuit or gauge), some
precautions must be taken before boarding an airplane or exposing yourself
to any kind of changes in atmospheric pressure.
For single dives that did not require mandatory deco stops, wait a minimum
interval of 12 hours on the surface.
In the event of multiple dives in a single day, or multiple consecutive days with
dives, wait a minimum interval of 18 hours.
For dives that required mandatory deco stops, wait a minimum interval of
24 hours.
m WARNING!
These instructions can change on the basis of new studies and
research. It's possible that this information may have become obsolete
when you read this manual. Always refer to your training or a hyperbaric
doctor about the minimum interval before exposing yourself to changes
in pressure.
After every dive in OC or GAUGE mode, GURU shows the NO FLY warning
on the watch screen.
m WARNINGS!
In GAUGE mode, no y time is always 24 hours.
After a dive in OC or GAUGE mode, the FREE function cannot be activated
for the following 12 hours.
Page 55
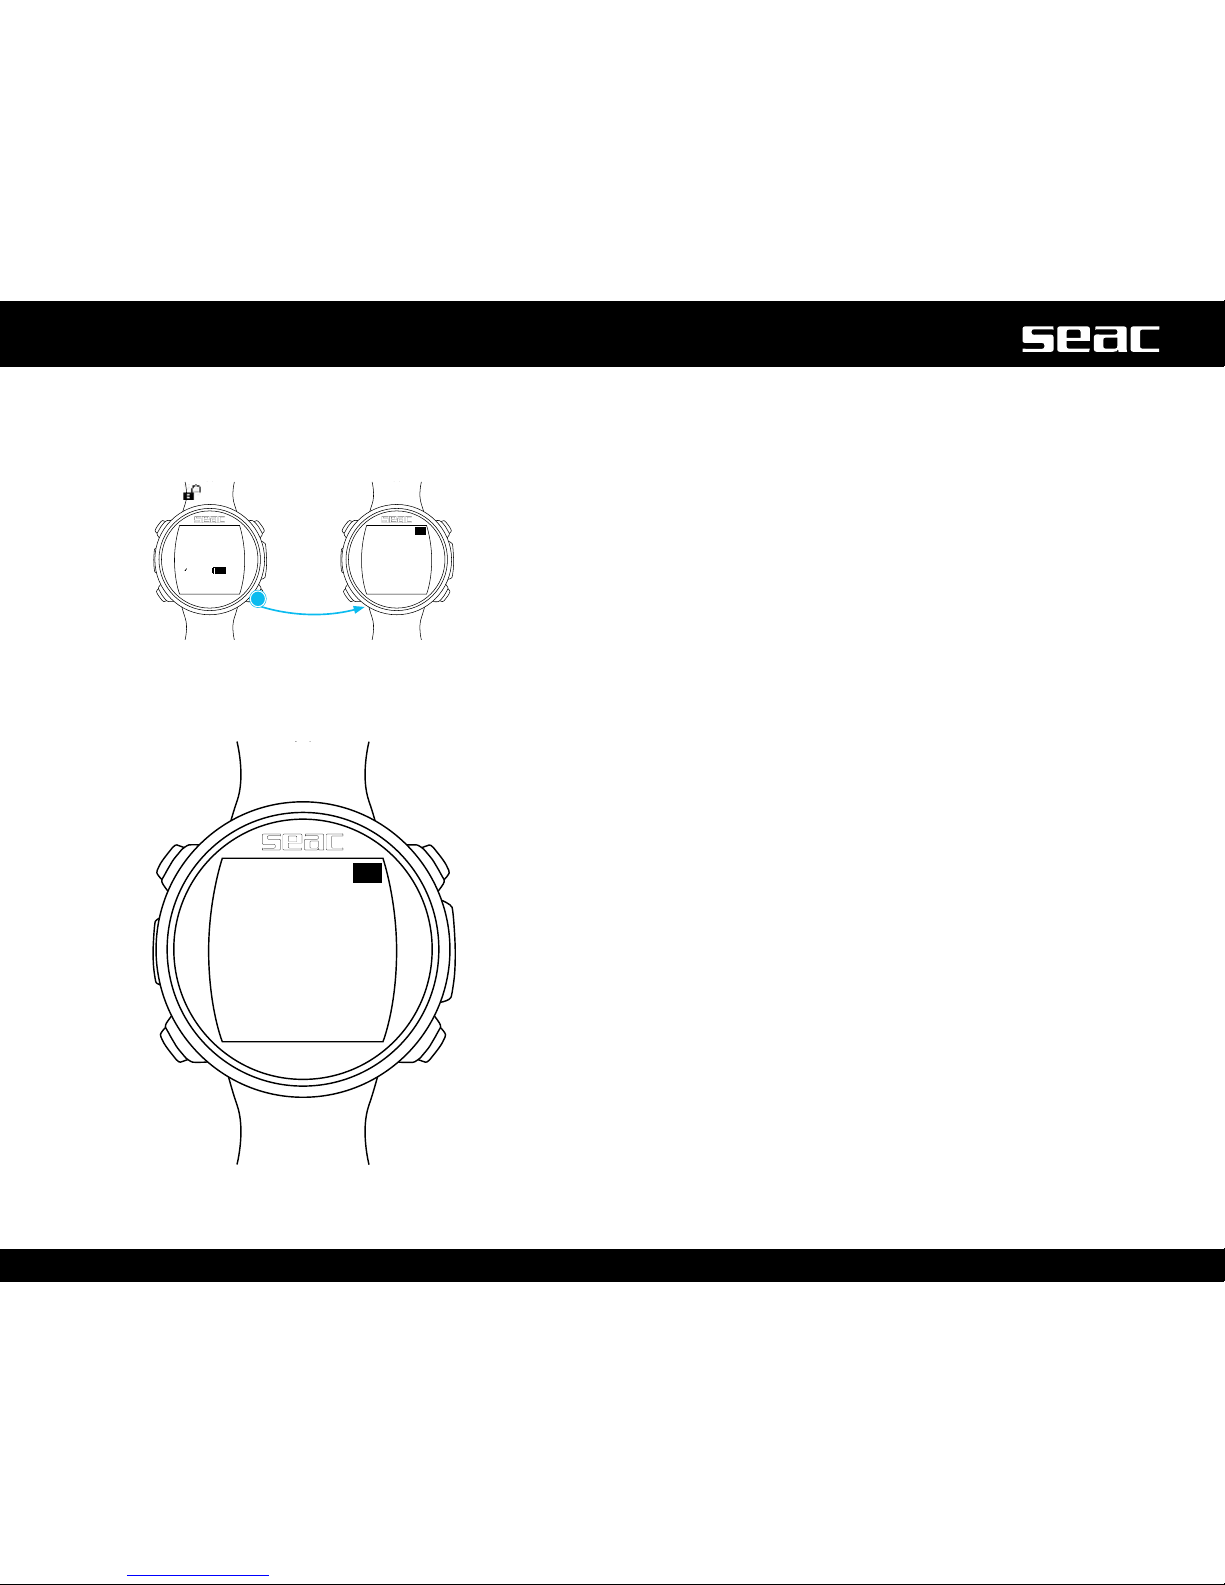
12:30
01/01 Th
95%
D
0.0
0
:00
0 0.0
0.0
OC
DIVE
Desat: 11:45
No Fly: 11:45
Surf Time: 01:24
m/min
DEPTH
NO FLY
0.0 0:00
0 0.0
0.0
OC
DIVE
Desat: 11:45
No Fly: 11:45
Surf Time: 01:24
m/min
DEPTH
55
English
Desaturation information
Once 10 minutes have elapsed after the last dive with scuba equipment
(open circuit or gauge), the desaturation data can be shown on the watch
screen by pressing the D button.
Desat: Desaturation time remaining (hh:mm).
NO FLY: Time remaining until deactivation of the No-Fly alarm.
Surf time: Surface time elapsed since the end of the dive.
GURU
unlocked
Page 56
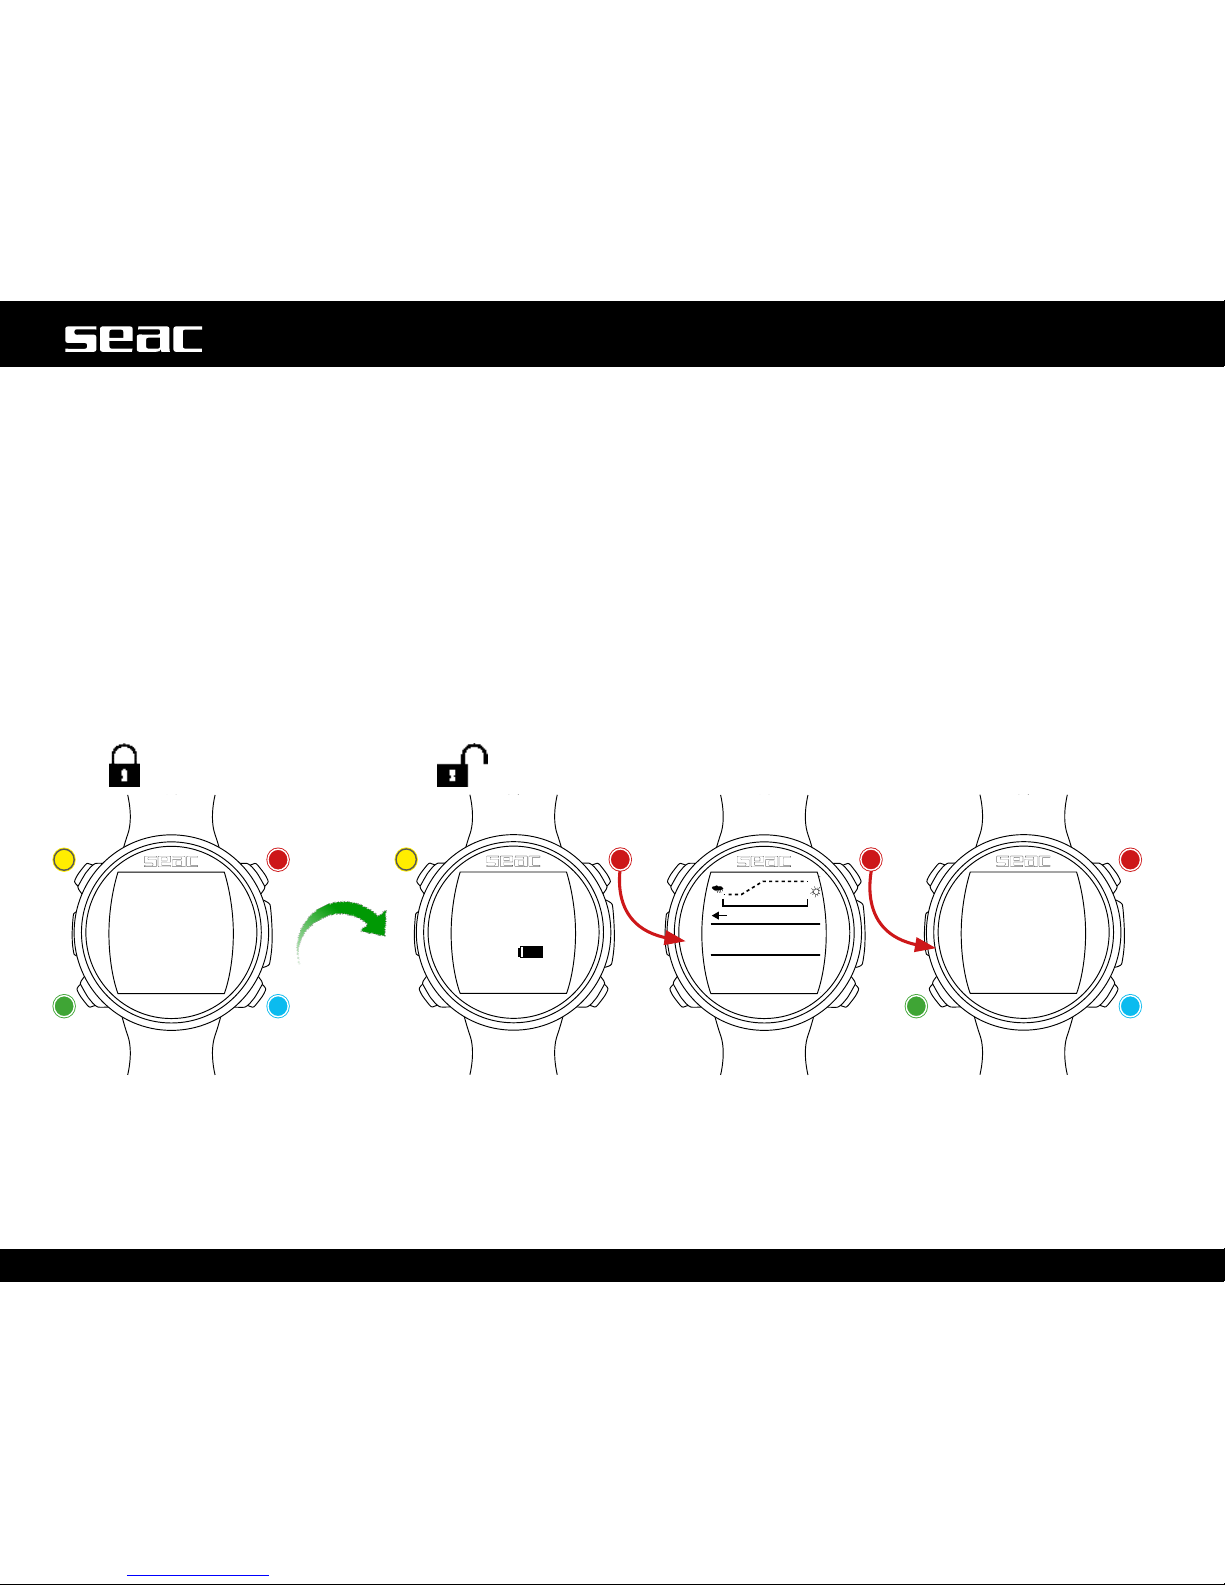
NE-E-SE-S
200m
+27°C
990mb
54°
12:30
12:30
01/01 Th
01/01 Th
95%
B
C
A
A
D
B
C D
B
CHRONO
MOON
FITNESS
CLOCK ALARM
Exit
B
56
English
App Menu
To access the App Menu, press any button to unlock the GURU. Press the B button to access the compass screen and press the
B button again to access the App menu.
Press the B, C and D buttons as shown in the gure to navigate around the menu.
To exit the App Menu quickly, press the B button after selecting the rst app available in the list, or select EXIT.
Lock screen
GURU
unlocked
Unlock
Backlighting
Unlock
Compass
Unlock
Unlock
App
Up
DownSelect
Page 57
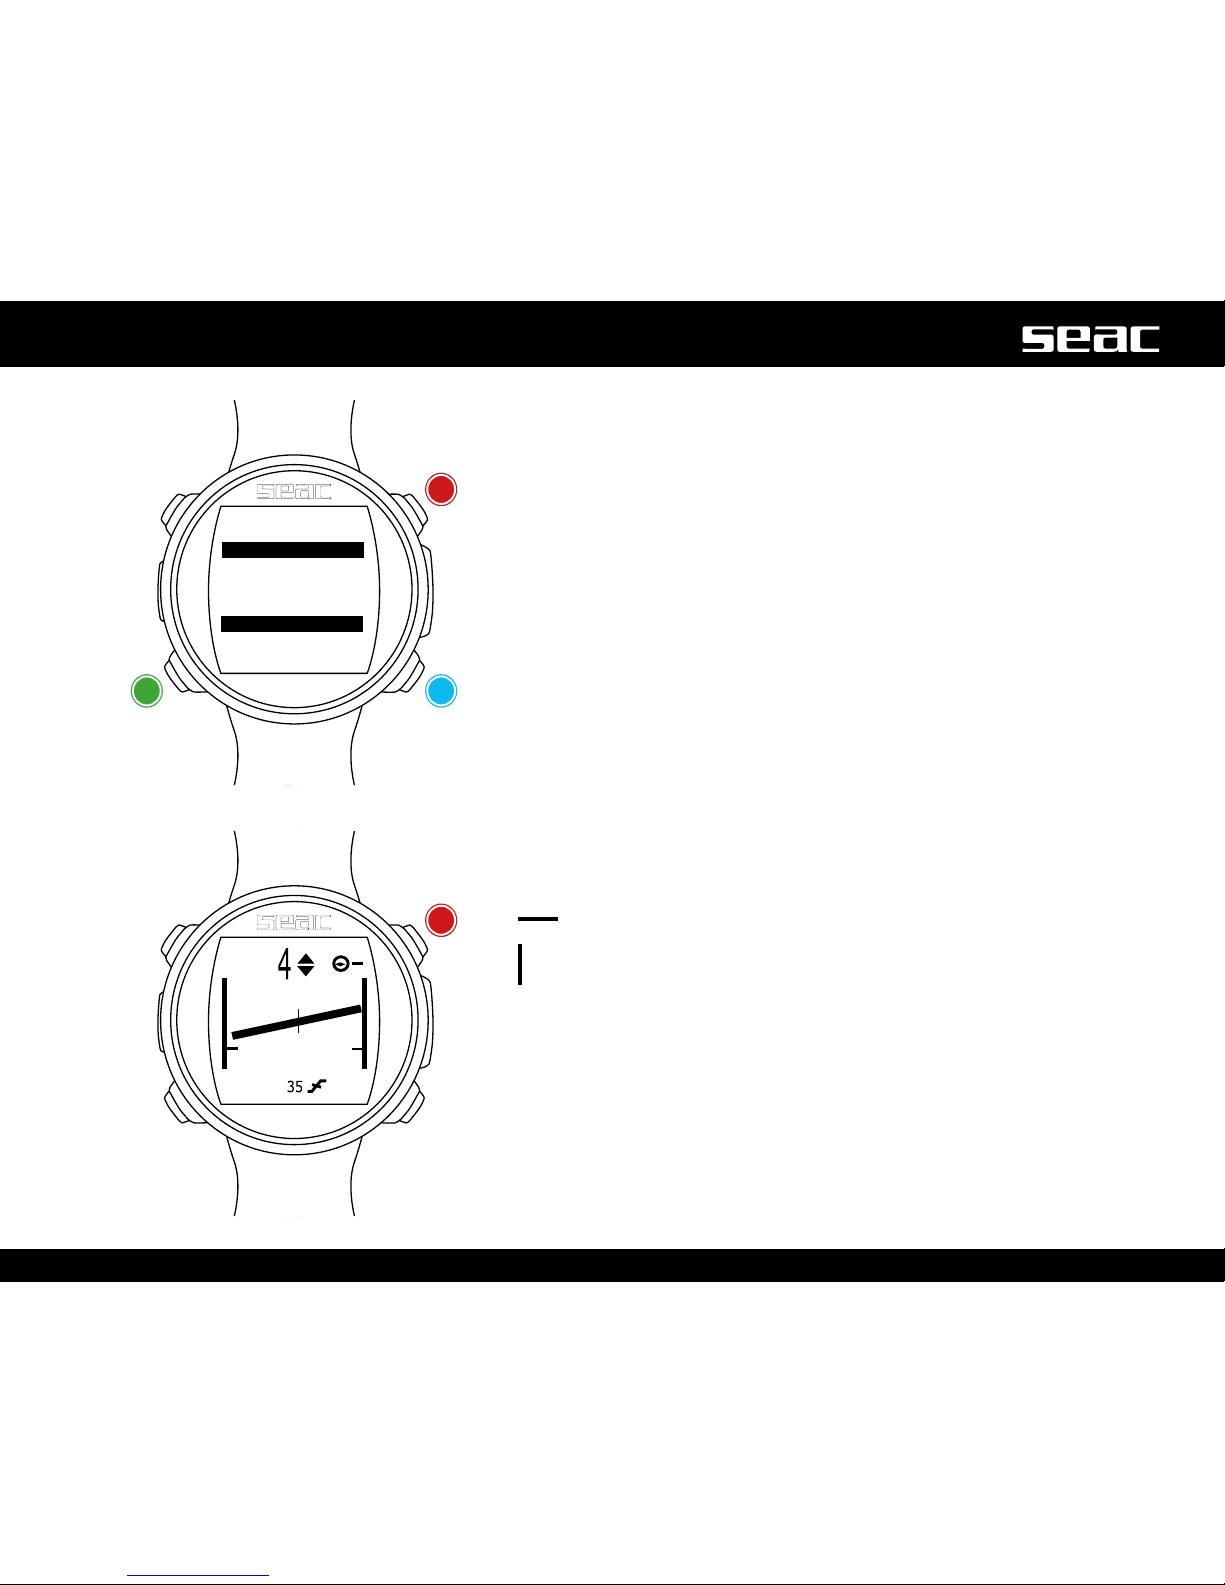
B
C D
00:00:00
00:00:00
00:00:00
LAP TIME
LAST LAP
B
57
English
CHRONO: Stopwatch
Press the B, C and D buttons as shown in the gure to use the app.
If the stopwatch is running, use the D button to save the partial times (LAP TIME
and LAST LAP TIME).
If the stopwatch is stopped, the D button will reset all times.
The Stopwatch only stops when you press the C button. It will continue to run
even when you exit the CHRONO app.
LAP TIME: Lap time since the D button was pressed last.
LAST LAP: Lap time since the last time the stopwatch was launched.
To completely reset the CHRONO App, you need to stop the time (C) and press D.
PITCH-ROLL (Pitch & Roll)
The GURU has various accelerometers built into it, used principally to compensate
for the angle of the arm and increase the precision of the compass. These same
accelerometers are used in the PITCH-ROLL App to show the tilt of the device
with respect to the axes.
The reference axis is shown in the upper right corner of the screen.
Press D to change the reference axis.
Horizontal Axis
Vertical Axis
The current tilt is shown in the center bar and the two graduated scales at the
sides.
Press B to exit.
Exit
Exit
RESET/LAPSTART/STOP
Page 58
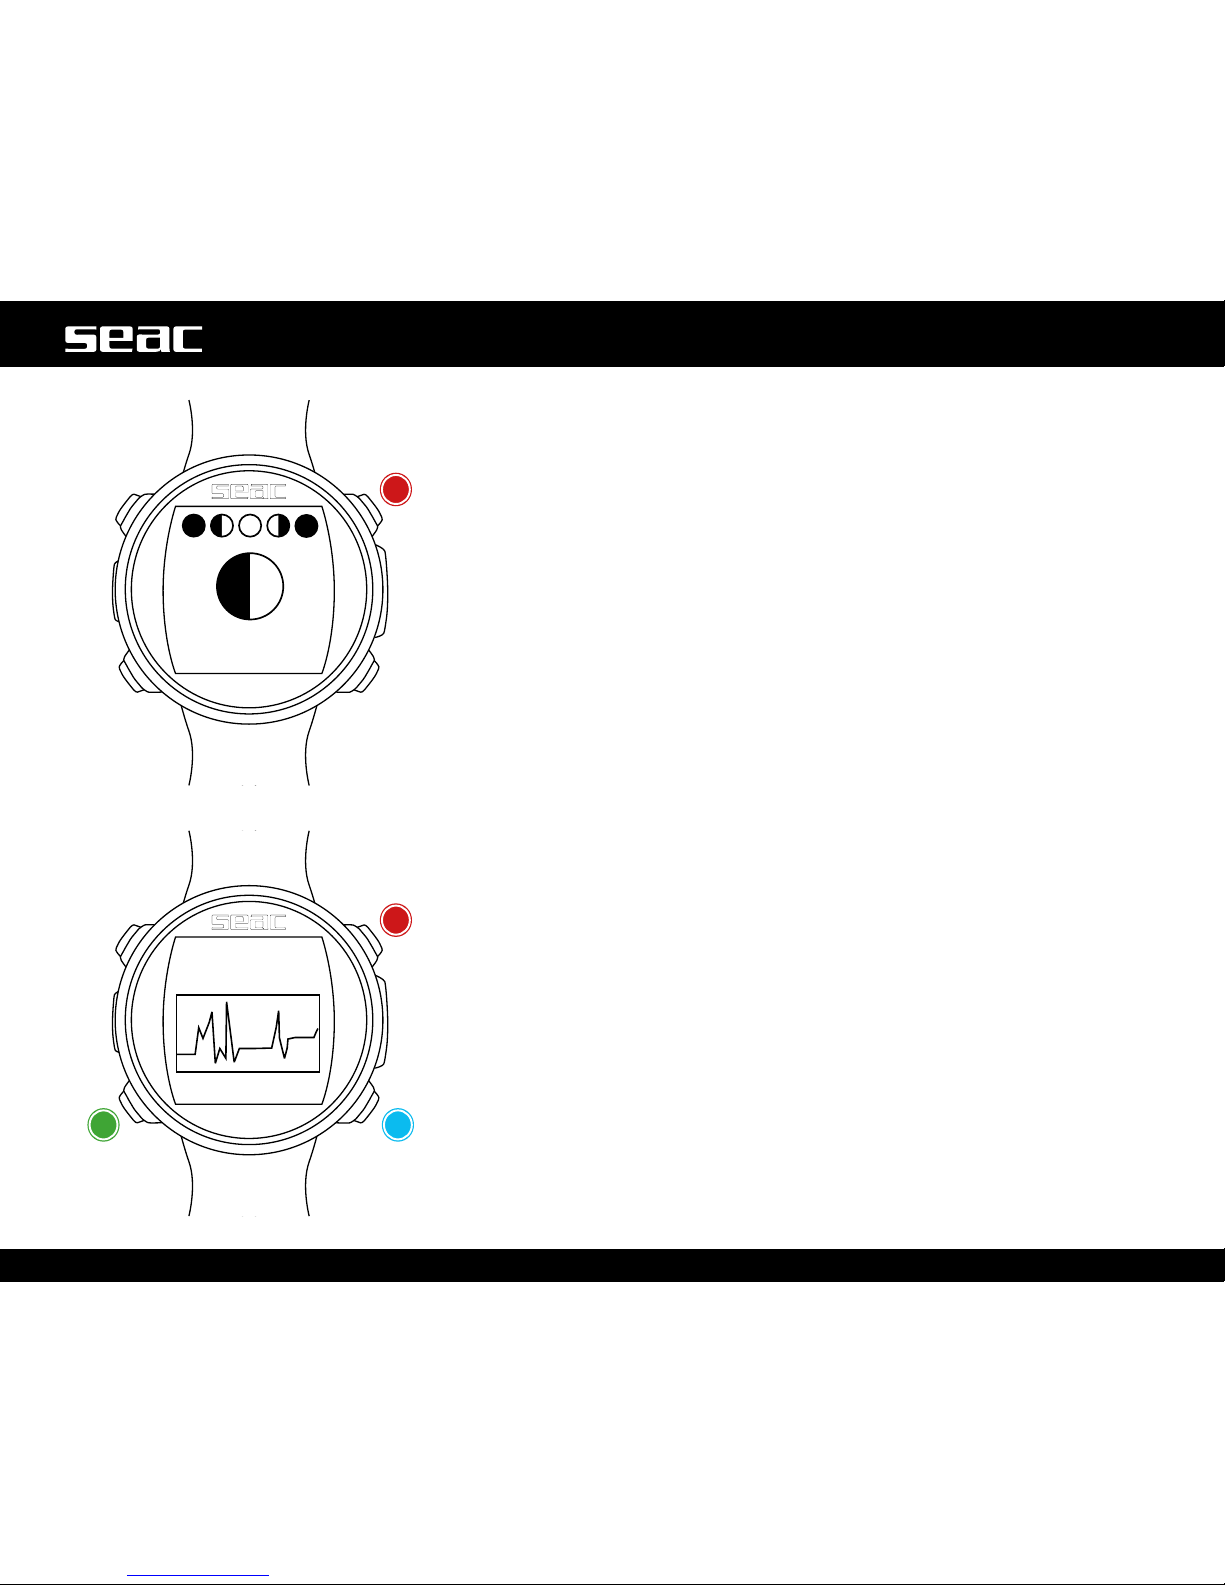
B
B
EPT
20
03/12/2016
AGE
2
C D
RESET/LAPSTART/STOP
4ut 17ut
18.9
uT
58
English
MOON: Phases of the Moon
Press the B, C and D buttons as shown in the gure to use the app.
The legend for the phases of the moon is shown at the top of the screen. The
actual phase is shown large in the middle.
(The new moon is shown as a completely black circle, while the full moon is
completely white).
AGE: The number of days since the new moon.
(A lunar cycle (from new moon to new moon) lasts 29.5 days).
EPACT: The moon age value on January 1 of the current year.
(Used largely to establish the occurrence of certain religious festivals).
MAGMETER (Magnetometer)
The GURU can detect the electromagnetic elds emitted by certain types of
metal (“ferromagnetic”) (Stainless steel and gold are not ferromagnetic; iron is).
The magnetometer is calibrated automatically when calibrating the compass.
The current density of the magnetic eld is shown in uT (microTeslas).
The GURU activates the acoustic alarm if the current value detected is 5uT
higher or 5uT lower than the reference value (shown in the bottom right corner).
You can set the reference value by pressing the D (+1uT) and C (-1uT) buttons.
The scale of the diagram is set automatically.
You can also use the Magnetometer during the dive.
The magnetometer works better in the water, since it is not disturbed by the
electromagnetic elds present in the air.
The magnetometer inserted in the GURU cannot be considered to be a
professional-level, absolutely precise instrument.
Exit
Exit
Page 59
0
0m
0.0kmh
0kcal
Height: 160cm
Exit
B
C D
59
English
FITNESS: Step counter
Press the B, C and D buttons as shown in the gure to use the app.
The GURU shows (from top to bottom).
Number of Steps
Distance covered
Current speed
Calories burned
Press the B or D button to reset the step counter.
To make the reading as accurate as possible, walk or run at a consistent rate,
enter your Height and Weight, selecting the value you want to change with the C
button, and set the correct number using the B and D buttons.
Use this same method to set the sensitivity of the pedometer (SENSE) to adapt
its detection to your running style, the type of terrain on which you run, and the
kind of shoes you wear.
Step counter readings are not accurate during the dive.
To Exit, select Exit using the C button and press D.
Reset/Up
Reset/DownNext value
Page 60
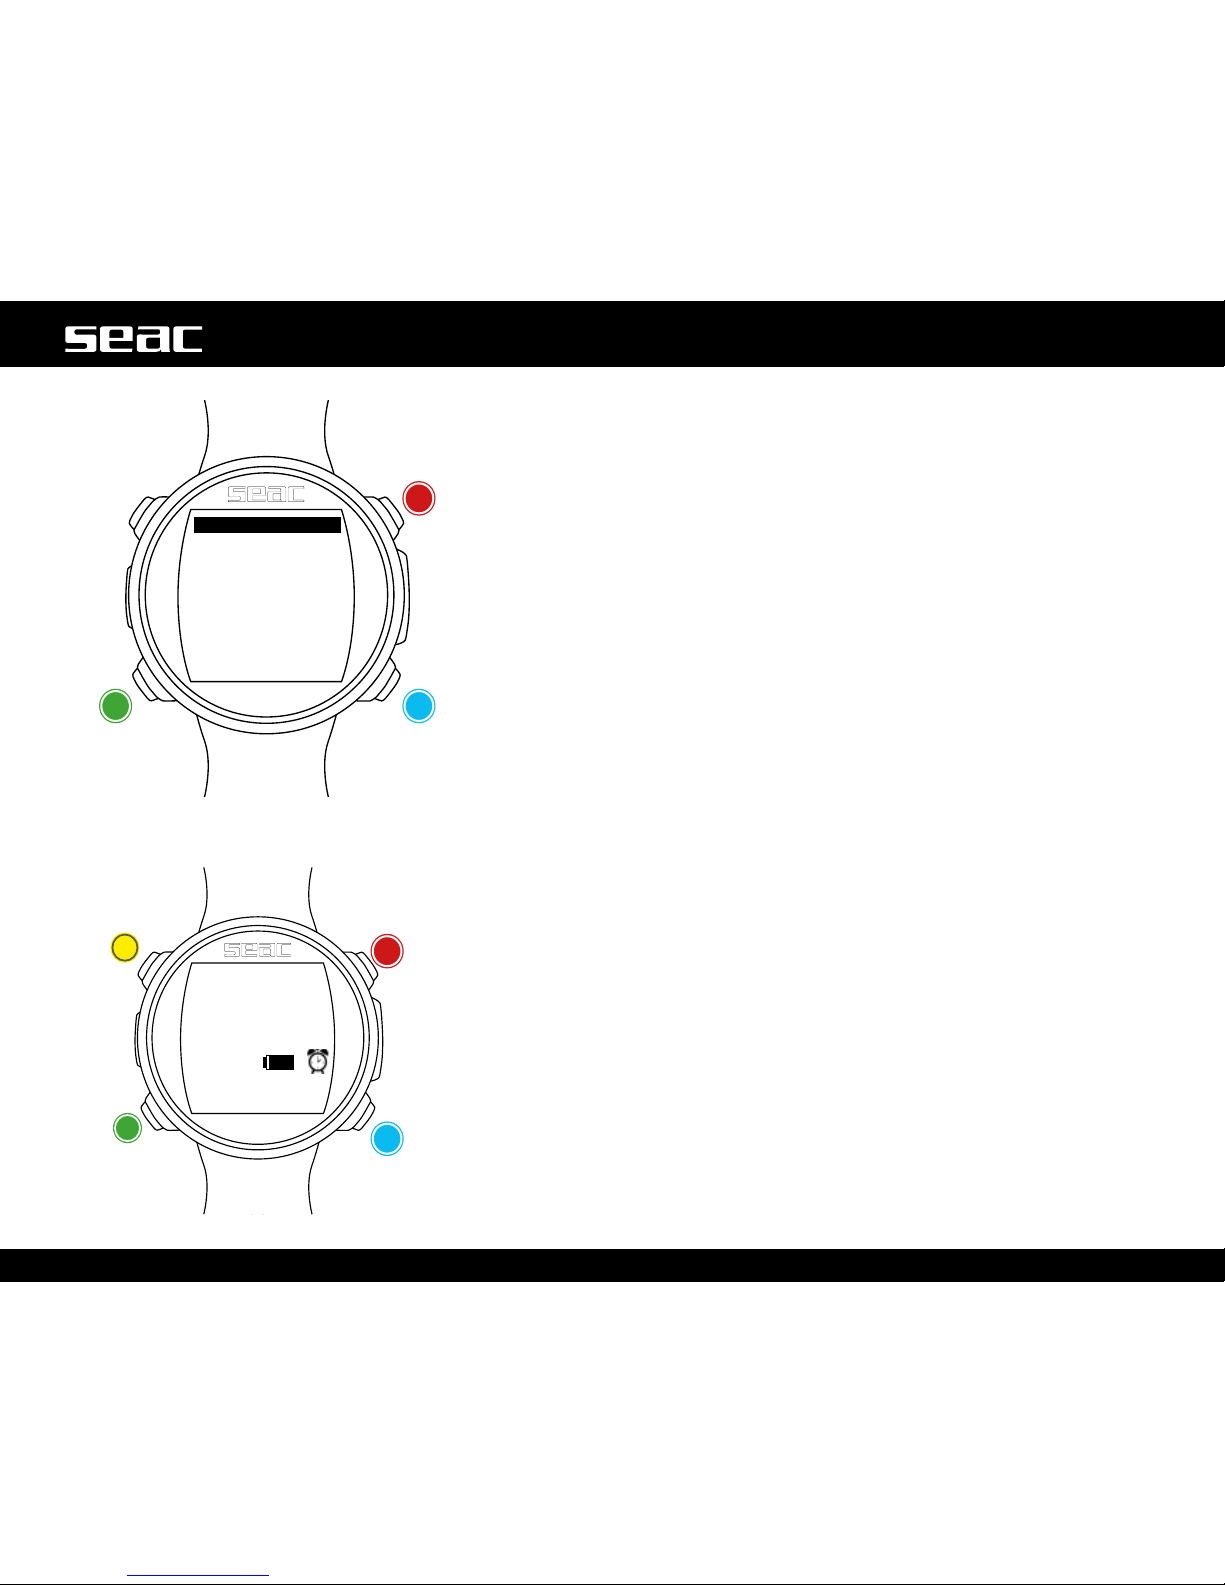
11:30
ON
Exit
B
B
C
C
D
D
CLOCK ALARM
12:30
01/01 Th
95%
A
60
English
CLOCK ALARM Alarm clock
Press the B, C and D buttons as shown in the gure to use the app.
The time set for the alarm is shown in the center. The ON/OFF activation
switch is located at center bottom.
ON = GURU issues an audible alarm each day at the time set.
OFF = No alarm set.
If the ALARM CLOCK is set to ON, the alarm icon will be shown on the right
of the watch screen and the GURU lock screen.
When the alarm sound plays, press any key to silence it. If the CLOCK ALARM
App is not subsequently turned OFF, the alarm will sound automatically the
next day at the same time.
+
-Next value
Stop alarm
Stop alarm
Stop alarm
Stop alarm
Page 61

61
English
Connect your GURU computer to your Mac or PC.
GURU can be connected to your Mac or PC to download dives
or for performing updates.
Updating your GURU Dive Computer
It's very important to keep your GURU Dive Computer
consistently up to date with the most recent version of the
software.
The GURU must be connected to a Mac or PC using the USB
cable to run the updates.
m WARNING!
During the update, a new version of the operating system
will be installed.
After every update:
- Check that GURU's settings (mix. algorithms, deco
stops, etc.) are set correctly for your next dive.
- The compass must be recalibrated.
- After every update, GURU runs a “reset to default” for
the tissue settings (see “RESET TO DEFAULT” in this
manual).
- The device must be fully recharged.
Page 62

62
English
CERTIFICATE OF GUARANTEE
The warranty has a duration of 2 (two) years in accordance
with current European regulations.
To exercise the warranty, you must display a copy of your proof
of purchase upon request.
SEAC guarantees the correct operation of this product as
described in this document.
The warranty herein can be exercised according to the
conditions and limits expressly indicated below:
1. The warranty has a duration of 2 (two) years starting from
the time the product is purchased at a SEAC authorized
dealer and requires no prior or subsequent formal validation.
2. The warranty is acknowledged only to the original buyer of
the product at a SEAC authorized dealer.
The warranty is strictly individual; it is not transferable to third
parties unless previously and explicitly authorized by SEAC.
3. The warranty covers all damage to the device caused by
malfunctions arising from factory defects. Each device is
tested in a hyperbaric chamber before it is made available
for purchase.
The warranty covers operating defects deriving from:
• Intrinsic defects caused by the use of materials considered
unsuitable.
• Clear errors in the design, manufacturing, or assembling of
the product or its components.
• Incorrect or inadequate instructions and recommendations
for use.
4. Any repairs, modications, transformations, adjustments or
tampering in general carried out on the nished product or
parts of it that are not authorized in advance by SEAC or that
are carried out by non-authorized personnel automatically
and immediately void the warranty.
Breaking the seals immediately voids the warranty.
5. The warranty entitles you to assistance and free repair in
the shortest possible time, or to a full free replacement of
the product (at the sole discretion of SEAC) or parts of it
whenever a malfunctioning defect specically described in
item 3 above is acknowledged by SEAC.
6. This warranty may also be exercised by shipping the
product believed to be defective to SEAC. The authorized
intermediary for this operation must be the SEAC dealer
where the product was purchased. If this is not practically
possible, solely upon authorization from SEAC, customers
may by authorized to send the defective product to any other
SEAC dealer or directly to SEAC itself.
In order to exercise the warranty, the product must be
accompanied by proof of purchase in the form of a copy of the
receipt or invoice (or other equivalent scal record showing the
name of the authorized SEAC dealer from which the product
was purchased as well as the date of purchase).
Whenever SEAC receives a product which:
• is not accompanied by proof of purchase having the above
mentioned characteristics;
• is in such condition as to determine the termination of the
warranty in accordance with the provisions of item 4 above;
• has defects resulting from external causes outside those
specically mentioned under item 3 above;
• has been used improperly and/or for uses other than those
for which the product was designed;
• has clearly been damaged or deteriorated through intensive
use or normal wear.
SEAC will not carry out any investigations on the product, and
will advise the sender/authorized dealer.
If the sender still wishes an inspection to be performed, the
sender will forward a request to SEAC within the subsequent
fteen working days; in this request he/she must expressly
state that he/she is willing to bear all the costs relevant to
said inspection (labor, spare parts if any, and shipping charges).
Page 63

63
English
Failing this, SEAC will return the product at the expense and
care of the recipient.
The warranty always excludes defects or imperfections deriving
from:
- Improper use or excessive stress.
- Failure to follow the usage instructions.
- External agents, such as damage due to transport, blows or
falls, atmospheric agents, natural phenomena, or chemical
agents.
- Unauthorized personnel performing maintenance or repairs
or opening the device.
- Pressure testing out of the water.
- Accidents while diving.
- Use other than that intended for the product, or other than
that indicated in the instruction manual. The warranty does
not cover depletion of batteries.
Repairs or replacements made during the warranty period do
not imply any right to an extension of the warranty itself.
m WARNING!
• DO NOT UNSCREW THE SCREWS on the computer; this
voids the warranty immediately.
• Do NOT use solvents to clean the product. Use only
running water.
• Check that the stabilizing O-Ring on the USB cable is
always in place.
• USE A WALL CHARGER to charge the computer until the
screen turns off.
Page 64

64
English
© 2017
Unauthorized reproduction prohibited, in whole or in part.
SEACSUB S.p.A.
Page 65

65
English
NOTES
..................................................................................................................................................................................
..................................................................................................................................................................................
..................................................................................................................................................................................
..................................................................................................................................................................................
..................................................................................................................................................................................
..................................................................................................................................................................................
..................................................................................................................................................................................
..................................................................................................................................................................................
..................................................................................................................................................................................
..................................................................................................................................................................................
..................................................................................................................................................................................
..................................................................................................................................................................................
..................................................................................................................................................................................
..................................................................................................................................................................................
..................................................................................................................................................................................
..................................................................................................................................................................................
..................................................................................................................................................................................
..................................................................................................................................................................................
..................................................................................................................................................................................
..................................................................................................................................................................................
..................................................................................................................................................................................
..................................................................................................................................................................................
..................................................................................................................................................................................
..................................................................................................................................................................................
..................................................................................................................................................................................
..................................................................................................................................................................................
..................................................................................................................................................................................
..................................................................................................................................................................................
..................................................................................................................................................................................
..................................................................................................................................................................................
Page 66

66
English
NOTES
..................................................................................................................................................................................
..................................................................................................................................................................................
..................................................................................................................................................................................
..................................................................................................................................................................................
..................................................................................................................................................................................
..................................................................................................................................................................................
..................................................................................................................................................................................
..................................................................................................................................................................................
..................................................................................................................................................................................
..................................................................................................................................................................................
..................................................................................................................................................................................
..................................................................................................................................................................................
..................................................................................................................................................................................
..................................................................................................................................................................................
..................................................................................................................................................................................
..................................................................................................................................................................................
..................................................................................................................................................................................
..................................................................................................................................................................................
..................................................................................................................................................................................
..................................................................................................................................................................................
..................................................................................................................................................................................
..................................................................................................................................................................................
..................................................................................................................................................................................
..................................................................................................................................................................................
..................................................................................................................................................................................
..................................................................................................................................................................................
..................................................................................................................................................................................
..................................................................................................................................................................................
..................................................................................................................................................................................
..................................................................................................................................................................................
Page 67

67
English
NOTES
..................................................................................................................................................................................
..................................................................................................................................................................................
..................................................................................................................................................................................
..................................................................................................................................................................................
..................................................................................................................................................................................
..................................................................................................................................................................................
..................................................................................................................................................................................
..................................................................................................................................................................................
..................................................................................................................................................................................
..................................................................................................................................................................................
..................................................................................................................................................................................
..................................................................................................................................................................................
..................................................................................................................................................................................
..................................................................................................................................................................................
..................................................................................................................................................................................
..................................................................................................................................................................................
..................................................................................................................................................................................
..................................................................................................................................................................................
..................................................................................................................................................................................
..................................................................................................................................................................................
..................................................................................................................................................................................
..................................................................................................................................................................................
..................................................................................................................................................................................
..................................................................................................................................................................................
..................................................................................................................................................................................
..................................................................................................................................................................................
..................................................................................................................................................................................
..................................................................................................................................................................................
..................................................................................................................................................................................
..................................................................................................................................................................................
Page 68
SEACSUB S.p.A.
Via D. Norero, 29
16040 S. Colombano Certenoli
(GE) Italy
Tel. +39 0185356301
Fax +39 0185356300
e-mail: [email protected]
www.seacsub.com
Seac USA Corp.
7925 NW 12th Street, Suite 229
Miami FL 33126
United States
Tel. +1 786 580 -3695
e-mail: [email protected]
www.seacsub.com
MADE IN ITALY • 06/17 • Artbook 13641/17
 Loading...