

Page 1

Contents
1. Safety Warnings and Cautions
2. Features
3. What's in the box
4. Name of Parts and Functions
5. How to use
6. Specifications
Page 2
1. Safety Warnings and Cautions
The following contains important information for ensuring safety of the user and preventing potential damage or inconvenience due to
improper use. Please read the following warnings and cautions thoroughly before using the product.
* The safety warnings and cautions are categorized as below, depending on the level of
potential risks and damages that may result from improper use.
-Warnings
Failure to follow safety warnings may lead to serious injury or death.
-Cautions
Failure to follow cautions may lead to injury or property damages.
Warnings
1. Do not disassemble, or modify the product on your own or
install the product in a way other than intended.
Improper installation, disassembly, or modification of the product
may cause product to malfunction. Such malfunctions are not
covered under product warranty.
: This device complies with part 15 of the FCC Rules. Operation is subject to the
following two conditions:
(1) This device may not cause harmful interference, and
(2) This device must accept any interference received, including interference that
may cause undesired operation.
Caution: Any changes or modifications to the equipment not expressly approved by
the party responsible for
compliance could void user’s authority to operate the equipment.
This appliance and its antenna must not be co-located or operation in conjunction
with any other antenna or transmitter.
WARNING: Changes or modifications to this unit not expressly approved by the
party responsible for compliance could void the user’s authority to operate the
equipment
2.Do not operate the product while driving.
Operating the product while you driving may cause an accident. If
you need to operate the product, do so after coming to a full stop
This appliance and its antenna must not be co-located or operation in conjunction
with any other antenna or transmitter.
A minimum separation distance of 20 ㎝
and the person for this appliance to satisfy the RF exposure requirements.
in a safe location .
3. Do not operate the product if it malfunctions.
If any foreign matters or water has entered the product or if the
product releases smoke, stop using the product immediately and
contact Customer Support.
4. Before connecting/disconnecting rear camera, make sure that the power is turned off.
Connecting/disconnecting rear cameras to the product while power is on may cause a malfunction.
5. Before installing the product, make sure that the vehicle's
ignition is turned off.
Installing the product while the ignition is on may result in electric
shock or accident.
6.Do not install the product on where it may obstruct the
driver's view or cause any kind of disturbance to driver.
Installing the product in such positions may lead to an accident.
must be maintained between the antenna
Page 3
1. Safety Warnings and Cautions
7. Do not use this product when it is not functioning properly.
Continuing use of the product may lead to an accident.
8. Do not drop the product in water or store it in a humid
environment for an extended period of time.
If the product is damaged by water or humidity, contact your
retailer or Customer Support.
9. Maintain the appropriate temperature (0°C to 50°C)
during use.
Operating the product beyond this temperature range may
lower the product’s performance and/or damage the hardware.
10. Do not apply heat to the product using a furnace,
microwave, or hair drier.
It may cause explosions, deformations, or defects.
11. Do not expose the product to direct sunlight for an
extended period of time during summer.
It may lead to a product malfunction or a fire.
12. Always use genuine parts and accessories from manufacturer.
Using non-genuine parts or accessories may lead to malfunctions or defects.
13. When installing the product, make sure it does not
interfere with the operation of other onboard devices,
such as airbags.
Failure to do so may interrupt proper operation of such devices
and cause injuries.
14. Use the product only with recommended voltage.
It may lead to a product malfunction or a fire.
15. Firmly install the product on a proper position.
If it is not attached firmly, the product may fall while driving, and
may cause traffic accidents.
Page 4
1. Safety Warnings and Cautions
Cautions
1. Avoid strong impact to the product.
It may damage the product or cause malfunctions.
2. Be careful when you touch this product while in use. The
heat generated from the product may cause burn injuries.
Prolonged continuous use of this product may generate heat and
cause burn injuries.
3. Dramatic changes in the surroundings such as brightness
or backlight may degrade video recording quality.
Video recording quality may be affected in situations where
brightness changes quickly, such as entering and exiting tunnels,
or when facing strong backlight.
4. Do not touch this product with greasy or wet hands.
It may damage the product or cause malfunctions.
5. Keep the camera lens clean at all times.
Failure to keep the camera lens clean may lower quality of
recordings.
6. Using the product in a vehicle with a tinted windshield
may alter the video recording.
7. Event Recording may not be initiated if external impact is
not strong enough.
In such case, you can use the Manual Recording button to record
the event.
Page 5
1. Safety Warnings and Cautions
8. Do not operate the product with a sharp objects such as
nails or awls.
It may damage the product or cause malfunctions.
9. Do not place the product near a magnet or areas with
strong magnetic fields.
It may damage the product or cause malfunctions.
10. You should always backup important data to another
storage medium.
If the data must be preserved for a long period of time, always
backup the data to an additional storage medium..
11. Check the condition of the product and recording quality
on regular basis.
Make sure that the Micro SD card inserted in the product is
working properly. If any problems are found, stop using the
product and contact Customer Support.
12. To install a product to a constant power source of your vehicle,
always seek help of a trained professional.
13. Your vehicle's battery may be fully discharged if your car is parked for an extended period of time.
Page 6
2. Features
1. Front/Rear 30Frame Full HD
2. 3.5 inch Full Touch LCD
3. Internal Wi-Fi
4. Internal GPS
5. Easy Separation of bracket and main body
6. Convenient way of upgrading the firmware through the mobile application
Note
User should rerun the mobile application in case of rebooting after connecting between the product and the mobile application through WIFI.
Page 7
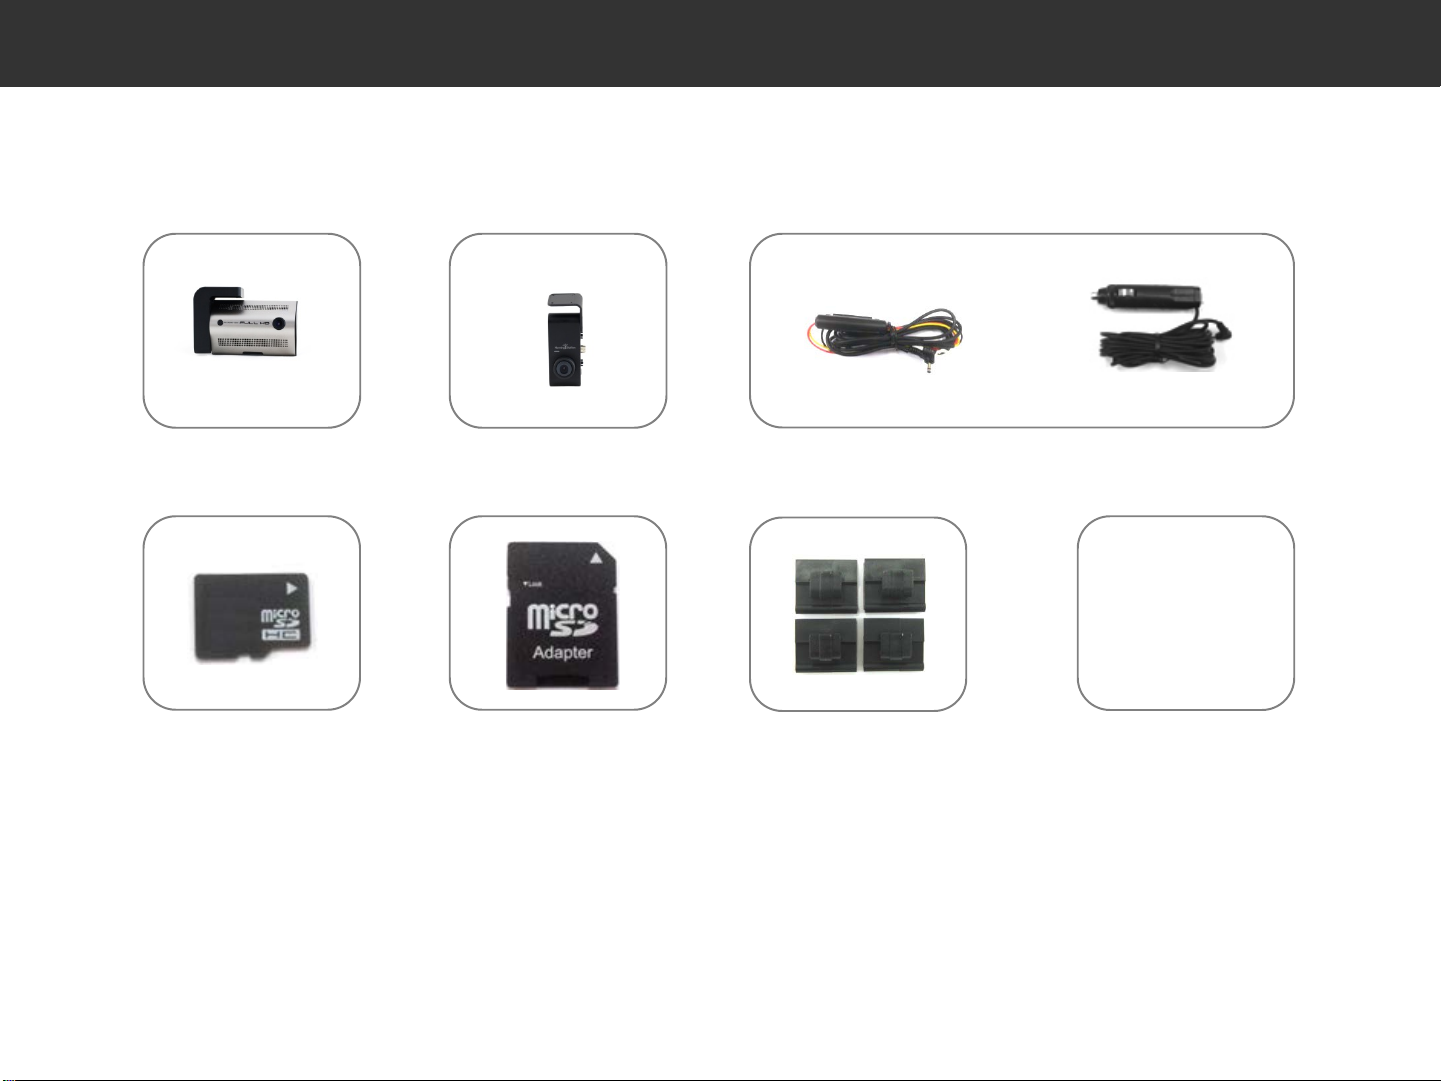
3. What's in the Box
The parts included in your package may not look identical with the following figures.
And some parts can be changed without notice.
Note.
Main Unit Rear Camera & Extension Cable
micro SD Card micro SD Card Adapter Clips Quick Guide
or
Constant Power Cable Cigarette Jack Cable
Power Cable
User’s Manual
- User's Manual and dedicated viewer program can be downloaded from the manufacturer's web site.
- A Manufacturer is not responsible for loss of data due to defective Micro SD Card .
Page 8
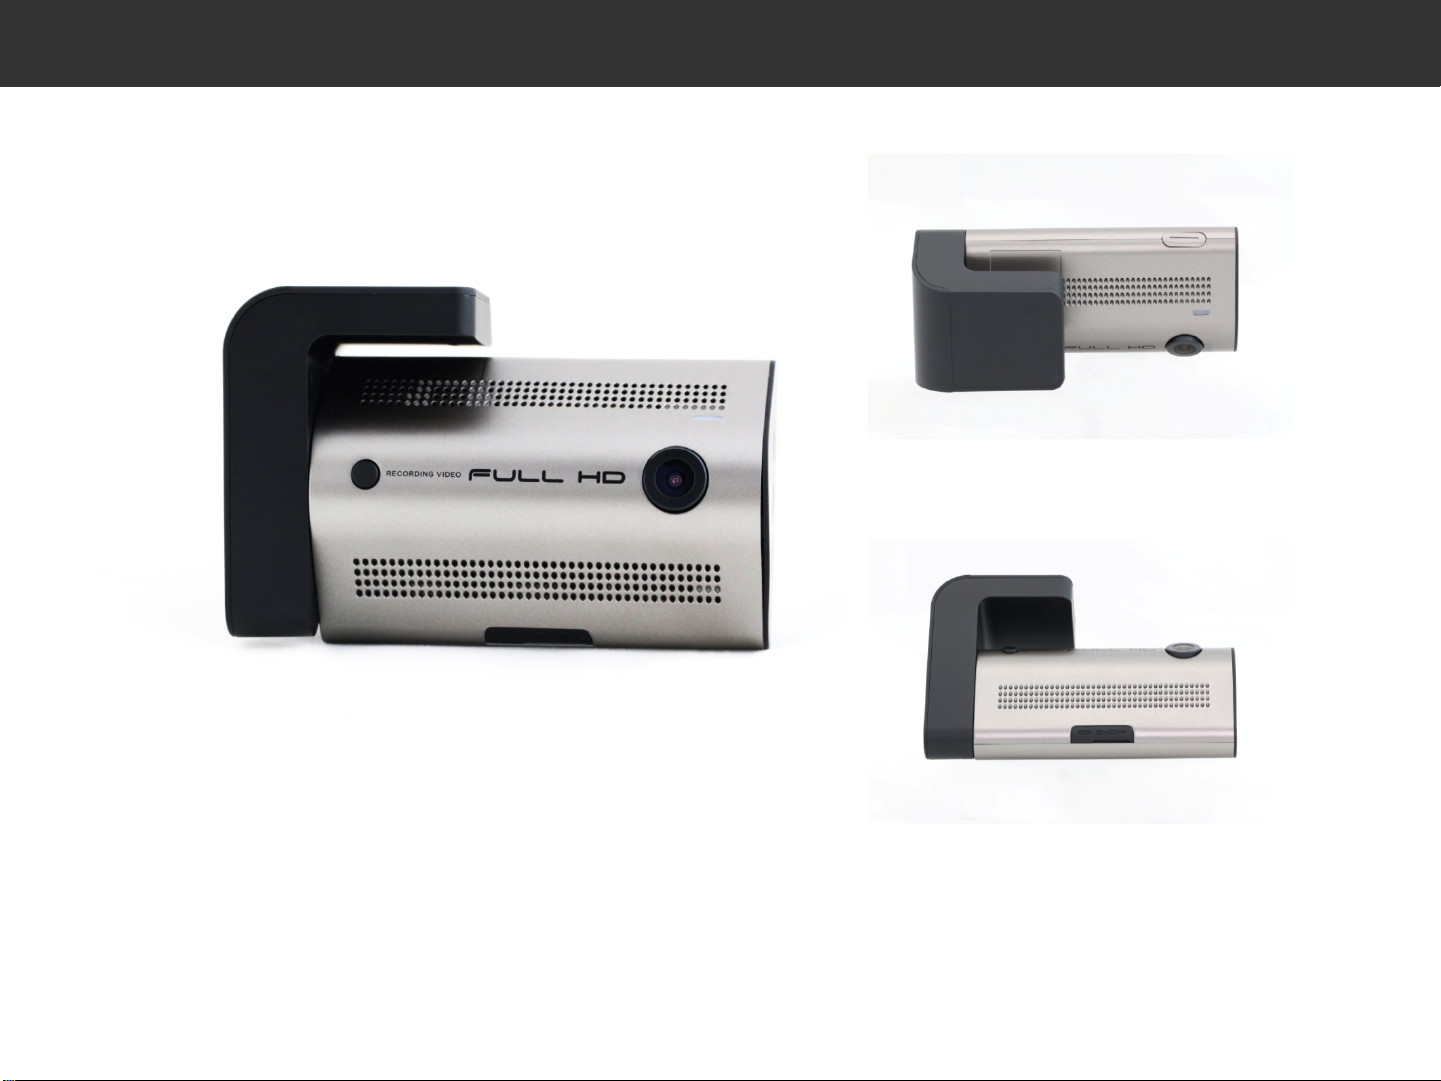
4. Name of Parts and Functions
Main Unit
*Check the right direction before inserting the Micro SD Card.
*The figures shown in this manual may vary from the actual product.
*The contents of this manual are subject to be change without notice for performance enhancement.
Page 9
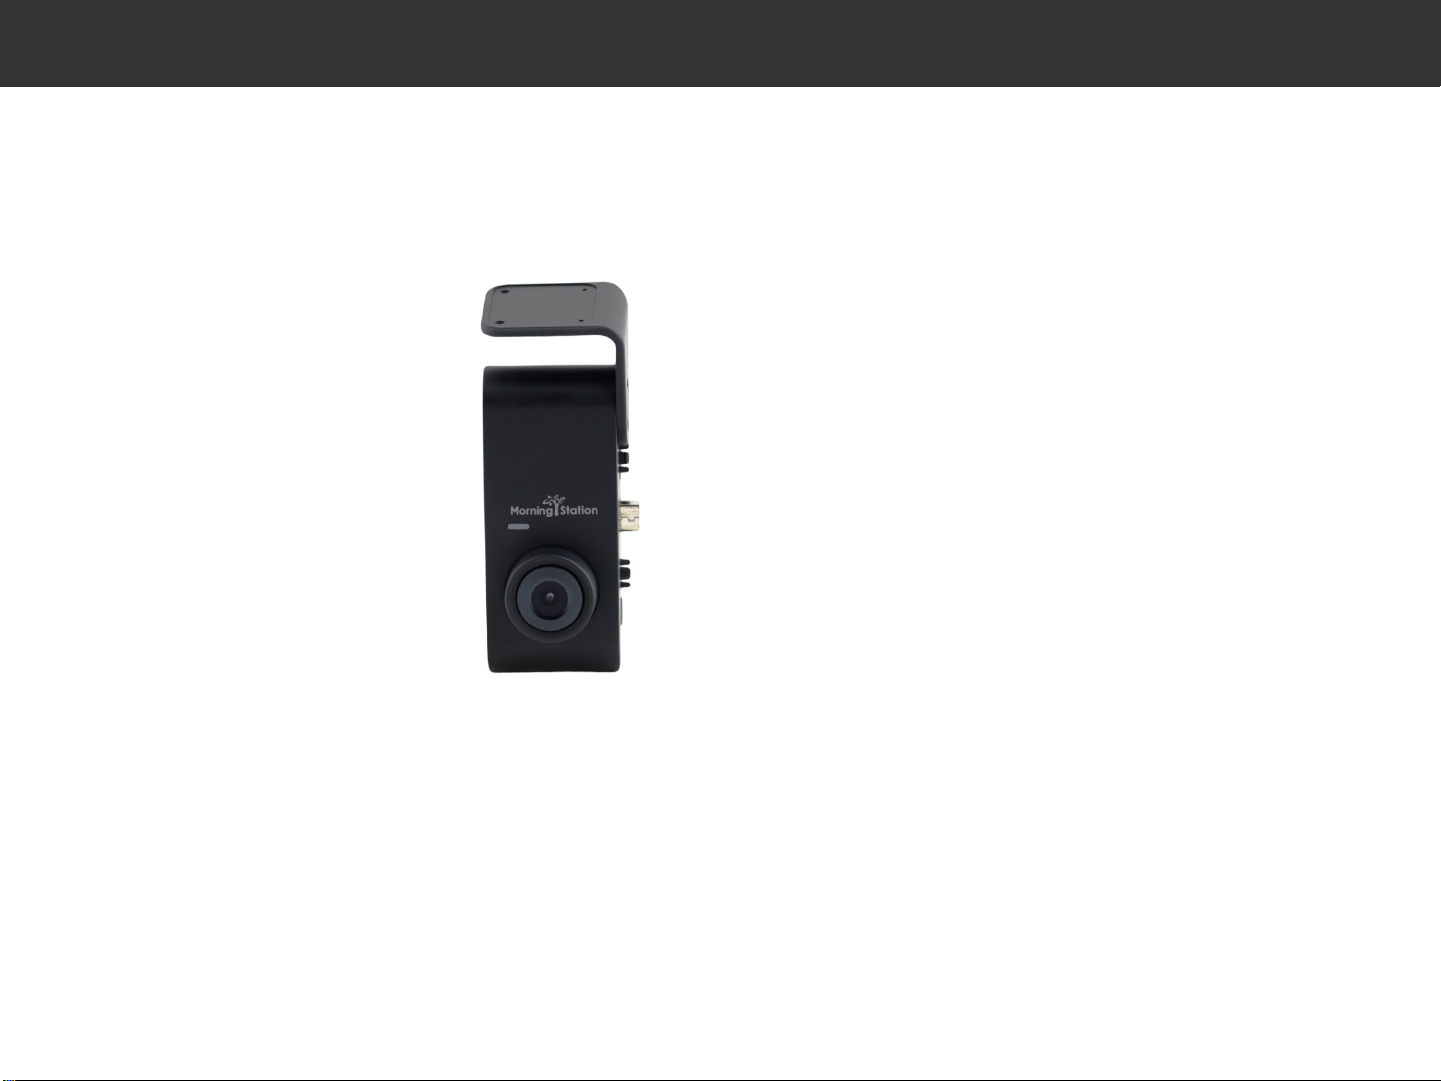
4. Name of Parts and Functions
Rear Camera
*The figures shown in this manual may vary from the actual product.
*The contents of this manual are subject to be change without notice for performance enhancement
Page 10
5. How to use
1) Power On/Off
After connecting the power cable and turning on the vehicle's ignition, the power is on with the following message in audio :
“Please, drive safely today”. After that, the device will be displayed the Live video with the following message in audio :“Driving mode is on”.
If the recording doesn’t go smoothly, the device will be rebooted automatically with the following message on the LCD: “Camera error.
Rebooting.”
If the power is lower than the standard voltage, the device will be turned off with the following message on the LCD : “System will be shutdown”
If the device temperature is higher that the standard temperature, the device will be turned off with the following message on the LCD: “System
will be shutdown”
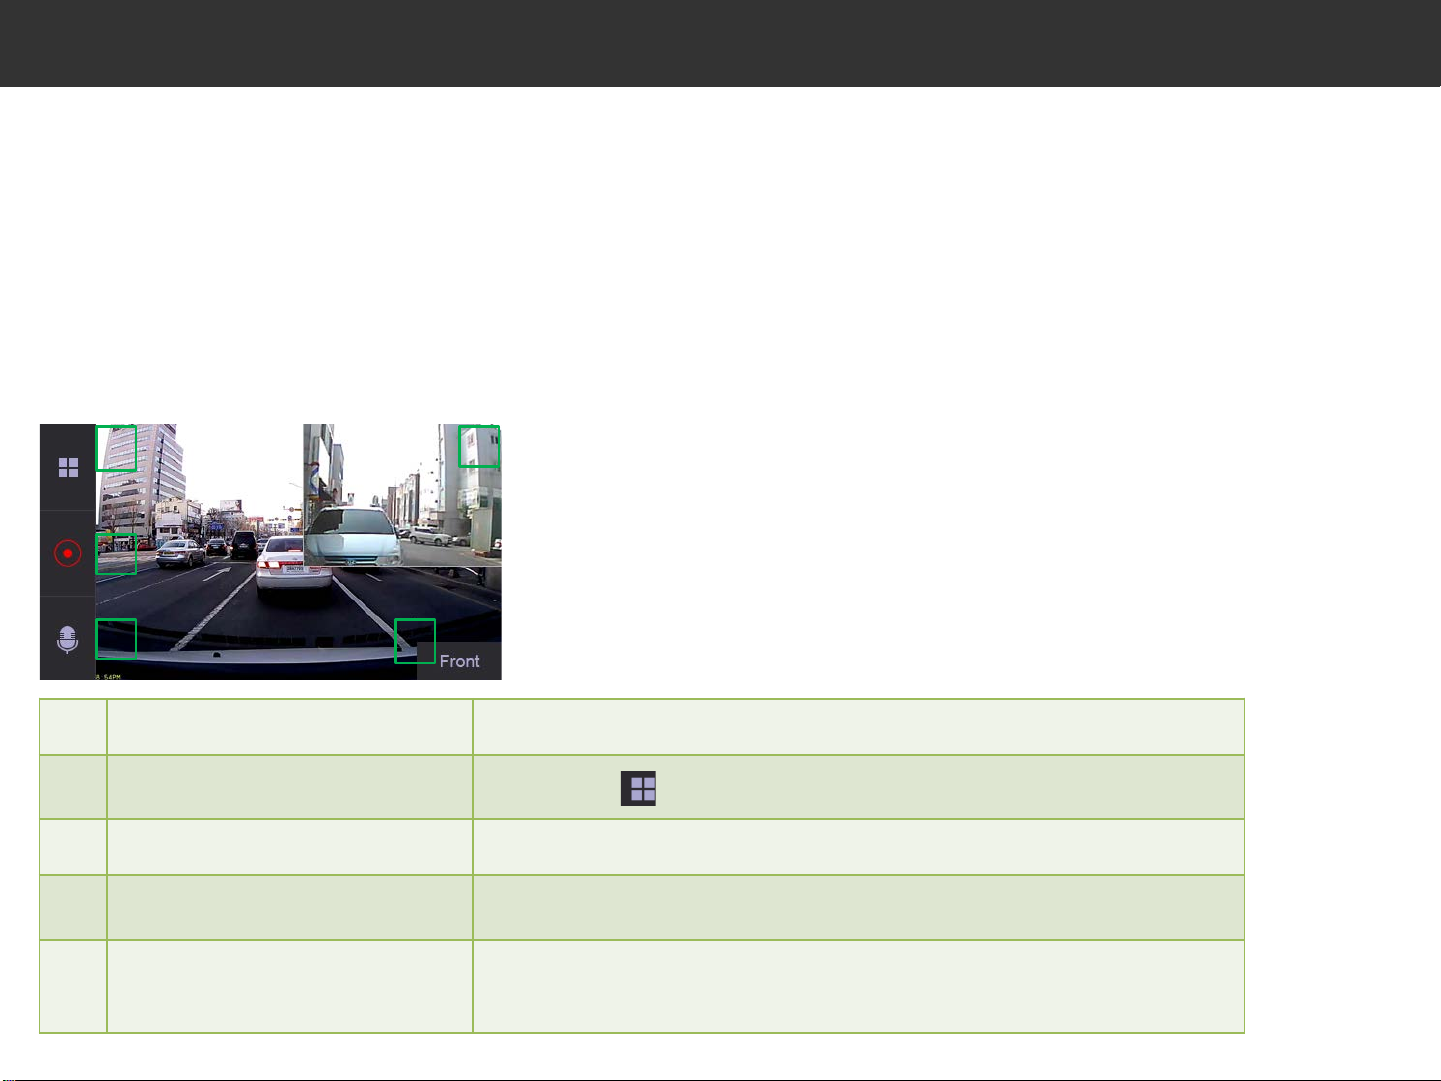
2) Playback Screen
After booting, the device will be displayed the Live video automatically.
1 2
1
3
4 5
1 Live Video(Live View) Display the video currently being recorded.
2 Main Menu Touch the icon in the upper left to go to Main Menu.
3 Manual Recording Touch the icon in the middle of the left to start Manual Recording.
4 Voice Recorder ON/OFF Touch the icon in the bottom left to stop or start voice recording.
Both : Display Live video of the front and rear view as a default value.
5 Live video Selecting
Front : Display Live video of the front view.
Rear : Display Live video of the rear view.
Page 11
5. How to use
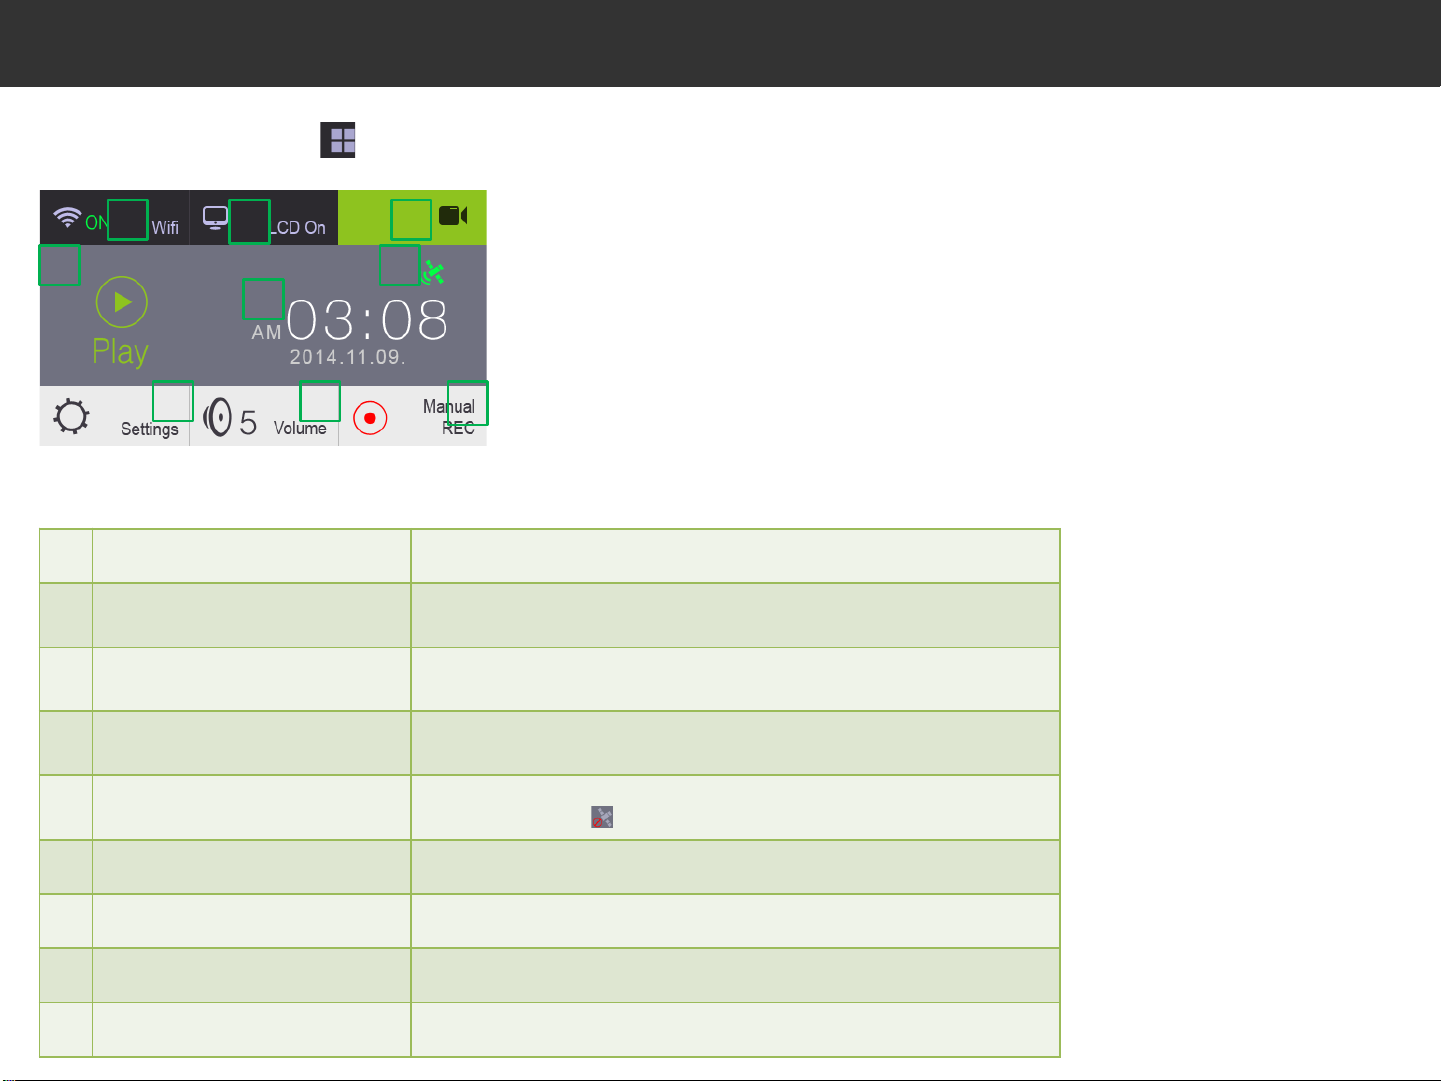
3) Main Menu
After booting, touch the icon on the Playback, and then this page will be appeared on the screen.
1 2
2
3
4 5
6
7 8 9
1 Wi-Fi Being able to check the status of Wi-Fi connection
2 LCD OFF
3 Live Video(Live View)
4 Playlist
5 GPS Connection
Touch the screen to turn LCD OFF and the re-touch the screen to turn
LCD ON.
Touch the screen to switch to the live video that you are currently
watching.
Touch the Play to check the recorded playlist and touch the file name to
play the video.
When the GPS is connected, then the green is displayed. When the GPS is
disconnected, then is displayed.
6 Time and Date Display the time currently being recorded.
7 Settings Touch the screen to go to Settings of the Black Box.
8 Volume Control Touch the screen to configure voice guidance ON/OFF.
9 Manual Touch the screen to commence manual recording
Page 12
5. How to use
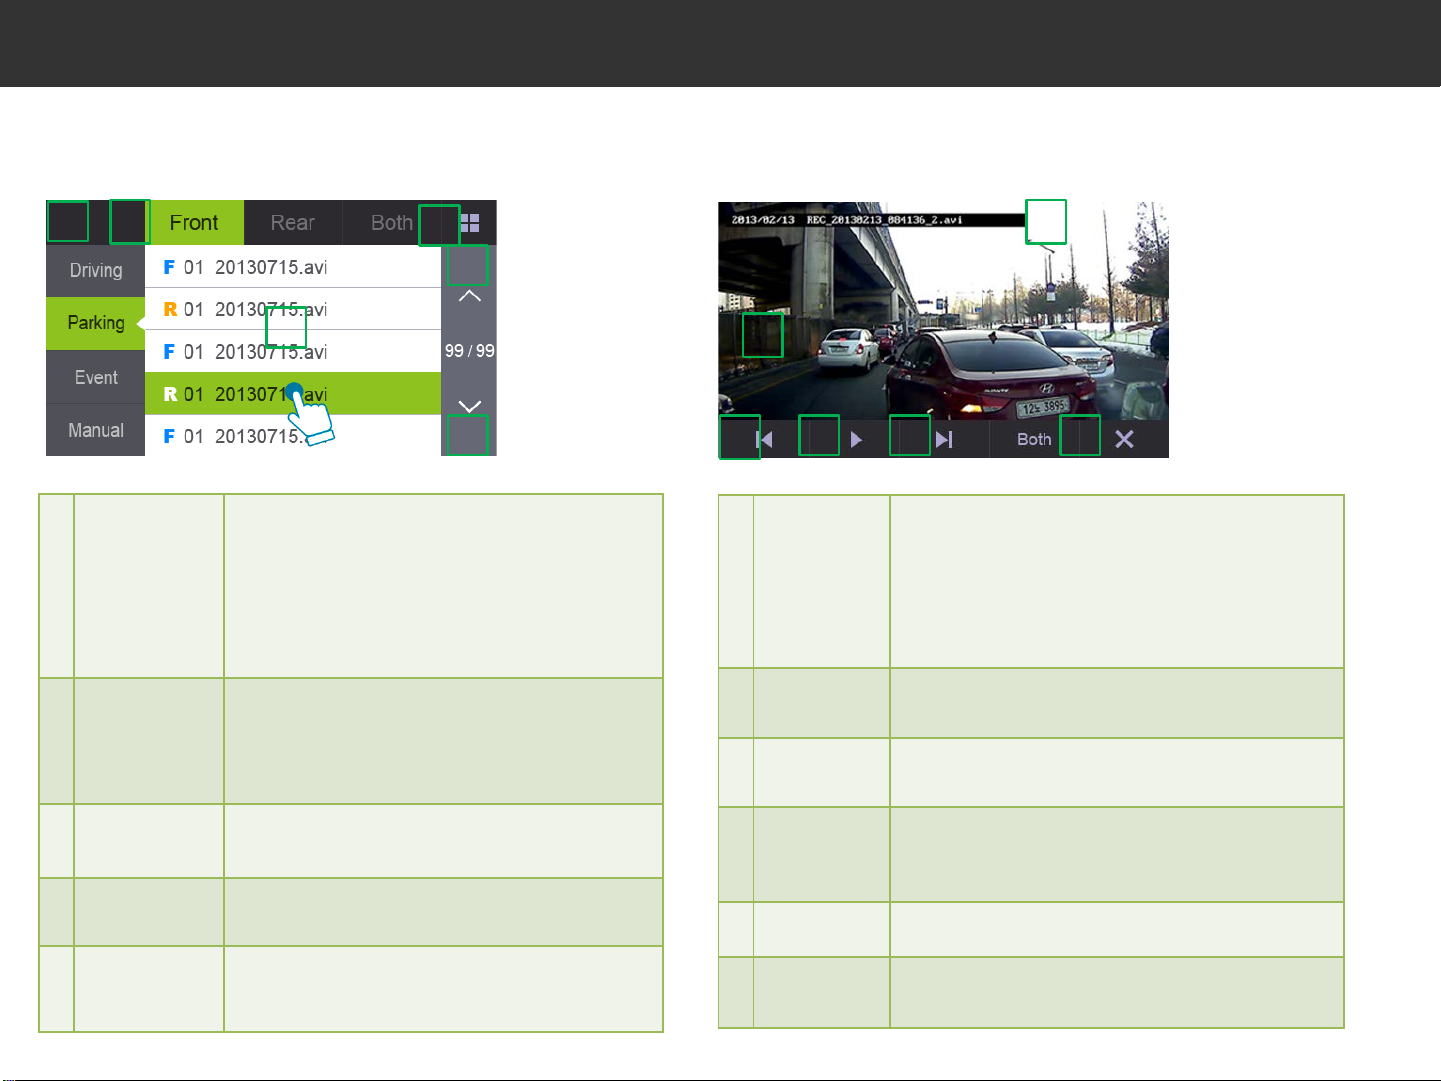
4) List of Files
Touch the Play on the Main Menu, and then this page will be
appeared on the screen.
1
2
1
4
5
3
6
Display the playlist by its folder Display a list of
files stored in the folder.
Video
1
Recording
Modes
Driving : Display recorded video for Driving Mode
Parking : Display recorded video(Motion Detection
Recording) for Parking Mode
Event : Display recorded video for Event Mode
Manual : Display recorded video for Manual Mode
5) Playing files
Touch the file names from the list of files to play videos.
2
1
3 5 6
1
4
Playback
Screen
Recorded video is displayed on the LCD screen.
Touch the screen and the control bar at the
bottom is disappeared. Once you touch the screen
during playback, the control bar is appeared again.
Return to the main menu when the video is ended.
Video
2
Recording
Methods
3 Playlist
Recording
4
Button
Previous/Next
5
Button
Select the video recording methods. Display a list
of files stored in the folder.
Front : Display Recorded front view
Rear : Display Recorded rear view
Both(Default) : Display Recorded front/rear view
The files are displayed sequentially depending on
the video recording modes and methods. Touch
the file to play the video.
Touch the screen to start recording.(<-Can I go
back to the previous screen?)
In case of many filmed video files, these buttons
enable you to move to previous/next page.
Video File
2
Information
3 Previous File Play the previous video.
4 Play/Pause
5 Next File Play the next video.
Previous
6
screen
The time of recording, date and file name will be
displayed.
Press the button once to pause during playback
and to resume playback when paused.
Touch the screen, and then the playlist will be
appeared.
Page 13
5. How to use
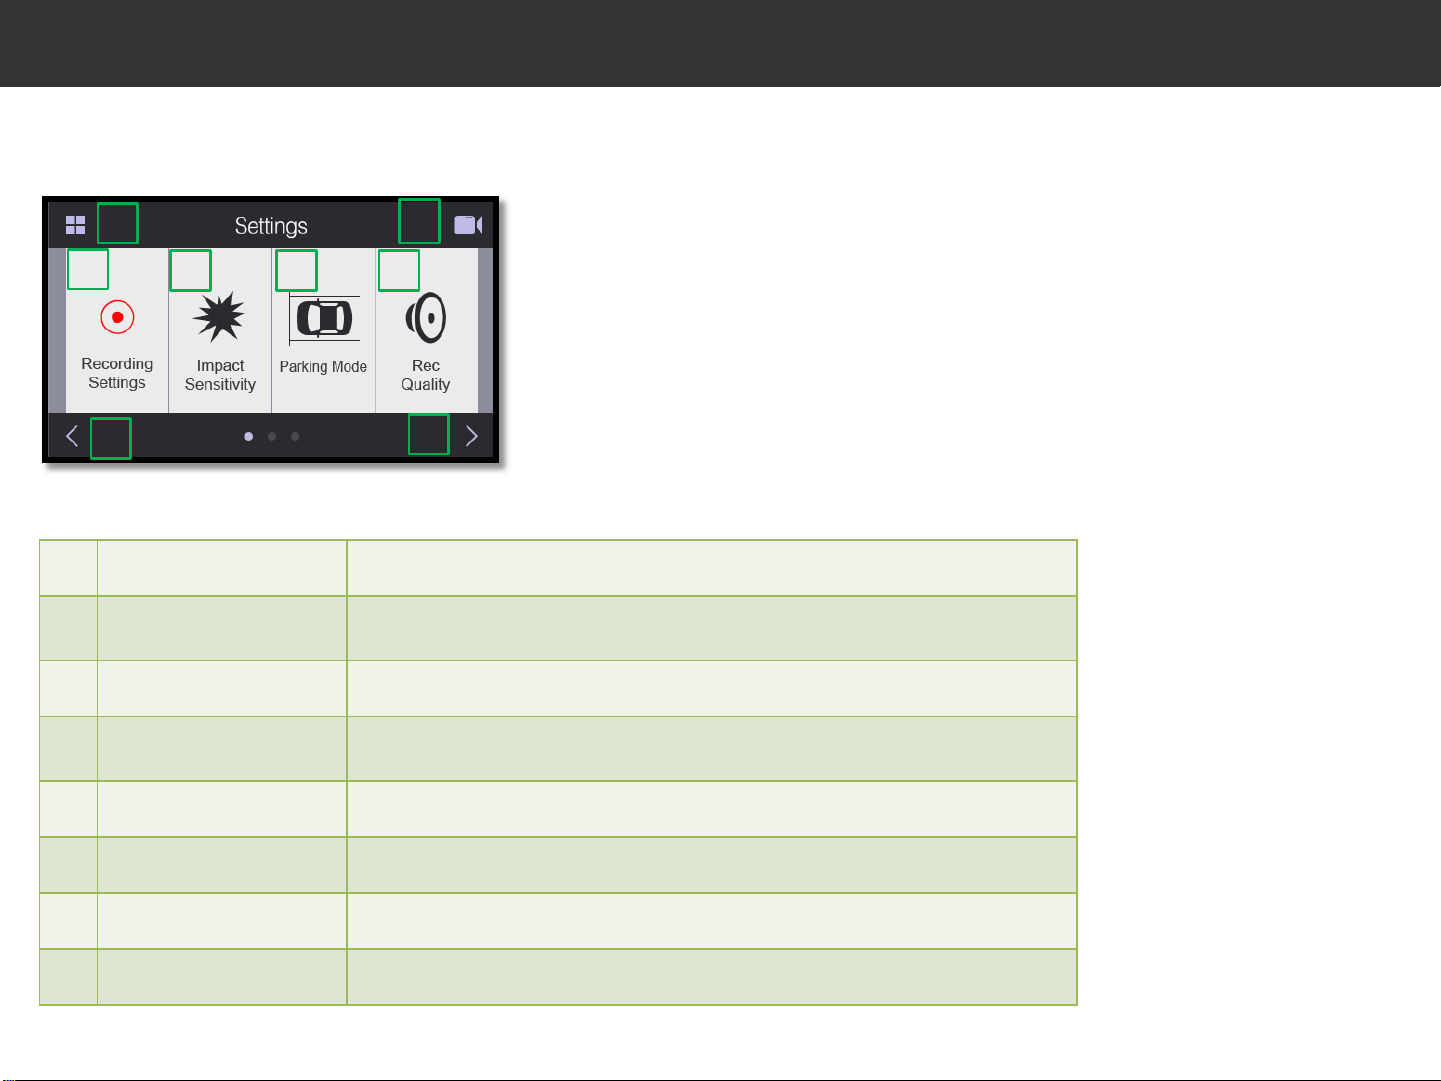
6) Settings screen 1
Touch the Settings on the Main Menu, and then this page will be appeared on the screen.
Recording stops while setting up.
6
2
8
8
1
3
7
1 Main Menu Go to the Main Menu. (Start recording.)
2 Video Recording Go to the screen of real-time videos. (Start recording. )
3 Record Settings Set up the resolution, FPS, brightness and video quality.
4 Impact Sensitivity Set up the impact sensitivity while driving and parking.
4 5
7
5 Parking Mode Enable and disable the Parking Mode.
6 Rec Quality Set up the volume of audio guide.
7 Previous Page Go to the previous page.
8 Next Page Go to the next page.
Page 14
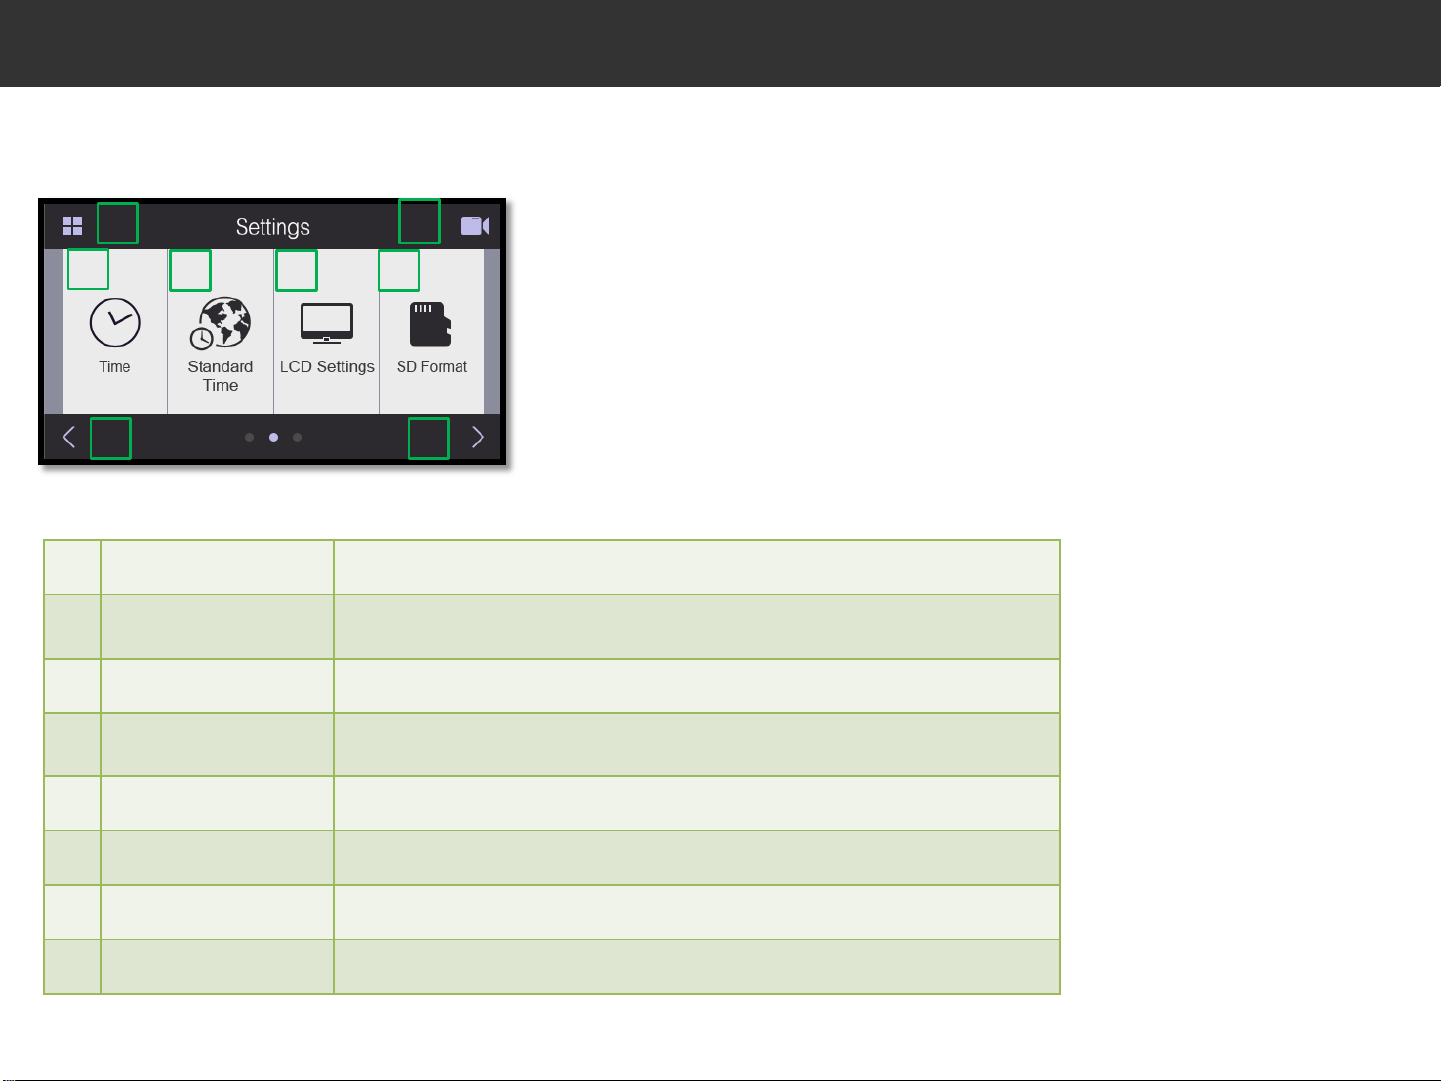
5. How to use
7) Settings Screen 2
Touch the Next Page on Settings Screen 1, and then this page will be appeared on the screen.
2
6
3
1
4 5
7 8
1 Main Menu Go to the Main Menu. (Start Recording.)
2 Video Recording
3 Time Set up the date and time.
4 Standard Time Set up the Standard Time.
5 LCD Settings Set up the brightness of LCD and Sleep Mode.
Go to the screen of real-time videos. (Start recording.)
6 SD Format Format the SD Card.
7 Previous Page Go to the Previous Page.
8 Next Page Go to the Next Page.
Page 15
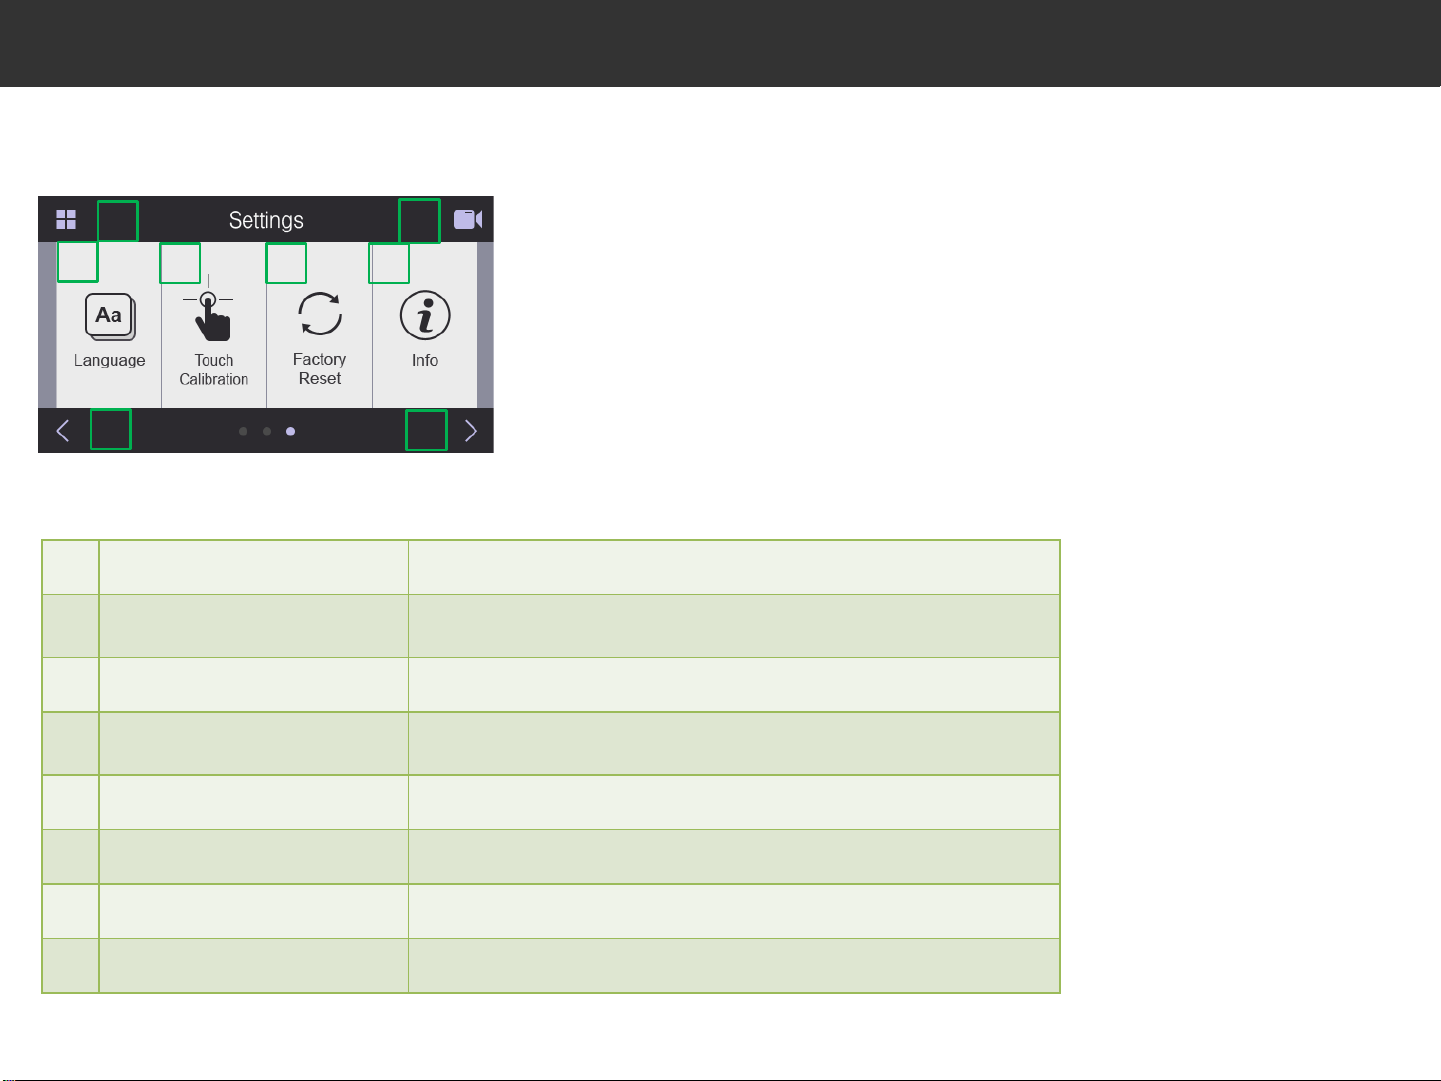
5.How to use
8) Settings Screen 3
Touch the Next Page on Settings Screen 2, and then this page will be appeared on the screen.
1
3
4 5
7
1 Main Menu Go to the Main Menu.(Start Recording.)
2 Video Recording Go to the screen of real-time videos.(Start Recording.)
3 Language Set up the language.
4 Touch Set up the touch area of LCD Screen.
5 Factory Reset Reset the product to Factory Settings.
2
6
8
6 Info Display the Firmware Version.
7 Previous Page Go to the Previous Page.
8 Next Page GO to the Next Page.
Page 16
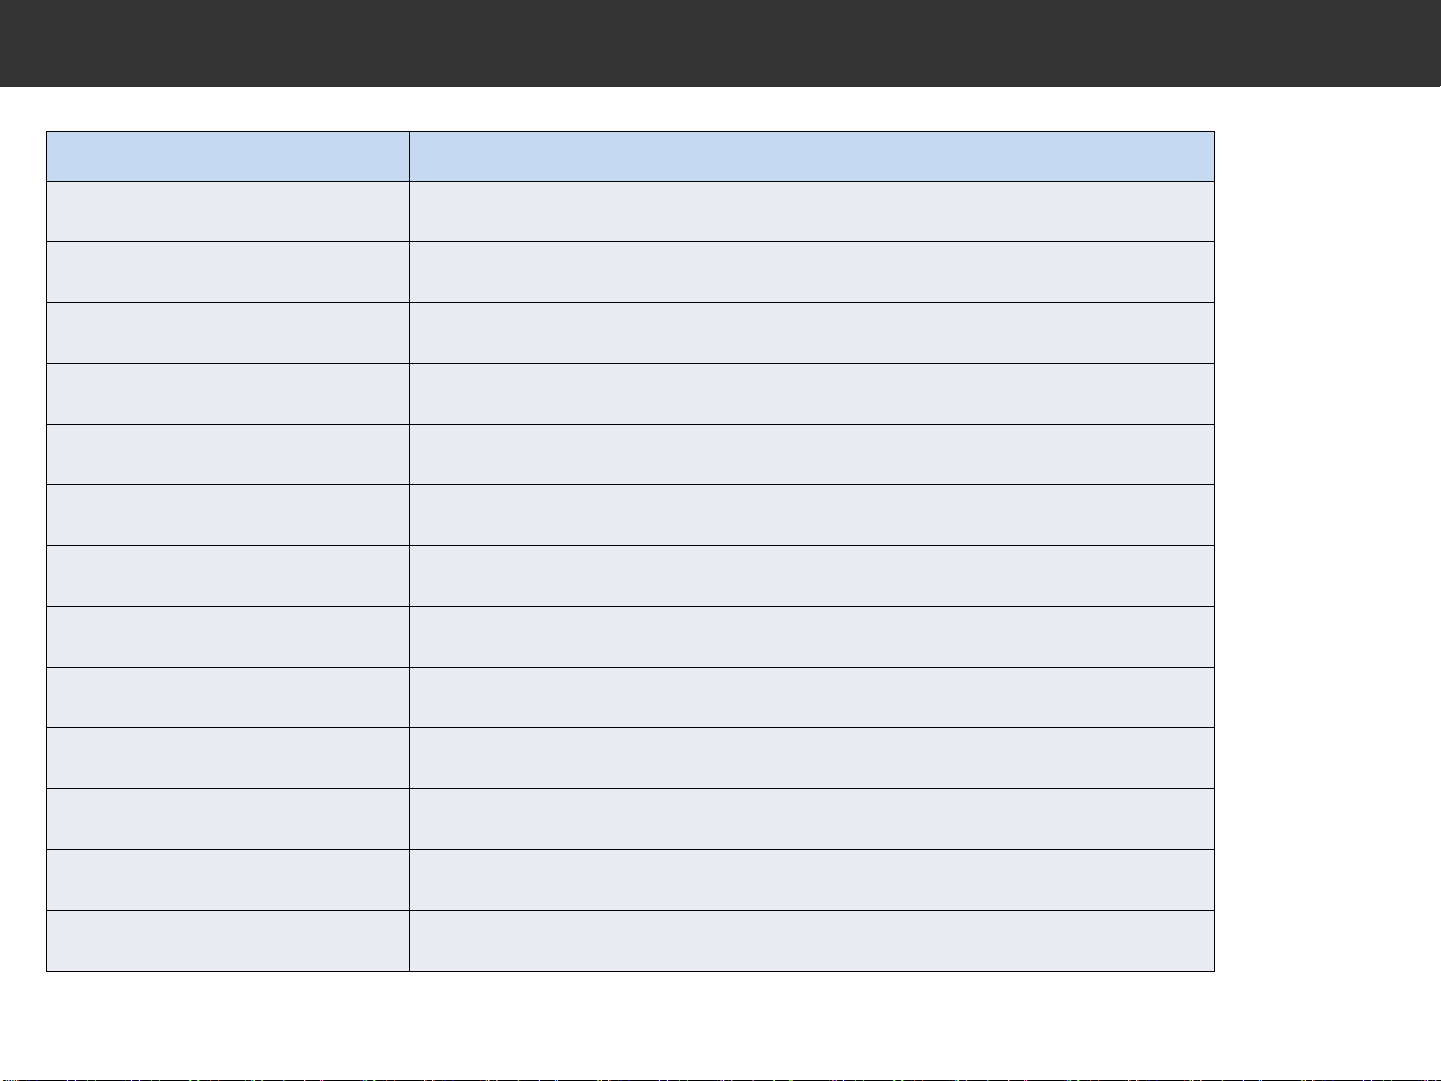
6. Specifications
Category Specifications
Model MS-600F2
Lens F2.2
Image Sensor 2.12 Megapixels Sony IMX322 Image sensor
LCD 3.5inch Wide Viewing Angle, Full Touch LCD(320*240)
Resolution/Frame Rate Full HD(1920*1020), 30FPS
Viewing Angle
Recording Modes Driving/Event/Parking/Manual
Video/Audio Compression H.264(Video), AAC(Audio)
File Format mp4
Dimension/Weight
Operating Temperature
Power Supply DC12V, 24V
Storage Medium SDHC(Recommended Type) Up to 32GB
124°(Diagonal Angle), 103°(Horizontal Angle), 54°(Vertical Angle)
Front : 120×76×63.7/ Rear : 192g, 28×76.3×25.8/ 28g
-20℃~+65℃
 Loading...