

Page 1

Model: iBT22A
IB (English)
Size: 153mm x 120mm
Printing color: Black
Date : July 8, 2013
P1
iBT22A
Bluetooth Wireless
Dual Alarm Clock
instruction manual
Page 2
Page 3
Page 4

P4
Information FCC
Déclaration FCC quant à l'exposition à la radiation
Cet équipement est conforme aux limites FCC relatives à l'exposition à la radiation par radiofréquences
établies pour les environnements non contrôlés. Cet émetteur ne doit pas être colocalisé ou utilisé en conjonction
avec tout autre émetteur ou antenne.
Cet appareil est conforme à la norme RSS-210 des règlements relatifs aux circuits intégrés. Le fonctionnement est
sujet aux deux conditions suivantes :
1) Cet appareil ne doit pas causer d'interférences; et
2) Cet appareil doit accepter toute interférence reçue y compris les interférences qui peuvent occasionner un fonctionnement indésiré.
Cet appareil répond aux exigences du paragraphe 15 de la loi de la Commission Fédérale sur les Communications. L’utilisation
de cet appareil doit répondre aux deux conditions suivantes: (1) Cet appareil ne doit pas provoquer d’interférences nuisibles, et
(2) cet appareil doit accepter toutes les interférences reçues, y compris les interférences pouvant provoquer un fonctionnement non
désiré
• Avertissement : Tout changement ou modification apporté à cet appareil sans le consentement expresse de la partie
responsable pour la conformité peut annuler le droit de l'utilisateur d'utiliser cet appareil.
• Remarque : Cet équipement a été testé et jugé conforme aux limitations pour un appareil numérique de Classe B,
selon la Section 15 de la règlementation FCC.
Ces limites sont conçues pour fournir une protection raisonnable contre les interférences nuisibles dans une installation résidentielle. Cet
équipement génère, utilise et peut émettre des fréquences radio et, s'il n'est pas installé et utilisé selon les instructions, peut causer des
interférences nuisibles aux communications radio.
Cependant, il n'existe aucune garantie que des interférences ne se produiront pas dans une installation particulière. Si cet équipement
produit des interférences nuisibles sur la réception de la radio ou de la télévision, ce que vous pouvez facilement constater en éteignant et
en rallumant l'équipement, nous vous encourageons à prendre l'une ou plusieurs des mesures correctives suivantes :
• Réorienter ou déplacer l’antenne réceptrice,
• Éloigner davantage l'appareil du récepteur.
• Branchez l’équipement sur une prise ou un circuit auquel le récepteur n’est pas branché.
• Consultez votre revendeur ou un technicien radio/télévision qualifié pour plus d’informations.
Cet appareil numérique de la classe B est conforme à la norme NMB-003 du Canada
iBT22A
FCC ID: EMOIBT22A
IC: 986B-IBT22A
QDID:B020340
Page 5

Page 6

Included
• iBT22A Alarm Clock
• 100V-240V universal AC adaptor
• Backrest
• 3 AAA batteries
• 12” patch cord
alm. reset
snooze
dimmer
P6
iBT22A
Installing the Backrest
1
2
Once inserted, the backrest is a permanent part of the
sleep
unit and offers enhanced stability for your devices.
Test your device in the backrest to make sure it is stable.
A tablet may not be suitable for use with the backrest.
1) Insert the front tabs
of the included backrest at
a slight angle into the slots
on top of the unit (behind
the buttons).
2) Grip the unit in both hands
from front to back as shown
and squeeze the unit
slightly towards you while
pressing down firmly on the
backrest until it clicks
into place.
power
adaptor
Patch cord
alarm clock
backrest
1
Page 7

P7
Meet Your iBT22A
Sleep Button
Alarm Reset/Power Button
Alarm 1 Button
Rev/– Setting Button
Snooze Dimmer Button
Aux-in Jack
Bluetooth/Pairing Button
Clock Adj. Button
Top
Back
iBT22A
Back Rest
Lower Volume Button
Raise Volume Button
Fwd/+ Setting Button
Alarm 2 Button
Play/Pause Button
DC Jack
USB Charging Port
DST Switch
2
Page 8
P8
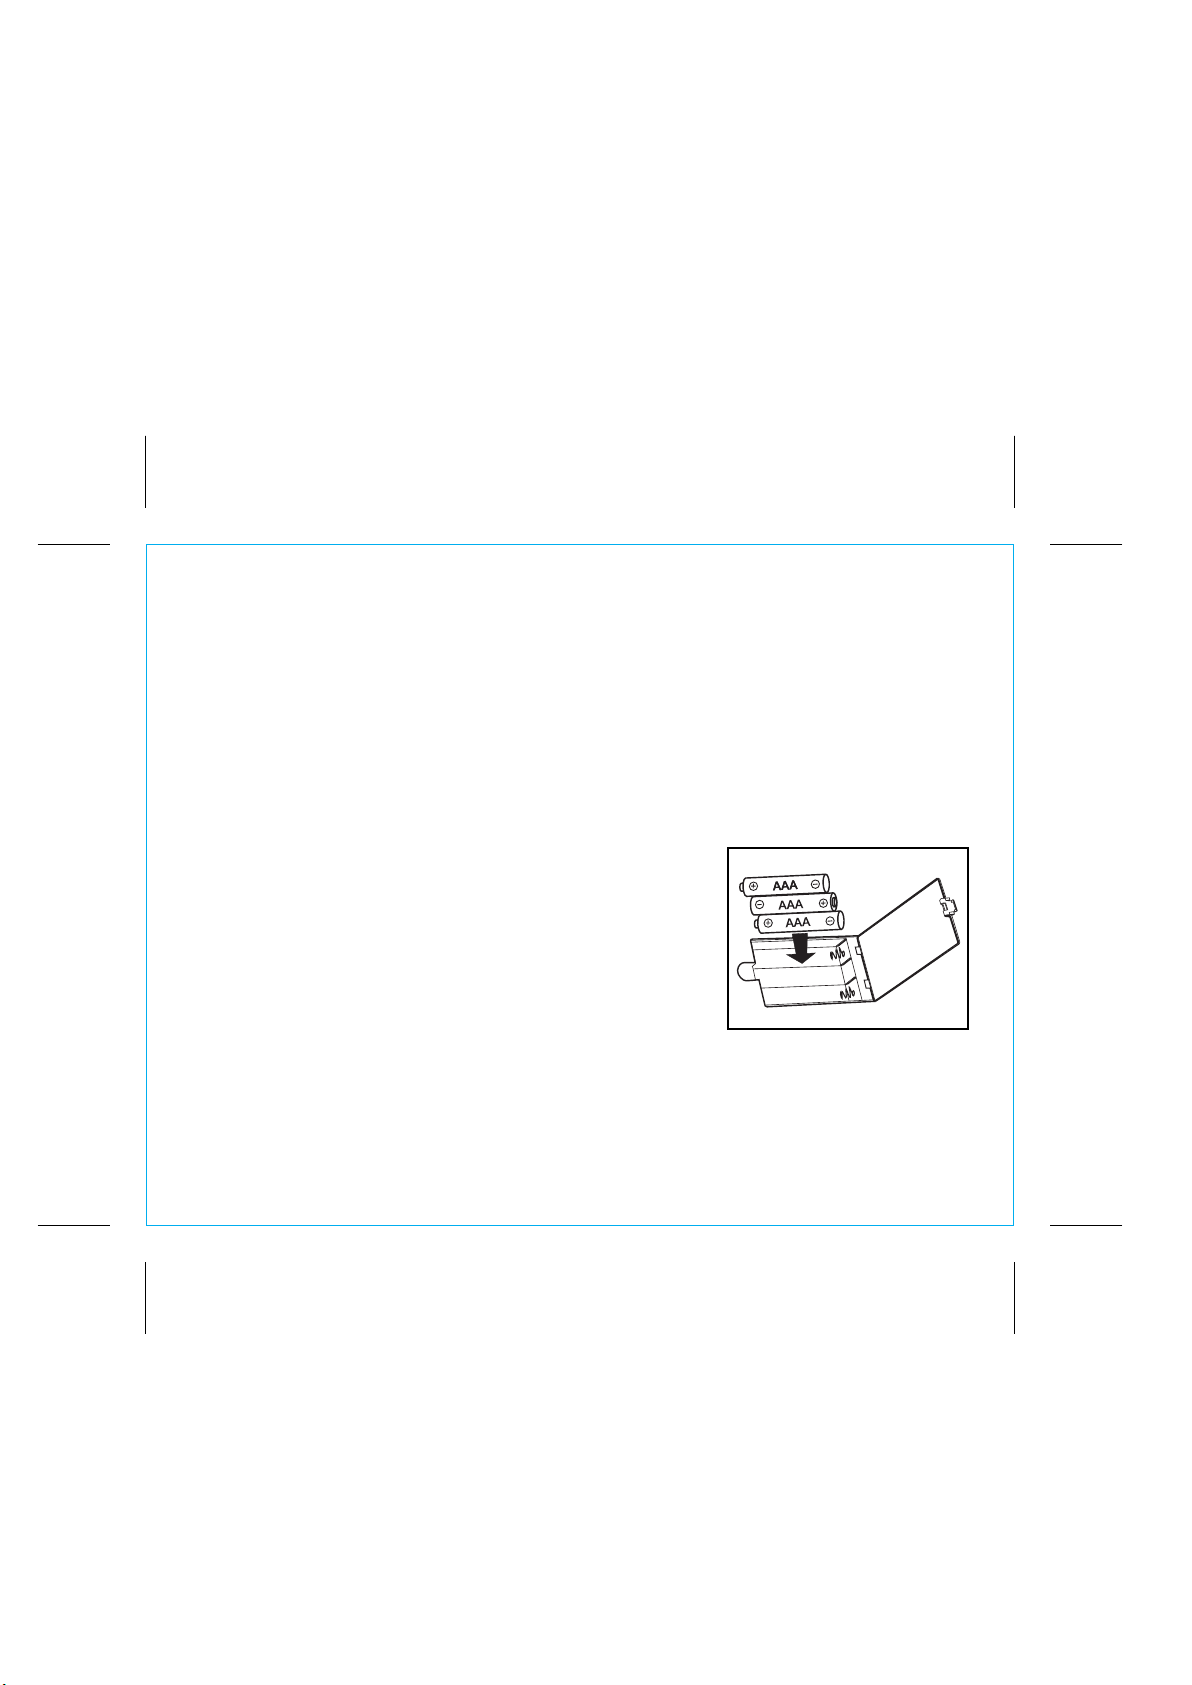
Replacing & Installing Clock Backup Batteries
The iBT22A uses 3 AAA batteries (included) for backup to provide continuous alarm operation and clock
settings in the event of a power failure. If the backup batteries have been installed and a power failure
occurs or the AC adaptor is accidentally disconnected, the display backlight will not remain lit, but current
time and alarm time settings will be temporarily maintained. Otherwise, you must reset the time and alarm
settings.
Note: You should replace backup batteries when the Battery Low Indicator appears on the display.
1. Please make sure the AC adaptor is connected. Otherwise all settings may be lost during battery
replacement.
2. Open backup battery compartment door located on the bottom
of the unit.
3. Insert three “AAA” batteries, checking the + and – ends of the
batteries match the diagram inside the compartment. We
recommend to use alkaline battery for longer life. Do not mix
alkaline, standard (carbon-zinc) or rechargeable (nickel-cadmium)
batteries.
4. Close the compartment cover.
Note: Make sure you dispose of batteries properly (see your local
regulations).
Battery Low Indicator
The Battery Low Indicator is located at the top left of the display.
When it blinks it is time to replace backup batteries.
3
Using the
iBT22A
Page 9
P9
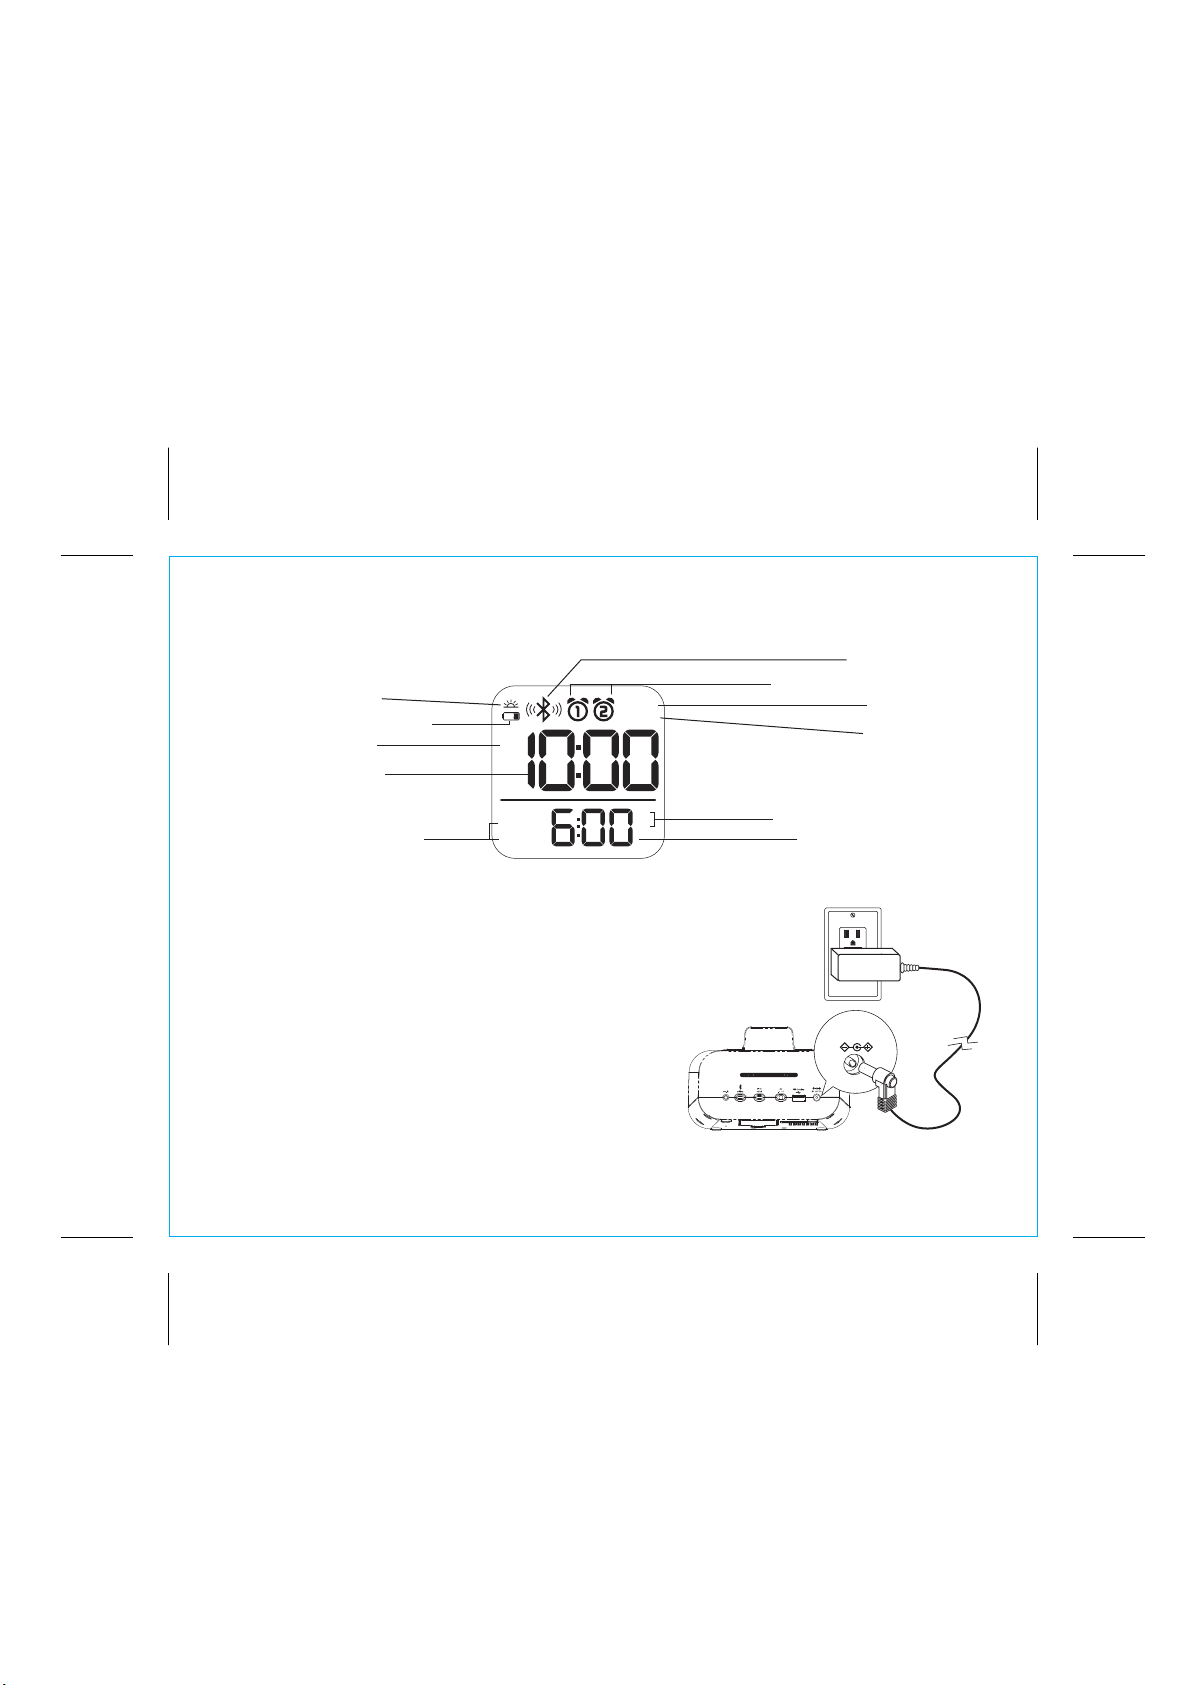
The Display
DST indicator
Battery Low Indicator
PM Indicator
PM
Using the
SLEEP
AUX-IN
Time Display
PM
AM
Year/Date Indicator
ALM.
YEAR
DATE
Setting Up the Unit
1. Connect the included AC adaptor to the DC jack located
on the back of the unit and connect the other end to a working
wall outlet.
Turning the Unit ON and OFF
1. Once the AC adaptor is properly connected, press the
Power Button located on top of the unit to turn the unit
ON. “ON” will appear briefly on the display.
2. Press the Power Button to turn the unit OFF.
“OFF” will appear briefly on the display.
NOTE: The unit has an automatic shut off function: if no audio is
detected for 3 minutes, the unit will power off.
4
iBT22A
Bluetooth Indicator
Alarm 1 & Alarm 2 Indicators
Sleep Indicator
Aux-in Indicator
Alarm time AM/PM Indicator
Alarm Time/Date Display
outlet
RESET
RESET
TEST
TEST
7.5V 2A
Page 10

P10
Setting the Time
1. Press and hold the Clock Adjust Button (located on the back of the unit) until the time flashes in the
display and a beep sounds.
2. Press and release the – or + Buttons to adjust the clock to the current time (hold to advance or reverse
rapidly). Make sure to set the correct AM/PM time. The PM indicator appears to the left of the time
display; there is no AM indicator.
3. Press and release the Clock Adjust Button. The year will flash on the display and a beep will sound.
4. Press and release the – or + Buttons until the current year is displayed (hold to advance or reverse
rapidly).
5. Press and release the Clock Adjust Button again. The date will flash on the display and a beep will
sound.
6. Press and release the – or + Buttons until the current date is displayed (hold to advance or reverse
rapidly).
7. Press and release the Clock Adjust Button again to complete time setting. You will hear 2 beeps to
confirm time setting is complete.
NOTE: Press the or Button at any time during time setting to toggle between standard
12 hour display and 24 hour (”military”) display modes.
Using the
iBT22A
Daylight Saving Time
1. Slide the DST (Daylight Saving Time) Switch located on the back of the unit to +1 to add one hour
for daylight saving time or slide to -1 to subtract an hour for standard time. The DST icon will appear
on the display when switch is set to +1 to indicate daylight saving time.
5
 Loading...