

The lightning flash and arrowhead within the triangle is a warning sign
alerting you of "dangerous voltage" inside the product.
USER MANUAL
Model : GB-6000-BTKFM3UC
High Power Rechargeable Wireless Boombox
CAUT ION
RISK O F ELEC TRIC SH OCK
DO NOT OPEN
WARNING:
TO RE DUCE THE RISK OF F IRE O R EL ECTRIC SH OCK, DO NOT EXPOSE THIS
APPLIANCE TO DRIPPI NG O R SPL ASHI NG L IQUID S.
THE M AINS PLU G IS USED A S THE DIS CONNE CT DE VICE A ND IT SHALL REM AIN
READILY OPER ABLE. T O C OMPLE TELY DIS CONN ECT TH E PO WER INPU T, THE
MAINS PLU G OF TH E APPARATUS MUS T BE DISCO NNEC TED FROM TH E MAINS
COMPLE TELY. THE M AINS PLUG SHO ULD NOT B E OBS TRUC TED OR SH OULD BE
EASILY ACC ESSE D DURING INTE NDED USE.
PLEAS E NOTE: Y OU WILL FIN D THE
RATING LABEL FOR THIS PRODU CT
LOCATED ON THE REAR O F THE U NIT.
CAUTION: G ROUN DING O R POL ARIZ ATION. TH E PRECAUTI ONS S HOULD BE TAKEN
SO THAT THE WIDER BLAD E OF TH E AC PLU G MUST MATCH THE SLOT I N
RECEPTACLE "WA LL SOCK ET".
THE APPARATUS SHOULD NOT BE EXPOS ED TO DRIPPIN G OR SPLASHING
AND NO OBJE CTS FILLED WITH LIQUIDS SHOULD BE PLA CED ON THE AP PARATUS.
UNDER THE ENVIRO NMENT WITH ELECT ROSTATIC DISCHARGE, THE BLUETOOTH® FUNCTIO N
MAY STOP TEMPORARY AND THE USER NEEDS TO MANUALLY PRESS THE PLAY KEY AGAIN
TO GO ON LISTEN ING THE MUSIC.
BATTERY SHALL NOT BE EXPOSED TO EXCESSIV E HEAT SUCH AS SUNS HINE,
FIRE OR TH E LIKE.
THE DEVICE COMPLIES WITH PART 15 OF THE FCC RULES. OPERATION IS SUBJECT TO THE FOLLOWING TWO
CONDITIONS: (1) THIS DEVICE MAY NOT CAUSE HARMFUL INTERFERENCE, AND (2) THIS DEVICE MUST ACCEPT ANY
INTERFERENCE RECEIVED, INCLUDING INTERFERENCE THAT MAY CAUSE UNDESIRED OPERATION.
CHANGES OR MODIFICATIONS NOT EXPRESSLY APPROVED BY THE PARTY RESPONSIBLE FOR COMPLIANCE COULD
VOID THE USER'S AUTHORITY TO OPERATE THE PRODUCT.
NOTE: THIS PRODUCT HAS BEEN TESTED AND FOUND TO COMPLY WITH THE LIMITS FOR A CLASS B DIGITAL DEVICE,
PURSUANT TO PART 15 OF THE FCC RULES. THESE LIMITS ARE DESIGNED TO PROVIDE REASONABLE PROTECTION
AGAINST HARMFUL INTERFERENCE IN A RESIDENTIAL INSTALLATION. THIS PRODUCT GENERATES, USES AND CAN RADIATE
RADIO FREQUENCY ENERGY AND, IF NOT INSTALLED AND USED IN ACCORDANCE WITH THE INSTRUCTIONS, MAY CAUSE
HARMFUL INTERFERENCE TO RADIO COMMUNICATIONS. HOWEVER, THERE IS NO GUARANTEE THAT INTERFERENCE
WILL NOT OCCUR IN A PARTICULAR INSTALLATION. IF THE PRODUCT DOES CAUSE HARMFUL INTERFERENCE TO RADIO
OR TELEVISION RECEPTION, WHICH CAN BE DETERMINED BY TURNING THE EQUIPMENT OFF AND ON,
THE USER IS ENCOURAGED TO TRY TO CORRECT THE INTERFERENCE BY ONE OR MORE OF THE FOLLOWING MEASURES :
-REORIENT OR RELOCATE THE RECEIVING ANTENNA. -INCREASE THE SEPARATION BETWEEN THE PRODUCT AND RECEIVER.
-CONNECT THE PRODUCT INTO AN OUTLET ON A CIRCUIT DIFFERENT FROM THAT TO WHICH THE RECEIVER IS CONNECTED.
-CONSULT THE DEALER OR AN EXPERIENCED RADIO/TV TECHNICIAN FOR HELP.
WARNING:
To reduce the risk of electric shock, d o not r emove cover ( or back). N o
user-serviceable parts inside. Refer servicing t o qualified s ervice personnel.
CAUTION:
The exclamation point within the triangle is a warning sign alerting you of
important instructions accompanying the product.
DO NO T EXP OSE T O DRI PPIN G
NOTE: CAU TION SYMB OLS AR E PR INTED ON BOTTO M OF UNIT.
PLEASE RE FER TO INS TRUC TION MANU AL.
DANGER OF EXPLOSION IF BATTERY IS INCO RRECTLY REPLACED.
REPLACE ON LY WITH THE SAME OR EQUIVALENT TY PE.
CAUTION
CAUTION
OR SP LASH ING LIQUI DS!
E-2
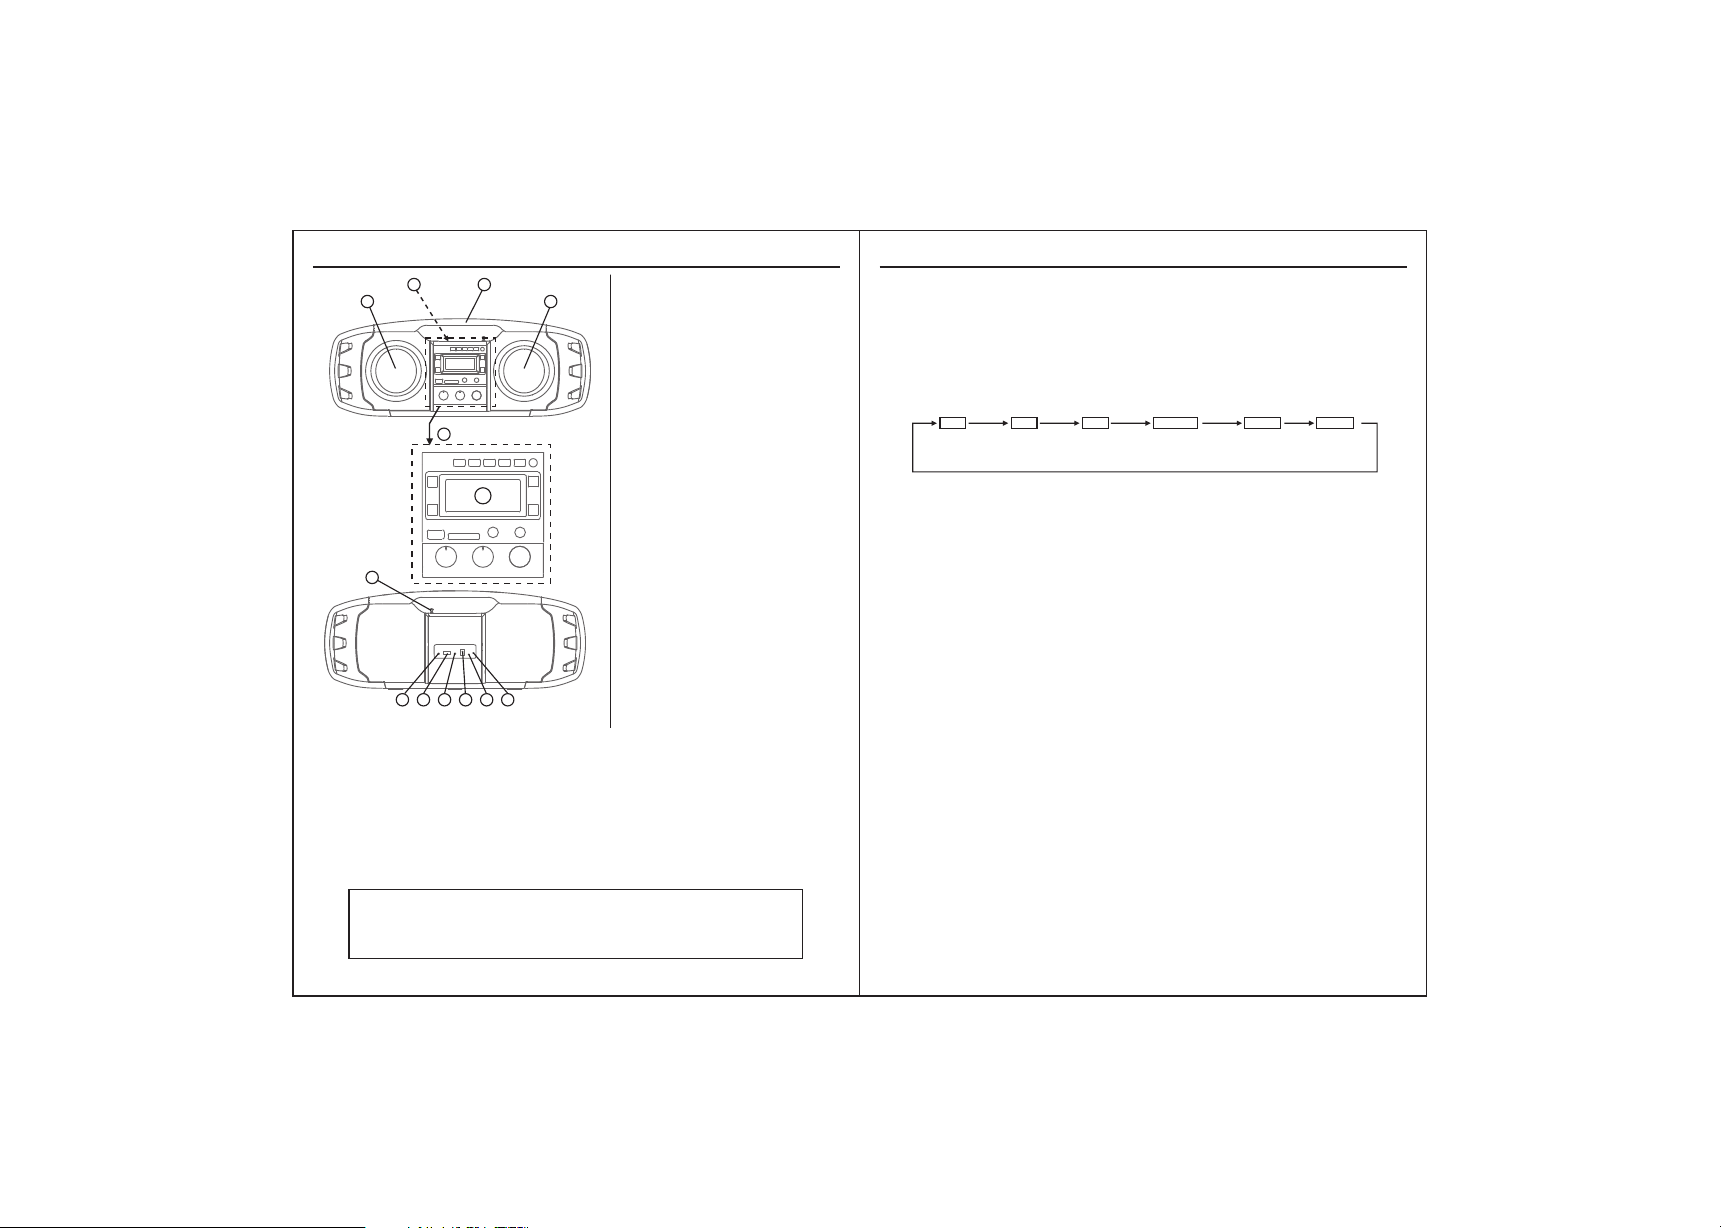
LOCATION OF CONTROLS/ POWER SOURCES
2
1
3
Enlarge view of the
4
Function keys panel:
1
567 8 9 10
12
13
16
17
20 21 22
23
24 25 26 27 28 29
Rechargeable Battery:
- This unit runs via internal rechargeable Lithium-ion battery.
- It can be also recharged with the provided AC-Charger.
- Please ensure your country’s AC-Charger is within the AC-Adaptor’s voltage range.
- Insert the small DC plug of the AC-Charger into the DC Socket at the back of the unit.
- Plug the AC-Charger into a wall outlet with AC power.
- The unit is charging if the charging LED indicator is on.
- Once the unit is fully charged, the charging LED indicator will automatically switch off.
- Once the unit has been charged, it can simply be unplugged and taken anywhere to be used.
- Total play time when fully charged can go upto 5-6 hours, depending on the type of music played
and the loudness level.
- When the unit is not being used, we suggest to keep it plugged in and charging.
PLEASE FULLY CHARGE THE UNIT BEFORE FIRST USE!
FOR BEST RESULT, FULLY CHARGE THE UNIT BEFORE USE EACH TIME.
IF THE BATTERY IS FULLY DRAINED, PLEASE ALLOW IT TO RECHARGE
14
11
15
18
19
IMPORTANT
FOR A FEW HOURS BEFORE USE.
1. Main Speaker (Left/ Right)
2. Slot for placing your Smartphone/ Tablet
3. Handle
4. Function keys panel
5. Display key
6. Mode key
7. Stop/ Prog. key
8. MEM - / Folder - key
9. MEM + / Folder + key
10. Power key (On/ Standby)
11. LCD display
12. Next/ Tune + key
13. Back/ Tune - key
14. Play/ Pair key
15. Function Key
16. USB MP3 Socket
17. SD-Card Socket
18. Microphone Input Socket
19. Microphone Volume Knob
20. Bass Knob
21. Treble Knob
22. Volume Control Knob
23. Telescopic antenna
24. Aux input-1 socket
25. USB Charging Socket
26. Aux-Input 2 socket
27. DC Power Socket
28. Charge Indicator LED
29. Reset hole
E-3
OPERATION
USB charging port
This unit is equipped with a DC 5V USB charging port on the back panel. To utilize this function,
simply connect the device you would like to charge (eg: Smartphone or Tablet ) to a USB cord
and plug it into the USB charging port.
The device will be charged automatically when it is successfully connected, even during playback.
The USB port should only be used when the AC-Charger is plugged into the unit.
FUNCTION KEY
Pressing the FUNCTION Key repeatedly will allow you to select one of the different source
functions, as follows :
BT FM
Bluetooth Radio MP3
Radio
- Press “FUNC” key repeatedly until display shows FM.
USB
player
CARD
SD-Memory Card
MP3 player
- To improve radio reception, extend and adjust position of the telescopic antenna.
- After tuning into a desired station, use “MODE” key to select (MONO/ STEREO) mode.
In some cases, when the reception is poor, we recommend to use “MONO” mode
for better clarity.
Manual Frequency Adjustment (Scan Mode)
- Press & immediately release “TUNE+” or “TUNE-“ Key to manually adjust the radio frequency
1 step at a time.
- When the desired station is reached, it can be saved into one of the “MEMORY” positions.
(See “Radio Memory” section for further details).
Automatic Frequency Adjustment (Seek Mode)
- Press & Hold (For 2 seconds) “TUNE+” or “TUNE-“ key to seek the next available radio station
frequency.
- When the desired station is reached, it can be saved into one of the “MEMORY” positions.
(See “Radio Memory” section for further details).
Radio Memory
- After tuning into a desired station, it can be stored into one of the 20 available memory positions.
- Short Press “PROG.” key to go to memory tuning mode.
- Press & release “MEM+” or “MEM –“ key to choose the desired memory storage
position you would like to store into (CH01 to CH20).
- Short Press “PROG.” key again to confirm selection.
- To erase a saved radio station, simply replace it with a new station in same memory position.
Recalling a saved memory station
- Short press “MEM+”/ “MEM-“key to find (recall) a desired memory position .(CH01 to CH20)
E-4
AUX-1
Input
Jack
AUX-2
Input
Jack
 Loading...