

AM4
AM2 (+),AM3 (+)
FM1 ,FM2 (+)
1366775
115x
Intel
LGA 1366 / 1156 / 1155 / 1151 / 1150 / 775
1 2
775 腳位專用
775 only
775のみ
775 接口专用
10
12
12
Intel
AMD
5
1 2
5
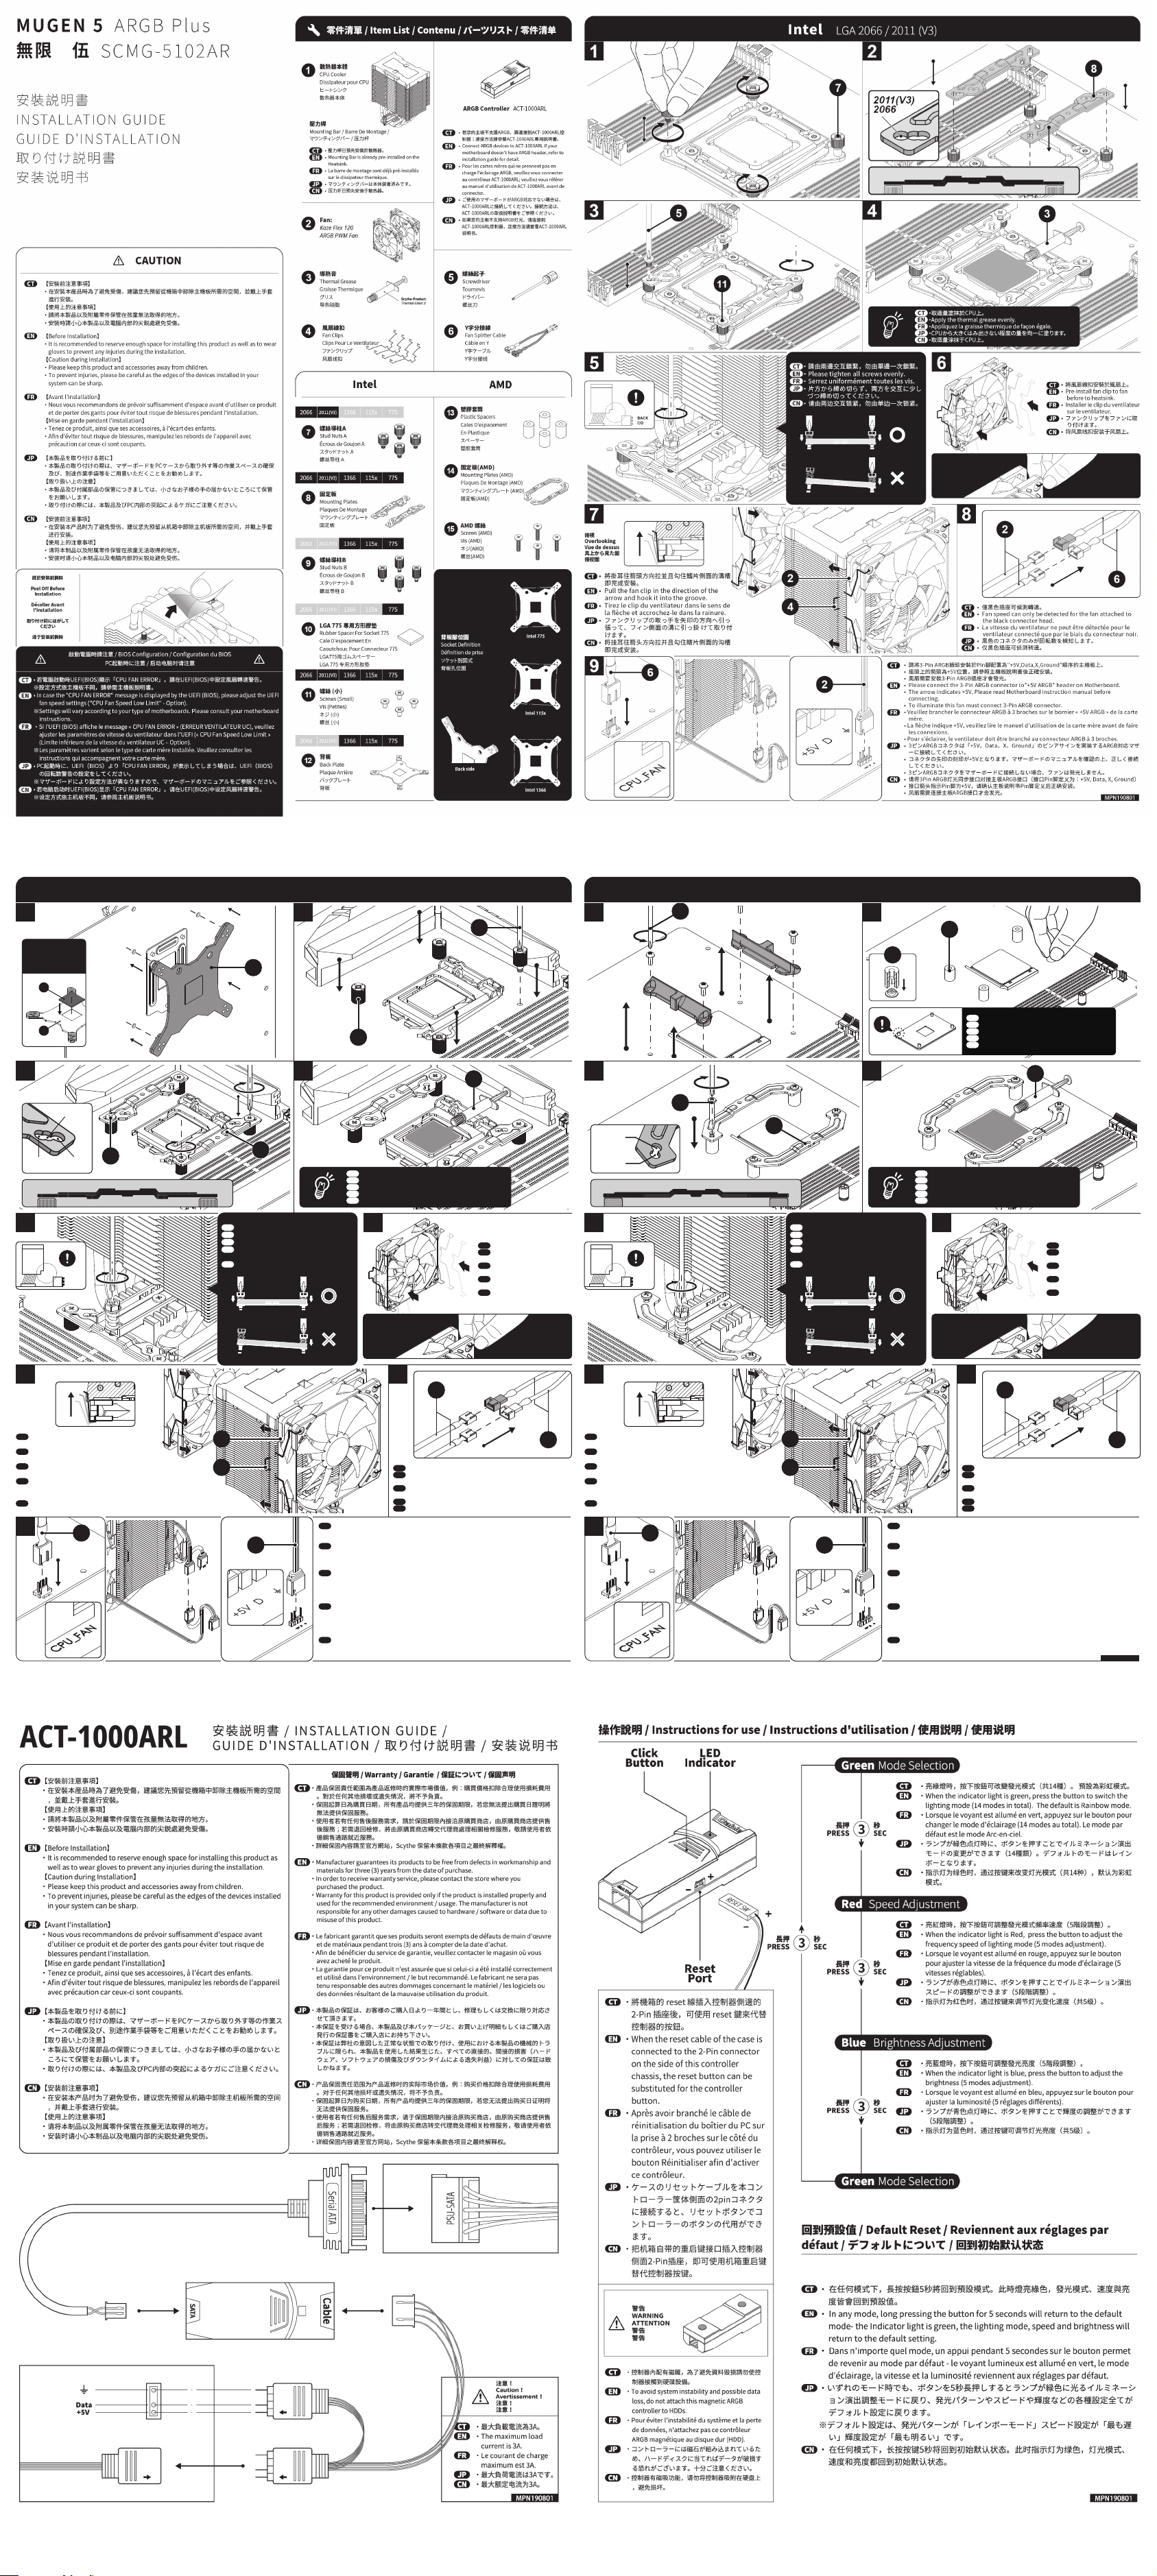
LGA 2066 / 2011 (V3)
FM2(+) / FM1 / AM4 / AM3(+) / AM2(+)
13
13
CT
※請使用主機板上的背板。
EN
※Please use the original backplate.
FR
※Veuillez utiliser la plaque arrière d’origine.
JP
9
※マザーボード付属のバックプレートをご使用ください。
CN
※请使用主板上的背板。
3 4
11
5 6
BACK
I/O
8
CT
・請由兩邊交互鎖緊,勿由單邊一次鎖緊。
EN
・Please tighten all screws evenly.
FR
・Serrez uniformément toutes les vis.
JP
・片方から締め切らず、両方を交互に少し
づつ締め切ってください。
CN
・请由两边交互锁紧,勿由单边一次锁紧。
〇
CT
EN
FR
JP
CN
×
7
俯視
Overlooking
Vue de dessus
真上から見た図
俯视图
• 將掛耳往箭頭方向拉並且勾住鰭片側面的溝槽
CT
即完成安裝。
• Pull the fan clip in the direction of the
EN
arrow and hook it into the groove.
• Tirez le clip du ventilateur dans le sens de
FR
la flèche e t accrochez-le dans la rainure.
• ファンクリップの取っ手を矢印の方向へ引っ
JP
張って、フィン側面の溝に引っ掛 けて取り付
けます。
• 将挂耳往箭头方向拉并且勾住鳍片侧面的沟槽
CN
即完成安装。
9
6
2
4
• 請將3-Pin ARGB插頭安裝於Pin腳配置為"+5V,Data,X,Ground" 順序的主機板上。
CT
• 插頭上的箭頭為+5V位置,請參照主機板說明書後正確安裝。
• 風扇需要安裝3-Pin ARGB插座才會發光。
• Please connect the 3-Pin ARGB connector to"+5V ARGB" he ader on Motherboard .
2
EN
• The arrow indic ates +5V, Please read Motherboa rd instruction manual before
connecting.
• To illuminate this fan must connect 3-Pin ARGB connect or.
• Veuillez branch er le connecteur ARGB à 3 broches sur le born ier « +5V ARGB » de
FR
mère.
• La flèche indique +5V, veuillez lire le manuel d'utilisation de la carte mère avant de faire
les connexions.
• Pour s' éclairer, le ventilateur do it être branché au connecteur ARGB à 3 broches.
• 3ピンARGBコネクタは「+5V、Data、X、Ground」のピンアサインを実装するARGB対応マザ
JP
ーに接続してください。
• コネクタの矢印の刻印が+5Vとなります。マザーボードのマニュアルを確認の上、正しく接続
してください。
• 3ピンARGBコネクタをマザーボードに接続しない場合、ファンは発光しません。
• 请将3Pin ARGB灯光同步接口对接主板ARGB接口(接口Pin脚定义为:+5V, Data, X, Ground)
CN
• 接口箭头指示Pin脚为+5V,请确认主板说明书Pin脚定义后正确安装。
• 风扇需要连接主板ARGB接口才会发光。
3
・取適量塗抹於CPU上。
・Apply the thermal grease evenly.
・Appliquez la graisse thermique de façon égale.
・CPUから大きくはみ出さない程度の量を均一に塗ります。
・取适量涂抹于CPU上。
CT
EN
FR
JP
CN
8
2
• 僅黑色插 座可偵測轉速。
CT
• Fan speed c an only be detected for the fan attached to
EN
the black connector head.
• La vitesse du ventilateur ne peut être détectée pou r le
FR
ventilateur connecté que par le biais du connecteur noi r.
• 黒色のコ ネクタのみが回転数 を検知します。
JP
• 仅黑色插 座可侦测转速。
CN
• 將風扇線扣安裝於風扇上。
• Pre-install fan clip to fan
before to heatsink.
• Installer le clip du ventilateur
sur le ventilateur.
• ファンクリップをファンに取
り付けます。
• 将风扇线扣安装于风扇上。
6
la cart e
3 4
15
14
5
BACK
I/O
CT
・請由兩邊交互鎖緊,勿由單邊一次鎖緊。
EN
・Please tighten all screws evenly .
FR
・Serrez uniformément toutes les vis.
JP
・片方から締め切らず、両方を交互に少し
づつ締め切ってください。
CN
・请由两边交互锁紧,勿由单边一次锁紧。
7
俯視
Overlooking
Vue de dessus
真上から見た図
俯视图
• 將掛耳往箭頭方向拉並 且勾住鰭片側面的溝槽
CT
即完成安裝。
• Pull the fan clip in the direction of the
EN
arrow and hook it into the groove.
• Tirez le clip du ventilateur d ans le sens de
FR
la flèche et a ccrochez-le dans la rainure.
• ファンクリップの取っ 手を矢印の方向へ引っ
JP
張って、フィン側面の溝に引っ掛 けて取り付
けます。
• 将挂耳往箭头方向拉并 且勾住鳍片侧面的沟槽
CN
即完成安装。
9
6
2
4
2
3
CT
・取適量塗抹於CPU上。
EN
・Apply the thermal grease evenly.
FR
・Appliquez la graisse thermique de façon égale.
JP
・CPUから大きくはみ出さない程度の量を均一に塗ります。
CN
・取适量涂抹于CPU上。
6
• 將風扇線扣安裝於風扇上。
CT
• Pre-install fan clip to fan
EN
before to heatsink.
• Installer le clip du ventilateur
FR
sur le ventilateur.
• ファンクリップをファンに取
JP
り付けます。
• 将风扇线扣安装于风扇上。
〇
CN
×
8
2
• 僅黑色插 座可偵測轉速。
CT
• Fan speed can only be detected for th e fan attached to
EN
the black connector head.
• La vitesse du ventil ateur ne peut être dét ectée pour le
FR
ventilateur connecté que p ar le biais du connecte ur noir.
• 黒色のコ ネクタのみが回転数 を検知します。
JP
• 仅黑色插 座可侦测转速。
CN
• 請將3-Pin ARGB插頭安裝於Pin腳配置為"+5V ,Data,X,Ground"順序的主機板上。
CT
• 插頭上的箭頭為+5V位置,請參照主機板說明書後正確安裝。
• 風扇需要安裝3-Pin ARGB插座才會發光。
• Please connect the 3-Pin ARGB connector to"+5V ARGB" he ader on Motherboard .
EN
• The arrow indic ates +5V, Please read Motherb oard instruc tion manual before
connecting.
• To illuminate this fan must connect 3-Pin ARGB connect or.
• Veuillez branch er le connecteur ARGB à 3 broches sur le born ier « +5V ARGB » de la cart e
FR
mère.
• La flèche indique +5V, veuillez lire le manuel d'utilisation de la carte mère avant de faire
les connexions.
• Pour s' éclairer, le ventilateur do it être branché au connecteur ARGB à 3 broches.
• 3ピンARGBコネクタは「+5V、Data、X、Ground」のピンアサインを実装するARGB対応マザ
JP
ーに接続してください。
• コネクタの矢印の刻印が+5Vとなります。マザーボードのマニュアルを確認の上、正しく接続
してください。
• 3ピンARGBコネクタをマザーボードに接続しない場合、ファンは発光しません。
• 请将3Pin ARGB灯光同步接口对接主板ARGB接口(接口Pin脚定义为:+5V , Data, X, Ground)
CN
• 接口箭头指示Pin脚为+5V,请确认主板说明书Pin脚定义后正确安装。
• 风扇需要连接主板ARGB接口才会发光。
6
MPN190801
 Loading...