

Page 1
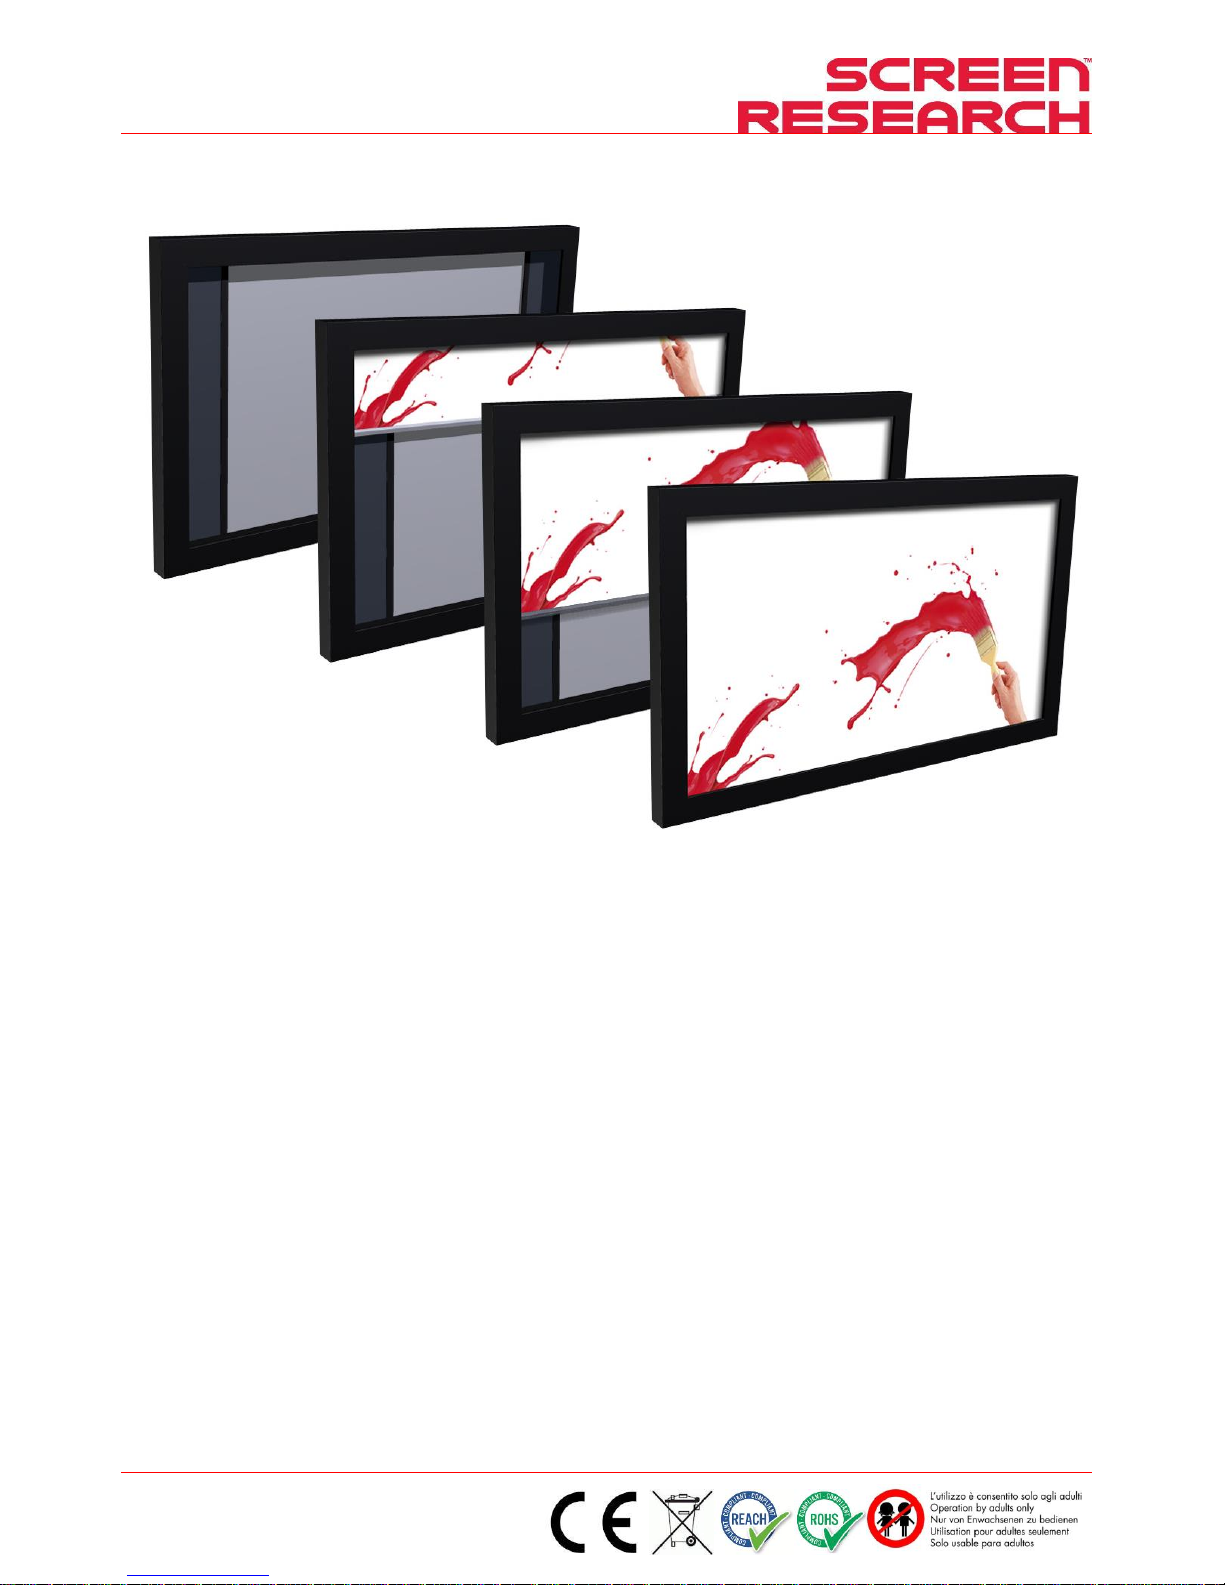
XLR3 Décor mask version Installation Manual
Made by Adeo Screen Sp. Z o.o. (Poland)
Doc: XLR3 Installation Manual rev3 | 04.12.2017
Model Fixed Frame Screen with Masking
Reference X-Mask 2-Way Lateral Décor mask – XLR3
Code PFMAXLR3-XXXXX
Manuale d’installazione e d’uso schermo a cornice rigida con mascheramento
Fixed frame screen with masking installation and operation manual
Manuel d’installation et d’utilisation de l’écran à cadre rigide avec masquage
Bedienungs- und Installationsanleitung: Leinwand mit festem Rahmen und Maskierung
Manual de instalación y de uso: pantalla con marco rígido y máscara
Instrukcja montażu i obsługi ekranu ramowego z maskami
Page 2
Manuale d’installazione e d’uso schermo a cornice rigida con mascheramento
ITALIANO
Made by Adeo Screen Sp. Z o.o. (Poland) Specifications are subject to change without notice. E&OE
Please verify that you are working with the latest revision of this document before specifying your screen.
Doc: XLR3 – Installation Manual rev3 | 04.12.2017| Download at: www.screenresearch.com 2017 AdeoSreen All Rights Reserved.
Page 2
01 INTRODUZIONE
Il presente manuale è parte integrante del prodotto e la sua lettura e comprensione sono di fondamentale importanza per la si curezza. In esso sono descritte le norme e le modalità di
impiego che consentiranno al cliente un corretto e sicuro uso dello schermo. Il manuale deve sempre accompagnare il prodotto e va custodito con cura in luogo idoneo a garantirne
l’integrità fisica e facilmente accessibile a chiunque sia autorizzato alla sua consultazione. Ogni utilizzatore del prodotto è responsabile della salvaguardia del manuale. L’utilizzatore è
inoltre responsabile del controllo della funzionalità dello schermo e della riparazione o sostituzione di parti soggette ad usura che potrebbero causare danni.
Le immagini contenute in questo manuale hanno lo scopo di descrivere in maniera dettagliata funzioni, caratteristiche o procedure. Tuttavia possono differire per i l tipo di modello
rappresentato, questo non comporta modifiche al significato descrittivo dell’immagine.
02 NORME GENERALI DI SICUREZZA
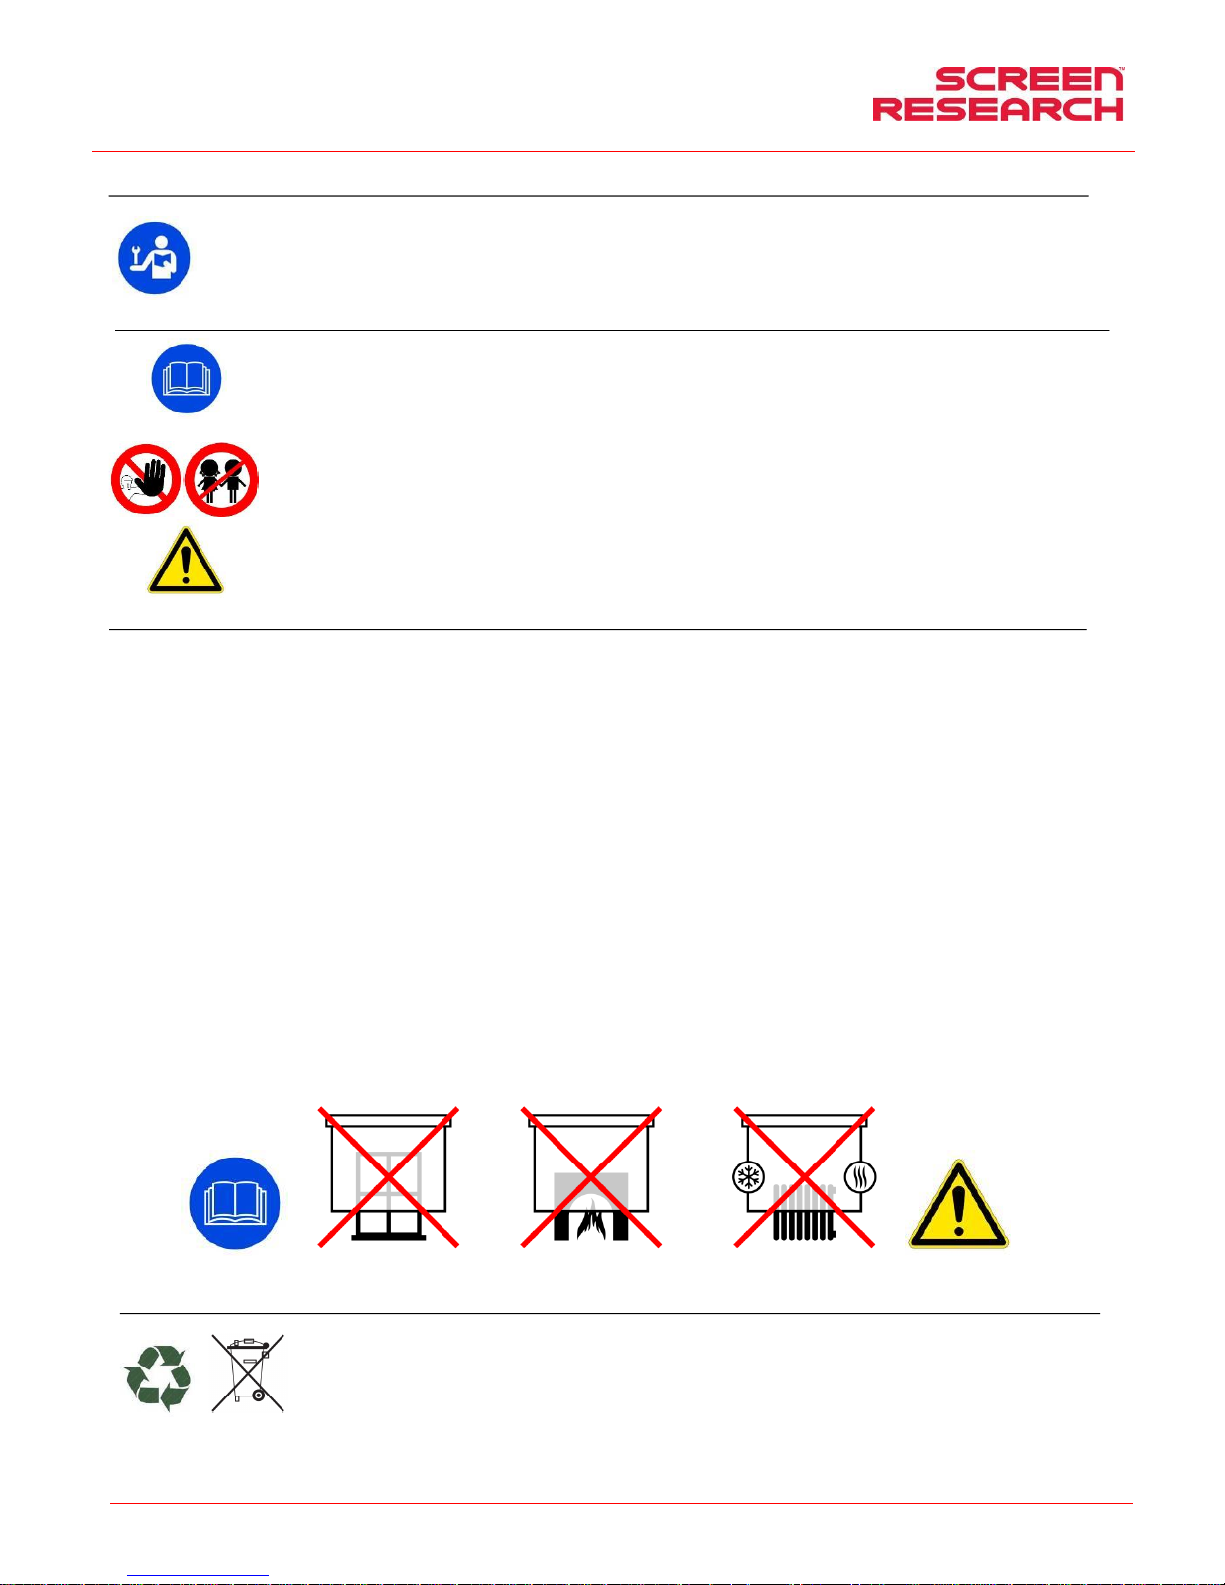
ATTENZIONE: Importanti istruzioni di sicurezza. Attenersi alle istruzioni poiché l’installazione impropria può provocare gravi ferite. Assicurarsi semp re di aver letto e co mpreso
bene le istruzioni e le avvertenze contenute in questo manuale prima di iniziare ad utilizzare il prodotto e di effettuarne qualsiasi intervento di manutenzione.
- Divieto assoluto di installare gli schermi sopra zone di possibil e transito di persone. Controllare, prima e durante l’utilizzo, che lo s chermo non generi situazioni pericolose.
- Non manomettere, togliere o danneggiare nessun elemento o parte dello schermo.
- Non eseguire mai operazioni di manutenzione sullo schermo c on motore acceso (Per una maggior sicurezza, togliere l’alimentazione).
- Obbligatorio scollegare l’alimentazione durante la p ulizia, la manutenzione o quando si sostituiscono delle parti.
- Divieto assoluto di utilizzo del prodotto ai bambini. Divieto assoluto di far avvicinare bambini allo schermo durante il suo movimento.
Ogni schermo è coperto da garanzia, la cui validità dipende dall ’effettivo rispetto ed esecuzione delle istruzioni contenute in questo manuale .
ATTENZIONE: I kit d’installazione di ogni schermo, non c ontengono viti e tappi a espansione per il fissaggio alle pareti/soffitti. L’installatore è r esponsabile della scelta
adeguata di viti e sistemi di fissaggio, in base alle differenti tipologie d i materiale delle pareti o soffitti sui quali deve installare lo schermo.
Un’installazione errata può compromettere la sicurezza delle persone che useranno il prodotto, il produttore non è responsabile per danni a cose o persone causati da
installazione errata, uso improprio dello schermo, scar sa o insufficiente manutenzione.
Il produttore non è responsabile di problem i legati ad errori d’installazione. Se necessario contattare il nostro ufficio tecnico per eventuali chiarimenti.
L’installazione dello schermo, i collegamenti elettrici e le verifiche in c aso di malfunzionamento degli avvolgimenti motorizzati devono esser e eseguiti dal rivenditore
autorizzato o da personale competente e a conoscenza dei risch i che può presentare l’energia elettrica. Il cavo di collegamento non può ess ere sostituito. Se il cavo è
danneggiato lo schermo deve essere sostituito. La manomissione dei fine corsa o la foratura del sigillo posto sopra i fori comporta la decadenza della garanzia.
FINITO IL MONTAGGIO DELLO SCHERMO SULL E STAFFE E’ OBBLIGATORIO VERIFICARE LA PERFETTA ORI ZZONTALITA’ PRIMA DELL’UTILIZZO.
03 AVVERTENZE E PRECAUZIONI PER L’UTILIZZO E INSTALLAZIONE
Gli schermi sono indicati per utilizzi in ambienti interni con condiz ioni di temperatura (20 - 25 °C) ed umidità normali.
Assolutamente vietato di installare gli schermi fronte finestre e di utilizzarli come oscuranti, vietato installare lo schermo in prossimità di fonti di calore o freddo quali c aminetti condizionatori o termosifoni, il
mancato rispetto di questi divieti potrebbe comportare deformazioni o allungamenti permanenti del tessuto di proiezione.
L’utilizzo dello schermo motorizzato all’ esterno prevede l’adozione di particolari precauzioni quali:
1- Protezione del cavo/i di alimentazione del motore dalle radiazio ni UV, con adeguate canaline o guaine idonee all’installazione esterna.
2- Utilizzo di passacavi per l’isolamento all’acqua e um idità nelle giunzioni con le scatole portafrutti o derivanti.
3- Utilizzo di commutatori con grado di protezio ne IP55 o superiore (il commutatore di serie al prodotto non è conforme all’utilizzo esterno).
4- Copertura e relativa protezione dello schermo dal conta tto diretto con acqua o liquidi
Non lasciare esposto per lunghi periodi il telo di proiezione alla l uce solare per prevenire l’ingiallimento dello stesso (verificare anche che, a causa dell’ esposizione alla luce solare, lo schermo non raggiunga
i livelli di temperatura sopra indicati).
Poiché il materiale di cui è composto il telo di proiezione (PVC) t ende a caricarsi elettrostaticamente, una presenza eccessiva di polveri nell’ a mbiente di proiezione può provocare un degrado delle qualità
ottiche del telo a causa della deposizione delle polveri per attrazione e lettrostatica (vedi anche pulizia del telo di proiezione).
Si premette che l’utilizzo dello schermo avvolgibile prevede la complet a apertura del tessuto (discesa) e successivamente al suo utilizzo con proiettore, la comp leta chiusura del tessuto (salita). La completa
apertura e chiusura (discesa-salita) dello sch ermo viene indicato come “ciclo”.
Gli schermi avvolgibili motorizzati sono indicati per utiliz zi a “ciclo” unico, questo significa che fra un ciclo e l’altro viene normalmente lasciato passare un not evole lasso di tempo. Non è previsto l’utilizzo
dello schermo con continue aperture e chiusure.
I motori utilizzati negli schermi, sono provvisti di si stemi di bloccaggio termico che permette di non surriscaldare il motore danneggiandolo in modo perm anente. L’attivazione del blocco termico avviene dopo
un certo numero di cicli di utilizzo, il numero di cicli varia in base al tip o di motore e al tipo di schermo (normalmente fra 3 e 6 cicli). Si precisa comunque c he il calore emesso dal motore viene trasmesso al
rullo e di conseguenza al tessuto avvolto sul rullo. Il surr iscaldamento del tessuto può provocare deformazioni o allungamenti n on omogenei permanenti con conseguenti disallineamenti del fondale o
deformazioni del tessuto.
Allo scopo di evitare quanto precedentemente descritto si fa divieto a ssoluto di utilizzare lo schermo superando 3 cicli completi di utilizzo (s alita-discesa). Al raggiungimento del 3 ciclo di utilizzo continuo o a
tempi ravvicinati, sarà necessario attendere 40min con lo schermo in posizione aperta ( tessuto srotolato) per permettere il r affreddamento del motore e relativi componenti strutturali, prima di un nuovo
utilizzo.
ATTENZIONE: Non forzare manualmente la fuoriuscit a del telo perché potrebbe provocare danni al motore o il distacco del cassonetto di con tenimento dalle staffe di fissaggio.
Non permettere ai bambini di giocare con i dispositivi di coman do fissi. Tenere i telecomandi lontano dai bambini.
Osservare lo schermo in movimento e tenere lontane le persone finché lo schermo non sia completamente chiuso.
E’ vietato, bloccare, impedire e forzare il movimento dello sc hermo, aggrapparsi o dondolarsi , aggiungere o applicare q ualunque oggetto al telo o fondale, modificare la struttura dello schermo; in quanto
potrebbe causare danni al sistema di avvolgimento co n conseguenti danni a cose e persone.
Divieto assoluto di installare lo schermo fronte finestre e l’utilizzo di esso come oscurante.
Divieto assoluto di installare lo schermo in prossimità d i fonti di calore o freddo quali caminetti condizionatori, termosifoni o sim ilari.
Installare lo schermo tassativamente in bolla .
SMALTIMENTO DEL PRODOTTO
Come per le operazioni d'installazione, anche al termine della vita di questo prodotto, le operazioni di smantellamento devon o essere eseguite da personale qualificato.
Questo prodotto è costituito da vari tipi di materiali: alcuni possono essere riciclati, altri devono essere smaltiti. Informatevi sui sistemi di riciclaggio o smaltimento
previsti dai regolamenti vigenti nel vostro territorio, per questa categoria di prodotto.
Come indicato dal simbolo a fianco è vietato gettare questo prodotto nei rifiuti domestici. Eseguire quindi la "raccolta separata" per lo smaltimento, secondo i metodi
previsti dai regolamenti vigenti nel vostro territorio, oppure riconsegnare il prodotto al venditore nel momento dell'acquisto d i un nuovo prodotto equivalente.
Attenzione: i regolamenti locali possono prevedere pesanti sanzioni in caso di smaltimento abusivo di questo prodotto.
Page 3
Manuale d’installazione e d’uso schermo a cornice rigida con mascheramento
ITALIANO
Made by Adeo Screen Sp. Z o.o. (Poland) Specifications are subject to change without notice. E&OE
Please verify that you are working with the latest revision of this document before specifying your screen.
Doc: XLR3 – Installation Manual rev3 | 04.12.2017| Download at: www.screenresearch.com 2017 AdeoSreen All Rights Reserved.
Page 3
04 CARATTERISTICHE GENERALI DEL PRODOTTO
Lo schermo prodotto è costruito in conformità con le disposizio ni delle seguenti direttive CE: 2014-35-CE LDV Bassa tensione
2014-30-EU EMC Compatibilità elettromagnetica
2014-53-CE Apparecchiature radio
2009-125-CE CONSUMI Eco design
2011-65-CE ROHS Sostanze pericolose
2012-19-CE RAEE Trattamento rifiuti
2001-95-CE SICUREZZA Prodotti sicuri
Lo schermo descritto nel presente manuale deve essere utilizzat o solo ed esclusivamente come supporto per la videoproiezione. Qualsia si altro uso non previsto da questo manuale, non è acconsentito.
Lo schermo contiene uno o più tessuti/ fogli di proiezione in PVC plastificato senza cadmio oppure in FIBRA di VETRO impregnata di PVC plas tificato, ogni tessuto può essere classificato di categoria:
- M1 o M2 s econdo la regolamentazione Francese (LNE Laboratoire national de métrologie et d ’essais – SME Centre de recherches du Bouchet - WARRINGTONFIRE GENT Laboratoire de
métrologie et d’essais – IFTH Laboratoire acc reditè )
- B1 o B2 secondo la regolamentazione Tedesca (LNE Laboratoire national de métrologie et d’essais – SME Centre de recherches du Bouchet - WARRINGTON FIRE GENT Laboratoire nat ional de
métrologie et d’essais)
- UL94HB secondo la regolamentazione degli Stati Uniti D’Amer ica (THE GOVMARK Organization, Inc.)
Poiché non esiste ancora a livello europeo una armonizzazione tra le varie normative nazionali di c lassificazione si esplicit a che la classe M1 francese corrisponde a mater iale non infiammabile e la
classificazione M2 corrisponde a materiale no n facilmente infiammabile.
I tessuti/fogli di proiezione contenuti e utilizzati sugli schermi sono costituiti principalmente da PVC plastificato o fibra di vetro plastificata, tali tessuti sono sensibili a tempe ratura e umidità, per tale motivo
la tolleranza dimensionale accettata è del’1% su ogni dimensio ne.
Le tolleranze sui profili in alluminio utilizzati sono di +/ -2 mm.
Le tolleranze sull’ingombro totale sono di:
- +/- 3 mm fino a 2500 mm di ingombro totale;
- +/- 5 mm fino a 4000 mm di ingombro totale;
- +/- 10 mm fino a 8000 mm di ingombro totale;
- +/- 20 mm fino a 16000 mm di ingombro totale;
- +/- 30 mm fino a 24000 mm di ingombro totale.
05 PULIZIA MANUTENZIONE
Lo schermo e i tessuti di proiezione degli schermi sono delicati, quindi bisogna prestare particolare attenzione e seguire le s eguenti istruzioni per la loro pulizia:
Non utilizzare mai solventi, prodotti chimici o abrasivi o strume nti appuntiti per pulire la superfice.
Evitare qualsiasi contatto con altri materiali (vernici, inchiostri e ct) in quanto potrebbe essere impossibile rimuoverli dal tessuto.
TESSUTI DI PROIEZIONE CLEARPIX : Usare un panno morbido, pulito, inumidito utilizzandolo sempre con movimenti che partono dal centro dell’area di proiezione verso i lati esterni. E’ acconsentito utilizzare
un spazzola installata su aspirapolvere solo se le setole sono morbide e perfettamente pulite.
TESSUTI DI PROIEZIONE SOLIDPIX, MULTI PIX,: Per pulire telo di proiezione, utilizzare un panno morbido, pulito, inumidito, eventualmente abb inato con detergenti a base neutra o alcool. Poiché dopo la
pulizia potrebbe verificarsi che il telo si carichi di elettricità static a, a causa dello sfregamento con il panno, si consiglia di passare, con un panno pulito, un liquido antis tatico sul telo per evitare che la
polvere venga nuovamente attratta dallo stesso
TESSUTI DI PROIEZIONE SILVERPIX Obbligatorio leggere attentamente il foglio allegato al tessuto dello schermo
PROFILI GENERICI: Per pulire il profilo spo lverare utilizzando un panno morbido pulito ed eventualmente dei detergenti non aggressivi.
PROFILI VELLUTATI: Per pulire il profilo spolverare ut ilizzando un panno morbido pulito o spazzole con sedole morbide e antista tiche. E’ acconsentito utilizzare un spazzola installata su aspirapolvere solo se le
setole sono morbide e perfettamente pulite.
STRUTTURA e STAFFE DI FISSAGGIO : E’ obbligatorio verificare periodicamente lo stato del prodotto e la tenuta delle sue staffe di fissaggio. In caso di presenza di deformazioni, lacerazioni o cedimenti
strutturali di staffe viti o componenti del prodotto, è obbligatorio mettere immediatamente in sicurezza la zona circostante lo schermo, per evitare qualsiasi tipo di danno a cose e persone. Successivamente è
obbligatorio provvedere all’immediata sosituzione del p resunto componente difettoso e al ripristino del prodotto.
06 DISIMBALLO DELLO SCHERMO E MOVIMENTAZIONE PRODOTTO
Assicurarsi che nessuna parte dello schermo sia stata d anneggiata durante il trasporto. In caso di anomalia comunicarlo tempe stivamente al rivenditore. Verificare che siano presenti tutti gli accessori per
tipo di schermo descritti nel manuale.
In comune
-n° 16 dadi per fissaggio Housing
-n°1 logo Screen Research
-n° 4 guanti in lattice
-n° 1 foglio protettivo in Nylon
-n° 1 chiave esagonale n°3
-n° 1 chiave esagonale n°4
-n° 1 chiave esagonale n°2,5
-n°1 libretto istruzioni
-n° 1 CD contenente manuale, foto e filmato screen
-n° 1 set connessione elettrica MCS
-n°2 cavi elettrici con spina elettrica
(non compresi viti e tasselli per parete)
<=160”
-n°2 STAFFE
>160”
-n°3 STAFFE
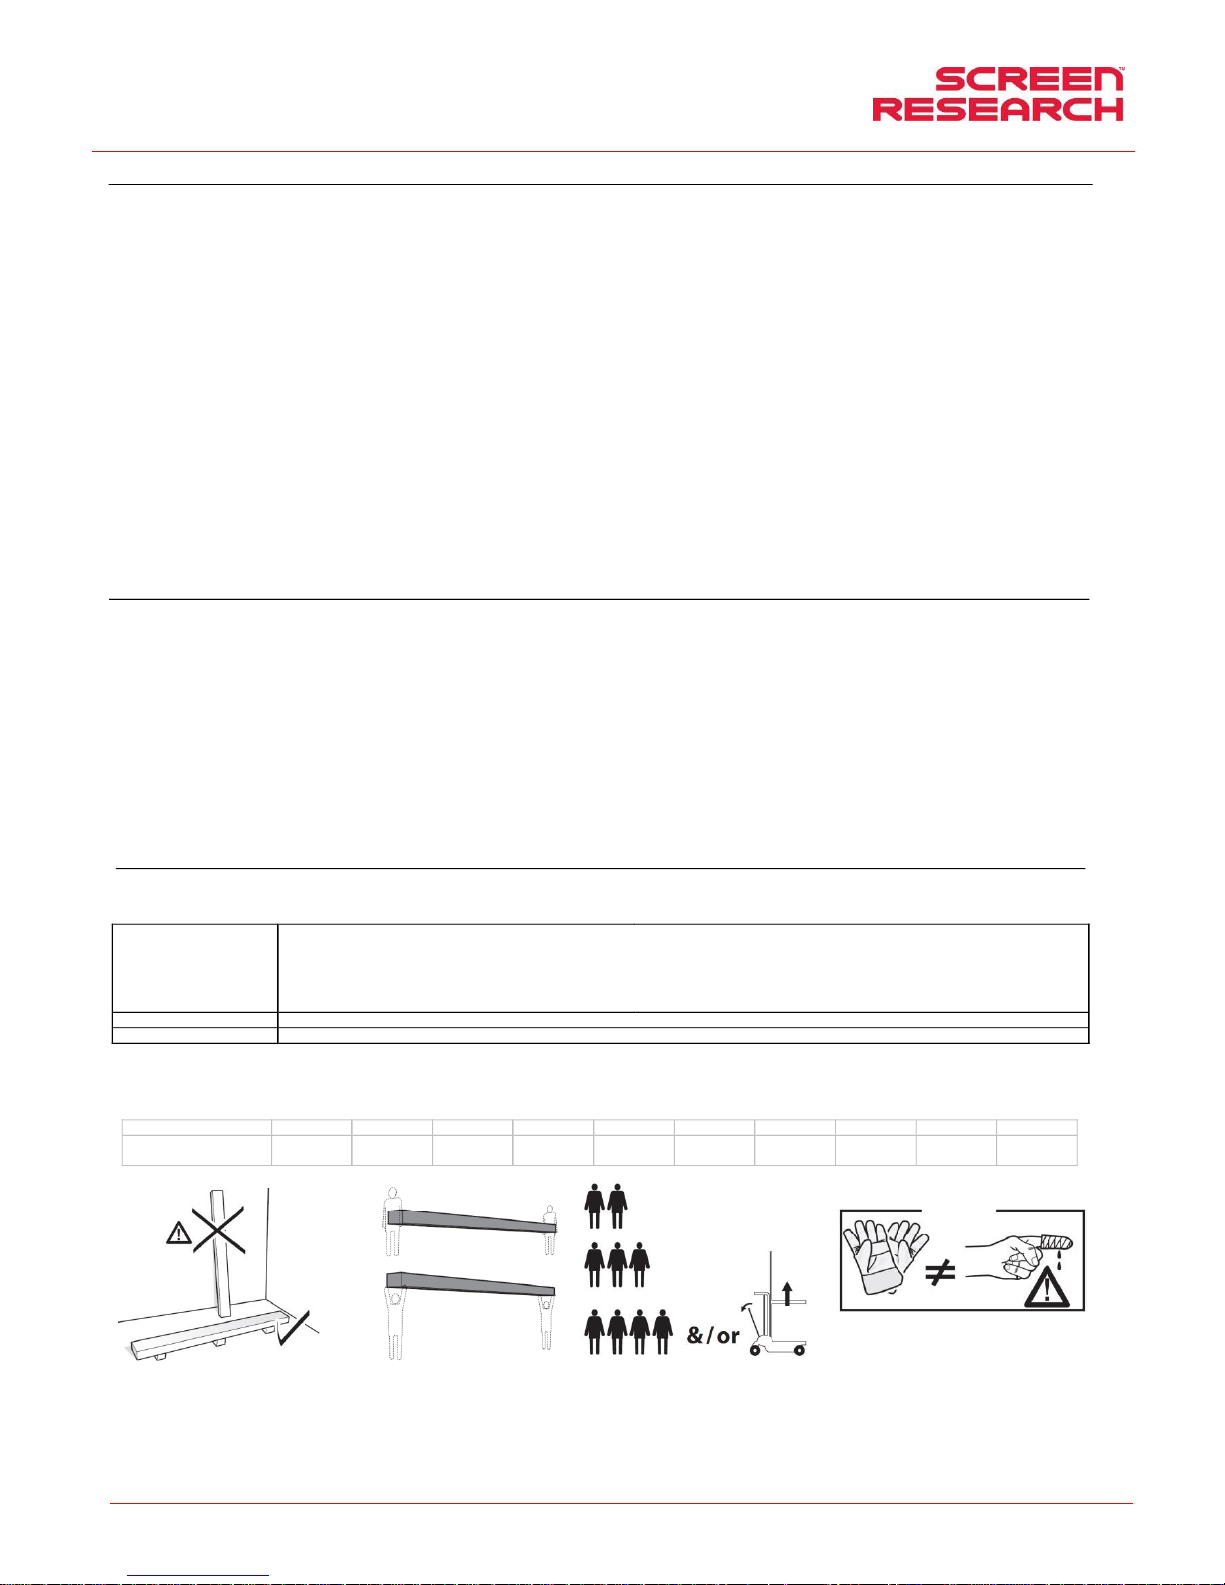
ATTENZIONE non usare t aglierini o oggetti appuntiti per aprire l'imballo, utilizzare sempre guanti di protezione durante l’apertura dell’imballo e l’install azione o movimentazione del prodotto. Movimentare
e installare il prodotto minimo in due tre o quattro persone in base al peso del prodotto (valori di riferimento per carico propersona: 25kg maschio - 15kg femmina). In caso di pesi superiori si raccomanda
di utilizzare attrezzatura di sollevamente specifica.
Fino a pollici
80”
90”
96”
100”
110”
120”
130”
140”
150”
160”
XLR3 Peso complessivo
144 Kg
317,5 Ibs
151 Kg
332,9 Ibs
158 Kg
348,3 Ibs
165 Kg
363,7 Ibs
172 Kg
379,2 Ibs
179 Kg
394,6 Ibs
184 Kg
405,6 Ibs
210 Kg
462,9 Ibs
217 Kg
478,4 Ibs
223 Kg
491,6 Ibs
Page 4
Manuale d’installazione e d’uso schermo a cornice rigida con mascheramento
ITALIANO
Made by Adeo Screen Sp. Z o.o. (Poland) Specifications are subject to change without notice. E&OE
Please verify that you are working with the latest revision of this document before specifying your screen.
Doc: XLR3 – Installation Manual rev3 | 04.12.2017| Download at: www.screenresearch.com 2017 AdeoSreen All Rights Reserved.
Page 4
07 ISTRUZIONI PER L’INSTALLAZIONE
ATTENZIONE:
Vedi immagini nelle ultime pagine di questo manuale . E’ assolutamente vietato installare lo schermo su pareti mobili o cavi instabili, le staffe devono essere applicate su
superfici che garantiscono nel tempo la d istanza fra una staffa e l’altra. L’installazione dello schermo deve essere effettuato con viti e ta sselli adeguati al peso e alla tipologia di parete o soffitto sulle qu ali si
vuole fissare le staffe, prima di incominciare l’installazione s cegliete il tipo di tassello o fissaggio seguendo lo schema seguente:
RACCOMANDAZIONI:
Utilizzare il telo (in dotazione) per coprire l’a rea di assemblaggio per evitare di rovinare il prodotto
Assicurarsi di installare eventuali sistemi di controllo in una zona acessibile per eventuali future assistenze e controlli.
ATTENZIONE !!!
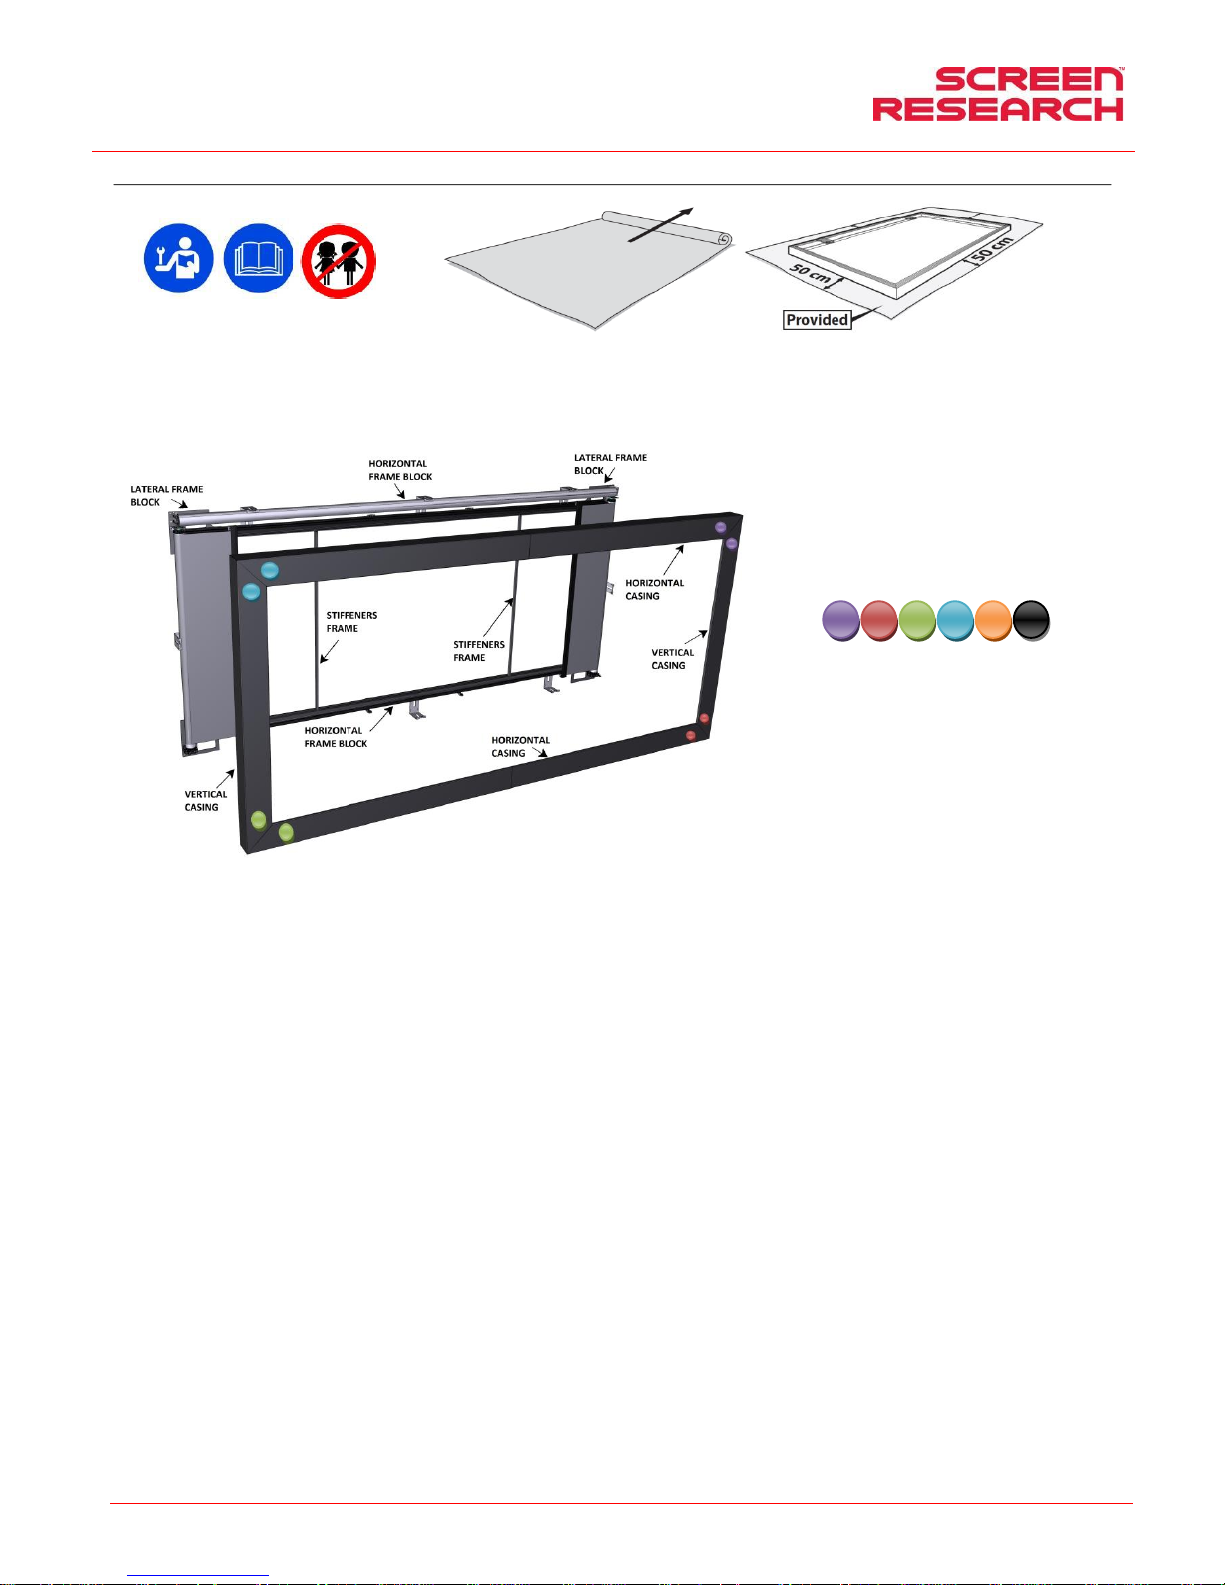
Lo schermo è composto da differenti componenti orrizontali e
verticali preassemblati in fabbrica.
Per facilitare il loro assemblaggio sono presenti ne gli angoli degli
adesivi circolari colorati che permettono di ver ificare il corretto
posizionamento degli elementi.
Page 5
Manuale d’installazione e d’uso schermo a cornice rigida con mascheramento
ITALIANO
Made by Adeo Screen Sp. Z o.o. (Poland) Specifications are subject to change without notice. E&OE
Please verify that you are working with the latest revision of this document before specifying your screen.
Doc: XLR3 – Installation Manual rev3 | 04.12.2017| Download at: www.screenresearch.com 2017 AdeoSreen All Rights Reserved.
Page 5
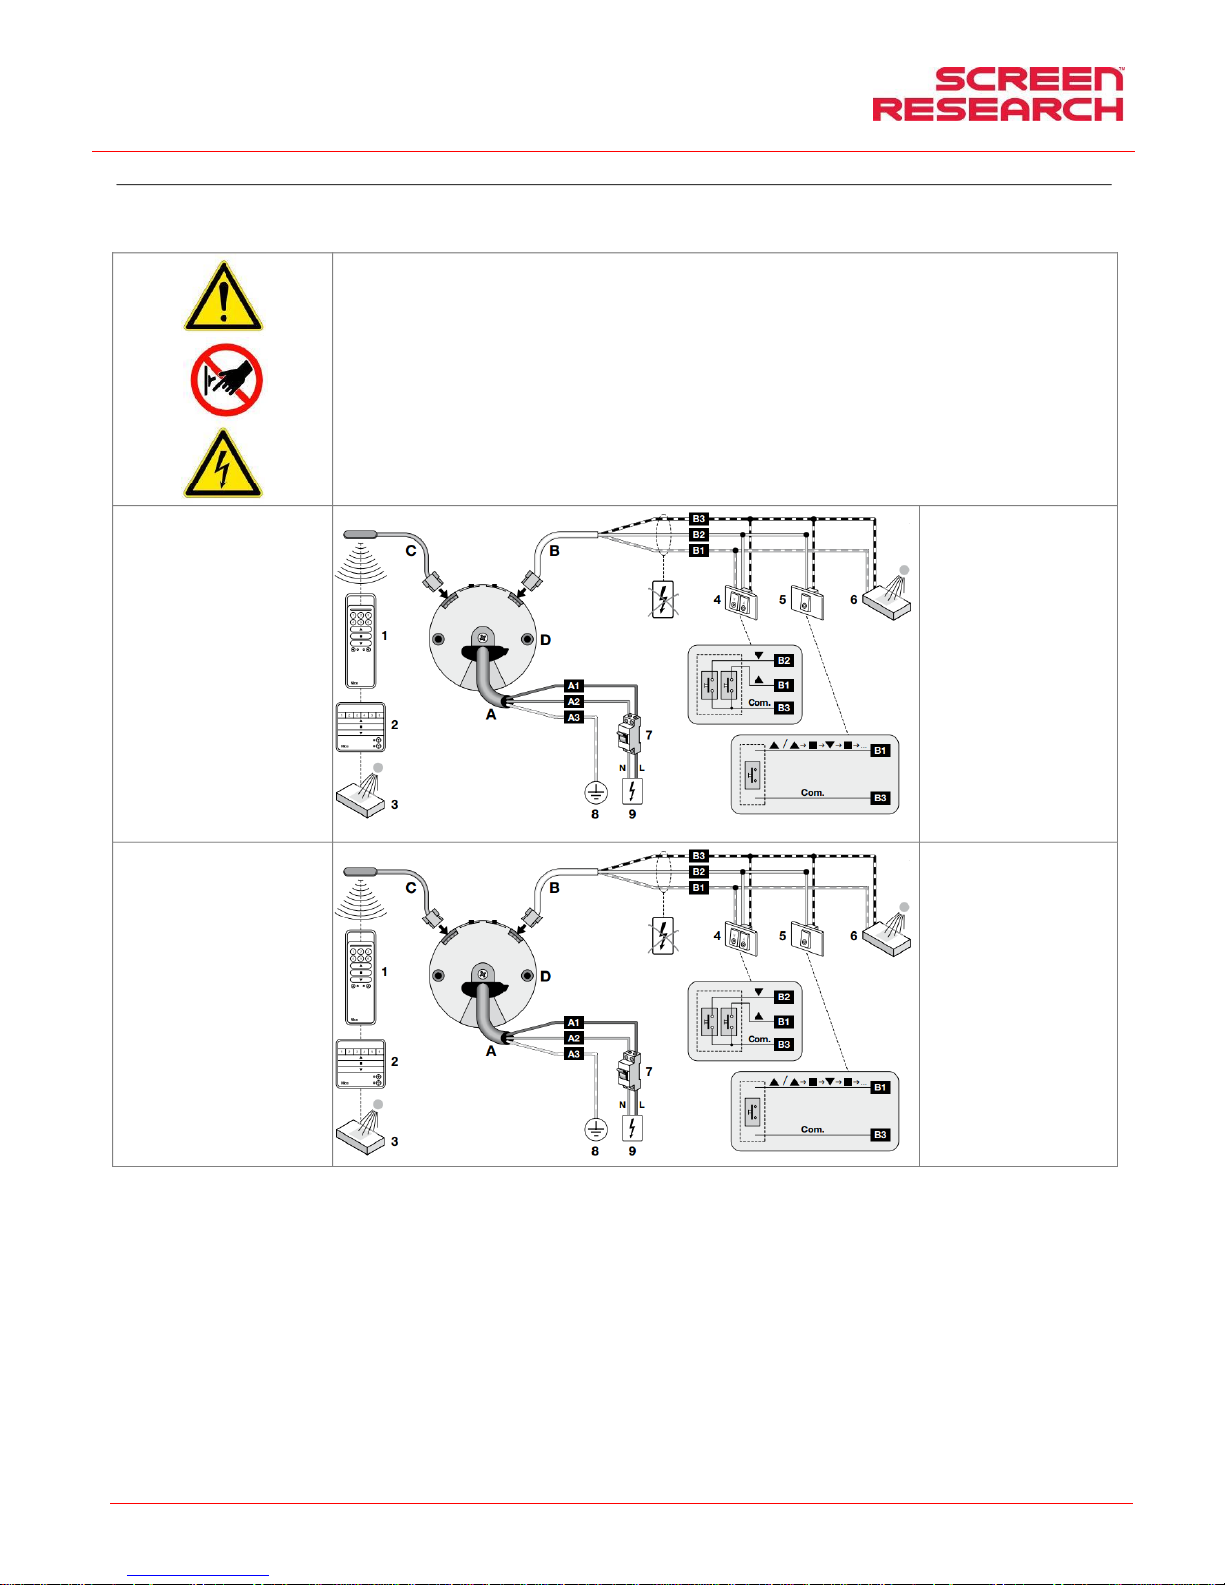
09 IDENTIFICAZIONE TIPO MOTORE – CARATTERISTICHE – COLLEGAMENTO ELETTRICO
Il tipo di motore installato sul prodotto è identificato sull’e tichetta riportante il logo CE e applicata su ogni prodotto, all’apertura dell’imball o si prega di controllare tale etich etta e di identificare il modello
corretto di motore per effettuare la corretta installazione e il corretto cablaggio. Nel caso in cui la potenza del motore non corrispondesse alla potenza della line a elettrica del luogo di installazione, si prega di
contattare un tecnico elettricista e fornirsi di un corretto trasformato re di corrente e Hz.
COLLEGAMENTO ELETTRICO:
Il cablaggio elettrico deve rispettare le norme CEI in vigore. La n orma CEI EN 60335-1 prevede che nella rete di alimentazione ci sia u n dispositivo di
disconnessione onnipolare con una distanza di apertu ra dei contatti di almeno 3 mm per ogni singolo motore (es. interruttore spina ecc.) In caso di necessità,
questo dispositivo garantisce una veloce e sicura scon nessione dell’alimentazione elettrica.
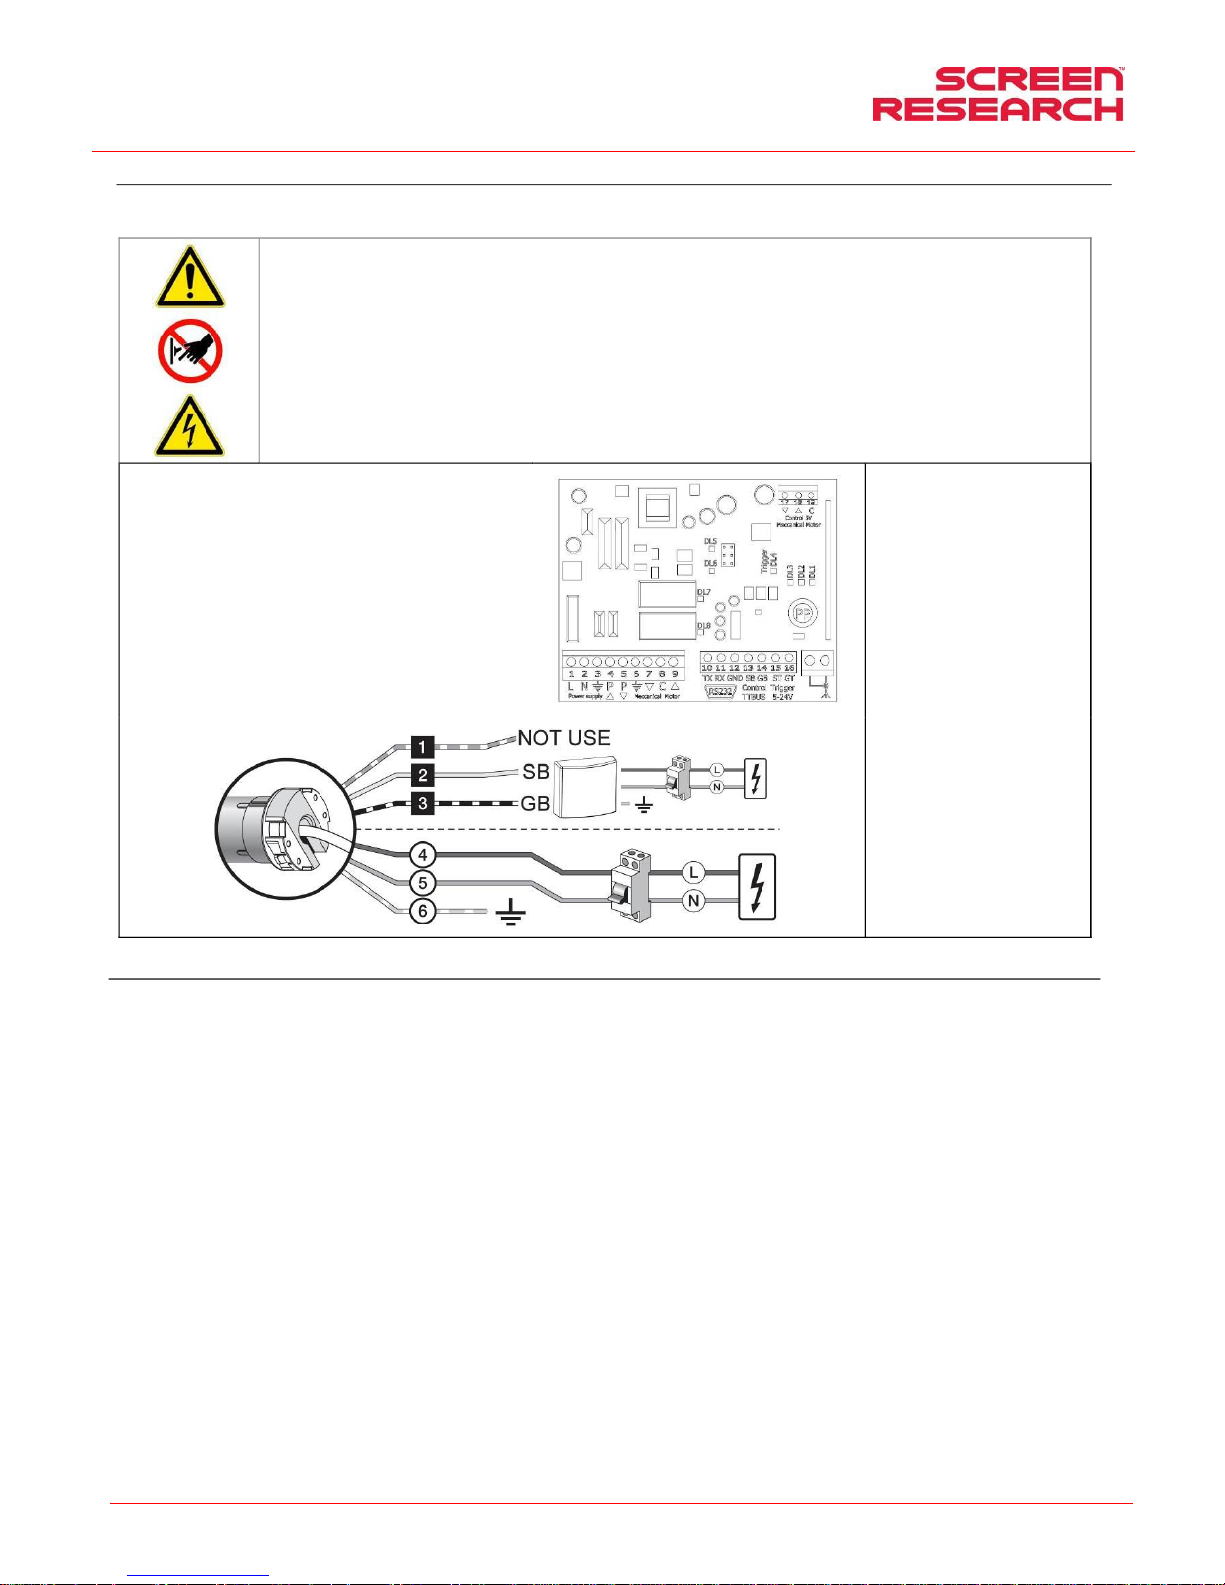
Utilizzare i cavi per la connessione come descritto nell’immagine .
ATTENZIONE:
Questo prodotto contiene due motori quindi effettuare lo s tesso cablaggio per tutti e due i motori.
E’ obbligatorio isolare i cavi BUS se non vengono utili zzati per il comando via pulsante.
ATTENZIONE:
La corretta esecuzione degli allacciamenti elettrici, a regola d’ar te e nel rispetto delle norme vigenti, è importante ai fini della prevenzione de gli infortuni e del
buon funzionamento, inalterato nel tempo, dello schermo.
Prima di eseguire qualsiasi operazione su parti elettric he, assicurarsi che non vi sia tensione.
Il motore negli schermi dotati di cassonetto è posto sulla destra dello schermo visto frontalmente
L’ azionamento avviene tramite radiocomand i forniti di serie.
Caratteristiche Motore
Nice ERA INN EDGE –AC
86-230V 50-60Hz:
Frequenza: ~Hz50-60
Potenza: 45W
Coppia: 3Nm
Velocità: 32Rpm
Ciclo di funzionamento: S2 4min
Lunghezza cavo: 3 mt
Resistenza meccanica: secondo norma
EN14202
T° di funzionamento:da –20 a +55 °C
Frequenza: 433.92 MHz
Portata trasmet: 150mt
Livello di pressione sonora ponderato:
LpA ≤ 70 dB(A)
Classe protezione motore IP44
Connessione per ogni motore:
A1 – Marrone (fase alimentazione)
A2 – Blu (neutro)
A3 – Giallo-verde (terra)
B1 – Bianco-arancio (salita)
B2 – Bianco (discesa TTBUS)
B3 – Bianco-nero (comune)
Caratteristiche Motore
Nice ERA INN EDGE –AC
86-230V 50-60Hz:
Frequenza: ~Hz50-60
Potenza: 70W
Coppia: 6Nm
Velocità: 32Rpm
Ciclo di funzionamento: S2 4min
Lunghezza cavo: 3 mt
Resistenza meccanica: secondo norma
EN14202
T° di funzionamento:da –20 a +55 °C
Frequenza: 433.92 MHz
Portata trasmet: 150mt
Livello di pressione sonora ponderato:
LpA ≤ 70 dB(A)
Classe protezione motore IP44
Connessione per ogni motore:
A1 – Marrone (fase alimentazione)
A2 – Blu (neutro)
A3 – Giallo-verde (terra)
B1 – Bianco-arancio (salita)
B2 – Bianco (discesa TTBUS)
B3 – Bianco-nero (comune)
Page 6
Manuale d’installazione e d’uso schermo a cornice rigida con mascheramento
ITALIANO
Made by Adeo Screen Sp. Z o.o. (Poland) Specifications are subject to change without notice. E&OE
Please verify that you are working with the latest revision of this document before specifying your screen.
Doc: XLR3 – Installation Manual rev3 | 04.12.2017| Download at: www.screenresearch.com 2017 AdeoSreen All Rights Reserved.
Page 6
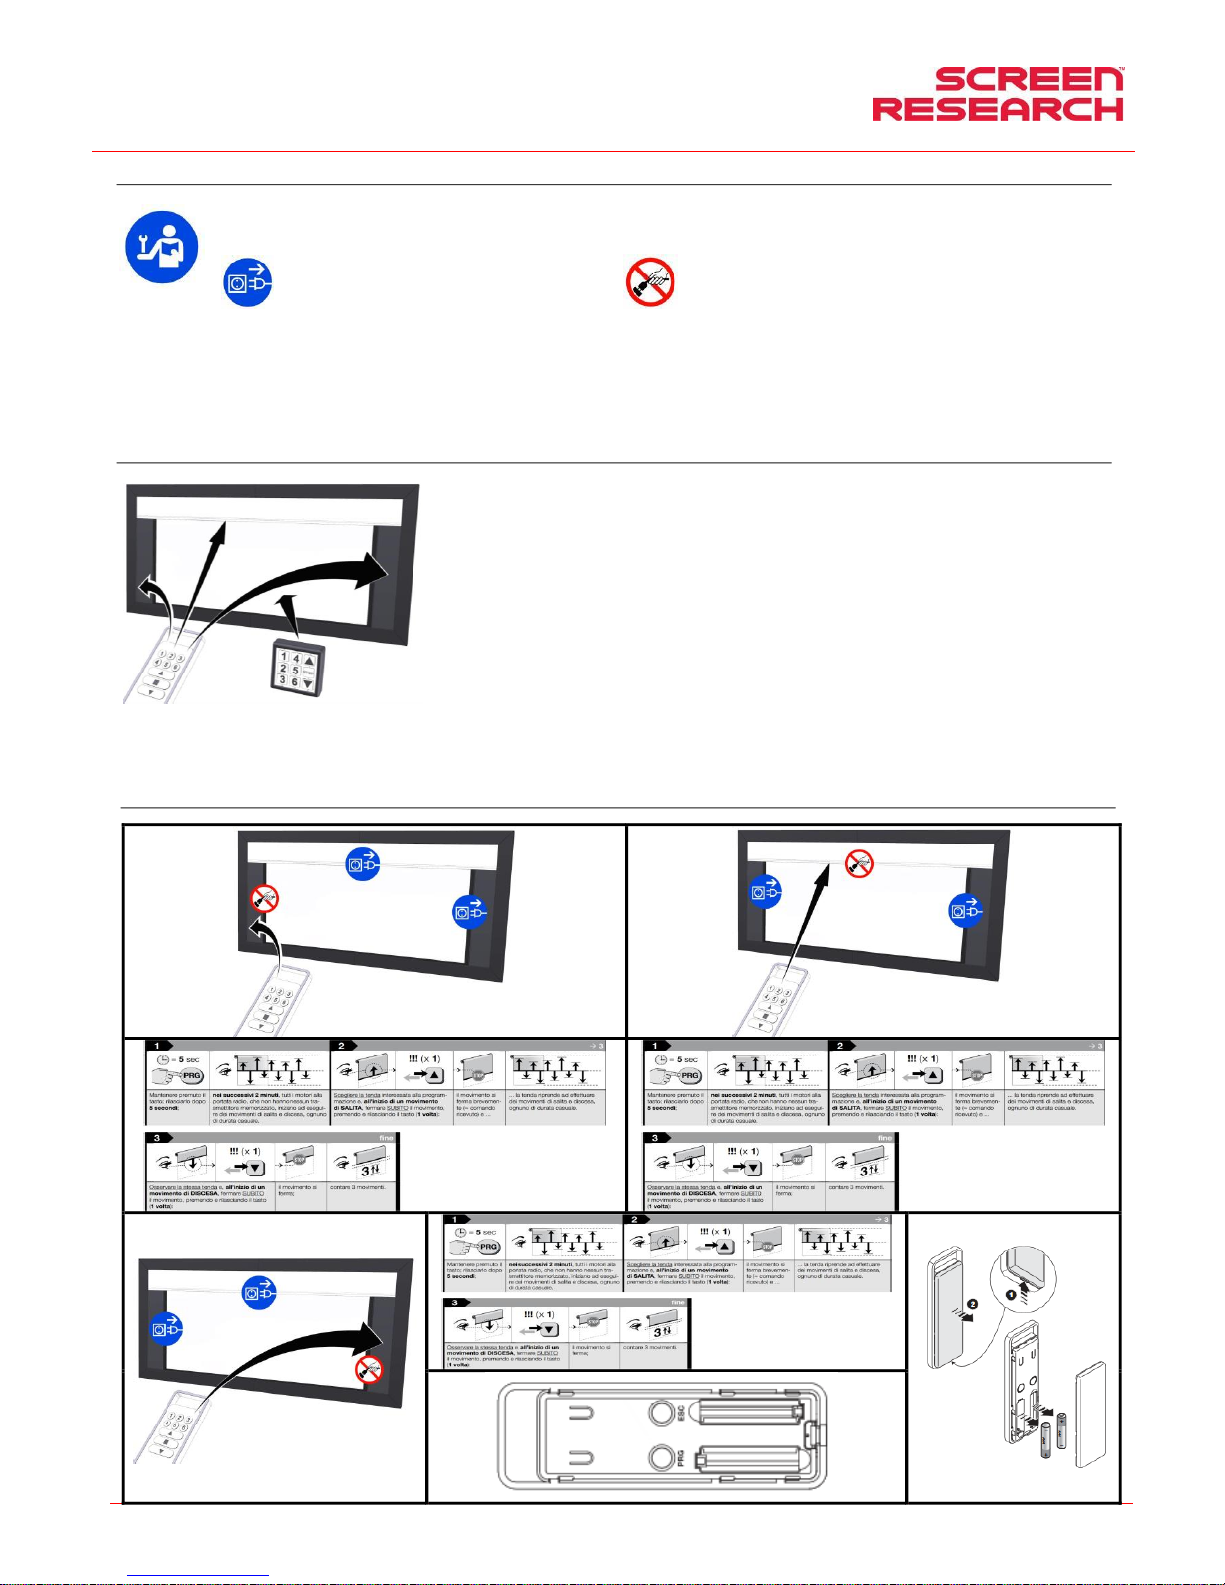
10 REGOLAZIONE FINE CORSA
ATTENZIONE LEGGERE PRIMA DI EFFETTUARE LE R EGOLAZIONI
le regolazioni indicate devono essere eseguite solo da personale autorizzato e specializzato. l’utilizzo non corretto delle procedure descritte poss ono causare danneggiamenti al
prodotto, per i quali non sarà riconosciuta la garanzia.
ATTENZIONE: nell’eseguire le procedure descritte nel ma nuale fare attenzione alle seguenti icone:
Togliere corrente al motore del mascheramento indicato Non togliere corrente al motore del mascheramento i ndicato
AVVERTENZE
Il fine corsa è regolato in maniera da permettere che il mascheramento sia avvolto per almeno 1,5 giri attorno al rullo per evitare il distacco del foglio. Un errata regola zione dei fine corsa può causare:
-Distacco del mascheramento dal rullo
-Avvolgimento in senso contrario del m ascheramento con danneggiamento della planarità e dei meccanismi di avvolgimento.
-Sforzo eccessivo sul motore con possibile danneggiam ento e attivazione della resistenza termica contenuto in esso.
-Avvolgimento eccessivo del sistema di taratura fine corsa con c onseguente rottura della parte meccanica.
GARANZIA
Si ricorda agli operatori che in caso di manomissione dei sigilli e danneggiamento derivante da una regolazione errata, gli interventi per riparazione verranno co nsiderati fuori garanzia.
LOGICA DI FUNZIONAMENTO e di PROGRAMMAZIONE
Telecomando MASTER: deve essere utilizza to da personale tecnico e permette le memorizzazioni dei fine corsa alti bassi e i due sing oli
mascheramenti
Telecomando PILOT: I tasti 1-6 possono e ssere usati per memorizzare ulteriori formati.
I tasti -STOP-permettono di muovere o fermare co ntemporaneamente i due mascheramenti (già programmati in fabbrica).
Prima di inziare a programmare i motori dell’ E-MASK , bisogna conoscere alcune logiche di f unzionamento per evitare incomprensioni e
problemi durante l’esecuzione delle procedure.
-La corretta sequenza di programmazione per poter funzionare è:
1° sintonizzazione dei telecomandi (già im postato in fabbrica)
2° impostazione dei fine corsa , massima e minima apert ura possibile dei mascheramenti (già impostati in fabbrica),
3° programmazione dei formati, fino ad un totale di 6 (consult are le varianti del vostro modello per capire quali sono impostate in fabbrica
e quali no)
Ogni procedura di programmazione è composta da più punti, al termine di un punto, l’operatore ha tempo 60sec per iniziare que llo
successivo, questo sistema serve ad evitare di entrare ed eseguire procedure diverse da quelle volute. Quindi se il motore non esegue
esattamente quello indicato nell’istruzione, attendere 6 0 sec. per uscire dalla programmazione e ricominciare nuovamente la p rocedura.
-Durante l’esecuzione di una qualsiasi procedura, si co nsiglia di mantenere premuto il tasto fino al completamento del movimento di conferma del moto re.
Prima di eseguire le programmazioni è necessario che il telecom ando master sia sintonizzato ai due singoli rulli, quindi il gruppo di tasti sinitri deve movimentare il mascheramento in basso , il gruppo di
tasti deve movimentare il mascheramento in alto.
Se il telecomando non esegue i movimenti sovra descritti, mem orizzare il telecomando come segue:
MEMORIZZARE IL TELECOMANDO MASTER (procedura già effettuata in fabbrica, NON deve essere eseguita da personale non autorizzato)
Page 7
Manuale d’installazione e d’uso schermo a cornice rigida con mascheramento
ITALIANO
Made by Adeo Screen Sp. Z o.o. (Poland) Specifications are subject to change without notice. E&OE
Please verify that you are working with the latest revision of this document before specifying your screen.
Doc: XLR3 – Installation Manual rev3 | 04.12.2017| Download at: www.screenresearch.com 2017 AdeoSreen All Rights Reserved.
Page 7
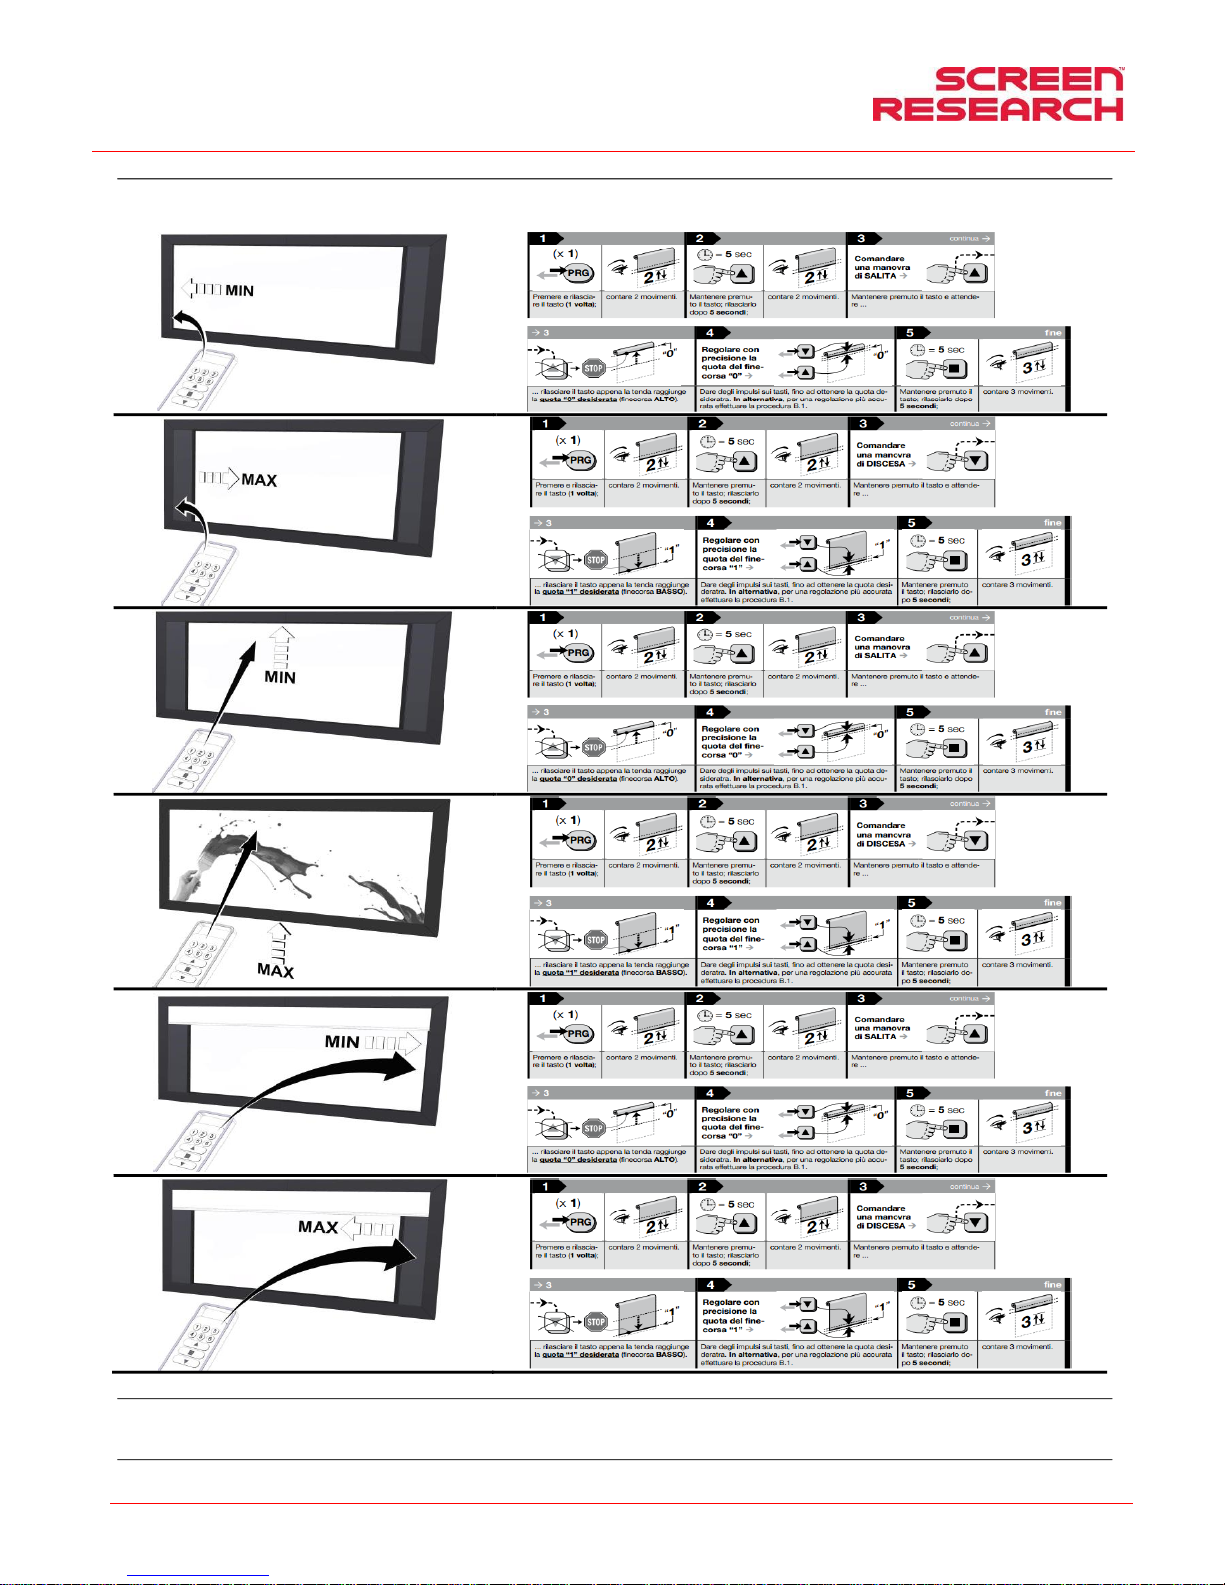
PROGRAMMAZIONE FINE CORSA MASCHERAMENTI (Procedura già effettuata in fabbrica, NON deve essere eseguita da personale non autorizzato)
Ogni procedura di programmazione è composta da più pun ti, al termine di un punto, l’operatore ha tempo 60sec per iniziare quello successivo, questo sistema serve ad evitare di e seguire procedure diverse
da quelle volute. Quindi se il motore non esegue esattamente quello indicato nell’istruzione, attende re 60 sec. per uscire dalla programmazione, oppure eseguire l’annullamento procedura come ind icato nel
capitolo specifico, quindi ricominciare nuovam ente la procedura.
SPOSTAMENTO FINE CORSA MASCHERAMENTI (NON deve essere eseguita da personale non autorizzato)
I motori h anno una logica di sovrascrittura, quindi una volta memorizzate le posizioni di fine corsa non esiste una procedura per la loro cancellazione, ma soltanto la possibilità di rimemorizzarli eseguendo
nuovamente la loro procedura di memorizzazione sop ra indicata.
ANNULLAMENTO PROGRAMMAZIONE IN CORSO
In qualunque momento premere contemporaneamen te ■ e ▼ finchè il motore eseguirà 6 movimenti per annullare la procedura in cor so.
Page 8
Manuale d’installazione e d’uso schermo a cornice rigida con mascheramento
ITALIANO
Made by Adeo Screen Sp. Z o.o. (Poland) Specifications are subject to change without notice. E&OE
Please verify that you are working with the latest revision of this document before specifying your screen.
Doc: XLR3 – Installation Manual rev3 | 04.12.2017| Download at: www.screenresearch.com 2017 AdeoSreen All Rights Reserved.
Page 8
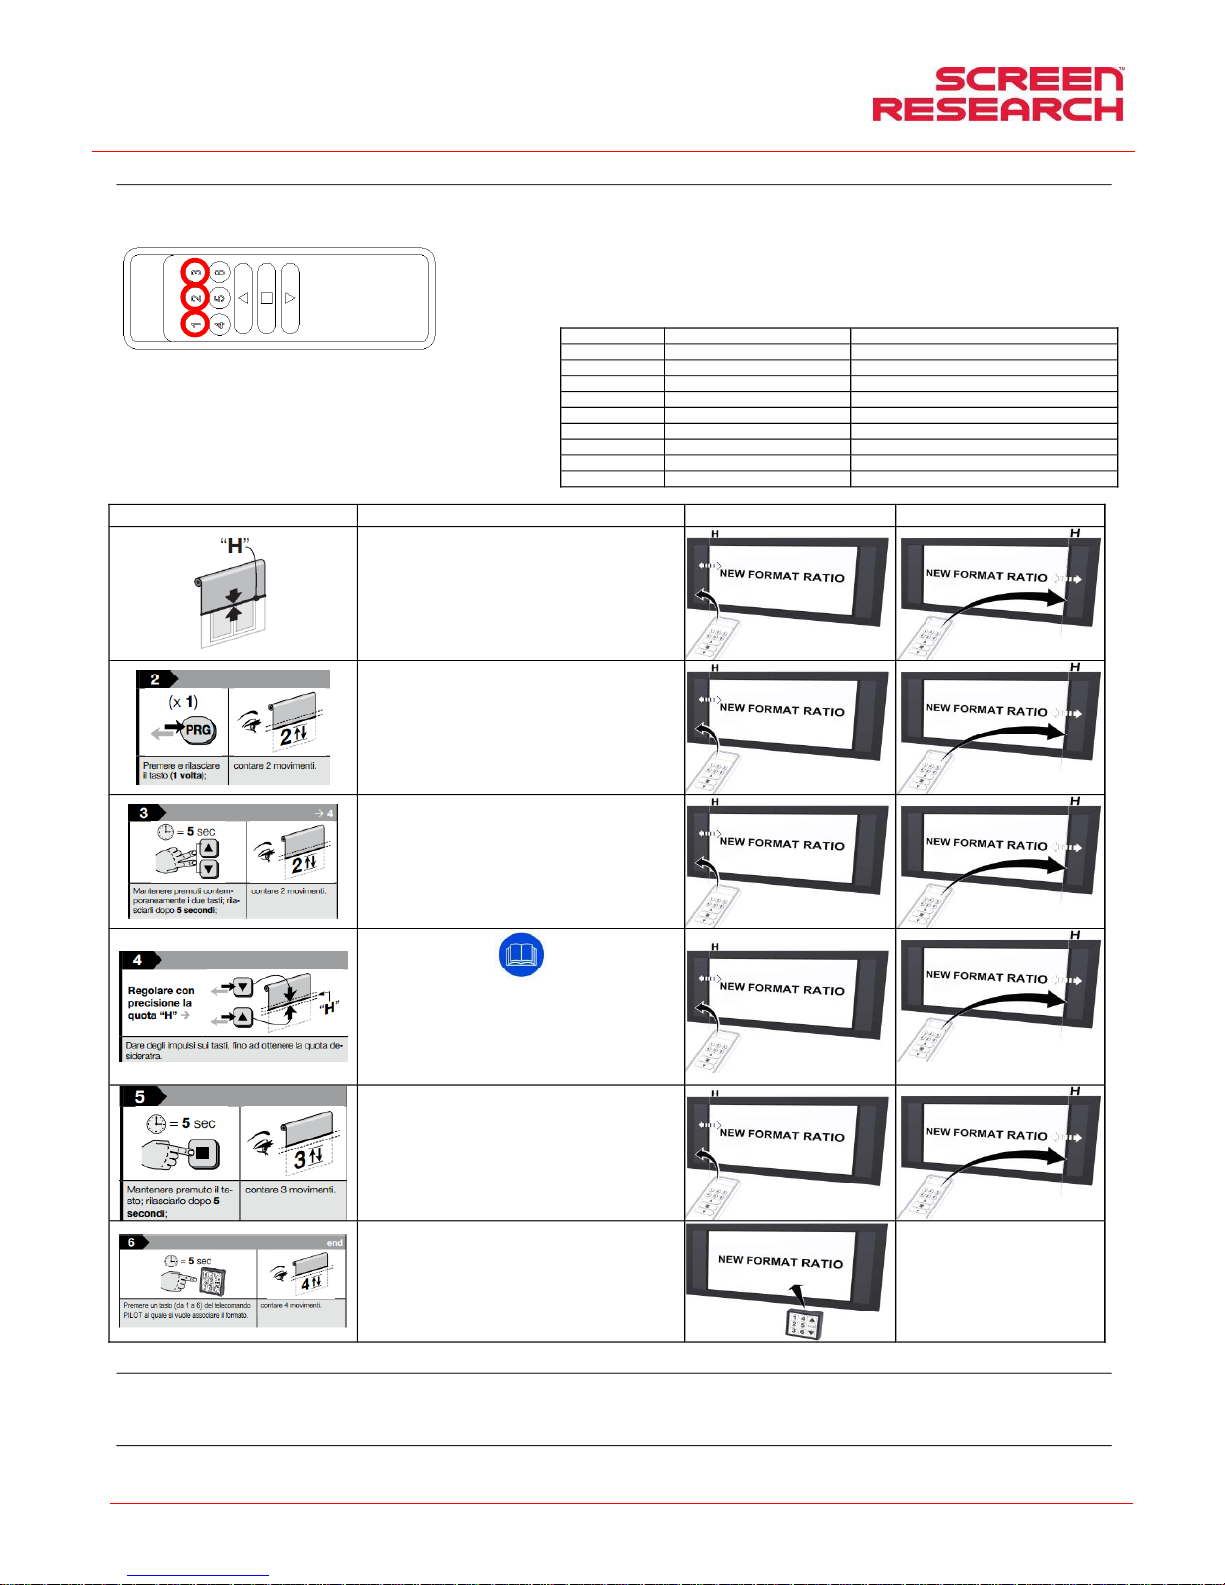
PROGRAMMAZIONE FORMATI
Ogni procedura di programmazione è composta da più pun ti, al termine di un punto, l’operatore ha tempo 60sec per iniziare quello successivo, quest o sistema serve ad evitare di eseguire procedure diverse
da quelle volute. Quindi se il motore non esegue esattamente quello indicato nell’istruzion e, attendere 60 sec. per uscire dalla programmazione, oppure eseg uire l’annullamento procedura come indica to nel
capitolo specifico , quindi ricominciare nuo vamente la procedura.
Prima di inziare c on la prorammazione scegliere il motore che si vuole programmare con la pulsantiera numerica, 1 – mo tore a sinistra,
2 – motore deco, 3 – motore a sinistra.
Eseguire la sequenza sottostante per ogni motore.
Seguire tabella a lato per impostare i formati su PILOT conrelativa apertura e chius ua del
mascheramento con la stampa. Seguire la ta bella sottostante per impostare i formati con
il tecomando MASTER e relativo salvataggio su PILOT, nella riga con il passaggio numero
6.
MOTORE 1 – MOTORE 3
MOTORE 1 – MOTORE 3
MOTORE 1
MOTORE 3
Con il telecomando Master e i tasti ▲▼■, portare tutt i e due i
teli nelle vicinanze della posizione che si vuole programmare (si
consiglia di proiettare sullo schermo immagini con il formato
desiderato per avere riferimenti precisi sulla dimension e del
formato) quindi proseguire nel seguente modo
Tenere premuto il tasto PRG finché il motore esegue e te rmina 2
movimenti
Tenere premuti contemporaneamente i tasti sinistri ▲ e ▼
finché il motore esegue e termina 2 movimenti
Nota: a questo punto, tutti e due i motori, dovranno esser e
mossi tassativamente con i tasti ▲▼ per eseguire la t aratura
di precisione Il telecomando funzionerà a scatti. Per eseguire
movimenti millimetrici premere brevemente i tasti ▲ o ▼. Per
eseguire movimenti più ampi (ma comunque sempre a scatti)
mantenere premuti i tasti ▲ o ▼. Con le modalità suddet te
posizionare i due teli esattamente dove si vuole programmarli
Raggiunta la posizione desiderata tenere premuto il tasto
sinistro ■ finchè il motore non esegue e termina 3 mo vimenti.
Premere un tasto (da 1 a 6) del telecomand o PILOT (circa 8 sec)
al quale si vuole associare il formato, finché ogni motore esegue
e termina 4 movimenti.
Il formato desiderato sarà ora
memorizzato sul tasto del
telecomando Pilot prescelto (1-6)
concludendo la procedura di
programmazione
SPOSTAMENTO DEI FORMATI
I motori h anno una logica di sovrascrittura, quindi una volta memorizzate le posizion i di fine corsa non esiste una procedura per la loro cancellazione, m a soltanto la possibilit à di rimemorizzarli eseguendo
nuovamente la loro procedura di memorizzazione sop ra indicata.
ANNULLAMENTO PROGRAMMAZIONE IN CORSO
In qualunque momento premere contemporaneame nte ■ e ▼ finchè il motore eseguirà 6 movimenti per annullare la procedura in cors o.
TASTI PILOT
POSIZIONE MASCHERAMENTO
MASCHERAMENTO DECO
Tasto 1 del PILOT
Formato di proiezione 1
In stato in “fine corsa ALTO” (pagina precedente)
Tasto 2 del PILOT
Formato di proiezione 2
In stato in “fine corsa ALTO” (pagina precedente)
Tasto 3 del PILOT
Formato di proiezione 3
In stato in “fine corsa ALTO” (pagina precedente)
Tasto 4 del PILOT
Formato di proiezione 4
In stato in “fine corsa ALTO” (pagina precedente)
Tasto 5 del PILOT
Formato di proiezione 5
In stato in “fine corsa ALTO” (pagina precedente)
Tasto 6 del PILOT
Formato di proiezione 6
In stato in “fine corsa ALTO” (pagina precedente)
Tasto 7 del PILOT
Formato di proiezione 7
In stato in “fine corsa ALTO” (pagina precedente)
Tasto 8 del PILOT
Formato di proiezione 8
In stato in “fine corsa ALTO” (pagina precedente)
Tasto 9 del PILOT
Formato di proiezione 9
In stato in “fine corsa BASSO” (pagina precedente)
Page 9
Manuale d’installazione e d’uso schermo a cornice rigida con mascheramento
ITALIANO
Made by Adeo Screen Sp. Z o.o. (Poland) Specifications are subject to change without notice. E&OE
Please verify that you are working with the latest revision of this document before specifying your screen.
Doc: XLR3 – Installation Manual rev3 | 04.12.2017| Download at: www.screenresearch.com 2017 AdeoSreen All Rights Reserved.
Page 9
COLLEGAMENTO MCS-N-RS232 (acessorio non incluso)
Prima di effettuare il collegamento, leggere attentamente le ist ruzioni complete allegate al prodotto. Nel caso in cui la potenza del motore non corrispo ndesse alla potenza della linea elettrica del luogo di
installazione, si prega di contattare un tecnico elettricista e forn irsi di un corretto trasformatore di corrente e Hz.
COLLEGAMENTO ELETTRICO:
Il cablaggio elettrico deve rispettare le norme CEI in vigore. La n orma CEI EN 60335-1 prevede che nella rete di alimentazione ci sia un dispositivo di dis connessione
onnipolare con una distanza di apertura dei contatti di almeno 3 mm per ogni singolo motore (es. interruttore spina ecc.) In caso di ne cessità, questo dispositivo
garantisce una veloce e sicura sconness ione dell’alimentazione elettrica.
Utilizzare i cavi per la connessione come descritto nell’immagine .
ATTENZIONE:
Questo prodotto contiene due motori quindi effettuare lo s tesso cablaggio per tutti e due i motori.
E’ obbligatorio isolare i cavi BUS se non vengono utilizzat i per il comando via pulsante.
ATTENZIONE:
La corretta esecuzione degli allacciamenti elettrici, a regola d’ar te e nel rispetto delle norme vigenti, è importante ai fini della prevenzione de gli infortuni e del buon
funzionamento, inalterato nel tempo, dello schermo.
Prima di eseguire qualsiasi operazione su parti elettric he, assicurarsi che non vi sia tensione.
Il motore negli schermi dotati di cassonetto è posto sulla destra dello schermo visto frontalmente
L’ azionamento avviene tramite radiocomand i forniti di serie.
Caratteristiche MCS-N
Alimentazione:
110 ÷ 240 VAC 50/60 Hz
Corrente massima assorbita: 80 m Ain stand-by, 3A a massimo carico
Codifiche: FloR (rolling code)
Frequenza: 433.92 MHz
Impedenza antenna: 52 ohm
Sensibilità: migliore di 0,5μV per segnale a buon fin e
Portata: stimata in 200 m se in spazio libero e 35 m se a ll’interno di edifici
N° trasmettitori memorizzabili : 30
Uscita: n°1 uscita per il pilotaggio di un motore a due fasi
Capacità dei contatti: 3A - 250V
Grado di protezione: IP44 (a contenitore i ntegro)
Temperatura di funzionamento: -20 ÷ 55 °C
Dimensioni / peso: 128 x 112 x 43 mm / 260 g
Connessione per ogni motore
version 230V:
Bianco Arancio (BUS)
Bianco (BUS)
BiancoNero (comune TTBUS)
Marrone (Linea 230V)
Blu (Fase 230V)
Giallo verde (Terra 230V)
Connessione per ogni motore
version 120V:
Bianco Arancio (BUS)
Bianco (BUS)
Bianco Nero (comune BUS)
Bianco (Linea 120V)
Nero (Fase 120V)
Verde (Terra 120V)
GARANZIA
1.GARANZIA ScreenResearch garantisce che il prodo tto da essa prodotto sarà esente da difetti di fabbricazione nei materiali e nelle lavo razioni, nel rispetto dei termini e condizioni qui sotto indicati. I tessuti
di proiezione e profili sono garantiti per un p eriodo di cinque (5) anni dalla data della fattura originale. Moto ri, comandi motore, telecomandi, e hardware di montaggio sono ga rantiti per tre (3) anni dalla data
della fattura originale.
2.CONDIZIONI E LIMITAZIONI La pr esente Garanzia è soggetta alle seguenti condizioni e limitazioni. La garanzia è nulla e inapplicabile se il prodotto è s tato usato o manipolato non in conformità con il
manuale di istruzione contenuto nella confezione del pr odotto, se abusato o utilizzato impropriamente, se danneggiato da un incident e o negligenza durante il trasporto, o se il difetto è dovuto a riparazioni o
manomissioni effettuate da personale non autorizzato. Il p rodotto deve essere installato da un professionista debitamente autor izzato da ScreenResearch e devono essere eseguite regolarmente le
manutenzioni indicate nel manuale.
3.RESI Nessun prodotto restituito sarà accettato se nza autorizzazione scritta (RMA) da parte ScreenResearch. Il prodotto deve essere reso, imballato nella confezione originale o equivalente, al fine di evitare
danni durante il trasporto. Il prodotto deve essere imballato e r estituito a ScreenResearch o un centro riparazione autorizzato, a caric o del cliente. Le spese di riconsegna del prodotto sono a carico di
ScreenResearch. Il prodotto restituito deve e ssere accompagnato da una descrizione scritta del difetto e una fotocopia della ricevuta originale di acquisto. Questa ricevuta deve indic are chiaramente il
modello e numero di serie, la data di acquisto, il nome e l'indiriz zo dell'acquirente e rivenditore autorizzato e il prezzo pagato dall'acquirente. ScreenResearch si riserva il diritto di modificare il design di
qualsiasi prodotto, senza obblighi nei confronti di prod otti fabbricati in precedenza e di modificare i prezzi o le specifiche di qualsias i prodotto senza preavviso o obbligo nei confronti di qualsiasi persona.
4.RIMEDI Nel caso in cui il prodotto non sia conforme all a garanzia sopra, l'unico rimedio per l'acquirente ai sensi della presente Gar anzia Limitata è quello di restituire il prodotto a ScreenResearch o a un
Centro di assistenza autorizzato. La non conformità sa rà rettificata senza spese di manodopera o per componenti.
5.LIMITE PER ACQUIRENTE ORIGINALE Questa garanzia è ad esclusivo beneficio dell'acquirente originale del prodotto coperto e non d eve essere trasferito ad un successivo acquirente del prodotto.
6.VARIE Tutte le garanzie implicite relative a prodotti di ScreenResearch sono limitate alla durata di questa garanzia. La garanzia n on si estende a eventuali danni diretti o indiretti per l'acquirente. Alcuni stati
o paesi non consentono limitazioni sulla durata di una garanzia implicita o l'esclusione o la limitazione di danni incidentali o consequenziali, pertanto le suddette limitazioni o esclusioni potrebbero non
essere applicabili. Questa garanzia conferisce diritti leg ali specifici, e si può anche avere altri diritti che variano da stato a stato , o da paese a paese.
7.RICHIESTE per quanto riguarda la garanzia l imitata di cui sopra, possono essere inviate al rivenditore autorizzato di ScreenResearch.
8. SUPPORTO DI GARANZIA GESTITO DA DISTR IBUTORI AUTORIZZATI Screen Research ha autorizzato la distribuzione dei loro pr odotti in molti paesi del mondo. In ogni paese, il Distributore autorizzato
importatore è responsabile per l'assistenza in garanzia dei prodotti venduti nei rispettivi paesi. Il servizio di garanzia deve essere ottenut o dal rivenditore importatore o il distributore da cui si ha acquistato il
prodotto.
Page 10
Fixed frame screen with masking installation and operation manual
ENGLISH
Made by Adeo Screen Sp. Z o.o. (Poland) Specifications are subject to change without notice. E&OE
Please verify that you are working with the latest revision of this document before specifying your screen.
Doc: XLR3 – Installation Manual rev3 | 04.12.2017| Download at: www.screenresearch.com 2017 AdeoSreen All Rights Reserved.
Page 10
01 INTRODUCTION
This manual is an integral part of the product and must be read and understood in all its parts for safety reasons. It contains norms and directions for correct and safe use of the screen.
The manual should never be separated from the product; it must be stored in a suitable place to ensure its integrity, and in such a way as to be easily consulted by authorised personnel.
Product user shall be responsible for the manual’s safekeeping. User shall also be responsible for checking the screen’s functionality and for the repair or replacement of any damaged
parts that could pose a hazard.
Images contained in this manual are intended to provide a detailed description of the product’s functions, characteristics and procedures. Any slight difference, depending on the model
represented, will not change the meaning that the images convey.
02 GENERAL SAFETY NORMS
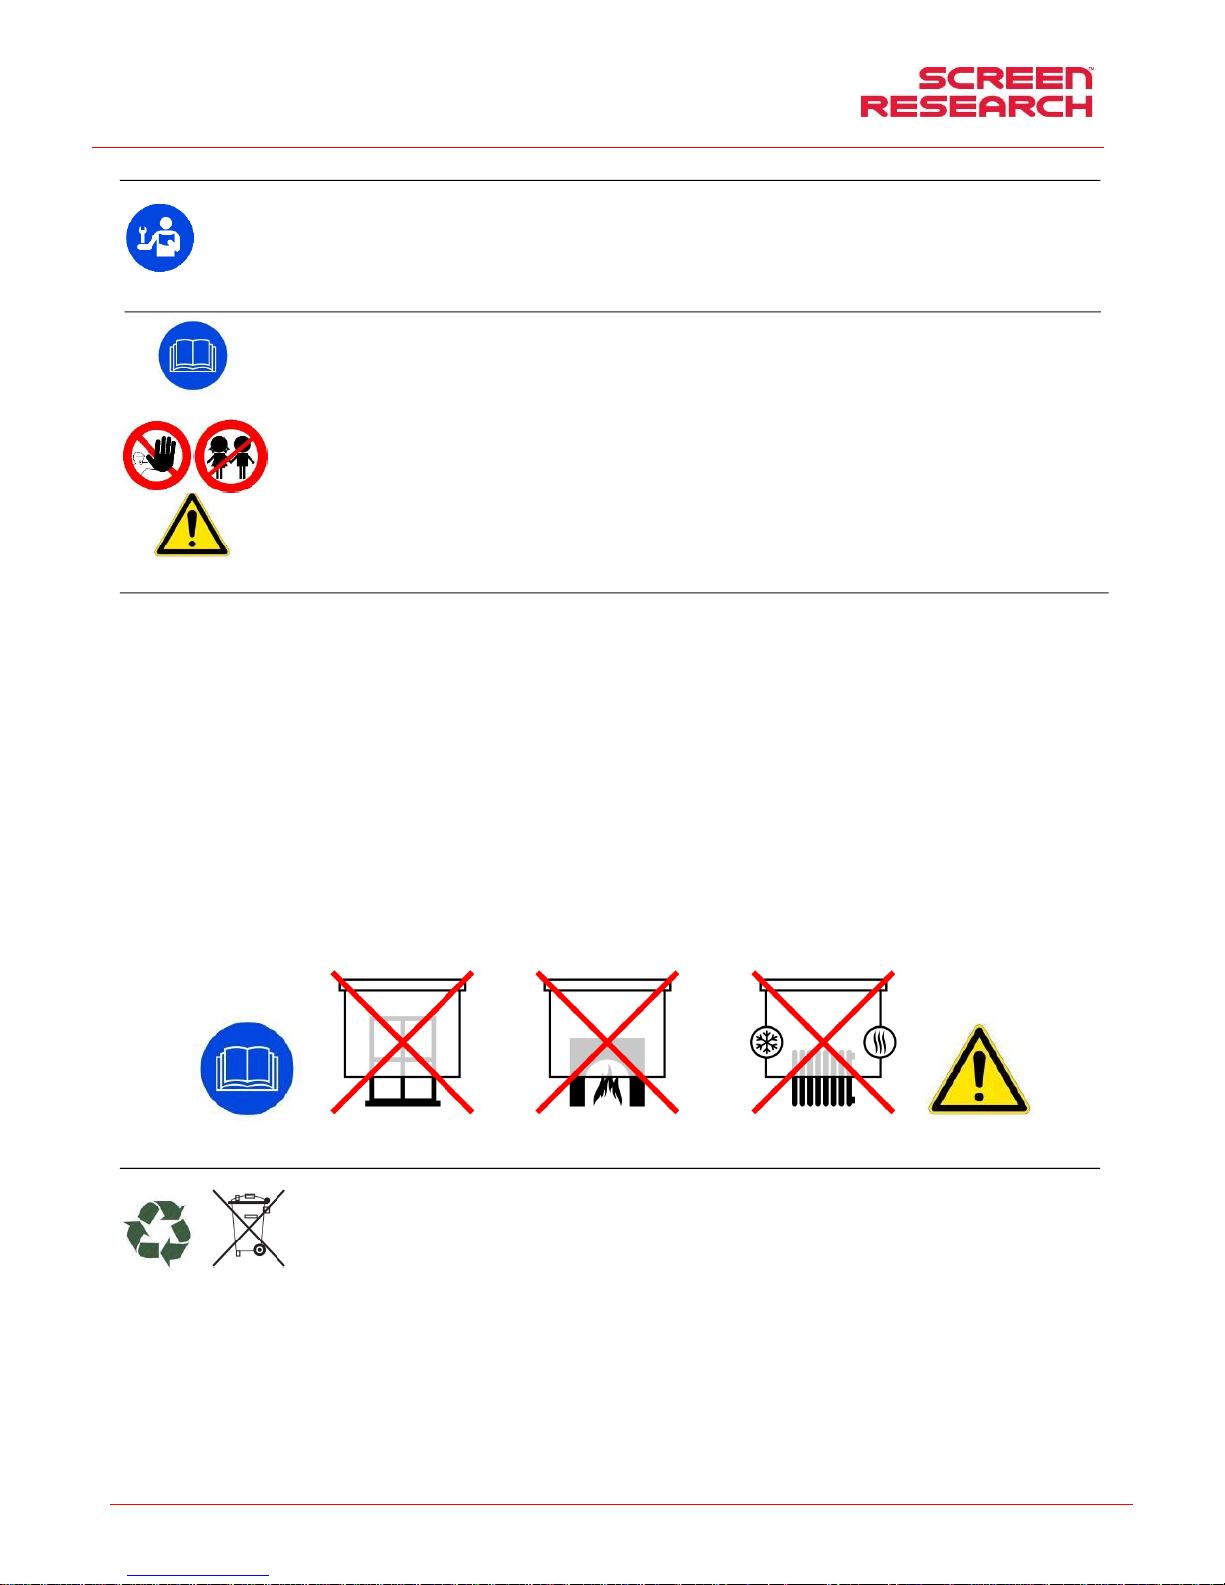
CAUTION: Important safety instructions. Follow the instruct ions as improper installation can cause serious injury. Always read th e instructions and warnings set out in this
manual very carefully before using the product or before performing any maintenance interventions.
- Installation of the screen above passagewa y is strictly forbidden. Before and during use, check that the screen poses no risk of hazard.
- Do not tamper with, remove or damage any part or componen t of the screen.
- Never carry out maintenance work on the screen with the mot or on and always disconnect the power first.
- Always disconnect the power when cleaning, carrying out main tenance or replacing parts.
- Not children safe. It is mandatory to keep children away during operations with the screen.
All our screens are covered by guarantee; validity of the same sh all be subject to user’s full compliance with the instructions contained in th is manual.
WARNING: Faulty installation may compromise the s afety of the product’s operators; manufacturer shall not be held liable for damages to persons or thin gs resulting from faulty
installation, improper use, insufficient or inadequate m aintenance of the screen.
Manufacturer shall not be held responsible for problems a ssociated with installation errors.
Screen installation, electrical connections and verificatio ns in case of malfunction of motorised rolling screens must be performed b y authorised vendor or by personnel that is
informed and trained in electrical hazards . The connection cable cannot be replaced. If the cable is damaged the screen must be replaced. Tampering with end stops or pie rcing
the seal placed over holes shall entail the forfeiture of the guara ntee. For any necessary clarifications please contact our technical office.
N.B.ONCE THE SCREEN HAS BEEN MOUNTED ON THE BRACKET S, AND PRIOR TO USING IT, USER IS MANDATORILY REQUIRED TO ENSURE THAT THE SCREEN’S POSITION IS
PERFECTLY HORIZONTAL.
03 WARNINGS AND RECOMMENDATIONS FOR CORRECT USE AND INSTALLATION
Our screens are suitable for indoor use at normal temperature ( 20 - 25 °C) and humidity conditions.
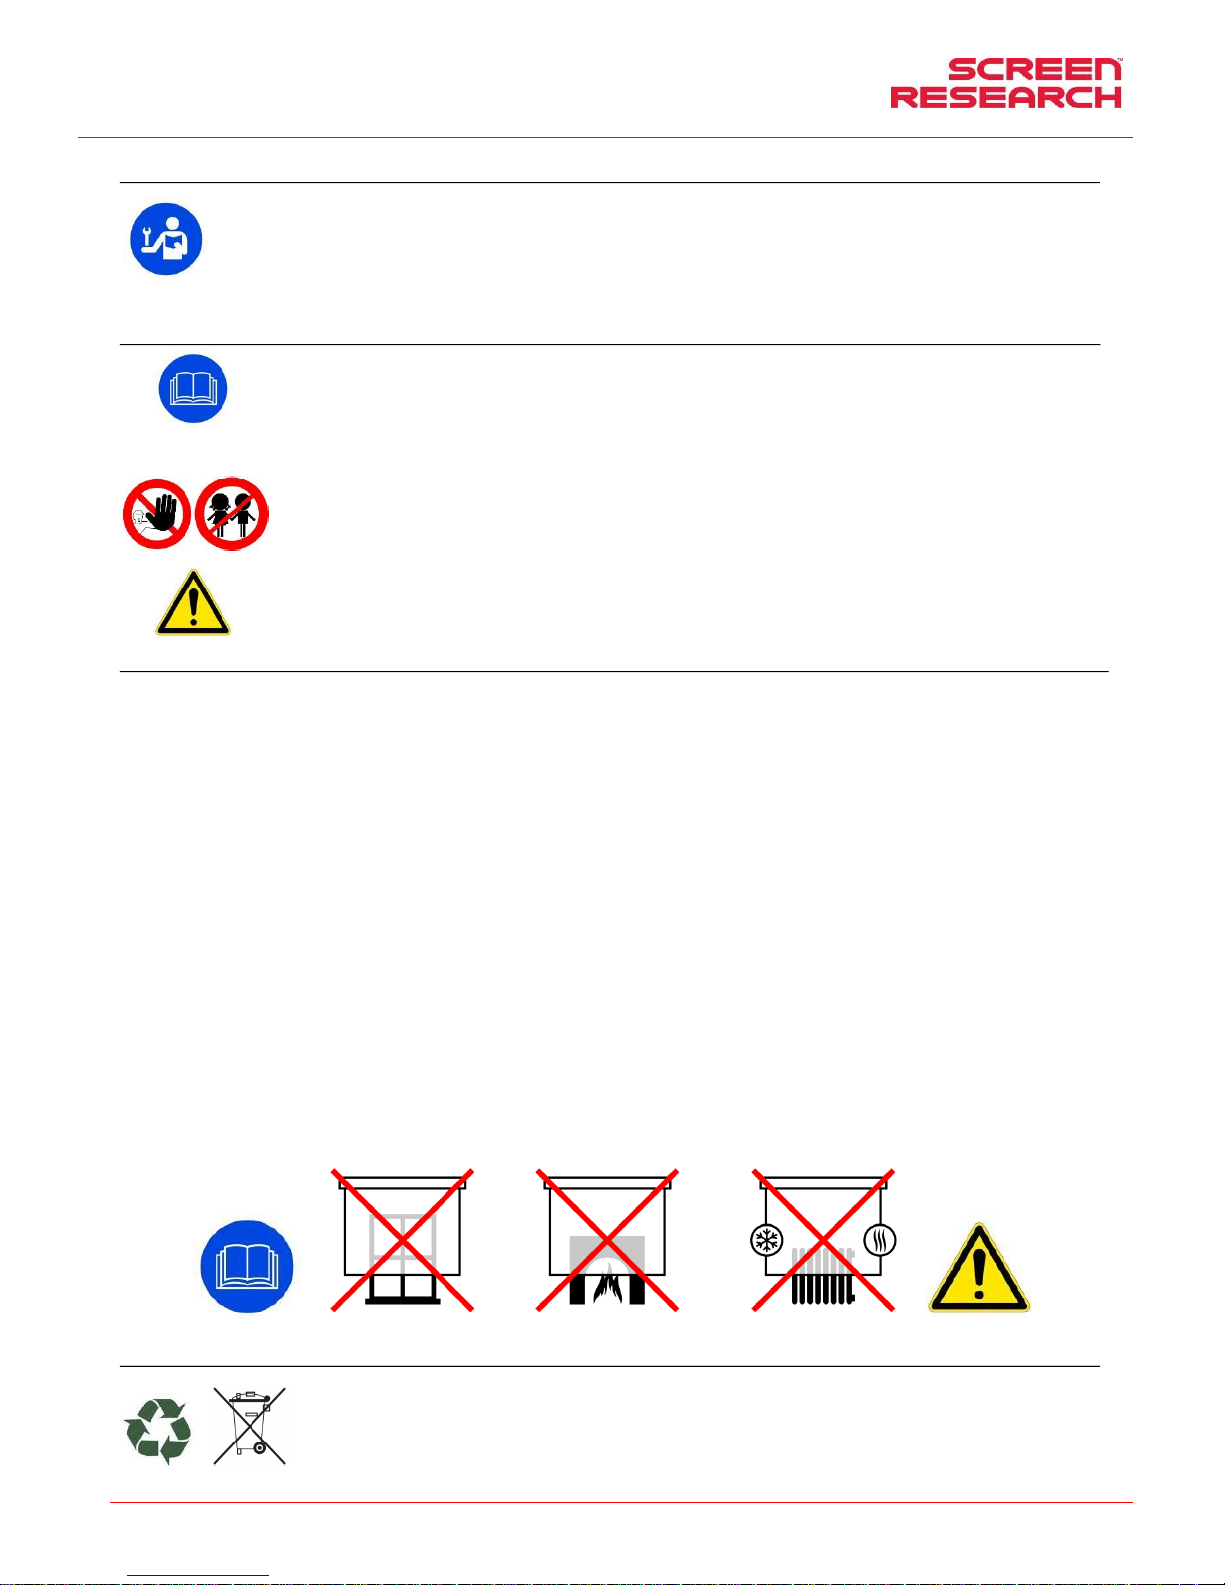
It is absolutely forbidden to install the video projection screens i n front of windows or use them as blackouts exposed to direct sunlight near strong sources of light, near heat sources, such as stoves,
fireplaces or flues near air conditioning systems, for bo th cold or warm air, failure to comply with these prohibitions may caus e deformation or permanent stretching of the projection fabric.
Special precautions are required when using the motorised scr een outdoors, including:
1- Use of appropriate ducts or sheaths suitable for outdoor installa tion to protect the motor power cable(s) from UV radiation.
2- Use of cable glands to seal against water and moisture at joints with switch/socket or junction boxes.
3- Use of switches with a protection level of IP55 or higher (the swit ch supplied with the product is not suitable for outdoor use).
4- Cover and protect the screen from direct contact with w ater or liquids.
Since electrostatic charge tends to accumulate on the projectio n screen (which is made of PVC), attracting dust, excessive dustiness in the projection environment can deteriorate the optical quality of the
screen (see projection screen cleaning instructions).
To avoid yellowing screens must not be exposed to sunlight. S creens must never be mounted near sources of heat or exposed to sunligh t, as this could damage projection surface.
When using a motorized roller projector screen , the fabric must be fully extended before use and fully retracted a fter use. Please try to allow a reasonable amount of time between ex tending and retracting the
screen, as multiple, consecutive uses could be harmful to the screen. The screen motor has a built in thermal cut-off to prevent the s creen from overheating in such situations, which would normally be
between 3 and 6 consecutive uses of exten ded and retracted. We would strongly recommend you do not put the motor under such st ress, as the excess heat in the housing can cause deformation and
stretching of the fabric itself. If you do find yourself in a situation where you have used the screen 3 times of extended and retracted continuos or in a short space of time, we recom mend that you wait up to 40
minutes for the motor to cool down before using it again.
WARNING: Do not manually force the screen’s unroll ing: this could result in the motor being damaged or the screen’s case to come away from the wall mount brackets.
Do not allow children to play with the screen’s control pa nel. Keep remote control out of children’s reach.
Monitor screen movement and allow no-on e near it until it is completely closed.
The following operations: blocking, preventing or forcing the screen’s movement, hanging or swinging from it, adding or applying any object to the screen or ba ckdrop, modifying the screen’s structure – are
strictly forbidden and could result in damages to the screen’s r olling system and ensuing hazard to persons and things.
Absolutely forbidden to install the video projection scre ens in front of windows or use them as blackouts.
Absolutely forbidden to install the video projection scre ens near heat sources, such as stoves, fireplaces or flues near air cond itioning systems, for both cold or warm air.
Place the screens perfectly horizontal.
PRODUCT’S DISPOSAL
As is the case for installation procedures, when the product reaches the end of its useful life, disposal operations must be c arried out by qualified personnel.
The product is made up of various types of material: some can be recycled, others have to be disposed of. You must follow applicable recycling or disposal regulations in
force in your area for this product category.
As shown in the picture on the left, you must not throw the product into a domestic litter bin. Either dispose of th e various components separately, pursuant to the
regulations applicable in your territory, or hand the product over to a vendor upon purchasing a similar new product.
Warning: local regulations can foresee heavy fines in case of unlawful disposal of this product.
Page 11
Fixed frame screen with masking installation and operation manual
ENGLISH
Made by Adeo Screen Sp. Z o.o. (Poland) Specifications are subject to change without notice. E&OE
Please verify that you are working with the latest revision of this document before specifying your screen.
Doc: XLR3 – Installation Manual rev3 | 04.12.2017| Download at: www.screenresearch.com 2017 AdeoSreen All Rights Reserved.
Page 11
04 GENERAL CHARACTERISTICS OF THE PRODUCT
The screen product is manufactured in compliance with the pro visions of the following EC directives: 2014-35-CE LDV Low voltage
2014-30-EU EMC Electromagnetic compatibility
2014-53-CE Radio Equipment
2009-125-CE CONSUMPTION Ecodesign
2011-65-CE ROHS Restriction of Hazardous Substances
2012-19-CE RAEE Waste management
2001-95-CE SAFETY Safe Product
The screen described in this manual must be used exclu sively as a support for video projection. Any other use not covered by this ma nual, it is not consented.
The s creen contains one or more Fabric/sheet of projectio n. The Fabric of projection is a cadmium -free plastic pvc sheet or Glass wire (continuos filament) plast ified PVC impregnated, any fabric can be
classified in category:
- M1 and M2 fire classification under French standards (LNE Laboratoire national de métrologie et d’essais – SME Cent re de recherch es du Bouch et - WARRINGTONFIRE GENT Laboratoire de
métrologie et d’essais – IFTH Laboratoire acc reditè
- B1 and B2 fire classification under German standards (LNE Laboratoire na tional de métrologie et d’essais – SME Centre de recherches du Bouche t - WARRINGTONFIRE GENT Laboratoire
national de métrologie et d’essais)
- UL94HB fire classification under USA standards ( THE GOVMARK Organization, Inc.)
In the absence of a standardisation at a European level of th e various national classification norms, it should be noted that the French M1 class corresponds to n on flammable material and that M2 class
corresponds to flame retardant material. The screens use projection fabrics/sheets composed ma inly of plasticized PVC or fibreglass. As these fabrics are se nsitive to temperature and humidity, the
acceptable size tolerance is 1% in each dimension.
There is a tolerance of +/-2 mm on the alu minium profiles used.
The tollerance on the overall size are:
- +/- 3 mm up to an overall size of 2500 mm ;
- +/- 5 mm up to an overall size of 4000 mm ;
- +/- 10 mm up to an overall size of 8000 mm;
- +/- 20 mm up to an overall size of 16000 mm;
- +/- 30 mm up to an overall size of 24000 mm.
05 CLEANING AND MAINTENANCE
Screens and their projection surfaces are delicate and must be cleaned with great care, according to the following instructions:
Never use solvents, chemical or abrasive products, or pointed to ols to clean the surface.
Avoid contact with other materials (varnishes, inks etc) as they might be impossible to remove from the canvas.
FABRIC CLEARPIX: Use a soft, clean, dampened clo th, wiping from the center of the projection surface towards the outer edges. A vacuum -cleaner brush may be used, provided its bristles are soft and
perfectly clean.
FABRIC SOLIDPIX, MULTIPIX,: Remo ve dust from the case with a soft, clean cloth and a non aggressive detergent as necessary.
Clean the projection screen with a soft, clean, damp cloth, and a neutral or alcohol-base detergent as necessary. Since rubbing the screen with a cloth d uring cleaning operations can cause electrostatic
charge to accumulate, we recommend the subsequent applica tion of an antistatic liquid with a clean cloth, to avoid dust being attracted again
FABRIC SILVERPIX is Mandatory to read t he instructions accompanying the fabric screen
GENERIC PROFILE: Remove dust from the case with a soft, clean cloth and a non aggressive detergent as necessary
VELVET PROFILE: Clean profile with a sof t clean cloth, or a brush with soft, antistatic bristles. A vacuum-cleaner brush may be used, prov ided its bristles are soft and perfectly clean.
STRUCTURE and ANCHORING BRACKETS: The state of the product and the anchoring capacity of its brackets must be checke d regularly. In case of canvas deformation or rips, or loosening of structural
components such as brackets or screws, action must be taken i mmediately to clear the area around the screen and avoid hazard to pe ople and things, replace the defective component and restore the
product's functionality.
06 UNPACKING AND HANDING THE SCREEN
Ensure that the screen has suffered no damage during transpo rt. Should any fault be detected, promptly notify your dealer. Ve rify that all screen accessories have been included
Common
-n° 16 Plastic nut for assmbly housing
-n°1 logo Screen Research
-n° 4 Ruber gloves
-n° 1 Protective foil Nylon
-n° 1 Hex key n°3
-n° 1 Hex key n°4
-n° 1 Hex key n°2,5
-n°1 Installation manual
-n° 1 CD with manual, picture,movie
-n° 1 set MCS electric connection
-n°2 Power cord for motor power+connector
(screws and plugs for installation not included)
<=160”
-n°2 BRACKETS
>160”
-n°3 BRACKETS
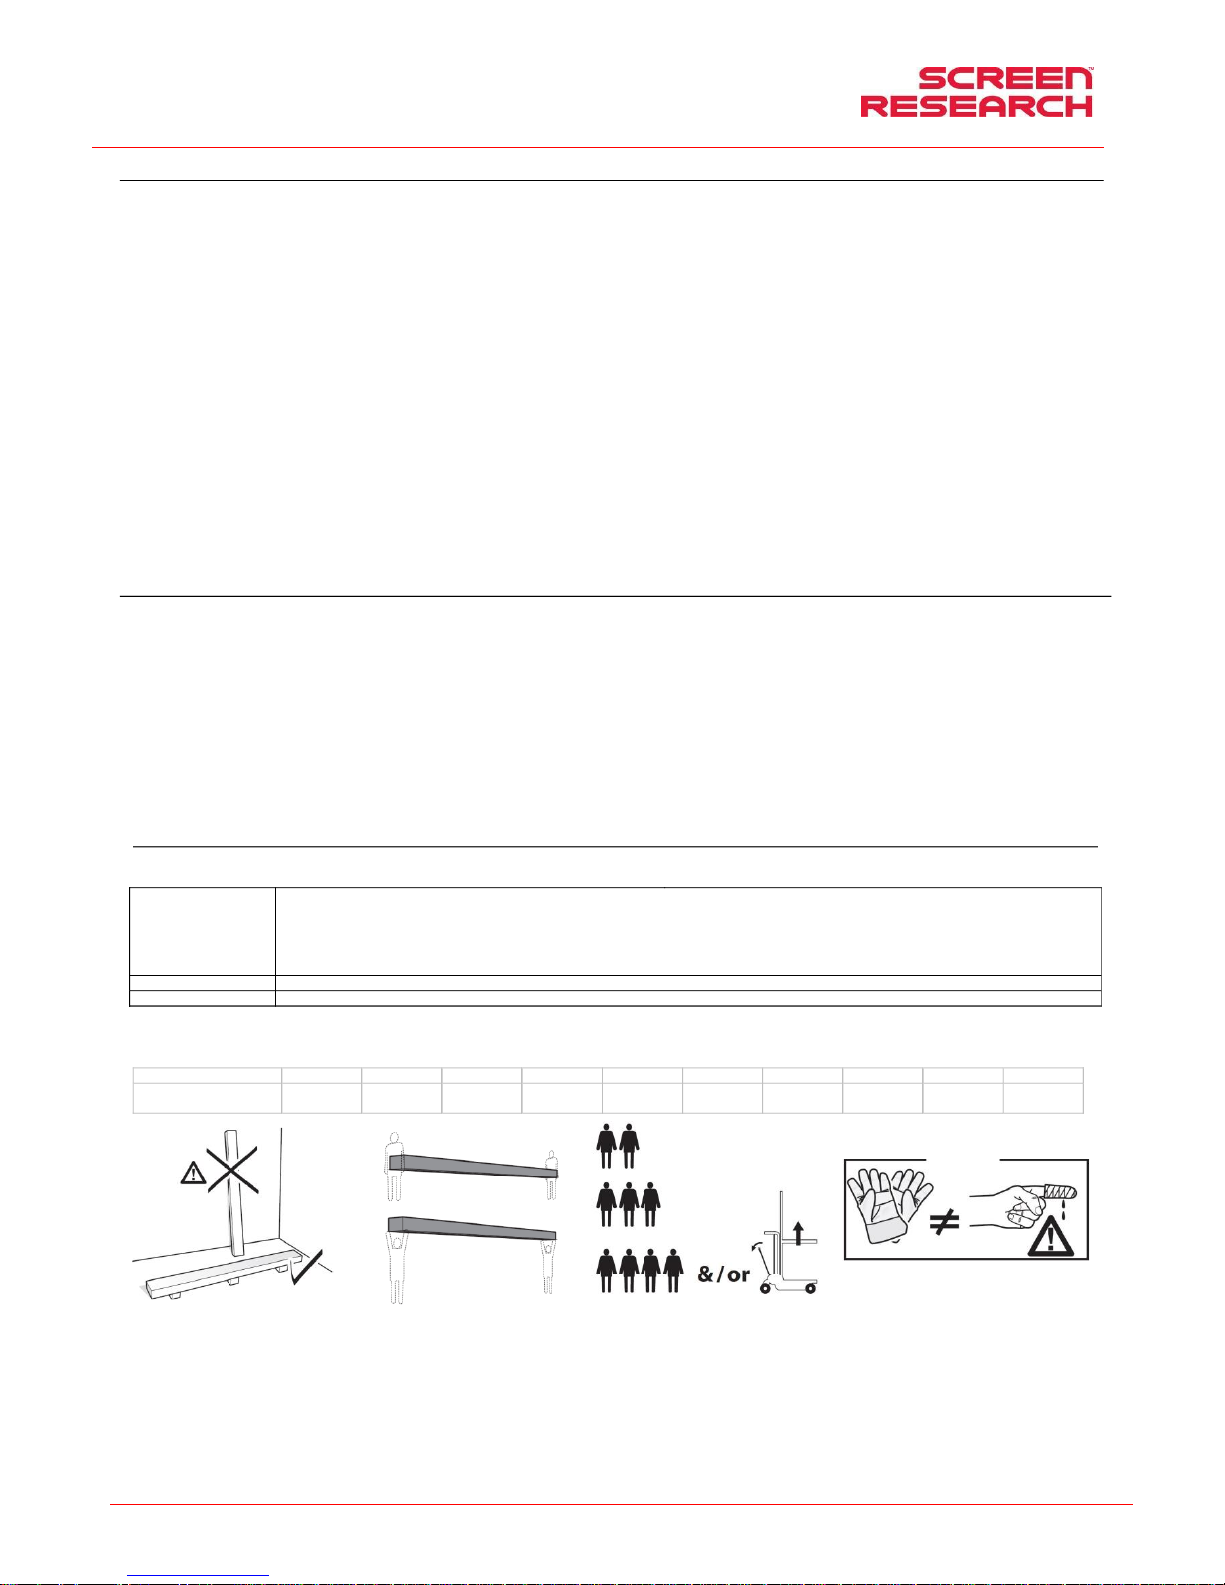
ATTENTION do not use cutters or sharp objects to op en the wrapping, always use protection gloves when unpacking, handling and insta lling the product. Depending on the product’s weight (reference load:
25 Kg male – 15 Kg female), handling and installing ope rations should be performed by two, three or people people at least. For heavier lo ads we recommend the use of specific lifting equipment.
up to inches
80”
90”
96”
100”
110”
120”
130”
140”
150”
160”
XLR3 Overall weight
144 Kg
317,5 Ibs
151 Kg
332,9 Ibs
158 Kg
348,3 Ibs
165 Kg
363,7 Ibs
172 Kg
379,2 Ibs
179 Kg
394,6 Ibs
184 Kg
405,6 Ibs
210 Kg
462,9 Ibs
217 Kg
478,4 Ibs
223 Kg
491,6 Ibs
Page 12
Fixed frame screen with masking installation and operation manual
ENGLISH
Made by Adeo Screen Sp. Z o.o. (Poland) Specifications are subject to change without notice. E&OE
Please verify that you are working with the latest revision of this document before specifying your screen.
Doc: XLR3 – Installation Manual rev3 | 04.12.2017| Download at: www.screenresearch.com 2017 AdeoSreen All Rights Reserved.
Page 12
07 INSTALLATION INSTRUCTIONS
WARNING:
See images on the end p ages of this m anual. It 's absolutely forbidden to install the screen on mobile walls or unstable cables,the brackets must be applied on surfaces that are suitable to maintain the
correct distance over time
When installing the screen use plugs and screws suitable for t he screen’s weight and for the type of wall or ceiling on which the mount brac kets are to be fixed, based on the following criteria:
WARNING:
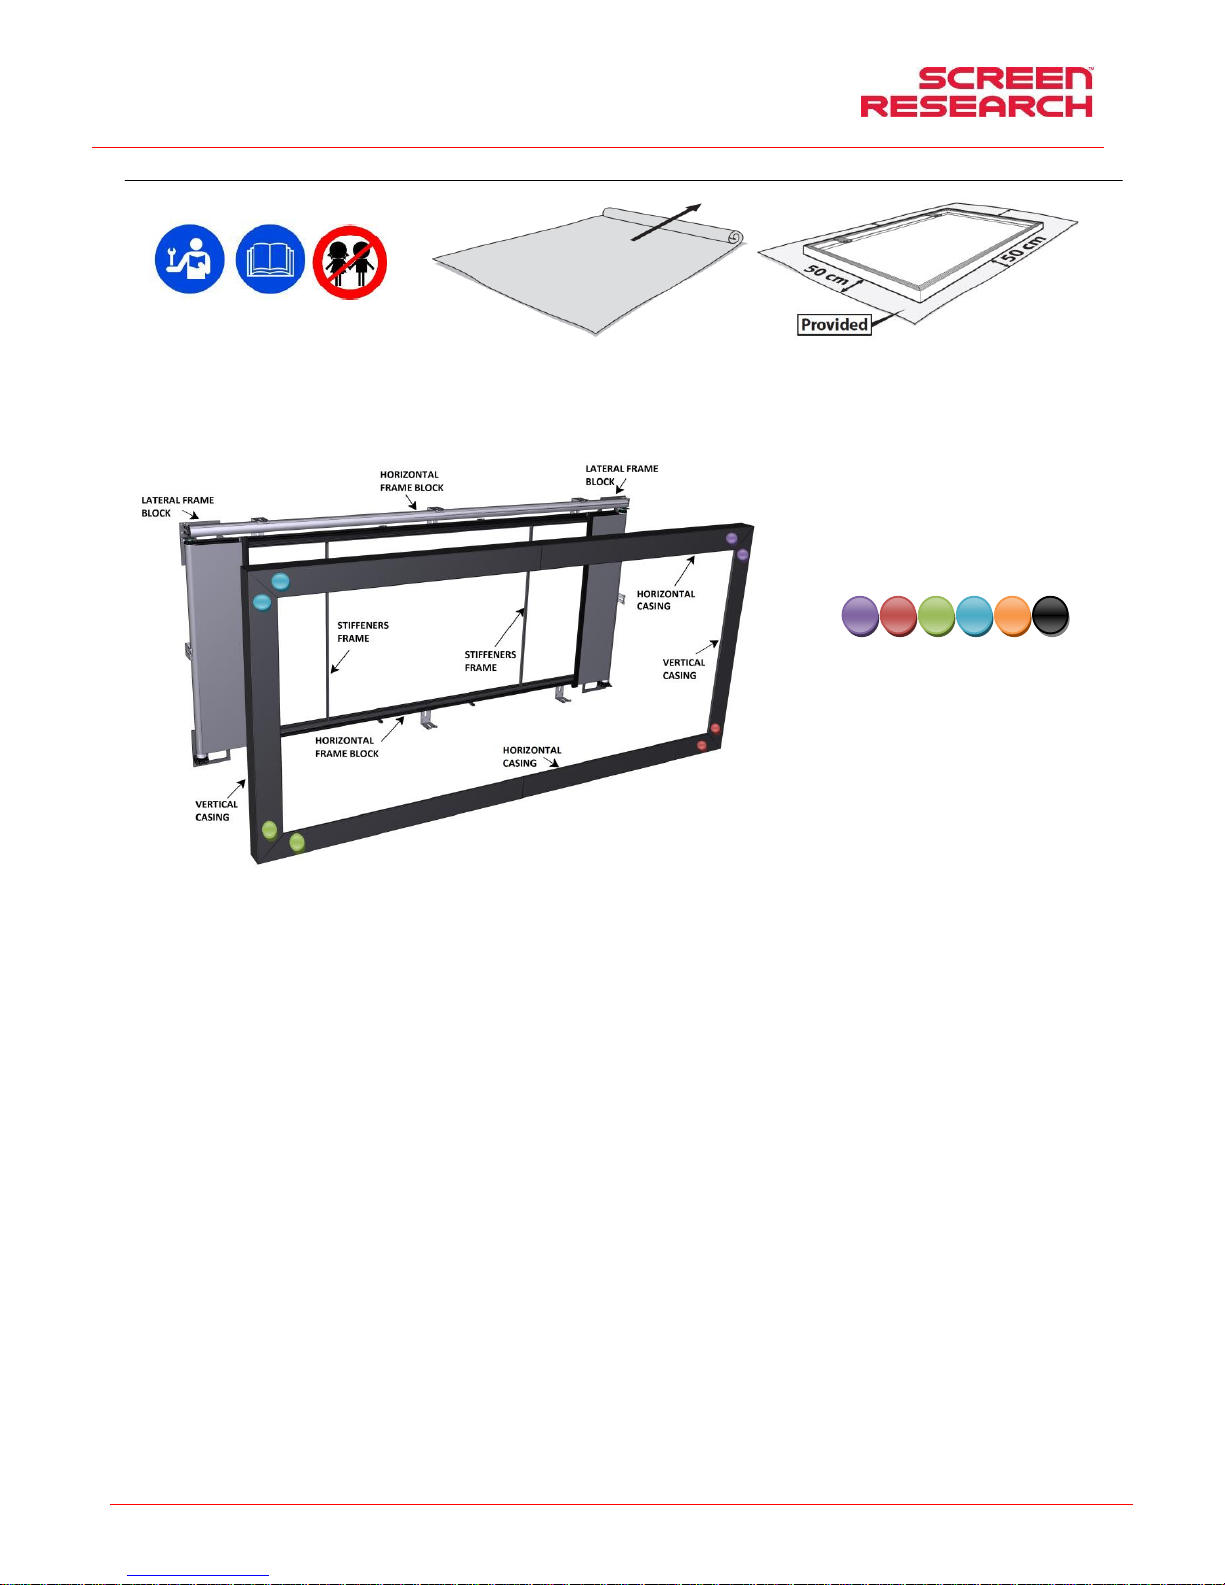
Use the provided fabric to cover the assemb ly area as to awaid damaging the product.
Make sure that any control systems are fitted in an area easily accessible for future servicing and checks.
WARNING !!!
The screen is made of different horizontal and vertical part s that are preassembled at the factory.
Colored circular labels have been applied in the corners of the a ssembly
parts to verify the correct positioning of each element.
Page 13
Fixed frame screen with masking installation and operation manual
ENGLISH
Made by Adeo Screen Sp. Z o.o. (Poland) Specifications are subject to change without notice. E&OE
Please verify that you are working with the latest revision of this document before specifying your screen.
Doc: XLR3 – Installation Manual rev3 | 04.12.2017| Download at: www.screenresearch.com 2017 AdeoSreen All Rights Reserved.
Page 13
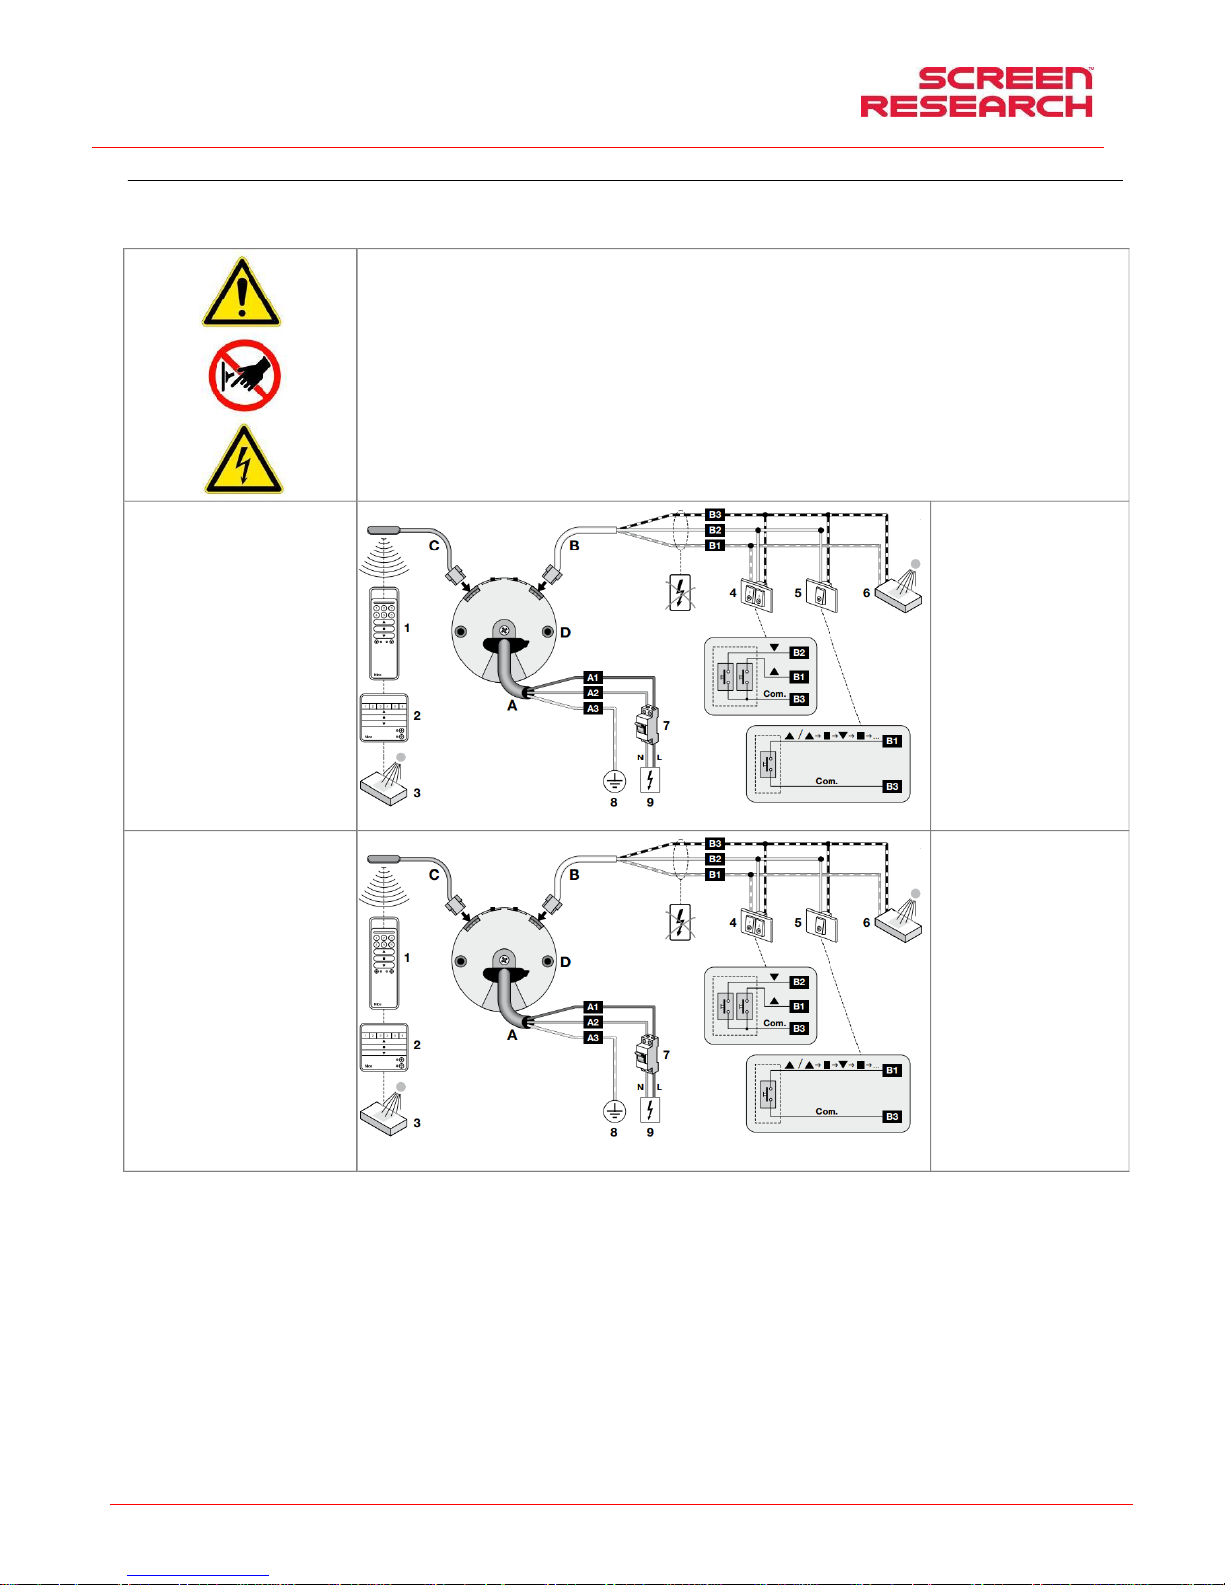
09 MOTOR TYPE IDENTIFICATION –CHARACTERISTICS – ELECTRICAL CONNECTION
The type of motor installed on the product is identified by a lab el applied on each product showing the CE logo. When unwrapping the prod uct please check the model type indicated on the label in order to
perform the installation and cable connections correctly. Should the power of the motor be different from that of the supply network o f the installation place, please contact an electrician to have a current and
Hz transformer installed.
ELECTRICAL CONNECTION: electric cablin g must be conformant with applicable IEC standards. IEC norm EN 60335-1 requires that s upply network be fitted
with an omnipolar selector switch with contact opening d istance of at least 3 mm.
For each motor (e.g. plug switch etc.). In case of need, th is device ensures that the power supply is safely and quickly cut off.
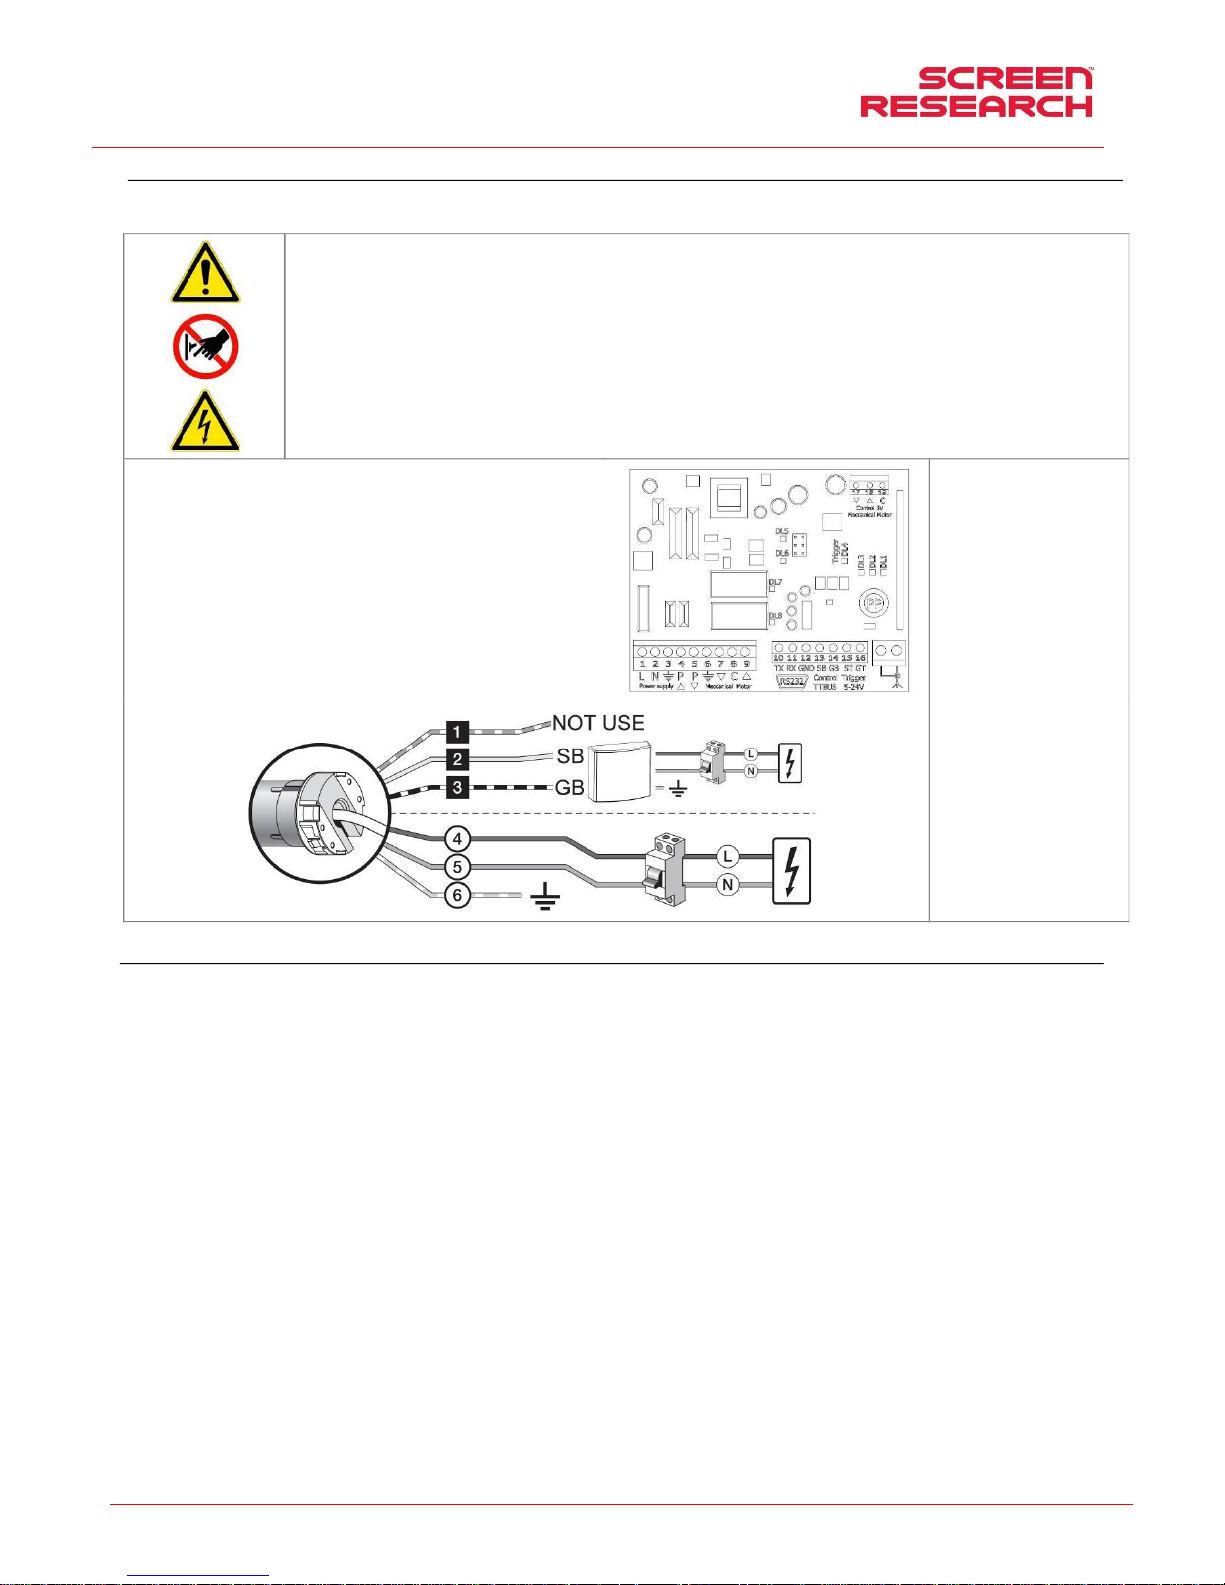
Use the wires as described in the figure.
ATTENTION:
This product contains two motors, which must both be wired i n the same manner.
Bus cables must be insulated if not used for the push -button command.
WARNING: Correctly performed, state -of-the-art, norm-compliant electrical connections are important to prevent accidents and to ensure the screen’s
optimal and unaltered performance ov er time. Prior to carrying out any operation on electrical parts ensure that power supply is disconnected.
Bus cables (black white orange) must be insulated if not used f or the push-button command.
In screens fitted with cases the motor is positioned on the right-hand side of the screen as seen from the front.
Operates with standard radio control (supplied).
Technical characteristics:
Nice ERA INN EDGE –AC
86-230V 50-60Hz:
Frequency: ~Hz50-60
Power: 45W
Torque: 3Nm
Speed: 32Rpm
Duty cycle: S2 4min
Cable length: 3mt
Mechanical strength: EN14202 conformant
Operating T°:
from –20 to +55 °C
Frequency: 433.92 MHz
Trans. range: 150mt
Weighted sound pressure level:
LpA ≤ 70 dB(A)
Motor protection class: IP44
Connection for each motor:
A1 – Brown (power supply phase)
A2 – Blue (neutral)
A3 – Yellow-green (earth)
B1 – White-orange (up command)
B2 – White (down command
TTBus)
B3 – White-black (common)
Technical characteristics:
Nice ERA INN EDGE –AC
86-230V 50-60Hz:
Frequency: ~Hz50-60
Power: 70W
Torque: 6Nm
Speed: 32Rpm
Duty cycle: S2 4min
Cable length: 3mt
Mechanical strength: EN14202 conformant
Operating T°:
from –20 to +55 °C
Frequency: 433.92 MHz
Trans. range: 150mt
Weighted sound pressure level:
LpA ≤ 70 dB(A)
Motor protection class: IP44
Connection for each motor:
A1 – Brown (power supply phase)
A2 – Blue (neutral)
A3 – Yellow-green (earth)
B1 – White-orange (up command)
B2 – White (down command TTBus)
B3 – White-black (common)
Page 14
Fixed frame screen with masking installation and operation manual
ENGLISH
Made by Adeo Screen Sp. Z o.o. (Poland) Specifications are subject to change without notice. E&OE
Please verify that you are working with the latest revision of this document before specifying your screen.
Doc: XLR3 – Installation Manual rev3 | 04.12.2017| Download at: www.screenresearch.com 2017 AdeoSreen All Rights Reserved.
Page 14
10 END STOP MOTOR ADJUSTMENT
WARNING - READ CAREFULLY BEFORE PER FORMING ADJUSTMENTS
Adjustments shown must be performed by authorised and specialised personnel only. Incorrect performance of the procedures des cribed may result in damages to the product which
will not be covered by guarantee.
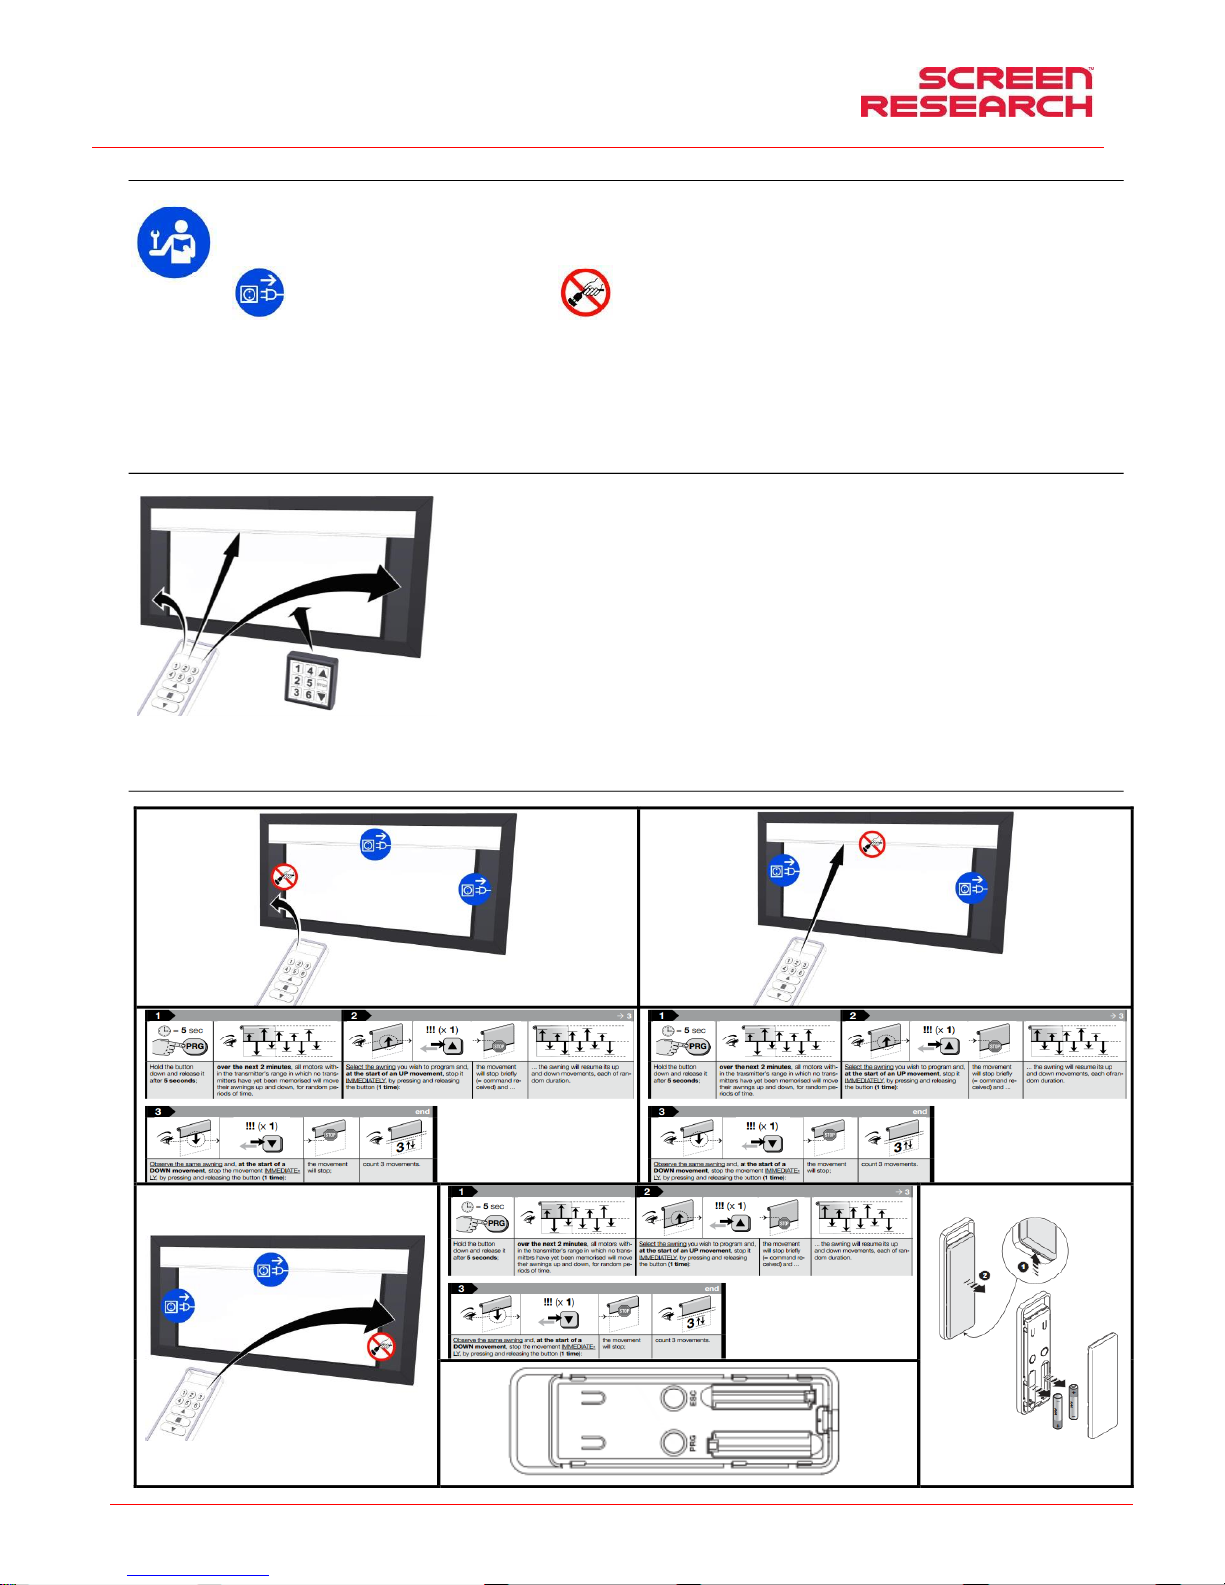
ATTENTION: while performing the procedures described in this m anual please pay attention to the icons below:
Unplug the motor of the masking identified with this icon Do not unplug the motor of the masking identifi ed with this icon
WARNING
End stop is adjusted so as to allow the mas k sheet to wind around the roller at least 1.5 times to avoid the sheet coming loose. Incorre ct adjustment of end stops can cause:
-Mask coming away from the roller
-Mask winding the wrong way, with ensuing d amage to flatness of the masking surface and to winding mechanisms
-Excessive strain on motor with possible ensuing damage and a ctivation of motor’s thermal resistance
-Excessive winding of the end stop adjustment system with ens uing breaking of the mechanical part
WARRANTY
Operators are reminded that in cases where seals have been ta mpered with and where any damages have resulted from incorrect adju stment, repair interventions shall not be covered by guarantee.
OPERATIONAL and PROGRAMMING LOGICS
MASTER remote: must be used by technical staff; it e nables the memorization of upper, lower and intermediate end stops of the two
individual maskings
Telecomando PILOT: keys 1-6 can be used to memoriz e additional formats.
Keys --enable the operator to simultaneously move or stop the two maskings (as set by default).
Before you start to programme the Multiformat’s motors , in order to avoid misunderstandings and issues during the performance of the
set-up procedures it is important to understand certain o perational logics.
The correct sequence of the programming is:
1. tuning of remote controls (supplied with factory setting) ;
2. setting of maximum and minimum possible opening of maskings (supplied with fac tory setting);
3. programming of formats, up to a total of 6 (check the variants of your model to see which have default settings and which don’t).
- Each pr ogramming procedure consists of several steps; at the end of each step, the operator has 60 seconds to start the next step; this
system is devised to prevent the risk of performing operations other than those desired. Therefore, if the motor does not perform the
operation exactly as indicated in the instructions, wait 6 0 seconds, then exit programming and start the procedure all over again.
-During the performance of any procedure, the push -button must be kept pressed until the response movement of the motor is completed.
Before carrying out any programming you need to match the m aster remote to the two individual rollers: the keys of the left-hand g roup control the movement of the bottom masking, while the keys of the
right-hand group control the top masking. Should the remote not carry out the above movements, reset the remote as follows:
MASTER REMOTE TO PROJECTION SURFACE (procedures already carried out in factory SHOULD NOT be performed by unauthorised personnel)
Page 15
Fixed frame screen with masking installation and operation manual
ENGLISH
Made by Adeo Screen Sp. Z o.o. (Poland) Specifications are subject to change without notice. E&OE
Please verify that you are working with the latest revision of this document before specifying your screen.
Doc: XLR3 – Installation Manual rev3 | 04.12.2017| Download at: www.screenresearch.com 2017 AdeoSreen All Rights Reserved.
Page 15
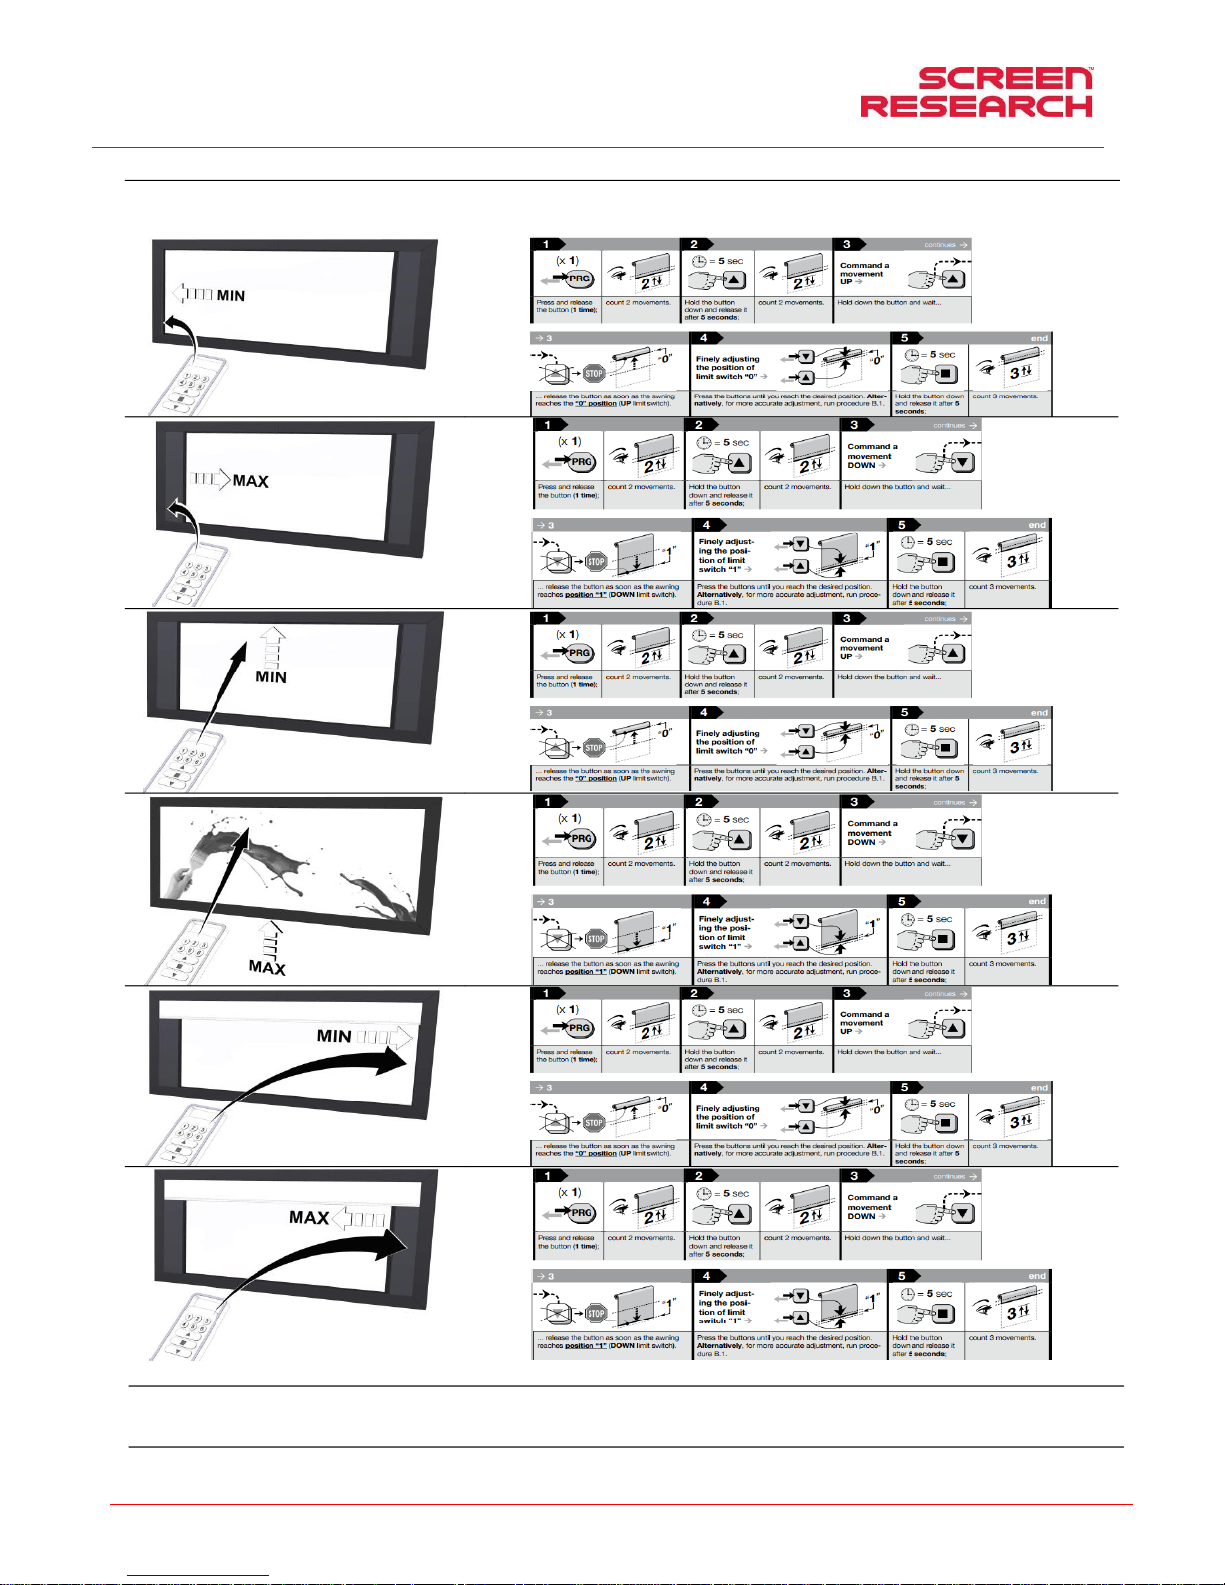
PROGRAMMING END STOPS MASK (procedures already carried out in factory, SHOULD NOT be performed by unauthorised personnel)
Each programming procedure consists o f several steps; at the end of each step, the operator has 60 seconds to start the next step; this system is devised to prevent the risk of performing operations other
than those desired. Therefore, if the motor does not perform the o peration exactly as indicated in the instructions, wait 60 seconds, then exit pro gramming, or cancel the procedure as in dicated at specific
point, and start the procedure all over again.
END STOP MASK MOVEMENT (SHOULD NOT be performed by unauthorised personnel)
The motor’s settings follow an overwriting logic: therefore, o nce the end stop positio ns have been memorised they cannot be cancelled, but only overwritten by following the above-mentioned procedure from
the start.
TO CANCEL THE PROGRAMMING IN COURSE
In order to cancel the procedure in course, simultaneously press and at any time, until the motor has executed 6 movements.
Page 16
Fixed frame screen with masking installation and operation manual
ENGLISH
Made by Adeo Screen Sp. Z o.o. (Poland) Specifications are subject to change without notice. E&OE
Please verify that you are working with the latest revision of this document before specifying your screen.
Doc: XLR3 – Installation Manual rev3 | 04.12.2017| Download at: www.screenresearch.com 2017 AdeoSreen All Rights Reserved.
Page 16
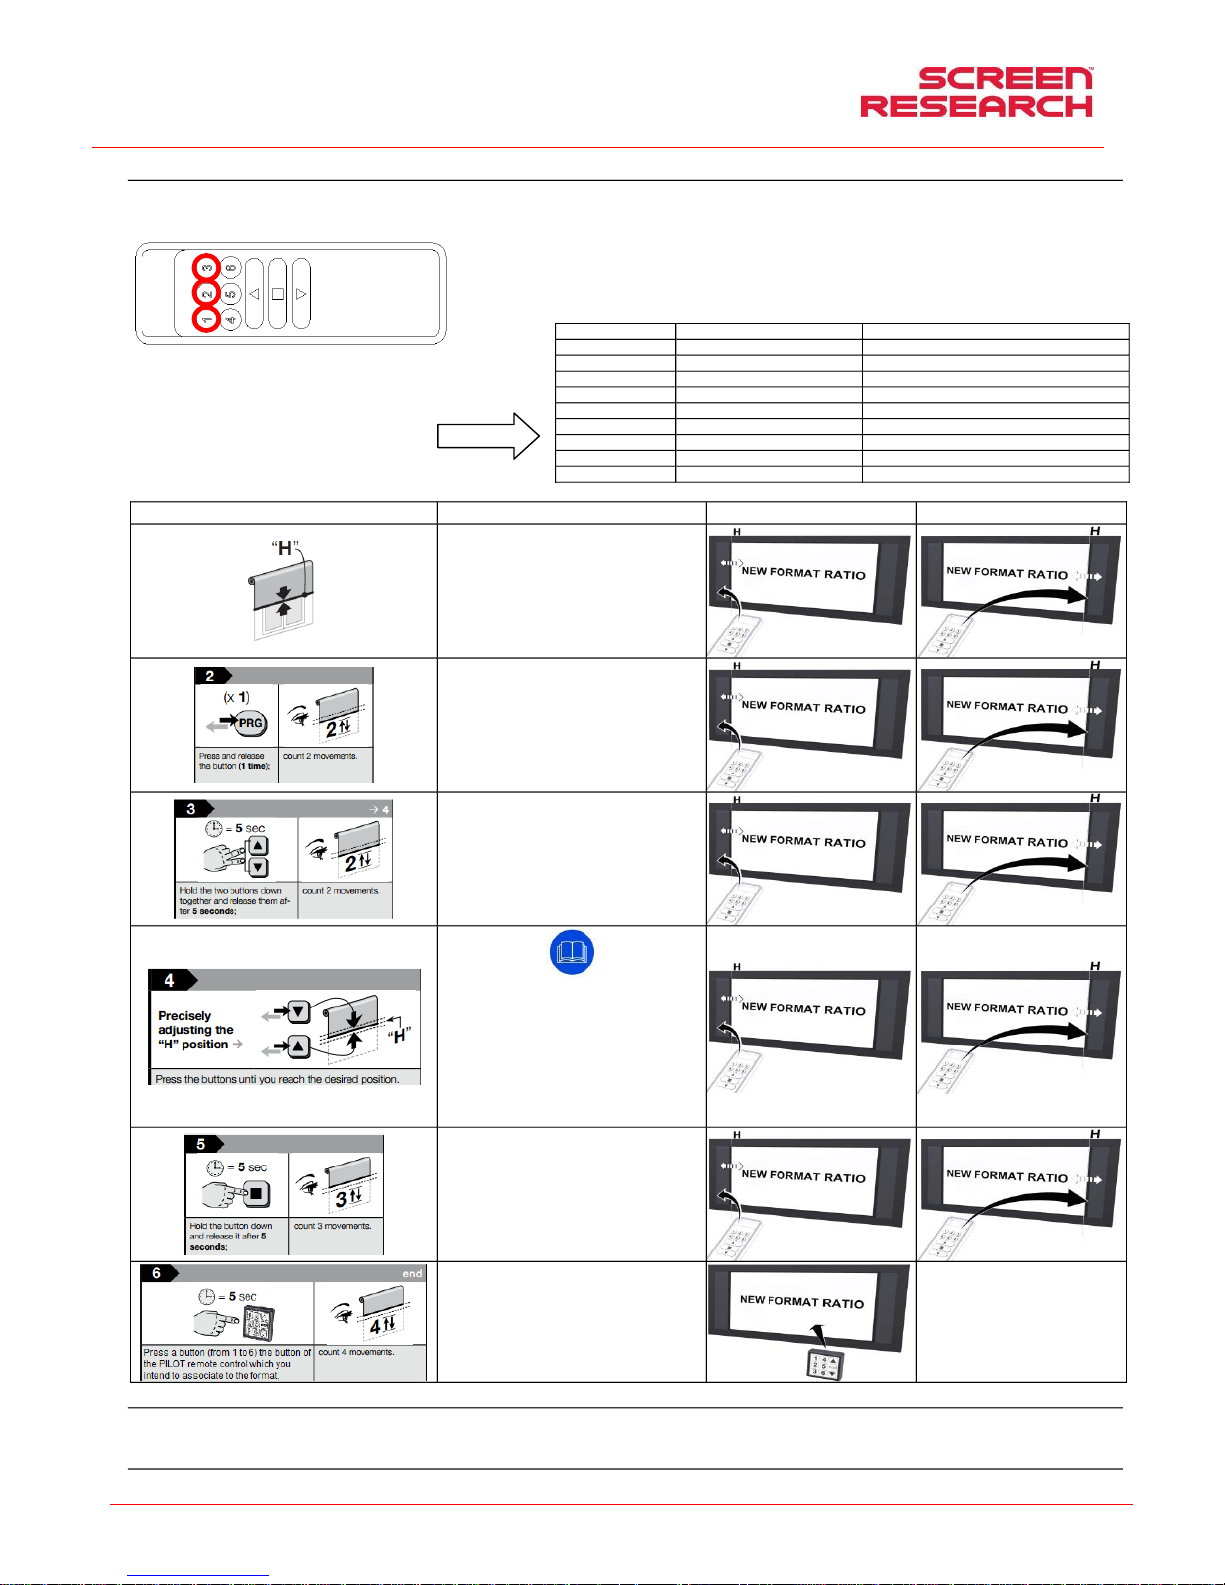
RATIO MEMORIZATION
Each programming procedure consists o f several steps; at the end of each step, the operator has 60 seconds to start the next step; this system is devised to prevent the risk of performing operations other
than those desired. Therefore, if the motor do es not perform the operation exactly as indicated in the instructions, wait 60 seconds, then exit programming, or cancel the procedure as indicated at specific
point, and start the procedure all over again.
Before start the programm ation choose the engine you want to program with the number button, 1 – motor in the left side, 2 – motor of
the deco, 3 - motor in the right side.
Do the sequency below for each engine.
Follow the table opposite to set formats of PILOT with the opening and
closing of the masking with print. Follow the table below to set the formats
with the MASTER remote control and saving it on PILOT, in line with the
transition number 6.
ENGINE 1 – ENGINE 3
ENGINE 1 – ENGINE 3
ENGINE 1
ENGINE 3
With the Master remote control and the ▲▼ ■
keys, bring both screens approximately to the
position that you intend to programme (to check the
exact size of the format required, we recommend
that you project some images of the relevant
format), then proceed as follows
Keep PRG key pressed until the motor performs and
finishes 2 movements
Keep ▲ and ▼ keys simultaneously pressed until
the motor performs 2 movements
Note: at this stage, in order to perform precision
adjustments both the motors must be moved
exclusively with the ▲▼ keys. The remote control
will operate in a stuttering mode. In order to
perform millimetric adjustments press the ▲ or ▼
key briefly. To perform longer movements (but still
in a stuttering mode) keep the ▲ or ▼ key
pressed. Proceed in this manner to position the two
canvases exactly where you want to programme
them.
Once the required position is reached, keep the ■
key pressed until the motor has finished performing
3 movements.
Press a button (from 1 to 6) the button of the PILOT
remote control which you intend to associate to the
format, until each motor has finished performing 4
movements.
The required format is now
memorized on the Pilot remote
control of your choice (1-6) and
the programming procedure is
concluded.
MOVEMENT OF FORMAT
The motor’s settings follow an overwriting logic: therefore , once the end stop positions have been memorised they cannot be canc elled, but only overwritten by following the above-mentione d procedure from
the start.
TO CANCEL THE PROGRAMMING IN COURSE
In order to cancel the procedure in course, simultaneously press ■ and ▼ at any time, until the motor has executed 6 movements.
BOTTONS PILOT
MASK POSITION
DECO MASK
Botton 1 of PILOT
Aspect Ratio 1
In state “UP limit switch” (previous page)
Botton 2 of PILOT
Aspect Ratio 2
In state “UP limit switch” (previous page)
Botton 3 of PILOT
Aspect Ratio 3
In state “UP limit switch” (previous page)
Botton 4 of PILOT
Aspect Ratio 4
In state “UP limit switch” (previous page)
Botton 5 of PILOT
Aspect Ratio 5
In state “UP limit switch” (previous page)
Botton 6 of PILOT
Aspect Ratio 6
In state “UP limit switch” (previous page)
Botton 7 of PILOT
Aspect Ratio 7
In state “UP limit switch” (previous page)
Botton 8 of PILOT
Aspect Ratio 8
In state “UP limit switch” (previous page)
Botton 9 of PILOT
Aspect Ratio 9
In state “DOWN limit switch” (previous page )
Page 17
Fixed frame screen with masking installation and operation manual
ENGLISH
Made by Adeo Screen Sp. Z o.o. (Poland) Specifications are subject to change without notice. E&OE
Please verify that you are working with the latest revision of this document before specifying your screen.
Doc: XLR3 – Installation Manual rev3 | 04.12.2017| Download at: www.screenresearch.com 2017 AdeoSreen All Rights Reserved.
Page 17
CONNECTION MCS-N-RS232 (options not included)
Before to do the electric cabling , read carefu lly the complete instruction of the MCS . Should the power of the motor be different from that of the supply network of the installation place, please contact an
electrician to have a current and Hz transformer installed.
ELECTRICAL CONNECTION: electric cabli ng must be conformant with applicable IEC standards. IEC norm EN 60335-1 requires that supply network be fitted with an
omnipolar selector switch with contact opening distance of at least 3 mm.
For each motor (e.g. plug switch etc.). In case of need, this device ensures that the power supply is safely and quickly cut off.
Use the wires as described in the figure.
ATTENTION:
This product contains two motors, whic h must both be wired in the same manner.
Bus cables must be insulated if not used for the push -button command.
WARNING: Correctly performed, state -of-the-art, norm-compliant electrical connections are important to prevent accidents and to ensure the screen’s optimal and
unaltered performance over time. Prior to carrying out any operation on electrical parts ensure that pow er supply is disconnected.
Bus cables (black white orange) must be insulated if not used f or the push-button command.
In screens fitted with cases the motor is positioned on the right-hand side of the screen as seen from the front.
Operates with standard radio control (supplied).
MCS-N characteristics:
Power supply:
110 - 240 VAC 50/60 Hz
Maximum absorbed current: 80 m A in stand-by mode, 3 A at full load
Encoding: FloR (rolling code)
Frequency: 433.92 MHz
Antenna impedance: 52 ohm
Sensitivity: more than 0,5μV for successful sig nal
Range: estimated at 200 m in open space or 35 m inside buildings
No. of storable transmitters: 30
Output: 1 output for controlling a two- phase motor
Contact capacity: 3 A - 250 V
Protection rating: IP44 (with container in tact)
Operating temperature: -20° C . +55° C
Dimensions / weight: 128 x 112 x 43 mm / 2 60 g
Connection for each motor,
230V version:
White orange (BUS)
White (BUS)
White Black (common BUS)
Brown (Neutral 230V)
Blue (Phase 230V)
Yellow Green (Ground 230V)
Connection for each motor,
120V version:
White orange (BUS)
White (BUS)
White Black (common BUS)
White (Neutral 120V)
Black (Phase 120V)
Green (Ground 120V)
WARRANTY
1.LIMITED WARRANTY Screen Research w arrants the product designated herein to be free of manufacturing defects in material and workmanship, subje ct to the term and conditions hereinafter set forth.
Surface fabric(s) and frames are warranted for a p eriod of five (5) years from the date of invoice by the original purchaser. Motors, motor controllers, remote contro ls, and related assembly hardware are
warranted for three (3) years parts and labor from date of invoice by the original purchaser.
2.CONDITIONS AND LIMITATIONS This Warranty is subject to the following conditions and limitations. The Warranty is void and inapplicable if the product ha s been used or handled other than in accordance
with the instructions in the owner’s manual, abused or m isused, damaged by accident or neglect or in being transported, or the defect is due to the product being repa ired or tampered with by anyone other
than Screen Research or an authorized Screen Research deale r or installer. The product must be installed by a professional, duly- authorized Screen Research dealer/custom installer, and maintained
according to the written instructions.
3.RETURNS No product returns accepted witho ut a prior written return authorization from Screen Research. Product must be packed in the original PACKAGE CONTENTS or equivalent packaging in order to
avoid any damage during transportation. The product (s) must be packed and returned to Screen Research or an authorized Screen Research repair center by the customer at his or her sole expense. Screen
Research will pay return freight of its choice. A RETURNED PROD UCT MUST BE ACCOMPANIED BY A WRITTEN DESCRIPTION OF THE DEFECT AND A PHOTOCOPY OF THE ORIGINAL PURCHASE RECEIPT. This
receipt must clearly list model and serial number, the date of p urchase, the name and address of the purchaser and authorized dealer and the price paid by the p urchaser. Screen Research reserves the right to
modify the design of any product without obligation to pu rchasers of previously manufactured products and to change the pric es or specifications of any product without notice or obligation to any person.
4.REMEDY In the event the product fails to meet the abo ve Warranty, the purchaser’s sole remedy under this Limited Warranty shall be t o return the product to Screen Research or an authorized Screen
Research service center where the defect will be rectified without charge for parts or labor, during the term of this Limited Warranty.
5.LIMITED TO ORIGINAL PURCHASER This Warranty is for the sole benefit of the original purchaser of the covered product and shall not be t ransferred to a subsequent purchaser of the product.
6.MISCELLANEOUS Any implied warrant ies relating to Screen Research products shall be limited to the duration of this warranty. The warranty d oes not extend to any incidental or consequential damages to
the purchaser. Some states or countries do not allow limitation s on how long an implied warranty lasts, or an exclusion or limitation of incidental or consequential damages, so the above limitations or
exclusions may not apply to you. This Warranty gives you s pecific legal rights, and you may also have other rights which vary from state to st ate, or country to country.
7.WARRANTOR Enquiries regarding the above L imited Warranty may be sent to the following address, specific to country where purcha sed:
8. WARRANTY SUPPORT MANAGED BY AUTHO RIZED DISTRIBUTORS Screen Re search has authorized distribution in many countries of the world. In each country, the authorized impo rting Distributor is
responsible for warranty support of products sold in the respective country by that retailer or distributor. Warranty service should be obtained from the importing retailer or distributor from whom you purchased
your product.
Page 18
Manuel d’installation et d’utilisation de l’écran à cadre rigide avec masquage
FRANCAIS
Made by Adeo Screen Sp. Z o.o. (Poland) Specifications are subject to change without notice. E&OE
Please verify that you are working with the latest revision of this document before specifying your screen.
Doc: XLR3 – Installation Manual rev3 | 04.12.2017| Download at: www.screenresearch.com 2017 AdeoSreen All Rights Reserved.
Page 18
01 INTRODUCTION
Ce manuel fait partie intégrante du produit et sa lecture et compréhension sont d’une importance fondamentale pour la sécurit é. Il décrit les normes et modalités d’utilisation qui
permettront au client d’utiliser l’écran correctement et en toute sécurité. Le manuel doit toujours accompagner le produit et doit être conservé avec soin dans un lieu adapté afin d’e n
garantir l’intégrité physique, tout en permettant d’y accéder facilement par toute personne autorisée à le consulter. Tout ut ilisateur du produit est responsable de la conservation de ce
manuel. L’utilisateur est également responsable du contrôle du bon fonctionnement de l’écran et de la réparation ou substitution des pièces sujettes à l’usure et pouvant provoquer des
dommages. Les images contenues dans ce manuel ont pour but de décrire de manière détaillée les fonctions, caractéristiques ou procédures. T outefois elles peuvent différer selon le
type modèle représenté, ceci n’enlève rien au sens descriptif de l’image.
02 NORMES GÉNÉRALES DE SÉCURITÉ
ATTENTION : Consignes importantes de sécurité. Ne pas respect er les consignes relatives à l’installation peut engendrer des blessures graves. S’assurer toujours d’avoir
bien lu et compris les instructions et les avertissem ents contenus dans le manuel avant de commencer à utiliser le produit et d’effectuer toute intervention d’entretien.
-L’installation de l’ècran au dessus des zones de passa ge est strictement interdite Contrôler, avant et pendant l’utilisation, que l’écran ne g énère pas de situations
dangereuses.
- Ne modifier, enlever ou endommager aucun élément ou partie de l’écran.
- Ne jamais réaliser d’opérations de maintenance sur l’écran lo rsque le moteur est allumé (couper l’alimentation pour une sécurité renf orcée).
- Obligation de déconnecter l’alimentation lors du netto yage, la maintenance ou lorsque de remplacement d’une pièce
- Interdire l'utilisation de l’écran aux enfants. Ne pas in itier les enfants a l’utilisation de l'écran.
Chaque écran est couvert par une garantie, d ont la validité dépend du respect et de l’exécution des instru ctions contenues dans ce manuel.
ATTENTION: Le kit d'installation pour chaque écran, n e contiennent pas de vis et chevilles en plastique pour fixation aux murs / plafo nds. L'installateur est responsable du
choix approprié des vis et des chevilles, selon les différents type s de matériaux des murs ou des plafonds pour lequel vous souhaitez installer l' écran. Une installation
incorrecte peut compromettre la sécurité des personnes q ui utiliseront ce produit, le fabricant ne pourra être tenu responsable des dommages causés aux chos es ou aux
personnes suite à une installation et à un usage incorrects de l’é cran, et à un mauvais entretien.
Le fabricant n’est pas responsable des problèmes l iés à des erreurs d’installation.
Si nécessaire, contacter notre bureau technique pour tout éclair cissement.
L’installation de l’écran, les raccordements électriques et les co ntrôles en cas de mauvais fonctionnement des enrouleurs motorisés doivent ê tre effectués par le revendeur
autorisé ou par un technicien qualifié connaissant les r isques liés à l’électricité. Le câble de raccordement ne peut pas être subs titué. Si le câble est endommagé, l’écran
doit être substitué. La modification des fins de course ou le percement de la protection située au-dessus des orifices entraînent l’annulation de la gar antie.
UNE FOIS LE MONTAGE DE L’ÉCRAN SUR LES SUPPORTS TERMINÉ, IL EST IMPÉRATIF DE VÉRIFIER QU’IL EST PARFAITEMENT HORIZONTAL AVANT DE L’UTILISER.
03 AVERTISSEMENTS ET PRÉCAUTIONS D’EMPLOI ET INSTALLATION
Il est recommandé d’utiliser les écrans dans des locaux couverts , dans des conditions de température (20 - 25 °C) et d’humidité normales.
Il est absolument interdit d’installer les écrans de projec tion vidéo devant des fenêtres ou de les utiliser comme stores occultants exposés à la lumière directe du soleil près de sources fortes de lumière, à
proximité des sources de chaleur telles que des poêles, cheminés ou conduits proches des systèmes de climatisation, à la fois pour l’ air chaud et froid, tout manquement au respect de ces interdictions
pourra causer des déformations ou un étirement permane nt du tissu de projection.
Des précautions particulières doivent être adoptées en cas d’utilisation à l’extérieur, en particulier en ce qui concerne les températures et la poussière.
L’utilisation de l’écran motorisé en extérieur nécessite d’adopte r des précautions spécifiques dont :
1- Protection du / des câble(s) d’alimentation du moteur c ontre les radiations UV à l’aide de conduites ou gaines adaptées à une installation en extérieur.
2- Utilisation de joints de câbles en tant que protection contre l’eau et l ’humidité dans les raccords avec les boîtiers de jonction ou de dérivation .
3- Utilisation de commutateurs de classe de pro tection IP55 ou supérieure (le commutateur de série du produit n’est pas conforme pour un usage en extérieur).
4- Couvrez et protéger l’écran contre le contact direct avec de l’eau ou du liquide
L’écran étant composé d’une toile de projection (PVC ), il tend à se charger électrostatiquement, et donc une présence excessive de poussière dans l’environnement de project ion peut entraîner une
dégradation des qualités optiques de la toile à cause du dépôt d e poussières par attraction électrostatique (voir aussi Nettoyage de la toile de projection).
Veillez à ne pas fixer vos écrans de projection à proximité d'une sourc e de chaleur pour éviter des dégâts sur la surface de pro jection.
L'utilisation de l'écran enroulable prévoit l'ouverture co mplète du tissu (descente) et après son utilisation avec un projecteur, la fermeture complète du tissu ( montée). L'ouverture et la fermeture complètes
(descente–montée) de l'écran sont appelées « cycle ».
Les écrans enroulables motorisés sont conseillés pour des utilisations à « cycle » unique, c'est-à-dire qu'un laps de temps cons idérable s'écoule entre deux cycles. On n'a pas prévu la possibilité d'effectuer
des ouvertures et des fermetures continues.
Les moteurs utilisés sur les écrans sont munis de systè mes de blocage thermique qui permettent de ne pas surchauffer le moteur afin d'éviter les domma ges permanents. Le blocage thermique s'active après
un certain nombre de cycles d'utilisation qui varie en fonction d u type de moteur et du type d'écran (normalement entre 3 et 6 cycles) . On précise quoiqu'il en soit que la chaleur émise par le moteur est
transmise au rouleau et donc au tissu enroulé sur ce d ernier. La surchauffe du tissu peut provoquer des déformations ou des a llongements non homogènes permanents entraînant des désalignements du
fond ou des déformations du tissu.
Pour éviter ces situations, il est formellement interdit d'util iser l'écran au-delà de 3 cycles complets d'utilisation (montée–descente). A u bout de 3 cycles d'utilisation continue ou rapprochée, il faudra
attendre 40 minutes avec l'écran en position ouverte (tissu dér oulé) pour permettre le refroidissement du moteur et des compo sants structuraux correspondants, avant une nouvelle utilisation.
ATTENTION: Ne pas permettre aux enfants de jouer a vec les dispositifs de commande fixes. Tenir les télécommandes hors de portée des enfants.
Observer l’écran en mouvement et éloigner toute personne de l ’écran tant qu’il n’est pas complètement refermé.
Il est interdit d e s’accrocher ou de se balancer, d’a jouter ou appliquer tout objet à la toile ou au fond, ou de modifier la structure de l’écran, car cela pourrait provoquer des dommages à l’ écran, ainsi qu’aux
choses et aux personnes. nous rappelons que les bases sont structurées pour une utilisation interne et pour des écrans allant jusqu’à 4 m. Toute autre installation devra être faite en mettant le produit en
sécurité afin d’empêcher qu’il ne se renverse ou qu’il cède .
Interdiction absolue d’installer les écrans de projection vidéo de vant des fenêtres ou de les utiliser comme stores occultants.
Interdiction absolue d’installer les écrans de projection vidéo à proximité des sources de chaleur telles que les poêles, les cheminées ou conduits proches des systèmes de clima tisation, à la fois pour l’air
chaud et froid.
Placez l’écran parfaitement à l’horizontal.
ÉLIMINATION DU PRODUIT
Comme pour les opérations d'installation, au terme de la vie du produit, les opérations de démontage doivent être effectuées p ar un technicien qualifié.
Ce produit est composé de différents types de matériaux : certains peuvent être recyclés, d’autres doivent être éliminés. Informez -vous sur les systèmes de recyclage et
d’élimination des déchets prévus par les réglementations en vigueur sur votre territoire pour cette catégorie de produits.
Comme l’indique le symbole ci-contre, il est interdit de jeter ce produit dans les déchets domestiques. Effectuez donc un "tri sélectif" pour le traitement des déchets ,
selon les méthodes prévues par les réglementations en vigueur sur votre territoire, ou bien ramenez le produit chez le vendeu r au moment de l'achat d’un nouveau
produit équivalent. Attention: les réglementations locales peuvent prévoir des sanctions en cas d’élimination abusive de ce produit
Page 19
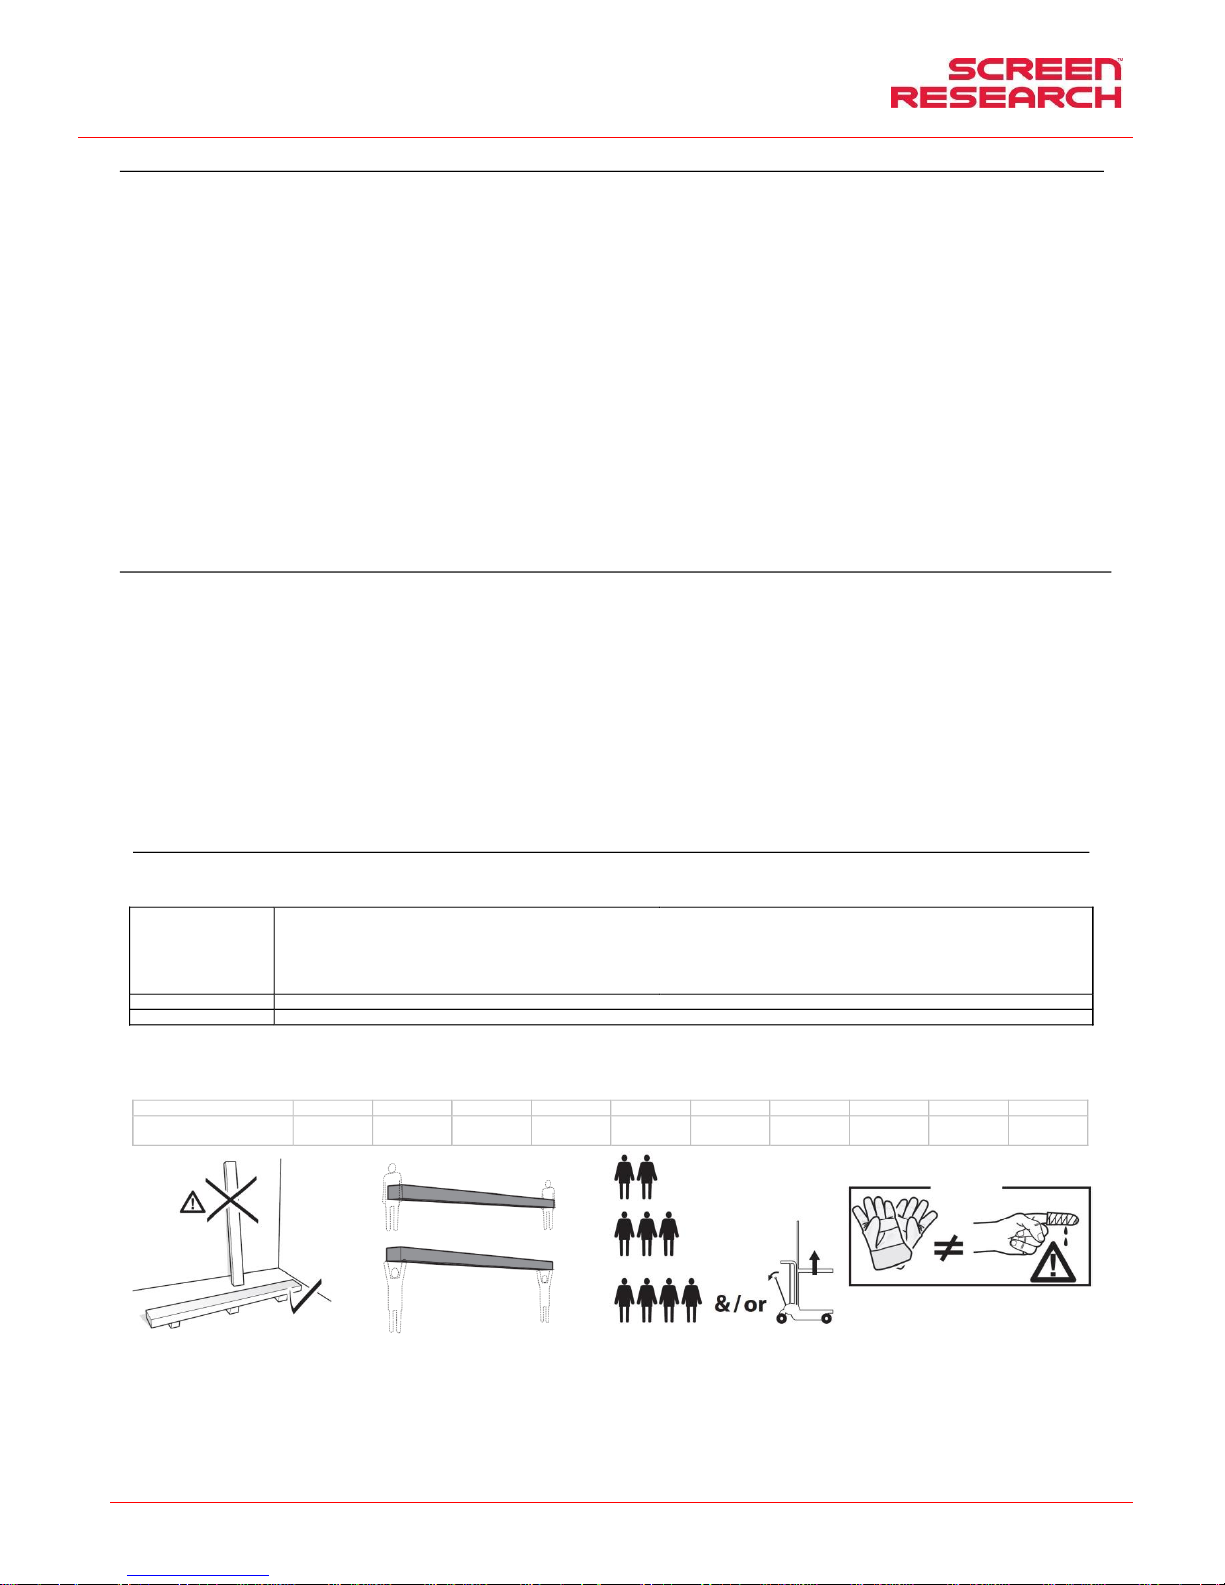
Manuel d’installation et d’utilisation de l’écran à cadre rigide avec masquage
FRANCAIS
Made by Adeo Screen Sp. Z o.o. (Poland) Specifications are subject to change without notice. E&OE
Please verify that you are working with the latest revision of this document before specifying your screen.
Doc: XLR3 – Installation Manual rev3 | 04.12.2017| Download at: www.screenresearch.com 2017 AdeoSreen All Rights Reserved.
Page 19
04 CARACTÉRISTIQUES GÉNÉRALES DU PRODUIT
Le produit écran est fabriqué en conformité avec les dispos itions des directives CE: 2014-35-CE LDV Basse tension
2014-30-EU EMC Compatibilité électromagnétique
2014-53-CE Équipement radio
2009-125-CE CONSOMMATION Ecodesign
2011-65-CE ROHS Substances dangereuses
2012-19-CE RAEE Traitements des déchets
2001-95-CE SÉCURITÉ Produits sûrs
L'écran décrites dans ce manuel doit être utilisé exclusivement comme un support pour la projection vidéo. Toute autre utilisation non couverte par le présent manuel, i l n'est pas consenti.
L'écran contient un ou plusieurs toile/feuilles de projection en PVC plastifié sans cadmium or Fil de verre (filament continue) plastifiées PVC imprégné, chaque toile peut être classé dans la catégorie:
- M1 o M2 selon la réglementation française (LNE Laboratoire national de métrologie et d’essais – SME Centre de recherches du Bouchet - WARRINGTONFIRE GENT Laboratoire de métrologie et
d’essais – IFTH Laboratoire accreditè )
- B1 o B2 selon la réglementation Allemand (LNE Laboratoire national de métrologie et d’essais – SME Centre de recherches du Bouchet - WARRINGTONFIRE GENT Laboratoire national de
métrologie et d’essais)
- UL94HB selon la réglementation USA (THE GOVMARK Organization, Inc.)
Étant donné qu’il n’existe encore au niveau européen aucune harmonisation en tre les différentes réglementations natio nales de clas sification, nous précisons que la classe M1 française corresp ond à
matériau non inflammable et la classe M2 correspo nd à matériau difficilement inflammable. Les toile/feuilles de protection contenues et utilisées sur les écrans son t principalement composés de PVC
plastifié ou de fibres de verre, ces tissus sont sensibles à la tem pérature et à l’humidité, ainsi la tolérance dimensionnelle acceptée est d’1 % sur chaqu e dimension.
Les tolérances sur les profils en aluminium utilisés son t de +/- 2 mm.
les tolérances sur l’enveloppe totale sont de:
- +/- 3 mm jusqu’à 2500 mm d’enveloppe totale ;
- +/- 5 mm jusqu’à 4000 mm d’enveloppe totale ;
- +/- 10 mm jusqu’à 8000 mm d’enveloppe totale;
- +/- 20 mm jusqu’à 16000 mm d’enveloppe totale;
- +/- 30 mm jusqu’à 24000 mm d’enveloppe totale.
05 NETTOYAGE ET ENTRETIEN
L’écran et les toiles de projection des écrans sont délicats : il faut dont prêter une attention particulière et suivre les instructions suivantes pour le nettoyage.
Ne jamais utiliser de solvants, produits chimiques ou a brasifs, ni d’outils pointus pour nettoyer la surface.
Éviter tout contact avec d’autres matériaux (peintures, encres, e tc.) car il pourrait être impossible de les éliminer de la surface de la toile.
TOILES DE PROJECTION CLEARPIX: utiliser un chiffon doux, propre et humidifié en effectuant toujours des mouvements partant du centre de la zone de project ion pour aller vers les bords. Il n’est permis
d’utiliser une brosse montée sur un aspirateur que si le s poils sont doux et parfaitement propres.
TOILES DE PROJECTION SOLIDPIX, MULTIPI X,: Pour nettoyer la toile de projection, utiliser un chiffon doux, propre, hum idifié, avec un détergent à base neutre ou de l’alcool si nécessaire. Étant donné
qu’après le nettoyage la toile pourrait se charger d’électricité sta tique à cause du frottement du chiffon, il est conseillé de passer, avec un chiffon propre, un liquide ant istatique sur la toile afin d’éviter que la
poussière ne soit à nouveau attirée par l’écran .
TOILES DE PROJECTION SILVEPIX est obligatoire de lire les instructions fournies en écran tissu
PROFILS: Pour nettoyer le caisson, utiliser un chiffon d oux propre et un détergent non agressif si nécessaire.
PROFILS VELOUTÉS : Pour nettoyer le profil, dépouss iérer en utilisant un chiffon doux et propre, ou bien une brosse à poils doux et antistatiq ues. Il n’est permis d’utiliser une brosse montée sur un aspirateur
que si les poils sont doux et parfaitement propres.
STRUCTURE ET BRIDES DE FIXATION : Il est obligatoire de vérifier régulièrement l’état du produit et la tenue des brides de fixation. En cas de déformations, lacérations ou de fléchissements structu rels des
brides, vis et autres éléments qui composent le produit, il est ob ligatoire de mettre immédiatement en sécurité la zone où l’écran est installé , afin d’éviter tout type de dommage aux chos es ou aux personnes.
Ensuite, il est obligatoire de procéder à la substitution immédia te du composant défectueux et à la réparation du produit.
06 DÉSEMBALLAGE DE L’ÉCRAN ET MANUTENTION DU PRODUIT
S’assurer qu’aucune partie de l’écran n’a été endommagée pen dant le transport. En cas d’anomalie, communiquer immédiatement le p roblème au revendeur. Vérifier que tous les accessoires sont compris,
en fonction du type d’écran, selon la instructions
Common
-n° 16 Plastic nut for assmbly housing
-n°1 logo Screen Research
-n° 4 Ruber gloves
-n° 1 Protective foil Nylon
-n° 1 Hex key n°3
-n° 1 Hex key n°4
-n° 1 Hex key n°2,5
-n°1 Installation manual
-n° 1 CD with manual, picture,movie
-n° 1 set MCS electric connection
-n°2 Power cord for motor power+connector
(screws and plugs for installation not included)
<=160”
-n°2 BRACKETS
>160”
-n°3 BRACKETS
ATTENZIONE ne pas utiliser de cutter ou d’objets point us pour ouvrir l'emballage, utiliser toujours des gants de protection pendant l’ouvertur e de l’emballage et l’installation ou la manutention du produit.
Manutentionner et installer le produit avec l’aide d’au m oins deux, trois ou quatre personnes en fonction du poids du produit (valeurs de ré férence de charge par personne : 25kg hommes - 15kg femmes).
En cas de poids supérieurs, il est conseillé d’utiliser des é quipements de soulèvement spécifiques.
largeur max de (en inches)
80”
90”
96”
100”
110”
120”
130”
140”
150”
160”
XLR3 Poids total à considérer
144 Kg
317,5 Ibs
151 Kg
332,9 Ibs
158 Kg
348,3 Ibs
165 Kg
363,7 Ibs
172 Kg
379,2 Ibs
179 Kg
394,6 Ibs
184 Kg
405,6 Ibs
210 Kg
462,9 Ibs
217 Kg
478,4 Ibs
223 Kg
491,6 Ibs
Page 20
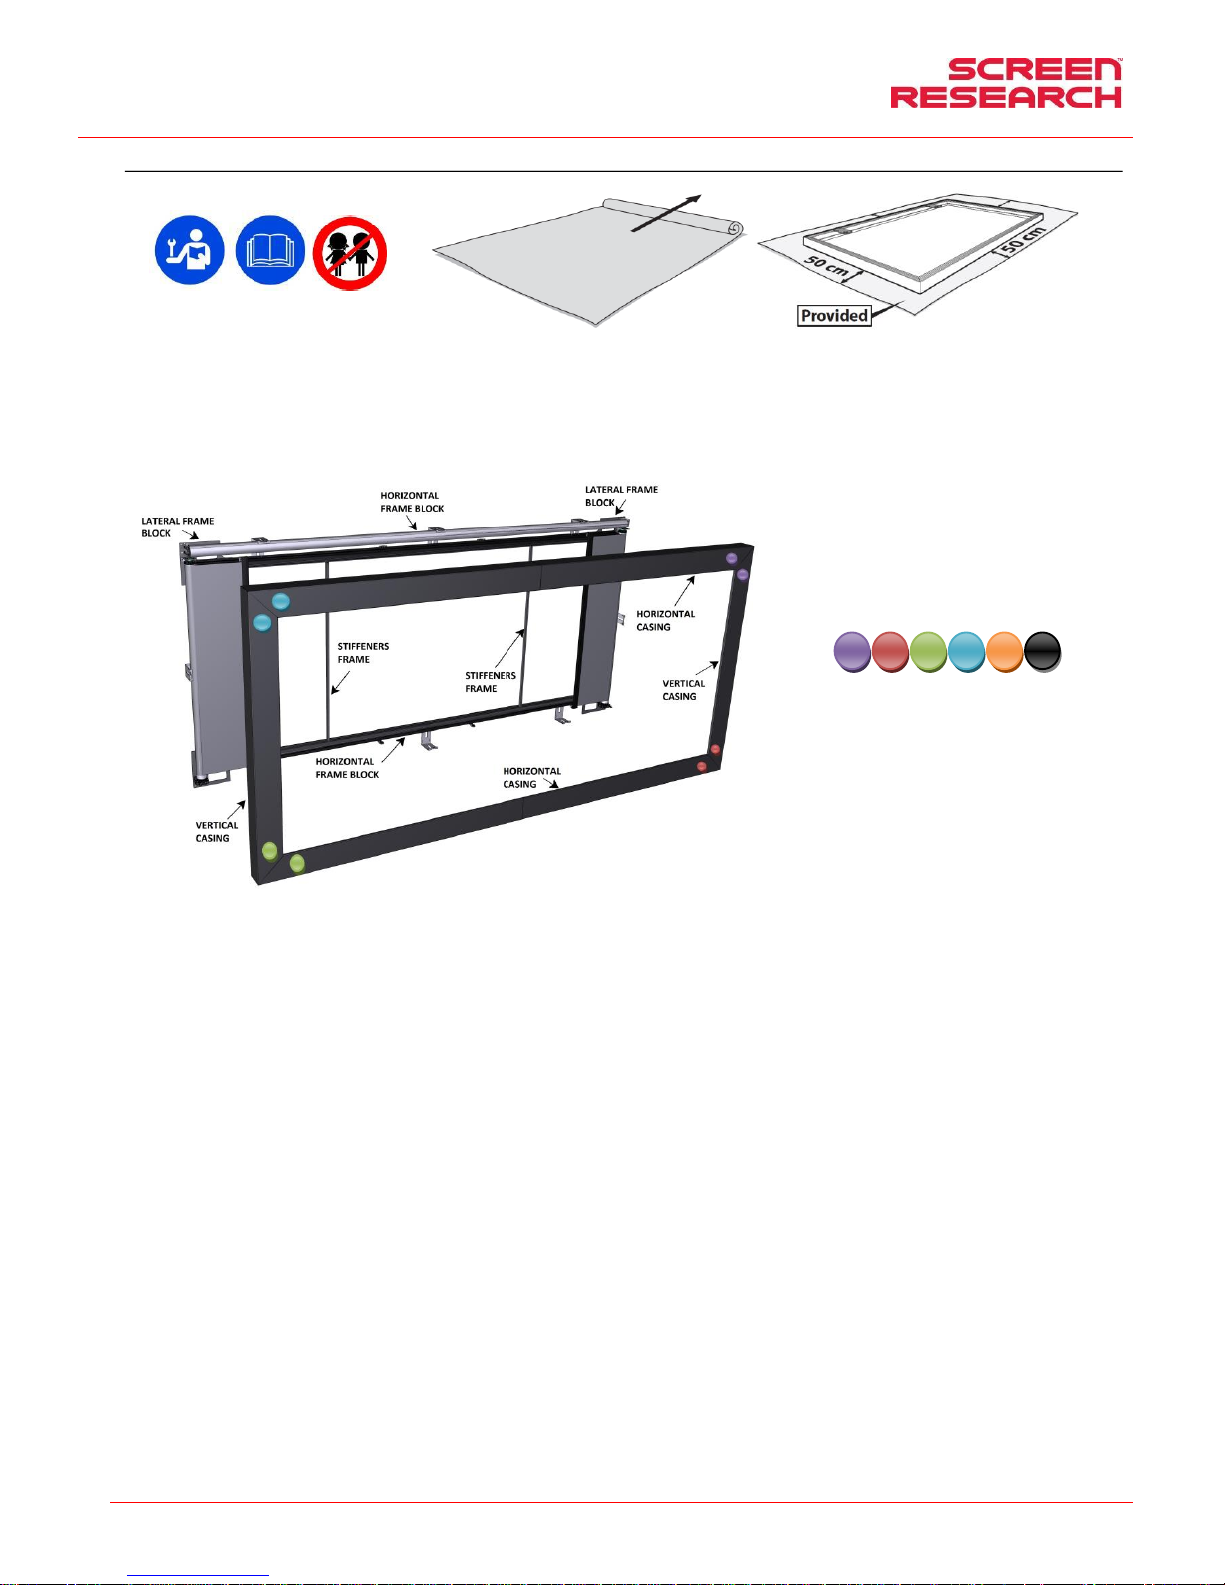
Manuel d’installation et d’utilisation de l’écran à cadre rigide avec masquage
FRANCAIS
Made by Adeo Screen Sp. Z o.o. (Poland) Specifications are subject to change without notice. E&OE
Please verify that you are working with the latest revision of this document before specifying your screen.
Doc: XLR3 – Installation Manual rev3 | 04.12.2017| Download at: www.screenresearch.com 2017 AdeoSreen All Rights Reserved.
Page 20
07 ISTRUCTIONS POUR L’INSTALLATION
ATTENTION:
Voir les im ages aux dernières pages d u manuel. Il e st absolument interdit d'installer l'écran sur les murs mobiles ou les câbles instables, les supports doivent être appliqués sur des surfaces qui assurent
dans le temps, votre distance.
L’installation de l’écran doit être effectuée à l’aide de vis et d e chevilles adaptées au poids et au type de pa roi ou de pla fond sur lesquels on souhaite fixer les supports. Avant de commencer l’in stallation,
choisissez le type de cheville ou de fixation en suivant le schéma suivant.
WARNING:
Utiliser la bâche de protection pour protéger d’éventuel domma ge.
S’assurer que le système de contrôle est facilement accessible p our d’éventuelles vérifications ou mise à jour.
ATTENTION !!!
L’écran est réalisé a partir d’éléments horizontaux et verticaux q ui ont
déjà pré-assemblé en usine
Des étiquettes de couleurs circulaires ont serve à repér er les
différents éléments à assembler
Page 21
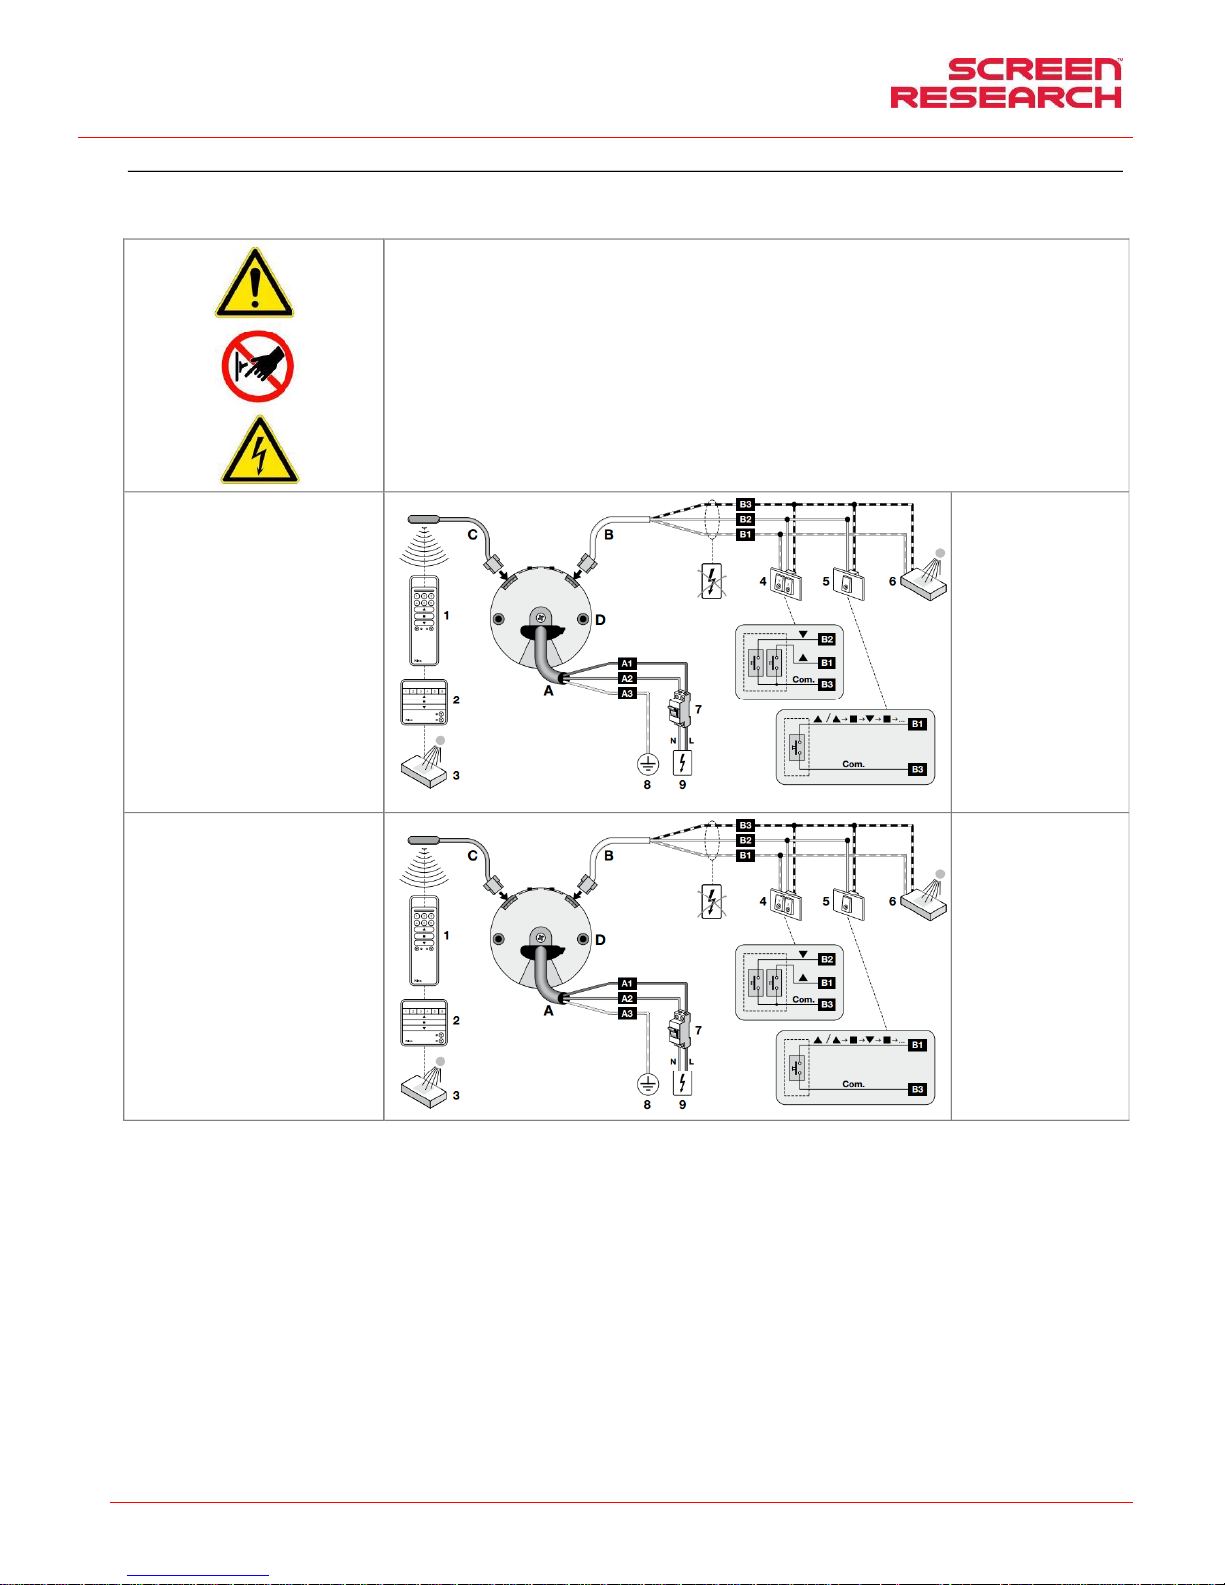
Manuel d’installation et d’utilisation de l’écran à cadre rigide avec masquage
FRANCAIS
Made by Adeo Screen Sp. Z o.o. (Poland) Specifications are subject to change without notice. E&OE
Please verify that you are working with the latest revision of this document before specifying your screen.
Doc: XLR3 – Installation Manual rev3 | 04.12.2017| Download at: www.screenresearch.com 2017 AdeoSreen All Rights Reserved.
Page 21
IDENTIFICATION DU TYPE DE MOTEUR – CARACTÉRISTIQUES – RACCORDEMENT ÉLECTRIQUE
Le type de moteur installé sur le produit est identifié sur l’étiqu ette reportant le logo CE appliquée sur chaque produit. À l’ouverture de l’emballage, veuillez contrôler l’étiquette et identifier le modèle correct
du moteur afin d’effectuer l’installation et le câblage corrects d e l’appareil. Au cas où la puissance du moteur ne correspondrait pas à la puissance du réseau électrique du lieu d’installation, veuillez
contacter un électricien et vous munir d’un transformateur de courant et Hz adapté.
RACCORDEMENT ÉLECTRIQUE:
Le câblage électrique doit respecter les normes CEI en vigueur. La norme CEI EN 60335-1 prévoit que le réseau d’alimentation doit être pourvu d’un
dispositif de déconnexion omnipolaire avec une distance d’ouv erture des contacts d’au moins 3 mm. Pour chaque moteur (par ex. int errupteur prise
etc.) En cas de besoin, ce dispositif garantit une déconnexion r apide et sûre de l’alimentation électrique. Utiliser des câbles pour la connexion comme
l’illustre l’image.
ATTENTION: ce produit contient deux moteurs d onc il faut effectuer le même câblage pour les deux moteurs.
Il est obligatoire d’isoler les câbles Bus (noir, blanc, ora nge) s’ils ne sont pas utilisés pour la commande à l’aide du bouton.
ATTENTION: l’exécution correcte des raccordements é lectriques, dans les règle de l’art et dans le respect des réglementations en vigueur , est
importante pour la prévention des accidents et afin de garant ir un fonctionnement correct et durable de l’écran.
Avant d’effectuer toute opération sur les parties électriques, s’as surer qu’il n’y a pas de tension.
Le moteur des écrans pourvus de caisson est situé sur la droit e de l’écran vu de face (sur demande, il est possible de l’avoir sur la gauche).
L’actionnement se fait à travers une radiocommande four nie de série.
Caractéristiques Moteur :
Nice ERA INN EDGE –AC
86-230V 50-60Hz
Fréquence: ~Hz50-60
Puissance: 45W
Couple: 3Nm
Vitesse: 32Rpm
Cycle de service : S2 4 min
Longueur câble: 3m
Résistance mécanique:
conforme norme EN14202
Temp. de fonctionnement:
de –20 à +55 °C
Fréquence: 433.92 MHz
Portée émetteur: 150m
Niveau de pression sonore pondérée :
LpA ≤ 70 dB(A)
Classe de protection du moteur : IP44
Raccordement pour chaque
moteur :
A1 – Marron (puissance de
phase)
A2 – Bleu (neutre)
A3 – Jaune-vert (terre)
B1 – Blanc-orange (montée)
B2 – Blanc (descentes TTBUS)
B3 – Blanc-noir (commun)
Caractéristiques Moteur :
Nice ERA INN EDGE –AC
86-230V 50-60Hz
Fréquence: ~Hz50-60
Puissance: 70W
Couple: 6Nm
Vitesse: 32Rpm
Cycle de service : S2 4 min
Longueur câble: 3m
Résistance mécanique:
conforme norme EN14202
Temp. de fonctionnement:
de –20 à +55 °C
Fréquence: 433.92 MHz
Portée émetteur: 150m
Niveau de pression sonore pondérée :
LpA ≤ 70 dB(A)
Classe de protection du moteur : IP44
Raccordement pour chaque
moteur :
A1 – Marron (puissance de
phase)
A2 – Bleu (neutre)
A3 – Jaune-vert (terre)
B1 – Blanc-orange (montée)
B2 – Blanc (descentes TTBUS)
B3 – Blanc-noir (commun)
Page 22
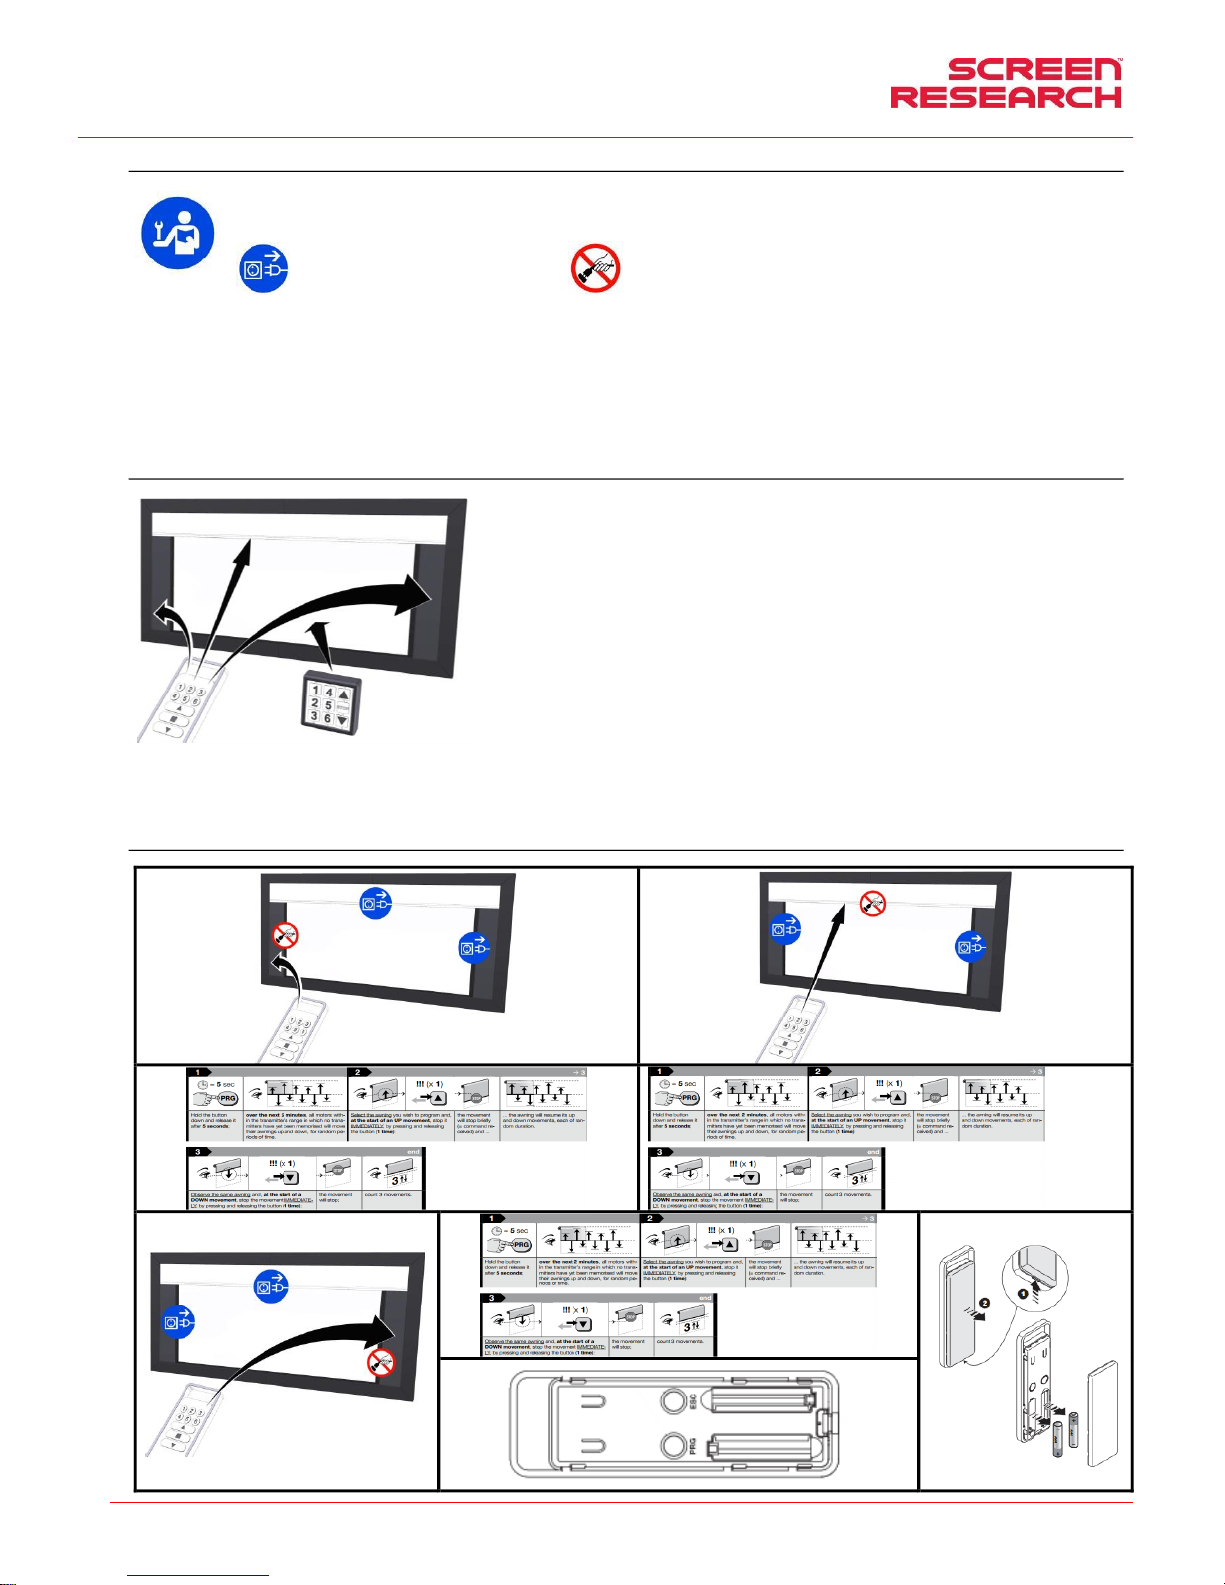
Manuel d’installation et d’utilisation de l’écran à cadre rigide avec masquage
FRANCAIS
Made by Adeo Screen Sp. Z o.o. (Poland) Specifications are subject to change without notice. E&OE
Please verify that you are working with the latest revision of this document before specifying your screen.
Doc: XLR3 – Installation Manual rev3 | 04.12.2017| Download at: www.screenresearch.com 2017 AdeoSreen All Rights Reserved.
Page 22
10 PROGRAMMATION DES FINS DE COURSES
ATTENTION: À LIRE AVANT D’EFFECTUER TOUT RÉGL AGE
Les réglages indiqués doivent être effectués par un person nel autorisé et spécialisé. L’utilisation incorrecte des procédures décr ites peuvent provoquer des dommages au produit,
pour lesquels la garantie ne sera pas valable.
ATTENTION : pendant l’exécution des procédures déc rites dans le manuel, faire attention aux symboles suivants :
débrancher le moteur du masque indiqué Ne pas débrancher le moteur du masque indiqué
RISQUES
La fin de course est réglée de manière à permettre que le masq ue reste enroulée sur au moins 1,5 tours autour du rouleau afin d ’éviter le décrochage du masque. Un mauvais réglage des fins de course
peut provoquer :
-Décrochage du masque de son rouleau
-Enroulement dans le sens contraire du masque avec endomm agement de la surface et des mécanismes d’enroulement.
-Effort excessif du moteur avec risque d’endommage ment et de déclenchement de la résistance thermique contenue dans celui-c i.
-Enroulement excessif du système de réglage des fins de cours e et rupture de la partie mécanique.
GARANTIE
Nous rappelons aux opérateurs qu’en cas de modification des protections et d’endommagement dû à un réglage incorrect, les interventions d e réparation seront considérées hors garantie
LOGIQUE DE PROGRAMMATION E FONCTIONNEMENT
Télécommande MASTER: elle doit être util isée par un personnel technique et permet d’enregistrer les fins de course supérieure,
inférieure des deux rouleaux mask
Télécommande PILOT : les touches 1-6 peuvent être utilisées pour enregistrer d’autres formats.
Les touches -STOP-permettent de déplacer ou d’a rrêter en même temps les deux masques (déjà programmés en usine).
Avant de commencer à programmer les moteu rs du EMASK, il faut connaître certaines logiques de fonctionnement afin d’éviter
toute incompréhension et tout problème durant l’exécutio n des procédures.
-La séquence correcte de programmation pour pouvoir fon ctionner est:
1°syntonisation des télécommandes (déjà p rogrammée en usine)
2°Programmation de la fin de course maximum et de l’ouvertu re minimum possible des masques (déjà programmée en usine),
3° programmation des formats, jusqu’à un total de 6 (co nsulter les variantes de votre modèle afin de comprendre lesquelles sont
programmées en usine et lesquelles ne le sont pas)
-Chaque procédure de programmation est composée de plusieurs points. Au terme d’un point, l’opérateur a 60 secondes pour
commencer le suivant. Ce système sert à éviter d’entrer et d’exécuter des procédures différentes de celles vo ulues. Donc si le
moteur n’exécute p as exactement ce qui est indiqué dans les instruction s, attendre 60 secondes pour quitter la programmation et
recommencer à nouveau la procédure.
-Durant l’exécution d’une procédure quelcon que, il est conseillé de maintenir la touche appuyée jusqu’au terme du mouvement de confirmation du mote ur.
Avant d’effectuer les programmations il est nécessaire que la télécommande soit programmée pour chacun des deux rouleaux, donc le groupe de touches de gauche doit actionner le rouleau du masque
inférieur, et le groupe de touches de droite doit actionner le rou leau du masque supérieur.
Si la télécommande n’actionne pas les toiles comme indiqué c i-dessus, enregistrer la télécommande comme suit:
ENREGISTREMENT DE LA TÉLÉCOMMANDE MASTER (procédure déjà effectuée en usine, NE DOIT PAS être effectuée par un personnel non autorisé)
Page 23
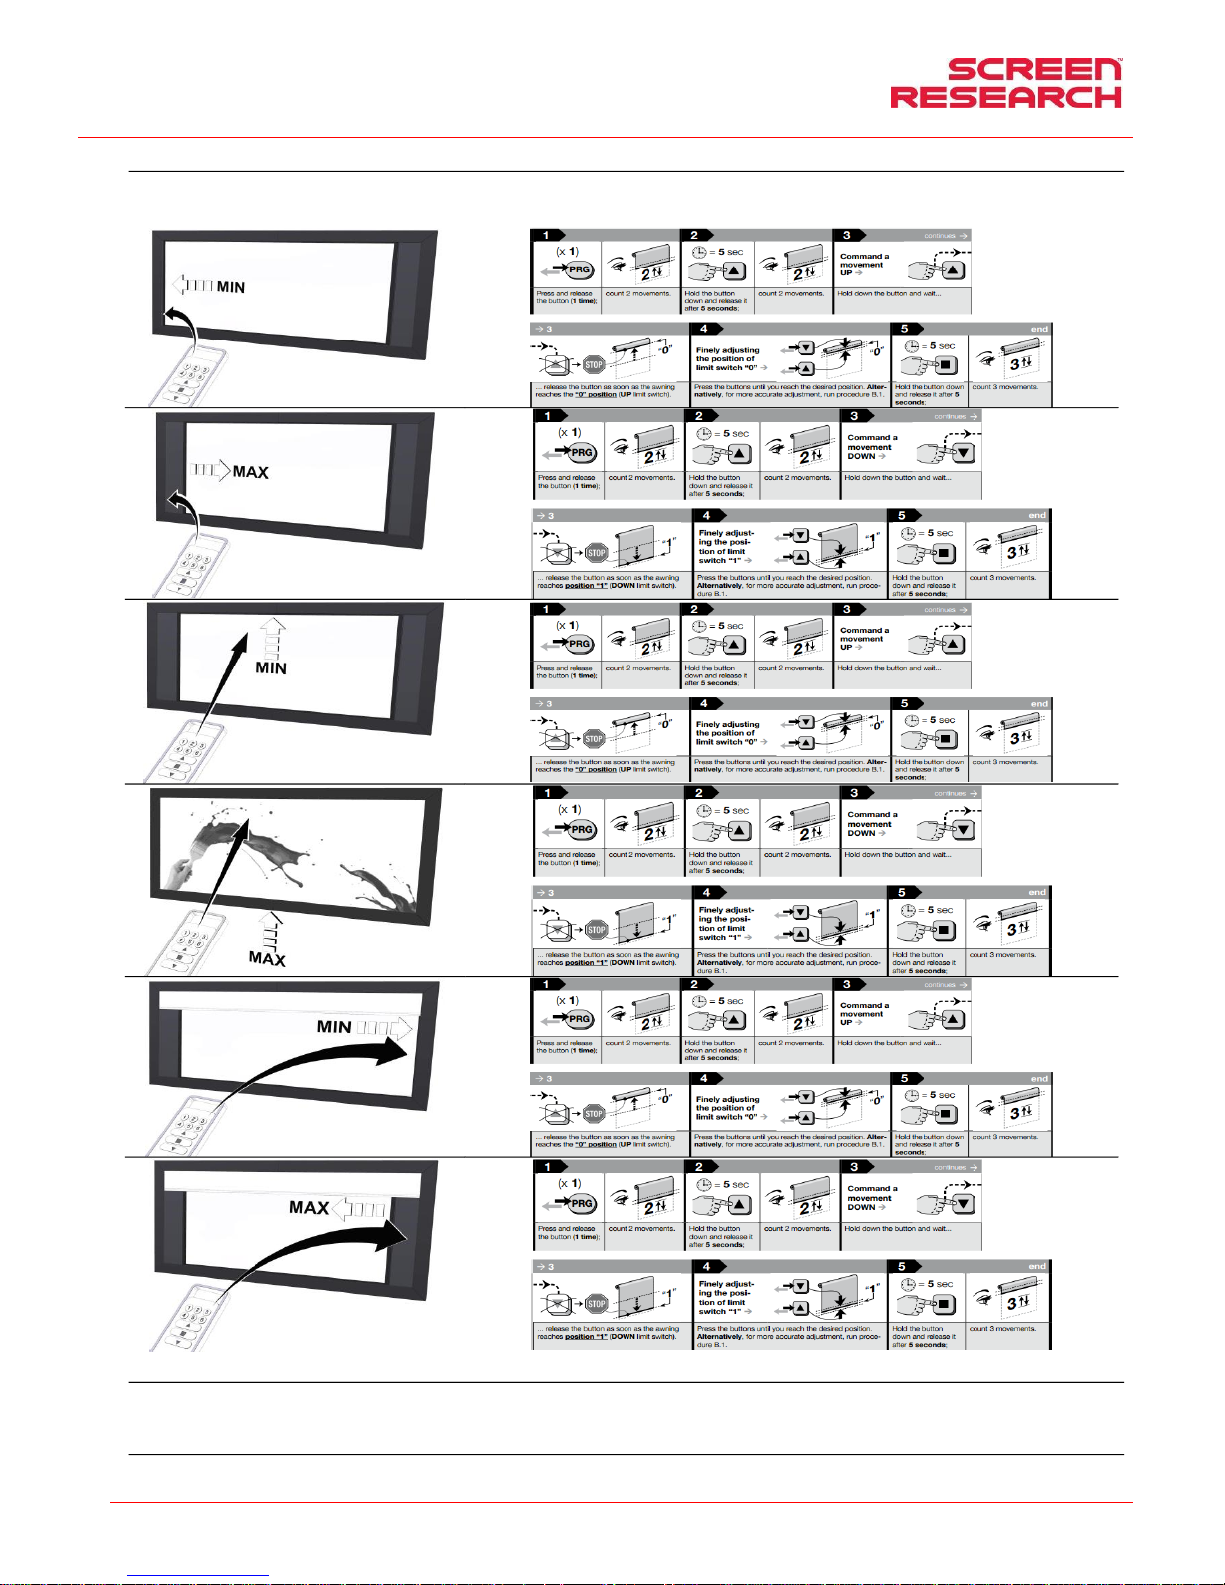
Manuel d’installation et d’utilisation de l’écran à cadre rigide avec masquage
FRANCAIS
Made by Adeo Screen Sp. Z o.o. (Poland) Specifications are subject to change without notice. E&OE
Please verify that you are working with the latest revision of this document before specifying your screen.
Doc: XLR3 – Installation Manual rev3 | 04.12.2017| Download at: www.screenresearch.com 2017 AdeoSreen All Rights Reserved.
Page 23
PROGRAMMATION DE FINS DE COURSE DE MASK (procédure déjà effectuée en usine, ne doit pas être effectuée par un personnel non a utorisé)
Chaque procédure de pr ogrammation est composée de plusieurs points. Au terme d’un point, l’opérateur a 60 secondes pour commencer le suivant. Ce système sert à éviter d’entrer et d’exécuter des
procédures différentes de celles voulues. Donc si le moteur n’exécute pas exactement ce qui est indiqué dans les instructions , attendre 60 secondes pour quitter la programmation, ou bien annuler la
procédure selon les indications reportées dans le chapitre spécifique , puis recommencer à nouveau la procédure
DÉPLACEMENT DES POSITIONS DE FINS DE COURSE (ne doit pas être effectué par un personnel non autorisé)
Les moteurs on t une logique selon laquelle une fois que vous avez enregistré les positions de fin de course, vous ne pouvez plus les effacer, mais seulement les enregistrer à nouveau en recommençant la
procédure d’enregistrement ci-dessus.
ANNULATION PROGRAMMATION EN COURS
À tout moment, appuyer en même temps sur ■ et ▼ jusqu’à ce que le moteur exécute 6 mouvements pour annuler la procédure en cours.
Page 24
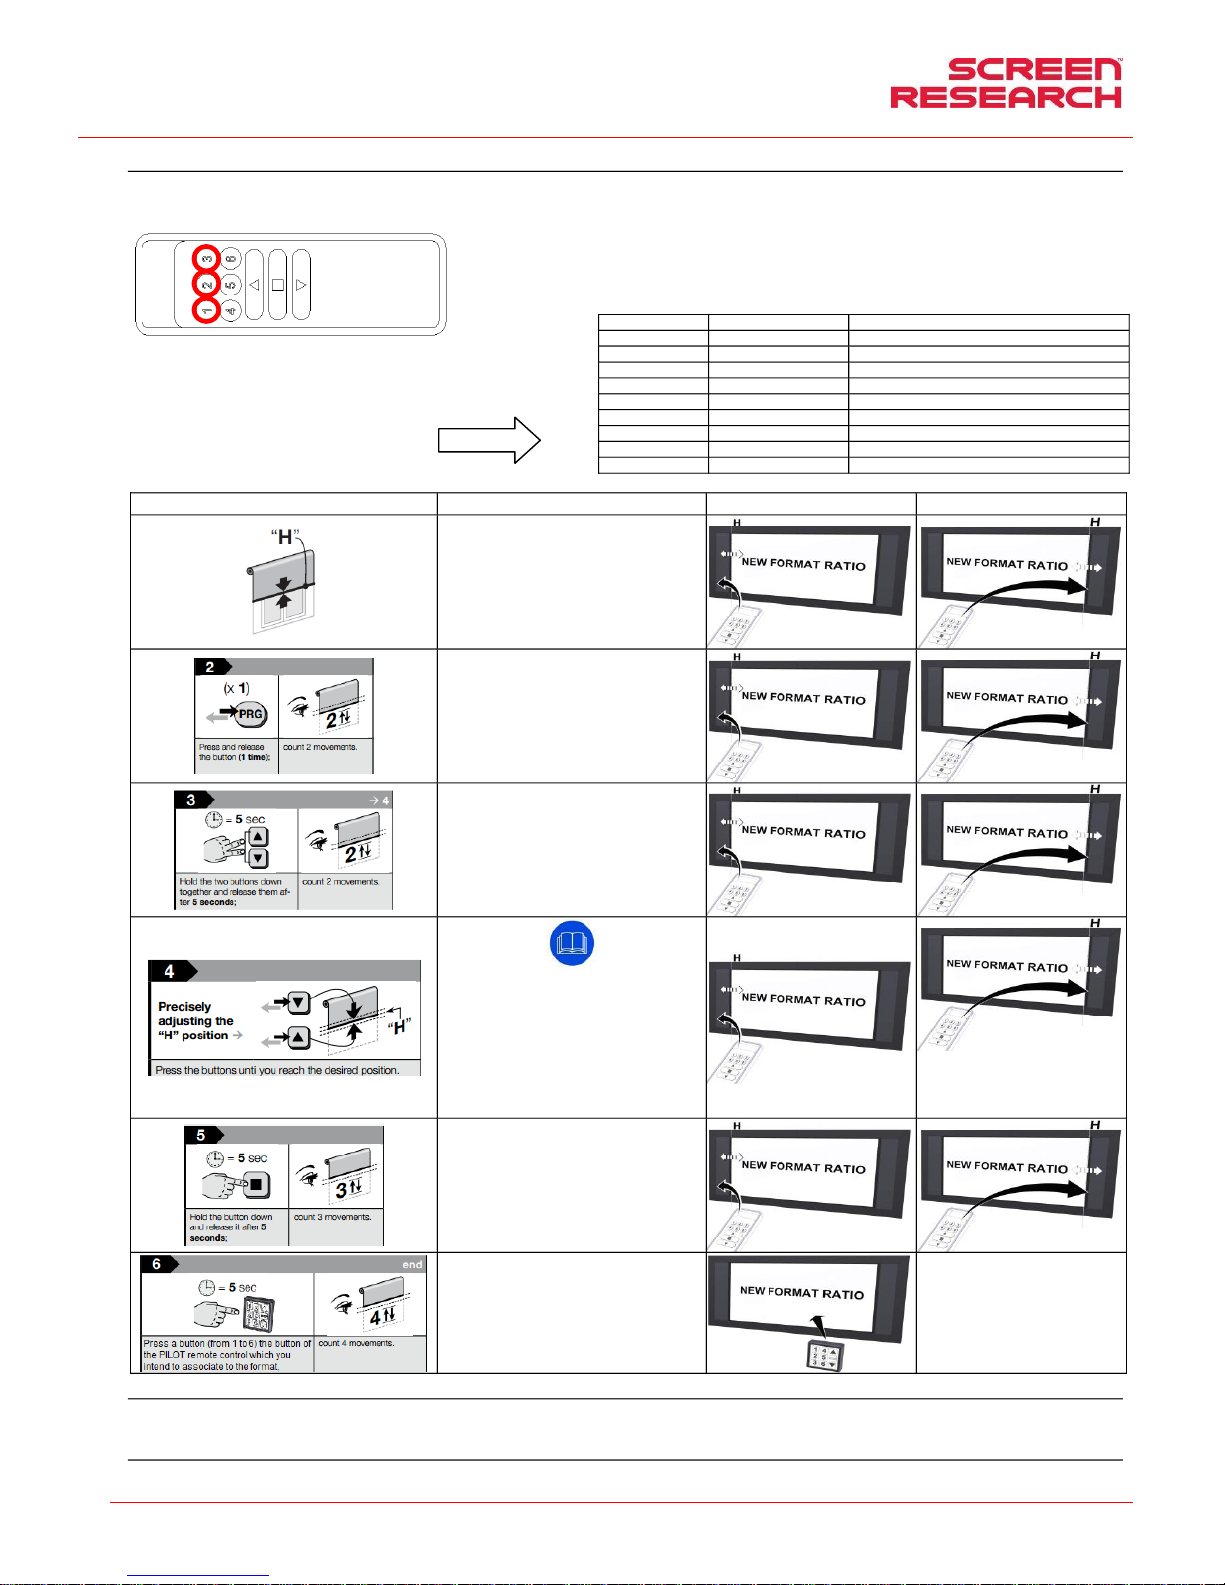
Manuel d’installation et d’utilisation de l’écran à cadre rigide avec masquage
FRANCAIS
Made by Adeo Screen Sp. Z o.o. (Poland) Specifications are subject to change without notice. E&OE
Please verify that you are working with the latest revision of this document before specifying your screen.
Doc: XLR3 – Installation Manual rev3 | 04.12.2017| Download at: www.screenresearch.com 2017 AdeoSreen All Rights Reserved.
Page 24
PROGRAMMATION FORMAT
Chaque procédure de programmation est composée de plusieurs points. Au terme d’un point, l’opérateur a 60 secondes pour comme ncer le suivant. Ce système sert à éviter d’entrer et d’exécuter des
procédures différentes de celles voulues. Do nc si le moteur n’e xécute pas exactement ce qui e st indiqué dans les instructions, attendre 60 secondes pour quitter la programmation, ou bien annuler la
procédure selon les indications reportées , puis recom mencer à nouveau la procédure.
Avant de commencer la programmation choisir le moteur que vous souhaitez programmer avec le bouton numéro 1 - moteur dans le
côté gauche, 2 - moteur de la déco, 3 - moteur dans le côté droit.
Effectuez la séquence ci-dessous pour chaque moteur.
Suivez le tableau ci-contre pour définir les formats de PILOT avec l'ouverture et la
fermeture du masquage avec impression. Suivez le tableau ci-dessous pour définir
les formats avec la télécommande MASTER et l'enregistrer sur PILOT, en ligne avec
le numéro de transition 6.
MOTEUR 1 – MOTEUR 3
MOTEUR 1 – MOTEUR 3
MOTEUR 1
MOTEUR 3
Avec la télécommande Master et les touches
▲▼■, amener les deux toiles à proximité de la
position que l’on souhaite programmer (il est
conseillé de projeter sur l’écran des images avec le
format voulu pour avoir des références précises sur
la dimension du format) puis poursuivre comme suit
Maintenir appuyée la touche de gauche PRG
jusqu’à ce que le moteur exécute et termine 2
déplacements
Maintenir appuyée la touche de gauche ▲ et ▼
jusqu’à ce que le moteur exécute et termine 2
déplacements
REMARQUE: Les deux moteurs devront alors être
commandés impérativement à l’aide des touches
▲▼ pour effectuer le réglage de précision. La
télécommande fonctionnera par à-co ups. Pour
effectuer des déplacements millimétriques,
appuyer brièvement sur les touches ▲ et ▼. P our
effectuer des déplacement plus longs (mais
toujours par à-coups) maintenir les touches ▲ et
▼ appuyées. Positionner ainsi les deux toiles
exactement là où l’on souhaite les programmer
Une fois la position désirée est atteinte, maintenez
la touche enfoncée jusqu'à ce que ■ le moteur a
fini d'effectuer 3 mouvements.
Appuyer sur la touche de la télécommande PILOT (1
6) à laquelle on souhaite associer le format, jus qu’à
ce que chaque moteur exécute et termine 4
déplacements
Le format voulu sera maintenant
enregistré sur la touche de la
télécommande Pilot choisie (1-6),
concluant ainsi la procédure de
programmation.
DÉPLACEMENT DES POSITIONS DES FORMATS DÉJÀ PROGRAMMÉS
Les moteurs ont une logique selon laquelle un e fois que vou s avez enregistré le s positions de fin de course, vous ne pouvez p lus les effacer, mais seu lement les enregistrer à nouveau en recommençant la
procédure d’enregistrement ci-dessus.
ANNULATION PROGRAMMATION EN COURS
À tout moment, appuyer en même temps sur ■ et ▼ jusqu ’à ce que le moteur exécute 6 mouvements pour annuler la procédure en co urs.
BOUTONS PILOT
POSITION MASQUE
MASQUAGE DECO
Bouton 1 de PILOT
Format de Dépistage 1
Dans l’état “UP fin de course” (page précédente)
Bouton 2 de PILOT
Format de Dépistage 2
Dans l’état “UP fin de course” (page précédente)
Bouton 3 de PILOT
Format de Dépistage 3
Dans l’état “UP fin de course” (page précédente)
Bouton 4 de PILOT
Format de Dépistage 4
Dans l’état “UP fin de course” (page précédente)
Bouton 5 de PILOT
Format de Dépistage 5
Dans l’état “UP fin de course” (page précédente)
Bouton 6 de PILOT
Format de Dépistage 6
Dans l’état “UP fin de course” (page précédente)
Bouton 7 de PILOT
Format de Dépistage 7
Dans l’état “UP fin de course” (page précédente)
Bouton 8 de PILOT
Format de Dépistage 8
Dans l’état “UP fin de course” (page précédente)
Bouton 9 de PILOT
Format de Dépistage 9
Dans l’état “fin de course DOWN” (page précédente)
Page 25
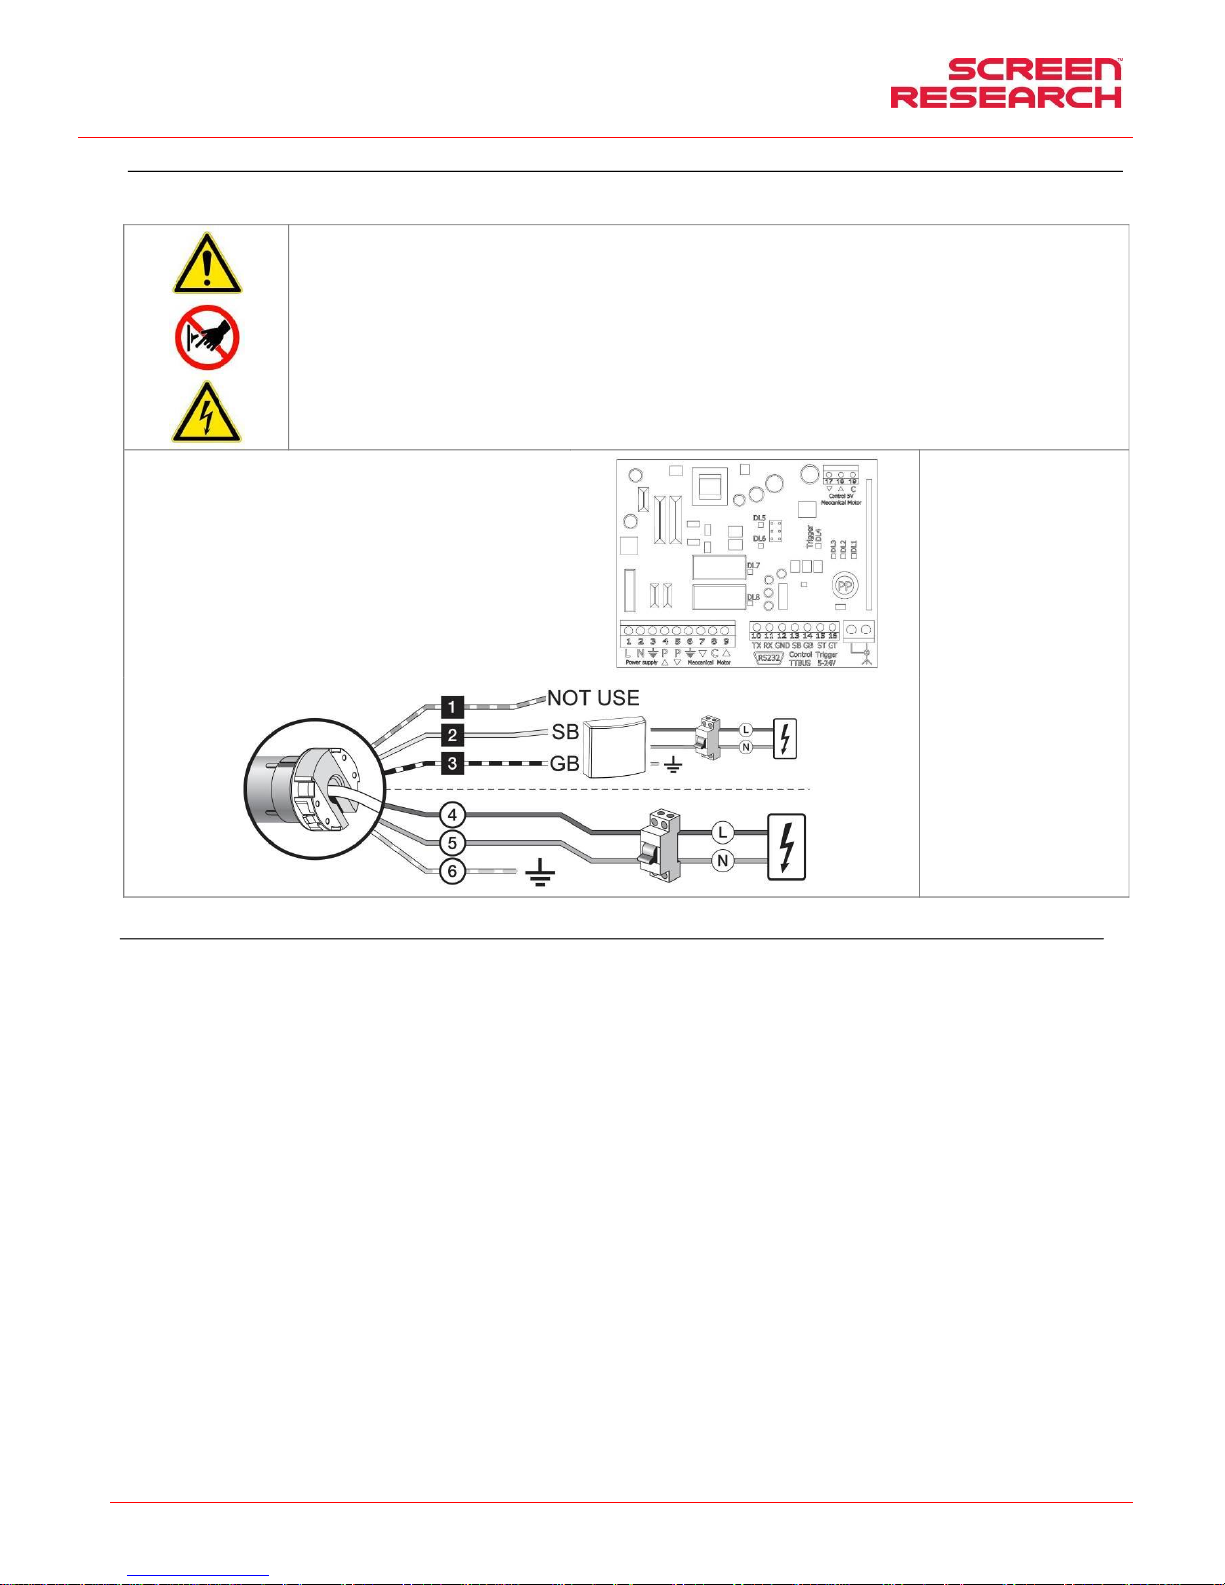
Manuel d’installation et d’utilisation de l’écran à cadre rigide avec masquage
FRANCAIS
Made by Adeo Screen Sp. Z o.o. (Poland) Specifications are subject to change without notice. E&OE
Please verify that you are working with the latest revision of this document before specifying your screen.
Doc: XLR3 – Installation Manual rev3 | 04.12.2017| Download at: www.screenresearch.com 2017 AdeoSreen All Rights Reserved.
Page 25
RACCORDEMENT MCS-N-RS232 (pas inclus, option)
Avant de faire le câblage électrique, lire attentivement les directives a u complet du MCS. Au cas où la puissance du moteur ne correspondrait pas à la puissanc e du réseau électrique du lieu d’installation,
veuillez contacter un électricien et vous munir d’un transfo rmateur de courant et Hz adapté.
RACCORDEMENT ÉLECTRIQUE:
Le câblage électrique doit respecter les normes CEI en vigueur. La norme CEI EN 60335-1 prévoit que le réseau d’alimentation doit êt re pourvu d’un dispositif de
déconnexion omnipolaire avec une distance d’ouverture des contacts d’au moins 3 mm. Pour chaque moteur (par ex. interrupteur prise etc.) En cas de besoin, ce dispositif
garantit une déconnexion rapide et sûre de l’alimentat ion électrique. Utiliser des câbles pour la connexion comme l’illustre l’image.
ATTENTION: ce produit contient deux moteurs d onc il faut effectuer le même câblage pour les deux moteurs.
Il est obligatoire d’isoler les câbles Bus (noir, blanc, ora nge) s’ils ne sont pas utilisés pour la commande à l’aide du bouton.
ATTENTION: l’exécution correcte des raccordements é lectriques, dans les règle de l’art et dans le respect des réglementations en vigueur , est importante pour la prévention
des accidents et afin de garantir un fonction nement correct et durable de l’écran.
Avant d’effectuer toute opération sur les parties électriques, s’as surer qu’il n’y a pas de tension.
Le moteur des écrans pourvus de caisson est situé sur la droit e de l’écran vu de face (sur demande, il est possible de l’avoir sur la gauche).
L’actionnement se fait à travers une radiocommande four nie de série.
Caractéristiques MCS-N:
Alimentation : 110 . 240 Vca 50/60 Hz
Courant maximum absorbé : 80 mA en stand-by, 3 A en charge maxi
Codages : FloR (rolling code)
Fréquence : 433,92 MHz
Impédance antenne : 52 ohms
Sensibilité : superieure a 0,5μV pour s ignal a bonne fin
Portée : estimee a 200 m en espace libre et a 35 m a l’in terieur d’edifices
Nombre d’émetteurs mémorisables : 30
Sortie : 1 sortie pour le pilotage d’un moteur a deux p hases
Capacité des contacts : 3 A 250 V
Indice de protection : IP44 (avec boitier i ntact)
Température de fonctionnement : -2 0 . +55° C
Dimensions / poids : 128 x 112 x 43 mm / 260 g
Raccordement pour chaque moteur ,
230V version:
Blanc Orange (BUS)
Blanc (BUS)
Blanc noir (commun TTBUS)
Marron (Phase 230V)
Bleu (Neutre 230V)
Jaune Vert (Terre 230V)
Raccordement pour chaque moteur,
120V version:
Blanc Orange (BUS)
Blanc (TTBUS)
Blanc noir (commun BUS)
Blanc (Phase 120V)
Noir (Neutre 120V)
Vert (Terre 120V)
GARANTIE
1.GARANTIE ScreenResearch garantit que le produit f abriqué est exempt de tout défaut de fabrication dans les matériaux et dans les usina ges, conformément aux termes et conditions ci-après. Les toiles de
projection et les profils sont garantis pour une période de cinq (5) ans à compter de la date de la facture originale. Moteurs, commandes moteur, télécommandes, et matéri el de montage sont garantis trois (3)
ans à compter de la date de la facture originale.
2.CONDITIONS ET LIMITATIONS La présente garantie est soumise aux conditions et limitations suivantes. La garantie est nulle et inapplicable si le produit a été u tilisé ou manipulé de manière non conforme
au manuel d’instructions contenu dans l’emballage du produit, s’il est mal utilisé ou utilisé de manière impropre, s’il a été endomm agé par accident ou par négligence pendant le transport, ou si le défaut est
dû à des réparations ou modifications effectuées par un perso nnel non autorisé. Le produit doit être installé par un professionnel dûm ent autorisé par ScreenResearch et les opérations d’entretien indiquées
dans le manuel doivent être exécutées régulièrement.
3.RETOURS DE MARCHANDISE Au cun produit restitué ne sera accepté sans autorisation écrite (RMA) de la part de ScreenResearch. Le produit do it être retourné emballé dans son emballage original ou
équivalent, afin d’éviter tout endommagement pendant le transport. Le produit doit être emballé et restitué à ScreenResearch ou à u n centre de réparation autorisé, à la charge du client. Les frais de
restitution du produit sont à la charge de ScreenResearch . Le produit restitué doit être accompagné d’une description écrite du défau t et d’une photocopie du reçu original d’achat. Ce reçu doit indiquer
clairement la liste des modèles et le numéro de série , la date d’achat, le nom et l'adresse de l'acheteur et du revendeur autorisé, et le prix payé par l'acheteur. ScreenResearch se réserve le droit de modifier
le design de tout produit, sans aucune obligation par r apport aux produits fabriqués précédemment, et de modifier les prix ou les spécifications de tout produit sans préavis ou obligation d’aucune sorte.
4.SOLUTIONS Au cas où le produit ne serait pas conf orme à la garantie ci-dessus, l'unique solution pour l’acheteur selon les dispositio ns de la présente Garantie Limitée est de restituer le produit à
ScreenResearch ou à un centre de recherche autorisé. La non -conformité sera rectifiée sans frais de main d’œuvre ni frais de substitution des composants.
5.LIMITE AU PREMIER ACHETEUR Cette garantie n’est valable que pour le premier acheteur du produit et ne peut pas être transférée à un acheteur succe ssif du produit.
6.DIVERS Toutes les garanties implicites relatives au x produits ScreenResearch sont limitées à la durée de cette garantie. La garantie ne s’étend pas à d’éventuels dommages directs ou indirects à l'acheteur.
Certains pays ne permettent pas de limitations sur la duré e d’une garantie implicite ou l'exclusion ou la limitation des dommages accid entels ou conséquents ; les susdites limitations ou exclusions
pourraient donc ne pas être applicables. Cette garantie confère des droits légaux spécifiques, et il est également possible d’o btenir d’autres doits en fonction du pays de résidence.
7.DEMANDES Pour toute demande concernan t la garantie limitée ci-dessus, veuillez vous adresser au revendeur autorisé ScreenResearch.
8. ASSISTANCE SOUS GARANTIE GÉRÉE PAR L ES DISTRIBUTEURS AUTORISÉS Screen Research autorise la distribution de se s produits dans de nombreux pays du monde. Pour chaque pays, le distributeur
autorisé/importateur est responsable de l'assistance sous garantie des produits vendus dans son pays. Le service de garantie doit être revendiqué auprès du revendeur, importateur ou distributeur, auprès
duquel le produit a été acheté.
Page 26
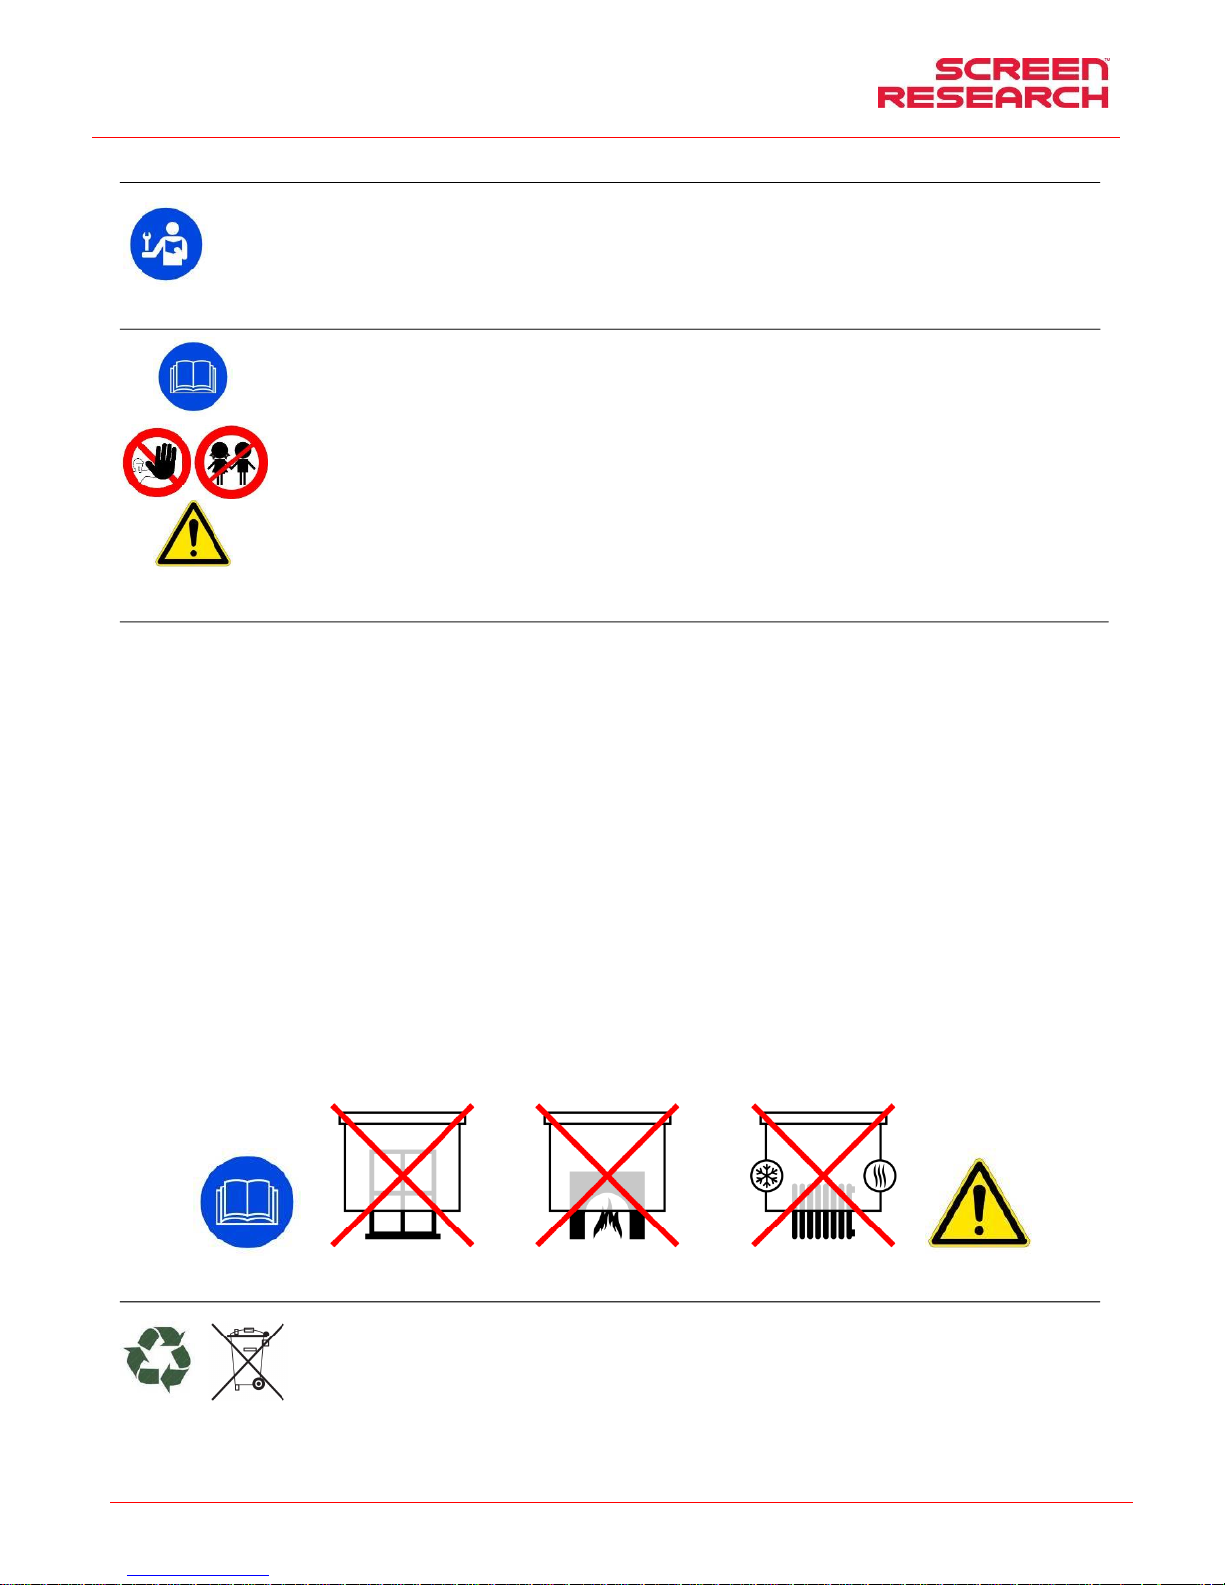
Bedienungs- und Installationsanleitung: Leinwand mit festem
Rahmen und Maskierung
DEUTSCH
Made by Adeo Screen Sp. Z o.o. (Poland) Specifications are subject to change without notice. E&OE
Please verify that you are working with the latest revision of this document before specifying your screen.
Doc: XLR3 – Installation Manual rev3 | 04.12.2017| Download at: www.screenresearch.com 2017 AdeoSreen All Rights Reserved.
Page 26
01 EINFÜHRUNG
Dieses Handbuch ist integraler Teil des Produkts, und dessen Lektüre und Verständnis sind von wesentlicher Bedeutung für die Sicherheit. Darin sind die Normen und
Verwendungsmodalitäten beschrieben, die dem Kunden eine richtige und sichere Nutzung der Projektionswand ermöglichen. Das Handbuch muss stets beim Produkt verbleiben und ist
sorgfältig an einem geeigneten Ort aufzubewahren, um seine Unversehrtheit zu gewährleisten und allen berechtigten Personen zu r Hinzuziehung zugänglich zu sein. Jeder Nutzer des
Produkts ist für den Schutz des Handbuchs verantwortlich. Außerdem ist er für die Überprüfung der Funktionstüchtigkeit der Projektionswand und für alle Reparaturen und den
Austausch von abgenützten Teilen, die Schäden verursachen könnten.
Die in diesem Handbuch enthaltenen Bilder dienen dazu, Funktionen, Eigenschaften und Verfahren im Detail zu zeigen. Trotzdem können sie sich je nach dargestelltem Modell
unterscheiden, wobei sich jedoch die Bedeutung des Bildes im Hinblick auf den beschreibenden Zweck nicht ändert
02 ALLGEMEINE SICHERHEITSVORSCHRIFTEN
ACHTUNG: Wichtige Sicherheitshinweise. Diese Hinweis e sind unbedingt zu beachten, da eine unsachgemäße Installation schwere V erletzungen verursachen kann.
Lesen Sie die Anleitungen und Hinweise dieser Gebrauch sanleitung vor Verwendung des Produkts oder Durchführung jeglicher Art von Wartung und versichern Sie sich, dass
Sie sie verstanden haben. Installation des Bil dschirms über Durchgangszone ist streng verboten.
- Überprüfen Sie vor und während der Verwendung, dass die Projektionswand keine gefährlichen Situationen erzeugt.
- Keines der Elemente oder Teile der Projektionswand beschädig en oder entfernen.
- Niemals Wartungsarbeiten an der Leinwand bei eingeschaltete m Motor vornehmen (sicherheitshalber das Stromkabel ausstecken).
- Während der Reinigung, der Wartung oder beim Austausch vo n Teilen immer das Gerät von der Stromversorgung trennen.
- Das Produkt darf unter keinen Umständen von Kindern b enutzt werden. Kinder dürfen sich der Projektionswand unter keinen Umstä nden nähern, solange diese sich bewegt.
Jede Projektionswand ist durch eine Garantie gedeckt, deren G ültigkeit von der tatsächlichen Einhaltung der Anleitungen in die sem Handbuch abhängt.
ACHTUNG: Eine falsche Installation kann die Sicherh eit der Anwender des Produkts beeinträchtigen. Der Hersteller lehnt jegliche Haftung für Personen - bzw. Sachschäden ab,
die auf unsachgemäße Benutzung, Montagefehler ode r ungenügende Wartung zurückzuführen sind.
Der Hersteller haftet nicht für Probleme, die durch Installationsfehler verursacht werden.
Die Montage der Leinwand, die elektrischen Anschlüsse und die Über prüfungen bei Störungen der motorbetriebenen Wicklungen sin d von einem hierzu befugten Händler oder
von Fachpersonal durchzuführen, das Kenntnis von de n Gefahren hat, die von elektrischer Energie ausgehen. Das Anschlusskabel kann nicht ersetzt werd en. Bei
Beschädigung des Kabels muss die gesamte Leinwand ausgeta uscht werden. Eingriffe an den Endschaltern oder das Aufbrechen der angebrachten Siegel führen zu
Garantieverlust. Bei Rückfragen wenden Sie sich bit te an unser technisches Büro.
NACH DER MONTAGE DES BILDSCHIRMS AN DEN BÜGELN IST VOR DER VERWENDUNG SICHERZUSTELLEN, DASS DER BILDSCHIRM PERFEKT HORIZONTAL POSITIONIERT IST.
03 HINWEISE UND VORSICHTSMASSNAHMEN FÜR DEN GEBRAUCH UND INSTALLATION
Die Leinwände sind für die Benutzung in Innenräumen unter no rmalen Temperatur- (20 - 25 °C) und Feuchtigkeitsbedingungen vorgesehen.
Es ist absolut verboten die Projektionsleinwände vor Fenstern zu installieren oder sie als Verdunkelungsrollos zu verwenden. Sie dürfen weder direkter Sonnen bestrahlung ausgesetzt sein noch in der Nähe
von starken Lichtquellen, Wärmequellen (z. B. Öfen, Ka mine oder Schornsteine) oder Klimaanlagen (Warmluft oder Kalt luft) installiert werden. Bei Nichteinhaltung dieser Verbote könnte die
Projektionsleinwand verformt oder permanent verzoge n werden.
Der Einsatz der motorisierten Leinwand im Außenbereich erfor dert besondere Vorsichtsmaßnahmen:
1- Das/Die Stromzufuhrkabel des Motors mittels für den Außenbereich geeigneter Kabelkanäle oder Kabelmäntel vor UV-Strahlun g schützen.
2- An den Anschlussstellen mit den Verbindungs - oder Abzweigkästen wasserundurchlässige und feuchtigkeitsbeständige Kabeldurchführungen verwend en.
3- Nur Schalter mit Schutzart IP55 oder höher verwenden (der serie nmäßig mitgelieferte Schalter ist nicht für den Außenbereich geeigne t).
4- Bedecken und schützen Sie die Leinwand vor direktem Kontakt m it Wasser oder anderen Flüssigkeiten.
Da das Material, aus dem die Leinwand beste ht (PVC), zur elektrostatischen Aufladung neigt, kann sic h bei übermäßigem Staubanfall in der Umgebung durch die elektr ostatische Anziehung dieser Staub auf
der Leinwand ablagern und zu einer Beeinträchtigung ihrer optis chen Eigenschaften führen (siehe auch Reinigung der Leinwand).
Leinwände dürfen niemals in der Nähe von Hitzequellen oder na he Klimageräten installiert werden, da dies das empfindliche Proje ktionstuch beschädigen kann.
Eine Rollbildwand soll bei Verwendung stets kompl ett ausgerollt und nach Verwendung wieder ganz eingefahren werden. Dieser Prozess, des vollständ igen heraus- und wieder hineinfahrens wird hier als ein
“Zyklus “ bezeichnet.
Die motorisierte Rollbildwand ist zur Verwendung in jew eils einem Zyklus konzipiert. Dies bedeutet, dass zwischen den Zyklen gewöhnlich eine beträchtlic he Menge an Zeit vergeht. Das Verwenden der
Projektionswand ist nicht zum ständigen Öffnen und Schließen i n kurzen Intervallen vorgesehen.
Die in der Projektionswand verwendeten Motoren sind mit einem thermischen Überlastschutz ausgestattet. Dieser verhindert ein Überhitzen und Beschädigung des Moto rs. Die Aktivierung der ThermoSchutzschaltung geschieht nach einer gewissen Anzahl an Zyklen . Die Anzahl der Zyklen variiert abhängig von der Art des Motors und Art und Größe der Projektionswand (gewöhnlich zwischen 3 bis 6 Zyklen).
Bitte beachten Sie, dass die Abwärme des Motors auf die Welle übertragen wird und somit auf das Gewebe, welches auf der Welle ge wickelt ist. Das Erhitzen des Gewebes kann in bleibenden Verformungen
oder Dehnung bzw. Verzerrung resultierenden.
Um Beschriebenes zu vermeiden, ist dringlich davon ab zuraten, die Projektionswand mit mehr als 3 vollständigen, aufeinanderfo lgenden Zyklen (aufwärts-abwärts) zu verwenden.
Nach 3 aufeinanderfolgenden oder nahe beieinander l iegenden Zyklen müssen mindestens 40 Minuten mit ausgefahrener Projektions fläche (ausgerolltes Gewebe) abgewartet werden, um vor dem erneuten
Verwenden den Motor und entsprechende Bauteile abkühlen zu lassen.
ACHTUNG: Die Leinwand nicht gewaltsam von Hand herausziehen, da dadurch der Motor beschädigt oder der Bügelkasten abgerissen werden kö nnte.
Erlauben Sie Kindern nicht, mit den fest angebrachten Steuerv orrichtungen zu spielen.
Beobachten Sie die Leinwand und halten Sie Personen davon fern, bis die Projektionswand völlig ges chlossen ist.
Es ist verboten, die Bewegung der Leinwand zu blockieren, zu verhind ern oder zu erzwingen, sich an der Leinwand oder an der unte ren Schiene festzuhalten oder daran zu schaukeln, Gegenstände an der
Leinwand oder an der unteren Schiene anzubringen oder die Str uktur der Leinwand zu ändern, da dies zu Schäden am Aufwickelsyste m und somit zu Personen- und Sachschäden führen kann.
Es ist absolut verboten die Projektionsleinw ände vor Fenstern zu installieren oder sie als Verdunkelungsrollos zu verwenden.
Es ist absolut verboten die Projektionsleinwände in de r Nähe von Wärmequellen (z. B. Öfen, Kamine oder Schornsteine) oder Klim aanlagen (Warmluft oder Kaltluft) zu installieren.
Positionieren sie Leinwände perfekt waagrecht .
PRODUKTENTSORGUNG
Produkt gilt, gilt auch am Ende der Lebensdauer für seine Entsorgung: sie ist von Fachpersonal vorzunehmen.
Dieses Produkt besteht aus verschiedenen Materialien: einige können wieder verwertet werden, andere sind zu entsorgen. H olen Sie Informationen über das in Ihrem
Land geltende Recycling- und Entsorgungssystem für diese Produktkategorie ein.
Wie Sie aus dem Symbol hier links ersehen können, ist es verboten, das Produkt in den Hausmüll zu geben. Befolgen Sie also die Vorg aben zur Mülltrennung nach den
in Ihrem Land geltenden Vorschriften oder geben Sie das Produkt beim Neukauf eines gleichwertigen Artikels an den Händler zur ück.
ACHTUNG: die örtlichen Gesetze können schwere Strafen bei missbräuchlicher Entsorgung dieses Produkts vorsehen
Page 27
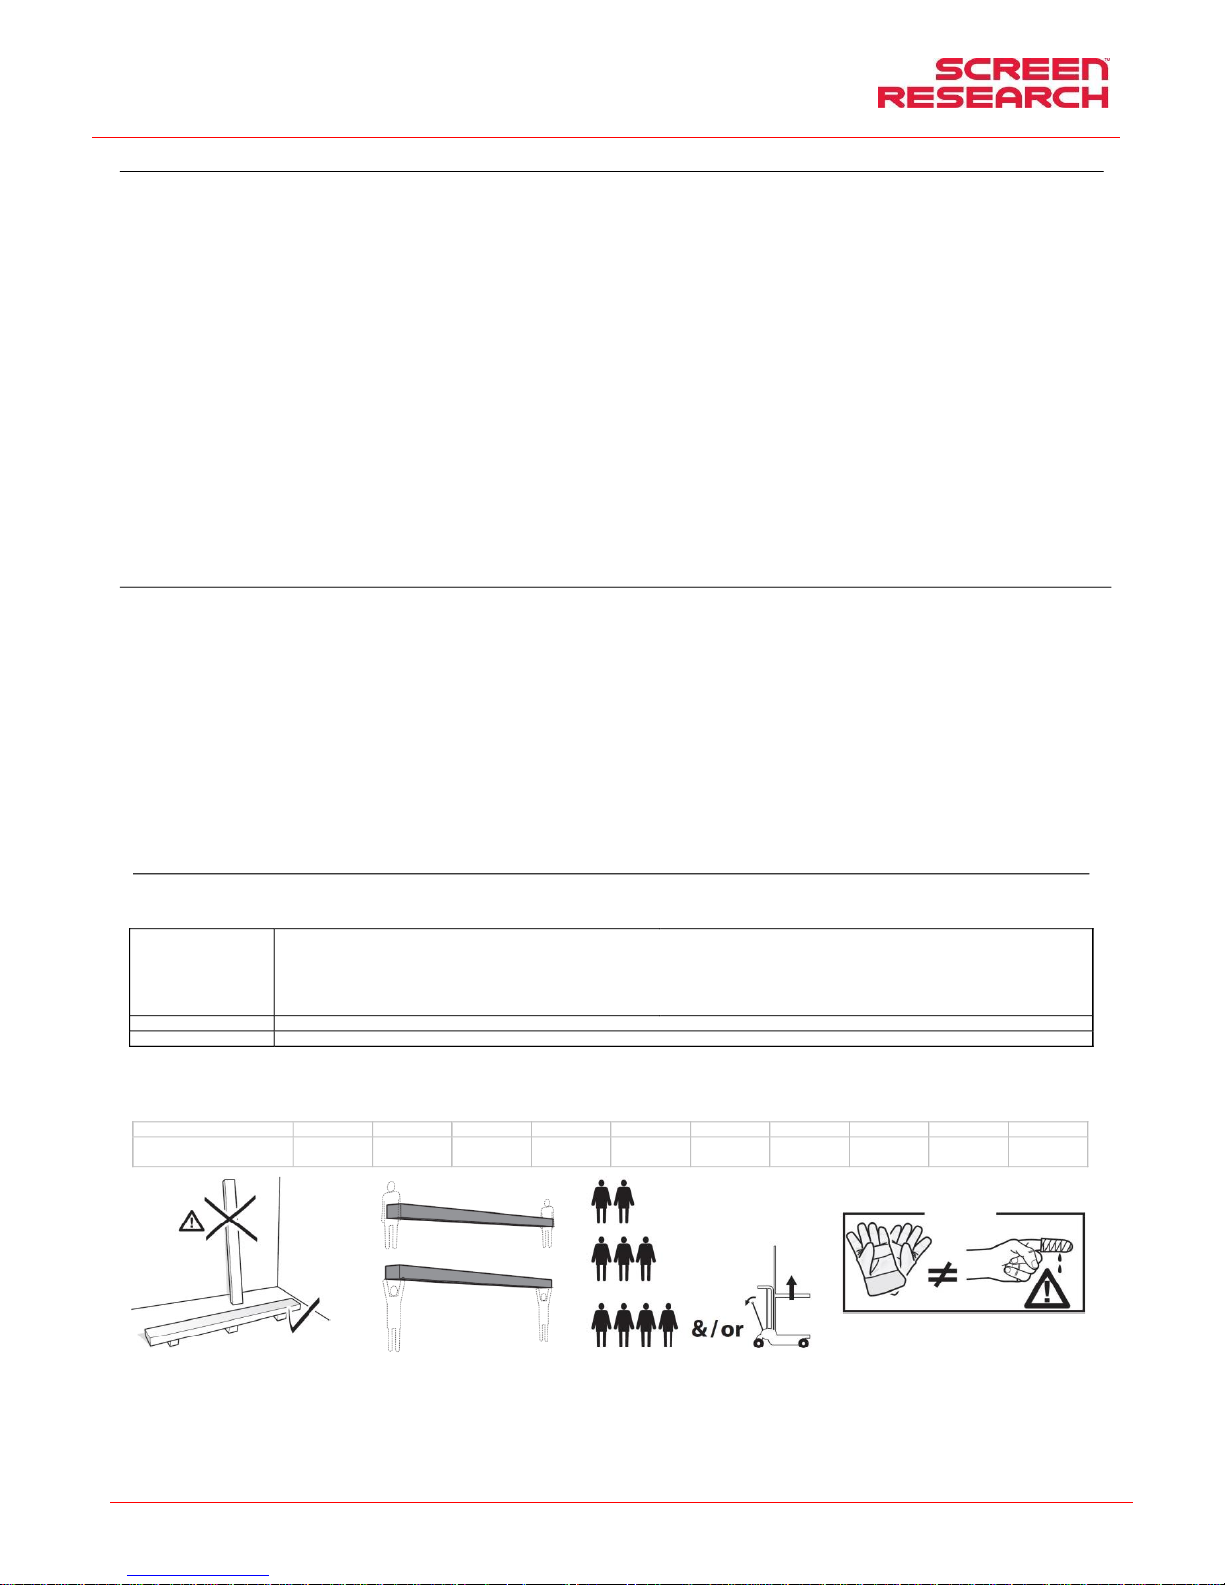
Bedienungs- und Installationsanleitung: Leinwand mit festem
Rahmen und Maskierung
DEUTSCH
Made by Adeo Screen Sp. Z o.o. (Poland) Specifications are subject to change without notice. E&OE
Please verify that you are working with the latest revision of this document before specifying your screen.
Doc: XLR3 – Installation Manual rev3 | 04.12.2017| Download at: www.screenresearch.com 2017 AdeoSreen All Rights Reserved.
Page 27
04 ALLGEMEINE PRODUKTEIGENSCHAFTEN
Die Projektionswände werden in Übereinstimmung zu folgende n CE-Richtlinien hergestellt: 2014-35-CE LDV Niederspannung
2014-30-EU EMC Elektromagnetische Verträglichkeit
2014-53-CE Funkausrüstung
2009-125-CE VERBRAUCH Ecodesign
2011-65-CE ROHS Gefahrstoffe
2012-19-CE RAEE Abfallbehandlung
2001-95-CE SICHERHEIT Sichere Produkte
Die in diesem Handbuch beschriebene Projektionswand darf nu r als Bildwand für die Videoprojektion verwendet werden. Jede andere, nicht i n diesem Handbuch vorgesehene Verwend ung ist unzulässig.
Die Projektionswand enthält eines oder mehrere Projektionsstoffe/Projektionsfolien aus cadmiumfreiem PVC oder aus PVC -imprägnierter GLASFASER. Jedes Tuch kann in folgende Baustoffklassen eingeteilt
werden:
- M1 und M2 gemäß den französischen Bestimmungen (LNE L aboratoire national d e métrologie et d’essais – SME Centre de recherche s du Bouchet - WARRINGTO NFIRE GENT Labo ratoire de
métrologie et d’essais – IFTH Laboratoire acc reditè )
- B1 und B2 gemäß den deutschen Bestimmungen (LNE Laboratoire national de m étrologie et d’essais – SME Centre de recherches du Bouchet - WARRINGTONFIRE GENT Laboratoire na tional de
métrologie et d’essais)
- UL94HB gemäß den US-amerikanischen Best immungen (THE GOVMARK Organization, Inc.)
Da es noch k eine europaweite Harmonisierung der verschiedenen nationalen Einstufungsnormen gibt, wird darauf hingewiesen, dass die französische Klasse M1 nicht entzündlichem Material, und die Klasse
M2 schwer entzün dlichem Material entspricht. Die f ür unsere Leinwände verwendeten Pro jektionsstoffe/Projektionsfolien bestehen hauptsächlich aus plastifiziertem PVC oder Glasfasergewebe. Diese Stoffe
sind temperatur- und feuchtigkeitsempfindlich. Aus diesem Grund ist für alle Abmessungen eine Toleranz von 1% zulässig.
Die Toleranzen für die verbauten Aluminiumprofile bet ragen +/- 2 mm.
Die Toleranzen für Gesamtabmessungen betragen :
- +/- 3 mm für Abmessungen bis 2500 mm;
- +/- 5 mm für Abmessungen bis 4000 mm;
- +/- 10 mm für Abmessungen bis 8000 mm
- +/- 20 mm für Abmessungen bis 16000 mm ;
- +/- 30 mm für Abmessungen bis 24000 mm .
05 REINIGUNG UND WARTUNG
Die Projektionswände und deren Projektionstücher sin d sehr empfindlich, daher müssen sie besonders sorgfältig behandelt und un ter Befolgung der nachstehenden Hinweise gepflegt werden:
Zum Reinigen der Oberfläche keine Lösungsmittel, Chemikalien oder Scheuermittel und keine spitzen Utensilien benutzen.
Jeden Kontakt mit anderen Materialien (Lacke, Tinten usw .) vermeiden, da sich diese möglicherweise nicht mehr von dem Gewebe entfernen lassen.
PROJEKTIONSTÜCHER CLEARPIX: Ve rwenden Sie ein weiches, sauberes und leicht angefeuchtetes Tuch und bewegen Sie es immer von der Mitte des P rojektionsbereichs nach außen. Ein Bürstenaufsatz am
Staubsauger darf nur benutzt werden, wenn die Borsten weich und perfekt sauber sind.
PROJEKTIONSTÜCHER SOLIDPIX, MULTIPIX , : Per pulire telo di proiezione, utilizzare un panno morbido, pulito, inumidito, eventualmente abbin ato con detergenti a base neutra o alcool. Poiché dopo la pulizia
potrebbe verificarsi che il telo si carichi di elettricità statica, a c ausa dello sfregamento con il panno, si consiglia di passare, con un panno pulito, un liquido antistatico su l telo per evitare che la polvere venga
nuovamente attratta dallo stesso.
PROJEKTIONSTÜCHER SILVERPIX is t obligatorisch, um die Anleitung für das Gewebe Bildschirm lesen
PROFILE: Das Gehäuse ist mit einem weichen, saube ren Tuch abzustauben und gegebenenfalls mit einem milden Reinigungsmittel zu reinigen .
PROFILE MIT SAMTBEZUG: Zur Pflege des P rofils wird dieses mit einem weichen, sauberen Tuch oder mit einer Bürste mit weichen, antistatis chen Borsten abgestaubt. Ein Bürstenaufsatz am Staubsauger
darf nur benutzt werden, wenn die Borsten weich und perfekt s auber sind.
STRUKTUR und BEFESTIGUNGSBÜGEL: Der Zustand des Produkts und der Halt der Befestigungsbügel müssen regelmäßig kontrolliert werden . Sind Verbiegungen, Risse oder Materialermüdung von Bügeln,
Schrauben oder Bauteilen des Produkts festzustellen, muss die Umgebung der Projektionswand abgesichert werden, um Sach- und Personenschäden zu vermeiden. Anschließend das anscheinend defekte
Teil sofort ersetzen und das Produkt wieder herstellen.
06 AUSPACKEN DER PROJEKTIONSWAND UND HANDLING DES PRODUKTES
Stellen Sie sicher, dass während des Transports kein Teil der Leinwand beschädigt wurde. Bei Auffälligkeiten ist umgehend der Händler zu info rmieren. Überprüfen Sie, ob alle Zubehörteile für die
nachfolgend beschriebene Leinwand mitgeliefert wurden.
Common
-n° 16 Plastic nut for assmbly housing
-n°1 logo Screen Research
-n° 4 Ruber gloves
-n° 1 Protective foil Nylon
-n° 1 Hex key n°3
-n° 1 Hex key n°4
-n° 1 Hex key n°2,5
-n°1 Installation manual
-n° 1 CD with manual, picture,movie
-n° 1 set MCS electric connection
-n°2 Power cord for motor power+connector
(screws and plugs for installation not included)
<=160”
-n°2 BRACKETS
>160”
-n°3 BRACKETS
ACHTUNG: Zum Öffnen der Verpackung keine Tepp ichmesser oder spitzen Gegenstände verwenden. Beim Öffnen der Verpackung, sowie bei Installation und Handling des Produktes immer
Schutzhandschuhe tragen. Das Produkt muss je nach Gewicht v on mindestens zwei, drei oder vier Personen befördert werden (Richtwerte fü r die Last pro Person: 25 kg Männer - 15 kg Frauen). Bei höheren
Gewichten wird empfohlen, spezifisches Hebezeug verwe nden
Inches
80”
90”
96”
100”
110”
120”
130”
140”
150”
160”
XLR3 Zu berücksichtigendes
Gesamtgewicht
144 Kg
317,5 Ibs
151 Kg
332,9 Ibs
158 Kg
348,3 Ibs
165 Kg
363,7 Ibs
172 Kg
379,2 Ibs
179 Kg
394,6 Ibs
184 Kg
405,6 Ibs
210 Kg
462,9 Ibs
217 Kg
478,4 Ibs
223 Kg
491,6 Ibs
Page 28
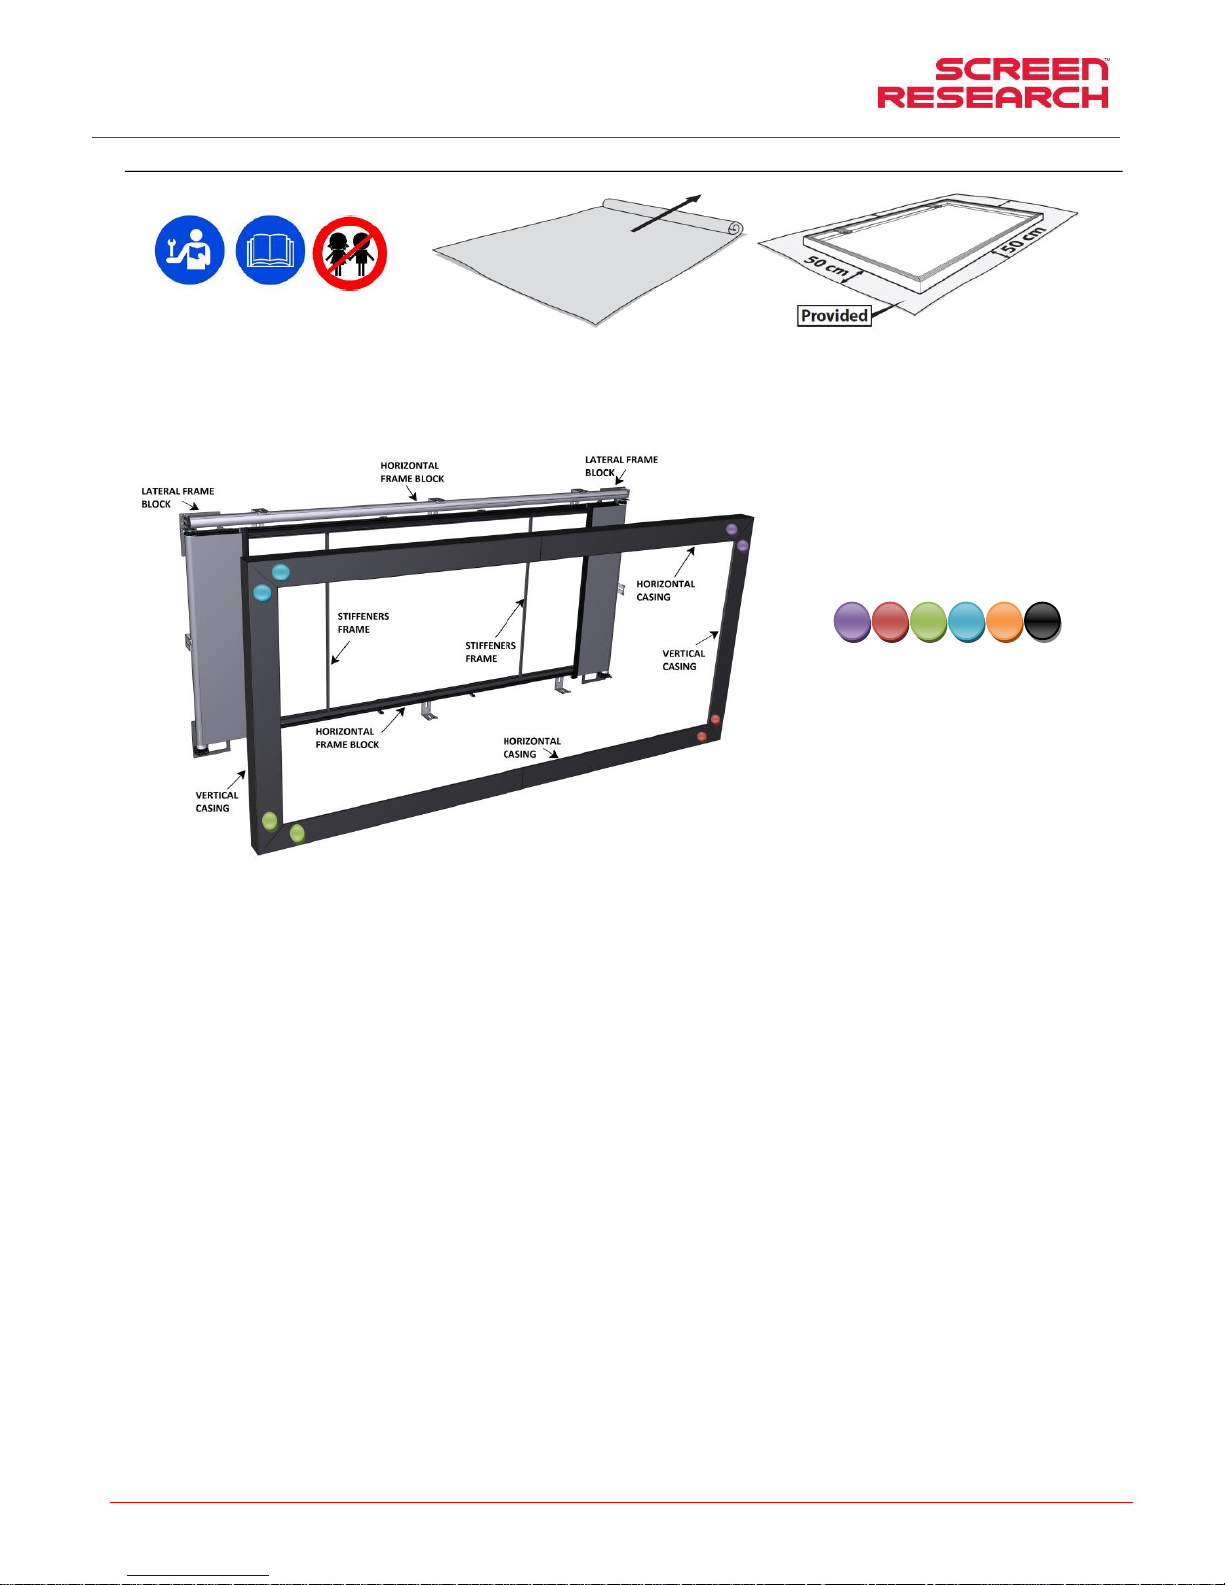
Bedienungs- und Installationsanleitung: Leinwand mit festem
Rahmen und Maskierung
DEUTSCH
Made by Adeo Screen Sp. Z o.o. (Poland) Specifications are subject to change without notice. E&OE
Please verify that you are working with the latest revision of this document before specifying your screen.
Doc: XLR3 – Installation Manual rev3 | 04.12.2017| Download at: www.screenresearch.com 2017 AdeoSreen All Rights Reserved.
Page 28
07 MONTAGEANLEITUNG
ACHTUNG:
Siehe Abbildungen auf den letzten Seiten dieses Handbuchs. Es ist strikt verboten, die Projektion swand an beweglichen Wänden oder instabilen Kabe ln zu installieren, die Bügel müssen an Fläc hen
angebracht werden, die auf Dauer sicherstellen, dass der Abstand zwischen den Bügeln beibehalten wird. Die Montage der Projektionswand hat mit Schrauben und Dübeln zu erfolgen, die für das Gewicht
und die Art der Wand oder der Decke geeignet sind, an der die B ügel befestigt werden sollen. Vor Beginn der Installation, wählen Sie den Dübel oder das Befest igungssystem nach dem folgenden Schema
WICHTIGE HINWEISE:
Das (mitgelieferte) Tuch benutzen, um den Montagebereic h abzudecken, damit das Produkt nicht beschädigt wird
Um spätere Wartungseingriffe und Kontrollen zu erm öglichen, müssen etwaige Steuersysteme in einem gut zugänglichen Bereich installiert we rden.
ACHTUNG !!!
Die Projektionswand besteht aus verschiedenen horizo ntalen und
vertikalen Komponenten, die im Werk bereits vormontiert wurden.
Um ihre Montage zu erleichtern, sind an den Ecken farbige run de
Aufkleber angebracht, anhand derer die korrekte Positionierun g der
Elemente kontrolliert werden kann.
Page 29
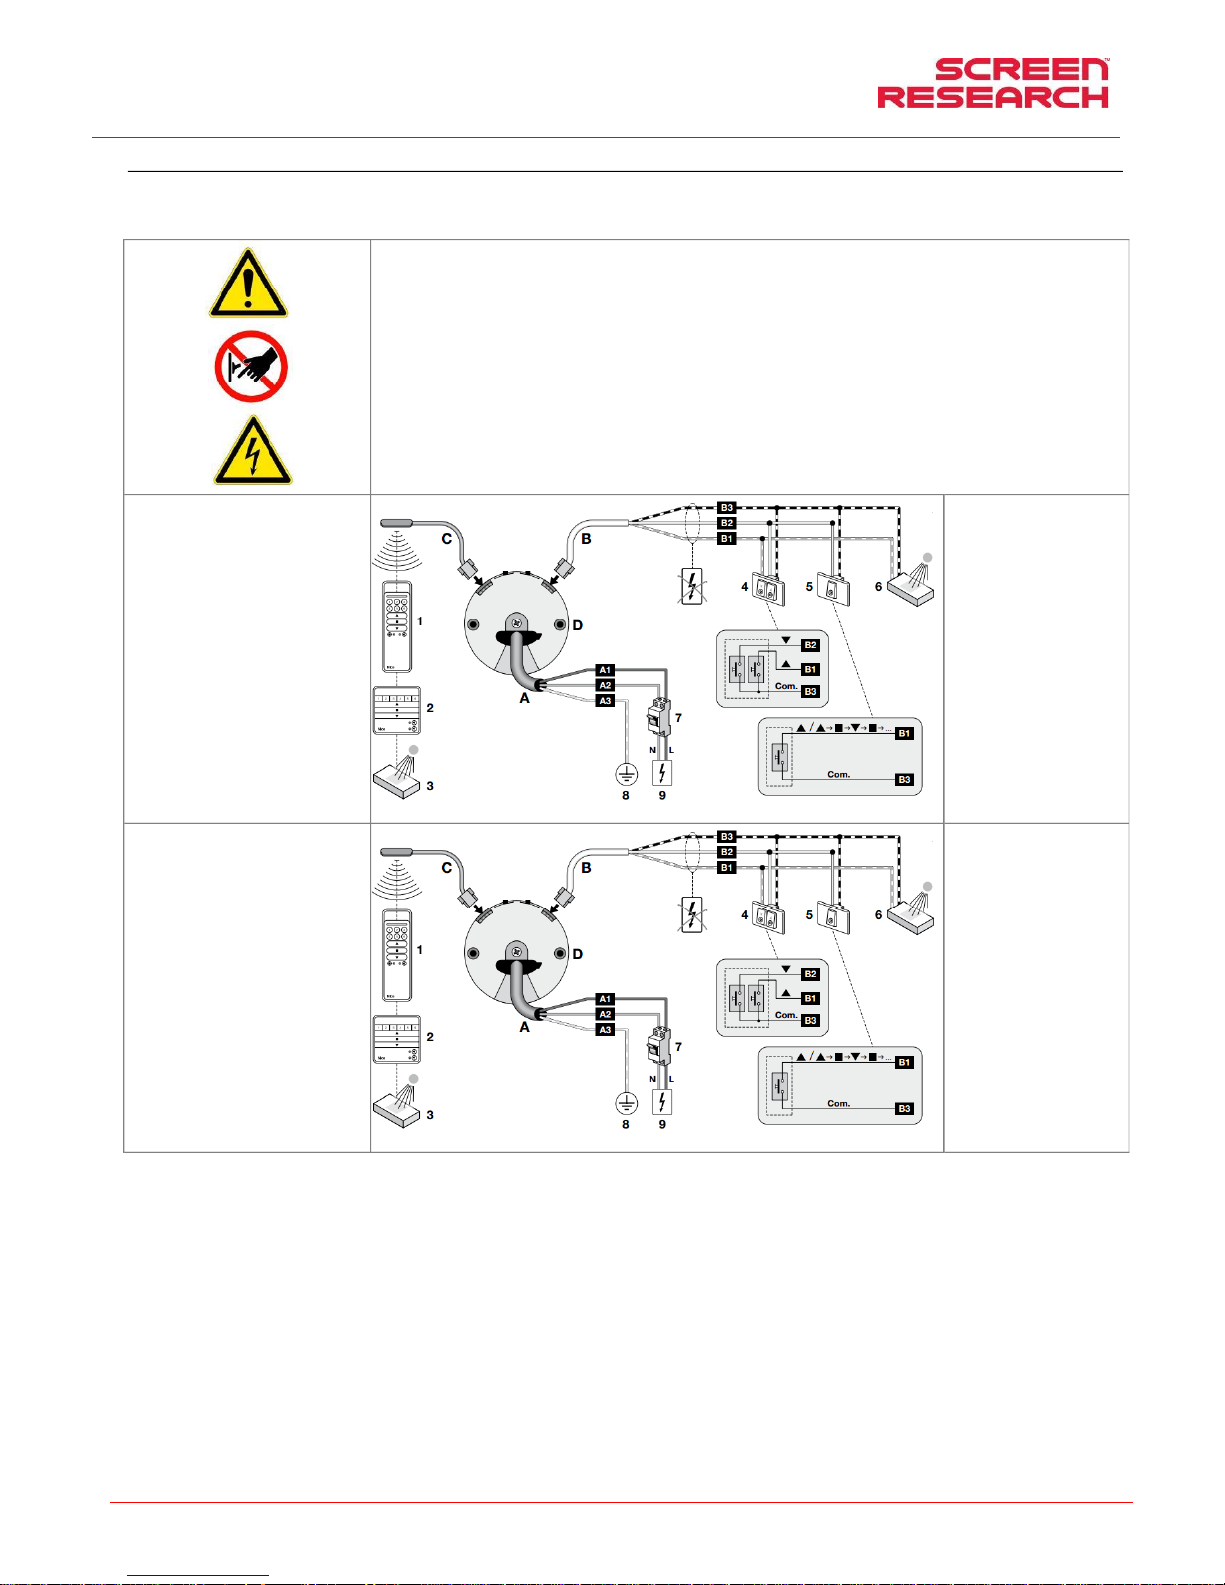
Bedienungs- und Installationsanleitung: Leinwand mit festem
Rahmen und Maskierung
DEUTSCH
Made by Adeo Screen Sp. Z o.o. (Poland) Specifications are subject to change without notice. E&OE
Please verify that you are working with the latest revision of this document before specifying your screen.
Doc: XLR3 – Installation Manual rev3 | 04.12.2017| Download at: www.screenresearch.com 2017 AdeoSreen All Rights Reserved.
Page 29
09 KENNUNG DES MOTORTYPS – FEATURES - ELEKTRISCHER ANSCHLUSS
Der am Produkt installierte Motortyp ist auf dem an jedem Pr odukt angebrachten Typenschild mit dem CE-Logo angegeben. Bei Öffnen der Verpackung muss dieses Typenschild kontrolliert, und zur korrekten
Installation und Verdrahtung das korrekte Motormodell ermitt elt werden. Falls die Motorleistung nicht der Leistung des Stromnetzes a m Installationsort entspricht, wenden Sie sich bitte an einen
Elektroinstallateur und besorgen Sie einen passenden S trom-Frequenz-Wandler.
ELEKTRISCHER ANSCHLUSS:
Die elektrische Ve rkabelung muss den geltenden CEI -Bestimmungen entsprechen. Die CEI-Norm EN 60335-1 sieh t vor, dass im Stromnetz für jeden
einzelnen Motor (z.B. Steckerunterbrecher usw.) ein einpoli ger Trennschalter mit einer Kontaktöffnung von zumindest 3 mm vorgeschaltet ist.
Gegebenenfalls garantiert diese Vorrichtung ein schnelles und sicheres Abschalten der elektrischen Versorgung. Die Kabel sind gemäß nebenstehender
Beschreibung anzuschließen.
ACHTUNG:
Dieses Produkt ist mit zwei Motoren ausgestattet, daher is t bei beiden Motoren dieselbe Verkabelung auszuführen.
Die Bus-Kabel (schwarz weiß orange) müssen unbed ingt isoliert werden, wenn sie für die Bedienung mittels Druckknopf nicht verwendet werden.
ACHTUNG:
Die korrekte und fachgerechte Durchführung in Einhaltung der geltenden Normen der elektrischen Anschlüsse ist zur Verhütung von Un fällen und für den
korrekten, über die Zeit hinweg unveränderten Betrieb der Projektionswand wichtig. Stellen Sie bitte vor Eingriffen an elektrischen Teilen fest, dass das
Gerät spannungsfrei ist.
Bei Projektionswänden mit Gehäuse befindet sich der Antrieb, von vorne gesehen, rechts von der Leinwand (auf Wunsch kann er auch links angebracht
werden).
Folgen Sie den Anleitungen im Schaltplan,
Kenndaten des Motors
Nice ERA INN EDGE –AC
86-230V 50-60Hz:
Frequenz: ~Hz50-60
Leistung: 45W
Drehmoment: 3Nm
Geschwindigkeit: 32U/M
Betriebszyklus: S2 4Min
Kabellänge: 3m
Mechanische Festigkeit: nach Norm EN1420 2
Betriebstemperatur:
von –20 bis +55 °C
Frequenz: 433.92 MHz
Sendebereich: 150mt
Bewerteter Schalldruckpegel:
LpA ≤ 70 dB(A)
Schutzart des Motors: IP44
Anschluss für jeden Motor:
A1 – Braun (Phasen-Strom)
A2 – Blau (neutral)
A3 – Gelb-Grün (Erdung)
B1 – Weiß-Orange (bergauf)
B2 – Weiß (bergab TTBUS)
B3 – Weiß -Schwarz
(gemeinsam)
Kenndaten des Motors
Nice ERA INN EDGE –AC
86-230V 50-60Hz:
Frequenz: ~Hz50-60
Leistung: 70W
Drehmoment: 6Nm
Geschwindigkeit: 32U/M
Betriebszyklus: S2 4Min
Kabellänge: 3m
Mechanische Festigkeit: nach Norm EN1420 2
Betriebstemperatur:
von –20 bis +55 °C
Frequenz: 433.92 MHz
Sendebereich: 150mt
Bewerteter Schalldruckpegel:
LpA ≤ 70 dB(A)
Schutzart des Motors: IP44
Anschluss für jeden Motor:
A1 – Braun (Phasen-Strom)
A2 – Blau (neutral)
A3 – Gelb-Grün (Erdung)
B1 – Weiß-Orange (bergauf)
B2 – Weiß (bergab TTBUS)
B3 – Weiß -Schwarz
(gemeinsam)
Page 30
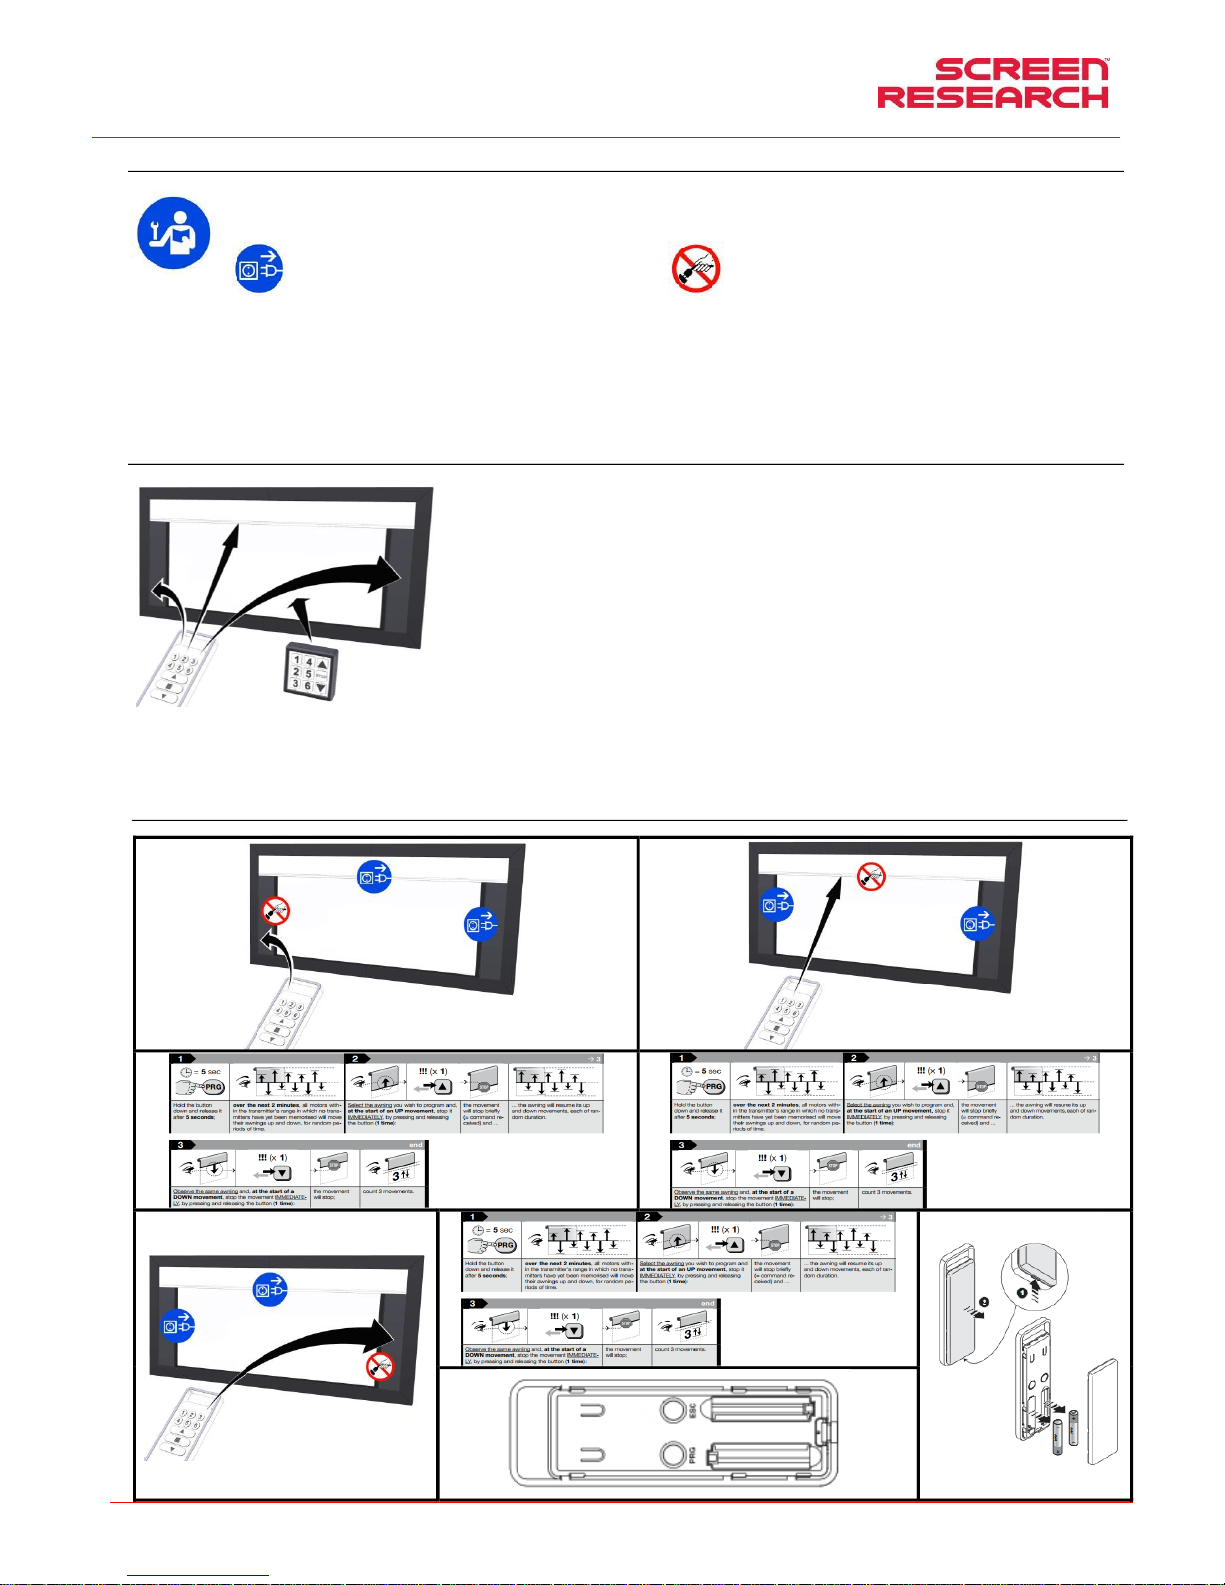
Bedienungs- und Installationsanleitung: Leinwand mit festem
Rahmen und Maskierung
DEUTSCH
Made by Adeo Screen Sp. Z o.o. (Poland) Specifications are subject to change without notice. E&OE
Please verify that you are working with the latest revision of this document before specifying your screen.
Doc: XLR3 – Installation Manual rev3 | 04.12.2017| Download at: www.screenresearch.com 2017 AdeoSreen All Rights Reserved.
Page 30
10 EINSTELLUNG DES ENDSCHALTERS
ACHTUNG, VOR DEM EINSTELLEN LESEN
Die angegebenen Einstellungen dürfen nur von hierzu befugtem Fachpersonal vorgenommen werden. Durch die nicht korrekte Ausführung der beschriebenen Vorgänge können
Beschädigungen des Produkts verursacht werden; solche Schäden sind nicht von der Garantie gedeckt.
ACHTUNG: Bei Durchführung der im Handbuch beschriebenen Vorgänge auf die folgenden Symbole achten:
Die Stromzufuhr zum Motor der angezeigten Leinwandmaskierung trennen Die Stromzufuhr zum Motor der angezeigten Leinwandmaskierung nicht trennen
BITTE BEACHTEN
Der Endschalter wird so eingestellt, dass die Leinwandmaskierung mindestens anderthalb Mal um die Rolle gewickelt ist, damit sie sich nicht lösen kann. Durch die falsche Einstellung des Endschalters
kann folgendes verursacht werden:
- Ablösen der Maskierung von der Rolle
- Aufrollen der Maskierung in umgekehrter Richtung, wodurch die Ebenheit der Projektionsfläche und die Wickelmechanismen beschädigt werden.
- Überlastung des Motors mit möglicher Beschädigung und Auslösen des darin enthaltenen Thermowiderstandes.
- Übermäßiges Aufwickeln des Endschalter-Justiersystems mit daraus folgender Beschädigung der Mechanik.
GARANTIE
Bei Aufbrechen der Siegel und bei Schäden, die auf eine falsche Einstellung zurückzuführen sind, werden die anfallenden Reparaturen nicht als Garantiefall behandelt.
BETRIEBS- und PROGRAMMIERUNGSLOGIK
MASTER-Fernbedienung Diese darf nur von Technikern benutzt werden und dient zum Speichern der oberen und unteren Endschalter der
einzelnen Maskierungen
PILOT-Fernbedienung Die Tasten 1-6 können zum Speichern weiterer Formate verwendet werden.
Mit den Tasten -STOP-können die zwei Maskierungen gleichzeitig bewegt oder angehalten werden (bereits im Werk programmiert).
Bevor man mit der Programmierung der Motoren des E-MASK beginnt, muss man sich mit einigen Betriebslogiken vertraut machen, um
Missverständnisse und Probleme während der Durchführung der Vorgänge zu vermeiden.
- Korrekter Programmierungsablauf für einen einwandfreien Betrieb:
1. Abstimmen der Fernbedienungen (bereits im Werk eingestellt)
2. Einstellen der Endschalter, d.h. der größt- und kleinstmöglichen Öffnung der Maskierungen (bereits im Werk eingestellt)
3. Programmierung von bis zu 6 Formaten (bitte die Varianten Ihres Modells nachschlagen, um festzustellen, welche bereits im Werk
eingestellt werden und welche nicht)
Jeder Programmierungsvorgang besteht aus mehreren Schritten. Nach Beendigung eines Schrittes haben Sie 60 Sekunden Zeit, um mit dem
nächsten Schritt zu beginnen. Auf diese Weise wird das Ausführen anderer als der gewünschten Vorgänge vermieden. Wenn der Mo tor sich
also nicht genau so verhält, wie in de r Anleitung angegeben, warten Sie 60 Sekunden um die Programmierung zu beenden oder halten Sie
den Vorgang beschrieben an und beginnen den Vorgang danach erneut.
- Während der Ausführung jedes Vorgans sollte die Taste solange gedrückt werden, bis der Motor den Vorgang mit einer Bewegung bestätigt.
Vor Durchführung der Programmierungen muss die Master-Fernbedienung auf die zwei einzelnen Rollen abgestimmt werden. Anschließend muss die Maskierung mit der linken Tastengruppe nach unten,
und mit der rechten Tastengruppe nach oben bewegt werden.
Wenn die Fernbedienung nicht die oben beschriebenen Bewegungen ausführt, muss die Fernbedienung wie folgt gespeichert werden:
SPEICHERN DER MASTER-FERNBEDIENUNG (Dieser Vorgang wurde bereits im Werk vorgenommen und darf NICHT von unbefugtem Personal durchgeführt werden)
Page 31
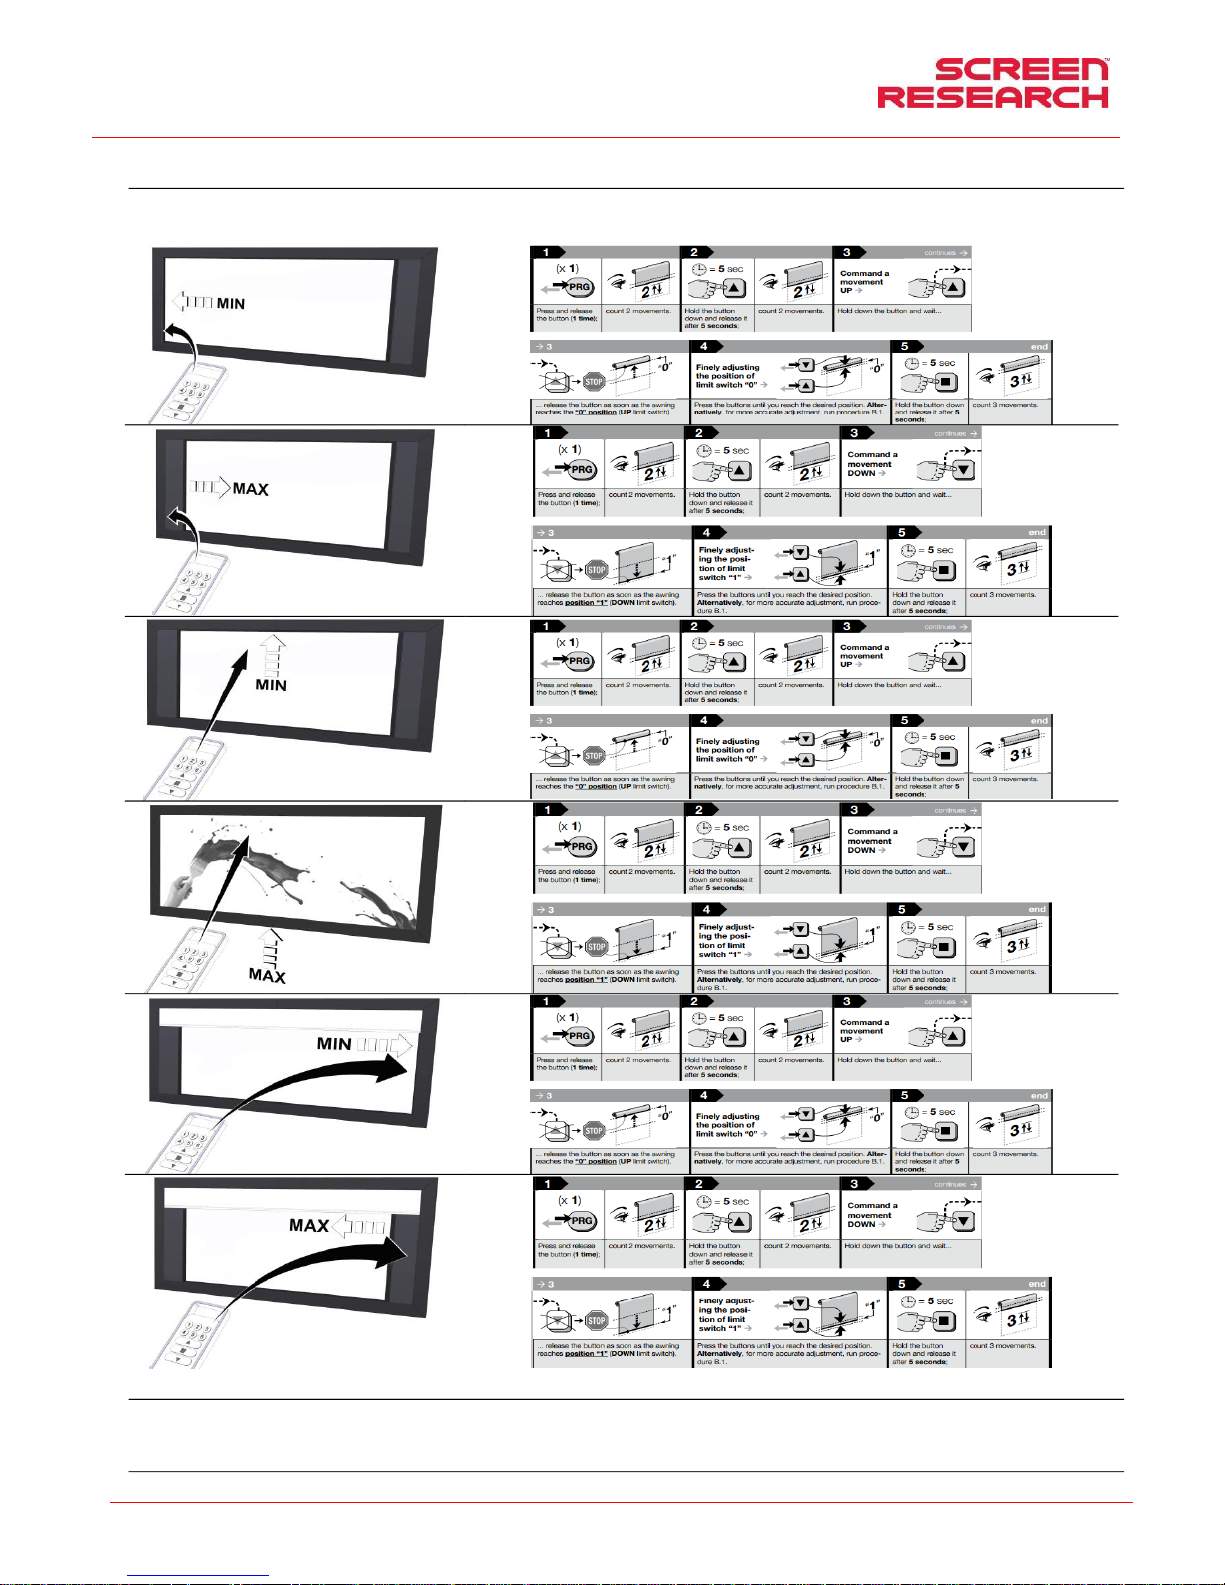
Bedienungs- und Installationsanleitung: Leinwand mit festem
Rahmen und Maskierung
DEUTSCH
Made by Adeo Screen Sp. Z o.o. (Poland) Specifications are subject to change without notice. E&OE
Please verify that you are working with the latest revision of this document before specifying your screen.
Doc: XLR3 – Installation Manual rev3 | 04.12.2017| Download at: www.screenresearch.com 2017 AdeoSreen All Rights Reserved.
Page 31
PROGRAMMIERUNG DES ENDSCHALTERS DER MASKIERUNGEN (Dieser Vorgang wurde bereits im Werk vorgenommen und darf NICHT von unbefug tem Personal durchgeführt
werden)
Jeder Programmierungsvorgang besteht aus mehreren Schritten. Nach Beendigung eines Schrittes haben Sie 60 Sekunden Zeit, um mit dem nächsten Schritt zu beginnen. Durch dieses System wird das
Ausführen anderer als der gewünschten Vorgänge vermieden. Wenn der Motor sich also nicht genau so verhält, wie in der Anleitung angegeben, warten Sie 60 Sekunden um die Programmierung zu beenden
oder halten Sie den Vorgang beschrieben an und beginnen den Vorgang danach erneut.
VERSCHIEBUNG DES ENDSCHALTERS DER MASKIERUNGEN (darf NICHT von unbefugtem Personal durchgeführt werden)
Die Motoren haben eine Überschreiblogik, das heißt, nach Speichern der Endstellungen können sie nicht gelöscht, sondern lediglich neu gespeichert werden, indem der oben beschriebene Speichervorgang
erneut durchgeführt wird.
ANHALTEN DER LAUFENDEN PROGRAMMIERUNG
Drücken Sie in einem beliebigen Moment gleichzeitig die Tasten und bis der Motor 6 Umdrehungen durchführt, um den laufenden Vorgang anzuhalten.
Page 32
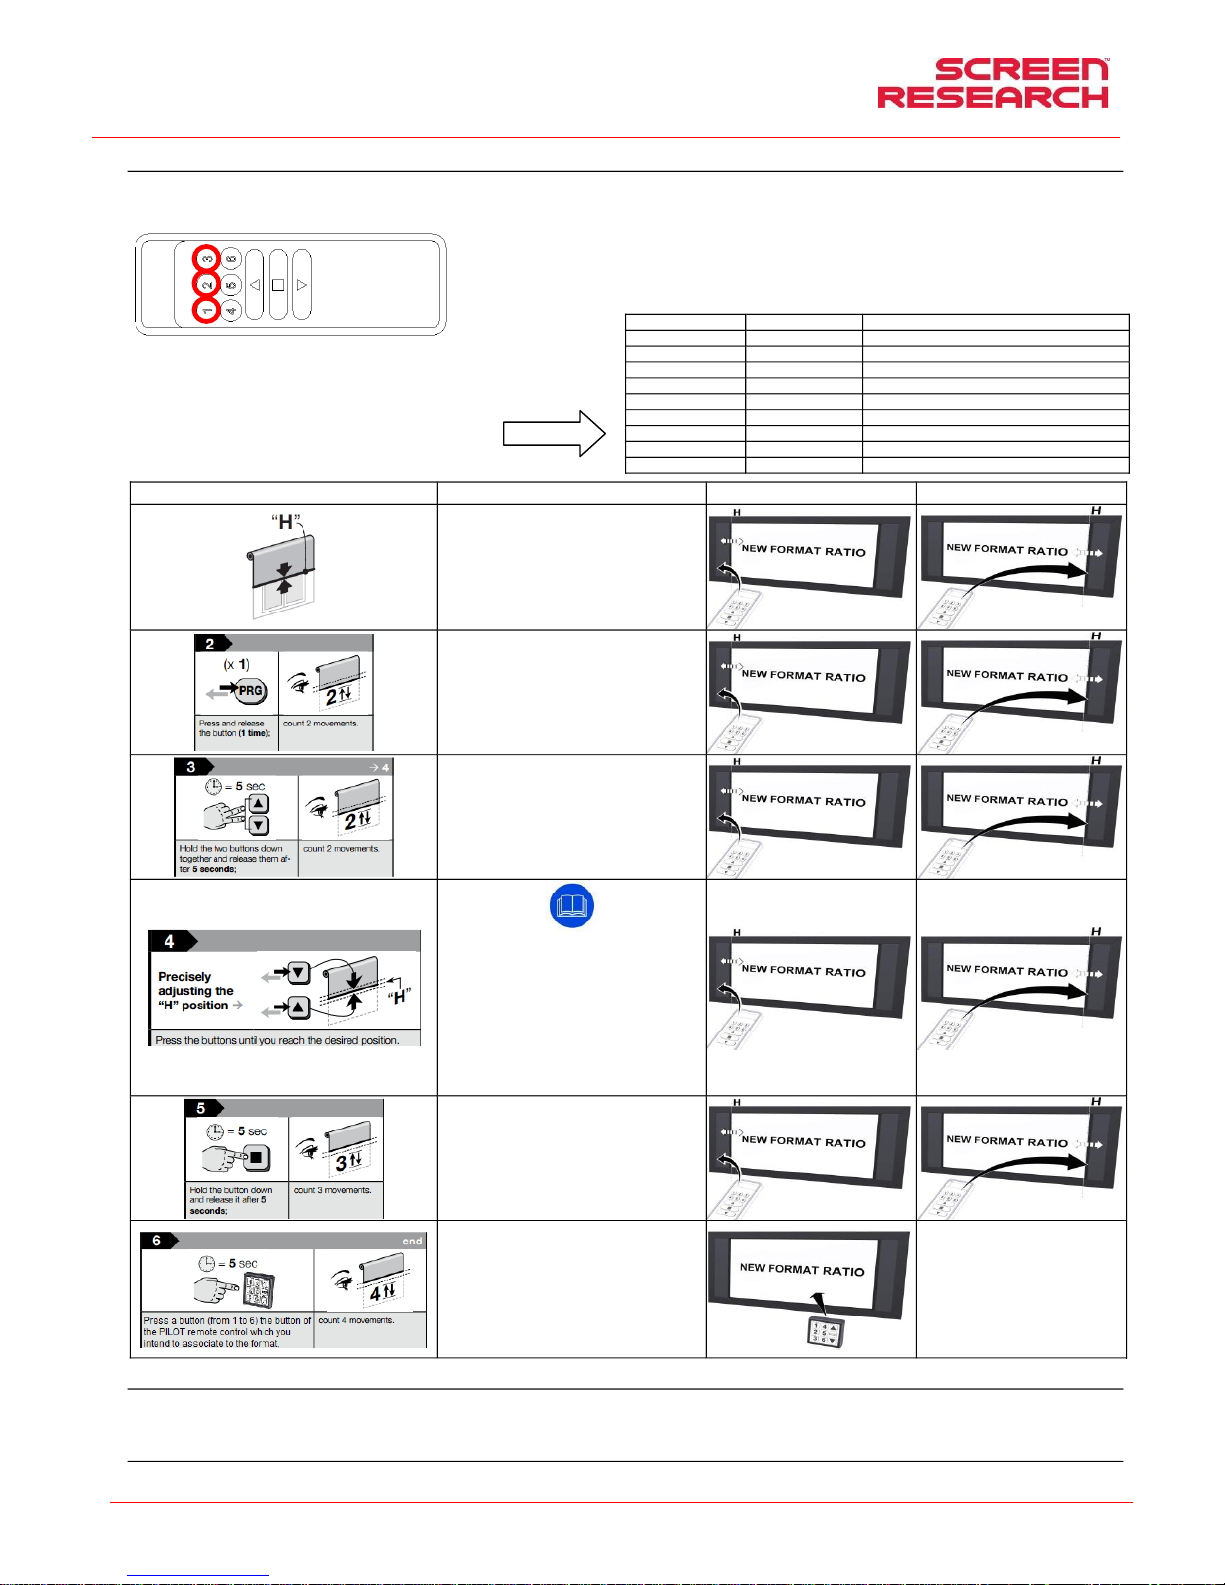
Bedienungs- und Installationsanleitung: Leinwand mit festem
Rahmen und Maskierung
DEUTSCH
Made by Adeo Screen Sp. Z o.o. (Poland) Specifications are subject to change without notice. E&OE
Please verify that you are working with the latest revision of this document before specifying your screen.
Doc: XLR3 – Installation Manual rev3 | 04.12.2017| Download at: www.screenresearch.com 2017 AdeoSreen All Rights Reserved.
Page 32
PROGRAMMIERUNG DER FORMATE
Jeder Programmierungsvorgang besteht aus mehreren Schritten. Nach Beendigung eines Schrittes haben Sie 60 Sekunden Zeit, um mit dem nächsten Schritt zu beginnen. Auf diese Weise wird das Ausführen
anderer als der gewünschten Vorgänge vermieden. Wenn der Motor sich also nicht genau so verhält, wie in der Anleitung angegeben, warten Sie 60 Sekunden um di e Programmierung zu beenden oder halten
Sie den Vorgang beschrieben an und beginnen den Vorgang danach erneut.
Bevor Sie beginnen, um den Motor zu wählen, die Programmierung, die Sie mit den Zifferntasten programmieren möchten, 1 - linke
Motor, 2 - Motor des deco, 3 - Motor nach rechts.
Führen Sie die folgenden Reihenfolge für jeden Motor.
Folgen Sie der nebenstehenden Tabelle Formate von PILOT zu setzen mit dem Öffnen
und Schließen der Maskierung mit Aufdruck. Folgen Sie der unten stehenden Tabelle
die Formate mit dem Master-Fernbedienung einstellen und es auf PILOT zu speichern,
im Einklang mit der Transitionsnummer 6.
MOTOR 1 – MOTOR 3
MOTOR 1 – MOTOR 3
MOTOR 1
MOTOR 3
Bringen Sie die beiden Leinwände mit der Master-
Fernbedienung und den Tasten ▲▼■ ungefähr in
die Position, die Sie programmieren möchten (es
wird empfohlen, auf die Projektionswand Bilder mit
dem gewünschten Format zu projizieren, um genaue
Anhaltspunkte bezüglich der Maße des Formats zu
erhalten). Gehen Sie danach wie folgt vor
Halten Sie die linke Taste PRG gedrückt, bis der
Motor 2 Umdrehungen durchgeführt und
abgeschlossen hat
Halten Sie die linke Taste ▲ und ▼ gedrückt, bis
der Motor 2 Umdrehungen durchgeführt und
abgeschlossen hat
Achtung: Nun müssen beide Motoren sehr genau
mit den Tasten ▲▼ bewegt werden, um die exakte
Einstellung vorzunehmen. Mit der Fernbedienung
führen Sie ruckartige Bewegungen aus. Um
millimetergenaue Bewegungen durchzuführen,
drücken Sie die Tasten ▲ oder ▼ kurz. Um größere
(aber ebenfalls ruckartige) Bewegungen
durchzuführen, halten Sie die Tasten ▲ oder ▼
gedrückt. Positionieren Sie die beiden Leinwände
auf diese Weise genau dort, wo sie programmiert
werden sollen
Nach dem Erreichen der gewünschten Position und
halten Sie die linke Taste ■ bis der Motor 3
Umdrehungen durchgeführt und abgeschlossen hat.
Drücken Sie die Taste der PILOT-Fernbedienung (1-
6), der Sie das Format zuweisen wollen, bis jeder
Motor 3 Umdrehungen durchgeführt und
abgeschlossen hat.
Um weitere Formate zu
programmieren, führen Sie die
oben beschriebenen Schritte
erneut aus und wählen Sie bei
Punkt 9 eine andere Taste der
Pilot-Fernbedienung (1-6) aus, für
die noch keine Programmierung
vorgenommen wurde.
UMSTELLUNG DER FORMATE
Die Motoren haben eine Überschreiblogik, das heißt, nach Speichern der Endstellungen können sie nicht gelöscht, sondern lediglich neu gespeichert werden, indem der oben beschriebene Speichervorgang
erneut durchgeführt wird.
ANHALTEN DER LAUFENDEN PROGRAMMIERUNG
Drücken Sie in einem beliebigen Moment gleichzeitig die Tasten ■ und ▼ bis der Motor 6 Umdrehungen durchführt, um den laufenden Vorgang anzuhalten.
TASTEN PILOT
MASK POSITION
DECO MASK
Taste 1 von PILOT
Screening-Format 1
Im Zustand “UP-Endschalter” (vorherige Seite)
Taste 2 von PILOT
Screening-Format 2
Im Zustand “UP-Endschalter” (vorherige Seite)
Taste 3 von PILOT
Screening-Format 3
Im Zustand “UP-Endschalter” (vorherige Seite)
Taste 4 von PILOT
Screening-Format 4
Im Zustand “UP-Endschalter” (vorherige Seite)
Taste 5 von PILOT
Screening-Format 5
Im Zustand “UP-Endschalter” (vorherige Seite)
Taste 6 von PILOT
Screening-Format 6
Im Zustand “UP-Endschalter” (vorherige Seite)
Taste 7 von PILOT
Screening-Format 7
Im Zustand “UP-Endschalter” (vorherige Seite)
Taste 8 von PILOT
Screening-Format 8
Im Zustand “UP-Endschalter” (vorherige Seite)
Taste 9 von PILOT
Screening-Format 9
Im Zustand “DOWN-Endschalter” (vorherige Seite)
Page 33
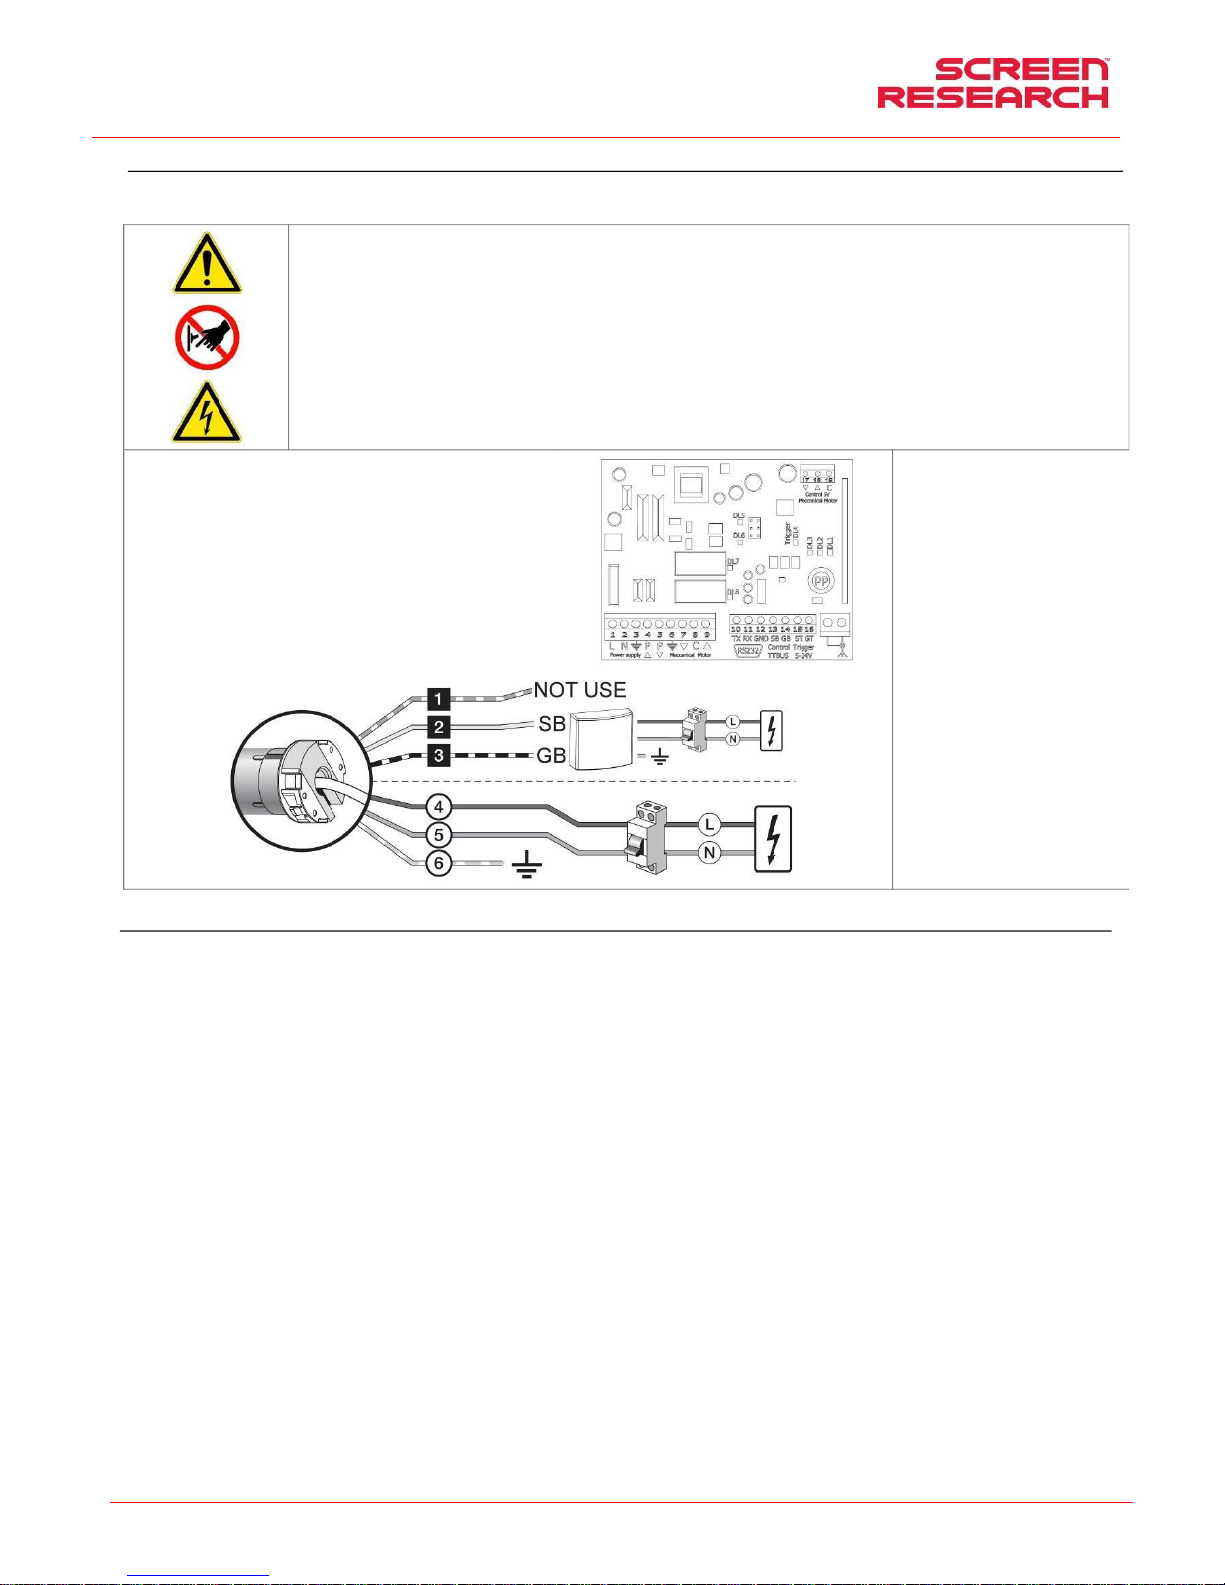
Bedienungs- und Installationsanleitung: Leinwand mit festem
Rahmen und Maskierung
DEUTSCH
Made by Adeo Screen Sp. Z o.o. (Poland) Specifications are subject to change without notice. E&OE
Please verify that you are working with the latest revision of this document before specifying your screen.
Doc: XLR3 – Installation Manual rev3 | 04.12.2017| Download at: www.screenresearch.com 2017 AdeoSreen All Rights Reserved.
Page 33
ANSCHLUSS MCS-N-RS232 (Optionen nicht enthalten)
Bevor Sie die elektrische Verkabelung zu tun, lesen Sie die Betriebsanleitung der MCS. Falls die Motorleistung nicht der Leistung des Stromnetzes am I nstallationsort entspricht, wenden Sie sich bitte an
einen Elektroinstallateur und besorgen Sie einen pas senden Strom-Frequenz-Wandler.
ELEKTRISCHER ANSCHLUSS:
Die elektrische Ve rkabelung muss den geltenden CEI -Bestimmungen entsprechen. Die CEI -Norm EN 60335-1 sieht vor, dass im Stromnetz für jeden einzelnen Motor ( z.B.
Steckerunterbrecher usw.) ein einpoliger Trennschalter mit einer Kontaktöffnung von zumindest 3 mm vorgesch altet ist. Gege benenfalls garantiert diese Vorrichtung ein
schnelles und sicheres Abschalten der elektrischen Ver sorgung. Die Kabel sind gemäß nebenstehender Beschreibung anzuschließen.
ACHTUNG:
Dieses Produkt ist mit zwei Motoren ausgestattet, daher is t bei beiden Motoren dieselbe Verkabelung auszuführen.
Die Bus-Kabel (schwarz weiß orange) müssen unbed ingt isoliert werden, wenn sie für die Bedienung mittels Druckknopf nicht verwendet werden.
ACHTUNG:
Die korrekte und fachgerechte Durchführung in Einhaltung der geltenden Normen der elektrischen Anschlüsse ist zur Verhütung von U nfällen und für den korrekten, über die
Zeit hinweg unveränderten Betrieb der Projektionswand w ichtig. Stellen Sie bitte vor Eingriffen an elektrischen Teilen fest, dass das Ger ät spannungsfrei ist.
Bei Projektionswänden mit Gehäuse befindet sich der A ntrieb, von vorne gesehen, rechts von der Leinwand (auf Wunsch kann er auc h links angebracht werden).
Folgen Sie den Anleitungen im Schaltplan,
Kenndaten des MCS-N
Anschluss: 110 - 240 V AC 50/60 Hz
Maximale Stromaufnahme: 80 mA im Stand-by, 3 A bei maximaler Belastung
Codierungen: FloR (Rolling Code)
Frequenz: 433.92 MHz
Impedanz Antenne: 52 Ohm
Empfindlichkeit: besser als 0,5 μV bei positivem Signal
Reichweite: schatzungsweise 200 m im Freien und 3 5 m in Gebauden
Anzahl der speicherbaren Sender: 30
Ausgang: 1 Ausgang zur Steuerung eines 2 -Phasen-Motors
Kapazität der Kontakte: 3 A - 250 V
Schutzart: IP44 (bei unversehrtem Behalt er)
Betriebstemperatur: -20 . +55° C
Abmessungen/Gewicht: 128 x 112 x 43 mm / 260 g
Anschluss für jeden Motor
230V version:
Weiß Orange (BUS)
Weiß (BUS)
Weiß Schwarz (gemeinsame TTBUS)
Braun (Phase 230V)
Blau (Neutral)
Gelb grun (Erde)
Anschluss für jeden Motor,
120V version:
Weiß Orange (BUS)
Weiß (TTBUS)
Weiß Schwarz (Masse BUS)
Weiß (Netz 120V)
Schwarz (Phase 120V)
Grün (Erde)
GARANTIE
1. GARANTIE Die Firma ScreenResearch garant iert unter folgenden Bedingungen und mit folgenden Fristen, dass das von ihr gefertigte Produk t frei von Fabrikationsmängeln ist, die auf Material- und
Verarbeitungsfehler zurückzuführen sind. Für die Pro jektionsgewebe und Profile wird eine Garantie von fünf (5) Jahren ab Originalrechnung gewährt. Für Motoren , Motorsteuerungen, Fernbedienungen und
Montageteile wird eine Garantie von drei (3) Jahren ab Originalr echnung gewährt.
2. BEDINGUNGEN UND EINSCHRÄNKUNGEN Diese Ga rantie unterliegt den folgenden Bedingungen und Einschränkungen. Bei Benutzung oder Handhabung des Produkts unter Mis sachtung der im
Lieferumfang enthaltenen Anleitungen, bei missbräuch licher oder zweckwidriger Verwendung, bei Beschädigung infolg e eines Unfalls oder Nachlässigkeit während des Transports, oder wenn der Fehler auf
Reparaturen oder Eingriffe durch unbefugtes Persona l zurückzuführen ist, ist die Garantie ungültig und nicht anwendbar. Das P rodukt muss von einem von ScreenResearch befugten Fachmann installiert
werden und die im Benutzerhandbuch aufgeführten Wartungs eingriffe sind regelmäßig durchzuführen.
3. RÜCKSENDUNGEN Ohne schriftliche G enehmigung (RMA-Nummer) von ScreenResearch wird keine Warenrücksendung angenommen. Das Produk t muss in der Originalverpackung oder in einer
gleichwertigen Verpackung zurückgeschickt werden, um Transportschäden zu vermeiden. Verpackung und Rücksendung an ScreenResea rch oder an eine Vertragswerkstatt gehen zu Lasten des Kunden. Die
Rückgabe nach Reparatur erfolgt auf Kosten von ScreenResearch. Dem zurückgeschickten Produkt muss eine schriftliche Beschreibung des Fehlers und eine Fotokopie des Orig inal-Kaufbelegs beiliegen. Auf
diesem Beleg müssen Modell und Seriennummer, Ka ufdatum, Name und Anschrift des Käufers und des Fachhändlers, sowie der vom Käufer bezahlte Preis klar und deutlich angegeben sein. ScreenResearch
behält sich das Recht vor, das Design jedes Produkts ohne jegli che Verpflichtung in Bezug auf vorher hergestellte Produkte zu überarbe iten und die Preise bzw. Leistungsmerkmale jedes Produkts ohne
Vorankündigung und ohne jegliche Verpflichtung gegen über irgendeiner Person zu ändern.
4. ABHILFE Wenn das Produkt nicht der obigen Garantie entspricht, ist die einzige Abhilfe für den Käufer im Sinne der vorliegenden e ingeschränkten Garantie die Rücksendung des Produkts an
ScreenResearch oder an eine Vertragswerkstatt. Die Nichtkonfo rmität wird ohne Kosten für Arbeitszeit oder Ersatzteile beseitigt.
5. BESCHRÄNKUNG AUF DEN ERSTKÄUFER Diese Garantie gilt ausschließlich für den Erstkäufer des garantierten Produkts und ist bei einem Weiterverk auf desselben nicht auf den Erwerber übertragbar.
6. VERSCHIEDENES Alle impliziten Garant ieansprüche in Bezug auf die Produkte von ScreenResearch sind auf die Dauer dieser Garantie beschränkt. Die Garantie deckt keine dem Käufer eventuell
unmittelbar oder mittelbar entstandenen Schäden. E inige Staaten oder Länder erlauben keine Einschränkungen der Dauer eines im pliziten Garantieanspruchs, noch den Ausschluss oder die Einschränkung
der Unfall- oder Folgeschäden, daher sind die obigen Einschrä nkungen oder Ausnahmen möglicherweise nicht anwendbar. Mit dieser Garantie werden spezifische rechtliche Ansprüche gewährt und unter
Umständen können auch andere Ansprüche vor liegen, die von Staat zu Staat bzw. von Land zu Land variieren.
7. ANFRAGEN in Bezug auf die obige eingeschränkte Garantie können an den Vertragshändler von ScreenResearch gerichtet werden.
8. ERBRINGEN DER GARANTIELEISTUNG DUR CH VERTRAGSHÄNDLER Die Firma ScreenResearch hat den Vertrieb ihrer Prod ukte in vielen Ländern weltweit autorisiert. In jedem Land ist der
Vertragshändler/Importeur für die Ausführung der Ga rantieeingriffe an den im jeweiligen Land verkauften Produkten verantwortl ich. Die Garantieleistung muss beim Importeur, bzw. bei dem Händler, bei dem
das Produkt erworben wurde, angefordert werden
Page 34
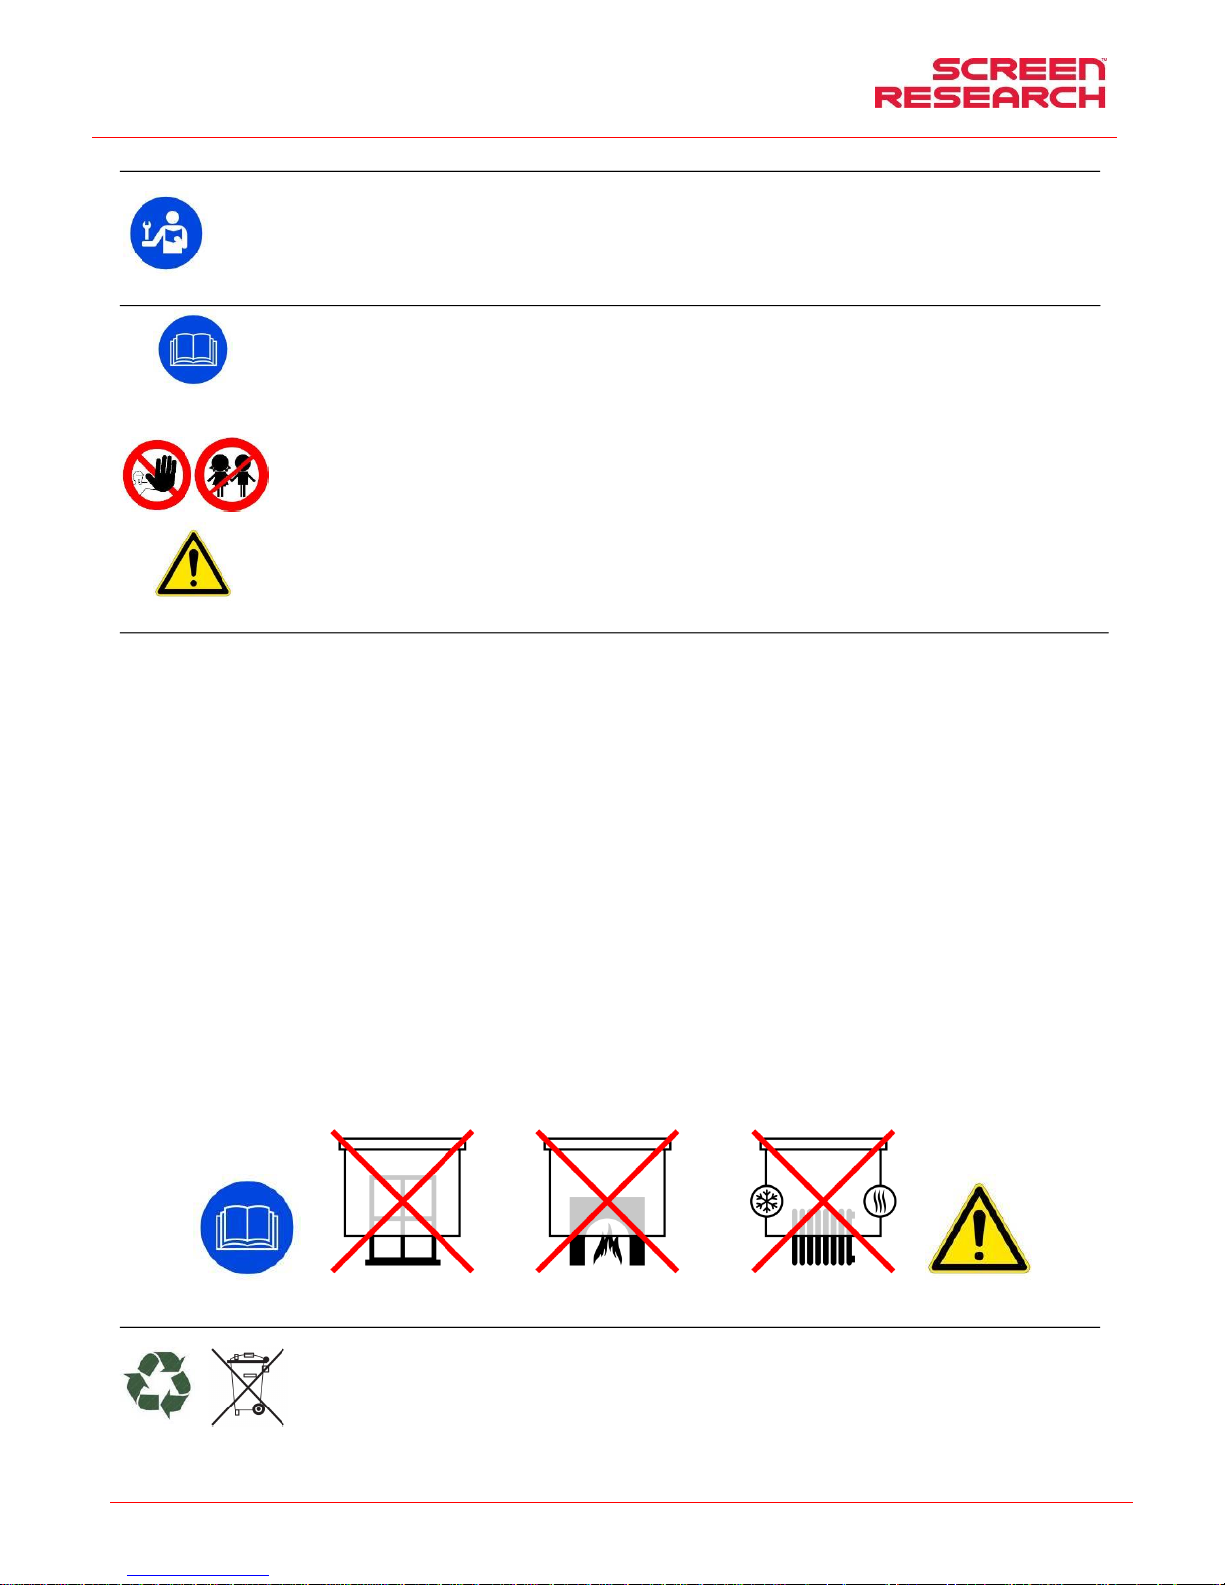
Manual de instalación y de uso: pantalla con marco rígido y máscara
ESPAÑOL
Made by Adeo Screen Sp. Z o.o. (Poland) Specifications are subject to change without notice. E&OE
Please verify that you are working with the latest revision of this document before specifying your screen.
Doc: XLR3 – Installation Manual rev3 | 04.12.2017| Download at: www.screenresearch.com 2017 AdeoSreen All Rights Reserved.
Page 34
01 INTRODUCCIÓN
El presente manual forma parte integrante del producto y su lectura y comprensión revisten importancia fundamental para la se guridad. En el manual se indican las normas y modos de
empleo para que el cliente utilice la pantalla correctamente y con seguridad. El manual deberá acompañar siempre al producto y deberá ser guardado en un lugar que garantice su
integridad y que esté al alcance de las personas autorizadas a consultarlo. Cada usuario del producto será responsable de la correcta conservación del manual. El usuario también es
responsable de controlar la funcionalidad de la pantalla y de la reparación o sustitución de piezas sujetas a desgaste que podrían procurar daños.
Las imágenes contenidas en este manual tienen la finalidad de describir en detalle las funciones, características o procedimientos. Sin embargo, pueden diferir por el tipo de modelo
representado, lo que no implica cambios en el significado descriptivo de la imagen.
02 NORMES GÉNÉRALES DE SÉCURITÉ
ATTENTION : Consignes importantes de sécurité. Ne pas respect er les consignes relatives à l’installation peut engendrer des blessures graves. S’assurer toujours d’avoir
bien lu et compris les instructions et les avertissem ents contenus dans le manuel avant de commencer à utiliser le produit et d’effectuer toute intervention d’entretien.
-L’installation de l’ècran au dessus des zones de passa ge est strictement interdite Contrôler, avant et pendant l’utilisation, que l’écran ne g énère pas de situations
dangereuses.
- Ne modifier, enlever ou endommager aucun élément ou partie de l’écran.
- Ne jamais réaliser d’opérations de maintenance sur l’écran lo rsque le moteur est allumé (couper l’alimentation pour une sécurité renf orcée).
- Obligation de déconnecter l’alimentation lors du netto yage, la maintenance ou lorsque de remplacement d’une pièce
- Interdire l'utilisation de l’écran aux enfants. Ne pas in itier les enfants a l’utilisation de l'écran.
Chaque écran est couvert par une garantie, d ont la validité dépend du respect et de l’exécution des instru ctions contenues dans ce manuel.
ATTENTION: Le kit d'installation pour chaque écran, n e contiennent pas de vis et chevilles en plastique pour fixation aux murs / plafo nds. L'installateur est responsable du
choix approprié des vis et des chevilles, selon les différents type s de matériaux des murs ou des plafonds pour lequel vous souhaitez installer l' écran. Une installation
incorrecte peut compromettre la sécurité des personnes q ui utiliseront ce produit, le fabricant ne pourra être tenu responsable des dommages causés aux chos es ou aux
personnes suite à une installation et à un usage incorrects de l’é cran, et à un mauvais entretien.
Le fabricant n’est pas responsable des problèmes l iés à des erreurs d’installation.
Si nécessaire, contacter notre bureau technique pour tout éclair cissement.
L’installation de l’écran, les raccordements électriques et les co ntrôles en cas de mauvais fonctionnement des enrouleurs motorisés doivent ê tre effectués par le revendeur
autorisé ou par un technicien qualifié connaissant les r isques liés à l’électricité. Le câble de raccordement ne peut pas être subs titué. Si le câble est endommagé, l’écran
doit être substitué. La modification des fins de course ou le percement de la protection située au-dessus des orifices entraînent l’annulation de la gar antie.
UNE FOIS LE MONTAGE DE L’ÉCRAN SUR LES SUPPORTS TERMINÉ, IL EST IMPÉRATIF DE VÉRIFIER QU’IL EST PARFAITEMENT HORIZONTAL AVANT DE L’UTILISER.
03 AVERTISSEMENTS ET PRÉCAUTIONS D’EMPLOI ET INSTALLATION
Il est recommandé d’utiliser les écrans dans des locaux couverts , dans des conditions de température (20 - 25 °C) et d’humidité normales.
Il est absolument interdit d’installer les écrans de projec tion vidéo devant des fenêtres ou de les utiliser comme stores occultants exposés à la lumière directe du soleil près de sources fortes de lumière, à
proximité des sources de chaleur telles que des poêles, cheminés ou conduits proches des systèmes de climatisation, à la fois pour l’ air chaud et froid, tout manquement au respect de ces interdictions
pourra causer des déformations ou un étirement permane nt du tissu de projection.
Des précautions particulières doivent être adoptées en cas d’utilisation à l’extérieur, en particulier en ce qui concerne les températures et la poussière.
L’utilisation de l’écran motorisé en extérieur nécessite d’adopte r des précautions spécifiques dont :
1- Protection du / des câble(s) d’alimentation du moteur c ontre les radiations UV à l’aide de conduites ou gaines adaptées à une installation en extérieur.
2- Utilisation de joints de câbles en tant que protection contre l’eau et l ’humidité dans les raccords avec les boîtiers de jonction ou de dérivation .
3- Utilisation de commutateurs de classe de pro tection IP55 ou supérieure (le commutateur de série du produit n’est pas conforme pour un usage en extérieur).
4- Couvrez et protéger l’écran contre le contact direct avec de l’eau ou du liquide
L’écran étant composé d’une toile de projection (PVC ), il tend à se charger électrostatiquement, et donc une présence excessive de poussière dans l’environnement de project ion peut entraîner une
dégradation des qualités optiques de la toile à cause du dépôt d e poussières par attraction électrostatique (voir aussi Nettoyage de la toile de projection).
Veillez à ne pas fixer vos écrans de projection à proximité d'une sourc e de chaleur pour éviter des dégâts sur la surface de pro jection.
L'utilisation de l'écran enroulable prévoit l'ouverture co mplète du tissu (descente) et après son utilisation avec un projecteur, la fermeture complète du tissu ( montée). L'ouverture et la fermeture complètes
(descente–montée) de l'écran sont appelées « cycle ».
Les écrans enroulables motorisés sont conseillés pour des utilisations à « cycle » unique, c'est-à-dire qu'un laps de temps cons idérable s'écoule entre deux cycles. On n'a pas prévu la possibilité d'effectuer
des ouvertures et des fermetures continues.
Les moteurs utilisés sur les écrans sont munis de systè mes de blocage thermique qui permettent de ne pas surchauffer le moteur afin d'éviter les domma ges permanents. Le blocage thermique s'active après
un certain nombre de cycles d'utilisation qui varie en fonction d u type de moteur et du type d'écran (normalement entre 3 et 6 cycles) . On précise quoiqu'il en soit que la chaleur émise par le moteur est
transmise au rouleau et donc au tissu enroulé sur ce d ernier. La surchauffe du tissu peut provoquer des déformations ou des a llongements non homogènes permanents entraînant des désalignements du
fond ou des déformations du tissu.
Pour éviter ces situations, il est formellement interdit d'util iser l'écran au-delà de 3 cycles complets d'utilisation (montée–descente). A u bout de 3 cycles d'utilisation continue ou rapprochée, il faudra
attendre 40 minutes avec l'écran en position ouverte (tissu dér oulé) pour permettre le refroidissement du moteur et des compo sants structuraux correspondants, avant une nouvelle utilisation.
ATTENTION: Ne pas permettre aux enfants de jouer a vec les dispositifs de commande fixes. Tenir les télécommandes hors de portée des enfants.
Observer l’écran en mouvement et éloigner toute personne de l ’écran tant qu’il n’est pas complètement refermé.
Il est interdit d e s’accrocher ou de se balancer, d’a jouter ou appliquer tout objet à la toile ou au fond, ou de modifier la structure de l’écran, car cela pourrait provoquer des dommages à l’ écran, ainsi qu’aux
choses et aux personnes. nous rappelons que les bases sont structurées pour une utilisation interne et pour des écrans allant jusqu’à 4 m. Toute autre installation devra être faite en mettant le produit en
sécurité afin d’empêcher qu’il ne se renverse ou qu’il cède .
Interdiction absolue d’installer les écrans de projection vidéo de vant des fenêtres ou de les utiliser comme stores occultants.
Interdiction absolue d’installer les écrans de projection vidéo à proximité des sources de chaleur telles que les poêles, les cheminées ou conduits proches des systèmes de clima tisation, à la fois pour l’air
chaud et froid.
Placez l’écran parfaitement à l’horizontal.
ELIMINACION DEL PRODUCTO
Así como para los trabajos de instalación, también al final de la vida útil de este producto, el desguace deberá ser hecho po r personal experto.
Este producto está formado de varios tipos de materiales: algunos pueden ser reciclados, otros deberán ser elim inados. Infórmese sobre los sistemas de reciclaje o
eliminación previstos por las normas vigentes en su territorio para esta categoría de producto.
El símbolo de al lado indica que está prohibido desechar este producto con los residuos domésticos. Por lo tanto, haga la “recogida selectiva” según los métodos
previstos por las normas vigentes en su territorio, o bien entregue el producto al vendedor en el momento de la compra de un producto nuevo equivalente.
Atención: las normas locales pueden prever sanciones pesadas en caso de eliminación abusiva de este producto.
Page 35
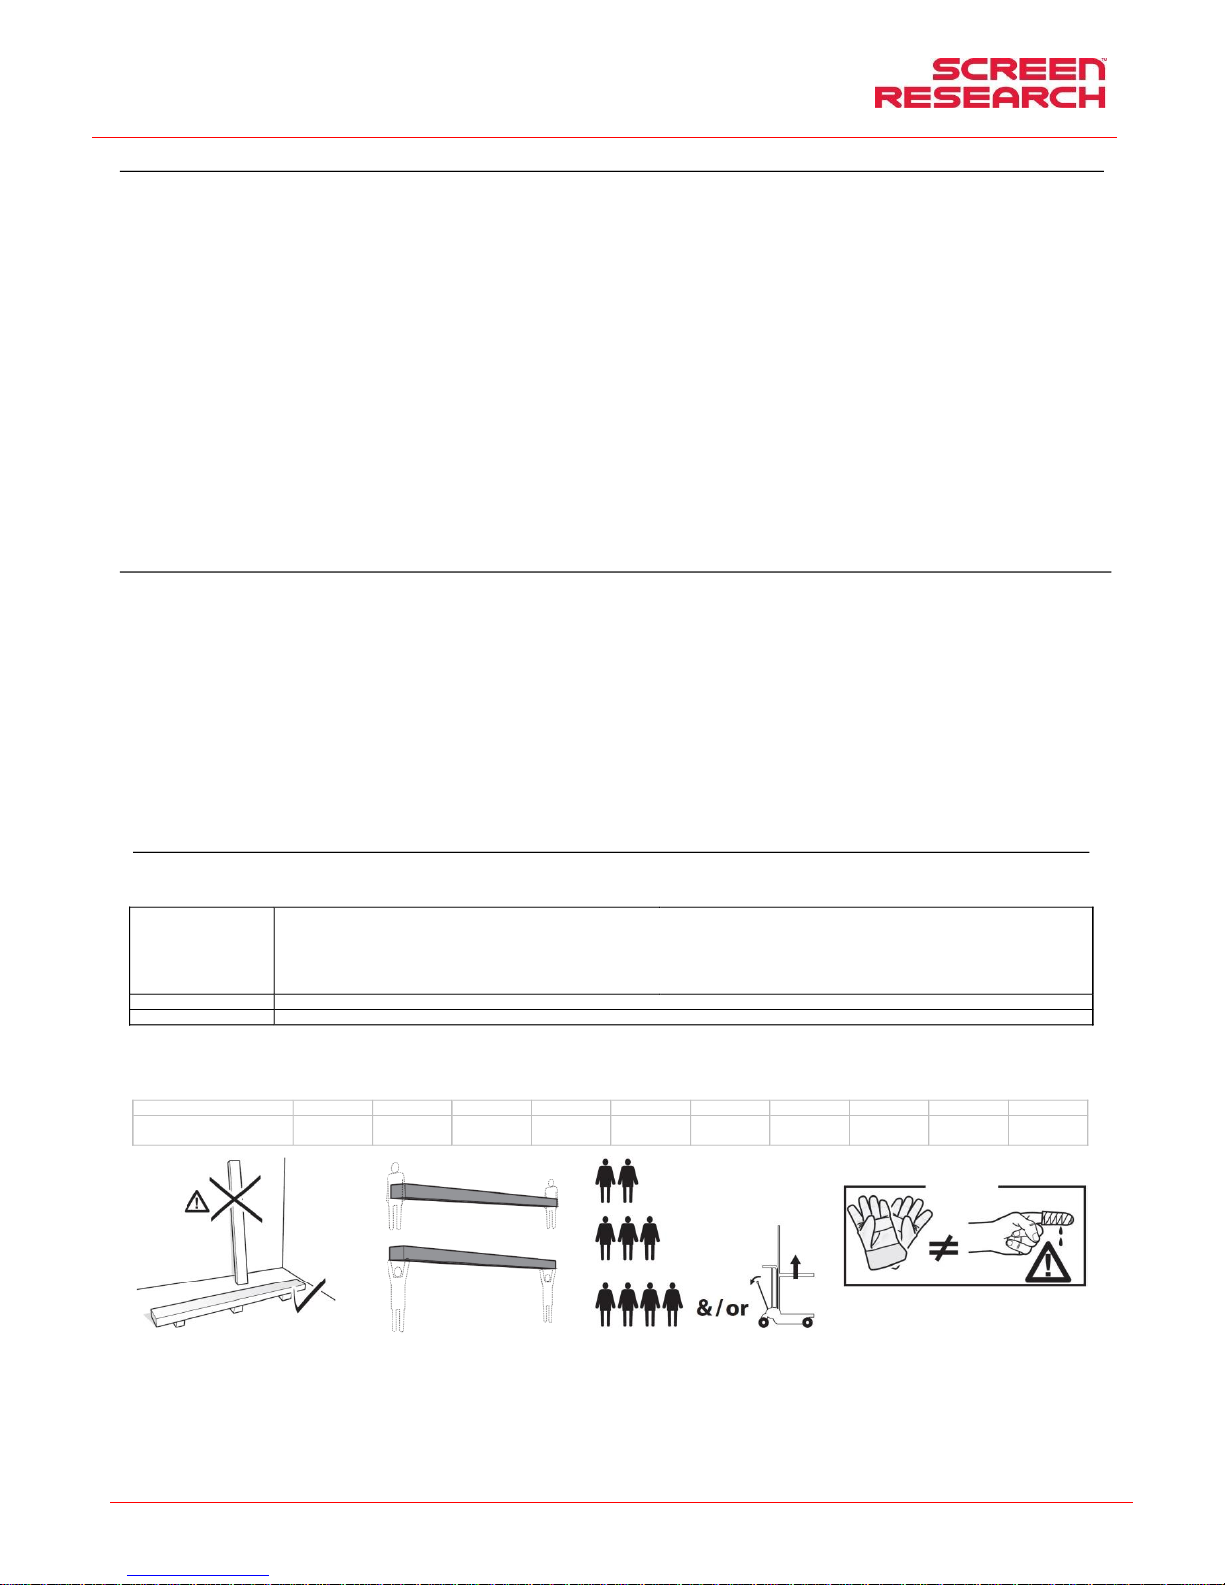
Manual de instalación y de uso: pantalla con marco rígido y máscara
ESPAÑOL
Made by Adeo Screen Sp. Z o.o. (Poland) Specifications are subject to change without notice. E&OE
Please verify that you are working with the latest revision of this document before specifying your screen.
Doc: XLR3 – Installation Manual rev3 | 04.12.2017| Download at: www.screenresearch.com 2017 AdeoSreen All Rights Reserved.
Page 35
04 CARACTÉRISTIQUES GÉNÉRALES DU PRODUIT
Le produit écran est fabriqué en conformité avec les dispos itions des directives CE: 2014-35-CE LDV Basse tension
2014-30-EU EMC Compatibilité électromagnétique
2014-53-CE Équipement radio
2009-125-CE CONSOMMATION Ecodesign
2011-65-CE ROHS Substances dangereuses
2012-19-CE RAEE Traitements des déchets
2001-95-CE SÉCURITÉ Produits sûrs
L'écran décrites dans ce manuel doit être utilisé exclusivement comme un support pour la projection vidéo. Toute autre utilisation non couverte par le présent manuel, i l n'est pas consenti.
L'écran contient un ou plusieurs toile/feuilles de projection en PVC plastifié sans cadmium or Fil de verre (filament continue) plastifiées PVC imprégné, chaque toile peut être classé dans la catégorie:
- M1 o M2 selon la réglementation française (LNE Laboratoire national de métrologie et d’essais – SME Centre de recherches du Bouchet - WARRINGTONFIRE GENT Laboratoire de métrologie et
d’essais – IFTH Laboratoire accreditè )
- B1 o B2 selon la réglementation Allemand (LNE Laboratoire national de métrologie et d’essais – SME Centre de recherches du Bouchet - WARRINGTONFIRE GENT Laboratoire national de
métrologie et d’essais)
- UL94HB selon la réglementation USA (THE GOVMARK Organization, Inc.)
Étant donné qu’il n’existe encore au niveau européen aucune harmonisation en tre les différentes réglementations natio nales de clas sification, nous précisons que la classe M1 française corresp ond à
matériau non inflammable et la classe M2 correspo nd à matériau difficilement inflammable. Les toile/feuilles de protection contenues et utilisées sur les écrans son t principalement composés de PVC
plastifié ou de fibres de verre, ces tissus sont sensibles à la tem pérature et à l’humidité, ainsi la tolérance dimensionnelle acceptée est d’1 % sur chaqu e dimension.
Les tolérances sur les profils en aluminium utilisés son t de +/- 2 mm.
les tolérances sur l’enveloppe totale sont de:
- +/- 3 mm jusqu’à 2500 mm d’enveloppe totale ;
- +/- 5 mm jusqu’à 4000 mm d’enveloppe totale ;
- +/- 10 mm jusqu’à 8000 mm d’enveloppe totale;
- +/- 20 mm jusqu’à 16000 mm d’enveloppe totale;
- +/- 30 mm jusqu’à 24000 mm d’enveloppe totale.
05 NETTOYAGE ET ENTRETIEN
L’écran et les toiles de projection des écrans sont délicats : il faut dont prêter une attention particulière et suivre les instructions suivantes pour le nettoyage.
Ne jamais utiliser de solvants, produits chimiques ou a brasifs, ni d’outils pointus pour nettoyer la surface.
Éviter tout contact avec d’autres matériaux (peintures, encres, e tc.) car il pourrait être impossible de les éliminer de la surface de la toile.
TOILES DE PROJECTION CLEARPIX: utiliser un chiffon doux, propre et humidifié en effectuant toujours des mouvements partant du centre de la zone de project ion pour aller vers les bords. Il n’est permis
d’utiliser une brosse montée sur un aspirateur que si le s poils sont doux et parfaitement propres.
TOILES DE PROJECTION SOLIDPIX, MULTIPI X,: Pour nettoyer la toile de projection, utiliser un chiffon doux, propre, hum idifié, avec un détergent à base neutre ou de l’alcool si nécessaire. Étant donné
qu’après le nettoyage la toile pourrait se charger d’électricité sta tique à cause du frottement du chiffon, il est conseillé de passer, avec un chiffon propre, un liquide ant istatique sur la toile afin d’éviter que la
poussière ne soit à nouveau attirée par l’écran .
TOILES DE PROJECTION SILVEPIX est obligatoire de lire les instructions fournies en écran tissu
PROFILS: Pour nettoyer le caisson, utiliser un chiffon d oux propre et un détergent non agressif si nécessaire.
PROFILS VELOUTÉS : Pour nettoyer le profil, dépouss iérer en utilisant un chiffon doux et propre, ou bien une brosse à poils doux et antistatiq ues. Il n’est permis d’utiliser une brosse montée sur un aspirateur
que si les poils sont doux et parfaitement propres.
STRUCTURE ET BRIDES DE FIXATION : Il est obligatoire de vérifier régulièrement l’état du produit et la tenue des brides de fixation. En cas de déformations, lacérations ou de fléchissements structu rels des
brides, vis et autres éléments qui composent le produit, il est ob ligatoire de mettre immédiatement en sécurité la zone où l’écran est installé , afin d’éviter tout type de dommage aux chos es ou aux personnes.
Ensuite, il est obligatoire de procéder à la substitution immédia te du composant défectueux et à la réparation du produit.
06 DESEMBALAJE DE LA PANTALLA Y DESPLAZAMIENTO DEL PRODUCTO
Controle que ninguna parte de la pantalla haya sufrido desperfe ctos durante el transporte. En caso de anomalías, informe de inmediato al re vendedor. Controle que estén presentes todos los accesorios
para el tipo de pantalla descrito en el manua l.
Common
-n° 16 Plastic nut for assembly housing
-n°1 logo Screen Research
-n° 4 Rubber gloves
-n° 1 Protective foil Nylon
-n° 1 Hex key n°3
-n° 1 Hex key n°4
-n° 1 Hex key n°2,5
-n°1 Installation manual
-n° 1 CD with manual, picture, movie
-n° 1 set MCS electric connection
-n°2 Power cord for motor power + connec tor
(screws and plugs for installation not included)
<=160”
-n°2 BRACKETS
>160”
-n°3 BRACKETS
ATENCIÓN no utilizar ni una cuchilla ni un ob jeto puntiagudo para abrir el embalaje, utilizar siempre guantes de protección durante la apertura del embalaje y la instal ación o desplazamiento del producto.
Desplazar e instalar el producto mínimo entre dos, tres o cuatro personas, según el peso del producto (valores de referencia de carga por persona: 25kg macho - 15kg hembra). En caso de pesos superiores
se recomienda utilizar equipos de elevación específicos .
Ancho hasta inches
80”
90”
96”
100”
110”
120”
130”
140”
150”
160”
XLR3 Peso total a considerar
144 Kg
317,5 Ibs
151 Kg
332,9 Ibs
158 Kg
348,3 Ibs
165 Kg
363,7 Ibs
172 Kg
379,2 Ibs
179 Kg
394,6 Ibs
184 Kg
405,6 Ibs
210 Kg
462,9 Ibs
217 Kg
478,4 Ibs
223 Kg
491,6 Ibs
Page 36
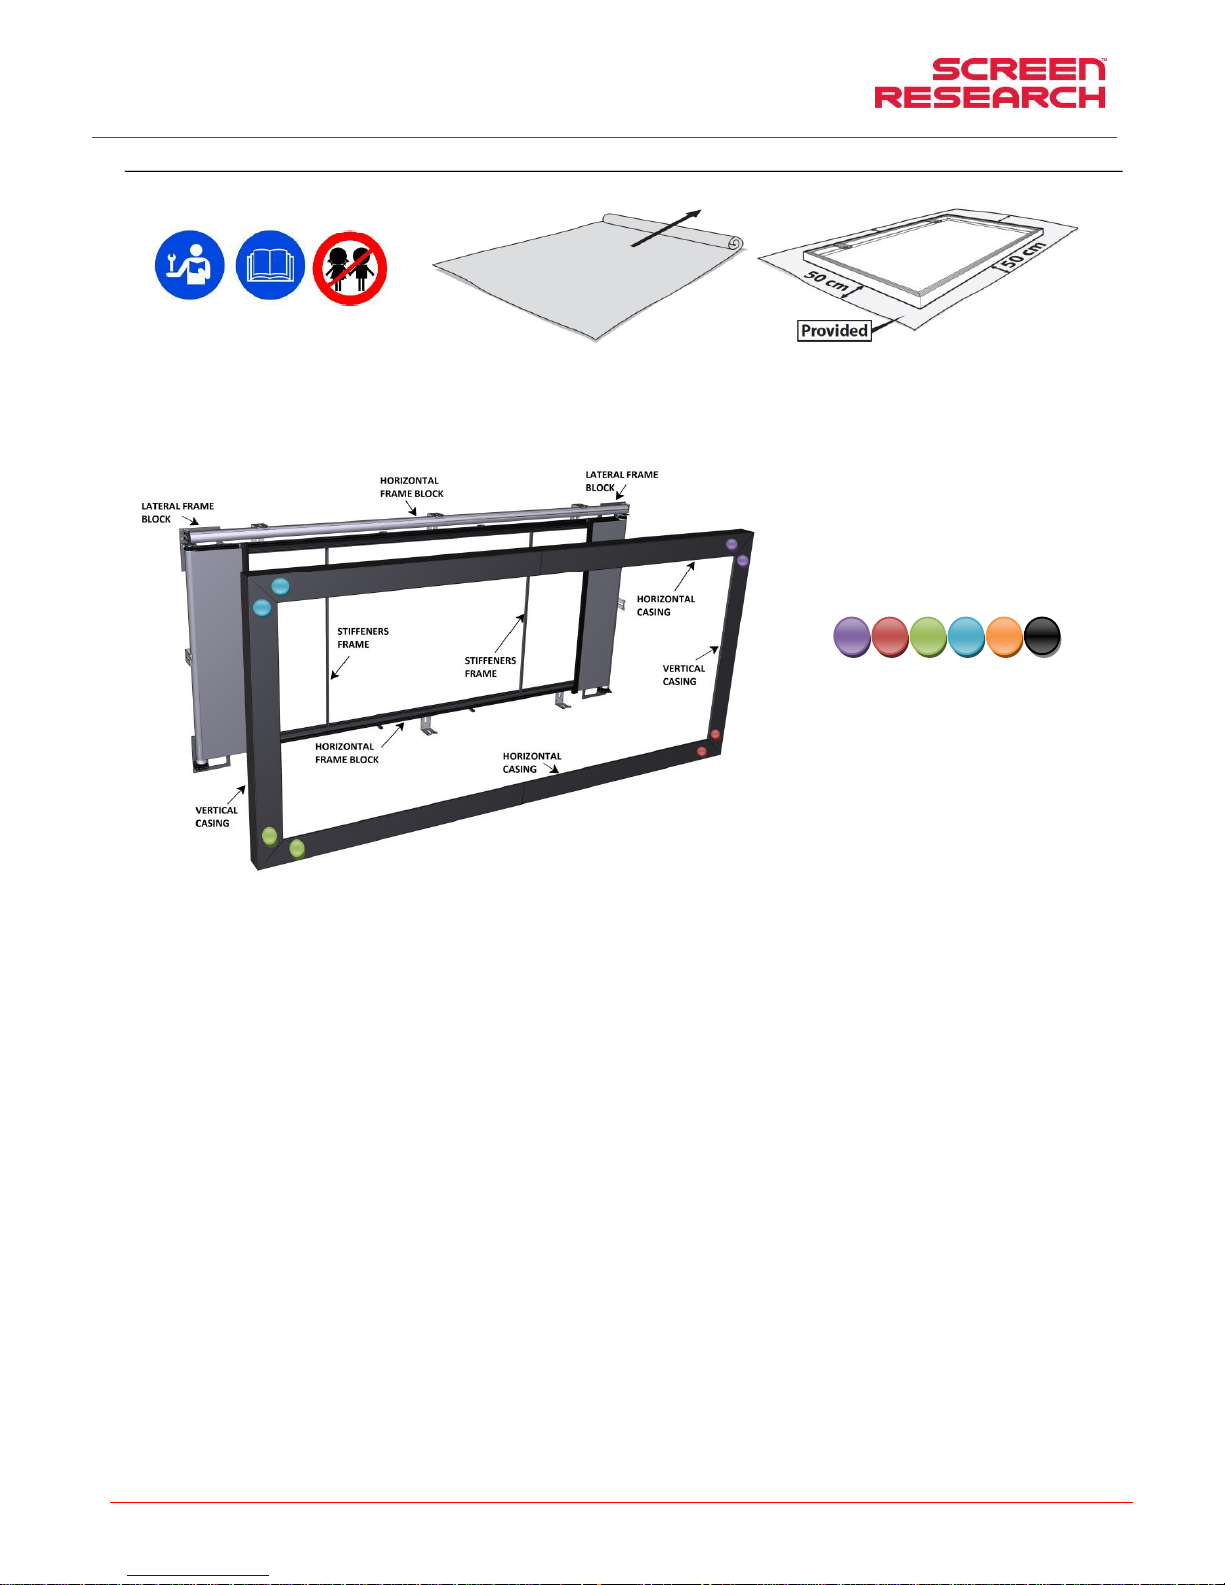
Manual de instalación y de uso: pantalla con marco rígido y máscara
ESPAÑOL
Made by Adeo Screen Sp. Z o.o. (Poland) Specifications are subject to change without notice. E&OE
Please verify that you are working with the latest revision of this document before specifying your screen.
Doc: XLR3 – Installation Manual rev3 | 04.12.2017| Download at: www.screenresearch.com 2017 AdeoSreen All Rights Reserved.
Page 36
07 INSTRUCCIONES PARA LA INSTALACIÓN
ATENCIÓN:
Véanse las imágenes en las últimas páginas de este manu al. Está totalmente prohibido instalar la pantalla en paredes móviles o con cables inestables; los soportes deben ser aplicados en superfic ies que
garanticen estabilidad a lo largo del tiempo. La pantalla se deberá instalar utilizando tornillos y t acos adecuados según el peso y el tipo de pared o techo al qu e se fijarán los soportes. Antes de com enzar la
instalación elija el tipo de taco o fijación seg ún el siguiente esquema.
RECOMENDACIONES:
Utilizar la lona (que se entrega de serie) para cubrir el área de e nsamblado y evitar desperfectos en el producto
Asegúrese de instalar eventuales sistemas de control e n una zona accesible para eventuales futuras operaciones de asistencia y control .
ATENCIÓN !!!
La pantalla está formada por distintos componentes horiz ontales y
verticales preensamblados en fábrica.
Para facilitar su ensamblado, en los ángulos se han colocado
adhesivos circulares de colores que permiten comprob ar el
emplazamiento correcto de los elementos .
Page 37
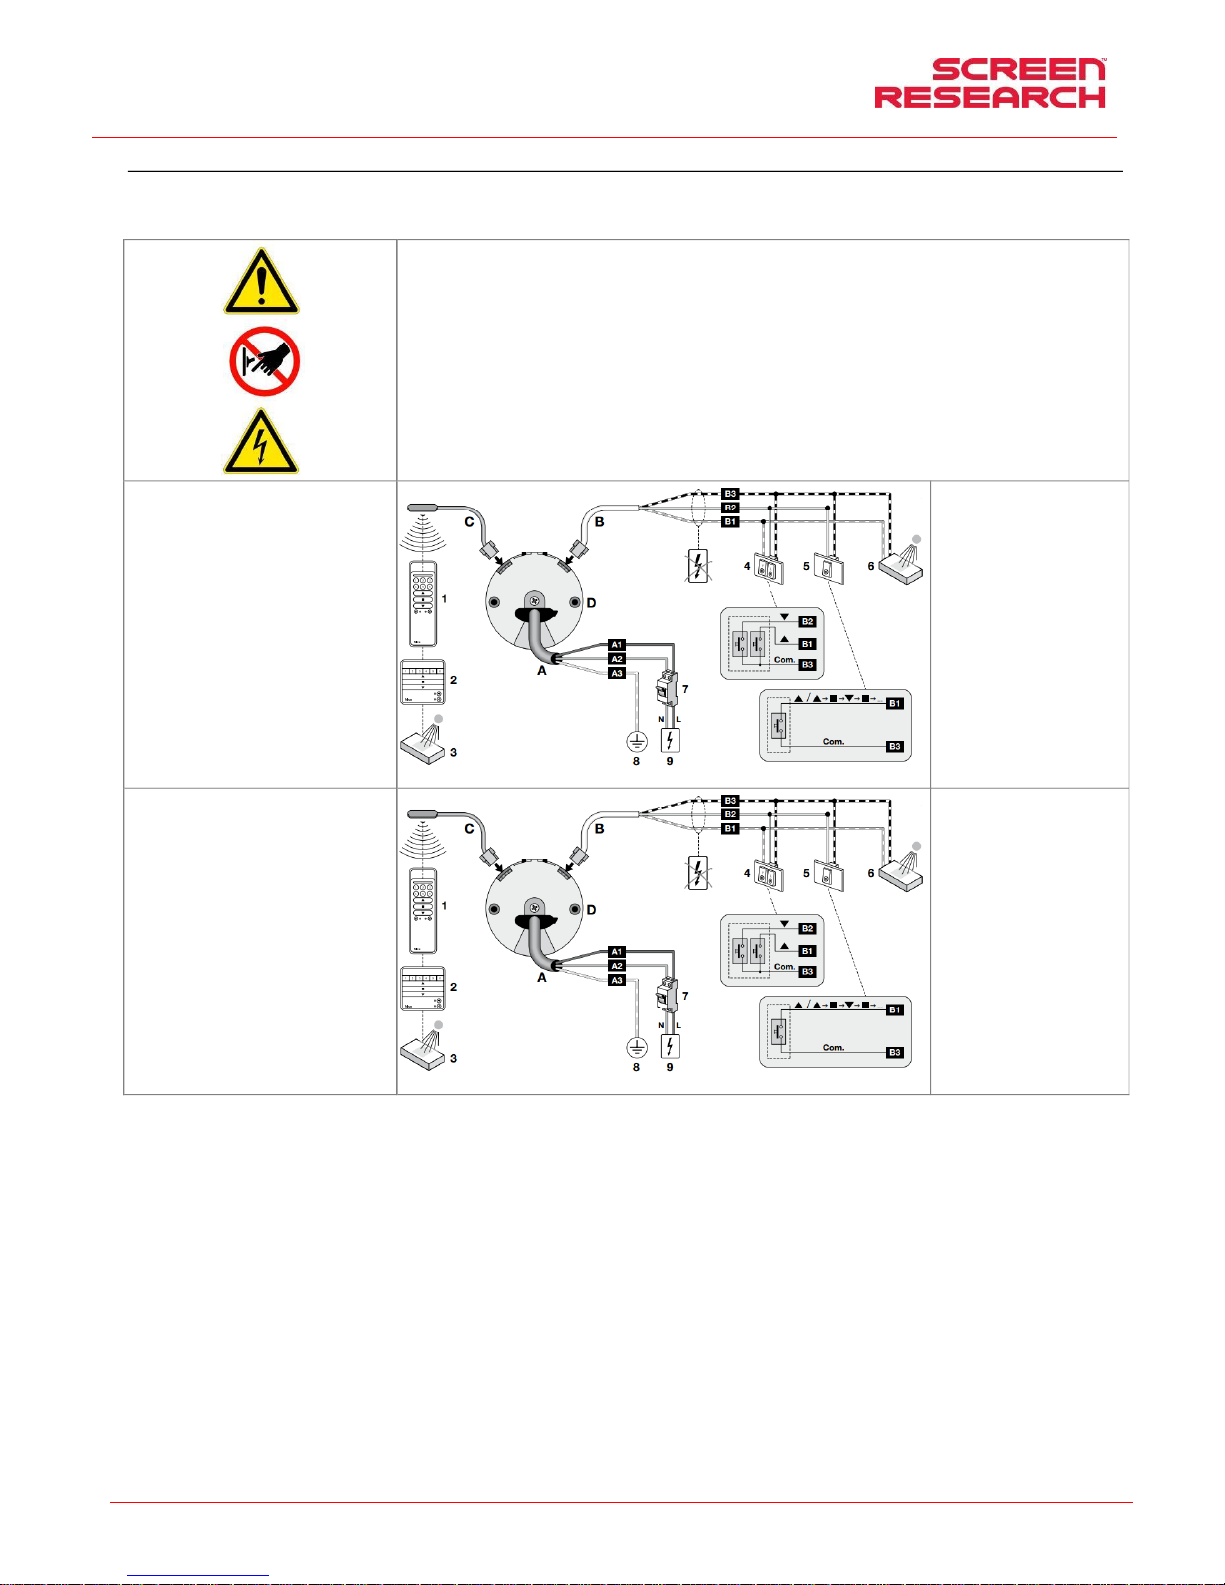
Manual de instalación y de uso: pantalla con marco rígido y máscara
ESPAÑOL
Made by Adeo Screen Sp. Z o.o. (Poland) Specifications are subject to change without notice. E&OE
Please verify that you are working with the latest revision of this document before specifying your screen.
Doc: XLR3 – Installation Manual rev3 | 04.12.2017| Download at: www.screenresearch.com 2017 AdeoSreen All Rights Reserved.
Page 37
09 IDENTIFICACIÓN DEL TIPO DE MOTOR – CARACTERÍSTICAS – CONEXIÓN ELÉCTRICA
El tipo de motor instalado en el producto se identifica en la etiqueta en la que aparece el logo CE y que se aplica en todos los productos; al abrir el embalaje se recomienda controlar esta etiqueta e
identificar el modelo correcto de motor para efectuar u na instalación y un cableado correctos. Si la potencia del motor no corresponde a la potencia de la línea eléctrica del lugar de instalación, tendrá que
ponerse en contacto con un técnico electricis ta y utilizar un adecuado transformador de corriente y Hz.
CONEXIÓN ELÉCTRICA:
el cableado eléctrico tiene que respetar las normas C EI en vigor. La norma CEI EN 60335-1 prevé que la red de alimentación disponga de un
dispositivo de desconexión omnipolar con una distancia d e apertura de los contactos de por lo menos 3 mm por cada uno de los motores (por ej.
clavija de enchufe, etc.) En caso de necesidad, este dispositivo g arantiza una desconexión rápida y segura de la corriente eléctrica.
Utilizar los cables para la conexión tal como se describe en la image n.
ATENCIÓN:
Este producto contiene dos motores y, por lo tanto, tiene que e fectuar el mismo cableado para los dos motores.
Es obligatorio aislar los cables BUS si no se utilizan para el control mediante botón.
ATENCIÓN:
La ejecución correcta de las conexiones eléctricas, con todas la s de la ley y respetando las normas vigentes, es importante para prevenir acc identes y
para un funcionamiento apropiado y duradero de la pan talla.
Antes de efectuar una operación sobre las partes eléctricas, co ntrole que no haya tensión.
El motor en las pantallas que disponen de carcasa se encuentr a a la derecha de la pantalla vista de frente
La pantalla se acciona mediante un mando a distancia que se entrega de serie.
Características del motor
Nice ERA INN EDGE –AC
86-230V 50-60Hz:
Frecuencia: ~Hz50-60
Potencia: 45W
Par: 3Nm
Velocidad: 32Rpm
Ciclo de funcionamiento: S2 4 min
Longitud del cable: 3m
Resistencia mecánica: de acuerdo con la n orma
EN14202
T° de funcionamiento: entre –20 y +55 °C
Frecuencia: 433.92 MHz Alcance transm: 150m
Nivel de presión sonora ponderado:
LpA ≤ 70 dB(A)
Clase de protección del motor: IP44
Conexión para cada motor:
A1 – Marrón (de energía trifásica)
A2 – Azul (neutro)
A3 – Amarillo-verde (tierra)
B1 – Blanco- anaranjado (cuesta
arriba)
B2 – Blanco (cuesta abajo TTBUS)
B3 – Blanco -Negro (común)
Características del motor
Nice ERA INN EDGE –AC
86-230V 50-60Hz:
Frecuencia: ~Hz50-60
Potencia: 70W
Par: 6Nm
Velocidad: 32Rpm
Ciclo de funcionamiento: S2 4 min
Longitud del cable: 3m
Resistencia mecánica: de acuerdo con la n orma
EN14202
T° de funcionamiento: entre –20 y +55 °C
Frecuencia: 433.92 MHz Alcance transm: 150m
Nivel de presión sonora ponderado:
LpA ≤ 70 dB(A)
Clase de protección del motor: IP44
Conexión para cada motor:
A1 – Marrón (de energía trifásica)
A2 – Azul (neutro)
A3 – Amarillo-verde (tierra)
B1 – Blanco- anaranjado (cuesta
arriba)
B2 – Blanco (cuesta abajo TTBUS)
B3 – Blanco -Negro (común)
Page 38
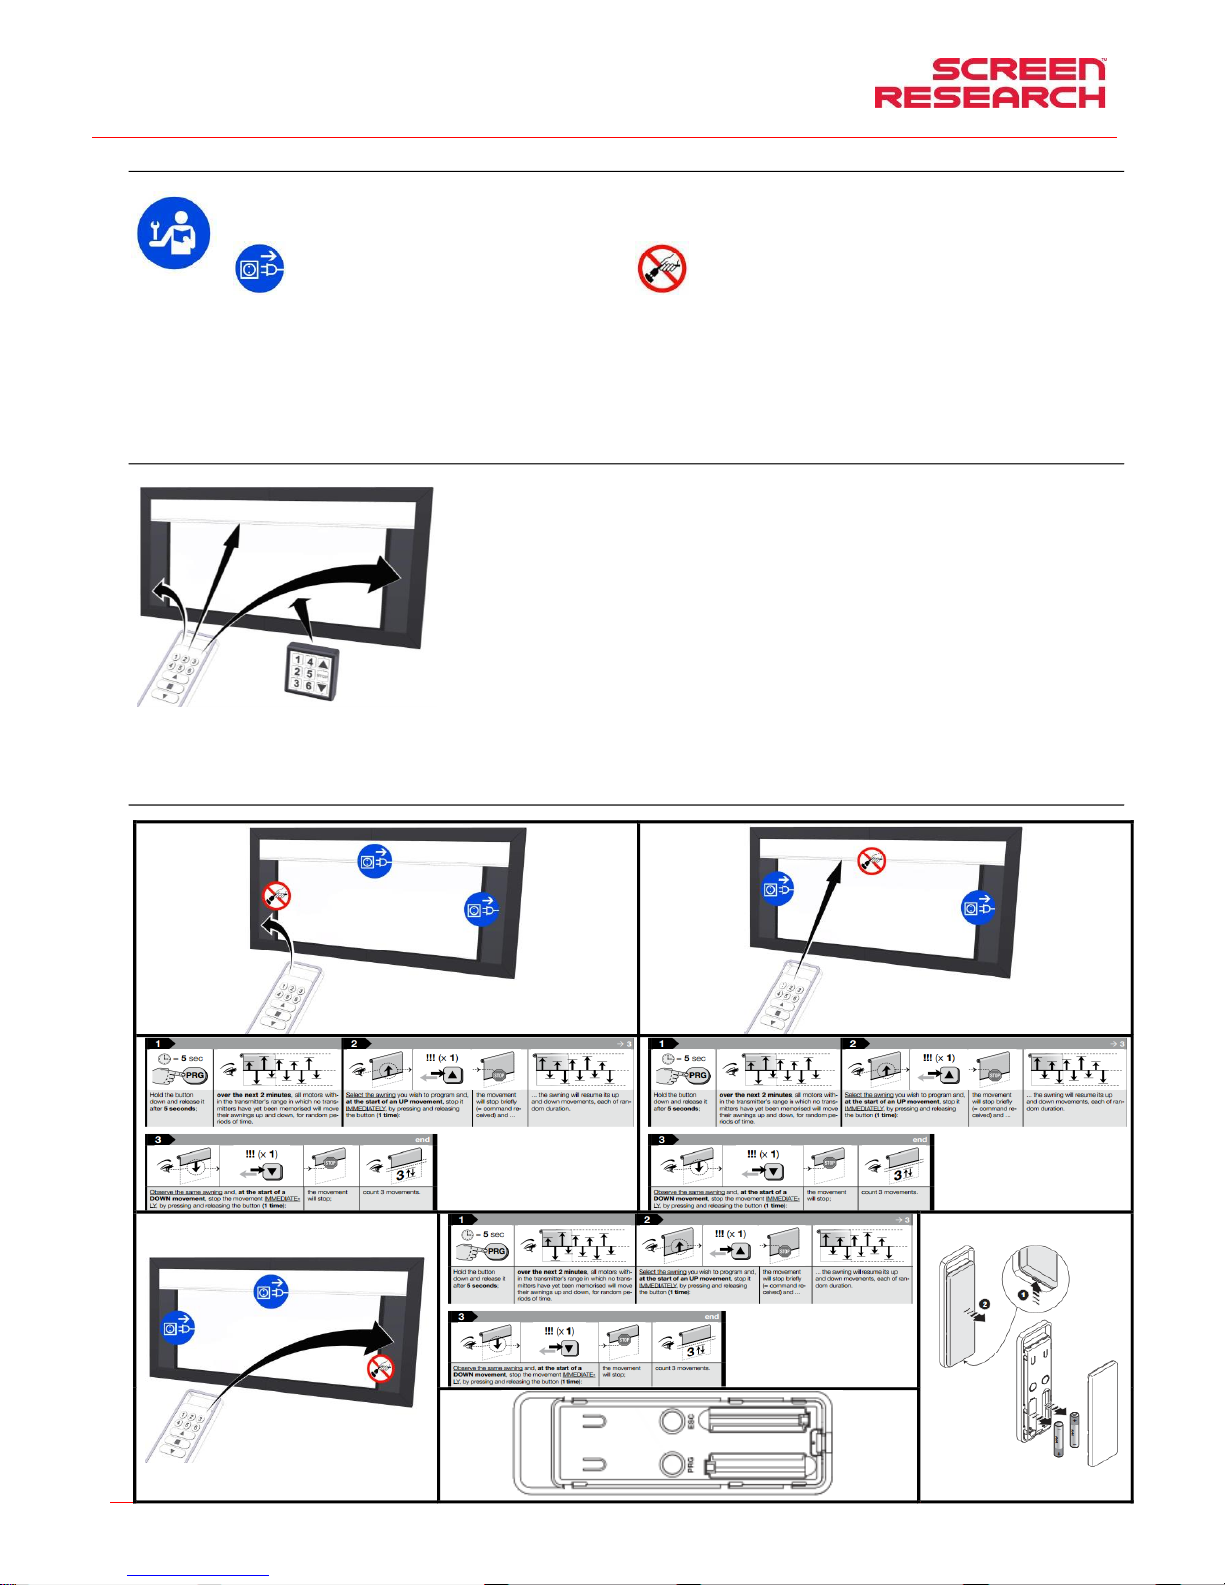
Manual de instalación y de uso: pantalla con marco rígido y máscara
ESPAÑOL
Made by Adeo Screen Sp. Z o.o. (Poland) Specifications are subject to change without notice. E&OE
Please verify that you are working with the latest revision of this document before specifying your screen.
Doc: XLR3 – Installation Manual rev3 | 04.12.2017| Download at: www.screenresearch.com 2017 AdeoSreen All Rights Reserved.
Page 38
10 PROGRAMACIÓN FINAL DE CARRERA
ATENCIÓN LEA DETENIDAMENTE ANTES DE EFECTUAR LAS REGULACIONES
las regulaciones que se indican en las figuras tiene que efectuarlas sólo personal autorizado y experto, la ejecución incorrecta de los procedimientos descritos puede provocar
desperfectos en el producto que no estarán cubiertos por la garantía.
ATENCIÓN: al efectuar el procedimiento descrito en el manual, es necesario prestar atención a los iconos siguientes:
Sacar la corriente al motor del enmascaramiento indicado No sacar corriente al motor del enmascaramiento indicado
ADVERTENCIAS
El final de carrera está regulado de forma que permita que la tela del enmascaramiento quede enrollada al menos 1,5 vueltas alrededor del tubo para que no se desprenda. Una regulación incorrecta de
los finales de carrera podría provocar:
-El desprendimiento de la tela del enmascaramiento del tubo
-El enrollamiento en sentido contrario del enmascaramiento, perjudicando la planaridad de la superficie del enmascaramiento y de los mecanismos de enrollamiento.
-Un esfuerzo excesivo en el motor con posible avería y activación de la resistencia térmica que lleva montada.
-Un enrollamiento excesivo del sistema de regulación del final de carrera con consiguiente rotura de la parte mecánica.
GARANTÍA
Se recuerda a los operadores que en caso de alteración de los precintos y de desperfectos que deriven de una regulación incorrecta, las reparaciones no estarán cubiertas por la garantía
LÓGICA DI FUNCIONAMIENTO y de PROGRAMACIÓN
Mando a distancia MASTER: tiene que utilizarlo sólo personal técnico y permite la programación de finales de carrera altos, bajos y
medios de ambos rollos individualmente (enmascaramientos)
Mando a distancia PILOT: las teclas 1-6 se pueden utilizar para programar ulteriores formatos.
Las teclas -STOP-permiten mover o detener de forma contemporánea dos enmascaramientos (ya programados en la fábrica).
Antes de empezar a programar los motores del E-MASK , es necesario conocer algunas lógicas de funcionamiento para evitar
incomprensiones y problemas durante la ejecución de los procedimientos.
- La secuencia correcta de programación para poder funcionar es:
1º sintonización de los mandos a distancia (ya configurados de fábrica)
2º programación de los finales de carrera máxima y mínima apertura posible de los enmascaramientos (ya configurados en la fábrica),
3º programación de los formatos, hasta un total de 6 (consulte las variantes de su modelo para saber cuáles se han configura en la fábrica
y cuáles no)
Cada procedimiento de programación está formado por dos puntos, al final de un punto, el operador dispone de 60 seg de tiempo para
iniciar el siguiente, este sistema sirve para evitar ejecutar procedimientos diferentes de los deseados. Por lo tanto, si el motor no ejecuta
exactamente lo que se indica en las instrucciones, espere 60 seg para salir de la programación o ejecutar de nuevo el procedimiento
- Durante la ejecución de cualquier procedimiento, se aconseja mantener pulsada la tecla hasta que se complete el movimiento de confirmación del motor.
Antes de iniciar la programación es necesario que el mando a distancia Master se programe para sus dos rollos individuales: el grupo de la izquierda tiene que mover el rollo con el enmascaramiento top,
mientras el grupo de la derecha tiene que mover el rollo del enmascaramiento bottom. Abrir y posteriormente cerrar las dos telas para verificar la sintonización. Si el mando a distancia no realiza los
movimientos anteriormente descritos, programar el mando a distancia de la siguiente manera:
PROGRAMAR MANDO A DISTANCIA MASTER (procedimiento ya realizado en fábrica, NO puede efectuarlo personal no autorizado)
Page 39
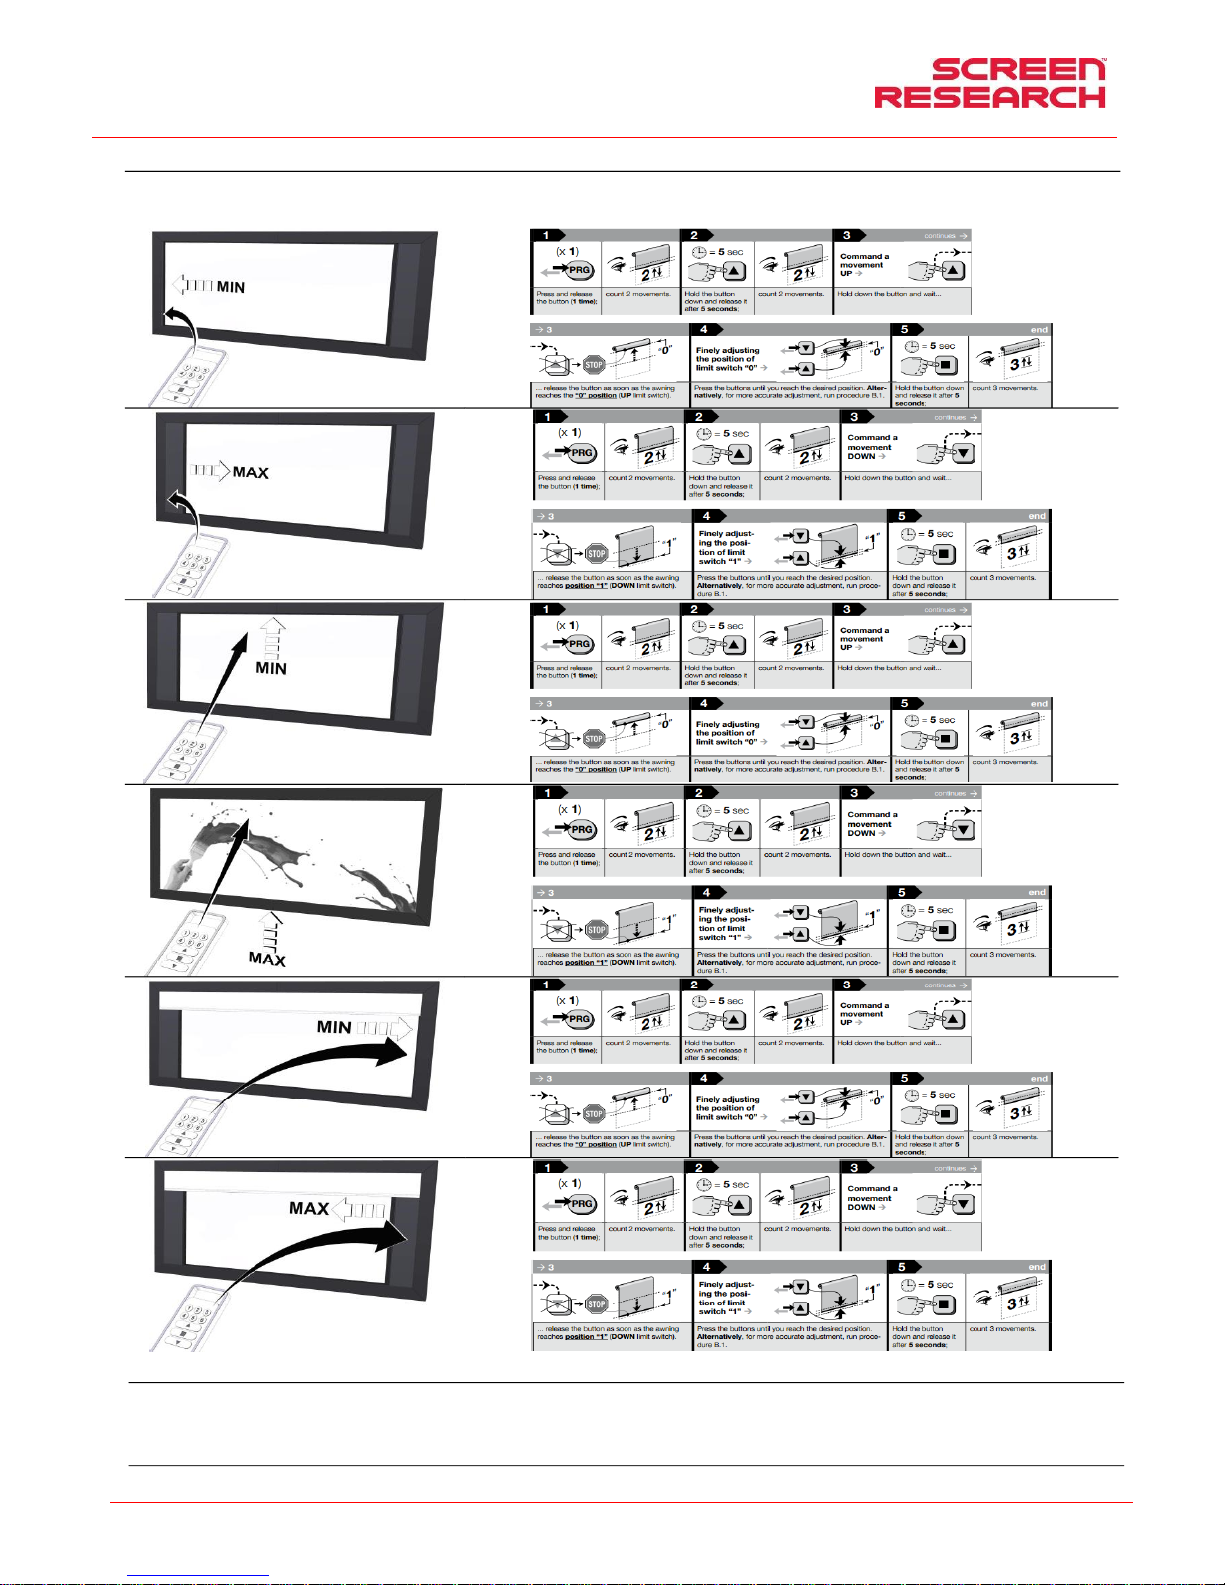
Manual de instalación y de uso: pantalla con marco rígido y máscara
ESPAÑOL
Made by Adeo Screen Sp. Z o.o. (Poland) Specifications are subject to change without notice. E&OE
Please verify that you are working with the latest revision of this document before specifying your screen.
Doc: XLR3 – Installation Manual rev3 | 04.12.2017| Download at: www.screenresearch.com 2017 AdeoSreen All Rights Reserved.
Page 39
PROGRAMACIÓN FINAL DE CARRERA DE ENMASCARAMIENTOS (procedimiento ya realizado en fábrica, NO puede efectuarlo personal no autorizado)
El procedimiento de programación está formado por dos puntos, al final de un punto el operador dispone de 60seg para iniciar el siguiente, este sistema sirve para evitar ejecutar procedimientos diferentes
de los deseados. Por lo tanto, si el motor no ejecuta exactamente lo que se indica en las instrucciones, espere 60 seg para salir de la programación, o efectuar la anulación del procedimiento tal como se
indica en el punto específico, y luego reiniciar de nuevo el procedimiento.
CAMBIO DE POSICIONES DE LOS FORMATOS (NO puede efectuarlo personal no autorizado)
Los motores tienen una lógica de sobreecritura y, por lo tanto, cuando las posiciones de final de carrera se han programado, no existe un procedimiento para su eliminación, sólo la posibilidad de
programarlos de nuevo efectuando un nuevo procedimiento de programación.
ANULACIÓN PROGRAMACIÓN EN CURSO
En cualquier momento pulsar contemporáneamente ■ y ▼ hasta que el motor ejecute 6 movimientos para anular el procedimiento en curso.
Page 40
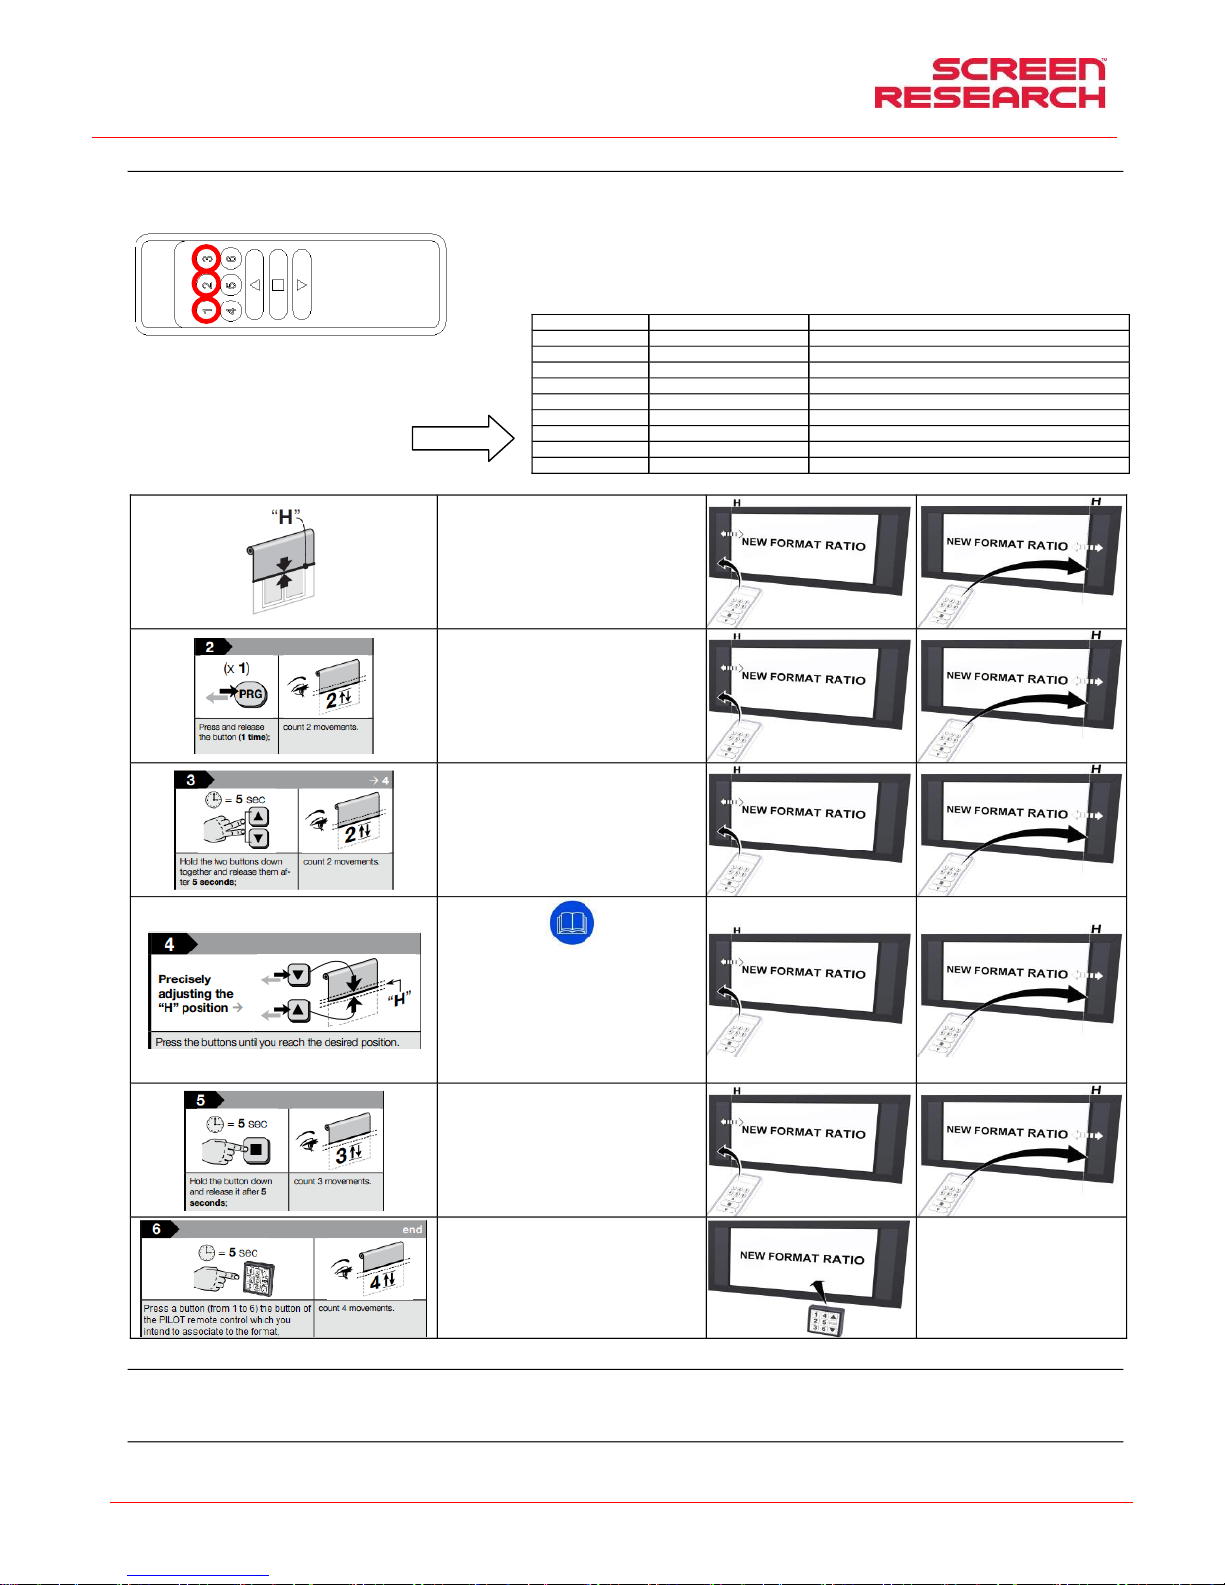
Manual de instalación y de uso: pantalla con marco rígido y máscara
ESPAÑOL
Made by Adeo Screen Sp. Z o.o. (Poland) Specifications are subject to change without notice. E&OE
Please verify that you are working with the latest revision of this document before specifying your screen.
Doc: XLR3 – Installation Manual rev3 | 04.12.2017| Download at: www.screenresearch.com 2017 AdeoSreen All Rights Reserved.
Page 40
PROGRAMACIÓN FORMATOS
Cada procedimiento de programación está formado por dos puntos, al final de un punto, el operador dispone de 60seg para inici ar el siguiente, este sistema sirve para evitar ejecutar procedimientos
diferentes de los deseados. Por lo tanto, si el motor no ejecuta exactamente lo que se indica en las instrucciones, será necesario esperar 60seg para salir de la programación o ejecutar la anulación del
procedimiento tal como se indica en el punto específico y luego reiniciar de nuevo el procedimiento.
Antes de comenzar con la programación elegir el motor que desea programar con el teclado numérico, 1 - motor izquierdo, 2 - motor a
la derecha.
Realizar la siguiente secuencia para cada motor.
Siga la tabla opuesta a establecer formatos de piloto con la apertura y
cierre del enmascaramiento con la impresión. Siga la tabla a
continuación para configurar los formatos con el control remoto
maestro y guardarlo en el piloto, de acuerdo con el número 6 de
transición.
Con el mando a distancia Master y las teclas
▲▼■ llevar de nuevo las dos telas hasta una
posición cercana a la posición que se desea
programar (se aconseja proyectar en la pantalla
imágenes con el formato deseado para tener
referencias precisas sobre el tamaño del formato) y
luego continuar del modo siguiente
Mantener pulsada la tecla izquierda PRG hasta que
el motor ejecute 2 movimientos.
Mantener pulsada la tecla izquierda ▲ y ▼ hasta
que el motor ejecute 2 movimientos.
Nota: ahora los dos motores se tendrán que mover
taxativamente con las teclas ▲▼, para ejecutar el
calibrado de precisión el mando a distancia funcionará
con interrupciones. Para ejecutar movimientos
milimétricos pulsar brevemente las teclas ▲ o ▼. Para
ejecutar movimientos más amplios (pero siempre a
intervalos) mantener pulsadas las teclas ▲ o ▼. Con
las modalidades antedichas, posicionar las dos telas
exactamente donde se desea programarlas
Cuando se alcance la posición deseada, mantener
pulsada la tecla izquierda ■ hasta que el motor
ejecute 3 movimientos.
Pulsar la tecla del mando a distancia PILOT (1-6) a
la que se desea asociar el formato, hasta que cada
motor ejecute y termine 3 movimientos.
El formato deseado se programará
en la tecla del mando a distancia
Pilot preseleccionado (1-6)
concluyendo el procedimiento de
programación
CAMBIO DE POSICIONES DE LOS FORMATOS
Los motores tienen una lógica de sobreecritura y, por lo tanto, cuando las posiciones de final de carrera se han programado, no existe un procedimiento para su eliminació n, sólo la posibilidad de
programarlos de nuevo efectuando un nuevo procedimiento de programación.
ANULACIÓN PROGRAMACIÓN EN CURSO
En cualquier momento pulsar contemporáneamente ■ y ▼ hasta que el motor ejecute 6 movimientos para anular el procedimiento en curso.
BOTONES PILOT
POSICIÓN DE LA MÁSCARA
DECO MÁSCARA
Botón 1 de PILOT
Formato de Proyección 1
En el estado de “fin de carrera” (página anterior)
Botón 2 de PILOT
Formato de Proyección 2
En el estado de “fin de carrera” (página anterior)
Botón 3 de PILOT
Formato de Proyección 3
En el estado de “fin de carrera” (página anterior)
Botón 4 de PILOT
Formato de Proyección 4
En el estado de “fin de carrera” (página anterior)
Botón 5 de PILOT
Formato de Proyección 5
En el estado de “fin de carrera” (página anterior)
Botón 6 de PILOT
Formato de Proyección 6
En el estado de “fin de carrera” (página anterior)
Botón 7 de PILOT
Formato de Proyección 7
En el estado de “fin de carrera” (página anterior)
Botón 8 de PILOT
Formato de Proyección 8
En el estado de “fin de carrera” (página anterior)
Botón 9 de PILOT
Formato de Proyección 9
En el estado de “final de carrera hacia abajo” (página anterior)
Page 41
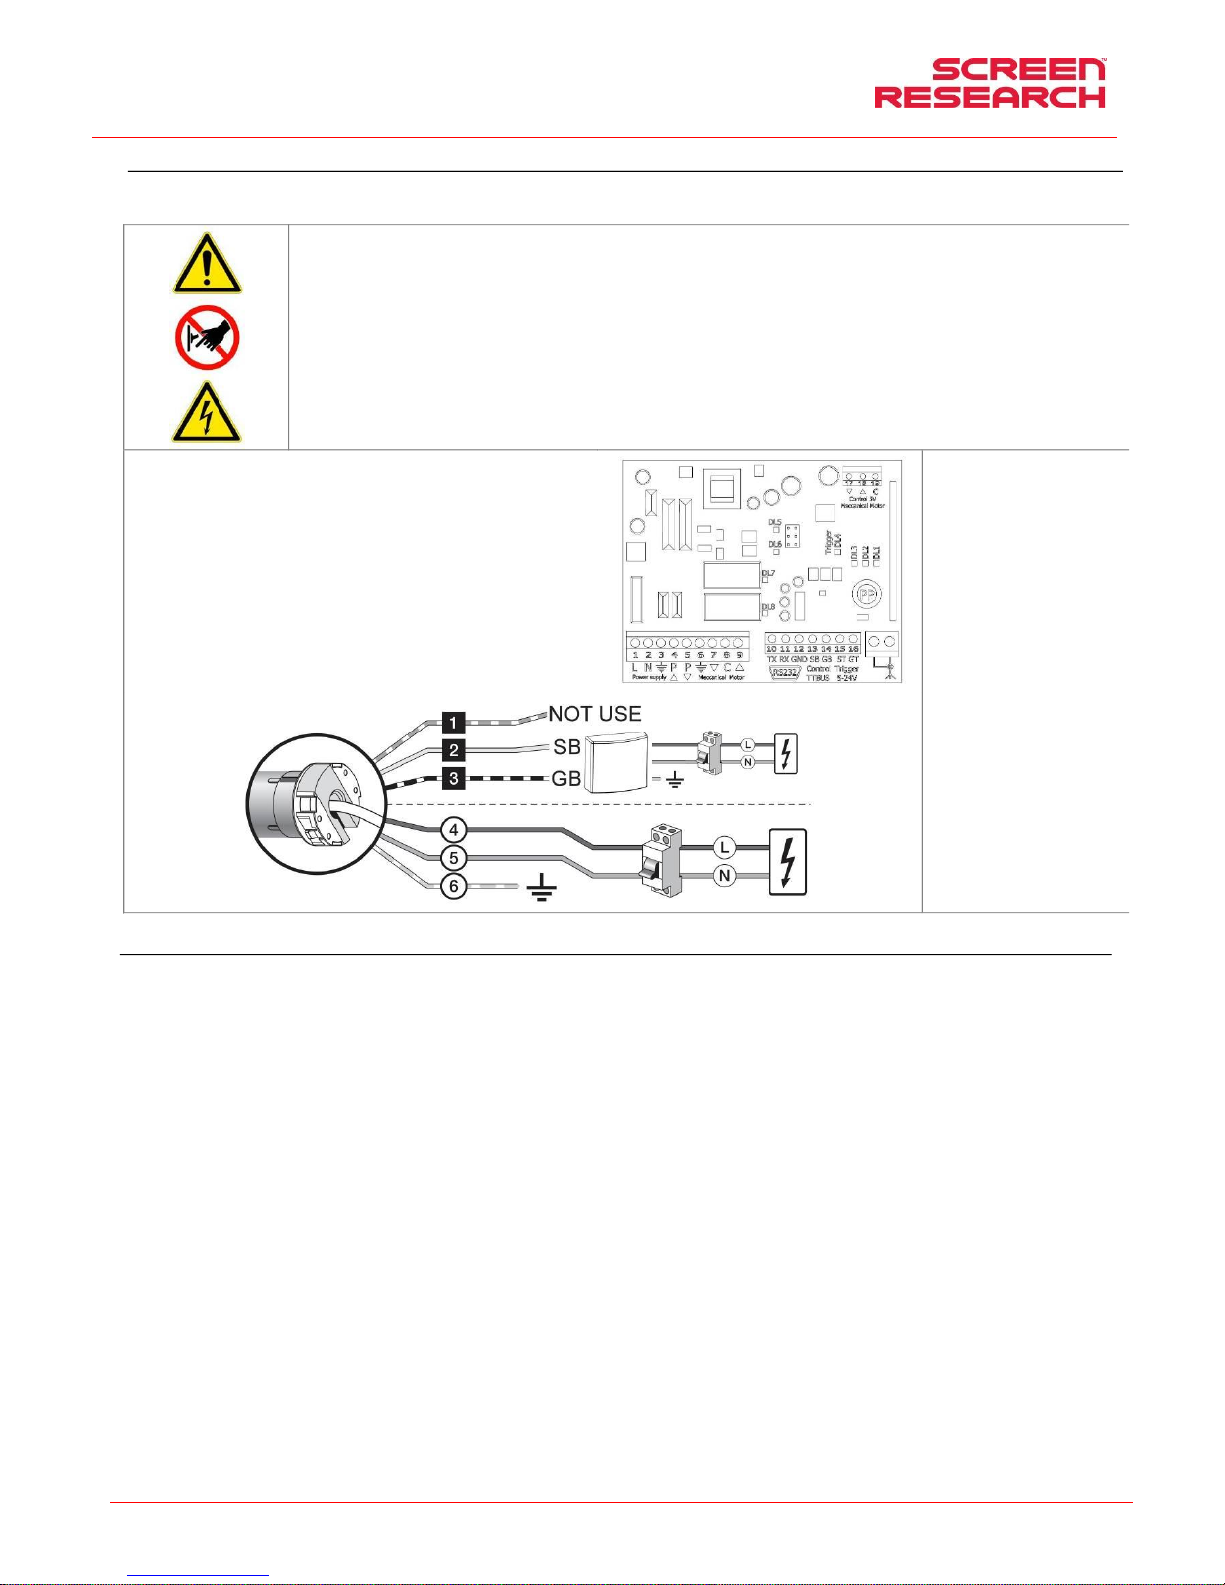
Manual de instalación y de uso: pantalla con marco rígido y máscara
ESPAÑOL
Made by Adeo Screen Sp. Z o.o. (Poland) Specifications are subject to change without notice. E&OE
Please verify that you are working with the latest revision of this document before specifying your screen.
Doc: XLR3 – Installation Manual rev3 | 04.12.2017| Download at: www.screenresearch.com 2017 AdeoSreen All Rights Reserved.
Page 41
CONEXIÓN MCS-N-RS232 (Accesorio no incluido)
Antes de realizar la conexión eléctrica, lea la s instrucciones completas incluyen con el producto. Si la potencia del motor no corresponde a la potencia de la línea eléctrica del lugar de instalación, tend rá que
ponerse en contacto con un técnico electricista y utilizar u n adecuado transformador de corriente y Hz.
CONEXIÓN ELÉCTRICA:
el cableado eléctrico tiene que respetar las normas C EI en vigor. La norma CEI EN 60335-1 prevé que la red de alimentación dispon ga de un dispositivo de desconexión
omnipolar con una distancia de apertura de los contactos de por lo menos 3 mm por cada uno de los motores (por ej. clavija de ench ufe, etc.) En caso de necesidad, este
dispositivo garantiza una desconexión rápida y segura de la corriente eléctrica.
Utilizar los cables para la conexión tal como se describe en la image n.
ATENCIÓN:
Este producto contiene dos motores y, por lo tanto, tiene que e fectuar el mismo cableado para los dos motores.
Es obligatorio aislar los cables BUS si no se u tilizan para el control mediante botón.
ATENCIÓN:
La ejecución correcta de las conexiones eléctricas, con todas la s de la ley y respetando las normas vigentes, es importante para preven ir accidentes y para un
funcionamiento apropiado y duradero de la p antalla.
Antes de efectuar una operación sobre las partes eléctricas, co ntrole que no haya tensión.
El motor en las pantallas que disponen de carcasa se encuentr a a la derecha de la pantalla vista de frente
La pantalla se acciona mediante un m ando a distancia que se entrega de serie.
Características MCS-N
Alimentación: 110 . 240 Vac 50/60 Hz
Corriente máxima absorbida: 80 m A en stand-by, 3 A a maxima carga
Códigos: FloR (rolling code)
Frecuencia: 433.92 MHz
Impedancia antena: 52 ohmios
Sensibilidad: mas de 0,5 V para senal a buen fin
Alcance: estimado en 200 m en espacio libre y en 35 m dentro de edificios
N° transmisores memorizables: 30
Salida: 1 salida para el piloteo de un motor de dos fases
Capacidad de los contactos: 3 A - 250 V
Grado de protección: IP44 (con la caja in tegra)
Temperatura de funcionamiento: - 20 . +55° C
Medidas / peso: 128 x 112 x 43 mm / 260 g
Conexión para cada motor,
Version 230V:
Blanco Naranja (BUS)
Blanco (BUS)
Blanco Negro (común TTBUS)
Marrón (Fase 230V)
Azul (neutro)
Amarillo-Verde (Tierra)
Conexión para cada motor,
Version 120V:
Blanco Naranja (BUS)
Blanco (TTBUS)
Blanco Negro (común BUS)
Blanco (Fase 120V)
Negro (Neutro)
Verde (Tierra)
GARANTÍA
1. GARANTÍA ScreenResearch garantiza que el producto fabricado no presentará defectos de fabricación en materiales ni elaboraciones, segú n los términos y condic iones que se indican a continuación. Las
telas de proyección y los contornos están garantizados durante un periodo de cinco (5) años a partir de la fec ha de la factura original. Los motores, mandos de motor, tel emandos y hardware de montaje están
garantizados durante tres (3) años a partir de la fecha de la fa ctura original.
2.CONDICIONES Y LIMITACIONES La presente Garantía está sujeta a las siguientes condiciones y limitaciones. La garantía será nula e inaplicable si el produ cto hubiera sido utilizado o manipulado no en
conformidad con el manual de instruccio nes incluido en la confección del produ cto, si resultara alterado o hubiera sido utilizado de forma inapropiada, si se presentara dañado por accidente o negl igencia
durante su tr ansporte o si el defecto fuera debido a reparaciones o manipulaciones efectuadas por parte de personal no auto rizado. El producto deberá ser instalado por un pr ofesional debidamente
autorizado por ScreenReasearch y el mantenimiento debe rá efectuarse tal como se indica en el manual.
3.DEVOLUCIONES Ningún producto podrá ser aceptado sin autorización escrita (RMA) de ScreenResearch. El producto deberá ser devue lto embalado en su confección original o equivalente, con el fin de
evitar que se produzcan daños durante el transporte. El producto deberá ser embalado y devuelto a ScreenResearch o a un ce ntro de repar ación autorizado, por cuenta del cliente. Los gastos de entrega del
producto correrán por cuenta d e ScreenResearch. Deberá acompañarse con el producto devu elto una descripción escrita d el defecto y una fotocopia del recibo original de compra. Dicho recibo deberá i ncluir
claramente el modelo y número de serie, la fecha de compra, el nombre y dirección del comprador y del revendedor autorizado, así como el precio que hubiera pagado el comprador. ScreenResearch se
reserva el derecho de modificar el diseño de cualquier producto, sin obligaciones por lo que respecta a productos fabricados anteriormen te; asimismo podrá modificar los precios y las características t écnicas
de cualquier producto, sin previo aviso u obligación an te ninguna persona.
4.SOLUCIONES En caso de que el producto no sea conforme a la garantía anterior, el comprador podrá optar únicamente, en virtud de esta Garantía Limitada, por devolver el producto a ScreenResearch o a
un Centro de Asistencia autorizado. La no conformidad será re ctificada sin gastos adicionales de mano de obra o de componentes.
5.LÍMITE PARA EL COMPRADOR DE ORIGEN E sta garantía podrá utilizarla exclusivamente el comprador de origen del p roducto garantizado y no podrá ser cedida a ninguno de los sucesivos comprado res del
producto.
6.VARIOS Todas las garantías implícitas relativas a productos de ScreenResearch se limitan al perio do de duración de la presente garantía. La gara ntía no cubre eventuales daños directos o indire ctos.
Algunos estados o países no permiten lim itaciones en la duració n de una garantía implícita o la exclusión o la limitación de daños accidentales o subsiguientes; por tanto, dichas limitaciones o exclusiones
podrían no ser aplicables. Esta garantía otorga derechos legale s específicos, pudiendo disfrutarse además otros derechos que podr ían variar en los diferentes estados o países.
7.COMUNICACIONES Por lo que respecta a la garantía limitada mencionada anteriormente, Ud. podrá enviar sus comunicaciones al revendedor autori zado de ScreenResearch.
8. SOPORTE DE GARANTÍA GESTIONADO POR DISTRIBUIDORES AUTORIZADOS ScreenResearch ha autorizado la distribución de sus productos en muchos países del mundo. En todos los paíse s, el
Distribuidor importador autorizado responde de la as istencia, durante el periodo de garantía, de los p roductos vendidos en cada uno de los países. Deberá solicitar la garantía al revendedor importador o al
distribuidor que le haya vendido el producto.
Page 42
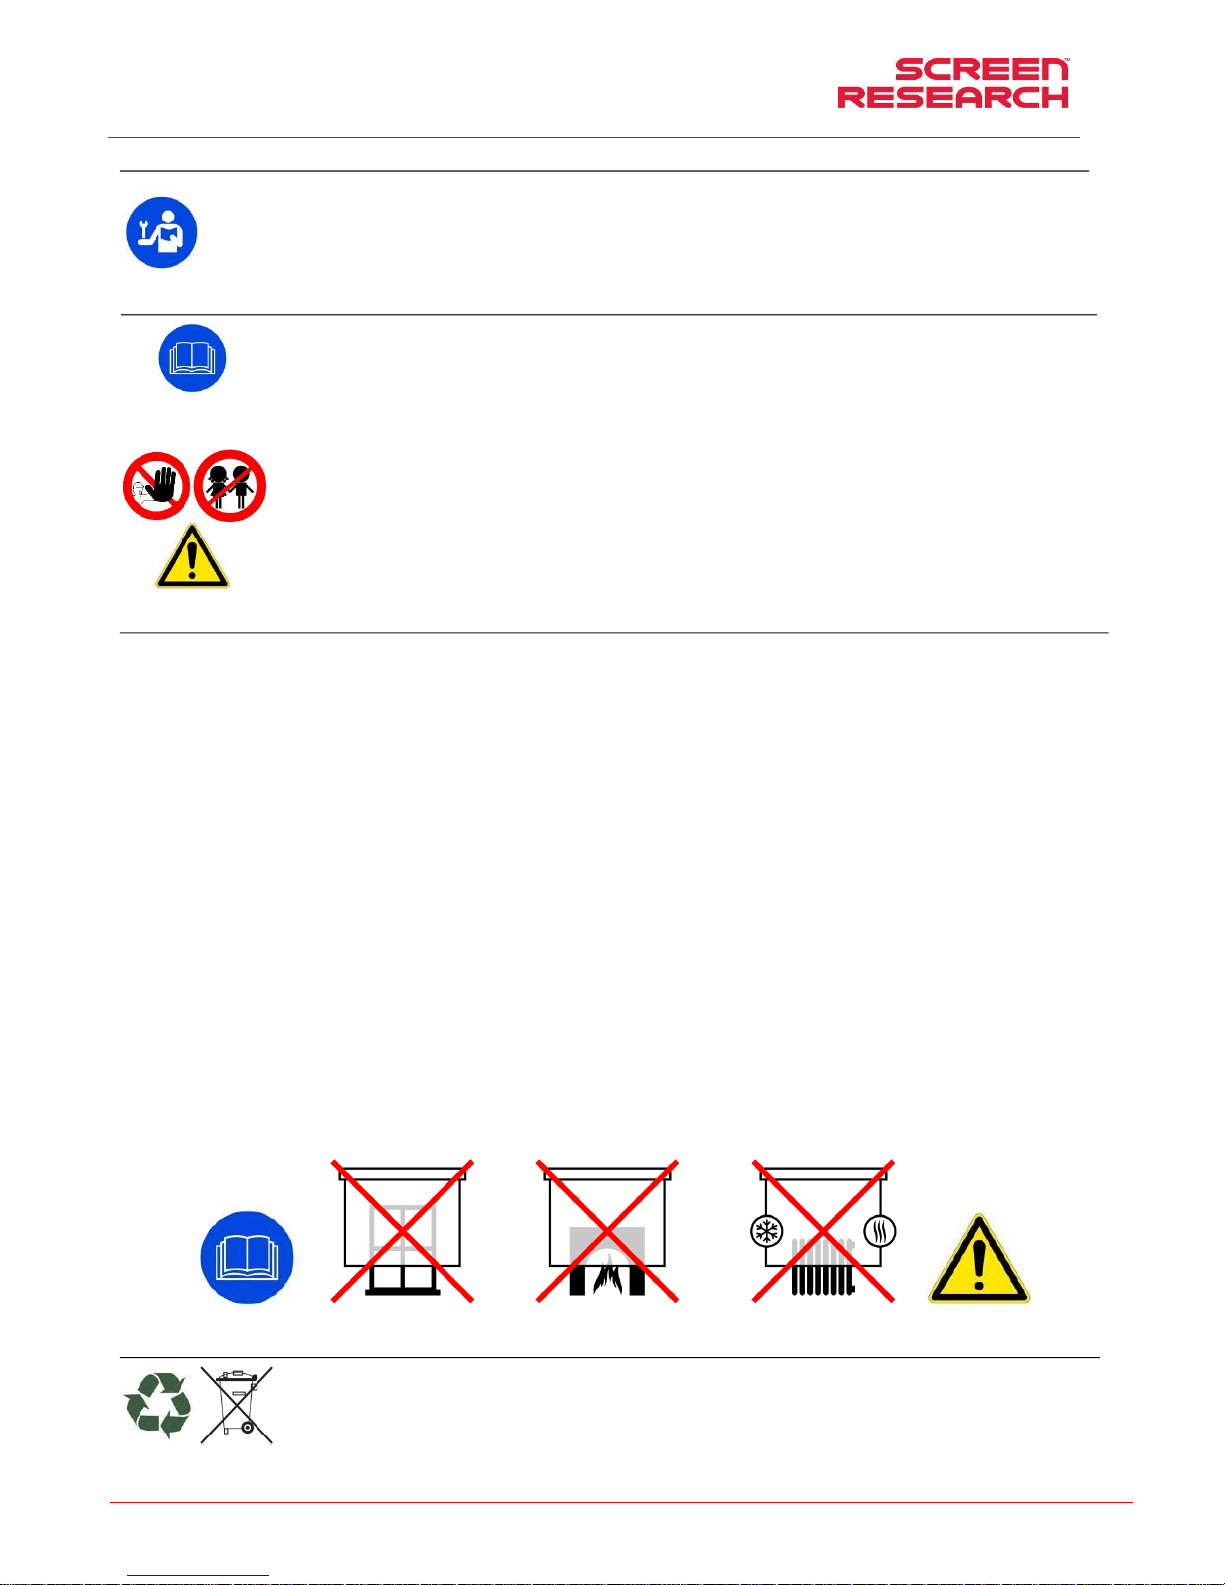
Instrukcja montażu i obsługi ekranu ramowego z maskami
POLSKI
Made by Adeo Screen Sp. Z o.o. (Poland) Specifications are subject to change without notice. E&OE
Please verify that you are working with the latest revision of this document before specifying your screen.
Doc: XLR3 – Installation Manual rev3 | 04.12.2017| Download at: www.screenresearch.com 2017 AdeoSreen All Rights Reserved.
Page 42
01 WSTEP
Niniejszy podręcznik stanowi część składową produktu, a jego przeczytanie i zrozumienie mają podstawowe znaczenie dla zachowa nia bezpieczeństwa. Zostały w nim opisane zasady i
sposoby użytkowania, pozwalające klientowi na właściwe i bezpieczne korzystanie z ekranu. Podręcznik powinien zawsze znajdować się w pobliżu produktu, należy przechowywać go w
miejscu gwarantującym nie zniszczenie oraz łatwo dostępnym dla osób upoważnionych. Każdy użytkownik ekranu jest odpowiedzialn y za przechowywanie podręcznika. Użytkownik jest
również odpowiedzialny za kontrolę działania ekranu oraz za naprawy lub wymiany części podlegających zużyciu, mogących spowod ować uszkodzenia.
Rysunki zawarte w podręczniku mają za zadanie opisać w sposób szczegółowy funkcje, charakterystykę lub procedury. Rysunki mogą różnić się z zależno ści od przedstawionego modelu,
nie powoduje to jednak zmiany opisowego znaczenia rysunku.
02 OGÓLNE NORMY BEZPIECZEŃSTWA
UWAGA: Ważne wskazówki dotyczące bezpieczeństwa. N ależy postępować zgodnie z instrukcjami, ponieważ nieprawidłowy sposób inst alacji może spowodować poważne
obrażenia. Przed rozpoczęciem użytkowania produktu oraz wykonaniem jakichkolwiek czynności konserwacyjnych upewnić się, że informacje zawarte w tym podręczniku zostały
przeczytane i dobrze zrozumiane.
- Sprawdzać przed rozpoczęciem i podczas użytkowania czy ekra n nie powoduje powstawania niebezpiecznych sytuacji. Zakaz instalacji ekranów projekcyjnych nad ciągami
komunikacyjnymi.
- Nie demontować, nie usuwać i nie uszkadzać żadnego element u lub części ekranu.
- Nigdy nie należy wykonywać prac konserwujących dotyczących e kranu przy pracującym silniku (ze względów bezpieczeństwa należy wyłączyć z asilanie).
- Należy odłączyć zasilanie podczas czynności czyszczenia, konser wacji lub wymiany części ekranu.
- Zabrania się używania produktu przez dzieci. Absolutnie zabra nia się dziecion zbliżania do ekranu podczas jego funkcjonowania.
Każdy ekran posiada gwarancję, której ważność zależy od rzeczyw istego stosowania się do instrukcji zawartych w tym podręczniku i po stępowania zgodnie z nimi.
UWAGA: Błędna instalacja może zagrażać bezpieczeńs twu osób, które używają ekran. Producent nie ponosi odpowiedzialności za szkody materialne i uszczerbki na zdrowiu osób
spowodowane błędną instalacją, nieodpowiednim użyt kowaniem ekranu, złą lub niewystarczającą konserwacją.
Producent nie ponosi odpowiedzialności za problemy s powodowane błędami przy instalacji.
Instalacja ekranu, połączenia elektryczne oraz kontrola w wypadku złego funkcjonowania automatycznego zwijania powinny być wykonywane przez autoryzowanego sprzedawcę
lub przez przeszkolony personel, znający niebezpieczeńst wa, jakie może spowodować prąd elektryczny. Nie wolno wymieniać przewodu zasilania. Jeś li przewód jest uszkodzony
ekran musi być wymieniony. Naruszenie wyłączników kra ńcowych lub przerwanie plomby umieszczonej powyżej otworów powoduje utra tę gwarancji. W wypadku konieczności
wyjaśnień prosimy o skontaktowanie się z naszym biure m technicznym.
PO ZAKOŃCZENIU MONTAŻU EKRANU NA LISTWACH NIEZBĘDN E JEST SKONTROLOWANIE DOKŁADNOŚCI USTAWIENIA W POZIOMIE PRZED ROZPOCZĘCIEM UŻYTKOWANIA.
03 OSTRZEŻENIA I UWAGI DO UŻYTKOWANIA I INSTALACJI
Ekrany dedykowane są do zastosowań w pomieszczeniach o nor malnych warunkach temperatury (20 - 25 °C) i wilgotności.
Jest absolutnie zabronione instalowanie ekranów proje kcyjnych z przodu przed oknami i używanie ich jako zasłon wystawionych na bezpośredn ie działanie promieni słonecznych lub innych silnych źród eł
światła. Zabrania się również instalowania ekranów w pob liżu żródeł ciepła takich jak grzejniki, piece, kominki oraz w pobliżu systemów klima tyzacyjnych gdzie mogłyby być narażone na działanie
zimngo/ciepłego powietrza.
Nie zastosowanie się do powyższych zakazów może spo wodować deformację lub trwałe zniekształcenie powierzchni projekcyjnej w ekranie.
W przypadku użytkowania ekranu elektrycznego na zewnątrz należy zachować szczególne środki ostrożności takie jak:
1- Ochrona kabla/kabli zasilania silnika przed promieniowa niem UV za pomocą odpowiednich przewodów lub osłon przeznaczonych do i nstalacji na zewnątrz.
2- Zastosowanie odpowiednich osłon izolacyjnych do dodatkowych kabli oraz skrzynek z okablowaniem zabezpie czających je przed wilgocią.
3- Wykorzystanie przełączników ze stopniem ochrony IP55 l ub wyższym (przełącznik seryjny zawarty w produkcie nie jest odpowiedni do użycia na zewnątrz).
4- Chronić ekran przed bezpośrednim kontaktem z wodą lub innymi płynami
Dla uniknięcia żółknięcia ekranu, nie należy wystawiać g o przez dłuższy czas na działanie promieni słonecznych (należy sprawdz ać także czy z powodu działania takich promieni, ekran nie osiąga poziomów
temperatur wskazanych powyżej). Ekran y projekcyjne nie mogą być bezpośrednio narażone na działanie promieni słonecznych oraz nie powinny być montowane w pobl iżu źródeł ciepła, może to doprowadzić
do uszkodzenia ich powierzchni.
Ponieważ materiał, z którego wykonana jest powierzchnia projekcyjna (PVC) może w łatwy sposób zostać naładowany elektrostatycznie, nadmierne zapylenie oto czenia spowodować może obniżenie
właściwości optycznych ekranu, co związane jest z odkładaniem się pyłów przyciąganych elektrostatycznie (patrz także: czyszczenie ekranu projekcyjnego).
Zakłada się, że korzystanie z ekranu rozwijanego elektrycznie przewidu je całkowite otwarcie powierzchni projekcyjnej (w dół), a po jego użyciu z projektorem, całkowite zamknięcie powierzchni projekcyjnej (w
górę). Pełne otwarcie i zamyknięcie ekranu (w dół -w górę) jest określane jako "cykl".
Ekrany rozwijane elektrycznie są przeznaczone do pracy w formie pojedynczego cyklu, oznacza to, że pomiędzy jednym cyklem a drugim powinna zostać za chowana określona ilość czasu. Dlatego nie zaleca się
wielokrotnego otwierania i zamykania ekranu elektrycz nego w krótkim przedziale czasu.
Silniki stosowane w ekranach rozwijanych elektrycznie, są wypos ażone w systemy zabezpieczenia termicznego, które zapobiegają nadmiernemu przegrzaniu się o budowy silnika i jego trwałego uszkodzenia.
Aktywacja zabezpieczenia termicznego odbywa się po o kreślonej liczbie cykli (góra- dół) i liczba ta zależy od rodzaju silnika oraz typu ekranu (zwykle jest to maksymalnie od 3 do 6 cykli). Należy jednak
pamiętać, że ciepło emitowane przez silnik jest przekazywane na rurę, a tym samym na nawiniętą na niej powierzchnię projekcyjną. Przegrza nie powierzchni projekcyjnej może spowodować jej trwałe
odkształcenie lub rozciągnięcie, a w konsekwencji nieró wnomierne położenie obciążnika ekranu. W celu uniknięcia powyższych sytu acji zabrania się użytkowania ekranu w sposób, który spowoduje
przekroczenie trzech pełnych cykli (góra-dó ł). Po osiągnięciu 3 wspomnianych cykli pracy, ekran należy pozostawić w pozycji otwartej (rozwinięta powierzchnia projekcyjna) i odczeka ć 40 minut, umożliwi to
ochłodzenie silnika i innych elementów konstrukcyjnych przed po nownym użyciem.
UWAGA: Nie wymuszać ręcznego wysuw ania ekranu ponieważ mogłoby to spowodować uszkodzenie silnika lub oderwanie kasety od elementów montażowych.
Nie pozwalać dzieciom bawić się stałymi urządzeniami sterującymi. Pilot przechowywać w miejscu niedostępnym dla dzieci.
Obserwować ekran gdy znajduje się w ruchu d opilnowując, aby nikt nie zbliżał się do ekranu dopóki n ie zostanie on całkowicie zamknięty.
Zabrania się blokować, zatrzymywać czy wymuszać ruc h ekranu, przytrzymywać się lub zawieszać, dołączać lub instalować jakieko lwiek przedmioty na ekranie lub na tylnej jego części, modyfikować
konstrukcję ekranu; zachowania takie mogą spowodować uszkodzenia sytemu zwijania, co z kolei mogłoby sprowokować niebezpieczeństwo dla osób czy przedmiotów.
Jest absolutnie zabronione instalowanie ekranów projekcyjnych przed oknami i używanie ich jako zasłon.
Jest absolutnie zabronione instalowanie ekranów w pob liżu żródeł ciepła takich jak grzejniki, piece, kominki a także w pobliżu system ów klimatyzacyjnych gdzie mogłyby być narażone na działanie
zimngo/ciepłego powietrza.
Ekran należy idealnie wypoziomować.
USUWANIE ZUŻYTEGO PRODUKTU
Podobnie jak w przypadku czynności instalacyjnych, również czynności wykonywane na zakończenie pracy tego produktu przy jego usuwaniu powinny być zrealizowane przez
wyspecjalizowany personel. Produkt skonstruowany został z różnych materiałów: niektóre z nich mogą zostać poddane recyklingowi, inne muszą być usunięte. Należy
zasięgnąć informacji o sposobach recyklingu oraz usuwania odpadów, przewidzianych przez prawo obowiązujące w danym kraju i dla danej kategorii produktu. Zabronione
jest usu wanie produktu do domowych odpadów, co pokazuje symbol zamieszczony obok. Należy więc segrego wać odpady przy usuwaniu produktu, zgodnie z metodami
przewidzianymi przez prawo obowiązujące w danym kraju albo przekazać produkt sprzedawcy w momen cie zakupu nowego.
Uwaga: miejscowe regulacje prawne mogą przewidywać poważne sankcje w wypadku usuwania produktu w sposób zakazany prawem.
Page 43
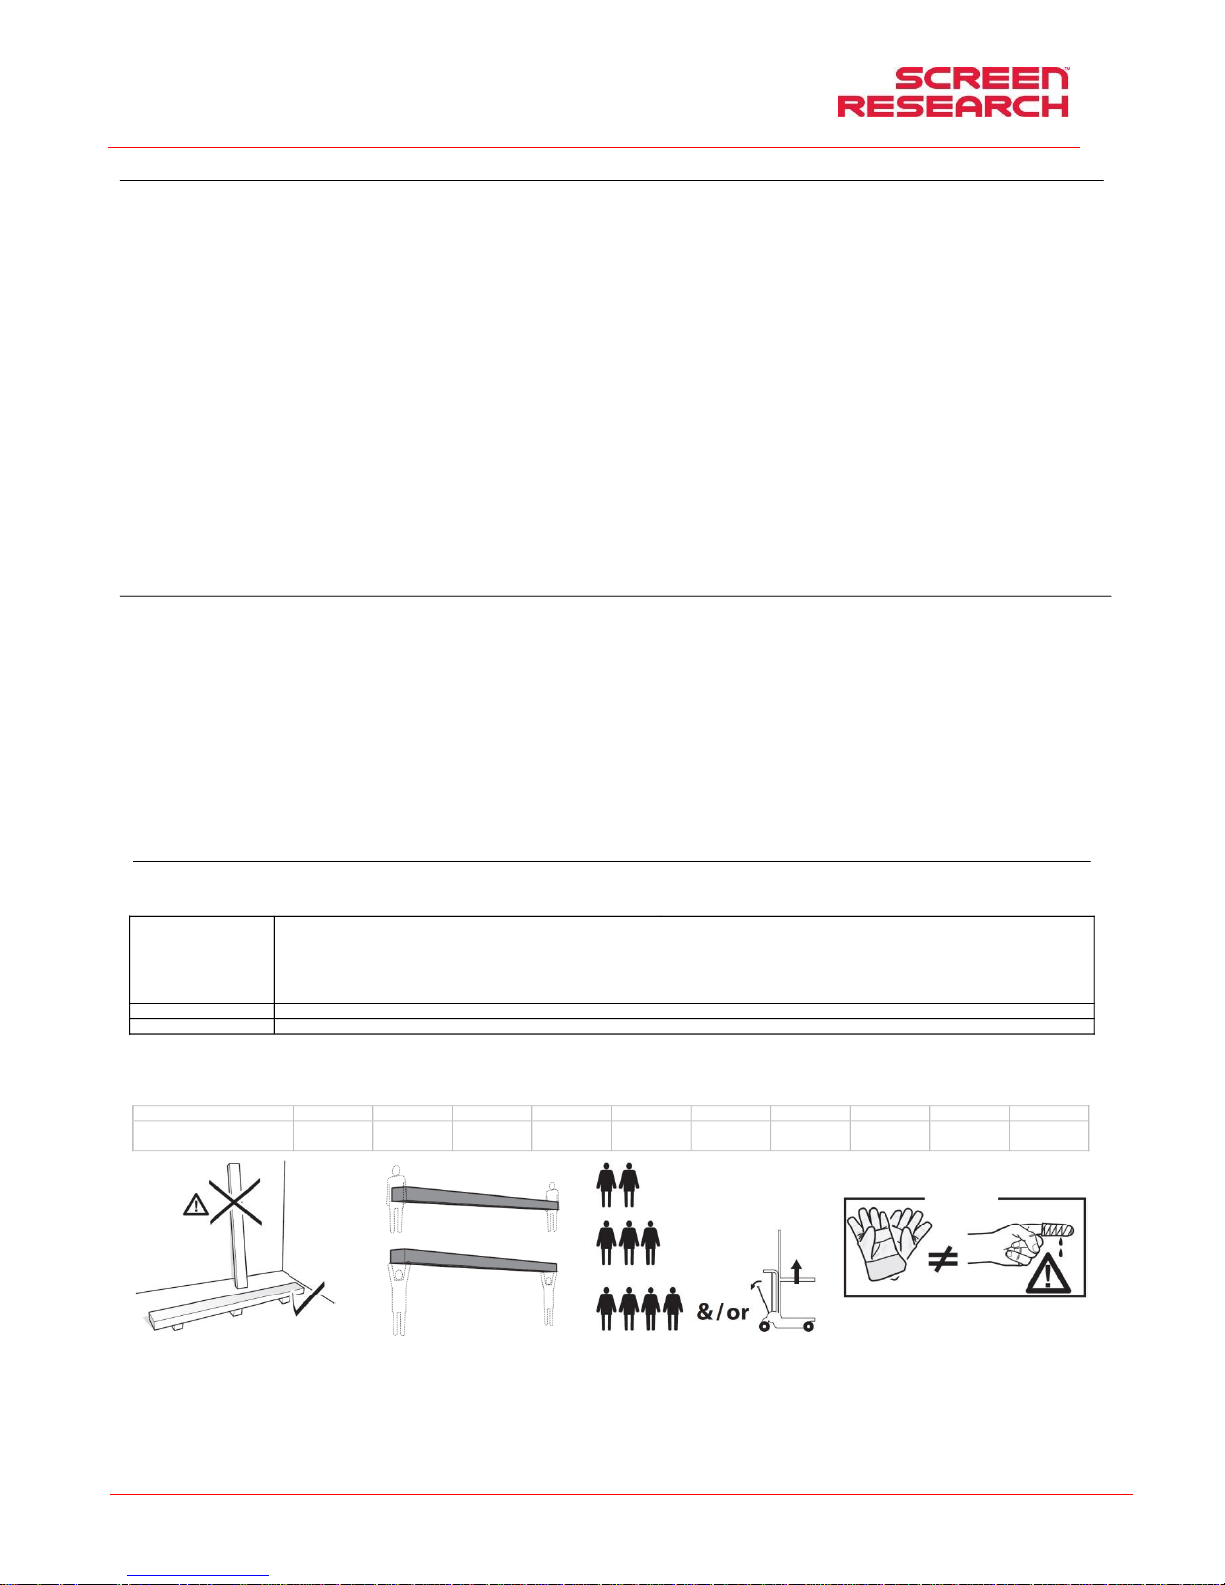
Instrukcja montażu i obsługi ekranu ramowego z maskami
POLSKI
Made by Adeo Screen Sp. Z o.o. (Poland) Specifications are subject to change without notice. E&OE
Please verify that you are working with the latest revision of this document before specifying your screen.
Doc: XLR3 – Installation Manual rev3 | 04.12.2017| Download at: www.screenresearch.com 2017 AdeoSreen All Rights Reserved.
Page 43
04 OGÓLNA CHARAKTERYSTYKA PRODUKTU
Ekran projekcyjny jest wytwarzany zgodnie z przepisami następu jących dyrektyw CE: 2014-35-CE LDV Niskiego napięcia
2014-30-EU EMC Zgodności elektromagnetycznej
2014-53-CE Aparatury radiowej i terminali telekomunikacyjny ch
2009-125-CE Dotyczącą Ekoprojektu dla produktów wykorzystujących e nergię
2011-65-CE ROHS Ograniczenie stosowania niektórych niebezpiecznych substa ncji
2012-19-CE RAEE W sprawie utylizacji zużytego sprzętu elektrycznego
2001-95-CE Ogólne bezpieczeństwo produktów
Ekran opisany w niniejszym podręczniku musi b yć stosowany wyłącznie jako wsparcie dla projekcji wideo. Wszelkie inne użcie jest niezgodne oraz nie jest objęte treścią niniejszego podręcznika.
Ekran posiada jedną lub więcej tkanin p rojekcyjnych z plastycznego PVC nie zawiera jących kadmu lub z impregnow anego włókna szklanego impregnowanego plastycznym PVC, każda tkanina może być
sklasyfikowana w następujący sposób:
- M1 lub M2 zgodnie z regulacjami f rancuzkimi (LNE Laboratoire national de métrologie et d’essais – SME Centre de recherches du Bouchet - WARRINGTONFIRE GENT Laboratoire de métrologie et
d’essais – IFTH Laboratoire accreditè ),
- B1 lub B2 zgodnie z regulacjami niemieckimi (LNE Laboratoire national de métrologie et d’essais – SME Ce ntre de recherche s du Bouchet - W ARRINGTONFIRE GENT Laboratoire national de
métrologie et d’essais),
- UL94HB zgodnie z regulacjami amerykańskimi (THE GOVMARK Or ganization, Inc.).
Ponieważ nie istnieje jeszcze harmonizacja na poziomie europejskim pomiędzy różnymi krajowymi normami klasyfikacji trudnop alności, wyjaśniamy, że francuska klasa M1 od powiada materiałom niepalnym a
klasyfikacja M2 materiałom nie łatwopaln . Materiały projekcyjne używane do produkcji ekranów projekcyjnych są wykonane głównie z laminowanego P VC lub z włókna szklanego pokrytego PVC, materiały te są
wrażliwe na temperaturę i wilgotność, w związ ku z tym tolerancja akceptowalna dotycząca wymiarów pow ierzchni projekcyjnej to 1% dla każdego rozmiaru.
Tolerancja dotycząca używanych profili aluminiowych to +/-2 mm.
Tolerancje ogólne dotyczące wymiarów całkowitych ekranów są nast ępujące:
- +/- 3 mm dla wymiarów całkowitych do 2500 mm;
- +/- 5 mm dla wymiarów całkowitych do 4000 mm;
- +/- 10 mm dla wymiarów całkowitych do 8000 mm;
- +/- 20 mm dla wymiarów całkowitych do 16000 mm;
- +/- 30 mm dla wymiarów całkowitych do 24000 mm.
05 CZYSZCZENIE I KONSERWACJA
Ekran oraz tkaniny projekcyjne stosowane na ekranach są wykonane z materiałów delikatnych, należy więc zachować szczególną ostrożność p rzy ich czyszczeniu, wykonując te czynności w następując y sposób:
Nigdy nie używać rozpuszczalników, produktów chemicznych, ściernych czy też zaostrzonych przyrządów do czyszczenia powierzchni.
Unikać wszelkiego kontaktu z innymi materiałami (lakie ry, tusz itp.), ponieważ usunięcie ich z tkaniny może okazać się niemożliwe.
TKANINY PROJEKCYJNE CLEARPIX: Stosować miękką, czystą, wilgotną ściereczkę, wykonując ruchy poczynając od środka powierzchni projekcyjnej w kierunku na z ewnątrz. Możliwe jest używanie szczotki
zamontowanej na odkurzaczu, ale wyłącznie wtedy, gdy jej włos ie jest miękkie i dokładnie oczyszczone.
TKANINY PROJEKCYJNE SOLIDPIX, MULTIP IX,: Do czyszczenia materiału projekcyjnego stosować miękką, czystą, wilgotną ściereczkę, ewentualnie w połą czeniu z detergentami na bazie obojętnej lub alkoholu.
Ponieważ po oczyszczeniu ekran z powodu tarcia ściereczki może naładować się prądem statycznym, doradza się przetrzeć materiał czystą ściereczką nasączoną płynem ant ystatycznym, dla uniknięcia
ponownego przyciągania pyłów. Okresowo kontrolować system mocujący i połączenia elektryczne
TKANINY PROJEKCYJNE SILVERPIX obowiązkowe jest przeczytanie instrukcji dołączonych ekran tkaniny
PROFILE Do czyszczenia profilu stosować miękką, cz ystą ściereczkę lub szczotki z miękkim i antystatycznym włosiem
PROFILE RAMY z WELURU: Do czyszczenia profilu stosować miękką, czystą ściereczkę lub szczotki z miękkim i an tystatycznym włosiem. Możliwe jest używanie szczotki zamonto wanej na odkurzaczu, ale
wyłącznie wtedy, gdy jej włosie jest miękkie i dokładnie oczyszczone.
KONSTRUKCJA i LISTWY MONTAŻOWE: Nie zbędne jest okresowe kontrolowania stanu produktu oraz wy trzymałości listew montażowych. W przypadku pojawienia się odkształceń, rozdarć l ub konstrukcyjnych
uszkodzeń listew, wkrętów czy komponentów produk tu należy nieodzownie zabezpieczyć okoliczną strefę dla uniknięcia wszelkich szkód czy z agrożeń dla osób i przedmiotów. Następnie trzeba podjąć
działania mające na celu natychmiastową wymianę us zkodzonej części i naprawę produktu.
06 ROZPAKOWANIE EKRANU I PRZEMIESZCZANIE PRODUKTU
Należy upewnić się, że żaden z elementów ekranu nie został uszkodzon y podczas transportu. W razie wystąpienia anomalii należy naty chmiast zawiadomić o tym fakcie sprzedawcę. Sprawdzić czy w
opakowaniu znajduje się całość wyposażenia opisane go w instrukcji, odpowiednio dla danego typu ekranu.
Common
-n° 16 Plastic nut for assembly housing
-n°1 logo Screen Research
-n° 4 Ruber gloves
-n° 1 Protective foil Nylon
-n° 1 Hex key n°3
-n° 1 Hex key n°4
-n° 1 Hex key n°2,5
-n°1 Installation manual
-n° 1 CD with manual, picture,movie
-n° 1 set MCS electric connection
-n°2 Power cord for motor power+connector
(screws and plugs for installation not included)
<=160”
-n°2 BRACKETS
>160”
-n°3 BRACKETS
UWAGA do otwierania opakowania nie należy używać n ożyków czy innych ostrych narzędzi. Stosować zawsze rękawice ochronne podczas otwieran ia i instalacji czy przenoszenia produktu. Produkt należy
przenosić czy instalować minimum w dwie lub cztery osoby, w za leżności od ciężaru ekranu (wartości odnośnie dopuszczalnego ciężaru na osobę to: 25kg mężczyzna - 15kg kobieta). W przypadku większych
ciężarów zaleca się stosowanie odpowiednich urządzeń do podn oszenia ładunków.
Ekran o szerokości do inches
80”
90”
96”
100”
110”
120”
130”
140”
150”
160”
XLR3 Całkowity ciężar
jaki należy przewidzieć
144 Kg
317,5 Ibs
151 Kg
332,9 Ibs
158 Kg
348,3 Ibs
165 Kg
363,7 Ibs
172 Kg
379,2 Ibs
179 Kg
394,6 Ibs
184 Kg
405,6 Ibs
210 Kg
462,9 Ibs
217 Kg
478,4 Ibs
223 Kg
491,6 Ibs
Page 44
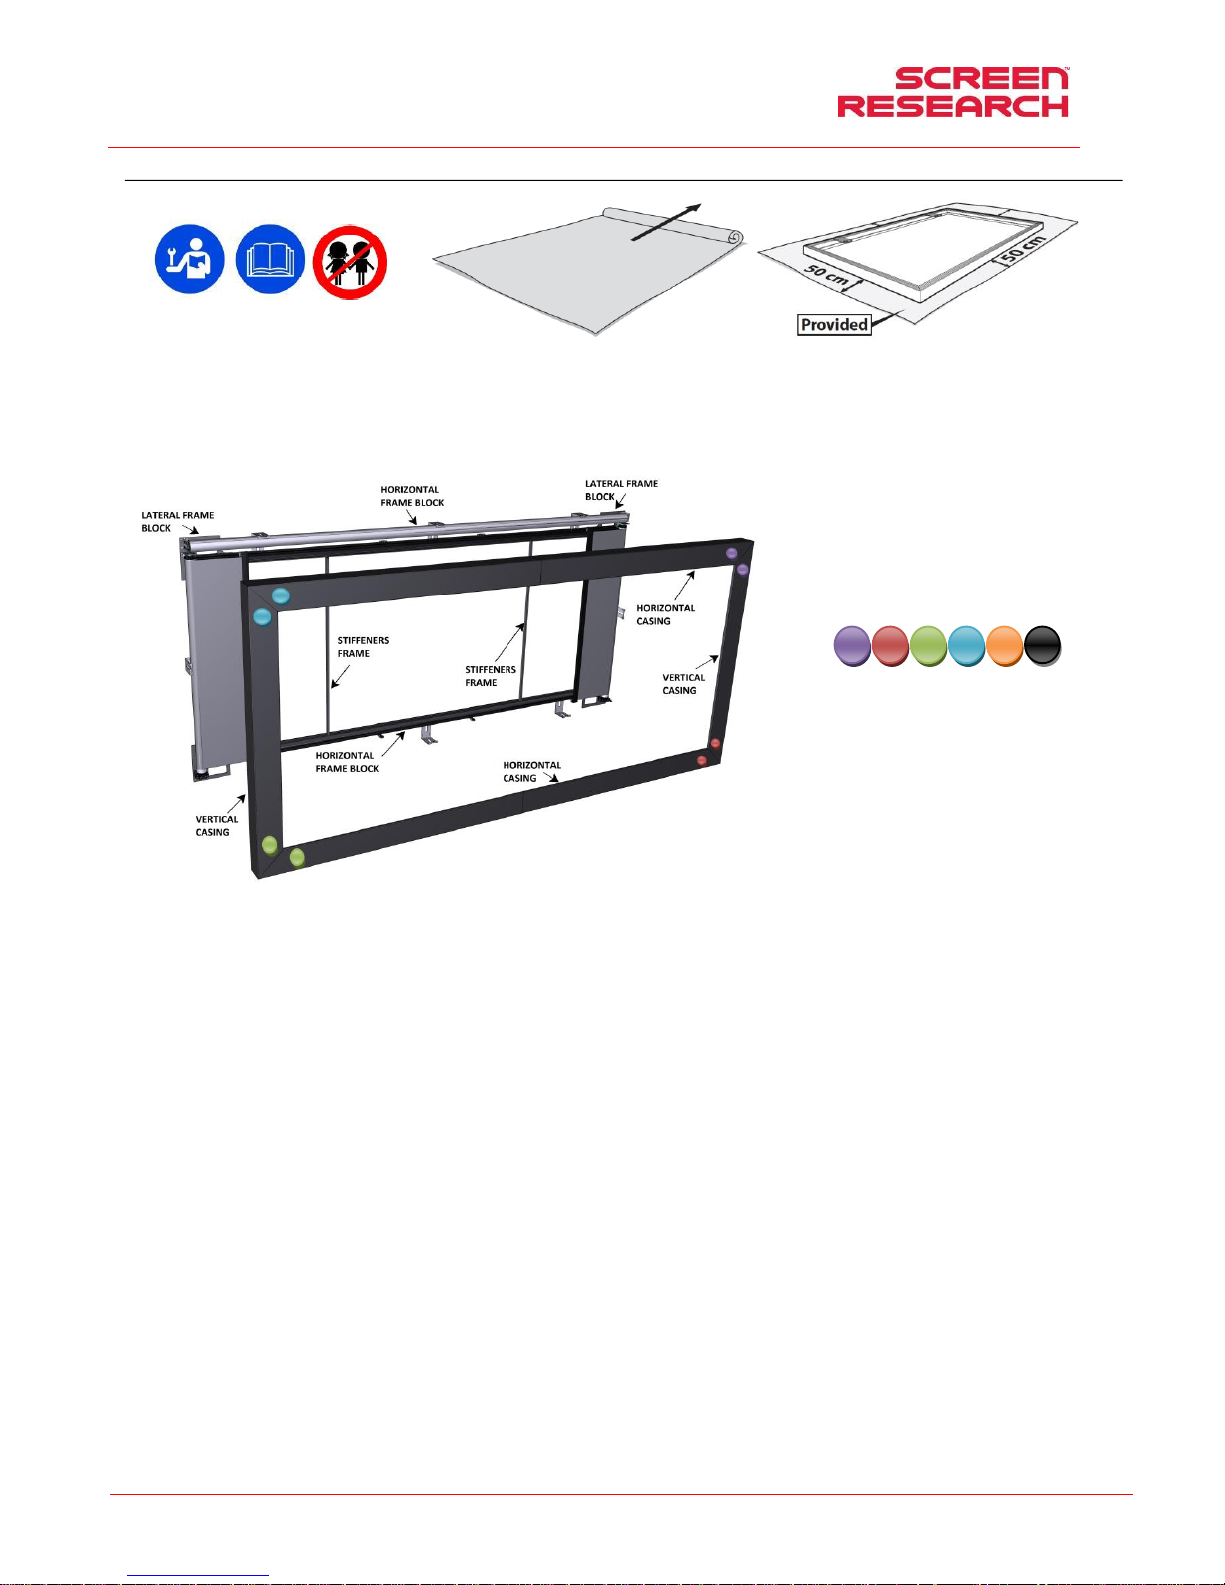
Instrukcja montażu i obsługi ekranu ramowego z maskami
POLSKI
Made by Adeo Screen Sp. Z o.o. (Poland) Specifications are subject to change without notice. E&OE
Please verify that you are working with the latest revision of this document before specifying your screen.
Doc: XLR3 – Installation Manual rev3 | 04.12.2017| Download at: www.screenresearch.com 2017 AdeoSreen All Rights Reserved.
Page 44
07 INSTRUKCJA INSTALACJI
UWAGA:
Patrz zdjęcia na ostatnich stronach niniejszej instrukcji . Jest to absolutnie zabronione, aby zainstalować ekran na ruchomymi ścianami lub kabli niestabilnych, wspornik i należy stosować na powierzchniach,
które zapewniają w tym czasie dystans .
Do instalacji ekranu należy zastosować wkręty i kołki rozporowe odpo wiednie dla ciężaru i rodzaju ściany lub sufitu, na jakich zamierzamy zam ontować elementy mocujące. Przed rozpoczęciem montażu
wybrać rodzaj kołków lub mocowania zgodn ie z następującym schematem.
ZALECENIA:
W celu zapobiegania zniczenia profili podczas montowania ekra nu należy używać dołączonego materiału .
Należy upewnić się, aby ewentualne systemy kontrolne były zamontowane w łatwo dostępnym miejscu w przypadku ewentualnych kont roli lub napraw.
UWAGA !!!
Ekran składa się z różnych części poziomych i pionowych
zmontowanych w fabryce.
W celu ułatwienia zmontowania ekranu, w narożnikach
poszczególnych części znajdują się kolorowe okrągłe na klejki, które
pozwalają na określenie właściwego położenia tych elementów.
Page 45
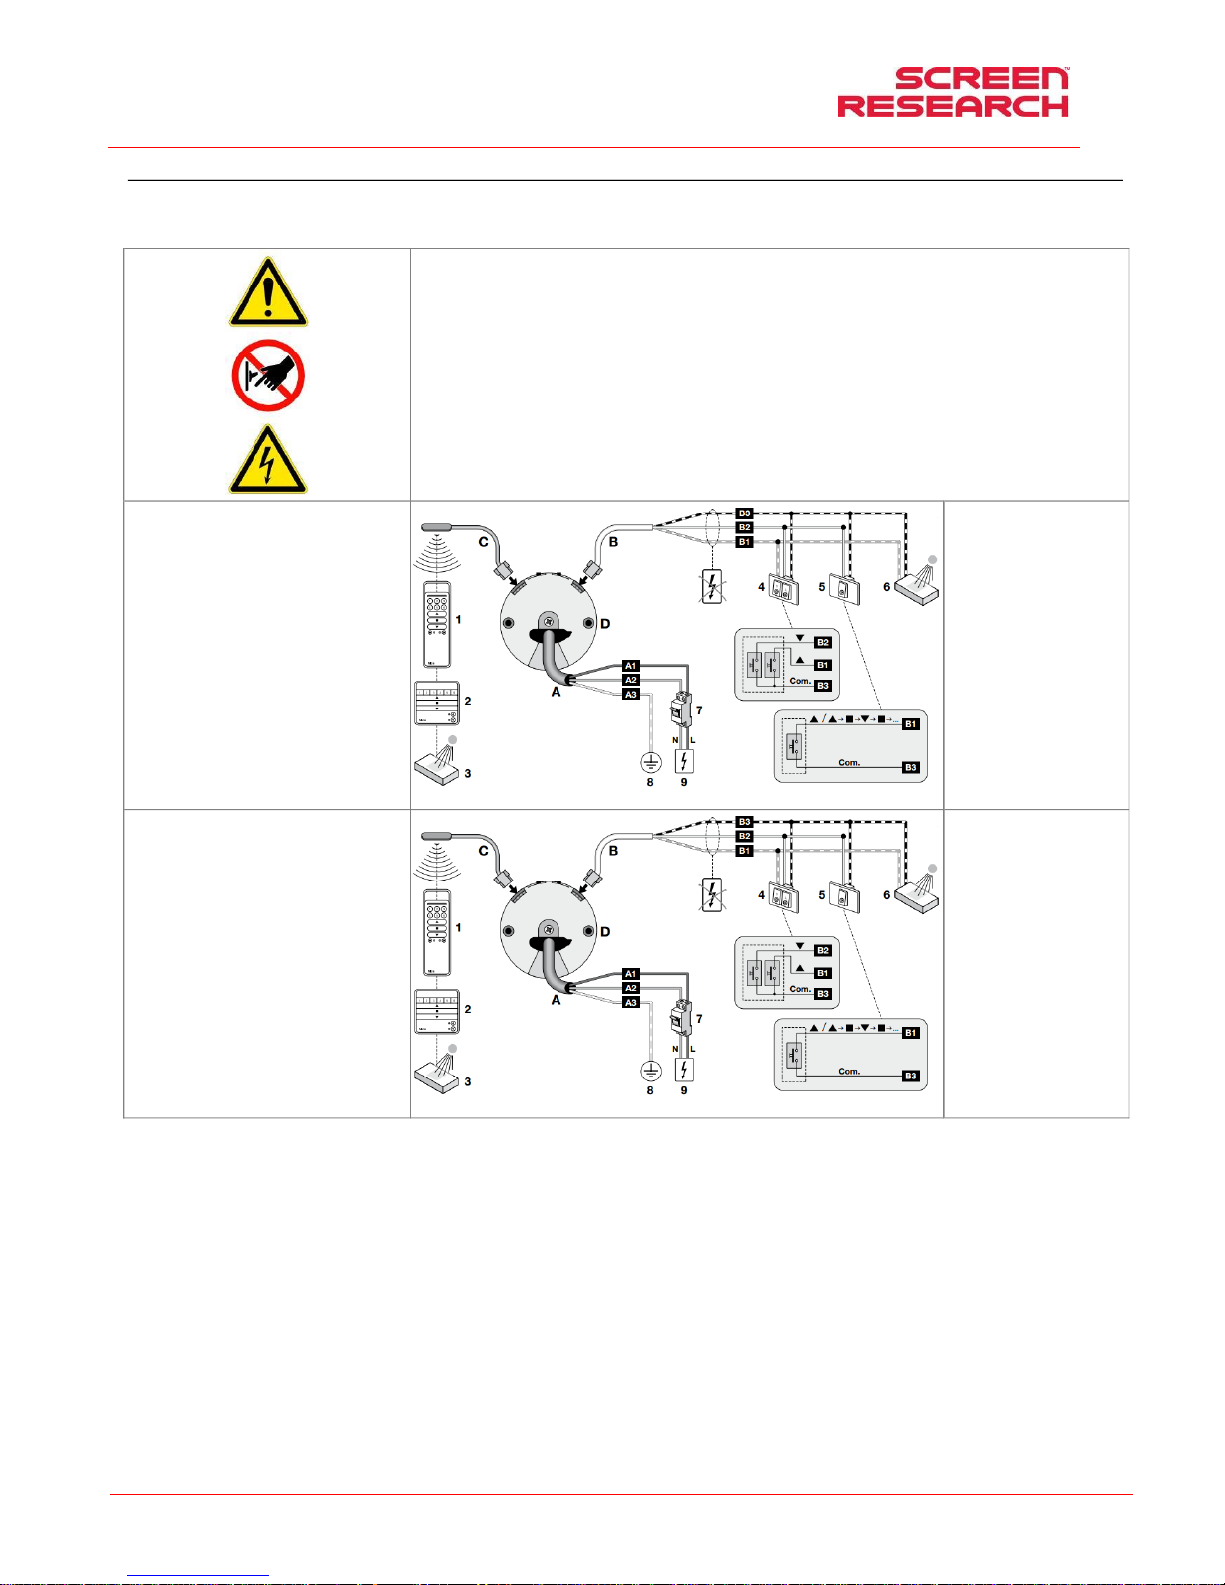
Instrukcja montażu i obsługi ekranu ramowego z maskami
POLSKI
Made by Adeo Screen Sp. Z o.o. (Poland) Specifications are subject to change without notice. E&OE
Please verify that you are working with the latest revision of this document before specifying your screen.
Doc: XLR3 – Installation Manual rev3 | 04.12.2017| Download at: www.screenresearch.com 2017 AdeoSreen All Rights Reserved.
Page 45
09 CHARAKTERYSTYKA SILNIKA – DANE TECHNICZNE – POŁĄCZENIE ELEKTRYCZNE
Typ zainstalowanego w produkcie silnika opisany jest n a etykiecie posiadającej oznakowanie CE, a znajdującej się na każdym produk cie. W trakcie otwierania opakowania należy skontrolować etykietę i
ustalić rodzaj silnika, aby wykonać poprawną instalację i prawidłowe okablowanie. W przypadku, kiedy moc silnika nie odpowiada m ocy linii elektrycznej w miejscu instalacji urządzenia, prosimy o
skontaktowanie się z elektrykiem i wyposażenie we właściwy transformator prądu i częstotliwości.
PODŁĄCZENIE ELEKTRYCZNE:
Okablowanie elektryczne musi respektować obowiązują ce normy WE. Norma WE EN 60335-1 przewiduje w sieci zasilania istnienie
wielobiegunowego urządzenia rozłączającego, o sze rokości otwarcia styków co najmniej 3 mm dla każdego silnika (z wyłączeniem wtyczki itp.). W
razie potrzeby to urządzenie zapewnia bezpieczne i szybkie odcię cie źródła zasilania. Kable łączyć jak pokazano na rysunku po prawej stronie .
UWAGA:
Ten produkt zawiera dwa silniki, których podłączenia mu szą być wykonane w ten sam sposób.
Obowiązkiem jest zaizolowanie kabli Bus (czarny, biały, pomarańczowy) jeśli nie będą używane do sterowania poprzez przełączni k dwubiegunowy.
UWAGA:
Właściwe wykonanie połączeń elektrycznych, zgodn ie ze sztuką i w zachowaniu obowiązujących norm prawnych, jest istotne dla zabezpieczenia
przed wypadkami oraz właściwego i niezmiennego dzia łania ekranu. Przed wykonaniem jakichkolwiek czynności w instalacji elektr ycznej, upewnić
się, że napięcie zostało odłączone.
Silniki umieszczone są po prawej stronie ekranu patrząc od jego frontu.
Uruchamianie wykonywane jest za pomocą pilota na fale radio we dostarczanego w standardzie.
Dane techniczne silnika
Nice ERA INN EDGE –AC
86-230V 50-60Hz:
Częstotliwość: ~Hz50-60
Moc: 45W
Moment obrotowy: 3Nm
Prędkość: 32Rpm
Cykl pracy: S2 4min
Długość przewodu: 3m
Wytrzymałość mechaniczna: zgodnie z normą EN14202
Temperatura pracy: od –20 do +55 °C
Częstotliwość: 433.92 MHz
Zasięg nadajnika: 150mt
Poziom natężenia dźwięku:
LpA ≤ 70 dB (A)
Klasa ochrony silnika: IP44
Połączenia dla każdego silnika:
A1 – Brązowy (Faza 230V)
A2 – Niebieski (neutralny)
A3 – Żółto-zielony (ziemia)
B1 – Biało-pomarańczowy (pod
górę)
B2 – Biały (Spadek TTBUS)
B3 – Biało-czarny (wspólny)
Dane techniczne silnika
Nice ERA INN EDGE –AC
86-230V 50-60Hz:
Częstotliwość: ~Hz50-60
Moc: 70W
Moment obrotowy: 6Nm
Prędkość: 32Rpm
Cykl pracy: S2 4min
Długość przewodu: 3m
Wytrzymałość mechaniczna: zgodnie z normą EN14202
Temperatura pracy: od –20 do +55 °C
Częstotliwość: 433.92 MHz
Zasięg nadajnika: 150mt
Poziom natężenia dźwięku:
LpA ≤ 70 dB (A)
Klasa ochrony silnika: IP44
Połączenia dla każdego silnika:
A1 – Brązowy (Faza 230V)
A2 – Niebieski (neutralny)
A3 – Żółto-zielony (ziemia)
B1 – Biało-pomarańczowy (pod
górę)
B2 – Biały (Spadek TTBUS)
B3 – Biało-czarny (wspólny)
Page 46
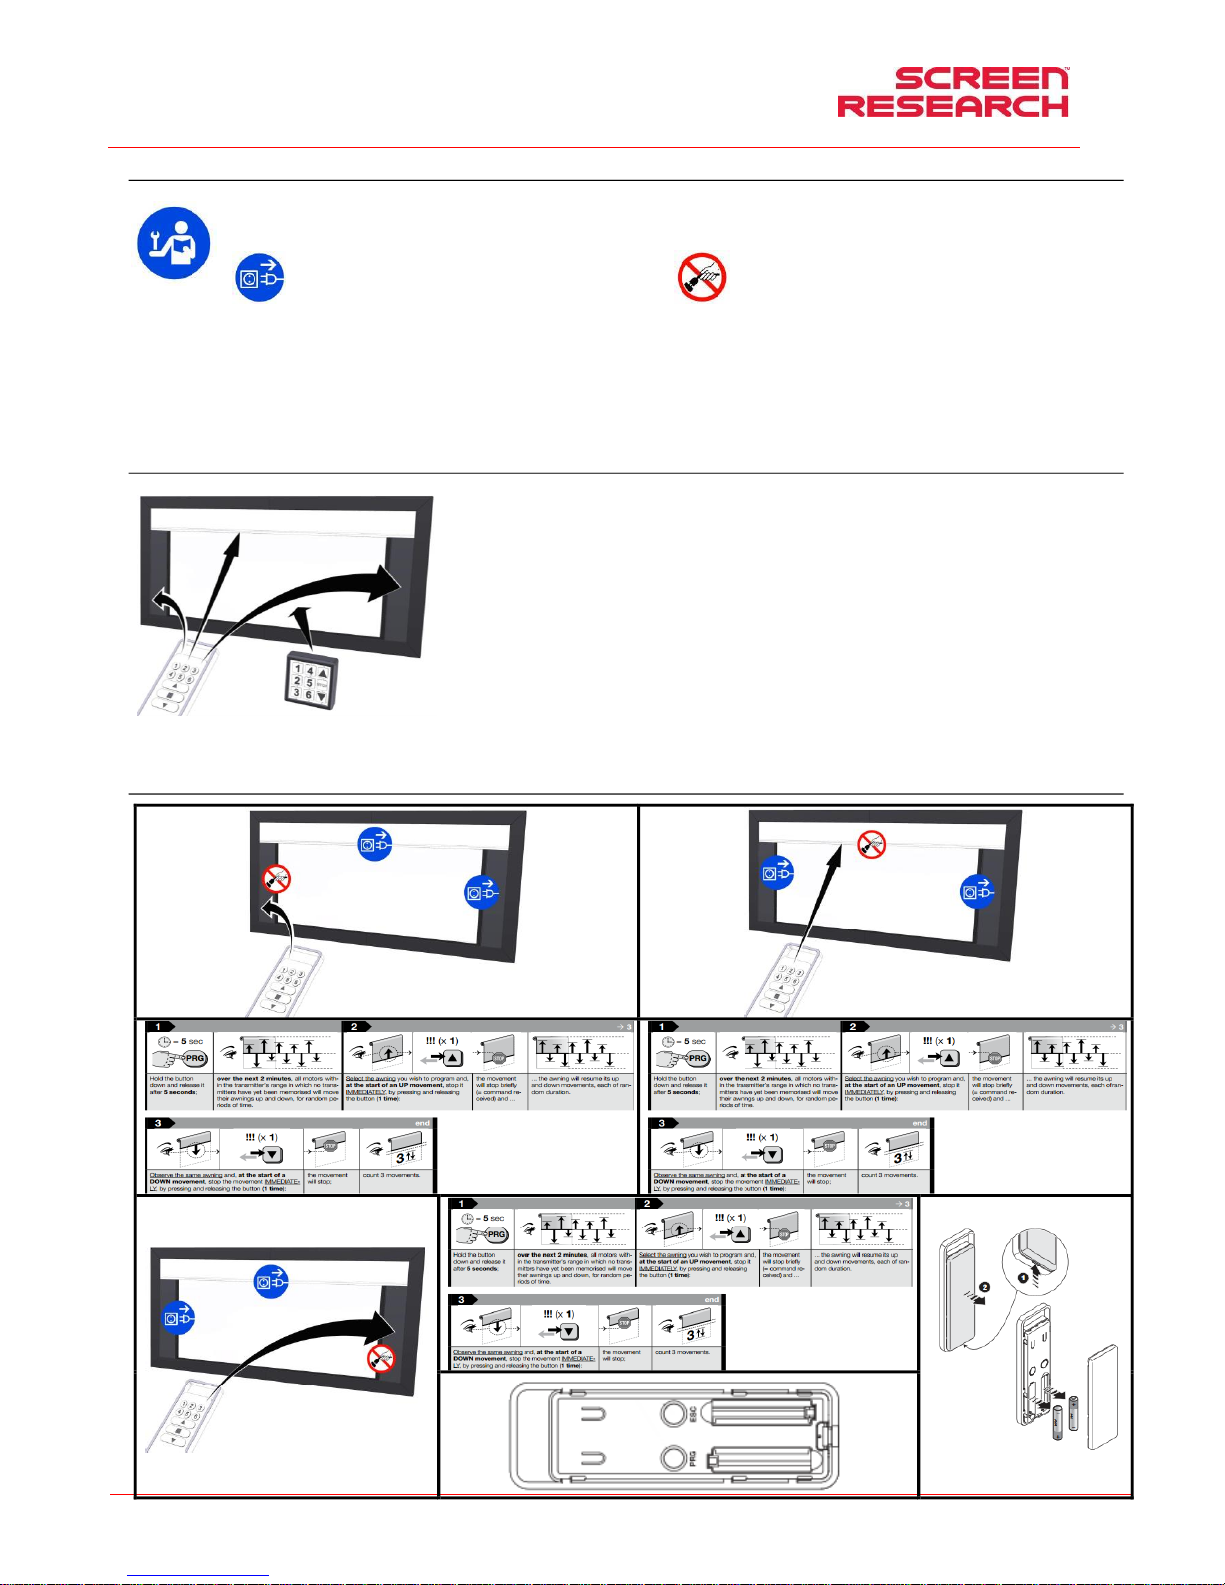
Instrukcja montażu i obsługi ekranu ramowego z maskami
POLSKI
Made by Adeo Screen Sp. Z o.o. (Poland) Specifications are subject to change without notice. E&OE
Please verify that you are working with the latest revision of this document before specifying your screen.
Doc: XLR3 – Installation Manual rev3 | 04.12.2017| Download at: www.screenresearch.com 2017 AdeoSreen All Rights Reserved.
Page 46
10 REGULACJA WYŁĄCZNIKA KRAŃCOWEGO
UWAGA: PRZECZYTAĆ PRZED WYKONANIEM REGULACJI
regulacje tu opisane powinny być wykonywane wyłącznie przez upoważniony i wyspecjalizowany personel. Nieprawidłowe wykonanie opisanych procedur spowodować może
uszkodzenie produktu, którego naprawa nie będzie wykonana w ramach gwarancji.
UWAGA: w czasie wykonywania opisanych w instrukcji procedur należy zwrócić uwagę na następujące ikonki:
Odłączyć zasilanie elektryczne od właściwego silnika zasłaniania Nie odłączać zasilania elektrycznego od wła ściwego silnika zasłaniania
OSTRZEŻENIA
Wyłącznik krańcowy wyregulowany jest w sposób umoż liwiający nawinięcie zasłony co najmniej 1,5 obrotu wokół rolki, aby uniknąć odklejenia materiału projekcyjnego. Błędna regulacja wyłącznika
krańcowego może spowodować:
-Odklejenie zasłony od rolki
-Nawinięcie zasłony w kierunku przeciwnym, przy jedno czesnym uszkodzeniu powierzchni ekranu i mechanizmu zwijania.
-Przeciążenie silnika przy możliwym uszkodzeniu oraz aktywowaniu wyłącznika termicznego, znajdującego się w silniku.
-Za duże nawinięcie systemu regulacji w yłącznika krańcowego, czego konsekwencją będzie uszkodzenie części mechanicznej.
GWARANCJA
Przypomina się użytkownikom, że w przypad ku naruszenia pieczęci i uszkodzenia wynikającego z nieprawidłowej regulacji wszelk ie naprawy wykonywane będą poza gwarancją.
LOGIKA DZIAŁANIA i PROGRAMOWANIA
Sterowanie MASTER: powinno być u żytkowane przez wyspecjalizowany personel, pozwala na zapisywanie górnych i dolnych w yłączników
krańcowych, obrębnie dla każdej z zasłon.
Sterowanie PILOT: Przyciski 1-6 mogą być stosowane dla zapamiętania dodatkowych formatów.
Przyciski -STOP-umożliwiają poruszanie lub zat rzymanie jednoczesne obu zasłon (zaprogramowane przez produce nta).
Przed rozpoczęciem programowania silników E-MASK należy poznać logikę działania dla uniknięcia nieporozumień i problemów podczas
wykonywania procedur.
-Poprawna kolejność programowania, aby umożliwić uruchomienie urządzenia:
1° dostrajanie pilotów (zaprogramowane przez producenta )
2° wyregulowanie wyłączników krańcowych, otwarcie m ożliwie maksymalne i minimalne zasłon (zaprogramowane przez producenta),
3° programowanie formatów do maksimum 6 (sprawdzić warianty Waszego modelu dla zweryfikowania, które ustawione są przez
producenta, a które nie)
Każda procedura programowania składa s ię z dwó ch e tapów. Po zakończeniu pierwszego operator ma czas 60 sek. na rozpoczęcie
następnego – taki system umożliwia uniknąć w ykonania procedur innych niż zaplanowane. Jeśli więc silnik nie wykona dokładnie czynności
zaplanowanej w instrukcji, odczekać, 60 sek. aby w yjść z programowania u ponownie rozpocząć procedurę.
-Podczas wykonywania jakiejkolwiek procedu ry zaleca się nacisnąć i przytrzymać przycisk aż do zakończenia ruchu silnika.
Przed wykonaniem programowania niezbędne jest, aby pilot Master był dostrojony do dwóch rolek, a więc przeciski lewe mają poruszać dolną zasłonę, a przyciski prawe zasłonę górną .
Jeśli pilot nie wykona powyższych czynności należy go zapr ogramować jak następuje:
PROGRAMOWANIE PILOTA MASTER (procedura wykonana przez producenta, NIE może być wykonywana przez nieupoważniony personel)
Page 47
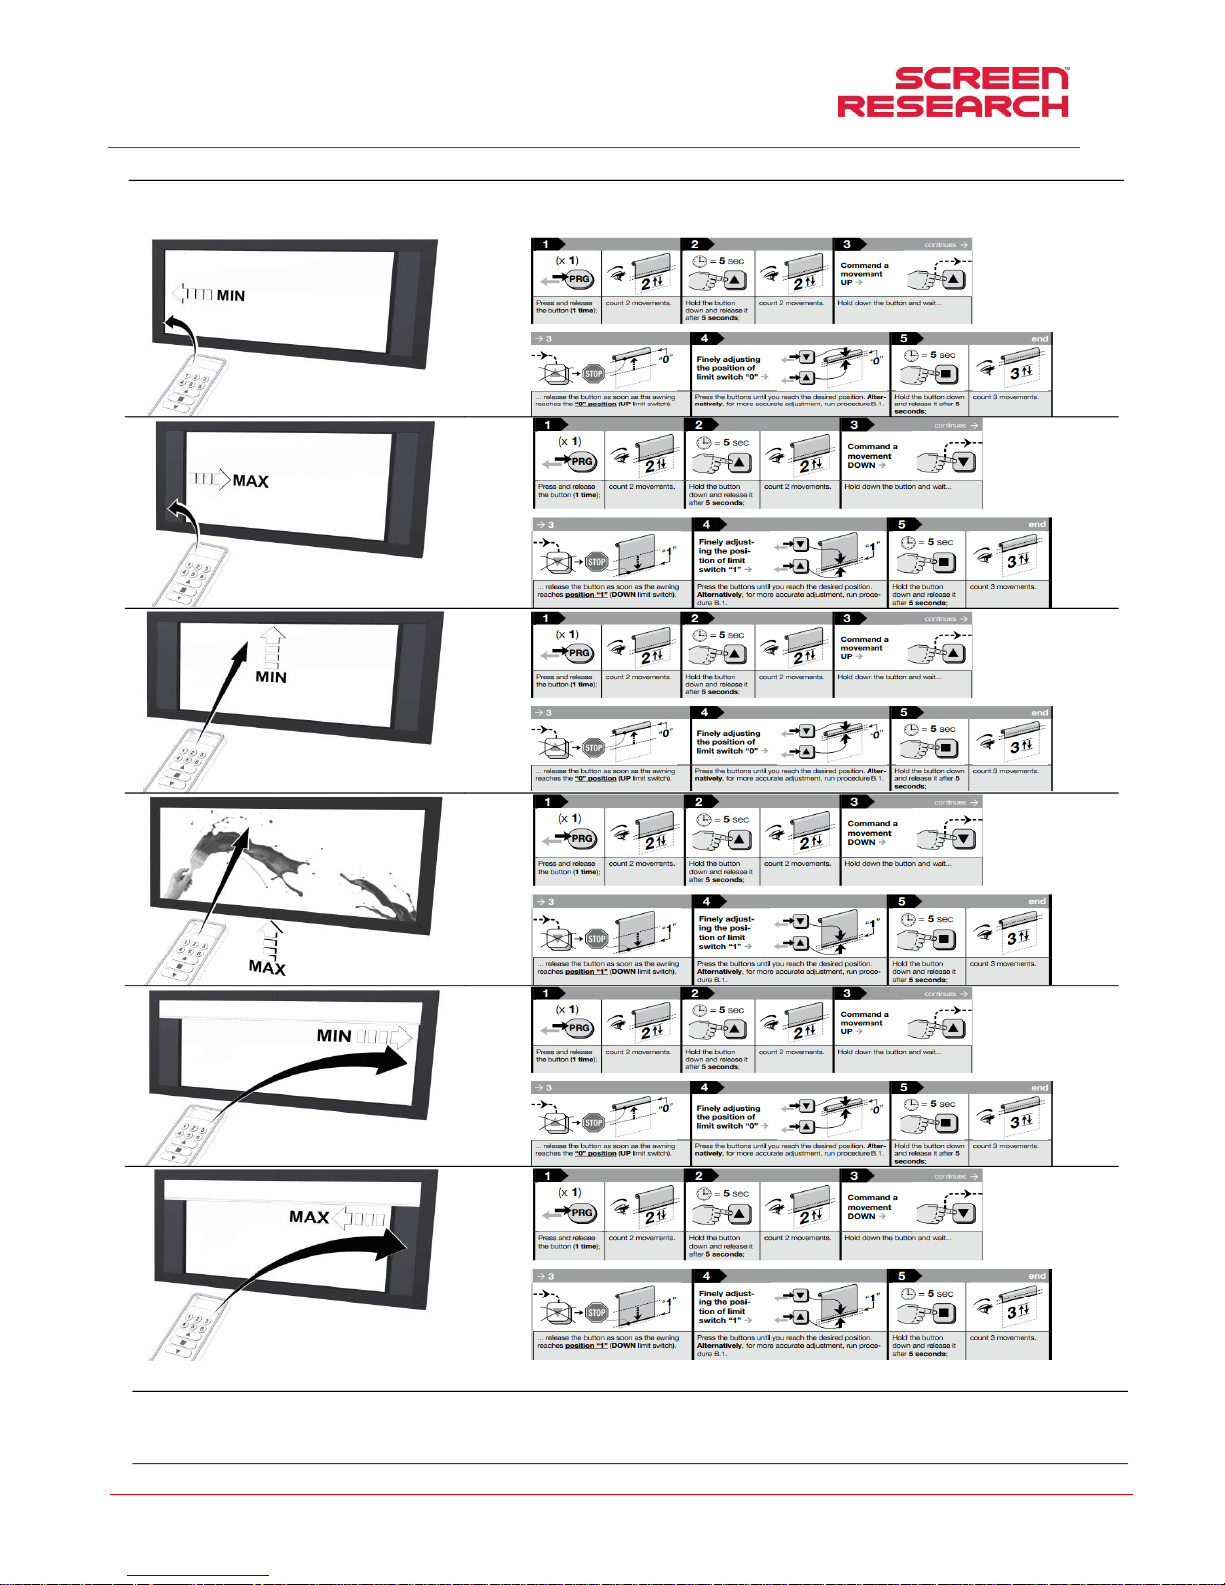
Instrukcja montażu i obsługi ekranu ramowego z maskami
POLSKI
Made by Adeo Screen Sp. Z o.o. (Poland) Specifications are subject to change without notice. E&OE
Please verify that you are working with the latest revision of this document before specifying your screen.
Doc: XLR3 – Installation Manual rev3 | 04.12.2017| Download at: www.screenresearch.com 2017 AdeoSreen All Rights Reserved.
Page 47
PROGRAMOWANIE WYŁĄCZNIKÓW KRAŃCOWYCH MASKOWNIC (procedura, która została wykonana w fabryce, NIE może być wykonywana przez nieupoważnione osoby)
Każda pr ocedura programowania składa się z kilku kroków, po wykonaniu każdego z kroków, operator ma 60 sekund na rozpoczęcie następnego kroku, system ten jest by zapobiec ryzyku wykonywania
czynności innych niż te pożądane. Dlatego też, jeśli silnik nie wykonuje operacji dokładnie tak jak wskazano w instrukcji, poczekać 60 sekund, aby zamknąć prog ram lub anulować procedurę jak opisano w
odnośnym rozdziale, po czym uruchomić ponownie proces.
PRZESUNIĘCIE WYŁĄCZNIKÓW KRAŃCOWYCH MASKOWNIC (NIE może być wykonywane przez nieupoważnione osoby)
Silniki posiadają logikę nadpisywania, a więc po zapisaniu pozycji wyłączników krańcowych nie istnieje procedura ich anulowan ia. Istnieje jedynie możliwość ponownego zapamiętania pozycji poprzez
powtórne wykonanie wyżej opisanej procedury ich zapamiętania.
ANULOWANIE PROGRAMOWANIA W TOKU
W celu anulowania programowania w toku należy przycisnąć jednocześnie i przytrzymać przyciski ■ i ▼ dopóki silnik nie wykona 6 RUCHÓW ; proces został anulowany
Page 48
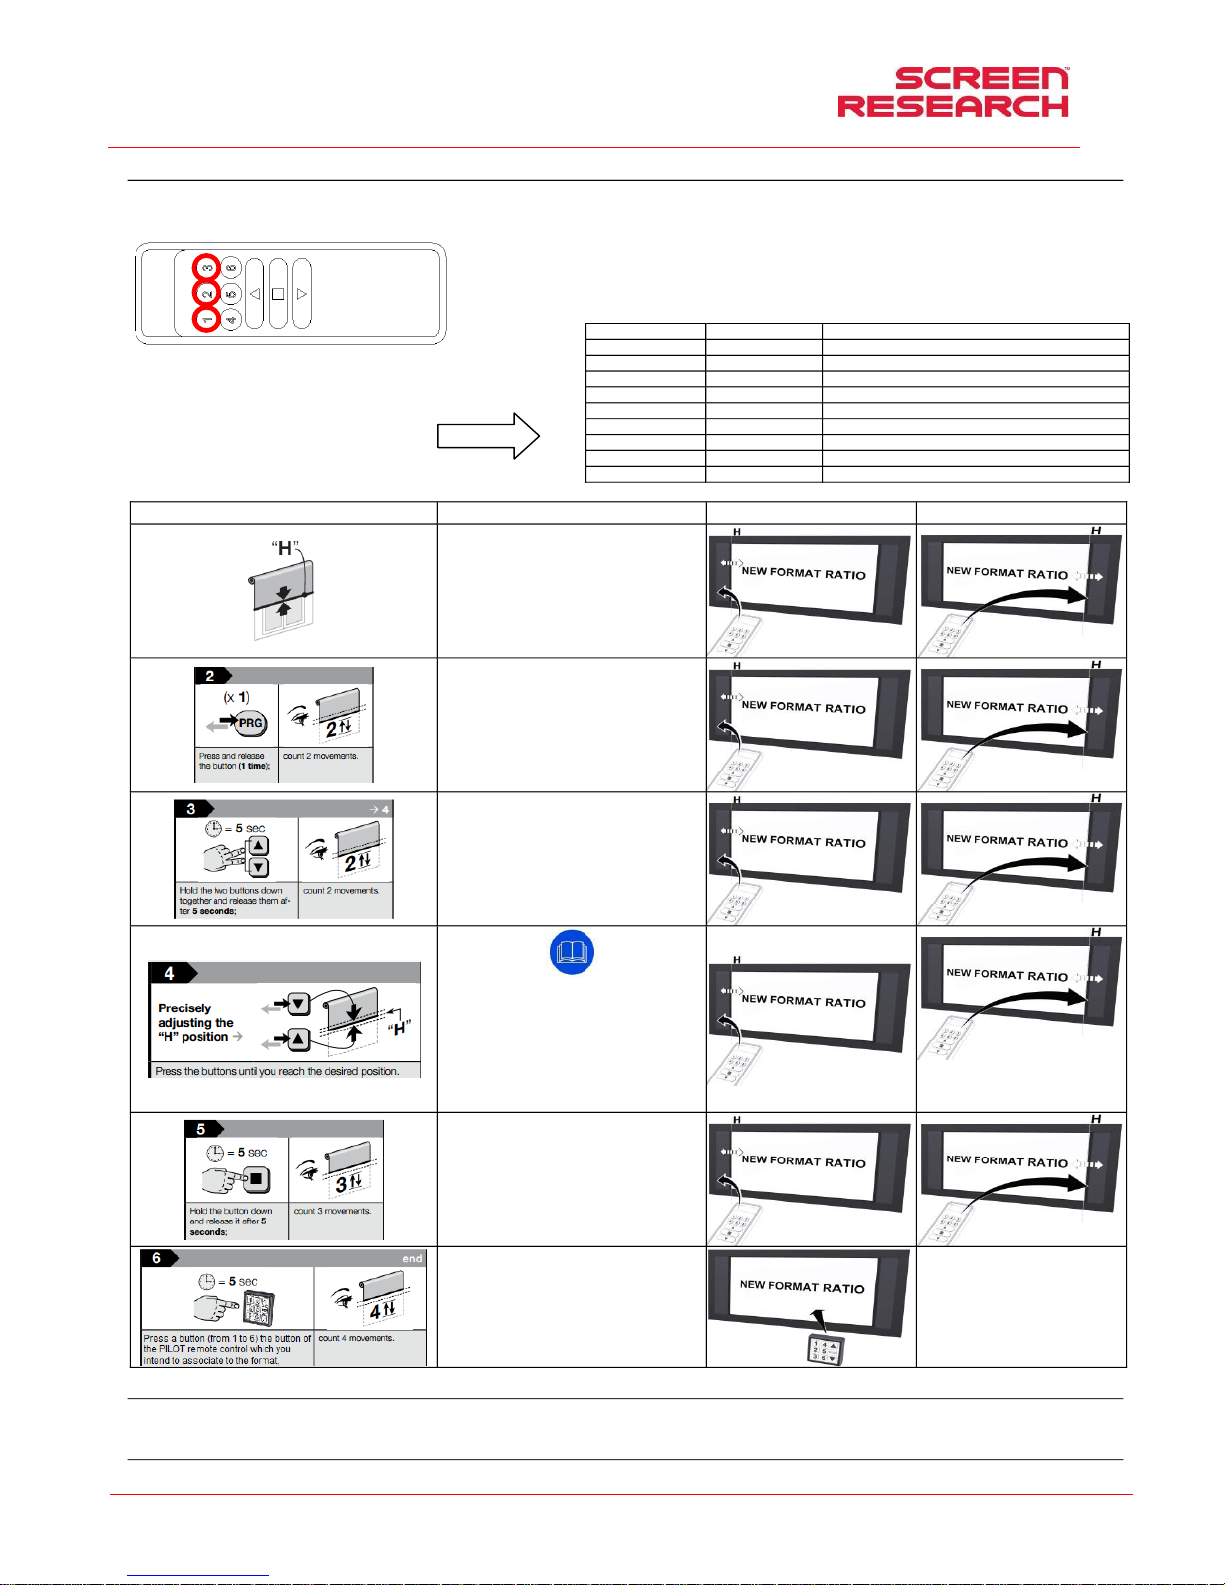
Instrukcja montażu i obsługi ekranu ramowego z maskami
POLSKI
Made by Adeo Screen Sp. Z o.o. (Poland) Specifications are subject to change without notice. E&OE
Please verify that you are working with the latest revision of this document before specifying your screen.
Doc: XLR3 – Installation Manual rev3 | 04.12.2017| Download at: www.screenresearch.com 2017 AdeoSreen All Rights Reserved.
Page 48
PROGRAMOWANIE FORMATÓW
Każda pr ocedura programowania składa się z kilku kroków, po wykonaniu każdego z kroków, operator ma 60 sekund na rozpoczęcie następnego kroku, system ten jest by zapobiec ryzyku wykonywania
czynności innych niż te pożądane. Dlatego też, jeśli silnik nie wykonuje operacji dokładnie tak jak wskazano w instrukcji, poczekać 60 sekund, aby zamknąć program lu b anulować procedurę jak opisano w
odnośnym rozdziale,, po czym uruchomić ponownie proces.
Przed rozpoczęciem programmation wybrać silnik, który chcesz zaprogramować za pomocą przycisku, 1 - numer silnika w lewym boku, 2
- Silnik deco, 3 - silnik w prawym boku.
Wykonaj poniższą sekwencję dla każdego silnika.
Śledź tabeli obok, aby ustawić formaty PILOT z otwarciem i zamknięciem
maskowania z nadrukiem. Postępuj zgodnie z poniższą tabelą, aby ustawić
formatów za pomocą pilota MASTER i zapisywanie go na PILOT, zgodnie z liczbą
przejściowym 6.
SILINK 1 – SILINK 3
SILINK 1 – SILINK 3
SILINK 1
SILINK 3
Przy użyciu przycisków nadajnika Master ▲▼■,
ustawić obie rolki z powierzchniami w pobliżu
miejsc, które mają być zaprogramowane (przy
ustawianiu zaleca się wyświetlenie obrazu na
ekranie w formacie, który ma być zaprogramowany
w celu sprecyzowania wymiarów formatu) następnie
postępować według opisanych poniżej kroków
Przytrzymać wciśnięty lewy przycisk PRG przez około
5 sekund dopóki silnik nie wykona 2 KRÓTKICH
ruchów; wówczas zwolnić przycisk
Przytrzymać wciśnięty lewy przycisk ▲ lub ▼ przez
około 5 sekund dopóki silnik nie wykona 2
KRÓTKICH ruchów; wówczas zwolnić przycisk
Uwaga: Teraz, aby wykonać precyzyjne dostrojenie,
obydwa silniki, muszą być wprawione w ruch wyłącznie
klawiszami ▲▼. Pilot będzie działał skokami. Aby
wykonać ruchy milimetr po milimetrze przyciskać krótko
klawisze ▲ lub ▼. Aby wykonać ruchy bardziej
obszerne (ale zawsze skokami) przytrzymać wciśnięte
klawisze ▲ lub ▼. Ww. sposobami należy ustawić dwie
powierzchnie w pozycji, w której mają zostać
zaprogramowane
Po osiągnięciu wymaganej pozycji, przytrzymać
wciśnięty lewy przycisk ■ dopóki silnik nie wykona 3
KRÓTKICH ruchów.
D Przytrzymać (1-6) wybrany przycisk nadajnika
PILOT, na którym ma być zaprogramowany żądany
format dopóki silnik nie wykona 4 KRÓTKICH
ruchów..
Ządany format będzie teraz
zapamiętany na wybranym
przycisku nadajnika Pilot (1-6) i
procedura programowania została
zakończona pomyślnie
ZMIANA ZAPAMIĘTANYCH FORMATÓW
Silniki oparte są na logice nadpisywania, a więc po zapisaniu pozycji wyłączników krańcowych nie istnieje procedura ich anulowania. Istnieje jedynie możliwość ponownego zapamiętania pozycji poprz ez
powtórne wykonanie wyżej opisanej procedury ich zapamiętania.
ANULOWANIE PROGRAMOWANIA W TOKU
W celu anulowania programowania w toku należy przycisnąć jednocześnie i przytrzymać przyciski ■ i ▼ dopóki silnik nie wykona 6 RUCHÓW ; proces został anulowany
GUZIKI PILOT
MASK POSITION
DECO MASK
Guzika 1 PILOT
Proporcje obrazu 1
W stanie “w górę” (wyłącznik krańcowy poprzedniej stronie)
Guzika 2 PILOT
Proporcje obrazu 2
W stanie “w górę” (wyłącznik krańcowy poprzedniej stronie)
Guzika 3 PILOT
Proporcje obrazu 3
W stanie “w górę” (wyłącznik krańcowy poprzedniej stronie)
Guzika 4 PILOT
Proporcje obrazu 4
W stanie “w górę” (wyłącznik krańcowy poprzedniej stronie)
Guzika 5 PILOT
Proporcje obrazu 5
W stanie “w górę” (wyłącznik krańcowy poprzedniej stronie)
Guzika 6 PILOT
Proporcje obrazu 6
W stanie “w górę” (wyłącznik krańcowy poprzedniej stronie)
Guzika 7 PILOT
Proporcje obrazu 7
W stanie “w górę” (wyłącznik krańcowy poprzedniej stronie)
Guzika 8 PILOT
Proporcje obrazu 8
W stanie “w górę” (wyłącznik krańcowy poprzedniej stronie)
Guzika 9 PILOT
Proporcje obrazu 9
W stanie “DOWN wyłącznik krańcowy” (poprzednia strona)
Page 49
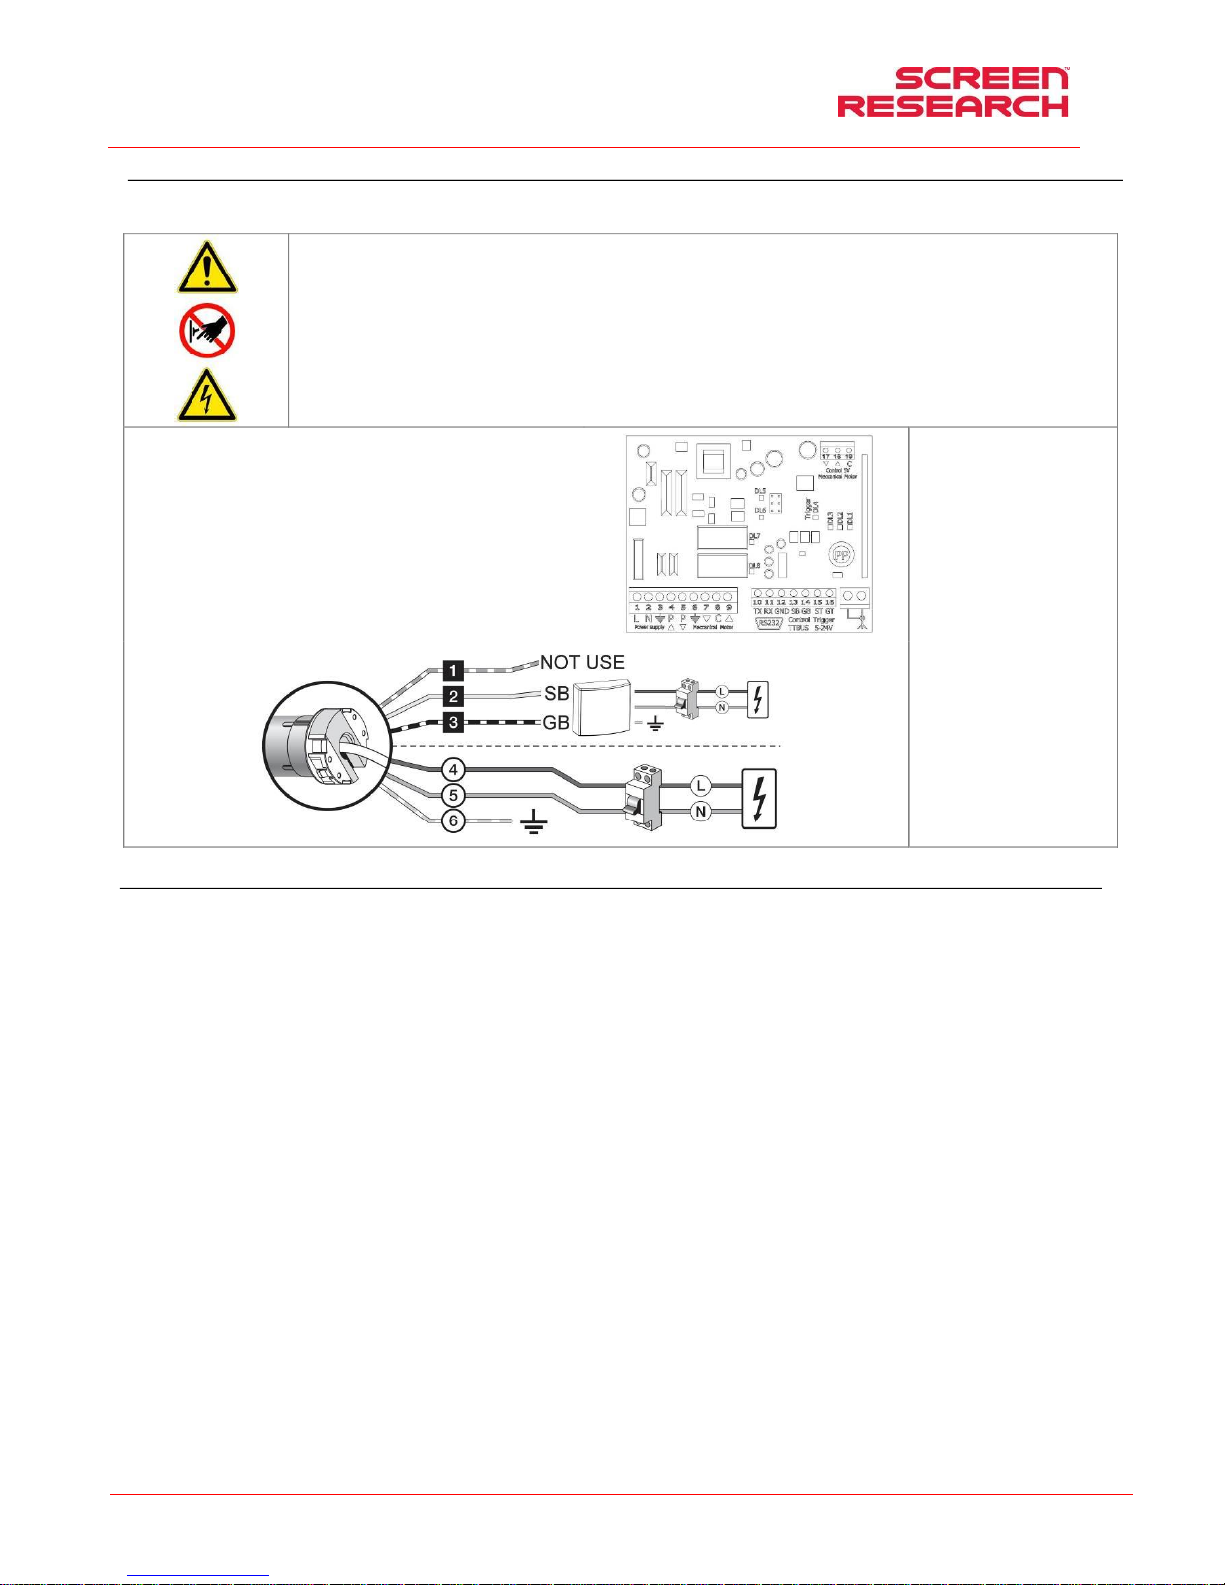
Instrukcja montażu i obsługi ekranu ramowego z maskami
POLSKI
Made by Adeo Screen Sp. Z o.o. (Poland) Specifications are subject to change without notice. E&OE
Please verify that you are working with the latest revision of this document before specifying your screen.
Doc: XLR3 – Installation Manual rev3 | 04.12.2017| Download at: www.screenresearch.com 2017 AdeoSreen All Rights Reserved.
Page 49
POŁĄCZENIE ELEKTRYCZNE MCS-N-RS232 (akcesoria opcjonalne)
Przed przystąpieniem do podłączenia należy u ważnie przeczytać kompletną instrukcję dołączoną do produktu. W przypadku, k iedy moc silnika nie odpowiada mocy linii elektrycznej w miejscu instalacji
urządzenia, prosimy o skontaktowanie się z elektrykiem i wypo sażenie we właściwy transformator prądu i częstotliwości.
PODŁĄCZENIE ELEKTRYCZNE:
Okablowanie elektryczne musi respektować obowiązują ce normy WE. Norma WE EN 60335-1 przewiduje w sieci zasilania istnienie wie lobiegunowego urządzenia
rozłączającego, o szerokości otwarcia styków co najmniej 3 mm dla każdego silnika (z wyłączeniem wtyczki itp.). W razie potrzeby to urządzen ie zapewnia bezpieczne i
szybkie odcięcie źródła zasilania. Kable łąc zyć jak pokazano na rysunku po prawej stronie.
UWAGA:
Ten produkt zawiera dwa silniki, których podłączenia muszą być wykonane w ten sam sposób.
Obowiązkiem jest zaizolowanie kabli Bus (czarny, biały, pomarańczowy) jeśli nie będą używane do sterowania poprzez przełąc znik dwubiegunowy.
UWAGA:
Właściwe wykonanie połączeń elektrycznych, zgodnie ze sztuką i w zachowaniu obowiązujących norm prawnych, jest istotne dla zab ezpieczenia przed wypadkami oraz
właściwego i niezmiennego działania ekranu. Przed wy konaniem jakichkolwiek czynności w instalacji elektrycznej, upewnić się, że napięcie zostało od łączone.
Silniki umieszczone są po prawej stronie ekranu patrząc od jego frontu.
Uruchamianie wykonywane jest za pomocą pilota na fale radio we dostarczanego w standardzie.
Dane techniczne MCS-N
Zasilanie: 110 . 240 Vpp 50/60 Hz
Maksymalny prąd pobierany: 80 m A w stand-by, 3 A przy maksymalnym obciążeniu
Kodowania: FloR (rolling code)
Częstotliwość: 433.92 MHz
Impedancja anteny: 52 ohm
Czułość: powyżej 0,5μV dla prawidłowe go odbioru
Zasięg: szacowany na 200 m na zewnątrz i na 35 m wewnątrz budynkow
Ilość wczytywanych nadajników: 30
Wyjście: 1 wyjście do sterowania silnikiem dwufazow ym
Obciążalność styków: 3 A - 250 V
Stopień ochrony: IP44 (z kompletną obud ową)
Temperatura robocza: -20 . +55° C
Wymiary / waga: 128 x 112 x 43 mm / 260 g
Połączenia dla każdego silnika,
Wersja 230V:
Biało-pomarańczowy (BUS)
Biały (BUS)
Biało-czarny (wspólny TTBUS)
Brązowy (Linia 230V)
Niebieski (Faza 230V)
Żółto-zielony (Uziemienie 230V)
Połączenia dla każdego silnika,
Wersja 120V:
Biało-pomarańczowy (BUS)
Biały (TTBUS)
Biało-czarny (wspólny BUS)
Biały (Linia 120V)
Czarny (Faza 120V)
Zielony (Uziemienie 120V)
GWARANCJA
1. OGRANICZONA GWARANCJA Screen Research gwarantuje, że niniejszy produkt jest wolny od materiałowych i wykonawczych wad produkcyjnych zgodnie z warunkami określonymi w niniejszej gwarancji.
Materiał powierzchni oraz rama są objęte pięcioletnią (5) gwarancją począwszy od daty otrzymania faktury przez oryginalnego nabywcę. Silniki, kontrolery silników, urządzenia zdalnego sterowania oraz
powiązane części montażowe są objęte trzyletnią (3) gwarancją począwszy od daty otrzymania faktury przez oryginalnego nabywcę.
2. WARUNKI I OGRANICZENIA Niniejsza Gwarancja podlega ograniczeniom wyszczególnionym poniżej. Niniejsza Gwarancja traci ważność w przypadku, gdy produkt był wykorzystywany lub obsługiwany w
sposób niezgodny ze wskazówkami zawartymi w instrukcji obsługi, używany niewłaściwie, uszkodzony w wyniku wypadku, zaniedbania lub podczas przewozu, albo gdy wada jest wynikiem naprawy lub
modyfikacji produktu przez podmiot inny niż Screen Research lub autoryzowany przez Screen Research punkt dystrybucji lub montażu. Instalacji produktu powinien dokonać autoryzowany przez Screen
Research sprzedawca lub punkt montażowy, konserwacja produktu powinna być przeprowadzana w sposób zgodny z pisemnymi wskazówkami.
3. ZWROTY Nie przyjmuje się zwrotów produktu bez uprzedniej pisemnej autoryzacji przez Screen Research. Produkt powinien być umieszczony w oryginalnym opakowaniu, wraz z oryginalną zawartością, lub w
opakowaniu równie dobrze zabezpieczonym, tak aby uniknąć uszkodzeń w trakcie transportu. Produkt w opakowaniu należy zwrócić do Screen Research bądź do autoryzowanego centrum serwisowego Screen
Research. Użytkownik jest odpowiedzialny za dokonanie zwrotu i ponosi jego koszt. Screen Research dokona opłaty za przesyłkę zwrotną wybranego rodzaju. DO ZWRÓCONEGO PRODUKTU POWINIEN BYĆ
DOŁĄCZONY PISEMNY OPIS WADY ORAZ KSEROKOPIA ORYGINALNEGO DOWODU ZAKUPU. Dowód zakupu powinien w sposób wyraźny wskazywać model, datę zakupu, nazwisko i adres nabywcy oraz
autoryzowanego sprzedawcy, a także cenę nabycia. Screen Research zastrzega sobie prawo modyfikacji konstrukcji dowolnego produktu bez uprzedzenia i bez zobowiązań wobec nabywców uprzednio
wyprodukowanych produktów, a także do zmiany cen lub specyfikacji dowolnego produktu.
4. ŚRODKI NAPRAWCZE W okresie obowiązywania niniejszej Ograniczonej Gwarancji, w przypadku gdy produkt nie spełnia warunków określonych w niniejszej Gwarancji nabywca, zgodnie z niniejszą
Ograniczoną Gwarancją, ma prawo wyłącznie do zwrotu produktu do Screen Research lub autoryzowanego przez Screen Research centrum serwisowego, gdzie wada zostanie usunięta bez obciążania
użytkownika kosztami robocizny i części zamiennych.
5. OGRANICZENIE GWARANCJI DO ORYGINALNEGO NABYWCY Niniejsza Gwarancja obejmuje wyłącznie oryginalnego nabywcę objętego nią produktu. Nie istnieje możliwość przeniesienia jej na kolejnych
nabywców produktu.
6. POSTANOWIENIA RÓŻNE Wszelkie domniemane gwarancje dotyczące produktów Screen Research ograniczone są czasem trwania niniejszej Gwarancji. Gwarancja nie obejmuje odpowiedzialności za szkody
przypadkowe lub wynikowe nabywcy. Niektóre państwa nie dopuszczają ograniczeń terminu obowiązywania domniemanych gwarancji ani wyłączania lub ograniczania odpowiedzialności za szkody
przypadkowe lub wynikowe, tym samym powyższe ograniczenia mogą nie mieć zastosowania w Państwa przypadku. Na mocy niniejszej Gwarancji przysługują Państwu określone prawa. Dodatkowo mogą
Państwu przysługiwać inne prawa w zależności od jurysdykcji.
7. GWARANT Zapytania dotyczące niniejszej Ograniczonej Gwarancji można kierować na następujący adres odpowiedni dla kraju zakupu:
8. WSPARCIE GWARANCYJNE AUTORYZOWANEGO DYSTRYBUTORA Screen Research dysponuje siecią autoryzowanych dystrybutorów w wielu krajach na całym świecie. W przypadku każdego kraju
autoryzowany Dystrybutor dokonujący importu odpowiedzialny jest za wsparcie gwarancyjne produktów sprzedawanych w danym kraju przez takiego dystrybutora lub sprzedawcę detalicznego. Serwis
gwarancyjny świadczony jest przez sprzedawcę detalicznego lub dystrybutora dokonującego importu, od którego został nabyty produkt.
Page 50
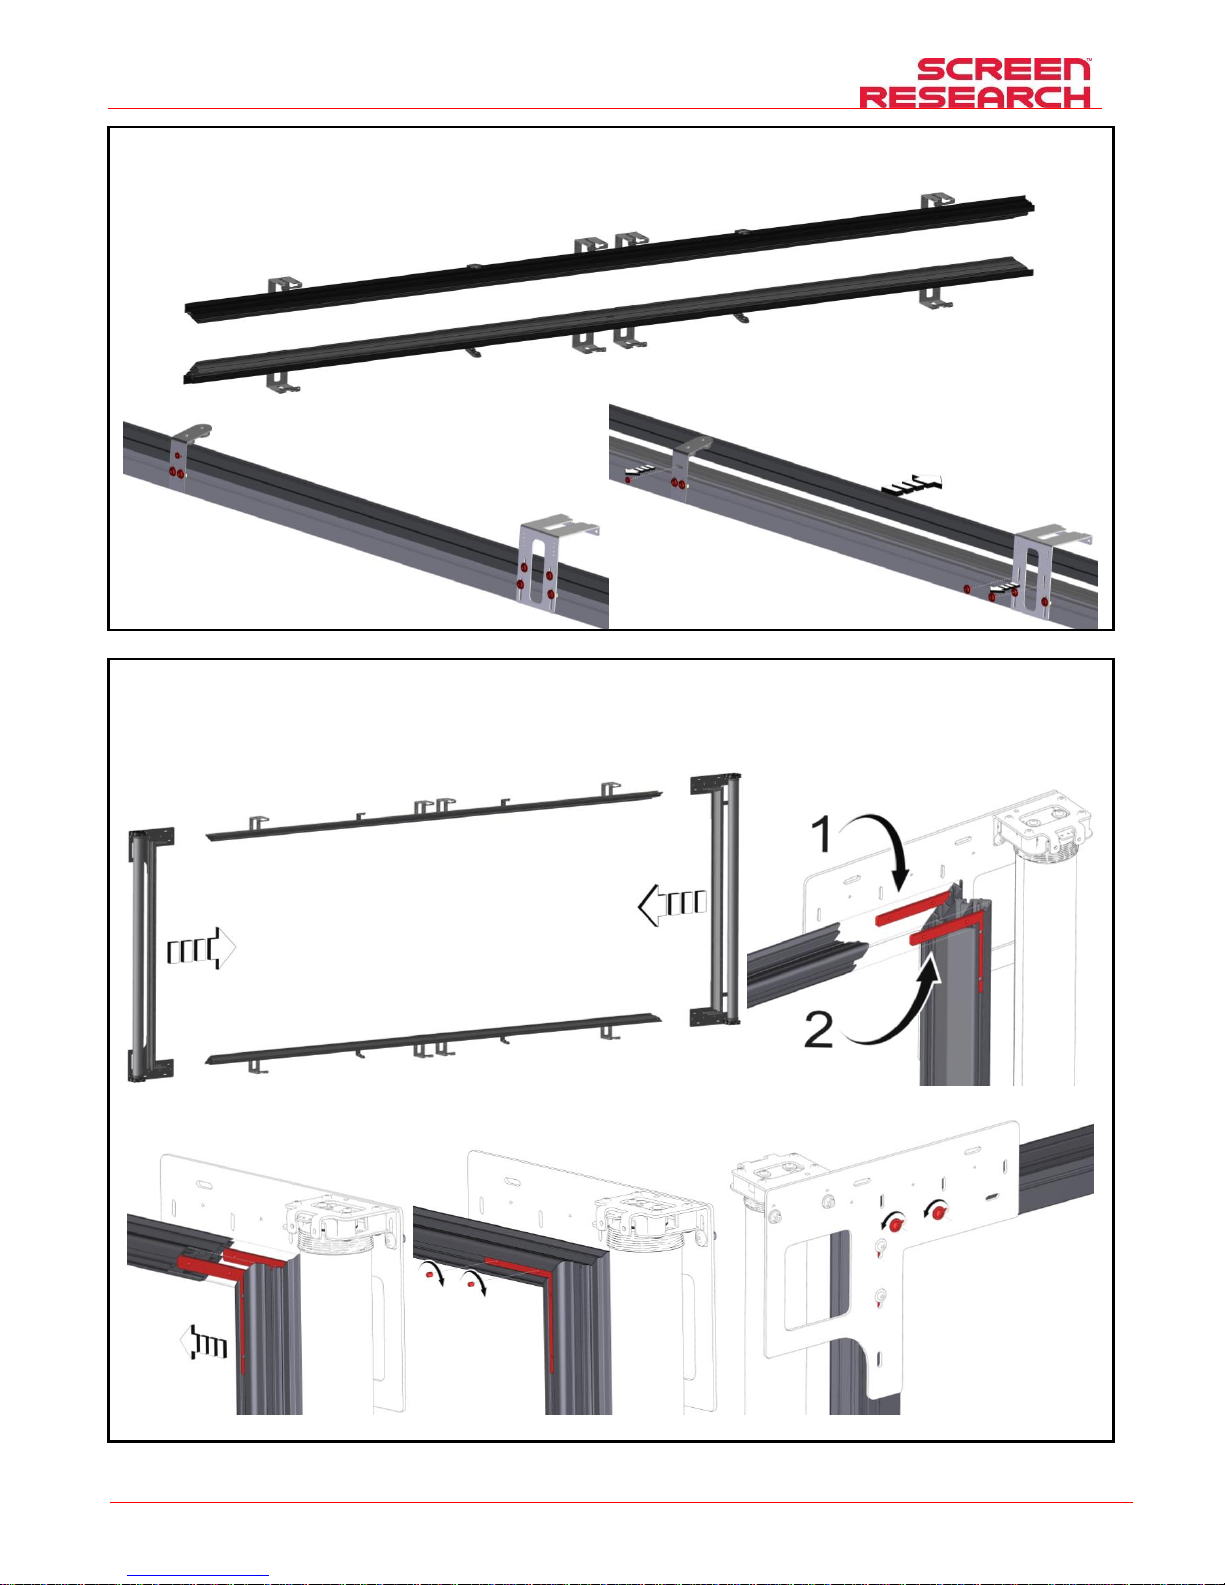
INSTALLATION SCREEN
Made by Adeo Screen Sp. Z o.o. (Poland) Specifications are subject to change without notice. E&OE
Please verify that you are working with the latest revision of this document before specifying your screen.
Doc: XLR3 – Installation Manual rev3 | 04.12.2017| Download at: www.screenresearch.com 2017 AdeoSreen All Rights Reserved.
Page 50
1 Take out the top and bottom image borders from the frame profiles.
2 Place the four frame profiles on your workspace. Insert the 2 corners (1, 2) of the lateral blocks,
inside each middle groove of the frame profiles.
Page 51
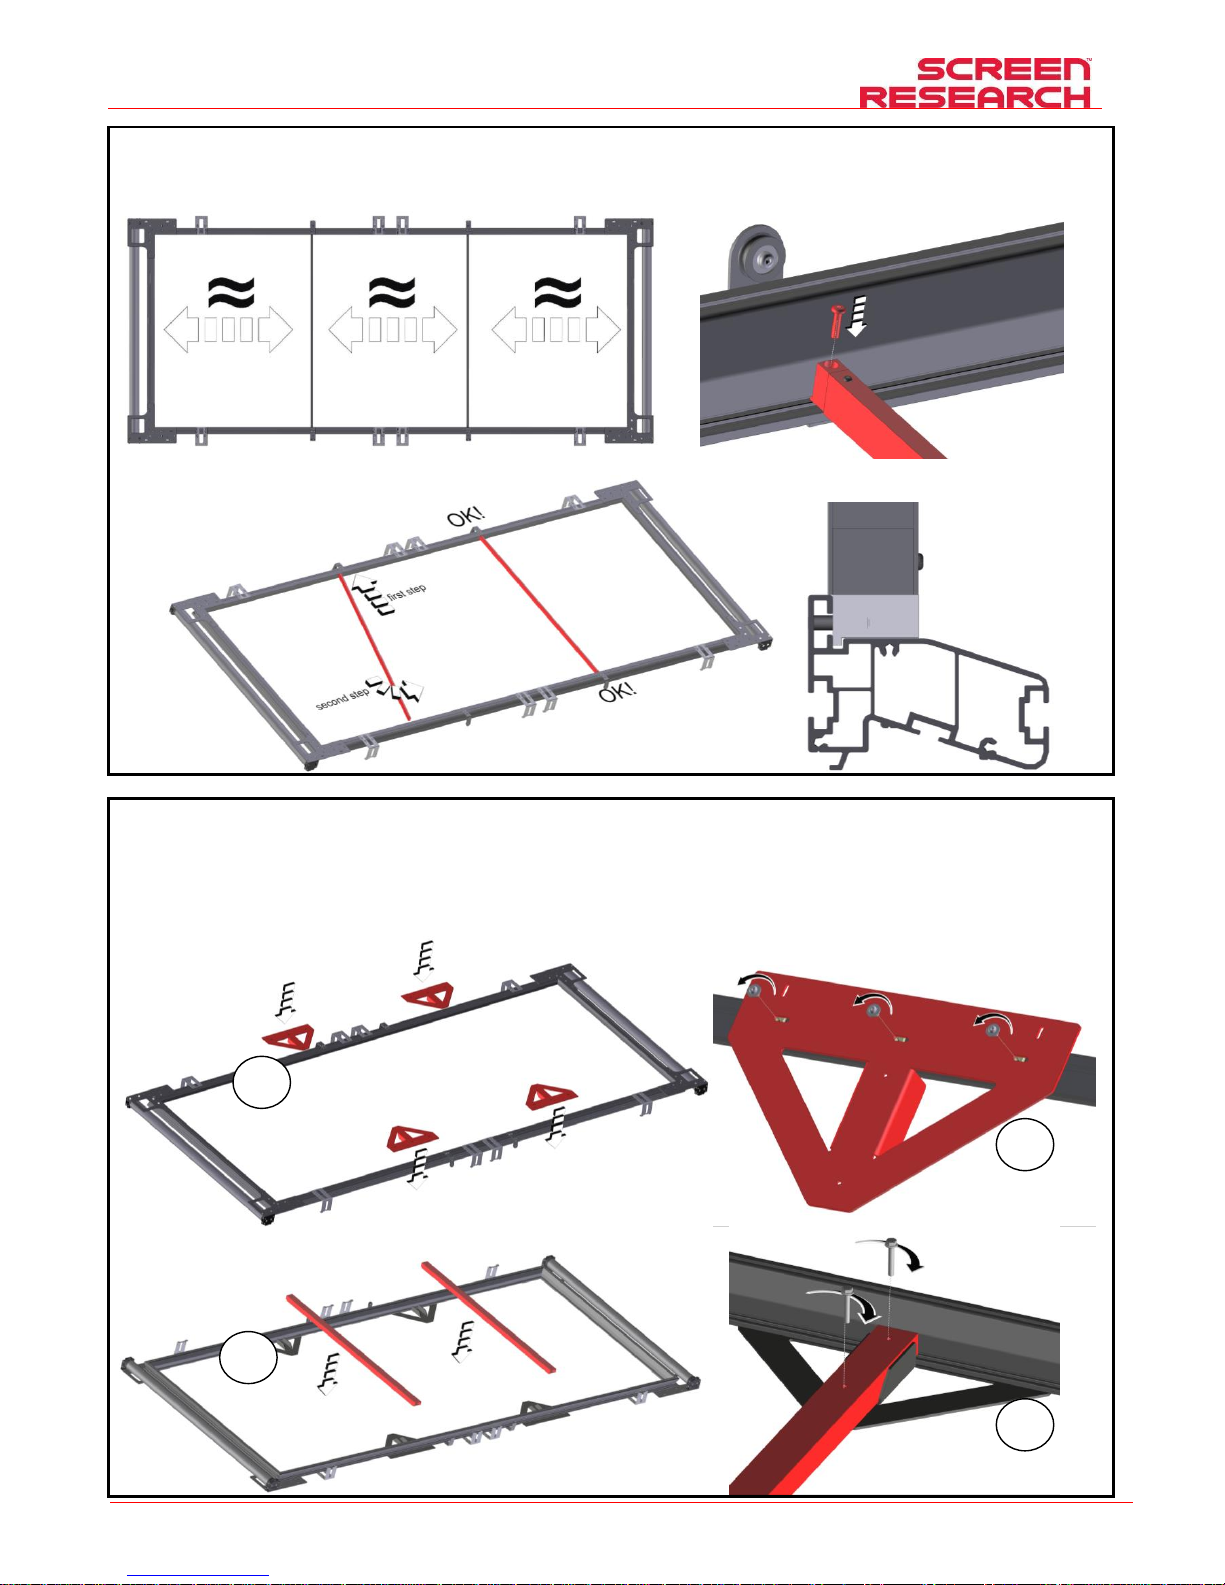
INSTALLATION SCREEN
Made by Adeo Screen Sp. Z o.o. (Poland) Specifications are subject to change without notice. E&OE
Please verify that you are working with the latest revision of this document before specifying your screen.
Doc: XLR3 – Installation Manual rev3 | 04.12.2017| Download at: www.screenresearch.com 2017 AdeoSreen All Rights Reserved.
Page 51
3 ≤160” VERSION ONLY Insert the stiffener profiles in the internal groove of the frame, screw them
on the frame from the front side of the screen.
3 >160” VERSION ONLY Position the brackets on the horizontal frame profiles (IMG.1), fix them on
the profile with the screws and the square nuts wich are inside the profile (IMG.2), position the
rectangular tube inside the brackets (IMG.3) and for last fix the rectangular tube on the brackets with
big screws, the screws are already plugged into the profiles(IMG.4).
1
2
3
4
Page 52
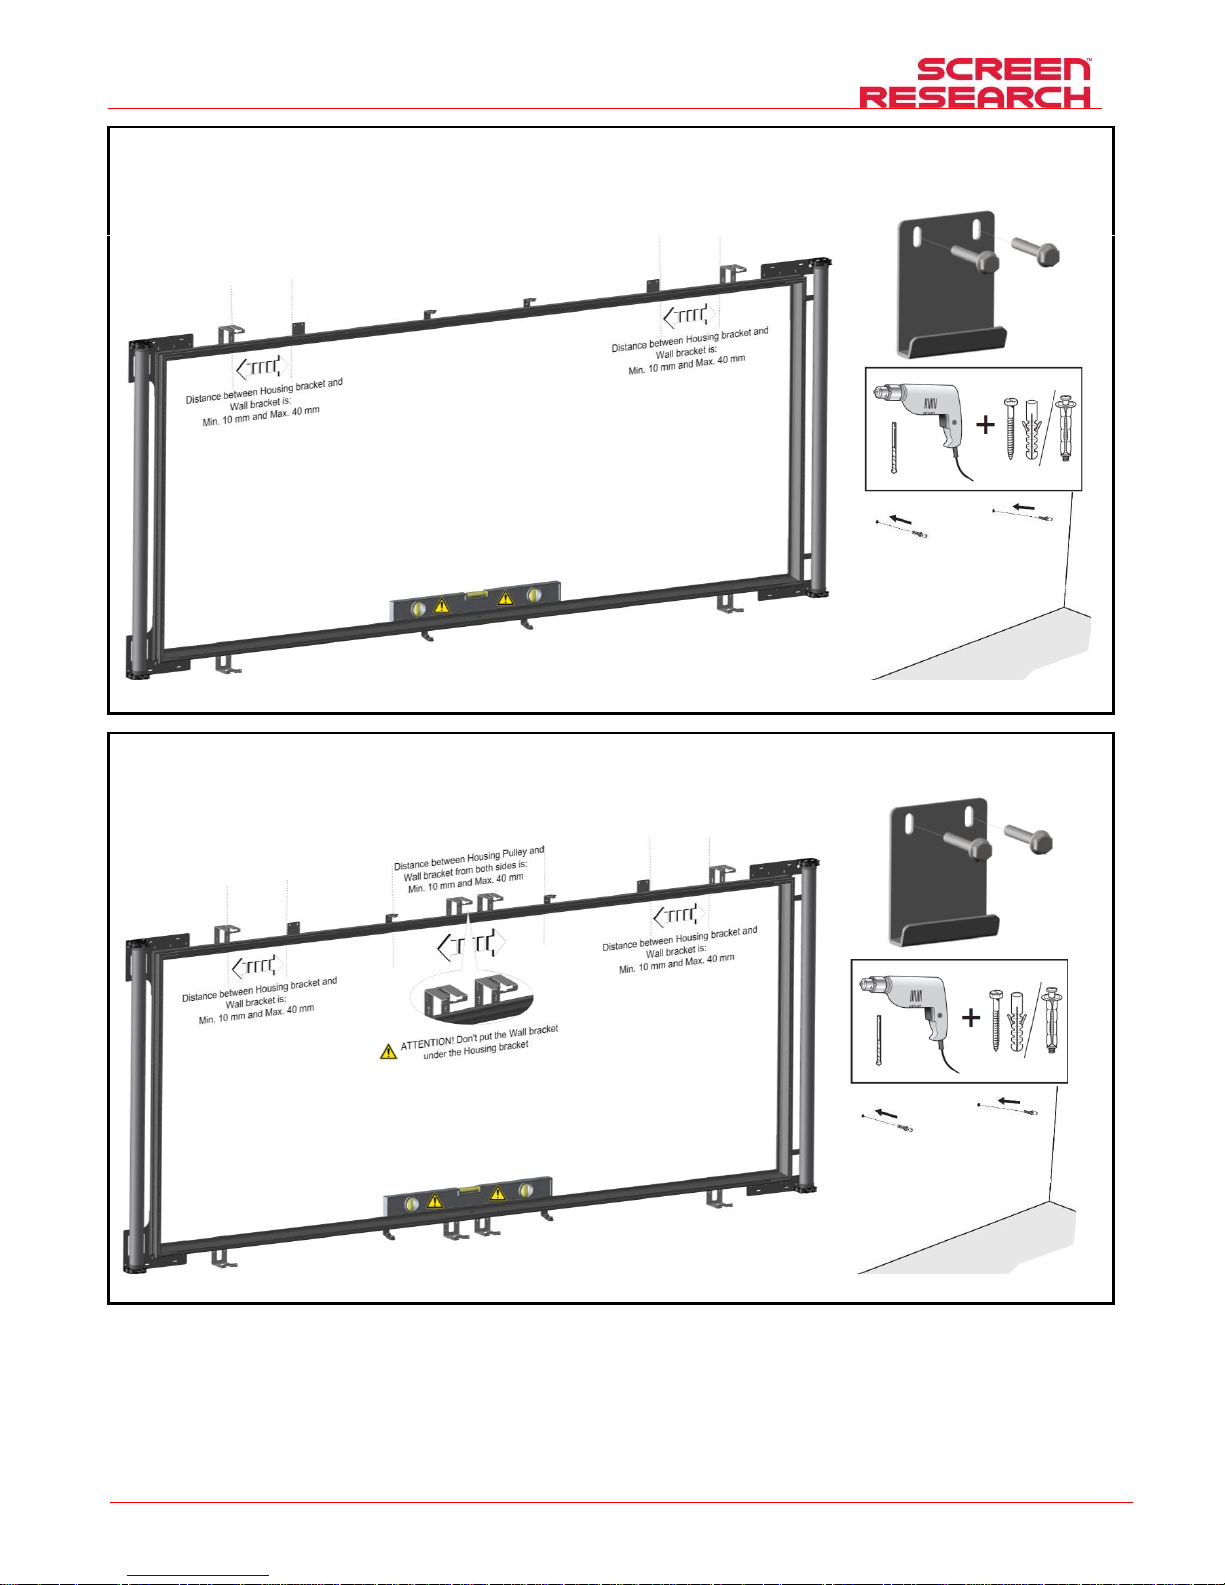
INSTALLATION SCREEN
Made by Adeo Screen Sp. Z o.o. (Poland) Specifications are subject to change without notice. E&OE
Please verify that you are working with the latest revision of this document before specifying your screen.
Doc: XLR3 – Installation Manual rev3 | 04.12.2017| Download at: www.screenresearch.com 2017 AdeoSreen All Rights Reserved.
Page 52
$ ≤160” VERSION ONLY For an easy screen installation set up the bracket on the wall.
$ >160” VERSION ONLY For an easy screen installation set up the bracket on the wall.
Page 53
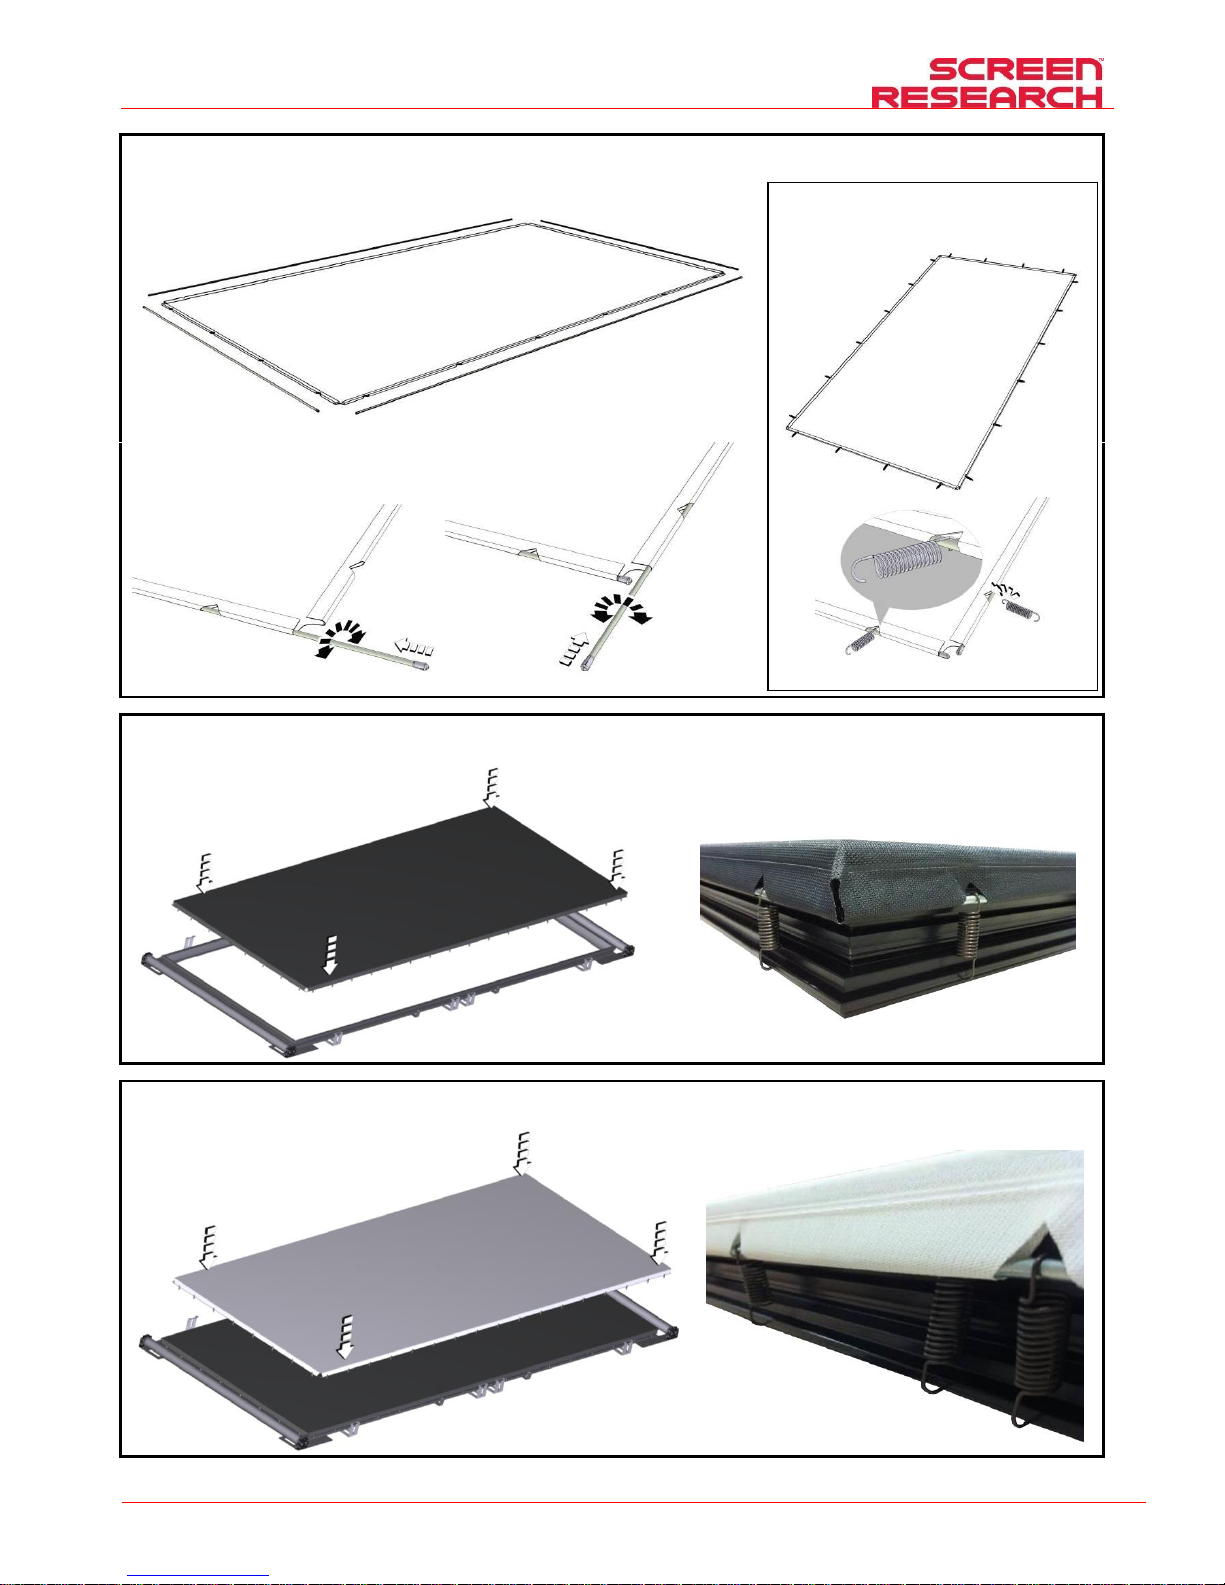
INSTALLATION SCREEN
Made by Adeo Screen Sp. Z o.o. (Poland) Specifications are subject to change without notice. E&OE
Please verify that you are working with the latest revision of this document before specifying your screen.
Doc: XLR3 – Installation Manual rev3 | 04.12.2017| Download at: www.screenresearch.com 2017 AdeoSreen All Rights Reserved.
Page 53
5 PREPARE THE FABRIC FOR THE INSTLLATION, insert the round bars in the pockets.
5 INSTALLL THE BLACK BACKING FABRIC IF PRESENT
5 INSTALLL THE FABRIC.
Fix the springs on the round bar
for every triangular hole.
Page 54
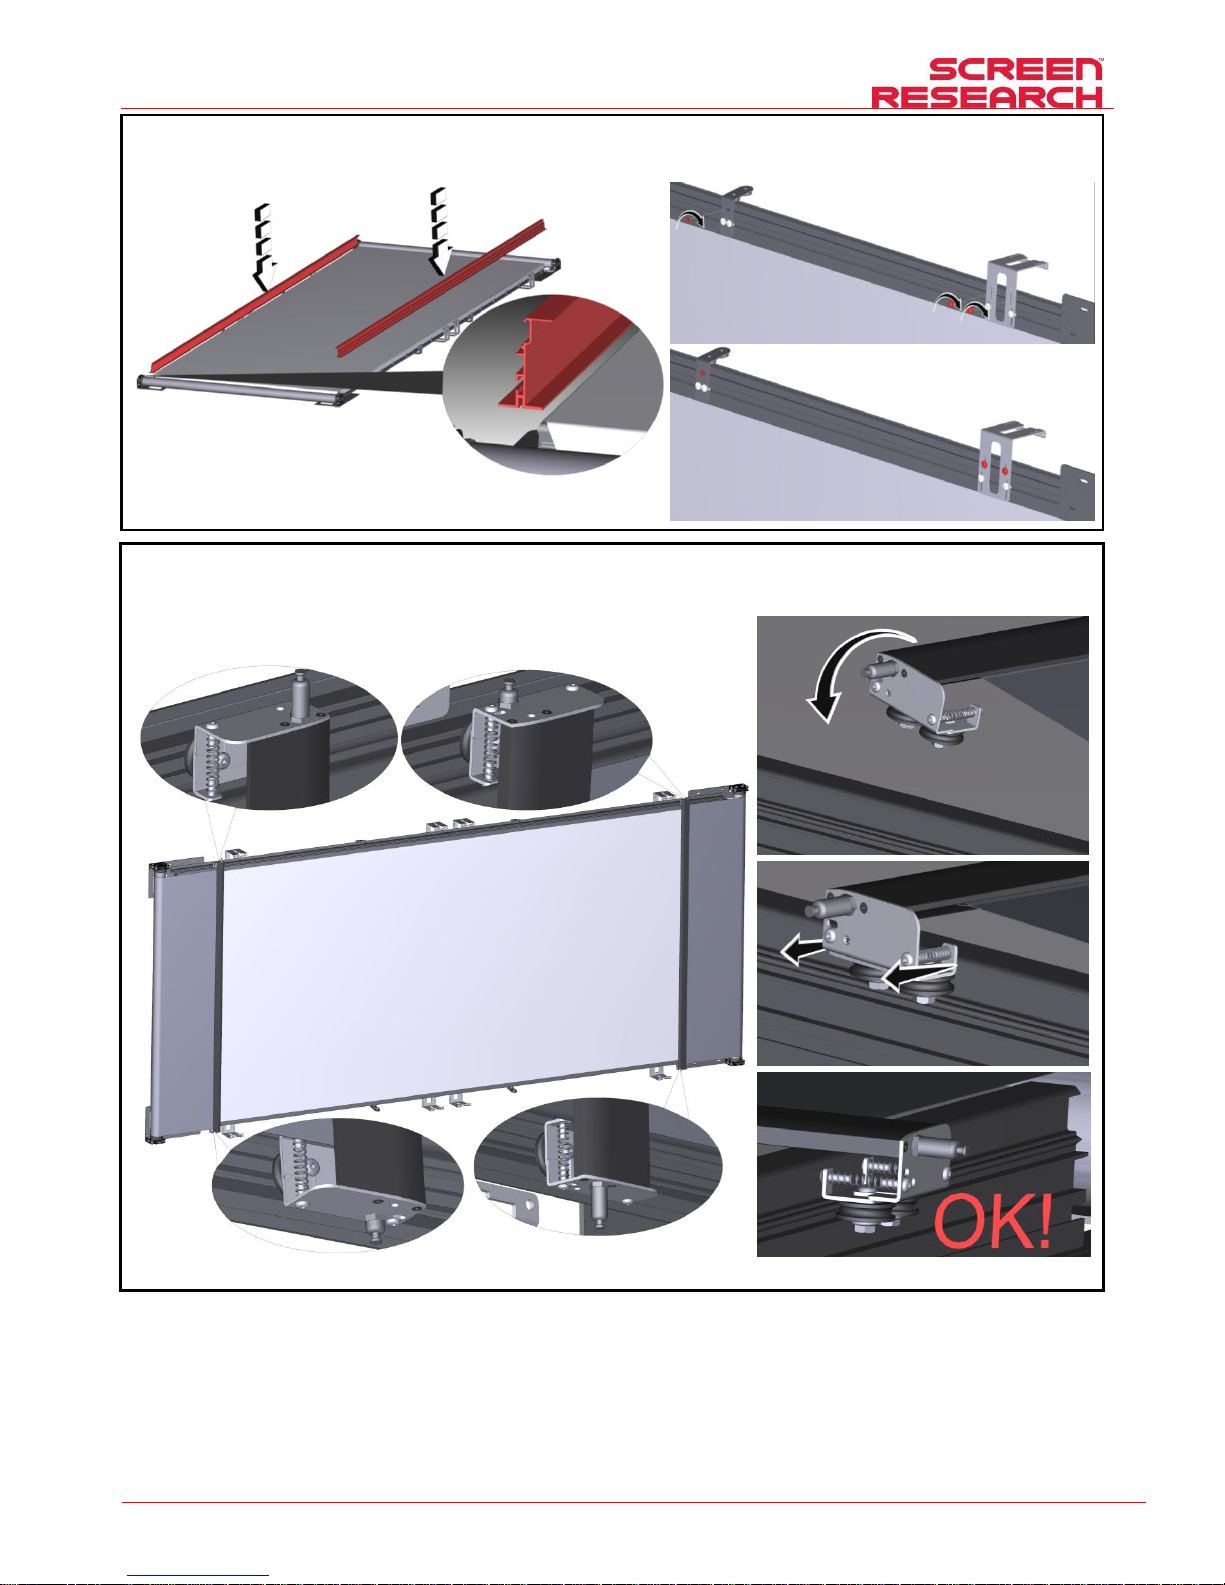
INSTALLATION SCREEN
Made by Adeo Screen Sp. Z o.o. (Poland) Specifications are subject to change without notice. E&OE
Please verify that you are working with the latest revision of this document before specifying your screen.
Doc: XLR3 – Installation Manual rev3 | 04.12.2017| Download at: www.screenresearch.com 2017 AdeoSreen All Rights Reserved.
Page 54
6 Re-position the top and bottom image borders.
7 ≤160” STANDARD and FULL CLOSURE version screens: Install the masking system guide.
Page 55
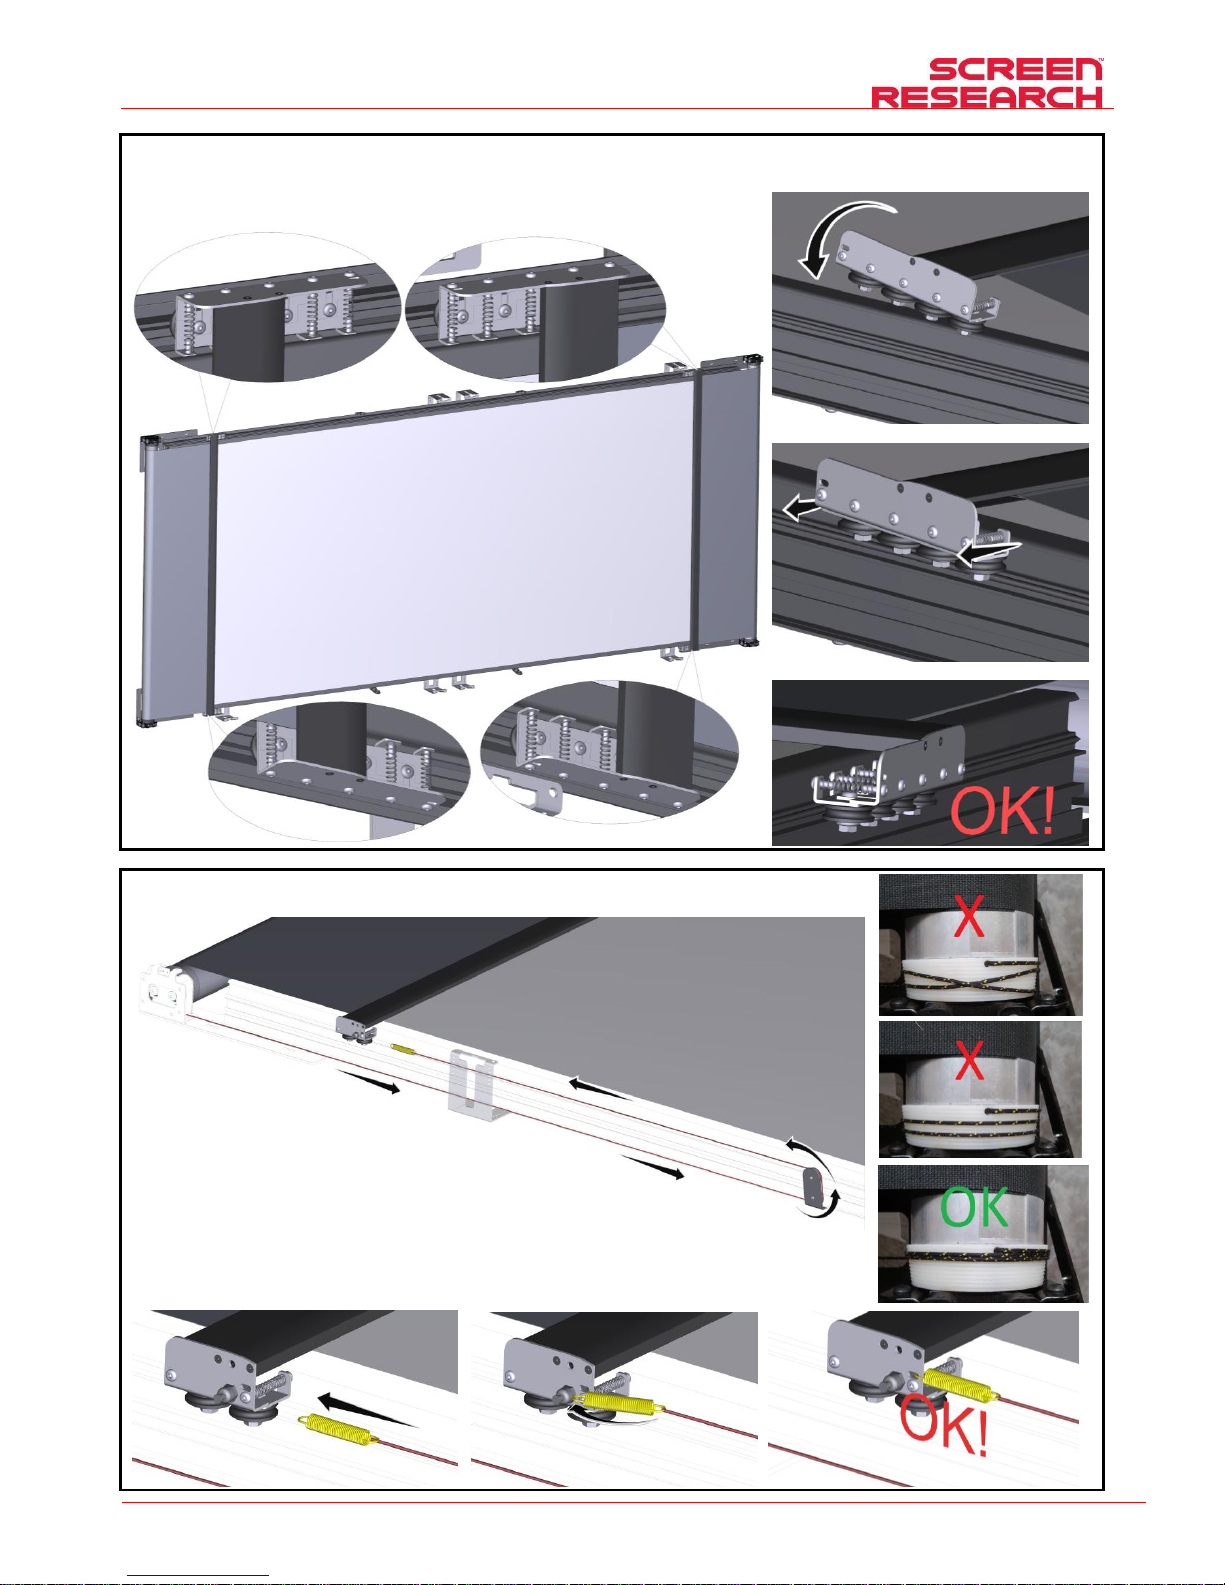
INSTALLATION SCREEN
Made by Adeo Screen Sp. Z o.o. (Poland) Specifications are subject to change without notice. E&OE
Please verify that you are working with the latest revision of this document before specifying your screen.
Doc: XLR3 – Installation Manual rev3 | 04.12.2017| Download at: www.screenresearch.com 2017 AdeoSreen All Rights Reserved.
Page 55
7 >160” STANDARD and FULL CLOSURE version screens: Install the masking system guide.
8 ≤160” STANDARD version screen: Attach the cable with the spring.
Page 56
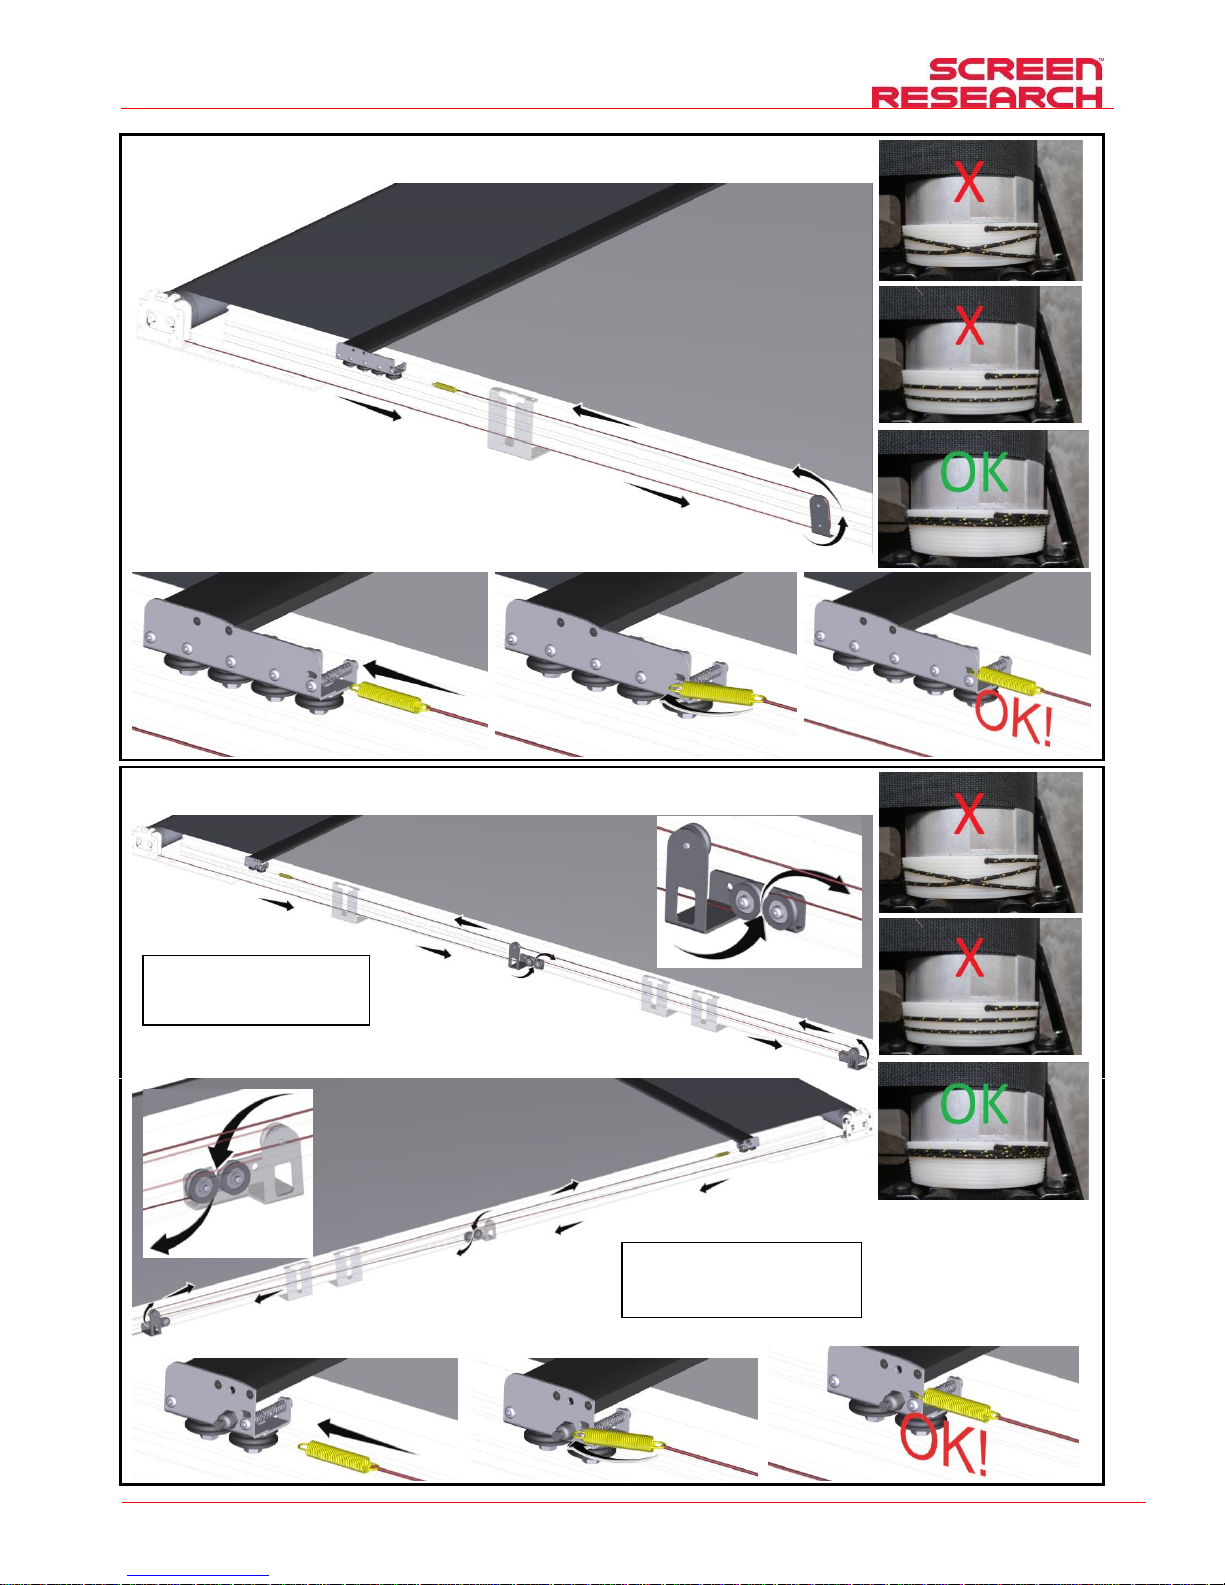
INSTALLATION SCREEN
Made by Adeo Screen Sp. Z o.o. (Poland) Specifications are subject to change without notice. E&OE
Please verify that you are working with the latest revision of this document before specifying your screen.
Doc: XLR3 – Installation Manual rev3 | 04.12.2017| Download at: www.screenresearch.com 2017 AdeoSreen All Rights Reserved.
Page 56
8 >160” STANDARD version screen: Attach the cable with the spring.
8 FULL CLOSURE version screen: Attach the cable with the spring.
The cable path for
the Top-Bottom Left
The cable path for the
Top-Bottom Right
Page 57
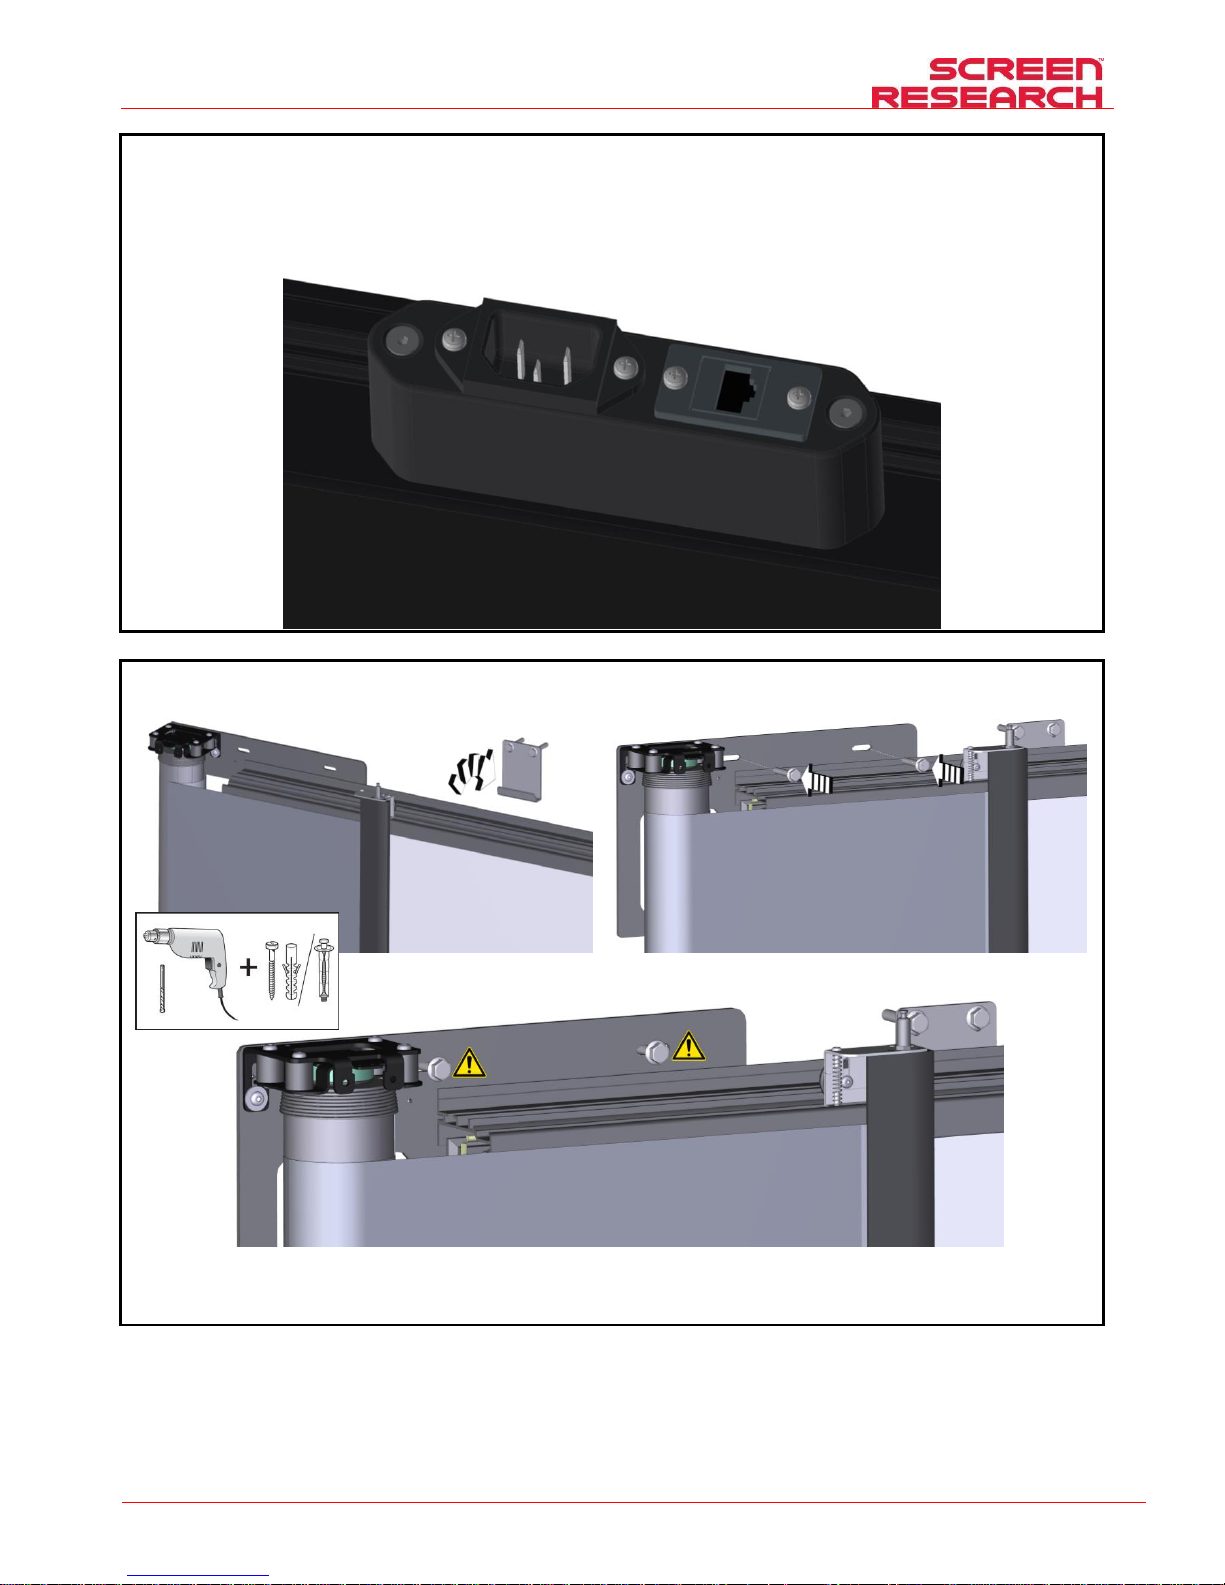
INSTALLATION SCREEN
Made by Adeo Screen Sp. Z o.o. (Poland) Specifications are subject to change without notice. E&OE
Please verify that you are working with the latest revision of this document before specifying your screen.
Doc: XLR3 – Installation Manual rev3 | 04.12.2017| Download at: www.screenresearch.com 2017 AdeoSreen All Rights Reserved.
Page 57
9 Connect power and data cable using the socket you can find in the left, right and top frame of
the screen. (Power and data cables are included)
a Hang the screen on the support and fix the screen on the wall with screes (not included).
b Assemble the Housing.
Page 58
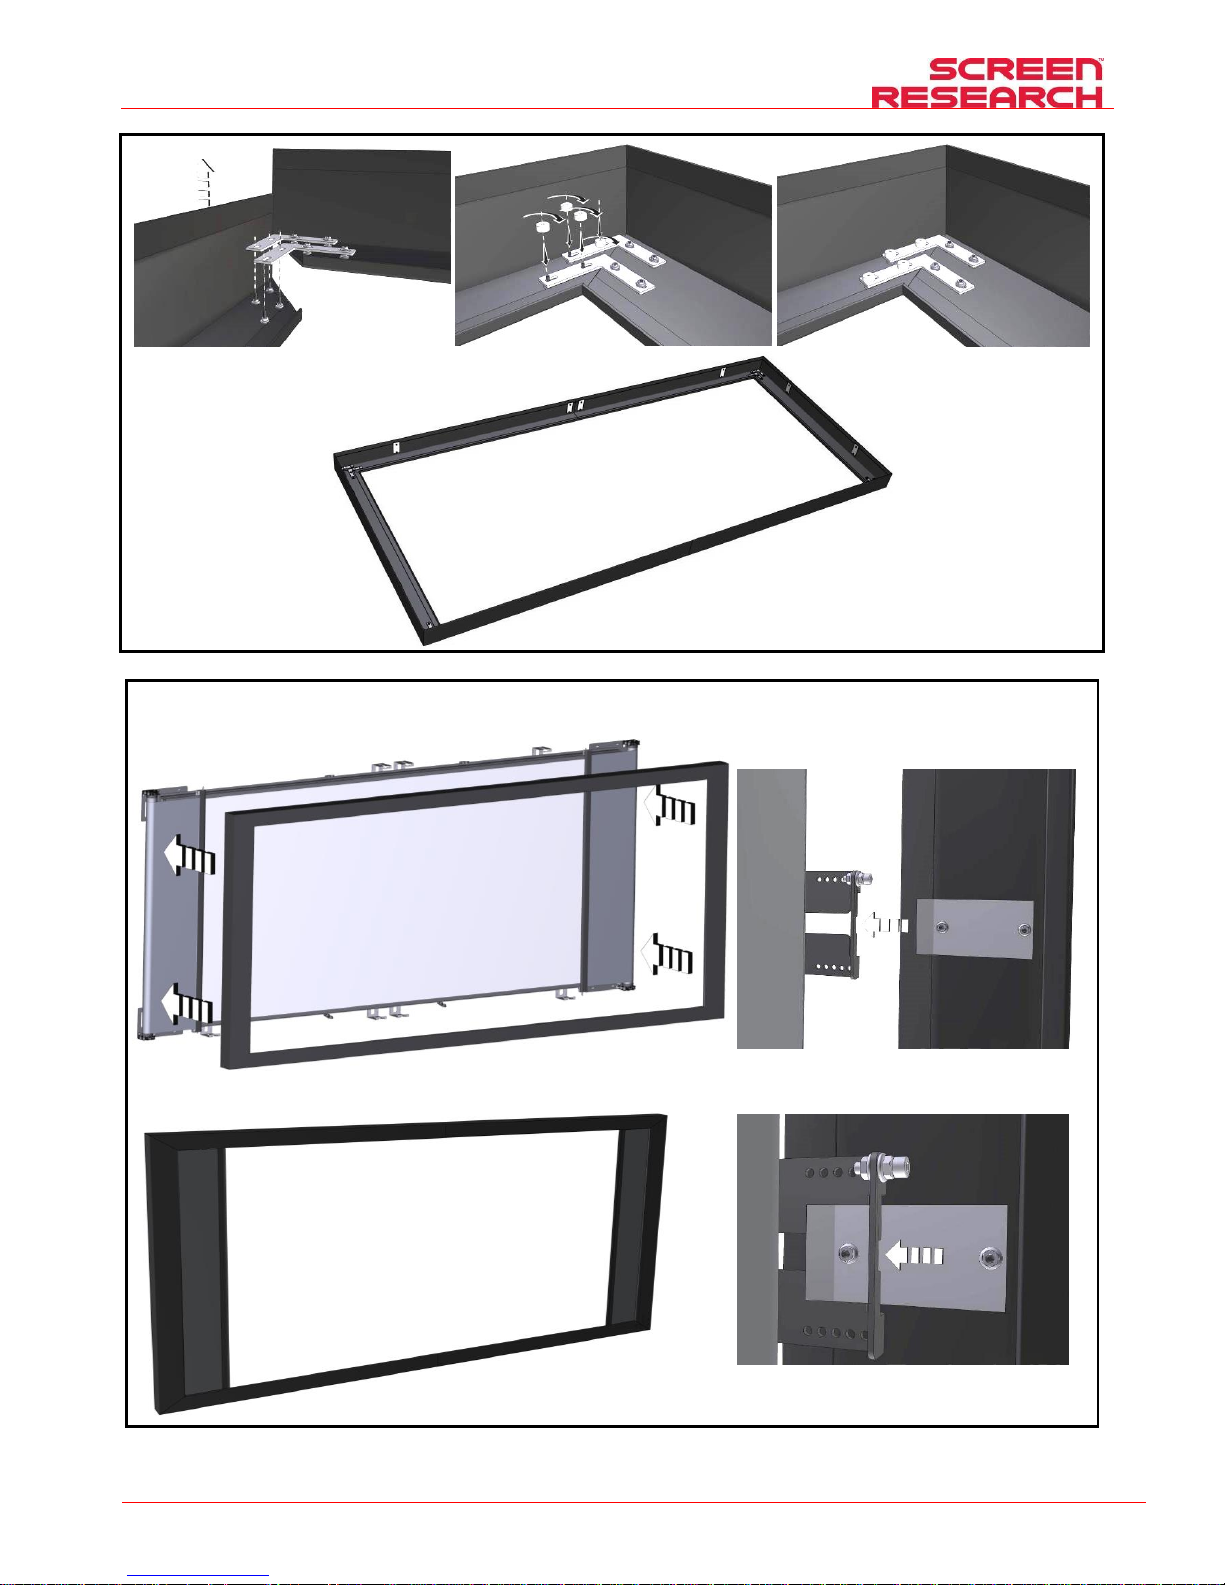
INSTALLATION SCREEN
Made by Adeo Screen Sp. Z o.o. (Poland) Specifications are subject to change without notice. E&OE
Please verify that you are working with the latest revision of this document before specifying your screen.
Doc: XLR3 – Installation Manual rev3 | 04.12.2017| Download at: www.screenresearch.com 2017 AdeoSreen All Rights Reserved.
Page 58
b Assemble the Housing on the frame screen.
Page 59
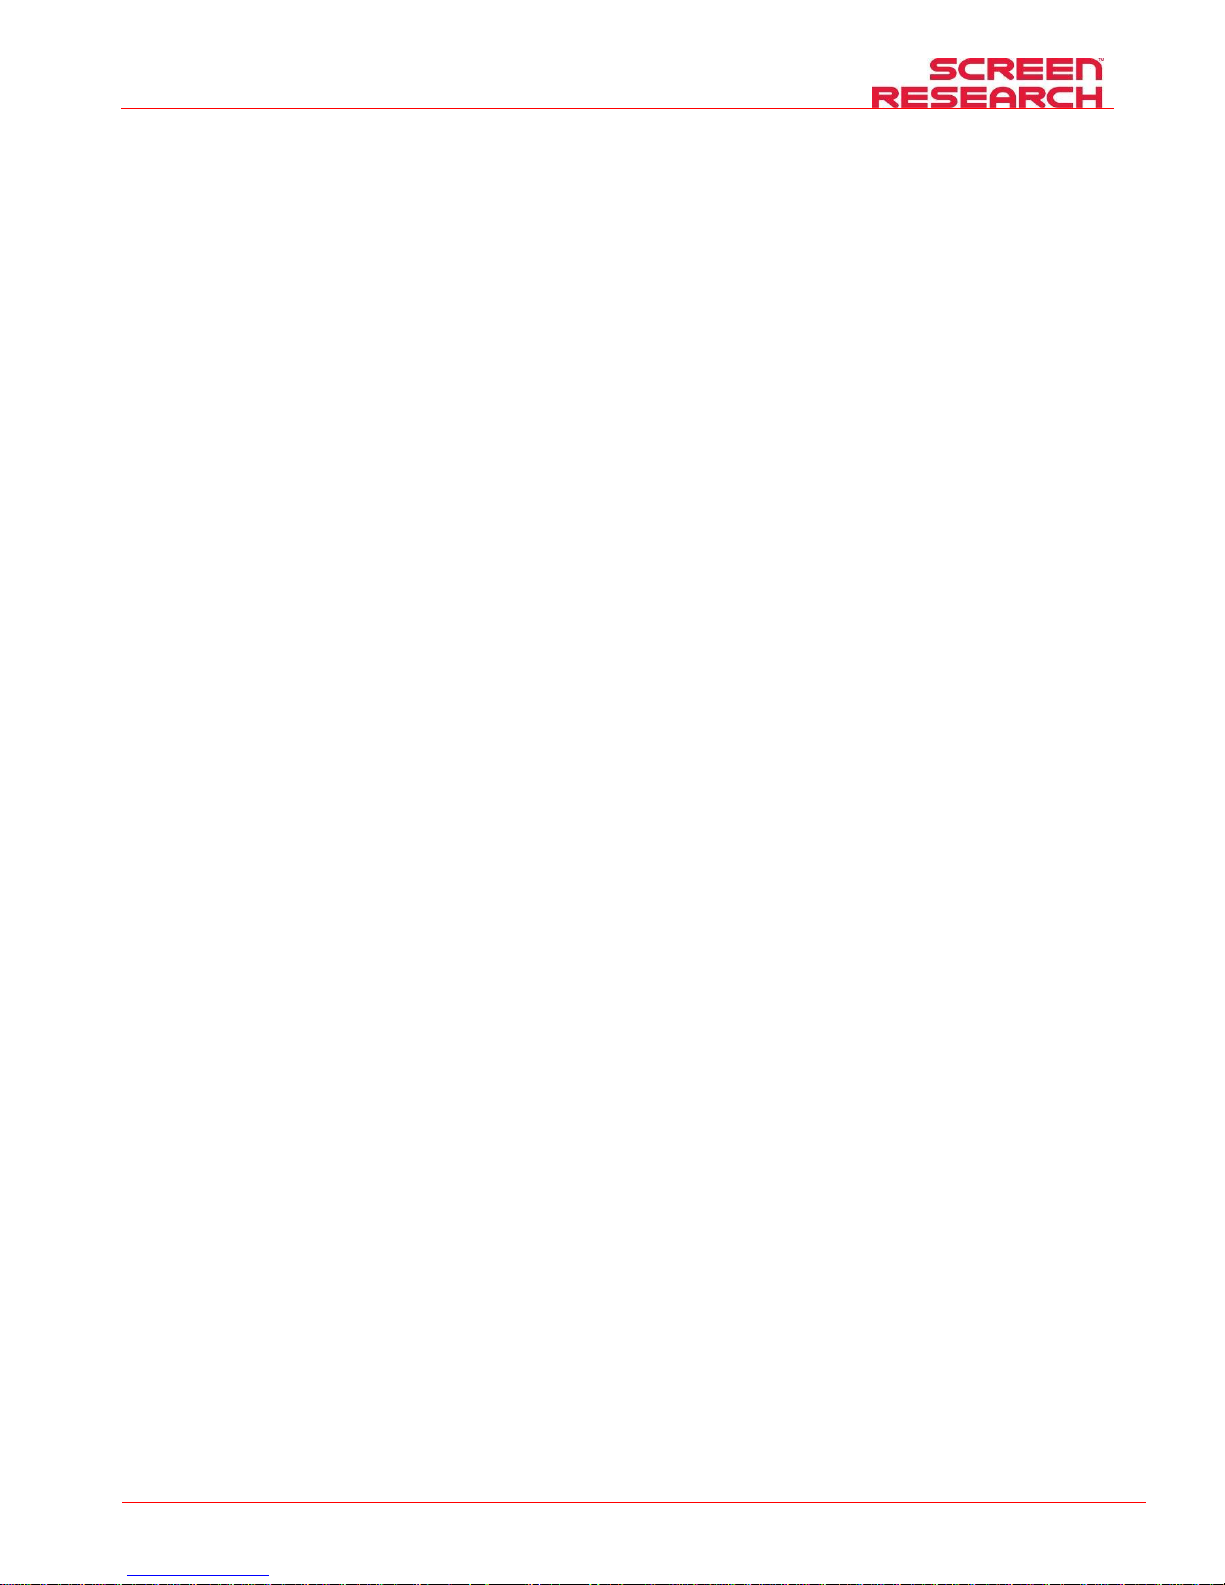
Made by Adeo Screen Sp. Z o.o. (Poland) Specifications are subject to change without notice. E&OE
Please verify that you are working with the latest revision of this document before specifying your screen.
Doc: XLR3 – Installation Manual rev3 | 04.12.2017| Download at: www.screenresearch.com 2017 AdeoSreen All Rights Reserved.
Page 59
Page 60
Screen Research Contacts
Made by Adeo Screen Sp. Z o.o. (Poland) Specifications are subject to change without notice. E&OE
Please verify that you are working with the latest revision of this document before specifying your screen.
Doc: XLR3 – Installation Manual rev3 | 04.12.2017| Download at: www.screenresearch.com 2017 AdeoSreen All Rights Reserved.
Page 60
ADEO SCREEN Sp. Z o.o.
Ul. Boleslawa Krzywoustego 31
59-500 Zlotoryja, POLAND
Phone +48 76 850 53 01
Fax + 48 76 850 53 70
Emails
For commercial inquiries: [email protected]
For technical inquiries: [email protected]
© Copyright 2017 Adeo Screen. All rights reserved.
Adeo Screen products are covered by one or more of the following patents:
No. 08.02361 (France); No. 09.03989 (France); No. 167.61.72 (Europe); No. 167.75.55 (Europe); No. EP 2277083 (Europe);
No. US 7 777 947-B2 (USA); No. US 7 466 483-B2 (USA); No. US 2011 043908 (USA); USPTO : 200 701 71 522 (USA);
No. 200480025260.9 (China); No. 1126/CHENP/2007 (India); No. 2006-524398 (Japan) pending;
SilverPix, ClearPix, MultiPix, SolidPix, X-Mask, E-Mask, TheaterCurved, Pi-Grip, E-Grip, TFX, StopLight, DécorMask, TailorMade and the Screen Research logo are all
trademarks of Screen Research.
ISF is a trademark of Imaging Science Foundation Inc.
THX is a trademark of THX Ltd
Somfy is a registered trademark of Somfy SA
Era Inn is a registered trademark of Nice SpA
Crestron is a trademark of Crestron Electronics, Inc.
Sivoia QS is a registered trademark of Lutron Electronics Co., Inc.
Mastrotto is a trademark of Gruppo Mastrotto SpA
All other trademarks are the property of their respective owners.
 Loading...