

Page 1 of 3
Full Instructions for installing the Screaming Banshee™ warning system!
What’s in the Box?
Firstly, open the box and ensure that you have the following parts
Full Screaming Banshee™ System Includes:
(Does not apply if you purchased a Control Unit only)
Control Unit Only Includes:
(Does not apply if you purchased a Full Screaming Banshee™ System)
• 1 Quick Start Instruction Manual
ensure that your horn is correctly fitted and well-grounded to the chassis.
For example, here is a perfect
This instruction manual is for mounting and wiring both the Full Screaming Banshee™ Horn System and the Control Unit.
More information and a downloadable version of this guide are available at our website screaming-banshee.com/installation
• 1 Quick Start Instruction Manual
• 1 Screaming Banshee™ Control System
• 1 Screaming Banshee™ Black or Chrome horn
• 1 Hardware pack with 7 electrical terminals, 1 Stainless Steel bolt, 1 nut, 1
washer, 1 cable tie and 1 short piece of black electrical cable.
• 1 Screaming Banshee™ Control System
• 1 Hardware pack with 5 electrical terminals and 1 cable tie.
Note: If you are purchasing just the control unit we assume that you have a suitable loud horn that you
would like to use with the Screaming Banshee™ Control System. This horn must not draw more than 18
amps or failure of the Control Unit may occur, which will not be covered by the warranty. You will need to
Step 1: Mounting the Horn (full system only, for control unit only orders skip to step 3)
To begin fitting the Screaming Banshee™ system to your vehicle, it’s best to start by mounting the horn itself. Examine
your vehicle for a suitable spot to mount the horn. Closer to vertical is preferred as well as in a place where rain water
is less likely to get into the flute of the horn. You don’t want it to face directly into oncoming rain. We recommend
that you mount the compressor vertically, but being 20 - 30 degrees off from vertical typically works without problem.
Just use common sense.
See our Picture Gallery
• Do's & Don'ts
• General Pictures
• Naked Bikes & Cruisers
• Scooters
• Sports & Sports Tourers
• Tourers
for specific installations done on different types of bikes as well as a few cars. The sections are:
You can also choose from a range of brackets on our website
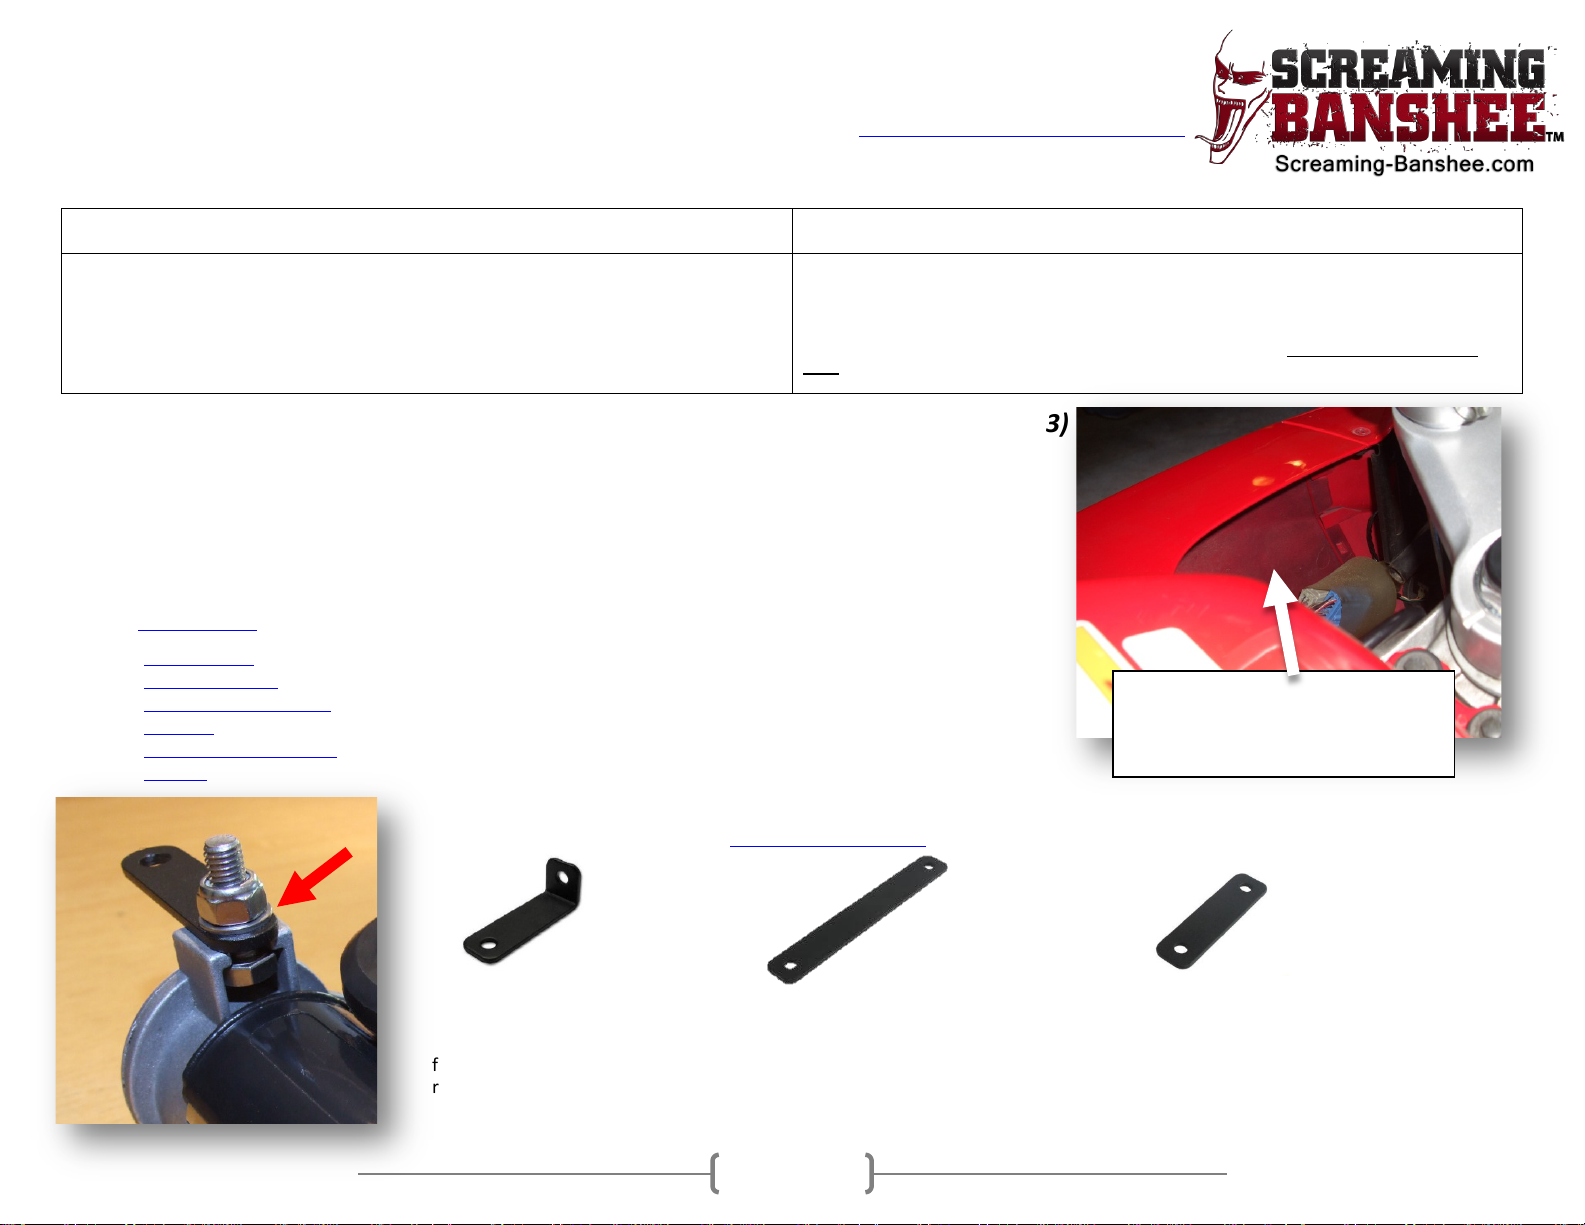
SKU: longflatbracket SKU: anglebracket SKU: shortflatbracket
Use the included Stainless steel metric bolt, nut & washer. (8mm x 1.25mm pitch)
First, the bolt should be placed into the horn housing; this will securely mount the horn to one of our brackets or to whatever you
find best to mount your system to. Then fit the washer and nyloc nut. Make sure to snug it up tight to prevent vibrations from
rattling it loose.
that are suitable for almost all models of motorcycles and cars.
Full Instructions – Version 1.1 – Revised 03/31/12
place to mount the horn and
control unit on a Honda VFR800
Page 2 of 3
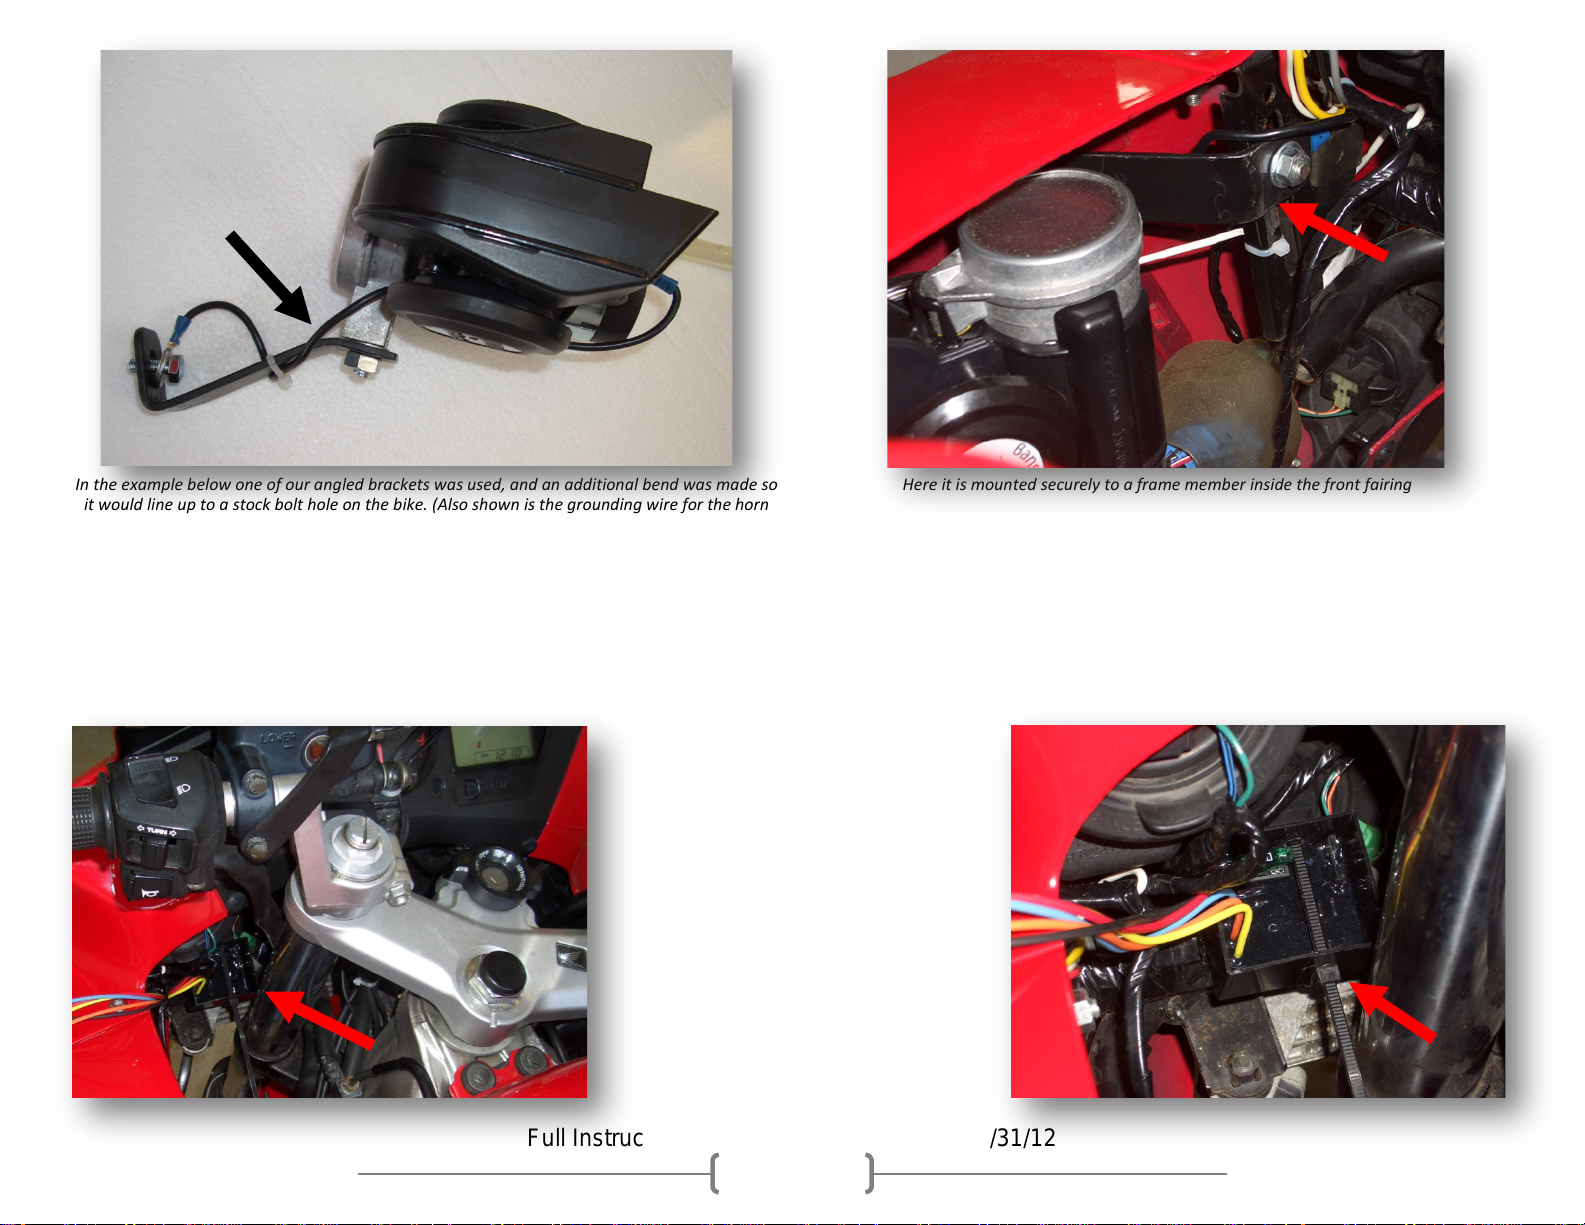
In the example below one of our angled brackets was used, and an additional bend was made so
compressor – this will be covered later in detail)
Here it is mounted securely to a frame member inside the front fairing
it would line up to a stock bolt hole on the bike. (Also shown is the grounding wire for the horn
If you cannot find a suitable place to conceal the horn, there are two other options. Firstly you can find an exposed place and mount the horn so it’s “on show”. Alternatively, we
can supply a smaller horn that is almost as loud and a bit closer to the size of a stock horn – contact us about this if you need a smaller horn – but remember, it won’t be as loud!
Step 2: Mounting The Screaming Banshee™ horn Control Unit
Find a place to mount the control unit that is close to the stock horn and also close to the new Screaming Banshee™ horn. Secure with the supplied cable tie to a convenient
chassis member or even to plastic bodywork. The control unit does not need to be readily accessible, except for the initial setting up. Mount it so it won’t fill up with water if it is
going to be exposed.
Full Instructions – Version 1.1 – Revised 03/31/12
Page 3 of 3
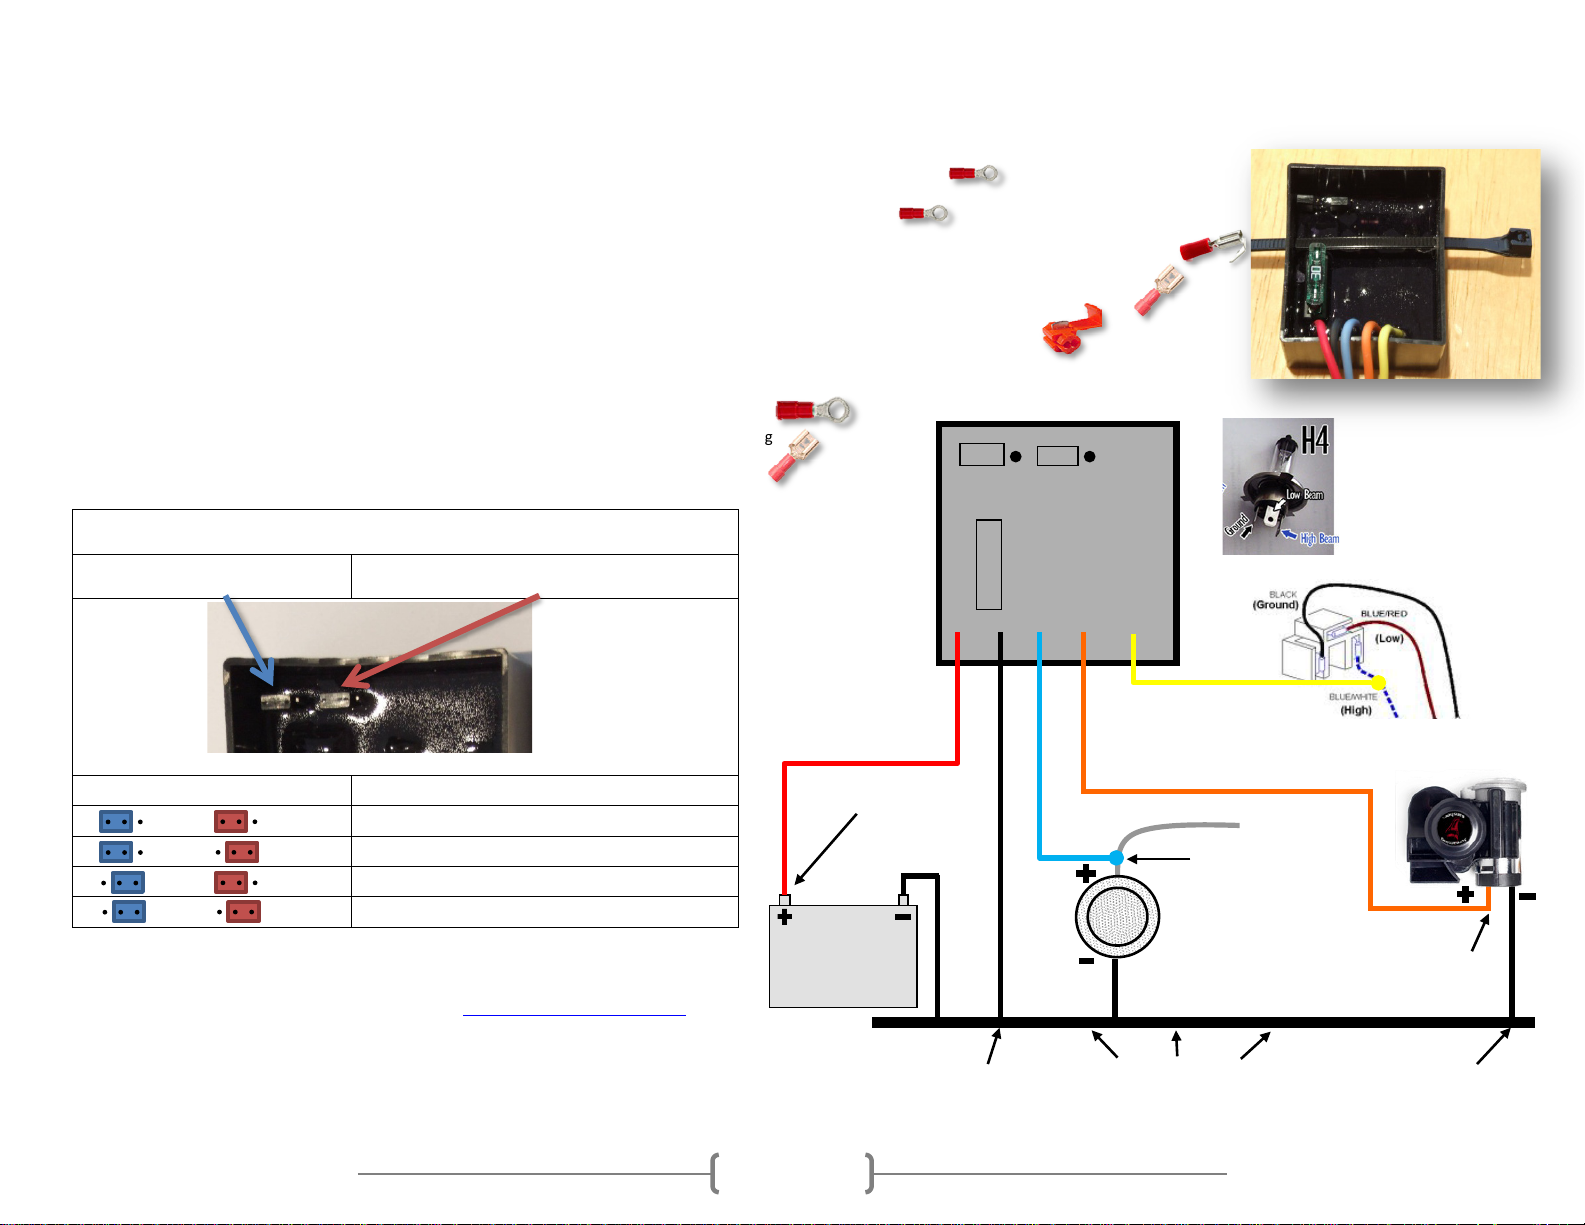
30
Chassis / Fra me
Factory Horn
Connect to the + w ire on
the Factory Horn
Connect to the + w ire on
the Battery
Connect to the Chassis
Connect to the + w ire on
the Screaming
Banshee™ Horn
Battery
Connect to the Hi gh
Beam w ire on the
Headlight Plug (show s
typical type of plug,
yours may be different)
Connect to the Chassis
Screaming Banshee™ Control U nit
Step 3: Wiring the System
Settings -
place the small plastic cover (called a jumper) in either position to select the options you prefer.
This jumper controls the delay time
This jumper controls weather you want your
Jumper Position
Chosen setting
0.25 Second Delay / Pulse
0.25 Second Delay / Solid
0.5 Second Delay / Pulse
0.5 Second Delay / Solid
Follow the instructions below for each wire; MAKE SURE THAT THE BATTERY IS DISCONNECTED WHILE YOU ARE DOING THIS PART OF INSTALLATION. You will need a wire
stripper and crimp tool to crimp the connectors to each wire. When running wires, make sure that you do not place them close to parts that get extremely hot, like the cylinder
head or any exhaust parts. It’s best to have 2 inches of clearance between wiring and any hot components. Secure wires every 4-6” to ensure they do not vibrate or get caught
on moving parts. Do not attach wires to any moving components like levers / linkages etc.
Red Wire – connect this to the (+) of your battery using one of the smaller ring terminals.
Black Wire – connect to a good chassis point using one of the smaller ring terminals.
Blue Wire – Connect to the wire going to your existing horn (not the ground wire), using the piggyback terminal.
Orange Wire – Connect to the (+) of the new Screaming Banshee™ horn using one of the slide on terminals.
Yellow Wire – Connect this to the High Beam wire on your headlight using the Tap Splice terminal.
Grounding Cable (Only applies to Full System buyers) - You will also need to make a
small ground wire for the Screaming Banshee™ horn. Using the black electrical cable, crimp a slide on
terminal onto one end of the cable and the larger ring terminal on the other end. Then, attach the
slide on terminal end to the (-) on the Screaming Banshee™ horn, strip installation and attach the ring
terminal end to a good grounding point on your vehicle. It is often best to use the point where you
mount the horn or horn bracket to the chassis for this but make sure there is no paint preventing a
good connection.
You can set the Screaming Banshee™ system to operate in 4 different ways. Simply
until the horn kicks in
headlights and horn to pulse or stay solid
Lastly, reconnect the battery and turn on the key. Now press and hold your horn switch
and if everything has been wired correctly the Screaming Banshee™ system will kick in! If
you have any issues or questions, please review the installation sections, and if still
stumped then email us with any specfic questions on info@screaming-banshee.com, or if
all else fails then give us a call at (727) 744-6808!
Enjoy your new Screaming Banshee™ horn system!
Full Instructions – Version 1.1 – Revised 03/31/12
 Loading...