


3
1
2
4
6
5
P
O
W
E
R
O
N
PO
WE
R
O
F
F
/
T
E
S
T
A
D
B C
POWER OFF / TEST
POWER ON
User guide
Powered by the Sun
scout
SolarPlate
™
0°C
50°C
Copyright © 2013 Suntrica Ltd. Suntrica is a registered trademark of Suntrica ltd. All rights reserved.
Suntrica Ltd
Örninkatu 15 B 28
24100 Salo
Finland
suntrica.com
facebook.com/suntrica
twitter.com/SuntricaLtd
For all USB-compatible
mobile devices

FI
Onnittelut Suntrica SolarPlate™ SCOUT aurinkoenergialla
toimivan latauslaitteen hankinnasta. SCOUTilla voidaan ladata
lähes kaikkia USB yhteensopivia 5V:n latausjännitettä käyttäviä
laitteita, mm. matkapuhelimia, MP3-soittimia, GPS-laitteita ja
digitaalikameroita.
HUOM! Lataamiseen tarvitset USB-standardin mukaisen
kaapelin. Jos kohdelaitteesi ei ole suoraan USB yhteensopiva,
Suntrica suosittelee käyttämään kohdelaitteen valmistajan
suosittelemaa adapteria. Latauksessa saattaa silti ilmetä
häiriöitä, mikäli kohdelaite ei ole USB-standardin mukainen.
Opas sisältää tärkeitä turvallisuus- ja käyttöohjeita. Lue tämä
käyttöopas sekä ladattavassa laitteessa olevat ohjeet ja
varoitukset huolellisesti ennen SCOUTin käyttöä.
Pakkauksen sisältö
• Suntrica SolarPlate™ SCOUT aurinkolaturi
• Käyttöohje
Aurinkolaturin kuvaus
1. Aurinkopaneeli
2. Kotelo
3. USB-naaras latauskaapeli
4. Virtakytkin – päälle
5. Virtakytkin – pois & lataustason ilmaisin
6. LED-valot
Tärkeitä turvallisuusohjeita
• Lue kaikki SCOUTin pakkauksessa ja tässä käyttöoppaassa
levat varoitukset ja noudata niitä.
• Älä käytä SCOUTia, jos se on vahingoittunut.
• Älä upota SCOUTia veteen – paneeli on roiskevesitiivis, mutta
kaapeli on suojattava kosteudelta.
• SCOUT on sähkölaite, huolehdi paloturvallisuudesta.
• Älä aseta raskaita esineitä SCOUTin päälle.
• Älä taivuta tuotetta voimakkaasti.
• Älä aiheuta tarpeetonta vetorasitusta aurinkolaturin
latauskaapelille.
• Kierrätä SCOUT kuten muukin elektroniikka. SCOUT
sisältää akun, jota ei saa hävittää polttamalla tai muun
kotitalousjätteen mukana.
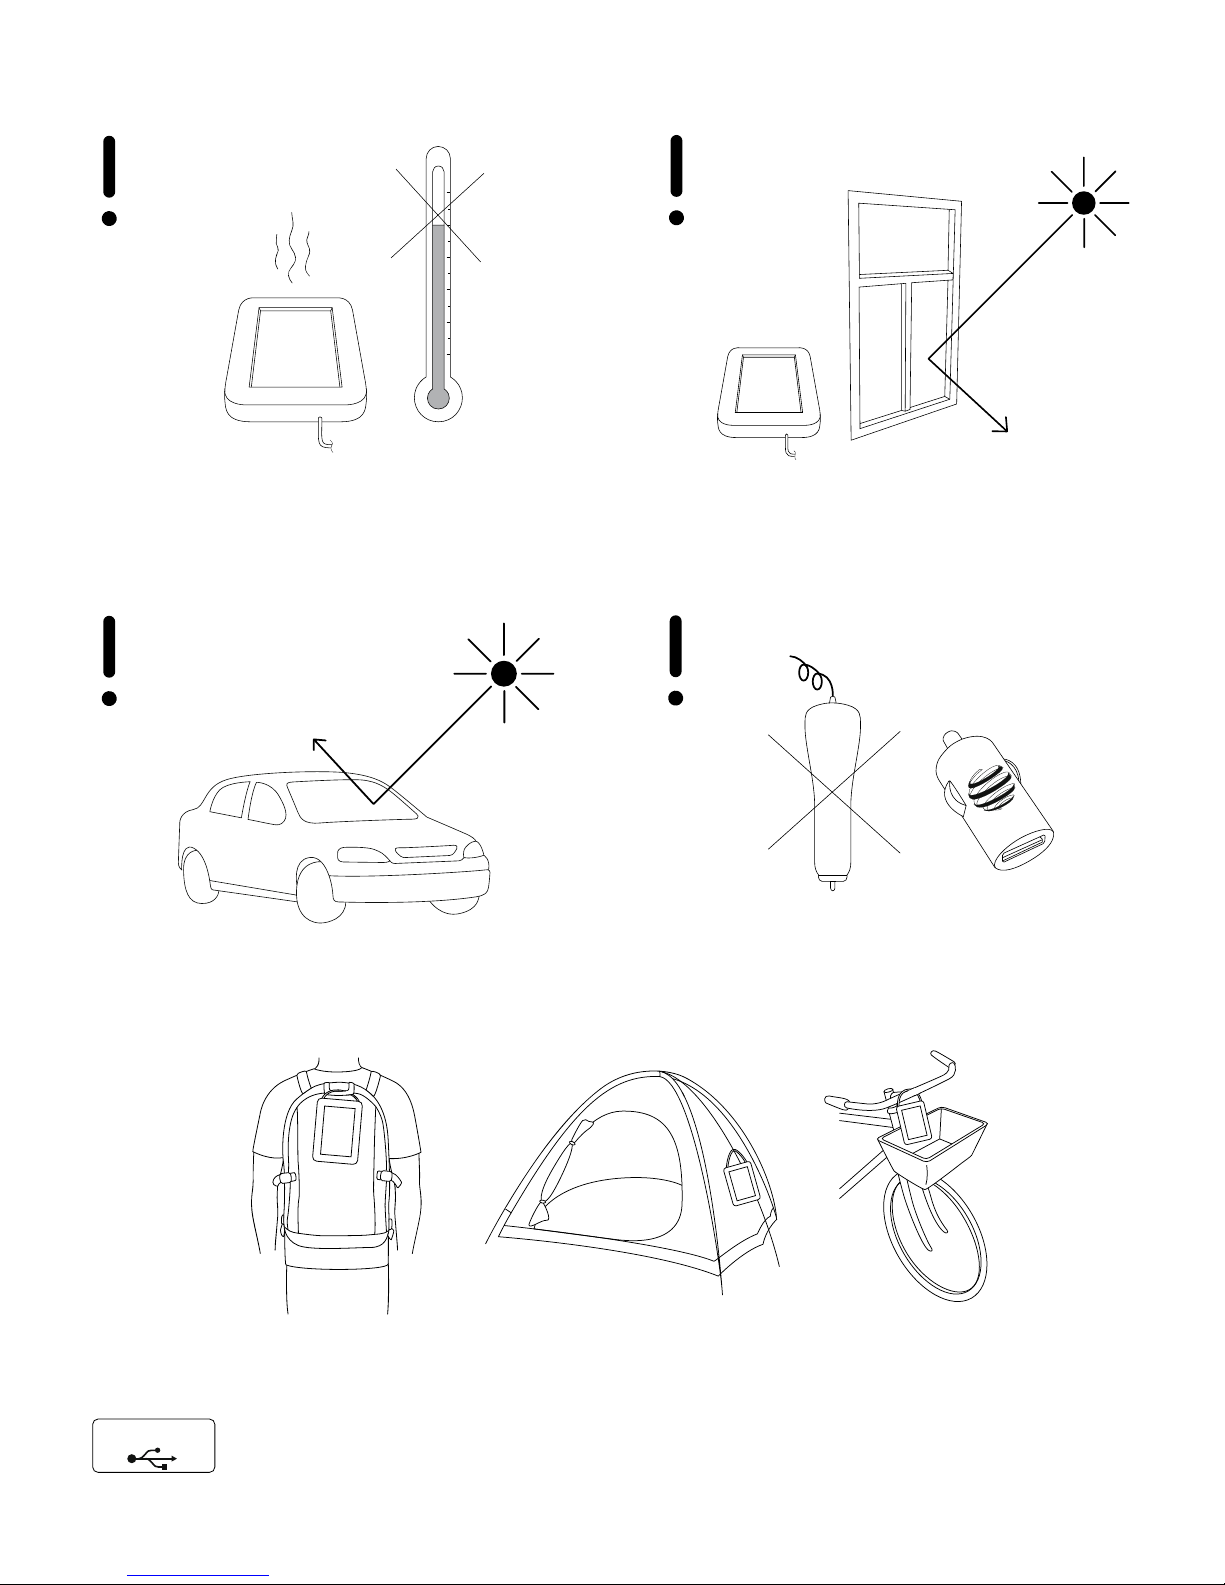
• Käytä SCOUTia vain lämpötila-alueella
+0...+50°C. Varmista SCOUTin riittävä jäähdytys
jättämällä sen ympärille riittävästi vapaata tilaa,
jossa ilma pääsee vaihtumaan.
• HUOM! SCOUTin sisäistä akkua voi ladata
ainoastaan sen omalla aurinkopaneelilla.
Älä lataa SCOUTia seinälaturilla,
tupakansytytinlaturilla äläkä USB laturilla esim.
tietokoneesta. Väärä lataustapa saattaa
vahingoittaa tuotetta pysyvästi.
Toiminnan esittely
KuvaA: Aurinkolataus
Suntrica SolarPlate™ SCOUT kerää aurinkoenergiaa tehokkaan
aurinkopaneelin avulla ja varastoi energian sisäiseen akkuun.
Aurinkoenergian varaaminen akkuun alkaa heti, kun SCOUT
asetetaan aurinkoiseen paikkaan. Voit halutessasi ladata
SCOUTin akkua auringosta sekä kohdelaitteesi akkua SCOUTista
samanaikaisesti.
Aurinkolaturin latausteho on parhaimmillaan ulkotiloissa ja
sen ollessa kohtisuorassa aurinkoon nähden. Pilvet, varjot
ja ikkunalasi heikentävät lataustehoa. Teoreettinen akun
latautuminen 0%-50%:iin kestää 2,5 tuntia ihanneolosuhteissa.
Litiumpolymeeri-akun virranottokyky pienenee sen lataussyklin
lopussa, jolloin akun varautuminen 50%:sta - 100%:iin kestää
kauemmin.
• Aurinkolaturi on suunniteltu vain ulkokäyttöön.
Suntrica ei suosittele latausta ikkunalasin tai
auton tuulilasin läpi. Tällöin latausteho on erittäin
heikko ja lämpötila saattaa kohota haitallisen
korkeaksi aurinkolaturille.
KuvaB: Akun varaustason testaaminen
Latausliitintä käytetään:
• kohdelaitteen lataamiseen.
• SCOUTin sisäisen akun varaustason tarkistamiseen
koskettamalla kevyesti kullanväristä ”POWER OFF/TEST” –
kosketuspintaa USB-liittimen päällä.
• SCOUTin virran päälle- ja poiskytkemiseen (”POWER ON” ja
”POWER OFF/TEST” –kosketuspinnat).
Kolme LED-valoa osoittavat sisäisen akun varaustason. Kun
kosketat latausliittimen USB-päällä ”POWER OFF/TEST”kosketuspintaa, joko yksi, kaksi tai kolme LED-valoa osoittavat
SCOUTin akun likimääräisen varaustilan.
1 LED-valo akussa n. 10% varaus
2 LED-valoa akussa n. 50% varaus
3 LED-valoa akussa n. 90% varaus
Jos LED-valot vilkahtavat nopeasti mutta eivät jää
palamaan vaikka pidät USB-päätä kiinni ”POWER OFF/TEST”
-kosketuspinnassa, on SCOUTin akku tyhjä tai lähes tyhjä.
Kuva
C
: Kohdelaitteen lataaminen: valmistelu
Ladataksesi kohdelaitetta SCOUTilla, kytke aurinkolaturi
päälle koskettamalla SCOUTin USB-liittimellä ”POWER ON” –
kosketuspintaa, jolloin myös kaikki LED-valot syttyvät.
HUOM! Kohdelaitteen lataus on mahdollista vain silloin kun
SCOUTin virta on päällä. LED-valot palavat samanaikaisesti
aina kun lataustoiminto on käytössä. Jos LED-valot eivät syty
”POWER ON” –kosketuspintaa hipaistaessa, on SCOUTin akku
tyhjä tai lähes tyhjä.
SCOUT toimii myös valonlähteenä. Kytkemällä LED valot
päälle ”POWER ON” –kosketuspinnasta, voit käyttää SCOUTia
myös pelkästään valonlähteenä ilman, että latauskaapeli
on kytkettynä kohdelaitteeseen. Kun SCOUTia käytetään
pelkästään valonlähteenä, LED-valot palavat täydellä akulla
yhtäjaksoisesti n. 10 tuntia.
Valaistuksen ja kohdelaitteen latauksen kytkeminen päälle/
pois SCOUTin oman kiinteän USB-kaapelin päällä perustuu USBkaapelin maadoitukseen. Mikäli et saa kytkettyä aurinkolaturia
päälle/pois oman latauskaapelisi päällä, oma kaapelisi ei ole
maadoitettu. Saat silti aina kytkettyä SCOUTin päälle ja pois sen
omalla kiinteällä kaapelilla.
Kuva
D
: Kohdelaitteen lataaminen
Kytke kohdelaitteen USB-latauskaapelin USB-uros -pää
SCOUTin latauskaapeliin ja toinen pää kohdelaitteeseen. Jos
lataus ei käynnisty, muista tarkistaa että olet kytkenyt virran
aurinkolaturiin! LED-valot palavat koko latauksen ajan.
Kun lopetat kohdelaitteen latauksen, LED-valojen käytön tai
SCOUTin akku on tyhjä, irrota kohdelaite sekä kohdelaitteen
latauskaapeli aurinkolaturista ja kytke virta pois koskettamalla
”POWER OFF/TEST” kosketuspintaa, jolloin aurinkolaturi ei
kuluta turhaan sähköä.
Kohdelaitteen lataaminen SCOUT aurinkolaturilla kestää
suunnilleen yhtä kauan kuin kohdelaitteen omalla laturilla.
Ylläpito
• Puhdista SCOUTin ulkopinta kuivalla tai kostealla pehmeällä
kankaalla.
• Älä käytä kemikaaleja, liuottimia tai puhdistusaineita.
• Älä avaa tai pura SCOUTia.
Tekniset tiedot
Sisäinen akku 1500mAh / 5,5Wh (Li-Po)
Aurinkopaneelin teho (piikki) 1,3W (epoksilaminoitu
polykristallipaneeli)
Nimellislähtövirta 5V, 1000mA
Käyttölämpötila +0°C…+50°C
Mitat 170 x 118 x 19mm
Paino 185g
Kotelo Vaahtomuovikumi, roiskeen-
ja iskunkestävä
Sähköliitännät Standardi USB-naarasliitin,
kiinteä johto
Valot Kolme LED-valoa, palamisaika
yli 10 tuntia täydellä akulla
Akun varaustason ilmaisin Laitteen omat LED-valot
ilmaisevat akun varaustason
1-3 LED-valolla hipaisukytkintä
kosketettaessa
Vianmääritys
Ongelma: SCOUT ei lataa kytkettyä laitetta.
Mahdollinen syy: Ratkaisu:
SCOUTia ei ole kytketty päälle
”Power On” -kosketuspinnasta.
Kytke SCOUT päälle koskettamalla
”POWER ON” -kosketuspintaa
SCOUTin USB-kaapelin päällä.
Sisäinen akku on tyhjä. Lataa SCOUTia auringonvalossa
kunnes LED-valot osoittavat
varaustilaa.
SCOUT tai kohdelaitteen
latauskaapeli ei ole yhteensopiva
kohdelaitteen kanssa.
Käytä kohdelaitteen valmistajan
suosittelemaa adapteria.
Kohdelaitteen virrankulutus ylittää
SCOUTin nimellisen lähtötehon.
Perehdy kohdelaitteen
käyttöoppaaseen ja varmista, että
SCOUT soveltuu kohdelaitteesi
lataamiseen. SCOUT tuottaa
latausvirtaa USB-standardin
mukaisiin laitteisiin, jotka
käyttävät 5V:n tasajännitettä.
Kohdelaitteen oma latauskaapeli
on vahingoittunut.
Vaihda kohdelaitteen latauskaapeli.
SCOUTin oma lataussysteemi on
vahingoittunut.
Tutki takuuehdot. Mikäli epäilet,
että tuotteessa on valmistusvika,
ota yhteyttä paikalliseen
jälleenmyyjään.
SCOUTin sisäinen akku ei lataudu
auringosta.
Huomioi aurinkolaturin käyttölämpötila +0°C…+50°C. Jos
SCOUTin akun lämpötila nousee
yli +50°C, se katkaisee latauksen,
kunnes lämpötila on laskenut
takaisin rajojen sisään. Aseta
aurinkolaturi viileään paikkaan
jäähtymään ja kokeile hetken
kuluttua uudelleen.
Aurinkolaturin oikea hävittäminen
Aurinkolaturissa tai sen ohjeissa oleva merkintä osoittaa,
että sitä ei saa hävittää muun kotitalousjätteen mukana
sen käyttöiän lopussa. Aurinkolaturi on hävitettävä samalla
tavalla kuin muut laitteet, joissa on akkuja ja sähköisiä osia.
Aurinkolaturia ei saa sekoittaa muiden jätteiden joukkoon
hävittämistä varten.
VAATIMUSTENMUKAISUUSVAKUUTUS
Suntrica Oy ilmoittaa, että tämä SolarStrap™ MOVE vastaa
direktiivin 2004/108/EY olennaisia vaatimuksia ja muita
asiaankuuluvia määräyksiä.
©2013 Suntrica. Kaikki oikeudet pidätetään. Suntrica,
SolarStrap™ ja SolarPlate™ ovat Suntrica Oy:n tavaramerkkejä
tai rekisteröityjä tavaramerkkejä. Suntrica Oy pidättää
itsellään kaikkiin tämän käyttöoppaan ja/tai teknisten tietojen
muutoksiin ilman erillistä ilmoitusta.
TAKUU
Suntrica myöntää tuotteilleen takuun valmistajan rajoitettujen
takuuehtojen mukaisesti (Limited Manufacturer’s warranty).
Sopimusehdot annetaan suoraan tuotteen loppukäyttäjälle
ja ne ovat myös saatavissa osoitteesta www.suntrica.com.
Vialliset takuunalaiset laitteet vaihdetaan tai hyvitetään
Suntrican harkinnan mukaan.
Paikallinen jälleenmyyjä:
scout
SolarPlate
™
Powered by the Sun
Käyttöohje
SP-W103

EN
Congratulations on your purchase of Suntrica SolarPlate™
SCOUT, a solar powered charging device. SCOUT provides
charging power to most USB compatible devices having a
charging voltage of 5V DC, e.g. mobile phones, MP3 players,
GPS devices and digital cameras.
PLEASE NOTE! To be able to use the solar charger, a charging
cable supporting the USB standard is required. If the target
device is not USB compatible, Suntrica recommends using an
adapter recommended by the target device manufacturer.
However, disruptions may occur if the target device is not
supporting the USB standard.
This guide contains important safety and operating instructions.
Before using SCOUT, carefully read this user guide and all
instructions and cautionary markings on SCOUT and the device
to be charged.
Contents of the sales package
• Suntrica SolarPlate™ SCOUT solar charger
• User guide
Description of the solar charger
1. Solar panel
2. Enclosure
3. Charging cable (USB connector)
4. Power switch – ON
5. Power switch – OFF & battery charge level indicator
6. LED-lights
Important safety instructions
• Read and follow all warnings on the sales package and in
this user guide.
• Do not use SCOUT if it has been subjected to damage.
• Do not expose SCOUT under water – the solar panel is splash
proof, but the cable has to be protected from moisture.
• SCOUT is an electronic device, ensure fire safety.
• Do not place any heavy objects on SCOUT.
• Do not bend SCOUT heavily.
• Do not cause unnecessary tensile stress to the charging
cable.
• Recycle SCOUT like any other electronic device. SCOUT
includes an internal battery which is forbidden to be disposed
by burning or with other household wastes.
• Use SCOUT only in proper temperature
(+0...+50°C). Make sure to leave free space
around SCOUT to ensure adequate cooling.
• PLEASE NOTE! SCOUT’s internal battery can only
be charged with its own solar panel. Do not
charge SCOUT with a wall charger, car charger or
with a USB cable from e.g. a laptop. The wrong
type of charge may damage the product
permanently.
Functional overview
FigureA: Sun charging
Suntrica SolarPlate™ SCOUT gathers solar energy by the high
efficiency solar panel and stores the energy into an internal
battery.
SCOUT starts gathering solar energy instantly, when it is placed
in the sun. SCOUT is capable of charging its internal battery
from the sun and the target device from the internal battery
simultaneously.
Optimal charging performance is achieved outdoors in direct
sunlight when the solar panel is positioned towards the
sun. Clouds, shades, and window glass reduce the charging
performance notably. Theoretical battery charge from 0% to
50% takes 2,5 hours in ideal conditions. Power absorption of
the Li-Po battery slows down in the end of its charging cycle,
causing the battery to charge up from 50% to 100% in a longer
period.
• The solar charger is designed to be used in
outdoors only. Suntrica does not recommend
charging behind a window glass or through
a car windshield as they weaken the charging
performance and the temperature might rise
dangerously high for the solar charger.
Figure
B
: Testing the battery charge level
The charging cable is used for:
• Charging the target device.
• Testing the charge level of SCOUTS’s internal battery by gently
touching the gold colored ”POWER OFF/TEST” contact surface
with the tip of the cable.
• Switching SCOUT on and off (touching ”POWER ON” and
”POWER OFF/TEST” contact surfaces).
The three embedded LED lights on the back of the product
indicate SCOUT’s charge level. By touching the ”POWER OFF/
TEST” contact surface with the tip of the charging cable,
one, two or three LED lights will light up to indicate the
approximate charge level.
1 LED-light approx. 10% charge level
2 LED-lights approx. 50% charge level
3 LED-lights approx. 90% charge level
SCOUT’s battery is empty or almost empty if the LED lights flash
quickly but do not stay illuminated while the tip of the USB
connector is hold on to the ”POWER OFF/TEST” contact surface.
Figure
C
: Charging the target device: preparations
To charge the target device with SCOUT, switch the solar charger
on by touching the ”POWER ON” contact surface with the tip of
the charging cable. The three LED lights will turn on.
PLEASE NOTE! Charging the target device is possible only
when SCOUT has been turned on. The LED lights will illuminate
always when the power is switched on! SCOUT’s internal
battery is empty or almost empty if the three LED lights will
not light up while touching the ”POWER ON” contact surface.
SCOUT can be used also as a source of light. Switching the LED
lights on by touching the ”POWER ON” contact surface with the
tip of the charging cable, SCOUT can be used also as a source of
light without having the charging cable attached to the target
device. If SCOUT is used only for illuminating purposes, a fully
charged internal battery will provide power to the LED lights
approx. 10 hours.
Using the tip of the charging cable for operating SCOUT is based
on the grounding of the fixed USB cable. If you are unable to
switch the solar charger on and off with the tip of your target
device’s cable, the cable may not be grounded properly. SCOUT
can still always be operated with the tip of its own fixed cable.
Firure
D
: Charging the target device
Connect your target device’s USB cable to SCOUT’s fixed USB
charging cable and the other end to the target device. If the
charging does not start, remember to switch the solar charger
on! The LED lights will illuminate througout the charging period.
After SCOUT’s internal battery is empty, the charging period is
finished or you don’t use the LED lights anymore, remove the
charging cable from the target device and the target device’s
cable from SCOUT. Remember to switch SCOUT off by touching
the ”POWER OFF/TEST” contact surface with the tip of the
charging cable to save energy.
The charging time with SCOUT is approximately similar as it
would be with the target devices own charger.
Maintenance
• Use a soft, dry/damp cloth to clean SCOUT’s exterior.
• Do not use harsh chemicals, cleaning solvents or strong
detergents.
• Do not disassemble SCOUT.
Technical specifications
Battery capacity 1500mAh / 5,5Wh (Li-Po)
Solar panel power (peak) 1,3W (epoxy laminated
polycrystalline solar panel)
Rated Output 5V, 1000mA
Operating temperature +0°C…+50°C
Dimensions 170 x 118 x 19mm
Weight 185g
Enclosure Soft foam rubber, splash- and
shockproof
Electrical connections Standard USB female adapter,
fixed cable
Lights Three LED lights, use time
more than 10 hours with a
full battery
Charge level indicator The embedded LED lights
indicate the charge level with
1-3 LED lights, when the
contact surface is touched
Troubleshooting
Problem: SCOUT does not charge the connected device.
Possible cause: Solution:
SCOUT has not been switched on
from the ”POWER ON” contact
surface.
Switch SCOUT on by touching
”POWER ON” contact surface
with the tip of SCOUT’s fixed USB
charging cable.
SCOUT’s internal battery is empty. Charge SCOUT in direct sun light
until the LED lights indicate a
charge level.
SCOUT or the target device’s
charging cable is not compatible
with the target device.
Use an adapter recommended by
the target device manufacturer.
The power absorption of the
target device exceeds SCOUT’s
nominal output power.
Read the target device’s
instruction manual and make sure,
that SCOUT is compatible with
the target device. SCOUT provides
charging power to USB compatible
devices having a charging voltage
of 5V DC.
Target device’s charging cable is
damaged.
Change the target device’s charging
cable.
SCOUT’s charging system has been
damaged.
See warranty information. If you
suspect that SCOUT is defected,
please contact your local
distributor.
SCOUT’s internal battery does not
charge from direct sunlight.
Please note, that the operating
temperature should be between
+0° to +50°C. If the temperature
of SCOUT’s battery rises above
+50°C, it stops charging until the
temperature has dropped back
within the limits. Take SCOUT out
of sunlight to cool down and try
charging again later.
Correct disposal of the product
The markings shown on the product and its literature indicate,
that it should not be disposed with other household wastes
at the end of its working life. This product should be disposed
similarly like any other product having batteries and electrical
components. The product should not be mixed with other
wastes for disposal.
DECLARATION OF CONFORMITY
Hereby, Suntrica Ltd. declares that this SolarStrapTM MOVE
product is in compliance with the essential requirements and
other relevant provisions of Directive 2004/108/EC.
©2013 Suntrica. All rights reserved. Suntrica, SolarStrap™ and
SolarPlate™ are trademarks or registered trademarks of Suntrica
Ltd. Suntrica Ltd. reserves all rights to any changes to this User
Guide and/or product specification without prior notice.
WARRANTY
Suntrica agrees to warrant the Products in accordance with
Suntrica’s Limited Manufacturer’s Warranty terms in force from
time to time (the ”LMW”) for the applicable Product type. The
LMW is given directly to end-users of Products and can be found
at www.suntrica.com. Defective Products under warranty will
be replaced or refunded at Suntrica’s discretion.
Local Distributor:
scout
SolarPlate
™
Powered by the Sun
User guide
SP-W103
 Loading...