

Page 1
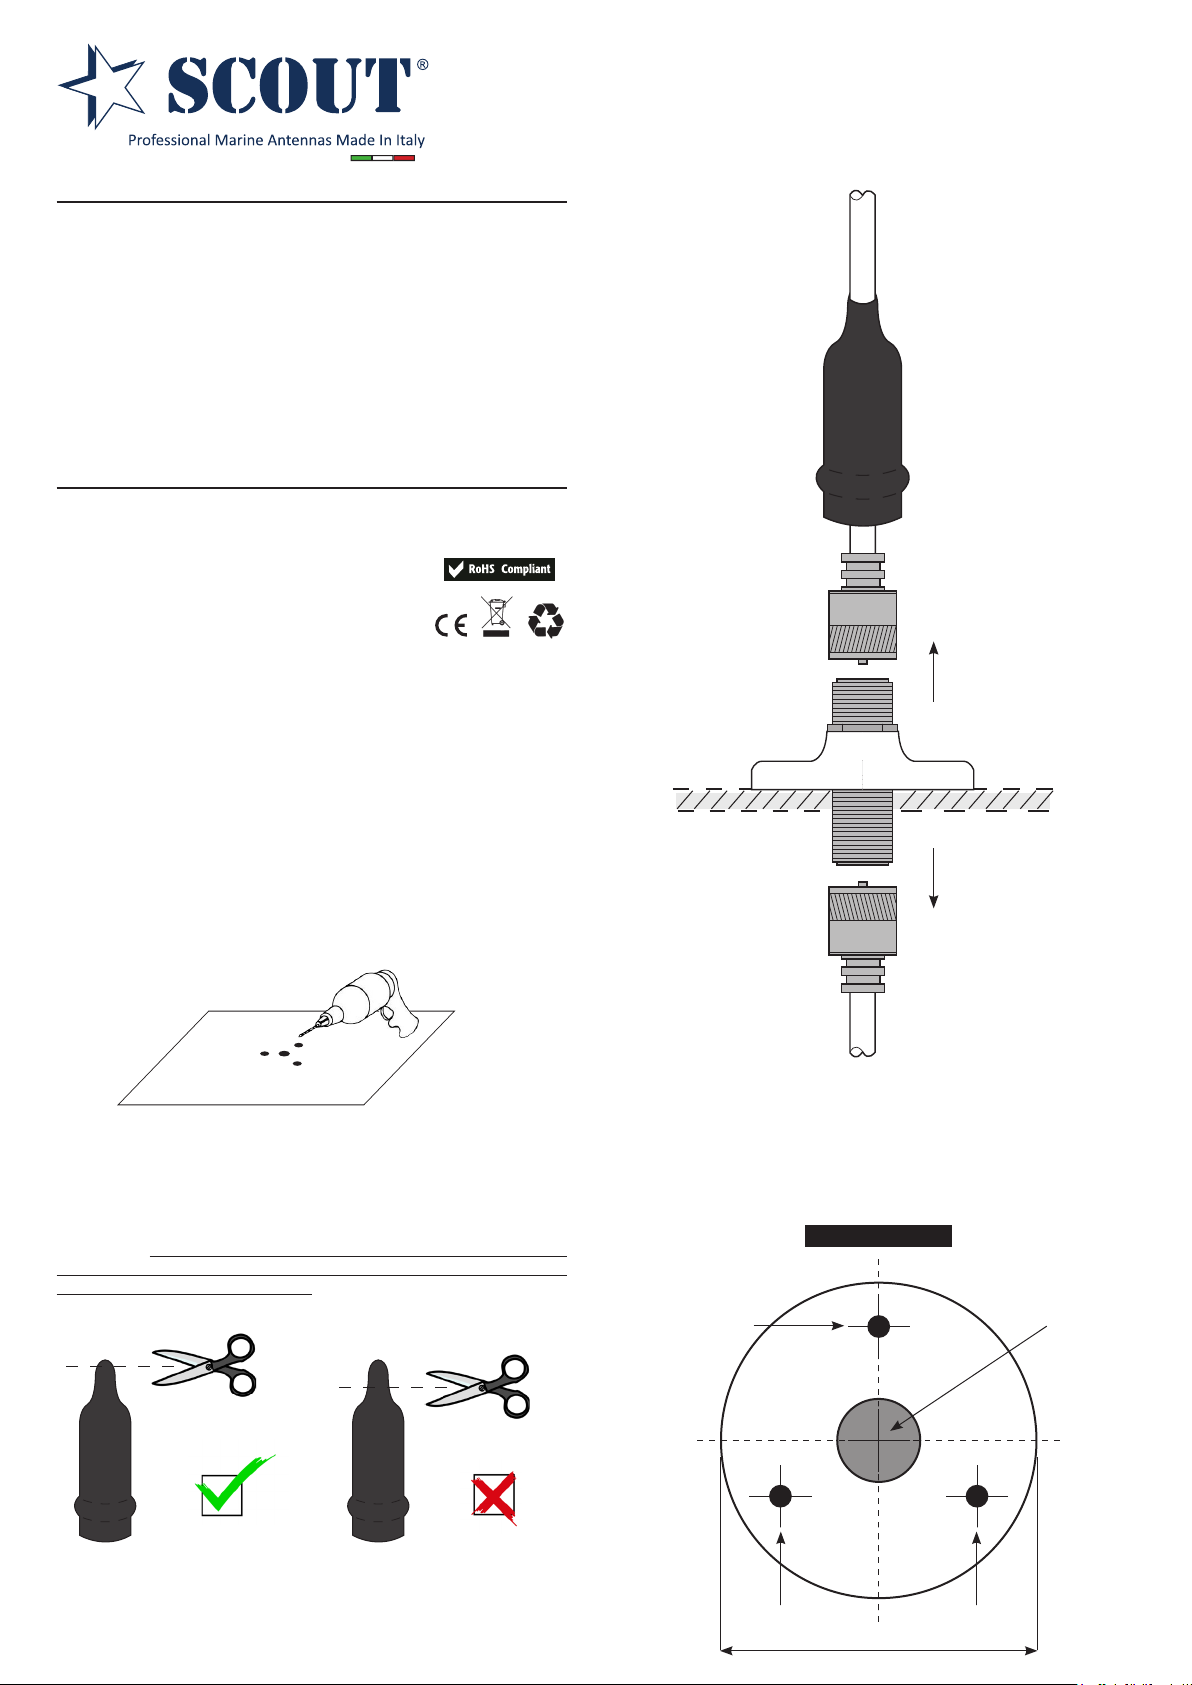
PA-90 Passaparatia coassiale stagno SO 239 - bianco
Foro 15 mm
Foro 4 mm
Foro 4 mm
Foro 4 mm
2A F type 1 / x dia / ”
40-860
2-69
0-18dB
12-24V x 50mA DC
<4dB
Model VSB12
9421300 Iss 2
Made in China
4
1
4
1
Varia ble S ignal Boost er x 1
‘F’ to C oaxial Flyl ead x 1
12/ 24V fu sed p ower cable x 1
Scr ew x 2
Scr ew Ca p x 2
‘F’ Conne ctor x 2
A:
B:
C:
D:
E:
F:
A
B
PACK CONTENTS
D
E
F
Inst allat ion i nstruc tions insid e
No pictur e on TV
■ C heck amplif ier L ED is on
■ C heck coaxia l cab le co nnecti ons
■ A djust gain of am plifie r
■ T V or set top b ox not tune d in
■ P oor r ecepti on ar ea
Pic ture breaks up o r fre ezes
■ A djust gain of am plifie r
■ P oor r ecepti on
Powe r LED does not illum inate when power is s witche d on
■ N o pow er, chec k othe r dev ices on sa me el ectric al ci rcuit
■ F use h as b
low n
H
■ Helpline: +44 (0) 1553 811000
■ Email: cust_serv@maxview.co.uk
■ Visit: www.maxview.co.uk
Maxview Reserve the right to change
specifications without prior notice
FAULT FINDING
2 YEAR GUARANTEE
A:
B:
C:
D:
E:
F:
G:
H
:
Wall fixing hole
On/off power switch
LED power indicator
Gain control knob
12/ 24V po wer i nput
Ante nna i nput
TV/ Radio outpu t
TV/ Radio outpu t
SAFETY WARNINGS
C
SPECIFICATIONS
”
x d ia1/
4
”
Des igned for
cont inuou s use
Des igned for
ind oor us e onl y
This sign al bo oster is g uarante ed ag ainst defec tive p arts or
work mansh ip for 2 y ears from time of pu rchase . This excl udes any
mal functi on ca used b e imp roper use, accid ental or m alicio us
dam age
or remo val of the outer casi ng. Th is do es no t aff ect y our
stat utory right s.
TO
AER IAL
EXTR A TV /RADIO
OUTP UT IF REQU IRED
POWE R CONN ECTIO N
RED +12/2 4V BL ACK 0 V
TO TV ‘F ’
COAXI AL
FLYLEA D
12/ 24V FU SED C ONNECT ION
ON
1. Slid e pow er sw itch t o rig ht. L ED ind icato r shou ld no w be on.
2. Turn gain cont rol k nob c lockwi se to incre ase s ignal stren gth.
1
2
CONNECTION DIAGRAM
OPERATION
Varia ble S ignal Boost er x 1
‘F’ to C oaxial Flyl ead x 1
12/2 4V fu sed p ower cable x 1
Scr ew x 2
A:
B:
C:
D:
A
B
PACK CONTENTS
D
E
F
No pictur e on TV
■ C heck amplif ier L ED is on
■ C heck coaxia l cab le con necti ons
■ A djust gain of am plifie r
■ T V or set top b ox not tune d in
■ P oor r ecepti on ar ea
Pict ure b reaks up o r fre ezes
■ A djust gain of am plifie r
■ P oor r ecepti on
Powe r LED does not illumi nate when power is s witche d on
■ N o pow er, chec k othe r dev ices on sa me el ectric al ci rcuit
■ F use h as b
lown
H
■ Helpline: +44 (0) 1553 811000
FAULT FINDING
2 YEAR GUARANTEE
A:
B:
C:
D:
E:
F:
G:
H
:
Wall fixing hole
On/off power switch
LED power indicator
Gain control knob
12/2 4V po wer i nput
Ante nna i nput
TV/ Radio outpu t
TV/ Radio outpu t
SAFETY WARNINGS
C
SPECIFICATIONS
”
x d ia1/
4
”
Desi gned for
cont inuou s use
Desi gned for
indo or us e onl y
This sign al bo oster is gu arante ed ag ainst defec tive p arts or
work manshi p for 2 y ears from time of pur chase. This excl udes any
malf uncti on cau sed b e imp roper use, accid ental or m alicio us
dama ge
or remo val of the outer casin g. Th is do es no t aff ect y our
stat utory right s.
TO
AERI AL
EXTR A TV /RADIO
OUTP UT IF REQU IRED
POWE R CONN ECTION
RED +12/2 4V BL ACK 0 V
TO TV ‘F ’
COAXI AL
FLYLEA D
12/2 4V FU SED C ONNECT ION
ON
1. Slid e pow er sw itch t o rig ht. LE D ind icator shou ld no w be on.
2. Turn gain cont rol k nob c lockwis e to incre ase s ignal stren gth.
1
2
CONNECTION DIAGRAM
FITTING ‘F’ CONNECTOR
OPERATION
Codice: PF AN NCONN024
PA-90B Passaparatia coassiale stagno SO 239 - nero
Codice: PF AN NCONN026
PA-91 Passaparatia coassiale stagno N - bianco
Codice: PF AN NCONN025
PA-91B Passaparatia coassiale stagno N - nero
Codice: PF AN NCONN027
ITA
CONTENUTO DELLA CONFEZIONE
Passaparatia coassiale (x1)
Guarnizione O-ring (x1)
Vite acciaio inox autolettante (x3)
Cappuccio copri connettore (x1)
Made in Italy
Istruzioni di montaggio
5 - Completare l’installazione e i collegamenti come riportato nella
seguente illustrazione.
ANTENNA
PROCEDURA DI INSTALLAZIONE
1 - Individuare la supercie sulla quale applicare il passaparatia,
tenendo conto che il tipo di supercie è ininuente ai ni
dell’installazione (le viti autolettanti in dotazione non sono utilizzabili
su una supercie metallica).
2 - Procedere con il forare la supercie utilizzando la dima di
montaggio riportata a fondo pagina.
A seconda del tipo di connettore maschio che si andrà ad utilizzare
potrà rendersi necessario un foro centrale di diametro superiore ai
15 mm indicati nella dima.
3 - Applicare la guarnizione O-ring nella sua sede nel basamento del
passaparatia.
4 - Tagliare la punta del copri connettore per permettere il passaggio
del cavo coassiale.
Attenzione: tagliare il meno possibile e poco alla volta per evitare di
creare un foro troppo largo - il copri connettore deve essere aderente
il più possibile alla guaina del cavo.
Scout S.r.l.
Via Enrico Fermi 90 - 41010 Limidi di Soliera MO - Italy - VAT nr. IT03625890367
[email protected] - www.scoutantenne.com
OK
NO
VHF TRANSCEIVER
5 - Completare l’installazione con l’ausilio di silicone per migliorare la
sigillatura del passaparatia.
Dima di foratura
56 mm
Page 2
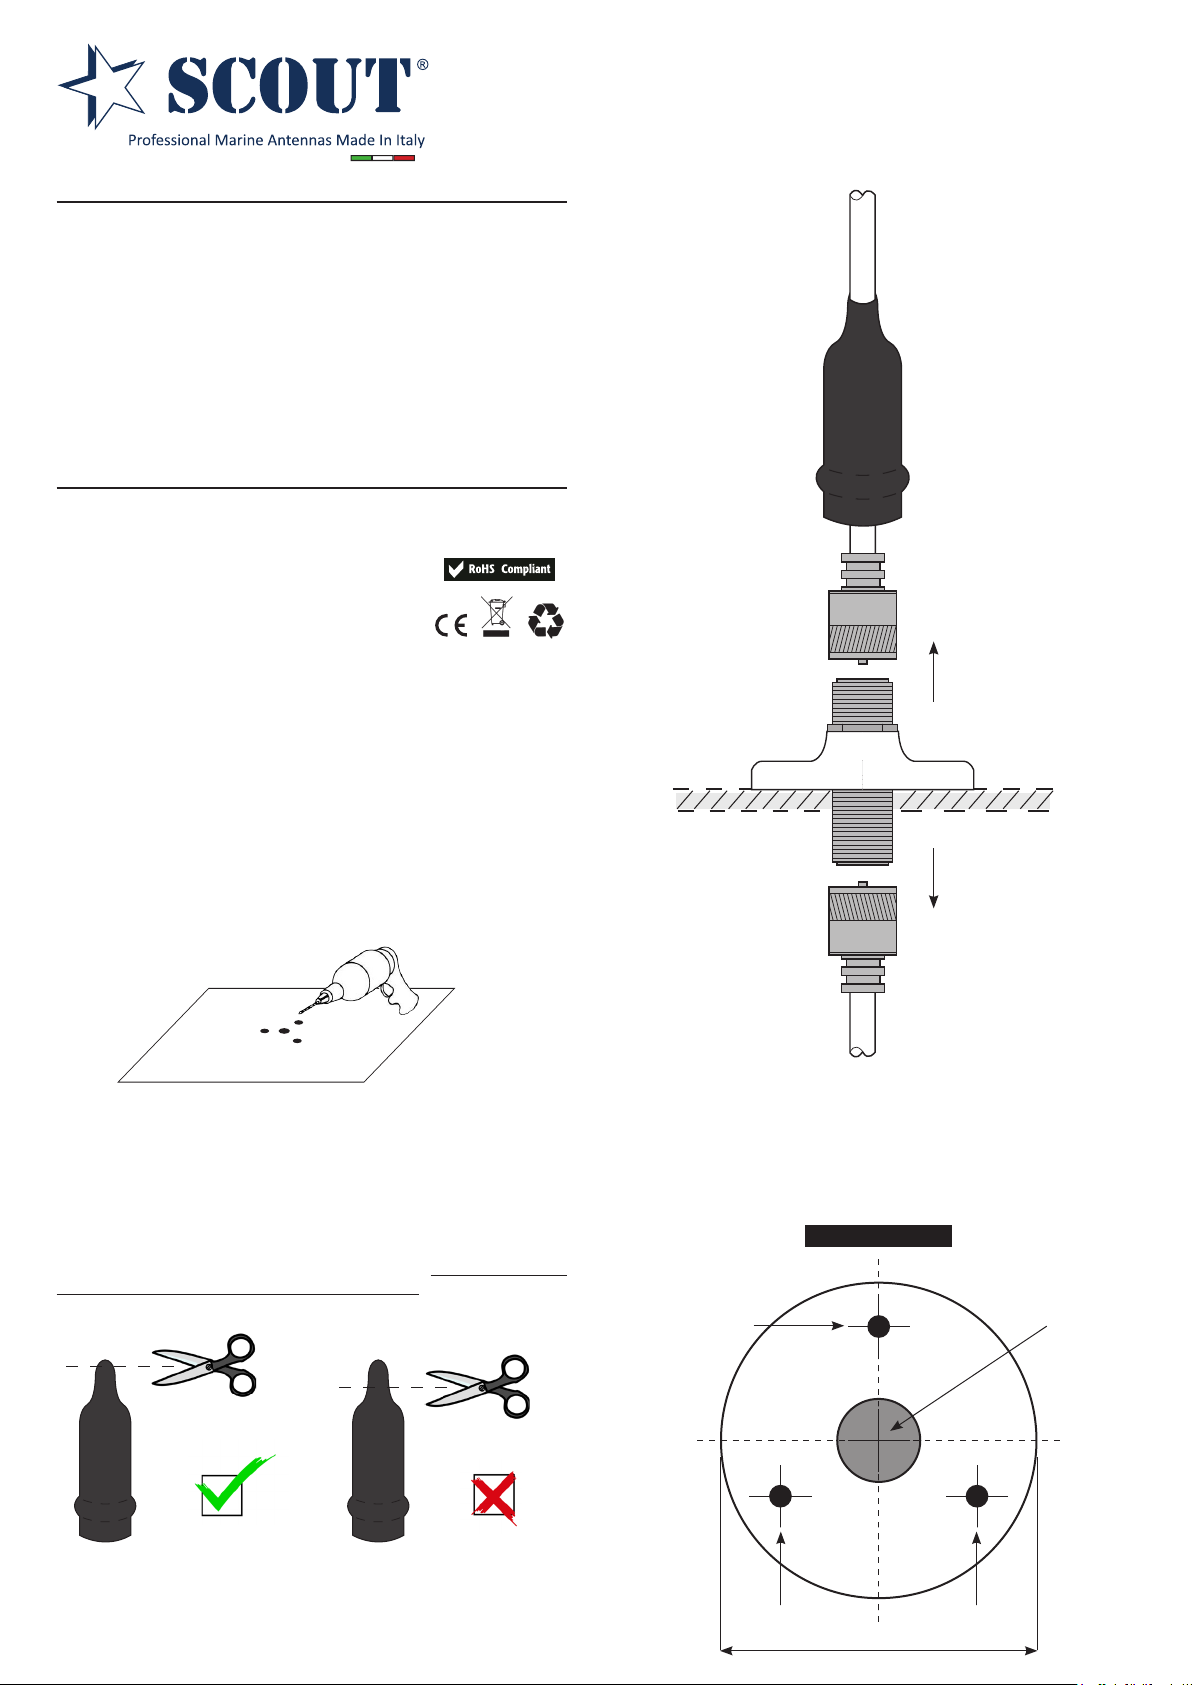
PA-90 Deck connector SO 239 (UHF) type - white
Hole 15 mm
Hole 4 mm
Hole 4 mm
Hole 4 mm
2A F type 1 / x dia / ”
40-860
2-69
0-18dB
12-24V x 50mA DC
<4dB
Model VSB12
9421300 Iss 2
Made in China
4
1
4
1
Varia ble S ignal Boost er x 1
‘F’ to C oaxial Flyl ead x 1
12/ 24V fu sed p ower cable x 1
Scr ew x 2
Scr ew Ca p x 2
‘F’ Conne ctor x 2
A:
B:
C:
D:
E:
F:
A
B
PACK CONTENTS
D
E
F
Inst allat ion i nstruc tions insid e
No pictur e on TV
■ C heck amplif ier L ED is on
■ C heck coaxia l cab le co nnecti ons
■ A djust gain of am plifie r
■ T V or set top b ox not tune d in
■ P oor r ecepti on ar ea
Pic ture breaks up o r fre ezes
■ A djust gain of am plifie r
■ P oor r ecepti on
Powe r LED does not illum inate when power is s witche d on
■ N o pow er, chec k othe r dev ices on sa me el ectric al ci rcuit
■ F use h as b
low n
H
■ Helpline: +44 (0) 1553 811000
■ Email: cust_serv@maxview.co.uk
■ Visit: www.maxview.co.uk
Maxview Reserve the right to change
specifications without prior notice
FAULT FINDING
2 YEAR GUARANTEE
A:
B:
C:
D:
E:
F:
G:
H
:
Wall fixing hole
On/off power switch
LED power indicator
Gain control knob
12/ 24V po wer i nput
Ante nna i nput
TV/ Radio outpu t
TV/ Radio outpu t
SAFETY WARNINGS
C
SPECIFICATIONS
”
x d ia1/
4
”
Des igned for
cont inuou s use
Des igned for
ind oor us e onl y
This sign al bo oster is g uarante ed ag ainst defec tive p arts or
work mansh ip for 2 y ears from time of pu rchase . This excl udes any
mal functi on ca used b e imp roper use, accid ental or m alicio us
dam age
or remo val of the outer casi ng. Th is do es no t aff ect y our
stat utory right s.
TO
AER IAL
EXTR A TV /RADIO
OUTP UT IF REQU IRED
POWE R CONN ECTIO N
RED +12/2 4V BL ACK 0 V
TO TV ‘F ’
COAXI AL
FLYLEA D
12/ 24V FU SED C ONNECT ION
ON
1. Slid e pow er sw itch t o rig ht. L ED ind icato r shou ld no w be on.
2. Turn gain cont rol k nob c lockwi se to incre ase s ignal stren gth.
1
2
CONNECTION DIAGRAM
OPERATION
Varia ble S ignal Boost er x 1
‘F’ to C oaxial Flyl ead x 1
12/2 4V fu sed p ower cable x 1
Scr ew x 2
A:
B:
C:
D:
A
B
PACK CONTENTS
D
E
F
No pictur e on TV
■ C heck amplif ier L ED is on
■ C heck coaxia l cab le con necti ons
■ A djust gain of am plifie r
■ T V or set top b ox not tune d in
■ P oor r ecepti on ar ea
Pict ure b reaks up o r fre ezes
■ A djust gain of am plifie r
■ P oor r ecepti on
Powe r LED does not illumi nate when power is s witche d on
■ N o pow er, chec k othe r dev ices on sa me el ectric al ci rcuit
■ F use h as b
lown
H
■ Helpline: +44 (0) 1553 811000
FAULT FINDING
2 YEAR GUARANTEE
A:
B:
C:
D:
E:
F:
G:
H
:
Wall fixing hole
On/off power switch
LED power indicator
Gain control knob
12/2 4V po wer i nput
Ante nna i nput
TV/ Radio outpu t
TV/ Radio outpu t
SAFETY WARNINGS
C
SPECIFICATIONS
”
x d ia1/
4
”
Desi gned for
cont inuou s use
Desi gned for
indo or us e onl y
This sign al bo oster is gu arante ed ag ainst defec tive p arts or
work manshi p for 2 y ears from time of pur chase. This excl udes any
malf uncti on cau sed b e imp roper use, accid ental or m alicio us
dama ge
or remo val of the outer casin g. Th is do es no t aff ect y our
stat utory right s.
TO
AERI AL
EXTR A TV /RADIO
OUTP UT IF REQU IRED
POWE R CONN ECTION
RED +12/2 4V BL ACK 0 V
TO TV ‘F ’
COAXI AL
FLYLEA D
12/2 4V FU SED C ONNECT ION
ON
1. Slid e pow er sw itch t o rig ht. LE D ind icator shou ld no w be on.
2. Turn gain cont rol k nob c lockwis e to incre ase s ignal stren gth.
1
2
CONNECTION DIAGRAM
FITTING ‘F’ CONNECTOR
OPERATION
Code: PF AN NCONN024
PA-90B Deck connector SO 239 (UHF) type - black
Code: PF AN NCONN026
PA-91 Deck connector N type - white
Code: PF AN NCONN025
PA-91B Deck connector N type - black
Code: PF AN NCONN027
ENG
CONTENTS
Deck connector (x1)
O-ring gasket (x1)
Stainless steel self-tapping screw (x3)
Protection shroud (x1)
Made in Italy
Mounting instructions
5 - Complete the installation and the connections as indicated in the
picture below.
ANTENNA
MOUNTING PROCEDURE
1 - Choose the surface on which installing the deck connector, the
surface must be even and every material is allowed (the self-tapping
screws don’t work properly on a metal surface).
2 - Use the mounting template (that you’ll nd at the end of this page)
to drill the four holes on the surface, and clean it in the end.
Depending on the type of male connector that you’ll use to make
the connection it might be necessary to drill a larger hole than what
indicated in the mounting template.
3 - Place the O-ring gasket in the groove on the bottom side of the
deck connector.
4 - Cut the top of the protection shroud to let the coaxial cable pass
through it.
Warning: cut as less as possible and little by little to avoid making
a hole that is too wide for the coaxial cable. The protection shroud
must be as tight as possible on the coaxial jacket.
Scout S.r.l.
Via Enrico Fermi 90 - 41010 Limidi di Soliera MO - Italy - VAT nr. IT03625890367
[email protected] - www.scoutantenne.com
OK
NO
VHF TRANSCEIVER
5 - Finish the installation by adding some silicone to improve the
water resistance.
Drilling template
56 mm
 Loading...