

Scott RXI 300 WL,RXi 300WL Instruction Manual
High Power Internet Radio
Instruction Manual

GB-Wireless Internet Radio Contents 1
Contents
Safety Warnings
Internet Radio Quick start Guide 1
What you need before you can use your Internet radio.......................................................1
Controls ...............................................................................................................................2
Steps for connecting your radio to your wireless network...................................................3
Step 1 - Switch on the radio ..................................................................................3
Step 2 - Scan for a wireless network connection...................................................3
Step 3 - Connect to the wireless network ..............................................................4
Choosing a radio station to listen to.....................................................................................4
Changing the volume...........................................................................................................5
Storing a radio station..........................................................................................................5
Playing a preset radio station...............................................................................................6
Requesting a station that is currently unavailable................................................................6
Stations with on-demand programmes.................................................................................6
Setting the clock ..................................................................................................................7
Setting the alarm..................................................................................................................7
Media Player Quick start Guide 9
Set up your Windows PC to allow the radio to access your audio files via Windows
Shares...................................................................................................................................9
Locate the shared audio files using the radio.......................................................................9
Listening to a single track..................................................................................................10
Listening to a complete album...........................................................................................10
Adding tracks to a playlist queue.......................................................................................10
Adding albums to a playlist queue.....................................................................................10
Controlling playback .........................................................................................................10
Browsing the list of tracks currently being played.............................................................10
Removing tracks from the queue.......................................................................................11
Playing tracks in random order..........................................................................................11
Playing tracks in the queue repeatedly...............................................................................11
Set up a Windows PC to allow the radio to access your audio files via a UPnP server..... 12
Locating and playing media files using the radio and a UPnP server................................13
Browsing the list of tracks currently queued up for playback............................................14
Adding tracks from a UPnP server to a playlist queue.....................................................14
Adding albums to a playlist queue.....................................................................................14
Controlling playback .........................................................................................................14
Removing tracks from the queue.......................................................................................14
Playing tracks in random order..........................................................................................15
Playing tracks in the queue repeatedly...............................................................................15
Configure menu 16
Choosing the option you want from the Configure menu..................................................16
<Network Config>.............................................................................................................16
<Version>..........................................................................................................................16
<Upgrade Firmware>.........................................................................................................16
<Language>.......................................................................................................................16
<Factory Reset>.................................................................................................................16
<Register> .........................................................................................................................17
<Clock>.............................................................................................................................17
<Sleep Timer>...................................................................................................................17
<Backlight>.......................................................................................................................17

GB-Wireless Internet Radio Contents 2
Troubleshooting 18
Appendix 19
Step 1: Set Up Media Sharing in Windows Media Player 11............................................19
Step 2: Play Music on the Internet Radio..........................................................................20
Set Up Media Sharing in MAC OS....................................................................................21
Set up Windows File Sharing on a MAC............................................................21
Accounts Setup....................................................................................................21
Directory Setup....................................................................................................21
Specifications.....................................................................................................................22
License Information ..........................................................................................................22

GB-Wireless Internet Radio Contents 3
Safety Warnings
Please read before installation.
If this Internet radio has been moved from a cold place to a warm place (e.g. from a cold car boot
to a warm room), PLEASE WAIT for 2-3 hours before plugging it in.
. There is a possibility that condensation may have formed in the Internet radio. To avoid damage
please unpack your Internet radio and allow it to stand at room temperature for 2-3 hours before
use. This will help any moisture evaporate and prevent unnecessary damage to your Internet
radio.
DO ensure that the mains plug is easily accessible.
Covers - Do not remove any fixed covers as this may expose dangerous voltages.
Ventilation - The ventilation holes on the casing of your Internet radio prevent it from over
heating. Do not block or cover these holes, especially with cloth or paper.
Allow a minimum distance of 5cm around the apparatus for sufficient ventilation.
Damage - Never use your Internet radio if it is damaged in any way. Always place your Internet
radio on a flat level surface avoiding anywhere which may be subject to strong vibrations.
Temperature - Avoid extremes of temperature, either hot or cold, place your Internet radio well
away from heat sources such as radiators or gas/electric cookers.
Moisture - Do not allow your Internet radio to be exposed to rain, moisture or dust. If any liquid
is spilt into your Internet radio it can cause serious damage. If you spill any liquid into your
Internet radio switch it off at the mains immediately. Contact your store immediately.
CAUTION –Do not open any covers and do not try to repair the unit yourself. Repair work must
be carried out by qualified personnel.

GB-Wireless Internet Radio 1
Internet Radio Quick start Guide
What you need before you can use your Internet radio
Before you can use your Internet radio, you need the following:
• A broadband Internet connection.
• A wireless access point (Wi-Fi) connected to your broadband Internet, preferably via a router.
• If your wireless network is configured to use Wired Equivalent Privacy (WEP) or Wi-Fi Protected Access
(WPA) data encryption then you need to know the WEP or WPA code so you can connect your Internet
radio to the network.
• If your wireless network is configured to only accept trusted stations you will need to enter the radio’s
MAC address into your wireless access point. You can find the radio’s MAC address using the menu:
Configure Æ Network Config Æ View Config Æ MAC Address
• To enter the MAC address into your wireless access point, you must read the instructions supplied with the
wireless access point.
The Internet radio should work anywhere where a wireless access point is available. However, wireless
coverage can be limited by the environment and by building materials such as the number/thickness of
walls, doors or windows. To maximize the wireless range, see your router specifications for Wi-Fi distance.
Before you continue, make sure that your wireless access point is switched on and connected to your broadband
Internet. To do this, please read the instructions supplied with the wireless access point.
GB-Wireless Internet Radio 2
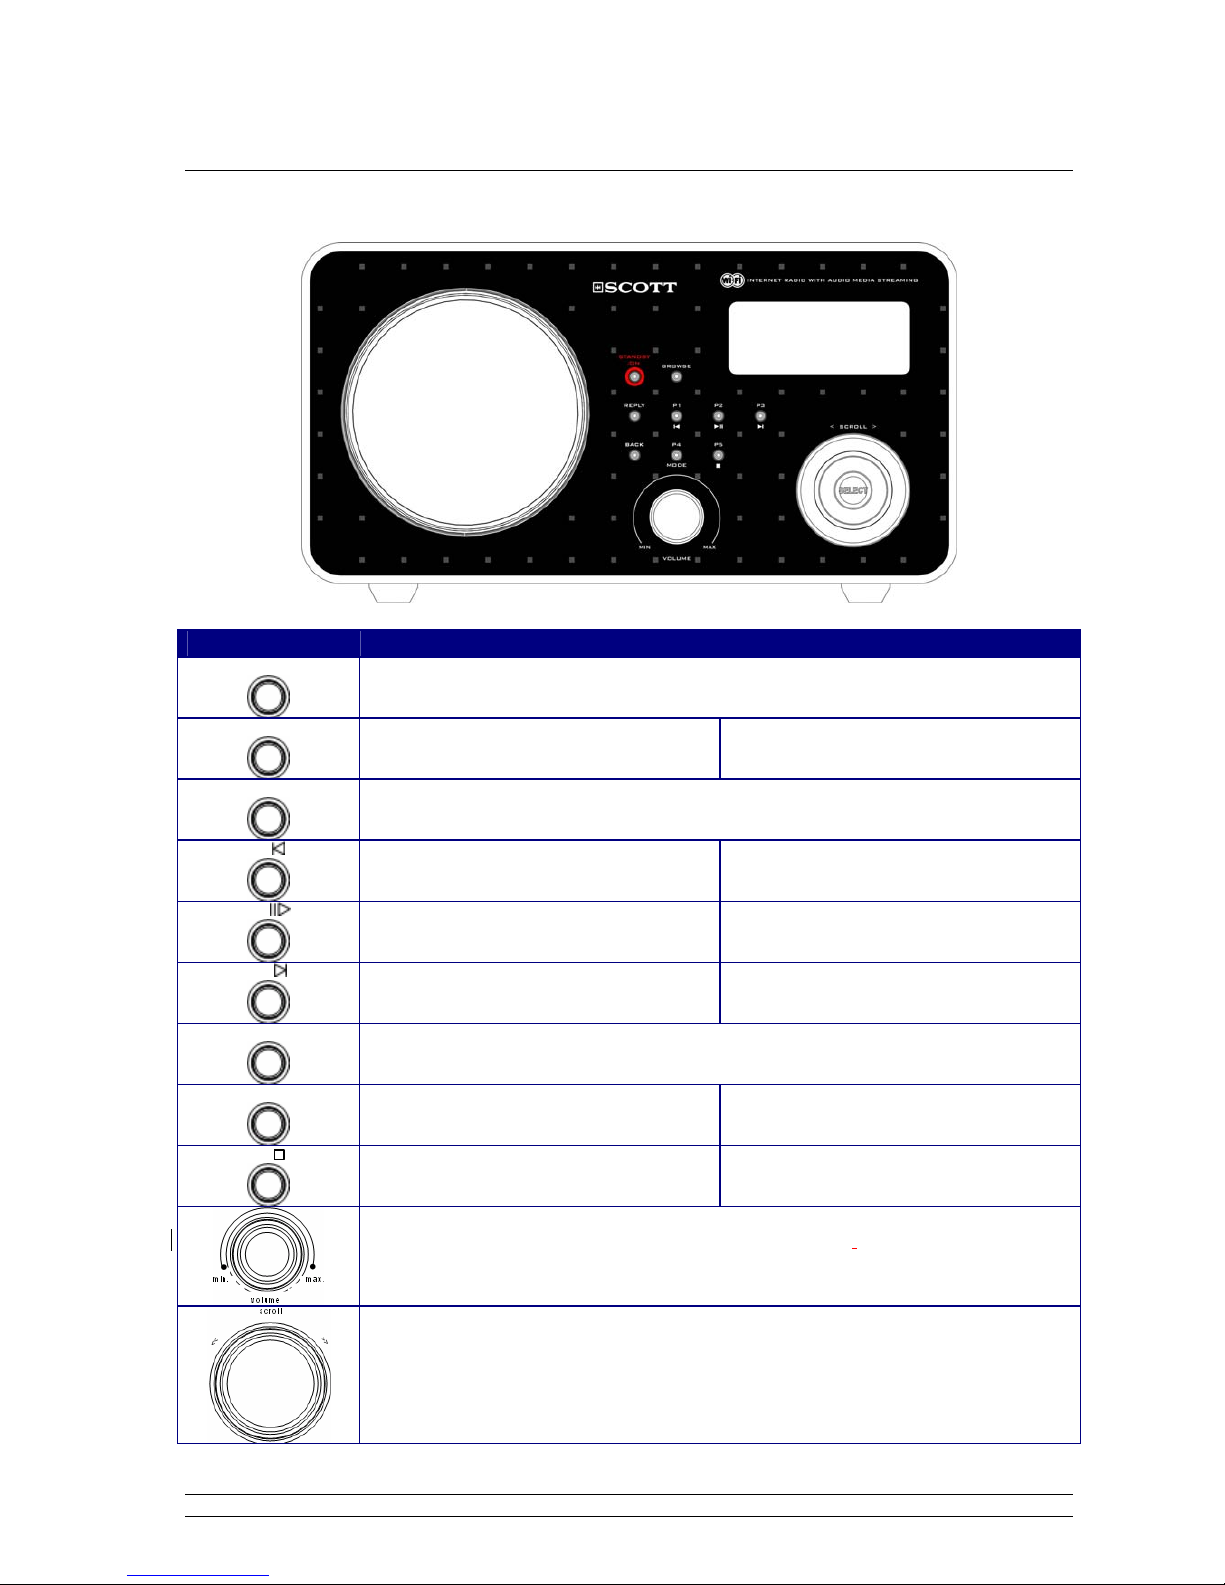
Controls
Control Internet Radio mode Media Player mode
STANDBY/ON
Press to turn the Internet Radio on/off
Browse
No function Display playlist information
Reply
Button reserved for future interactive services
P1/
Hold down to save Preset station P1
Press to load Preset station P1
Previous Track
P2/
Hold down to save Preset station P2
Press to load Preset station P2
Play/Pause
P3/
Hold down to save Preset station P3
Press to load Preset station P3
Next Track
Back
Go back to previous menu
P4/ mode
Hold down to save Preset station P4
Press to load Preset station P4
Repeat On/Off
Shuffle On/Off
P5/
Hold down to save Preset station P5
Press to load Preset station P5
Stop
Increase volume by turning the knob clockwise
Decrease volume by turning the knob counter
clockwise
Turn the button to change options. Press the button to SELECT

GB-Wireless Internet Radio 3
Steps for connecting your radio to your wireless
network
Step 1 - Switch on the radio
First, connect to the AC Power plug. The radio can be switched on with the standby/on button.
The display on the front of the radio will light up and indicate:
Reciva Radio
ARM Powered
After a few seconds, this will change to show:
Initialising
Network
After a few seconds, this will change to show:
< Scan for networks >
Enter network
View Config
Edit Config
Step 2 - Scan for a wireless network connection
When the display indicates <Scan for networks>, press the SELECT button.
(Note: if you make a mistake at any point, press the BACK button to go back to the previous screen.)
The radio will now scan for all available wireless networks and will display:
Scanning
If the radio can’t find an available wireless network, then the display will indicate:
No networks
Found
If this happens then your wireless access point is probably not working properly - see the instructions
supplied with it.
When the radio finds your wireless network, it displays the ESSID for the access point on the screen - this
is a name that is allocated to the access point by the person who set up the network - for example:
< My Home Network >
It is possible, and in some locations highly likely, that your radio will find m ore than one wireless access
point, especially in some urban areas or highly populated areas. In this case, you can choose which one you
want to connect to. Turn the SELECT button on the radio to see the ESSID for each access point the radio
has found.

GB-Wireless Internet Radio 4
Step 3 - Connect to the wireless network
When the ESSID for the access point you want to connect to is displayed on the screen, press the SELECT
button.
If your network is not encrypted, the following message is displayed on the screen:
Connecting to
network
Then:
Network OK
If the screen displays either:
Enter WEP key
Or:
Enter WPA key
Then the network is using one of the encryption systems: Wired Equivalent Privacy (WEP) or Wi-Fi
Protected Access (WPA). You therefore need to enter the correct WEP or WPA code into the radio to get it
to connect to your network.
Only the person who set up the network in the first place knows this code; if this is not you then you need to
ask this person what the code is.
After 3 seconds, the radio goes into entry mode. To enter the code, use the button to select each character of
the code in turn, pressing the SELECT button after each character. Please note that WEP and WPA codes
are sensitive to upper and lower case characters so you must enter them exactly.
Use the BACK button to erase incorrect characters.
After entering the final character, use the button to select “END” and press the SELECT button to
confirm.
The radio should now be able to connect to the network.
If the display indicates “Invalid key” or “Network Error”, an incorrect password has probably been entered.
Choosing a radio station to listen to
1. Press the SELECT button.
(Please note: if you make a mistake at any point, press the BACK button to go back to the
previous screen.)
< Stations >
Configure
Media Player
2. If the screen does not indicate < Stations > as shown above, turn the SELECT button until it does.
3. Press the button.
 Loading...