

Page 1

Page 1 of 13
SCOTT
SIMPLISSIMO CHEF
Instruction Manual
Model no.: 21210
Page 2

Page 2 of 13
IMPORTANT
For safety purpose you should read the instructions carefully before using the appliance for the first
time. Save the instructions for future reference.
Warning: To prevent burns, always use a mitt or potholder for handling. Remove the lid slowly
with the underside of the lid pointing away from you and let steam escape gradually.
Danger: The appliance can cause injuries if it is misused.
DO'S
1. Check if the rating of the appliance corresponds to local mains supply.
2. Place and use the appliance on a dry, level, heat resistance surface.
3. Keep the appliance out of reach from children or infirm persons. Do not let them use the
appliance.
4. Make sure all parts are correctly assembled before you switch on the appliance.
5. Always inspect the appliance before use for noticeable signs of damage. Do not use if damaged
or has been dropped.
6. Unplug from the mains when not in use and before cleaning. Allow to cool before assembling or
disassembling parts, before cleaning, or storing the appliance.
7. Always disconnect the appliance before plugging in any accessory or removing the glass bowl
from the base unit. To disconnect, press ON/OFF button and remove the plug from the mains.
8. If the supply cord is damaged, it must be replaced by the manufacturer or its service agent or
similarly qualified person in order to avoid a hazard.
9. This appliance is not intended for use by persons with reduced physical, sensory or mental
capabilities, or lack of experience and knowledge, unless they have been given supervision or
instruction concerning use of the appliance by a person responsible for their safety.
10. Children should be supervised to ensure that they do not play with the appliance.
11. The appliance should be used for preparation of food and drinks as described within the
instructions for use that accompany it.
12. The blades inside the glass bowl are sharp. Handle with great care whilst emptying and
cleaning.
13. Always ensure that your hands are dry before removing the plug from the mains socket. Never
pull the plug out of the mains socket.
14. Be careful when removing the lid, hot steam will escape and can burn. Always remove the lid
by pushing up the lid tab and facing away from you.
15. Avoid scalding from rising hot steam by lifting the lip in forward direction.
16. Keep the device stable when it contains anything hot.
Page 3

Page 3 of 13
17. Be careful while pouring hot liquid into the glass bowl as the liquid can be ejected due to
sudden steaming.
18. Avoid overflow and water spilling to the connector under the bowl.
DO NOT’S
1. The appliance is intended for household and domestic use only. Do not use for any other
purpose.
2. The plastic bags used to wrap this appliance or the packaging may be dangerous. To avoid risk
of suffocation, keep these bags out of reach of babies and children. These bags are not toys.
3. Do not cover the appliance when in use.
4. Do not connect the appliance to an external timer or remote control system.
5. Do not touch the cook blender during use. It will get very hot.
6. Do not touch the glass bowl after use, wear oven gloves when removing the glass bowl from
the base unit.
7. Do not leave the cord hanging over the edge of a kitchen table or work top. Avoid contact
between the cord and hot surfaces.
8. Do not operate the appliance near a wall or cabinet, keep at least 10cm away from the walls
and other surface in order to allow sufficient airflow.
9. Do not immerse the appliance in water or other liquids to protect against fire, electric shock
or personal injury.
10. The appliance contains no user-serviceable parts. Do not attempt to open the cabinet or
dismantle any parts from the appliance.
11. Do not put the appliance in dishwasher.
12. Do not remove the measuring cup or add ingredients when the appliance is blending.
13. Do not insert utensils through the hole of the measuring cup when the appliance is operating.
14. Do not add cold liquids into the glass bowl, hot steam will escape and can burn.
15. Do not operate the appliance (heating, blending functions or programs) when the glass bowl
in empty.
16. Do not use chemical descaler on the coated-heating plate of the glass bowl. Whenever
necessary, add a 300ml mixture (50% water and 50% alcoholic vinegar or distilled vinegar) into
the glass bowl to discale. Leave it for 12 hours without heating, remove the mixture and
clean with water.
17. Do not attempt to remove the glass bowl from the heating plate. The glass bowl cannot be
immersed in water. Use the Auto Clean setting to clean inside the glass bowl and underneath
the blades.
18. The temperature of all surfaces marked with this symbol will be very hot when the
appliance is in use. Do not touch these surfaces as possible injury could occur.
Page 4
Page 4 of 13
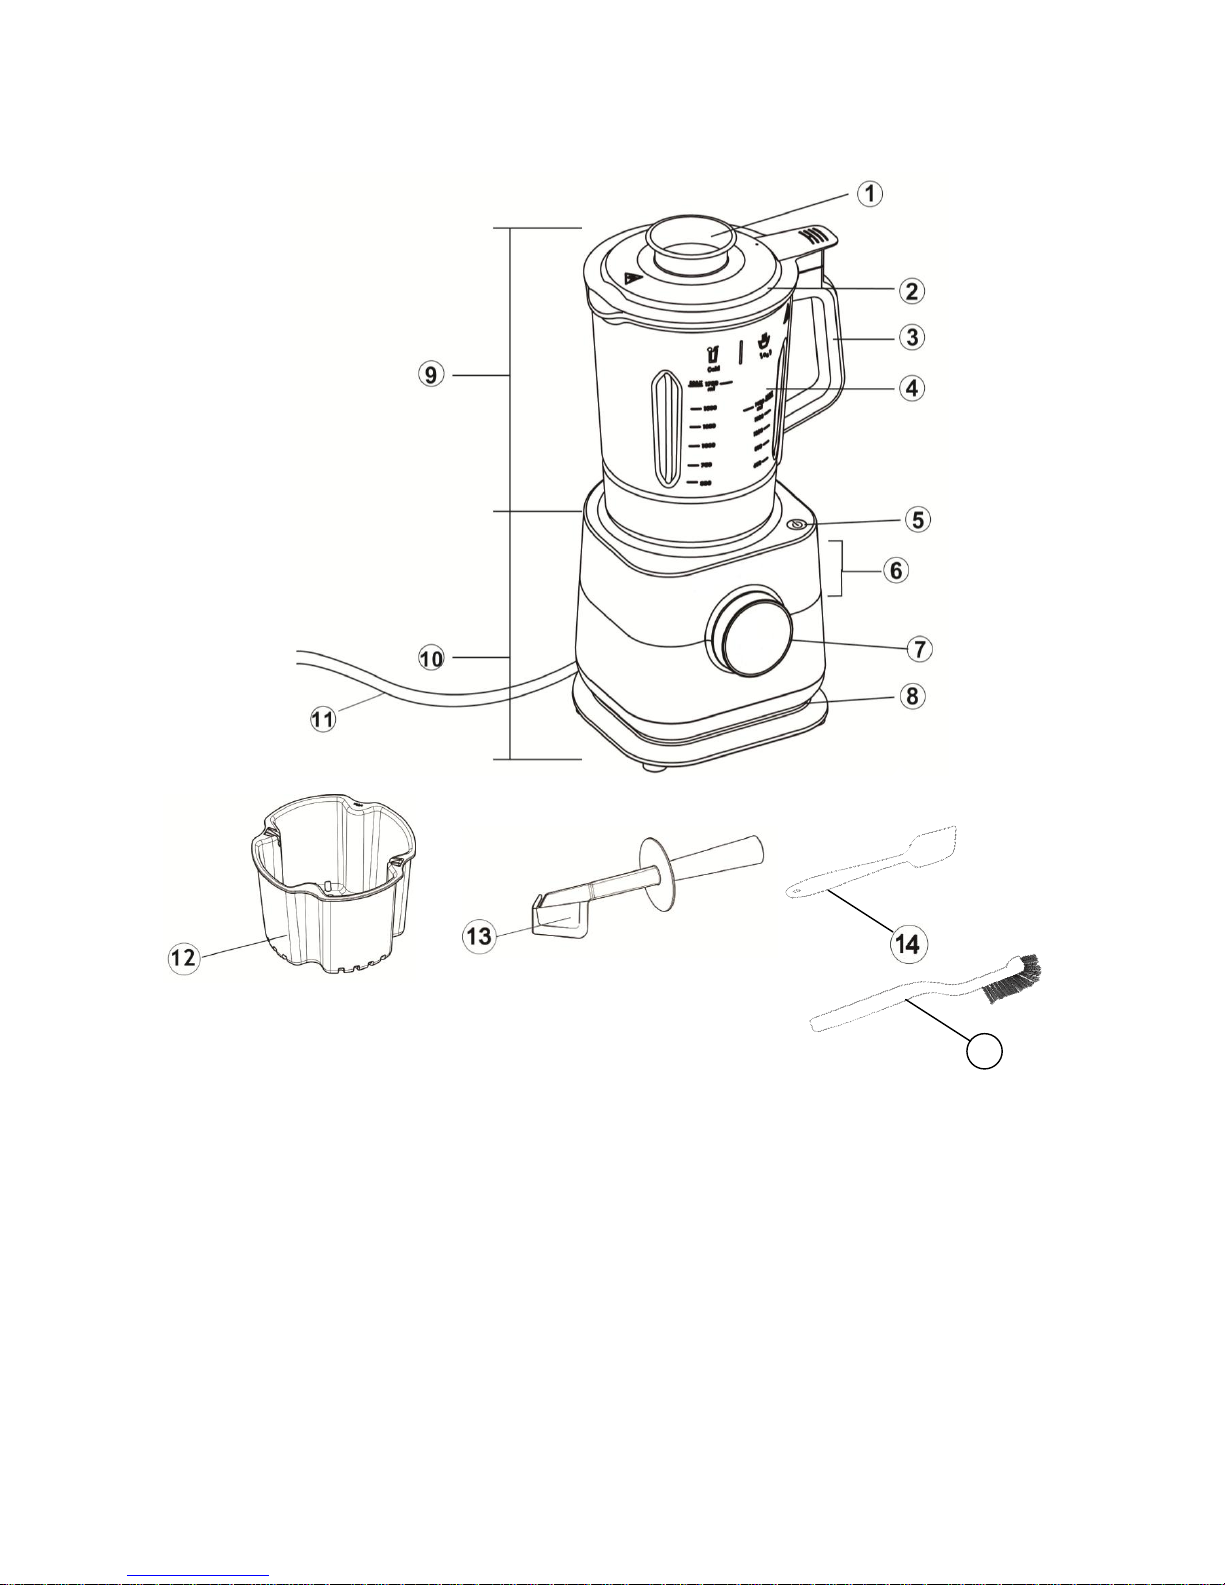
GET TO KNOW YOUR COOK BLENDER
1. Measuring Cup
2. Lid
3. Handle
4. Volume Markings
5. On/Off Button
6. Display Panel
7. Control Knob
8. Cord and Plug Storage
9. Glass Bowl Unit with Blade
10. Base Unit
11. Power Cord
12. Steam Basket
13. Plastic Spatula
14. Rubber Spatula
15. Cleaning Brush
Accessories
Cook Blender
15
Page 5

Page 5 of 13
CONTROL PANEL
1. Chunky/Thick Soup Mode Indicator
2. Smooth/Fine Soup Mode Indicator
3. Sauce Mode Indicator
4. Ice Crushing Mode Indicator
5. Auto clean Mode Indicator
6. Manual Cooking Mode Indicator
7. Steaming Mode Indicator
8. Blending Button
9. Timer Setting Indicator
10. Temperature Setting Indicator
(only for Manual Cooking Mode)
11. Time/Speed Setting Display
12. Set Button
13. Start/Stop Button
Page 6

Page 6 of 13
BEFORE THE FIRST TIME USE
1. Remove the appliance and all accessories from the packaging.
2. Peel off the adhesive labels and protection foil on control panel of the appliance.
3. Clean all parts which come into contact with food before you assemble the appliance.
4. Wipe the base unit and outside of the glass bowl with a clean damp cloth.
QUICK GUIDE
HOW TO USE
1. Place the appliance on a firm, stable and flat surface; allow sufficient ventilation.
2. Put the diced ingredients into the glass bowl and add water as per your desired recipe. Cover with
the lid and press it to the glass bowl.
3. Place the measuring cup into the opening of the lid.
4. Position the glass bowl onto the base unit by using guided grooves and make sure it fits properly.
5. Connect the appliance to a suitable mains supply outlet.
1. Place the glass bowl
onto the base unit.
6. Select the mode you
want to use by
turning the control
knob.
3. Place the lid in
position.
2. Put all ingredients
into the glass bowl.
7. Press the start button
to start cooking.
8. Lift up the glass bowl
after the cooking
process completes.
4. Connect the appliance
to main supply outlet.
5. Press ON/OFF button
to switch on the
appliance
Page 7

Page 7 of 13
6. Press ON/OFF button to start the appliance and initialize the program. It then goes to ‘Standby’
mode.
7. Select the desired cooking mode by turning the control knob and start cooking by pressing
Start/Stop button.
WARNING: Do not touch the bottom of glass bowl and glass bowl during cooking, as it can get very
hot. Pour hot liquid from the glass bowl carefully when there is any.
8. At the end of the cooking program, the display will show “00” and 5 beep sounds will be heard.
9. Disconnect the appliance from mains supply and let it cool down completely.
Note:
1. The appliance will start only if the glass bowl is correctly positioned on base unit and lid on
the glass bowl.
2. During the cooking program, press Start/Stop to pause the process. The program continues
when it’s pressed again. After completion of the program, the appliance will shut down
automatically if no button is pressed within 10 minutes.
3. To turn off the appliance in any condition, press ON/OFF button.
AUTO MODE
MAKING SOUP
This appliance is able to make two kinds of soup - Chunky soup and Smooth soup.
Note: The Maximum fill for hot ingredients is 1400ml. During the cooking process, you can lift the
measuring cup to add more ingredients through the opening of the lid.
Warning: Do not remove the measuring cup or add ingredients when the appliance is blending.
1. Turn the control knob to select Chunky soup program or the Smooth soup program , then
the selected program is highlighted. The Start/Stop button will be flashing.
Page 8

Page 8 of 13
2. Press the Start/Stop button to start, the button stops flashing and changes from white to orange.
Cooking time starts to count down.
3. After cooling for a few minutes, the appliance automatically starts stirring the ingredients. During
the cooking process, you can stir at any time by pressing on control panel.
4. When cooking completes, 5 beep sounds will be heard. The appliance will automatically switch to
keep warm mode for 20 minutes. The display will show:
5. After 20 minutes of keep warm function, 5 beep sounds will be heard and then the appliance will
automatically go to standby mode.
MAKING SAUCE
1. Turn the control knob to select the sauce program , then the selected program is highlighted.
The Start/Stop button will be flashing.
2. Press the Start/Stop button to start the process, the button stops flashing and changes from white
to orange. Cooking time starts to count down.
3. After cooling for a few minutes, the appliance automatically starts stirring the ingredients. During
the cooking process, you can stir at any time by pressing on control panel.
4. When cooking procedure is completes, 5 beep sounds will be heard and the appliance will
automatically goes into standby mode.
Note: In Auto mode, the cooking temperature, time duration and blending speed will be
automatically selected by default, as per table below.
Program
Temperature
Cooking Time
Keep Warm
Blending
CHUNKY/THICK SOUP
95ºC-100ºC
~30 minutes
~20 minutes
Medium Speed
SMOOTH/FINE SOUP
95ºC-100ºC
~30 minutes
~20 minutes
High Speed
SAUCE
85ºC-90ºC
~20 minutes
~20 minutes
Low Speed
DOING ICE CRUSHING/ MAKING SMOOTHIE
Note: The maximum fill for cold ingredients/ice cubes is 1750ml.
1. Turn the control knob to select the ice crushing mode , then Start/Stop button to start the
process.
2. The appliance will blend the ingredients for 1 minute.
3. When blending completes, a sequence of beep sound will be heard.
Page 9

Page 9 of 13
AUTO CLEAN FUNCTION
This function will facilitate cleaning of the glass bowl.
1. Fill the glass bowl with 1200ml of water with 3 to 4 drops of washing-up liquid.
2. Rinse inside the glass bowl and use cleaning brush to remove residue sticking on glass bowl.
3. Wash the lid in water with washing up liquid and rinse it by using the cleaning brush. Cover the
glass bowl with the lid.
4. Turn the control knob to select auto cleaning function on control panel.
5. Press Start/Stop button to start the cleaning process.
6. The appliance will mix the liquid and heat for 2 minutes, it will mix the liquid again until the end
of cleaning process. The sticking residue under the blade will be removed.
7. Lift the glass bowl from base unit and place it on a flat surface.
8. Remove the lid and finish cleaning the glass bowl with a sponge, and dry them thoroughly.
9. Clean the base unit with moist soft cloth.
Warning:
1. Do not clean glass bowl, interface and base housing with abrasive side of a sponge or pad.
Only use soft cloth to clean.
2. The blades inside the glass bowl are very sharp. Handle with great care while cleaning.
3. Do not put the glass bowl in a dishwasher.
4. Never immerse the appliance in water.
Note: To clean easily, wash the removable parts (lid, glass bowl & measuring cup) in warm soapy
water immediately after use.
EXPERT MODE
MANUAL COOKING FUNCTION
1. Turn the control knob to select manual cooking mode .
2. Press the button. The appliance will display a default cooking temperature of 40ºC.
3. Turn the control knob to adjust the temperature from the range of 40 to 99 ºC.
4. Once the desired temperature is selected, press the button to adjust the cooking time.
5. The appliance will display a default cooking time of 30 minutes.
6. Turn the control knob to adjust the timer from the range of 1 minute to 8 hours. To speed up the
adjustment process, turn and hold the control knob until your desired time is reached.
Page 10

Page 10 of 13
7. Once the cooking time is selected, press the Start/Stop button to start cooking.
8. You can also stir at any time by pressing (Only available at 80ºC or above).
9. When the cooking process completes, 5 beep sounds will be heard. The appliance will
automatically switch to keep warm mode for 20 minutes.
The display will show:
10. After 20 minutes of keep warm function, 5 beep sounds will be heard and then the appliance will
automatically go to standby mode.
STEAM FOOD
1. Add a maximum of 300ml water into the glass bowl.
2. Place the food that you would like to steam into the steam basket provided.
3. Place the steam basket into the glass bowl and cover with the lid.
4. Place the bowl in position.
5. Press on control panel and select steaming mode. The appliance will display a default cooking
time of 30 minutes.
6. Press button, then turn and adjust the timer from the range of 1 to 40 minutes. To speed up
the adjustment process, turn and hold the control knob until your desired time is reached.
7. Once the desired cooking time is selected, press Start/Stop button to start cooking.
8. You can adjust the cooking time anytime during the cooking process. button will appear after
pressed Start/Stop button, press button and then turn and adjust the timer again.
9. When the cooking process completes, 5 beep sounds will be heard. The appliance will
automatically switch to keep warm mode for 20 minutes.
The display will show: .
Display
1 to 99 minutes will show in 2 digits
Start from 2 hours, will add up 0.5 hours
per adjustment until maximum 8.0
Adjust minutes
Adjust hours
Page 11

Page 11 of 13
10. After 20 minutes of keep warm function, 5 beep sounds will be heard and the appliance will
automatically go to standby mode.
11. Turn off the machine by pressing the Power On/Off button, use the spatula to lift the steam basket
as below:
BLENDING
1. To blend the ingredients according to your preference, press on control panel.
Medium (2) speed is by default selected.
2. Press button, then adjust the blending speed LOW(1), MEDIUM(2), HIGH(3) by using the
control knob.
3. Put the ingredients into glass bowl, cover with lid and make sure it fits properly.
4. Once selected the blending speed, press to start blending. There is no defaulted blending
time, if you keep the finger on , blending will continue. If you remove the finger from ,
it will stop.
Note: For safety reasons, the blending function will stop automatically after a period of use.
Page 12

Page 12 of 13
TROUBLESHOOTING
The appliance does not work.
Possible Cause
Solution
The appliance is not plugged in.
Check the mains plug and make sure it is
connected to the socket properly.
The glass bowl is not placed on base unit.
Place the glass bowl properly with guided
grooves on the base unit.
The lid is not placed/ fitted well onto the
glass bowl.
Place the lid properly onto the glass bowl and
make sure it fits properly.
The control panel stops working. No options can be selected or sensitivity of panel is low.
Possible Cause
Solution
The appliance is under electromagnetic
interference.
Unplug the appliance from power socket. Restart
after a few minutes.
There is dirt on control panel.
Clean the panel with soft cloth.
The ingredients are not blended well.
Possible Cause
Solution
The ingredients exceed the maximum
indication in the glass bowl.
Remove some of the ingredients and ensure the
ingredients are placed evenly at the bottom of
the glass bowl.
Water or cooking liquid is not enough.
Make sure the water/cooking liquid level is
correct as mentioned in the recipe booklet.
The food is burnt.
Possible Cause
Solution
A wrong program is selected.
Select another program (refer the recipe
booklet).
Water or cooking liquid is not enough.
Make sure the water/cooking liquid level is
correct as mentioned in the recipe booklet.
Page 13

Page 13 of 13
RECYCLING YOUR ELECTRICALS
At the end of the electrical products useful life, it should not be disposed of with household waste.
Please arrange to take this appliance to recycling points set up around the country.
To find out more information about the recycling of electrical items and the recycling point, please
visit www.recycle-more.co.uk.
SCOTT (UK) Limited
Unit 1, The iO Centre,
Fingle Drive, Stonebridge,
Milton Keynes,
MK13 0AT,
United Kingdom.
 Loading...