

Scott 2014 BIKE Owner's Manual

GENERAL INFO
A
ORIGINAL INSTRUCTIONS
SCOTT 2014
BIKE OWNER’S
MANUAL
SCOTT SP ORTS SA | 17 RTE DU CROC HET | 1762 GIVIS IEZ | SWITZERL AND
© 2013 SCOTT S PORTS SA, ALL R IGHTS RESERV ED | SCOTT-SPORTS .COM
DISTRIBUTION: SSG (EUROPE) DISTRIBUTION CENTER SA
P.E.D ZON E C1, RUE DU KIE LL 60 | 6790 AUBANG E | BELGIUM | V3 .2/201307 10

2 scott-sports.com 3
GENERAL
BIKE OWNER’S MANUAL
ENGLISH
CONTENT
Congratulations ............................................................... P. 004
Bicycle Safety .................................................................. P. 005
Saddle height .................................................................. P. 006
Suspension on SCOTT mountain bikes ......................................... P. 007
Gears .......................................................................... P. 007
Brakes ......................................................................... P. 008
Tires and rims .................................................................. P. 012
Maintenance and care .......................................................... P. 018
Bicycle care .................................................................... P. 020
Troubleshooting . . . . . . . . . . . . . . . . . . . . . . . . . . . . . . . . . . . . . . . . . . . . . . . . . . . . . . . . . . . . . . . . P. 022
Warranty ....................................................................... P. 0 24
Parts of wear and tear .......................................................... P. 026
SCOTT Service Plan ............................................................ P. 028

4 scott-sports.com 5
GENERAL
BIKE OWNER’S MANUAL
ENGLISH
CONGRATULATIONS BICYCLE SAFETY
Congratulations on your purchase of a new SCOTT bicycle! We are confident that the
bicycle will exceed your expectations for value, performance, and ride quality. Each
frame set and component has been custom specified and designed to enhance your
riding experience. Whether you are a beginning cyclist, or a seasoned pro, SCOTT
bicycles will provide endless hours of two-wheeled fun.
We strongly encourage you to take the time to read this manual and familiarise
yourself with your new bicycle. If you have purchased a bike for your children, please
take the time to make sure they understand the information contained in this Owner’s
Manual.
IMPORTANT!
If you purchased this bicycle for a minor, it is essential that a responsible adult/
parent thoroughly reviews and reads the Owner’s Manual to the minor.
Please make sure to get your SCOTT bike completely assembled from your authorized
SCOTT dealer.
This is very important for optimum performance and safety and guarantees you a long
lasting joy while riding your bike.
It is important to understand the basics of riding a bicycle, but it is equally important to
exercise common sense when cycling. Cycling is a dynamic sport and requires reacting
to varying situations. Like any sports, cycling involves risk of injury and damage.
By choosing to ride a bicycle, you assume the responsibility for that risk.
IMPORTANT!
Please use the bike of your choice only for the purpose it was made for.
For instance a road racing bike can not be used to substitute a mountain bike in off
road terrain or a Trekking bike can not be used for downhill racing or road racing.
If you have questions or problems regarding your new SCOTT bicycle, please contact
your Authorised Dealer.
Ride Frequently!
1. Obey all traf fic laws,
2. Make sure that the bike size is right for the rider, and that he can reach brake levers
properly.
3. Make sure that the brakes and the bic ycle work per fectly well (cf maintenance).
4. Always have a light at night and insta ll reflectors properly.
5. Never ride two people on a bicycle designed for one
(except specially designed and properly ins talled child carrie rs.).
6. Never hitch a rid e on anothe r vehicle.
7. Do not weave or race in traffic.
8. Watch out for parked cars (door c an be open ed at any time) and ca rs pulling into
traffic.
9. Use proper signals when turning.
10. Mount l oads secu rely. Never carr y packages that interfere with brakes or vision.
11. Always wear a helmet.
6 scott-sports.com 7
GENERAL
BIKE OWNER’S MANUAL
ENGLISH
SADDLE HEIGHT SUSPENSIONS ON SCOTT BIKES
GEARS
Comfortable riding not only depends on the position of the saddle, but also on its
height. You can accurately adjust the height of the saddle to the length of your legs
when you proceed as follows:
1. Straddle the sad dle. Place the ball of your fo ot on the pedal nearest to the ground.
Make sure the cranks are ver tical.
2. If the heel of your foot points down about 30 degree s, the height of the saddle is
correct.
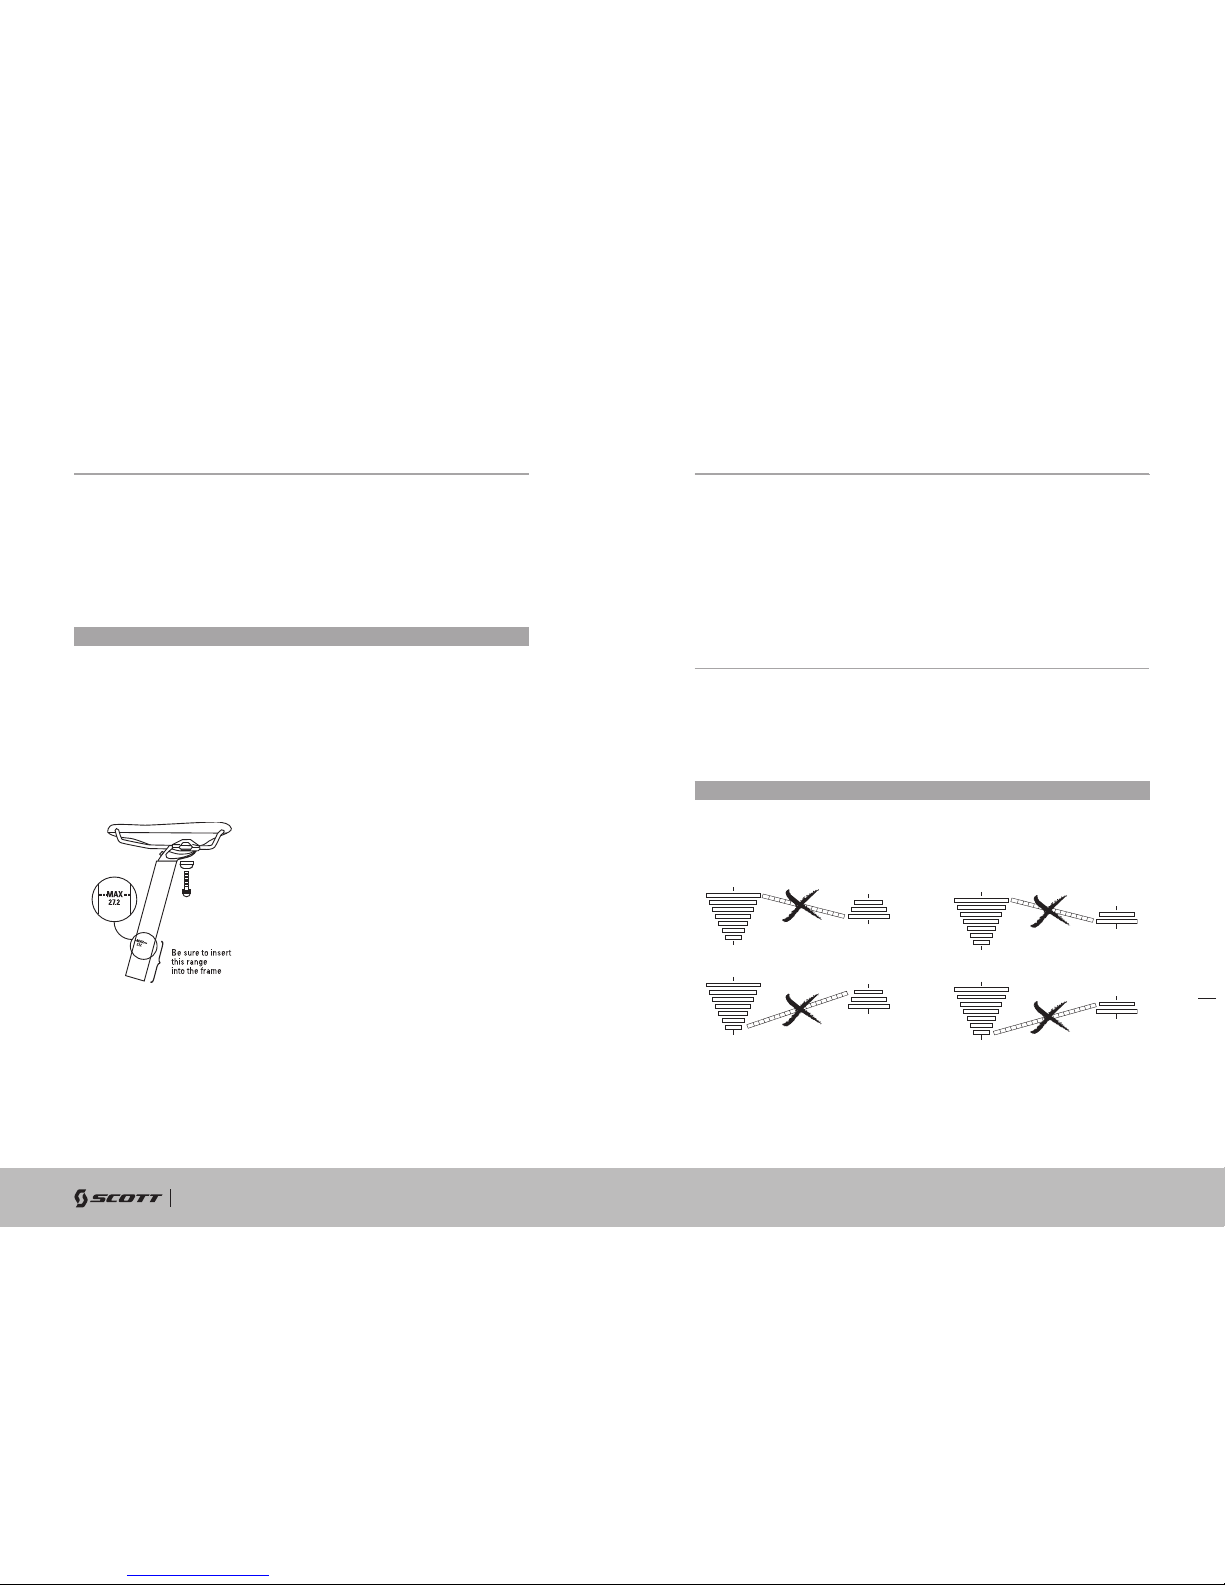
CAUTION!
Make sure that the limit mark on your seat post is inside the seat tube. If it is not
possible to reach the correct seat height, you have to choose a size above.
Make sure that this mark is inserted into the frame. If you need to change the
inclination of the saddle or the horizontal position, please make sure not to exceed the
max. tightening torque.
Screws with M5 should be tightened with 6 Nm, M8 with 20 Nm.
Please make sure the saddle is connected perfect with the seat post before every ride.
Please note that SCOTT is not responsible for damages caused by neglecting the
tightening torques on the seat clamp fixing screws.
If you have chosen a SCOTT bike equipped with a suspension fork, please refer to the
enclosed instructions of the manufacturer.
For the adjustment of the rear suspension on a fully suspension bike, please refer to
the instructions of the manufacturer of the suspension elements, and to the SCOTT
instructions for full suspension bikes. Both booklets are enclosed with the bike.
Only a well adjusted suspension brings security, comfort and fun.
The front and the rear derailleur have already been adjusted by your SCOTT dealer.
Therefore, no readjustment will be necessary to begin with. However, it is advisable to
check the adjustment of the gear change mechanism regularly.
For more information concerning the shifting system please read the manual of the
shifting components producer attached to your bike.
CAUTION!
To avoid excessive wear and damage of the chain, sprockets and chain wheels, we
advise against the following combinations (see illustrations):
- Largest chain wheel — largest sp rocket
- Smallest c hain whee l — smallest sprocket
Regularly check that your chain is clean and well-lubricated. Have your dealer check
the chain for wear. Should you nevertheless want to check it yourself, you need to
purchase the Rohloff Chain Caliber 2 from your SCOTT Dealer. This caliber will help
you to work out whether your chain is too slack or not.
8 scott-sports.com 9
GENERAL
BIKE OWNER’S MANUAL
ENGLISH
BRAKES
Brake adjustment general
Your SCOTT bike is fitted with a reliable and well-functioning braking system, provided
the brakes are correctly adjusted. Check by measuring the distance between the brake
shoes and the rim: it should be 1.5 to 2 mm.
Cable connection and adjustment of the (Dual Pivot) brake
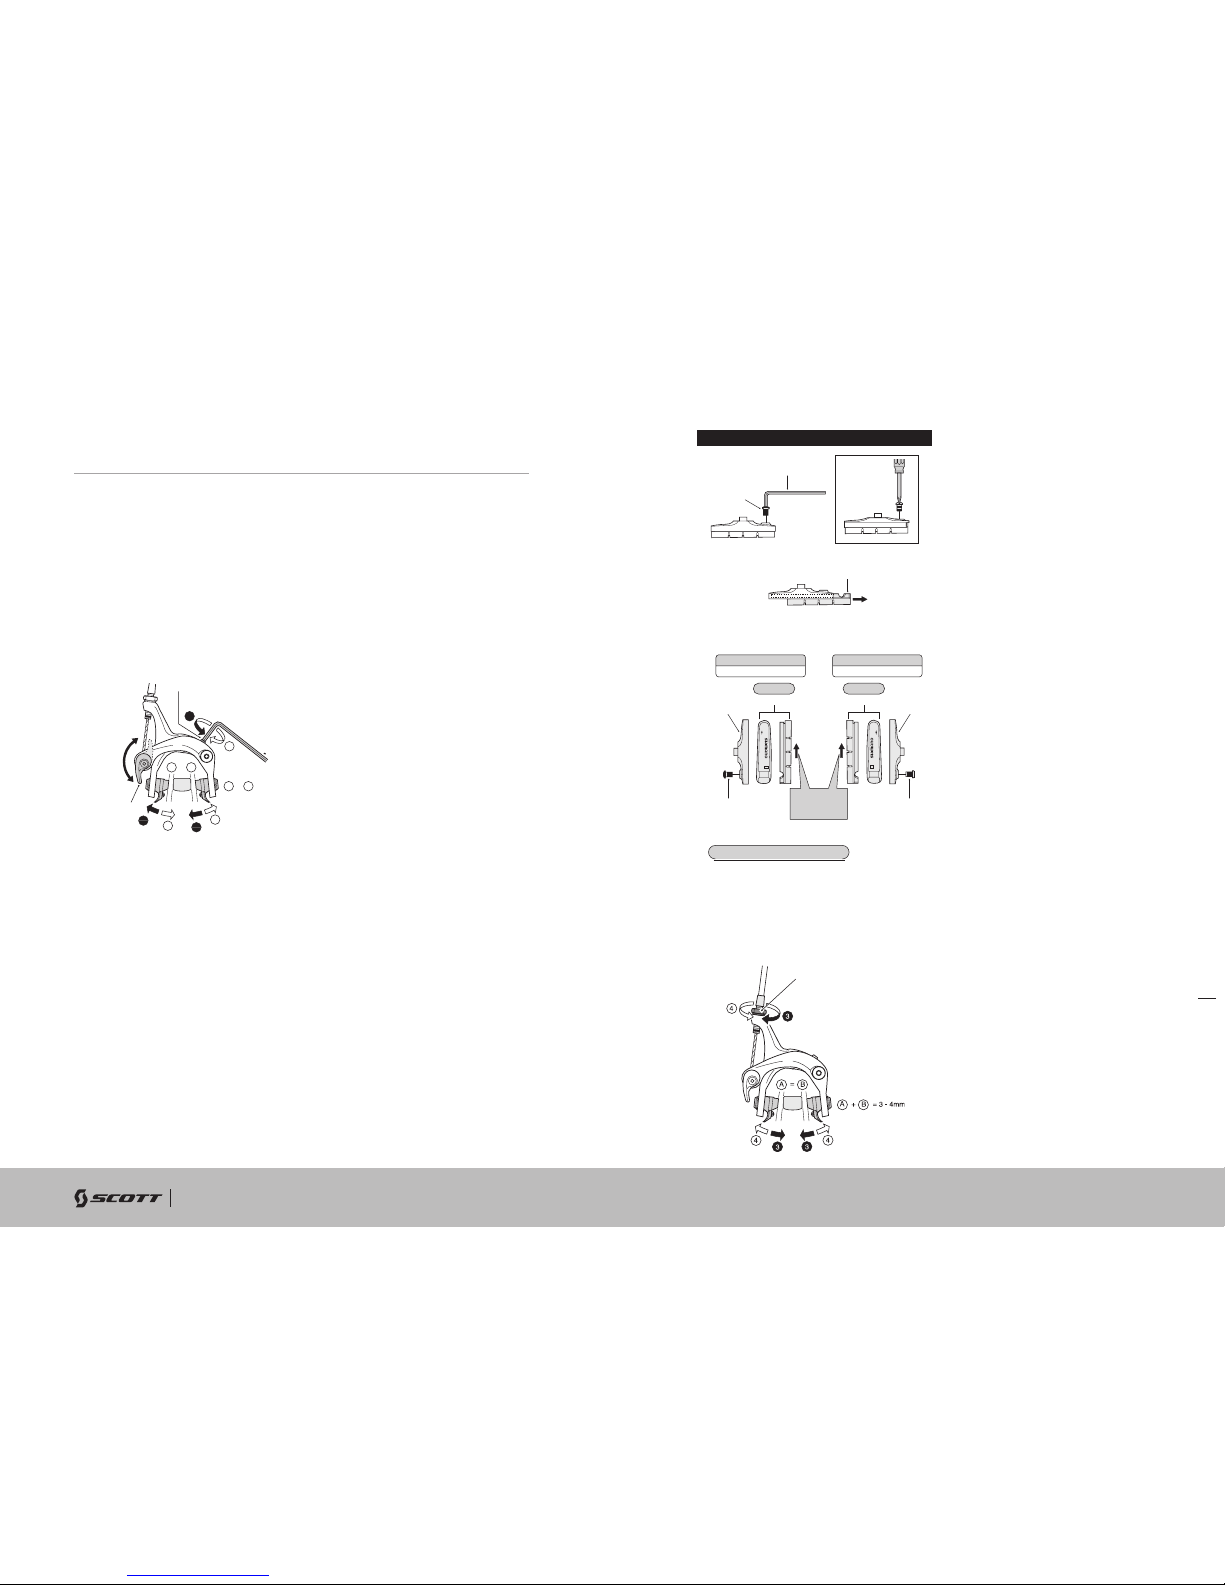
1. Put the quick lever on the closed position.
2. Adjust the brake shoe cle arance (as shown in the illustratio n) and secure the c able
with the pinch bolt nut.
Cable bolt tightening torque 6-8 Nm
Change of brake pads
1. Loosen up the secu rity screw with a 2 mm allen key.
2. Push the used brake pad o ut of the aluminium brake shoe.
3. Push the new brake pad into the brake shoe, and beware of the arrow which
shows the mounting direction.
4. Tighten up the security screw to approximately 1. 5 Nm.
Centring the brake shoes
Make a minor adjustment by using the centring adjustment screw.
Readjustment of the brake shoe clearance
Turn the cable-adjustment bolt to readjust the brake shoe clearance.
Schieben Sie den Bremsschuh zum Abnehmen aus der Bremsschuhhalternut.
Auf der rechten und linken Seite werden verschiedene Bremsschuhe und
Bremsschuhhalter verwendet. Schieben Sie den neuen Bremsschuh in die
Bremsschuhhalternut und achten Sie darauf, daß die Einschubrichtung und die
Schraubenlöcher richtig übereinstimmen.
Die Schraube wieder festziehen.
Die Schraube lösen.
Bremsschuh-
einschub-
richtung
für linke Seite für rechte Seite
gleich für vorne und hinten
gleich für vorne und hinten
vorne
vorne
Bremsschuh
Bremsschuh
Bremsschuhhalter
Bremsschuhhalter
Schraube
Schraube
2mm Inbusschlüssel
Schraube
Bremsschuh
Austauschen der Bremsschuheinheit
Anzugsdrehmoment: 1 - 1,5 Nm
Replacement of the cartridge shoe
2mm allen key
Loosen the screw
remove the shoe by sliding it along the groove of the shoe holder
shoe
screw
There are two different types of shoe and shoe holder to be used in the left and
right positions respectively. Slide the new shoes into the grooves on the shoe
holders while taking note of the correct directions and screw hole positions.
for the left
front front
for the right
same at front and rear
brake shoe
brake shoe holder brake shoe holder
screw
screw
brake shoe
same at front and rear
tighten the set screw
shoe insertion
direction
tightening torque: 1-1,5 Nm (9-13 in. lbs.)
centering adjustment bolt
2
Zentrierschraube
3mm-Inbusschlüssel
A
B
+
= 3 - 4 mm
2
2
1
1
offen
geschlossen
Schnellspannhebel
quick release lever
centering adjustment bolt
closed
open
3mm allen key
 Loading...