

Page 1

KIDS
B
SCOTT 2014
BIKE OWNER’S
MANUAL
SCOTT SP ORTS SA | 17 RTE DU CROC HET | 1762 GIVIS IEZ | SWITZERL AND
© 2013 SCOTT S PORTS SA, ALL R IGHTS RESERV ED | SCOTT-SPORTS .COM
DISTRIBUTION: SSG (EUROPE) DISTRIBUTION CENTER SA
P.E.D ZON E C1, RUE DU KIE LL 60 | 6790 AUBANG E | BELGIUM | V3 .2/201307 10
Page 2
2 scott-sports.com 3
KIDSENGLISH
BIKE OWNER’S MANUAL
CONTENT
Congratulations ............................................................... P. 004
General introduction ........................................................... P. 005
Safety .......................................................................... P. 005
Assembly of training wheels .................................................... P. 006
Chain tension .................................................................. P. 006
Brakes ......................................................................... P. 007
Light systems .................................................................. P. 009
Bicycle helmet and clothing .................................................... P. 009
Replacement of defective or bent parts ........................................ P. 010
Maintenance and care ........................................................... P. 011
Checklist ....................................................................... P. 012
Tightening torques for SCOTT Bikes ............................................ P. 014
Bicycle care .................................................................... P. 015
Spare parts .................................................................... P. 015
Warranty ....................................................................... P. 016
SCOTT Service Plan ............................................................ P. 018
Page 3

4 scott-sports.com 5
KIDSENGLISH
BIKE OWNER’S MANUAL
CONGRATULATIONS GENERAL INTRODUCTION
SAFETY
Congratulations on your purchase of a new SCOTT bicycle! We are confident that the
bicycle will exceed your expectations for value, performance, and ride quality. Each
frame set and component has been custom specified and designed to enhance your
riding experience. Whether you are a beginning cyclist, or a seasoned pro, SCOTT
bicycles will provide endless hours of two-wheeled fun.
We strongly encourage you to take the time to read this manual and familiarise
yourself with your new bicycle. If you have purchased a bike for your children, please
take the time to make sure they understand the information contained in this Owner’s
Manual.
Important!
If you purchased this bicycle for a minor, it is essential that a responsible adult/
parent thoroughly reviews and reads the Owner’s Manual to the minor.
Please make sure to get your SCOTT bike completely assembled from your authorized
SCOTT dealer.
This is very important for optimum performance and safety and guarantees you a long
lasting joy while riding your bike.
It is important to understand the basics of riding a bicycle, but it is equally important to
exercise common sense when cycling. Cycling is a dynamic sport and requires reacting
to varying situations. Like any sports, cycling involves risk of injury and damage.
By choosing to ride a bicycle, you assume the responsibility for that risk.
Important!
Please use the bike of your choice only for the purpose it was made for.
For instance a road racing bike can not be used to substitute a mountain bike in off
road terrain or a Trekking bike can not be used for downhill racing or road racing.
If you have questions or problems regarding your new SCOTT bicycle, please contact
your Authorised Dealer.
Ride Frequently!
Legal advice:
Your new Kids bike meets, (as complete equipped model), all demands of the traffic
law standards and is allowed to be used in public streets.
It is obligatory that your child has reached the age of 8 years otherwise he/she should
use the sidewalk, which is legal up to 10 years of age. Please check your national laws
regarding this point!
Use of the bikes:
Maximum load of the bike must not exceed 50 kg.
The carrier ( when supplied with the bike) is made for a maximum load of 20 kg. In
general we recommend not to use the carrier on kids bikes for load transports due to
the reduced riding performance. SCOTT kids bikes are built to be very robust, jumps or
riding on stairways however exceed normal use.
When producing your SCOTT kids bike we only spec’d parts of high quality and
which offer safety under all riding situations. This is very important when participating
in public traffic. You will reach a maximum of safety by avoiding any dangerous
situations.
- Make sure that your child is well experienced in cycling when riding in public traffic.
Please be reminded that your child needs some time to get used to his/her
new bike. In addition children are allowed to ride on the sidewalk up to an age of
10 years.
- To react in the right way on public streets it is important for your child to know
about the traffic laws.
- Do not stress your child. It might happen that other participants in traffic, especially
cars, will make feel him/her unsure. Please have some lessons on how to ride in a
parking ground before participating in traffic.
Page 4
6 scott-sports.com 7
KIDSENGLISH
BIKE OWNER’S MANUAL
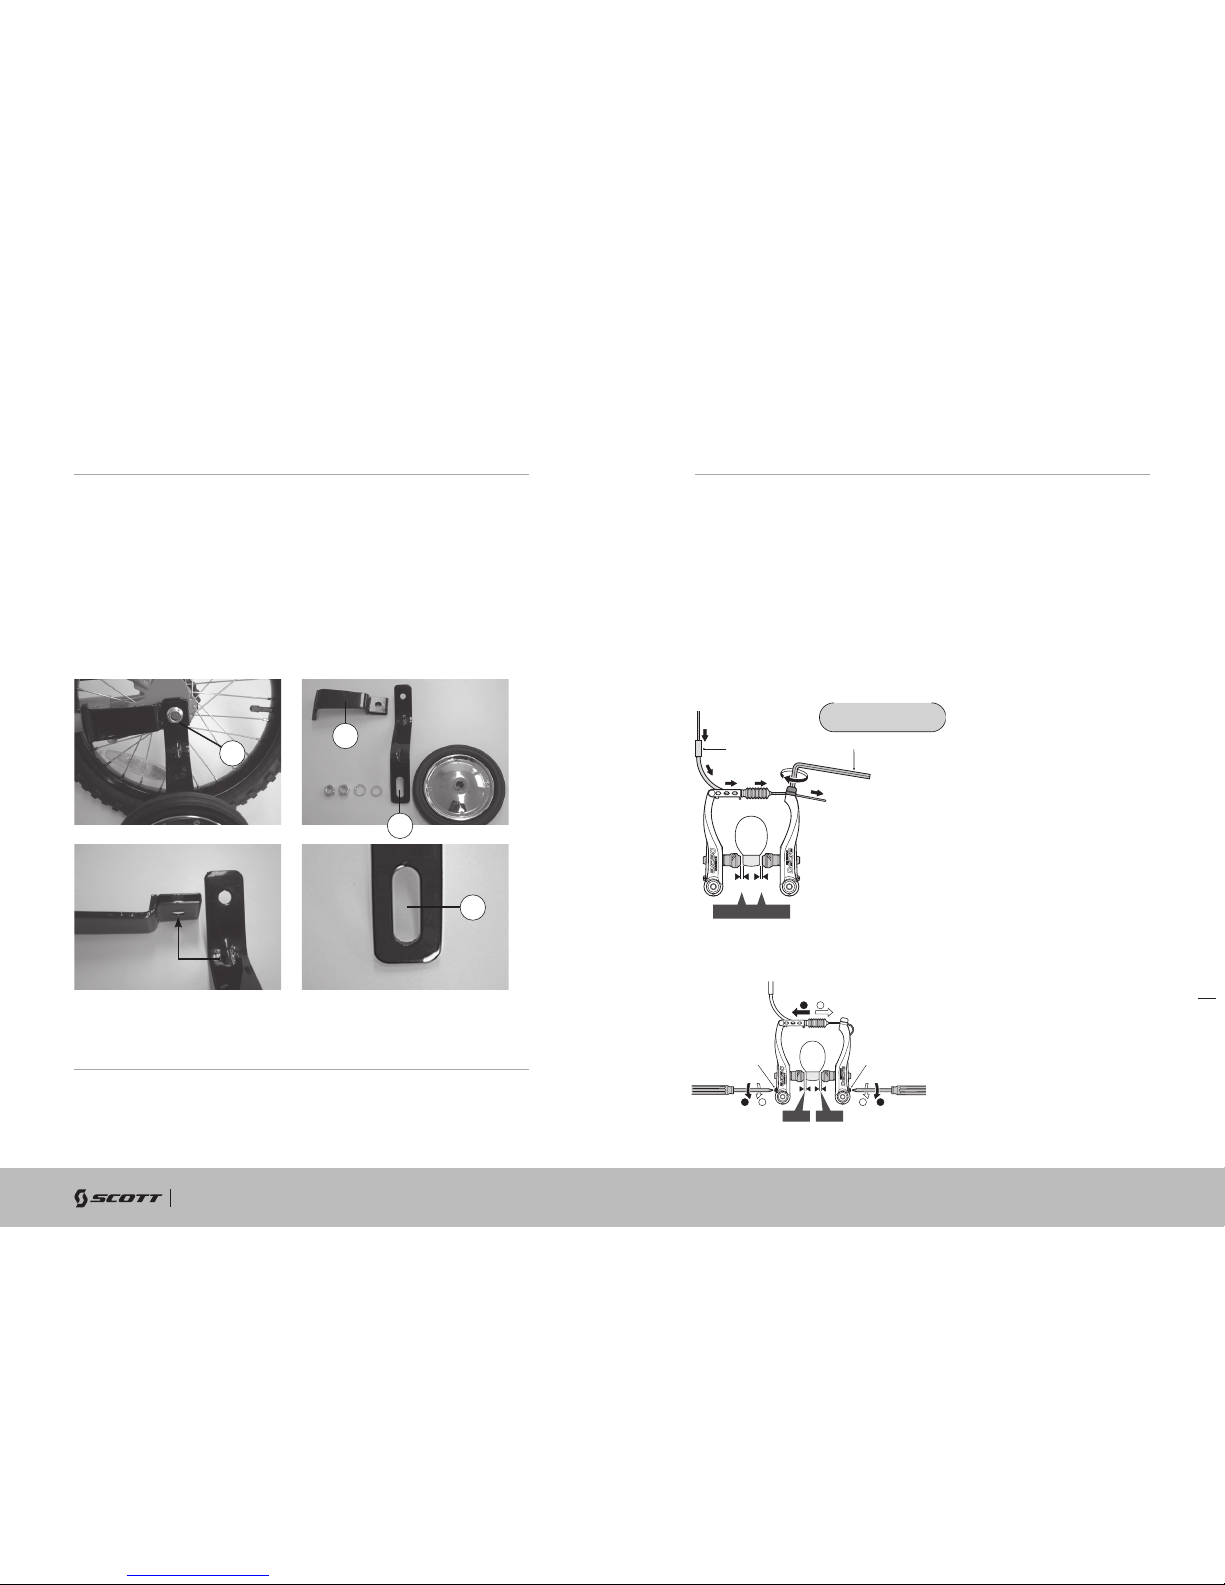
ASSEMBLY OF TRAINING WHEELS
CHAIN TENSION
BRAKES
Assembly of training wheels (only 12” and 16” models) und adjustment of chain tension
on bikes without rear derailleurs. For the assembly of the optional training wheels for
12” and 16” bikes please follow the instruction below:
- Release on one side of the rear wheel nut A and remove it including the washer.
- Put part B in part C and fix it with nut A with the washer between nut A and part C
- Assemble now the bolt and nuts/washers as shown below to fix the wheel on part B
- The long sleeved hole D will help you to balance the bike when you assembled on
the other side of the bike the parts as mentioned above.
- Both training wheels should be with a distance of 1-1.5cm to the ground when the
bike is balanced on its wheels. After balancing the bike please tighten the wheel
fixing nuts and the counter nuts.
In case the chain needs to be tensioned again, please release on both sides nut A and
pull the rear wheel straight backward until the tension is ok.
Please retighten nut A on both sides. Please note the tightening torque as mentioned
in the table of tightening torques at the end of this file.
- Your new bike is equipped with two brakes which work independently of each other.
- In case you can pull the brakelever more than half of its way to the handlebar,
you should readjust the brake.
To do so, please follow as shown below:
V-Brake
1. While holding the shoe against the rim, tighten the shoe fixing nut.
2. Pass the inner cable through the inner cable lead, and after setting so that the total
of the clearances between the left and right shoes and the rim is 2 mm tighten the
cable fixing bolt.
3. Adjust the distance with the spring tension adjustment screws.
A
B
C
D
Anzugsdrehmoment:
6 – 8 Nm
BC
B+C=2 mm
inner cable lead
5mm allen key
tightening torque :
6-8 Nm (52-69 in. lbs.)
Federeinstellschraube Federeinstellschraube
1 mm 1 mm
12
1 1
2 2
Spring tension
adjustment screw
Spring tension
adjustment screw
Page 5

8 scott-sports.com 9
KIDSENGLISH
BIKE OWNER’S MANUAL
4. Depress lever about 10 times
Caliper brake
Release counter nut A and turn adjustment screw B counter clockwise until the
distance between brake pads and rims is approx. 2mm on each side.
Tighten counter nut A.
- In case adjustment screw B is released already to the limit, please release cable
clamping screw C and turn adjustment screw clockwise to its original position.
- Close the caliper brake with your hand to the rim , adjust the brake cable and tighten
clamping screw C. Please note the table of tightening torques at the end of this file.
- Finally make the fine tuning with adjustment screw B as mentioned above.
The wheel needs to spin free without touching the brake pads. Fix counter nut A.
Important:
Make sure that the brake works perfectly.
Important:
Under wet conditions the brake performance can decrease which will result in a
prolongation of the braking distance.
Bremshebel circa 10
mal anziehen
Depress lever about
10 times
B
A
C
LIGHT SYSTEMS
BICYCLE HELMET AND CLOTHING
- light the front and rear lights by the beginning of the dusk. To switch on the dynamo
press with the thumb on the button. But never while riding! To check the function of
front and rear light turn the raised front wheel.
- Under wet conditions the effectiveness of the dynamo may decrease.
- Please take care that your child wears clothing with bright colors and, if possible,
with reflective stripes or fabrics.
- A helmet that fits is the best way to avoid head injuries. The helmet should meet
DIN EN 1078 and should have the CE label. By choosing bright colors it will help to
improve the visibility. Wearing such a helmet should be matter of course for all
cyclists. In addition consider to be a good example for children.
Page 6

10 scott-sports.com 11
KIDSENGLISH
BIKE OWNER’S MANUAL
REPLACEMENT OF DEFECTIVE OR BENT PARTS
MAINTENANCE AND CARE
In case the bike is damaged by a crash or accident, please replace all damaged parts
immediately at your local SCOTT dealer. Never try to repair bent parts, they might fail
and cause an accident!
Before riding:
In the beginning the seat height should be adjusted in that way that your child, when
sitting on the saddle, can reach the ground with both feet. When more experienced
the saddle can be raised up into perfect riding position.
Important
Never exceed the seatpost and stem over the marked area. Otherwise the connection
can get loosen and can cause in worst case a crash.
Please check that your child can reach easily the handle bar and use brake- and shifting
levers as well as the bell.
Before every ride:
The traffic laws demand that one checks all functions that concern safety. Check every
brake when starting to ride. Also check the function of front and rear light and check
the air pressure of the tyres.
In addition to the checks listed above please check your bike regularly or if necessary,
according to the following list or contact your local SCOTT dealer to do so in order to
reach maximum safety and fun while riding.
- All bolts and nuts, especially the quick releases of the wheels for proper fit and in
case they are loose tighten them .
- Stem and handlebar for visible damages and replace them if necessary. Please make
sure that the bolts are tightened evenly when closing the front cap, according to the
tightening torque recommended by the producer of the parts.
- Braking systems
- Air pressure of the tyres according to the recommendation of the producer.
- Light systems and bell
- Handlebar grips to be fixed to the handlebar
- All parts of the rear suspension system including mounting bolts
- The front suspension fork for perfect function and play in the bushings.
- Front and rear derailleur for perfect function and grease them. If necessary readjust
the system and clean it.
- The play of the headset. If necessary readjust it.
- Brake and shifting cables for perfect wear and leakage on hydraulic systems.
If necessary grease the cables.
The table of maintenance below may help you to check your bike regularly and keep
the full performance of your bike.
Page 7

12 scott-sports.com 13
KIDSENGLISH
BIKE OWNER’S MANUAL
CHECKLIST
Part Description OK
Saddle/seatpost - Saddle tightened on seatpost
- Seatpost tightened in frame
- Check for minimum insertion line (min.55mm!)
Bar/stem - Check for minimum insertion (min. 65mm!)
- Stem tightened on fork steerer
- Bar tightened on stem
- Easy to reach
Brake - Brake levers easy to reach
- Function ok
- Check wear of brake pads
- Check position of the brake pads on the rim
- Brake surface on rim without oil or grease
Coaster brake - Function ok
Shifting parts - Function ok, adjusted acc. to owner’s manual
Chain - Chain tension ok
- Chain lubricated
- Chaincase in good condition (if existing)
Tires - Profile ok
- Check air pressure acc. to recommendation shown on sidewall
Wheels - Spoke tension ok and equalized
- Axle nuts/quick release tightened
Training wheels - Check fixation screws
Pedals - Antislip surface
- Tight fixed on cranks
- Bearings without lose play
Bell - Easy to reach
Front light - Tight fixed and adjusted
- Bulp ok
- Reflector clean and without cracks
Dynamo - Easy rolling on tire
- Electrical connections ok
- Light system checked
Part Description OK
Tail light - Tight fixed and adjusted
- Bulp ok
- Reflector clean and without cracks
Reflectors - Tight fixed and adjusted
- Clean and without cracks
Visual check - All parts without visible defects, all screws tightened acc.
to table of tightening torques
Screws - all screws tightened acc. to table of tightening torques
In case you are not 100% sure that you can do the check properly please contact your
dealer to avoid damages, crashes or injuries.
Page 8

14 scott-sports.com 15
KIDSENGLISH
BIKE OWNER’S MANUAL
TIGHTENING TORQUES FOR SCOTT BIKES
Mounting bolt
Cable fixing bolt
Pulley screws
Clamp
Cable fixing bolt
Clamp mounting bolt
Clamp mounting bolt
Clamp mounting bolt
Freewheel body
Cassette fixing nut
Square type
Spline type
Chainring screws
Mounting bolts M5
M6
M4
M5
M6
Frame mounting bolts
Cable fixing bolt
Brake pad bolts
Magura
Shimano
Formula
Hayes
Magura
Shimano
Formula
Hayes
Rear Derailleur
Front Derailleur
Rapidfire lever
STI
Brake lever
Freewheel hub
Crankset
BB-Cartridge
Pedals
Stem
Seatpost-seatclamp
V-Brake
Caliper Disc brake
Disc mounting bolts
7.8-9.8 Nm
3.9-5.9 Nm
2.9-3.9 Nm
4.9-6.8 Nm
4.9-6.8 Nm
4.9-6.8 Nm
4.9-6.8 Nm
4.9-6.8 Nm
35-49 Nm
30-49 Nm
35-45 Nm
35-50 Nm
7.8-10.7 Nm
50-70 Nm
40 Nm
5.6-7.8 Nm
9.8-13.7 Nm
2.8-3.9 Nm
5.6-7.8 Nm
9.8-13.7 Nm
5-6.8 Nm
5.8-7.8 Nm
5-6.8 Nm
6 Nm
6-8 Nm
9 Nm
12 Nm
4 Nm
2-4 Nm
6.2 Nm
5 Nm
In order to keep the function and optic of the bike in good condition we recommend
periodical bicycle care.
Doing so keeps the value of the bike and helps to prevent from corrosion or other
damages:
- clean with soft brush, water and soft towel. Do not use high pressure cleaner,
otherwise bearings, color or decals can be damaged.
- Do not use aggressive cleaning additives
- Repair color damages at once
- Grease or oil all metal parts especially during winter use
Please use biodegradable bicycle cleaners and degreasers which are offered at your
local dealer.
For buying spare parts we strongly recommend to visit your local SCOTT dealer as he
knows best which parts will fit to your bike and can help you to make your choice of
parts matching to your bike.
By doing so, you can avoid a combination of parts that might not match to each other.
Please only use original spare parts as only these can guarantee optimum function and
safety while riding.
This is extremely important on parts of the brake system, the tire and air tube.
Never use adapter solutions to fix or assemble brakes, seat/seatpost
and stem/handle bar!
BICYCLE CARE
SPARE PARTS FOR YOUR SCOTT BIKE
Page 9

16 scott-sports.com 17
KIDSENGLISH
BIKE OWNER’S MANUAL
WARRANTYWARRANTY
SCOTT Bikes
Gambler, Voltage FR, Volt-X
5
What is Covered? This warranty covers defects in materials and workmanship at the time of
transfer of risks in frames, swingarms and forks (provided it is a fork of SCOTT) on SCOTT
branded bikes sold completely assembled by SCOTT or an authorized SCOTT dealer
(“Product”).
How Long Does Coverage Last? This voluntary manufacturer’s warranty is limited to five years
for frames and swingarms, respectively two years for forks, from the date of purchase of the
Product and is limited to the first purchaser of the Product. Transfer of the Product from the
first purchaser to another person terminates this limited warranty.
The limited warranty of five years for the frames and swingarms shall only be granted in case
once a year a maintenance service has been effected according to maintenance requirements
as set forth in the manual. The effected annual maintenance service shall be confirmed by
stamp and signature. In case such an annual maintenance service has not been effected the
warranty of five years for the frame shall be reduced to three years. Costs for maintenance and
service have to be borne by the owner of the Product.
On Gambler, Voltage Fr and Volt-X the warranty period is limited to two years.
Repaired or replaced Products are covered for the remainder of the original warranty period
and subject to the conditions outlined in the original warranty, to the extent permitted by law.
Hereby SCOTT grants a worldwide voluntarily manufacturer’s warranty. To the extent
permitted by law and unless a shorter duration is stipulated by law, any warranties implied by
law are limited in duration to maximum five, respectively two years, from the date of purchase
of the Product and are limited to the first purchaser of the Product.
What Will SCOTT Do? SCOTT will replace or repair any defective Product, or will refund
your purchase price (as evidenced by your tendered receipt of purchase of the Product), at
SCOTT’s option. You must pay charges in connection with replacement of any non-defective
parts. In such a case, you will be alerted to the advisability of replacing non-defective parts, so
you can pre-authorize the costs.
What Does this Limited Warranty Not Cover? This limited warranty does not cover defects
which did not exist before the transfer of risks. This limited warranty does not cover Products
used in rental operations. This limited warranty does not cover purchases of not completely
assembled bikes. This limited warranty does not cover any defect caused by “wear and
tear” (a complete list of all parts of “wear and tear” can be found in the manual), accident,
neglect, improper handling, abuse, misuse, an act of God, improper assembly, non-compliance
with recommended maintenance and care procedures, improper or incorrectly performed
maintenance or repairs performed by someone other than an authorized SCOTT dealer, use
of parts or devices not consistent with the Product, and alteration of the Product. All Products
come with a manual; please carefully follow the instructions located there or affixed elsewhere
to the Product. To the extent permitted by law, consequential and incidental damages are not
recoverable under this limited warranty.
How Do You Make a Claim Under this Limited Warranty? To make a claim under this limited
warranty, you must notify SCOTT of the claimed defect within the warranty period and timely
return the Product to SCOTT at your expense for inspection. Please contact your authorized
SCOTT dealer, call SCOTT’s customer service or the national SCOTT distributor (dealer locator:
www.scott-sports.com). All returned Products must be accompanied by proof of purchase
(receipt) from an authorized SCOTT dealer or this limited warranty will not apply. In case of
replacement or refund, returned Product becomes the property of SCOTT.
A protocol for the handing over of the Product (which you will find at the end of the manual)
will remain in copy at the SCOTT dealer after acceptance and signature of the consumer. It is
obligatory to show this protocol of handing over together with the defective part in case of
a warranty claim given that it provides evidence of purchase or this limited warranty will not
apply.
How Do State Laws Affect Your Rights Under This Limited Warranty? This limited warranty
gives you specific legal rights, and you may also have other rights, which vary from state to
state.
Recommendation
We strongly recommend that you use only authorized SCOTT dealers for yearly maintenance
services and for repairs, as improper or incorrectly performed maintenance or repairs voids this
limited warranty. Costs for maintenance service have to be borne by the consumer.
Page 10

18 scott-sports.com 19
KIDSENGLISH
BIKE OWNER’S MANUAL
Annual service to be done
- Check of shock mounts incl. lubricating the bushings
- Check of swingarm pivot incl. axle and mounts
- Check of rear shock according to the enclosed shock manual
- Check of hubs, bottom bracket and headset
- Check of all screws of the bike
- Check of handle bar, stem, saddle rails and seat post
- Check if brakepads and rims are worn out
- Check of disc brake according to enclosed service manual
- Check of suspension fork according to enclosed service manual
- Check of shifters and derailleurs incl. cables.
SCOTT SERVICE PLAN SCOTT SERVICE PLAN
Model
Year
Size
Frame
Date of purchase
Model
Year
Size
Frame
Date of purchase
Date of Service: Date of Service:Dealer’s Signature: Dealer’s Signature:
Page 11

20 scott-sports.com 21
KIDSENGLISH
BIKE OWNER’S MANUAL
Annual service to be done
- Check of shock mounts incl. lubricating the bushings
- Check of swingarm pivot incl. axle and mounts
- Check of rear shock according to the enclosed shock manual
- Check of hubs, bottom bracket and headset
- Check of all screws of the bike
- Check of handle bar, stem, saddle rails and seat post
- Check if brakepads and rims are worn out
- Check of disc brake according to enclosed service manual
- Check of suspension fork according to enclosed service manual
- Check of shifters and derailleurs incl. cables.
Annual service to be done
- Check of shock mounts incl. lubricating the bushings
- Check of swingarm pivot incl. axle and mounts
- Check of rear shock according to the enclosed shock manual
- Check of hubs, bottom bracket and headset
- Check of all screws of the bike
- Check of handle bar, stem, saddle rails and seat post
- Check if brakepads and rims are worn out
- Check of disc brake according to enclosed service manual
- Check of suspension fork according to enclosed service manual
- Check of shifters and derailleurs incl. cables.
SCOTT SERVICE PLAN SCOTT SERVICE PLAN
Model
Year
Size
Frame
Date of purchase
Model
Year
Size
Frame
Date of purchase
Date of Service: Date of Service:Dealer’s Signature: Dealer’s Signature:
Page 12

22 scott-sports.com 23
KIDSENGLISH
BIKE OWNER’S MANUAL
Annual service to be done
- Check of shock mounts incl. lubricating the bushings
- Check of swingarm pivot incl. axle and mounts
- Check of rear shock according to the enclosed shock manual
- Check of hubs, bottom bracket and headset
- Check of all screws of the bike
- Check of handle bar, stem, saddle rails and seat post
- Check if brakepads and rims are worn out
- Check of disc brake according to enclosed service manual
- Check of suspension fork according to enclosed service manual
- Check of shifters and derailleurs incl. cables.
SCOTT SERVICE PLAN
Model
Year
Size
Frame
Date of purchase
Date of Service: Dealer’s Signature:
 Loading...