

Scott 2007,TT 2008,2009,B kids bike 2010,2007 Bike Owner's Manual

CONFORME AUX EXIGENCES DE SECURITE - NF R30-020
B
OWNERS MANUAL
BEDIENUNGSANLEITUNG
MANUEL D’UTILISATION
BIKE
OWNERS
MANUAL
2007
©2005 Scott Sports SA – all rights reserved
WWW
.SCO
TT-SPORTS.COM
Scott Sports SA
Route du Crochet 17
1762 Givisiez / Switzerland
www
.sc
ott-sports.c
om
01
> Congratulations p. 2
> General introduction p. 2
> Safety p. 3
> Assembly of training wheels p. 3
> Chain tension p. 3
> Brakes p. 4
> Light systems p. 5
> Bicycle helmet and clothing p. 5
> Replacement of defective or bent parts p. 6
> Maintenance and care p.6
> Checklist p. 7 / 8
> Tightening torques for Scott Bikes p. 9
> Bicycle care p. 10
> Spare parts p. 10
> Warranty
p. 10
> SCOTT Service Plan p. 12
CONTENT
00
ENGLISH
CONTENT
DEUTSCH
FRANÇAIS
03
02
ASSEMBLY OF TRAINING WHEELS
Congratulations on your purchase of a new SCOTT bicycle! We are confident that the bicycle will exceed your
expectations for value, performance, and ride quality.
Each frame set and component has been custom specified
and designed to enhance your riding experience.
Whether you are a beginning cyclist, or a seasoned pro.
SCOTT bicycles will provide endless hours of twowheeled fun.
We strongly encourage you to take the time to read
this manual and familiarise yourself with your new
bicycle. If you have purchased a bike for your children,
please take the time to make sure they understand the
information contained in this Owner’s Manual.
Important!
If you purchased this bicycle for a minor, it is
essential that a responsible adult/parent thoroughly reviews and reads the Owner’s Manual
to the minor. Please make sure to get your Scott
bike completely assembled from your authorized
Scott dealer. This is very important for optimum
performance and safety and guarantees you a
long lasting joy while riding your bike.
It is important to understand the basics of riding a bicycle,
but it is equally important to exercise common sense
when cycling. Cycling is a dynamic sport and requires
reacting to varying situations. Like any sports, cycling
involves risk of injury and damage. By choosing to ride
a bicycle, you assume the responsibility for that risk.
Important :
Please use the bike of your choice only for the
purpose it was made for. E.g. a road racing bike
can not be used to substitute a mountain bike in
off road terrain or a Trekking bike can not be
used for downhill racing or road racing.
If you have questions or problems regarding your new
SCOTT bicycle, please contact your Authorised Dealer.
Ride Frequently!
CONGRATULATIONS GENERAL INTRODUCTION
When producing your SCOTT kids bike we only spec’d
parts of high quality and which offer safety under all
riding situations. This is very important when participating
in public traffic. You will reach a maximum of safety by
avoiding any dangerous situations.
– make sure that your child is well experienced in
cycling when riding in public traffic. Please be
reminded that your child needs some time to get
used to his/her new bike. In addition children are
allowed to ride on the sidewalk up to an age of 10
years.
- To react in the right way on public streets it is
important for your child to know about the traffic
laws.
- Do not stress your child. It might happen that other
participants in traffic, especially cars, will make
feel him/her unsure. Please have some lessons on
how to ride in a parking ground before participating
in traffic.
SAFETY
Legal advice:
Your new Kids bike meets, (as complete equipped model),
all demands of the traffic law standards and is allowed
to be used in public streets.
It is obligatory that your child has reached the age of 8
years otherwise he/she should use the sidewalk, which
is legal up to 10 years of age. Please check your national
laws regarding this point!
Use of the bikes:
Maximum load of the bike must not exceed 50 kg.
The carrier ( when supplied with the bike) is made for a
maximum load of 20 kg. In general we recommend not
to use the carrier on kids bikes for load transports due
to the reduced riding performance. SCOTT kids bikes are
built to be very robust, jumps or riding on stairways
however exceed normal use.
In case the chain needs to be tensioned again, please
release on both sides nut A and pull the rear wheel
straight backward until the tension is ok.
Please retighten nut A on both sides. Please note the
tightening torque as mentioned in the table of tightening
torques at the end of this file.
CHAIN TENSION
A
C
B
D
ENGLISH
DEUTSCH
FRANÇAIS
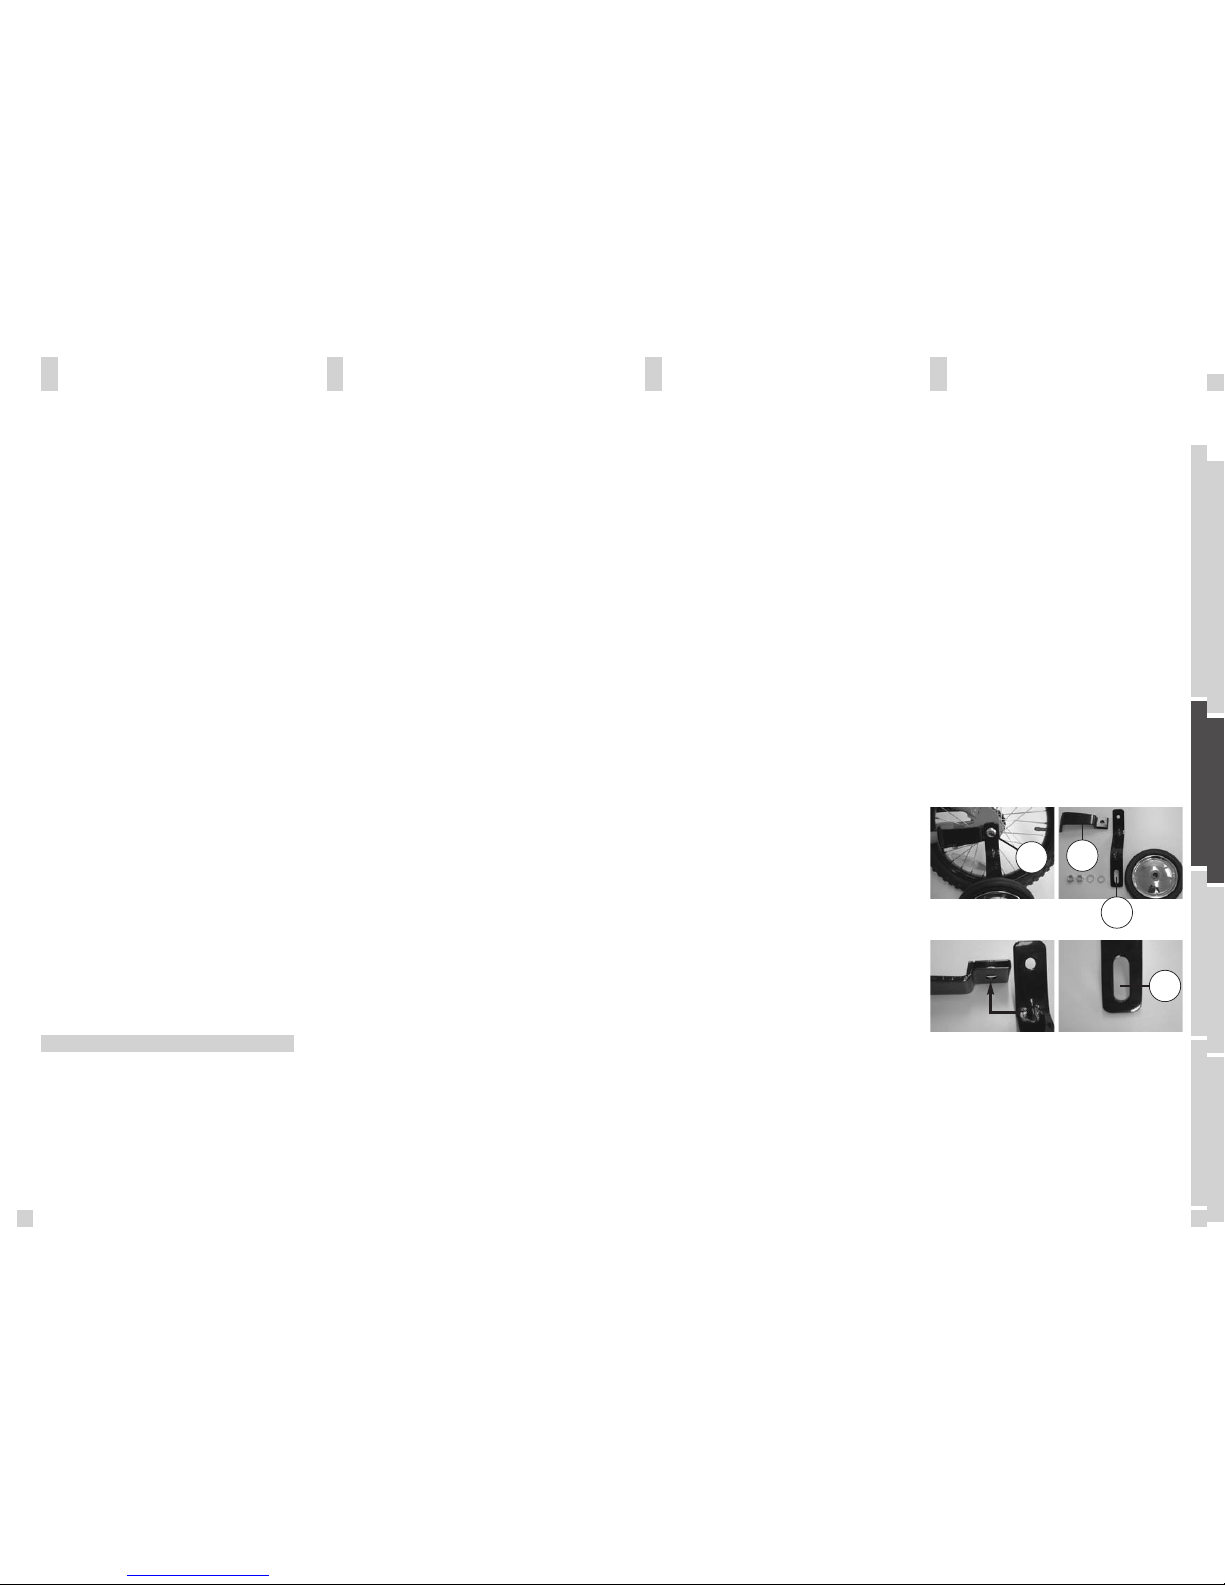
Assembly of training wheels (only 12” and 16” models)
und adjustment of chain tension on bikes without rear
derailleurs. For the assembly of the optional training
wheels for 12” and 16” bikes please follow the instruction
below:
- Release on one side of the rear wheel nut A and
remove it including the washer.
- Put part B in part C and fix it with nut A with the
washer between nut A and part C
- Assemble now the bolt and nuts/washers as shown
below to fix the wheel on part B
- The long sleeved hole D will help you to balance
the bike when you assembled on the other side of
the bike the parts as mentioned above.
- Both training wheels should be with a distance of
1-1.5cm to the ground when the bike is balanced on
its wheels. After balancing the bike please tighten
the wheel fixing nuts and the counter nuts.

05
04
BRAKES
- Your new bike is equipped with two brakes which
work independently of each other.
- In case you can pull the brakelever more than half
of its way to the handlebar, you should readjust the
brake.
To do so, please follow as shown below:
VV--bbrraakke
e
1. While holding the shoe against the rim, tighten
the shoe fixing nut.
2. Pass the inner cable through the inner cable lead,
and after setting so that the total of the clearances
between the left and right shoes and the rim is 2
mm tighten the cable fixing bolt.
3. Slide the new pad into the shoe and make sure
that the direction is correct and that the security pin
holes concord.
4. The insertion of the security fixing pin is very important. It keeps the shoe properly in place
BRAKES
Caliper brake
Release counter nut A and turn adjustment screw B
counter clockwise until the distance between brake
pads and rims is approx. 2mm on each side. Tighten
counter nut A.
- In case adjustment screw B is released already to the
limit, please release cable clamping screw C and turn
adjustment screw clockwise to its original position.
- Close the caliper brake with your hand to the rim ,
adjust the brake cable and tighten clamping screw
C. Please note the table of tightening torques at
the end of this file.
- Finally make the fine tuning with adjustment screw
B as mentioned above. The wheel needs to spin free
without touching the brake pads. Fix counter nut A.
BRAKES
IMPORTANT:
Make sure that the brake works perfectly.
IMPORTANT:
Under wet conditions the brake performance can
decrease which will result in a prolongation of the braking
distance.
- light the front and rear lights by the beginning of
the dusk. To switch on the dynamo press with the
thumb on the button. But never while riding! To
check the function of front and rear light turn the
raised front wheel.
- Under wet conditions the effectiveness of the
dynamo may decrease.
LIGHT SYSTEMS
- Please take care that your child wears clothing
with bright colors and, if possible, with reflective
stripes or fabrics.
- A helmet that fits is the best way to avoid head
injuries. The helmet should meet DIN EN 1078 and
should have the CE label. By choosing bright colors
it will help to improve the visibility. Wearing such
a helmet should be matter of course for all cyclists.
In addition consider to be a good example for children.
BICYCLE HELMET AND CLOTHING
B
A
C
ENGLISH
DEUTSCH
FRANÇAIS
Anzugsdrehmoment:
6 – 8 Nm
BC
B+C=2 mm
Federeinstellschraube Federeinstellschraube
1 mm 1 mm
12
1 12 2
Bremshebel circa 10
mal anziehen
inner cable lead
5mm allen key
tightening torque :
6-8 Nm (52-69 in. lbs.)
Spring tension
adjustment screw
Spring tension
adjustment screw
Depress lever about 10
times
 Loading...