


User's Manual
Manuale dell’utente
Manual del usuario
Manuel de l’utilisateur
Bedienungsanleitung
C0322
C0522
C0330
C0530
C0630
C0830
C1030
C0322 through C1030 D Series
Air and Water Cooled User Manual
Introduction
The design of this modular cuber is the result of
years of experience and testing. Standard features
include front accessible indicator lights and on-off
switches that provide the user with fast access to
critical information and easy operational control.
Keep this manual for future reference.
Table of Contents
Use and Operation........................................ Page 2
Control Switches......................................... Page 3
Option: Adjustable ice level control, kit # KVS .......................... Page 4
Ice, Heat and Noise ....................................... Page 5
Cleaning, Sanitation and Maintenance ............................. Page 6
What to do before calling for service .............................. Page 7
Note any Caution or Warning symbols when they
appear on the product or in this manual. They
indicate potential hazards.
Warranty Information
The warranty statement for this product is provided
separately from this manual. Refer to it for
applicable coverage. In general warranty covers
defects in material or workmanship. It does not
cover maintenance, corrections to installations, or
situations when the machine is operated in
circumstances that exceed the limitations printed
above.
This appliance intended to be used in household
and similar applications such as:
•
Staff kitchen areas in shops, offices and
other working environments;
•
Farm houses and by clients in hotel, motels
and other residential type environments
•
Bed and breakfast type environments;
•
Catering and similar non-retail applications
It may be used with supervision by:
•
Children 8 years old and above. They must
not play with the appliance.
•
Persons with reduced physical, sensory or
mental abilities.
•
Persons with limited experience or
knowledge.
Scotsman reserves the right to make design
changes and/or improvements at any time.
Specifications and design are subject to change
without notice.
October 2014
The GWP (Global Warming potential) of gas HFC
R134a is 1300, of gas HFC R404A is 3750.
Page 1
C0322 through C1030 D Series
Air and Water Cooled User Manual
Use and Operation
Once started, the ice machine will automatically
make ice until the bin or dispenser is full of ice.
When ice level drops, the ice machine will resume
making ice.
Caution: Do not place anything on top of the ice
machine, including the ice scoop. Debris and
moisture from objects on top of the machine can
work their way into the cabinet and cause serious
damage. Damage caused by foreign material is not
covered by warranty.
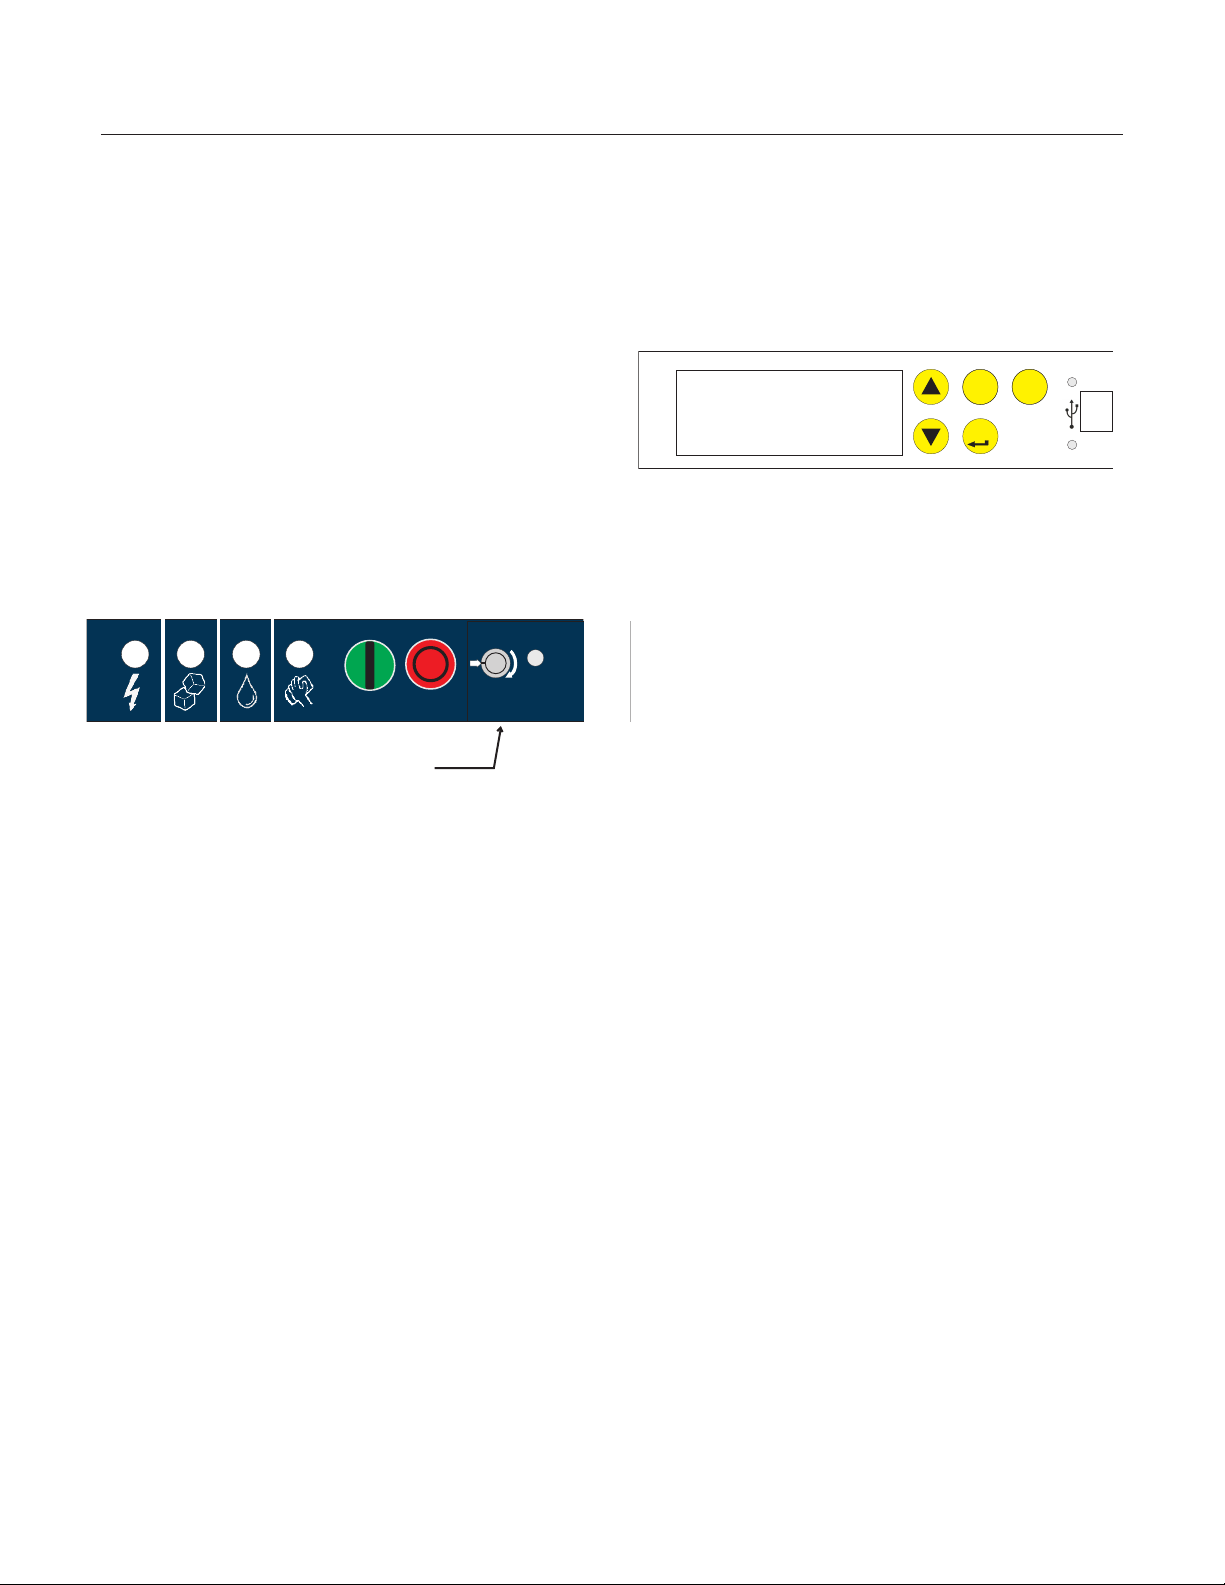
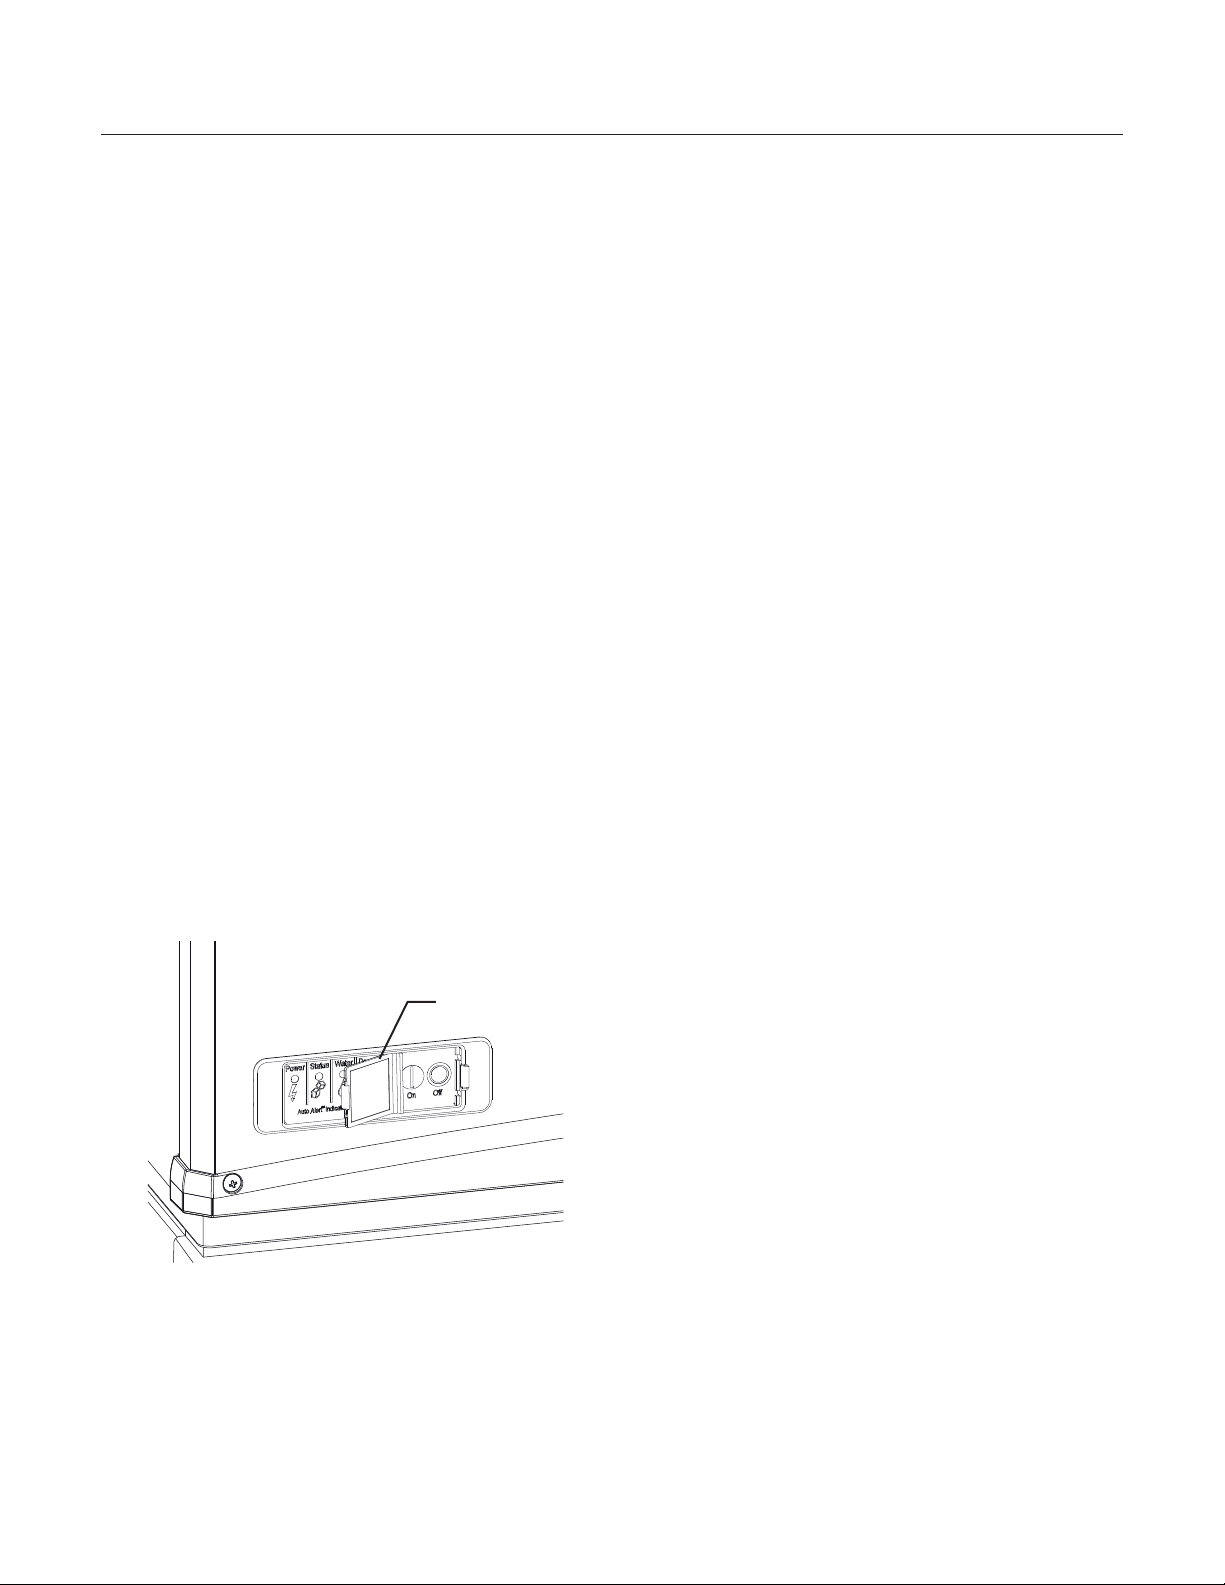
There are four indicator lights at the front of the
machine that provide information on the condition
of the machine.
Indicator Lights:
Power
•
Status
•
Water
•
De-scale & Sanitize
•
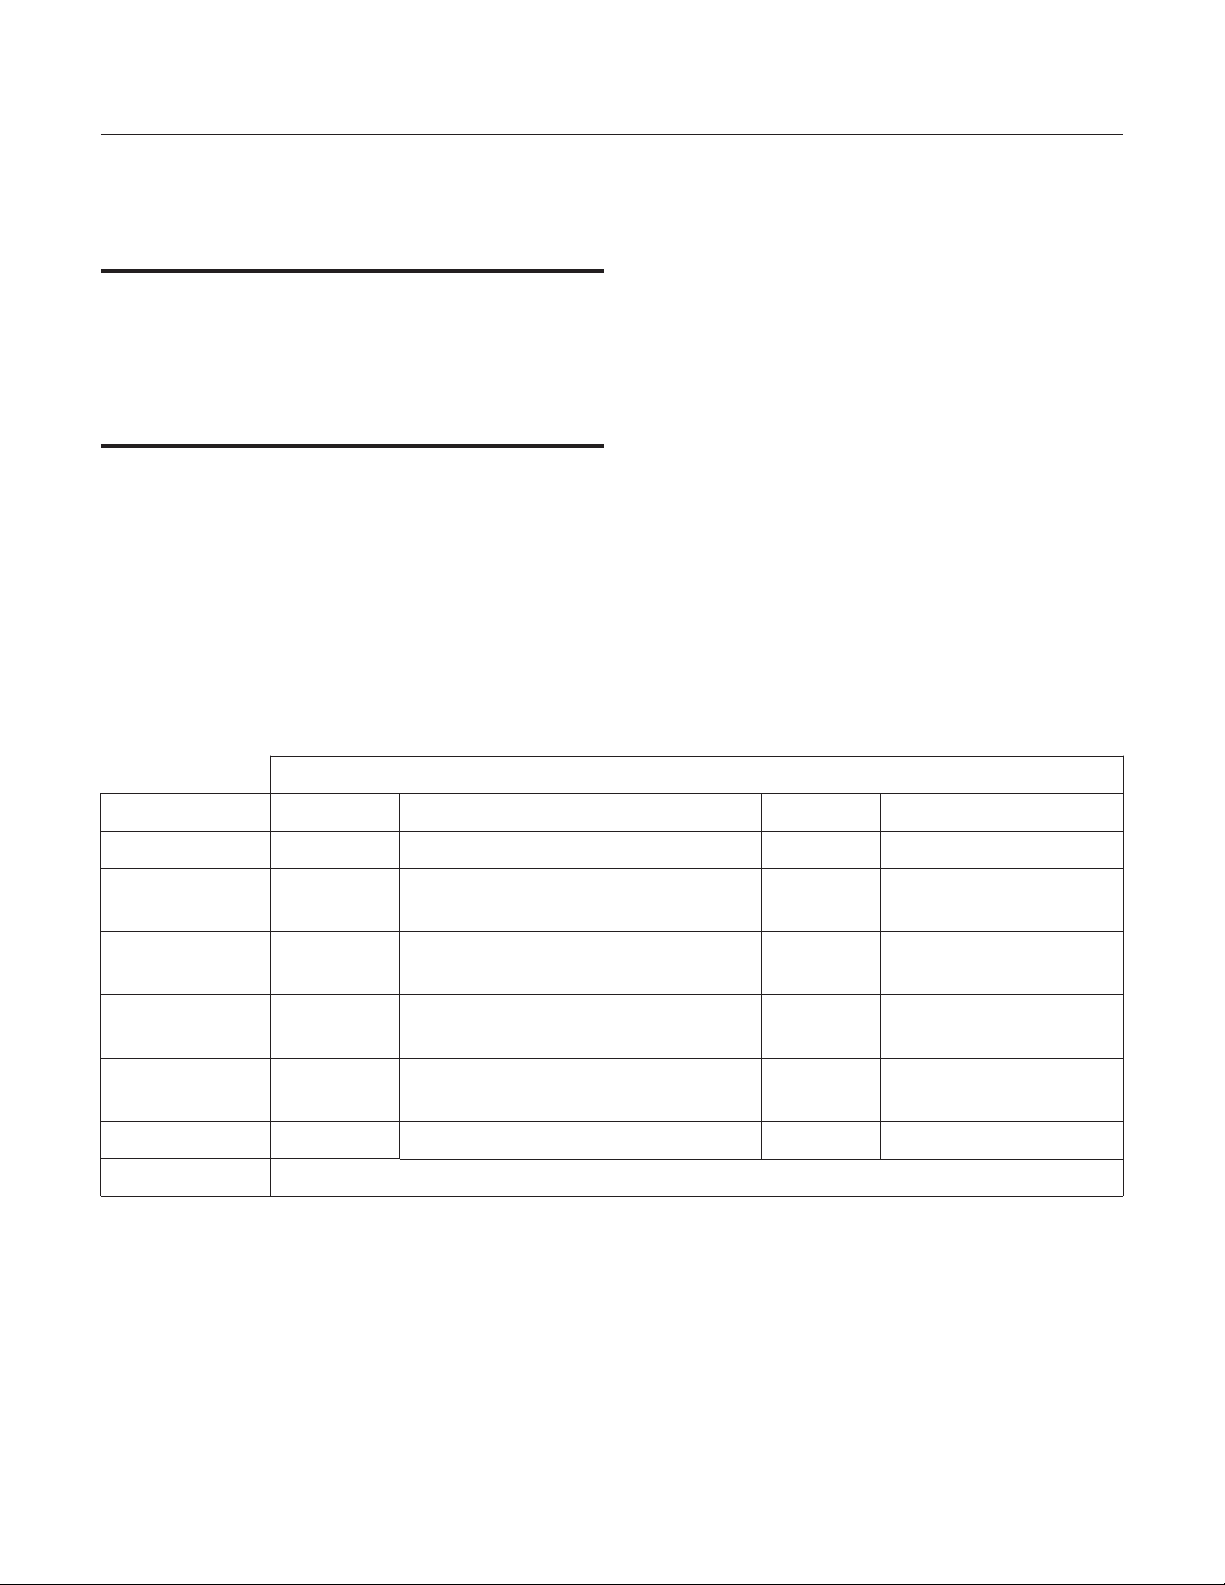
Indicator Lights & Their Meanings
Power Status Water De-Scale & Sanitize
Steady Green Normal Normal – bin full or making ice - -
Blinking Green
Blinking Red -
Yellow - - -
Blinking
Yellow
Light off No power Switched off Normal Normal
All Blinking Unit remotely locked out – check with leasing company
Self Test
Failure
- - - In Cleaning mode
Switching on or off - -
Diagnostic shutdown or, if making
ice, temperature sensor failure
Lack of
water
-
Time to de-scale and
sanitize
If the Water light is on, the machine has sensed a
lack of water. Check the water supply to the
machine. The water could have been shut off or the
water filter cartridges might need to be changed.
If the De-Scale light is on, the machine has
determined that it needs to be cleaned. Contact an
authorized Scotsman service agent and have the
machine cleaned, de-scaled and sanitized.
October 2014
Page 2

C0322 through C1030 D Series
Air and Water Cooled User Manual
Control Switches
There is front access to two switches – On and Off.
Status De-Scale Off
Power Water On
To switch the machine OFF, push and release the
Off button. The machine will shut off at the end of
the next cycle. To shut the machine off
immediately, push and hold the Off button for 3
seconds.
To switch the machine ON, push and release the
On button. The machine will go through a start up
process and then resume ice making.
Control Options
There are two optional, field installed controls that
can be added to this machine.
•
VariSmart™ adjustable ice level control
•
Smart-Board™ advanced control board and
data logger
October 2014
Page 3
C0322 through C1030 D Series
02-4294-01 Rev.A.
Adjust Ice Level
L
o
w
e
r
Bin
Full
SmartBoard Advanced Feature Control™
See Instructions for Available Features
34
SEL
02-4293-01 Rev A.
ENTER
ESC
Air and Water Cooled User Manual
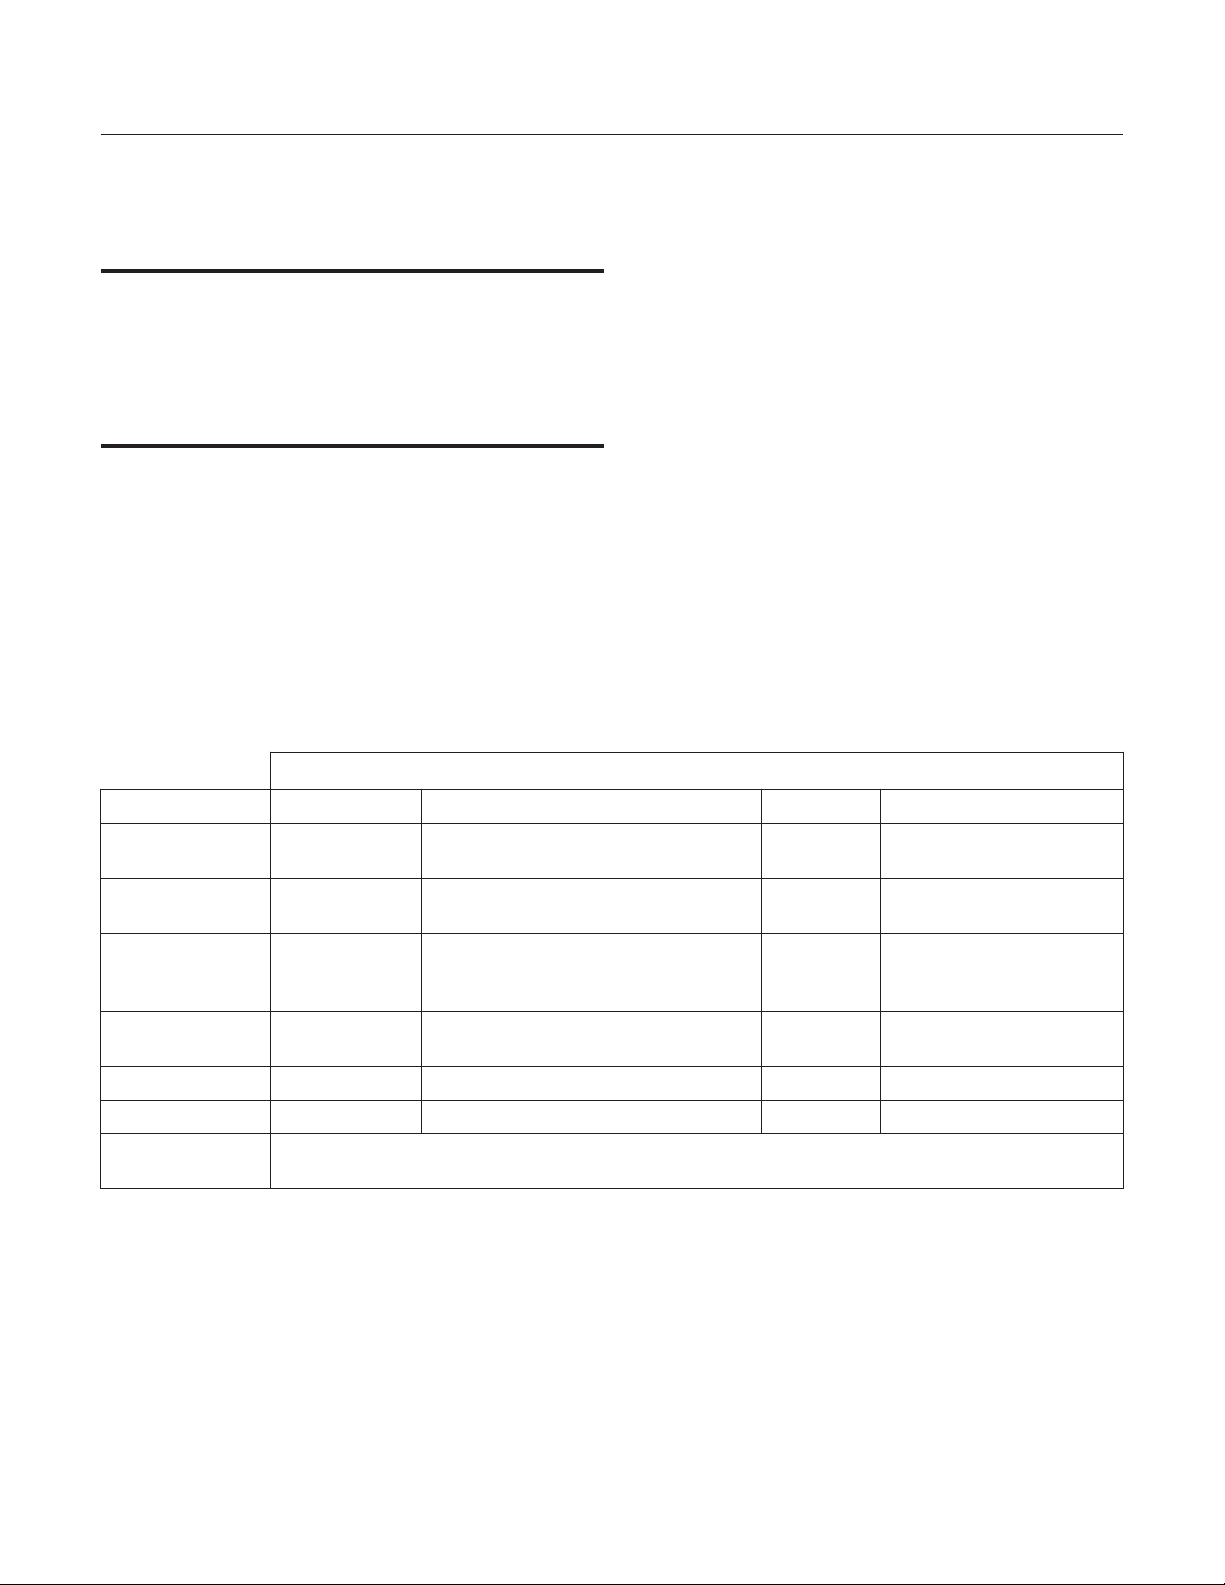
Option: Adjustable ice level control, kit # KVS
When this option is present there is an adjustment
post and an additional indicator light to the right of
the four indicator lights mentioned above. The
ultrasonic ice level control allows the user to control
the point that the ice machine will stop making ice
before the bin or dispenser is full. Reasons for this
include:
Seasonal changes in ice used
•
Planning to sanitize the bin
•
Faster turnover for fresher ice
•
Certain dispenser applications where
•
maximum ice level is not desired
Use of control
Option: Advanced Feature Board, kit #KSB
When this option is present there is an additional
display panel in the area below the main control
board. It is not visible when the front panel is on.
The Smart-Board’s features include:
Seven day programmable ice level setting
•
when used with the optional Ultrasonic ice
level control
Recording of machine operation, including
•
cycle time.
Calculation of average cycle time
•
Recall of malfunctions with the time they
•
occurred.
VariSmart Control Area
There are several positions the ice level can be set
to, including Off (knob and label indicators lined
up), where it fills the bin until the standard bin
control shuts the machine off. See the kit’s
instructions for complete details.
Rotate the adjustment post to the desired ice level.
The machine will fill up to that level and when it
shuts off the indicator light next to the adjustment
post will be On.
Note: Ice will build up in the bin or dispenser at an
angle, the distance set will be from the sensor to
the top of the ice.
The actual distance between the highest point of
the ice may be closer or further away than the
distance set, depending upon the angle of the ice.
October 2014
Page 4

C0322 through C1030 D Series
Air and Water Cooled User Manual
Ice, Heat and Noise
Ice
The cuber drops ice in large sections. That ice will
break up into random parts as it falls into the bin,
but some large sections may remain on top of the
ice in the bin. When removing ice, tap the groups of
ice with an ice scoop to separate them into smaller
units. In a dispenser, this ice will break up into
mostly individual cubes as the dispense
mechanism moves the ice.
The ice in the bin will slope down from the right to
the left. This is normal.
Heat
Air cooled models will generate heat when in
operation. That heat is discharged out the back of
the cabinet.
Noise
The ice machine will make noise when it is in ice
making mode. The compressor, fan motor(s) if air
cooled and water pump all produce some sound. It
is also normal to hear some cracking just before
the harvest cycle begins. In addition, during the
harvest cycle the harvest assist solenoid will click
twice as it pushes the ice out and returns to its
normal position. The ice harvests as a unit or slab,
which makes some noise when it impacts the bin or
dispenser. These noises are all normal for this
machine.
October 2014
Page 5
C0322 through C1030 D Series
Air and Water Cooled User Manual
Cleaning, Sanitation and Maintenance
This ice system requires three types of
maintenance:
Note: Cleaning and maintenance must not be done
by children without supervision.
Remove the build up of mineral scale from
•
the ice machine’s water system and sensors.
Sanitize the ice machine’s water system and
•
the ice storage bin or dispenser.
Clean or replace the air filter and clean the
•
air cooled condenser (air cooled models
only).
It is the User’s responsibility to keep the ice
machine and ice storage bin in a sanitary condition.
Sanitize the ice storage bin as frequently as local
health codes require, and every time the ice
machine is cleaned and sanitized.
The ice machine’s water system should be
cleaned and sanitized a minimum of twice per
year. This is critical to the proper operation of
the ice machine. Contact your local authorized
service agent for water system cleaning.
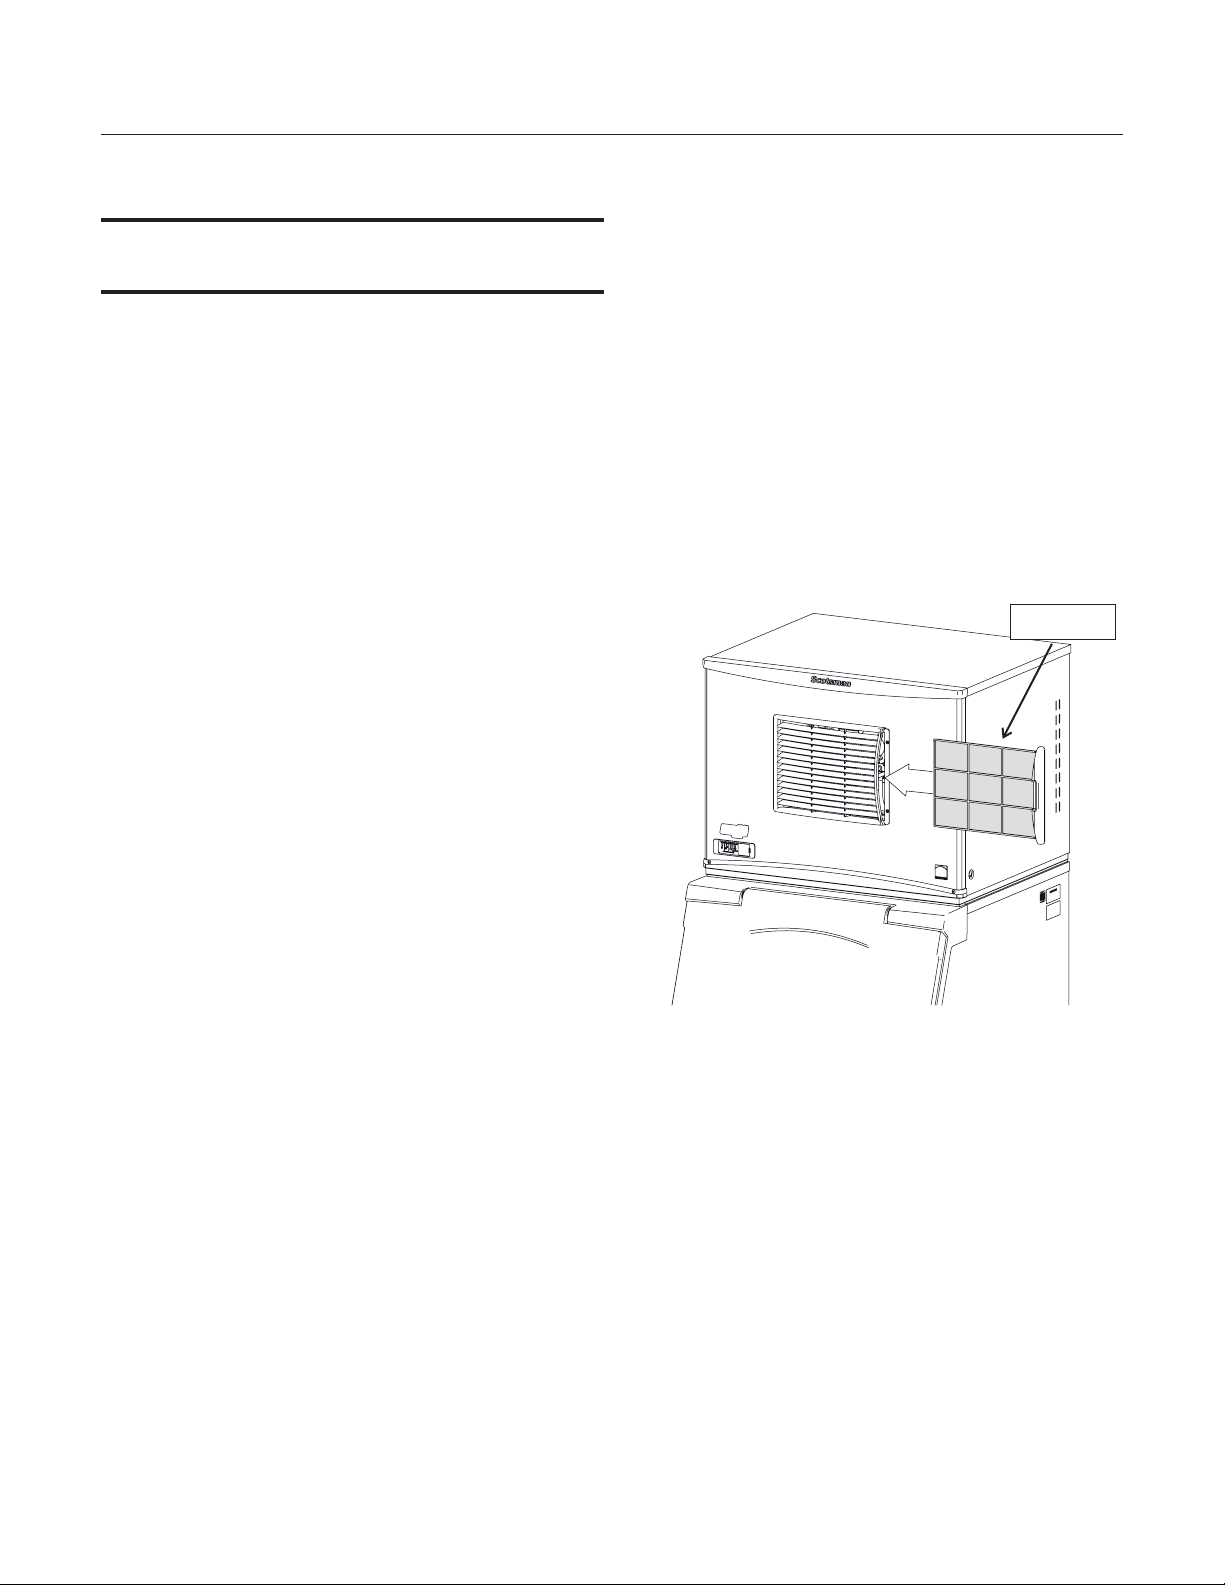
Air cooled condenser filter
1. Pull air filter(s) forward from side panel.
2. Wash the dust and grease off the filter.
3. Return it to its original position.
Do not operate the machine without the filter in
place except during cleaning.
Air cooled condenser
Air Filter
The front and side panels are durable stainless
steel. Fingerprints, dust and grease will require
cleaning with a good quality stainless steel cleaner.
Water filters
If the machine has been operated without a filter
the air cooled condenser fins will need to be
cleaned.
They are located under the fan blades. The
services of a refrigeration technician will be
required to clean the condenser.
Exterior Panels
March 2007
If the machine has been connected to water filters,
check the cartridges for the date they were
replaced or for the pressure on the gauge. Change
cartridges if they’ve been installed more than 6
months or if the pressure drops too much when the
ice machine fills with water.
Page 6
C0322 through C1030 D Series
Air and Water Cooled User Manual
What to do before calling for service
Reasons the machine might shut itself off:
Lack of water.
•
Freeze cycle takes too long.
•
Harvest cycle takes too long.
•
High discharge temperature.
•
Controller self test failure.
•
Check the following:
1. Has the water supply to the ice machine or
building been shut off? If yes, the ice machine will
automatically restart within 25 minutes after water
begins to flow to it.
2. Has power been shut off to the ice machine? If
yes, the ice machine will automatically restart when
power is restored.
3. Has someone shut the water off to a water
cooled unit? If yes, after the water supply has been
restored the ice machine may need to be manually
reset.
To Manually Reset the machine.
•
Open the switch door
•
Push and release the Off button.
•
Push and release the On button.
Switch Door
Reset or Switch Off
To Shut the Machine Off:
1. Push and hold the Off button for 3 seconds or
until the machine stops.
October 2014
Page 7

C0322 à C1030 D Manuel de l’utilisateur des
modèles refroidis à l’air et à l’ea
Introduction
La conception de cette machine à glaçons modulaire est
le fruit d’années d’expérience et de tests. Elle est équipée
d’origine d’indicateurs lumineux et d’un commutateur
marche/arrêt situés sur le devant de l’appareil et qui
permettent donc à l’utilisateur d’accéder rapidement
à des informations importantes et de contrôler
facilement son fonctionnement.
Veuillez conserver ce manuel pour y faire référence à
l’avenir.
Table des matières
Utilisation et fonctionnement........................................... Page 2
Commutateurs de commande .......................................... Page 3
Options: Commande de réglage du niveau de glaçons, kit N°KVS ....................... Page 4
Glaçons, Chaleur et Bruit ............................................ Page 5
Nettoyage, Désinfection et Entretien ...................................... Page 6
Ce qu’il faut faire avant d’appeler un technicien de service ........................... Page 7
Prenez note des symboles de mise en garde ou
d’avertissement lorsqu’ils apparaissent sur le produit
ou dans ce manuel. Ils indiquent des risques potentiels.
Informations sur la garantie
La déclaration de garantie de ce produit est fournie sur un
feuillet séparé du manuel. Consultez-la pour connaître la
couverture de garantie applicable. De manière générale,
cette garantie couvre la machine contre tout défaut
matériel ou de fabrication. Elle ne couvre pas l’entretien,
les modifications à apporter aux installations ou les
situations dans lesquelles la machine fonctionne dans
des conditions qui dépassent les limites décrites ci-dessus.
Scotsman se réserve le droit d’apporter quand cela s’avère
nécessaire, des modifications de conception et/ou des
améliorations. Ces spécifications et conceptions sont
sujettes à modification sans préavis.
Cet appareil est conçu pour être utilisé dans des
applications ménagères et similaires telles que :
•
Les zones de cuisine de personnel dans les ateliers,
bureaux et autres environnements de travail ;
•
Fermes et par clients dans les environnements de
type hôtels, motels et autre résidentiels ;
•
Environnements de type Bed and breakfast ;
•
Traiteurs et applications similaires autres que ventes
au détail
Il peut être utilisé avec supervision par :
•
Des enfants âgés d’au moins 8 ans. Ils ne doivent
pas jouer avec l’appareil
•
Les personnes handicapées physiques, sensorielles
ou mentales
•
Les personnes ayant une expérience ou une
connaissance limitée
Le GWP (Global Warming potential) du gaz HFC R134a est
1 300, du gaz HFC R404A est 3 750.
Juillet 2014
Page 1
C0322 à C1030 D Manuel de l’utilisateur des
modèles refroidis à l’air et à l’ea
Utilisation et fonctionnement
Une fois démarré, la machine à glaçons produira
automatiquement des glaçons jusqu’à ce que le bac ou
le distributeur soit remplis. Lorsque le niveau de glaçons
diminue, la machine recommence à en fabriquer.
Mise en garde : Ne placez rien sur le dessus de la
machine, même la pelle à glaçons. Des particules ou
de l’humidité provenant d’objets placés sur le dessus
de la machine peuvent s’introduire dans le coffret et
l’endommager sérieusement. Tout dommage découlant
de matières étrangères n’est pas couvert par la garantie.
Quatre voyants lumineux situés sur le devant de
la machine fournissent des informations sur l’état
de la machine.
Voyants lumineux :
Alimentation
•
État
•
Eau
•
Détartrer & Désinfecter
•
Voyants lumineux & leur signification
Alimentation État Eau Détartrer & Désinfecter
Vert continu Normal
Vert clignotant
Rouge clignotant -
Jaune - - -
Jaune clignotant - - - En mode de nettoyage
Voyants éteints Hors tension Mis hors tension Normal Normal
Tous les voyants
clignotent
Échec de test
automatique
La machine est verrouillée par un contrôle à distance – consultez l’entreprise de location
Normal – le bac est plein ou la
machine confectionne des glaçons
Mise sous tension ou hors tension - -
Arrêt suite à diagnostic ou, si en
mode de production de glaçons,
défaut du capteur de température
--
Manque
d’eau
-
Il est temps de détartrer
et de désinfecter
Si le voyant Eau est allumé, c’est que la machine a détecté
un manque d’eau. Vérifiez l’alimentation d’eau vers la
machine. Il se peut que l’arrivée d’eau soit fermée ou que
les cartouches de filtration de l’eau doivent être remplacées.
Si le voyant Détartrer est allumé, c’est que la machine a
déterminé avoir besoin d’un nettoyage. Contactez un agent
de service Scotsman agréé pour faire nettoyer, détartrer
et désinfecter la machine.
Juillet 2014
Page 2

C0322 à C1030 D Manuel de l’utilisateur des
modèles refroidis à l’air et à l’ea
Commutateurs de commande
Il existe deux commutateurs sur le devant de la machine,
On (Marche) et Off (Arrêt).
État Détartrer Arrêt
Alimentation Eau Marche
Pour mettre la machine hors tension, appuyez sur le
bouton Off puis relâchez-le. La machine sera mise hors
tension à la fin du cycle suivant. Pour mettre la machine
hors tension immédiatement, appuyez sur le bouton
Off et maintenez-le enfoncé pendant 3 secondes.
Pour mettre la machine sous tension, appuyez sur le
bouton On puis relâchez-le. La machine commencera
son processus de démarrage puis reprendra la
confection des glaçons.
Options de commande
Il existe deux commandes optionnelles qui peuvent être
ajoutées à cette machine.
•
Une commande de réglage du niveau
de glaçons VariSmart™
•
Un tableau de commande et journal
de données détaillé SmartBoard™
Juillet 2014
Page 3

C0322 à C1030 D Manuel de l’utilisateur des
02-4294-01 Rev.A.
Adjust Ice Level
L
o
w
e
r
Bin
Full
SmartBoard Advanced Feature Control™
See Instructions for Available Features
34
SEL
02-4293-01 Rev A.
ENTER
ESC
modèles refroidis à l’air et à l’ea
Options: Commande de réglage du niveau de glaçons, kit N°KVS
Si cette option est installée, vous disposerez d’un repère
de réglage et d’un voyant lumineux supplémentaires à
droite des quatre voyants lumineux mentionnés ci-dessus.
La sonde de niveau de glaçons ultrasonique permet à
l’utilisateur de contrôler le niveau de glaçons désiré dans
la cabine en arrêtant la production dès le niveau atteint.
Motifs d’installation :
Changements saisonniers d’utilisation des glaçons
•
Planification de désinfection du bac
•
Production plus fréquente qui donne des glaçons
•
plus « frais »
Certaines applications de distributeur pour
•
lesquelles un niveau de glaçons maximal
n’est pas souhaitable
Utilisation de cette commande
Options:
Panneau détaillé de fonctions, kit
n°KSB
Lorsque cette option est installée, un panneau d’affichage
supplémentaire se trouvera dans la zone située
au-dessous du panneau de commande. Il n’est pas visible
lorsque le panneau avant est en place. Les fonctionnalités
Smart-Board comprennent :
Un réglage de niveau de glaçons programmable
•
sur sept jours lorsqu’il est utilisé avec la sonde
de niveau de glaçons ultrasonique.
Consignation du fonctionnement de la machine,
•
y compris les durées de cycles.
Calcul d’une durée de cycle moyenne.
•
Enregistrement des erreurs de fonctionnement
•
avec l’heure à laquelle elles se sont produites.
Zone de contrôle VariSmart
Le niveau de glaçons peut être réglé sur plusieurs niveaux,
y compris Off (molette et indicateurs d’étiquettes alignés)
pour lequel le bac est rempli jusqu’à ce que la commande
standard du bac mette la machine à l’arrêt. Consultez les
instructions du kit pour obtenir des détails complets.
Faites tourner le repère de réglage jusqu’au niveau de
glaçons souhaité. La machine se remplira jusqu’à ce
niveau et lorsqu’elle s’arrêtera, le voyant lumineux près
du repère de réglage s’allumera.
Remarque : Les glaçons s’accumuleront dans le bac ou
dans le distributeur selon un certain angle, la distance
réglée sera celle entre le capteur et le sommet de la
pile de glaçons.
La distance réelle entre le point le plus haut de la pyramide
de glaçons pourra être plus proche ou plus éloignée de
celle réglée, selon l’angle de la pyramide.
Juillet 2014
Page 4
 Loading...