

Page 1
Register
your
product
online at
www.scosche.com/register
~
SCCJSCIIE
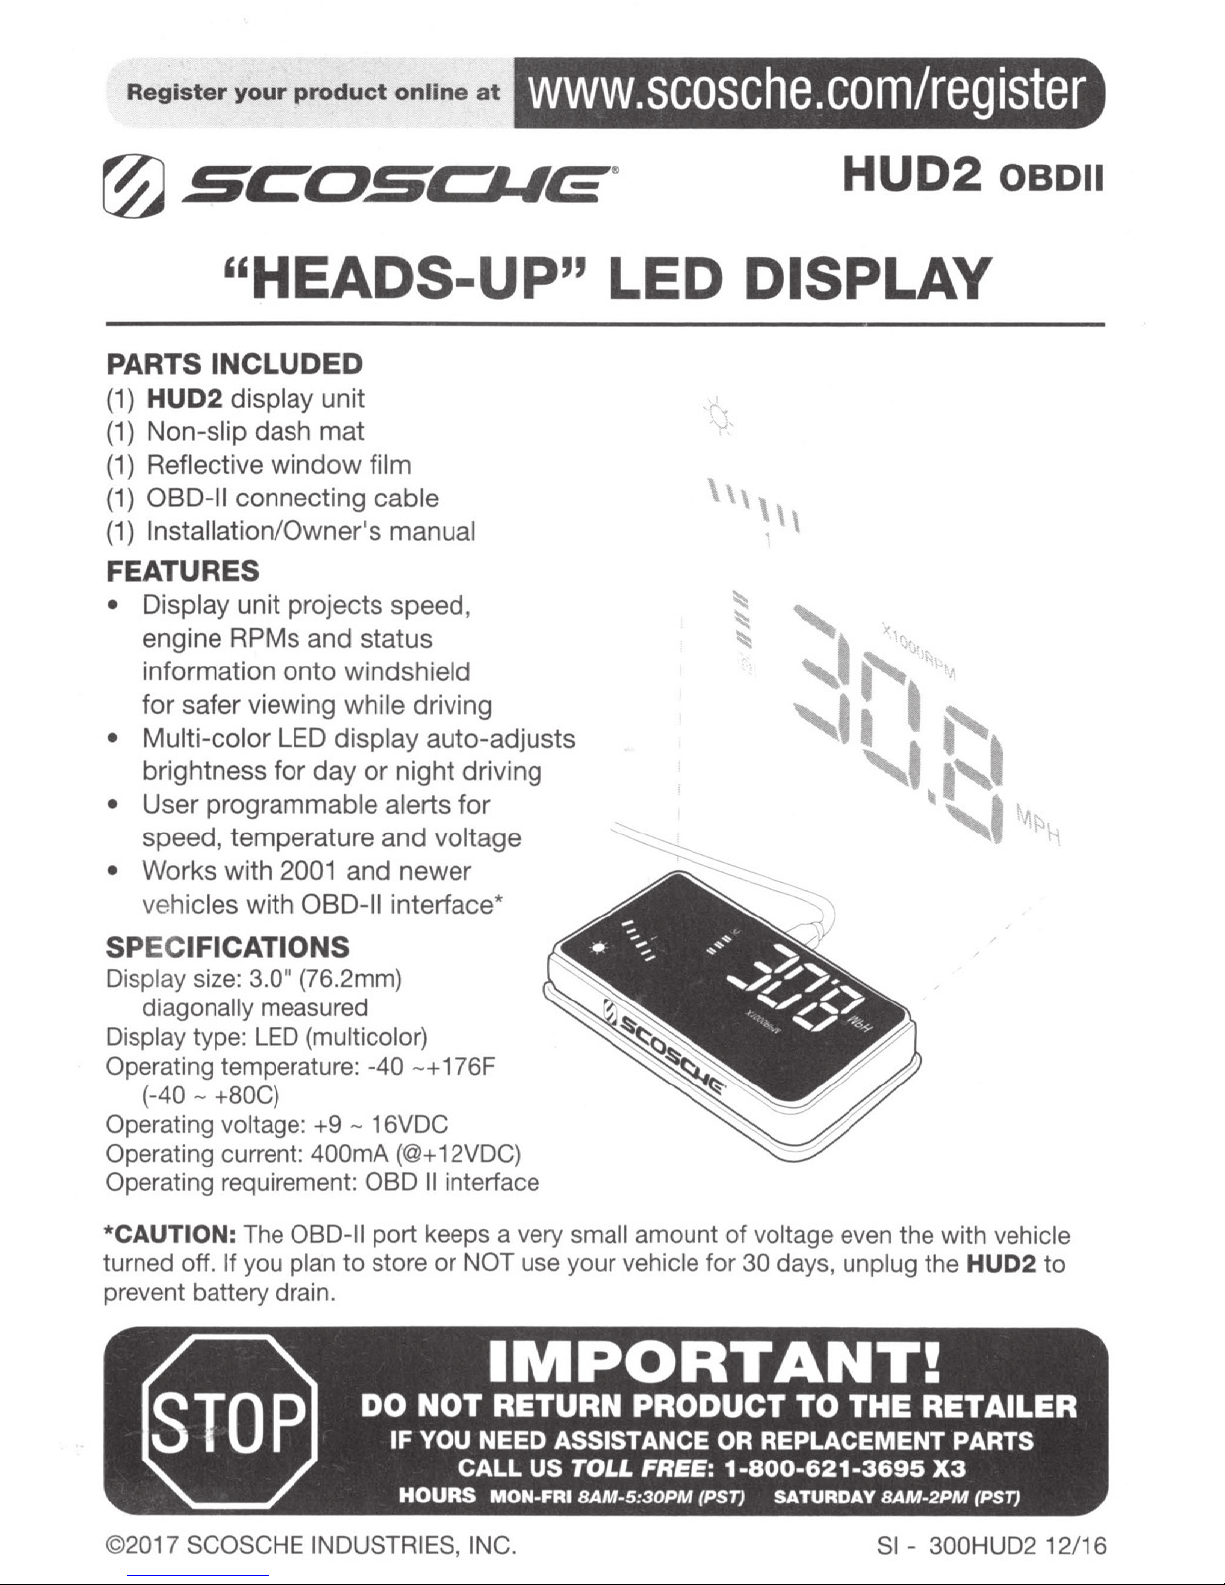
''HEADS-UP'' LED DISPLAY
PARTS INCLUDED
(1)
HUD2 display unit
(1)
Non-slip dash mat
(1)
Reflective
(1)
080-11 connecting cable
(1)
lnstallation/Owner•s manual
FEATURES
• Display unit projects speed,
engine RPMs and status
information onto windshield
for safer viewing while driving
• Multi-color LED display auto-adjusts
brightness
• User programmable alerts
speed,
• Works with 2001 and newer
vehicles with
window
for
temp
day
or
erature
OBD-11
film
night driving
for
and
voltage
interface*
' HUD2 OBDII
SPECIFICATIONS
Display size: 3.0
diagonally measured
Display type:
Operating temperature: -40
(-40-
Operating voltage: +9 - 16VDC
Operating current: 400mA
Operating requirement: OBD
*CAUTION: The
turned off. If you plan to store or NOT use your vehicle
prevent battery drain.
+SOC)
..
(76.2mm)
LED
(multicolor)
OBD-11
- + 176F
(@+
12VDC)
II
interface
port keeps a very small amount
of
voltage even the with vehicle
for
30 days, unplug the
HUD2
to
©2
017 SCOSCHE INDUSTRIES, INC.
Sl-
300HUD2 12/16
Page 2
-------------------,
I
\
I
1 -
2
---+--
--=-------
1
1
\-
-¢f-
,,,,,,
- 1 2
\
0
---
---
_,_
-----
-----
------
(t
• ; I (-'}
~
\ 4 5 6 7 8
\
\
\
\
-
-
-
-
__
-
\
I
II
3 4 5 6 7
_
..
t.
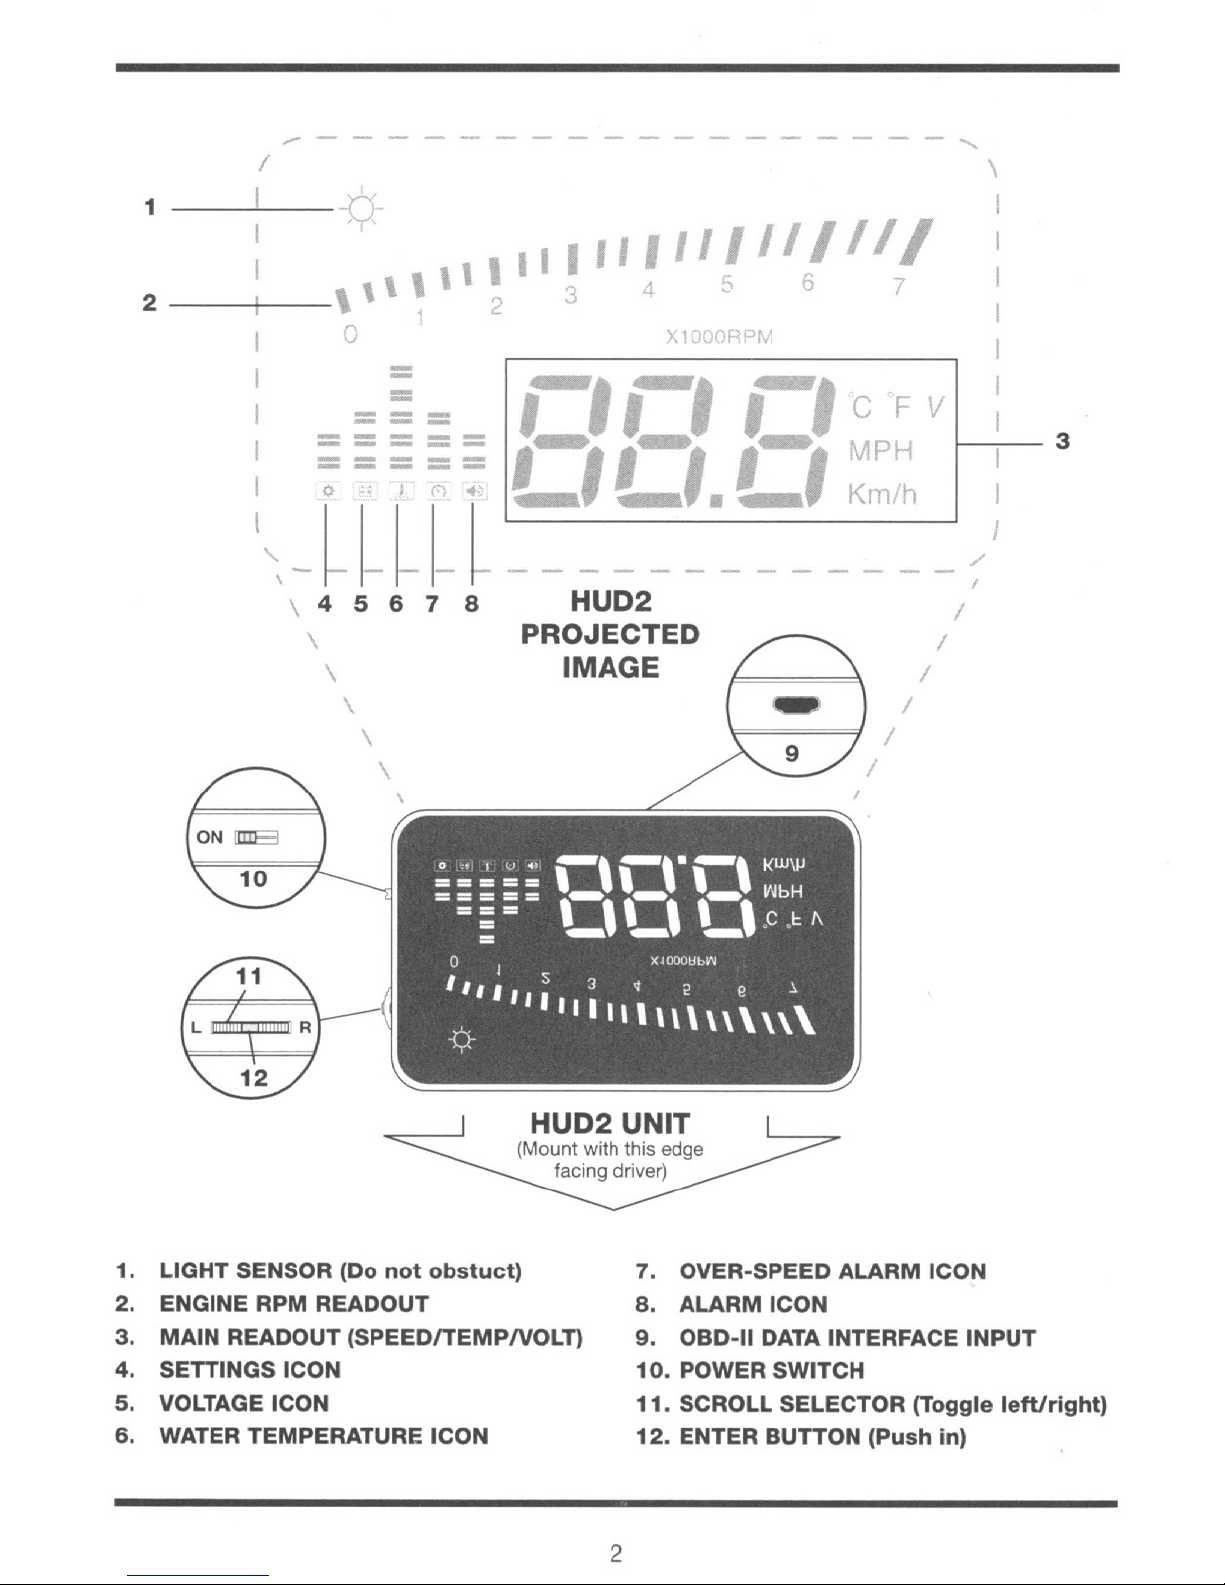
HUD2
PROJECTED
IMAGE
II
I
II
X1000RPM
I
11/11/
1-----
I
J
/
I
I
I
I
I
,
I
3
1.
LIGHT SENSOR (Do
2.
ENGINE RPM READOUT
3.
MAIN
4.
SETTINGS ICON
5.
VOLTAGE ICON
6.
WATER TEMPERATURE ICON
READOUT (SPEED/TEMPNOLT)
not
obstuct)
HUD2
(Mount with this edge
facing
UNIT
driver)
7. OVER-SPEED ALARM ICON
8.
ALARM ICON
9.
OBD-11
10.
POWER SWITCH
11.
SCROLL SELECTOR (Toggle
12.
ENTER BUTTON (Push in)
2
DATA INTERFACE INPUT
left/right)
Page 3
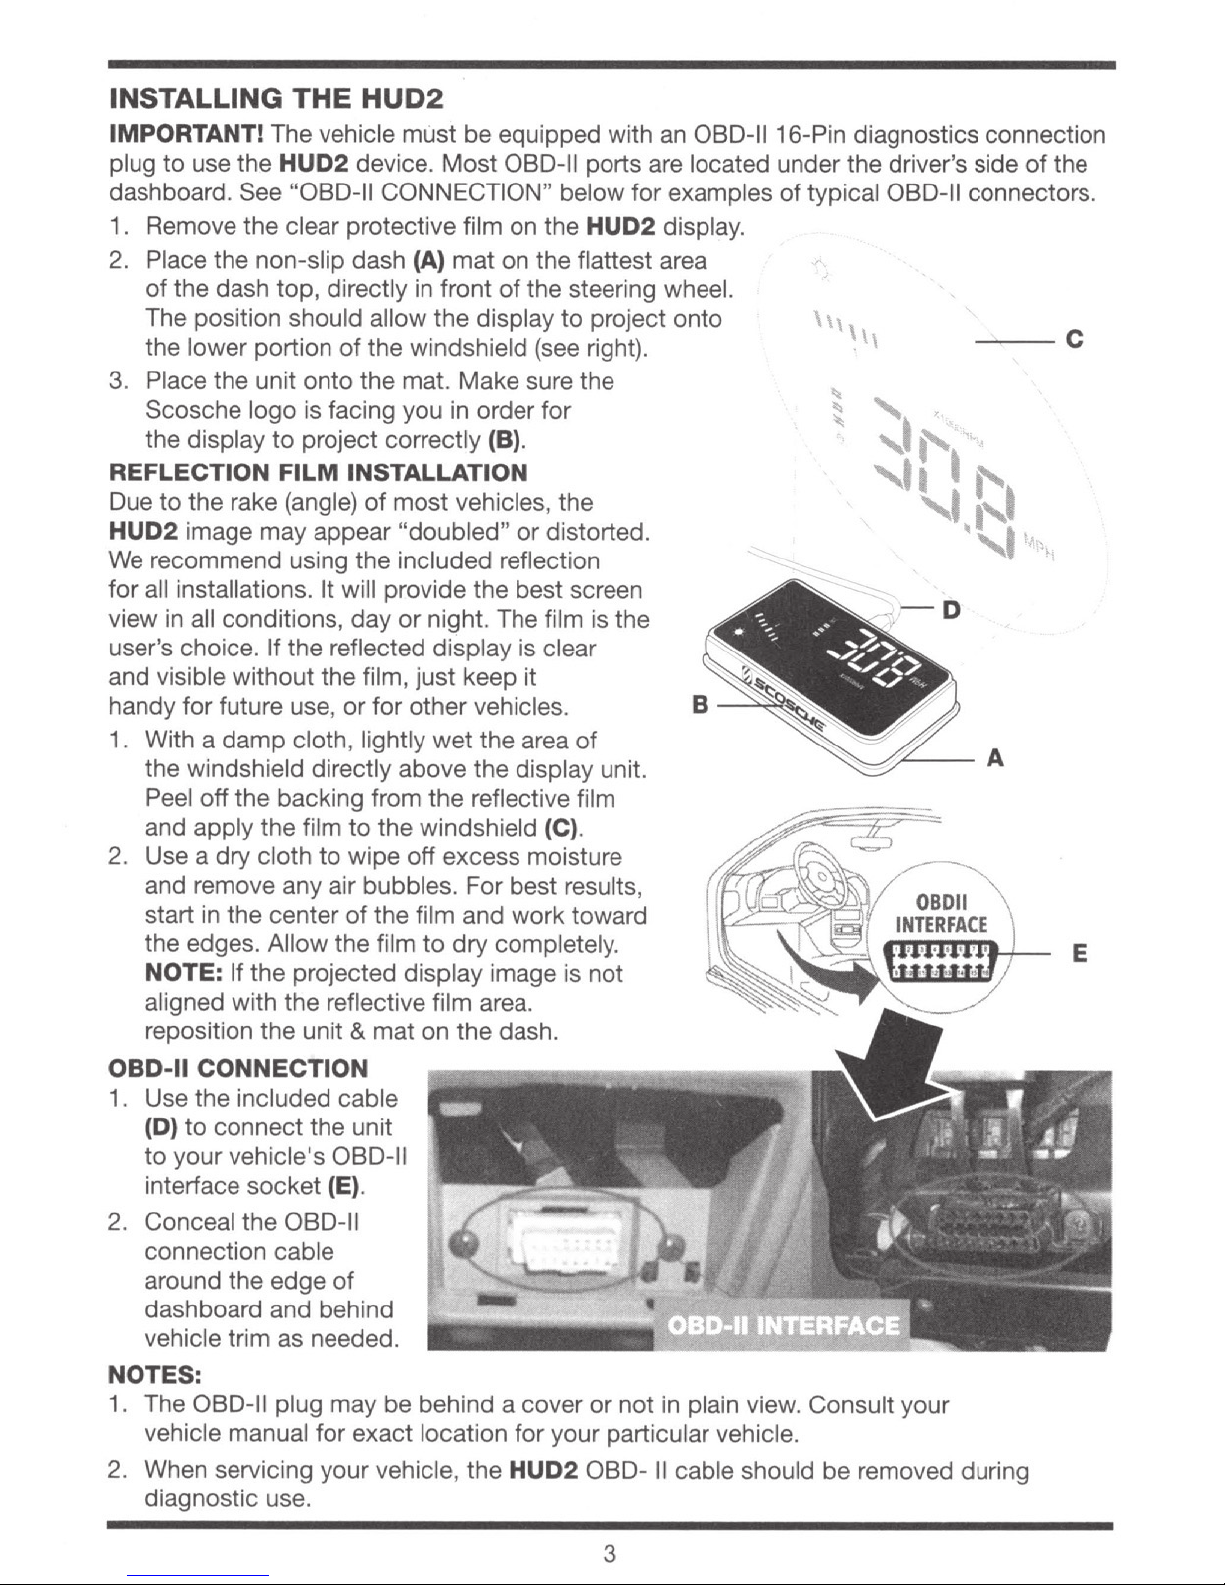
INSTALLING THE
IMPORTANT! The vehicle must be equipped with an 080-11 16-Pin diagnostics connection
plug to use the
dashboar
1 . Remove the clear protective film on the
2. Place the non-slip dash
of the
The position should allow the display to project onto
the lower portion
3. Place the unit onto the mat. Make sure the
Scosche logo is facing you
the
REFLECTION
Due
d.
dash top, directly
disp
to
the rake (angle)
HUD2 device. Most 080-1 1 ports are located under the driver
See "080-11 CONNECTION" below for examples
lay
to
FILM
HUD2
(A)
in
of
the windshield
project
cor
rectly (B).
INSTALLATION
of
most vehicles, the
HUD2 display.
mat on the flattest area
front
of
the steering wheel.
(see
right).
in
order
for
's
side
of
of
typical 080-11 connectors.
---
the
C
HUD2 image may appear "doubled" or distorted.
We
recommend using the included reflection
all
for
view
user's choice. If the reflected display is clear
and visible without the film, just keep it
handy for future use, or for other vehicles.
1.
2. Use a
installations. It will provide the best screen
in
all conditions, day
With a
the winds hield directly above the display unit.
Peel
and apply the film
and remove any air bubbles. For best results,
start
the edges. Allow the film
NOTE: If the projected display image is not
aligned with the reflective film area.
reposition the unit & mat on the dash.
damp
off
dry
in
the center
cloth , lightly wet the area
the backing from the reflective film
cloth to wipe
or
night. The film is the
of
to
the windshield (C).
off
excess moisture
of
the film and work toward
to
dry completely.
.
"
-o
E
OBD-11
1. Use
2.
NOTES:
1. The 080-11 plug may be behind a cover or not in plain view. Consult your
2. When servicing your vehicle, the
CONNECTION
the included cable
(D) to connect the unit
to
your vehicle's
interface socket (E).
Conceal the 080-11
connection cable
around the edge
dashboard and behind
vehicle trim as needed.
vehicle manual for exact location for your particular vehicle.
diagnostic use.
OB0-11
of
HUD2
080-
3
II
cable should be removed during
Page 4

GETTING STARTED
1. After installation, start engine and power on
the ON position and the
2. The unit will display the current voltage while communicating with the vehicle's E
(Electronics Cont rol Unit)
3.
Wi
thin a few secon
unit has been installed successfully. If display continues
please check whether the
NOTE: If unit still does
compa
tible with your vehicle. Call Tech support for assistance:
ds
HUD2
the HUD2 will display the engine RPM and speed (if moving) if the
not
operate after steps 1-3, then the
will be controlled with the vehicle's ignition).
HUD2
OBD-11 cable is installed
HUD2
. NOTE: Leave the power switch in
to
ONLY show the voltage,
cor
rectly and try agai
HUD2
device may not
1-800-621-3695
x3.
CU
n.
be
(
...
/,
-----
,,,,,,
-
=
==
==
==
HUD2 SETTINGS
The information on the
Unit). In some vehicles there
and the vehicle's dash instruments. The Settings Mode allows you
display values,
installation , then there is no need to access various adjustments.
Mode adjustments, refer to "HUD2 SETTINGS OPTIONS"
to
,-,
-,
I-,,-
-·-
HUD2
synchronize (or match) the dashboard. If your
,_
display comes from the vehicle's ECU (Electronics Control
is
a slight variance between what is displayed on HUD2
/
\
'
=
--
==
==
-,
-
L
HUD2
on
-
\
: .
~
..
--,
,_
Ll
-=
,_
....
\1-'H
J
~
to
fine-tune the HUD2
matches after
For specific Settings
pages 6-7.
USING THE HUD2 SCROLL SELECTOR BUTTON
L
111111111
PRESS INWARD TOGGLE
To
enter
Press the button INWARD for 5 seconds.
To
navigate adjustments:
Toggle the button UP (left), DOWN (right) and press INWARD (enter)
or to change next option leve
To
change values and options:
To
change option values toggle t
the correct value press
1 1
and
1111111
11 R
navigate
the
HUD2
button INWARD
11111!1!11 111111111
L
Settings Mode:
l.
he
button UP (left), DOWN (right). Once you have
to
4
UP
scroll
1 R
to
next
option#
L 1
11111111
TOGGLE
to
SELECT
.
1
DOWN
Page 5

MAIN DISPLAY SCROLLING
Press and release the setting button to change the
scroll
voltage and water temp.
of
the main display function between MPH,
L :
1111111
11
1111111111
R
~
:-,,-
..........
--,
~
I G
·--'
,--,
...
....
, ,
...
...........
'
AUDIBLE WARNING ALARMS
To
turn
the
Audible alarms
toggle switch toward "R"
beep and turn OFF
Alarm icon will illuminate.
FACTORY OPTION RESET
Press and hold the Settings toggle switch toward
for 5 seconds and entire HUD2
on. Repeat this step and options will restore
default values.
To
OFF,
press and hold the Settings
for
5 seconds and Alarm Icon will
activate alarm, repeat this step and
L 11
1111111
1
IJII!!IIII
LED
display will turn
to
factory
, 0
R
"L"
•c•-
1!..1
L 1
111111111 111111111
o
1 R
(
===
-----
-----
HUD2
When
itself off.
AUTO POWER OFF
the
vehicle is turned off, the
It
may take from 1 0 seconds
,,,,,
0
'
==
,,
....
=
==
,._,
, ... , I J , ... , •.
~
......
HUD2
to
,,,,,,,,,,,
+
rl rl
--·~
device will sense lower voltage levels and shut
1 minute
5
to
turn
. r
r~
klt
/
OFF.
Page 6

HUD2 SETTINGS OPTIONS
Refer
each setting adustment option. The illustrations
represent each option screen with its factory
default setting. Note that each option number
(1-7) appears
adjustment setting appears
display readout.
to
the chart on page 7 for descriptions
in
the
RPM
display, and the
in
the main
of
0
t
rt
IL.I
2
-,
I
'
I I I
3
'-,
Cl
~I
'-'
5
-,
,-
~
I
MPH
-,
I L.l
4
rt
rt
L.l
6
-,
,-
~
"F
,-,
-,
I=IC
6
7
0
3
2
5
4
7
rt
L.l
6
Page 7

Option#
0
1
Function Description
If
HUD2
speed
Speedometer,
value
Speed
Calibration
Engine
RPM
(Rotations)
Calibration
higher
the
HUD2
ter
reading.
this
option
factor,
for
If
than
trial-error
fine
tuning.
HUD2
RPM
Tachometer,
adjustment
accordingly
dash
Tachomter
adjustment
on a percentage
method
is
is
toggle
or
lower
matches
The
values
is
based
method
is
higher
toggle
value
higher
until
the
reading.
on
this
factor,
required
higher
or
lower
the
adjustment
accordingly
dash
Speedome-
adjustment
on a percentage
is
required
or
lower
the
or
lower
HUD2
option
matches
The
values
is
based
trial-error
for
fine
tuning.
than
until
on
Adjustment Factory
range
50-150%
50-150%
Default
107
117
2
3
4
5
6
7
High
RPM
(Rotations)
Alarm
Over-speed
Alarm
Display
Brightness
Speed Units
Water
Temp.
Units
Power
On
Voltage
Provides
RPM
up
or
tion
Provides
speed.
down
The
is
based
not
trial-error
tuning
O=Auto,
1=Km/H,
an
audible
threshold.
down
speed)
an
Toggle
to
change
values
on
equate
method
exact
Toggle
to
set
a specific
alarm.
audible
the
adjustment
over
adjustment
percentage
to
exact
MPH
is
MPH/Km/H
1 =Darker, 2=Brighter
2=MPH 1-2
alarm
the
alarm
at
adjustment
at
speed
on
this
factor.
or
required
alarm
specific
RPM
(rota-
specific
up
or
alarm.
option
It
does
Km/H,
for
fine
point.
1 =Celsius, 2=Fahrenheit
HUD2 will automatically turn on
with car Ignition and voltage above
13.2VDC. Please refer to Voltage
Note(**)
(page
in
TROUBLESHOOTING
8).
0-75
19-311
0-2
1-2
110-150
70
94
0
2
2
132
-
01234567
(all digits on)
Mode
0 = Normal Mode; 1 = Demo mode;
(Use
2 = Power off override
setting if
HUD2 remains on 0-2 0
this
after engine is shut off.)
7
Page 8

Problem/Issue
TROUBLESHOOTING
Solution(s)
~
HUD2
light,
No
Power
only
HUD2
display
looks
power
is
displays
does
vehicle's
Speed
vehicle
RPM
match
No
does
dash.
(revolutions)
vehicle
audible
not
fuzzy
to HUD2.
ON,
but
voltage.
not
display
speed
not
or
match
dash.
alarms
visible
or
doubled.
HUD2
RPM.
do
not
in
day-
Install
the
windshield
1.
Check
Vehicle
2.
3.
Check
Car
may
not
device.
Car
may
not
HUD2
1.
2.
See
Check
OFF,
menu
device.
Make
or
Km/H.
See
"9ettings"
"Settings"
status
then
to
adjust
provided
above
to
ensure
Ignition
that
08011
use
OBD
use
OBD
sure
HUD2
Option
Icon
alarms
are
alarm
HUD2
HUD2.
power
is
ON.
connection
II
protocol
II
protocol
is
set
Option
#1
for
on
HUD2 for
off.
If
parameters.
window
button
for
proper
#0
for
fine
Audible
Icon
is
reflection
is
ON.
cable
that
is
that
is
units
fine
tuning
tuning
ON,
then
screen
is
plugged
compatible
compatible
MPH
adjustments.
adjustments
alarms.
If
check
indicator
the
on
front
in
properly.
with
with
settings
HUD2
is
(**)
If
the
HUD2
1.
When
30
seconds
HUD2
within 1 minute
turns
This device complies with Part
this device
including interference
Scosche Industries Inc. warrants this product
period
independently determined
the product only. This warranty does
misuse, abuse, alteration, accident,
water
The original dated sales slip
prove defective within the warranty period, return
Inc. Scosche, at its option, will replace
paid.
In
defective product, or in any way be liable
empress warranties and
above (which is made expressly in lieu
does
not
power
after
OFF.
may
not
o
of
1 year from purchase. This Scosche product is sold with the understanding that the purchaser has
or
physically damaged
no
event shall Scosche Industries, Inc. be responsible
off
vehicle
2.
default
When
please
If
the
HUD2
default
15
of
the FCC Rules. Operation is subject
cause harmful interference, and
that
may
cause undesired operation.
FCC
setting
STATEMENT
LIMITED
to
the
suitability
by
accident
or
proof
no
implied warranties,
of
this product. This warranty is offered
not
cover the product if physically damaged, subject
or
an
act
of
or
which has been misused, disassembled
of
purchase will establish warranty eligibility. If the product should
or
repair the product free
or
responsible
of
all other warranties) shall apply
will
not
power
both
your
car
and
setting
your
adjust
will
from
(2)
HUD2
car
not
this device must
from
is
off,
the
Mode
power
13.2Vto
restarts
13.2V
and
WARRANTY
be
free from defects
GOD. This warranty
the
product with proof
of
for
claims beyond the replacement value
for
consequential
for
any particular use
OFF
automatically
HUD2
are
powered
automatically,
to
13.5V.
the
HUD2
setting
ON
automatically:
12.8V.
to
accept
in
does
of
charge and return the product postage
or
to
(option
LED
to 2 (last
(option
the following
material and workmanship
not
purchase
otherwise, except as set forth
products sold
#7,
any interference received,
to
the
apply
or
to
or
incidental damages. No
:
off,
but
after
increase
#7,
light
option,
Lower
pg.
two
original purchaser
to
product which has
altered.
Scosche Industries
the
page
remains
page
the
7)
conditions:
to
negligence
by
Scosche.
7)
on,
7)
of
(1)
for
of
or
.. the
a
8
 Loading...