


Edge DVR Quick Guide
Advanced MPEG-4 DVR 4, 8 and 16 Channel Models
Scorpion Group Security - 01452 525397
Stand-Alone Digital Video Recorder
V0.97.07-R04-5000 For Service Call Scorpion Group 01452 525397

2
First guide for the operation of M5000
>> Cautions for Power-Off
y Forced power-off or unplug while DVR is in its operation (Record/Playback) can cause fatal damages or abnormal
operation to DVR. You are firmly requested to shutdown the system first in SYSTEM/Shutdown and then turn the power
off. You are suggested to turn the power on again after 5 seconds.
y Forced power-off or unplug while external storage devices (USB memory stick, External HDD, etc.) are being used for
back-up can cause fatal damages or abnormal operation to DVR. Keep the power on until data saving process is
completed. Forced removal of those storage devices while they are in operation results in same fatal damages.
y Forced power-off or unplug during HDD Format
can cause fatal damages or abnormal operation to DVR. Keep the power
on until Format process is completed.
>> Installation/Add/Change/Move/Removal of HDD & CD-RW (DVD-RW)
y You are firmly requested to turn the power of DVR off prior to the installation/Add/Change/Move/Removal of HDD and
CD-RW (DVD-RW). Otherwise it can cause fatal damages to those storage devices. For turning the power of DVR off, go
to SETUP>SYSTEM>Shutdown to shutdown the system and then DVR will be automatically rebooted. If DVR doesn’t
process automatic reboot, unplug power cord for power off by force.
y For Installing/Add/Change/Move: ‘HDD Format and Default’ should be processed once you install/add/change Hard
disk drive, regardless any cases of installing brand new one or second handed one, re-installing existing one, installing
additional ones as a Primary Slave or Secondary Master, changing the location of pre-installed HDDs and so on.
Otherwise DVR doesn’t properly detect the HDD and it can cause abnormal system operation. ‘HDD Format and Default’
will be processed as below;
① (Date/Time Setting) This is to set present Date and Time (SETUP>SYSTEM>Admin>Date/Time).
② (Default Setting) This is to set all of setting values as same as to those of the factory defaulted.
(SETUP>SYSTEM>Information>Status>Setup>Default).
③ (HDD Format) Go to SETUP>SYSTEM>Admin>Storage>Format to format HDD. If you are using 2 x HDD or more, it’s
required for you to format every HDD of them respectively. DVR will be automatically rebooted after format is
completed.
y For Removal: You are firmly requested to process Remove as soon as you remove the HDD. Go to
SETUP>SYSTEM>Admin>Storage>Format. To complete removal process, click ( ) Removed mark displayed next to
Format column of the HDD that is to be removed. DVR will be automatically rebooted after removal is completed.
>> New setting of Date/Time
y Once you set new Date/Time, this will be immediately applied to the Live screen. But this change doesn’t work in the
Record mode until you reboot DVR.
y You are firmly requested to reboot the system after new set of Date/Time is completed.
y Shutdown should always be processed in SETUP>SYSTEM>Shutdown before you reboot the system.
>> Cautions for Upgrade process
y You are not allowed to upgrade the system prior to installing HDD. Upgrade should be processed while HDD is in its
regular operation.
>> How to use Mouse
y Left button: Supports as same functions as Enter ( ) key has.
y Scroll button in the middle: Supports as same functions as Search key has (displays Search Menu)
y Right button: Supports to display various ‘Function Keys’ (Refer to How to use mouse in the manual)
>> PLAY/PAUSE Key
y Every press of PLAY/PAUSE key alternately changes the playback mode by ‘x1 playback’ and ‘PAUSE’. Screen will
automatically mark ► and II respectively.
y If you want to change the playback modes by x1playback, REW, FF, BACKWARD or FORWARD, you are firmly
requested to first pause the system by pressing PLAY/PAUSE key.
y If you want to back-up the images being play-back, you are firmly requested to first pause the system by pressing
PLAY/PAUSE key.
>> Camera Title
The Camera Titles to be displayed during Record or Playback are set to CAM1~CAM16. But you are allowed to register
new titles in ‘SETUP>DEVICES>Camera/PTZ>Title’ for your convenient application during setup process.

3
2.1 INSTALLATION OF HDD AND CD-RW (DVD-RW)
2.1.1 IDE ports
y This DVR provides 2 x IDE ports that are to be divided into Primary and Secondary respectively.
y Every IDE port will be connected with 2 IDE devices (HDD, CD-RW, DVD-RW) in a row, but each of the storage devices should be set as
Master or Slave in accordance with following port setting plan
y Correct set of CD-RW (or DVD-RW) is Slave in the Secondary port.
y Please refer to following Port Setting Plan for the installation of HDD and CD-RW (DVD-RW).
Storage Primary IDE Port Secondary IDE Port
HDD CD-RW (DVD-RW) Master Slave Master Slave
1 1pc HDD ---- ---- CD-RW (DVD-RW)
2 1pc HDD HDD ---- CD-RW (DVD-RW)
4 / 8ch DVR
3 ---- HDD HDD HDD ----
1 1pc HDD ---- ---- CD-RW (DVD-RW)
2 1pc HDD HDD ---- CD-RW (DVD-RW)
3 1pc HDD HDD HDD CD-RW (DVD-RW)
16ch DVR
4 ---- HDD HDD HDD HDD
2.1.2 How to set Master / Slave
y You are required to use Jumper pins for setting Master or Slave in the HDD or CD-RW (or DVD-RW). Because every brand has its own
specific ways of set, how to set will be described on the surface of each device. The setting pin for selecting Master / Slave locates at
between IDE connector (40-pin) and Power connector (4-pin).
2.1.3 How to install HDD
y You are required to use the brackets and screws provided in the package for installing HDD.
y You are firmly requested to use only the cable kits provided (Data cable and Power cable). Otherwise HDD can be damaged.
2.1.4 How to install CD-RW (or DVD-RW)
y You are required to use the brackets and screws provided in the package for installing CD-RW (or DVD-RW).
y You are firmly requested to use only the cable kits provided (Data cable and Power cable). Otherwise CD-RW (or DVD-RW) can be
damaged.
y You are allowed to use only 1 x CD-RW (or DVD-RW). CD-RW (or DVD-RW) should always be set as Slave in the Secondary ports.
(ATTENTION)
y You are firmly requested to turn the power of DVR off prior to the installation/Add/Change/Move/Removal of HDD and CD-
RW (DVD-RW). Otherwise it can cause fatal damages to those storage devices. For turning the power of DVR off, go to
SETUP>SYSTEM>Shutdown to shutdown the system and then DVR will be automatically rebooted. If DVR doesn’t process
automatic reboot, unplug power cord for power off by force.
y For Installing/Add-up/Change: ‘HDD Format and Default’ should be processed once you install/add/change Hard disk
drive, regardless any cases of installing brand new one or second handed one, re-installing existing one, installing
additional ones as a Primary Slave or Secondary Master, changing the location of pre-installed HDDs and so on. Otherwise
DVR doesn’t properly detect the HDD and it can cause abnormal system operation. ‘HDD Format and Default’ will be
processed as below;
① (Date/Time Setting) This is to set present Date and Time(SETUP>SYSTEM>Admin>Date/Time).
② (Default Setting) This is to set all of setting values as same as to those of the factory defaulted.
(SETUP>SYSTEM>Information>Status>Setup>Default).
③ (HDD Format) Go to SETUP>SYSTEM>Admin>Storage>Format to format HDD. If you are using 2 x HDD or more, it’s
required for you to format every HDD of them respectively. DVR will be automatically rebooted after format is completed.
y For Removal: You are firmly requested to process Remove as soon as you remove the HDD. Go to
SETUP>SYSTEM>Admin>Storage>Format. To complete removal process, click ( ) Removed mark displayed next to
Format column of the HDD that is to be removed. DVR will be automatically rebooted after removal is completed.
(ATTENTION)
y You are firmly requested to turn the power of DVR off first prior to installing HDD. Otherwise it can cause fatal damages to
HDD. For turning the power of DVR off, go to SETUP>SYSTEM>Shutdown to shutdown the system and then DVR will be
automatically rebooted. If DVR doesn’t process automatic reboot, unplug power cord for power-off by force. You are
suggested to turn the power on again after 5 seconds.
(ATTENTION)
You are firmly requested to turn the power of DVR off prior to installing HDD, CD-RW or DVD-RW. Otherwise it can cause fatal
damages to those storage devices. For turning the power of DVR off, go to SETUP>SYSTEM>Shutdown to shutdown the system
and then DVR will be automatically rebooted. If DVR doesn’t process automatic reboot, unplug power cord for power off by force.
You are suggested to turn the power on again after 5 seconds.
2. INSTALLATION

4
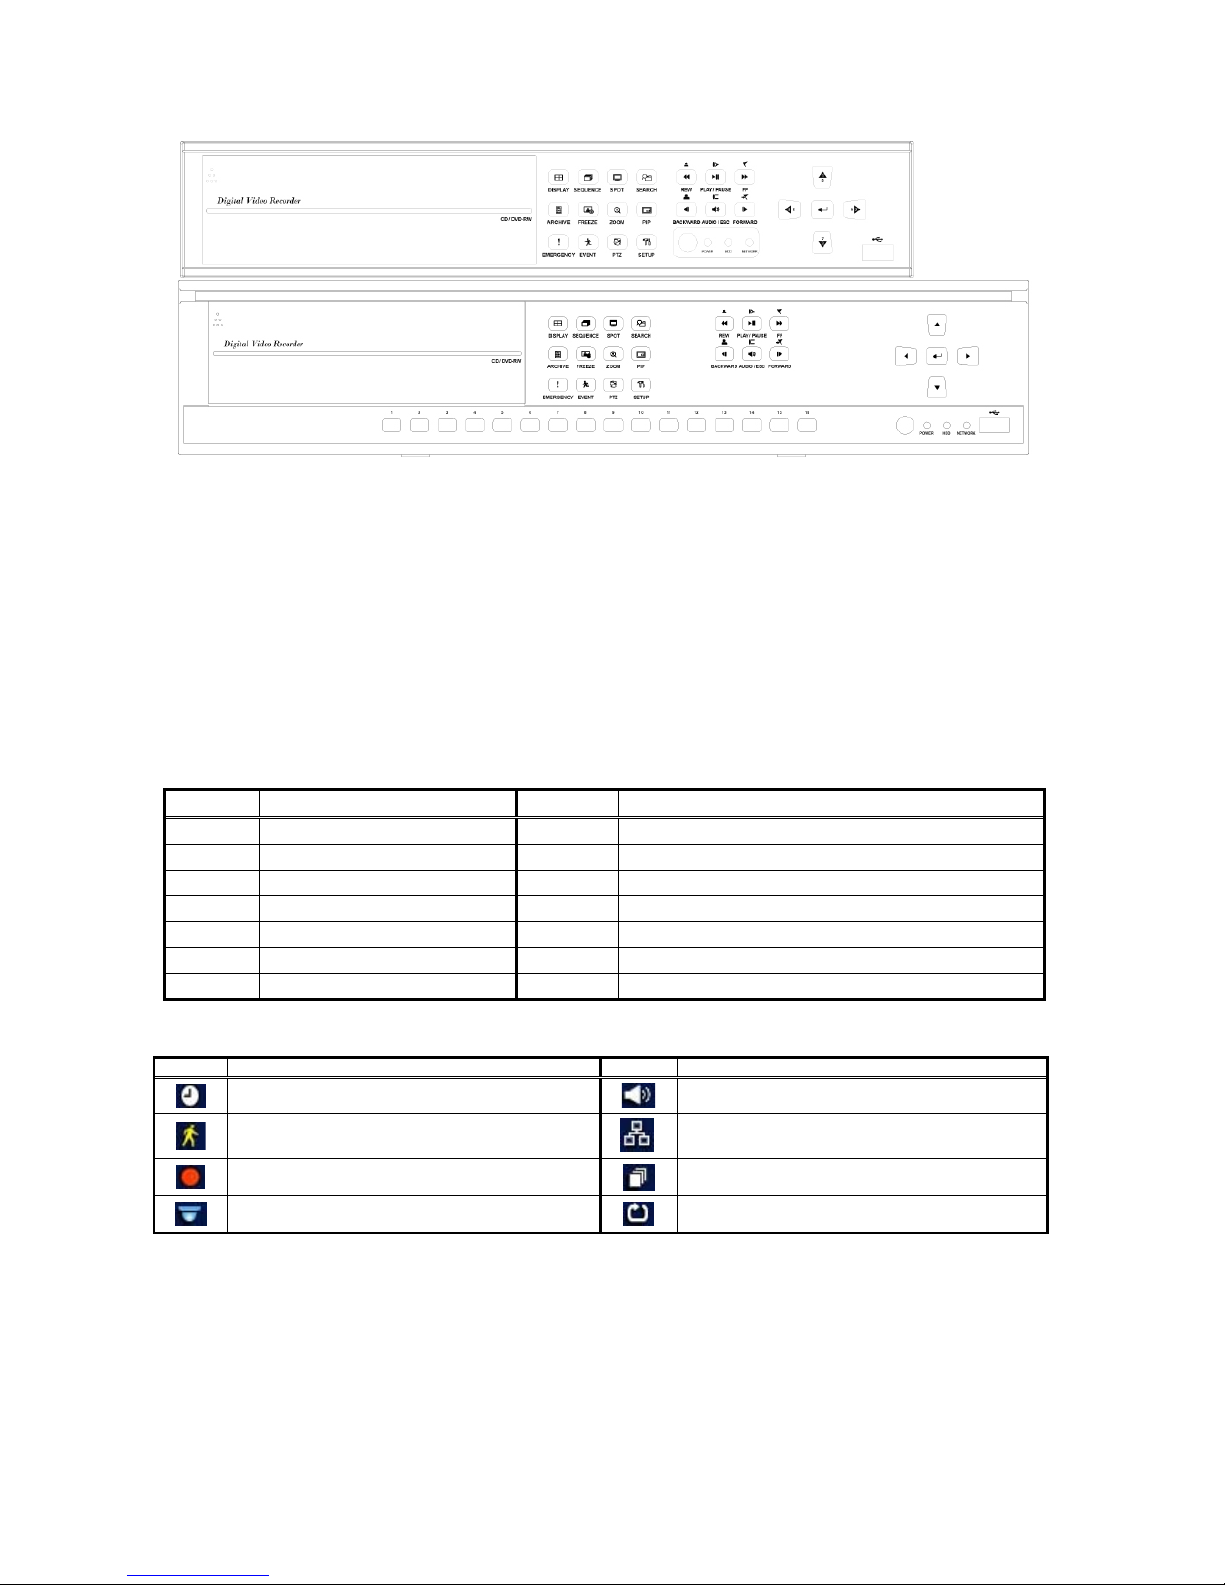
3.1 KEYS AND INDICATORS
Keys PTZ key Operation Mode Setup Mode
▲, ▼, ◄, ►
•Camera selection keys (For 4 / 8ch DVR)
• Rotate Pan/Tilt to Up/Down/Left/Right in PTZ Mode
•Move cursor to Up/Down/Left/Right
•Camera selection keys (For 8ch DVR)
•Enter into Sub-Menu
•Select where cursor locates at
1 ~ 16 •Camera selection keys (For 16ch DVR)
DISPLAY •To select split screen mode
SEQUENCE •Channel sequence Mode on/off (For Main Monitor)
SPOT •Channel sequence Mode on/off (For SPOT Monitor)
SEARCH •Video Search Mode on/off
ARCHIVE
•Live Screen:
- Full Screen: Color Control Window is popped up
- Split Screen: Alarm Out Control Window is popped up
•Playback Screen: Archive the images into the external
back-up storage devices
FREEZE •Screen Pause Mode on/off
ZOOM •Screen Zoom Mode on/off
PIP •PIP Mode on/off (Available only in Full Screen)
EMERGENCY •Emergency Record on/off
EVENT •Display of System Log on/off
PTZ •PTZ Control Mode on/off
SETUP •To enter into Main Menu
REW
•Fast Rewind (Every press changes it to x16 or x32)
•Zoom Out in PTZ Mode
BACKWARD
•Playback each still image in backward direction
•Zoom In in PTZ Mode
PLAY/PAUSE
•Monitoring Mode: One-touch playback (for the video
recorded during the latest 1 minute)
•Playback Mode: x1 Playback/Pause
•Focus Near in PTZ Mode
AUDIO
•Audio on/off (Monitoring/Playback)
•Audio channel selection: Hold pressing AUDIO key and
select the channel
•Focus Far in PTZ Mode
FF
•Fast Forward (Every press changes it to x16 or x32)
•Preset / Pan/Tilt Speed in PTZ Mode
FORWARD
•Playback each still image in forward direction
•Goto in PTZ Mode
Power Indicator(Red) •Light off: DVR off •Light on: DVR on
HDD Indicator (Green)
•Light off: Stop Record
•Blinking: Record/Playback is in process (HDD Access)
Network Indicator (Yellow)
•Light off: Ethernet is disconnected
•Blinking: Ethernet has been connected
3.2 CAMERA SELECTION KEYS FOR 4 / 8CH DVR
y Refer to how to select camera channel for 4 / 8ch DVR as below.
- To select #1 camera: Use ▲ key
- To select #2 camera: Use ► key
- To select #3 camera: Use ▼ key
- To select #4 camera: Use ◄ key
- To select #5 camera: Press key and use ▲ key
- To select #6 camera: Press key and use ► key
- To select #7 camera: Press key and use ▼ key
- To select #8 camera: Press key and use ◄ key
3. INPUT DEVICE and SCREEN ICONS
5
3.3 FRONT PANEL
3.4 HOW TO USE REMOTE CONTROLLER
y Function buttons and their functionalities of Remote Controller are as same as the buttons on the Front Panel of DVR.
y Follow the instructions below when you are in use of multi DVR units.
① Confirm System ID of the DVR (SYSTEM>Information>Status>System ID). You are allowed to select a number among 1~999.
② Hold pressing ID button of Remote Controller and input a 3-digit System ID (‘001’ means ID#1) while you head Remote Controller
toward the front Panel of DVR. Button number ‘10’ is equivalent with ‘0’.
(Ex) System ID is 3: Hold pressing ID button and press the number buttons by 10>10>3 in sequence.
3.5 HOW TO USE MOUSE
y USB Mouse allows you a convenient control of the DVR.
y Left button supports as same function as Enter ( ) key has.
y Scroll button in the middle supports as same function as Search key has. Once you press this button, there appears Search Menu on the
screen.
y Right button supports to display multi function keys described as below.
Keys Functions Keys Functions
Display Same as front panel key Event Same as front panel key
Sequence Same as front panel key Search One-touch playback (same as PLAY/PAUSE key)
Spot
Same as front panel key
Setup
Same as front panel key
Zoom
Same as front panel key
Emergency
Same as front panel key
Freeze
Same as front panel key
Shutdown Shutdown key (Same as SETUP>SYSTEM>Shutdown)
PIP
Same as front panel key
Cancel Function key Menu off
PTZ
Same as front panel key
3.6 SCREEN ICONS
Icon Description Icon Description
System is in Continuous Record Mode
System is in Audio recording Mode
System is in Event Record Mode
CMS connected / Allows 4 different login at max.
System keeps Recording
System is in Channel Sequence Mode
PTZ registered / PTZ Mode
HDD is in Overwrite Mode
16 channel DVR
4 / 8 channel DVR
4

6
4.2 SYSTEM
4.2.1 Information
y After Status input is completed, click ( ) Version to display
following screen menu.
Version Upgrade
y You are allowed to upgrade the DVR by applying new software.
y Refer to how to upgrade as below.
① Insert an USB memory stick that holds upgraded file in it to
the USB port of DVR.
② Click ( ) Load. The software version that USB memory stick
holds on will be displayed on the left of the screen.
③ Click ( ) Start. Upgrade will be started.
④ DVR will be automatically re-booted after upgrade process is
completed.
4.2.2 Admin
y Click ( )Admin in the SYSTEM to display following screen menu
Date
y This Menu is to set present Date.
y Refer to followings to adjust the Date and Time.
① Click ( ) Year, Month or Day where you want to adjust with.
The clicked will be highlighted by square.
② Adjust the figures by clicking ( ) ▲, ▼ buttons.
③ Adjust Year, Month and Day in same manner.
Time
y This Menu is to set present Time. Adjust the Time in same
manner of Date setting.
y Click ( ) Storage after your input for NTP is completed.
Following screen menu will be displayed.
y This Menu is to set S.M.A.R.T.(Self-Monitoring Analysis and
Reporting Technology) function that enables DVR to format HDD
and automatically display the information about HDD. But CDRW (DVD-RW) is not included in the SMART support.
y 4 x HDD at maximum can be identified as below.
- 1: Primary IDE port / Master
- 2: Primary IDE port / Slave
- 3: Secondary IDE port / Master
- 4: Secondary IDE port / Slave (Only for 16ch DVR)
Format
y You are firmly requested to format HDD for following cases.
- When you have newly installed HDD.
- When you added up new HDD.
- When you have changed HDD by another one.
- When you move HDD to another port.
- When you remove HDD.
y Click ( ) Add/Remove next to Format column and click ( ) ‘OK’
to start Format.
y DVR will be automatically rebooted after format is completed. If
you use 2 x HDD or more, DVR will be automatically rebooted
after all of HDD being applied are completely formatted.
y Once the column is changed to ‘---‘ after Reboot processed, this
means that Format has been successfully processed.
(ATTENTION)
Once you set new Date/Time, this will be
immediately applied to the Live screen. But this
change doesn’t work in the Record mode until you
reboot DVR. You are firmly requested to reboot the
system after new set of Date/Time is completed.
Shutdown should always be processed in
SETUP>SYSTEM>Shutdown before you reboot the
system.
(ATTENTION)
Even you remove the HDDs having been installed, you
are required to process Remove process. Remove
process is as same as that of Format process.
Storage
Date/Time
(ATTENTION)
If the date/time newly adjusted is earlier time than the
date of recorded data saved, the data left as those after
new date/time can be erased
(ATTENTION)
You are not allowed to upgrade the system prior to
installing HDD. Upgrade should be processed while HDD
is in its regular operation
(ATTENTION)
Forced power-off or removal of USB device while upgrade
has been in process can cause fatal damages to DVR.
Version
4. SETUP

7
4.2.6 Shutdown
y Shutdown is to safely turn off the power of DVR. Forced power
off can cause unexpected malfunction on the system. You are
firmly requested to turn the power off in the Shutdown mode.
y Click ( ) Shutdown in SYSTEM>Shutdown to display a screen
menu for confirming Shutdown. Click ( ) ‘OK’ to process Shut
Down.
y In Shutdown mode, all of OSD will be disappeared.
y You are required to reboot the DVR after Shutdown is completed.
Turn the power on after 5 seconds.
4.5 RECORD
y Click ( ) RECORD to display following screen menu
4.5.1 Settings
y Click( ) Setting in the RECORD>Settings to display following
screen menu
y There are 3 different record modes supported by this DVR that
are described below.
- Continuous: Continuous Record
- Event: Event Record(Sensor, Motion)
- Emergency: Record starts only when you press
EMERGENCY key
y This is the setup Menu for Continuous Record.
y There displays registered camera names in each Title column.
You are not allowed to change the name in this mode.
y Once you click ( ) resolution per each camera in Resolution
column, you can select required record resolution for every
camera. Select a resolution among 704x480, 704x240 and
352x240.
y Once you click ( ) record speed per each camera in Record
Speed column, you can select required record speed for every
camera. Refer to maximum record speed per each channel
described below. 352x240 in 4ch DVR is not applicable.
NTSC(PAL) 352x240 704x240 704x480
4ch DVR ---- 120(100) 60(50)
8ch DVR 240(200) 120(100) 60(50)
16ch DVR 480(400) 240(200) 120(100)
y Once you click ( ) record quality per each camera in Record
Quality column, you can select required record quality for each
camera. Select a record quality among Super, High and Std.
y Click ( ) ‘OK’ after setup is completed.
4.5.2 Schedule
y Click ( ) Schedule in RECORD>Schedule to display following
screen menu.
y This screen menu consists of 24 ‘Time Blocks’ by every week
days. Each block unit supports to set 1 hour respectively.
y Click ( ) Camera column and select #1 camera.
y Setup Record Mode in following sequence.
① Click 5 to select required record mode among the record
mode listed (Continuous, Alarm, Motion and PreAlarm).
Release 5 from all record modes if you want to stop record
② You can register record modes by selecting blocks, rows or
columns, or by clicking ( ) all of check boxes ().
- If you click ( ) a block, the block selected only will be
registered.
- If you click ( ) the columns (S~H), the column selected will
be registered.
- If you click ( ) the rows (00~23), the row selected will be
registered.
- If you click ( ) the block located at the top left and cross of
column and row, all of the columns and rows will be
registered.
y Repeat same setup process for camera 2~16. If you want to
setup all of cameras as same setup as camera#1, click ( ) Copy
to All Cameras.
y Following marks represent most of Record Mode supported.
Continuous
AlarmIn
AlarmIn / Continuous
AlarmIn / PreAlarm
Motion
Motion / Continuous
Motion / PreAlarm
Motion / AlarmIn
Motion / AlarmIn / Continuous
Motion / AlarmIn / PreAlarm
y Click ( ) ‘OK’ after setup is completed.
(ATTENTION)
y Forced power-off can cause unexpected malfunction
on the system. You are firmly requested to turn the
power off in the Shutdown Mode
Continuous

8
4.5.3 Motion Detection
y Click ( ) Motion Detection in RECORD>Motion Detection to
display following screen menu.
y This Menu is to set Motion Detection.
y Press SETUP key (or press Right button of Mouse) to display
setup Menu.
y Each setup Menu supports following operation.
- Camera: To select the camera for setup
- Sensitivity: To select the sensitivity (Low, Normal, Sensitive)
- Reverse Vert: To activate whole column blocks where cursor
locates at
- Reverse Horz: To activate whole row blocks where cursor
locates at
- Select All: To activate whole blocks
- Deselect All: To inactivate whole blocks
- Save: To save new setup and return to previous Menu
- Exit: To go direct to previous Menu disregarding new setup
- Cancel: Cancel Motion Menu
y Click ( ) ‘OK’ after setup is completed.
(Note)
Holiday will be registered in another Menu.

9
5.1 MONITORING
5.1.1 First Screen
y First screen defaulted to be displayed after power on will be a
split screen as below and DVR starts both of Live and record
functions as soon as system is booted.
y First screen shows Date/Time and following icons.
ICON Description
System is in Continuous Record Mode
System is in Event Record Mode
System keeps Recording
PTZ has been set
System is in Audio Recording Mode
CMS is connected / Allows 4 different login
at max.
System is in Channel Sequence Mode
HDD Overwrite Mode was selected
5.1.2 Screen
y System supports 4 different monitoring screens, such as Full
screen, Split screen, Sequence screen and PIP screen.
- Full screen: Press #1∼#16 keys to display a Full screen per
each camera selected.
- Split screen: Every press of DISPLAY key alternately
displays 3 different split screens (4, 9, 16).
- Sequence screen: After you select a screen display among
Full and Split screens in 4, 9 or 16, press SEQUENCE key to
activate Sequence mode. 4ch DVR supports Full screen
sequence, 8ch DVR supports Full and 4-split sequence and
16ch supports Full, 4-split and 8-split sequence. Press SPOT
key if you want to monitor sequence screens on the Spot
monitor.
- PIP screen: Once you press PIP key in a Full screen mode in
a certain channel, this enables to display the images of next
channel by PIP at right bottom of the screen.
y SPOT 모니터를 채널순환 방식으로 보려면 SPOT 키를
누르십시오.
5.1.3 Screen Zoom
y Press ZOOM key to magnify the screen by 4 times larger than
present screen size.
y Press Direction keys to monitor other corners of magnified
screen.
y Screen Zoom can be functioning only in Full screen Mode. This
function will not be working in Split, Sequence screens and PIP
mode.
5.1.4 Screen Freeze
y Press FREEZE key to pause present screen display.
y Screen Freeze can be functioning in Full screen and Split
screens. But this function will not be working in Sequence screen
mode and PIP mode.
5.1.5 PTZ Control
y Press PTZ key to control PTZ cameras connected to DVR. PTZ
Control can be functioning only in Full screen Mode.
y Once you start PTZ Control Mode, PTZ icon
will be
appeared on the bottom of the screen.
y Function keys for PTZ Control are shown below.
Keys Functions
▲, ▼, ◄, ► Up/Down/Left/Right
Zoom out
Zoom in
Focus near
Focus far
}
Iris In
{
Iris Out
Save Preset and
Adjust Control Speed
Go to the Preset
y When you use a mouse for the control of PTZ, move cursor to
the bottom of the screen near to Time display. Control keypad
will be popped up as below.
5. OPERATION
4

10
5.1.6 System Log
y Press EVENT key to display System Log as below.
y Please refer to ‘SETUP>SYSTEM>System Log’ to be informed
the sorts of Events to be listed up in System Log and how to
delete the Events.
5.1.7 Key Lock
y Press AUDIO>FF>FORWARD keys in order to activate Key
Lock function and display an icon on the bottom of the
screen.
y Press any key to pop up a Login Window. You are required to
Input password to release Key Lock. If there’s no password
encoded, press key.
5.1.8 Multi-functions of ARCHIVE Key
y ARCHIVE key will be applicable for following operations in Live
screen mode as well as to be used for Backup in Playback
screen mode.
- Full Screen Mode: Color Control Menu will be popped up
and you are allowed to control Brightness, Contrast and
Saturation.
- Split Screen Mode: Alarm Out Control Menu will be popped
up and you are allowed to select Alarm Out in the system.
5.1.9 Emergency Record
y Press EMERGENCY key to start emergency record regardless
of previous record setup.
y Emergency record doesn’t work in SETUP Mode.
y Press this key once more to stop Emergency Record
.
5.2 SEARCH
y This is to search images prior to process playback for the
recorded data.
y Press SEARCH key or press scroll button of the mouse in
monitoring screen mode. Following screen Menu will be popped
up.
y The system supports 2 different ways of Search.
- Date/Time Search: Search by putting in Date and Time.
- Calendar Search: Search by using Calendar dates.
5.2.2 Date/Time Search
y Click ( ) Date/Time Search in the pop-up screen to display
following screen Menu.
y How to set Date and Time will be described below.
① Click ( ) the position in the Date and Time where new set is
required. The selected will be highlighted by square.
② Change the figures by clicking ( ) ▲, ▼ buttons on the right.
y Click ( ) Search after new set is completed. Playback will be
started.
y Search Mode will be continued during the search time selected.
5.2.3 Calendar Search
y Click ( ) Calendar Search in the pop-up screen to display
following screen Menu.
y The date holding recorded data will be highlighted as above.
y How to set Date and Time will be described below.
① Select Year and Month by using the arrows on the top of the
calendar.
- : Search ‘Year’ by forward direction
- : Search ‘Year’ by backward direction
- : Search ‘Month’ by forward direction
- : Search ‘Month’ by backward direction
② Click ( ) the date for playback. The date selected will be
changed to a black highlight.
③ Click ( ) ▲ mark in the Time Bar. The date selected will be
changed to an orange highlight and ▲ mark will be changed
to ▲ mark.
④ Move ▲ mark by using ◄, ► keys to the time area where
playback is started.
y Click ( ) Search after new set is completed. Playback will be
started.
y Search Mode will be continued during the search time selected.

Scorpion Group Security - For Service Call (01452) 525397 - www.scorpion-group.co.uk
5.3 PLAYBACK
y First Playback screen is the maximum split screen of the DVR.
Press DISPLAY key or camera number key (1∼16) to change
screen mode.
y Move cursor to the bottom of the screen near to time display. A
Control keypad will be popped up.
y Every press of PLAY/PAUSE key alternately changes to ‘x1
playback’ or ‘Pause’. The marks on the screen will be changed
to ► or II respectively.
y The keys applied for playback control are described below. The
symbols in the keypad represent the functions described below.
REW
•Fast Rewind playback (Every press
alternately changes to x16 or x32)
BACKWARD
_I
•Playback a still frame to backward
direction
PLAY/PAUSE
/ II
•x1 playback / Pause
AUDIO
•Audio play on/off
•Audio channel selection: Press
AUDIO key and select required
channel key
FF
•Fast Forward playback (Every press
alternately changes to x16 or x32)
FORWARD
II`
•Playback a still frame to forward
direction
y Press SEARCH key to stop Playback.
5.4 ONE-TOUCH PLAYBACK
y You can directly go to the Playback screen by just pressing
PLAY/PAUSE key in the monitoring screen mode. This playback
screen only playback the latest 1-minute recorded data. Press
SEARCH key to stop playback.
y How to activate One-touch Playback by using mouse is
described below.
① Click Right button of the mouse to pop up ‘Function keys’ on
the screen.
② Click Search to start one-touch playback.
③ To stop one-touch playback, click Right button of the mouse
again to pop up a Search Menu. Click ‘Exit Search’ in the
Search Menu. One-touch playback will be stopped.
5.5 BACK-UP(ARCHIVE)
y Back-up function is to copy the recorded images (still images
and motion images) and save them into the storage devices
(USB memory stick, CD-RW and DVD-RW).
y Back-up can be functioning only in Playback mode.
y How to back-up in Playback mode is described below.
① Press PLAY/PAUSE keys to stop Playback. You can find
mark on the screen.
② Press ARCHIVE key. When you use a mouse, press Right
button and click Archive to display following screen menu.
③ Click ( ) Format and select ‘AVI’ or ‘JPEC’. It’s suggested to
select AVI file format for archiving motion images and select
JPEC file format for archiving still images.
④ Click ( ) the key mark on the right-end of ‘From’ and set
back-up start time.
⑤ Click T( ) the key mark on the right-end of ‘To’ and set back-
up end time.
⑥ Click ( ) Destination to select a back-up device. You are
allowed to select one out of USB and CD/DVD-RW.
⑦ Click ( ) the key mark on the right-end of ‘File Name’ to input
the file name. You don’t have to apply file extension (avi, jpg).
If there’s no file name encoded, save may not be processed.
⑧ Select a Camera number by checking 5. You are allowed to
select only one camera. In case you palyback a Full screen,
you are allowed to select only the camera that runs with a full
screen
⑨ Click ( ) Start button. A Progress Bar will be popped up and
save will be started.
⑩ Once save has been completed, a message confirming
‘Archive Success’ appears. Click ( ) ‘OK’ button. If save has
not been successful, a message confirming ‘Archive Fail’ and
you are required to try again from the beginning.
(ATTENTION)
If you want to back-up the images being play-back,
you are firmly requested to first pause the system
by pressing PLAY/PAUSE key.
(ATTENTION)
SEARCH key doesn’t work while keypad left to be popped
up. Press 7 button to remove the keypad.
(ATTENTION)
If you want to change the playback modes by
x1playback, REW, FF, BACKWARD or FORWARD,
you are firmly requested to first pause the system
by pressing PLAY/PAUSE key.
(ATTENTION)
Forced power off or removal of back-up devices during
back-up processed can cause fatal damages to DVR or
storage devices. You are required to reboot the system if
the devices are damaged. If the reboot doesn’t make the
system regularly operate, HDD format or system recovery
should be processed
(Note)
New setup try for DVR or CMS will be stopped during
back-up processed.
(Note)
Please keep the size of back-up data smaller than 2GB.
The data larger than 2GB cannot be archived
 Loading...