

Scientific Industries SI-G100, SI-G104, SI-G1500, SI-G1504, SI-G1600 Parts Assembly List
...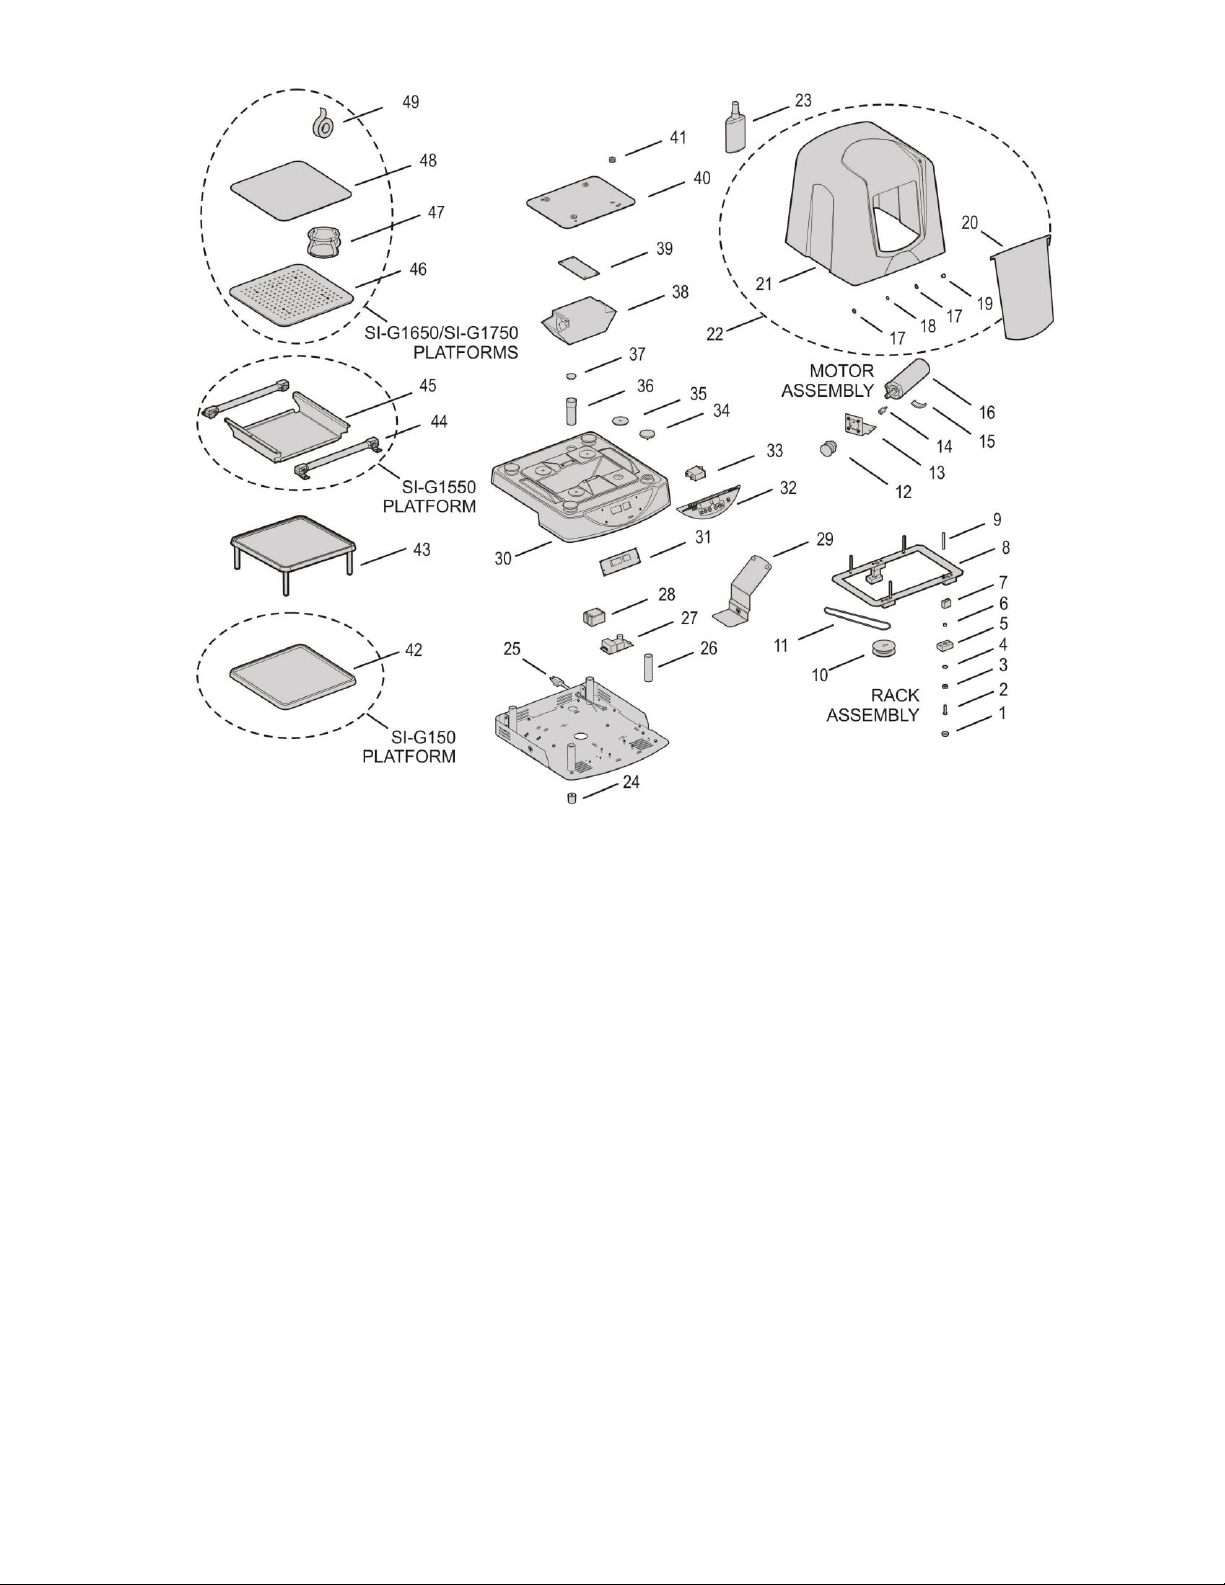
Item No.
Part No.
Description
Item No.
Part No.
Description
1
WAP0049
Spacer
26
0M-G100-220
Spacer
2a
SCP0105
Screw #1/4-28 X 1"
27
EPP0034
Power supply
2b
SCP0134
Screw #1/4-28 X 5/8" (Pulley-300 only)
28
EPP0035
Relay
3
BRP0001
Bearing
29
0A-G100-030
Kickstand Assembly
4
WAP0050
Washer
30
PP-G100-400
Housing
5
0M-G100-201
Bearing Block
31
EB-G100-500
Controller PCB
6
HWP0131
Sleeve
32a
EL-G100-575
Overlay-100
7
0M-G100-217
Offset
32b
EL-G1500-575
Overlay-300
8
0M-G100-202
Cage
33a
ESP0006
Rocker Switch 120V 5A
9
HWP0141
Standoff
33b
ESP0007
Rocker Switch 240V 2.5A
10a
0M-G100-219
Pulley-100
34
0M-G100-212
Disc Bubble
10b
0M-G1500-200
Pulley-300
35
0M-G100-207
Disc Heat Shield
11a
0M-G100-223
Belt-100
36
0M-G100-218
Access Tube
11b
0M-G1500-206
Belt-300
37
HWP0147
Cap
12a
0M-M100-214
Motor Pulley-100
38
0A-G100-020
Heating Element Assembly
12b
0M-M1500-208
Motor Pulley-300
39
0M-G100-208
Plate, Heating Element
13
0M-M100-215
Motor Bracket
40
0M-G100-203
Plate, Adaptor
14
HWP0139
Vibration Mount
41
HWP0144
Grommet
15
0M-M100-206
Motor Pad
42
SI-G150
Non-Slip Platform
16
EMP0016
Motor
43
SI-M150
Stacking Tray
17
WAP0055
Washer
44
SI-G1510
Universal Ratchet Clamp
18
WAP0054
Wave Washer
45
SI-G1550
Ratcheting Clamp Platform
19
HWP0143
Bushing
46
SI-G1650
Flask Clamp Platform
20
0M-G100-209
Door
47a
SI-1610
100mL Flask Clamp
21
PP-G100-401
Chamber
47b
SI-1611
125/150mL Flask Clamp
22
0A-G100-010
Chamber Assembly
47c
SI-1612
250mL Flask Clamp
23
CLP0002
NOVUS® Plastic Polish #1
47d
SI-1613
500 mL Flask Clamp
24
HWP0034
Foot
47e
SI-1614
1 L Flask Clamp
25a
318-0510-02
120V Line Cord
47f
SI-1615
2 L Flask Clamp
25b
0K-0246-901
230V Line Cord, C14 Socket
48
SI-M1617
Adhering Mat
25c
0K-0256-901
230V Line Cord, Euro Plug
49
SI-1616
Double Sided Adhesive Roll
25d
0K-0266-901
230V Line Cord, British Plug
25e
0K-0276-901
230V Line Cord, Swiss Plug
25f
0K-0286-901
100V Line Cord
Parts Assembly List
To order parts for the GENIE TEMP-SHAKER™:
Contact your local distributor or visit scientificindustries.com. Please specify Part No., quantity and electric voltage.
NOVUS® is a registered trademark of NOVUS Plastic Polish
Genie Temp-Shaker™ is a registered trademark of Scientific Industries Inc.
© Scientific Industries Inc. 2018 LTP0091 Rev. -

80 Orville Drive, Suite 102, Bohemia, NY 11716 U.S.A.
Phone: (631) 567-4700 • Fax: (631) 567-5896 Toll Free: 888-850-6208
Customer Service: custsvc@scientificindustries.com
scientificindustries.com
GENIE TEMP-SHAKER™
ORBITAL SHAKING INCUBATOR
OPERATING INSTRUCTIONS
Models SI-G100 through SI-G106 and SI-G1500 through SI-G1706

Fig. 1
Fig. 5
Fig. 7
Fig. 6
Fig. 2
Fig. 3
Fig. 4
The GENIE TEMP-SHAKER™ is designed to provide environmentally controlled, variable speed, multi vessel orbital shaking in a
compact, durable and user friendly unit. Chamber air is gently and continuously circulating at a rate that ensures the temperature
consistency and uniformity of all test samples. Microprocessor control easily achieves desired speed and temperature (28°C to 75°C)
which are shown on large, easy to read displays for accurate reproducible conditions. Visible and audible alarms exist for temperature.
Models SI-G100 thru SI-G106 have speed ranges of 20-100 RPM. Models SI-G1500 thru SI-G1506, SI-G1600 thru SI-G1606 and SIG1700 thru SI-G1706 have speed ranges of 35-300 RPM.
OPERATING INSTRUCTIONS
We recommend you retain the original packaging for 90 days in case you need to return the product for any reason to your distributor or
Scientific Industries.
Plug the line cord into a properly grounded electrical outlet.
The work surface on which the shaker is placed must be level, stable and non-slip.
GENIE TEMP-SHAKER™ 100 with Non Slip Platform
The shaker is supplied with a durable thermoplastic platform with an anti-slip rubber mat
(Fig.1). The platform has a molded raised edging that contains minor spills and keeps
the work surface dry and clean. Place the vessels so that they do not touch each other.
Position vessels evenly distributed on the platform. Uneven loading may result in
excessive vibrating of the shaker and support table. Should this occur, reduce the
speed or turn the shaker off and redistribute the vessels. The platform can
accommodate up to 2 liter vessels with a 2.3 Kg (5 lbs) load capacity. Stacking trays
are available that increase the capacity of vessels that can be utilized (Fig.2). These
trays also have an anti-slip rubber mat and raised molded edge.
GENIE TEMP-SHAKER™ 300 with Ratcheting Clamp Platform
The shaker is supplied with two ratcheting cushioned clamps (Fig.3) Position the two
ratcheting clamps on the platform with sufficient space to fit the vessels. It is very
important to regularly monitor shaking cycles to ensure that the vessels remain firmly
secure. Press the ratcheting clamps together until the foam is compressed against the
vessels (Fig.6). To release the ratcheting clamps, press the release arm and slide
away (Fig.7).
GENIE TEMP-SHAKER™ 300 with Flask Clamp Platform
The shaker is supplied with a platform for accepting various size flasks or beakers
(Fig.4). Flask clamps attach to the platform with captive mounting screws. Flask
clamps are sold separately. Position clamps evenly distributed on the platform.
Uneven loading may result in excessive vibrating of the shaker and support table.
Should this occur, reduce the mixing speed or turn the shaker off and redistribute the
load of the vessels.
GENIE TEMP-SHAKER™ 300 with Adhering Mat Platform
The shaker is supplied with an adhering rubber mat for use with bottles and dishes that
cannot be held with conventional clamps (Fig.5). Patented material is naturally
adhering. Rinse the rubber clean to renew adhering properties. Flasks clamps can be
used on this unit by removing the adhering mat.

Up/Down
Buttons
Up/Down
Buttons
Start/Stop
Button
SPECIFICATIONS
The GENIE TEMP-SHAKER™ is classified as "Installation Category 2”,
“Overvoltage Category 2” and “Pollution Degree 2”.
Environmental: 0°C - 38°C (32°F-100°F), 95% Humidity max.
Indoor use only in elevation up to 2000m of altitude.
Weight: 9 Kg (20 lbs.)
Dimensions: (WxD) 450 x 480mm (17.6 x 19 in.)
Orbit: 19mm
Temperature: 28°C to 75°C
Platform: 305mm x 305mm (12 x 12 in.)
Chamber Height: 305mm (12 in.)
Chamber Volume: 40 L (2400 cubic inches)
SI-G100
60HZ
0.50A
SI-G104
1.0
0.25A
SI-G1500
60HZ
0.50A
SI-G1504
1.0
0.25A
SI-G1600
60HZ
0.50A
SI-G1604
1.0
0.25A
SI-G1700
60HZ
0.50A
SI-G1704
1.0
0.25A
SI-G101
50HZ
0.25A
SI-G106
1.0
0.25A
SI-G1501
50HZ
0.25A
SI-G1506
1.0
0.25A
SI-G1601
50HZ
0.25A
SI-G1606
1.0
0.25A
SI-G1701
50HZ
0.25A
SI-G1706
1.0
0.25A
SI-G102
50HZ
0.25A
SI-G105
50/60HZ
0.50A
SI-G1502
50HZ
0.25A
SI-G1505
50/60HZ
0.50A
SI-G1602
50HZ
0.25A
SI-G1605
50/60HZ
0.50A
SI-G1702
50HZ
0.25A
SI-G1705
50/60HZ
0.50A
SI-G103
50HZ
0.25A
SI-G1503
50HZ
0.25A
SI-G1603
50HZ
0.25A
SI-G1703
50HZ
0.25A
CAUTION! Do not lift your GENIE TEMP-SHAKER™ by the platform.
CAUTION! If this equipment is used in a manner not specified by the manufacturer, the protection provided by the equipment may be impaired.
CAUTION! Unplug from power before cleaning. Do not immerse.
CAUTION! Do not position the equipment so that it is difficult to disconnect the power cord.
CAUTION! This equipment has been tested and found to comply with the limits for a Class A digital device, pursuant to Part 15 of the FCC Rules. These
limits are designed to provide reasonable protection against harmful interference when the equipment is operated in a commercial environment. This
equipment generates, uses, and can radiate radio frequency energy and, if not installed and used in accordance with the instruction manual, may cause
harmful interference to radio communications. Operation of this equipment in a residential area is likely to cause harmful interference in which case the
user will be required to correct the interference at his own expense.
CARE & HANDLING
Your GENIE TEMP-SHAKER™ should be given the care normally required for any electrical appliance. Unplug unit and wipe housing with damp cloth
and detergent. Blot any spills immediately. We recommend cleaning the clear dome with Novus Plastic Polish #1 and a clean soft cloth. Alternatively,
mild soap or detergent and luke warm water may be used. Do not dry rub the clear dome as scratching will occur.
OPERATION
The unit can be turned on/off by pressing the start/stop button.
When the unit is first turned ON (rocker switch on right side of
housing) the heater and fan will turn on and begin regulating
toward the set temperature. During this time, the temperature
display will blink green. The display will become solid green after
achieving the desired temperature.
Pressing the Up/Down Arrow buttons in the temperature control
area allows you to change the desired temperature. While
adjusting temperature, the display will be amber in color.
If there is a change of ±2°C, the display will turn solid red. At ±3°C deviation, the
display will blink red. At ±4°C the display will blink red and the alarm will sound.
UP and DOWN buttons in the speed area are used for changing the speed value.
While adjusting speed, the display will be amber in color. The display will turn back
to solid red shortly after the button is released.
START/STOP button is used for starting/stopping the operation.
CALIBRATION
The unit is electronically factory calibrated and should not need calibration, nor is it recommended. However, should the need arise,
the unit may be calibrated, as follows:
In order to calibrate, you will need to make an independent measurement of the chamber temperature. Make sure the thermometer is
accurate! Generally speaking, glass thermometers found around the lab will be less accurate than your GENIE TEMP-SHAKER™.
Good, certified glass or digital thermometers are available from laboratory supply dealers. A thermocouple wire may be passed through
the access port (rear/underside of unit).
Measure the temperature in the chamber via the lab thermometer, after chamber temperature has been allowed to settle for twenty
minutes. Note the difference in temperature between GENIE TEMP-SHAKER™ displayed temperature and your lab thermometer
temperature (ex. GENIE TEMP-SHAKER™ display reads 37°C, lab thermometer reads 38°C; difference is –1°C). This difference is the
calibration value to be entered.
To access the calibration menu, simultaneously press and hold the UP ARROW button in the temperature control area and the
START/STOP button while turning the unit ON.
The parameters on the display show:
TEMPERATURE: The temperature blinks amber and begins adjusting to reach the last temperature setting. Once there, it changes to
solid amber.
SPEED: 0 – The speed readout displays “0” in an amber color and can be adjusted ± 9 for each °C desired.
Press the START/STOP button to exit calibration mode.
 Loading...