

Page 1
Explorer® Digital Set-Top
User’ s Guide
Models Z60DVB™ and Z70DVB™
Page 2
Notice for Installers
The servicing instructions in this notice are for use by qualifi ed service personnel only.
To reduce the risk of electric shock, do not perform any servicing other than that contained
in the operating instructions, unless you are qualifi ed to do so.
Note to System Installer
For this apparatus, the coaxial cable shield/
screen shall be grounded as close as practical
to the point of entry of the cable into the building.
For products sold in the US and Canada, this
reminder is provided to call the system installer's
attention to Article 820-93 and Article 820-100 of
the NEC (or Canadian Electrical Code Part 1),
which provides guidelines for proper grounding
of the coaxial cable shield.
This symbol is intended to alert you that
uninsulated voltage within this product may
have sufficient magnitude to cause electric shock.
Therefore, it is dangerous to make any kind of
contact with any inside part of this product.
CAUTION: To reduce the risk of electric
shock, do not remove cover (or back).
No user-serviceable parts inside. Refer
servicing to qualified service personnel.
WARNING
TO PREVENT FIRE OR ELECTRIC SHOCK,
DO NOT EXPOSE THIS UNIT TO RAIN OR
MOISTURE.
This symbol is intended to alert you of
the presence of important operating and
maintenance (servicing) instructions in
the literature accompanying this product.
20070112 SysInstaller 820 English
U.S. Patents
A patent notice is affi xed to this product. In addition, the product may also be covered
by one or more of the following patents:
4,498,169, 4,692,919, 4,748,667; 4,829,569; 4,866,770; 4,885,775; 4,888,799; 4,890,319; 4,922,456; 4,922,532; 4,924,498;
4,965,534; 4,991,011; 5,003,384; 5,012,510; 5,029,207; 5,045,816; 5,053,883; 5,054,071; 5,058,160; 5,142,575; 5,142,690;
5,146,526; 5,155,590; 5,214,390; 5,225,902; 5,225,925; 5,235,619; 5,237,610; 5,239,540; 5,241,610; 5,247,364; 5,255,086;
5,257,403; 5,267,071; 5,270,809; 5,271,041; 5,272,752; 5,282,028; 5,285,497; 5,287,351; 5,301,028; 5,309,514; 5,317,391;
5,319,709; 5,341,425; 5,347,388; 5,347,389; 5,357,276; 5,359,601; 5,361,156; 5,367,571; 5,379,141; 5,379,145; 5,381,481;
5,390,337; 5,400,401; 5,406,558; 5,418,782; 5,420,866; 5,420,923; 5,425,101; 5,428,404; 5,430,568; 5,434,610; 5,436,749;
5,438,370; 5,440,632; 5,442,472; 5,455,570; 5,457,701; 5,471,492; 5,477,199; 5,477,262; 5,477,282 5,477,370; 5,481,389;
5,481,542; 5,485,221; 5,493,339; 5,497,187; 5,500,758; 5,502,499; 5,506,904; 5,519,780; 5,539,822; 5,550,825; 5,579,055;
5,579,057; 5,583,562; 5,592,551; 5,596,606; 5,600,378; 5,602,933; 5,640,388; 5,657,414; 5,675,575; 5,684,876; 5,715,515;
5,724,525; 5,734,822; 5,740,300; 5,742,677; 5,754,940; 5,757,416; 5,771,064; 5,774,859; 5,825,829; 5,826,167; 5,850,305;
5,854,703; 5,870,474; 5,892,607; 5,920,626; 5,923,755; 5,930,024; 5,930,515; 5,937,067; 5,963,352; 5,966,163; 5,982,424;
5,991,139; 5,999,207; 6,005,631; 6,005,938; 6,016,163; 6,028,941; 6,029,046; 6,052,384; 6,055,244; 6,072,532; 6,105,134;
6,148,039; 6,157,719; 6,188,729; 6,195,389; 6,212,278; 6,215,530; 6,219,358; 6,240,103; 6,243,145; 6,246,767; 6,252,964;
6,272,226; 6,292,081; 6,292,568; 6,320,131; 6,374,275; 6,405,239; 6,411,602; 6,417,949; 6,424,714; 6,424,717; 6,433,906;
6,438,139; 6,463,586; 6,467,091; 6,476,878; 6,493,876; 6,510,519; 6,516,002; 6,516,412; 6,526,508; 6,538,595; 6,546,013;
6,560,340; 6,567,118; 6,570,888; 6,622,308; 6,629,227; 6,664,984; 6,667,994; 6,671,879; 6,674,967; 6,678,891; 6,714,598;
6,721,352; 6,721,956; 6,725,459; 6,738,982; 6,744,892; 6,744,967; 6,751,271; 6,760,918; 6,795,972; 6,802,077; 6,804,708;
6,811,447; 6,817,028; 6,822,972; 6,823,385; 6,832,386; 6,845,106; 6,868,473; 6,874,075; 6,889,191; 6,909,471; 6,917,622;
6,917,628; 6,922,412; 6,927,806; 6,928,656; 6,931,058; 6,937,729; 6,969,279; 6,971,008; 6,971,121; 6,978,310; 6,986,156;
6,988,900; 6,996,838; 7,010,801; 7,053,960; 7,065,213; 7,069,578; 7,069572; D348065; D354959; D359737; D363932;
D390217; D434753; D507240; D507535; D513407; D516518; RE36368; RE36988
20070417 Patents
ii
Page 3

Contents
Important Safety Instructions ........................................................................................2
Safety First ...................................................................................................................4
Explorer eClub ..............................................................................................................4
Identify Y our Set-top .....................................................................................................4
About the Remote Control ............................................................................................5
What’s on the Front Panel? ..........................................................................................6
What’s on the Back Panel? ..........................................................................................7
Connecting the Set-Top ................................................................................................8
Connecting to a TV .......................................................................................................9
Watch TV ....................................................................................................................10
Setup Wizard ..............................................................................................................10
Set Parental Control PIN.........................................................................................10
Navigator Bar..............................................................................................................11
Block and Unblock Channels ..................................................................................12
Program Information ...............................................................................................12
Options....................................................................................................................12
Pay-Per-View Events ..............................................................................................13
Electronic Program Guide ..........................................................................................14
Favorite List ................................................................................................................14
Program Reminders ...................................................................................................15
Troubleshooting ..........................................................................................................16
1
Page 4
IMPORTANT SAFETY INSTRUCTIONS
Read These Instructions
Keep These Instructions
Heed All Warnings
Follow All Instructions
Power Source Warning
A label on this product indicates the correct power source for
this product. Operate this product only from an electrical outlet
with the voltage and frequency indicated on the product label.
If you are uncertain of the type of power supply to your home
or business, consult your service provider or your local power
company.
Ground the Product
WARNING:
Avoid electric shock and fi re hazard! Do not defeat
the safety purpose of the polarized or groundingtype plug. A polarized plug has two blades with one
wider than the other. A grounding-type plug has two
blades and a third grounding prong. The wide blade
or the third prong is provided for your safety. If the
provided plug does not fi t into your outlet, consult
an electrician for replacement of the obsolete outlet.
If this product connects to coaxial cable wiring, be sure the
cable system is grounded (earthed). Grounding provides some
protection against voltage surges and built-up static charges.
Prevent Power Cord Damage
Protect the power cord from being walked on or pinched,
particularly at plugs, convenience receptacles, and the point
where the cord exits from the apparatus.
Provide Ventilation and Select a
Location
• Do not block any ventilation openings. Install in accordance
with the manufacturer’s instructions.
• Do not place this apparatus on a bed, sofa, rug, or similar
surface.
• Do not place this apparatus on an unstable surface.
• Do not install near any heat sources such as radiators, heat
registers, stoves, or other apparatus (including amplifi ers)
that produce heat.
• Do not install this apparatus in an enclosure, such as a
bookcase or rack, unless the installation provides proper
ventilation.
• Do not place entertainment devices (such as VCRs or DVDs),
lamps, books, vases with liquids, or other objects on top of
this product.
Protect from Exposure to Moisture
and Foreign Objects
Do not use this apparatus near water.
WARNING:
Avoid electric shock and fi re hazard! Do not expose
this product to liquids, rain, or moisture.
Protect the Product from Lightning
For added protection, unplug this apparatus during lightning
storms or when unused for long periods of time. In addition to
disconnecting the AC power from the wall outlet, disconnect the
signal inputs.
Verify the Power Source from the
On/Off Power Light
When the on/off power light is not illuminated, the apparatus may
still be connected to the power source. The light goes out when
the apparatus is turned off, regardless of whether it is still plugged
into an AC power source.
Eliminate AC Mains Overloads
WARNING:
Avoid electric shock and fi re hazard! Do not overload AC
mains, outlets, extension cords, or integral convenience
receptacles. For products that require battery power or
other power sources to operate them, refer to the
operating instructions for those products.
2
WARNING:
Avoid electric shock and fi re hazard! Unplug this
product before cleaning. Clean only with a dry cloth.
Do not use a liquid cleaner or an aerosol cleaner.
Do not use a magnetic/static cleaning device (dust
remover) to clean this product.
WARNING:
Avoid electric shock and fi re hazard! Never push
objects through the openings in this product. Foreign
objects can cause electrical shorts that can result in
electric shock or fi re.
Accessories Warning
WARNING:
Avoid electric shock and fi re hazard! Only use
attachments/ accessories specifi ed by your service
provider or the manufacturer.
Page 5
IMPORTANT SAFETY INSTRUCTIONS, continued
Service Warnings
WARNING:
Avoid electric shock! Do not open the cover of this
product. Opening or removing the cover may expose
you to dangerous voltages. If you open the cover,
your warranty will be void. This product contains no
user-serviceable parts. Refer all servicing to qualifi ed
service personnel.
Servicing is required when the apparatus has been damaged
in any way, such as a power-supply cord or plug is damaged,
liquid has been spilled or objects have fallen into the apparatus,
the apparatus has been exposed to rain or moisture, does not
operate normally, or has been dropped.
Check Product Safety
Upon completion of any service or repairs to this product, the
service technician must perform safety checks to determine
that this product is in proper operating condition.
Protect the Product when Moving It
Always disconnect the power source when moving the
apparatus or connecting or disconnecting cables.
WARNING:
Avoid personal injury and damage
to this product! Use only with the
cart, stand, tripod, bracket, or table
specifi ed by the manufacturer or sold
with the apparatus. When a cart is
used, use caution when moving the
cart/ apparatus combination to avoid
injury from tip-over.
20070320 Set-Top Cable International
3
Page 6

Safety First
Before using the set-top, read the Important Safety Instructions section of this guide.
Explorer eClub
The online Explorer eClub provides news and information about consumer products.
Access the Explorer eClub on the Internet at the following Web address:
www.scientifi catlanta.com/explorerclub
Identify Your Set-Top
Your service provider may ask for the serial number or the MAC address of the settop if your system requires troubleshooting in the future.
Look for the serial number and the MAC address on the bottom of the set-top.
Write the serial number here: ____________________________________________
Write the MAC address here: ____________________________________________
4
Page 7

About the Remote Control
Power On/Off
Access specific
channels
Access Navigator Bar
Adjust volume
Select menu item
View channel options
Access Electronic
Program Guide (EPG)
Access Setup Wizard
Mute volume
Access last channel viewed
Scroll through channels
Scroll through menu pages
Scroll through menu items
(also used for VOD)
Exit menus
Access menus and EPG
Access video-on-demand (VOD)
window (if available from your
service provider)
Toggle between TV and Radio
modes
T12721
5
Page 8

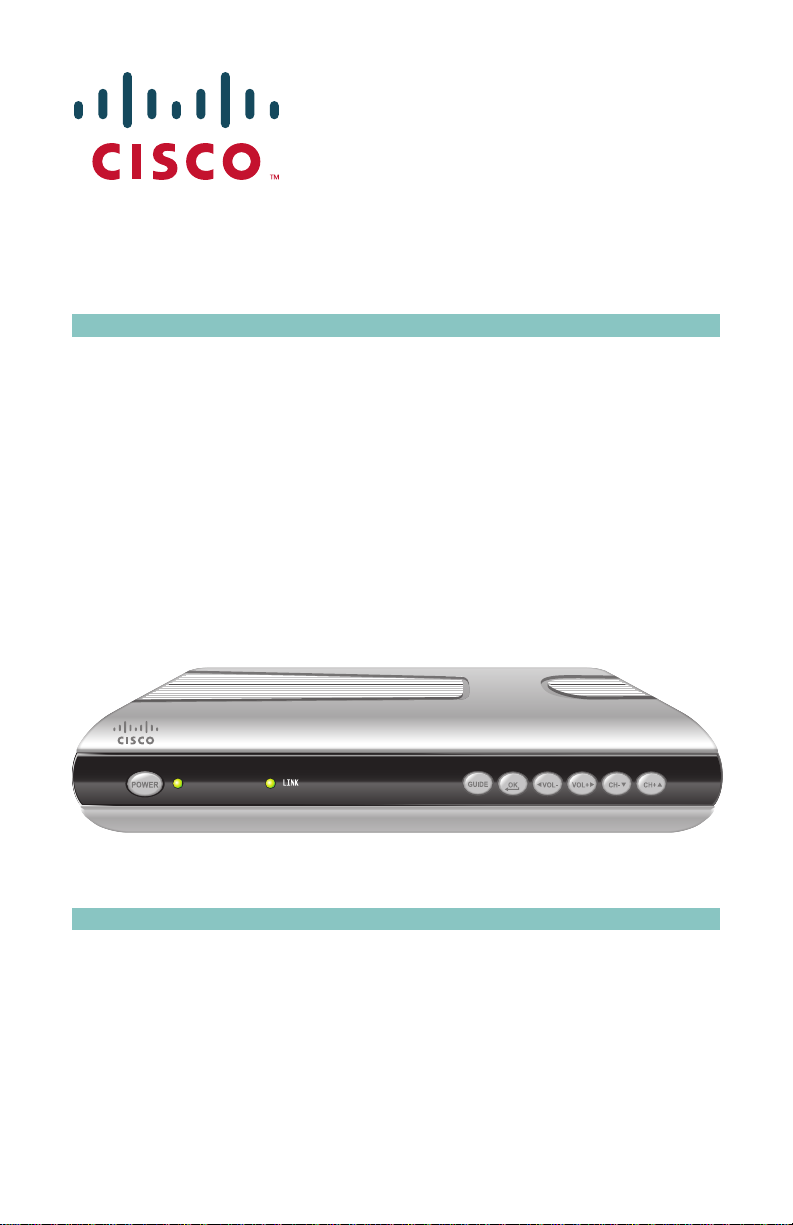
What’s on the Front Panel?
12 3456 7
1 Power Turns the set-top on and off
2 LED Illuminates green when the set-top is on
3 LINK Illuminates green when there is a linked connection to an
external modem for two-way communication between the
set-top and the service provider (Available on Z70 models)
4 Guide Accesses the Electronic Program Guide (EPG)
5 OK Exits menus
6 Vol-, Vol+ Adjusts volume
7 CH-, CH+ Scrolls through channels
T12718
6
Page 9

What’s on the Back Panel?
TV OutCable In Ethernet
12 4 5 6 73
LR
DC 12V INVideo OutAudio Out
T12719
1 Cable In Connects to the cable that delivers the signal from
your service provider
2 TV Out Provides an RF output. Connects to TV
3 Audio Out L/R Connects to left/right audio of TV
4 Video Out Connects to video input of TV
5 SIM Card Reader Reserved for future use
6 Ethernet Connects to Ethernet-equipped device
(Available on Z70 models)
7 DC 12V IN Connects to an external power supply
7
Page 10

R
Connecting the Set-Top
To connect your set-top to your entertainment devices, complete these steps.
Connect your TV to the set-top. (See connection diagram.)
1
Plug the set-top and the TV into a power source that is not controlled
by a wall switch.
2
POWE
Do not turn on the set-top or TV yet.
3
Wait for the green LED to illuminate. It may take several minutes for
the set-top to receive the latest software, programming, and service
information.
4
Press POWER on the remote control.
5
The fi rst time you turn on the set-top, the Setup Wizard will start.
Read and follow the directions on the screen to get your set-top
ready for use.
6
8
Page 11

Connecting to a TV
WARNING:
Electric shock hazard! Unplug all electronic devices before connecting or
disconnecting any device cables to the set-top.
Back of Z70DVB
Cable
Input
Back of TV
T12720
TV OutCable In Ethernet
CABLE IN
LR
AUDIO
IN
AUDIO
AUDIO
OUT
OUT
VIDEO
IN
RL
VIDEO
VIDEO
OUT
OUT
DC 12V INVideo OutAudio Out
T o Power
Receptacle
9
Page 12

Watch TV
When you turn on the set-top, you will
see a screen similar to this one until the
set-top has downloaded the latest
programming information.
Setup Wizard
The fi rst time you turn on the set-top, you
will see the Setup Wizard window. In the
Setup Wizard you can select the
language and screen settings for your
set-top.
Read and follow the directions on each
screen of the Setup Wizard.
If you want to change any of the settings
at a later time, you can access the Setup
Wizard by pressing the Setup key on the
remote control.
Set Parental Control PIN
To set the Parental Control PIN, press
the Setup key on the remote control and
access the Expert Setup option. The
fi rst time you select this option, you must
enter the Default PIN number (4321).
The next time you access the Expert
Setup option, you can enter a new PIN
number that is more meaningful to you.
Remember the PIN you choose because
you will use it to block and unblock TV
programs or channels for viewing.
Press the number keys on the remote
control to enter your PIN number, and
then press the OK key on the remote
control.
10
Page 13

Revert to Factory Settings
All of your setup choices will be erased if you choose the Revert to Factory Settings
option.
Navigator Bar
The Navigator Bar displays information about current and future programs.
To access the Navigator Bar, press the NAV key on the remote control.
Current Channel
Selected
Channel
Name
Selected Favorite
Branded Logo
Unblock a
Blocked Program
Display Program Information
Current
and Next
Programs
Current
Program
Status Bar
Display Options
Color-Coded Options
The selection options at the bottom of the Navigator Bar
(and on several other screens) are color-coded to match
these four keys on your remote control. To access your
selection, press the color-coded key on the remote
control.
Audio
Indicator
Current Time
Parental
Control Rating
Order a
PPV Event
T12717
T12722
11
Page 14

Block and Unblock Channels
You will see the Channel Blocked window
when you tune to a program that is
blocked by Parental Control Rating.
To unblock the program, press the colorcoded key on the remote control, and
then enter your four-digit Parental
Control PIN in the PIN Entry window.
Program Information
To access program information, press the
color-coded key on the remote control.
The Info window displays detailed
information about the current program.
Press the right arrow key to scroll to
information about the next program.
Options
To access the Options window, press the
color-coded key on the remote control.
The Options window displays selectable
audio and video settings for the current
channel.
12
Page 15

Pay-Per-View Events
To purchase a pay-per-view (PPV) event,
press the color-coded key on the remote
control.
In the Pay-Per-View Event window scroll to
the event (program) you want to purchase.
Read and follow the instructions for
ordering the event.
Each event needs to be purchased through
a call center or by sending a text message
through your mobile phone. Contact your
service provider for more information on
how to order a PPV event.
Read and follow the instructions in the
Confi rm PPV Purchase window to order
the event.
Then, select the Yes, I have ordered!
option by pressing the color-coded key
on the remote control to confi rm your
purchase. A program reminder (timer) will
be automatically set for this PPV event.
If you press the Exit key on the remote
control, this indicates that you do not
intend to purchase the event.
When it is time for the event to start, a
message appears on the screen 30
seconds before the start of the event.
Y ou have the option to tune to the channel
or to cancel the timer. The event will
automatically begin if you do not press OK
on the remote control within 30 seconds.
13
Page 16

Electronic Program Guide
The Electronic Program Guide (EPG)
displays channel program schedules for
the current and future days.
Use the arrow keys and the OK key on
the remote control to scroll through the
guide and select the program you want to
view.
Use the color-coded keys on the remote
control to access the list of your favorite
channels, program schedules for the
previous or next day, or the timer screen
for program reminders.
Favorite List
To access the Favorite window, press the
color-coded key on the remote control.
To add, change, delete or move programs
or channels in the list or to edit the Favorite
list, press the color-coded key on your
remote control.
To select a favorite program, scroll through
the list and then press OK.
If the set-top is in Radio mode, you will see
a list of favorite radio channels.
14
Page 17

Program Reminders
You can set a timer to remind you that a
specifi c program is about to begin or to
record a program.
You can access the Timers window from
the EPG or from the Info window by
pressing the color-coded key on the
remote control.
If you set a reminder from the program
Info window, all relevant information about
the reminder is automatically fi lled in when
the Set Reminder window is displayed.
When it is time for the event to start,
a message appears on the screen 30
seconds before the start of the event.
You have the option to tune to the
channel or to cancel the timer.
The event will automatically begin if you
do not press OK on the remote control
within 30 seconds.
15
Page 18

Troubleshooting
If the set-top does not perform as expected, the following tips may help. If you need
further assistance, contact your service provider.
No Picture
• Plug the TV and set-top into an electrical outlet that is not controlled by a wall
switch.
• Verify that all cables are properly connected.
• Verify that the Power to the TV is turned on.
• Verify that the TV is set to the proper input channel.
No Color
• Verify that the current TV program is broadcast in color.
• Adjust the TV color controls.
• Verify that all audio and coaxial cables are properly connected.
No Sound
• Verify that the TV and set-top are properly connected to an electrical outlet.
• Verify that all cables are properly connected.
• Verify that the TV is set to the proper input channel.
• Verify that the volume is turned on.
16
Page 19

17
Page 20

Trademarks
Scientifi c Atlanta is a registered trademark of Scientifi c-Atlanta, Inc.
Z60DVB and Z70DVB are trademarks of Scientifi c-Atlanta, Inc.
Cisco, Cisco Systems, and the Cisco Systems logo are registered trademarks of Cisco
Systems, Inc. and/or its affi liates in the U.S. and certain other countries.
All other trademarks shown are trademarks of their respective owners.
Disclaimer
Scientifi c-Atlanta, Inc. assumes no responsibility for errors or omissions that may appear in
this guide. Scientifi c-Atlanta, Inc. reserves the right to change this guide at any time without
notice.
Scientifi c Atlanta, A Cisco Company 770.236.5000
5030 Sugarloaf Parkway www.scientifi catlanta.com
Box 465447
Lawrenceville, GA 30042
Product and service availability are subject to change without notice.
© 2007 by Scientifi c-Atlanta, Inc. All rights reserved.
May 2007 4015101 Rev B
 Loading...