

Schwinn SRB-1500 Owner's Manual

-dD.
H
5,c;Hw'Nr{.rrsfT'ntrffisffi
E
XlWo
Schwinn Fitness. 1886 Prairie
Wav. Louisville. CO 80027
O 2002 Schwinn Fitness . SCIIWINNFITNESS.COM . 1.877.417.0519
|={rEas
,ffi\
IT
iY,
ttJ
#*
qs..
s
M
;s'!
M
llrl1il
SRB-'-sOO
FEATURES
AND
BENEFTTS
ffir
I
ffi
tw-l
ffi
W
l%n!
lw.]
l!
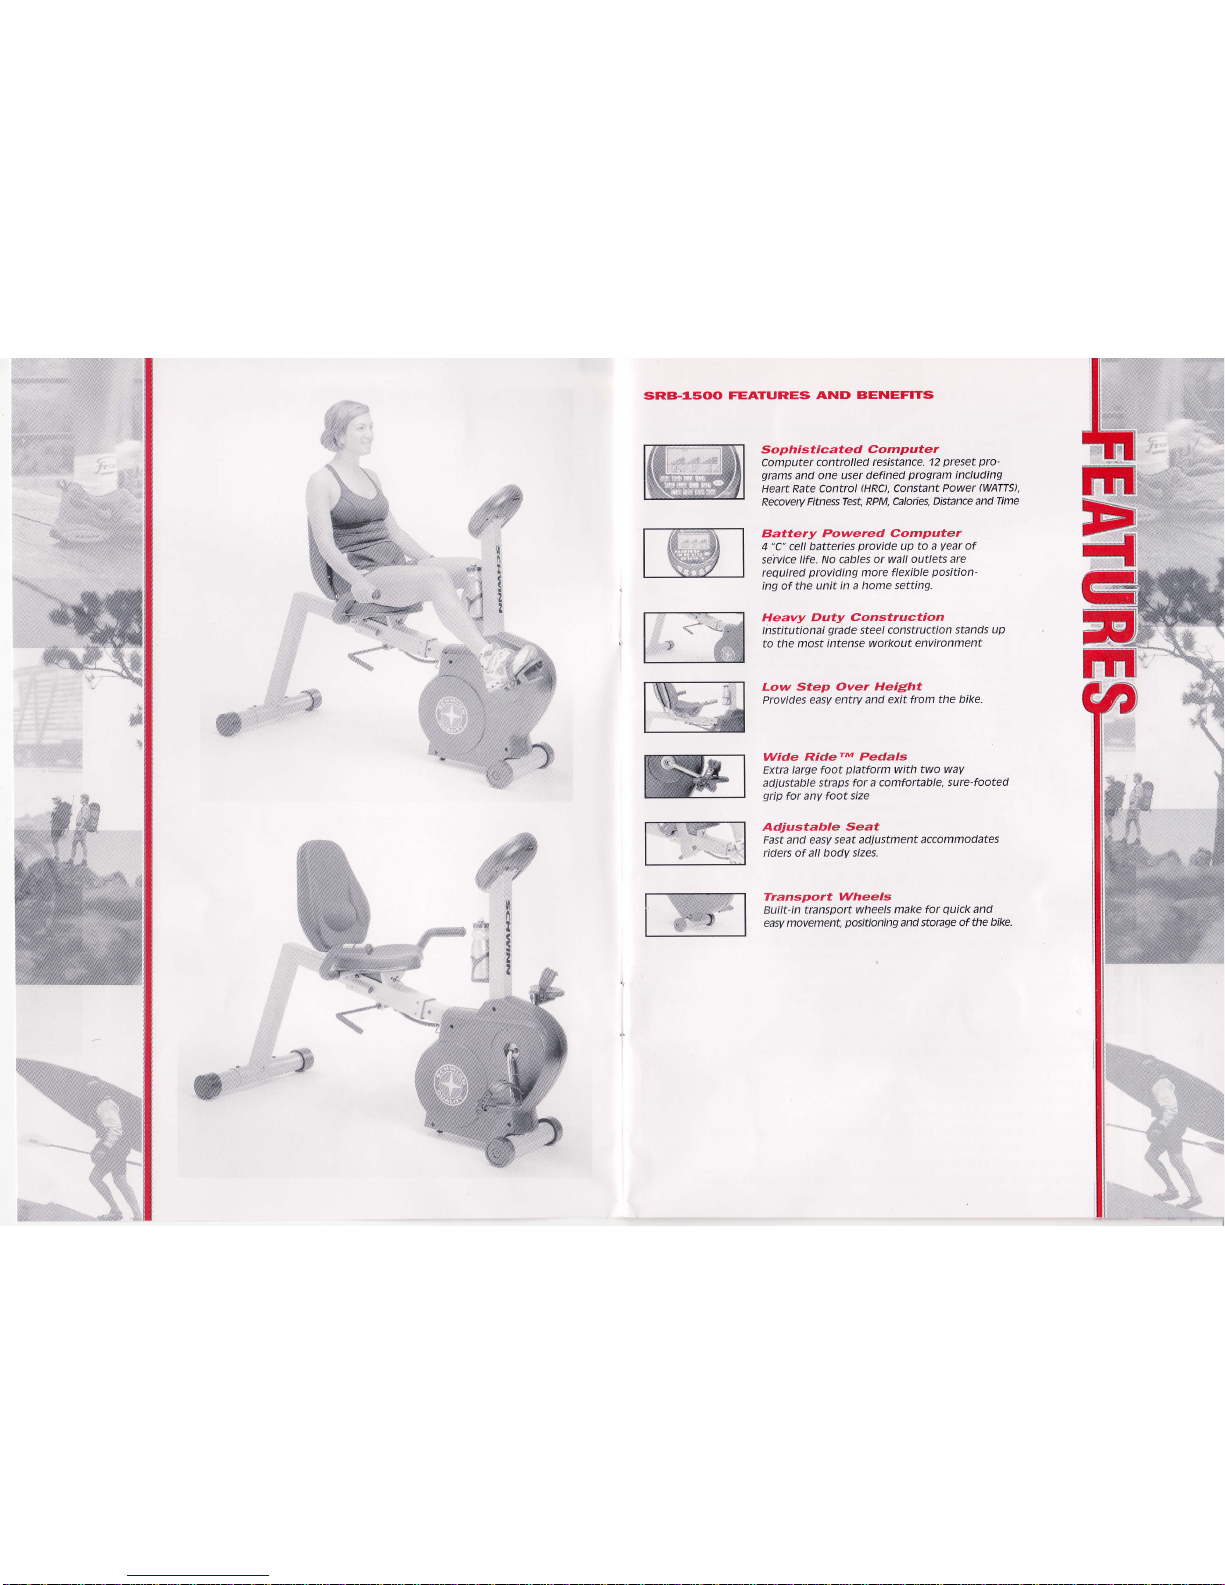
Sophisticated
Computer
Computer controlled
resistance.
12
preset pro'
grams
and one user defined
program
including
Heart Rate control
(HRO,
constant
Power
(WATT9,
Recovery
FitnessTest,
RPM, Calories, Distance
and Time
Battery Powered
Cornputer
4
"C"
cell hatteries
provide
up to
a
Vear
of
seivice
life. No cables or
wall outlets are
required
providing
more flexible
position'
ing of the
unit in a home setting.
Heavy Duty Construction
lnstitutionai
grade
steel construction
stands up
to the
most intense
workout environment
Low
Step Over Height
Provides easy entry and
exit from the
bike.
Wide
RideTM Pedals
Extra large foot
platform
with two
wav
adjustable
straps for a comfortable,
sure-footed
grip
for anv
foot size
Adjustable
Seat
Fast and easv seat adjustment
accommodates
riders of all
body sizes.
Transport Wheetrs
Built-in transport
wheels make for
quick
and
easy movement,
positioning
and
storage of the
bike.
GONGRATULATT('NS!
Thank
you
for
making the Schwinn SR8"1500 exercise bike a
part
of
your
exercise
program.
For many
years
to come,
you
will
be
able to rely on the
quality
of schwinn's craftsmanship and dura-
bility.
We have included
some
general
fitness
guidelines
for
your
use and hope
you
will find the information valuable in
assisting
you
in
your pursuit
of a healthy lifestyle.
The
SRB-1500 exercise bike will enable
vou
to customize and
monitor
your
workouts to:
A Increase
your
enerEly level
A Increase cardiovascular and aerobic fitness
A Increase lower body muscle stren$th
V Decrease
your
overall
percentaEle
of body
fat
Whether
you
are
just
getting
started in an exercise
program
or
are
already
physically
fit,
the
sRB-1500 is
designed to be an efficient, easy and enjoyable way to achieve an improved level of fitness. You
can exercise
your
way
to a more fit and healthy body.
The on-board digital computer enables
you
to accurately
monitor
your progress
by tracking time, distance, speed, calories, RPMS,
calories
per
hour, load and heart rate.
This owner's Manual contains all the information
you
need to
operate and enjoy
your
SRB-'1500 exercise bike. Please read the
manual in its entirety before attempting
to exercise on the
SRB-1500. Let's
get
started.
FITNESS SAFEGUARDS
Before starting any exercise
program,
c0nsult with
y0ur physician
0r health
professional.
He 0r she can help
establish the exercise frequency, intensity
(target
heart rate zone)
and time appropriate
for
your
particular
age and conditi0n. lf
you
have any
pain
0r tightness in
your
chest, an irregular heartbeat, shortness 0f
breath, feel faint 0r have any discomfort while
you
exercise, ST0P! Consult
your physician
before continu'
Ing.
l,vARNTNG
Failure t0 f0llow any 0f these satuguards may result in injury 0r serious health
pr0blems.
.
D0 not
place
fingers 0r any other objects into moving
parts
0f the
exercise equipment.
.
Keep children and
pets
away from the bike.
A child's curiosity may result in injury
.
Do not
allow children to use the SRB-1500 bike.
The machine
is
designed
and
intended for
adults,
not
children.
.
Never turn
pedal
crank arms by hand. T0 avoid enhnglement and
possible
injury d0 not expose
hands 0r arms t0 the drive mechanism.
.
D0
not dismount the SR8.1500 bike until the
pedals
are at a complete SToP
.
Warn
bvstanders t0
keep
a safe dishnce.
Do not
allow an\/one to touch the bike while it is in operation
TABLE OF
C('NTENTS
Operation....-..
....................6
How
to use the sRB-'1500
exercise bike.................................................6
How to use the
sRB-1500 exercise
bike computer........................7-15
Maintenance.
..............16
..............1 6
Moving
your
SRB-'1 500 exercise
bike...............................
A balanced
workout................
............22
warm up
...................22
Aerobic/strength
exercise ......
................................-...22
cool down......
....-.-...23
How to determine
your
maximum heart
rate...................................23
Target
heart rate training
zones ...............
................23
Beating
the dropout odds:
Jump start
your
fitness
program
.......24
summarv of surgeon
ceneral's
Report on
physical
activity
and health
.............24
Make exercise
a habit.............
............-..25
lt's
never too late
for fitness
...........26
Suggested
readings
........-.................26
Schwinn
Fitness
Limited Warranty .............................-27
H('vl' T('
USE THE
SRB.1sOO
EXERCISE
BII(E
IltG-l
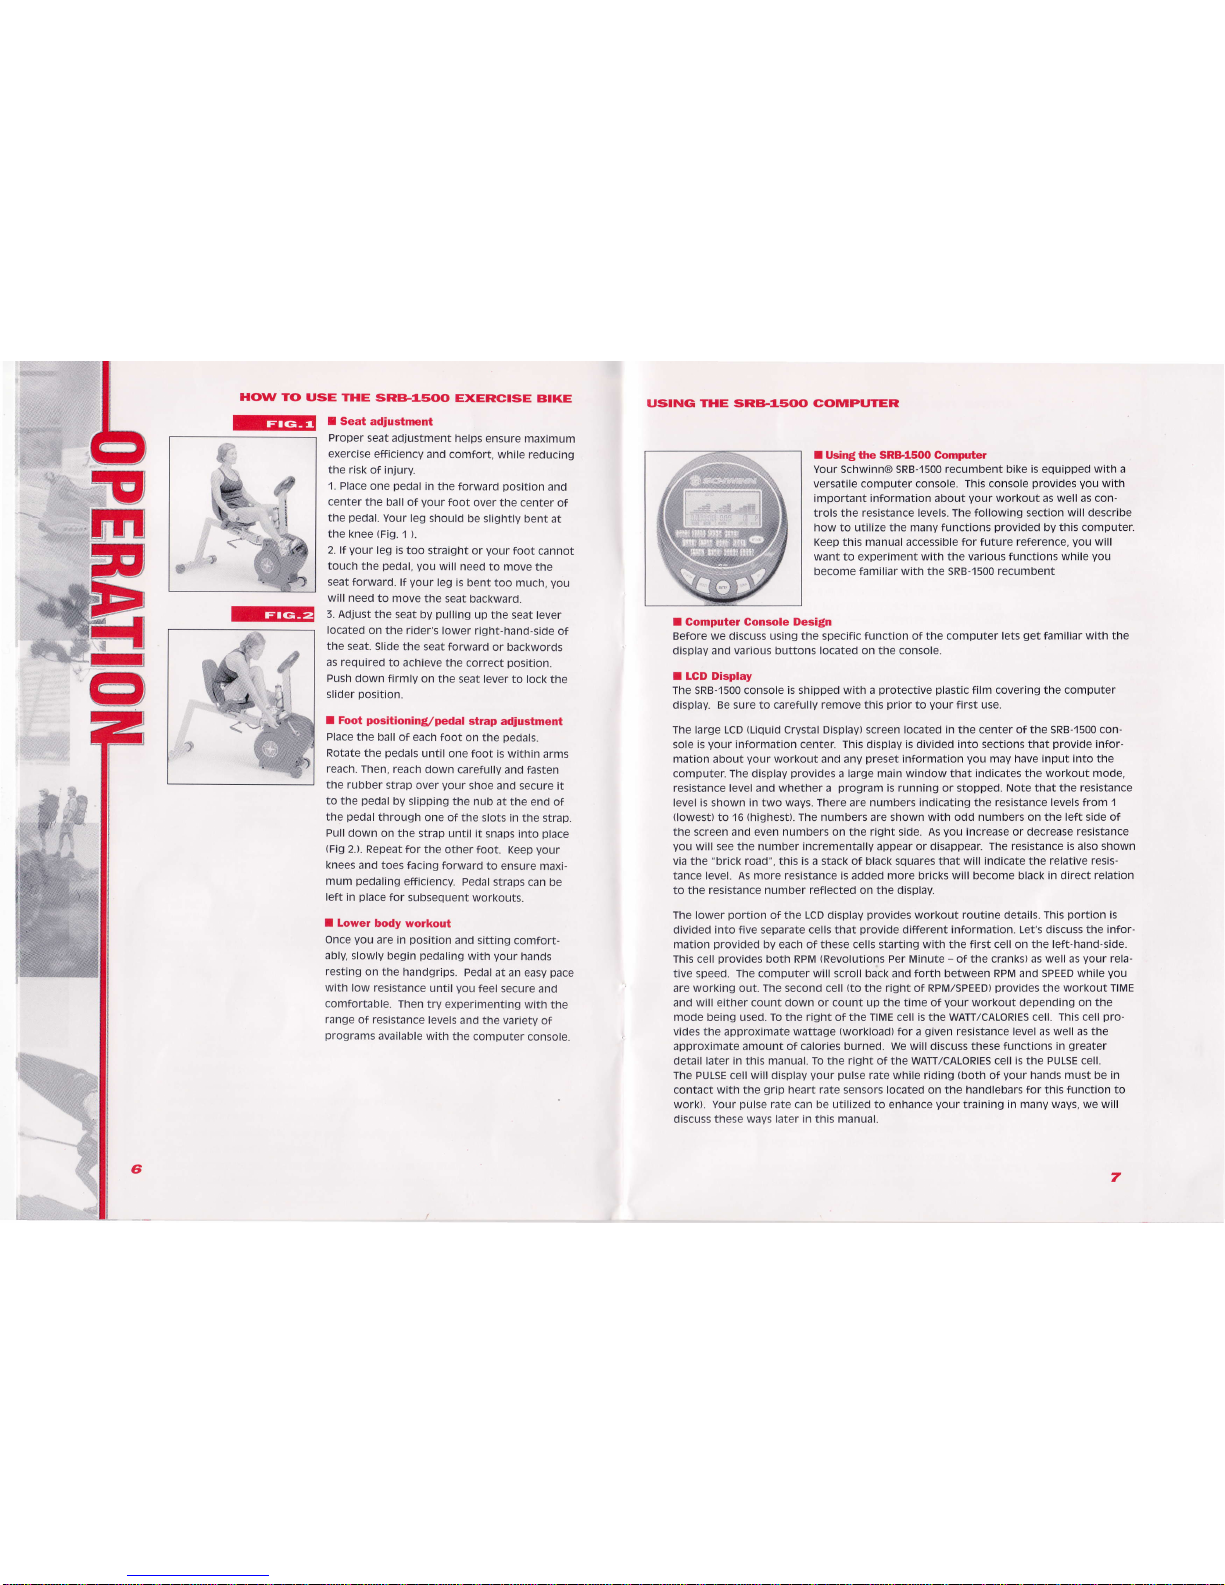
I
Seat adjustment
Proper
seat
adjustment helps
ensure
maximum
exercise efficiency
and comfort,
while reducing
the
risk of injurV.
1. Place
one
pedal
in
the forward
position
and
center the
ball of
Vour
foot
over the
center of
the
pedal.
Your
leg should
be slightlv
bent at
the
knee
(Fig.'1
).
2. lf
your
leg is
too straight
or
Vour
foot
cannot
touch
the
pedal,
you
will need
to move the
seat forward.
lf
your
leg is bent
too much,
you
will need to
move the
seat backward.
3. Adjust the
seat by
pulling
up the seat
lever
located
on the
rider's lower
right-hand-side
of
the
seat. slide
the seat forward
or backwords
as required
to achieve
the correct
position.
Push
down firmlV
on the seat lever
to lock
the
slider
position.
I Foot
positioning!/pedal
strap adjustment
Place
the ball
of each foot
on the
pedals.
Rotate
the
pedals
until one
foot is within
arms
reach. Then,
reach
down carefully
and fasten
the rubber
strap over
your
shoe and
secure it
to the
pedal
by slipping the
nub at the
end of
the
pedal
through
one of the
slots in the
strap.
Pull
down on the
strap until it
snaps into
place
(Fig
2.).
Repeat for
the other foot.
Keep
your
knees
and toes facing forward
to ensure maxi-
mum
pedaling
efficiency.
Pedal straps
can be
left
in
place
for
subsequent
workouts.
I
Lower body
workout
Once
you
are in
position
and
sitting comfort-
ably, slowly
begin
pedaling
with
vour
hands
resting
on the
handgrips.
Pedal at an
easy
pace
with
low resistance
until
you
feel secure
and
comfortable.
Then
try experimenting
with
the
range
of
resistance
levels
and
the varietv of
programs
available with
the computer
console.
USING THE SRB.'-sOO G('MPUTER
I
Using the SRe1s(X) Computer
Your schwinn@ sRB-1500 recumbent bike
is
equipped
with a
versatile computer console.
This console
provides you
with
important information about
your
workout
as
well
as con-
trols the
resistance levels. The following section will describe
how
to
utilize the many functions
provided
by this computer.
Keep this manual accessible for
future reference,
Vou
will
want to experiment
with
the
various functions while
vou
become
familiar with the SRB-1500 recumbent
I Computer Console DesiEln
Before we
discuss using
the
specific
function of the computer lets
get
familiar
with
the
displav and various buttons located on the console.
I LCD Display
The
SRB-1500 console
is shipped with a
protective
plastic
film covering the computer
displav. Be sure to carefully remove this
prior
to
your
first use.
The large LcD
(Liquid
crvstal Display) screen
located in
the
center ofthe sRB-1500 con-
sole is
your
information
center.
This
display
is dividecl into sections that
provide
infor-
mation about
Vour
workout and any
preset
information
you
may have input
into
the
computer. The display
provides
a large main window that
indicates the workout mode,
resistance level
and
whether a
program
is running or stopped. Note that the
resistance
level is shown in two ways. There are numbers indicating the
resistance levels from 1
(lowest)
to'16
(highest).
The numbers are
shown
with
odd
numbers on the left side of
the screen
and
even
numbers on the right side. As
you
increase or decrease
resistance
you
will see the number incrementally appear or disappear.
The resistance is also shown
via the
"brick
road", this is a stack of black squares that
will indicate the relative resis-
tance
level.
As
more resistance is added more bricks will become black in direct relation
to the resistance number reflected on the display.
The
lower
portion
of the
LCD
display
provides
workout routine details. This
portion
is
divided
into five
separate
cells that
provide
different information. Let's discuss the
infor-
mation
provided
by each of these cells starting with the first cell on the
left-hand-side.
This cell orovides both
RPM
(Revolutions
Per Minute - of the cranks) as well as
vour
rela-
tive speed. The computer will scroll back and forth between RPM and SPEED
while
you
are working out. The second cell
(to
the right of
RPM,/SPEED)
provides
the workoutTlME
and
will
either count
down
or
count up the time of
Vour
workout depending on the
mode being usecl. To the right of the TIME cell is the wAfi/cALoRlEs
cell. This cell
pro-
vides
the approximate
wattage
(workload)
for a
given
resistance level as well as the
approximate amount of calories burned. We will discuss these functions
in
greater
detail later in this manual. To the right of the wATT/cALoRlEs cell
is
the
PULSE cell.
The PULSE cell will displav
your pulse
rate
while
riding
(both
of
your
hands must be in
contact with the
grip
heart rate sensors located on the handlebars for this
function
to
work). Your
pulse
rate
can be utilized to enhance
your
training
in manv ways, we will
discuss
these wavs later in this manual.
I-tG-r
=#"
'M
<\Js
"dF
#ft
i
lii
tr,l i
"l!'
7
,l
tu
ru
HFT
USING
THE
SRB.'-sOO
C('MPUTER
I Buttons
There
are
six buttons
located
direcflv on
the front
of the
SRB-'1500
Console,
thev are,
ST/STOP
(Start/Stop),
RESET,
ENTER, UP,
DOWN
& RECOVERY.
Let's
discuss
the basic
function
of each of
these
buttons.
sT/sToP
is the START
and
sTop button
that
you
will
use to
begin, end
or
pause a pro-
gram.
RESET
can be
used to simply
reset
a
pro-
gram,
or it can
be
pushed
for 2 seconds
or more
to do a full
reset of
the computer.
A full reset
will
clear certain
user
information
that
you
may
have input
into
tne
computer.
ENTER
is used
to select a function
and accept
information
that
you
have
programmed
into
the computer.
The UP
and the DOWN
buttons
are
used to
scroll up through
program
modes,
to
increase
or decrease
resistance
ancl to
select
user
provided
information
during
programming.
The
RECOVERY
button
is located
separatelv
from
the other
but-
tons and
provides
access to
a fitness
test that will
allow
you
to
gauge your
general
fitness
level
and track
your
improve-
ments
over time
(based
on
your
bodies ability
to recoverv
from
phVsical
exertion).
I Program
Profiles
You
will
notice
'12
different
program
profiles
listed
on the
front
of the
sRB-1500
console.
Each of
the
profile
pl
through
P12 represents
a different
workout
routine
that is
prepro-
grammed
into the
computer.
you
mav
find these
profiles
helpful
in
deciding
which
preprogrammed
profile you
would
like
to use. You
will
access these
profiles
through
the
pRo-
CRAM
mode in
the computer,
not
bV
pushing
on the
profile
pictures
provided
on
the front
of the console
I Program
Modes
Your
SRB-1500
computer
provides
four
basic workout
modes,
MANUAL,
PROCRAM,
USER and TARCET
H.R..
Each mode
Dro.
vides
many options
for
customizing
your
workout.
The
manV
options
provided
will
become
more familiar
and
useful to
Vou
as
you
spend
time
eletting
to know
your
new
schwinn@
sRB-
1500
recumbent.
Below we will
discuss
how to
access and
use
each
of these
modes
and the various
sub routines
thev
con-
tain. In
order to
make this learning
process
as
simple as
possi-
ble we will
alwavs
start our discussion
from
the
,,start-uo"
screen
on
your
computer.
This is
the screen
that
you
first
see
wnen
you your
computer
powers
up.
you
can
simply
push
any of
the buttons
to
power
up the computer
or
get
on the
bike
and start
pedaling.
tf
at anv
time
you
want
to return
to
the start-up
screen,
simply
push
the RESET
button
and hold
it
for
at least 2
seconds,
this will
perform
a full
reset and
return
you
to the start-up
screen.
USING
THE SRB-'-sOO C(,MPUTER
I Mode:
Function:
Manual mode
provides
a
very simple way of controlling the resistance.
For a simple
workout routine,
with only the resistance level to adjust,
this is the
program
to use.
How to use this mode:
1. From the start-up screen
push
the uP button one time so the
MANUAL mode is flashing
2. Push ENTER once to
select the MANUAL mode.
3. Push the uP button to select the
resistance level from 1
(easiest)
to
16
(hardest).
4. Push the ST/STOP button
to begin the
program.
You
will notice that the flashing
6
icon in the upper left-hand corner of the
LCD
display
will disappear. This indicates
(l
that the
program
is running.
5. You may adjust the resistance
level bV using the UP or DOWN buttons
at any time
during the
workout.
6. You may
pause
the workout bv
pushing
the sT/sToP once. Restart the
program
from
where
Vou
left off by
pushing
the ST/STOP again.
r Mode:
ItrNm
*
rrfiIr
sub-routine
Function:
This mode will allow the user to
program
a specific
workout time while riding
in the
Manual mode. The computer
will
count
down the workout time until
the
clock
reaches
zero. When the clock reaches
zero an alarm will sound to notify
you
that
you
have
reached the desired time limit.
How to use this
mode:
1. From
the
start-up screen
push
the UP button one
time so the MANUAL mode
is flash-
ing
2. Push ENTER once to select
the MANUAL mode.
3- Push the uP button to select the resistance
level from 1
(easiest)
to
16
(hardest).
4. Push ENTER once to select
TIME sub-routine
(TIME
will flash).
5.
Push
the
uP button to select the length of time
for the work out.
6. Push the ST/STOP button to begin the
program.
You will notice that the
flashing
rl
icon
in
the
upper left-hand corner of the LCD display
will
disappear.
This indicates
(l
that the
program
is running.
7. You mav adjust the resistance level by using the UP or
DOWN
buttons
at any time
during the workout
8.
You
mav
pause
the workout by
pushing
the sT/sToP once. Restart the
program
from
where
you
left off bV
pushing
the ST/STOP again.
9
ffi
USTNG THE SRB.'.sOO
C('MPUTER
rMode:
tmlm * fiIlflfilf,]
sub-routine
Function:
This mode will
allow the user to
program
a specific workout distance while rid-
ing in
the Manual mode. The
computer will count down
the miles until the
user-defined
distance is reached. The
computer will sound an alarm
to notifv
you
that
you
have reached
your goal.
How
to use this mode:
1. From
the start-up screen
push
the UP button one time so
the
MANUAL
mode
is flashing
2. Push ENTER
once to select
the
MANUAL
mode.
3. Push the
UP button to select the resistance level
from't
(easiest)
to'16
(hardest).
4. Push ENTER twice to
select DISTANCE sub-routine
(D|STANCE
will ftash).
5. Push
the UP button to select
the
DISTANCE
(
in .01 mile increments) for
the work out.
6. Push the ST/STOP button
to begin the
program.
You will notice that
m
the flashing icon in
the upper left-hancl corner of
the
LCD
displav wiil dis- rl
appear. This indicates that
the
program
is running.
7. You may
adjust the resistance level by using
the UP or DOWN buttons
at anv
time during the workout
8. You may
pause
the workout by
pushing
the ST/STOP once. Restart
the
pro-
gram
from where
you
left off by
pushing
the
ST./STOP again.
rMode:
tmm * rtfiTrilffi
sub.routine
Function:
This
mode will allow
the user to
program
a specific calorie
target while riding
in the
Manual mode. When
the user-defined calorie target is reached
the com-
puter
will
sound an alarm to notify
you
that
Vou
have reached
your goal.
The
computer uses
preprogrammed
software to calculate the
estimated calorie
burn rate for
your
workout. This is
dependent on many factors such
as
resis-
tance level and
pedal
RPM.
How
to use this mode:
1. From the start-up
screen
push
the UP button
one time so the MANUAL
mode
is flashing
2. Push ENTER
once to select the MANUAL mode.
3. Push the
UP button to select the resistance level from
'l
(easiest)
to 16
(hardest).
4. Push ENTER
three times to select CALORtES sub-routine
(CALOR|ES
wiil ftash).
5. Push the UP button
to select the CALORIE target for the work
out.
USING THE SRB.'.sOO
G('MPUTER
6. Push the
sT/sToP button to begin the
program.
You
will notice that the
flashing icon in the upper left-hand
corner of the LCD display
will disappear.
This indicates that the
program
is running.
7. You
mav
adjust
the resistance level
by using the uP or
DowN buttons at any
time during the workout
8. You may
pause
the workout by
pushing
the sT/sToP once.
Restart the
pro-
gram
from where
you
left off by
pushing
the ST/STOP
again.
rMode:
ffmlm
*
Um
sub-routine
Function:
This mode will allow the
user to
program
a specific
constant WATT
(wattage)
target
while riding in the Manual
mode. A WATT is a measure
of workload simi-
lar
to
horsepower
(in
fact'l
horsepower is equal to
746 wATTs). This
program
will allow the user to determine
a constant
WATT load for the workout.
The
computer
will
slowly
adjust the resistance
level automatically to achieve
the
desired
Wattage load. lf
pedal
RPM slows down the computer
will increase
the
resistance level to
maintain the target wattage.
lf
pedal
RPM increases
the
computer
will decrease the resistance to
maintain the target
wattage. This
program
is a very
powerful
training
tool that will assure the
user maintains the
desired workout intensitv
throughout the entire duration.
lf for some
reason
the computer
cannot reduce the
resistance level sufficiently
to bring the users
WATT level down to the
preset
amount an alarm
will
sound
indicating an
"over
Wattage situation".
lf the user does not slow
their
pedal
RPM sufficiently
enough to
reach the target WATT
mount after 3 minutes the computer
will
shut off.
How to use this
mode:
'1.
From the start-up screen
push
the uP button one time
so the MANUAL
mode is flashing
2. Push
ENTER
once
to select the MANUAL
mode.
3. Push ENTER four more times
to select WATT sub-routine
(WATT
will flash).
4. Push the uP button
to select the WATT target
for the work out
(adjusted
in 5
WATT increments).
5. Push the sT/sToP
button to begin the
program.
You will notice that
tne
f7,l
flashing icon in the upper left-hand corner
of the LcD display
will disappear.
fll
This indicates that the
program
is running.
6.
Resistance levels for the workout are
controlled by the computer
and will
adjust automaticallV.
7. You
may adjust the constant WATT target during
the workout by
pushing
the STlsToP
button once to
pause
the
program,
then
push
the UP
or DOWN
buttons to
select the new target WATT value. Push
the sT/sToP button again
to restart the routine.
iru
:+' r"
;,1;ii.:.j
;r,li1
'iu
*
USTNG THE SRB-'-sOO
C()MPUTER
rMode:
tfimm
*
IlllT[l
sub-routine
Function:
This
mode will allow the user to
program
a
specific
pulse
target while riding in
the Manual mode. When
the user-defined
pulse
target is reached
the comput-
er will sound an alarm to notify
you
that
you
have
reached
your goal.
In this
program
the computer will not make adjustments
to
the resistance
level to
effect
your
heart rate, it will
onlv
notify
you
that
your preset
heart rate value
has been reached.
How
to use this mode:
'1.
From the start-up screen
push
the UP button one time so the MANUAL
mode is flashing
2. Push ENTER
once to select the MANUAL mode.
3. Push the UP button to
select the
resistance
level from 1
(easiest)
to 16
(hardest).
4. Push ENTER five times to select PULSE sub-routine
(PULSE
will flash).
5. Push
the UP button to select the
pulse
target for the work out.
6. Push the
ST/STOP button to begin the
program.
You will notice that ffie
m
flashing icon in the upper left-hand corner
of the LCD displav will disappear.
fI
This indicates
that the
program
is running.
7. You may actjust the resistance level
by using the UP or DOWN buttons at any
time during the workout
8. You may
pause
the workout by
pushing
the ST/STOP once. Restart the
pro-
gram
from where
you
left
off by
pushing
the sT/sToP again.
9. In order for the computer to accurately display
your pulse
rate
please
make
sure
your
hands remain in
contact
with
the
grip
heart rate sensors located on
both sides of the handlebar. You must be holding
both
for
the system to dis-
play your
heart rate.
I Mode:
Function:
This
mode will allow the user to select one of the 12
preprogrammed profile
stored in
the computer. You may reference the
program
number and
profile
printed
on the front of the computer. Each
program provides
a different
workout
routine that is fully automatic and controlled by the
computer.
The
user can increase the level
of the
resistance
if desired, these adjustments will
effect the entire
profile
therefore raising the resistance
throughout the entire
workout
routine. As the routine
progresses
a flashing column
of bricks on the
display will note
the
rider's location within
the
profile.
When the end of the
brick road is reached the routine will continue from the beginning.
USING
THE SRB-'-sOO C('MPUTER
How
to use
this mode:
1. From the start-up screen
push
the UP
button two times so the PRoCRAM
mode is flashing
2. Push ENTER once to select the PROCRAM
mode.
3. Push the uP button to select the
PRooRAM number P1 - P12
4. Push the ST/STOP button to begin the
program.
You will notice that the
fttt
flashing icon in the upper left-hand corner of
the LcD display will disappear.
fI
This indicates that the
program
is running.
5.
You mav
adjust
the resistance level by using the UP or DOWN buttons at anv
time during the workout. This adjustment
will
effect the entire
profile
not
just
the current setting.
6.
You may
pause
the
workout bV
pushing
the ST/STOP once. Restart the
pro-
gram
from where
you
left off by
pushing
the ST/SToP again.
I Mode:
Function:
This mode will allow the user to create one's
own
program
profile.
This user
created
program
will remain in the memory until the nextfull
reset is
per-
formed
(RESET
oushed and held for 2 seconds or
more). This mode allows for
great
creativity in designing one's unique
workout routines.
How
to use this
mode:
1. From the start-uo screen oush the UP button three times so
the usER mode
is flashing
2. Push ENTER once to select the USER mode.
3. Push the uP button to select the resistance
level for the first segment
(col-
umn).
lf
Vou
wish to
reduce the level
push
the DOWN button. Once the desired
resistance for the first segment of the brick road
is
determined
press
ENTER.
4. Push the UP button to set the resistance
level for the second segment in
the brick
road
using
the same
process
listed above. Repeat this
process
until
all 16 columns of the brick road have been
programmed.
5. Push the sT/sToP button to begin the
program.
You will notice that the
fi,t
flashing icon in
the upper
left-hancl corner of the LcD display
will
disappear. tl
This inclicates that the
program
is running.
6. You may adjustthe
resistance level by using the uP or DOWN buttons at any
time during
the workout, This adjustment will effect only the column of
the
profile
currentlv in use.
7.
You mav
pause
the workout bV
pushing
the ST/STOP once. Restart the
pro-
gram
from where
Vou
left off by
pushing
the ST/STOP again.

USING THE SRB.1sOO C('MPUTER
rMode:
Iffirilfli[l
Function:
This mode will allow the user to
preset
a target workout heart rate. The com-
puter
will
provide
a
warm
up
period
and then slowly
increase
the
resistance
one level every 30 seconds until the target heart rate is achieved. The com'
puter
will make fine adjustments to the resistance to hold
your
heart rate in
the target
zone.
Changes
in
your
heart rate will
effect
resistance level. There
are several ways to
preset your
target heart rate. The computer will ask
you
your
age and determine
your
theoretical maximum heart rate based on age.
The computer will
provide
Vou
with four
heat rate controlled options. The
three are
percentages
of
Vour
theoretical maximum heart rate $5%,75% or
90%). The forth option is T.H.R.
(Target
Heart Rate) which will allow the user to
enter the exact
heart rate
target desired.
How
to use this
mode:
1. From the start-up screen
push
the uP button fourtimes so theTARCET H.R.
mode is flashing
2. Push ENTER once to select the
TARCET H.R. mode.
3. Push the uP button to select
Vour
age
4. Push ENTER to
program your
age.
5. Push the uP button to select from the four TARCET H.R. options $5%,75%,
90% or T.H.R.). You will notice that the value for each of the 55%, 75V" & 90%
options
is
displayed
in
the
Pulse
cell of the
LCD
screen.
6. lf
you
have chosen one of the
percentage
heart rate amounts,
push
a
sT/sToP to begin the
program.
. You will notice that the flashing icon in the
fl
upper left-hand corner of the LCD display will disappear- This indicates that
the
program
is running.
7. lf
you
chose the T.H.R. option
push
ENTER.
8.
Push the UP and D0WN button to
select
your
target
heart rate value.
9. Push the ST/STOP button to begin the
program.
You will notice that the
m
flashing icon in the upper
left-hand
corner of the LcD clisplay will disappear.
fl
This indicates that the
program
is running.
'10.
You may
paus€
the workout by
pushing
the ST/STOP once. Restart the
pro-
gram
from where
you
left
off by
pushing
the ST/STOP again.
USING THE SRB.AsOO C('MPUTER
I Mode:
Function:
The recoverv mode is a fitness test that will
provide
an indication of
your
rela-
tive fitness based on
your
body's ability
to recover from exercise.
This is
only
a reference and not a
medical
exam.
After completing
your
workout routine
but before
Vour
warm down,
press
the RECOVERY button
on the console to
begin
Vour
60-second fitness test.
During the test, stop exercising but
contin-
ue to hold the
grip
heart rate sensors in
your
hand. Try to
relax and allow
your
bodv to
recover from
your
workout. During the test
the computer will display
a 60-second count down clock.
During
the
60 seconds the computer
will mon-
itor
your
heart rate recoverv and
issue a result at the end of the
test. The
results range
on
a scale from F6
(lowest
level of
fitness) to F'l
(Highest
level of
fitness). use this test as a tool to
gauge your
improvements over time.
There
is little value in
performing
this
test on a daily basis as improvements
in
your
fitness take time.
lt is
generally
not necessary to use
this test more than 2
times a month. People in the F6-F3
fitness level can often make rapid
improvements in their
general
fitness level. People in the F2-F1 category
will
not likely see rapid
improvements in their score due to their
generally
high
level
of initial
fitness.
How to use this mode:
1. After completion of
Vour
exercise routine
push
RECOVERY
to begin the fit-
ness test.
2. Remain seated and
holding both
grip
heart rate sensors
located on the han-
dlebar.
3. During the 60-second test
remain
as
calm and relaxed as
possible
allowing
your
body to recover
from the
physical
activity.
4. At the end of 60-seconds
the test result will display on
the screen, scores
range from F6
(lowest
fitness
level)
to
F1 thighest). Note
your
score
for future
comparison.
Now that
vou
are more
familiar with the many functions of
your
sRB-1500
recumbent bike
its time start achieving
your
fitness
goals!
The next section
provides
some useful information that
will help develop a workout
routine
focused on
your
specific
goals.
I
ll
I
I
ni
=+
iffi
iil
t4
 Loading...