


RANGEHOOD & INSTALLATION GUIDE
UM4220-12S
www.schweigen.com.auRevision V1_170519

Index
1. Welcome 3
Your State Regulatory Authority 3
2. Important Safety Information 4
Before Installation 5
Product Use 6
Ducted or Recirculating? 6
Maintenance and Service 6
Electrical Cord 6
3. Description 7
Rangehood 7
4. Operation 8
Remote Control and Buttons 8
Speed Control 8
5. Cleaning & Maintenance 9
Surfaces 9
Filters 9
Cleaning the Interior 10
Cleaning the Exterior 10
Replacing the Lights 11
Rangehood Size vs Cooktop Size 12
Mounting Instructions 12
6. Installation 13
Ceiling Cassette Installation Guide 14
Optional Bulkhead Installation Guide 15
®
Single Isodrive
Twin Isodrive
Motor Installation 16
®
Motor Installation 17
Ducting 18
Back Draft Fins (For applicable models) 18
7. Condensation Information 19
Cooking with Induction Cooktops 19
8. Troubleshooting 20
Troubleshooting 20
Service 21
Faulty Installation 21
9. Specications 22
Dimensions 22
Technical Specications 22
10. Disclaimer 23
Page 2

1. Welcome
Thank you for purchasing your new Schweigen rangehood.
To get the maximum output from this unit, please read through this guide before use.
The guide contains important information on the use and maintenance of the unit, as well as important
safety notes. This will ensure your personal safety and the lasting value of your rangehood.
We trust that you will enjoy your new Schweigen rangehood.
Please always retain your proof of purchase to aid in any warranty queries.
If you are unable to locate your warranty card, one is available to download from our website
www.schweigen.com.au.
This appliance and its packaging are produced by processes that minimise waste and respect
the environment.
Please help us to continue this eort to protect the environment by using the appliance eciently
and dispose of the packaging in a responsible manner.
Your State Regulatory Authority
Dierent Australian states have varying legislative requirements for the installation of rangehood
ducting. Some will insist on ducting being vented externally (i.e. not in to the ceiling cavity); others
will not. It is imperative that you check with your state building authority and/or private certier
to conrm their position.
Page 3

2. Important Safety Information
WARNING
Please read this section thoroughly before attempting to operate the appliance.
Inspect your product upon receipt. Any damage or defects MUST be reported
within 48 hours, or no claim will be recognised.
DO NOT INSTALL THIS APPLIANCE IF YOU FIND IT DAMAGED.
If this product is installed damaged, neither the supplier, nor the retailer, will be
responsible for the costs associated with the repair, replacement, removal or
re-installation of the appliances.
1. There shall be adequate ventilation in the room when the rangehood is used at the same time
as appliances burning gas or other fuels.
2. There is a re risk if cleaning is not carried out in accordance with the instructions.
3. Do not ambé under the rangehood. This will damage the rangehood and will not be covered by warranty.
4. Do not ignite burners that give o intense, uncontrolled ames beneath the rangehood.
5. Make sure that no ames emerge from the sides of pans.
6. Do not leave packaging materials (bags, corner brackets, etc.) within reach of children.
7. This appliance is not intended for use by person/s (including children) with reduced physical,
sensory or mental capabilities, or lack of experience and/or knowledge. Unless the person has
been given supervision or instruction concerning the use of the appliance by a person responsible
for their safety. Children should be supervised to ensure that they do not play with the appliance,
it is not a toy.
8. Exhaust air must not be discharged into an existing ue that is used for exhausting fumes from
appliances burning gas or other fuels.
9. Air exhaust must be installed in accordance with local laws. Regulations concerning the discharge
of air have to be fullled.
10. Accessible parts may become hot when used with cooking appliances.
11. Before performing any cleaning or maintenance operation, disconnect the rangehood from
the mains using the respective mains or sector switch or by unplugging it.
12. Do not use the rangehood without the grease lters.
13. Keep the grease lters clean and respect the recommended cleaning frequencies.
14. Turn the rangehood motor on before starting to cook.
15. Turn the rangehood motor o about 10-15 minutes after you nish cooking.
16. It is forbidden to use the rangehood as an aspirator.
17. Never cook foodstu directly over the ame or have the gas burners on under the rangehood
without using cookware.
Page 4

2. Important Safety Information
Before Installation
1. We recommend this appliance be installed or repaired by a qualied Schweigen Home Appliances
technician.
2. Please see our website www.schweigen.com.au for recommended installers.
3. It is dangerous to modify any part of this appliance. Modication of any kind, will immediately void the
warranty.
4. The manufacturer declines all responsibility in case of failure to adopt proper safety measures.
5. Ensure that the location in which this appliance is installed, has good and permanent ventilation.
6. Please consult local laws and regulations and install in accordance.
7. Use an electrical connector with earth that is correct for your location.
8. Check that the voltage in your area corresponds to the appliance as indicated on the rating label.
9. This appliance must be connected to an electricity supply with a ground connection.
10. Check that the installation and electrical connections are made by a qualied technician and that the
indicated instructions and local regulations in force are met, using materials that are compliant with
the applicable legislation.
11. The company will not be responsible for installations executed by non-qualied sta and
installations that fail to heed the applicable legislation on electrical safety (with regard to both
modes and materials).
12. The electrical technical data can be found inside the rangehood, after removing the grease lters.
13. The exible power cable supplied is already connected internally and emerges from the rangehood
near the air outlet tube.
14. Before installing the electrical connections, you should:
– Verify that the indicated electrical data coincide with the voltage values and frequency
of the electrical circuit in the house where the rangehood is to be installed;
– Check that the premises has electrical protection against short circuits and electrocution,
pursuant to the applicable legislation;
– Always switch o the current using the double-pole switch before maintenance and turn
the power on again for normal use only when the operation has been completed.
Page 5

2. Important Safety Information
Product Use
This product is designed for household use and should not be used for commercial applications.
After use, always ensure that all controls are in the “OFF” position.
When frying with a gas ame, take particular care not to allow the oil or grease in the pan to catch
re. (Flambé)
Ducted or Recirculating?
Ducted rangehoods (or extractor rangehoods) extract the cooking fumes from the kitchen and expel
them from the space via ducting. Good design practice would always see a re-rated ducting system
extend to the house exterior, rather than to the ceiling cavity. When a rangehood is ducted only into
the ceiling space, the collection of humidity and grease can present very real health issues and re hazards.
Recirculating (or non-ducted or ltered) rangehoods extract cooking fumes and pass them through
lters. As the name would suggest, they recirculate this air back into the room. Recirculating rangehoods
are not as eective as removing fumes from a kitchen space, but they are sometimes the only option due
to budgetary or building constraints. Your client should be made aware of the requirement to change and
clean lters on a regular basis for the optimum eciency of air ltering.
Maintenance and Service
The rangehood surface should be cleaned with soft cloth and non-corrosive detergent. Do not leave
the rangehood wet after cleaning or use, please keep rangehood dry.
IMPORTANT: Never attempt to repair this appliance by yourself. Always refer to a qualied
Service Technician.
Always switch o the electricity and unplug the connection before conducting maintenance
or cleaning.
Electrical Cord
Ensure the supply cord is not exposed to heat, chemicals or sharp objects. If the supply cord is damaged,
it must be replaced by the manufacturer, service agent or a similarly qualied person in order to avoid
a hazard.
Page 6
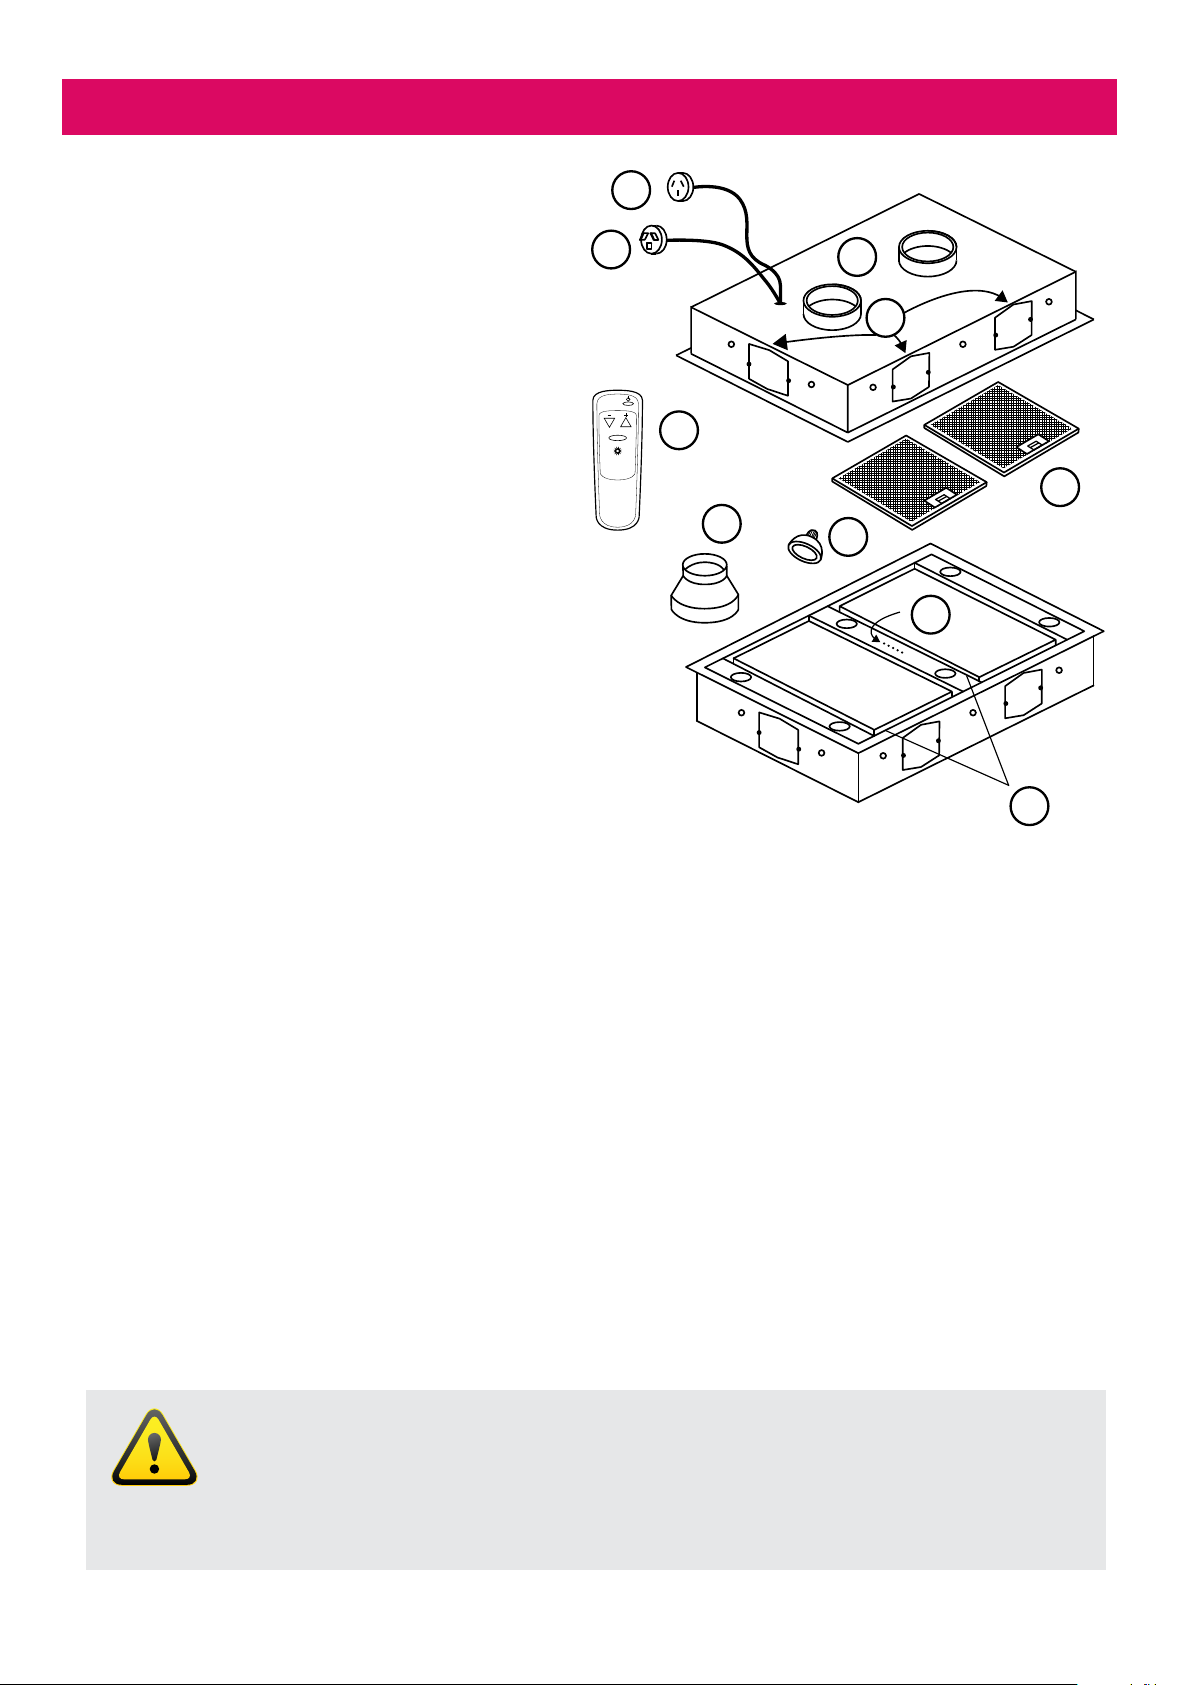
3. Description
Rangehood
1. For use with Isodrive® motor system
2. Male plug (main power 240V)
3. 2x main 200mm outlet
4. 3 x 150mm Outlets (optional only)*
(Square to round outlet adaptor
YT202.1000.04 are ordered separately)
5. Remote
®
6. Reducer (For Isodrive
7. Light
8. Filters
9. LED indicator panel
10. Extraction sheets
* Only to be used as an alternative.
Please note using the 150mm outlets can
reduce airow.
650 only)
1
2
POWER
5
6
3
4
8
7
9
10
NOTE: Filter and light quantity may vary from
model to model.
Important
Electronics MUST be accessible for service and/or maintenance once installed, failure to
do so, will result in any charges involved with accessing the part (removal of cabinetry etc.)
being forwarded to the customer.
Page 7

4. Operation
Schweigen silent rangehoods are recognised for their silent operation. Although this holds true for all of
our rangehoods with external motors, one must note that the rangehoods are silent when they are used
for regular cooking on the lower fan setting. Therefore, you will only hear the movement of air.
NOTE
There are no physical controls on the ceiling cassette. The ceiling cassette can only be
operated by the supplied remote control.
Remote Control and Buttons
1. On/O: Use this button for activating and deactivating the motor.
The starting speed of the motor is 1. The number of lights showing
on the LED Indicator Panel, (from left to right) relates to the speed
of the motor. 1 light for 1st speed, 2 lights for 2nd speed etc.
2. Speed + : The motor speed will be increased to the level above.
(Maximum level is 4)
3. Speed — : The motor speed will be decreased to the next level
down. (Minimum level is 1)
4. Lights: The light system is set up in 3 groups.
Group 1: Press once, 2 lights in middle will illuminate.
Group 2: Press twice, 4 lights on the sides will illuminate.
Group 3: Press 3 times, 6 lights will illuminate.
NOTE: If there is no change in operation to the unit in 4 hours, it will
shut down all functions, including lights and extraction fans (Available
on certain models only). If the remote control or unit fails, there is an
On/O switch in the unit to manually shut it down (behind the lters).
Speed Control
This cassette rangehood is equipped with a 4 speed
mechanical/electronic control. There are various motor congurations
®
from Isodrive
1600 and Twin Isodrive® 1600.
1
2
3
4
Speed control usage suggestions
• Low speed for simmering.
• Medium speed for light cooking.
• High speed for heavy frying or heavy cooking.
Page 8
 Loading...