

Schweigen KLS-9GLASS,UM-B19S,UM-PA9S,GA-900 Installation Manual

Page 1 of 40
RANGEHOOD & INSTALLATION GUIDE
Undermount
Revision V1.3

Page 2 of 40
INDEX
Before using this guide, please check our website www.schweigen.com.au to
ensure you have the latest version.
INDEX ................................................................................................................................... 2
1. WELCOME ....................................................................................................................... 4
2. YOUR SAFETY ................................................................................................................ 5
Safety Advice .................................................................................................................... 5
Before Installation .............................................................................................................. 6
Product Use....................................................................................................................... 7
Maintenance and Service .................................................................................................. 7
Electrical Cord ................................................................................................................... 7
3. TIPS AND SUGGESTIONS .............................................................................................. 8
Condensation Information.................................................................................................. 8
For Users ........................................................................................................................ 10
For Installers.................................................................................................................... 10
4. OPERATION ................................................................................................................... 11
Electrical Tactile Keypad ................................................................................................. 11
Electrical Tactile Keypad ................................................................................................. 12
Electronic Touch Keypad ................................................................................................. 13
Electrical Tactile Keypad ................................................................................................. 14
Remote Control ............................................................................................................... 15
Generating a New Transmission Code ............................................................................ 16
Synchronisation of the Remote Control with the Rangehood ........................................... 16
5. CLEANING AND MAINTENANCE ................................................................................. 17
Surfaces .......................................................................................................................... 17
Filters .............................................................................................................................. 17
Cleaning the Interior ........................................................................................................ 18
Cleaning the Exterior ....................................................................................................... 19

Page 3 of 40
INDEX
Replacing the Sealed LED Bulb....................................................................................... 20
Replacing the Halogen Bulb (Max 20W, 12V) .................................................................. 20
5. CLEANING AND MAINTENANCE ................................................................................. 21
Replacing the Strip Lighting ............................................................................................. 21
6. INSTALLATION .............................................................................................................. 22
Cabinet Cutout Size ......................................................................................................... 22
Mounting Laws and Regulations ...................................................................................... 22
Attaching the Computer Board (Certain models only) ...................................................... 24
Installing the Undermount Rangehood (With hanging devices) ........................................ 25
Installation for GA-600S and GA-900S (No Visible Screws) ............................................ 26
Installation for KLS-9GLASS and UM-PA9S .................................................................... 27
Installation for UM-B19S .................................................................................................. 28
Installing Basic GA (No Visible Screws) ........................................................................... 29
Regulating the Aventos Adjustable Hinge (only used with some models) ........................ 30
Flexible Ducting for Isodrive Motor System ...................................................................... 31
Reducer for Isodrive 650 motor only ................................................................................ 31
Isodrive Motor System Overview ..................................................................................... 32
7. MAINTENANCE ............................................................................................................. 33
Troubleshooting ............................................................................................................... 33
Faulty Installation ............................................................................................................ 34
8. TECHNICAL SPECIFICATIONS ..................................................................................... 35
9. DISCLAIMER .................................................................................................................. 37
NOTES ................................ ................................................................ ............................... 38

Page 4 of 40
1. WELCOME
Thank you for purchasing your new Schweigen rangehood.
To get the maximum output from this unit, please thoroughly read this guide before installation
and use.
The guide contains important information on the use and maintenance of the unit, as well as
important safety notes. This will ensure your personal safety and the lasting value of your
rangehood.
We trust that you will enjoy your new Schweigen rangehood.
Please always retain your proof of purchase to aid in any warranty queries.
If you are unable to locate your warranty card, one is available to download from our website
www.schweigen.com.au.
This appliance and its packaging are produced by processes that minimise waste and respect
the environment.
Please help us to continue this effort to protect the environment by using the appliance
efficiently and dispose of any packaging in a responsible manner.
Model
Purchase Date
Purchase Location

Page 5 of 40
2. YOUR SAFETY
WARNING
Please read this section thoroughly before attempting to operate the
appliance. Inspect your product upon receipt. Any damages or
defects
MUST
be reported within 48 hours of purchase, or no claim
will be recognised.
DO NOT INSTALL THIS APPLIANCE IF IT IS FOUND TO BE DAMAGED.
If this product is installed damaged, neither the supplier, nor the
retailer, will be responsible for any costs associated with the repair,
replacement, removal or re-installation of the appliance.
Safety Advice
1. There shall be adequate ventilation in the room when the rangehood is used at the
same time as appliances burning gas or other fuels.
2. There is a fire risk if cleaning is not carried out in conjunction with the instructions.
3. Do not flambé under the rangehood. This will damage the rangehood and will not be
covered by warranty.
4. Do not ignite burners that give off intense, uncontrolled flames beneath the
rangehood.
5. Flames beneath the pan must be contained at all times and cannot exceed the width
of the pan in use.
6. Do not leave any packaging material (bags, corner brackets etc.) within reach of
children.
7. This appliance is not intended for use by person/s (including children) with reduced
physical, sensory or mental capabilities, or lack of experience and/or knowledge.
Unless, the person is given supervision or instruction concerning the safe usage of
the appliance by person/s responsible for their safety. Children must be supervised to
ensure that they do not play with the appliance, it is not a toy.
8. Air exhaust systems must be installed in accordance with local government laws.
9. Accessible parts may become hot when used with cooking appliances.
10. Before performing any cleaning or maintenance operation, disconnect the rangehood
from the mains using the respective mains or sector switch or by unplugging it.
11. Do not use the rangehood without the grease filters.
12. Keep the grease filters clean and respect the recommended cleaning frequencies.
13. The rangehood motor must be switched on before commencing cooking.
14. Turn the rangehood motor off about 10-15 minutes after you finish cooking.
15. It is forbidden to use the rangehood as an aspirator.
16. Never cook foodstuff directly over the flame or have the gas burners on under the
rangehood without using cookware.

Page 6 of 40
YES
NO
2. YOUR SAFETY
Before Installation
1. We recommend this appliance be installed or repaired by a qualified Schweigen
Home Appliances technician.
2. Please see our website www.schweigen.com.au for a list of our recommended
installers.
3. It is dangerous to modify any part of this appliance. Modification of any kind, will
immediately void the warranty.
4. The manufacturer declines all responsibility in case of failure to adopt proper safety
measures.
5. Ensure that the location in which this appliance is installed, has good and permanent
ventilation.
6. Please consult local laws and regulations and install in accordance.
7. Please use an earthed electrical connector that coincides with relevant local laws and
regulations.
8. Check that the power voltage in your area corresponds to the appliance voltage
indicated on the rating label.
9. This appliance must be connected to an electrical supply that has a grounded
connection.
10. Check that the installation and electrical connections are carried out by a qualified
technician and that the indicated instructions and local regulations in force are met,
using materials that are compliant with the applicable legislation.
11. The company will not be responsible for installations executed by non-qualified staff
and installations that fail to heed the applicable legislation on electrical safety (with
regard to both modes and materials).
12. The electrical technical data can be found inside the rangehood, after removing the
grease filters.
13. The flexible power cable supplied is already connected internally and emerges from
the rangehood near the air outlet tube.
14. Before installing the electrical connections, you should:
• Verify that the indicated electrical data coincides with the voltage values and
frequency of the electrical circuit in the house where the rangehood is to be installed;
• Check that the premises has electrical protection against short circuits and
electrocution, pursuant to the applicable legislation;
• Always switch off the current using the double-pole switch before maintenance and
turn the power on again for normal use only when the operation has been completed.
15. Pay attention to the opening of the door. Do not force the door open.

Page 7 of 40
2. YOUR SAFETY
Product Use
This product is designed for household use and should not be used for commercial
applications.
After use, always ensure that all controls are in the “OFF” position.
When frying with a gas flame, take particular care not to allow the oil or grease in the pan to
catch fire. (Flambé)
Maintenance and Service
The rangehood surface should be cleaned with soft cloth and non-corrosive detergent. Do
not leave the rangehood wet after cleaning or use, please keep rangehood dry.
Important: Never attempt to repair this appliance by yourself. Always refer to a qualified
Service Technician.
Always switch off the electricity and unplug the connection before conducting maintenance
or cleaning.
Electrical Cord
Ensure the supply cord is not exposed to heat, chemicals or sharp objects. If the supply cord
is damaged, it must be replaced by the manufacturer, service agent or a similarly qualified
person in order to avoid a hazard.

Page 8 of 40
3. TIPS AND SUGGESTIONS
Condensation Information
The induction cooktop is designed to provide rapid heating, improved thermal efficiency and
greater heat consistency. For some customers with an induction cooktop, condensation can
form on their rangehood filters while using their cooktop.
The induction cooktops’ heat source is contained in the conductive base of the pot. When
compared with a gas, electric or wok burner, the heat is not isolated or contained to one area
and therefore gradually rises up on all sides of the pot or frypan. This combination allows the
rangehood filters to warm up slowly and eliminate the formation of condensation. For
induction cooktops, the immediate and contained heat source can produce vapours rapidly.
This prevents the filters from gradually warming up and increases the chance of
condensation forming.
There are many variables that can contribute to the condensation problem associated with
induction cooktops and rangehoods. Some of these variables include, but are not limited to:
- The Country or State you live in (example, WA versus VIC, and the variables in daily
temperatures)
- The position of your home and kitchen (morning/afternoon sun)
- The quality of pots and cookware you are using
- Height of rangehood
- Rapid heating
- Ducting angle
- Filter size
If induction rings, vitro-ceramic hobs and the like are not used correctly, they can lead to
problems with the condensation of liquids due to temperature differences. After some time in
use, these condensed liquids can build up and possibly appear on the metal filters or the
bottom of the rangehood.
For advice to avoid condensation, please refer to next page.

Page 9 of 40
3. TIPS AND SUGGESTIONS
User advice to avoid condensation in the rangehood:
• The rangehood should be switched on approx. 10 minutes prior to cooking and the
delay shut down timer set after cooking has stopped in order to clear the fumes held
in the flue. These steps will help clear the flue out fully.
• Do not cook at full power straight away, i.e. start on low or medium power for a while
so that the steel in the rangehood can warm up.
• Filters must be kept clean. For induction cooktop users, aim to clean filters at least
every 10 days, and replace the filters if their condition begins to deteriorate.
• There must be a constant flow of air into the cooking area to avoid the creation of a
depression which can affect the rate of aspiration.
• Follow the advice from the instructions for induction systems with regards to the
condensation effect.
• Suggested height for induction cooktop is approx. 750mm above the cooking surface.
Each person’s circumstances are different, but the vast majority of induction cooktop owners
have had no problems with condensation. However, it is important to understand that:
Neither the rangehood nor the induction cooktop are faulty. That in some circumstances, the
combination of the rangehood, the induction cooktop and the many variables within your
home, can lead to condensation forming on your rangehood filters. With a gas or standard
electric cooktop, you should not have any condensation.
Page 10 of 40
3. TIPS AND SUGGESTIONS
The Rangehood has one mode of operation:
Air extraction: The air is drawn in and cleaned by the grease filters and directed outside.
Please check the cleaning and maintenance section for the filters’ cleaning periods.
For Users
1. Do not leave the frying pan or fryer unattended, as the oil could overheat and catch
on fire.
2. Never flambé any foods beneath the rangehood. The unprotected flames could
cause a fire.
3. Before carrying out any operations inside the rangehood, unplug the appliance from
the electrical mains.
4. Respect the cleaning frequencies and intervals for changing the filters, as otherwise
the accumulated grease could cause a fire or damage to the appliance.
5. Changes made to the steel surface will render the warranty invalid.
For Installers
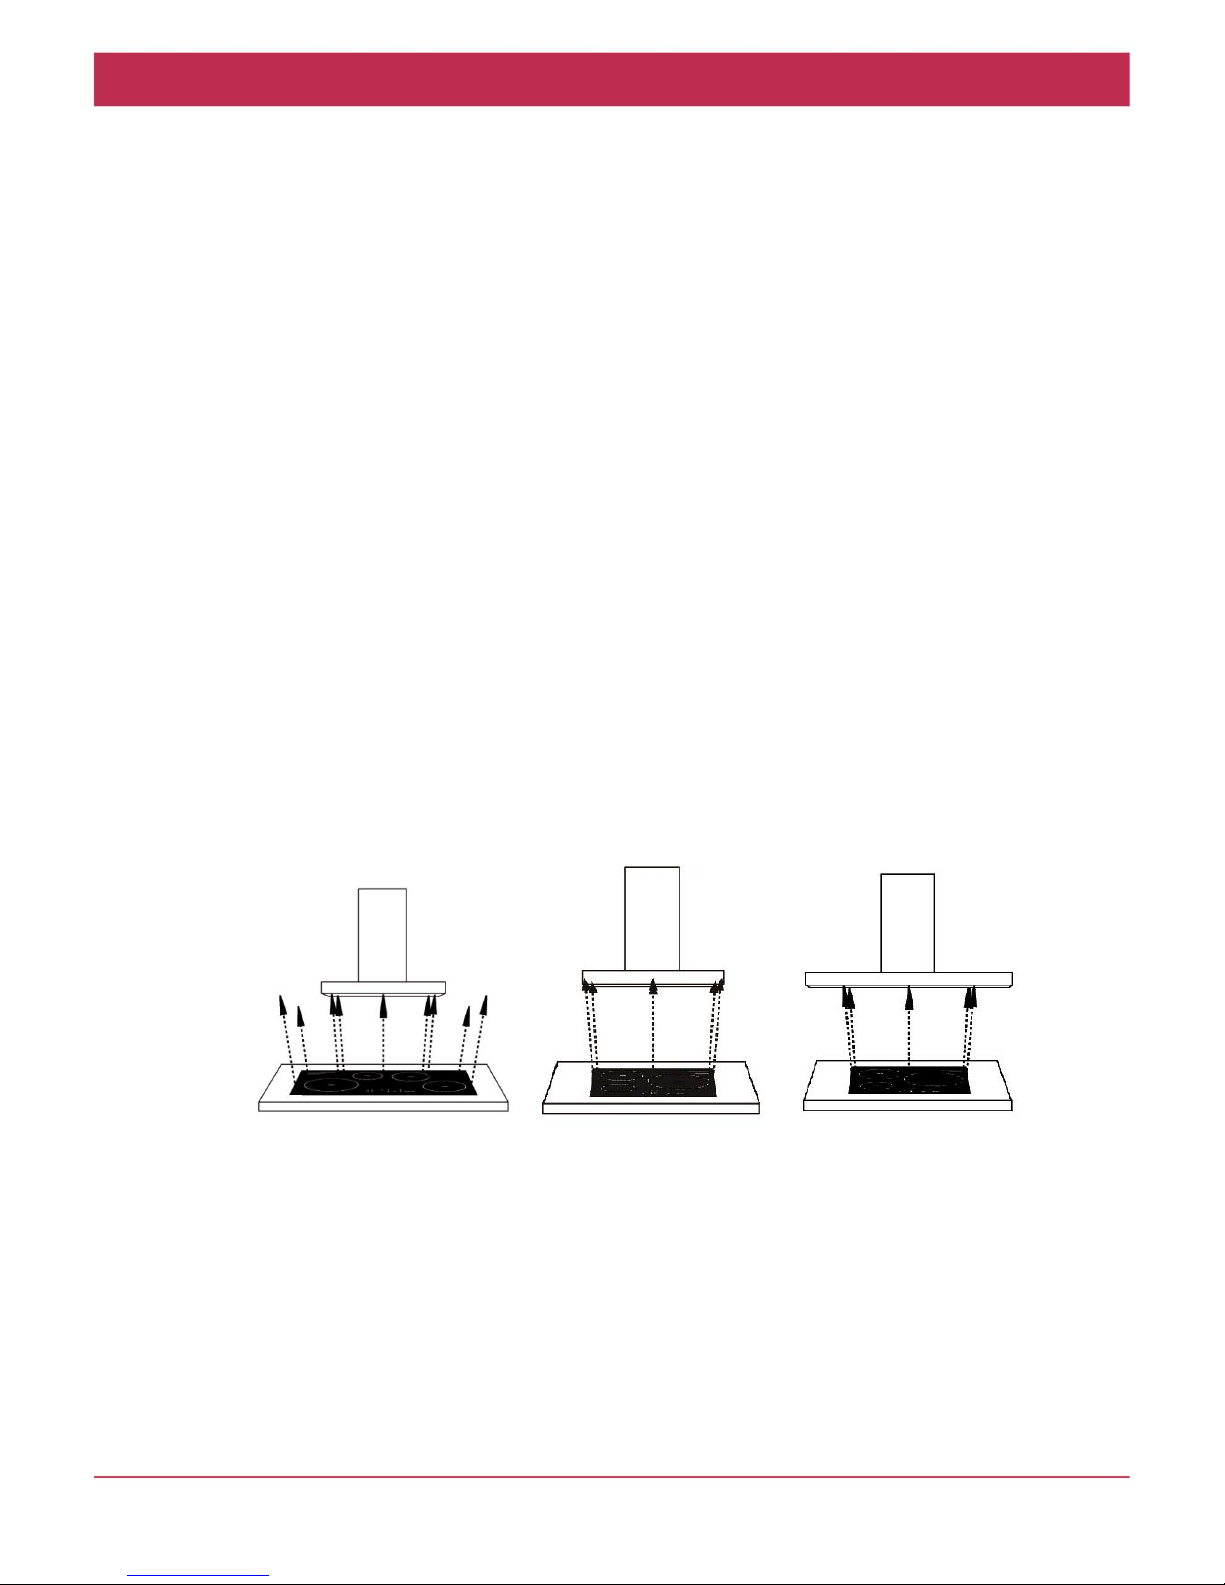
1. In addition to the size, the height of the rangehood above the cooktop is important to
obtain the best performance.
2. For recommended height, please refer to Mounting Laws and Regulations.
Rangehood smaller than
cooking zone
Rangehood same size as
cooking zone
Rangehood larger than
cooking zone
INADEQUATE
ADEQUATE
OPTIMAL
Page 11 of 40
4. OPERATION
Schweigen silent rangehoods are recognised for their silent operation. Although this holds
true for all of our rangehoods with external motors, one must note that the rangehoods are
silent when they are used for regular cooking on the lower fan setting. Therefore, you will
only hear the movement of air.
Electrical Tactile Keypad
To obtain the best performance, switch the rangehood on a few minutes prior to cooking and
leave it running for at least 10 minutes after you have finished cooking.
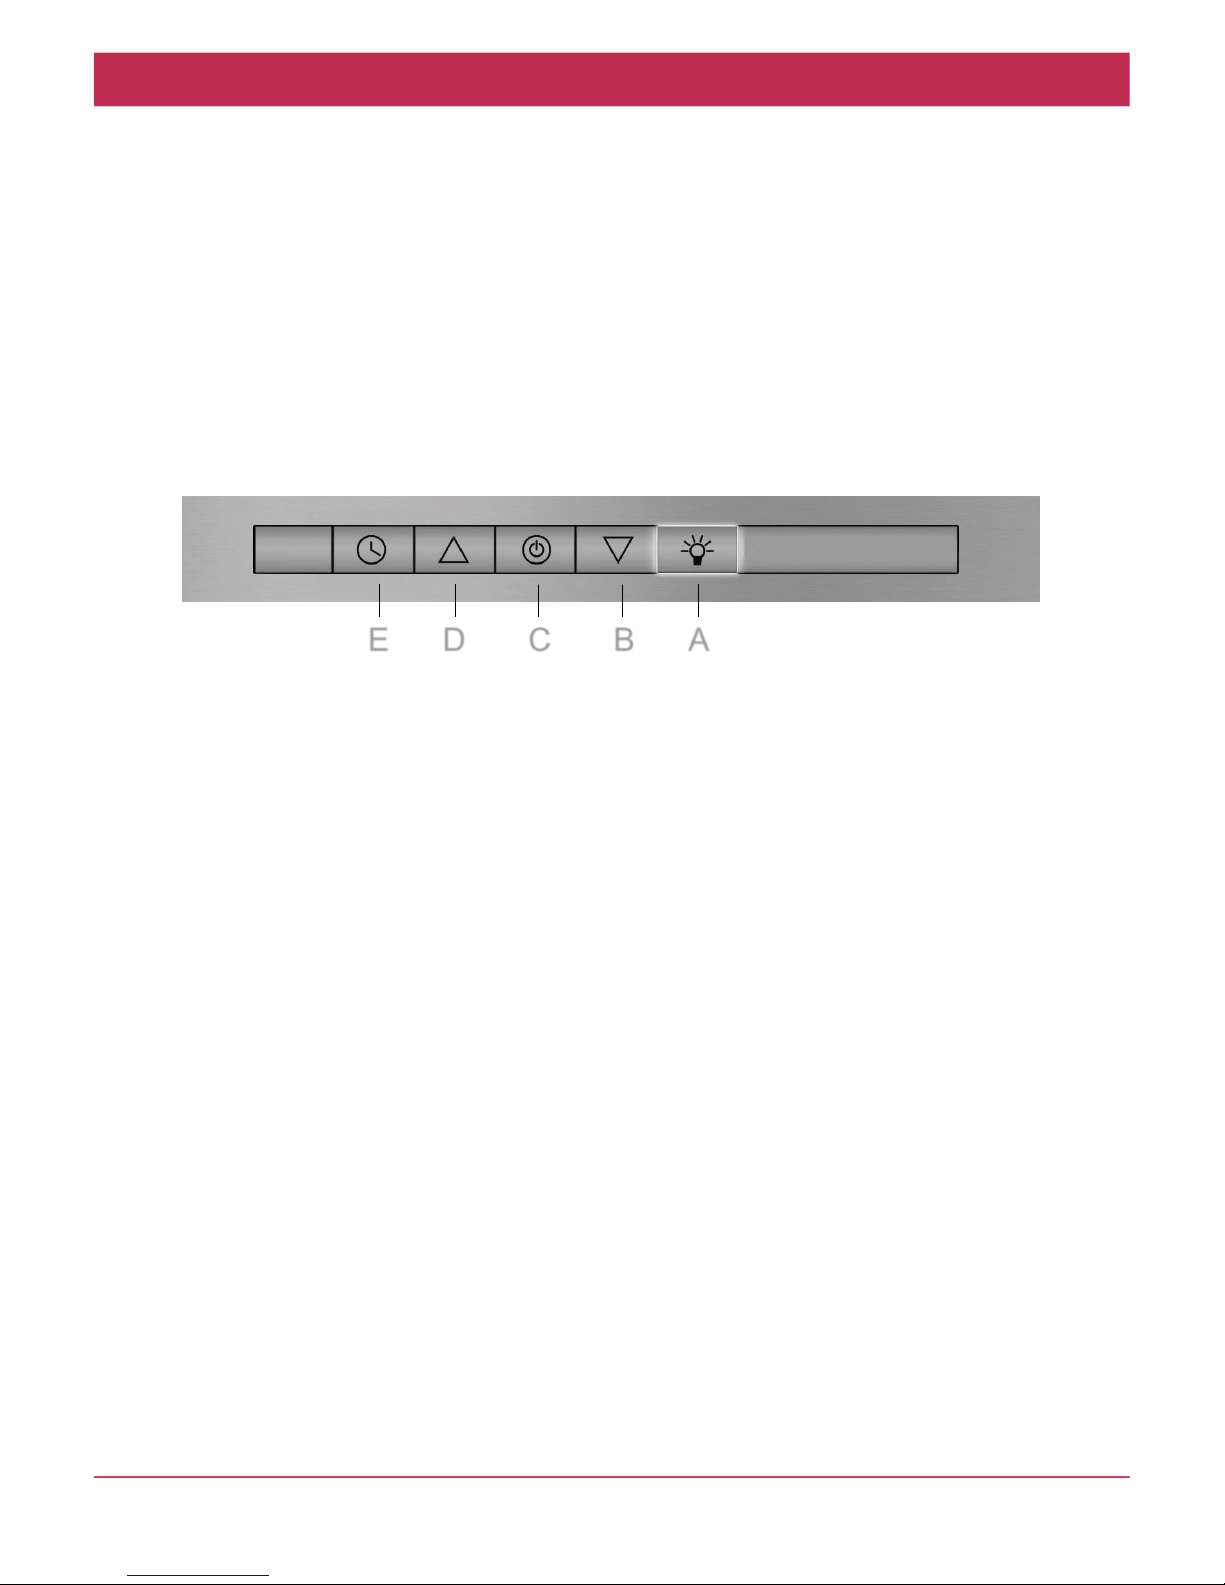
The rangehood has a 4-speed electronic keypad. The buttons have the following functions:
A.- Light switch: Press this switch to turn the lights on and off. When it is operating, the
light is blue.
B.- Low-speed button: This button reduces the aspiration speed. When it is operating, the
light is blue.
C.- ON / OFF button: This button turns the rangehood on and off. The rangehood will
always turn on at the same speed at which is was turned off at the last time of use.
D.- High-speed button: This button increases the aspiration speed. When it is operating,
the light is blue. When at maximum speed, the blue light will flash.
E.- Timer: When this function is activated, the blue light will flash on the timer button. The
rangehood continues to operate for a few minutes at the required speed and then
automatically switches off.
This rangehood has a device that lets you know when the grease filters must be changed.
When the lamp on button “E” flashes, this means the filters must be washed (usually every
40 hours of operation).
When the filters have been washed and re-mounted, hold the "E" button down for a few
seconds to reset it and return the counter down to zero.
E D C B A
Page 12 of 40
4. OPERATION
Electrical Tactile Keypad
To obtain the best performance, switch the rangehood on a few minutes prior to cooking and
leave it running for at least 10 minutes after you have finished cooking.
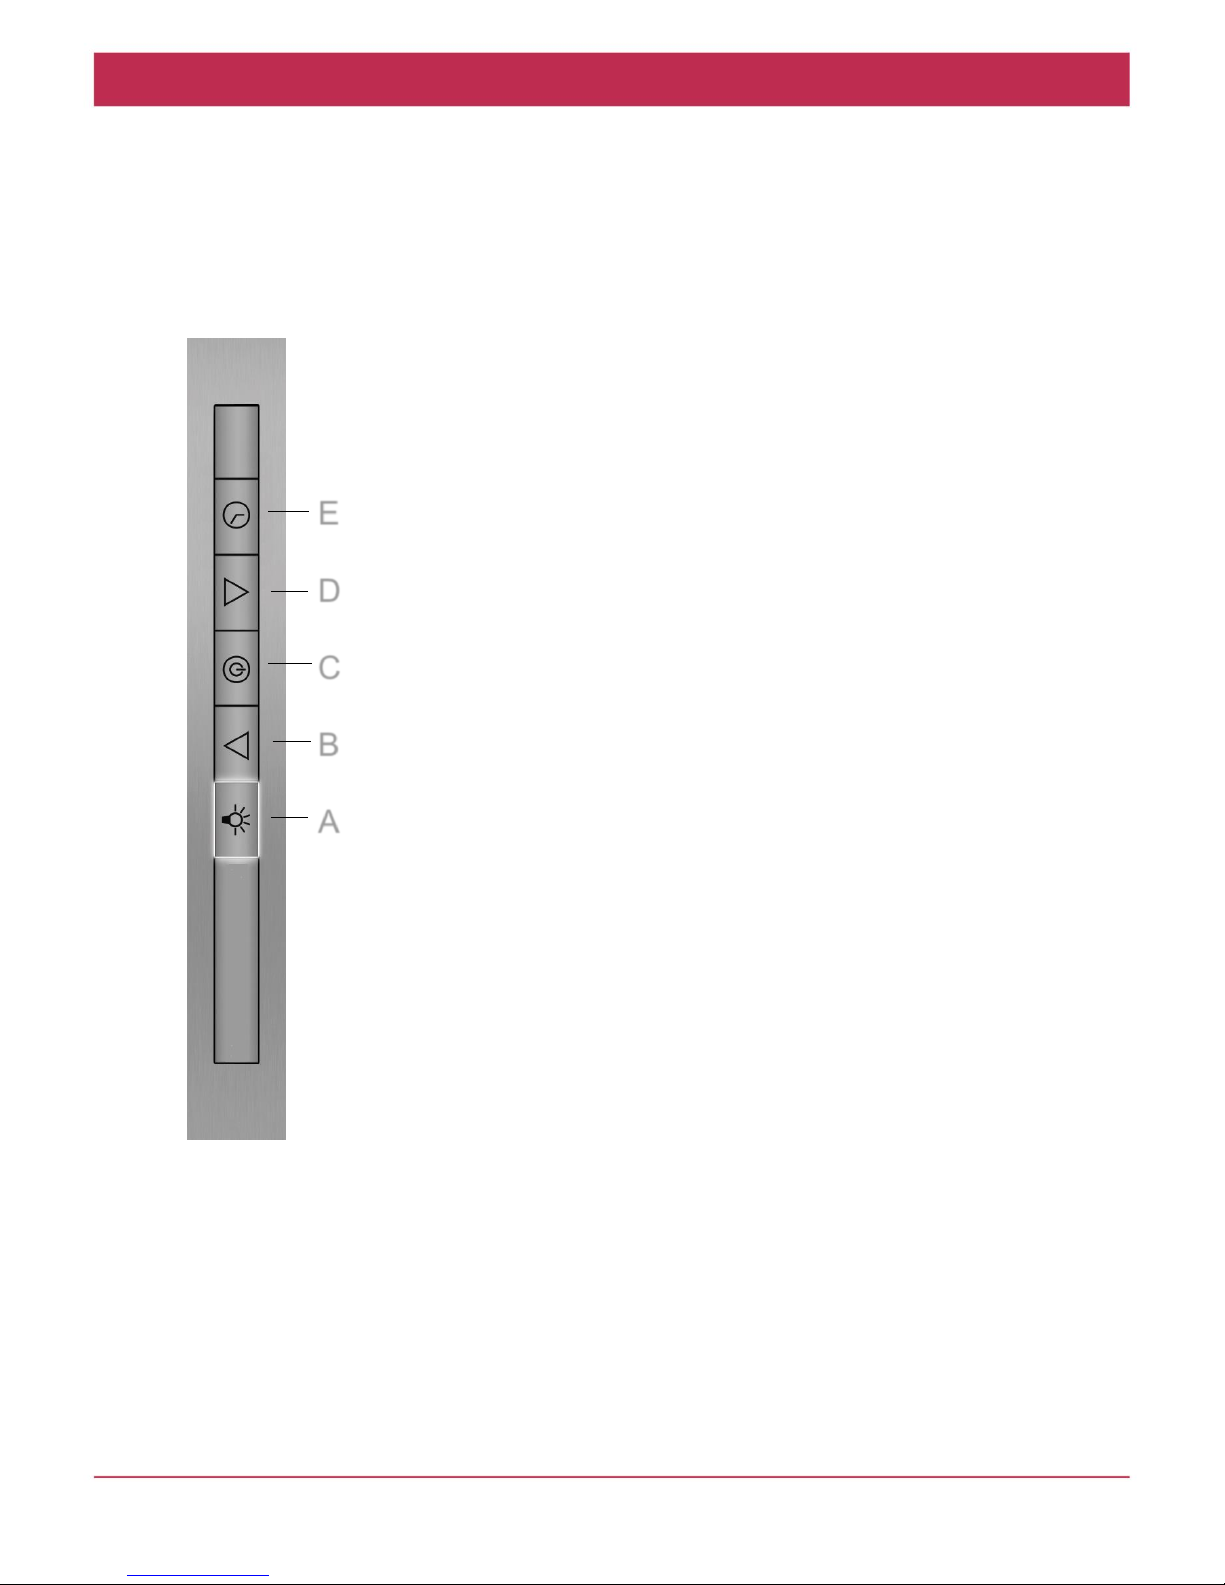
The rangehood has a 4-speed electronic keypad. The buttons
have the following functions:
A.- Light switch: Press this switch to turn the lights on and off.
When it is operating, the light is blue.
B.- Low-speed button: This button reduces the aspiration speed.
When it is operating, the light is blue.
C.- ON / OFF button: This button turns the rangehood on and off.
The rangehood will always turn on at the same speed at which was
turned off at the last time of use.
D.- High-speed button: This button increases the aspiration
speed. When it is operating, the light is blue. When at maximum
speed, the blue light will flash.
E.- Timer: When it is operating, the lamp will be lit. When this
function is activated, the rangehood continues to operate for a few
minutes at the required speed and then automatically switches off.
This rangehood has a device that lets you know when the grease
filters must be changed.
When the lamp on button “E” flashes, this means the filters must
be washed (usually every 40 hours of operation).
When the filters have been washed and re-mounted, hold the "E"
button down for a few seconds to reset it and return the counter
down to zero.
E
D
C
B
A
 Loading...