

Page 1
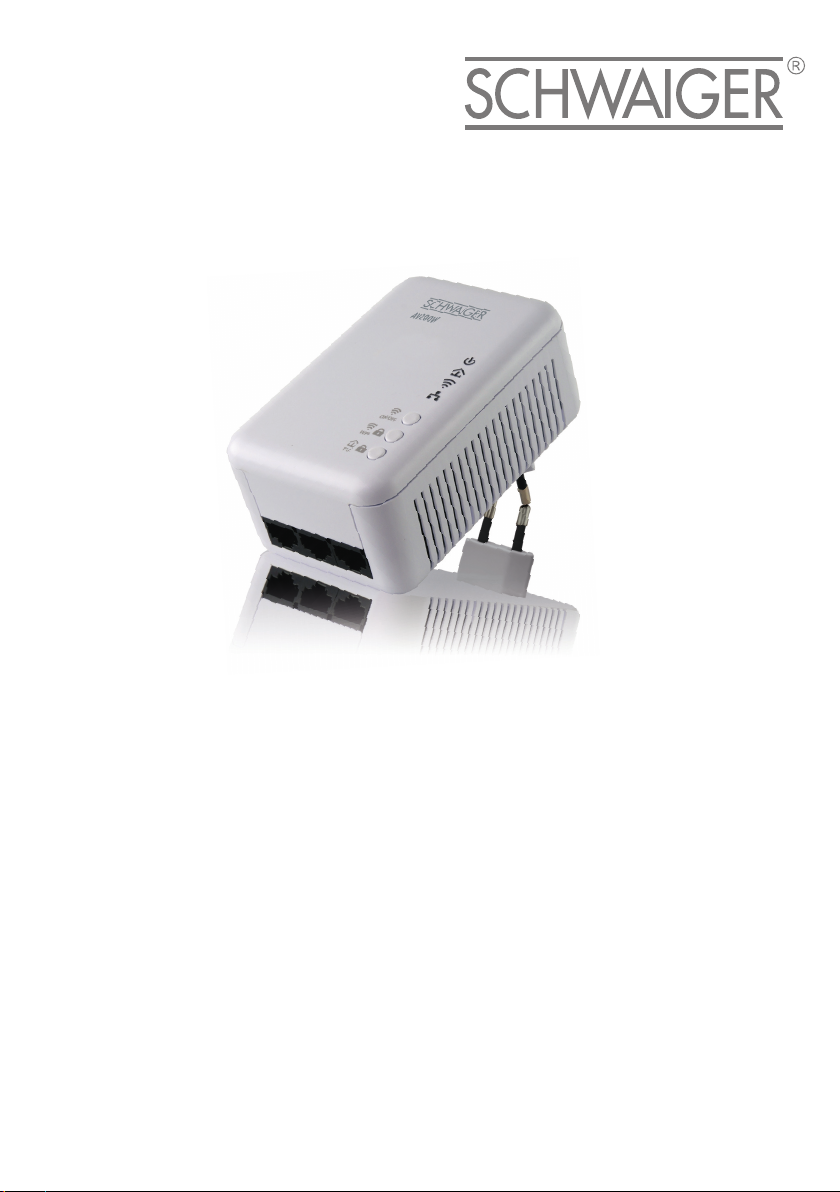
AV 200W
Inhouse-Powerline
Page 2

While the information in this manual has been compiled with great care, it may not be deemed an assurance of product
characteristics. The manufacturer shall be liable only to the degree specified in the terms of sale and delivery.
The reproduction and distribution of the documentation and software supplied with this product and the use of it s contents
is subject to written authorization from the manufacturer. We reserve the right to make any alterations that arise as the
result of technical development.
Trademarks
®
HomePlug
Linux
Ubuntu
Mac
Windows
Wi-Fi
Fi Alliance
is a registered trademark of HomePlug Power Alliance.
®
is a registered trademark of Linus Torvalds.
®
is a registered trademark of Canonical Ltd.
®
and Mac OS X® are registered trademarks of Apple Computer, Inc.
®
and Microsoft® are registered trademarks of Microsoft, Corp.
®
, Wi-Fi Protected AccessTM, WPATM, WPA2TM and Wi-Fi Protected SetupTM are registered trademarks of the Wi-
®
.
The manufacturer's firmware package contains files which are covered by different licenses, in particular under manufa cturer proprietary license and under open source license (GNU General Public License, GNU Lesser General Public
License or FreeBSD License). The source code which is available for Open Source distribution can be request ed in writing
from gpl@gplrequest.com.
This product complies with the technical requirements of the directive 1999/ 5/EC (R&TTE) and
the other relevant provisions of the FTEG, and it is designed for use in the EU and Switzerla nd.
The product is class A equipment. Class A devices may cause interference when us ed in residential environments.
"99/05/CE" (R&TTE directive) is a directive similar to the EMC directive. It applies to radio
equipment and telecommunication terminal equipment.Observance of these dire ctiv es is ve rified by the use of harmonized European norms.
For the CE declaration for this product, refer to the accompanying product CD under CE.
Subject to change without notice. No liability for technical errors or omissions.
June 2012
Page 3

Contents
1 Introduction ................................................................................................................ 5
1.1 Was bedeutet “HomePlug”? ....................................................................................5
1.2 What is WLAN? .......................................................................................................5
1.3 The AV200W ...........................................................................................................6
1.3.1 Example application ....................................................................................6
2 Installation ..................................................................................................................8
2.1 System requirements ...............................................................................................8
2.2 Connection and display elements ............................................................................8
2.2.1 Control lamps (LEDs) ...................................................................................8
2.2.2 Buttons .......................................................................................................9
2.2.3 Network jacks ...........................................................................................10
2.2.4 WLAN antennas ........................................................................................10
2.3 Connecting the adapter .........................................................................................10
3 Network configuration ............................................................................................. 11
3.1 Calling up the built-in configuration interface .......................................................11
3.2 Menu description 1 ..................................................................................................1
3.3 Status overview .....................................................................................................12
3.3.1 HomePlug status .......................................................................................12
3.3.2 WLAN status .............................................................................................13
3.4 Device configuration .............................................................................................13
3.4.1 Security .....................................................................................................13
3.4.2 Netzwork settings .....................................................................................14
3.4.3 HomePlug settings ....................................................................................15
3.4.4 Time server ................................................................................................16
3.5 WLAN configuration ..............................................................................................17
3.5.1 Access point ..............................................................................................18
3.5.2 WLAN filters ..............................................................................................20
3.5.3 WLAN time control ....................................................................................22
3.5.4 WiFi Protected Setup (WPS) .......................................................................23
3.6 Management .........................................................................................................25
3.6.1 Resetting the configuration .......................................................................26
3.6.2 Saving a configuration file .........................................................................27
3.6.3 Restoring a configuration ..........................................................................27
3.6.4 Refresh firmware .......................................................................................28
AV200W
Page 4

4 Configuring the HomePlug network ......................................................................... 29
4.1 Encrypting the PLC network at the touch of a button .............................................29
5 Appendix ................................................................................................................... 32
5.1 Technical data ......................................................................................................32
5.2 Important safety instructions .................................................................................33
5.3 Disposal of old devices ..........................................................................................34
5.4 Warranty conditions ..............................................................................................35
AV200W
Page 5

1 Introduction
This chapter gives an overview of the HomePlug technology and briefly introduces the adapter. A practical example is listed at the end of th
1.1 Was bedeutet “HomePlug”?
HomePlug (“Inhouse Powerline“) is an intelligent, secure technology that lets
you set up a home network easily, quickly and economically via your electrical wiring, without the need for complex and expensive
The available performance and effort required for the installation also compares favourably to traditional methods—HomePlug technology now
speeds you would expect from other LAN technologies.
1.2 What is WLAN?
WLAN (Wireless Local Area Network) refers to the use of radio technology to
network computers and other devices. While it is possible to wirelessly connect computers in pairs (peer-to-peer, p2p), a
to set up a network of multiple devices. Such access points are frequently
combined in a single device with modems for Internet access and routers to
manage network traffic.
The wireless network established by an access point using a specific
(from 1 to 13) and name (SSID) has a limited range. The range of the access
point, which is also known as a "radio cell", is impeded by building walls. In
some cases, stable connections are often only possible between WLAN
devices within a single room.
As it is not possible to rely on hardware such as ne
household wiring (in HomePlug) to control access to a WLAN, wireless networking naturally presents special security cha
a number of security measures, such as a concealed network name, data
encryption and access control via the MAC addresses of the network adapters.
Introduction 5
e chapter.
dedicated cabling.
attains
central access point is required
channel
twork cables (in a LAN) or
llenges. WLANs therefore use
AV200W
Page 6

6 Introduction
1.3 The AV200W
With the AV200W you can quickly and easily establish connections between
WLAN, HomePlug and LAN.
• As a WLAN access point, the adapter establishes communication be
your WLAN devices and an existing LAN or HomePlug network. In this way,
for example, you can expand your wireless network in no time to rooms that
otherwise could not be reached by wireless.
• As a HomePlug device, the AV200W has thre
necting three network devices to the
y combining the LAN, HomePlug and WLAN standards, you will become
• B
totally independent of existing network access points. Instead, you are completely free to connect all your devices either via
LAN or wirelessly. By simply reconnecting your AV200W, you can expand
or reconfigure your home network at any time, e.g. simply by taking the
adapter along into another room to work.
1.3.1 Example application
The AV200W is a WLAN access point and makes the HomePlug network
connected via the mains outlet available wirelessly to other client devices,
such as laptops, IP radios or IP telephones.
This is particularly practical if not all
WLAN access point, for example because concrete walls disrupt the signal.
With HomePlug, however, various rooms can be easily connected via the
mains supply. And using a AV200W, you can quickly and easily turn every
mains outlet into a WLAN connection with excellent reception quality.
tween
e LAN jacks for directly con-
power lines.
a power supply socket,
client stations are within range of a
AV200W
Page 7

The following illustration shows how the AV200W is used to establish a connection to the Internet and within the home netwo
rk for additional HomePlug
devices and a router.
Introduction 7
AV200W
Page 8

8 Installation
2Installation
This chapter covers everything you need to know to set up your AV200W. It
will explain connecting the device and its functions. We will also briefly introduce the included software and then guide you through its installation.
2.1 System requirements
• Operating systems: Windows XP (32/64 bit), Windows Vista Home Pre-
mium (32/64 bit), Windows 7 Home Premium (32/64 bit), Linux (Ubuntu),
Mac (OS X) or all operating systems with network support
• Network connection
Please note that your computer or other device
adapter with a network port. To set up a HomePlug network, you need at least
two HomePlug devices (200 Mbps or 500 Mbps).
2.2 Connection and display elements
2.2.1 Control lamps (LEDs)
LEDs AV200W
Power
HomePlug
WLAN
Ethernet
green Lit steady when the adapter is ready for operation.
green The network connection is suitable for HD video stream-
orange The network connection is suitable for SD video stream-
red The network connection is suitable for simple data trans-
green Lit steady when a connection to the WLAN network
ing; flashes when data is being transmitted.
ing and online gaming; flashes when data is being transmitted.
fer and Internet access; flashes when data is being transmitted.
sts; flashes when data is being transmitted.
exi
Lit steady when a connection to the Ethernet network
ts; flashes when data is being transmitted.
exis
must feature a network
AV200W
Page 9

2.2.2 Buttons
ON/OFF
Use the ON/OFF button to switch the WLAN function on or off.
Make sure that the WLAN function in the factory defaults is enabled and the
WLAN encryption is set to WPA2. The standa
of the AV200W. You will find the 16-character security ID on the label on the
back of the housing.
WPS
With the WPS (Wi-Fi Protected Setup)
WLAN network at the touch of a button.
Installation 9
rd WLAN key is the security ID
encryption button, you secure your
WPS is one of the encryption standards developed by the Wi-Fi
increasing security in a WLAN home network. The objective of WPS is to
make it easier to add devices to an existing network. For more detailed information, refer to Chapter 'WiFi Protected Setup (WPS)'.
HomePlug
Via the HomePlug encryption button, you secure your HomePlug network at
the touch of a button:
• To encrypt your HomeP
button on the connected devices for 1 second—within 2 minutes.
• To rem
For more details on HomePlug encryption, refer to Chapter 'Configuring the
HomePlug network'.
Reset
The Reset button (on the side of the housing) h
• Th
• To
The reset button can be pressed using the tip of a ball-point pen.
ove a HomePlug device from your network, press the encryption
button of the corresponding device for at least 10 seconds.
e device restarts if you press the Reset button for less than 1 second.
change the configuration of the AV200W back to the factory defaults,
press the Reset button for 5 – 10 seconds. Keep in mind that all settings
t have already been configured will be lost!
tha
lug network individually, press each encryption
as two different functions:
Alliance for
AV200W
Page 10

10 Installation
2.2.3 Network jacks
The three LAN ports can be used to connect computers or other network
devices to the AV200W via commercially available network cables.
2.2.4 WLAN antennas
The internal WLAN antennas are for connecting to other network devices
wirelessly.
2.3 Connecting the adapter
This section describes how to connect your AV200W to a computer or other
network device.
햲 Use a network cable to connect the AV200W to the network port of your
running computer or other netwo
햳 Plug the AV200W into a wall socket.
The outlet must be within reach of the connected network device.
The AV200W and the network device must be easily accessible.
rk device.
AV200W
In order to switch the AV200W off and disconnect it from the power supply,
pull the p
햴 Once you have connected at least two HomePlug adapters as
햵 To install the software, insert the included CD-ROM in the CD drive of
햶 The installation wizard will guide you through the
햷 You can find the installed software application under St
lug out of the power outlet.
described
above, your HomePlug network has been set up. To secure your network
individually, continue with the configuration in the Chapter 'Configuring
the HomePlug network'.
your computer.
software installation by
clicking on the button Install AV200W Weblauncher.
art -> All Pro-
grams -> Ho
mePlug -> HomePlug Wireless Configuration.
Page 11

Network configuration 11
3 Network configuration
The AV200W has a built-in configuration interface that can be called up using
a standard web browser. Most settings for operating the device can be modified here. To integrate the AV200W into an existing HomePlug network for
the first time only, use the encryption butt
HomePlug network').
3.1 Calling up the built-in configuration interface
Call up the built-in online configuration interface under Start -> All Programs
-> HomePlug -> HomePlug Wireless Configuration.
By default, you will come directly to the configuration
login password was set up via the option Device configuration -> Security,
you have
to enter it first. Read more about this under 'Security'.
3.2 Menu description
All menu functions are described in the corresponding interface as well as in
the associated chapter in the manual. The sequence of the description in the
manual follows the structure of the menu.
• Cl
ick Save to save the settings of the respective area of the configuration
interface.
lick Back to leave the respective area of the configuration interface.
• C
• Select the de
At first, after starting the configuration interface,
played:
• In the Status overview area, you get general information about all con-
nected HomePlug, WLAN and LAN devices.
• You can ch
configuration.
• You can change or modify WLAN settin
area.
• The Management section is for resetting, securing and restoring your indi-
vidual configurations. In addition, you can update the firmware of you
device here.
sired language in the language selection list.
ange or modify the various settings for your device under Device
on (see Chapter 'Configuring the
interface. However, if a
the four central areas are dis-
gs in the WLAN configuration
r
AV200W
Page 12
12 Network configuration
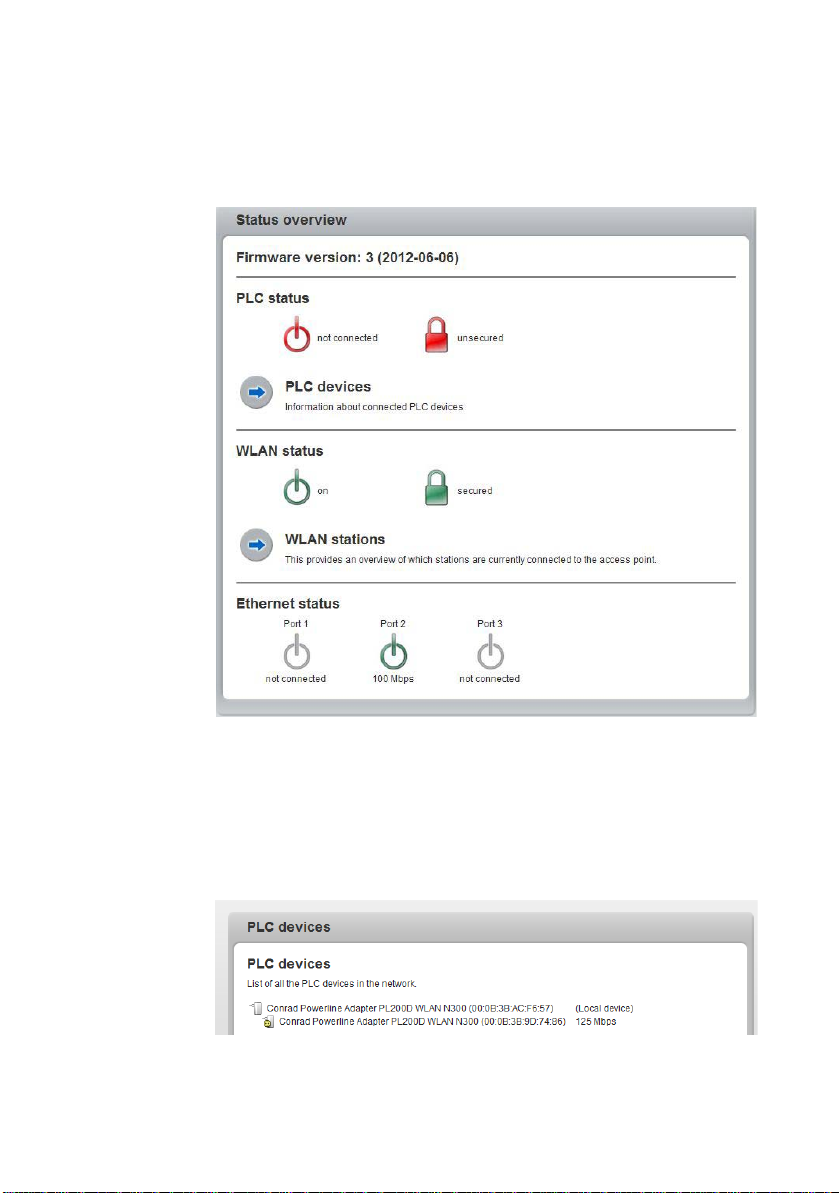
3.3 Status overview
In the Status overview area you can track the status of your connected
HomePlug, WLAN and LAN devices.
3.3.1 HomePlug status
To display all connected HomePlug devices, click either the Ready to operate icon or the HomePlug devices arrow. Each connected HomePlug
device, re
played with its MAC address. Clicking the lock icon
HomePlug settings (see Chapter 'HomePlug settings').
AV200W
gardless of whether it is connected locally or in the network, is dis-
brings you directly to the
Page 13

3.3.2 WLAN status
To display all connected WLAN devices, click either the Ready to operate
icon or the WLAN stations arrow. Each connected
with its MAC address. Clicking the lock icon brings you directly to the WLAN
filters area (see Chapter 'WLAN filters'), where you can configure settings for
network security.
3.4 Device configuration
In the configuration area you can modify settings for security, network, HomePlug, date and time.
Network configuration 13
WLAN client is displayed
3.4.1 Security
In this area you can set a login password for access to the configuration interface of the AV200W.
AV200W
Page 14

14 Network configuration
By default, the built-in configuration interface of the AV200W is not protected
with a password. After installing the AV200W, however, you should enable
this protection by assigning a password to prevent access by a third party.
To do so, first enter (if present) the current password and then enter the
desired new password twice. Now the configuration interf
against unauthorised access with your individual password!
ace is protected
If the configuration interface is called up
appears first:
Enter admin in the User name field and your individual password
Password field.
The admin user name cannot be changed.
3.4.2 Netzwork settings
The AV200W also communicates via the TCP/IP protocol as a component of
your home network. The IP address required for this can either be entered
again later, the following window
in the
AV200W
Page 15

manually as a static address or obtained automatically from a DHCP server.
The option Use this to accept network setti
DHCP server is enabled in the factory defaults.
If a DHCP server is already present in the ne
addresses, have the option Use this to accept network settings automati-
cally from a DHCP server enabled so that the AV200W automatically
receives an ad
You can also assign a static IP address by making entries under IP address
(e.g. '192.168.0.250') and Netmask (e.g. 255.255.255.0).
dress from it.
Network configuration 15
ngs automatically from a
twork for giving out IP
3.4.3 HomePlug settings
In a HomePlug network, all connected components must use the same password. The HomePlug password is normally defined once at
your AV200W using the HomePlug encryption button (see Chapter 'Configuring the HomePlug network') or is taken over from the existing network.
The HomePlug standard password is HomePlugAV.
the installation of
AV200W
Page 16

16 Network configuration
3.4.4 Time server
A time server is a server on the Internet whose task consists of providing the
exact time. Most time servers are coupled with a radio clock.
To see which Internet time server your computer uses to communicate, simply click the clock in the lower right corner of the screen and select the Internet time tab.
Enable the option Retrieve date and time automatically, so that the
AV200W can automatically synchro
zone and the Time server. If you have enabled the option Adjust to daylight
saving time
saving time.
nise the date and time. Select your Time
automatically, the AV200W automatically adjusts to daylight
AV200W
Page 17

3.5 WLAN configuration
In the WLAN configuration area, you can configure settings for the WLAN
network and its security.
Network configuration 17
There are three different methods for switching the WLAN funct
• Simply press the ON/OFF button on the front panel of the device.
• Use the Enable WLAN or Disable WLAN button on the configuration inter-
face under WLAN configuration.
nable the WLAN time control. For more information, refer to Chapter
• E
'WLAN time control'.
The operating state of the device is displayed under 'Status overview'.
ion on and off:
AV200W
Page 18

18 Network configuration
3.5.1 Access point
Since the AV200W acts as an access point, you have to configure various
parameters for your wireless network. If you would like, you can completely
shut off the WLAN part of your AV200W, e.g. if you want to operate it exclusively as a simple HomePlug device via the built-in Ethernet connections. To
do so, switch
tions, or simply press the WLAN ON/OFF button on the housing.
sta
Keep in mind that after saving this setting, you will be dis
existing wireless connection to the AV200W. In this case, configure the
device via Ethernet or HomePlug.
off the Enable WLAN option under Status overview -> WLAN
connected from any
When activating the encryption, make sure that
encryption mode and encryption key) of the access point always correspond
to the settings of the clients, as otherwise you will be (unintentionally) excluding devices from your network.
In the factory defaults of the AV200W, the WLAN function is enabled and the
WPA2 WLAN encryption is se
key. You will find the 16-character security ID on the label on the back of the
housing.
For operation as an access point, a (transmission) channe
There are 13 channels available. We recommend keeping the default setting
Auto, since in this setting the AV200W selects the channel regularly and
independently. In other
for a suitable channel is carried out immediately. If no stations are connected,
the device automatically selects a channel every 15 minutes.
The SSID specifies the name of your wireless network. You can see this
name when logging onto the WLAN and thereby identify the corre
t with the security ID as the standard WLAN
words, if the last connected station logs out, a search
the WLAN settings (SSID,
l must be specified.
ct subnet.
AV200W
Page 19

If you enable the Hide SSID option, your wireless network remains hidden.
In this case, potential network users must know the exact SSID and enter it
manually to be able to set up a connection.
Some WLAN adapters have difficulty connecting
works. If the connection to a hidden SSID poses problems, first try to set up
the connection with
a visible SSID and only then try to hide it.
Network configuration 19
to such hidden wireless net-
Without encryption, not only are all data tran
smitted from client computers to
the AV200W in your wireless network without protection, but there is also no
password prompt to establish the connection. If no other security measures
were set up, such as a WLAN filter (see Chapter 'WLAN filters'), third parties
can gain access to your network at any time and,
for example, share your
Internet connection. Usually this happens without you noticing it.
To secure the data transmission in your wireless network the
re are two secu-
rity standards available.
• The
older and weaker WEP standard can protect communication with the
help of a key having either 10 or 26 characters. To do so, enter a series of
hexadecimal characters with
the corresponding number of characters into
the Key field.
• The state-of-the-art WPA and WPA2 (Wi-Fi Protected Access) methods
allow individua
of up to 63 characte
out having to convert it into hexadecimal format
lised keys consisting of letters and numbers with a length
rs. You can simply enter this using the keyboard, with-
first (as with WEP). Under
Mode, you can limit access of clients to the AV200W to the method you
have selected
Save all modified settings before lea
You should always encrypt the connections in
.
ving this configuration area again.
your WLAN. Otherwise anyone
within range could penetrate into your home network and, for example, share
your Internet connection. Always select the better WPA2 encryption method
AV200W
Page 20

20 Network configuration
if possible. Use WEP only if one of your wireless terminal devices does not
operate with a better standard.
3.5.2 WLAN filters
In addition to encryption (see Chapter 'Access point'), you can secure your
wireless network even more by using a WLAN
AV200W
filter to limit access via WLAN
Page 21

to the AV200W for selected devices. Even if the encryption is switched off,
the device will not establish a connection.
Network configuration 21
The WLAN filter should be used only as an
additional option. By using it you
could limit access to your wireless network, but without encryption it would be
relatively easy for third parties to eavesdrop on all of your data transmissions.
To use the WLAN filter, enable the option Enable filters. Now you can enter
various network devices by means of what is known as your MAC address
for access to yo
stations connected to your AV200W are automatically listed, that is, to
or
ur AV200W. Confirm each entry with Add. Network devices
enable an already connected station for the AV200W, simply select the MAC
address of the respective device and confirm it with Add. This then appears
under Approved WLAN stations. To remove an enabled station, select its
MAC add
The MAC address designates the hardware
ress and confirm it with Delete.
interface of each individual net-
work device uniquely (e.g. the WLAN adapter of a computer or the Ethernet
of a printer). It consists of six double-digit hexadecimal numbers, each
port
separated by a colon (e.g. 00:0B:3B:37:9D:C4). The MAC address is on the
housing of the device.
You can easily determine the MAC address of a
Windows computer by open-
ing the window with the command prompt under Start -> All Programs ->
AV200W
Page 22

22 Network configuration
Accessories -> Command Prompt. Enter the command IPCONFIG /ALL
here. The MAC address is displayed under
address.
After entering the MAC addresses, do not forget to click the Save button. If
the entered values are incorrect (e.g. because the colons are missing), a corresponding error message is displayed.
Keep in mind that you also have to enter the MAC address of your own computer if you are connected to the AV200W
WLAN. Otherwise you will block your own access to the device via WLAN by
activating the WLAN filter!
3.5.3 WLAN time control
To be able to use the WLAN time control, the option Retrieve date and time
automatically must be enabled under Device configuration -> Date and
time. An active Internet connection is also
server')
To be able to use the WLAN time control, enable the option Enable time control. The time control automatically switches you
at certain times of the day.
You can define two time periods during which your wireless
enabled for each weekday. Then the time control automatically switches the
wireless network on or off.
the designation Physical
not via the Ethernet port, but via
required. (see Chapter 'Time
r wireless network on and off
network is to be
AV200W
Page 23

Keep in mind that, as long as the AV200W registers connected stations, the
wireless network remains enabled. The wireless network is not switched off
until the last station has logged off.
Network configuration 23
3.5.4 WiFi Protected Setup (WPS)
Wi-Fi Protected Setup (WPS) is one of the international encryption standards
developed by the Wi-Fi Alliance for easily and quickly setting up a secure
wireless network. The encryption keys of the respective WLAN client are
transmitted automatically and continuously to the other WLAN client(s) of the
wireless network. The AV200W offers two different variants for transmitting
these encryption keys:
WPS via PBC (Push Button Configuration):
햲 Start the encryption process on the AV200W
쑗 either by pressing the WPS button on the front panel of the device
or
쑗 by pressing the Start setup button on the user interface under WLAN
configuration -> Wi-Fi Protected Setup (WPS).
햳 Then press either the WPS key of the WL
WPS button on the configuration interface. Now the devices exchange
AN client you are adding or the
AV200W
Page 24

24 Network configuration
their encryption keys and establish a secure WLAN connection. The
WLAN LED on the front panel indicates the synchronisation process by
flashing.
WPS via PIN:
햲 To interconnect WLAN
variants, enter an individualised key in the configuration interface under
WLAN configuration -> Wi-Fi Protected Setup (WPS) -> PIN and start
the encryption process by pressing the Start setup button.
clients securely in your wireless network via PIN
햳 Open
the configuration interface of the WLAN client to be added and
transmit the PIN selected on the AV200W. Confirm the encryption process as described there. Now the devices exchan
ge their encryption
keys and establish a secure WLAN connection. The WLAN LED on the
front panel indicates the synchronisation process by flashing.
Use of the WPS process implies either WPA
or WPA2. For that reason, keep
in mind the following automatic settings depending on the encryption standard (also refer to Chapter 'Access point'), i.e.
쑗 if under WLAN configuration -> Access Point No encryption or
WEP is selected in advance, WPA2 is set automatically. The newly
nerated password is displayed under WLAN configuration ->
ge
Access Point in the Key field.
쑗 if under WLAN configuration -> Access Point WEP is selected in
vance, WPA2 is set automatically. The newly generated pass-
ad
word is displayed under WLAN configuration -> Access Point in
Key field.
the
AV200W
Page 25

쑗 if under WLAN configuration -> Access Point WPA is selected in
advance, this setting remains with the previously assigned password.
der WLAN configuration -> Access Point WPA2 is selected in
쑗 if un
advance, this setting remains with the previously assigned password.
3.6 Management
In the Management area you can reset the current configuration to the factory defaults, save it to your computer as
update the firmware of the AV200W.
Network configuration 25
a file or restore it from there and
AV200W
Page 26

26 Network configuration
3.6.1 Resetting the configuration
With the Management -> Reset configuration command, the AV200W is
reset to the original factory defaults. In doing so, you lose your personal settings. The last-assigned HomePlug password for the AV200W is also reset
to the HomePlu
Plug network individually again, reconfigure it by using the encryption button
(see Chapter 'Configuring the HomePlug network').
g standard password HomePlugAV. To secure your Home-
You can change the HomePlug password by using the configura
in the Windows program group Start -> All Programs -> HomePlug ->
HomePlug Wireless Configuration or by using the encryption button.
For backup purposes, all active configuration settings can b
your computer, stored there as a file and reloaded into the AV200W. In this
way, you can for example generate configurations for different network environments, with which you can set up the device quickly and easily.
3.6.2 Saving a configuration file
To save the active configuration to your computer as a file, select the corresponding button in the area Management -> Save configuration file. Then
enter a storage loca
tion and name for the settings file.
tion software
e transmitted to
AV200W
Page 27

3.6.3 Restoring a configuration
An existing configuration file can be sent to the AV200W in the area Management -> Restore device configuration and enabled there. Select a suitable
file via the Browse… button and start the operation by clicking the Restore
ice configuration button.
dev
3.6.4 Refresh firmware
The firmware of the AV200W includes the software for operating the device.
If necessary, Schwaiger offers new versions on the Internet as a file download, for example to mod
ify existing functions.
Network configuration 27
햲 To bring the firmware up to the
www.schwaiger.de, and download the appropriate file for the AV200W
r computer.
to you
햳 Then in
Update Firmware. Click Browse… and select the downloaded file.
햴 Then start
a successful update, the AV200W restarts.
the configuration dialogue, go to the area Management ->
the update procedure with the Update Firmware button. After
latest version, first go to the website
AV200W
Page 28

28 Network configuration
Ensure that the update procedure is not interrupted. To do so, it is best to
connect your computer to the AV200W via HomePlug or LAN rather than
WLAN.
AV200W
Page 29

Configuring the HomePlug network 29
4 Configuring the HomePlug network
To set up custom encryption for your network—either using the encryption
button or the HomePlug Configuration Wizard. Please note the following
basic principle when choosing your encryption method:
• In PLC networks,
all corresponding PLC devices are equipped with an encryption button.
• For PLC
tons, dat
Wizard.
networks that include devices with and without encryption but-
a encryption must be set up using the HomePlug Configuration
4.1 Encrypting the PLC network at the touch of a button
To encrypt a PLC network simply press the PLC button that is located on the
device. Pressing this button will encrypt your network with a randomly generated password.
data encryption is as simple as touching a button, since
Adapters cannot be configured while in Standby mode.
The following section contains exact instructions o
work scenarios:
n the basis of possible net-
AV200W
Page 30

30 Configuring the HomePlug network
Encrypting a new PLC network consisting of two PLC adapters
Once both adapters have been successfully connected, press each encryption button for one second within two minutes of one another. That's it!
Your PLC network is now protected against una
uthorized access.
AV200W
Expanding an existing PLC network with a new AV200W
If you have already secured your existing
PLC network using the encryption
button, use the same method to integrate other adapters. Once you have
successfully connected the new AV200W, first press the encryption button of
one of your network’s existing adapters (one second), then press the
encryption button of your new AV200W (one second) within two minutes.
That's it! The new AV200W is now integrated in your network.
To integrate additional adapters in your network, repeat the abo
ve steps.
Page 31

Excluding a AV200W from your network
Configuring the HomePlug network 31
To exclude a AV200W from an existing ne
twork, press its encryption button
for at least ten seconds. The device will be assigned a new randomly generated password and will thus no longer be able to access the network. To
integrate the adapter in a different
AV200W network, follow the steps
described above, depending on whether you are setting up a new network or
adding the adapter to an existing one.
AV200W
Page 32

32 Appendix
5 Appendix
5.1 Technical data
Standards Wireless spezification IEEE 802.11b,g,n (2.4 GHz Single
Media access Wireless 802.11: CSMA/CA,
Protocols DHCP (Client), APIPA, Auto IP, ARP, ICMP, TCP/IP, UDP
Modes Access point with WEP, WPA (TKIP), WPA2 (AES)
Transmission speed 200 Mbps over the power supply grid
Transmission method Asynchronous
Modulation OFDM - 1155 carriers, 10
Range 300 m over the power supply grid
Security 128Bit AES encryption over the power supply grid
LEDs 4 LEDs:
LAN ports HomePlug: EURO mains plug
Power consumption Maximum 0.13A with:
Power supply AC 230 V,
Band)
HomePlug standard AV
Ethernet standard IEEE 802.3/x/u, Au
EDCA Ethernet 802.3: CSMA/CD
HomePlug AV: CSMA/CA
P), WMM 802.11e, Ethernet Bridge 802.1D
(I
300 Mbps over wireless
via power grid
Wireless:
802.11b: DSSS (Direct Sequence Spread Spectru m )
02.11g: OFDM (Orthogon al Frequency Division Multiple-
8
xing)
802.11n: OFDM (Orth ogonal Frequency Division Multiplexing )
up to 300 m over wireless
WEP, WPA (PSK), WPA2 (PSK), TKIP over wireless
Power
Powerline Link/Act
WLAN On/Act
ETH Link/Act
WLAN: internal 2.4 GHz antennas
Ethernet: three RJ45 (IEEE 802.3u
Maximum: 7W
Typical: 5.6W
50 Hz
24/256/64-QAM, QPSK, BPSK
to MDI /MDI-X
/ 10/100 Mbps)
AV200W
Page 33

Appendix 33
Environment Humidity (non-condensing): 10-90%
System requirements Ethernet interface
Warranty
Storage: -25°C to 70°C
Operation: 0°C to 40°C
Windows XP (32/64 bit), Windows Vista (32/64 bit), Windows 7 (32/64 bit), Linux (Ubuntu), Mac (OS X)
2 years
5.2 Important safety instructions
All safety and operating instructions should be read and understood before
using the device, and should be kept for future reference.
• Never open the device.
device.
Do not try to service this product yourself! Contact qualified technicians each
and every
time your device needs maintenance. There is a risk of electric
shock!
• Use the device in a dry
• Always use the included
The outlet must be within reach of the connected network device. The
adapter and the network device must be easily accessible.
switch off the device, pull the power plug.
• To
disconnect the device from the power supply grid, pull the power plug.
• To
• Do not
• Do not
• S
keep the device in direct sunlight.
insert any objects into the openings of the device.
lots and openings on the case serve as ventilation. Never block or cover
them.
• Never set up
the device near a heater or radiator.
• The device should
ensured.
• Disconnect the device
moist towel to clean the device. Never use water, paint thinner, benzene,
alcohol or other strong cleaning agents when cleaning the device, as these
could damage the case.
There are no user-serviceable parts inside the
location only.
network cable to connect the device.
be located only where sufficient ventilation can be
from the power supply grid before cleaning. Use a
AV200W
Page 34

34 Appendix
• Never use the device with a power supply that does not meet the specifica-
tions provided on the rating plate. If you do not
supply you have at home, contact your dealer or energy supplier.
event of damage, disconnect the device from the power supply grid
• In the
and contact customer service. This applies, for example, if
power cable or plug is damaged.
• the
• liquid
• the
• the
• the
has been spilled on the device or objects have fallen into the
device.
device has been exposed to rain or water.
device does not work, even though the operating instructions
have been followed properly.
device’s case is damaged.
5.3 Disposal of old devices
To be used in the countries of the European Union and other European countries with a separate collecting system:
The icon with crossed-out wastebasket on the device means that this adapter
is an
electrical or electronic device that falls within the scope of application of
the German Electrical and Electronic Equipment Act ("Elektrogesetz"). Since
24 March 2006, these types of devices may no longer be disposed of with
household waste. Rather, in Germany, they can be given to a municipal collection point free of charge. Contact your municipal
the address and hours of the nearest collection point.
know what type of power
government to find out
AV200W
Page 35

5.4 Warranty conditions
The warranty is given to purchasers of the manufacturer's products in addition to the warranty
conditions provided by law and in accordance with the following conditions:
1 Warranty coverage
a) The warranty covers the eq
turer's sole discretion, be replaced or repaired free of charge if, despite p roven proper handling and adherence to the operating instructions, these parts became defective due to
fabrication and/or material defects. Alternatively, the manufacturer reserves the right to
replace the defective product with a comparable product with the same specifications and
features. Operating manuals and possibly supplied software are excluded from the warranty.
b) Material and service charges shall be covered by the manufacturer, but not shipping and
handling costs involved in transport from the buyer to the service stat ion and/or to th e man-
ufacturer.
c) Replaced parts become property of the manufacturer.
d) The manufacturer is authorized to carry out technical changes (e.g. firmware updates)
beyond repair and replacement of defective parts in order to bring the equipment up to the
current technical state. This does not result in any additional charge for the customer. A
legal claim to this service does not exist.
2 Warranty period
The warranty period for this product is two years. This period begins at the day of delivery from
the manufacturer's dealer. Warranty serv ices carried out by the man ufacture r do no t result in an
extension of the warranty period nor do they initiate a new warranty period. The warra nty period
for installed replacement parts ends with the warranty period of the device as a whole.
3 Warranty procedure
a) If defects appear during the warranty period, t
ately, at the latest within a period of 7 days.
b) In the case of any externally visible damage arising from transport (e.g. damage to the
housing), the person carrying out the transportation and the sender should be informed
immediately. On discovery of damage which is not externally visible, the transport company
and the sender are to be immediately informed in writing, at the latest with in 3 days of deliv-
ery.
c) Transport to and from the location where the warranty claim is accepted and/or the repaired
device is exchanged, is at the purchaser's own risk and cost.
d) Warranty claims are only valid if a copy of the original purchas e receipt is re turned with the
device. The manufacturer reserves the right to require the submission of the original pur-
chase receipt.
4 Suspension of the warranty
All warranty claims will be deemed invalid
a) if the label with the serial number has been removed from the device,
if the device is damaged or destroyed as a result of acts of nature or by environment al influ-
b)
ences (moisture, electric shock, dust, etc.),
c) if the device was stored or operated under conditions not in compliance with the technical
specifications,
uipment delivered and all its parts. Parts will, at the manufac-
Appendix 35
he warranty claims must be made immedi-
AV200W
Page 36

36 Appendix
d) if the damage occurred due to incorrect handling , especially to non-observance of the sys-
tem description and the operating instructions,
e) if the device was opened, repaired or modified by persons not contracted by the manufac-
turer,
f) if the device shows any kind of mechanical damage, or
g) if the warranty claim has not been reported in accordance with 3a) or 3b).
5 Operating mistakes
If it becomes apparent that the reported malfunction of the device has been caused by un suitable
hardware, software, installation or operation, the manufacturer reserves the right to charge the
purchaser for the resulting testing costs.
6 Additional regulations
a) The above conditions define the complete scope of the manufacturer's legal liability.
b) The warranty gives no entitlement to additional claims, such as any refund in full or in part.
Compensation claims, regardless of the legal basis, are excluded. This does not apply if
e.g. injury to persons or damage to private property are specifically covered by the pro duct
liability law, or in cases of intentional act or culpable negligence.
c) Claims for compensation of lost profits, indirect or consequential detriments, are excluded.
d) The manufacturer is not liable for lost data or retrieval of lost data in cases of slight and ordi-
nary negligence.
e) In the case that the intentional or culpable negligence of the manufac turer's employees has
caused a loss of data, the manufacturer will be liable for those costs typical to the recovery
of data where periodic security data back-ups have been made.
f) The warranty is valid only for the first purchaser and is not transferable.
g) The court of jurisdiction is located in Aachen, Germany in the case that the purchaser is a
merchant. If the purchaser does not have a court of jurisdiction in the Federal Republic of
Germany or if he moves his domicile out of Germany after conclusion of the contract, the
manufacturer's court of jurisdiction applies. This is also applicable if the purchaser's domi-
cile is not known at the time of institution of proceedings.
h) The law of the Federal Republic of Germany is applicable. The UN commercial law does
not apply to dealings between the manufacturer and the purchaser.
AV200W
Page 37

MANUFACTURER INFORMATION
Dear customer,
should you require technical assistance and your dealer or installer was
not able to help, please contact our technical support.
Schwaiger GmbH
Wuerzburger Straße 17
90579 Langenzenn
Hotline: +49 (0) 9101 702-299
www.schwaiger.de
info@schwaiger.de
Business hours:
Monday to Thursday: 08:00 am - 05:00 pm
Friday: 08:00 am - 02:30 pm
 Loading...