


0099001354CAWB-01
OWNERS MANUAL / MANUAL DEL USUARIO
Model / Modelo: XP2260-CA
INSTANT POWER™
Jump Starter and DC Power Source
Arrancador y Fuente de Poder de CC
PLEASE SAVE THIS OWNER’S MANUAL AND READ BEFORE EACH USE.
This manual will explain how to use the Instant Power safely and effectively.
Please read and follow these instructions and precautions carefully.
POR FAVOR GUARDE ESTE MANUAL DEL PROPIETARIO Y LEER ANTES
DE CADA USO. En este manual se explica cómo utilizar el Instant Power segura
y efectiva. Por favor, lea y siga las siguientes instrucciones y precauciones.

CONTENTS / CONTENIDOS
IMPORTANT SAFETY INSTRUCTIONS ........................................................................3
PERSONAL SAFETY PRECAUTIONS...........................................................................3
FEATURES ..................................................................................................................... 4
CHARGING THE INTERNAL BATTERY OF THE INSTANT POWER ............................4
USING THE INSTANT POWER ......................................................................................5
MAINTENANCE AND CARE .......................................................................................... 8
TROUBLESHOOTING .................................................................................................... 8
BEFORE RETURNING FOR REPAIRS ..........................................................................8
SPECIFICATIONS ..........................................................................................................9
REPLACEMENT PARTS/ACCESSORIES .....................................................................9
LIMITED WARRANTY ..................................................................................................10
INSTRUCCIONES IMPORTANTES DE SEGURIDAD ................................................. 11
PRECAUCIONES DE SEGURIDAD PERSONAL ........................................................11
CARACTERÍSTICAS ....................................................................................................12
PARA CARGAR LA BATERIA INTERNA DE LA FUENTE DEL INSTANT POWER .....12
CÓMO UTILIZAR EL INSTANT POWER ......................................................................13
MANTENIMIENTO Y CUIDADO ................................................................................... 16
LOCALIZACIÓN Y SOLUCIÓN DE PROBLEMAS .......................................................16
ANTES DE DEVOLVER A REPARACIONES ...............................................................17
ESPECIFICACIONES ................................................................................................... 17
REPUESTOS/ACCESORIOS ....................................................................................... 17
GARANTÍA LIMITADA ...................................................................................................18
WARRANTY CARD / TARJETA DE GARANTÍA ........................................................... 19
THIS UNIT CONTAINS A SEALED, NON-SPILLABLE LEAD-ACID
BATTERY. MUST BE DISPOSED OF PROPERLY.
ESTA UNIDAD CONTIENE UNA BATERÍA SELLADA DE ÁCIDO-PLOMO
NO DERRAMABLE QUE DEBE DESECHARSE APROPIADAMENTE.
WARNING: Possible explosion hazard. Contact with battery acid may
cause severe burns and blindness. Keep out of reach of children.
ADVERTENCIA: Posible Riesgo de una explosión. El contacto con una batería de ácido
puede causar quemaduras y ceguera. Manténgase alejado de los niños.

• 3 •
IMPORTANT SAFETY INSTRUCTIONS
WARNING – RISK OF EXPLOSIVE GASES
WORKING IN THE VICINITY OF A LEAD-ACID BATTERY IS DANGEROUS.
BATTERIES GENERATE EXPLOSIVE GASES DURING NORMAL OPERATION.
IT IS IMPORTANT THAT YOU FOLLOW THESE INSTRUCTIONS EACH TIME
YOU USE THE INSTANT POWER.
To reduce the risk of battery explosion, follow these instructions and those published by
the battery manufacturer and the manufacturer of any equipment you intend to use in the
vicinity of a battery. Review cautionary marking on these products and on the engine.
WARNING: Pursuant to California
Proposition 65, this product contains
chemicals known to the State of California
to cause cancer and birth defects or other
reproductive harm. Wash hands after
handling.
• Keep out of reach of children.
• Do not disassemble the Instant Power.
Take it to a qualied service professional
if service or repair is required. Incorrect
assembly may result in re or electrical
shock.
• Do not use the Instant Power to jump a
vehicle while charging the internal battery.
• Do not recharge the Instant Power with a
damaged extension cord.
• The Instant Power gets hot during charging
and must have proper ventilation.
• Do not set the Instant Power on ammable
materials, such as carpeting, upholstery,
paper, cardboard, etc.
• Place the Instant Power as far away from
the battery being jumped as the cables
will permit.
• Do not expose the Instant Power to rain
or snow.
• Never place the Instant Power directly
above battery being jumped.
• To prevent arcing, never allow the clamps to
touch together or to contact the same piece
of metal.
• Use of an attachment not recommended or
sold by Schumacher® Electric Corporation
may result in damage to the unit or personal
injury.
• Never operate the Instant Power if it is
damaged.
• If someone else uses the Instant Power,
ensure they are well informed on how to
use it safely, and have read and understood
the operating instructions.
• The Instant Power is NOT designed to be
installed as a replacement for a vehicle
battery.
• Use ONLY on vehicles, boats and garden
tractors powered with a 12V DC battery
system.
• If the engine fails to start after the
recommended number of attempts,
disconnect the unit and look for other
problems that may need to be corrected.
• Use the Instant Power for jump starting
lead-acid batteries ONLY. Do not use for dry
cell batteries that are commonly used with
home appliances.
PERSONAL SAFETY PRECAUTIONS
• Wear complete eye and clothing protection
when working near lead-acid batteries.
Always have someone nearby for help.
• Have plenty of fresh water, soap and baking
soda nearby for use, in case battery acid
contacts your eyes, skin, or clothing. Wash
immediately with soap and water and seek
medical attention.
• If battery acid comes in contact with eyes,
ush eyes immediately for a minimum 10
minutes and get medical attention.
• Neutralize any acid spills thoroughly with
baking soda before attempting to clean up.
• Remove all personal metal items from your
body, such as rings, bracelets, necklaces
and watches. A battery can produce a short
circuit current high enough to weld a ring to
metal, causing a severe burn.
• Never smoke or allow a spark or ame in
the vicinity of the battery or engine.
• 4 •
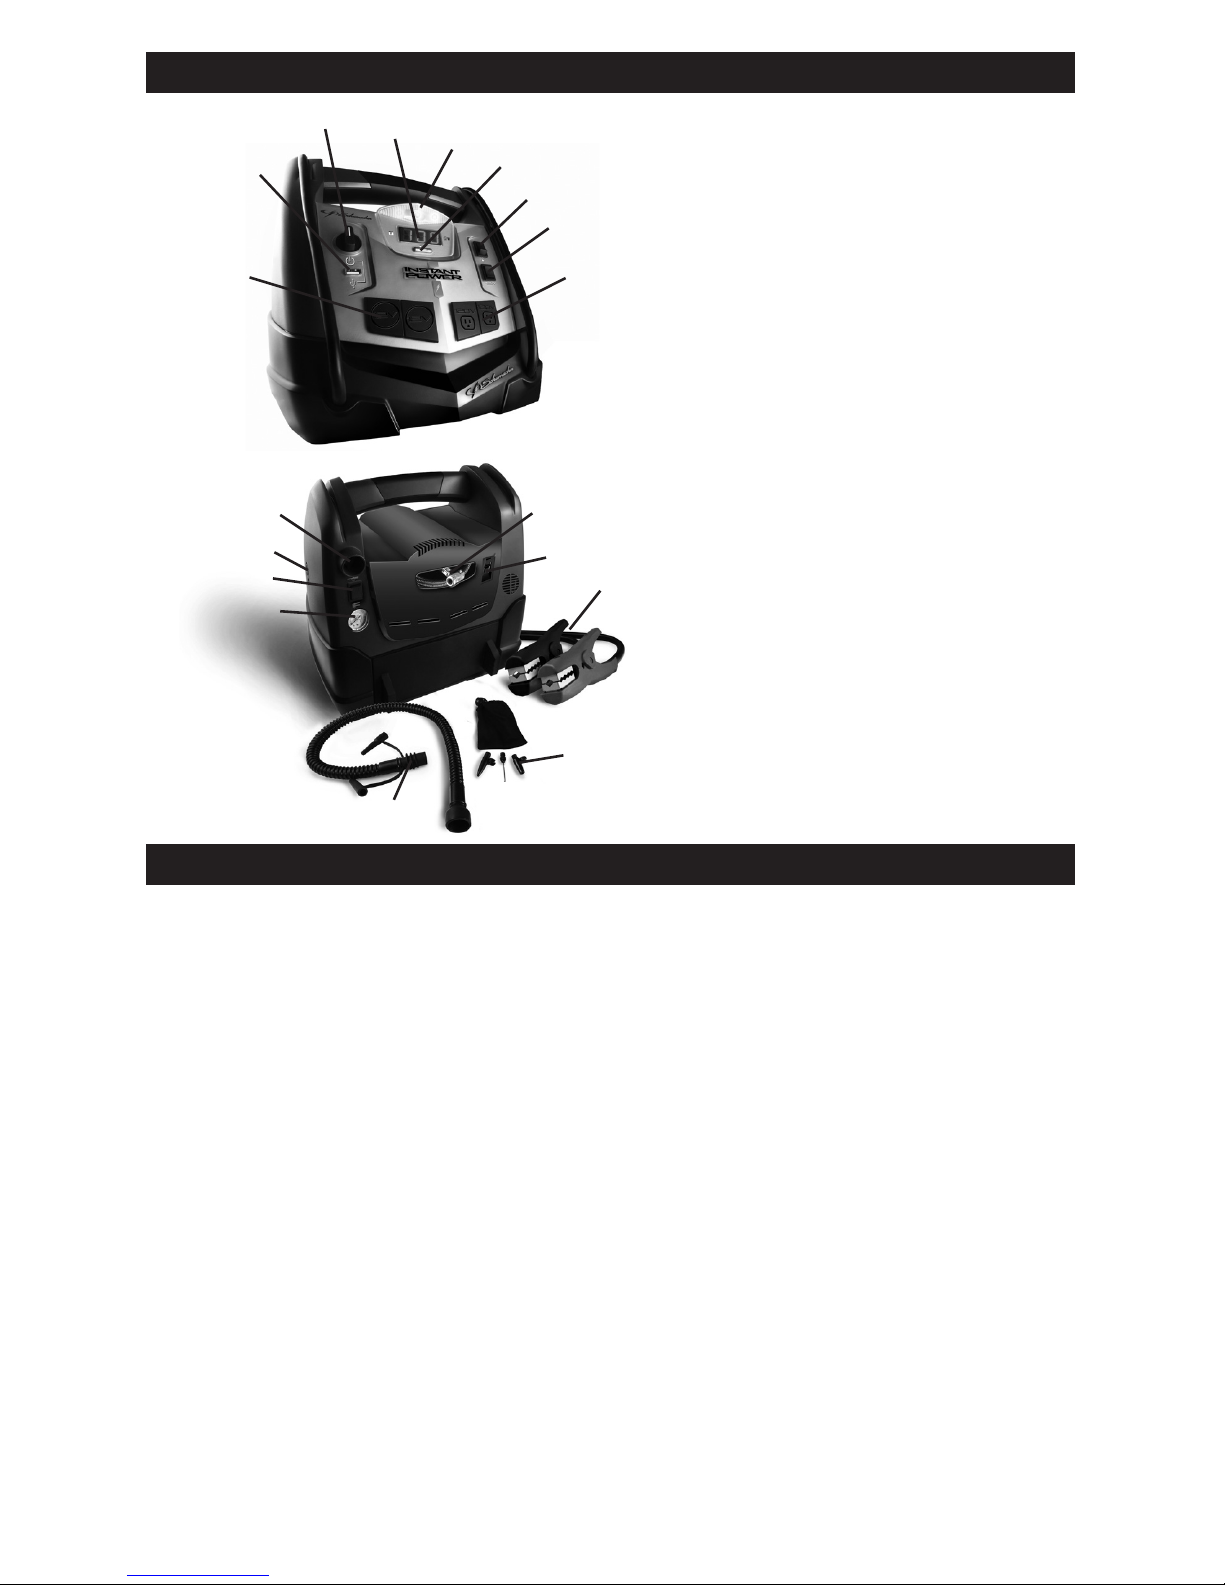
FEATURES
3
2
5
4
6
7
8
1
9
14
10
11
13
15
12
18
16
1. 12 Volt DC outlets
2. USB port
3. Jump start/USB On/Off switch
4. Digital display
5. Built-in work light
6. Display button
7. Work light On/Off switch
8. Inverter On/Off switch
9. 120 Volt AC outlets
10. Compressor gauge
11. Compressor/inator switch
12. Deator port
13. Inator port
14. Compressor hose
15. Charger port
16. Battery clamps
17. Adapters
18. Inator hose
17
CHARGING THE INTERNAL BATTERY OF THE INSTANT POWER
IMPORTANT! CHARGE IMMEDIATELY
AFTER PURCHASE, AFTER EACH USE
AND EVERY 30 DAYS, TO KEEP THE
INSTANT POWER’S INTERNAL BATTERY
FULLY CHARGED AND PROLONG
BATTERY LIFE.
CHECKING THE LEVEL
OF THE INTERNAL BATTERY
Check the internal battery’s charge level by
pressing the Display Button. The Digital
Display will show the battery’s percent of
charge. Charge the internal battery if the
display shows it is under 100%.
NOTE: The internal battery’s percent of
charge is most accurate when the Instant
Power has been disconnected from all
devices and charging sources for a few hours.
CHARGING THE INTERNAL BATTERY
Charge the internal battery for the Instant
Power using an extension cord (not included).
NOTE: Use of an improper extension cord
could result in a risk of re and electric shock.
1. To charge, plug an extension cord into the
charger port on the back of the jump starter.
2. Plug the extension cord into a 120VAC
electrical wall outlet.
3. While the jump starter is charging, the
green LED on the back of the unit will be
on. Complete charging may take up to 72
hours. The jump starter is then ready
to use.
4. The charger will automatically go into
maintain mode and maintain the battery
at full charge without damaging it.
5. Charge the jump starter as soon as
possible after use.
CHARGING THE INTERNAL BATTERY
WHILE DRIVING
You may also charge the internal battery
while driving, using a male-to-male
charger cable (part number 94500109 –
not included).

• 5 •
IMPORTANT: DO NOT CHARGE
INTERNAL BATTERY FOR MORE THAN
30 MINUTES OR LEAVE THE BATTERY
UNATTENDED. IT COULD EXPLODE,
CAUSING PROPERTY DAMAGE OR
PERSONAL INJURY.
1. Make sure the car is running.
2. Insert one end of the accessory cable into
the 12V DC power outlet.
3. Insert the other end of the accessory
cable into the vehicle’s accessory outlet
(lighter socket).
NOTE: The GREEN LED does not operate
during this method of charging. Using this
method to charge the battery overrides the
maintain mode and the battery can be
overcharged.
4. Monitor the progress of the charge by
pressing the display button on the front
of the unit. When the battery is fully
charged, disconnect the accessory cable
from the Instant Power, then from the
lighter socket of the vehicle.
NOTE: Completely disconnect the charger
cable when the engine is not running.
USING THE INSTANT POWER
IMPORTANT: Using the Engine Start
feature without a battery installed in the
vehicle will damage the vehicle’s electrical
system.
1. Turn the ignition OFF.
2. Lay the DC cables away from any
fan blades, belts, pulleys and other
moving parts.
3. For a negative-ground vehicle (as in most
vehicles), connect the Instant Power’s
POSITIVE (RED) clamp to the POSITIVE
(POS, P, +) battery post. Next, connect
the NEGATIVE (BLACK) clamp to the
vehicle chassis or engine block, away
from the battery.
4. For a positive-ground vehicle, connect
the Instant Power’s NEGATIVE (BLACK)
clamp to the NEGATIVE (NEG, N, -)
battery post. Next, connect the POSITIVE
(RED) clamp to the vehicle chassis or
engine block away from the battery.
5. Turn the switch to the ON position.
NOTE: When connected to the vehicle,
the display shows the vehicle’s battery
voltage. When connected and in the ON
position, the display shows the equalized
voltage between the vehicle’s battery and
internal battery.
6. Crank the engine for no more than 8
seconds. If the engine does not start, wait 2
minutes before cranking again.
7. After the engine starts, turn the switch to
the OFF position and remove the Instant
Power from the battery.
8. Charge the Instant Power.
USING THE USB PORT
The USB port provides up to 2A at 5V DC.
1. Ensure the battery clamps are securely
clipped on the storage holders.
2. Turn the Instant Power ON.
3. Plug your device into the USB port.
4. When nished using the USB port, turn
the switch to the OFF position.
5. Charge the Instant Power.
USING THE WORK LIGHT
The work light is controlled by a sliding ON/
OFF switch located on the front of the Instant
Power. Make sure the lamp is turned OFF
when the unit is being recharged or stored.
Position the Instant Power on a at, stable
surface near the intended work area.
Ensure the battery clamps are securely
clipped on the storage holders.
POWERING A 12V DC DEVICE
The Instant Power is a power source for all
12V DC accessories that are equipped with
a 12V accessory plug. Use it for power
outages and on shing or camping trips.
NOTE: Do not power a 12V device with the
Instant Power while charging the internal
battery.
1. Make sure the device to be powered
is OFF before inserting the 12V DC
accessory plug into the 12V DC
accessory outlet.
2. Open the protective cover of the DC power
outlet on the Instant Power.
3. Plug the 12V DC device into the DC
power outlet and turn on the 12V DC
device (if required).
4. When nished, turn off the DC device
(if required) and unplug from the DC
power outlet.
CAUTION: Do not use the Instant Power
to run appliances that draw more than
15A DC.
NOTE: Extended operation of a 12V DC
device may result in excessive battery
drain. Recharge the Instant Power
immediately after unplugging the 12V
DC device.

• 6 •
USING THE AIR COMPRESSOR
WARNING. Read the instructions of the
product being inated before using the
compressor. Avoid overination; do not
exceed the manufacturer’s recommended
pressures. Do not leave the air compressor
unattended during use.
NOTE: Before you use the compressor for
the rst time, you must install the
compressor hose wrap cleats. To install:
press each cleat into its corresponding
mounting hole on the back of the jump
starter until it clicks into place. Wrap the
compressor hose around these cleats when
it is not being used.
1. Remove the air compressor hose from
the storage cleats.
2. Connect the adaptor to the valve stem
and close the thumb latch. If necessary,
use one of the additional adaptors.
3. Turn ON the inator power switch and
inate to the desired pressure or fullness.
4. When the desired pressure is reached,
put the inator power switch to OFF,
open the thumb latch and remove the
connector from the valve stem.
5. Allow unit to cool.
6. Recharge the unit before storing.
NOTE: The air compressor is rated for
150 PSI.
USING THE INFLATOR
RISK OF EXPLOSION.
Read instructions of the product being
inated before using the inator. Avoid
overination, do not exceed the
manufacturer’s recommended pressures. Do
not leave the inator unattended during use.
1. Ensure the battery clips are securely on
the storage holders.
2. Attach the corrugated hose with end
adapter to the high-ow inator outlet
located near the Compressor/Inator
switch on the back of the Instant Power.
3. The main accessory adapter attached to
the corrugated hose accommodates up
to 4 sizes. If another size is needed, an
additional adapter can be attached to the
end of the main accessory adapter.
4. Insert the adapter into the product to be
inated.
5. Push the Compressor/Inator switch to the
INFLATOR position and inate the product.
6. When the product is inated to the
desired level, push the Compressor/
Inator switch to the OFF position and
remove the adapter.
Estimatedtimeforinating
Vehicle tires 13-16" 6-24 minutes
Bike tires 1-3 minutes
Sports balls 30 seconds
These times are approximate. Use the air
compressor gauge to ensure the proper pressure
has been reached. Do not overinate.
USING THE DEFLATOR
1. Ensure the battery clips are securely on
the storage holders.
2. Attach the corrugated hose with the end
adapter to the high-ow deator outlet,
which is located on the side of the
Instant Power.
3. The main accessory adapter attached to
the corrugated hose accommodates up
to 4 sizes. If another size is needed, an
additional adapter can be attached to the
end of the main accessory adapter.
4. Insert the adapter into the item to be
deated.
5. Push the Compressor/Inator switch to the
INFLATOR position and deate the item.
6. When the product is deated to the
desired level, push the Compressor/
Inator switch to the OFF position and
remove the adapter.
BEFORE USING THE INVERTER
Important Safety Instructions:
1. Keep the Instant Power well ventilated, in
order to properly disperse heat generated
while it is in use. Make sure there are
several inches of clearance around the
top and sides, and do not block the vents
on the back of the Instant Power.
2. Make sure the Instant Power is not close
to any potential source of ammable
fumes or clothing.
3. Keep the Instant Power dry.
4. DO NOT allow the Instant Power to come
into contact with rain or moisture.
5. DO NOT operate the Instant Power if
you, the Instant Power, the device being
operated or any other surfaces that may
come in contact with any power source
are wet. Water and many other liquids
can conduct electricity, which may lead to
serious injury or death.
6. Do not place the Instant Power on or near
heating vents, radiators or other sources
of heat.
7. Do not place the Instant Power in direct
sunlight. The ideal air temperature for
operation is between 50° and 80° F.

• 7 •
8. Do not use the inverter near an open
engine compartment where fumes may
accumulate.
9. Do not modify the AC receptacles in
any way.
USING THE INVERTER
It is important to know the continuous wattage
of the device you plan to use with the inverter.
The Instant Power must be used with devices
drawing 200 watts or less. If the wattage is
not marked on the device, use only devices
that draw less than 1.7 amps of AC current.
Devices like TVs, fans or electric motors
require additional power to start (commonly
known as the “starting or peak power”). The
Instant Power can supply a momentary
surge in wattage; however even devices
rated less than the maximum 200 watts can
exceed the inverter’s surge capability and
cause an automatic overload shutdown.
Do not use the inverter with a product that
draws a higher wattage than the inverter can
provide, as this may cause damage to the
inverter and the product.
Make sure the device you are using is
compatible with a modied sine wave inverter.
Always run a test to
establish whether the
inverter will operate a particular piece of
equipment or device.
In the event of a power overload, the inverter
is designed to automatically shut down. This
safety feature prevents damaging the
inverter while testing devices and equipment
with the 200-watt range.
If powering more than one device, start one
device at a time to avoid a power surge
and/or inverter overload. The surge load of
each device should not exceed the inverter’s
Continuous Operation wattage rate.
If you are using the power inverter to
operate a battery charger, monitor the
temperature of the battery charger for about
10 minutes. If the battery charger becomes
abnormally warm, disconnect it from the
inverter immediately.
You can use an extension cord from the
inverter to the device without signicantly
decreasing the power being generated by
the inverter. For best operating results, the
extension cord should be 16 AWG (1.31
mm2) or larger and no longer than 50 feet.
This inverter uses a
nonsinusoidal waveform.
Therefore, we do not recommend you use it
to power the following devices:
1. Switch mode power supplies
2. Linear power supplies
3. Class 2 transformers
4. Line lter capacitors
5. Shaded pole motors
6. Fan motors
7. Microwave ovens
8. Fluorescent and high-intensity lamps
(with a ballast)
9. Transformerless battery chargers
Doing so may cause the device to run
warmer or overheat.
POWERING A 120V AC DEVICE
To operate a 120V AC device:
1. Ensure the battery clips are securely on
the storage holders.
2. Open the protective cover of the AC
power outlet on the front panel of the
Instant Power.
3. Make sure the 120V AC device to be
operated is turned OFF.
4. Plug the 120V AC device into the AC
power outlet, and turn the Inverter switch
to the ON position. NOTE: When the
inverter is turned on and being used, the
display will show the total wattage used by
the device being powered by the inverter.
5. Turn the device on.
6. If the device does not operate properly
when rst connected to the inverter,
push the inverter rocker switch ON,
OFF, and ON again in quick succession.
If this procedure is not successful, it is
likely that the inverter does not have the
required capacity to operate the device
intended.
7. Charge the Instant Power as soon as
possible after each use.
RISK OF ELECTRIC SHOCK.
Incorrect operation of your inverter may
result in damage and personal injury. The
inverter output is 120V AC and can shock or
electrocute the same as any ordinary
household AC wall outlet.
NOTE: The maximum continuous load is 200
watts. Do not use the inverter with a product
that draws more than 200 watts, as this may
cause damage to the inverter and the product.

• 8 •
MAINTENANCE AND CARE
• Clean the clips and the case each time you
are nished using it.
• Recharge the unit once a month when not
in use.
• Store clips on their support posts, to ensure
they do not come into contact with any
metallic surface.
• Never completely discharge the internal
battery.
TROUBLESHOOTING
PROBLEM POSSIBLE CAUSE REASON/SOLUTION
The Instant Power won’t jump
start my car.
Jump Start/USB Switch is not
turned ON.
Clips are not making a good
connection to the battery.
The Instant Power’s battery is
not charged.
The vehicle’s battery is
defective.
Turn ON the Jump Start/USB
Switch.
Check for poor connection to
battery and frame. Make sure
connection points are clean.
Rock clips back and forth for a
better connection.
Check the battery charge
status by pressing the button
on the front of the Instant
Power. See DIGITAL DISPLAY
FUNCTIONS section of this
manual.
Have the battery checked.
The Instant Power won’t power
my 12V device.
The 12V device is not turned on.
The Instant Power’s battery is
not charged.
The 12V device draws more
than 15A or has a short circuit.
Turn on the 12V device.
Check the battery charge
status by pressing the button
on the front of the Instant
Power. See DIGITAL DISPLAY
FUNCTIONS section of this
manual.
Disconnect the 12V device.
The internal breaker will
automatically reset after a
minute or two. Try the 12V
device again. If it happens
again, replace the 12V device.
The battery in the Instant
Power won’t hold a charge.
The battery is bad (will not
accept a charge).
Have the battery checked.
BEFORE RETURNING FOR REPAIRS
If these solutions do not eliminate the problem, or for more information
about troubleshooting, contact customer service for assistance:
services@schumacherelectric.com•www.batterychargers.com
or call 1-800-621-5485
Monday-Friday 7:00am to 5:00pm CST
For REPAIR OR RETURN, contact Customer Service at 1-800-621-5485.
DO NOT SHIP UNIT until you receive a RETURN MERCHANDISE AUTHORIZATION
(RMA) number from Customer Service at Schumacher Electric Corporation.

• 9 •
SPECIFICATIONS
Internal battery type Maintenance-free AGM lead-acid
Nominal voltage 12V DC
DC power outlet (max. continuous load) 15A (both outlets combined)
Built-in work light (non-replaceable) 3 white LEDs
Jumper cables 4-gauge AWG, 24 Inches
Dimensions (H x W x D) 12 H x 11.5 x 10.5 Inches
Weight 23.9 lbs. (10.84 kg)
ACPowerSpecications
Maximum continuous power 200 Watts
Surge capacity (peak power) 400 Watts
No load current draw <0.4 Amps
Wave form Modied sine wave
Input voltage range 10.5 - 15.5V DC
AC outlets (2) 120V AC 3-prong NEMA 5-15
REPLACEMENT PARTS/ACCESSORIES
Air compressor accessory kit (3 hose adapters) ................................................0099000599
Inator accessory kit: (inator/deator hose, unit end and 3 hose adapters) .....0099000598
Male-to-male accessory cable ...............................................................................94500109

• 10 •
LIMITED WARRANTY
SCHUMACHER ELECTRIC CORPORATION, 801 BUSINESS CENTER DRIVE,
MOUNT PROSPECT, IL 60056-2179, MAKES THIS LIMITED WARRANTY TO THE
ORIGINAL RETAIL PURCHASER OF THIS PRODUCT. THIS LIMITED WARRANTY
IS NOT TRANSFERABLE OR ASSIGNABLE.
Schumacher Electric Corporation (the “Manufacturer”) warrants this Instant Power for one
(1) year and the internal battery for ninety (90) days from the date of purchase at retail
against defective material or workmanship that may occur under normal use and care.
If your unit is not free from defective material or workmanship, Manufacturer’s obligation
under this warranty is solely to repair or replace your product, with a new or reconditioned
unit, at the option of the Manufacturer. It is the obligation of the purchaser to forward the
unit, along with proof of purchase and mailing charges prepaid to the Manufacturer or its
authorized representatives in order for repair or replacement to occur.
Manufacturer does not provide any warranty for any accessories used with this product
that are not manufactured by Schumacher Electric Corporation and approved for use
with this product. This Limited Warranty is void if the product is misused, subjected to
careless handling, repaired, or modied by anyone other than Manufacturer or if this
unit is resold through an unauthorized retailer.
Manufacturer makes no other warranties, including, but not limited to, express,
implied or statutory warranties, including without limitation, any implied warranty
of merchantability or implied warranty of tness for a particular purpose. Further,
Manufacturer shall not be liable for any incidental, special or consequential damage
claims incurred by purchasers, users or others associated with this product, including,
but not limited to, lost prots, revenues, anticipated sales, business opportunities,
goodwill, business interruption and any other injury or damage. Any and all such
warranties, other than the limited warranty included herein, are hereby expressly
disclaimed and excluded. Some states do not allow the exclusion or limitation of
incidental or consequential damages or length of implied warranty, so the above
limitations or exclusions may not apply to you. This warranty gives you specic legal
rights and it is possible you may have other rights which vary from this warranty.
THIS LIMITED WARRANTY IS THE ONLY EXPRESS LIMITED WARRANTY AND
THE MANUFACTURER NEITHER ASSUMES OR AUTHORIZES ANYONE TO
ASSUME OR MAKE ANY OTHER OBLIGATION TOWARDS THE PRODUCT OTHER
THAN THIS WARRANTY.
Schumacher® and the Schumacher Logo are registered trademarks
of Schumacher Electric Corporation.

• 11 •
INSTRUCCIONES IMPORTANTES DE SEGURIDAD
ADVERTENCIA – RIESGO DE GASES EXPLOSIVOS
TRABAJAR CERCA DE UNA BATERÍA DE PLOMO-ÁCIDO ES PELIGROSO. LAS
BATERÍAS GENERAN GASES EXPLOSIVOS DURANTE SU FUNCIONAMIENTO
NORMAL. ES IMPORTANTE QUE SIGA LAS INSTRUCCIONES CADA VEZ QUE
UTILICE EL INSTANT POWER.
Para disminuir el riesgo de explosión de la batería, siga estas instrucciones, al igual
que las recomendaciones publicadas por el fabricante de la batería y de cualquier
equipoqueseutilizarácercadelabatería.Veriquelasseñalesdeadvertenciaque
se hayan colocado en estos productos y en el motor.
ADVERTENCIA: Conforme a la Propuesta
65 de California, este producto contiene
químicos de los cuales en el Estado de
California se tiene conocimiento que
provocan cáncer y malformaciones
congénitas u otras lesiones reproductivas.
Lávese las manos después de usar.
• Manténgase alejado de los niños.
• No desarme el Instant Power; hágalo
revisar por una persona capacitada que
efectúe reparaciones cuando necesite
servicio de mantenimiento o una
reparación. Volver a ensamblar el Instant
Power en forma incorrecta puede provocar
riesgo de incendio o descarga eléctrica.
• No utilice el Instant Power para pasar
corriente a un vehículo mientras se carga la
batería interna.
• No recargue el Instant Power con una
extensión dañada.
• El Instant Power se calienta durante la carga
y debe tener una ventilación adecuada.
• No coloque el Instant Power sobre
materiales inamables como alfombras,
tapicería, papel, cartón, etc.
• Coloque el Instant Power tan lejos de la
batería que se está cargando como los
cables lo permitan.
• No exponga el Instant Power a la lluvia
o la nieve.
• Nunca coloque el Instant Power directamente
sobre la batería que se está cargando.
• Para evitar la formación de arcos eléctricos,
nunca permita que las pinzas se toquen
entre sí o estén en contacto con la misma
pieza de metal.
• El uso de un accesorio no recomendado ni
vendido por Schumacher® Electric
Corporation puede ocasionar daños en la
unidad o lesiones corporales.
• Nunca opere el Instant Power si está dañado.
• Si otra persona usa el Instant Power,
asegúrese de que esté bien informada
sobre cómo usarlo de manera segura y
además, de que haya leído y comprendido
las instrucciones de funcionamiento.
• El Instant Power NO está diseñado para ser
instalado como reemplazo de la batería del
vehículo.
• Utilícelo SOLO en vehículos, barcos y
tractores de jardín alimentados con un
sistema de batería de 12 V CC.
• Si el motor no arranca luego de realizar el
número recomendado de intentos,
desconecte y verique la unidad en busca
de otros problemas.
• Utilice el Instant Power para recargar
baterías de plomo-ácido solamente. No lo
utilice para cargar las baterías de celdas
secas que habitualmente se colocan en los
aparatos domésticos.
PRECAUCIONES DE SEGURIDAD PERSONAL
• Use protección completa para ojos y
vestimenta cuando trabaje cerca de
baterías de plomo-ácido. Siempre cuente
con la presencia de otra persona para
obtener ayuda.
• Tenga a la mano bastante agua fresca, jabón
y bicarbonato de sodio en caso de que el
ácido de la batería entre en contacto con los
ojos, la piel o la ropa. Lave inmediatamente
con agua y jabón y busque atención médica.
• Si el ácido de la batería entra en contacto
con los ojos, enjuague inmediatamente
durante 10 minutos como mínimo y busque
atención médica.
• Neutralice el ácido derramado
abundantemente con bicarbonato de sodio
antes de intentar limpiarlo.
• Retire todos los objetos metálicos de su
cuerpo (anillos, pulseras, collares y relojes).

• 12 •
Una batería puede producir una corriente
de cortocircuito lo sucientemente alta
como para soldar un anillo al metal, lo que
ocasionaría una quemadura grave.
• NUNCA fume o permita la presencia de
chispas o llamas en la proximidad de una
batería o motor.
CARACTERÍSTICAS
3
2
5
4
6
7
8
1
9
14
10
11
13
15
12
18
16
1. Salidas de corriente continua
de 12 Volt
2. Puerto USB
3. Fuente de poder USB, con
interruptor de apagado/encendido
4. Pantalla digital
5. Luz integrada para laborar
6. Botón de la pantalla
7. Interruptor de encendido/apagado
de la luz para laborar
8. Interruptor de encendido/apagado
del inversor
9. Salidas de corriente alterna
de 120 Volt
10. Medidor del compresor
11. Interruptor del compresor/inador
12. Puerto para desinar
13. Puerto para inar
14. Manguera del compresor
15. Puerto del cargador
16. Pinzas para batería
17. Adaptadores
18. Manguera inador
17
PARA CARGAR LA BATERIA INTERNA DE LA FUENTE DEL INSTANT POWER
IMPORTANTE: CARGUE LA UNIDAD
INMEDIATAMENTE DESPUÉS DE
ADQUIRIRLA, AL TÉRMINO DE CADA
USO Y CADA 30 DÍAS PARA MANTENER
LA BATERÍA INTERNA DEL INSTANT
POWER COMPLETAMENTE CARGADA Y
PROLONGARÁ SU VIDA ÚTIL.
COMPROBACIÓN DEL NIVEL DE CARGA
DE LA BATERÍA INTERNA
Compruebe el nivel de carga de la batería
interna presionando el botón de la carátula.
El indicador digital demostrará el porcentaje
de carga. Cargue la batería interna si la
carátula muestra carga por debajo del 100%.
NOTA: El porcentaje de carga de la batería
interna es más connable si el Instant
Power ha sido desconectada de todos los
accesorios y conexiones por unas horas.
LA CARGA DE LA BATERÍA INTERNA
Para cargar la batería interna del Instant
Power, utilice un cable de extensión (no
incluido).
NOTA: Al utilizar una extensión inadecuada,
se corre el riesgo de ocasionar un incendio
o descargas eléctricas.
1. Para cargar, conecte un cable de
extensión en el puerto del cargador en la
parte posterior del Arrancador Portátil
2. Conecte el cable de extensión en un
tomacorriente eléctrico de 120 VCA.
3. Mientras que el Arrancador Portátil está
cargando, la luz LED VERDE en la parte
posterior de la unidad se mantendrá
encendida. Para una carga completa se
puede tardar hasta 72 horas. Entonces, el
Arrancador Portátil estará listo para usar.

• 13 •
4. El cargador se jará automáticamente en
modo de mantenimiento y mantendrá la
batería a plena carga sin dañarla.
5. Cargue el Arrancador Portátil tan pronto
como sea posible después de cada uso.
CÓMO CARGAR LA BATERÍA INTERNA
CON EL VEHÍCULO EN MARCHA
También puede cargar la batería interna
durante la conducción, utilizando un cable de
carga de varón a varón (p/n 94500109 –
no incluido).
IMPORTANTE: NO CARGAR LA BATERÍA
INTERNA POR MÁS DE 30 MINUTOS, NI
DEJAR LA BATERÍA SIN SUPERVISIÓN.
PODRÍA EXPLOTAR Y OCASIONAR
DAÑOS MATERIALES O LESIONES
CORPORALES.
1. Asegúrese de que el vehículo esté en
marcha.
2. Inserte un extremo del cable auxiliar en la
toma de corriente de 12 V CC.
3. Inserte el otro extremo del cable auxiliar
en el enchufe auxiliar del vehículo
(encendedor).
NOTA: La luz LED VERDE no opera
durante este método de carga. Al utilizar
este método para cargar la batería, se
anula el modo de mantenimiento y la
batería podría sobrecargarse.
4. Para supervisar el progreso de la carga,
presione el botón de la pantalla en la
parte frontal de la unidad. Cuando la
batería esta completamente cargada,
primero desconecte el cable auxiliar del
Instant Power y luego, de la toma del
encendedor del vehículo.
NOTA: Desconectar completamente el
cable del cargador cuando el motor no está
funcionando.
CÓMO UTILIZAR EL INSTANT POWER
IMPORTANTE: Utilización de la función
arranque del motor sin una batería instalada
en el vehículo dañará el sistema eléctrico
del vehículo.
1. APAGUE el motor.
2. Ponga los cables de CD lejos de las
aspas del ventilador, bandas, poleas u
otras partes móviles.
3. En los vehículos con carga negativa
a tierra (como en la mayoría de los
vehículos), conecte la pinza con el polo
POSITIVO (ROJO) del Instant Power
al borne POSITIVO (POS, P, +) de la
batería. A continuación, conecte la pinza
con el polo NEGATIVO (NEGRO) al
chasis del vehículo o al bloque del motor,
lejos de la batería.
4. En los vehículos con carga positiva a tierra,
conecte la pinza con el polo NEGATIVO
(NEGRO) del Instant Power al borne
NEGATIVO (NEG, N, -) de la batería. A
continuación, conecte la pinza con el polo
POSITIVO (ROJO) al chasis del vehículo o
al bloque del motor, lejos de la batería.
5. Coloque el interruptor en la posición de
Encendido (ON). NOTA: Cuando está
conectada al vehículo, mostrará el voltaje
de la batería del vehículo. Cuando está
conectada y en la posición encendido,
exhibirá el voltaje igualado entre la
batería del vehículo y la batería interna
6. Accione el encendido del motor durante
no más de 8 segundos. Si el motor no
enciende, espere 2 minutos antes de
arrancar de nuevo.
7. Una vez que haya arrancado el motor,
coloque el interruptor en la posición
de Apagado (OFF) y retire el Instant
Power de la batería.
8. Cargue el Instant Power.
EL USO DE PUERTO USB
El puerto USB provee poco más de 2A por
5V de CD.
1. Asegúrese que las pinzas estén jas en
el compartimiento.
2. Encienda el Instant Power (ON).
3. Conecte su aparato en el puerto USB.
4. Cuando termine de usar el puerto USB,
coloque el interruptor en la posición de
Apagado (OFF).
5. Cargue el Instant Power.
CÓMO UTILIZAR LA LUZ DE TRABAJO
La luz de trabajo se controla mediante un
interruptor deslizante de Encendido/Apagado
(ON/OFF) situado en la parte frontal del
Instant Power. Asegúrese de que la lámpara
esté apagada (OFF) cuando la unidad se esté
recargando o permanezca almacenada.
Coloque el Instant Power sobre una
supercie plana cerca del área de trabajo.
Asegúrese que las pinzas estén jas en el
compartimiento.

• 14 •
PARA HACER FUNCIONAR UN APARATO
DE 12V DE CD:
El Instant Power es una fuente de poder
para cualquier accesorio de 12V de
corriente directa que estén equipados con
enchufe de 12V. Utilícelo durante
apagones, pesca o días de campo.
NOTA: no encienda un dispositivo de 12 V
mientras se esté cargando la batería interna
del Instant Power.
1. Asegúrese de que el dispositivo que
desea cargar esté apagado (OFF) antes
de insertar el enchufe auxiliar de 12 V CC
en la toma auxiliar de 12 V CC.
2. Abra la tapa protectora de la toma de
alimentación de CC del Instant Power.
3. Conecte el dispositivo de 12 V CC a la
toma de alimentación de CC y enciéndalo
(si es necesario).
4. Cuando haya terminado de cargarse,
apague el dispositivo de CC (si es
necesario) y desenchúfelo de la toma de
alimentación de CC.
PRECAUCIÓN: no utilice el Instant Power en
aparatos que consuman más de 15 A de CC.
NOTA: si hace funcionar un dispositivo de
12 V CC durante mucho tiempo con el
Instant Power, la batería se agotará por
completo. Recargue el Instant Power
inmediatamente después de desconectar
los dispositivos de 12 V CC.
USO DEL COMPRESOR DE AIRE
ADVERTENCIA. Antes de usar el
compresor, lea las instrucciones del objeto a
inar. Evite sobre inar, no exceda la presión
de aire recomendado por el fabricante.
Durante el uso, no desatienda el compresor.
NOTA: Antes de que usted utilice el
compresor por primera vez, debe instalar los
sujetadores de la manguera del compresor.
Para instalar: presione cada sujetador en los
oricios de montaje correspondientes en la
parte trasera del arrancador hasta que
queden sujetos en sus sitior.
Enrolle la manguera del compresor
alrededor de los sujetadores cuando no se
esté utilizando.
1. Retire la manguera del compresor de aire
de los sujetadores de almacenamiento.
2. Conecte el adaptador al pivote de la
válvula y cierre el jador. Si es necesario,
utilice uno de los adaptadores adicionales.
3. Encienda el interruptor del compresor y
comience a inar a la presión deseada o
lleno total.
4. Cuando alcance la presión deseada,
apague el interruptor del compresor
jándolo en la posición OFF (apagado),
abra el jador y retire el conector del
pivote de la válvula.
5. Deje que la unidad se enfríe.
6. Cargue la unidad nuevamente antes
de guardarla.
NOTA: El Compresor de aire esta diseñado
para 150 PSI.
USO DEL INFLADOR
RIESGO DE EXPLOSIÓN.
Lea las instrucciones del producto que va a
ser inado antes de usar el inador. Evite
sobre inar, que el aire no exceda lo
recomendado por el productor. Nunca deje
el compresor de aire sin atender mientras
lo usa.
1. Asegúrese que las pinzas estén jas en
el compartimiento.
2. Fije la manguera corrugada con el
adaptador de la salida del inador de
alto-ujo colocada cerca del inador en la
parte de atrás del Instant Power.
3. El adaptador principal para la manguera
corrugada adjunto puede adaptarse a 4
diferentes medidas. En caso de necesitar
otra medida diferente de adaptador se
puede conectar al nal del adaptador
principal.
4. Inserte el adaptador en el producto que
va a ser inado.
5. Presione el selector del compresor/
inador a la posición INFLATOR (inador)
y comience a inar.
6. Cuando el artículo es inado al nivel
deseado, presione el selector a la posición
OFF (apagado) y quite el adaptador.
Tiempoestimadoparainar
Neumáticos para
vehículos de 13 a 16"
6 a 24 minutos
Llantas para bicicleta 1 a 3 minutos
Balones deportivos 30 segundos
Estos valores son aproximados. Utilice el
medidor del compresor de aire para asegurarse
de que se ha alcanzado el nivel de presión
adecuado. No ine en exceso.
USO DEL DESINFLADOR
1. Asegúrese que las pinzas estén jas en
el compartimiento.
2. Fije la manguera corrugada con la punta
del adaptador de la salida del desinador
de alto-ujo colocada justamente en el
lado del Instant Power.
3. El adaptador principal jado a la
manguera corrugada puede adaptarse
a 4 diferentes medidas. En caso de
necesitar otra medida diferente de
adaptador se puede conectar al nal del
adaptador principal.
4. Inserte el adaptador en el producto que
va a ser desinado.

• 15 •
5. Presione el selector del compresor/
inador a la posición INFLATOR (inador)
y desine el producto.
6. Cuando el artículo sea desinado al
nivel deseado, presione el selector a
la posición OFF (apagado) y quite el
adaptador.
ANTES DE USAR EL INVERSOR
Instrucciones importantes de seguridad:
1. Mantenga el Instant Power bien ventilada
para que disperse el calor generado
mientras se usa. Asegúrese de que haya
suciente espacio alrededor y hacia
arriba para que los ventiladores del
Instant Power no tengan obstrucción.
2. También verique que no exista fuego o
ropa alrededor del Instant Powe.
3. Mantenga el Instant Power en lugar seco.
4. NO permita que el Instant Power entre en
contacto con lluvia o humedad.
5. NO opere el Instant Power si la supercie
donde está montada o cualquier otra
supercie se encuentra mojada. El
agua o cualquier otro líquido conducen
electricidad, y esto podría conducir a
provocar serios daños y hasta la muerte.
6. No coloque el Instant Power cerca de
calentadores, radiadores u otra fuente
de calor.
7. Tampoco exponga el Instant Power a los
rayos directos del sol. Las temperaturas
ideales para la operación del Instant
Power oscila entre los 50° y 80°F.
8. No use el inversor cerca del
compartimiento del motor donde gases o
humos se acumulan.
9. De ningún modo modique las salidas de
Corriente Alterna CA.
USO DEL INVERSOR
Es de suma importancia saber la carga
continua en vatios del aparato que desea
usar con el inversor. El Instant Power debe
ser usada con aparatos que operados en
200 vatios o menos. Si los vatios no están
marcados en el aparato use sólo aparatos
que usen menos de 1,7 amperes de
Corriente Alterna CA.
Aparatos como televisiones, ventiladores o
motores eléctricos requieren energía adicional
para encender (comúnmente conocido como
arranque o máxima energía).El Instant Power
podría suplementar u operar en vatios; de
cualquier forma aún los aparatos clasicados
por debajo de los 200 vatios pueden exceder
de la capacidad del inversor y lo apaga
automáticamente por sobrecarga.
No use el inversor con un producto que
absorbe más vatios de los que el inversor
puede proveer, esto podría dañar el
inversor y el producto.
Asegúrese que el aparato que sea usado
sea compatible con las ondas senoidales
del inversor.
Realice siempre una
prueba para asegurar que
el inversor opere un equipo o un aparato.
En caso de sobre carga, el mismo inversor
está diseñado para apagarse
automáticamente. Este rasgo de seguridad
previene daño alguno al Inversor mientras
se pone a prueba el aparato a un promedio
de 200 vatios.
Si re requiere operar dos aparatos, hágase
la operación de uno por uno, para evitar
sobrecarga al inversor y perder energía. La
absorción de cada uno de los aparatos no
debe exceder la capacidad de salida de
vatios en una Operación Continua.
Si usted esta usando el Inversor de energía
para operar un cargador de baterías,
monitoree la temperatura del cargador de
baterías por aproximadamente 10 minutos.
Si el cargador de baterías se pone
anormalmente caliente, desconéctelo del
Inversor inmediatamente.
Usted puede utilizar una extensión del
inversor al aparato sin disminuir la carga
generada por el inversor. Para mejores
resultados de operación, el cable de
extensión debe ser de 16 AWG (1.31 mm2)
o de más intensidad pero, que no exeda de
50 pies (15 metros).
Este inversor usa ondas
solenoids. Por lo tanto,
no recomendamos para operar los
siguientes aparatos:
1. Fuentes energía de en forma de
conmutador
2. Líneas de corriente eléctrica
3. Transformadores clase2
4. Condensadores de capacidad
5. Motores ligeros.
6. Motores de ventilador
7. Hornos de microondas
8. Lámparas ourescentes y de alta
intensidad (con balastra)
9. Cargadores de Baterías sin tranformador
Al hacerlo, podría operar el aparato bajo
intenso calor y sobrecalentarlo.
OPERANDO CON UN APARATO DE 120V
DE CORRIENTE ALTERNA
Para operar un aparato de 120V de CA:
1. Asegúrese que las pinzas estén jas en
el compartimiento.
2. Primeramente, abrir la cubierta de salida
de corriente CA en el panel del frente del
Instant Power.

• 16 •
3. Asegúrese de que el aparato de 120V a
ser operado este APAGADO (OFF).
4. Conecte el aparato de 120V en la salida
de corriente CA, y gire el interruptor del
inversor a la posición ENCENDIDO.
NOTA: Cuando el inversor se enciende,
entonces mostrará el voltaje total usado
por el aparato que operado por el inversor.
5. Enciende el aparato de 120V.
6. Si el aparato no funciona adecuadamente
al momento de conectarlo al inversor,
presione el botón ON, OFF, y ON una
y otra vez consecutivamente. Si este
proceso no tiene éxito, quiere decir que el
Inversor no tiene la capacidad requerida
para operar el aparato deseado.
7. Cargue Fuente de Poder tan pronto sea
posible después de cada uso.
RIESGO DE DESCARGA ELÉCTRICA.
Una operación incorrecta de su inversor
podría resultar en daños y lesiones
personales. La salida del inversor es de
110V de CA y podría electrocutar o dañar de
la misma forma que un tomacorriente
doméstico de pared. NOTA: La cantidad
máxima de carga es de 200 vatios. No use
el inversor con un producto que absorba
más de 200 vatios, porque podría causar
daño al inversor y al producto.
MANTENIMIENTO Y CUIDADO
• Limpie las pinzas y la carcasa de la unidad
cada vez que termine de usarla.
• Recargue la unidad una vez al mes, cuando
no esté en uso.
• Guarde las pinzas en sus postes de apoyo
para asegurarse de que no entren en
contacto con alguna supercie metálica.
• Nunca descargue completamente la batería
interna.
LOCALIZACIÓN Y SOLUCIÓN DE PROBLEMAS
PROBLEMA POSIBLE CAUSA SOLUTIÓN
La fuente de poder no arranca
mi auto.
El Interruptor de la fuente
de Poder/USB no esta
ENCENDIDO.
Las pinzas no hacen buena
conexión a la batería.
La batería de la fuente de
poder no está cargada.
La batería del vehículo esta
defectuosa.
Encienda el interruptor de la
fuente de poder/USB.
Asegúrese de que existe
buena conexión a la batería y
la carrocería. También que los
puntos de las conexiones estén
limpios. Gire las pinzas para
una conexión efectiva.
Compruebe el estado de carga
de la batería presionando
el botón en el de Instant
Power™ Vea la sección de los
INDICADORES DE FUNCION
DIGITALTIONS de este manual.
Haga un chequeo de la batería.
La fuente de poder no pone a
funcionar mi aparato de 12V.
El aparato de 12V no
enciende.
La batería de la fuente de
poder no está cargada.
El aparato de 12V absorbe
más de 15A, o tiene un corto
circuito.
Allumez le 12V la machine.
Encienda el aparato de 12V.
Compruebe el estado de carga
de la batería presionando
el botón en el de Instant
Power. Vea la sección de los
INDICADORES DE FUNCION
DIGITALTIONS de este manual.
Desconecte el aparato de
12V. El interruptor interno se
autoprogramará después de
uno o dos minutes. Si sucede
lo mismo, reemplace el aparato
de 12V.
La batería de la fuente de
poder no retiene la carga.
La batería está en malas
condiciones (No recibirá
carga).
Haga un chequeo de la batería.

• 17 •
ANTES DE DEVOLVER A REPARACIONES
Si estas soluciones no eliminan el problema o si desea obtener más información
sobre la solución de problemas, póngase en contacto
con el departamento de servicio al cliente para recibir asistencia:
services@schumacherelectric.com•www.batterychargers.com
o llame 1-800-621-5485
Lunes-viernes 7:00am to 5:00pm CST
Para REPARACIÓN O DEVOLUCIÓN, comuníquese con Servicios al Cliente al
1-800-621-5485. NO ENVÍE LA UNIDAD hasta que usted reciba AUTORIZACIÓN
DE DEVOLUCIÓN DE MERCANCÍA (RMA) de Servicios al Cliente de Schumacher
Electric Corporation.
ESPECIFICACIONES
De Tipo interno AGM
Batería AGM de Acido-plomo, sin necesidad de
mantenimiento
El voltaje nominal De 12V de C.C.
Salida de Corriente Contínua (Máxima Carga) 15A (ambos enchufes combinados)
Luz incorporada (reemplazable) tres LEDs blanco
Cables de arranque AWG, de Calibre 4 y 24 pulgadas
Dimensiones (H x W x D)
de 12 de alto X 11.5 Ancho X 10.5 profundo
(pulgadas)
Peso del Producto M 23.9 libras (10,84 kg)
EspecicacionesdeenergíaenCA
Energía continua máxima 200 Watts
Capacidad de la oleada (energía máxima) 400 Watts
Corriente no obtenida <0.4 Amperes
Forma de onda Modicó la onda senoidal
Nivel de entrada de voltaje 10.5 - 15.5V CC
Salida de Tomacorriente De dos polos de 120V de CA a tierra NEMA 5-15
REPUESTOS/ACCESORIOS
Juego de accesorios del compresor de aire
(3 adaptadores de manguera)............................................................................0099000599
Juego de accesorios del inador: (Manguera para inador/desinador
al extremo de la unidad y 3 adaptadores para la manguera).............................0099000598
Cable accesorio macho a macho ...........................................................................94500109

• 18 •
GARANTÍA LIMITADA
SCHUMACHER ELECTRIC CORPORATION, 801 BUSINESS CENTER DRIVE,
MOUNT PROSPECT, IL 60056-2179, REALIZA LA PRESENTE GARANTÍA LIMITADA
AL COMPRADOR MINORISTA ORIGINAL DE ESTE PRODUCTO. LA PRESENTE
GARANTÍA LIMITADA NO PUEDE TRANSFERIRSE NI CEDERSE.
Schumacher Electric Corporation (el “Fabricante”) otorga garantía por esta unidad
por un (1) año y la batería interna por noventa (90) días contados a partir de la fecha
de compra, contra cualquier material defectuoso o de mano de obra de la unidad que
pudieran surgir durante su uso y bajo cuidado normal. Si su unidad cuenta con material
defectuoso o defectos de mano de obra, la obligación de los Fabricantes, conforme a la
presente garantía, será simplemente reparar o sustituir el producto por uno nuevo o por
una unidad reparada, a elección del fabricante. Es la obligación del comprador enviar la
unidad con comprobante de compra y los gastos de envío prepagos al Fabricante o a
sus representantes autorizados para que estos reparen o reemplacen el producto.
El Fabricante no presta garantía por lo accesorios utilizados con este producto que no
sean los fabricados por Schumacher Electric Corporation y que no estén aprobados
para su uso con este producto. La presente Garantía Limitada será nula si el producto
se utiliza en forma errónea, se trata de manera inadecuada, es reparado o modicado
por personas que nos sean el Fabricante o si esta unidad es revendida a través de un
vendedor minorista no autorizado.
El Fabricante no realiza ninguna otra garantía, incluidas, a título enunciativo, las
garantías expresas, implícitas o legales, incluidas, a modo de ejemplo, las garantías
implícitas de comerciabilidad o adecuación a un n especíco. Asimismo, el
Fabricante no será responsable ante reclamos por daños accidentales, especiales ni
directos en los que incurran los compradores, usuarios u otras personas asociadas
al producto, incluidas, a título enunciativo, los ingresos y ganancias no percibidas,
ventas anticipadas, oportunidades comerciales, el buen nombre, la interrupción de la
actividad comercial o cualquier otro daño que haya provocado. Todas las garantías,
excepto la garantía limitada incluida en el presente, por medio de la presente, quedan
expresamente anuladas y excluidas. Algunos estados no permiten la exclusión ni
la limitación de los daños accidentales ni directos o el plazo de garantía implícita,
por lo que las limitaciones o exclusiones mencionadas anteriormente podrían no
corresponder con su caso. La presente garantía le otorga derechos legales especícos
y es probable que usted cuente con otros derechos que podrían diferir de los incluidos
en la presente garantía.
LA PRESENTE GARANTÍA LIMITADA ES LA ÚNICA GARANTÍA LIMITADA
EXPRESA Y EL FABRICANTE NO ASUME NI AUTORIZA A NADIE A ASUMIR O A
ADQUIRIR NINGUNA OTRA OBLIGACIÓN RESPECTO DEL PRODUCTO QUE NO
SEA LA PRESENTE GARANTÍA.
Schumacher® y el logo Schumacher son maracas registradas
de Schumacher Electric Corporation.

• 19 •
1 YEAR LIMITED
WARRANTY PROGRAM
REGISTRATION
MODEL: _____________________DESCRIPTION: ________________________
This is the only express limited warranty, and the manufacturer neither assumes
nor authorizes anyone to assume or make any other obligation. There is no other
warranty, other than what is described in the product owner’s manual.
The warranty card should be submitted within 30 days of purchase. The customer
must keep the ORIGINAL receipt because it will be required for any warranty claims.
This warranty is not transferable. Send warranty card only.
DO NOT SEND UNIT TO THIS ADDRESS FOR REPAIR.
Mail this card to: Schumacher Electric Corporation
801 Business Center Drive
Mount Prospect, IL 60056-2179
Name ______________________________________________________________
Street Address _______________________________________________________
City ________________________________State _________ Zip Code _________
Phone _____________________Email ___________________________________
Store Name Where Purchased ___________________ Date of Purchase _________
Store Location ____________________ UPC Number ________________________
Serial Number ______________________________________ (SEE PRODUCT)
For faster warranty activation, go to www.batterychargers.com to register your product online.
PROGRAMA DE REGISTRO
DE 1-AÑO DE GARANTÍA
LIMITADA
MODELO: ____________________DESCRIPTIÓN: ________________________
Esta es la única garantía limitada expresa, y el productor no autoriza ni otorga
a alguien a realizar alguna otra obligación. No existe ninguna otra garantía
más que la descrita en el manual del dueño.
La tarjeta de garantía debe enviarse durante los primeros 30 días después de la
compra. El cliente debe mantener el recibo de compra ORIGINAL como
comprobante, el cual le otorga todo derecho a cualquier reclamo de garantía.
Esta garantía no es transferible. Envie tarjeta de garantía solamente.
NO ENVÍE LA UNIDAD A ESTA DIRECCIÓN PARA SU REPARACIÓN.
Enviar esta tarjeta a: Schumacher Electric Corporation
801 Business Center Drive
Mount Prospect, IL 60056-2179
Nombre ____________________________________________________________
Dirección ___________________________________________________________
Ciudad __________________________Estado ____________ C.P. _____________
Tel: ________________________ Correo electrónico _________________________
Nombre de la Tienda donde se Compró ____________ Fecha de compra _________
Localización de la Tienda ____________ Numero de Serie ____________________
Código de barras ___________________________ (CONSULTE EL PRODUCTO)
Para una activación más rápida, visite nuestra página de internet en www.batterychargers.com
¡AHORRE EN EL ENVÍO! ¡ACTIVE SU GARANTÍA EN LÍNEA-LA FORMA MAS RÁPIDA Y FÁCIL!
Visite nuestra página en www.batterychargers.com para registrar su producto en línea.
WARRANTY CARD / TARJETA DE GARANTÍA
SAVE ON POSTAGE! ACTIVATE YOUR WARRANTY ONLINE – THE QUICK AND EASY WAY!
Go to www.batterychargers.com to register your product online.
 Loading...