

Page 1
EN: Instruction manual for a Electric Dispenser
DE: Bedienungshandbuch für einen Berührungslosen Spender
FR: Manuel d’emploi pour un Distributeur sans contact
IT: Manuale per l’utente per un Erogatore senza contatto
NL: Handleiding voor een automatische dispenser
PL: Instrukcja obsługi dozownika elektrycznego
touchless D1
Page 2

EN
Table of Contents
Page
1
2
2.1
3
4
Box includes
Installation Guide
Installation Guide for touchless D1
Simple Trouble-Shooting Guide for touchless D1
Dispenser Installation Template
3
4
6
7
8
DE
Inhaltsverzeichnis
Seite
1
2
2.1
3
4
Verpackungsinhalt
Montageanleitung
Montageanleitung bebildert
Anleitung zur Fehlersuche und-beseitigung für touchless D1
Spender Installationsanweisung
9
10
12
13
14
FR
Sommaire
Page
1
2
2.1
3
4
Contenu du conditionnement
Instructions de montage
Instructions de montage illustrées
Guide de recherche et d‘élimination des erreurs pour le touchless D1
Instruction d‘installation du distributeur
15
16
18
19
20
IT
Elenco
Pagina
1
2
2.1
3
4
Contenuto della confezione
Istruzioni per il montaggio
Istruzioni per il montaggio illustrate
Istruzioni per l‘individuazione ed eliminazione dei guasti per touchless D1
Istruzioni per l‘installazione dell‘erogatore
21
22
24
25
26
NL
Inhoudsopgave
Zijde
1
2
2.1
3
4
Verpakkingsinhoud
Verkorte montage handleiding
Montage handleiding voor de touchless D1
Eenvoudige probleem oplossingen
Dispenser bevestiging mal
27
28
30
31
32
PL
Spis treści
Strona
1
2
2.1
3
4
Zawartość pudełka
Uproszczona instrukcja obsługi
Instrukcja obsługi dozownika touchless D1
Przykład instalacji dozownika
Szablon do montażu dozownika
33
34
36
37
38
Page 2 of 50 touchless D1 Instruction manual for a Electric Dispenser www.schuelke.com
04.14/A/RAKO
Page 3
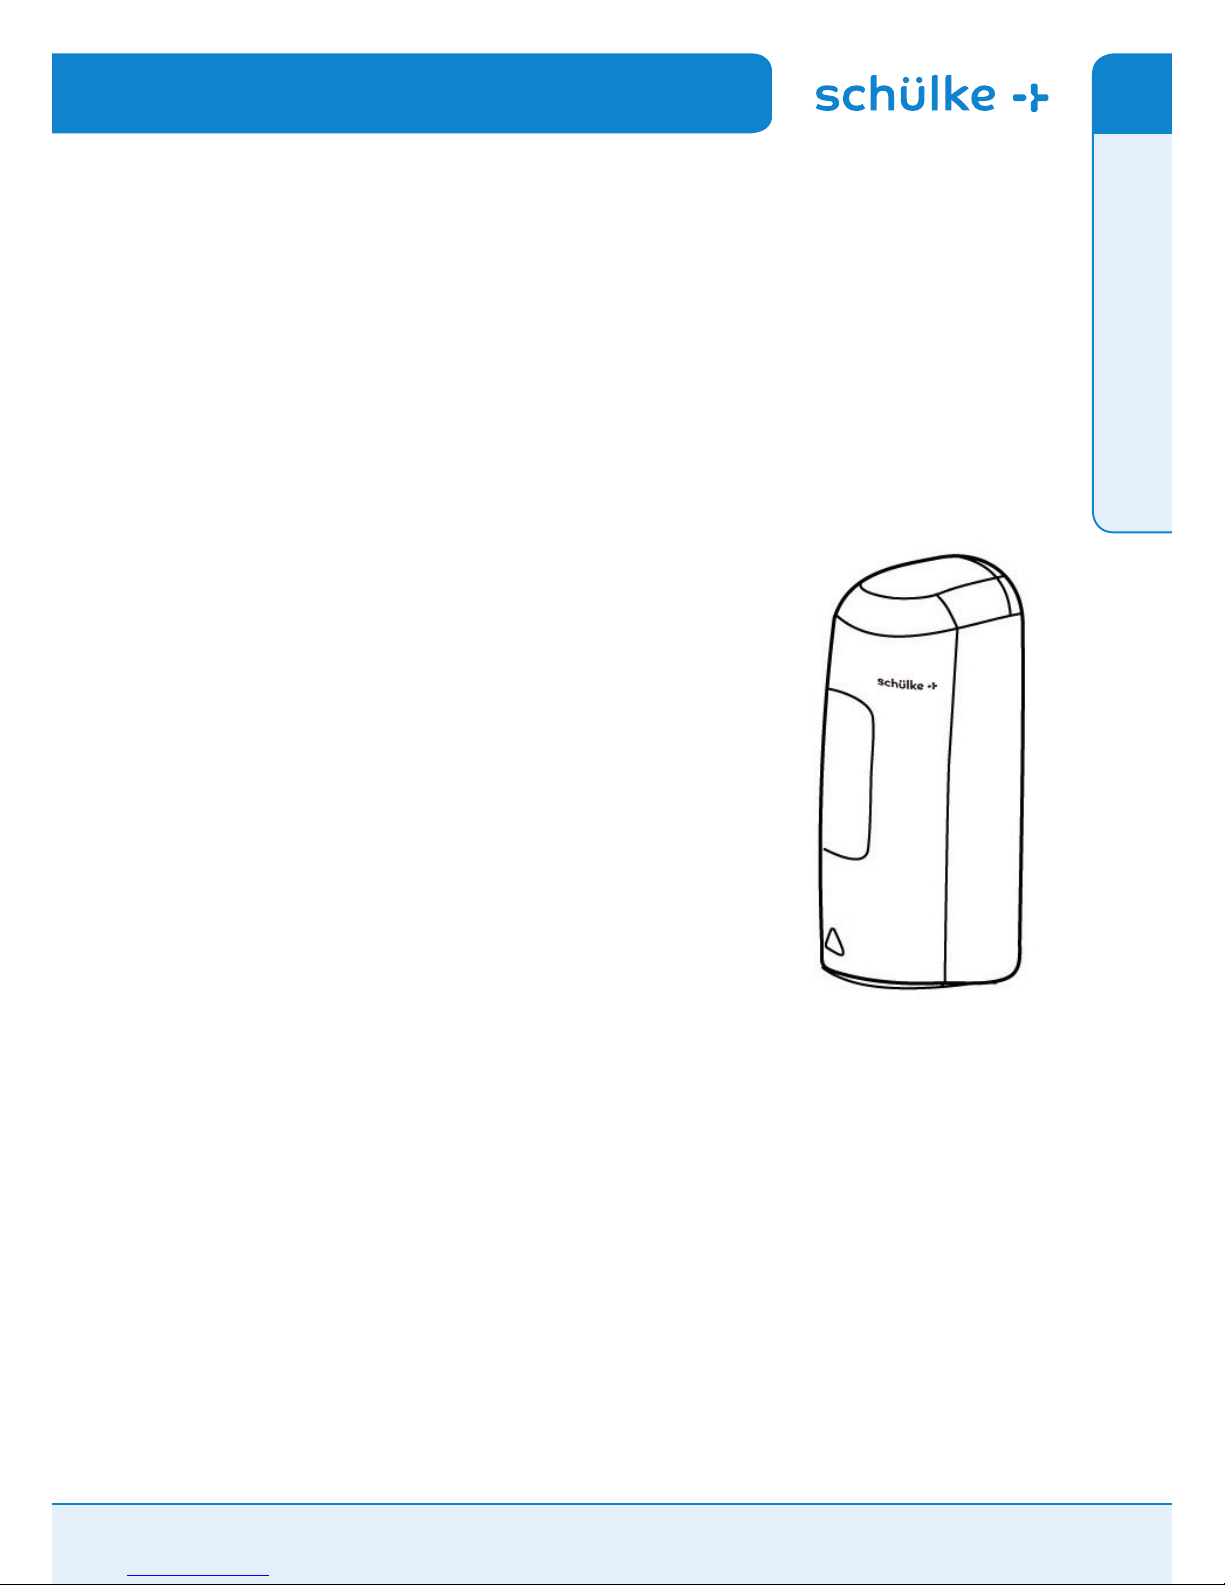
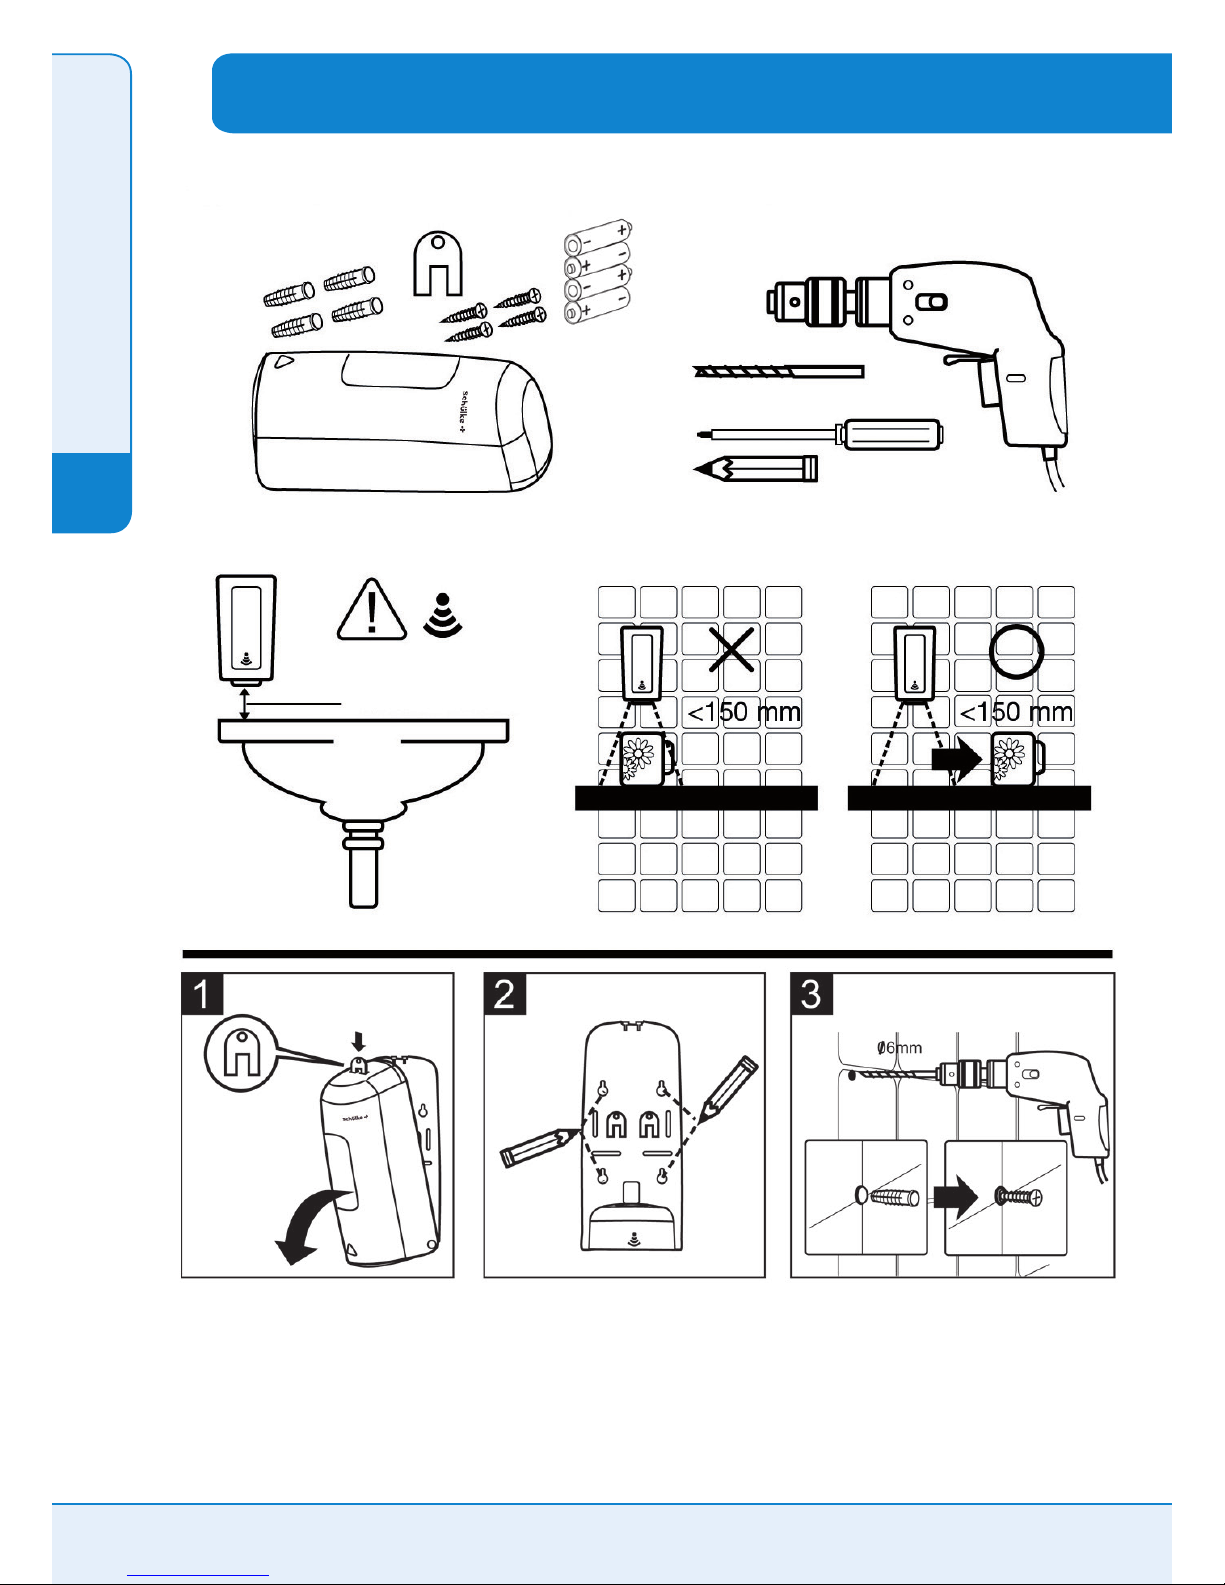
Box includes:
dispenser cover x 1
dispenser wall plate x 1
gear x 1
batteries x 4
screws + plugs x 4
user manual x 1
key x 1
drip cup x 1
touchless D1
Electric Dispenser
touchless D1 Instruction manual for a Electric Dispenser www.schuelke.com Page 3 of 38
Schülke & Mayr Ges.m.b.H
Seidengasse 9
1070 Wien, Austria
Phone +43 (0) 1- 523 25 01 - 0
Fax
+43 (0) 1- 523 25 01 - 60
Schülke & Mayr AG
Sihlfeldstrasse 58
8003 Zürich, Schweiz
Phone +41 (0) 44 - 466 55 44
Fax
+41 (0) 44 -466 55 33
Schülke & Mayr UK Ltd.
1 Jenkin Road
GB-Sheeld S9 1AT
Phone +44 (0) 1142 - 54 35 - 00
Fax
+44 (0) 1142 - 54 35 - 01
Schülke & Mayr GmbH
22840 Norderstedt, Germany
Phone
+49 (0) 40 - 521 00 - 0
Fax
+49 (0) 40 - 521 00 - 318
www.schuelke.com
[email protected]
EN
FR
DE
IT
NL
PL
Page 4
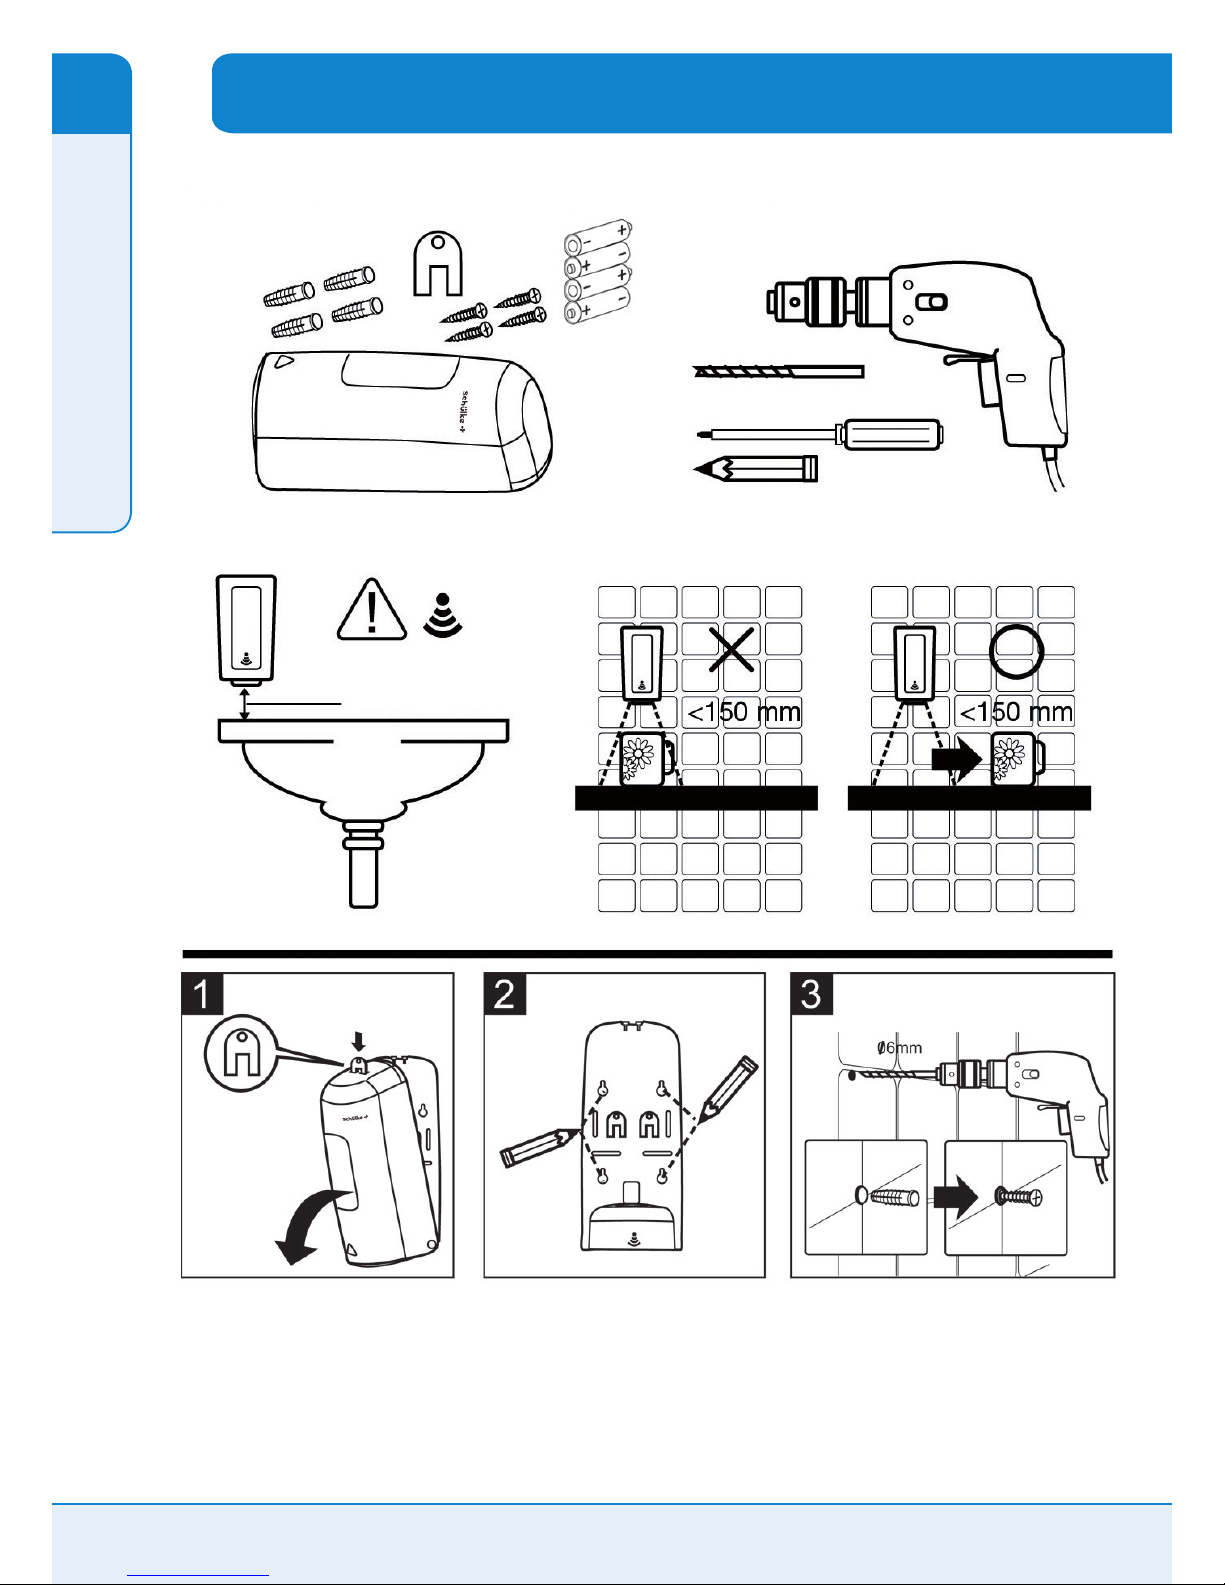
Package includes
Notes
Ø 6 mm
minimum 150 mm
Installation tools
Ø 6 mm
Ø 4,8 mm
Installation Guide
EN
FR
DE
IT
NL
PL
Page 4 of 38 touchless D1 Instruction manual for a Electric Dispenser www.schuelke.com
Page 5
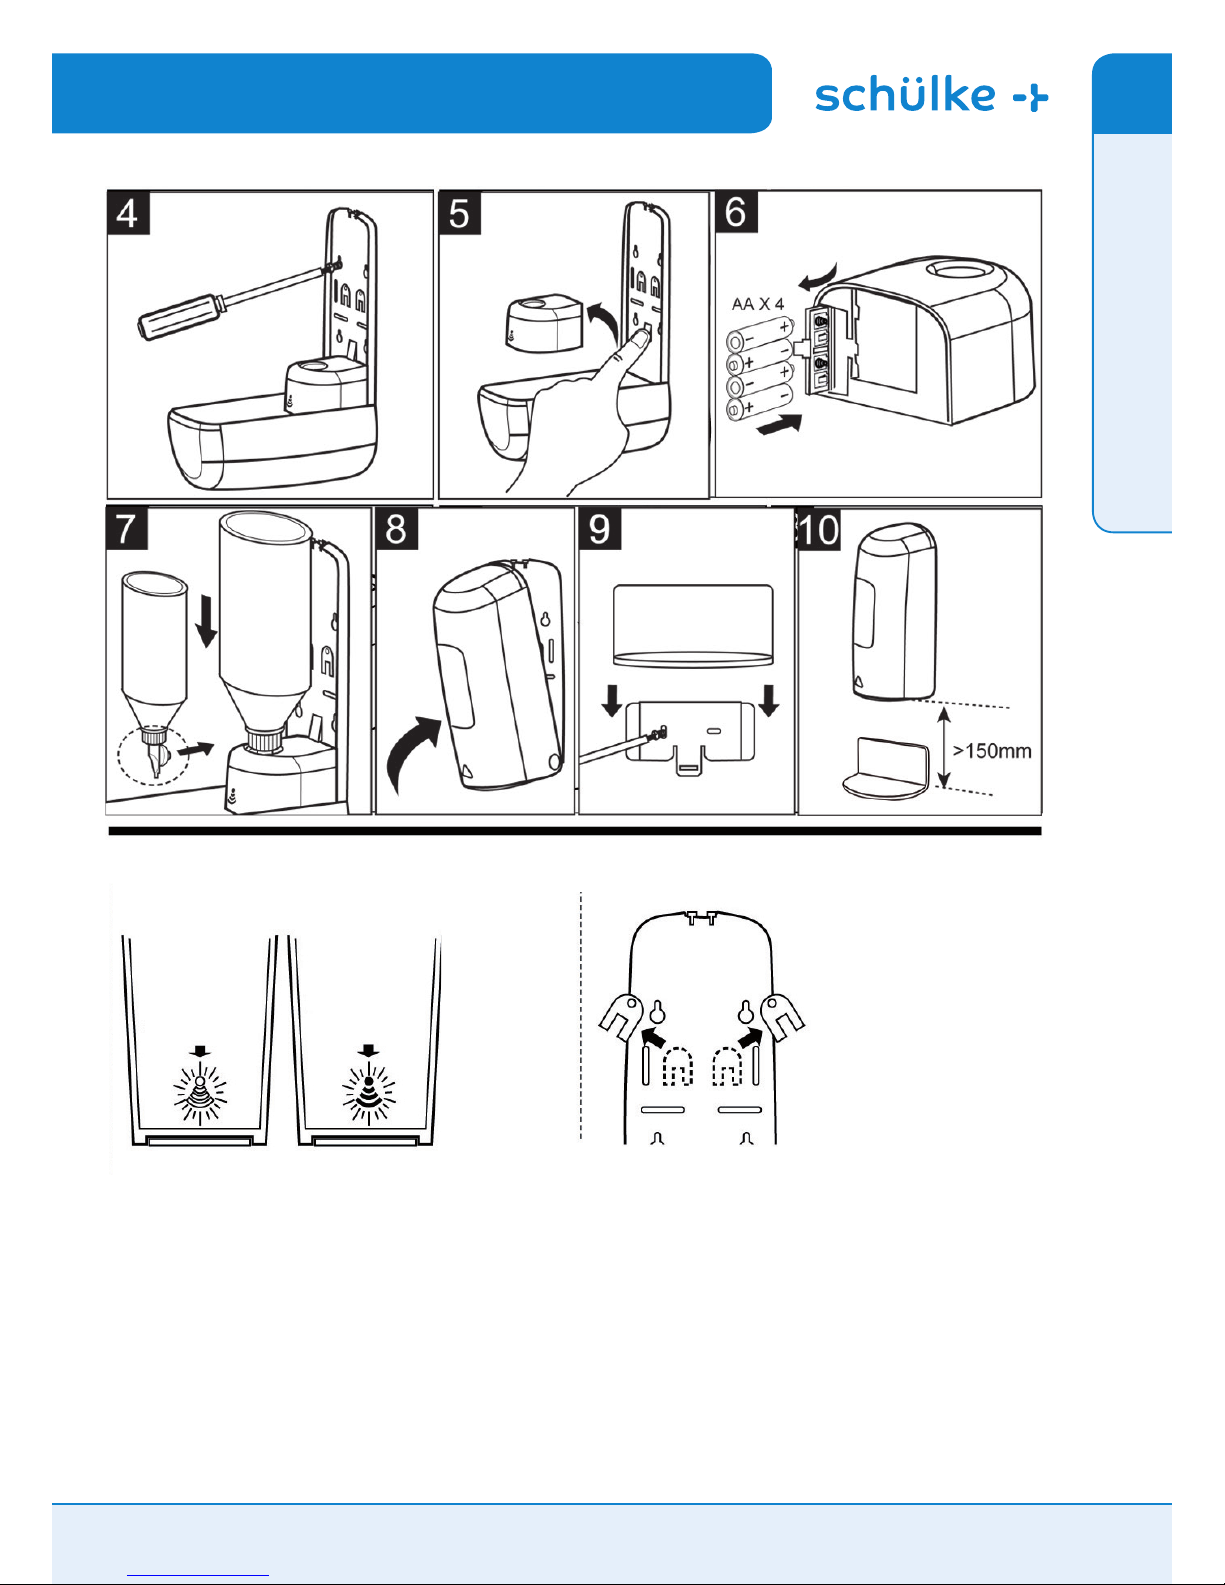
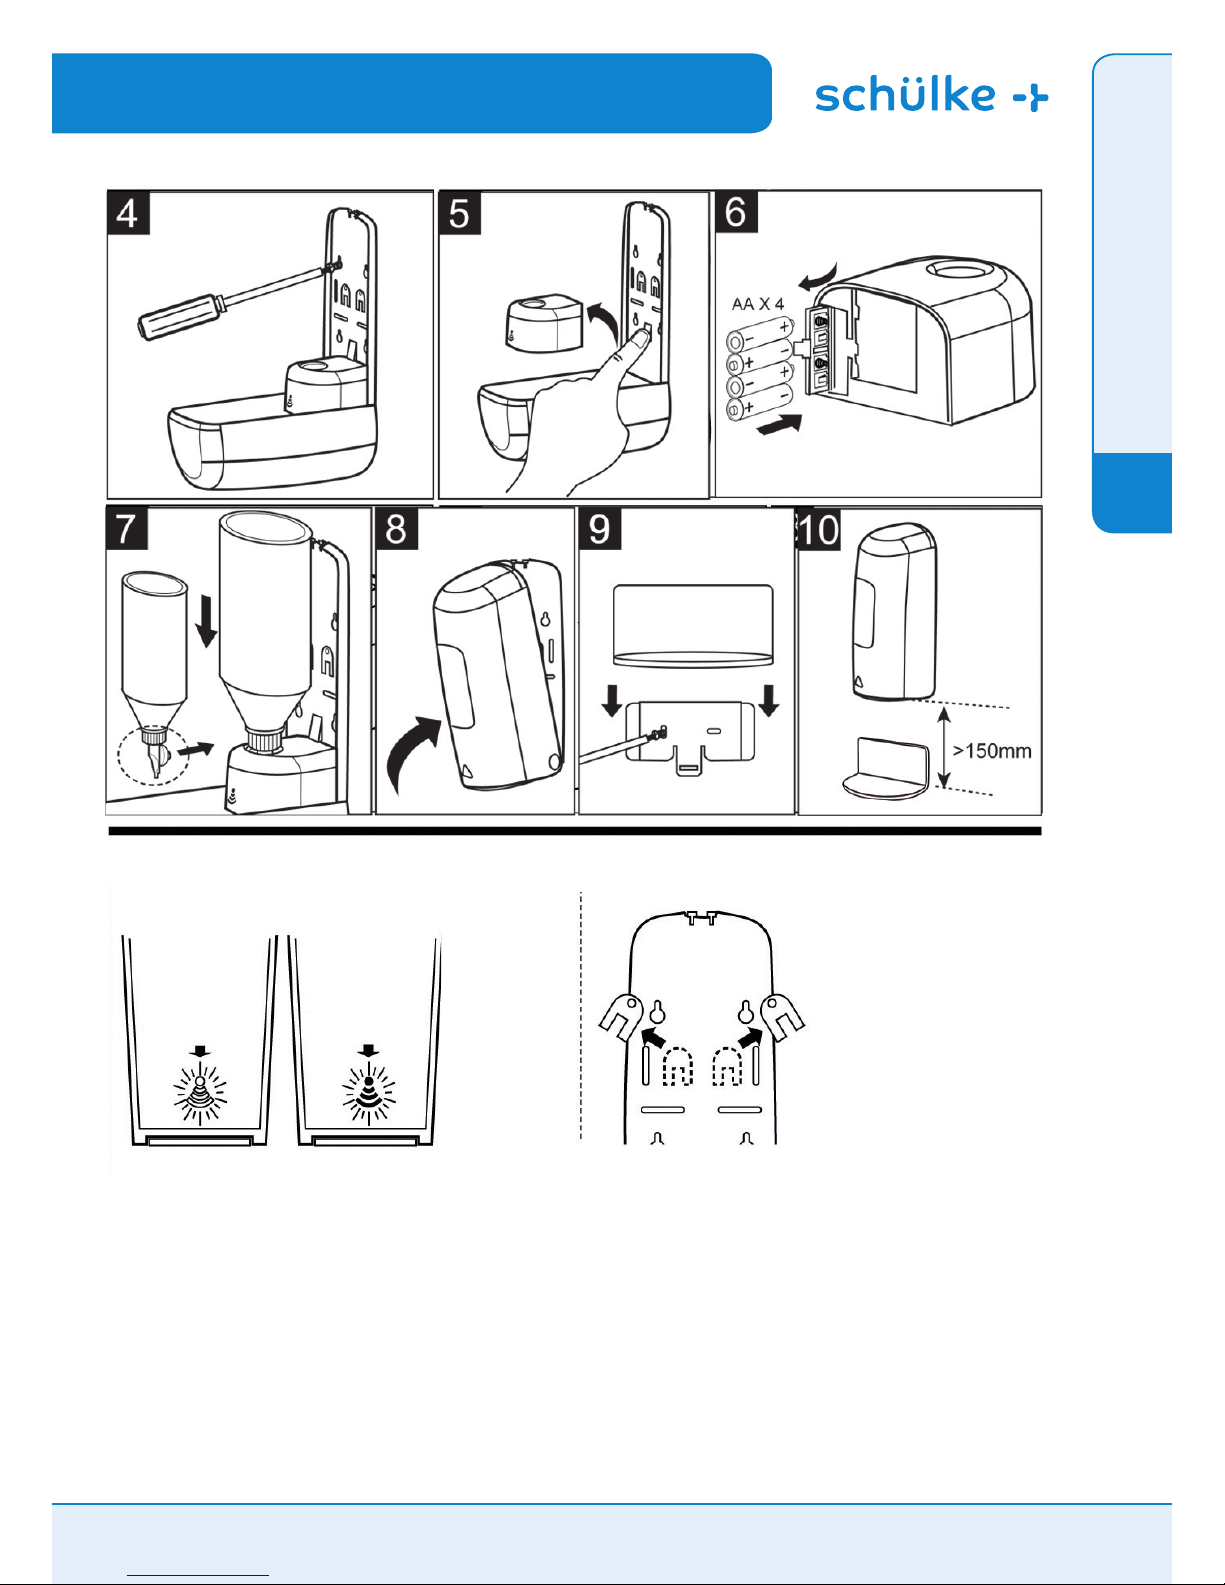
Backup keys
WORKING
BLUE LED LIGHT
LOW BATTERY
RED LED LIGHT
touchless D1 Instruction manual for a Electric Dispenser www.schuelke.com Page 5 of 38
EN
FR
DE
IT
NL
PL
Page 6
6
7
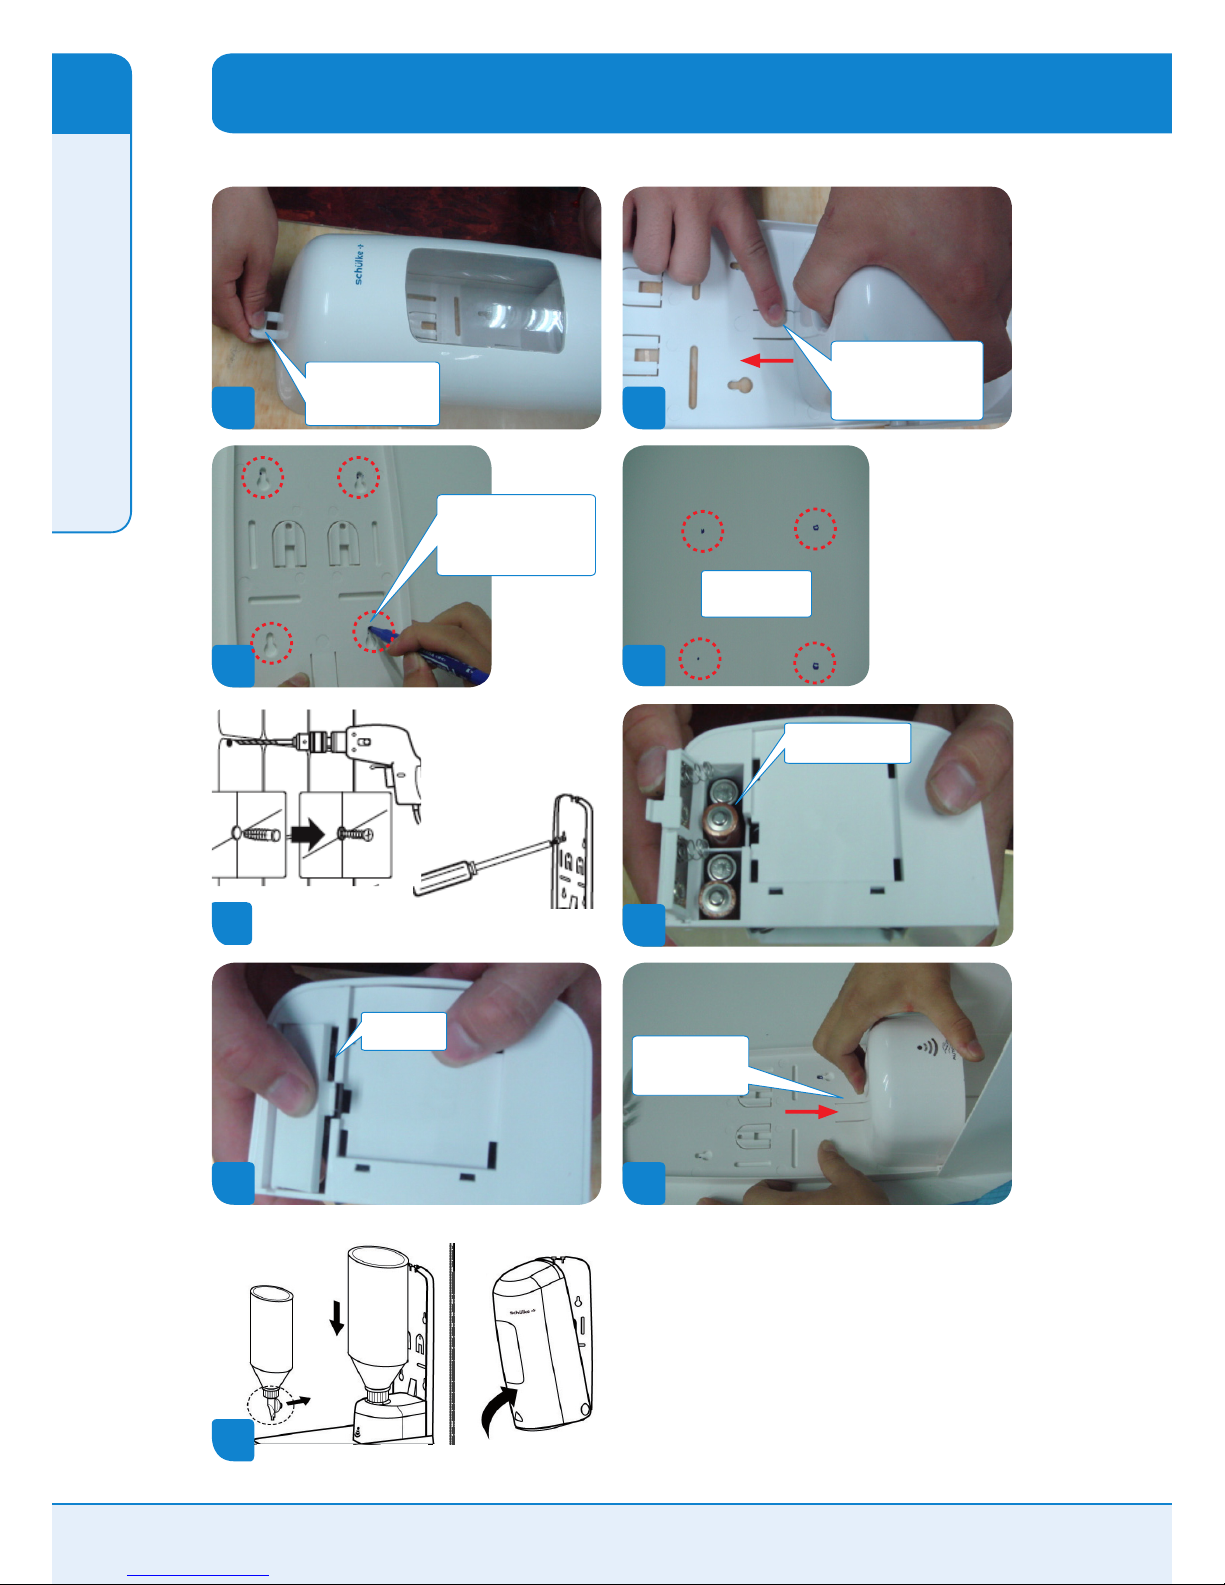
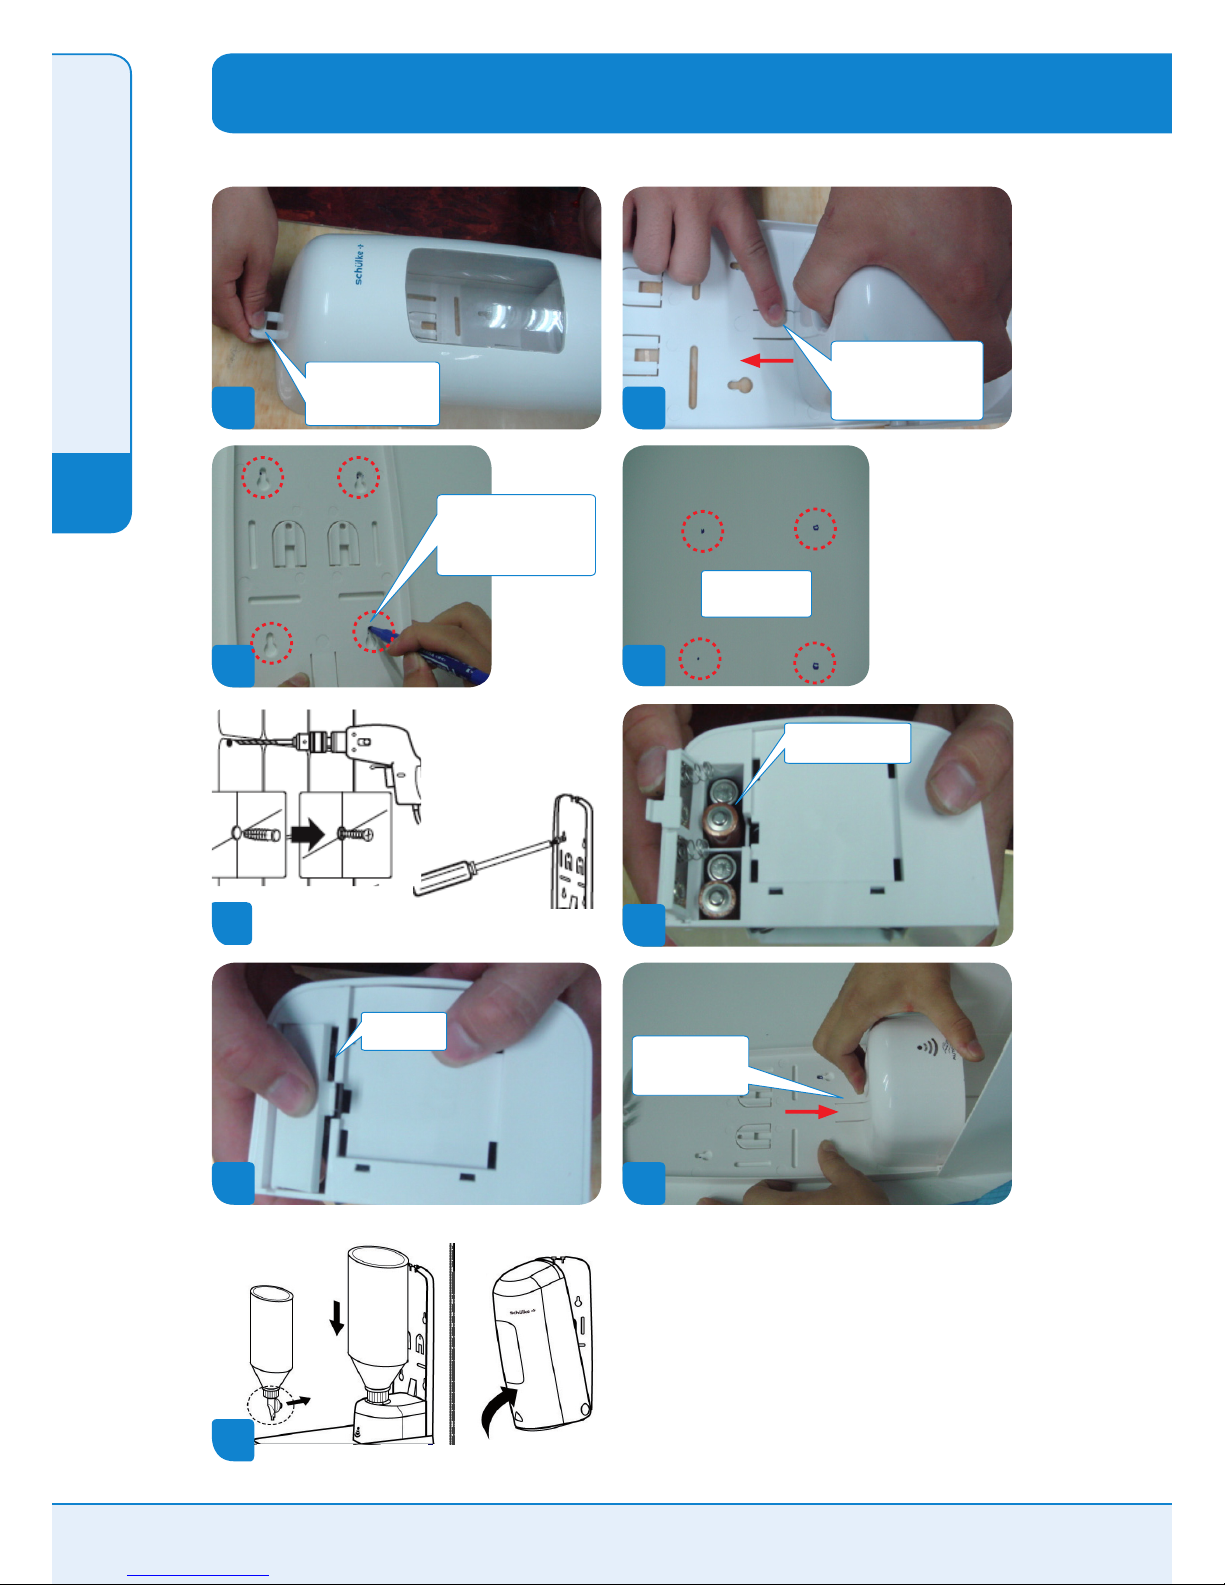
Installation Guide for touchless D1
1
Take out the dispenser
and use a key to open
the cover
2
After opening the
dispenser casing, press
here with nger and then
you can take o the gear
8
Fasten the gear to
the back board and
x it well
Close the
battery cover
Put the batteries into the
battery case of the gear
4
There are 4 marks
on the wall
3
Put the back board on the
wall. Use a pen to mark the
position of 4 holes (see red
circle) on the wall
5
9
Page 6 of 38 touchless D1 Instruction manual for a Electric Dispenser www.schuelke.com
EN
FR
DE
IT
NL
PL
Page 7
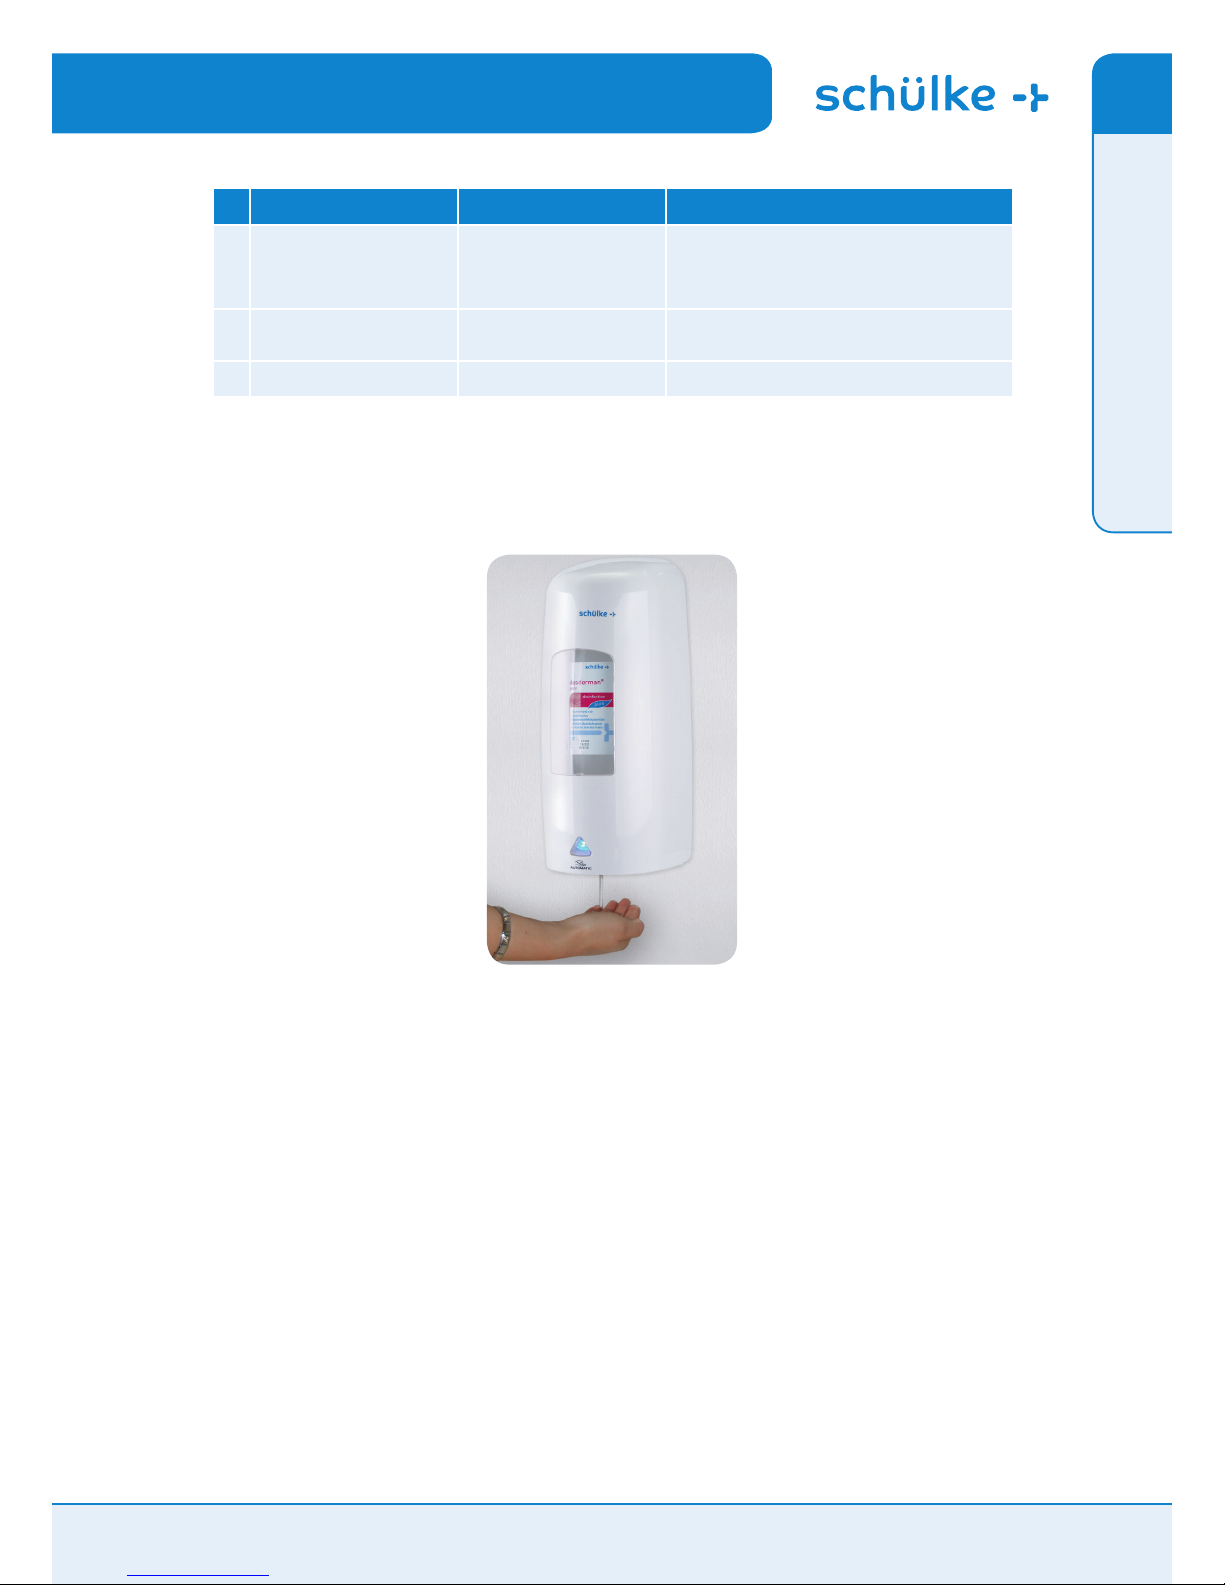
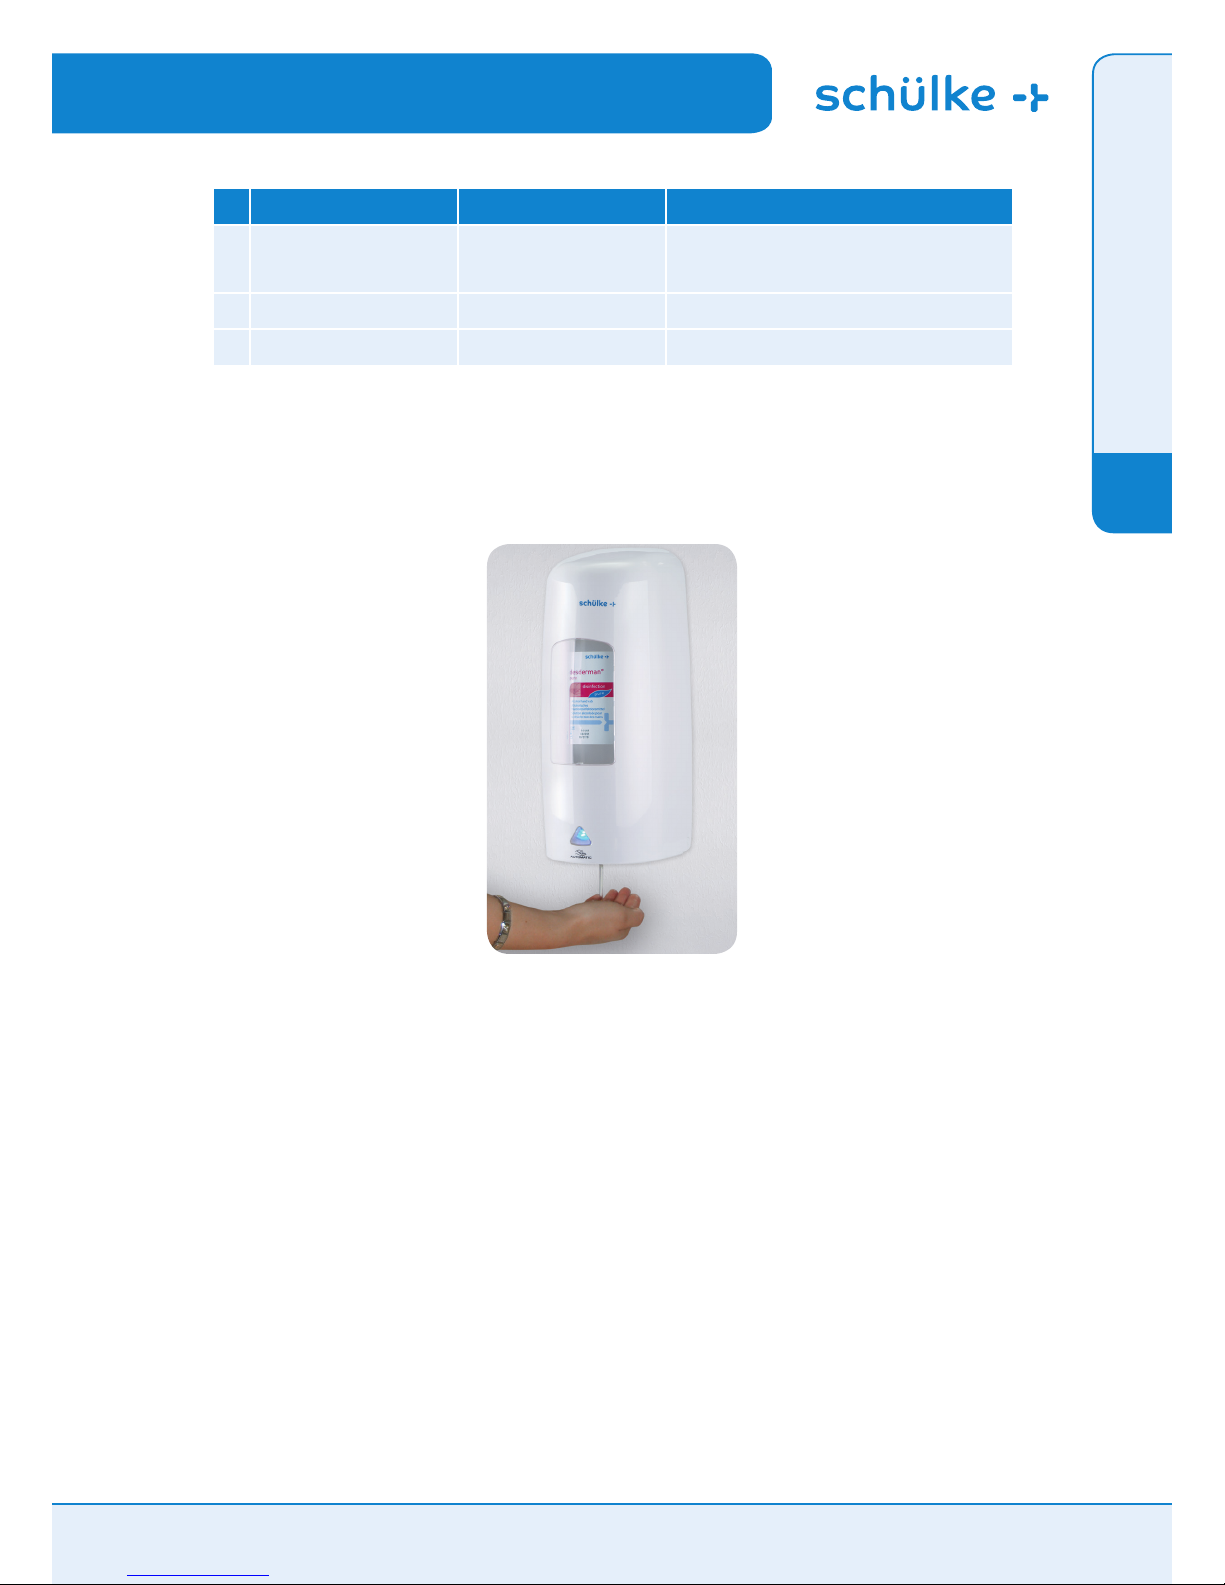
No. Situation Possible reason Solution
1
The engine creaks and weak. red/
blue light ashes.
1. Battery is in low power
2. Voltage dierence between
batteries‘ is too big even though
they are not below low voltage
setting (5V).
Change and try new batteries.
2
Engine does not work after inserting
the batteries. Red light ashes.
Batteries are nearly empty o and
the voltage is below the specied
minimum of 5 V.
Batteries have to be changed as the voltage of battery is too
low to work.
3
The LED of the gear ashes purple. The plunger is blocked by an
incorrectly inserted bottle.
Reset the gear by opening the battery box and insert the
bottle correctly.
Simple Trouble-Shooting Guide
for touchless D1
EN
FR
DE
IT
NL
PL
touchless D1 Instruction manual for a Electric Dispenser www.schuelke.com Page 7 of 38
Page 8
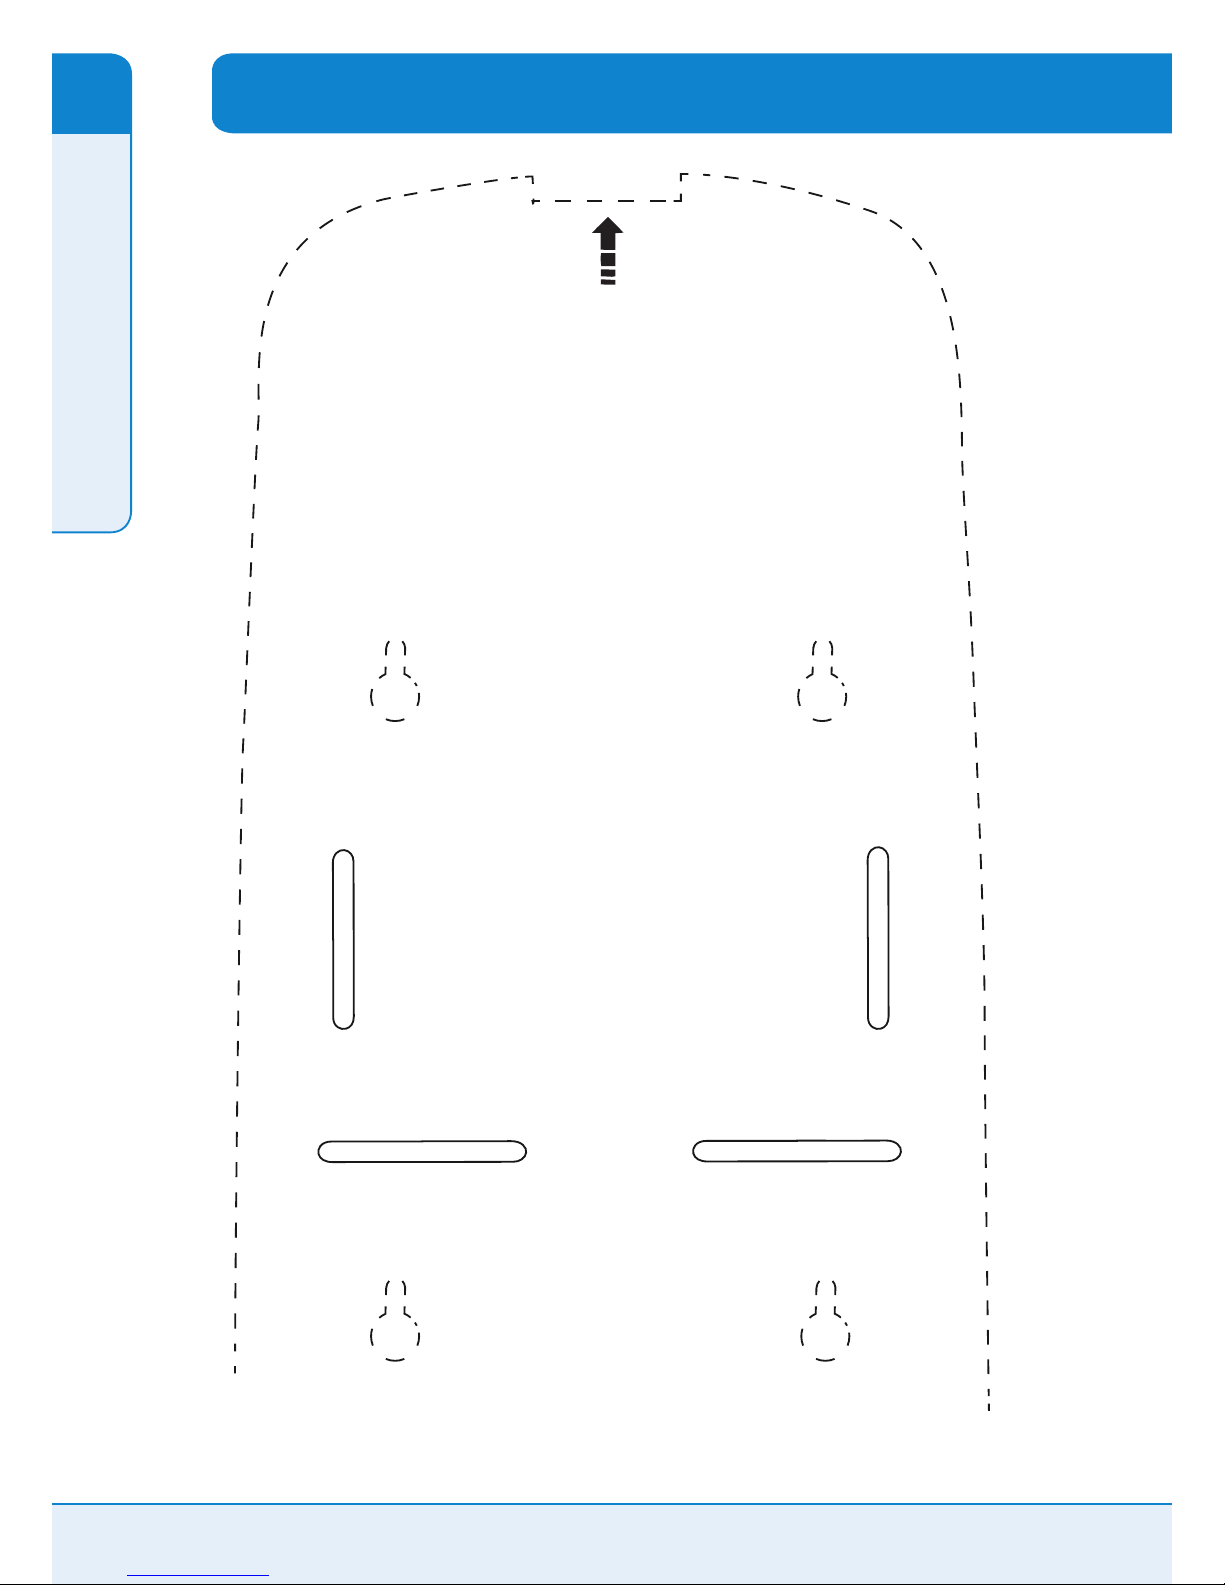
1. Cut along broken line
2. Moisten and pafte onto wall
3. Drill holes (Circles indicate screw position)
Dispenser Installation Template
EN
FR
DE
IT
NL
PL
Page 8 of 38 touchless D1 Instruction manual for a Electric Dispenser www.schuelke.com
Page 9
Verpackungsinhalt:
Spendergehäuse x 1
Spender Rückwand x 1
Antrieb x 1
Batterien x 4
Schrauben und Dübel x 4
Montageanleitung x 1
Schlüssel x 1
Tropfschale x 1
touchless D1
Berührungsloser Spender
Bedienungshandbuch für einen Berührungslosen Spender www.schuelke.com Seite 9 von 38
Schülke & Mayr Ges.m.b.H
Seidengasse 9
1070 Wien, Austria
Telefon +43 (0) 1 - 52325 01 - 0
Telefax
+43 (0) 1 - 523 25 01 - 60
Schülke & Mayr AG
Sihlfeldstrasse 58
8003 Zürich, Schweiz
Telefon +41 (0) 44 - 466 55 44
Telefax
+41 (0) 44 -466 55 33
Schülke & Mayr GmbH
22840 Norderstedt
Telefon
+49 (0) 40 - 521 00 - 0
Telefax
+49 (0) 40 - 521 00 - 318
www.schuelke.com
[email protected]
EN
FR
DE
IT
NL
PL
Page 10
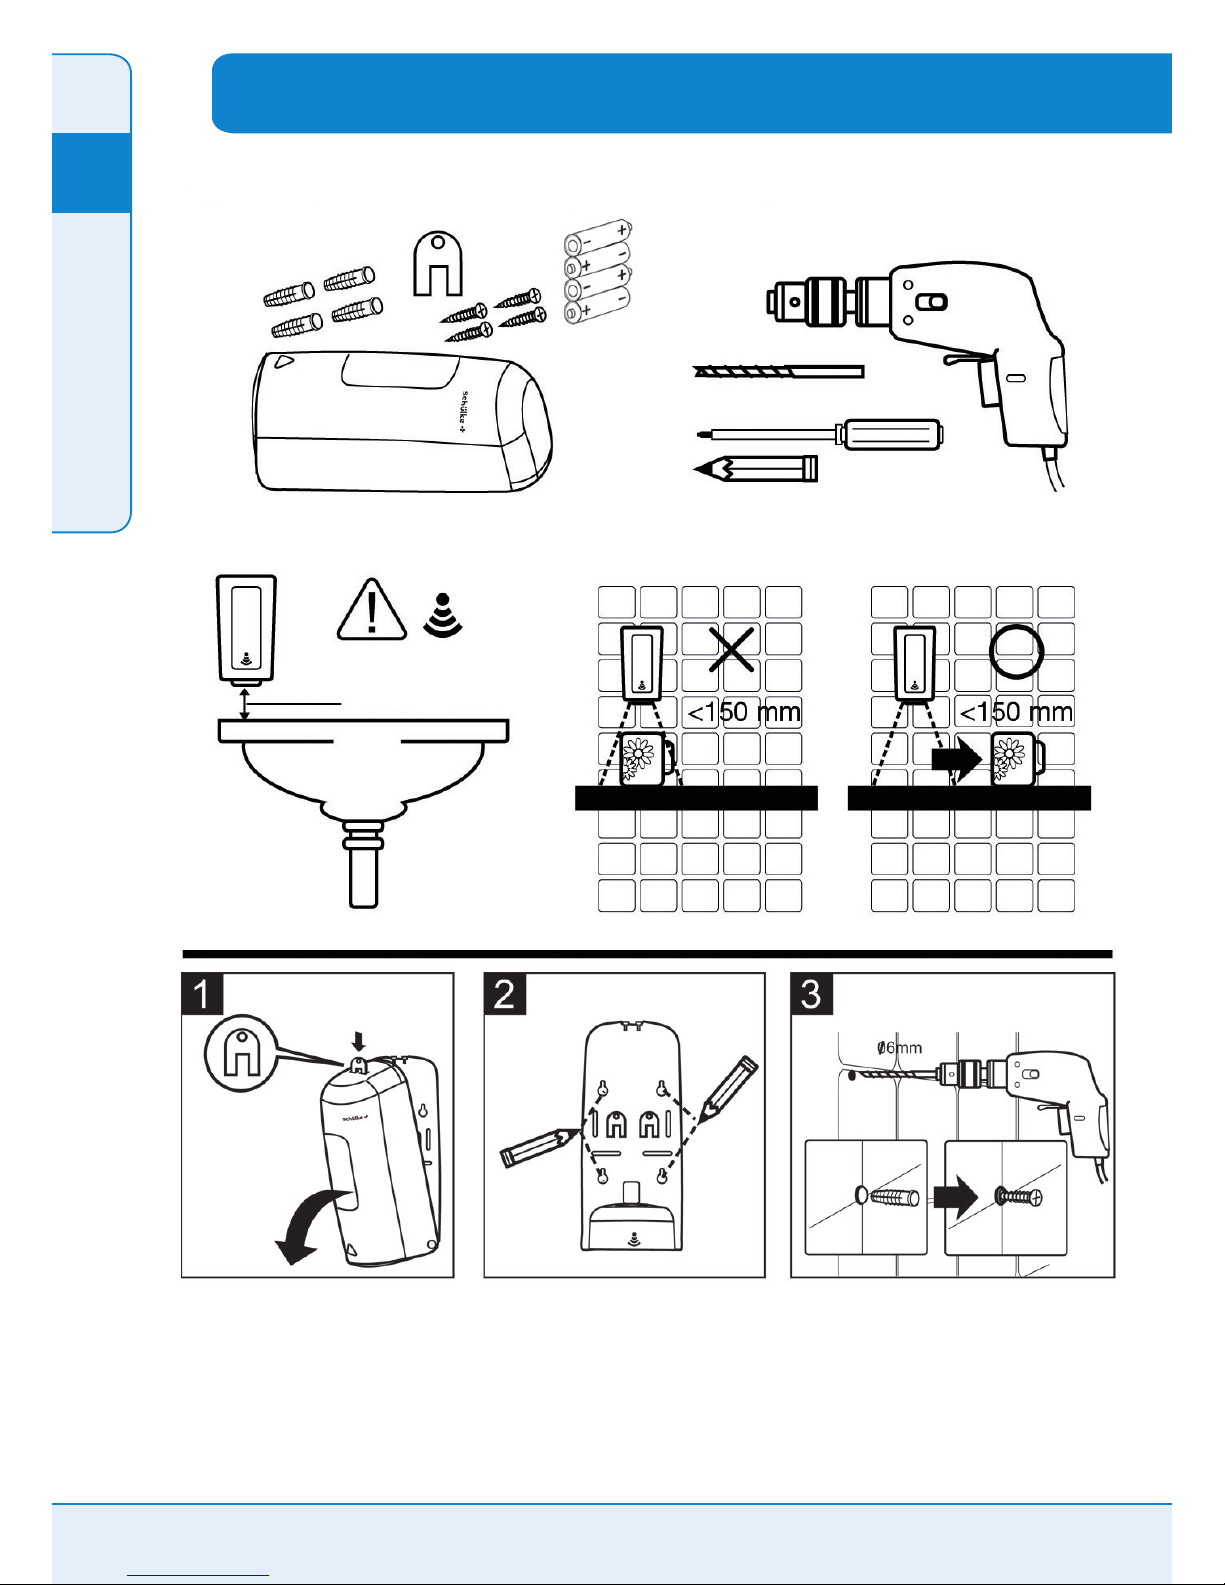
Verpackung beinhaltet
Hinweise
Ø 6 mm
minimum 150 mm
Zur Montage benötigtes Werkzeug
Ø 6 mm
Ø 4,8 mm
Montageanleitung
Seite 10 von 38 Bedienungshandbuch für einen Berührungslosen Spender www.schuelke.com
EN
FR
DE
IT
NL
PL
Page 11
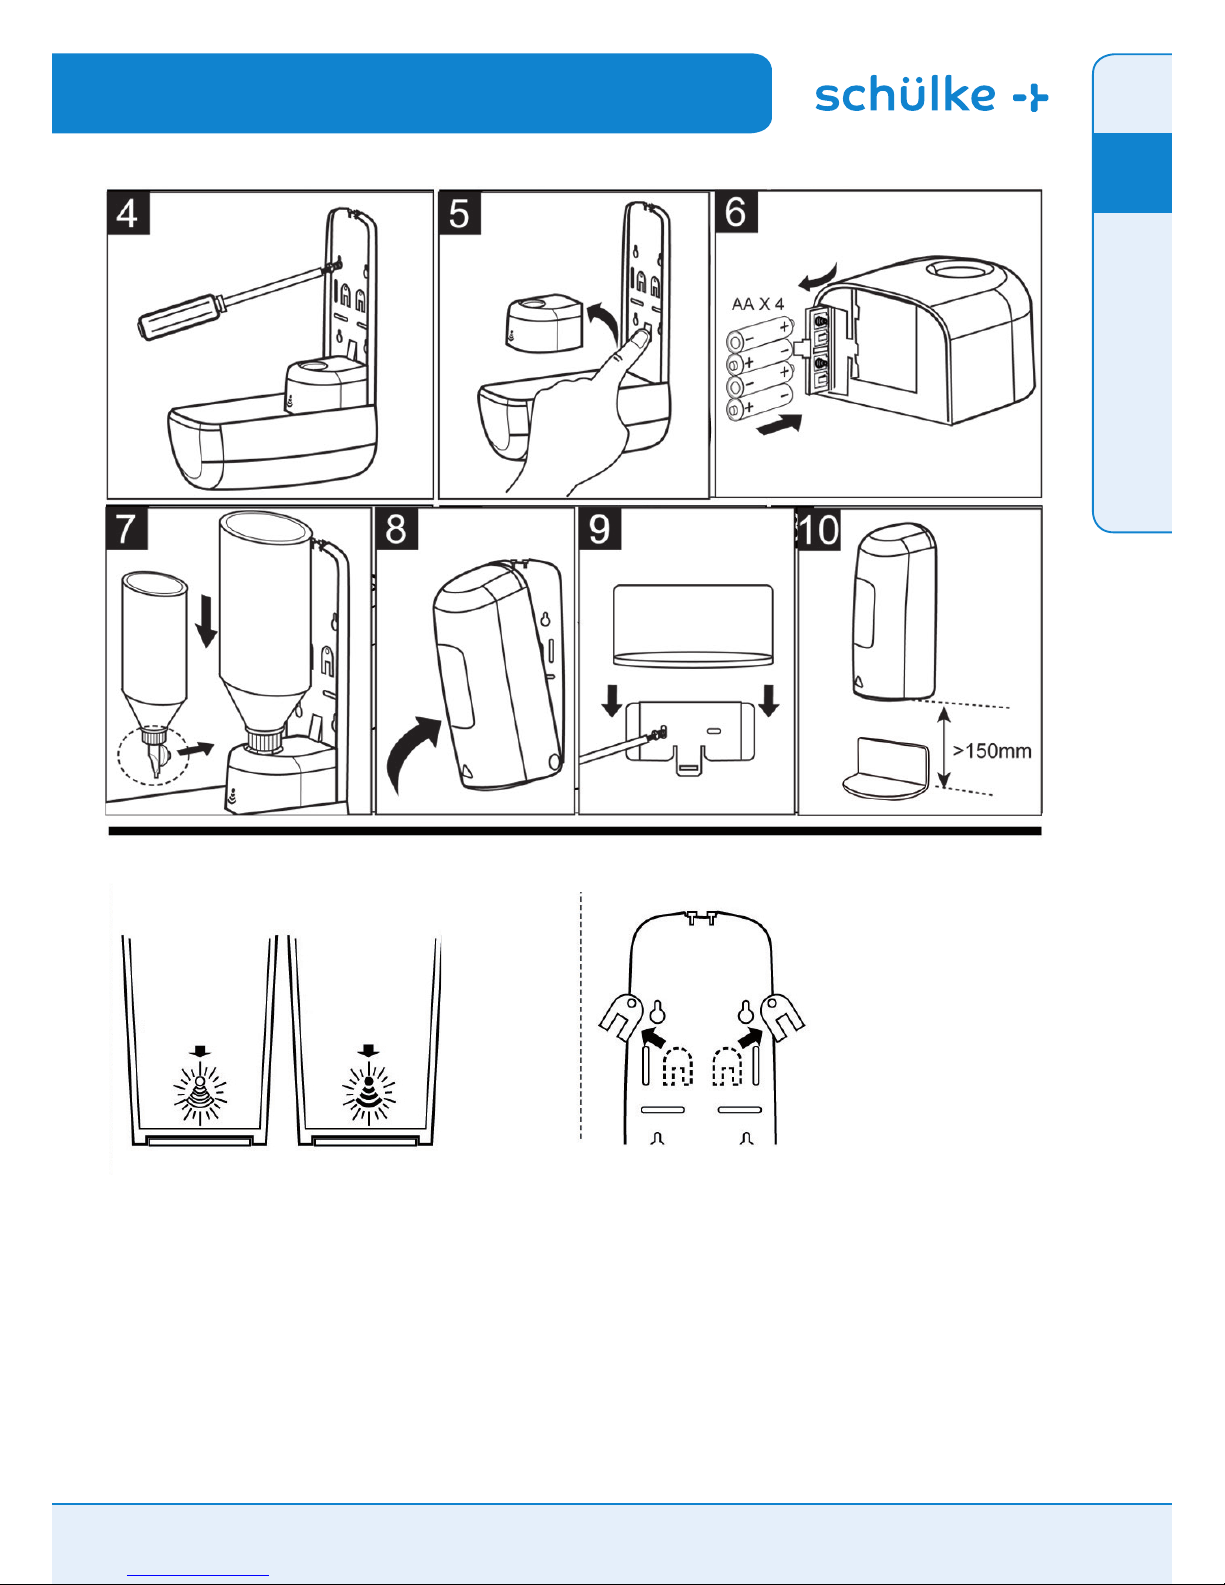
Bedienungshandbuch für einen Berührungslosen Spender www.schuelke.com Seite 11 von 38
EN
FR
DE
IT
NL
PL
IN BETRIEB
BLAUES LED-LICHT
SCHWACHE BATTERIE
ROTES LED-LICHT
Ersatzschlüssel
Page 12
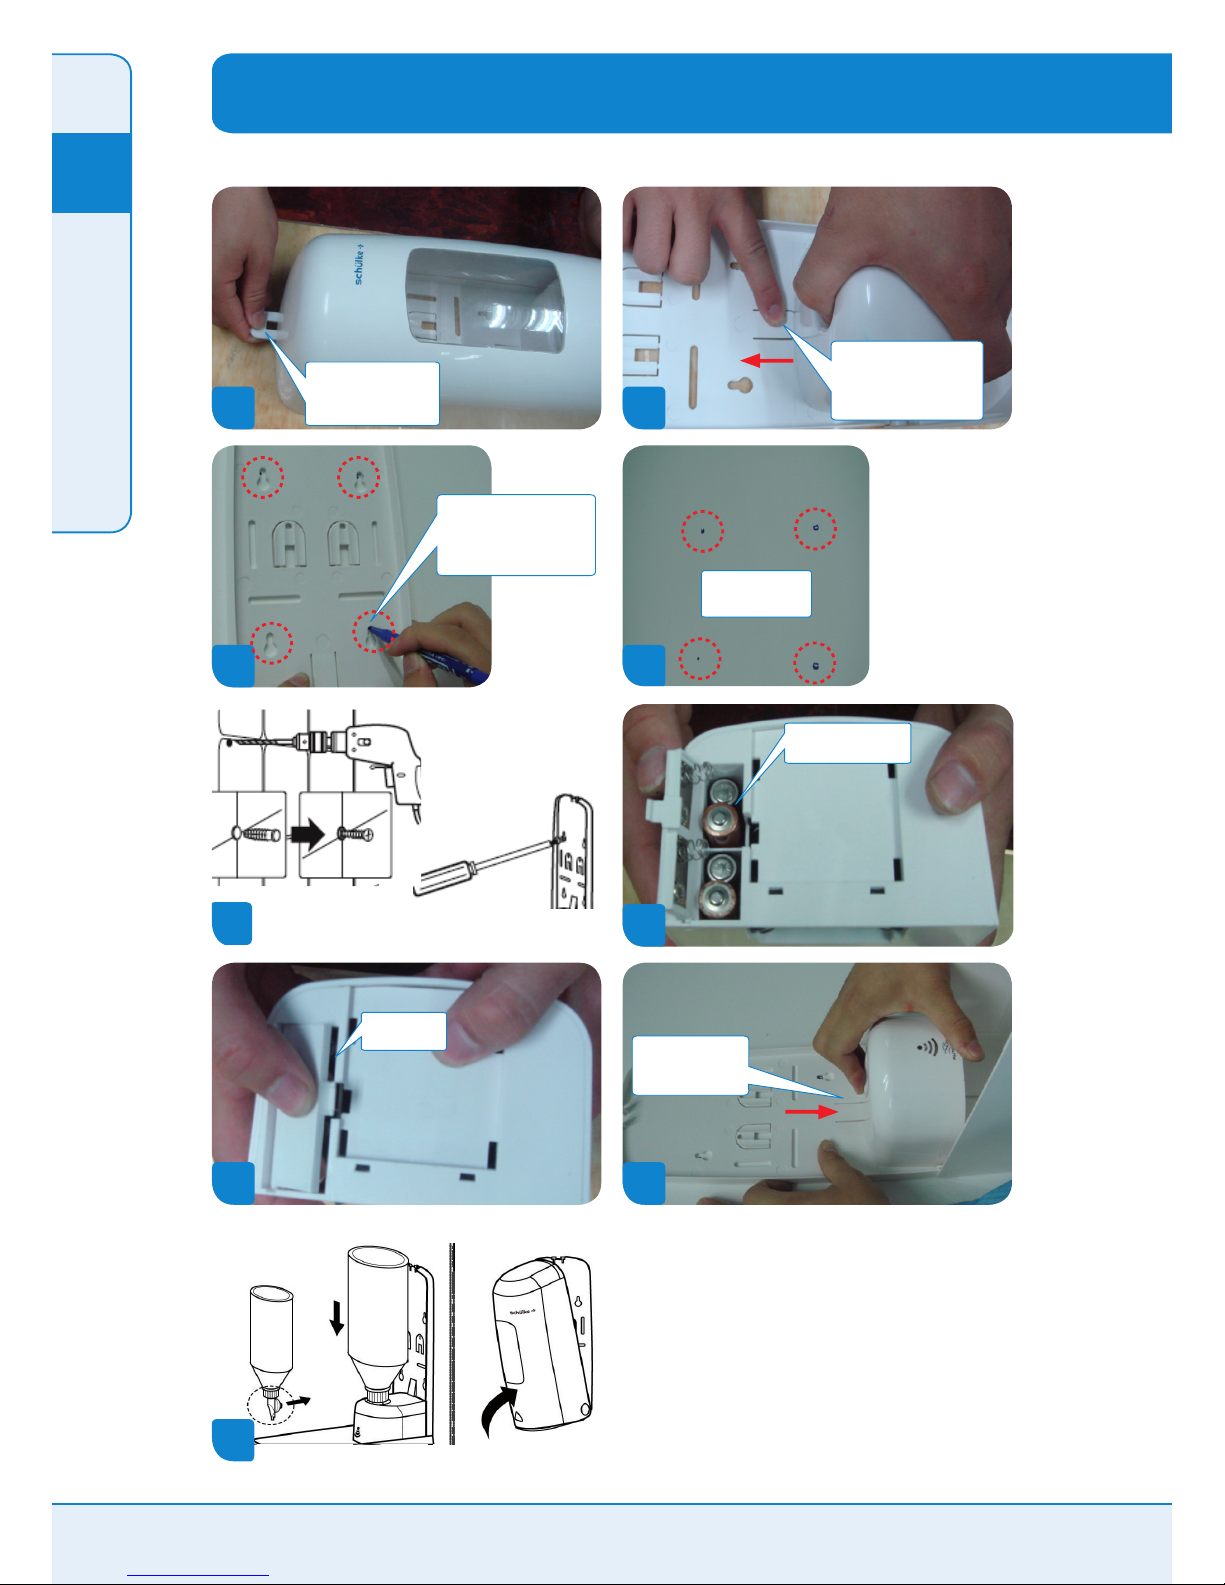
6
Montageanleitung bebildert
1
Nehmen Sie den
Präparatespender heraus und
verwenden Sie den beigefügten
Schlüssel, um die Abdeckung
zu önen
2
Nach dem Önen des
Spendergehäuses hier mit
dem Finger drücken und den
Antrieb abnehmen
8
Befestigen Sie den
Antrieb an der
Spenderrückwand
7
Schließen Sie die
Abdeckung des
Batteriefachs
4
An der Wand sind 4
Markierungen
3
Halten Sie die
Spenderrückwand an die
Wand. Markieren Sie mit einem
Stift an der Wand die Position
der 4 Löcher (siehe rote Kreise)
5
9
Seite 12 von 38 Bedienungshandbuch für einen Berührungslosen Spender www.schuelke.com
EN
FR
DE
IT
NL
PL
Legen Sie die Batterien in das
Batteriefach des Antriebs ein
Page 13
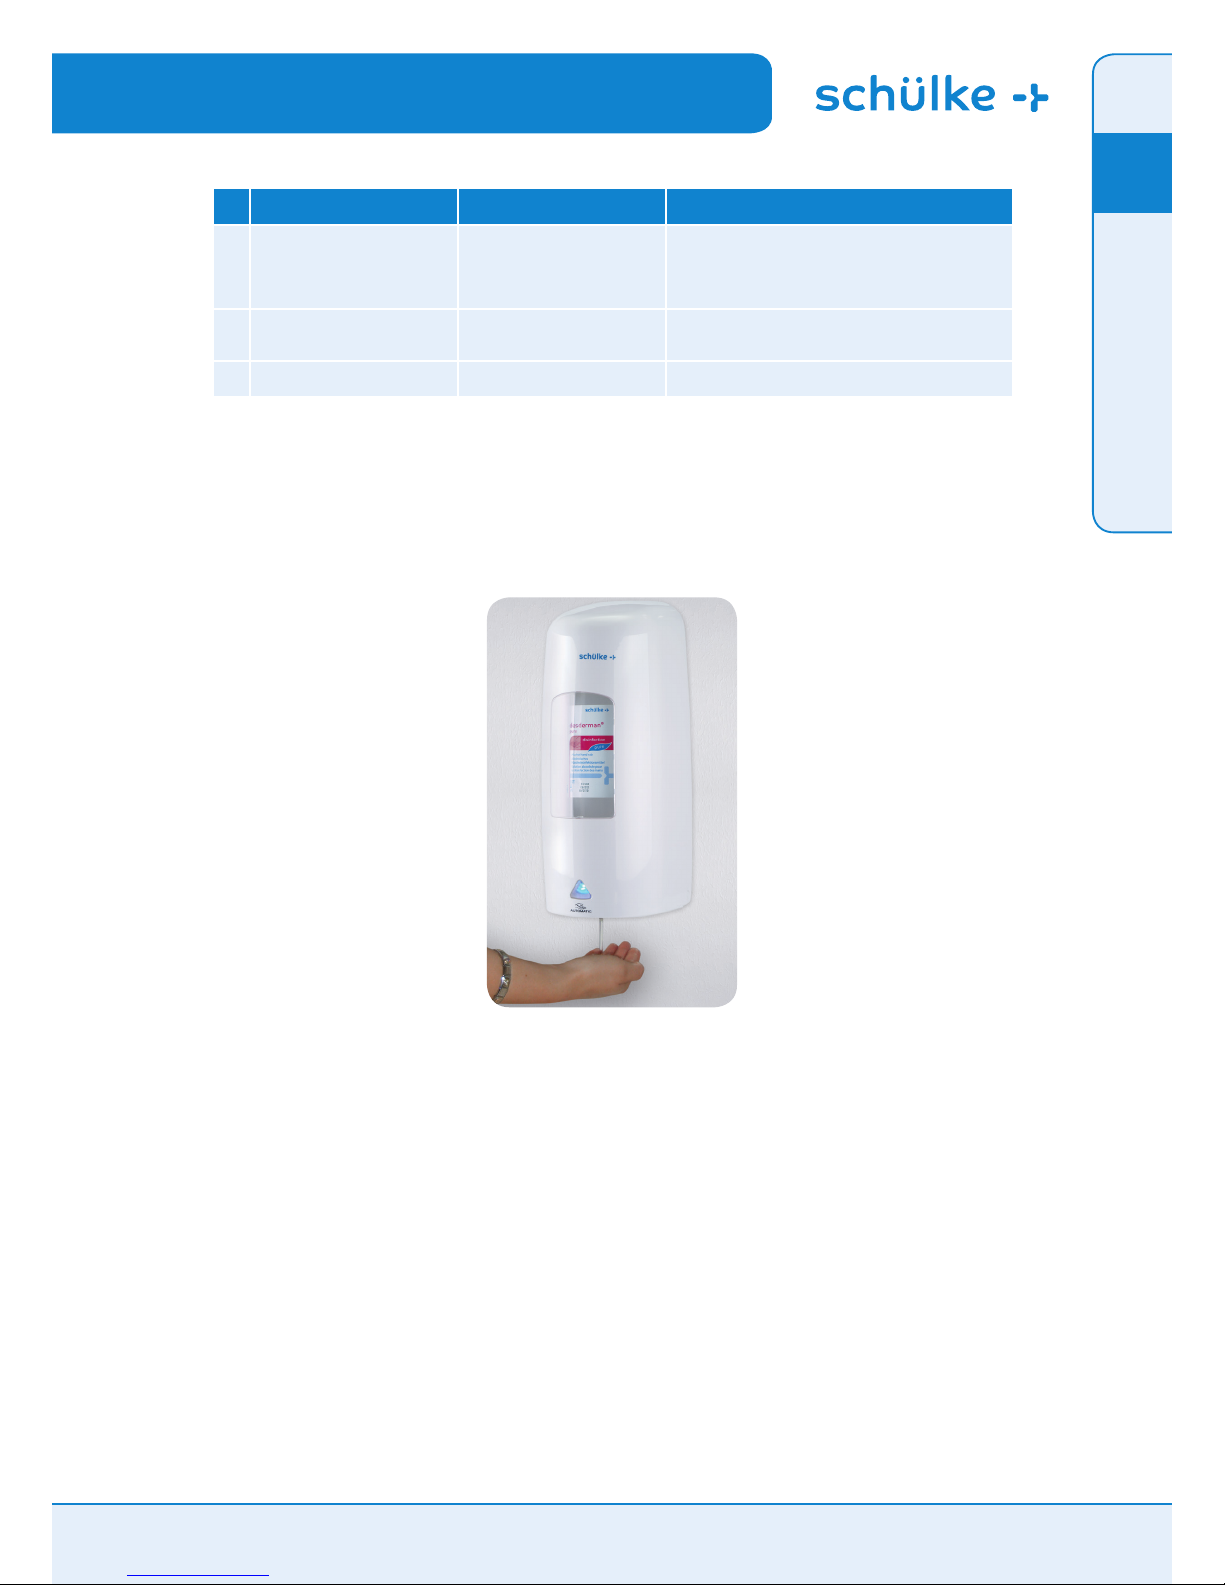
Nr. Situation Mögliche Ursache Lösung
1
Der Pumpantrieb quietscht und
lässt in der Leistung nach. Das rote/
blaue Licht leuchtet auf.
1. Batterie wird schwach
2. Die Spannungsdierenz zwischen
den einzelnen Batterien ist zu groß,
auch wenn diese nicht unter einer
Niederspannung laufen (5V).
Batterien auswechseln und neue einlegen.
2
Gerät funktioniert nach dem
Einlegen der Batterien nicht. Das
rote Licht leuchtet.
Die Batterien sind fast leer und die
Mindestspannung von 5 V wird
unterschritten.
Batterien müssen ausgewechselt werden, da die Spannung
für den Betrieb zu gering ist.
3
Die LED des Antriebes blinkt Lila. Der Kolben ist durch eine falsch
eingelegte Flasche blockiert.
Den Antrieb durch das Önen des Batteriefachs zurücksetzen
und die Flasche korrekt einlegen.
Anleitung zur Fehlersuche und beseitigung für touchless D1
EN
FR
DE
IT
NL
PL
Bedienungshandbuch für einen Berührungslosen Spender www.schuelke.com Seite 13 von 38
Page 14
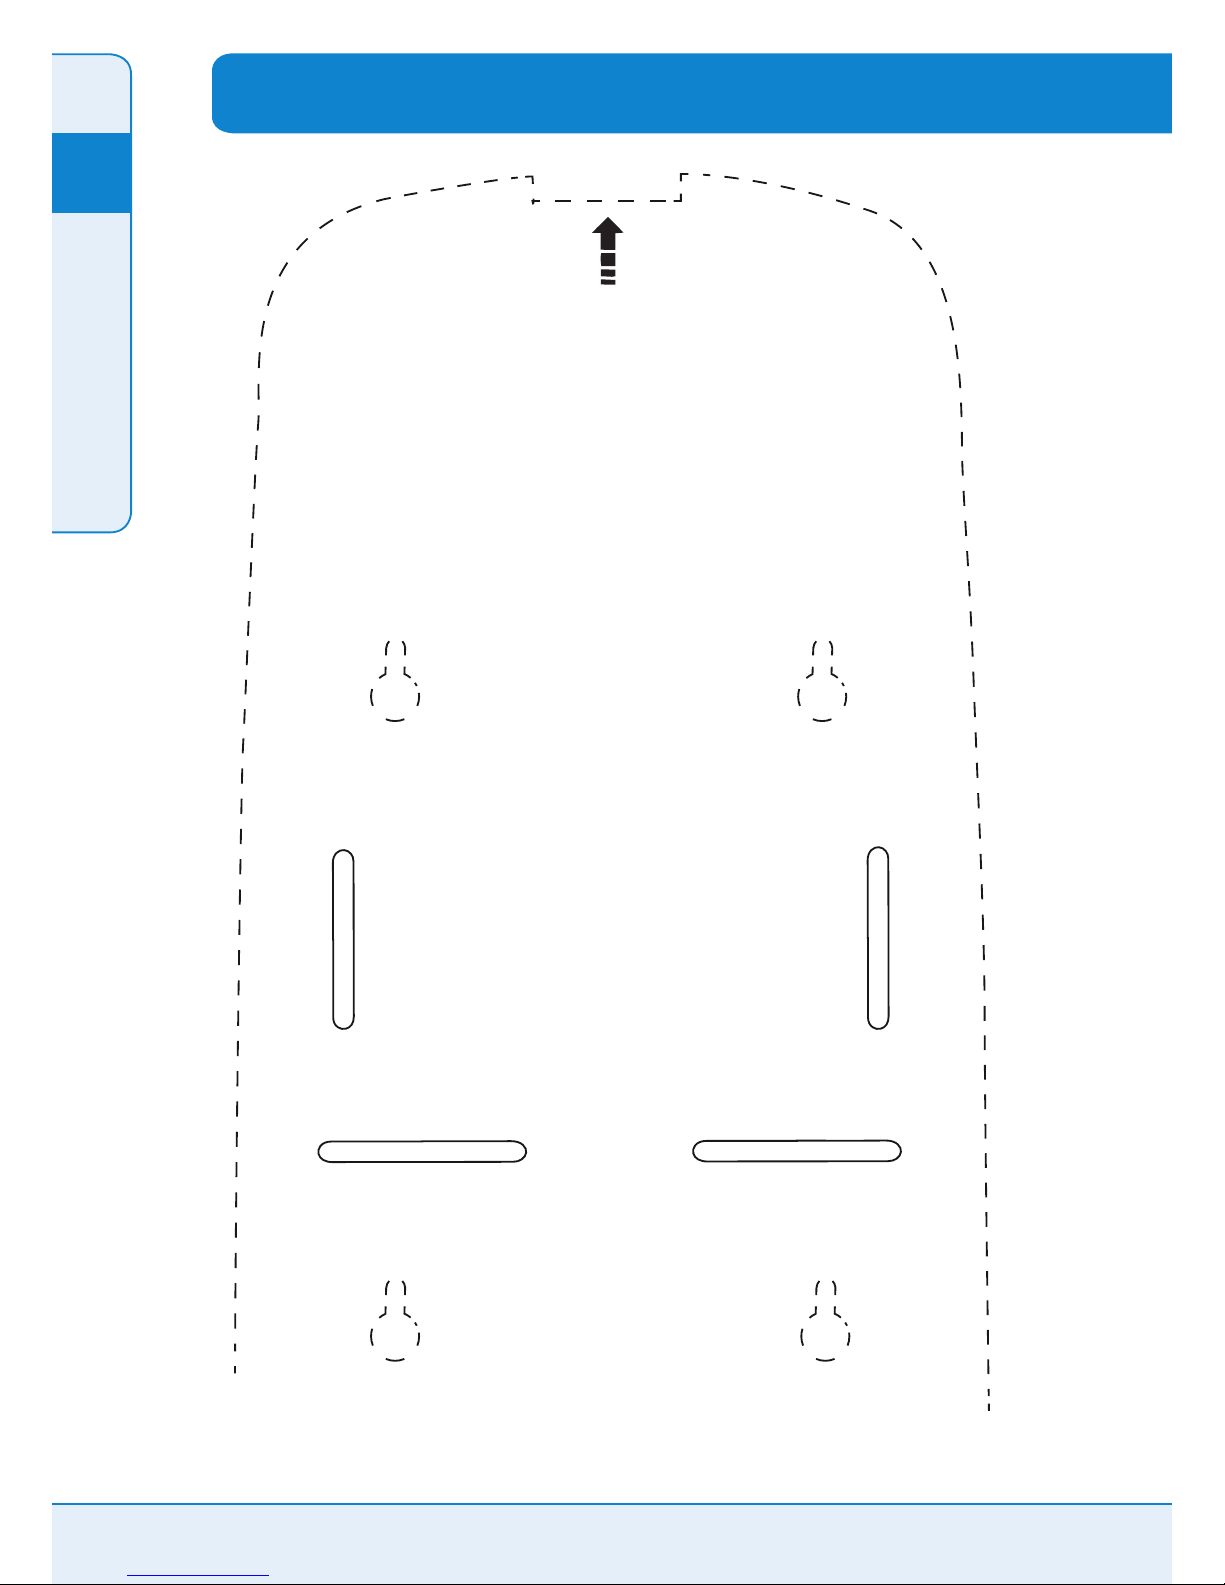
1. Schneiden Sie entlang der gestrichelten Linie
2. Anfeuchten und an die Wand kleben
3. Löcher bohren (die Kreise markieren die Position der Schrauben)
Spender Installationsanweisung
EN
FR
DE
IT
NL
PL
Seite 14 von 38 Bedienungshandbuch für einen Berührungslosen Spender www.schuelke.com
Page 15
Manuel d’emploi pour un Distributeur sans contact www.schuelke.com Page 15 de 38
Schülke & Mayr Ges.m.b.H
Seidengasse 9
1070 Wien, Austria
Phone +43 (0) 1- 523 25 01 - 0
Fax
+43 (0) 1- 523 25 01 - 60
Schülke & Mayr AG
Sihlfeldstrasse 58
8003 Zürich, Schweiz
Phone +41 (0) 44 - 466 55 44
Fax
+41 (0) 44 - 466 55 33
Schülke France SARL
8 rue d‘Arcueil
94250 Gentilly, France
Phone +33 1 49 69 83 78
Fax +33 1 49 69 83 85
Schülke & Mayr GmbH
22840 Norderstedt, Germany
Phone
+49 (0) 40 - 521 00 - 0
Fax
+49 (0) 40 - 521 00 - 318
www.schuelke.com
[email protected]
Contenu du conditionnement:
Boîtier du distributeur x 1
Panneau arrière du distributeur x 1
Mécanisme de commande x 1
Piles x 4
Vis et chevilles x 4
Instructions de montage x 1
Clé x 1
Bac égouttoir x 1
touchless D1
Distributeur sans contact
EN
FR
DE
IT
NL
PL
Page 16
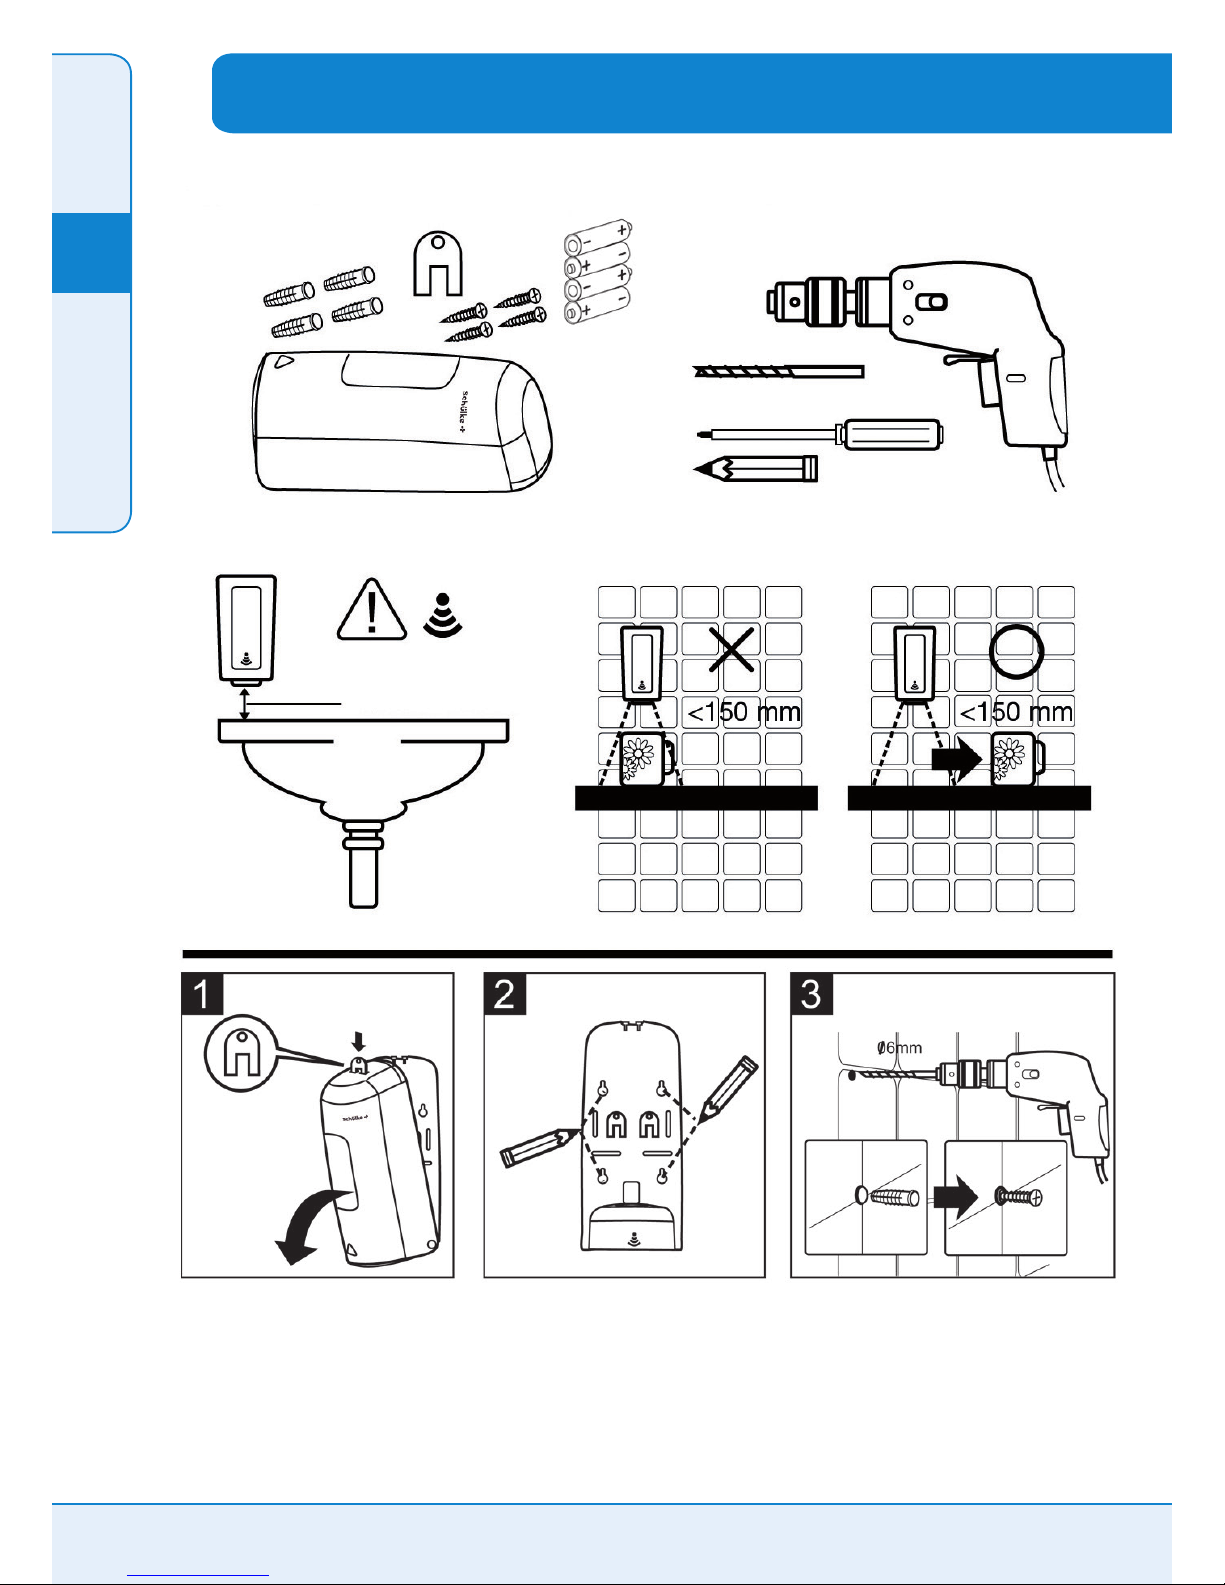
Contenu du conditionnement
Observations
Ø 6 mm
minimum 150 mm
Outils requis pour le montage
Ø 6 mm
Ø 4,8 mm
Instructions de montage
Page 16 de 38 Manuel d’emploi pour un Distributeur sans contact www.schuelke.com
EN
FR
DE
IT
NL
PL
Page 17
Manuel d’emploi pour un Distributeur sans contact www.schuelke.com Page 17 de 38
EN
FR
DE
IT
NL
PL
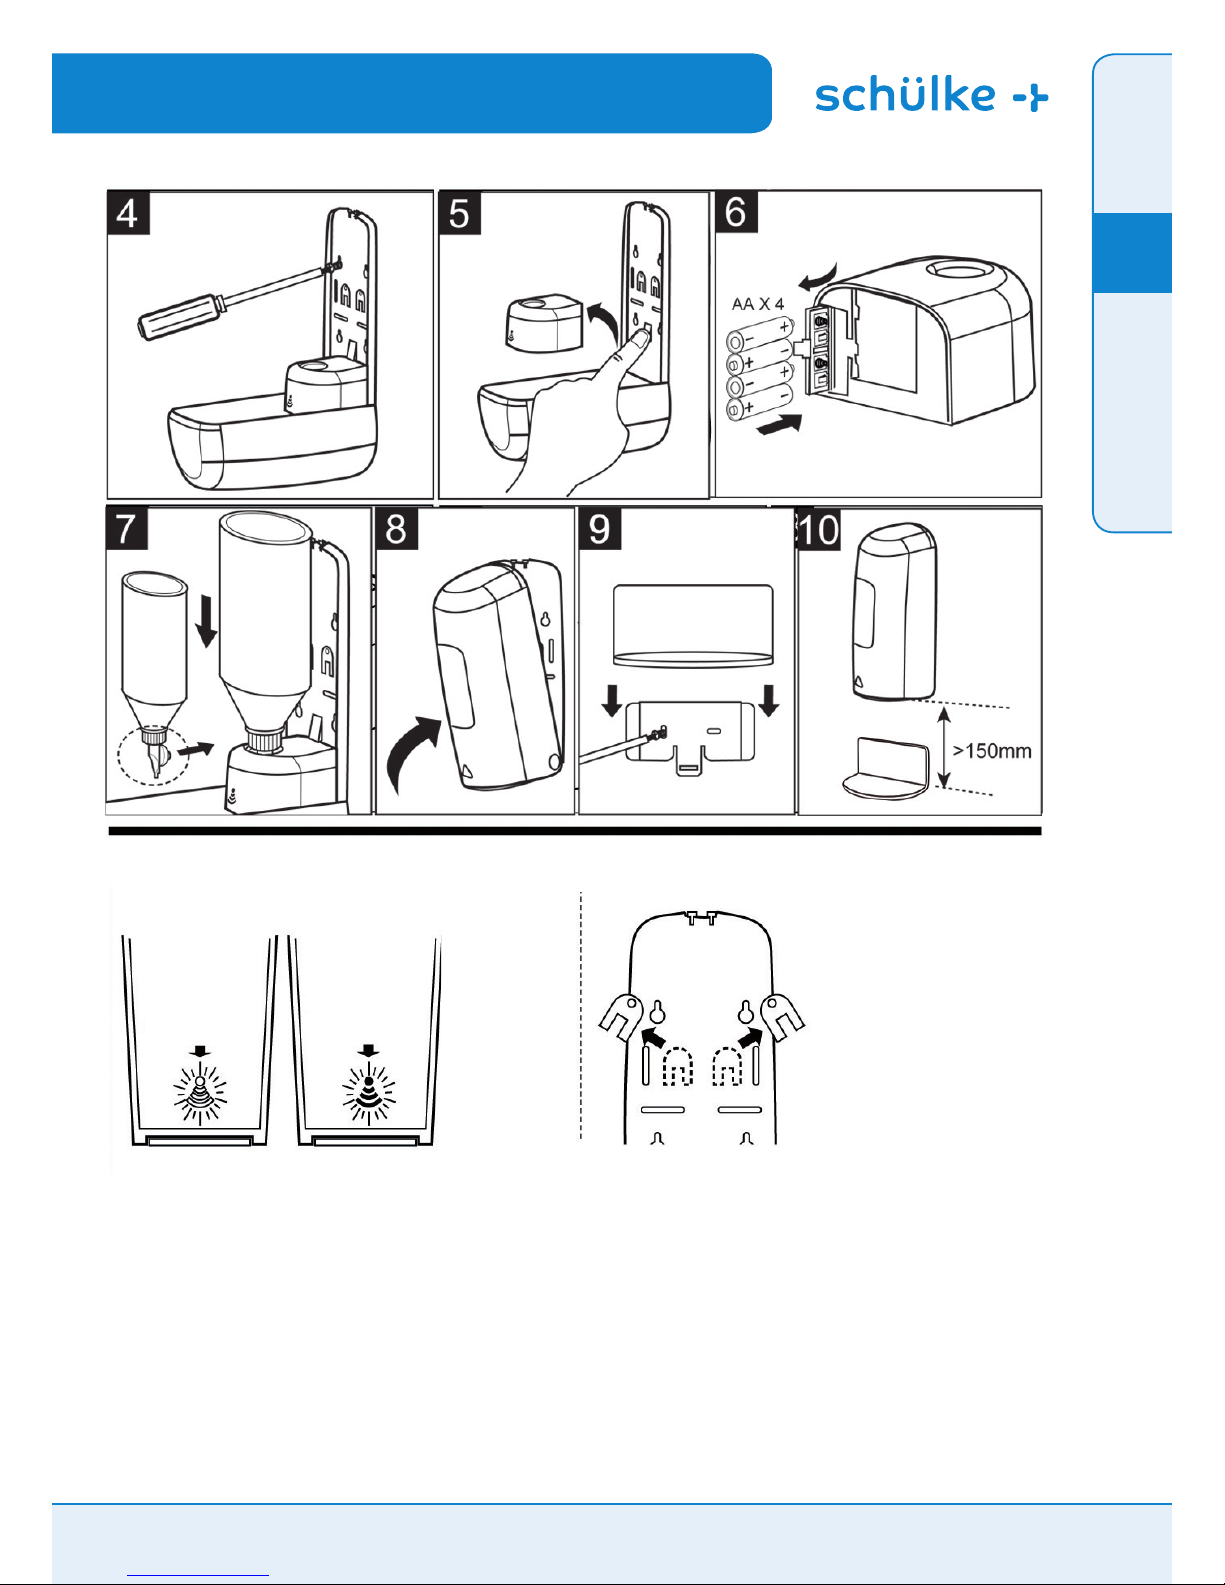
EN MARCHE
DEL BLEUE BRILLE
BATTERIE FAIBLE
DEL ROUGE BRILLE
Clé de remplacement
Page 18
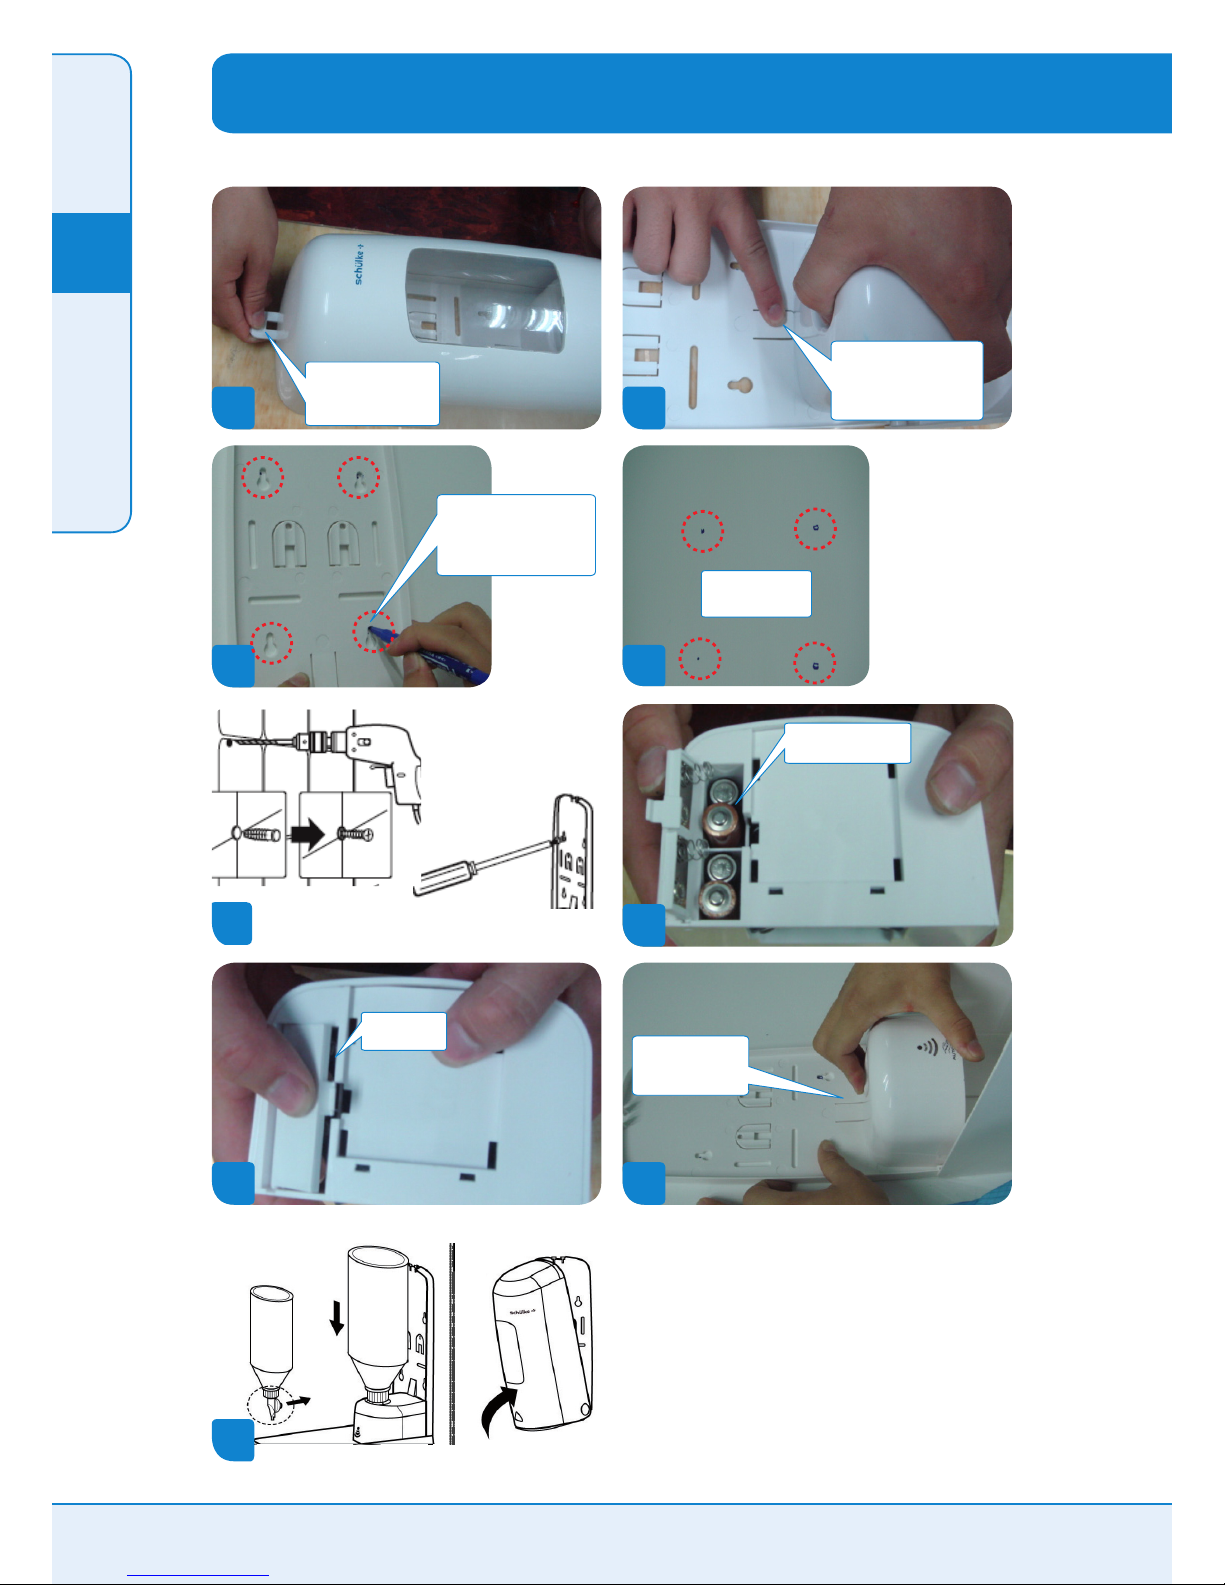
6
7
Instructions de montage illustrées
1
Retirez le distributeur de la
préparation du boîtier et
servez-vous de la clé jointe
pour ouvrir le cache.
2
Une fois le boîtier du
distributeur ouvert, appuyer
ici avec le doigt et retirer la
commande
8
Fixez la commande
à la partie arrière du
distributeur
Fermez le cache
du compartiment
à piles
Placez les piles dans le
compartiment à piles de
la commande
4
Le mur est
dorénavant doté de
4 repères.
3
Placez la partie arrière du
distributeur contre le mur.
Marquez les endroits pour le
perçage des 4 trous avec un crayon
sur le mur (voir les cercles ronds)
5
9
Page 18 de 38 Manuel d’emploi pour un Distributeur sans contact www.schuelke.com
EN
FR
DE
IT
NL
PL
Page 19
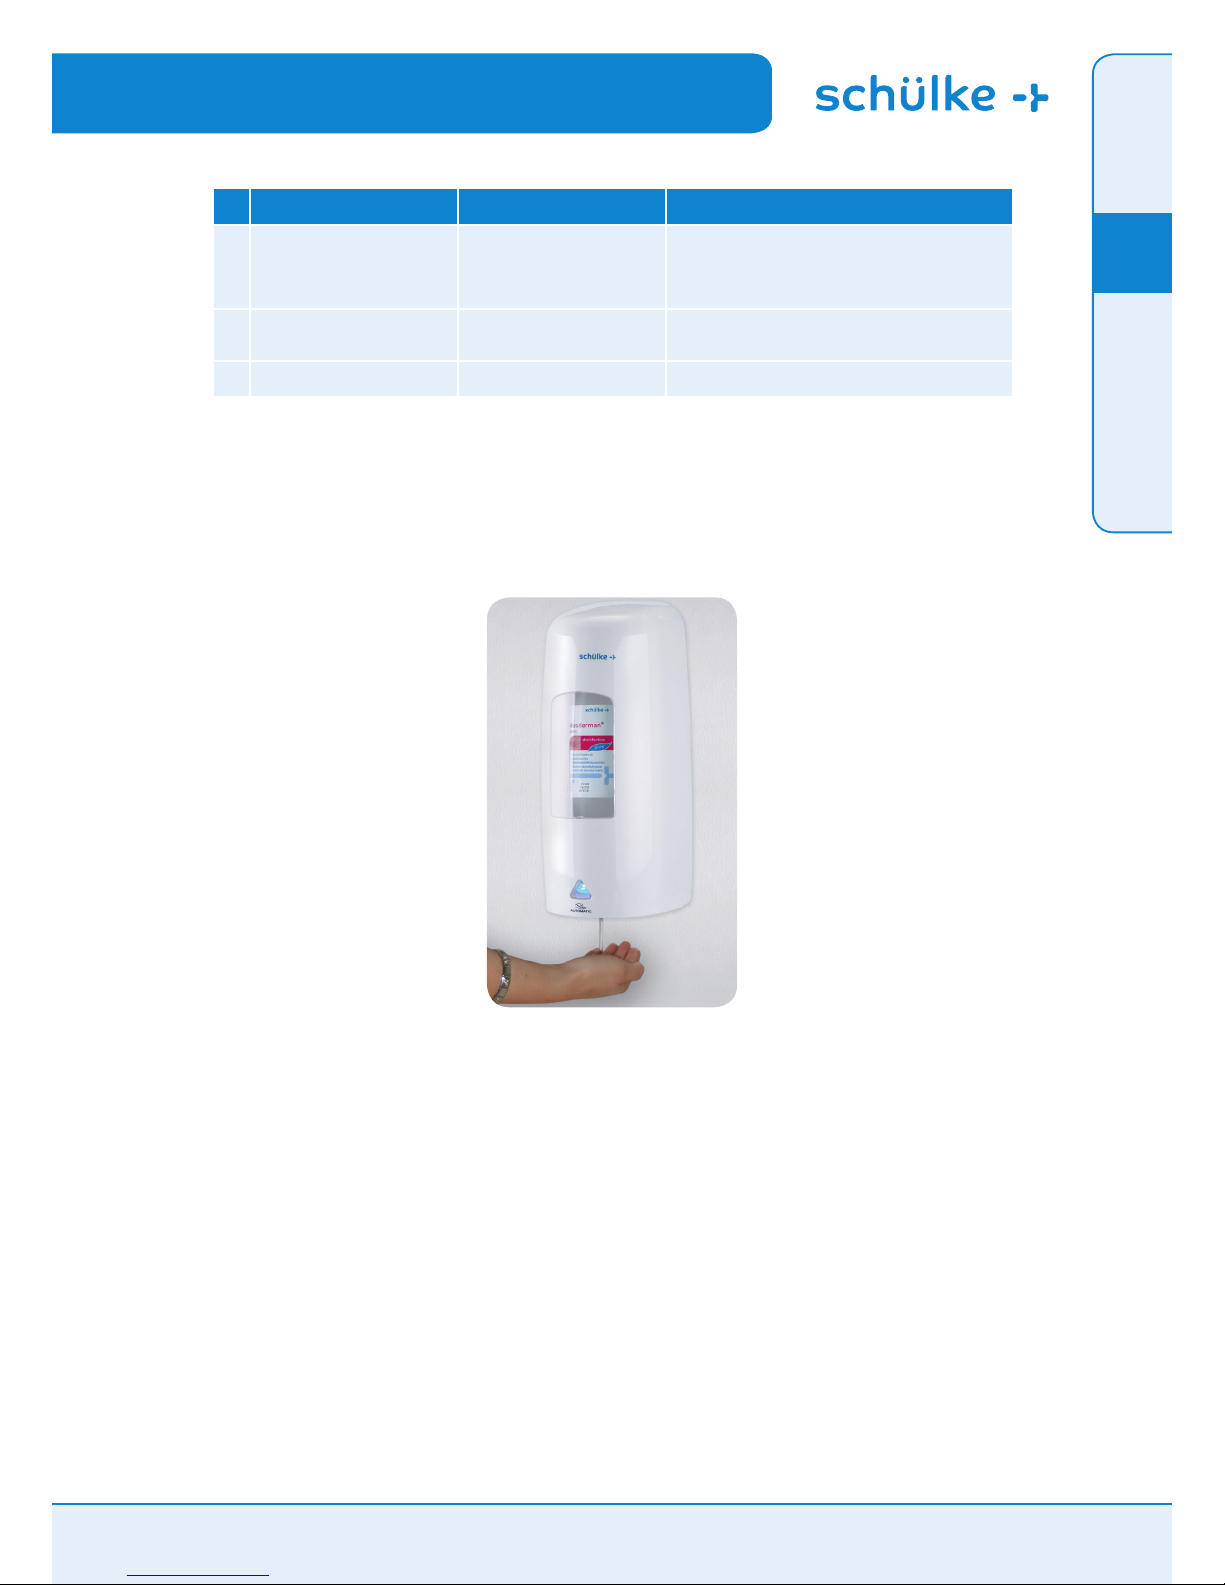
No. Situation Cause possible Remède
1
Le dispositif de pompage grince
et ne semple plus si puissant. La
lampe rouge / bleue brille.
1. Piles trop faibles
2. La diérence de tension entre les
piles est trop importante, même si
elles ne fonctionnent pas à basse
tension (5 volts).
Remplacez les piles et insérez des piles neuves.
2
L‘appareil ne fonctionne pas après
l‘insertion des piles. La lumière
rouge brille.
Les piles sont presque vides et la
tension est en dessous du minimum
spécié de 5 V.
Remplacez les piles étant donné qu‘elles ne fournissent pas
susamment de tension d‘utilisation.
3
La LED de la commande clignote
en lilas.
Le piston est bloqué par un acon
mal inséré.
Replacer la commande en ouvrant le compartiment à piles et
insérer le acon correctement.
Guide de recherche et d‘élimination
des erreurs pour le touchless D1
EN
FR
DE
IT
NL
PL
Manuel d’emploi pour un Distributeur sans contact www.schuelke.com Page 19 de 38
Page 20
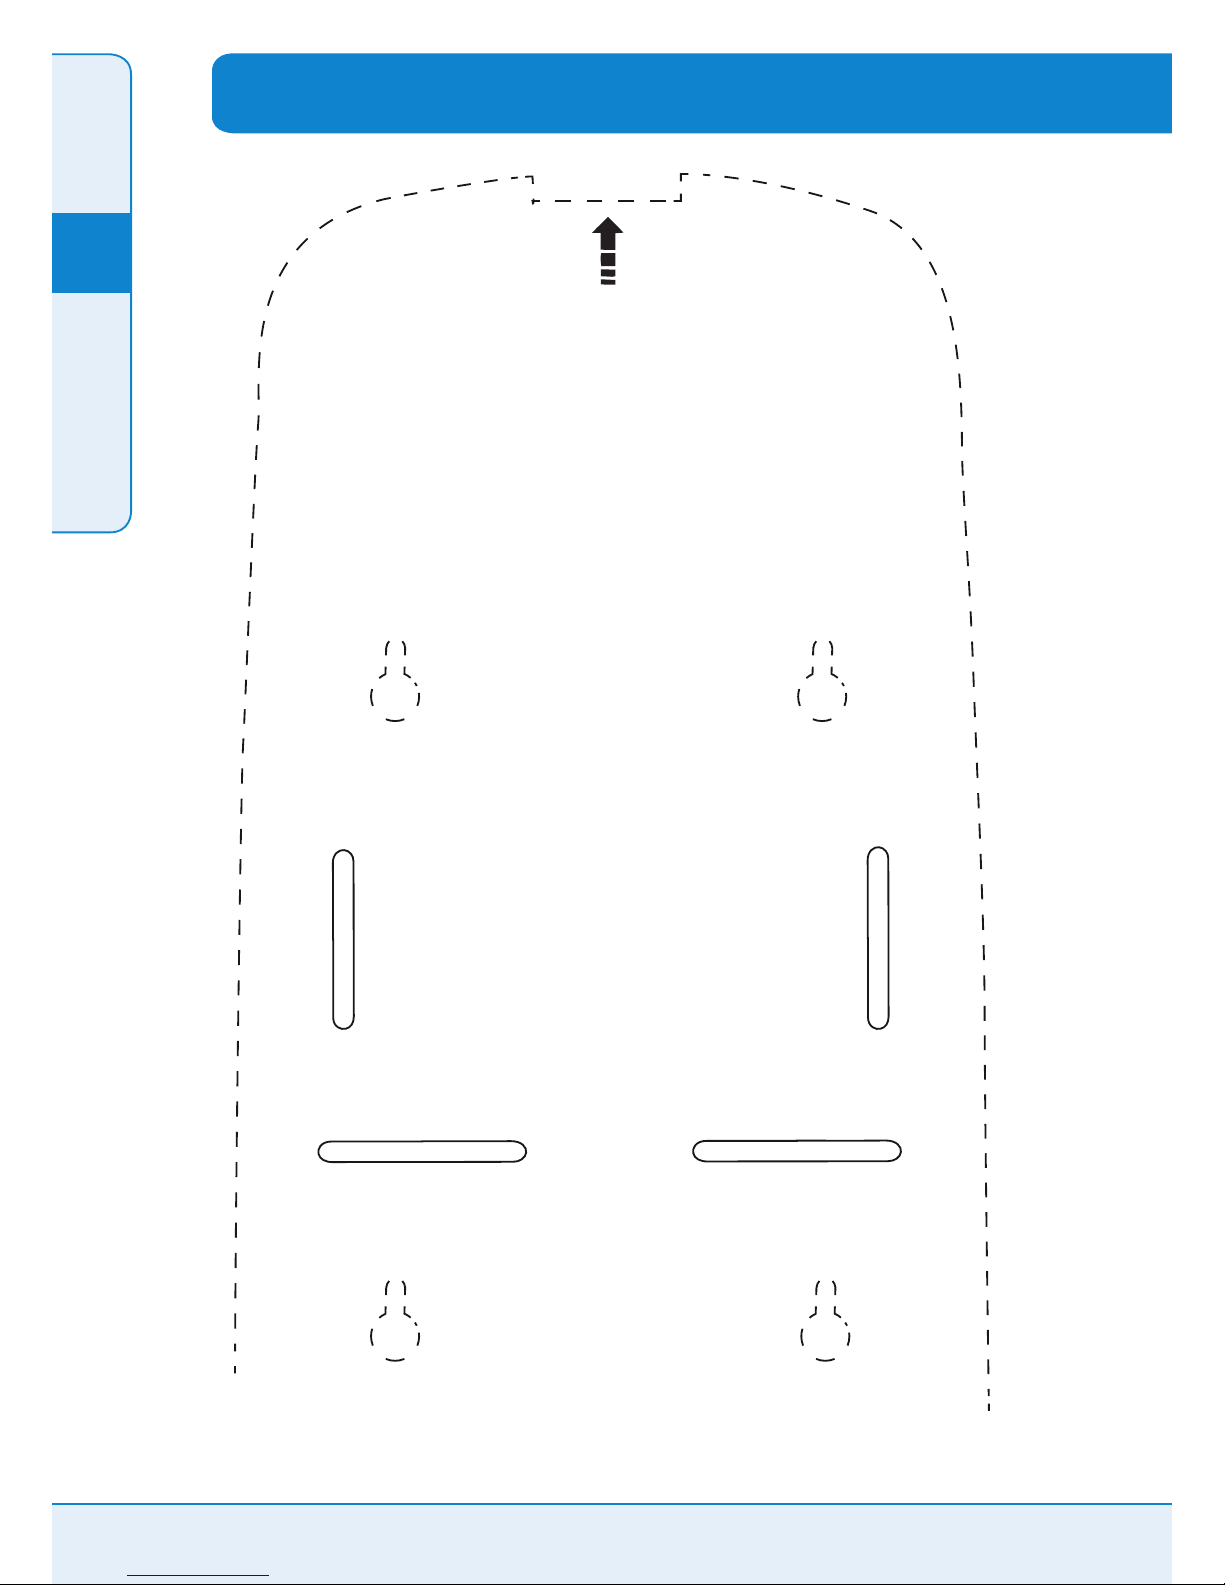
1. Coupez le long de la ligne interrompue
2. Humidiez et collez au mur
3. Percez les trous (les cercles marquenl la position de vis)
Instruction d‘installation du distributeur
EN
FR
DE
IT
NL
PL
Page 20 de 38 Manuel d’emploi pour un Distributeur sans contact www.schuelke.com
Page 21
Manuale per l’utente per un Erogatore senza contatto www.schuelke.com Pagina 21 di 38
Schülke & Mayr Ges.m.b.H
Seidengasse 9
1070 Wien, Austria
Telefono +43 (0) 1 - 523 25 01 - 0
Fax
+43 (0) 1- 523 25 01 - 60
Schülke & Mayr AG
Sihlfeldstrasse 58
8003 Zürich, Schweiz
Telefono +41 (0) 44 - 466 55 44
Fax
+41 (0) 44 -466 55 33
Schülke & Mayr Italia S.r.l.
Via G. Ciardi 9
20148 Milano / ITALY
Telefono
+39 02 40 21 820
Fax +39 02 40 21 829
[email protected]
Schülke & Mayr GmbH
22840 Norderstedt, Germany
Telefono
+49 (0) 40 - 521 00 - 0
Fax
+49 (0) 40 - 521 00 - 318
www.schuelke.com
[email protected]
Contenuto della confezione:
Alloggiamento erogatore x 1
Pannello posteriore erogatore x 1
Azionamento x 1
Batterie x 4
Viti e tasselli x 4
Istruzioni per il montaggio x 1
Chiave x 1
Vaschetta raccogli-gocce x 1
touchless D1
Erogatore senza contatto
EN
FR
DE
IT
NL
PL
Page 22
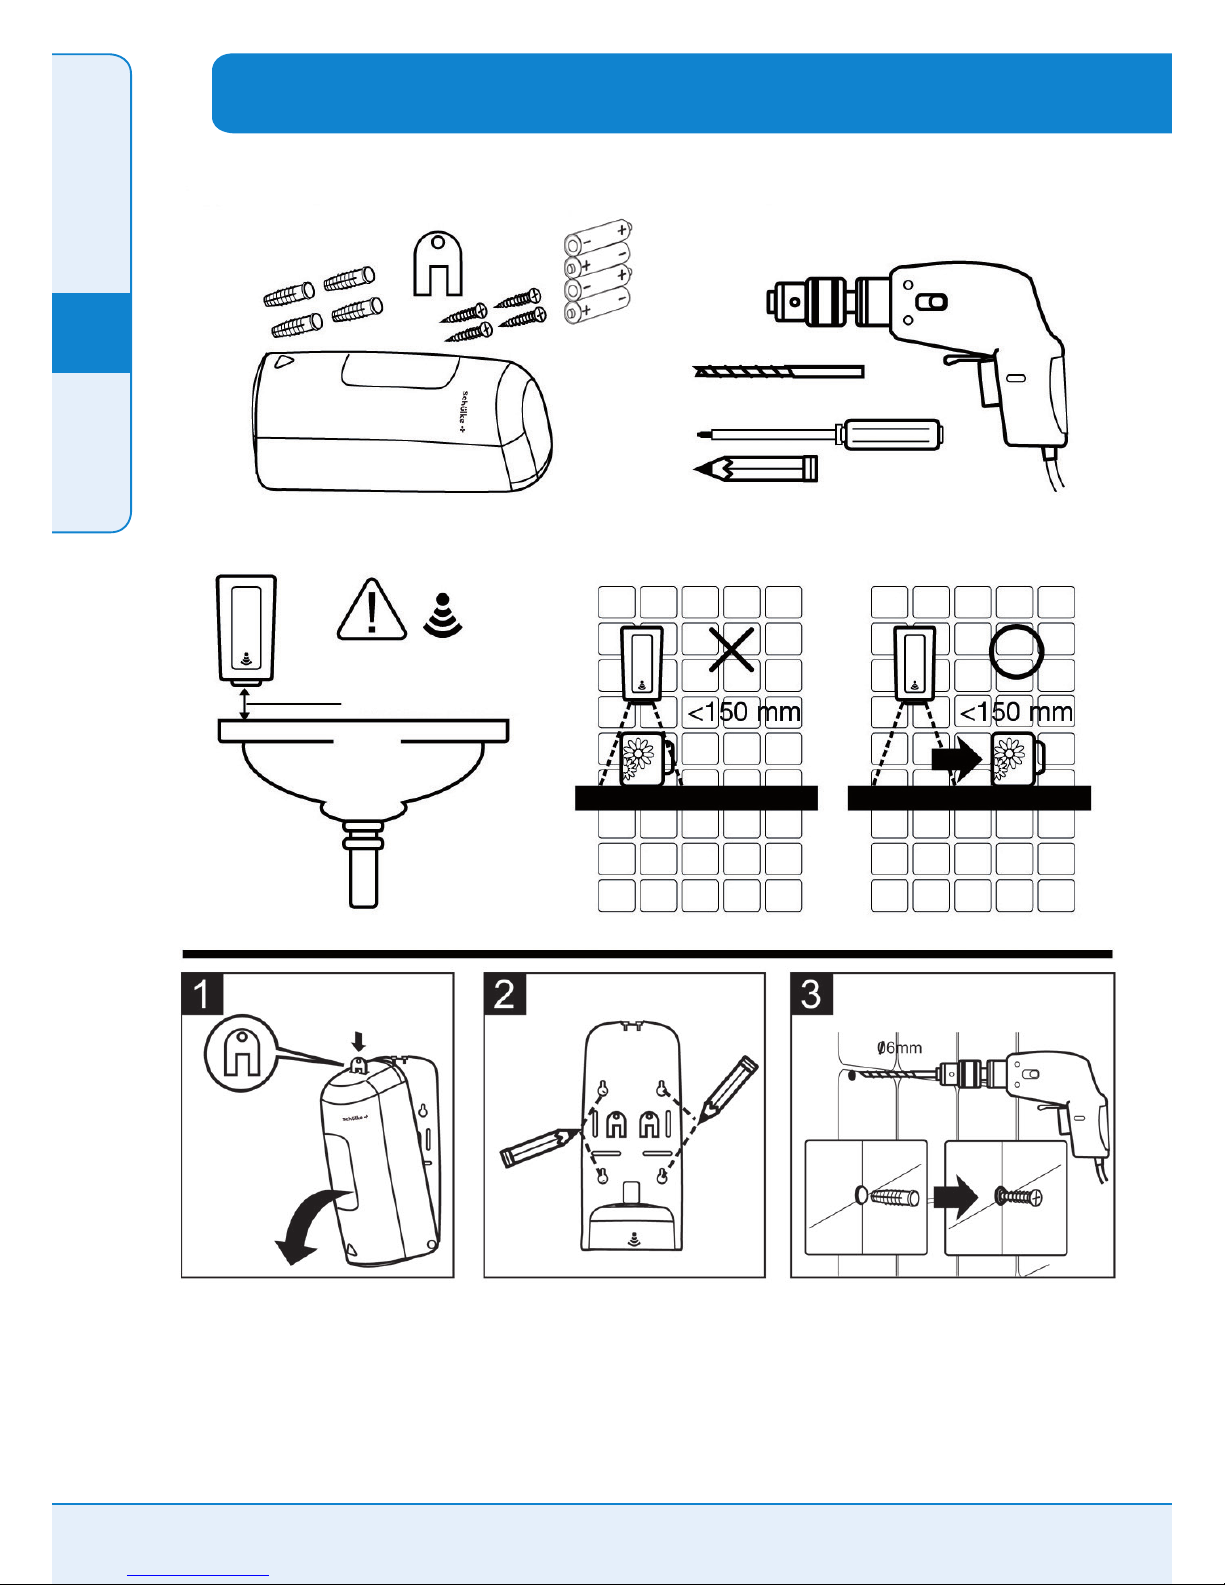
La confezione contiene
Avvertenze
Ø 6 mm
minimo 150 mm
Utensili necessari per il montaggio
Ø 6 mm
Ø 4,8 mm
Istruzioni per il montaggio
Pagina 22 di 38 Manuale per l’utente per un Erogatore senza contatto www.schuelke.com
EN
FR
DE
IT
NL
PL
Page 23
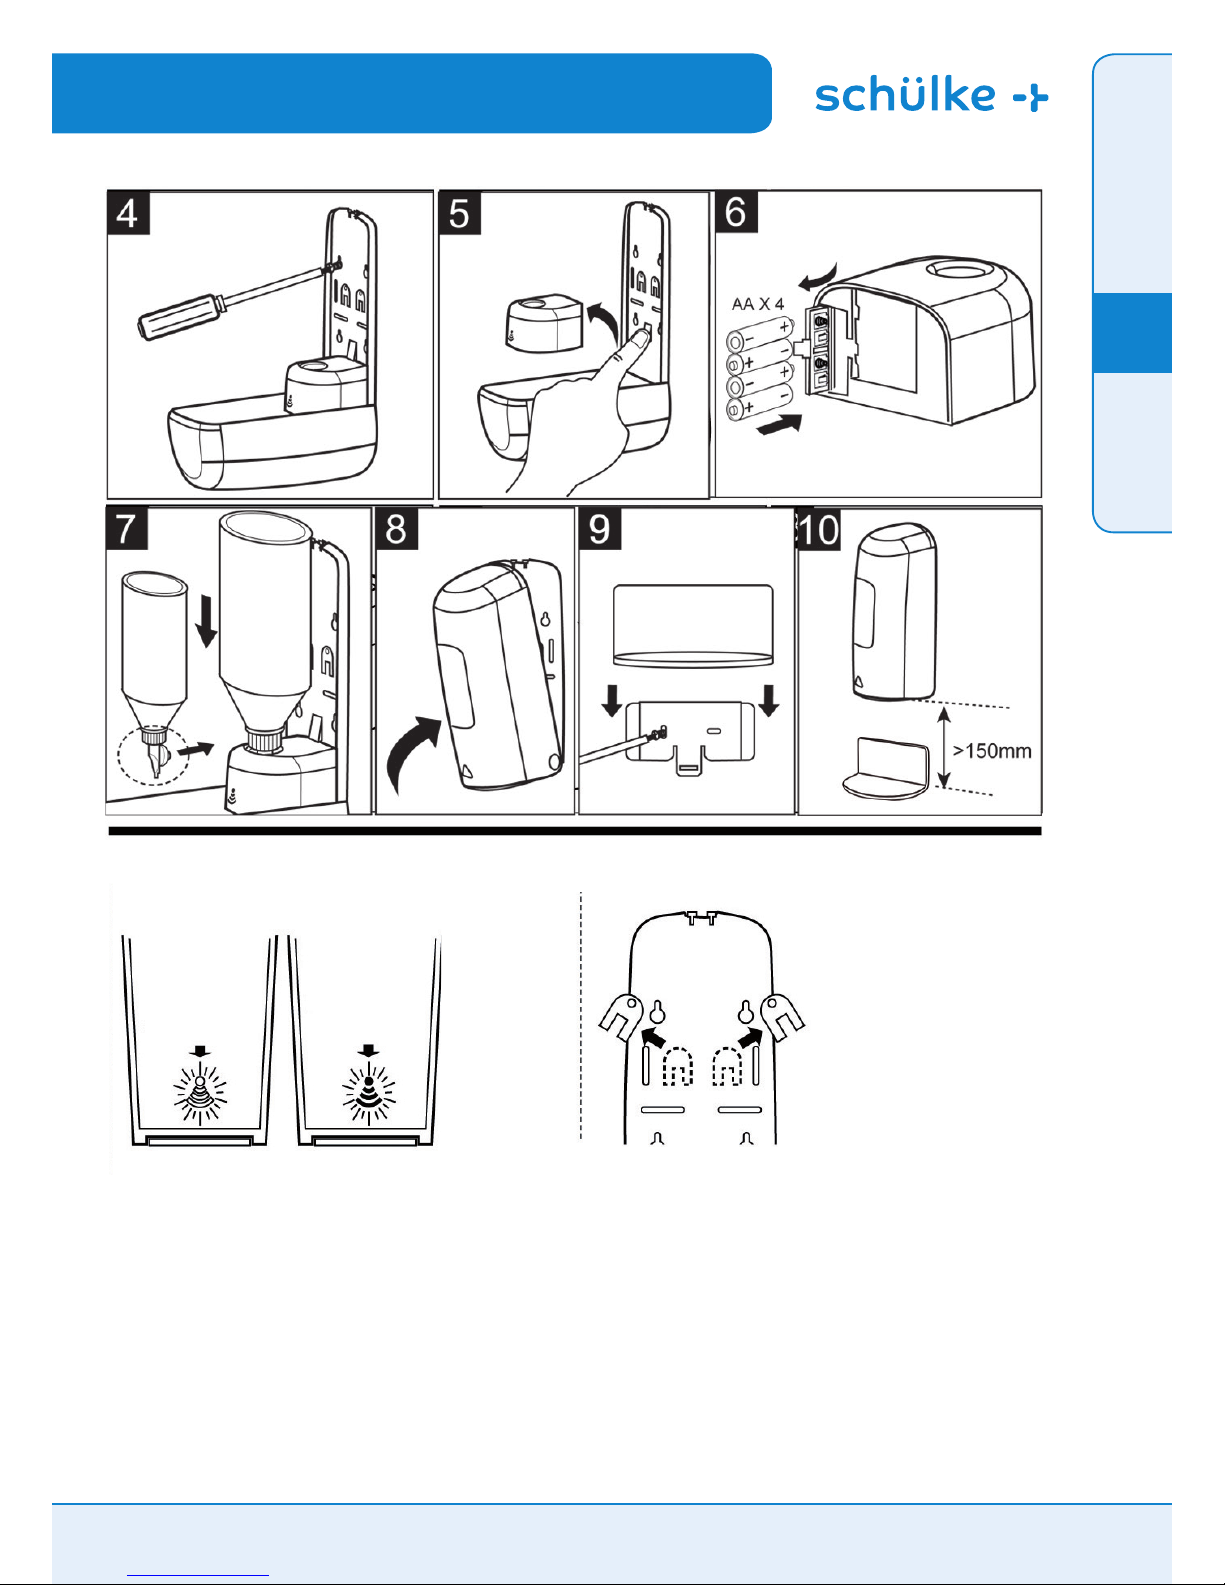
Manuale per l’utente per un Erogatore senza contatto www.schuelke.com Pagina 23 di 38
EN
FR
DE
IT
NL
PL
IN FUNZIONE
SPIA LED BLU
BATTERIA DEBOLE
SPIA LED ROSSA
Chiave di scorta
Page 24
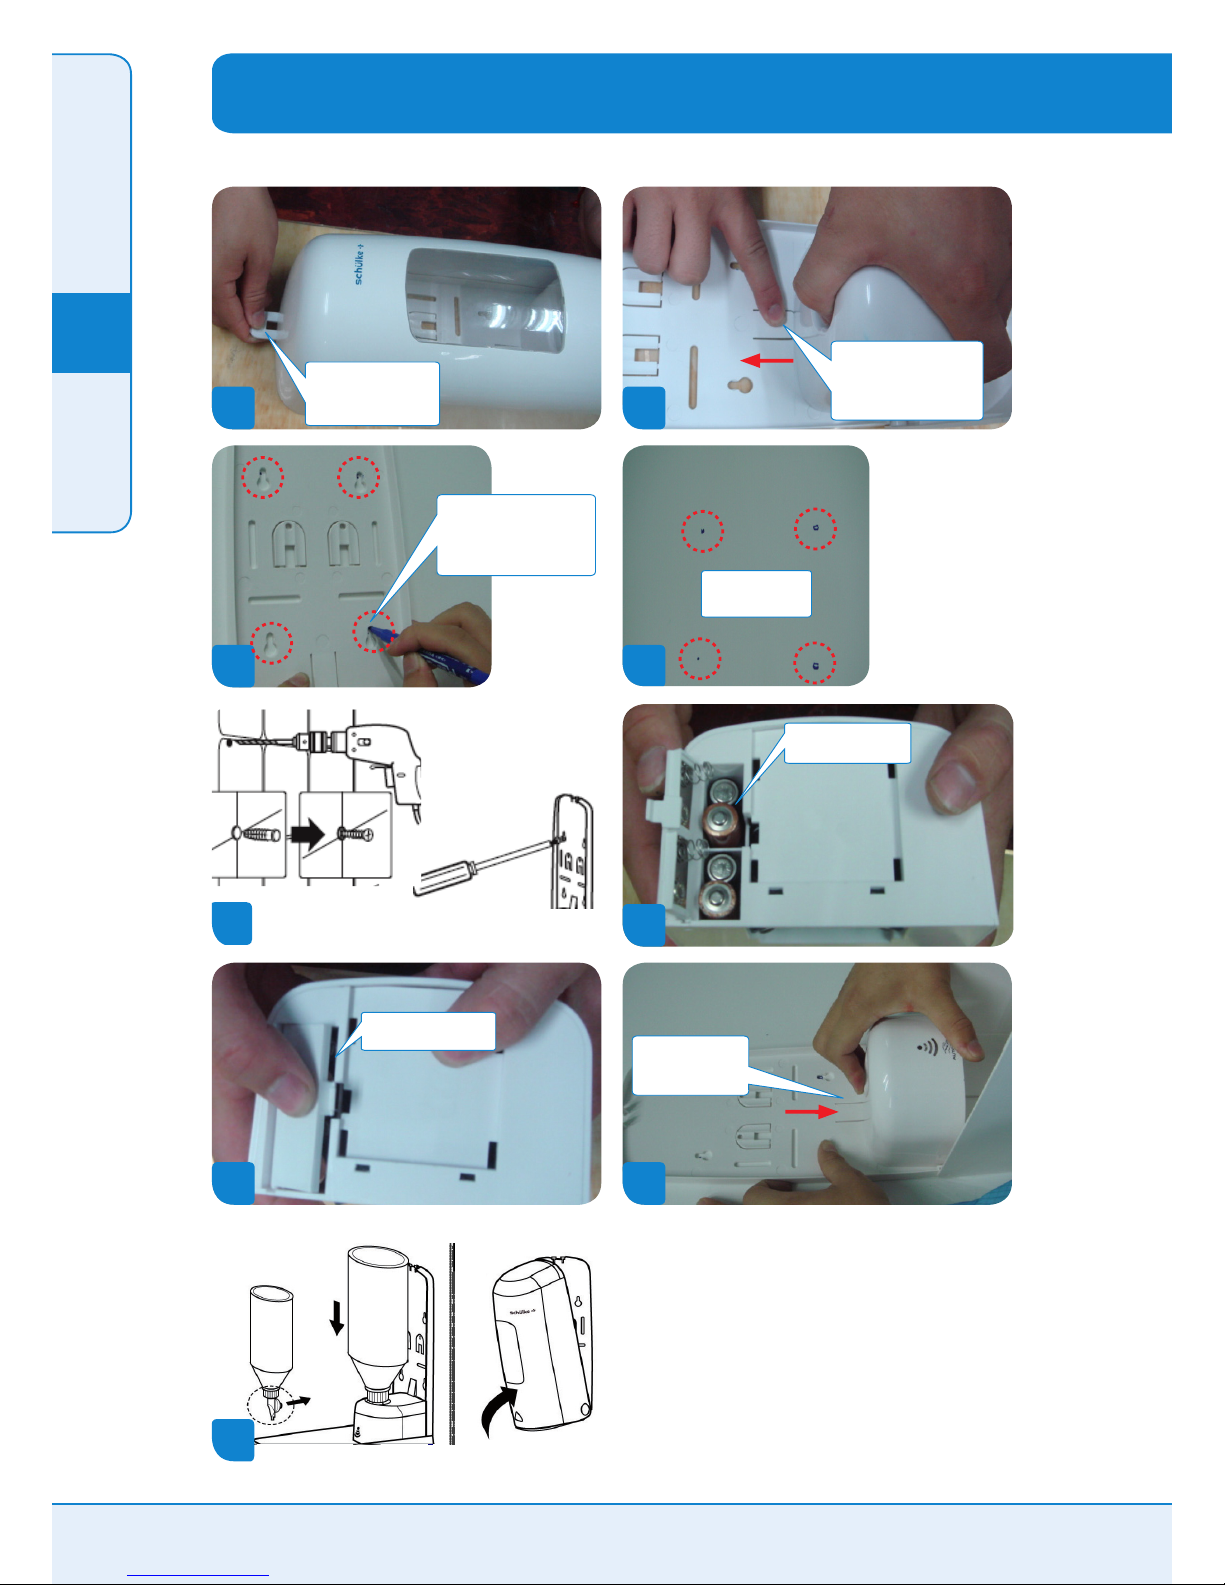
6
7
Istruzioni per il montaggio illustrate
1
Estrarre l‘erogatore del
preparato ed utilizzare la
chiave fornita in dotazione
per aprire la copertura.
2
Dopo l’apertura
dell’alloggiamento
dell’erogatore, premere con
il dito in questo punto ed
estrarre l’azionamento
8
Fissare l’azionamento
sulla parete posteriore
dell’erogatore
Chiudere la copertura del
comparto delle batterie
Inserire le batterie
nell‘apposito vano
dell‘azionamento
4
Sulla parete sono
segnati 4 punti.
3
Reggere la parete posteriore
dell’erogatore contro la parete.
Con una matita segnare sulla
parete la posizione dei 4 fori
(cerchiati in rosso)
5
9
Pagina 24 di 38 Manuale per l’utente per un Erogatore senza contatto www.schuelke.com
EN
FR
DE
IT
NL
PL
Page 25
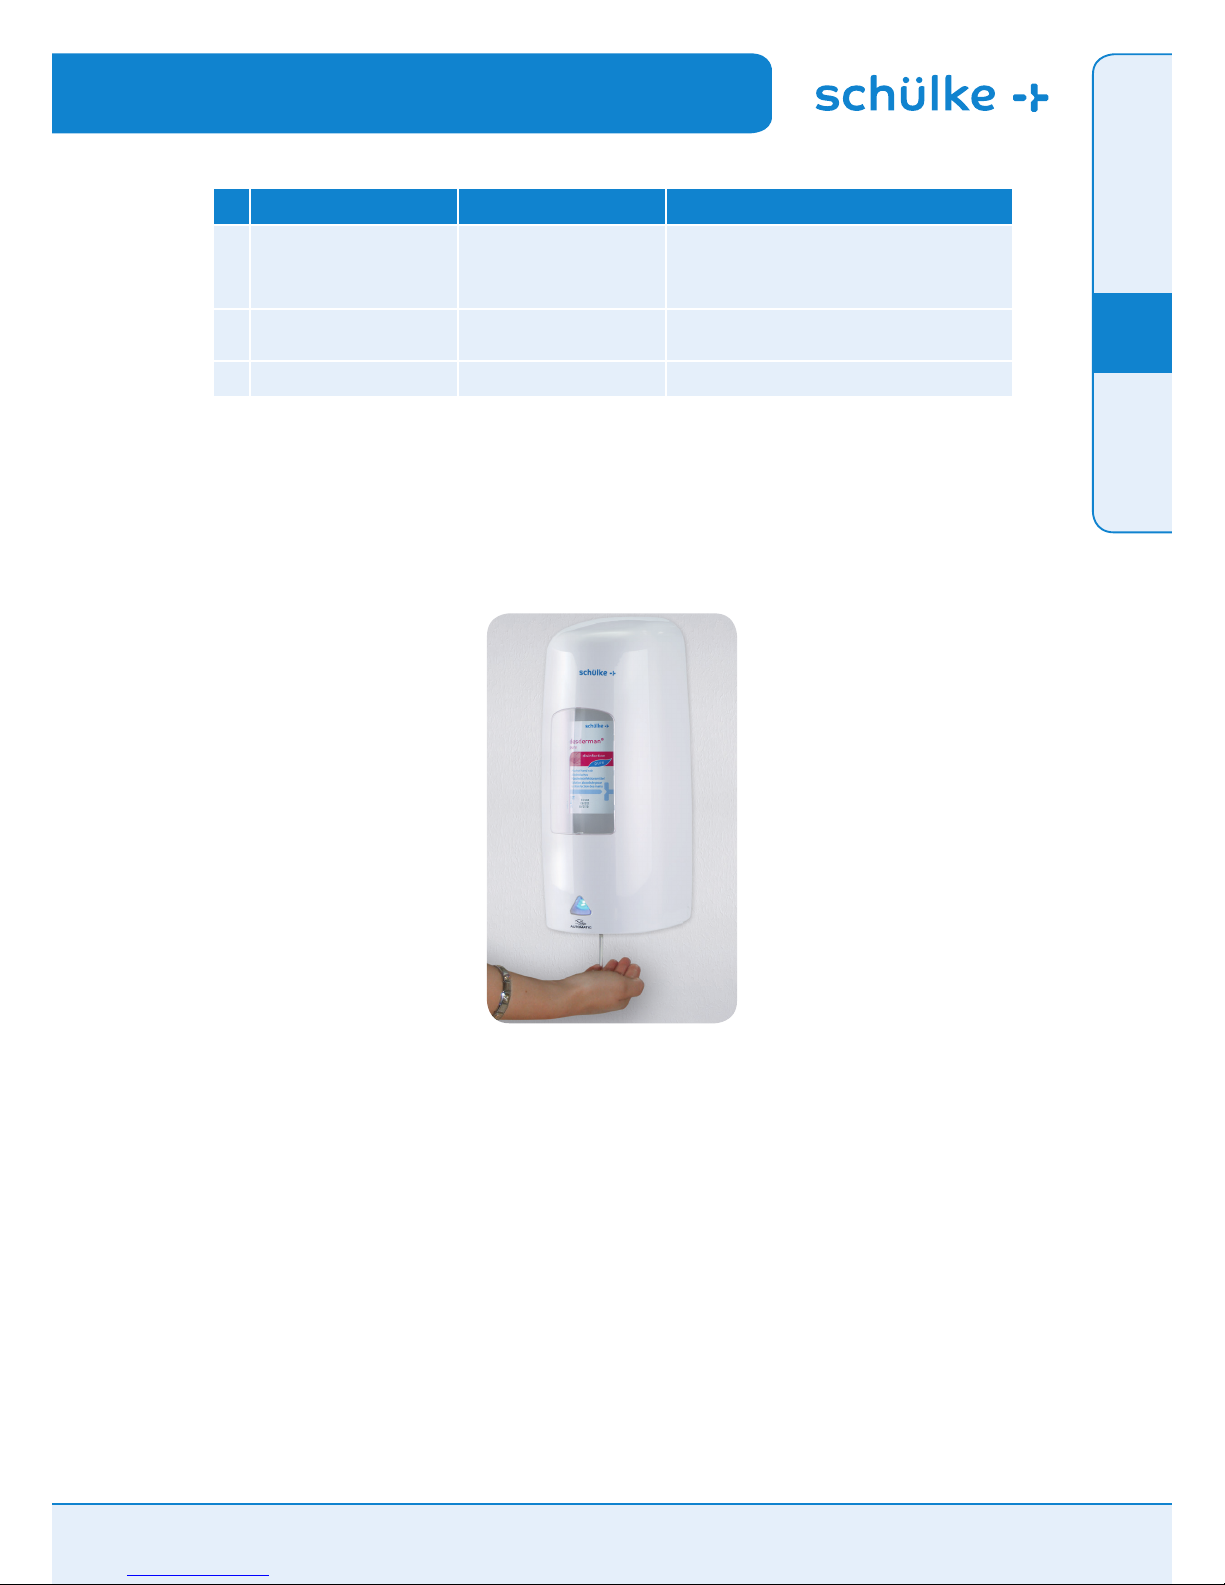
No. Situazione Possibile causa Soluzione
1
Il meccanismo di pompaggio cigola
ed ha un calo di potenza. La spia
rosso/blu si accende.
1. La batteria si scarica. 2. La
dierenza di tensione fra le singole
batterie è troppo elevata, anche
quando queste non funzionano a
bassa tensione.
Sostituire le batterie ed inserirne di nuove.
2
Il dispositivo, una volta inserite le
batterie, non funziona. La spia rossa
è accesa.
Le batterie sono quasi scariche
e la tensione è inferiore al valore
minimo indicato di 5 V.
Le batterie devono essere sostituite poiché la tensione è
insuciente per il funzionamento del dispositivo.
3
Il LED dell‘azionamento lampeggia
in lilla.
Il pistone è bloccato da una
bottiglia inserita in modo scorretto.
Resettare l’azionamento aprendo il vano batteria e inserire
correttamente la bottiglia.
Istruzioni per l‘individuazione ed
eliminazione dei guasti per touchless D1
EN
FR
DE
IT
NL
PL
Manuale per l’utente per un Erogatore senza contatto www.schuelke.com Pagina 25 di 38
Page 26
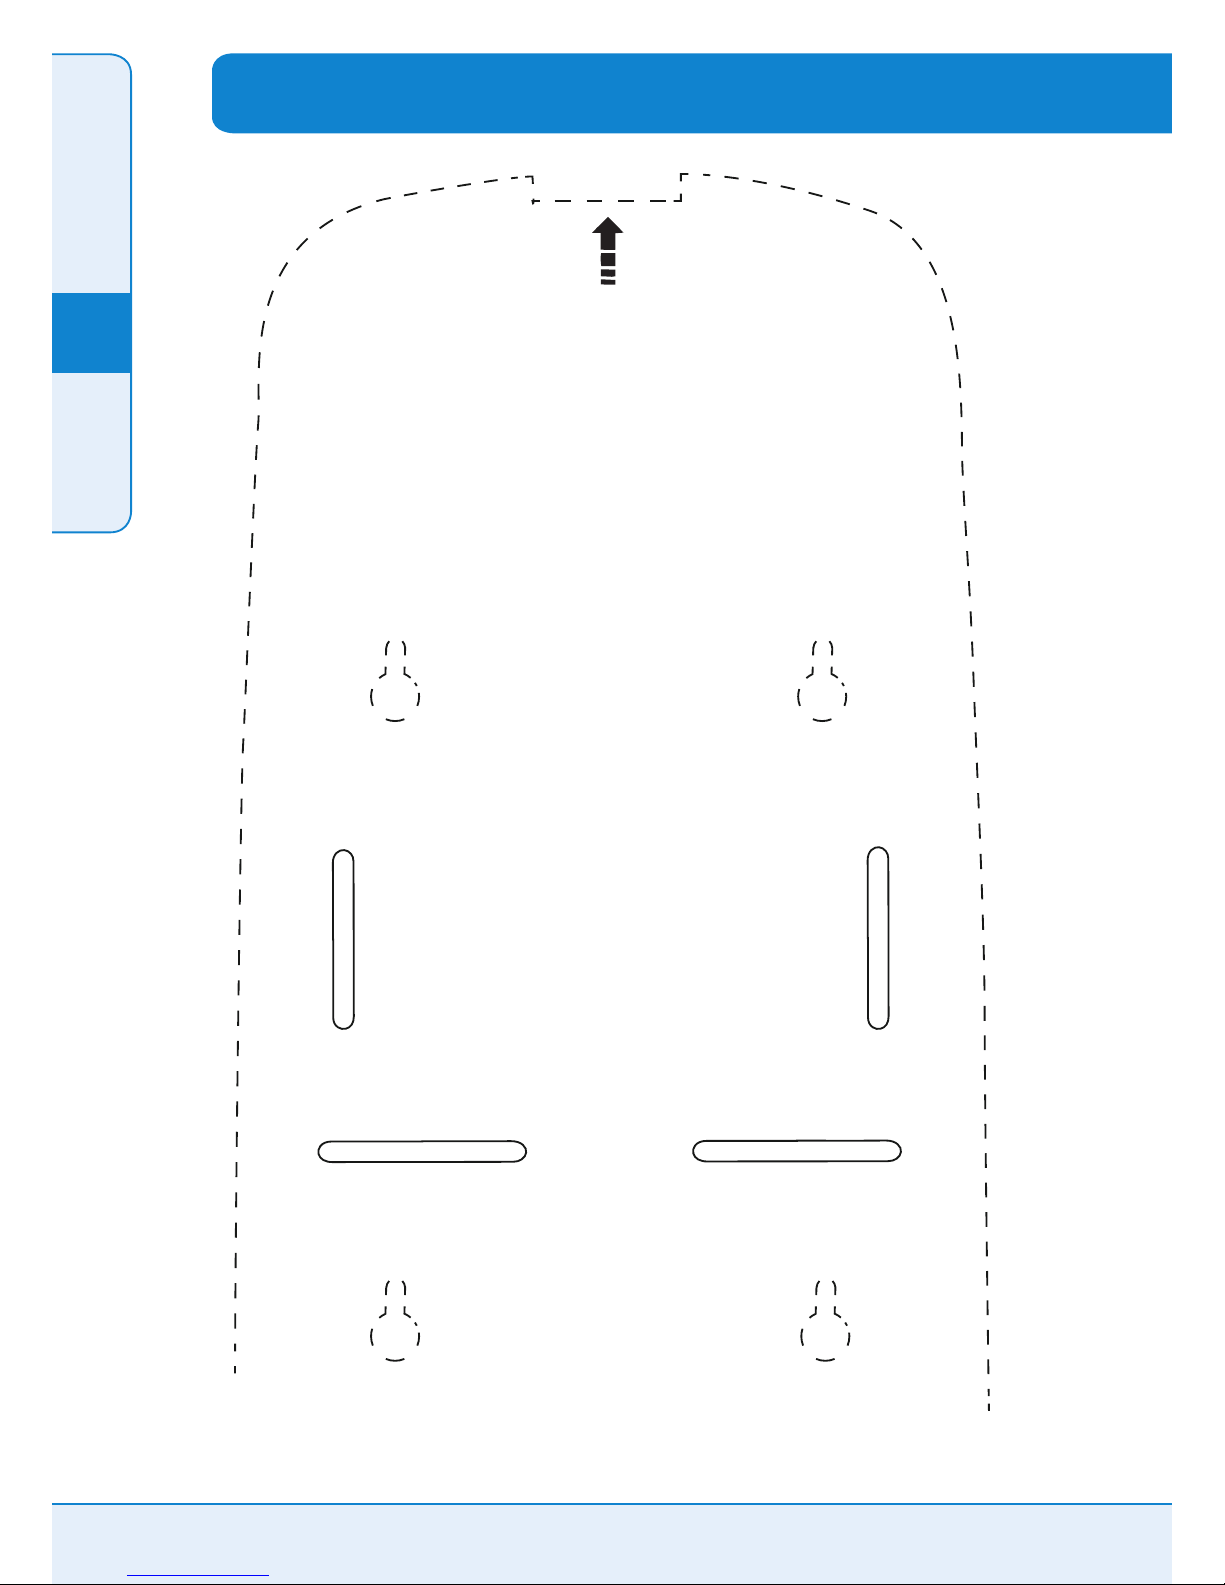
1. Tagliare lungo la linea tratteggiata
2. Inumidire e incollare alla parete
3. Pralicare fori (cerchi contrassegnano la posizione delle viti)
Istruzioni per l‘installazione dell‘erogatore
EN
FR
DE
IT
NL
PL
Pagina 26 di 38 Manuale per l’utente per un Erogatore senza contatto www.schuelke.com
Page 27
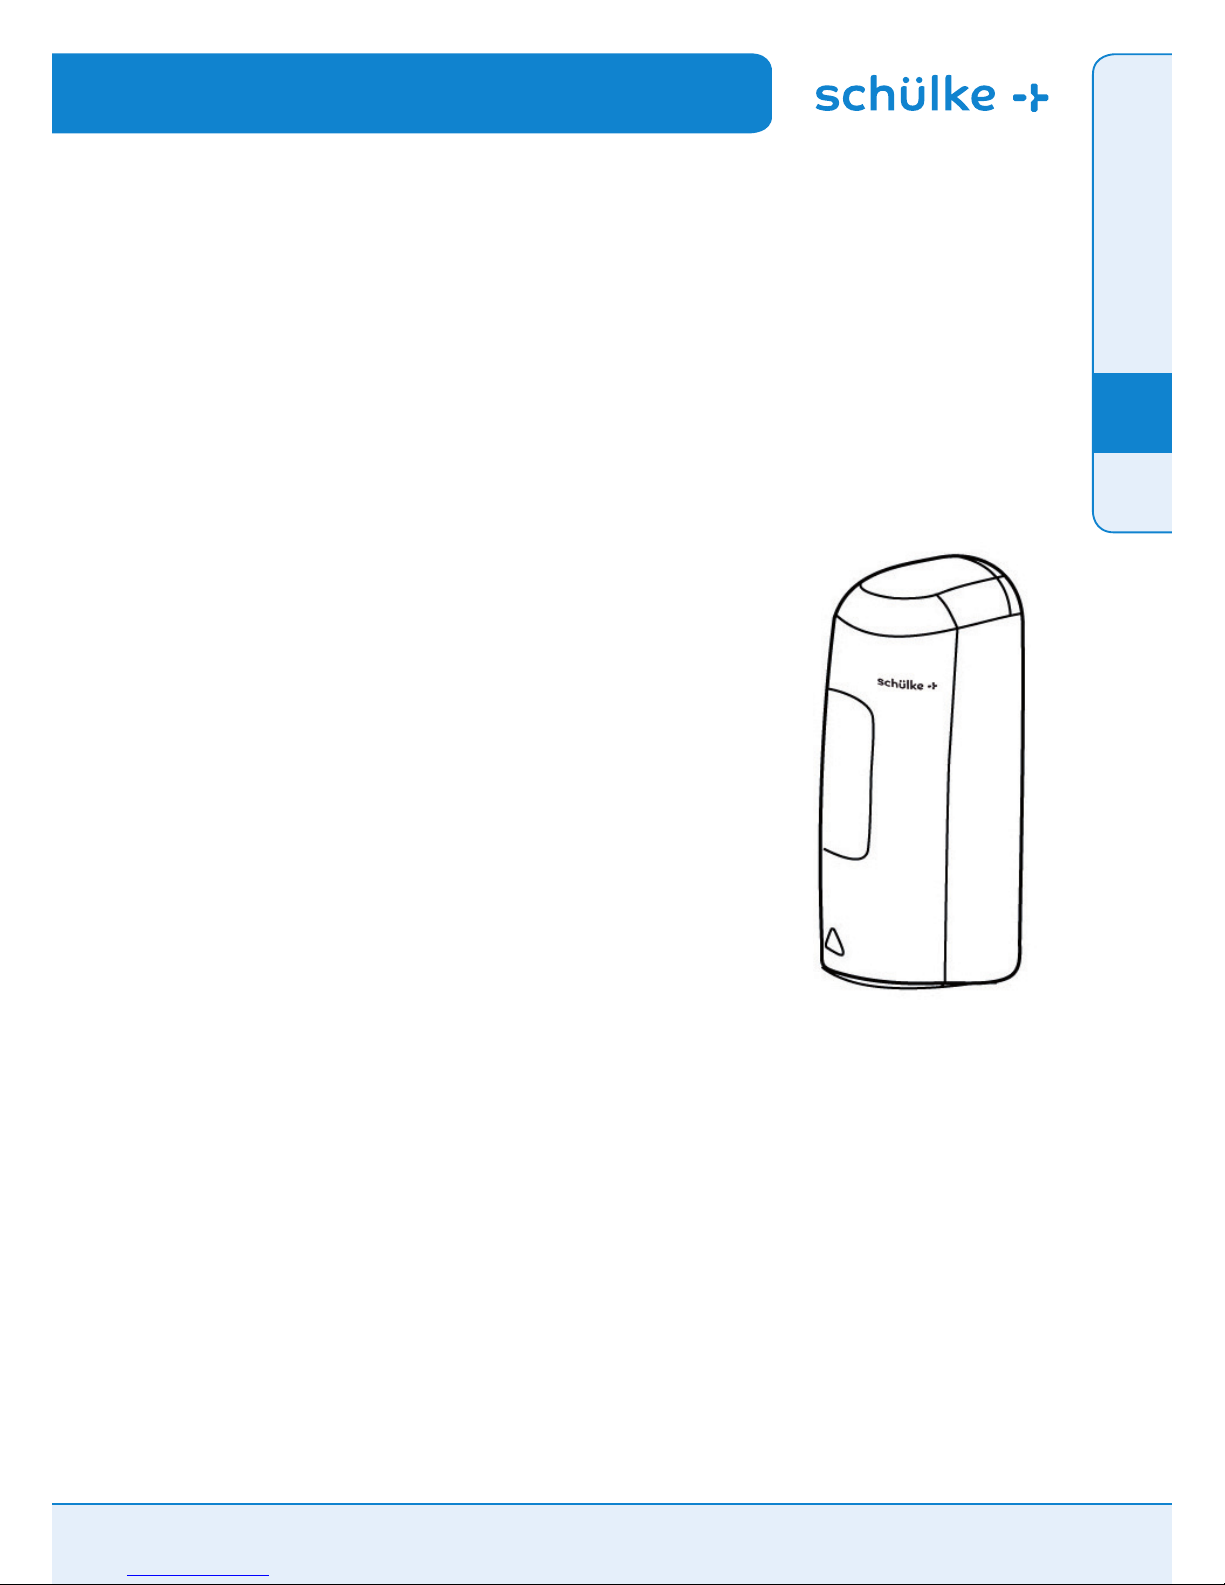
Verpakkingsinhoud:
Dispenser behuizing voorzijde x 1
Witte dispenser muurplaat x 1
Witte binnenunit x 1
Batterijen x 4
Schroeven en pluggen x 4
Gebruiksaanwijzing x 1
Sleutel x 1
Lekbak x 1
touchless D1
Automatische dispenser
Handleiding voor een automatische dispenser www.schuelke.com Pagina 27 van 38
Schülke & Mayr Ges.m.b.H
Seidengasse 9
1070 Wien, Austria
Phone +43 (0) 1 - 523 2501 - 0
Fax +43 (0) 1 - 523 25 01 - 60
o[email protected]
Schülke & Mayr AG
Sihlfeldstrasse 58
8003 Zürich, Schweiz
Phone +41 (0) 44 -466 55 44
Fax +41 (0) 44 - 466 55 33
[email protected]
Schülke & Mayr Benelux B.V.
Oudeweg 8d
2031 CC Haalem, Netherlands
Phone +31-23-535 26 34
Fax +31-23-536 79 70
[email protected]
Schülke & Mayr GmbH
22840 Norderstedt, Germany
Phone +49 (0) 40- 521 00 - 0
Fax +49 (0) 40 - 521 00 - 318
www.schuelke.com
[email protected]
EN
FR
DE
IT
NL
PL
Page 28
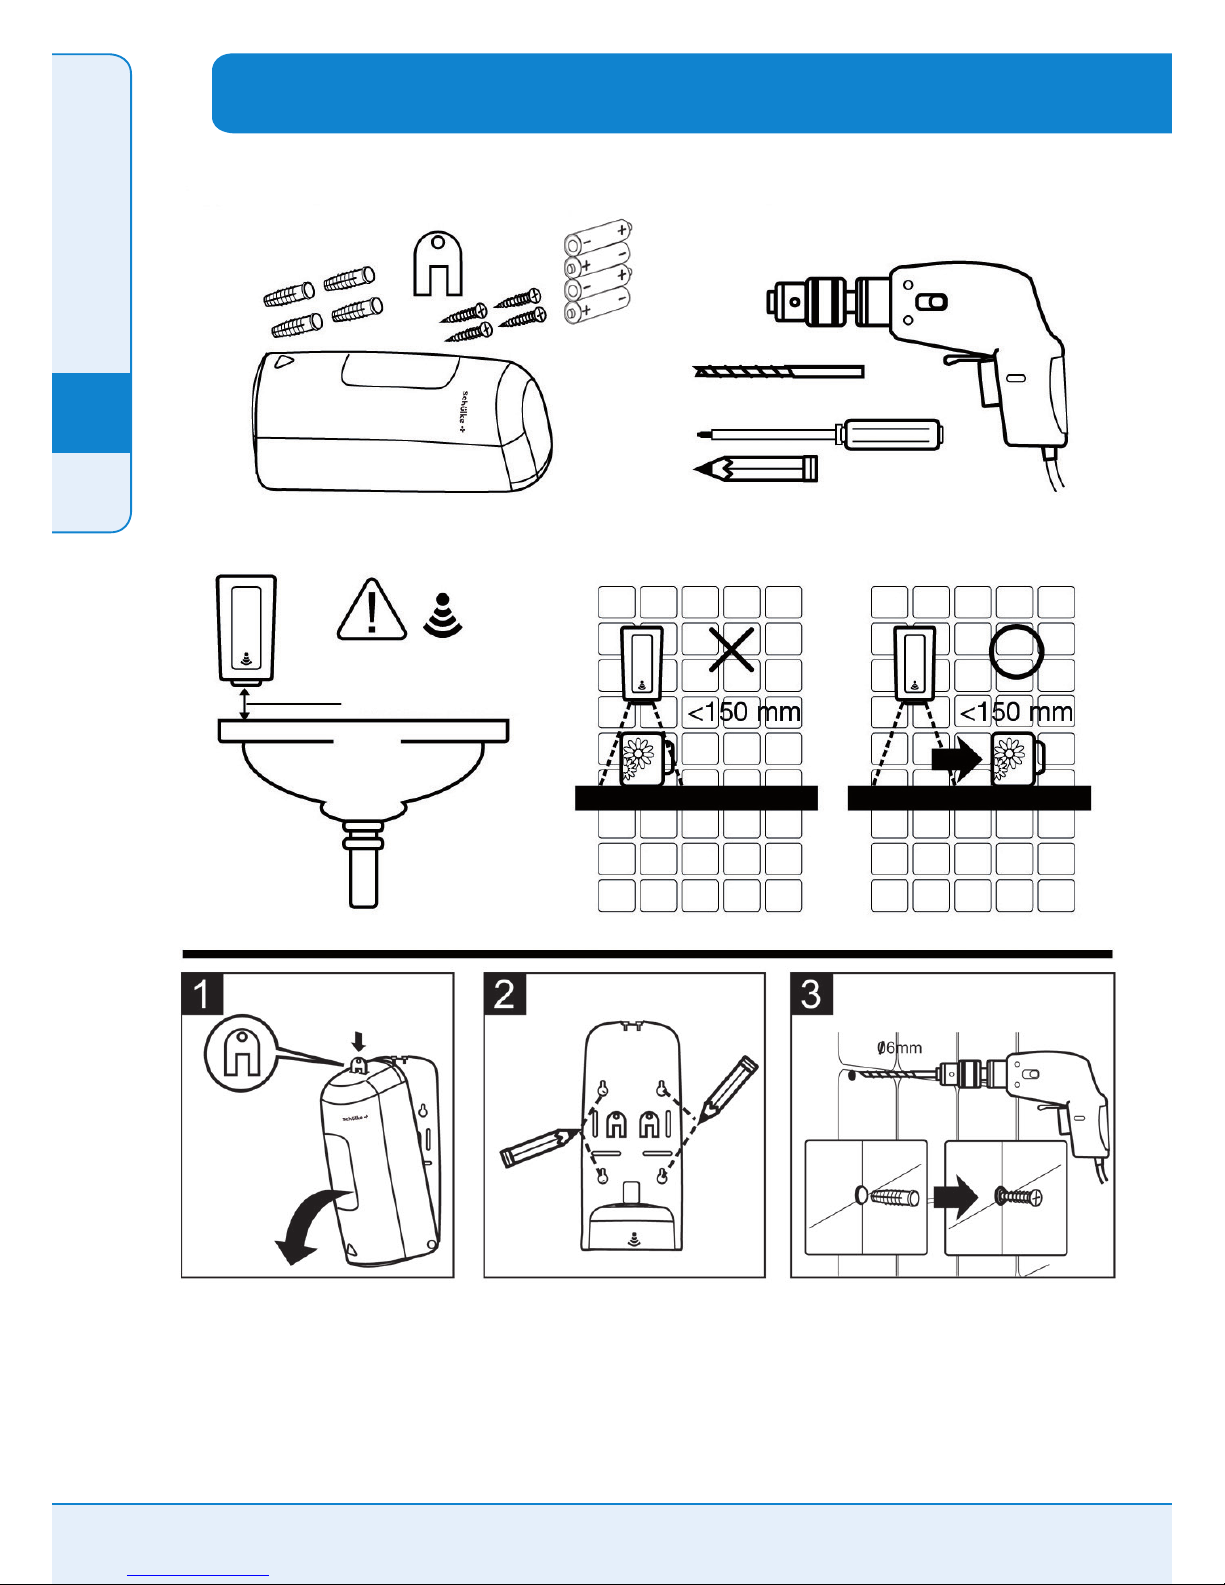
Verpakking bevat
Opmerkingen
Ø 6 mm
minimum 150 mm
Benodigd gereedschap
Ø 6 mm
Ø 4,8 mm
Verkorte montage handleiding
Pagina 28 van 38 Handleiding voor een automatische dispenser www.schuelke.com
EN
FR
DE
IT
NL
PL
Page 29
Handleiding voor een automatische dispenser www.schuelke.com Pagina 29 van 38
EN
FR
DE
IT
NL
PL
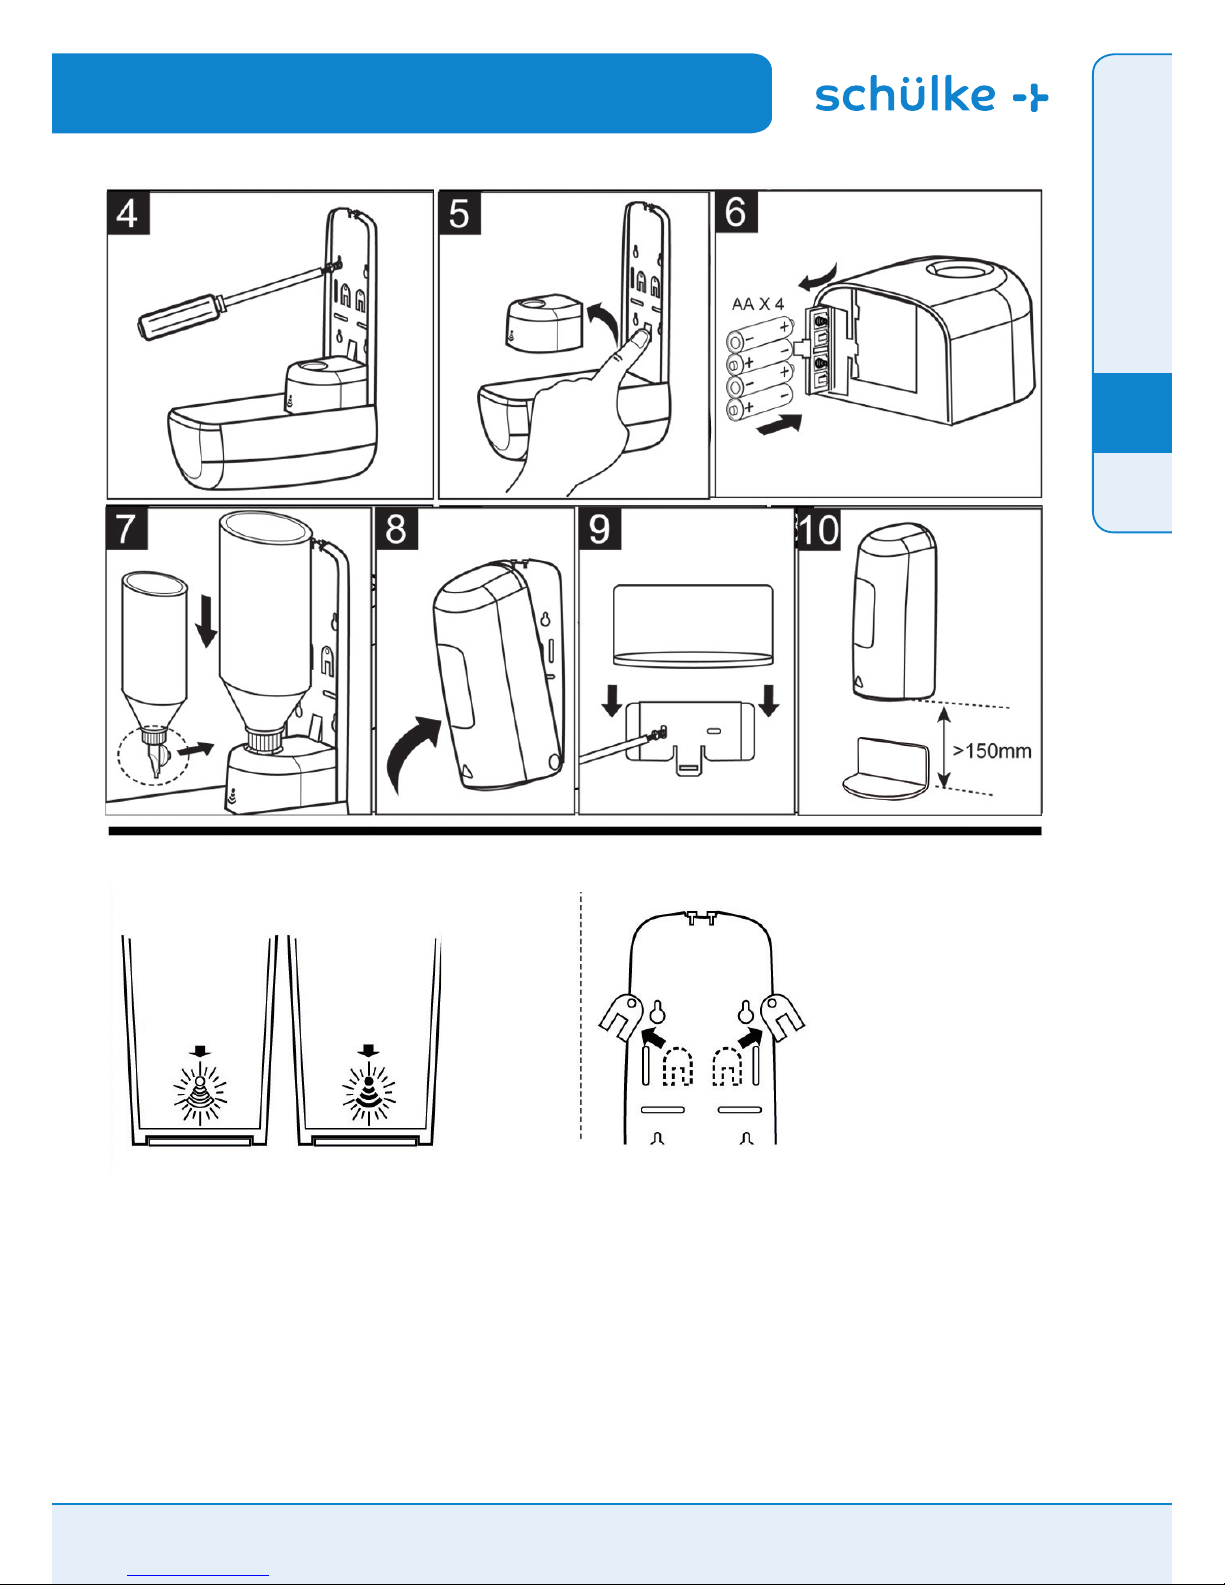
STAAT AAN
BLAUW LED LICHT
LAGE BATTERIJSPANNING
ROOD LED LICHT
Reserve sleutels
Page 30
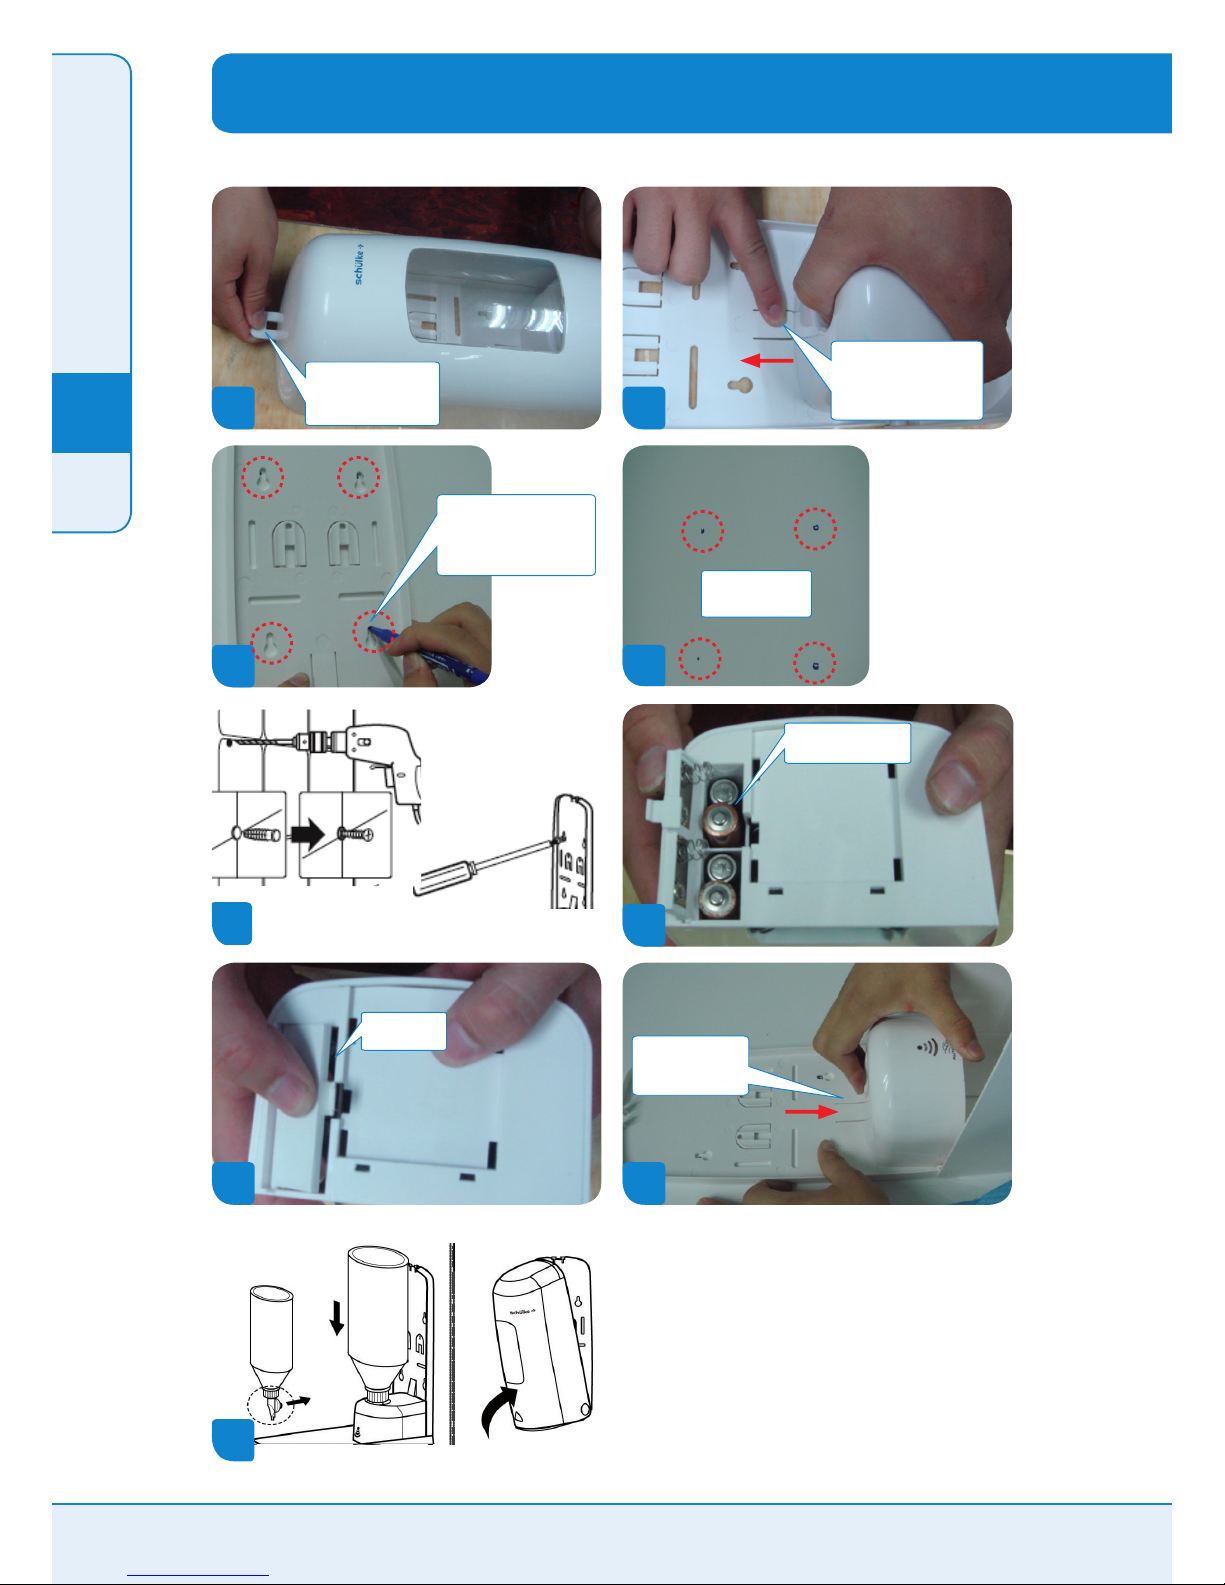
6
7
Montage handleiding voor de touchless D1
1
Haal de dispenser uit de
verpakking en open de
behuizing met de sleutel
2
Na het openen van het
dispenserhuis hier met
de vinger drukken en de
binnenunit wegnemen
8
Bevestig de binnenunit
op de achterwand van
de dispenser tot de borg
klep naar voren komt
Sluit de
batterijklep
Plaats de batterijen in
het batterijvak van de
binnenunit
4
De 4 afteken punten
op de muur
3
Plaats achterwand van de
dispenser tegen de muur en
markeer de 4 gaten op de
muur
5
9
Pagina 30 van 38 Handleiding voor een automatische dispenser www.schuelke.com
EN
FR
DE
IT
NL
PL
Page 31
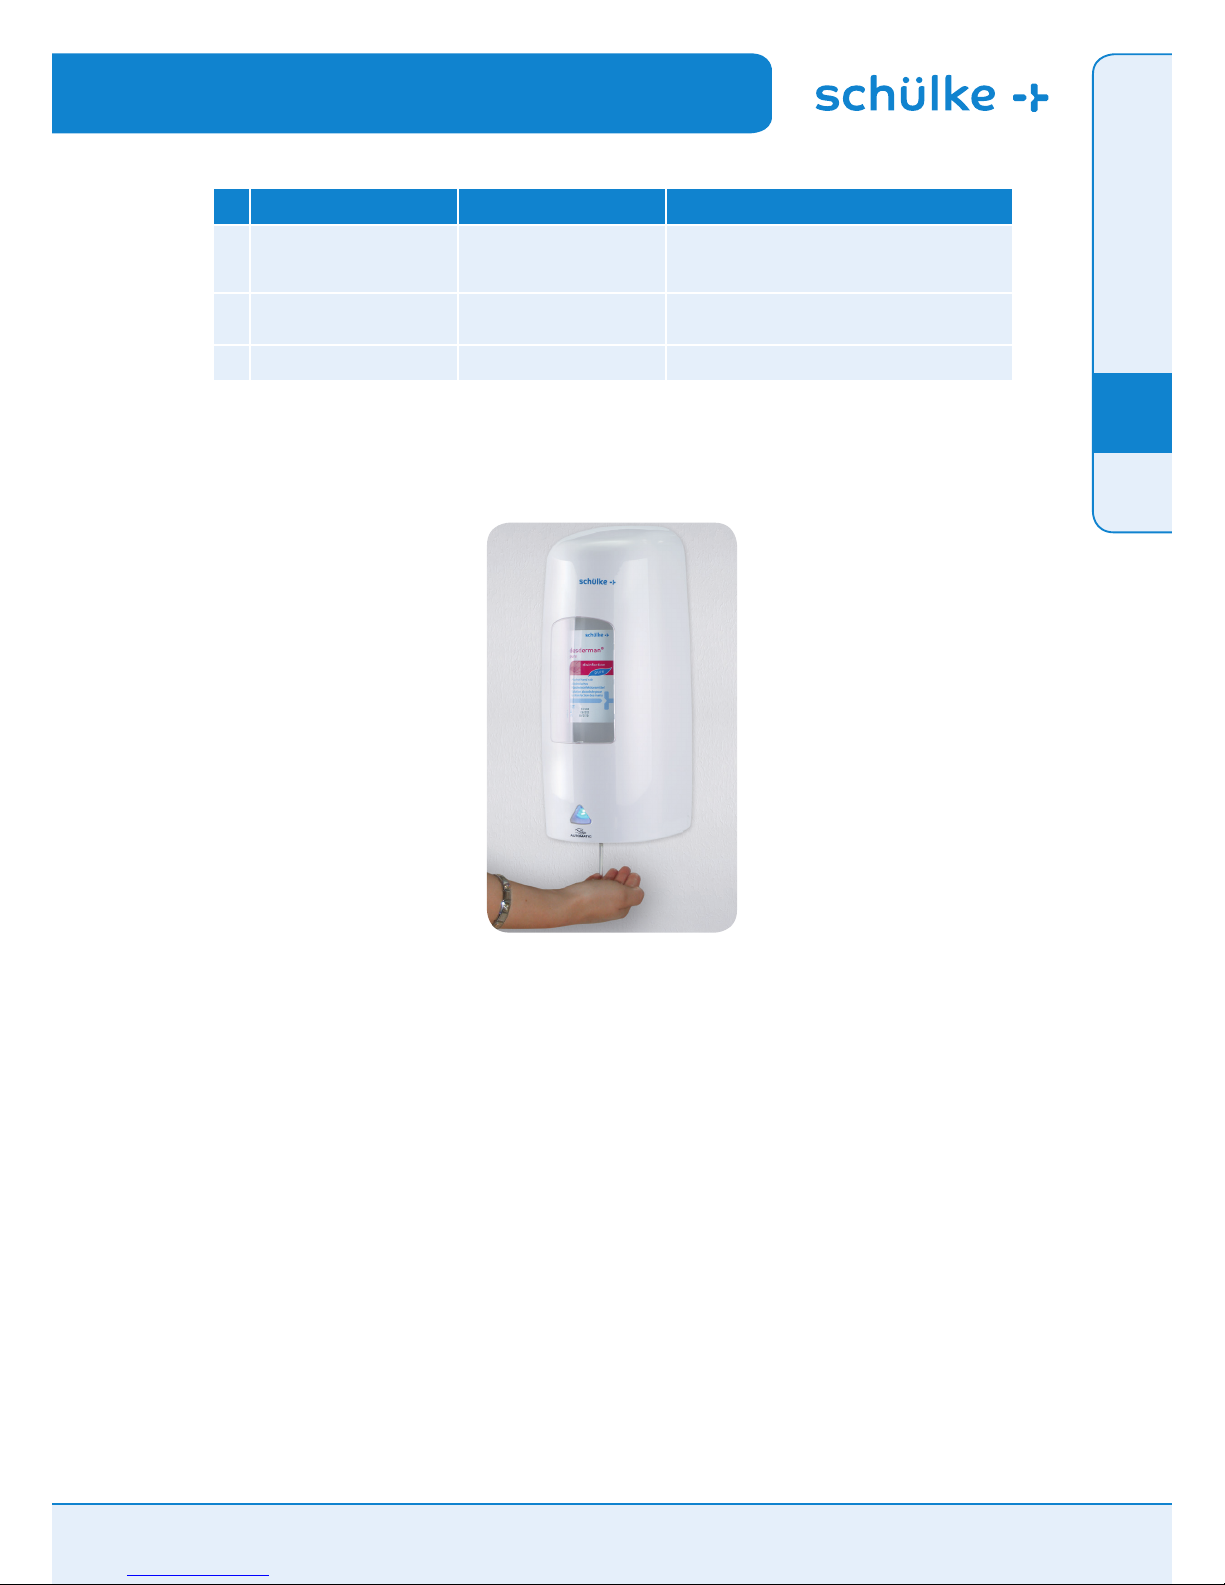
Nr. Situatie Mogelijke oorzaak Oplossing
1
De moter kraakt en is zwak. De unit
toont purper licht.
1. Batterijen zijn bijna leeg
2. Te groot voltage verschil tussen
de batterijen, ook al zijn ze nog
boven de 5V.
Verwissel de batterijen.
2
Werkt niet op huidige batterijen.
Geeft rood licht.
Batterijen raken leeg en de
spanning onder het aangegeven
minimum van 5 V.
Batterijen dienen te worden vervangen.
3
De led van de motor knippert paars. De kolf wordt door een verkeerd
ingelegde es geblokkeerd.
De motor door het openen van het batterijvak resetten en de
es op de juiste wijze plaatsen.
Eenvoudige probleem oplossingen
EN
FR
DE
IT
NL
PL
Handleiding voor een automatische dispenser www.schuelke.com Pagina 31 van 38
Page 32
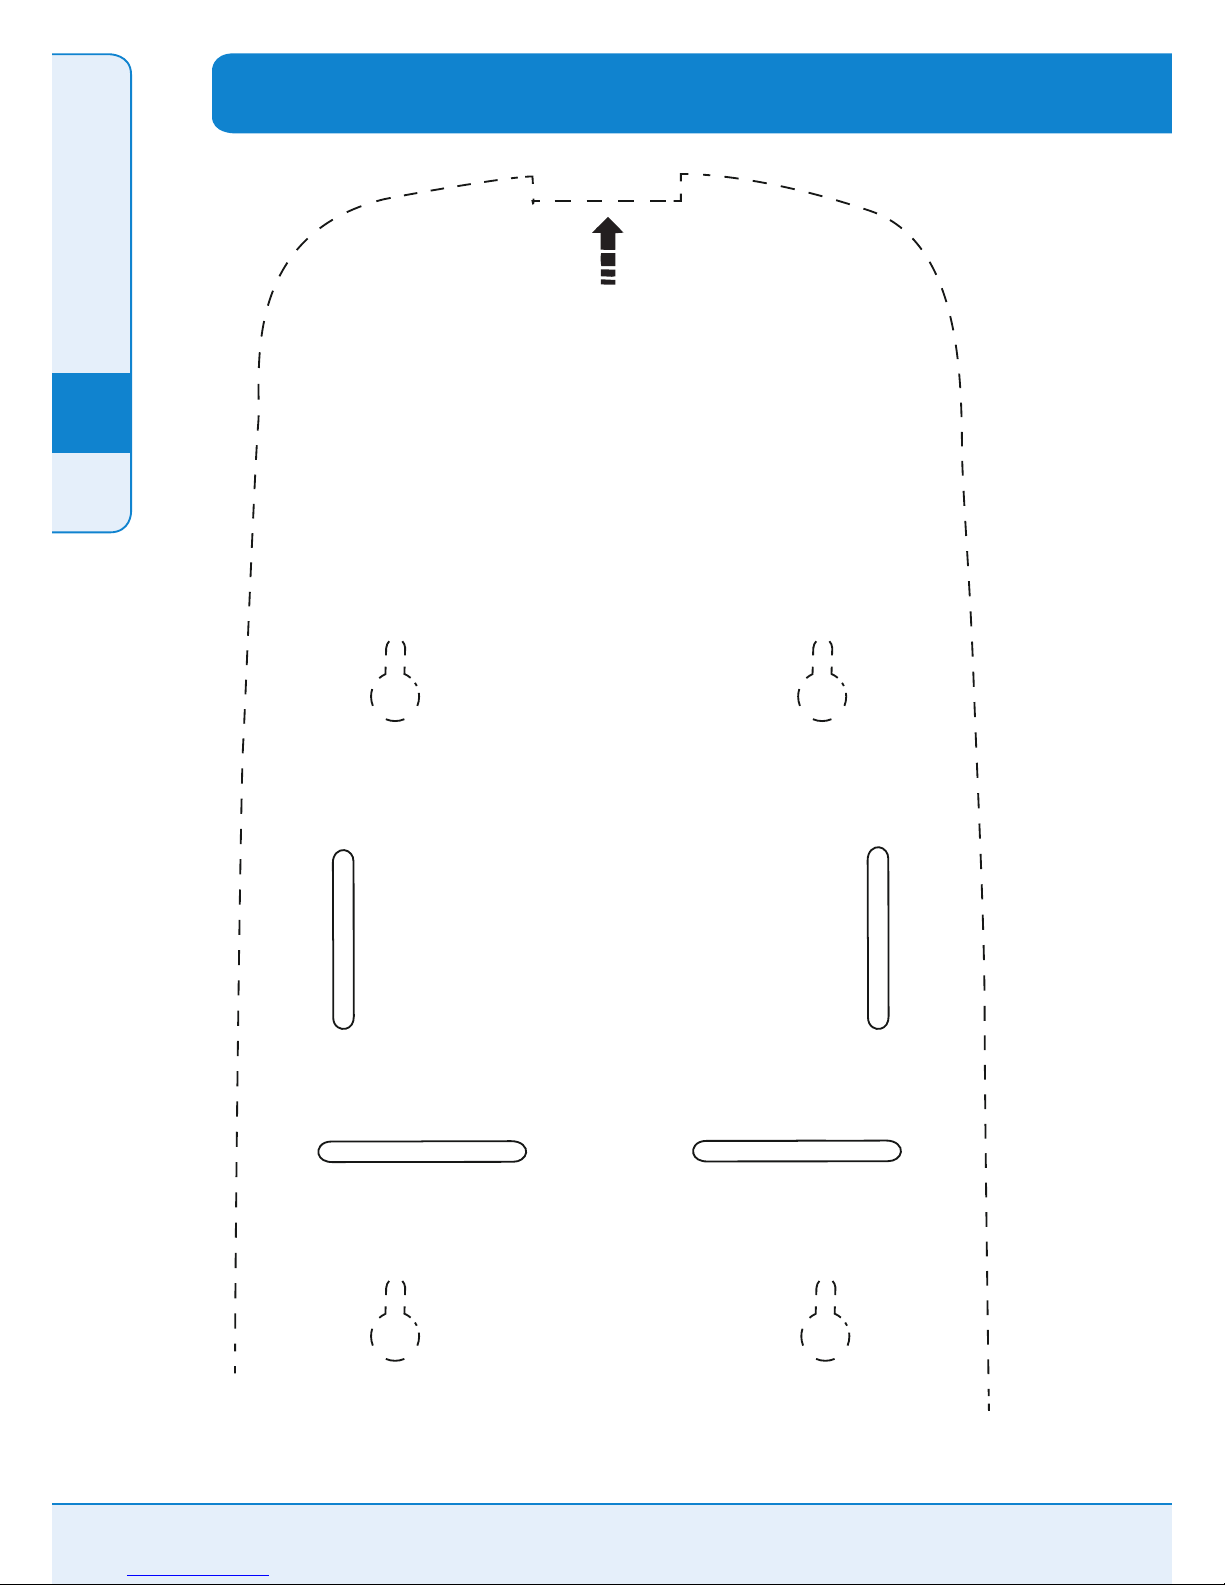
1. Uitknippen langs de stippellijn
2. Vochtig maken en tegen de muur kleven
3. Gaten boren (cirkels markeren de schroefposities)
Dispenser bevestiging mal
EN
FR
DE
IT
NL
PL
Pagina 32 van 38 Handleiding voor een automatische dispenser www.schuelke.com
Page 33
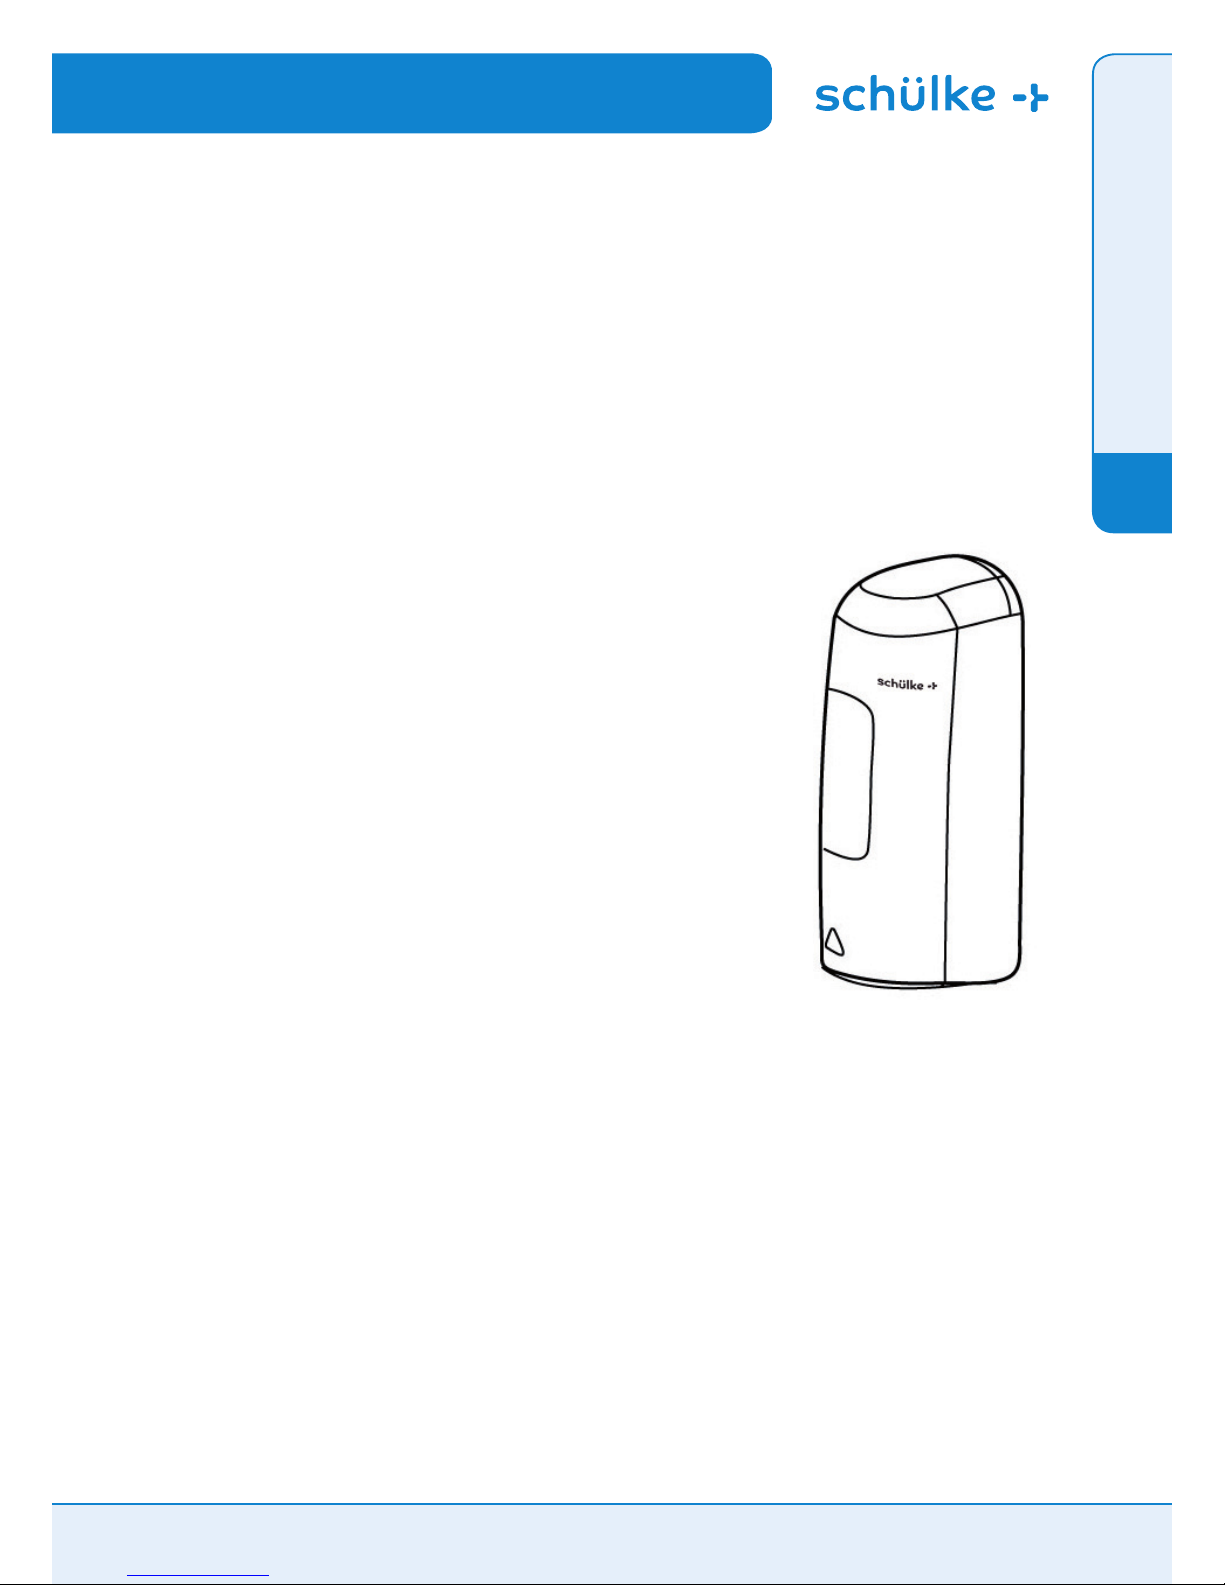
Zawartość pudełka:
Pokrywa podajnika x 1
Płytka ścienna podajnika x 1
Napęd x 1
Baterie x 4
Śruby i kołki montażowe x 4
Instrukcja obsługi x 1
Klucz x 1
Taca na pozostałości środka dezynfekcyjnego
x 1
touchless D1
Bezdotykowy dozownik
elektryczny
touchless D1 Instrukcja obsługi dozownika elektrycznego www.schuelke.com Strona 33 od 38
Schülke & Mayr Ges.m.b.H
Seidengasse 9
1070 Wien, Austria
Phone +43 (0) 1- 523 25 01 - 0
Fax
+43 (0) 1- 523 25 01 - 60
Schülke & Mayr AG
Sihlfeldstrasse 58
8003 Zürich, Schweiz
Phone +41 (0) 44 - 466 55 44
Fax
+41 (0) 44 - 466 55 33
Schülke & Mayr UK Ltd.
1 Jenkin Road
GB-Sheeld S9 1AT
Phone +44 (0) 1142 - 54 35 - 00
Fax
+44 (0) 1142 - 54 35 - 01
Schülke & Mayr GmbH
22840 Norderstedt, Germany
Phone
+49 (0) 40 - 521 00 - 0
Fax
+49 (0) 40 - 521 00 - 318
www.schuelke.com
[email protected]
EN
FR
DE
IT
NL
PL
Page 34
Opakowanie zawiera
Zwróć uwagę
Ø 6 mm
minimum 150 mm
Narzędzia do montażu
Ø 6 mm
Ø 4,8 mm
Uproszczona instrukcja obsługi
Strona 34 od 38 touchless D1 Instrukcja obsługi dozownika elektrycznego www.schuelke.com
EN
FR
DE
IT
NL
PL
Page 35
touchless D1 Instrukcja obsługi dozownika elektrycznego www.schuelke.com Strona 35 od 38
EN
FR
DE
IT
NL
PL
NIEBIESKIE ŚWIATŁO
DOZOWNIK AKTYWNY
CZERWONE ŚWIATŁO OZNA
CZA NISKI POZIOM BATERII
klucze zapasowe
Page 36
6
7
Instrukcja obsługi dozownika touchless D1
1
wyjmij dozownik
i użyj klucza, by
otworzyć pokrywę
2
po otwarciu obudowy
dozownika nacisnąć tu
palcem i zdjąć napęd
8
Przymocować
napęd do tylnej
ściany dozownika
nałóż wieczko
na baterie
włożyć baterie do
komory na baterie
napędu
4
4 znaki na ścianie
3
umieść tylną płytkę
na ścianie. Używając
ołówka zaznacz pozycję
4 otworów ( spójrz na
czerwone kółko) na ścianie
5
9
Strona 36 od 38 touchless D1 Instrukcja obsługi dozownika elektrycznego www.schuelke.com
EN
FR
DE
IT
NL
PL
Page 37
Nr Problem Możliwa przyczyna rozwiązanie
1
Silnik zgrzyta i jest słaby. Dioda
świeci na czerwono/niebiesko.
1. Baterie są rozładowane
2. Różnica napięć między bateriami
jest zbyt duża, nawet jeśli napięcie
jest powyżej 5V.
Wymień baterie.
2
Silnik nie pracuje po włożeniu
baterii. Światło świeci na czerwono.
Baterie są wyczerpane,
napięcie jest
poniżej określonego minimum 5 V.
Należy wymienić baterie, ponieważ ich napięcie jest zbyt
niskie.
3
Dioda LED napędu miga na liliowo. Tłok jest zablokowany
nieprawidłowo włożoną butelką.
Zresetować napęd poprzez otwarcie pojemnika na baterie i
włożyć prawidłowo butelkę.
Strona 37 od 38 touchless D1 Instrukcja obsługi dozownika elektrycznego www.schuelke.com
EN
FR
DE
IT
NL
PL
Przykład instalacji dozownika
Page 38
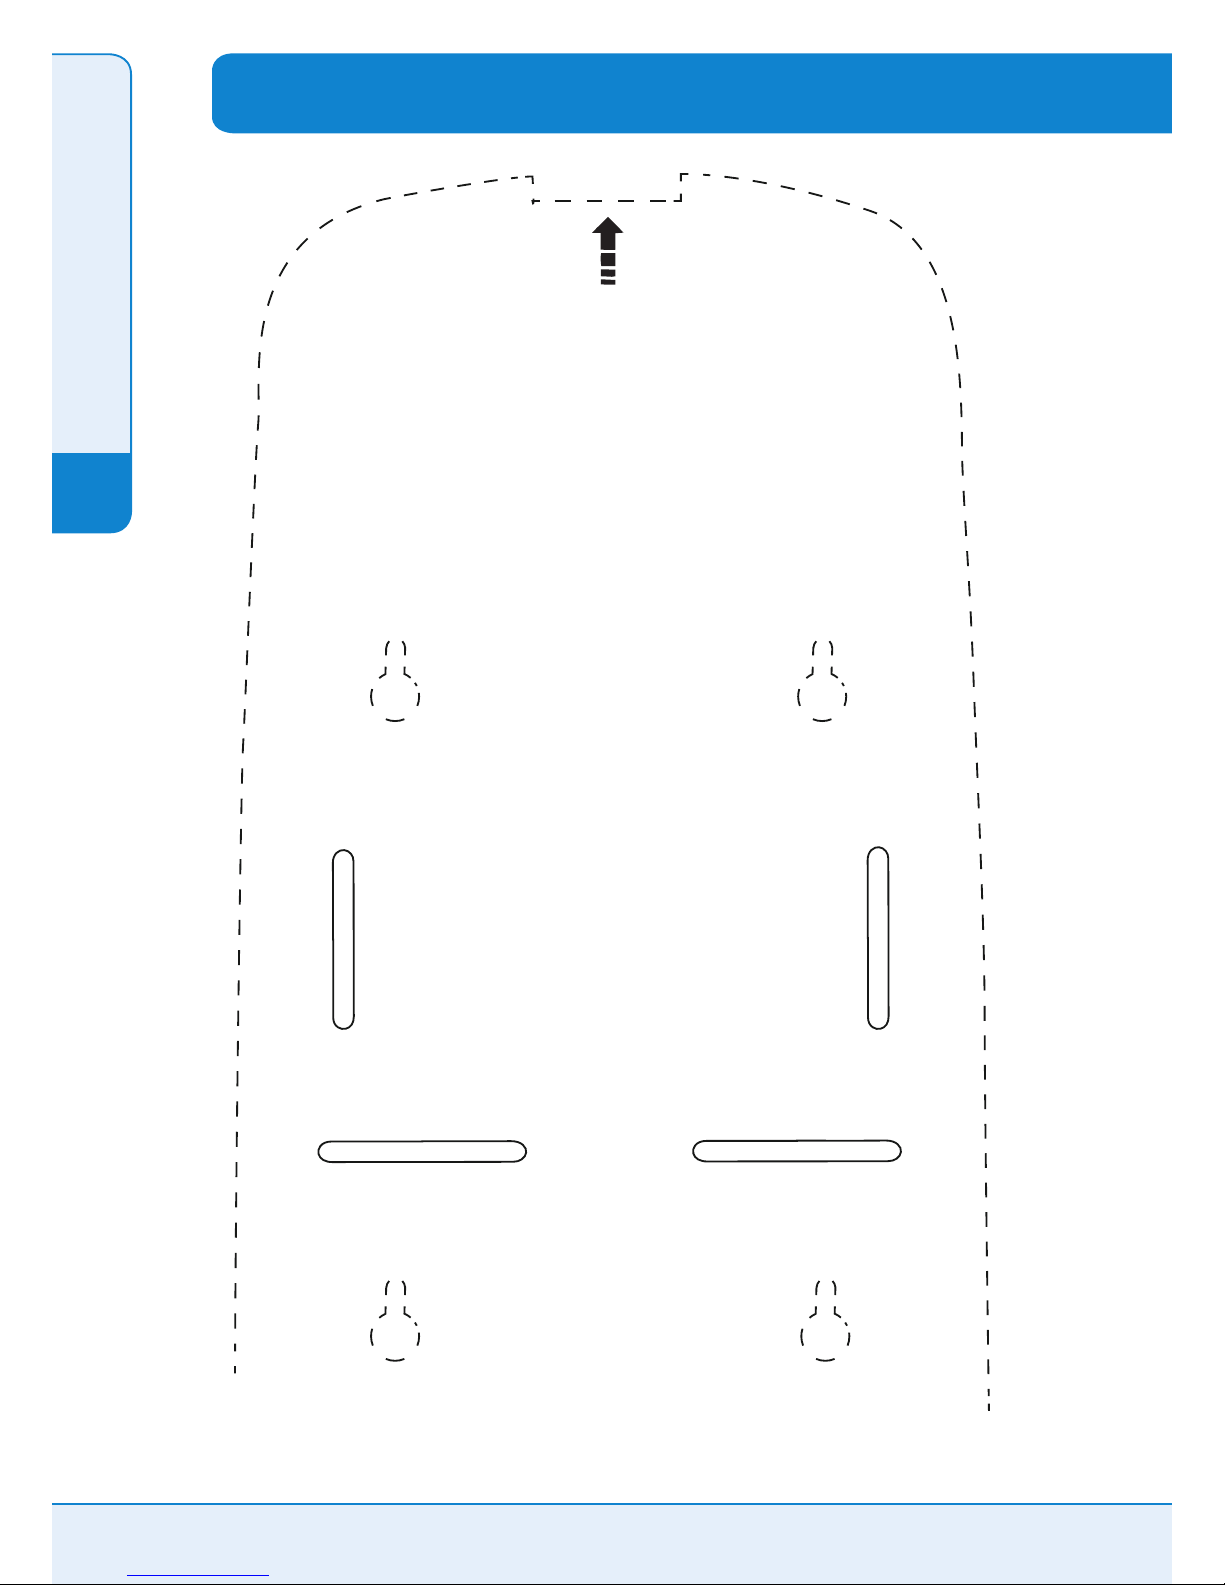
1. Wyciąć szablon wzdłuż linii
2. Zwilżyć szablon i przyłożyć do ściany
3. Wywiercić otwory
touchless D1 Instrukcja obsługi dozownika elektrycznego www.schuelke.com Strona 38 od 38
Szablon do montażu dozownika
EN
FR
DE
IT
NL
PL
Page 39

xxxx / 05.14 / A / Rako
schülke worldwide:
Austria
Schülke & Mayr Ges.m.b.H.
1070 Wien
Phone +43-1-523 25 01 0
Fax
+43-1-523 25 01 60
Belgium
S. A. Schülke & Mayr
Belgium N.V.
1130 Brussels
Phone
+32-2-479 73 35
Fax
+32-2-479 99 66
China
Schülke & Mayr GmbH
Shanghai Representative Office
Shanghai 200041
Phone
+86-21-62 17 29 95
Fax
+86-21-62 17 29 97
France
Schülke France SARL
94250 Gentilly
Phone +33-1-49 69 83 78
Fax
+33-1-49 69 83 85
India
Schulke India Pvt. Ltd.
Neu Delhi 110044
Phone +91-11-40 55 02 00
Fax
+91-11-40 55 02 01
Italy
Schülke & Mayr Italia S.r.l.
20148 Mailand
Phone +39-02-40 26 590
Fax
+39-02-40 26 609
Malaysia
Schülke & Mayr (Asia) Sdn Bhd.
47301 Petaling Jaya, Selangor
Phone +60-3-78 85 80 20
Fax
+60-3-78 85 80 21
Netherlands
Schülke & Mayr Benelux B.V.
2031 CC Haalem, Netherlands
Phone +31-23-535 26 34
Fax
+31-23-536 79 70
Poland
Schulke Polska Sp. z o.o.
01-793 Warszawa
Phone +48-22-568 22 02-03
Fax
+48-22-568 22 04
Singapore
Schülke & Mayr (Asia) Pte. Ltd.
Singapur 768767
Phone +65-62-57 23 88
Fax
+65-62-57 93 88
Switzerland
Schülke & Mayr AG
8003 Zürich
Phone +41-44-466 55 44
Fax
+41-44-466 55 33
Turkey
Schülke & Mayr GmbH
Istanbul Irtibat Bürosu
34517 Esenyurt – Istanbul/Türkiye
Phone
+90-21-23-567-203
United Kingdom
Schülke & Mayr UK Ltd.
Sheffield S9 1AT
Phone +44-114-254 35 00
Fax
+44-114-254 35 01
USA
schülke inc.
Fairfield, N.J. 07004
Phone +1-973-770-7300
Fax
+1-973-770-7302
... plus our international distributors
.53)FBMUI4QB"(
4JIMFHHTUSBTTF]8PMMFSBV]4DIXFJ[
'PO] Fax
JOGP!NUSBHDI]wwXNUSBHDI
 Loading...