

Page 1

Dalla cucina a carbone dei tempi che furono alla cottura digitale dei nostri giorni, Scholtès ha saputo
conservare in 80 anni di storia quello spirito di cose “fatte a mano” che rimane il suo tratto caratterizzante
e il suo punto di forza.
Ogni prodotto Scholtès è la riuscita combinazione di una estetica improntata alla massima eleganza
e di un contenuto tecnologico indiscutibile, fatto di prestazioni e innovazione.
Questo documento è stato realizzato con la preziosa collaborazione di un esperto culinario “della
casa” di assoluto prestigio, Philippe Rogé, che opera a pieno titolo all’interno del team Ricerca e
sviluppo della nostra azienda.
Nelle pagine di questo manuale troverà numerosi consigli che La invitiamo a seguire e che Le
permetteranno di sfruttare appieno l’esperienza del nostro chef e ottenere una cottura sempre perfetta
con risultati sempre ottimi.
Il Libretto di istruzioni descrive semplicemente in modo dettagliato le funzioni di cui è dotato
l’apparecchio. Vi si possono trovare inoltre utili consigli culinari che permetteranno di sfruttare al
meglio le capacità di questo forno.
Inoltre contiene tutte le informazioni necessarie per l’installazione, il collegamento, la manutenzione
dell’apparecchio, … e le raccomandazioni.
Buon appetito con SCHOLTES
- 2 -
Page 2

Indice
Avvertenze.............................................................................................................................. 4
Istruzioni per l'installazione ...............................................................................................5-7
Caratteristiche dei bruciatori ed ugelli ................................................................................ 8
Il piano di cottura ................................................................................................................... 9
Recipienti da adoperare ......................................................................................................10
Caratteristiche tecniche ......................................................................................................10
Manutenzione ordinaria e pulizia della cucina .................................................................. 11
Il cruscotto ........................................................................................................................... 12
La regolazione dell’ora ........................................................................................................ 12
Il contaminuti ....................................................................................................................... 12
Le cotture Création .........................................................................................................13-14
La programmazione ........................................................................................................15-16
Le cotture Succès ........................................................................................................... 17-18
Disinserimento "Demo Mode" ............................................................................................ 18
Gli accessori ........................................................................................................................ 19
Tabelle di abbinamento
piatti/funzioni di cottura ................................................................................................. 20-21
Pirolisi ................................................................................................................................... 22
COSA FARE SE … ................................................................................................................ 23
- 3 -
Page 3

Avvertenze
Per garantire l’efficienza e la sicurezza di questo elettrodomestico:
• rivolgetevi esclusivamente a centri di assistenza tecnica autorizzati
• richiedete sempre l’utilizzo di parti di ricambio originali
1 Questo apparecchio è stato concepito per un uso di tipo non professionale all’interno di abitazione.
2 Queste istruzioni sono valide solo per i paesi di destinazione i cui simboli figurano sul libretto e sulla targa matricola
dell’apparecchio.
3 Questo apparecchio riguarda un apparecchio di classe 1 (isolato) o classe 2 - sottoclasse 1 (incassato tra 2 mobili).
4 Prima di utilizzare l’apparecchio leggere attentamente le avvertenze contenute nel presente libretto in quanto forniscono importanti
indicazioni riguardanti la sicurezza di installazione, d’uso e di manutenzione. Conservare con cura questo libretto per ogni ulteriore
consultazione.
5 Dopo aver tolto l’imballaggio assicurarsi dell’integrità dell’apparecchio. In caso di dubbio non utilizzare l’apparecchio e rivolgersi
a personale professionalmente qualificato. Gli elementi dell’imballaggio (sacchetti in plastica, polistirolo espanso, chiodi, ecc.) non
devono essere lasciati alla portata dei bambini in quanto potenziali fonti di pericolo.
6 L’installazione deve essere effettuata secondo le istruzioni del costruttore da personale professionalmente qualificato. Una
errata installazione può causare danni a persone, animali o cose, nei confronti dei quali il costruttore non può essere considerato
responsabile.
7 La sicurezza elettrica di questo apparecchio è assicurata soltanto quando lo stesso è correttamente collegato ad un efficiente
impianto di messa a terra come previsto dalle vigenti norme di sicurezza elettrica. E’ necessario verificare questo fondamentale
requisito di sicurezza e, in caso di dubbio, richiedere un controllo accurato dell’impianto da parte di personale professionalmente
qualificato. Il costruttore non può essere considerato responsabile per eventuali danni causati dalla mancanza di messa a terra
dell’impianto.
8 Prima di collegare l’apparecchio accertarsi che i dati di targa (posti sull’apparecchio e/o sull’imballo) siano rispondenti a quelli
della rete di distribuzione elettrica e gas.
9 Verificare che la portata elettrica dell’impianto e delle prese di corrente siano adeguate alla potenza massima dell’apparecchio
indicata in targa. In caso di dubbio rivolgersi ad una persona professionalmente qualificata.
10 All’installazione occorre prevedere un interruttore omnipolare con distanza di apertura dei contatti uguale o superiore a 3 mm.
11 In caso di incompatibilità tra la presa e la spina dell’apparecchio fare sostituire la presa con altra di tipo adatto da personale
professionalmente qualificato. Quest’ultimo, in particolare, dovrà anche accertare che la sezione dei cavi della presa sia idonea alla
potenza assorbita dall’apparecchio. In generale è sconsigliabile l’uso di adattatori, prese multiple e/o prolunghe. Qualora il loro uso
si rendesse indispensabile è necessario utilizzare solamente adattatori semplici o multipli e prolunghe conformi alle vigenti norme
di sicurezza, facendo però attenzione a non superare il limite di portata in valore di corrente, marcato sull’adattatore semplice e sulle
prolunghe, e quello di massima potenza marcato sull’adattatore multiplo.
12 Non lasciare l’apparecchio inutilmente inserito. Spegnere l’interruttore generale dell’apparecchio quando lo stesso non è
utilizzato, e chiudere il rubinetto del gas.
13 Non ostruire le aperture o fessure di ventilazione o di smaltimento calore.
14 Il cavo di alimentazione di questo apparecchio non deve essere sostituito dall’utente. In caso di danneggiamento del cavo, o per
la sua sostituzione, rivolgersi esclusivamente ad un centro di assistenza tecnica autorizzato dal costruttore.
15 Questo apparecchio dovrà essere destinato solo all’uso per il quale è stato espressamente concepito. Ogni altro uso (ad
esempio: riscaldamento di ambienti) è da considerarsi improprio e quindi pericoloso. Il costruttore non può essere considerato
responsabile per eventuali danni derivanti da usi impropri, erronei ed irragionevoli.
16 L’uso di un qualsiasi apparecchio elettrico comporta l’osservanza di alcune regole fondamentali. In particolare:
• non toccare l’apparecchio con mani o piedi bagnati o umidi
• non usare l’apparecchio a piedi nudi
• non usare, se non con particolare cautela, prolunghe
• non tirare il cavo di alimentazione, o l’apparecchio stesso, per staccare la spina dalla presa di corrente.
• non lasciare esposto l’apparecchio ad agenti atmosferici (pioggia, sole, ecc.)
• non permettere che l’apparecchio sia usato dai bambini o da incapaci, senza sorveglianza
17 Prima di effettuare qualsiasi operazione di pulizia o di manutenzione, disinserire l’apparecchio dalla rete di alimentazione
elettrica, o staccando la spina, o spegnendo l’interruttore dell’impianto.
18 Allorché si decida di non utilizzare più l’apparecchio, si raccomanda di renderlo inoperante tagliandone il cavo di alimentazione,
dopo aver staccato la spina dalla presa di corrente. Si raccomanda inoltre di rendere innocue quelle parti dell’apparecchio suscettibili
di costituire un pericolo, specialmente per i bambini che potrebbero servirsi dell’apparecchio fuori uso per i propri giochi.
19 Sui bruciatori non debbono essere poste pentole instabili o deformate onde evitare incidenti per rovesciamento. Posizionatele
sul piano di cottura in modo che i manici siano rivolti verso l’interno, per evitare urti accidentali.
20 Alcune parti dell’apparecchio rimangono calde per lungo tempo dopo l’uso. Fate attenzione a non toccarle.
21 Non utilizzate liquidi infiammabili (alcool, benzina...) in vicinanza all’apparecchio mentre questo è in uso.
22 Usando piccoli elettrodomestici nelle vicinanze del piano fate attenzione che il cavo di alimentazione non finisca su parti calde.
23 Controllare sempre che le manopole siano nella posizione “•”/”¡” quando l’apparecchio non è utilizzato.
24 Durante l'uso dell'apparecchio gli elementi riscaldanti e alcune parti della porta forno diventano molto calde. Fare attenzione a
non toccarle e tenere i bambimi a distanza.
25 Gli apparecchi gas necessitano, per un corretto funzionamento, di un regolare ricambio d’aria. Accertarsi che nella loro
installazione siano rispettati i requisiti richiesti nel paragrafo relativo al “Posizionamento”.
26 Il coperchio vetro (presente solo su alcuni modelli) può frantumarsi nel caso si surriscaldi, quindi è necessario che tutti i bruciatori
o le eventuali piastre elettriche risultino spente prima di chiudere il coperchio.
27 Se la cucina viene posta su di un piedistallo, prendere adeguati accorgimenti affinchè l'apparecchio non scivoli dal piedistallo
stesso.
28 Attenzione: non utilizzare mai il vano inferiore per il deposito di materiale infiammabile.
29 Le superfici interne del cassetto (se presente) possono diventare calde.
- 4 -
Page 4
Istruzioni per l'installazione
Le istruzioni che seguono sono rivolte all’installatore qualificato affinchè compia le operazioni di installazione regolazione
e manutenzione tecnica nel modo più corretto e secondo le norme in vigore.
Importante: qualsiasi intervento di regolazione, manutenzione etc. deve essere eseguito con la cucina
elettricamente disinserita.
PP
osizionamentoosizionamento
P
osizionamento
PP
osizionamentoosizionamento
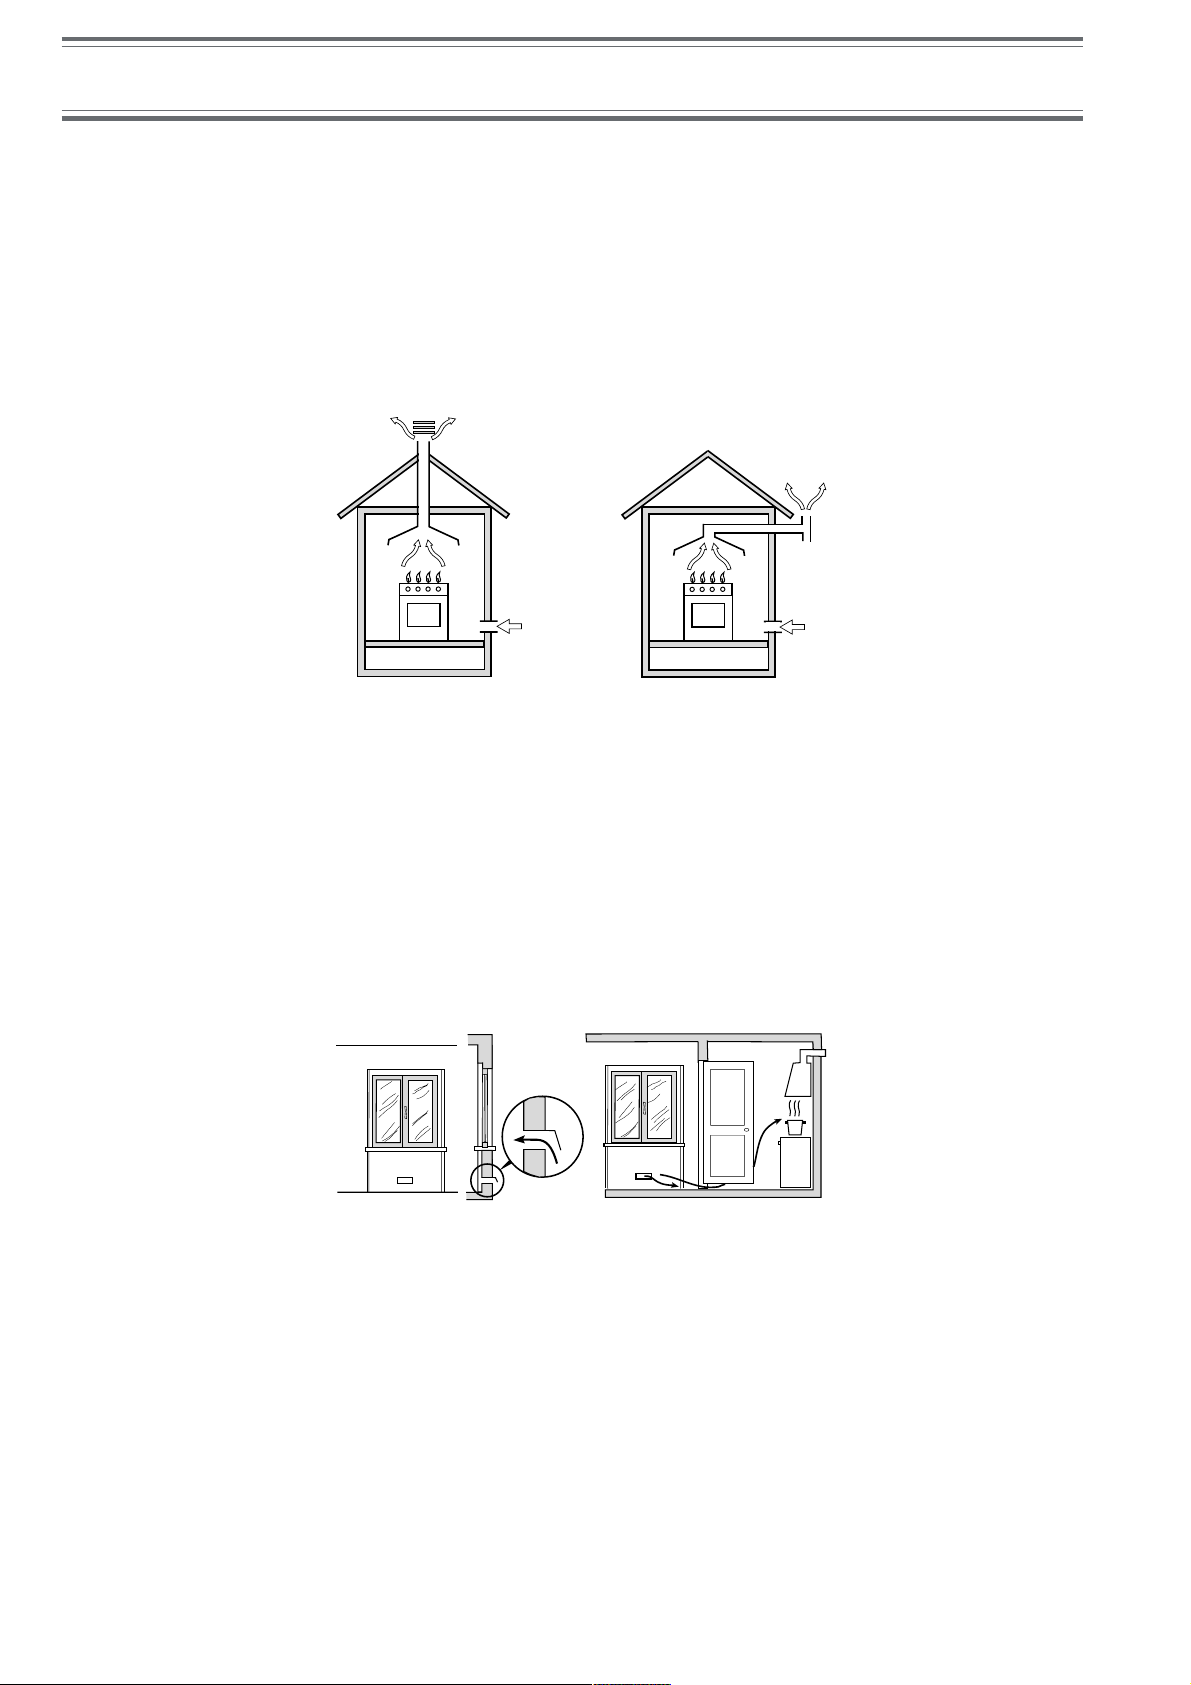
Importante: questo apparecchio può essere installato e funzionare solo in locali permanentemente ventilati secondo le
prescrizioni delle Norme UNI-CIG 7129 e 7131 in vigore. Debbono essere osservati i seguenti requisiti:
a) Il locale deve prevedere un sistema di scarico all’esterno dei fumi della combustione, realizzato tramite una cappa
o tramite un elettroventilatore che entri automaticamente in funzione ogni volta che si accende l’apparecchio.
In camino o in canna fumaria ramificata Direttamente all’esterno
(riservata agli apparecchi di cottura)
b) Il locale deve prevedere un sistema che consenta l’afflusso dell’aria necessaria alla regolare combustione. La
portata di aria necessaria alla combustione non deve essere inferiore a 2 m3/h per kW di potenza installata. Il sistema
può essere realizzato prelevando direttamente l’aria dall’esterno dell’edificio tramite un condotto di almeno 100 cm
sezione utile e tale che non possa essere accidentalmente ostruito. Per gli apparecchi privi sul piano di lavoro, del
dispositivo di sicurezza per assenza di fiamma, le aperture di ventilazione debbono essere maggiorate nella misura del
100%, con un minimo di 200cm
ventilazione con l’esterno come sopra descritto, e che non siano parti comuni dell’immobile, o ambienti con pericolo di
incendio, o camere da letto (Fig. B).
Esempi di aperture di ventilazione Maggiorazione della fessura fra
per l’aria comburente porta e pavimento
2
(Fig. A). Ovvero, in maniera indiretta da locali adiacenti, dotati di un condotto di
Particolare A Locale Locale da
adiacente ventilare
A
Fig. A Fig. B
2
di
c) Un utilizzo intensivo e prolungato dell’apparecchio può necessitare di una aerazione supplementare per esempio
l’apertura di una finestra o una aerazione più efficace aumentando la potenza di spirazione meccanica se essa esiste.
d) I gas di petrolio liquefatti, più pesanti dell’aria, ristagnano verso il basso. Quindi i locali contenenti bidoni di GPL
debbono prevedere delle aperture verso l’esterno così da permettere l’evacuazione dal basso delle eventuali fughe di
gas. Pertanto i bidoni di GPL, siano essi vuoti o parzialmente pieni, non debbono essere installati o depositati in locali
o vani a livello più basso del suolo (cantinati, ecc.). É opportuno tenere nel locale solo il bidone in utilizzo, collocato in
modo da non essere soggetto all’azione diretta di sorgenti di calore (forni, camini, stufe, ecc.) capaci di portarlo a
temperature superiori ai 50°C.
LiLi
vv
ellamento ellamento
Li
v
ellamento (presente solo su alcuni modelli)
LiLi
vv
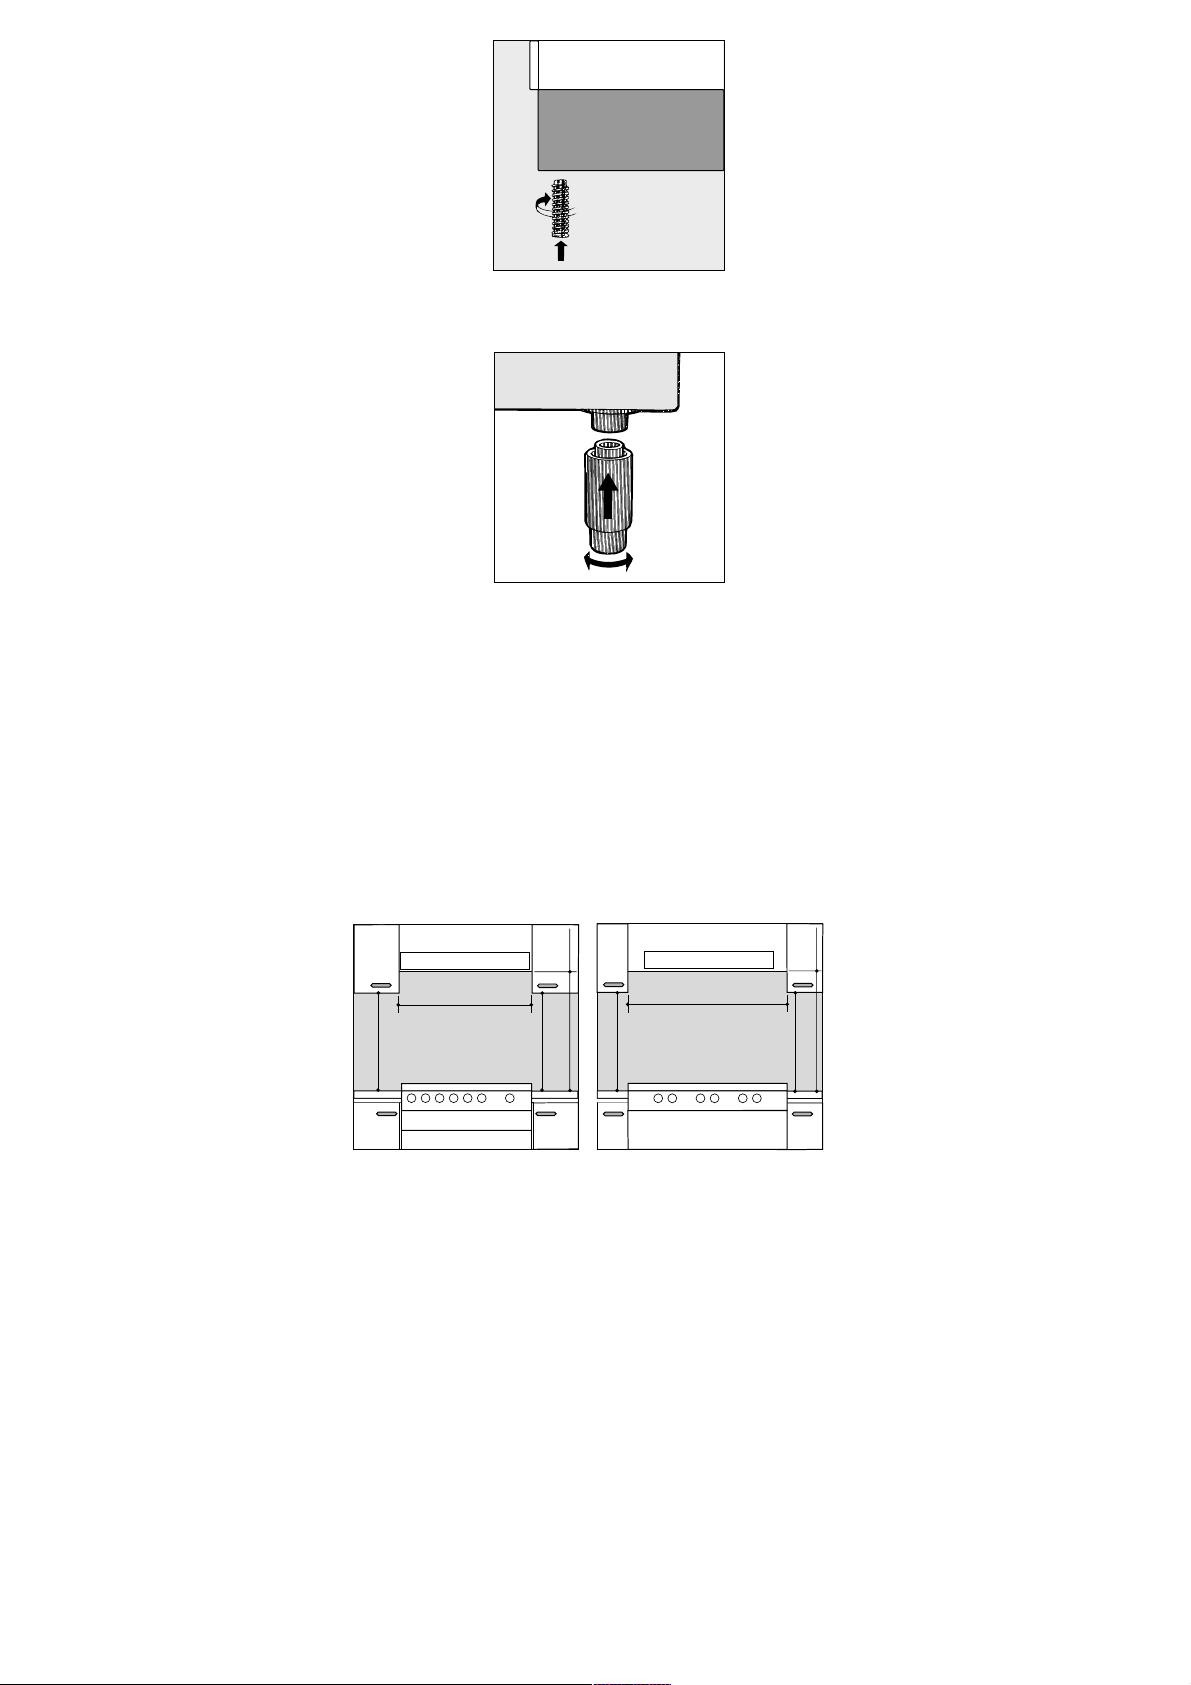
ellamento ellamento
Nella parte inferiore dell’apparecchio si trovano 4 piedini di sostegno regolabili con viti che permettono di migliorare il
livellamento dell’apparecchio, se necessario. E’ indispensabile che l’apparecchio sia posizionato in modo uniforme.
- 5 -
Page 5
MontaMonta
Monta
MontaMonta
gg
gio ggio g
g
gio g
gg
gio ggio g
ambe ambe
ambe (presente solo su alcuni modelli)
ambe ambe
Vengono fornite delle gambe da montare ad incastro sotto la base della cucina.
Installazione della cucinaInstallazione della cucina
Installazione della cucina
Installazione della cucinaInstallazione della cucina
E' possibile l’installazione a fianco di mobili la cui altezza non superi quella del piano di lavoro. La parete a contatto con la
parete posteriore della cucina deve essere in materiale ininfiammabile. Durante il funzionamento la parete posteriore della
cucina può raggiungere una temperatura di 50°C superiore a quella ambiente. Per una corretta installazione della cucina
vanno osservate le seguenti precauzioni:
a) I mobili situati a fianco, la cui altezza superi quella del piano di lavoro, debbono essere situati ad almeno 600 mm dal
bordo del piano stesso.
b) Le cappe debbono essere installate secondo i requisiti richiesti nei libretti istruzioni delle cappe stesse e comunque
ad una distanza minima di 650 mm.
c) Allorchè la cucina venga installata sotto un pensile, quest’ultimo dovrà mantenere una distanza minima dal piano di
700 mm (millimetri). I mobili adiacenti alla cappa dovranno mantenere una distanza minima dal piano di 420 mm. come
da Fig. C e D.
HOOD
Min. mm.
900
mm. with hood
mm. without hood
420
650
700
Min. mm.
min.
min.
mm.
420
Min.
HOOD
Min. mm.
600
mm. with hood
420
650
Min. mm.
min.
mm. without hood
700
min.
mm.
420
Min.
Fig. C Fig. D
ColleColle
Colle
ColleColle
gg
amento gamento g
g
amento g
gg
amento gamento g
asas
as
asas
Il collegamento dell’apparecchio alla tubazione o alla bombola del gas dovrà essere effettuato come prescritto dalle
Norme UNI-CIG 7129 e 7131, solo dopo essersi accertati che esso è regolato per il tipo di gas con cui sarà alimentato. In
caso contrario eseguire le operazioni indicate al paragrafo “Adattamento ai diversi tipi di gas”. Su alcuni modelli l’alimentazione
del gas può avvenire indifferentemente da destra o da sinistra a seconda dei casi; per cambiare il collegamento è necessario
invertire il portagomma con il tappo di chiusura e sostituire la guarnizione di tenuta (in dotazione con l’apparecchio). Nel
caso di alimentazione con gas liquido, da bombola, utilizzare regolatori di pressione conformi alle Norme UNI-CIG 7432.
Importante: per un sicuro funzionamento, per un adeguato uso dell’energia e maggiore durata dell’apparecchiatura,
assicurarsi che la pressione di alimentazione rispetti i valori indicati nella tabella 1 “Caratteristiche dei bruciatori ed ugelli”.
Allaccio con tubo flessibileAllaccio con tubo flessibile
Allaccio con tubo flessibile
Allaccio con tubo flessibileAllaccio con tubo flessibile
Eseguire il collegamento per mezzo di un tubo flessibile per gas rispondente alle caratteristiche indicate nelle norme UNICIG 7140. Il diametro interno del tubo da utilizzare deve essere:
- 8mm per alimentazione con gas liquido;
- 13mm per alimentazione con gas metano.
In particolare, per la messa in opera di tali tubi flessibili, debbono essere rispettate le seguenti prescrizioni:
- 6 -
Page 6
• Non deve essere in nessun punto del suo percorso a contatto con parti che siano a temperature maggiori di 50°C;
• Abbia una lunghezza inferiore a 1500 mm;
• Non sia soggetto ad alcun sforzo di trazione e di torsione, inoltre non deve presentare curve eccessivamente strette
o strozzature;
• Non venga a contatto con corpi taglienti, spigoli vivi e con parti mobili o schiacciato;
• Deve essere facilmente ispezionabile lungo tutto il percorso allo scopo di poter controllare il suo stato di conservazione;
Assicurarsi che il tubo sia ben calzato alle sue due estremità e fissarlo per mezzo di fascette di serraggio conformi alla
UNI-CIG 7141. Qualora una o più di queste condizioni non possa essere rispettata, bisognerà ricorrere ai tubi metallici
flessibili, conformi alla norma UNI-CIG 9891.
Allorchè la cucina venga installata secondo le condizioni della classe 2 sottoclasse 1 è opportuno collegarsi alla rete gas
solamente tramite tubo metallico flessibile conforme alla UNI-CIG 9891.
Allaccio con tubo fAllaccio con tubo f
Allaccio con tubo f
Allaccio con tubo fAllaccio con tubo f
Eliminare il portagomma già presente sull’apparecchio. Il raccordo di entrata del gas all’apparecchio è filettato 1/2 gas
maschio cilindrico. Utilizzare esclusivamente tubi conformi alla Norma UNI-CIG 9891 e guarnizioni di tenuta conformi alla
UNI-CIG 9264. La messa in opera di tali tubi deve essere effettuata in modo che la loro lunghezza, in condizioni di
massima estensione, non sia maggiore di 2000 mm.
ContrContr
Contr
ContrContr
Importante: ad installazione ultimata controllare la perfetta tenuta di tutti i raccordi utilizzando una soluzione saponosa e
mai una fiamma.
Ad allacciamento avvenuto assicurarsi che il tubo metallico flessibile non venga a contatto con parti mobili o schiacciato.
Allacciamento del caAllacciamento del ca
Allacciamento del ca
Allacciamento del caAllacciamento del ca
Montare sul cavo una spina normalizzata per il carico indicato sulla targhetta caratteristiche, nel caso di collegamento
diretto alla rete è necessario interporre tra l’apparecchio e la rete un interruttore omnipolare con apertura minima fra i
contatti di 3 mm. dimensionato al carico e rispondente alle norme in vigore (il filo di terra non deve essere interrotto
dall’interruttore). Il cavo di alimentazione deve essere posizionato in modo che non raggiunga in nessun punto una
temperatura superiore di 50°C a quella ambiente. Prima di effettuare l’allacciamento accertarsi che:
N.B: non utilizzare riduzioni, adattatori o derivatori in quanto essi potrebbero provocare riscaldamenti o bruciature.
AdaAda
Ada
AdaAda
Per adattare la cucina ad un tipo di gas diverso da quello per il quale essa è predisposta (indicato sulla etichetta fissata al
coperchio), occorre effettuare le seguenti operazioni:
ollo tenollo ten
ollo ten
ollo tenollo ten
• la valvola limitatrice e l’impianto domestico possano sopportare il carico dell’apparecchiatura (vedi targhetta
caratteristiche);
• l’impianto di alimentazone sia munito di efficace collegamento a terra secondo le norme e le disposizioni di legge;
• la presa o l’interruttore omnipolare siano facilmente raggiungibili con il piano installato.
ttamento del piano ai dittamento del piano ai di
ttamento del piano ai di
ttamento del piano ai dittamento del piano ai di
a) Sostituire il portagomma già montato con quello contenuto nella confezione “accessori della cucina”.
Attenzione:Il portagomma per gas liquido porta stampigliato il numero 8, quello per gas metano il numero 13. Avvalersi
comunque di una guarnizione di tenuta nuova.
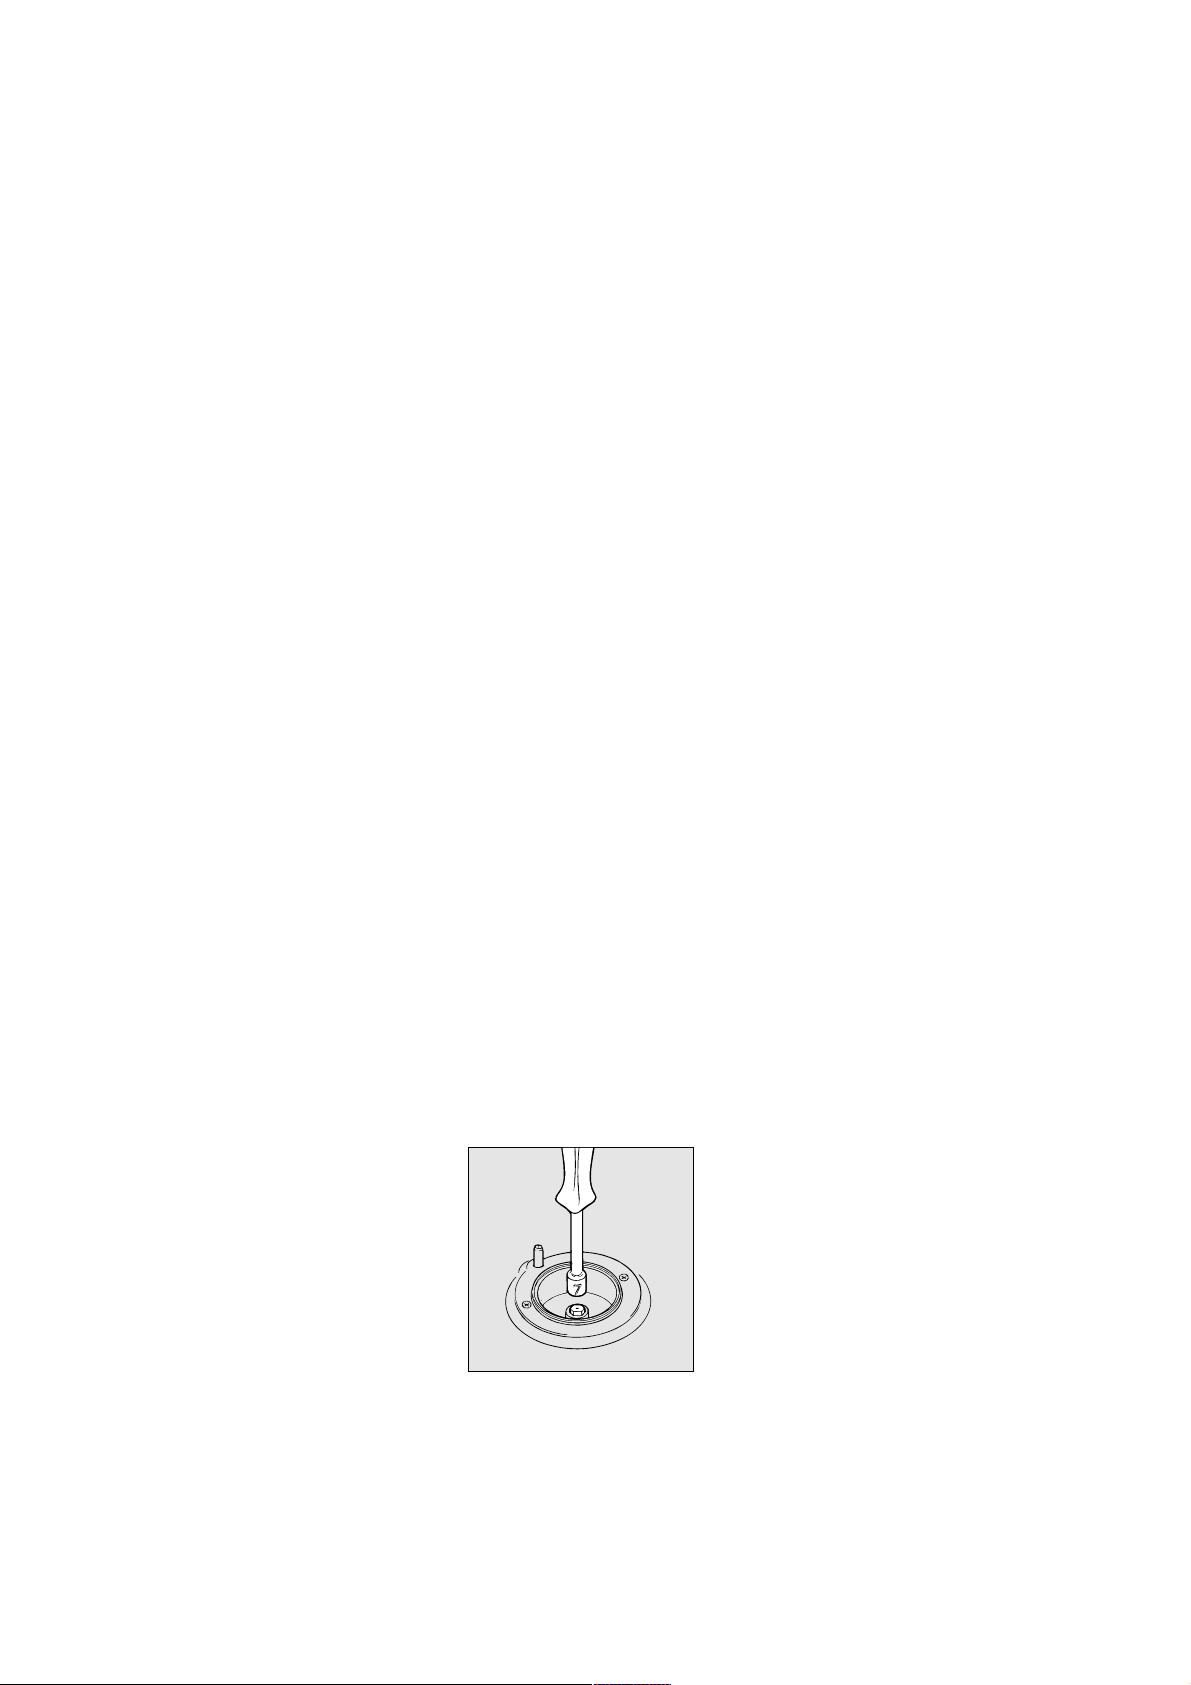
b) Sostituzione degli ugelli dei bruciatori del piano:
• togliere le griglie e sfilare i bruciatori dalle loro sedi;
• svitare gli ugelli, servendosi di una chiave a tubo da 7 mm, e sostituirli con quelli adatti al nuovo tipo di gas (vedi
tabella 1 “Caratteristiche dei bruciatori ed ugelli”).
utauta
uta
utauta
lessibile in acciaio inossidalessibile in acciaio inossida
lessibile in acciaio inossida
lessibile in acciaio inossidalessibile in acciaio inossida
vv
o di alimentazione alla ro di alimentazione alla r
v
o di alimentazione alla r
vv
o di alimentazione alla ro di alimentazione alla r
vv
erer
si tipi di gsi tipi di g
v
er
si tipi di g
vv
erer
si tipi di gsi tipi di g
asas
as
asas
bile a parbile a par
bile a par
bile a parbile a par
eteete
ete
eteete
ete continete contin
ete contin
ete continete contin
ua co n aua co n a
ua con a
ua co n aua co n a
ttaccttacc
ttacc
ttaccttacc
hi filettahi filetta
hi filetta
hi filettahi filetta
titi
ti
titi
• rimettere in posizione tutti i componenti seguendo le operazioni inverse rispetto alla sequenza di cui sopra.
c) Regolazione minimi dei bruciatori del piano:
• portare il rubinetto sulla posizione di minimo;
• togliere la manopola ed agire sulla vite di regolazione posta all’interno o di fianco all’astina del rubinetto fino ad
ottenere una piccola fiamma regolare.
N.B.: nel caso dei gas liquidi, la vite di regolazione dovrà essere avvitata a fondo.
• verificare poi che ruotando rapidamente il rubinetto dalla posizione di massimo a quella di minimo, non si abbiano
spegnimenti del bruciatore.
d) Regolazione aria primaria dei bruciatori del piano:
- 7 -
Page 7
I bruciatori non necessitano di alcuna regolazione dell’aria primaria.
Attenzione
Al termine dell’operazione sostituire la vecchia etichetta di taratura con quella corrispondente al nuovo gas di utilizzo,
reperibile presso i nostri Centri Assistenza Tecnica.
Nota
Qualora la pressione del gas utilizzato sia diversa (o variabile) da quella prevista, è necessario installare, sulla tubazione
d’ingresso un appropriato regolatore di pressione (secondo UNI-CIG 7430 “regolatori per gas canalizzati”).
Caratteristiche dei bruciatori ed ugelli
Tabella 1 Gas Liquido Gas Naturale
Bruciatore Diametro
(mm)
Ultra Rapido
(Grande)
(UR)
Semi Rapido
(Medio)(S)
Ausiliario
(Piccolo)(A)
Pressioni di
alimentazione
100 3,30 0,7 41 91 240 236 123 314
75 1.90 0.4 30 70 138 136 106 181
55 1.00 0.4 30 50 73 71 79 95
Potenza termica
kW (p.c.s.*)
Nomin. Ridot. (mm ) (mm ) *** ** (mm )
Nominale (mbar)
Minima (mbar)
Massima (mbar)
* At 15°C and 1013 mbar- dry gas
** Propano P.C.S. = 50,37 MJ/Kg
*** Butano P.C.S. = 49,47 MJ/Kg
Naturale P.C.S. = 37,78 MJ/m
By-Pass
1/100
3
ugello
1/100
S
UR
28-30
20
35
ø 180
A
portata*
g/h
37
25
45
ugello
1/100
portata*
l/h
20
17
25
- 8 -
Page 8
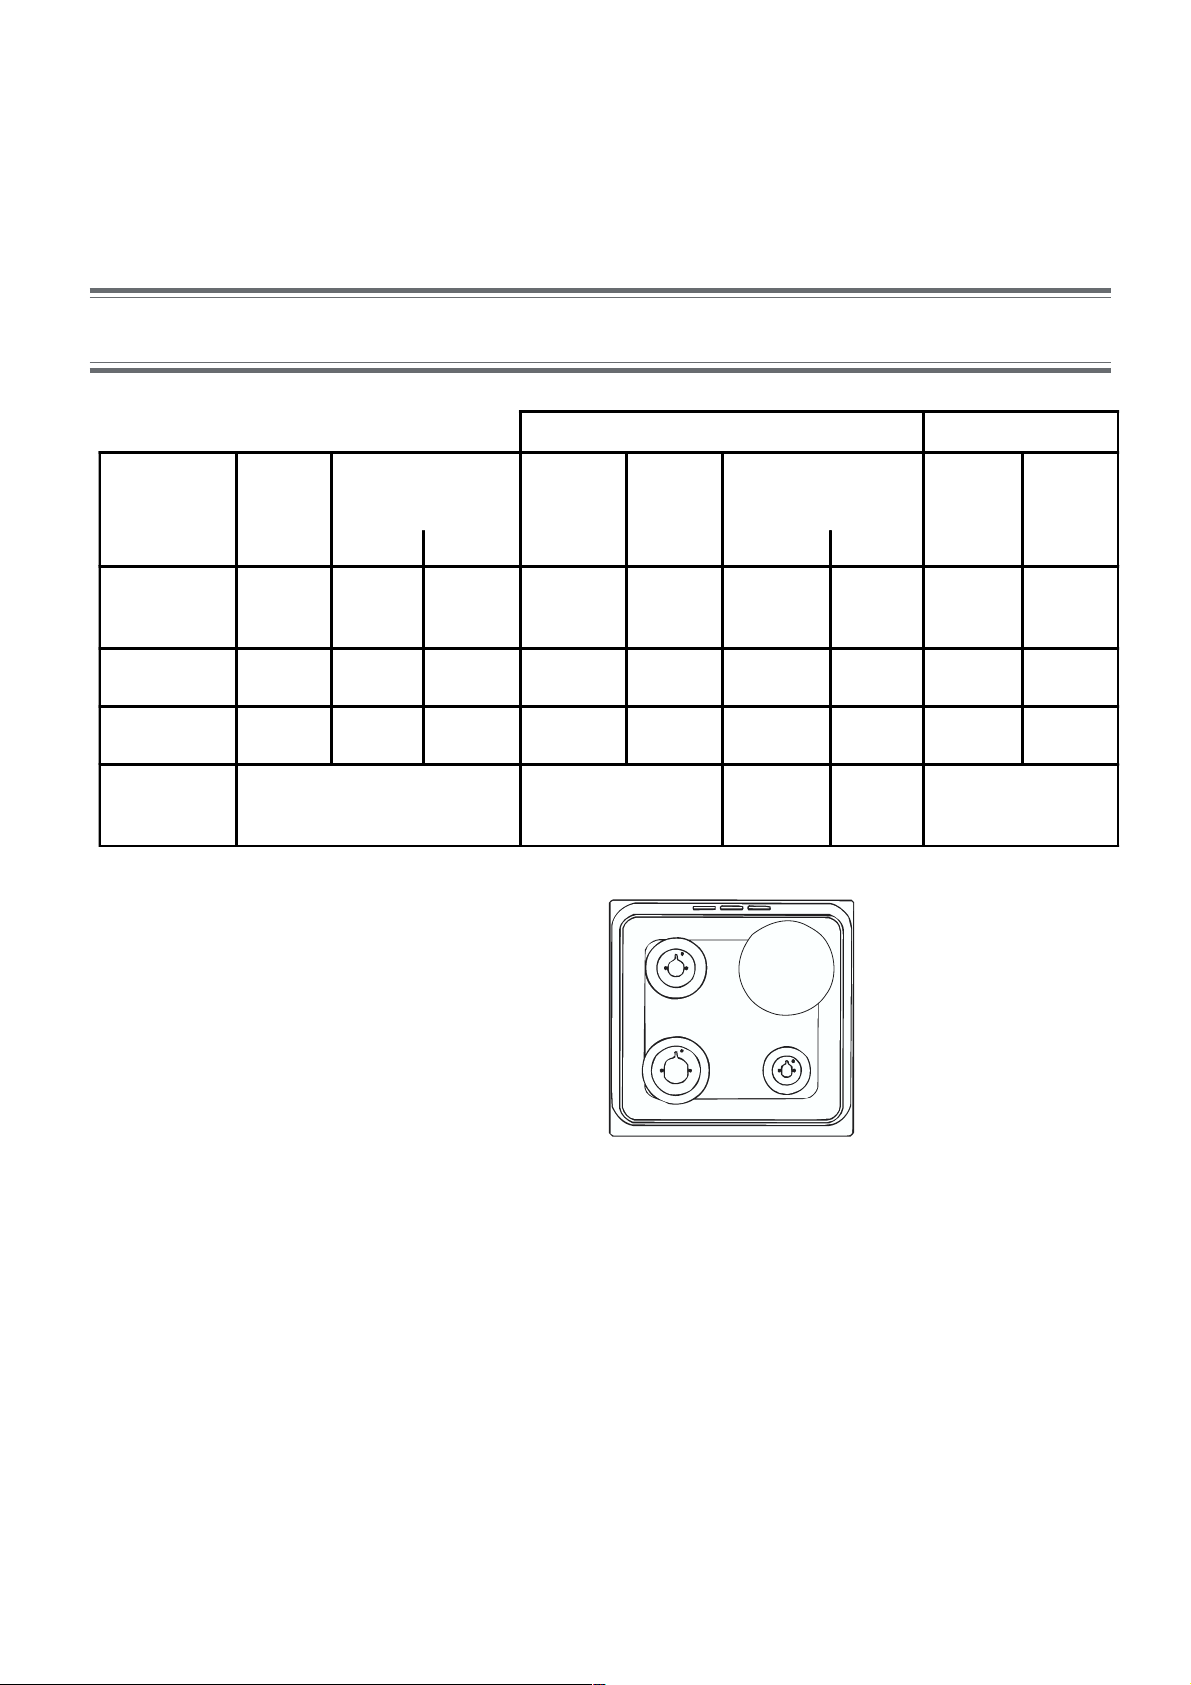
Il piano di cottura
Prima dell'uso, togliere tassativamente le pellicole in plastica poste ai lati dell'apparecchio
Regolazione dei bruciatoriRegolazione dei bruciatori
Regolazione dei bruciatori
Regolazione dei bruciatoriRegolazione dei bruciatori
La regolazione è progressiva, permette un facile adattamento ai diversi diametri di recipiente e alle intensità di riscaldamento.
La regolazione si esegue premendo e girando in senso antiorario la manopola di comando in modo da portare la tacca della
manopola di fronte ai simboli:
• un punto nero: chiuso
una grande fiamma: aperto
una piccola fiamma: portata ridotta
L'accensione dei bruciatori del vostro piano è "a una mano". Basta infatti premere la manopola di comando girandola
contemporaneamente in senso antiorario: un'emissione di scintille provoca l'accensione del bruciatore. Dopo la fuoriuscita
della fiamma, mantenere una pressione sufficiente per circa 3-4 secondi fino all'avvenuta accensione che permette
l'attivazione del dispositivo di sicurezza.
Se la fiamma si spegne accidentalmente durante il funzionamento, entra in funzione il dispositivo di sicurezza: l'erogazione
del gas si interrompe automaticamente. Per riaccendere il bruciatore, procedere nuovamente all'accensione come indicato
più sopra.
Nota: in mancanza di corrente elettrica, è possibile accendere il bruciatore con un fiammifero girando la manopola e
mantenendo una pressione sufficiente come indicato più sopra.
Nel caso di estinzione accidentale della fiamma del bruciatore, chiudere la manopola di comando e ritentare l'accensione
dopo almeno 1minuto.
Uso delle piastrUso delle piastr
Uso delle piastr
Uso delle piastrUso delle piastr
La piastra riscalda costantemente e un protettore ne evita il surriscaldamento in caso di uso troppo prolungato o errato
(pentola vuota, deformata...).
Utilizzando la piastra con protettore, è preferibile adoperare immediatamente la posizione massima (6) per ottenere un
aumento di temperatura pressoché immediato. Quando la piastra inizia a riscaldarsi, potete regolare la manopola su
posizioni inferiori.
La piastra continua a riscaldarsi per circa 10 minuti dopo l'arresto dell'alimentazione elettrica: è dunque vostro interesse
spegnerla prima della fine della cottura. Le piastre con protettore garantiscono un aumento della temperatura molto veloce
in posizione massima (6).
La manopola di comando della piastra rapida con protettore integrato è graduata da 1 a 6. Si regola nel modo seguente:
Pos. Piastra normale o rapida
0
Spento
1 Cottura di verdure, pesci
Cottura di patate (a vapore) minestre, ceci,
2
fagioli
Proseguimento di cottura di grandi quantità di
3
cibi, minestroni
4
Arrostire (medio)
5 Arrostire (forte)
e re r
e r
e re r
aa
a
aa
pide a prpide a pr
pide a pr
pide a prpide a pr
otettorotettor
otettor
otettorotettor
e intee inte
e inte
e intee inte
gg
rr
aa
toto
g
r
a
to
gg
rr
aa
toto
6
Rosolare o raggiungere bollitura in poco tempo
- 9 -
Page 9

Recipienti da adoperare
· Le griglie di supporto delle pentole dei piani di cottura tutto gas o misti non sono previste per l'uso di recipienti
a base concava o convessa.
· Vi consigliamo tuttavia di utilizzare sempre un bruciatore appropriato alle dimensioni del recipiente (vedi tabella)
di modo che le fiamme non lambiscano i contorni delle pentole: le fiamme devono scaldare solo il fondo della pentola.
· Non posate mai pentole instabili odeformate sui bruciatori e sulle piastre elettriche per evitare qualsiasi rischio
di sversamento accidentale.
· Controllate sempre che le manopole siano sulla posizione 0 quando non usate l'apparecchio.
· Non appena un liquido bolle nella pentola, è sufficiente un'intensità di riscaldamento minima per evitare che si
riversi fuori dalla pentola.
Bruciatore ø Diametro Recipienti (cm)
Ultra Rapido (UR) 24 - 26
Semi Rapido (S) 16 - 20
Ausiliario (A) 10 - 14
Nota
Sui modelli dotati di griglietta di riduzione, quest’ultima dovrà essere utilizzata solo per il bruciatore ausiliario, quando si
utilizzano dei recipienti di diametro inferiore a 12 cm.
Caratteristiche tecniche
Dimensioni utili del forno: larghezza cm. 43,5
profondità cm. 40
altezza cm. 32
Volume utile del forno: litri 56
Dimensioni utili del cassetto scaldavivande: larghezza cm. 46
profondità cm. 42
altezza cm. 8,5
ENERGY LABEL
Direttiva 2002/40/CE sull’etichetta dei forni elettrici
Norma EN 50304
Consumo energia convezione Naturale
funzione di riscaldamento:
Consumo energia dichiarazione Classe convezione Forzata
funzione di riscaldamento:
Tensioni e frequenza di alimentazione:
vedi targhetta caratteristiche
Tradizione
Rosticceria
Bruciatori: adattabili a tutti i tipi di gas indicati nella terghetta caratteristiche
La direttiva Europea 2002/96/CE sui rifiuti di apparecchiature
elettriche ed elettroniche (RAEE), prevede che gli elettrodomestici non debbano essere smaltiti nel normale flusso dei
rifiuti solidi urbani. Gli apparecchi dismessi devono essere
Questa apparecchiatura è conforme alle seguenti Direttive Comunitarie:
- 73/23/CEE del 19/02/73 (Bassa Tensione) e successive
modificazioni;
- 89/336/CEE del 03/05/89 (Compatibilità Elettromagnetica) e
successive modificazioni;
- 90/396/CEE del 29/06/90 (Gas) e successive modificazioni;
- 93/68/CEE del 22/07/93 e successive modificazioni.
raccolti separatamente per ottimizzare il tasso di recupero e
riciclaggio dei materiali che li compongono ed impedire potenziali danni per la salute e l’ambiente. Il simbolo del cestino
barrato è riportato su tutti i prodotti per ricordare gli obblighi di
raccolta separata.
Per ulteriori informazioni, sulla corretta dismissione degli elettrodomestici, i detentori potranno rivolgersi al servizio pubblico preposto o ai rivenditori.
- 10 -
Page 10
Manutenzione ordinaria e pulizia della
cucina
Prima di ogni operazione disinserire elettricamente la cucina. Per una lunga durata della cucina è indispensabile
eseguire frequentemente una accurata pulizia generale, tenendo presente che:
• per la pulizia non utilizzare apparecchi a vapore
• le parti smaltate e i pannelli autopulenti, se presenti, vanno lavate con acqua tiepida senza usare polveri abrasive e
sostanze corrosive che potrebbero rovinarle;
• l’interno del forno va pulito, con una certa frequenza, quando è ancora tiepido usando acqua calda e detersivo,
risciacquando ed asciugando poi accuratamente;
• gli spartifiamma vanno lavati frequentemente con acqua calda e detersivo avendo cura di eliminare le incrostazioni;
• Nelle cucine dotate di accensione automatica occorre procedere frequentemente ad una accurata pulizia della
parte terminale dei dispositivi di accensione istantanea elettronica e verificare che i fori di uscita del gas degli spartifiamma
non siano ostruiti;
• l’acciaio inox può rimanere macchiato se rimane a contatto per lungo tempo con acqua fortemente calcarea o con
detergenti aggressivi (contenenti fosforo). Si consiglia di sciacquare abbondantemente ed asciugare dopo la pulizia. E’
inoltre opportuno asciugare eventuali trabocchi d’acqua.
• nei modelli dotati di coperchio in cristallo la pulizia si effettua con acqua calda evitando l’impiego di panni ruvidi o
sostanze abrasive.
• Pulire il vetro della porta con spugne e prodotti non abrasivi e asciugare con un panno morbido; non usare materiali
ruvidi abrasivi o raschietti metallici affilati che possono graffiare la superficie e causare la frantumazione del vetro.
N.B.: evitare di chiudere il coperchio fino a che i bruciatori gas sono ancora caldi. Eliminare eventuali liquidi
presenti sul coperchio prima di aprirlo.
Importante: controllare periodicamente lo stato di conservazione del tubo flessibile di collegamento gas e sostituirlo non
appena presenta qualche anomalia; è consigliabile la sostituzione annuale.
Sostituzione della lampada del fSostituzione della lampada del f
Sostituzione della lampada del f
Sostituzione della lampada del fSostituzione della lampada del f
• Prima di effettuare qualsiasi operazione, disinserire elettricamente il forno, staccando la spina o agendo sull’interruttore
utilizzato per il collegamento del forno all’impianto elettrico.
• Servendosi di un oggetto stretto e piatto (cacciavite, manico di cucchiaio, ecc.), togliere il coperchio in vetro.
• Svitare la lampada e sostituirla con una dalle caratteristiche analoghe:
- tensione 230/240 W
- potenza 15 W
- attacco E 14
• Rimontare il coperchio in vetro prestando attenzione a posizionare correttamente la guarnizione.
ManMan
utenzione rutenzione r
Man
utenzione r
ManMan
utenzione rutenzione r
Con il tempo può verificarsi il caso di un rubinetto che si blocchi o presenti difficoltà nella rotazione, pertanto sarà necessario
provvedere alla sostituzione del rubinetto stesso.
N.B.: Questa operazione deve essere effettuata da un tecnico autorizzato dal costruttore.
ubinetti gubinetti g
ubinetti g
ubinetti gubinetti g
asas
as
asas
oror
or
oror
nono
no
nono
cavità
lampadina
guarnizione
coperchio
- 11 -
Page 11
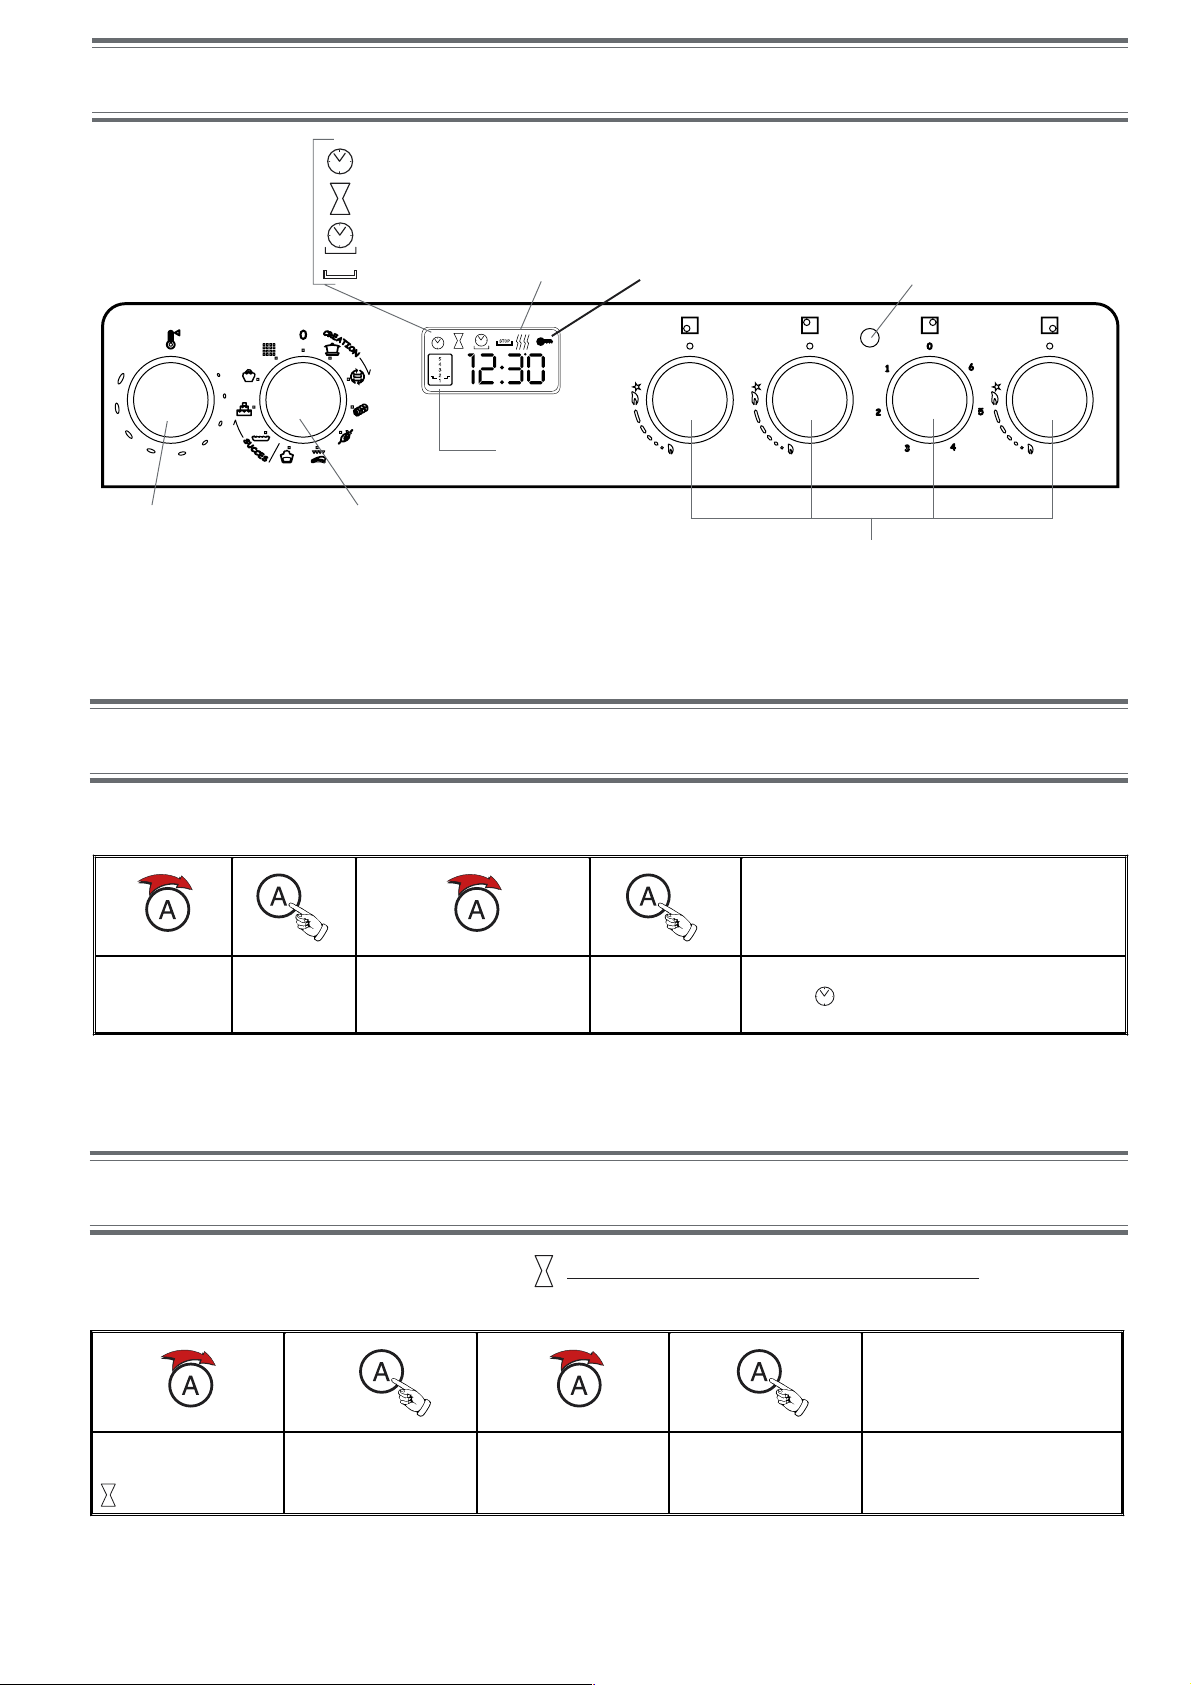
Ora
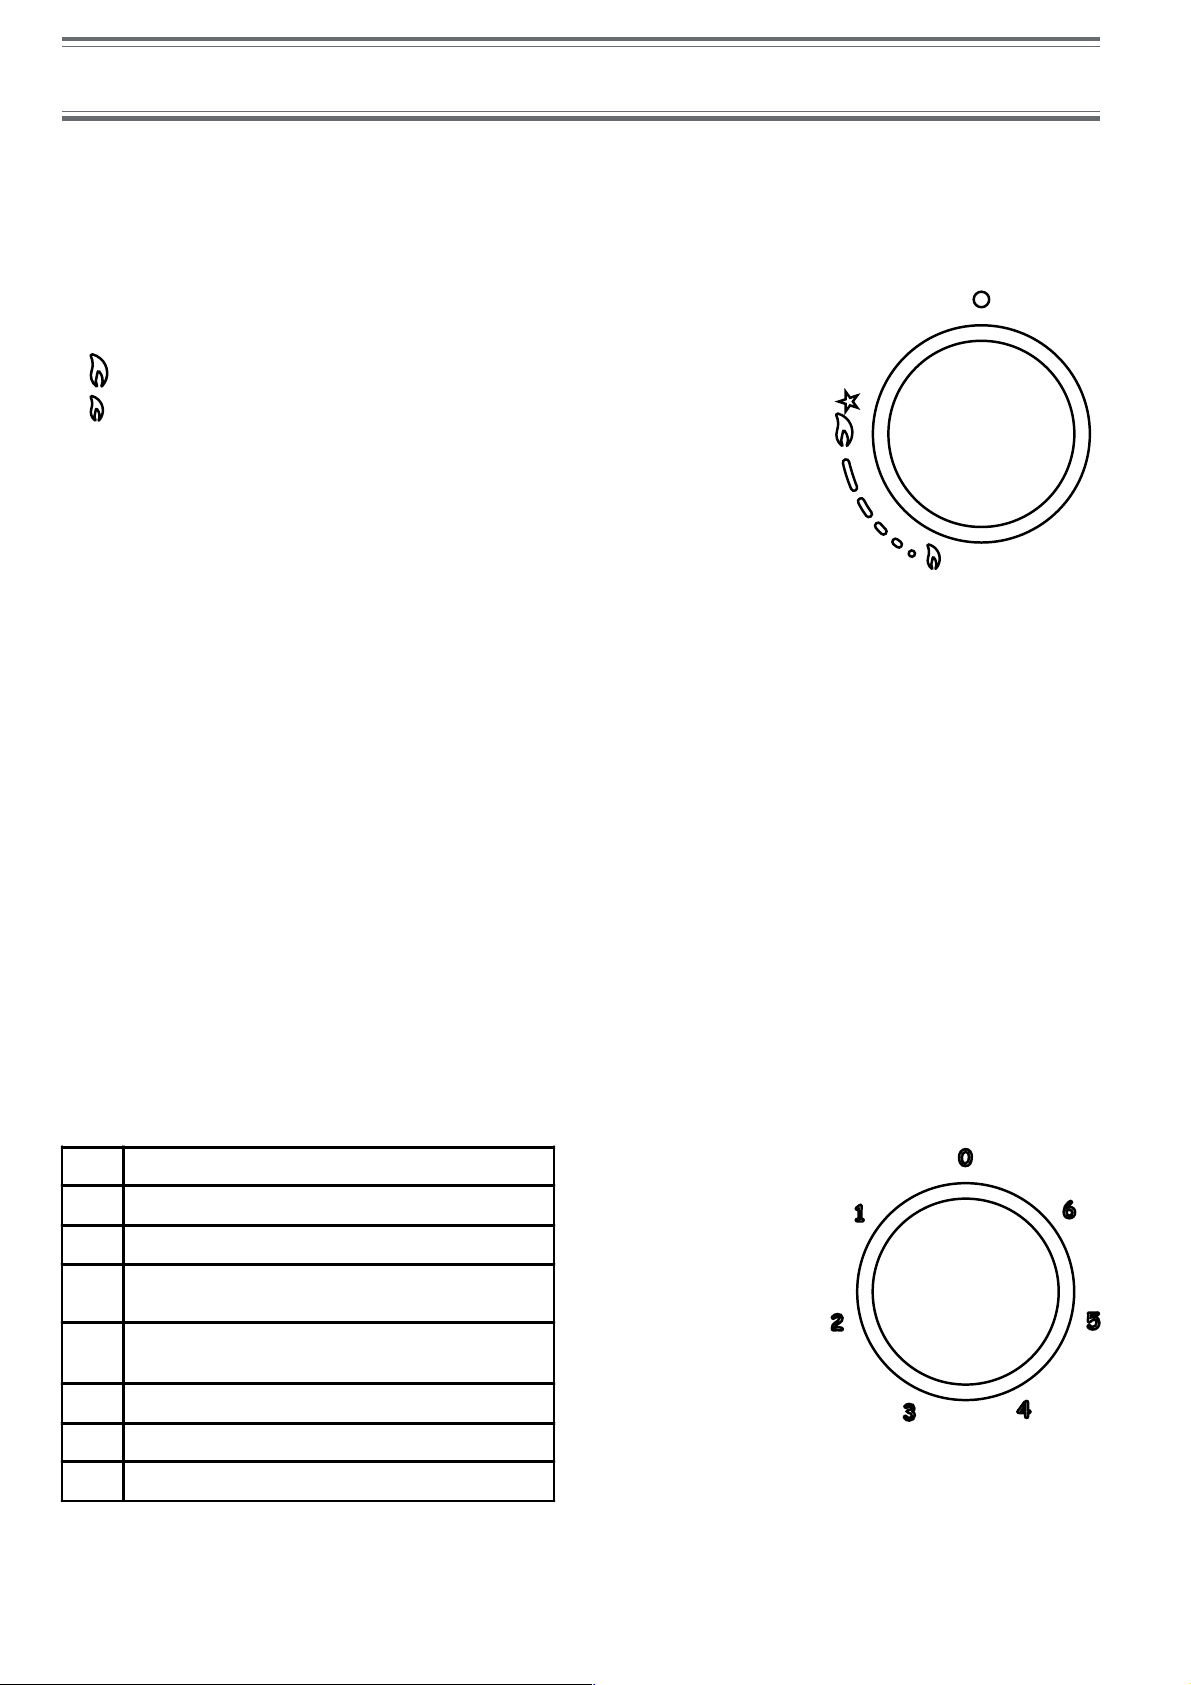
Contaminati
Il cruscotto
Tempo di cottura
STOP
Ora di fine cottura
Spia di
riscaldamento
Indicatore di
porta bloccata
Spia di funzionamento piastra elettrica
A B
Ripiano
consigliato
Regolazione
temperatura e tempo
di cottura
Manopola di selezione funzioni di
cottura
(temperature prestabilite)
Manopole di regolazione del piano cottura
La manopola A consente di regolare l’ora, la temperatura, il contaminuti, la durata e/o la fine di cottura o di pirolisi.
Tramite la manopola B è possibile selezionare le funzioni di cottura.
La regolazione dell’ora
Quando l’apparecchio viene collegato elettricamente 0:00 lampeggia sul display. Per impostare l’ora, procedere nel
modo seguente:
Note
Ruotare per
impostare l'ora
NotaNota
Nota
NotaNota
Premere per
confermare
I minuti lampeggiano ?
Ruotare per impostare i
minuti
Premere per
confermare
Per regolare l'ora, ruotare A per illuminare il
simbolo premere e quindi effettuare la stessa
procedura
L’ora può essere modificata unicamente quando il forno è spento (non durante la cottura o la programmazione).
Il contaminuti
Il contaminuti, contrassegnato dal simbolo , è indipendente dal funzionamento del forno e per impostarlo
procedere nel modo seguente:
Nota
Ruotare per illuminare il
simbolo del contaminuti
Premere per accedere
alla regolazione
Ruotare per impostare
la durata (da 0 a 23 ore
e 59 minuti)
Premere per
confermare la
regolazi one
Una sequenza di segnali acustici indica lo scadere del timer. Premere la manopola A per far cessare la suoneria.
NotaNota
Nota
NotaNota
Durante le cotture Succès non è possibile impostare il contaminuti.
- 12 -
Page 12
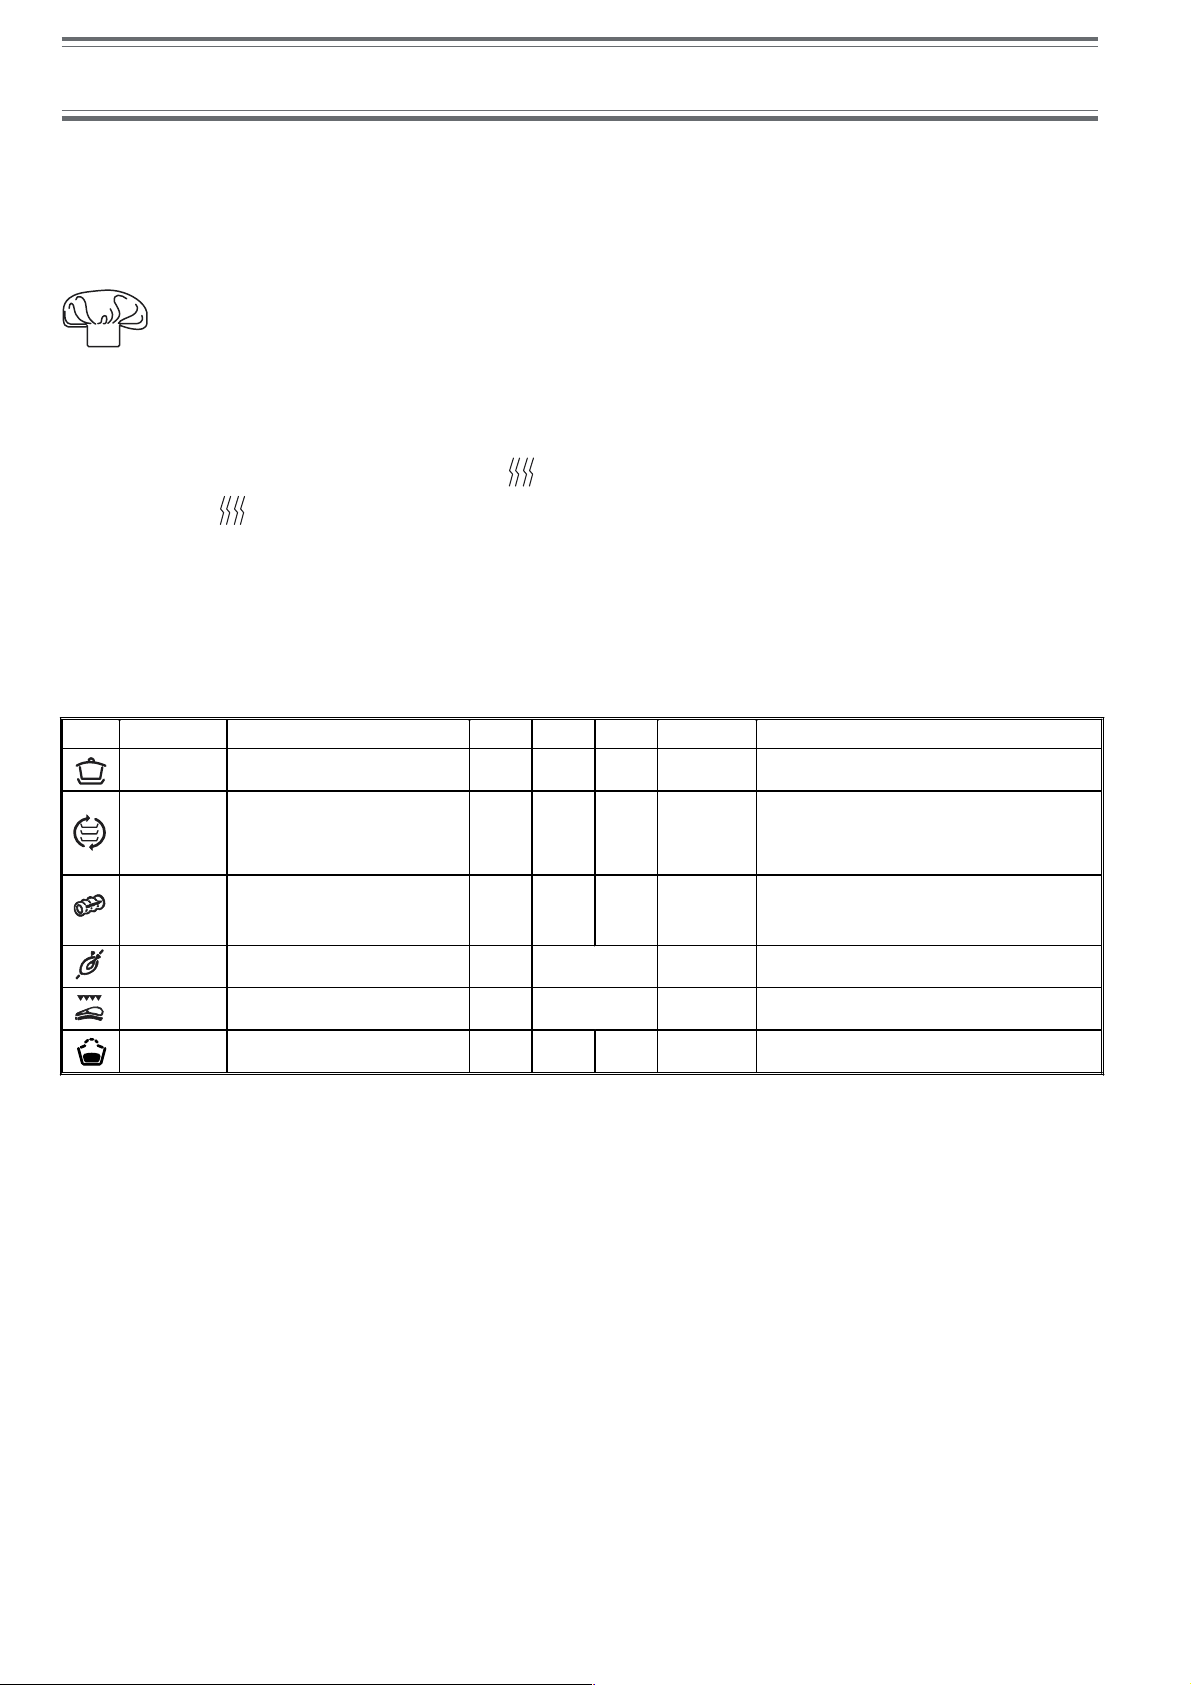
Le cotture Création
PrPr
esentazioneesentazione
Pr
esentazione
PrPr
1.1.
1.
1.1.
esentazioneesentazione
Per ciascuna cottura, il forno gestisce unicamente i parametri essenziali per la riuscita di tutte le ricette, dalle più
semplici alle più sofisticate: temperatura, fonte di calore, tasso d’umidità e circolazione forzata dell’aria sono valori
che vengono controllati automaticamente.
Questo capitolo è stato realizzato con la preziosa collaborazione del nostro esperto culinario. Invitiamo a
seguire i suoi consigli al fine di sfruttare appieno la sua esperienza e ottenere una cottura sempre perfetta.
Le funzioni di cottura, le temperature e i ripiani di posizionamento delle pietanze da selezionare sono
esattamente gli stessi da lui usati abitualmente per ottenere i migliori risultati.
Per ciascuna funzione, nella tabella seguente viene indicato se la pietanza va infornata a freddo o a caldo. Il
rispetto di queste indicazioni garantisce un risultato di cottura ottimale.
Durante la fase di preriscaldamento la spia
lampeggia. Il raggiungimento della temperatura di cottura verrà
indicata da
che rimarrà accesa senza lampeggiare.
La temperatura viene consigliata in base al tipo di cottura scelto; tuttavia è possibile modificarla per adattarla alla
specifica ricetta da realizzare (vedere pagina seguente).
È possibile anche impostare una durata di cottura con inizio immediato o ritardato (vedere pagina seguente).
2.2.
2.
Le funzioni CréaLe funzioni Créa
2.2.
Le funzioni Créa
Le funzioni CréaLe funzioni Créa
Funzione Cottura ra ccomandata per …
Tradizione
Multiliv ello
Rosticceria
Girarrosto*
Grill
Lievitazione
Nota: effettuare tutte le funzioni cottura con porta forno chiusa.
Cotture lente (backenhof, manzo
bourguignon, spezzatini, ecc.) o cotture
a bagno-maria (terrine, creme, ecc.)
Cottura con temporanea di più pietanze
su 2 o 3 livelli senza trasmissione di
odori o sapor i
Dolci non inclusi in Crostate e Brioche
(bigné, qua ttro quarti, pan di spagna,
ecc.)
Arrosti (carni bianche o rosse) e gratin 1 2 Freddo
Cottura di carni bianche o rosse 1 3 (girarrosto) Freddo Si consiglia di non superare i 200°C
Bistecche di manzo, pesci, grigliate,
gratin al piatto, ecc.
Lievitazione degli impasti con lievito
naturale (brioche, pane, torta allo
zucchero, croissant, ecc.)
tiontion
tion
tiontion
Livello
leccarda
Livello
griglia 1
2 Caldo
1 3
1
dallo spessore degli
alimenti da grigliare
2 Freddo Temperat ura (40°C) non modificabile.
Livello
griglia 2
5 (se
cottura
su 3
livelli)
Il livello dipende
Infornatura
Caldo
Caldo
Nota
Per la cottura a bagno-maria, è possibile mettere l'acqua
direttamente nella leccarda.
Se si utilizza questa funzione per una cottura singola,
inserire la leccarda sul 2° ripiano.
La temperatura consigliata garantisce una cottura perfetta
ed evita la produzione di fumo. Se la carne è stata
posizionata su un vassoio, inserire la leccarda sul 2°
ripiano. Si consiglia di non superare la temperatura di
200°C
Si consiglia di impostare la temperatura sulla posizione
MAX
Note sullo scongelamentoNote sullo scongelamento
Note sullo scongelamento
Note sullo scongelamentoNote sullo scongelamento
• Un prodotto scongelato deve essere consumato rapidamente.
• Non ricongelare mai un alimento scongelato.
• Una volta terminato lo scongelamento, estrarre l’alimento dal forno e metterlo in frigorifero in attesa di essere
cucinato o consumato entro breve tempo.
- 13 -
Page 13

Le cotture Création
3.3.
AA
3.
3.3.
4.4.
4.
4.4.
vvio di una cotturvvio di una cottur
A
vvio di una cottur
AA
vvio di una cotturvvio di una cottur
• ruotare la manopola B fino alla funzione desiderata;
• in base alla modalità di cottura scelta, viene visualizzata la temperatura consigliata e il ripiano del forno al
quale posizionare il cibo;
• Durante il preriscaldamento il simbolo
tale fase.
Modifica della temperModifica della temper
Modifica della temper
Modifica della temperModifica della temper
È possibile modificare la temperatura in qualsiasi momento.
aa
a
aa
aa
turtur
aa
a
tur
a
aa
turtur
aa
lampeggia (solo con alcune funzioni) e diventa fisso al termine di
• ruotare la manopola A
• premere la manopola A per accedere alla regolazione;
• ruotare la manopola A per aumentare o diminuire la temperatura;
• premere la manopola A per confermare la modifica.
SpeSpe
5.5.
5.
5.5.
gnimento del fgnimento del f
Spe
gnimento del f
SpeSpe
gnimento del fgnimento del f
Quando si ritiene che l’alimento sia sufficientemente cotto, riportare la manopola B in posizione 0.
oror
or
oror
finché sul display non lampeggia la temperatura;
nono
no
nono
- 14 -
Page 14
La programmazione
1.1.
PrPr
oo
gg
rr
1.
Pr
PrPr
1.1.
È possibile impostare una durata di cottura in modo tale che il forno entri in funzione immediatamente e si interrompa
automaticamente allo scadere del tempo programmato.
Selezionare una modalità di cottura, se necessario modificare la temperatura, ed effettuare le seguenti regolazioni:
ammazione di una durammazione di una dur
o
g
r
ammazione di una dur
oo
gg
rr
ammazione di una durammazione di una dur
aa
ta di cotturta di cottur
a
ta di cottur
aa
ta di cotturta di cottur
a con inizio immediaa con inizio immedia
a con inizio immedia
a con inizio immediaa con inizio immedia
toto
to
toto
1. Ruotare la manopola A
2. premere la manopola A per accedere alla regolazione della durata di cottura: sul display lampeggia 2:00
3. ruotare la manopola A per visualizzare la durata di cottura desiderata (minimo 20 minuti - massimo 9h59);
4. premere la manopola A per confermare la programmazione. La durata programmata verrà visualizzata in
alternativa con la temperatura scelta.
(1)
Per ciascuna funzione di cottura è preimpostata, per motivi di sicurezza, una durata di 2 ore. Nel caso in cui
non venga modificata il forno si spegne automaticamente trascorso tale tempo.
Esempio
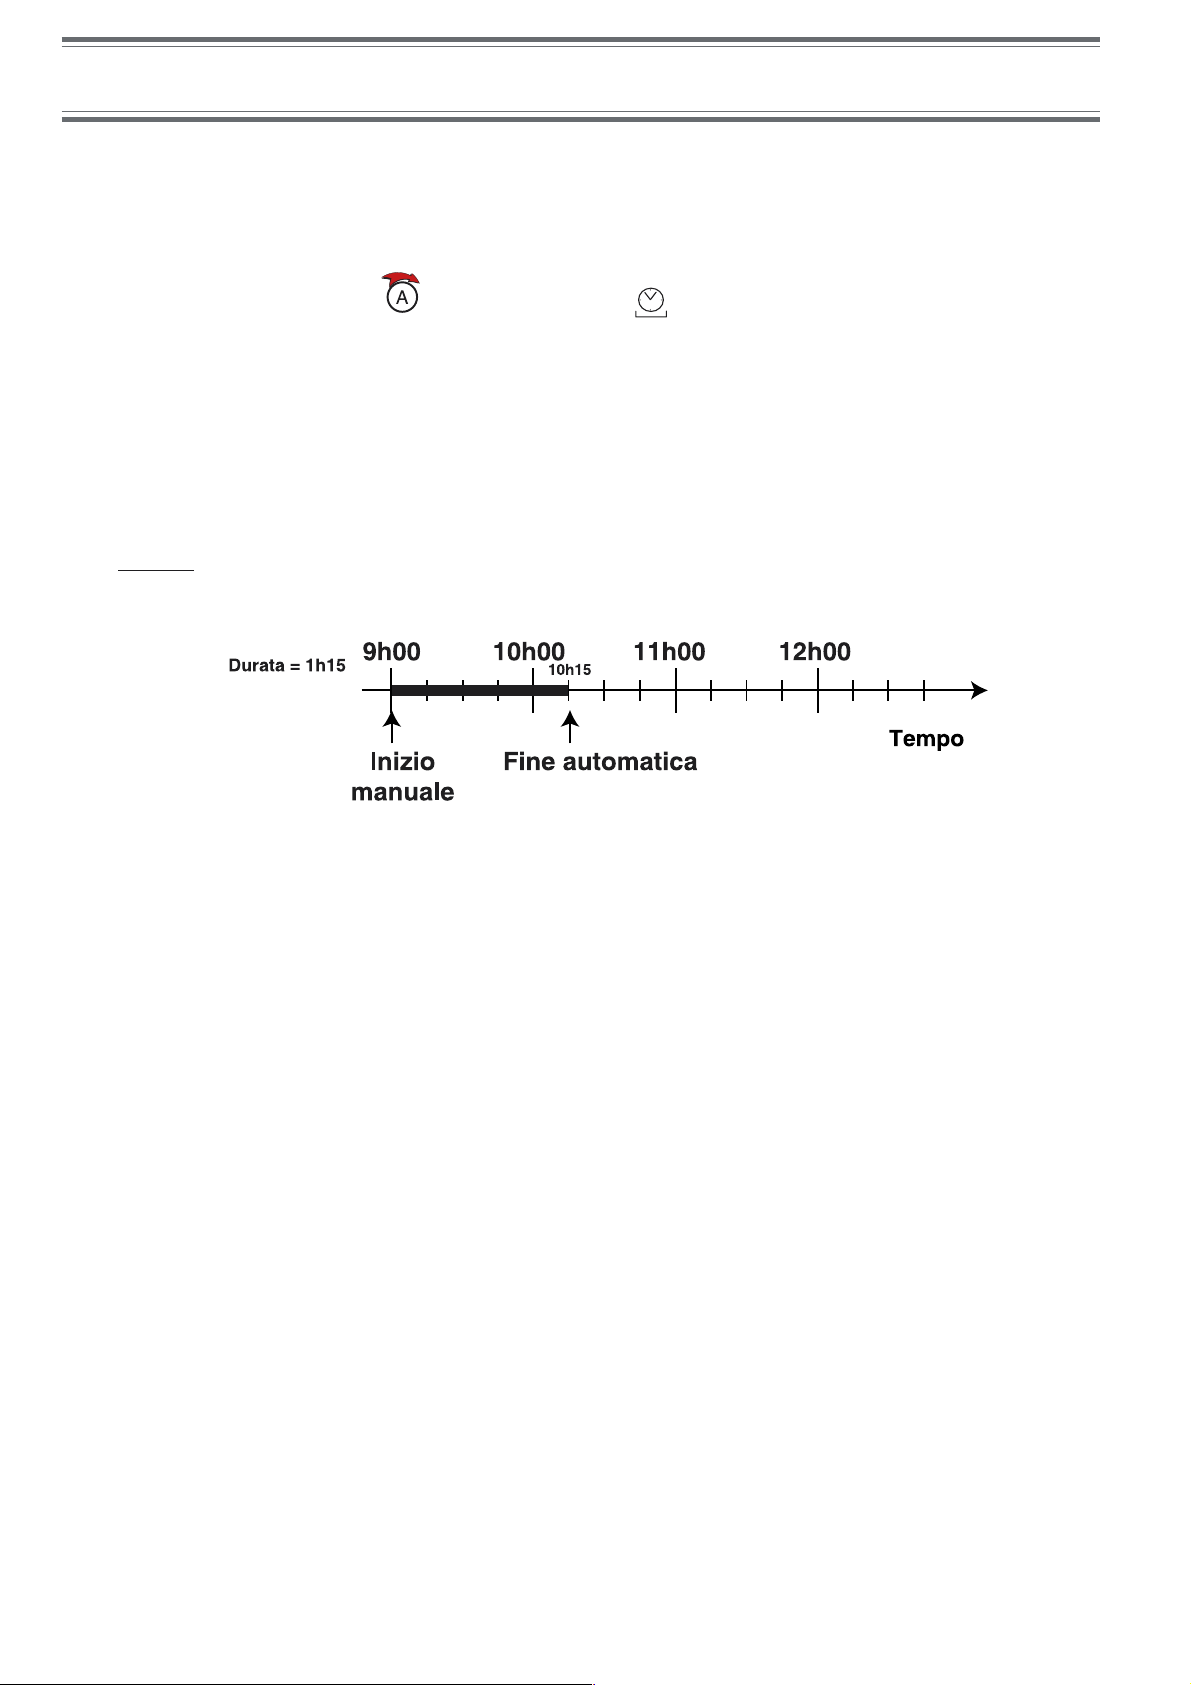
Sono le ore 9:00 e viene programmata una durata di cottura di 1 ora e 15 minuti. La cottura si arresterà
automaticamente alle ore 10:15.
La visualizzazione di «end», accompagnata da una sequenza di segnali acustici, indica che la durata programmata
è trascorsa e la cottura si interrompe.
• Premere la manopola A per interrompere i segnali acustici.
• Riportare la manopola B in posizione 0 per far scomparire la scritta «end».
per illuminare il simbolo ;
(1)
;
- 15 -
Page 15

La programmazione
PrPr
oo
gg
rr
2.2.
Pr
PrPr
2.
2.2.
È possibile programmare il forno in modo tale che la pietanza sia pronta per un orario stabilito: il programmatore
stabilisce automaticamente l’ora di inizio cottura e il forno si spegne al momento desiderato.
Esempio
Sono le ore 9:00 e si desidera che la pietanza sia pronta alle ore 12:30 sapendo che la cottura deve durare 1 ora e
15 minuti: si esegue dunque la programmazione della durata di cottura e dell’ora di fine cottura. Il forno stabilirà
automaticamente che l’avvio deve avvenire alle ore 11:15 affinché la cottura termini alle 12:30.
1° passaggio
Infornare la pietanza e selezionare una modalità di cottura. Modificare, se necessario, la temperatura e programmare
una durata di cottura nel modo seguente:
2° passaggio
Programmare l’ora di fine cottura desiderata:
ammazione di una durammazione di una dur
o
g
r
ammazione di una dur
oo
gg
rr
ammazione di una durammazione di una dur
1. Ruotare la manopola A per illuminare il simbolo
2. premere la manopola A per accedere alla regolazione della durata di cottura: la visualizzazione 2:00 lampeggia;
3. ruotare la manopola A per impostare la durata di cottura desiderata (minimo 20 minuti - massimo 9h59);
4. premere la manopola A per confermare la programmazione.La durata verrà visualizzata in alternativa con la
temperatura scelta.
1. Ruotare la manopola A per illuminare il simbolo
la cottura ha inizio immediatamente);
aa
ta di cotturta di cottur
a
ta di cottur
aa
ta di cotturta di cottur
a con inizio ritara con inizio ritar
a con inizio ritar
a con inizio ritara con inizio ritar
;
STOP
(il display indica 10h15, ossia l’ora della fine cottura, se
dada
da
dada
toto
to
toto
2. premere la manopola A per accedere alla regolazione dell’ora di fine cottura desiderata;
3. ruotare la manopola A per impostare l’ora di fine cottura.
4. premere la manopola A per confermare la programmazione. L'ora di fine verrà visualizzata in alternanza con
la temperatura scelta.
La cottura inizierà alle 11:15 e terminerà alle 12:30.
La visualizzazione di «end», accompagnata da una sequenza di segnali acustici, indica che la durata programmata
è trascorsa e la cottura si interrompe.
• Premere la manopola A per interrompere i segnali acustici.
• Riportare la manopola B in posizione 0 per far scomparire la scritta «end».
- 16 -
Page 16

Le cotture Succès
PrPr
esentazioneesentazione
Pr
esentazione
PrPr
1.1.
1.
1.1.
2.2.
2.
2.2.
esentazioneesentazione
Il programma Succès comprende tutte le cotture automatiche realizzate e impostate dal nostro chef.
Tutte le funzioni Succès sono completamente automatiche: la temperatura e la durata di cottura sono prestabilite
e non possono essere modificate tramite il sistema C.O.P.® (Cottura Ottimale Programmata) che garantisce
automaticamente un risultato perfetto. La cottura si interrompe automaticamente e il forno avvisa quando la pietanza
è cotta (solamente la funzione "Pizzeria" richiede una valutazione finale da parte dell'utente).
Questo capitolo è stato realizzato con la preziosa collaborazione del nostro esperto culinario. Invitiamo a
seguire i suoi consigli al fine di sfruttare appieno la sua esperienza e ottenere una cottura sempre perfetta.
Le funzioni di cottura, le temperature e i ripiani di posizionamento delle pietanze da selezionare sono
esattamente gli stessi da lui usati abitualmente per ottenere i migliori risultati.
La cottura può essere effettuata infornando a freddo o a caldo. Il nostro esperto culinario consiglia, quando possibile,
di infornare a freddo.
Le funzoni Succès hanno una durata prestabilita. Per ottenere i migliori risultati è consigliabile infornare appena
selezionato il programma desiderato.
Le funzioni SuccèsLe funzioni Succès
Le funzioni Succès
Le funzioni SuccèsLe funzioni Succès
Funzione Cottura raccomandata per …
Cr ostate
Plum-cake
Brioche
Torte salate o dolci (pasta sablée, pasta
frolla o pasta sfoglia)
Dolci a base di lievito chimico (quattro
quarti, biscotti marezzati, ecc.)
Dolci a base di lievito naturale (brioche,
dolce alle mandorle,ecc.)
Livello
leccarda
2
2
2
Infornatura Nota
Per una cottura multipla,
posizionare la leccarda sul 1°
Freddo
ripiano e le griglie sul 3° e 5°
ripiano. Se il forno è già caldo,
è possibile infornare a caldo.
- 17 -
Page 17

Le cotture Succès
3.3.
3.
3.3.
AA
vvio di una cotturvvio di una cottur
A
vvio di una cottur
AA
vvio di una cotturvvio di una cottur
I valori di Durata e Temperatura sono prestabiliti (non modificabili).
• ruotare la manopola B fino alla funzione desiderata;
• Selezionata la cottura Succés desiderata sul display appare la scritta "AUTO" lampeggiante per circa 10
secondi.
• In seguito il display mostra il tempo rimanente per la fine della cottura.
SpeSpe
gnimento del fgnimento del f
Spe
gnimento del f
SpeSpe
gnimento del fgnimento del f
Una serie di segnali acustici indicano la fine della cottura.
NONO
TT
AA
NO
T
A
NONO
TT
AA
Se non si interviene manualmente per lo spegnimento, il forno si spegnerà unicamente quando la temperatura sarà
sufficientemente bassa.
a Succèsa Succès
a Succès
a Succèsa Succès
oror
nono
or
no
oror
nono
Disinserimento "Demo Mode"
• Premere due volte la manopola A
• Ruotare in senso antiorario la manopola A e poi in senso orario la manopola A
• Premere la manopola A
- 18 -
Page 18

Gli accessori
Il forno dispone di 5 livelli di posizionamento delle pietanze (ripiani da 1 a 5, numerati dal basso verso l’alto) in
funzione della cottura da realizzare.
Per ottenere risultati di cottura ottimali il display visualizza il ripiano consigliato.
La leccarLa leccar
La leccar
La leccarLa leccar
Viene utilizzata:
• come piano di appoggio per qualsiasi recipiente di cottura su un solo livello e a bagno-maria sul 2°
ripiano;
• come piano di appoggio per gli alimenti (torte, crostate, bignè, ecc.) sul 2° ripiano;
• come contenitore di raccolta dei sughi e grassi di cottura abbinata a una griglia (carni, pesci, ecc.); in
questo caso, verrà sempre posizionata sul 1° ripiano;
• come piano di appoggio di recipienti o alimenti per una cottura su più livelli; in questo caso, viene posizionata
sul 1° ripiano.
Si sconsiglia di utilizzare la leccarda sui ripiani 4 e 5.
Le gLe g
rigrig
Le g
rig
Le gLe g
rigrig
Vengono utilizzate:
• come piano di appoggio di recipienti per una cottura multipla (3° ripiano per una cottura su 2 livelli e 3° e 5°
ripiano per una cottura su 3 livelli);
• come piano di appoggio della carne o del pesce abbinate alla leccarda per il recupero dei sughi di cottura; in
questo caso, la griglia verrà posizionata sul 2° ripiano;
• come piano di appoggio di cibi da scongelare abbinata alla leccarda per il recupero dei liquidi; in questo caso,
verrà posizionata sul 2° ripiano.
NONO
TT
NO
T
NONO
TT
Per la cottura di cibi di notevole peso (superiore a 8 kg), si raccomanda l’uso della leccarda.
Il girIl gir
Il gir
Il girIl gir
Il girarrosto è composto da un supporto, uno spiedo e un manico.
AA
A
AA
arar
ar
arar
lielie
lie
lielie
rr
ostoosto
r
osto
rr
ostoosto
dada
da
dada
Procedere nel modo seguente:
• Posizionare il supporto del girarrosto (A) sul 3° ripiano;
• infilare lo spiedo al centro del pezzo di carne da arrostire e
posizionare quest’ultimo in un punto equidistante dalle estremità
dello spiedo (B);
• fissare la carne tramite le forchette (C);
• fissare le forchette nella carne con le viti (D);
• posizionare lo spiedo sul supporto, incastrando a fondo
l’estremità posteriore dello spiedo nel foro situato sul retro del
vano.
Il manico estraibile in materiale isolante consente di evitare ustioni quando si estrae la pietanza al termine della
cottura. Durante la cottura il manico deve essere svitato.
Inserire una leccarda sul 1° ripiano per il recupero dei sughi di cottura e posizionare il supporto del girarrosto sul 3°
ripiano.
Vite
(D)
Spiedo
(B)
Vite
(D)
Manico dello spiedo (D)
Parete posteriore
Forchetta
(C)
Supporto del
girarrosto
(A)
- 19 -
Page 19

Tabelle di abbinamento
g
piatti/funzioni di cottura
Le seguenti tabelle forniscono utili informazioni per la scelta della funzione di cottura adatta alla pietanza da infornare.
La durata di cottura deve essere stabilita in base alla ricetta da eseguire in quanto dipende dalla quantità e dal
volume della pietanza.
PIETANZE ESEMPI FUNZIONE TEMPERATURA SUPPORTI
Torte salate e pasticci
(pasta frolla o pasta sfoglia)
Pizze alte con impasto di pane
(o surgelate)
Pizze (altro impasto) Crostate 220 °C tortiera su leccarda
Plum-cake salati plum-cake alle olive, al tonno, ecc.
Torte rustic he torte rus tiche al formaggio, pa sticcio al salmone,…
Terrine terrine di pesce, carne, verdure, foie gras, ecc. Tradizione 160 °C
PRIME PORTATE
I LEGUMI
Tegamino
Soufflé soufflé a l formaggio, alle verdure, al pesce, ecc. Multilivello 200 °C tortiera su leccarda
Pietanze da gratinar e ostriche farc ite, t oast, e cc. Grill 250 °C
Cibi al gratin gratin di patate, zuppa parmentier, lasagne, ecc.
Verdure farcite patate, pomodori, zucchine, cavoli, ecc. Multilivello 200 °C
Verdure brasate in cocotte lattuga, carote allo zafferano, scorzobianca, ecc. Tradizione 200 °C cocotte su leccarda
Flan flan ai funghi, frittelle di verdura, ecc. Tradizione 160 °C
Terrine terrine di verdure Tradizione 160 °C
Soufflé soufflé d'asparagi, al pomodoro, ecc. Multilivello 200 °C tortiera su leccarda
Pietanze in pastella pasticcio di verdur e, ecc. Multilivello 200 °C su leccarda
Cartoc cio tartuf i, ecc. Multilive llo 20 0 °C carto ccio su lec carda
Riso Pilaf Tradizione 180 °C vassoio su piastra
quiche lorraine, torta ai porri, ecc. Crostate 220 °C tortiera su le ccarda
pizze, focacce Brioche 220 °C su lecc arda
pasticci di fegato di volatile, purè di salmone, uova
in cocotte, ecc.
dolci
(o multilivello)
dolci
(o multilivello)
Tradizione 160 °C
gratin
(o rosticceria)
160 °C tortiera su leccarda
200 °C su lecc arda
stampo da ter rine su lecca rda
(bagno-maria con acqua già
tegamino su leccarda (bagno-
maria con acqua già calda)
o vassoio su griglia
200-210 °C vassoio su leccarda
o tortiera su leccarda
amino o t ortiera su leccarda
te
(bagno-maria con acqua già
tortiera su leccarda (bagno-
maria con acqua già calda)
calda)
su griglia
su leccarda
calda)
PIETANZE ESEMPI FUNZIONE TEMPERATURA SUPPORTI
Volatili ar rosto pollo, anatra, galletto, cappone,. Rosticceria 210 °C volatile su griglia
Volatili allo spie do pollo, galletti Girarrosto 250 °C sup porto per girarrosto
Arrosti
grossi pezzi brasati
Sauté di carne in cocottee
pietanze tradizionali
LE CARNI
Filetti di pesce (con aggiunta di
Pesce in pastella (pasta sfoglia
I PESCI
Grigliate
Carni in pastella
Pietanze in pastella di sale volatili in pastella di sale, ecc. Multilivello 24 0 °C
Pesci alla griglia e spiedini spigola, sgombro, sardina, triglia, tonno, ecc. Grill 250 °C
Pesci interi (farciti) orata, carpa, ecc. Multilivello 200 °C su leccarda
vino o altro liquido)
Cartoccio sogliola, lima nda, conchigli e di saint jacques, ecc. Multil ivello 200 °C su leccarda
o pasta frolla)
Pesce al gratin me rluzzo alla provenzale gratina to, ecc.
Soufflé con chiglie di s aint jacques, ecc. Multilivello 200 °C tortiera s u leccarda
Pesci in pastella di sale spigola, carpa, ecc. Multilivello 240 °C
arrosto di maiale, di vitello, di tacchino, roast-beef,
coscia d'agnello, coscia di capriolo, petto farcito di
cosciotto intero brasato, cappone o tacchino
manzo bourguignon, coniglio alla cacciatora, sauté
di vitello Marengo, stufato d'agnello, pollo alla
basca, ecc.backenhof, terrine, ecc.
bistecche, braciole, salsicce da grigliare, spiedini,
filetto di manzo Wellington, cosciotto in pastella,
salmone , scorf ano, merluzzo, spigola, ecc. Tradizion e 200 °C su leccarda
vitello, ecc.
grande, ecc.
cosce di pollo, ecc.
ecc.
salmone, spiedino, ecc. Multilivello 200 °C su leccarda
Rostic ceria 210 °C carne su griglia
Multilivello
Tradizione 190 °C cocotte su leccarda
Grill 250 °C
Multilivello 200 °C
gratin(o rostic ceria )
(grill per rosolatura)
180 °C(a un terzo
della cot tura,
abbassare a 160 °C)
200-210 °C
260 °C
carne su lecc ardabagnare a
intervalli regolari con il sugo di
su griglia (ripiano in funzione
su leccarda (per pez zi grandi,
abbassare a 160 °C dopo la
carne su lecc arda o vassoio su
su griglia (ripiano in funzione
vassoio su leccarda (o griglia
pesce su leccarda o vassoio su
cottura
dello spessore)
cottura della pastella)
leccarda
dello spessore)
per rosolatura al grill)
leccarda
- 20 -
Page 20

Tabelle di abbinamento
piatti/funzioni di cottura
DOLCI DI PASTICCERIA
PASTICCINI
ENTRE
FRUTTA
PIETANZE ESEMPI FUNZIONE TEMPERATURA SUPPORTI
Biscotti (senza lievito)
Plum-cake e quattro quarti (con
lievito chi mico)
Crostate alla frutta (pasta frolla
o pasta sfoglia, con o senza
Torte al formaggio bianco Crostate 200 °C tortiera su leccarda
Crostate in pasta lievitata
Cottura di basi per crostate
Pasticci (pa sta sfo glia o pasta
Piccoli dolci di pasticceria
Dolci di pasticceria grandi
Amaretti, palline di cocco amaretti alla noce di cocco o alla mandorla dolci (o multilivello) 180 °C su leccarda
Creme e flanDolci di semola
METS
Frutta farcita o al cartoccio mele al forno, ecc. Multilivello 200 °C tortiera o cartoccio su leccarda
Gratin di frutta (con zabaione) gratin di frutta fresca Grill 250 ° C vassoio su griglia
flan)
(pasta sablée)
frolla)
bigné
Pasta sfoglia panzerot ti alle m ele, torte rustiche, p asticci, ecc. dolci (o m ultilivello) 200 °C su leccarda
(lievito naturale)
(lievito naturale)
Pasta da biscotti
Pasta sablée frollini, biscotti spritz, biscottini secchi, ecc. dolci (o m ultilivello) 200 °C su leccarda
Pasta sfoglia dolci sfo gliati di vario tipo, ecc. dolci (o multilivello) 200 °C su lecc arda
Pasta lievitata mini-brioche, mini-croissant, ecc. Brioche 180 °C su leccarda
Meringhe bianche
Meringhe ambrate
Pudding pudding a base di pane o brioche, pudding al riso dolci (o multilivello) 19 0 °C tortiera su leccarda
Dolci al riso riso alla condé, riso imperatrice, ecc. dolci (o multilivello) 180 °C tort iera su leccarda
Soufflé sou fflé al liqu ore, souff lé alla frutta, ecc. dolci (o multilivello) 200 °C tortiera s u leccarda
pan di spagna, savoiradi, biscotti arrotolati,
plum-cake alla frutta, marezzati, quattro quarti,
crostate di mele, mirabe lle, pere, e cc. Crostate 220 °C tortiera s u leccarda
crostate a llo zucchero, torte d i pane briosciato al la
crostate alla frutta cruda (fragole, lamponi, ecc.) Crostate 180 °C
profiterol, piccoli bigné, bigné, paris brest, saint
croissant, crostate allo zucchero, brioche vuote,
kougloff, brioche, panettone, pane dolce,... Brioche 160 °C
biscotti in vassoietti di carta, biscotti al cucchiaio,
crème c aram el, crème brûl ée, flan al cioccolato,
Brownie,
ecc.
frutta
pasticci alle pere, ecc. Crostate 220 °C tortiera su leccarda
honoré, ecc.
piccoli savarin, ecc.
ecc.
ecc.
dolci (o m ultilivello) 200 °C tortiera su lecca rda
dolci (o m ultilivello) 160 °C tortiera su lecca rda
Brioche 180 °C tortiera su leccarda
tortiera su leccarda(fagiolo
secchi in pasta)
dolci (o m ultilivello) 190 °C su leccarda
Brioche 180 °C su leccarda
su leccarda o tortiera s u
dolci (o m ultilivello) 180 °C su leccarda
meringhe bianche(o
multilivello)
meringhe ambrate(o
multilivello)
dolci (o m ultilivello) 160 °C
70 °C su leccard a
110 °C su lecc arda
Stampi o tegamino su leccarda
(bagno-maria su leccarda)
leccarda
PIETANZE ESEMPI FUNZIONE TEMPERATURA SUPPORTI
Yogurt Tradizione 50 °C tegamino su leccarda
Cibi secc hi
Sterilizzazione vasetto di frutta sciroppata, ecc.
VARIE
Riscaldamento delle pietanze
Pane casalingo Multiliv ello
funghi, erbe, frutta o verdura a fette, ecc.
piatti precotti (in casa o di produzione
industriale)
Multiliv ello 60 °C su griglia
sterilizzaz ione
(o multiliv ello)
Riscaldamento delle pietanze
(o multiliv ello)
130 °C vas etti su lecca rda
140 °C v assoio su leccarda
250 °C per 10 minuti
210 °C f ino a f ine
cottura
su leccarda
- 21 -
Page 21

Pirolisi
1.1.
1.
Utili accorUtili accor
Utili accor
1.1.
Utili accorUtili accor
• Eliminare lo sporco accumulato in eccesso e gli scolamenti più consistenti, per evitare che si producano
fiamme o che si sprigioni fumo.
• Estrarre tutti gli accessori dal forno prima di eseguire un’operazione di pirolisi. Sotto l’effetto di una
temperatura particolarmente elevata, essi possono subire una deformazione e un cambiamento del colore.
• Non lasciare strofinacci sulla maniglia del forno.
• Nel caso in cui la temperatura nella zona dei componenti elettrici dell'apparecchio abbia raggiunto un valore
di sicurezza, non è possibile far partire la Pirolisi. Il display visualizzerà la scritta "HOT". Attendete lo spegnimento
della ventola di raffreddamento prima di far ripartire la Pirolisi.
• Avvertenza: per ottenere i migliori risultati di pulizia, si consiglia di eseguire la pirolisi con il piano
cottura spento.
2.2.
2.
FunzionamentoFunzionamento
Funzionamento
2.2.
FunzionamentoFunzionamento
Ruotare la manopola B verso destra fino alla posizione .
Il ciclo di pulizia automatica entra in funzione per una durata preimpostata di 1 h30.
• È tuttavia possibile
Procedere come segue:
1. ruotare la manopola A per impostare la durata desiderata;
2. premere la manopola A per confermare la programmazione.
• È possibile anche programmare una durata di pirolisi con inizio ritardato (vedere paragrafo "programmazione
di una cottura con inizio ritardato").
gimenti prima di una pirgimenti prima di una pir
gimenti prima di una pir
gimenti prima di una pirgimenti prima di una pir
modificare la durata del ciclo (da1h00 a 2h00) a seconda del grado di sporcizia del forno.
olisiolisi
olisi
olisiolisi
Una volta raggiunta una temperatura sufficientemente elevata all’interno del forno,
si accende automaticamente. Da questo istante non è più possibile modificare le impostazioni di dutata, fine e timer.
Quando la temperatura del forno sarà scesa opportunamente, la porta si sbloccherà e la spia
Un segnale acustico, accompagnato dalla visualizzazione di “end”, indica la fine del ciclo.
• Premere la manopola A per interrompere i segnali acustici.
• Riportare la manopola B in posizione 0 per far scomparire la scritta «end».
ImporImpor
3.3.
Impor
ImporImpor
3.
3.3.
Dopo la pirolisi, attendere il completo raffreddamento dell’apparecchio prima di rimuovere con una spugna umida
i depositi di polvere dovuti all’incenerimento dei residui alimentari.
Per velocizzare i tempi di preriscaldamento ed ottenere un sensibile risparmio di energia, si raccomanda di avviare
una pirolisi immediatamente dopo una cottura.
tanti atanti a
tanti a
tanti atanti a
• Le parti accessibili possono diventare molto calde; tenere i bambini a distanza.
• Evitare di raschiare lo smalto con oggetti taglienti (ad esempio, un coltello)
• Non utilizzare detergenti o prodotti abrasivi.
• Durante la pulizia del forno, evitare qualsiasi infiltrazione di liquido nelle asole della porta.
• Attraverso il vetro della porta forno è possibile notare alcune particelle che si illuminano durante la loro
carbonizzazione per pirolisi entrando in contatto con le resistenze: si tratta di una combustione istantanea,
fenomeno assolutamente normale che non comporta alcun pericolo.
vvvv
vv
vvvv
erer
er
erer
tenztenz
tenz
tenztenz
e:e:
e:
e:e:
la porta si blocca e la spia
si spegnerà.
- 22 -
Page 22

COSA FARE SE …
......
dal f dal f
oror
...
dal f
......
dal f dal f
• verificare che sia stata selezionata la funzione idonea rispetto al tipo di cottura desiderata;
• verificare che la temperatura visualizzata (se modificata dall’utente) non sia troppo elevata;
• ispezionare lo stato di sporcizia del forno e valutare l’eventualità di una pulizia: i residui alimentari,
carbonizzando, possono sprigionare fumo e odori acri.
......
la v la v
...
la v
......
la v la v
• la ventola si arresta automaticamente quando la temperatura all’interno del forno è opportunamente scesa.
... il display visualizza un codice del tipo ERxx... il display visualizza un codice del tipo ERxx
... il display visualizza un codice del tipo ERxx
... il display visualizza un codice del tipo ERxx... il display visualizza un codice del tipo ERxx
Il forno è dotato di un sistema di autotest: in presenza di un’anomalia di funzionamento, il display visualizza un
codice a due cifre di questo tipo:
Rivolgersi al proprio rivenditore o a un centro di assistenza tecnica autorizzato (vedere Guida tecnica) comunicando:
• il codice commerciale e il numero di matricola dell’apparecchio (riportati sul documento di garanzia);
• il codice di errore visualizzato.
no si sprigiona molto fumo:no si sprigiona molto fumo:
or
no si sprigiona molto fumo:
oror
no si sprigiona molto fumo:no si sprigiona molto fumo:
entola del fentola del f
entola del f
entola del fentola del f
oror
or
oror
no rno r
esta in funzione quando la cotturesta in funzione quando la cottur
no r
esta in funzione quando la cottur
no rno r
esta in funzione quando la cotturesta in funzione quando la cottur
-4NN-4NN
-4NN.
-4NN-4NN
a è tera è ter
a è ter
a è tera è ter
minamina
mina
minamina
ta:ta:
ta:
ta:ta:
- 23 -
Page 23

From the charcoal stoves of long ago to modern-day digital cooking, Scholtès has preserved that
particular "hand-made" spirit which has been its star asset and strength for over 80 years.
Every Scholtès appliance is a successful blend of highly stylish aesthetic appeal and unquestionable
technological contents, offering high performance levels and the utmost innovation.
This document was written in conjunction with our very own culinary expert, the professional chef
Philippe Rogé, who works as part of the company's Research and Development Department.
As you read through this manual, you will come across some practical advice, which we invite you to
follow, in order to benefir fully from his experience and to get perfect results, every time.
The User's Guide simply illustrates the various features of the new appliance in detail. It also contains
some cooking advice, which should help you use your oven to its full potential.
The User's Guide provides all the information necessary for the smooth installation, electrical
connection and maintenance of the appliance, along with any recommendations.
Enjoy cooking with SCHOLTES
- 24 -
Page 24

Table of contents
Important .............................................................................................................................. 26
Installation instructions ..................................................................................................27-29
Burner and nozzle specifications ....................................................................................... 30
Hob ........................................................................................................................................ 31
Suitable cookware ...............................................................................................................32
Technical Specifications ..................................................................................................... 32
Routine maintenance and cleaning....................................................................................33
Control panel........................................................................................................................ 34
Setting the time .................................................................................................................... 34
Timer ..................................................................................................................................... 34
Cooking with Création ....................................................................................................35-36
Programming .................................................................................................................. 37-38
Cooking with Succès ......................................................................................................39-40
Disabling "Demo Mode" ...................................................................................................... 40
Accessories ......................................................................................................................... 41
Cooking mode/dish combination tables .......................................................................42-43
Pyrolysis ............................................................................................................................... 44
TROUBLESHOOTING ..........................................................................................................45
- 25 -
Page 25

Important
To maintain the EFFICIENCY and SAFETY of this appliance, we recommend:
• call only the Service Centers authorized by the manufacturer
• always use original Spare Parts
1 This appliance is intended for non-professional use within the home.
2 These instructions are only for those countries whose symbols appear in the booklet and on the serial no. plate of the
appliance.
3 This owner’s manual is for a class 1 appliance (installed independently) or class 2, subclass 1 appliances
(installed between two cabinets).
4 Before using your appliance, read the instructions in this owner’s manual carefully since it provides all the information
you need to ensure safe installation, use and maintenance. Always keep this owner’s manual close to hand since you may
need to refer to it in the future.
5 When you have removed the packing, check that the appliance is not damaged. If you have any doubts, do not use the
appliance and contact your nearest Ariston Service Centre. Never leave the packing components (plastic bags, polystyrene
foam, nails, etc.) within the reach of children since they are a source of potential danger.
6 The appliance must be installed only by a qualified technician in compliance with the instructions provided. The manufacturer
declines all liability for improper installation, which may result in personal injury and damage to property.
7 The electrical safety of this appliance can only be guaranteed if it is correctly and efficiently earthed, in compliance with
regulations on electrical safety. Always ensure that the earthing is efficient. If you have any doubts, contact a qualified
technician to check the system. The manufacturer declines all liability for damage resulting from a system which has not
been earthed.
8 Before plugging the appliance into the mains, check that the specifications indicated on the date plate (on the appliance
and/or packaging) correspond with those of the electrical and gas systems in your home.
9 Check that the electrical capacity of the system and sockets will support the maximum power of the appliance, as
indicated on the data plate. If you have any doubts, contact a qualified technician.
10 An omnipolar switch with a contact opening of at least 3 mm or more is required for installation.
11 If the socket and appliance plug are not compatible, have the socket replaced with a suitable model by a qualified
technician, who should also check that the cross-section of the socket cable is sufficient for the power absorbed by the
appliance. The use of adaptors, multiple sockets and/or extensions, is not recommended. If their use cannot be avoided,
remember to use only single or multiple adapters and extensions which comply with current safety regulations. In these
cases, never exceed the maximum current capacity indicated on the individual adaptor or extension and the maximum
power indicated on the multiple adapter.
12 Do not leave the appliance plugged in if it is not in use. Switch off the main switch and gas supply when you are not using
the appliance.
13 The openings and slots used for ventilation and heat dispersion on the back and below the control panel must never be
covered.
14 The user must not replace the supply cable of this appliance. Always contact an after-sales service centre which has
been authorised by the manufacturer if the cable has been damaged or needs replacement.
15 This appliance must be used for the purpose for which it was expressly designed. Any other use (e.g. heating rooms) is
considered to be improper and consequently dangerous. The manufacturer declines all liability for damage resulting from
improper and irresponsible use.
16 A number of fundamental rules must be followed when using electrical appliances. The following are of particular importance:
• Do not touch the appliance when your hands or feet are wet.
• Do not use the appliance barefooted.
• Do not use extensions, but if they are necessary, caution must be exercised.
• Never pull the power supply cable or the appliance to unplug the appliance plug from the mains.
• Never leave the appliance exposed to atmospheric agents (rain, sun etc.).
• Do not allow children or persons who are not familiar with the appliance to use it, without supervision.
17 Always unplug the appliance from the mains or switch off the main switch before cleaning or carrying out maintenance.
18 If you are no longer using an appliance of this type, remember to make it unserviceable by unplugging the appliance from
the mains and cutting the supply cable. Also make all potentially dangerous parts of the appliance safe, above all for
children who could play with the appliance.
19 To avoid accidental spillage do not use cookware with uneven or deformed bottoms on the burners. Turn the handles of
pots and pans inwards to avoid knocking them over accidentally.
20 Some parts of the appliance remain heated for a long time after use. Make sure not to touch them.
21 Never use flammable liquids such as alcohol or gasoline, etc. near the appliance when it is in use.
22 When using small electric appliances near the hob, keep the supply cord away from the hot parts.
23 Make sure the knobs are in the “•”/”o” position when the appliance is not in use.
24 When the appliance is in use, the heating elements and some parts of the oven door become extremely hot. Make sure
you don't touch them and keep children well away.
25 Gas appliances require regular air exchange to ensure trouble-free performance. When installing the cooker,
follow the instructions provided in the paragraph on “Positioning” the appliance.
26 Some of the models have a glass hob cover. This could crack if overheated so make sure all the burners or electric hot
plates are off before closing it.
27 If the cooker is placed on a pedestal, take the necessary precautions to prevent the same from sliding off the pedestal
itself.
28 Warning: never place hot containers or items and flammable materials inside the dishwarmer drawer.
29 The internal surfaces of the compartment (where present) may become hot.
- 26 -
Page 26
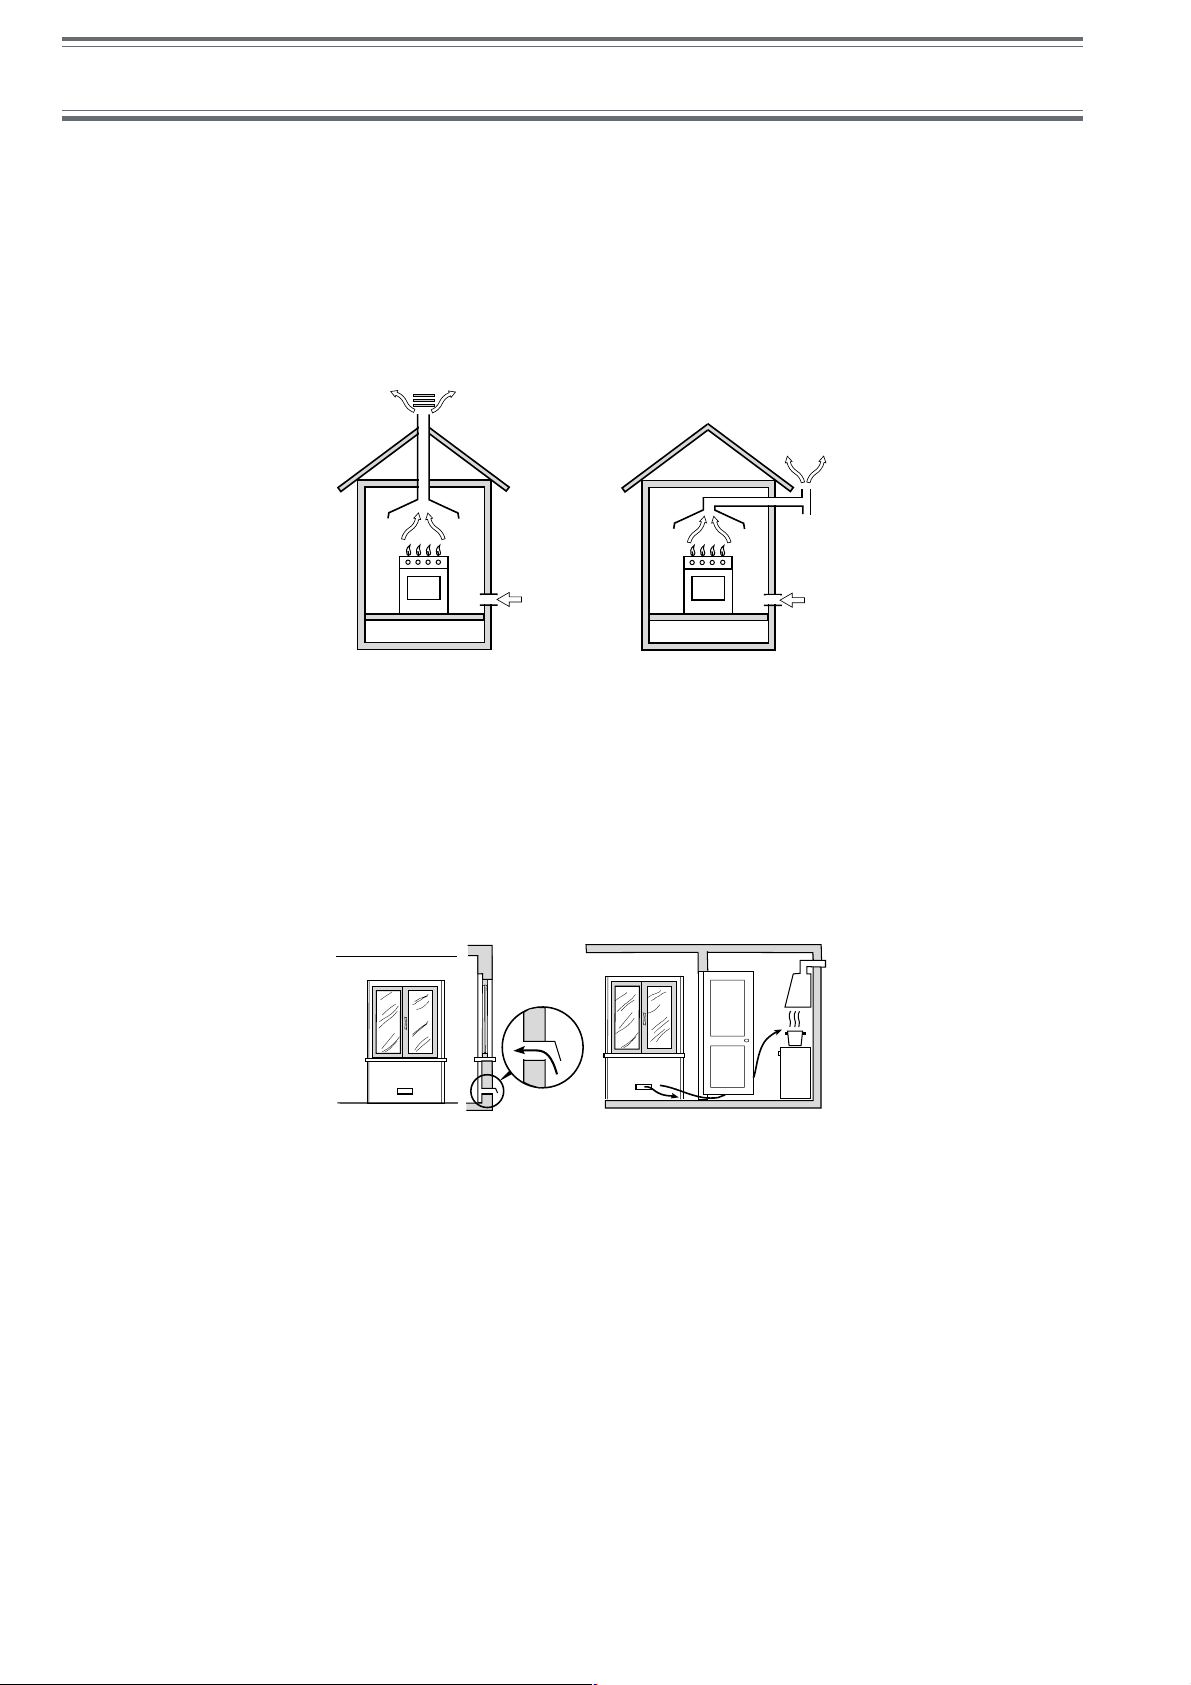
Installation
The following instructions should be read by a qualified technician to ensure that the appliance is installed, regulated and
serviced correctly in compliance with current standards.
Important: Remember to unplug the appliance from the mains before making adjustments or doing maintenance.
PP
ositioningositioning
P
ositioning
PP
ositioningositioning
Important: This unit may be installed and used only in permanently ventilated rooms in compliance with current National
Regulations. The following requirements must be observed:
a) The room must be equipped with an exhaust system that vents the combustion fumes to the outside. It may consist
of a hood or an electric fan that automatically starts each time the appliance is turned on.
Flue or Branched Flue System Directly to the Outside
(only for cooking appliances)
b) The room must also have a system to permit proper air circulation, needed for combustion to occur normally. The
flow of air needed for combustion must not be less than 2 m
take air directly from the outside by means of a pipe with an inner cross section of at least 100 cm
not be able to be accidentally blocked. For those appliances not equipped with a safety device for accidental flame loss,
the ventilation apertures must be increased by 100%, with the minimum being 200 cm2 (Fig. A). The system can also
provide the air needed for combustion by indirect means, i.e. from adjacent rooms fitted with air circulation tubes as
described above. However, these rooms must not be common rooms or bedrooms. (Fig. B).
Detail A Adjacent Room to
A
Examples of Ventilation Openings Increased Opening Between
Comburent Air Door and Floor
Fig. A Fig. B
c) Intensive and prolonged use of the appliance may result in the need for supplemental air circulation, e.g. opening
windows or increasing mechanical venting (if present).
d) Liquified petroleum gas is heavier than the air and, therefore, settles downwards. Thus, rooms containing LPG
cylinders must also be equipped with apertures to the outside for ventilation of gas in the case of leaks. LPG cylinders
must not, therefore, be installed or stored in rooms or storage areas that are below ground level (cellars, etc.) whether
they are partially or completely full. It is a good idea to keep only the cylinder being used in the room, positioned so that
it is not subject to heat produced by external sources (ovens, fireplaces, stoves, etc. ) which are able to increase the
temperature of the cylinder above 50°C.
3
/h per kW of installed power. The air circulation system may
Room be Ventilated
2
; the opening must
LeLe
vv
elling elling
Le
v
elling
LeLe
vv
elling elling
4 support feet which are adjusted using screws are located in the lower part of the cooker. These level off the oven when
necessary. It is essential that the cooker be standing level.
YY
Y
YY
our our
our
our our
AA
ppliance ppliance
A
ppliance (only on certain models)
AA
ppliance ppliance
- 27 -
Page 27

Mounting the leMounting the le
Mounting the le
Mounting the leMounting the le
gs gs
gs (only on certain models)
gs gs
Press-fit legs are supplied which fit under the base of your cooker.
Installing the CookInstalling the Cook
Installing the Cook
Installing the CookInstalling the Cook
erer
er
erer
The appliance can be installed next to cabinets, provided they are not taller than the hob. If the cooker is placed in contact
with walls or the sides of adjacent cabinets, they must be capable of withstanding a rise in temperature of 50°C above
room temperature. For proper installation of the cooker, the following precautions must be taken:
a) Kitchen cabinets installed next to the cooker that are higher than the top of the hob, must be at least 600 mm from
the edge of the hob itself.
b) Hoods must be installed according to the requirements in the installation manual for the hood and, in any case, at a
minimum height of 650 mm.
c) If the hood is installed below a wall cabinet, the latter must be at least 700 mm (millimetres) above the surface of the
hob. Cabinets installed adjacent to the hood must be at least 420 mm above the hob, as shown in Figures C and D.
HOOD
Min. mm.
900
mm. with hood
mm. without hood
420
650
700
Min. mm.
min.
min.
mm.
420
Min.
HOOD
Min. mm.
600
mm. with hood
420
650
Min. mm.
min.
mm. without hood
700
min.
mm.
420
Min.
Fig. C Fig. D
Making the Gas ConnectionMaking the Gas Connection
Making the Gas Connection
Making the Gas ConnectionMaking the Gas Connection
The appliance should be connected to the mains or to a gas cylinder in compliance with current directives. Before making
the connection, check that the cooker is regulated for the gas supply you are using. If not, follow the instructions indicated
in the paragraph “Converting to Different Types of Gas." On some models the gas supply can be connected on the left or
on the right, as necessary; to change the connection, reverse the position of the hose holder with that of the cap and
replace the gasket (supplied with the appliance). When using liquid gas from a cylinder, install a pressure regulator which
complies with the National Regulations.
Important: Check that the supply pressure complies with the values indicated in table 1 “Burner and Nozzle Characteristics”
since this will ensure safe operation, correct consumption and ensure a longer life for your appliance.
Connection with a HoseConnection with a Hose
Connection with a Hose
Connection with a HoseConnection with a Hose
Make the connection using a gas hose that complies with requirements set forth by the current standards. The inner
diameters of the pipe are as follows:
- 8 mm for liquid gas;
- 13 mm for methane.
When installing the hose, remember to take the following precautions:
• No part of the hose must come into contact with parts whose temperature exceeds 50°C;
• The length of the hose should be less than 1500 mm;
• The hose should not be subject to twisting or pulling, and should not have bends or kinks;
• The hose should not touch objects with sharp edges, corners or moving parts, and it should not be crushed;
• The full length of the hose should be easy to inspect in order to check its condition.
- 28 -
Page 28

Check that the hose fits firmly into place at the two ends and fix it with clamps complying with current standards. If any of
the above recommendations can not be followed, flexible metal pipes should be used. If the cooker is installed in compliance
with the requirements for class 2, subclass 1, it is highly recommended that the gas connection be made with a flexible
metal pipe in compliance with current safety standards.
Connecting a FConnecting a F
Connecting a F
Connecting a FConnecting a F
Remove the hose holder fitted on the appliance. The gas supply pipe fitting is a threaded 1/2 gas cylindrical male attachment.
Use only pipes and seals that comply with current National Regulations. The full length of the pipe when installed must not
exceed 2000 mm. After the connection has been made, make sure that the flexible metal pipe does not come into contact
with moveable parts and that it is not crushed.
ChecChec
Chec
ChecChec
Important: Once the installation has been completed, check to make sure that the seals on all the connections are tight,
using a soapy solution (never a flame).
Connecting the PConnecting the P
Connecting the P
Connecting the PConnecting the P
Install a normalised plug corresponding to the load indicated on the data plate. When connecting the cable directly to the
mains, install an omnipolar circuit-breaker with a minimum contact opening of 3 mm between the appliance and the mains.
The omnipolar circuit breaker should be sized according to the load and should comply with current regulations (the earth
wire should not be interrupted by the circuit breaker). The supply cable should be positioned so that it does not reach a
temperature of more than 50°C with respect to the room temperature, along its length. Before making the connection,
check that:
N.B.: Never use reducers, adaptors or shunts since they can cause heating or burning.
ConCon
Con
ConCon
In order to convert the cooker for use with a type of gas different than the one for which it was factory set (indicated on the
label attached to the lid), the following steps must be taken:
king the Sealking the Seal
king the Seal
king the Sealking the Seal
• The limiter valve and the home system can support the appliance load (see data plate);
• The mains are properly earthed in compliance with current safety standards and regulations;
• There is easy access to the socket and omnipolar circuit breaker, once the hob has been installed.
vv
erer
ting the Cookting the Cook
v
er
ting the Cook
vv
erer
ting the Cookting the Cook
a) Replace the hose holder mounted on the appliance with that supplied in the bag of “cooker accessories.”
Important: The hose holder for liquid gas is marked 8, the hose holder for methane. In any case, always use a new
sealing gasket.
b) Replace the burner nozzles on the hob:
• Remove the grids and slide the burners from their housings;
• Unscrew the nozzles using a 7 mm socket spanner, and replace them with nozzles for the new type of gas (see
table 1 “Burner and Nozzle Characteristics”).
• Replace all the components by repeating the steps in reverse order.
lele
le
lele
xibxib
xib
xibxib
lele
le
lele
oo
ww
er Suppler Suppl
o
w
er Suppl
oo
ww
er Suppler Suppl
er to Difer to Dif
er to Dif
er to Difer to Dif
,,
J J
ointlessointless
,
J
ointless
,,
J J
ointlessointless
,,
Stainless Steel Pipe to a Stainless Steel Pipe to a
,
Stainless Steel Pipe to a
,,
Stainless Steel Pipe to a Stainless Steel Pipe to a
y Cory Cor
y Cor
y Cory Cor
ff
f
ff
d to the Mainsd to the Mains
d to the Mains
d to the Mainsd to the Mains
erer
ent ent
TT
er
erer
ent
ent ent
ypes ofypes of
T
ypes of
TT
ypes ofypes of
Gas Gas
Gas
Gas Gas
TT
hrhr
T
hr
TT
hrhr
eaded eaded
eaded
eaded eaded
AttacAttac
Attac
AttacAttac
hmenthment
hment
hmenthment
c) Minimum regulation of the hob burners:
• Turn the tap to minimum;
• Remove the knob and adjust the regulation screw, which is positioned in or next to the tap pin, until the flame is small
but steady.
N.B.: In the case of liquid gas, the regulation screw must be screwed in all the way.
• Check that the flame does not go out when you turn the tap quickly from high to low.
d) Regulating the primary air of the burners: The primary air of the burners does not need to be regulated.
ImporImpor
Impor
ImporImpor
On completion of this operation, replace the old rating sticker with one indicating the new type of gas used. This sticker is
available from our Service Centres.
NoteNote
Note
NoteNote
Should the pressure of the gas used be different (or vary) from the recommended pressure, it is necessary to fit a suitable
pressure regulator onto the inlet pipe in compliance with current National Regulations relative to “regulators for channelled
gas”.
tanttant
tant
tanttant
- 29 -
Page 29
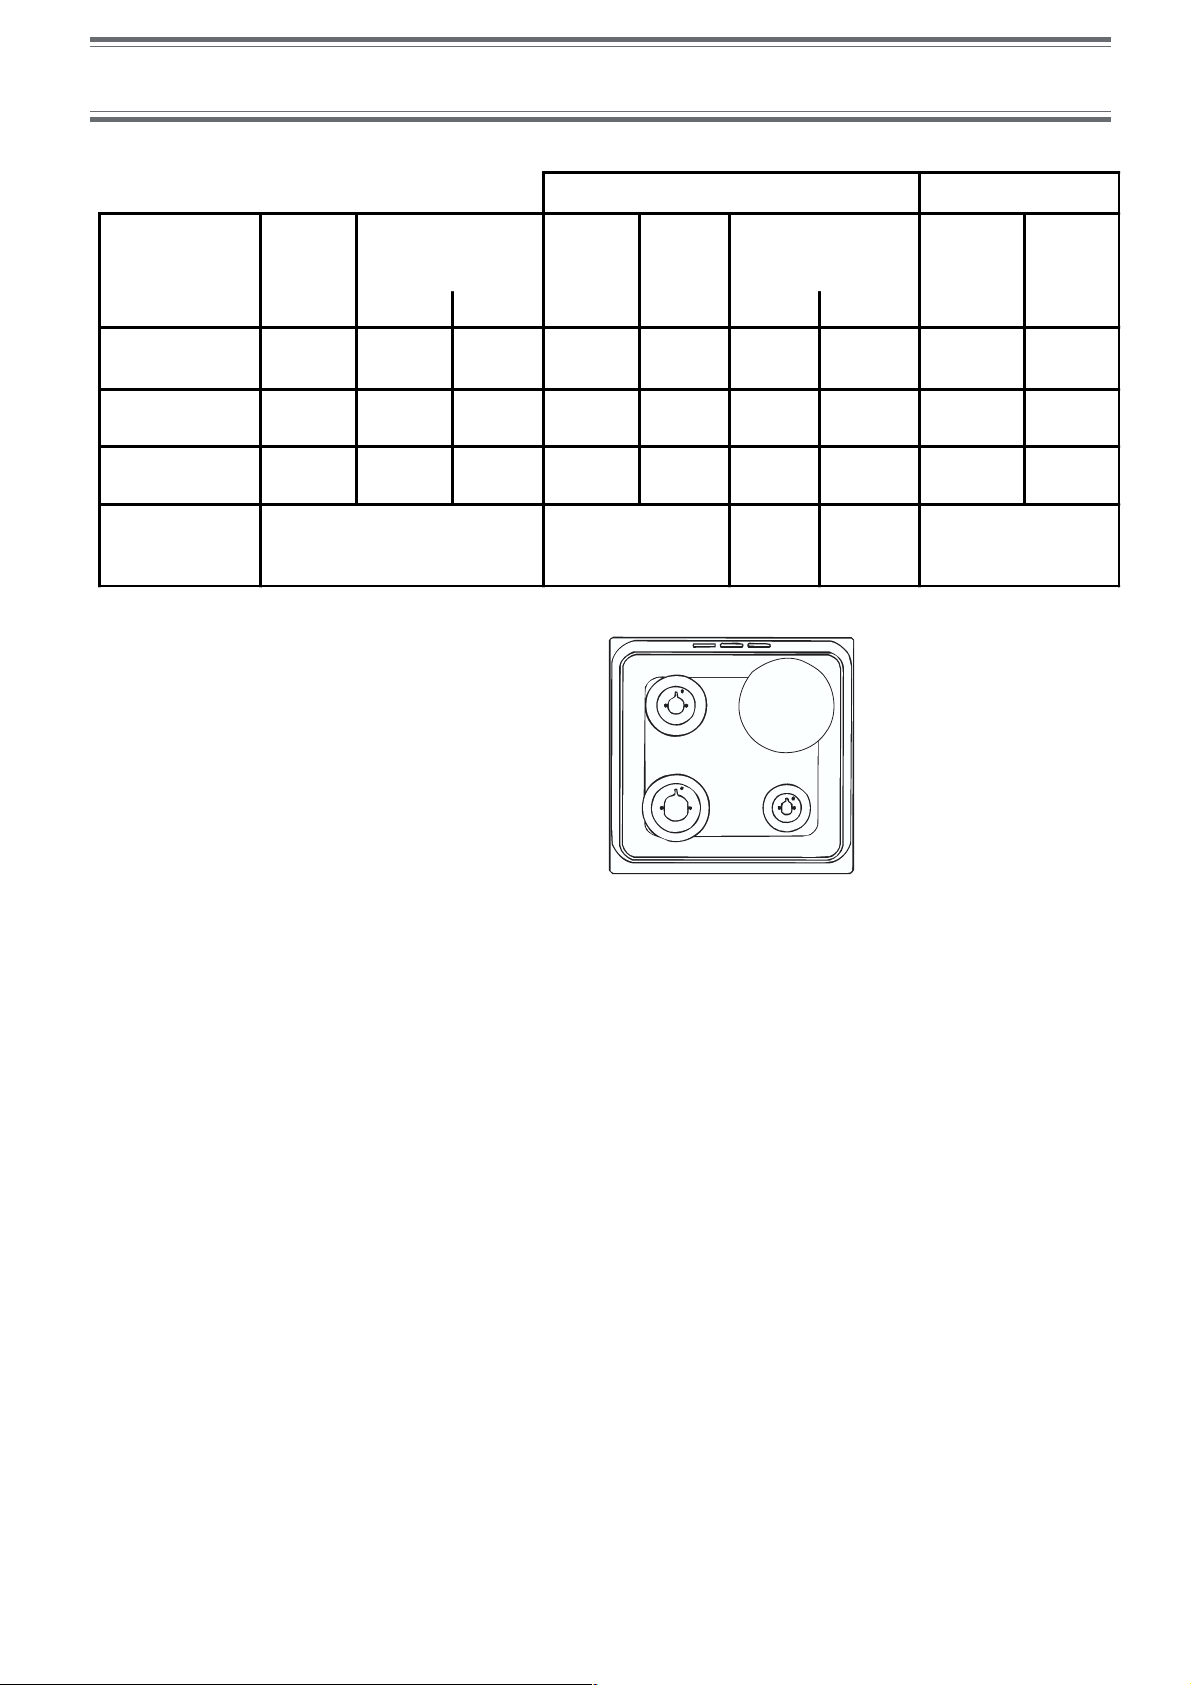
Burner and Nozzle Specifications
Table 1 Liquid Gas Natural Gas
Burner Diameter
(mm)
Thermal Power
kW (p.c.s.*)
Nominal Reduced (mm) (mm) *** ** (mm )
Ultrarapid
(Large)(UR)
Semi Fast
(Medium)(S)
Auxiliary
(Small)(A)
Supply
Pressures
100 3,30 0,7 41 91 240 236 123 314
75 1.90 0.4 30 70 138 136 106 181
55 1.00 0.4 30 50 73 71 79 95
Nominal (mbar)
Minimum (mbar)
Maximum (mbar)
* At 15°C and 1013 mbar- dry gas
** Propane P.C.S. = 50.37 MJ/kg
*** Butane P.C.S. = 49.47 MJ/kg
Natural P.C.S. = 37.78 MJ/m
By-Pass
1/100
3
Nozzle
1/100
S
UR
28-30
20
35
ø 180
A
Flow*
g/h
37
25
45
Nozzle
1/100
Flow*
l/h
20
17
25
- 30 -
Page 30

The hob
Before operating the product, remove all plastic film from the sides of the appliance.
Use ofUse of
Use of
Use ofUse of
The gradual adjustment of the gas flame makes it easy to set the desired heat level and to adapt to cooking vessels of
different sizes.
Adjustment is done by pressing and turning the control knob counter-clockwise so that the knob's marker points to the
desired symbol:
The burners on your hob can be ignited "using one hand". Press the control knob, turning it anticlockwise at the same time:
several sparks will be emitted, igniting the burner. After the burner has been ignited, maintain sufficient pressure on the knob
for approximately 3-4 seconds to ensure the security device is activated.
If the flame is accidentally extinguished whilst the burner is switched on, the security device begins to operate: the gas flow
is cut off automatically. To reignite the burner, repeat the above procedure.
Note: if there is no electrical current, the burner may be ignited using a match while turning and pressing the knob as
described above.
Warning: If the flame is accidentally extinguished, turn off the control knob and wait for at least 1 minute before
trying to relight it.
the g the g
the g
the g the g
• dot: closed
as bas b
as b
as bas b
large flame: full open
small flame: reduced flame.
urur
ur
urur
nerner
ner
nerner
ss
s
ss
Using the rapid plates with integrated safety deviceUsing the rapid plates with integrated safety device
Using the rapid plates with integrated safety device
Using the rapid plates with integrated safety deviceUsing the rapid plates with integrated safety device
The plate heats up constantly and a safety device prevents it from overheating if it has been used for a long period of time,
or if it has not been used correctly (with an empty or misshapen saucepan, for example).
When you are using a plate with the safety device, setting the temperature control to its highest position (6) will make the
temperature rise almost immediately. Once the plate has begun to heat up, you may set the control knob to other (lower)
positions.
The plate continues to provide heat for approximately 10 minutes after it has been switched off. It is therefore best to switch
it off before you have finished cooking. The plates with the safety device heat up extremely quickly when set to the
maximum (6).
The control knob for the rapid plate with integrated control device has 6 settings (1 - 6). The following information is a
guideline only:
Setting Normal or Fast Plate
0
Off
1 Cooking vegetables, fish
Cooking potatoes (using steam) soups,
2
chickpeas, beans.
Continuing the cooking of large quantities
3
of food, minestrone
4 For roasting (average)
5 For roasting (above average)
For browning and reaching a boil in a
6
short time.
- 31 -
Page 31
Cooking vessels
· The burners of the gas hobs are not designed for the use of concave or convex-bottomed cooking vessels.
· We nevertheless recommend that you always use a burner that matches the size of the cooking vessel (see
table) so that the flame does not go beyond the bottom rim of the pot; the flame should heat the bottom only.
· Do not put unstable or warped cooking vessels on the burners or on the electrical hotplates in order to avoid any
accidental spills.
· Always be sure that the burners' control knobs are all set to the black dot "
· As soon as a liquid begins boiling, reduce the heat of the burner to avoid boiling over.
Burner ø Cookware diameter (cm)
Ultrarapid (UR) 24 - 26
Semi-Rapid (S) 16 - 20
Auxilliary (A) 10 - 14
NoteNote
Note
NoteNote
On the models supplied with a reducer shelf, remember that this should be used only for the auxiliary burner when you use
casserole dishes with a diameter under 12 cm.
" when you are not using the hob.
Technical Specifications
Inner Dimensions of the Oven:
Inner Volume of the Oven:
Inner Dimensions of the Food Warmer:
ENERGY LABEL
Directive 2002/40/EC on the label of electric ovens
Norm EN 50304
Energy consumption for Natural convection heating mode:
Declared energy consumption for Forced convection Class heating mode:
Voltage and Frequency of Power Supply:
Burners:
adaptable for use with all the types of gas indicated on the data plate.
Convection
Width: 43.5 cm
Depth: 40 cm
Height: 32 cm
56 Liters
Width: 46 cm
Depth: 42 cm
Height: 8.5 cm
Roasting
see data plate
This appliance conforms with the following European Economic
Community directives:
- 73/23/EEC of 19/02/73 (Low Voltage) and subsequent modifications;
- 89/336/EEC of 03/05/89 (Electromagnetic Compatibility) and
subsequent modifications;
- 90/396/EEC of 29/06/90 (Gas) and subsequent modifications (only
for models which use gas);
- 93/68/EEC of 22/07/93 and subsequent modifications.
- 32 -
The European Directive 2002/96/EC on Waste Electrical and
Electronic Equipment (WEEE), requires that old household
electrical appliances must not be disposed of in the normal
unsorted municipal waste stream. Old appliances must be
collected separately in order to optimise the recovery and
recycling of the materials they contain and reduce the impact
on human health and the environment. The crossed out “wheeled
bin” symbol on the product reminds you of your obligation, that
when you dispose of the appliance it must be separately collected.
Consumers should contact their local authority or retailer for
information concerning the correct disposal of their old appliance.
Page 32

Routine Maintenance and Cleaning
Before each operation, disconnect the cooker from the electrical supply. To ensure that the appliance lasts a long time,
it must be thoroughly cleaned frequently, keeping in mind that:
· Do not use steam equipment to clean the appliance.
• The enamelled parts and the self-cleaning panels are washed with warm water without using any abrasive powders
or corrosive substances which could ruin them;
• The inside of the oven should be cleaned fairly often while it is still warm, using warm water and detergent followed
by careful rinsing and drying;
• The flame spreaders should be washed frequently with hot water and detergent, taking care to eliminate any scale;
• In cookers equipped with automatic lighting, the terminal part of the electronic instant lighting devices should be
cleaned frequently and the gas outlet holes on the flame spreaders should be checked to make sure they are free of
any obstructions;
• Stainless steel may become marked if it comes into contact with very hard water or harsh detergents (containing
phosphorous) for long periods of time. After cleaning, it is advisable to rinse thoroughly and dry. It is also recommended
that drops of water be dried;
• On models with glass covers, the covers should be cleaned with hot water; the use of rough cloths or abrasives is
to be avoided.
• Clean the glass part of the oven door using a sponge and a non-abrasive cleaning product, then dry thoroughly with
a soft cloth. Do not use rough abrasive material or sharp metal scrapers as these could scratch the surface and cause
the glass to crack.
N.B.: Avoid closing the cover while the gas burners and electric plates are still warm. Remove any liquid from
the lid before opening it.
Important: periodically check the wear of the gas hose and substitute it if there are any defects; we recommended
changing it every year.
RR
ee
placing the Ovplacing the Ov
R
e
placing the Ov
RR
ee
placing the Ovplacing the Ov
en Lampen Lamp
en Lamp
en Lampen Lamp
• Before carrying out any type of operation, disconnect the oven from the electrical supply by pulling out the plug or
using the switch connecting the oven to the electricity mains.
• Using a narrow, thin object (screwdriver, spoon handle, etc.), remove the glass cover.
• Unscrew the lamp and replace it with an identical one:
- voltage: 230/240 V
- power 15 W
- E 14 cap
• Replace the glass cover, making sure the seal is correctly positioned.
Oven
compartment
Lamp
Seal
Glass door
Gas tap maintenanceGas tap maintenance
Gas tap maintenance
Gas tap maintenanceGas tap maintenance
The taps may jam in time or they may become difficult to turn. If so, the tap itself must be replaced.
N.B.: This operation must be performed by a technician authorised by the manufacturer.
- 33 -
Page 33

The control panel
Time
Timer
Cooking time
STOP
Cooking end time
Heat
indicator light
Door locked
indicator
Electric hotplate indicator light
A B
Recommended
shelf
Cooking time and
temperature control
Cooking mode selector knob
(pre-set temperatures)
Hob control knobs
Knob A enables you to set the time, temperature, timer, cooking time and/or cooking end time or pyrolysis time and/
or pyrolysis end time.
Cooking modes can be selected using knob B.
Setting the time
When the appliance is connected to the electricity supply, "0.00" will start to flash on the display. To set the time,
proceed as follows:
Notes
Turn to set the
hours
NoteNote
Note
NoteNote
Press to
confirm
The minutes flash ?
Turn to set the minutes
Press to confirm
To switch from summer to winter time or vice
versa or following a power failure: Turn A to light
symbol and carry out the same procedure
The time can only be changed when the oven is switched off (not during cooking or programming functions).
Timer
The timer, marked with the symbol , operates independently from the oven. To set it, proceed as follows:
Note
Turn to light the timer
symbol
Press to access the
setting
Turn to set the duration
(from 0 to 23 hours and
59 minutes)
Press to confirm the
setting
The timer emits a series of sound signals when the set time period ends. Press knob A to stop the ringing.
NoteNote
Note
NoteNote
It is not possible to use the timer while cooking with Succès.
- 34 -
Page 34

Cooking with Création
IntroductionIntroduction
Introduction
IntroductionIntroduction
1.1.
1.
1.1.
The oven controls all essential aspects of each cooking programme and makes it easier for you to create the perfect
dish, from the simplest recipe to the most sophisticated culinary delights: the temperature, heat source, humidity and
fan assisted operation are all controlled automatically.
This chapter was written with the help of our very own culinary expert. We invite you to follow his advice so
you can benefit from his experience and perfect your cooking skills.
The recommended cooking modes, temperatures and oven rack heights reflect our expert's own experience
in the kitchen and will help you achieve the very best results.
The table below specifies whether it is best to preheat your oven or not for each cooking mode. Observing these
suggestions will guarantee perfect results.
The
will remain lit without flashing.
The temperature is recommended according to the cooking mode selected; however, you may adjust it to suit your
recipe (see next page).
You can also set a cooking time with an immediate or delayed start (see next page).
indicator light flashes during the pre-heating stage. When the set cooking temperature has been reached,
Création functionsCréation functions
Création functions
Création functionsCréation functions
2.2.
2.
2.2.
Mode Cooking recommended f or …
Convection
mode
Multi-level
Roasting
Turnspit*
Grill
Baking
Note: Always cook with the oven door closed (whichever function you are using).
Notes on defrostingNotes on defrosting
Notes on defrosting
Notes on defrostingNotes on defrosting
Slow-cooking dishes (hotp ots, beef
bourguignon, casseroles, etc.) or BainMarie cooking (terrines, crème caramel,
etc.)
Cooking several dishes on 2 or 3 racks
simultaneously without th e respective
flavours or aro mas mingling
Cakes other than Tarts and Brioches
(choux pastries , pound cake, sponge,
etc.)
Roasts (white or red meat) and gratin
dishes
Cooking red or w hite roasts 1 3 (turnsp it) Cold
Beef ribs, fish, grilled fo od and gratin
dishes, etc.
Baking process for dough made with
yeast or bakin g powder (brioc hes,
bread, sugar pie, croissants, etc.)
Oven
tray on
rack
Grid
level 1
2 Pre-heated
1 3
1 2 Cold
The shelf heig ht
depends on the size
1
of the food to be
2 Cold Temperature (40°C) cannot be adjusted.
grilled
Grid
level 2
5 (if
cooking
on 3
shelves)
• Food must be eaten promptly after it has been defrosted.
• Never re-freeze food that has thawed.
• Remove the food from the oven once it has completely defrosted and place it in the refrigerator until it is eaten
or cooked.
Oven at start
Pre-heated
Pre-heated
Notes
When using a Bain-Marie, you can po ur the water directly
into the oven tray.
If you use this function for one dish only, place the oven
tray on shelf 2.
The recommended temperature guarantees perfect
cooking and sealing of the roast and avoids the formation
of smoke. If your meat is in a roasting dish, use the oven
tray on shelf 2.
We recommend that the temperature does not exceed
200°C.
We recommend that the temperature is set to the MAX
position.
- 35 -
Page 35

Cooking with Création
3.3.
StarStar
3.
3.3.
4.4.
4.
4.4.
ting a cooking prting a cooking pr
Star
ting a cooking pr
StarStar
ting a cooking prting a cooking pr
• Turn knob B to the required cooking mode.
• Depending on the cooking mode selected, the recommended temperature and oven rack height are displayed.
• During the pre-heating stage, the
oven is ready.
Adjusting the temperatureAdjusting the temperature
Adjusting the temperature
Adjusting the temperatureAdjusting the temperature
You can adjust the temperature at any time.
oo
gg
o
g
oo
gg
rr
ammeamme
r
amme
rr
ammeamme
symbol flashes (only in certain cooking modes) and remains lit when the
• Turn knob A
• Press knob A to begin the process.
• Turn knob A to increase or decrease the temperature.
• Press knob A to confirm the changes.
TT
urur
ning the oning the o
T
ur
ning the o
TT
urur
5.5.
5.
5.5.
ning the oning the o
When you are sure the food is cooked through, turn knob B back to the "0" position.
until the temperature flashes on the display.
vv
en ofen of
v
en of
vv
en ofen of
ff
f
ff
- 36 -
Page 36

Programming
1.1.
PrPr
oo
gg
rr
1.
Pr
PrPr
1.1.
A cooking programme can be set so that the oven starts immediately and switches off automatically when the set
period of time has ended.
Select a cooking mode, if necessary adjust the temperature, and follow the instructions below:
amming a cooking time with instant staramming a cooking time with instant star
o
g
r
amming a cooking time with instant star
oo
gg
rr
amming a cooking time with instant staramming a cooking time with instant star
tt
t
tt
1. Turn knob A
2. Press knob A to access the cooking time adjustment process: 2:00
3. Turn knob A to set the required cooking time on the display (minimum 20 minutes - maximum 9 hours 59
minutes).
4. Press knob A to confirm the programme you have just set. The programmed cooking time and the set temperature
will appear alternately on the display.
(1)
For safety reasons, a default cooking time of 2 hours is set for each mode. If this time is not adjusted, the oven
will switch off automatically once this period has ended.
For example
It is 9:00 a.m. and a cooking time of 1 hour and 15 minutes has been programmed. Cooking will stop automatically at
10:15 a.m.
When the word "end" is displayed, accompanied by a sequence of sounds from the buzzer, the programmed period
of cooking time has ended and cooking has stopped.
• Press knob A to silence the buzzer.
• Turn knob B back to position 0 to remove the word "end" from the display.
so that the symbol lights up.
(1)
will flash on the display.
- 37 -
Page 37

Programming
PrPr
oo
gg
rr
2.2.
Pr
PrPr
2.
2.2.
The oven can be programmed so that the dish is ready at a given time: the programmer sets the cooking start time
automatically and the oven switches off at the required time.
For example
It is 9:00 a.m. and you want the dish to be ready at 12:30, knowing that cooking should last 1 hour and 15 minutes:
then the cooking time and cooking end time should be set. The oven will automatically calculate that cooking should
start at 11:15 a.m. for the dish to be ready at 12:30 p.m.
Step 1
Place the dish in the oven and select a cooking mode. Adjust the temperature if necessary and set a cooking time,
as follows:
Step 2
Set the desired cooking end time:
amming cooking with a delaamming cooking with a dela
o
g
r
amming cooking with a dela
oo
gg
rr
amming cooking with a delaamming cooking with a dela
1. Turn knob A so that the
2. Press knob A to begin adjusting the cooking time: 2:00 will flash on the display.
3. Turn knob A to set the required cooking time (minimum 20 minutes - maximum 9 hours 59 minutes).
4. Press knob A to confirm the programme. The programmed cooking time and the set temperature will appear
alternately on the display.
1. Turn knob A so that the
programme starts immediately).
symbol lights up.
STOP
symbol lights up (the display indicates 10:15, i.e. the cooking end time, if the
yy
ed stared star
y
ed star
yy
ed stared star
tt
t
tt
2. Press knob A to begin setting the required cooking end time.
3. Turn knob A to set the cooking end time.
4. Press knob A to confirm the programme. The programmed cooking end time and the set temperature will
appear alternately on the display.
Cooking will start at 11:15 a.m. and will stop at 12:30 p.m.
When the word "end" is displayed, accompanied by a sequence of sounds from the buzzer, the programmed period
of cooking time has ended and cooking has stopped.
• Press knob A to silence the buzzer.
• Turn knob B back to position 0 to remove the word "end" from the display.
- 38 -
Page 38
Cooking with Succès
IntroductionIntroduction
Introduction
IntroductionIntroduction
1.1.
1.
1.1.
The Succès function encompasses all the automatic cooking programmes devised and set by our chef.
All the Succès programmes are completely automatic: the temperature and cooking time are pre-set values,
guaranteeing a perfect result every time - automatically. These values cannot be adjusted using the C.O.P.®
(Programmed Optimal Cooking) system. Cooking ends automatically and the oven informs you when the dish is
ready (only the "Pizzeria" function requires the user to check the food before taking it out of the oven).
This chapter was written with the help of our very own culinary expert. We invite you to follow his advice so
you can benefit from his experience and perfect your cooking skills.
The recommended cooking modes, temperatures and oven rack heights reflect our expert's own experience
in the kitchen and will help you achieve the very best results.
You may start cooking whether or not you have preheated the oven. Our culinary expert advises you not to preheat
the oven if you can avoid doing so.
The length of every Succès mode is pre-set. To obtain the best results from each mode, we recommend you place
the dish in the oven as soon as you have selected the appropriate programme.
Succès cooking modesSuccès cooking modes
2.2.
Succès cooking modes
Succès cooking modesSuccès cooking modes
2.
2.2.
Mode Cooking programme recommended for …
Tarts
Sponge cake
Buns
Sweet or savoury pastries (shortcrust,
puff or flaky)
Desserts made with baking powder
(marbled biscuits, pound cake, etc.)
Desserts made with leaven (brioches,
almond cake, etc.)
Shelf
level
2
2
2
Oven at
start
Cold
Note
To cook several items at
once, place the tray on the
first shelf and the grids on
the third and fifth shelves.
These dishes may also be
placed in a hot oven.
- 39 -
Page 39

Cooking with Succès
3.3.
3.
3.3.
StarStar
ting a Succès cooking prting a Succès cooking pr
Star
ting a Succès cooking pr
StarStar
ting a Succès cooking prting a Succès cooking pr
The cooking time and temperature are pre-set (non-adjustable).
• Turn knob B to the required cooking mode.
• Once the required Succès mode has been selected, "AUTO" appears on the display and flashes for 10
seconds.
• After this, the display shows the time remaining until the cooking end time.
TT
urur
ning the oning the o
T
ur
ning the o
TT
urur
ning the oning the o
A sequence of buzzers sounds to indicate the cooking end time.
NOTENOTE
NOTE
NOTENOTE
If the oven is not turned off manually, it will turn off automatically when the temperature is low enough.
vv
en ofen of
v
en of
vv
en ofen of
ff
f
ff
oo
o
oo
gg
rr
ammeamme
g
r
amme
gg
rr
ammeamme
Disabling "Demo Mode"
• Press knob A twice.
• Turn knob A
• Press knob A
anticlockwise, then turn knob A clockwise.
.
- 40 -
Page 40

The accessories
Your oven is fitted with 5 different oven rack heights (from 1 to 5, from the bottom up) depending on the dish and
cooking mode selected.
For perfect results every time, the display indicates the recommended oven rack.
TT
he ohe o
vv
en tren tr
aa
T
he o
v
TT
he ohe o
It is used:
We advise against using the oven tray on rack heights 4 and 5.
TT
he ghe g
T
he g
TT
he ghe g
They are used:
en tr
vv
en tren tr
• as a dish support for all dishes when cooking on one rack only and in Bain-Marie cooking on rack 2;
• as a baking tray (for cakes, tarts, choux pastry, etc.) on rack 2;
• as a dripping pan to catch juices and fat dripping from food situated on the grid (meat, fish, etc.); in this
case, always place it on rack 1;
• as a dish support for multi-level cooking; in this case, place it on rack 1.
ridsrids
rids
ridsrids
• as a dish support for multi-level cooking (rack 3 when cooking on 2 racks and rack 3 and 5 when cooking on
3 racks);
• as a support for the meat or fish and the oven tray to catch any dripping fat or juices; in this case, the grid
should be placed on rack 2;
• as a support for the food to be defrosted and the oven tray to catch any melting liquids; in this case, the grid
should be placed on rack 2.
yy
a
y
aa
yy
NONO
TETE
NO
TE
NONO
TETE
If you wish to cook food of considerable dimensions (weighing more than 8 kg), we recommend you use the oven
tray.
TT
he turhe tur
T
he tur
TT
he turhe tur
The turnspit consists of a support, a spit and a handle.
Proceed as follows:
The removable handle is heatproof to avoid scalding yourself when removing the roast at the end of cooking. The
handle should be removed during cooking.
Use the oven tray on rack 1 to catch any cooking juices or fat, and place the turnspit support on rack 3.
nspitnspit
nspit
nspitnspit
• Place the turnspit support (A) on rack 3;
• Centre the meat on the spit, making sure you place it at an
equal distance from both ends of the spit (B);
• make sure the meat is kept firmly in place by the forks (C);
• set the forks in the meat using the screws (D);
• secure the spit onto the support, making sure the rear of
the spit is seated firmly in the hollow at the back of the oven
interior.
Screw
(D)
Spit
(B)
Screw
(D)
back
Fork
(C)
Rotisserie
support (A)
Spit handle (D)
- 41 -
Page 41

Cooking mode/dish combination tables
DISHES EXAMPLES COOKING MODE TEMPERATURE SUPPORTS
Savoury tarts and pies
(shortcrust or flaky pastry)
Deep pan pizzas made with
bread dough (or frozen ready-
made pizzas)
Pizzas (other doughs) Tarts 220 °C cake tin on the oven tray
Savoury brea d olive loaf, t una lo af, etc. Cakes ( or multi-level) 160 °C cake tin on the ov en tray
Country pies filo cheese pastries, salmon pithiviers, … Cakes (or multi-level) 200 °C on the oven tray
Terrines fish, meat, vegetable terrines, foie gras, etc. Convection mode 160 °C
STARTERS
Rameki ns
Soufflés cheese, vegetable or fish soufflés, etc. Multi-level 200 °C cake tin on the oven tray
Food requiring browning stuffed oysters, cheese on toast, etc. Grill 270 °C
Au gratin dauphinois, shepherd's pie, lasagna, etc. Gratin (or roasting) 200-210 °C dish on the oven tray
Stuffed veget ables
Vegetable casseroles cabbage, carrots and saffron, leeks, etc. Convection mode 200 °C casserole dish on the oven tray
Flans mushroom flan, vegetable flan, etc. Convection mode 160 °C
Terrines vegetable terrines Convection mode 160 °C
VEGETABLES
Soufflés asparagus or tomato soufflés, etc. Multi-level 200 °C soufflé dish on the oven tray
Pies vegetable pie, etc. Multi-level 200 °C on the oven tray
Foil parcels truffles, etc. Multi-level 200 °C foil parcels on the oven tray
Rice Pilaf Convection mode 180 °C dish on the oven tray
quiche lorraine, leek tart, etc. Tarts 220 °C cake tin on the oven tray
pizzas , focaccia Brioches 220 °C on t he ov en tra y
terrine dish on the oven tray
(Bain-Marie starting with hot
poultry liver pies, salmon mousse, eggs cocotte,
potatoes, tomatoes, courgettes, aubergines,
etc.
peppers, etc.
Convection mode 160 °C
Multi-level 200 °C
ramekins on the oven tray
(Bain-Marie starting with hot
directly on the grid or dish on
on the oven tray or in a dish on
ramekins or flan dish on the
oven tray (Bain-Marie starting
terrine dish on the oven tray
(Bain-Marie starting with hot
water)
water)
the grid
the oven tray
with hot water)
water)
DISHES EXAMPLES COOKING MODE TEM PERATURE SUPPORT S
Roast poultry chicken, duck, cockerel, capon. Roasting 210 °C poultry on the grid
Poultry on the spit chicken, cockerel Turnspit 270 °C turnspit support
Roasts
large pieces of braised meat whole ham on the bone, large capon or turkey, etc. Multi-level
Meat ca sserol es and trad itional
MEAT
Grille d fish and fi sh kebabs bass, macke rel, sardines , mullet, tu na, etc . Grill 270 °C
Fish pies (flaky or shortcrust
FISH
dishes
Grille d meat ribs, cutlets, sausages, kebabs, chicken thigh s, etc. Grill 300 °C
Meat pies Beef Wellington, steak and kidney pie, etc. Multi-level 200 °C
Salt-baking salt-baked poultry, etc. Multi-level 240 °C
Whole fish (stuffed) sea bream, carp, etc. Multi-level 200 °C on the oven tray
Fish fillet s (with bas ting) salmon, scorpion fish, cod, bass , etc. Convection mode 200 °C on the oven tray
Foil parcels sole, dab, scallops, etc. Multi-level 200 °C on the oven tray
pastry)
Fish au gratin brandade gratin, etc.
Soufflés scallop soufflé, etc. Multi-level 200 °C soufflé dish on the oven tray
Salt-baked fish bass, carp, etc. Multi-level 240 °C
roast pork, veal, turkey, beef, leg of lamb, haunch of
venison, stuffed veal breast, etc.
beef bourguignon, rabbit chasseur, veal Marengo,
lamb stew, Basquaise chicken, etc. hotpots,
cassoulet, etc.
salmon, pike, etc. Multi-level 200 °C on the oven tray
Roasting 210 °C me at directly on the g rid
180 °C ( one t hird
into cookin g, lower
the temperature to
160°C)
Convection mode 190 °C casserole dish on the oven tray
gratin (or roasting)
(grill for browning)
200-210 °C
270 °C
meat on the oven tray baste
regularly with the juice
on the grid (the rack depends
on the tray (for large pieces of
meat, l ower t he temperatu re to
160°C w hen the pastry crust is
meat on the oven tray or in a
dish on the oven tray
on the grid (the rack depends
dish on the oven tray (or grid
for browning under the grill)
fish on the oven tray or in a
dish on the oven tray
on the size)
baked)
on the size)
- 42 -
Page 42
Cooking mode/dish combination tables
Biscuits (no baking powder) sponge, savoy biscuits, rolled bi scuits, brownies, cakes (or multi-level) 200 °C cake tin on the oven tray
Fruit tart (shortcrust or flaky,
Blind baking pastry bases (puff
Pies ( shortcrust or flaky pastry) pear pies, etc. Tarts 220 °C cake tin on the oven t ray
PASTRIES
MINI CUP CAKES
Custards and fl ans Semolina
S
DESSERT
Stuffed fruit or fruit foil parcels oven-baked applies, etc. Multi-level 200 °C
FRUIT
Fruit gratins (with sabayon) fresh fruit gratin Grill 270 °C dish on the grid
DISHES EXAMPLES COOKING M ODE TEMPERATU RE SUPPORTS
Fruitcake and pound cake
(containing baking powder)
with or without flan)
Cheesecake Tarts 200 °C cake tin on the oven tray
Raised dough sugar pies, brioche fruit tart Brioches 180 °C cake tin on the oven tray
pastry)
Choux pastry
Flaky pastry apple turnovers, flaky pastries, pithiviers, etc. cakes (or multi-level) 200 °C on the oven tray
Buns and small pastries
(containing yeast or baking
powder)
Large pastries (containing
yeast or baking powder)
Biscuit dough mini cup cakes, finger bi scuits, etc. cakes (or multi-level) 180 °C on the oven tray
Puff pastry shortbread biscuit s, sp ritz , cookies, etc. cakes (or mul ti-l evel) 200 °C on the oven tray
Flaky pastry palmier biscu its, etc. cakes (or multi -level) 200 °C on t he ov en tra y
Macaroons, coconut rocks coconut or almond macaroons cakes (or multi-level) 180 °C on the oven tray
Raised dough mini-brioches, mini-croissants, etc. Brioches 180 °C on the oven tray
White meringues
Golden brown meringues
Puddings bread or brioche based pudding, rice pudding cakes (or multi-level) 190 °C cake tin on the oven tray
pudding
Rice pudding milky rice pudding, rich riz à l’impératrice cakes (or multi-level) 180 °C cake tin on the oven tray
Soufflés liqueur soufflé, fruit soufflé, etc. cakes (or multi-level) 200 °C cake tin on the oven tray
fruitcake, marble cake, pound cake, etc. cakes (or multi-level) 160 °C cake tin on the oven tray
apple, plum or pear tarts, etc. Tarts 220 °C cake tin on the oven tray
tarts garnished with fresh fruit (strawberries,
profiteroles, choux balls, eclairs, praline filled
croissants, sugar pies, individual brioches, small
Kugelhopf, brioche, panettone, currant cramique,... Brioches 160 °C
crème c aramel, crème brûlée, chocolate f lan, etc. cakes (or multi-level) 160 °C
raspberries, etc.)
paris brest, saint honoré, etc.
savarins, etc.
Tarts 180 °C
cakes (or mul ti-l evel) 190 °C on the oven t ray
Brioches 180 °C on the oven tray
white meringues (or
multi-level)
golden brown
meringues (or multi-
level)
70 °C on the oven tray
110 °C on t he ov en tra y
cake tin on the oven tray (dry
beans on the pastry base)
on the oven tray or in a dish on
Ramekins or flan dishes on the
oven tra y (Bain-Marie in the
dish or foil parcel on the oven
the oven tray
oven tray)
tray
DISHES EXAMPLES COOKING MODE TEMPERAT URE SUPPORTS
Yoghurts Convection mode 50 °C ramekins on the oven tray
Dry food
Sterilisation jars of fruit in syrup, etc. Sterilisation (or multi-level) 130 °C jars on the oven tray
Reheating dishes
MISCELLANEOUS
Home-made bread Multi-level
mushrooms, herbs, dried fruit or vegetables,
cooked dishes (home-made or rea dy-made
etc.
packets)
Multi-level 60 °C on the grid
Reheating dishes
(or multi-level)
140 °C dish on the oven tray
260 °C for 10
minute s 210 °C
afterwards
on the oven tray
- 43 -
Page 43

Pyrolysis
1.1.
1.
Useful tips befUseful tips bef
Useful tips bef
1.1.
Useful tips befUseful tips bef
• Remove the toughest grease and burnt-on food in order to avoid the creation of flames or smoke during the
process.
• Remove all oven accessories before running a pyrolysis cycle. Extremely high temperatures may cause
these accessories to become warped or discoloured.
• Do not leave tea towels on the oven handle.
• If the temperature in the electrical component area of the appliance has exceeded a certain value, it will not be
possible to start the pyrolysis fast cleaning cycle. The word "HOT" will appear on the display. Wait for the cooling
fan to switch off before restarting the pyrolysis programme.
• Warning: To obtain the best results from the pyrolysis cycle, we recommend that you do not use the
hob while the process is being carried out.
2.2.
2.
OperationOperation
Operation
2.2.
OperationOperation
Turn knob B clockwise to the position.
The automatic cleaning cycle takes place over a pre-set time of 1 hour 30 minutes.
• However, the
Proceed as follows:
1. Turn knob A to set the required cooking time.
2. Press knob A to confirm the programme.
• You can also set a pyrolysis cycle with a delayed start (see "Programming cooking with a delayed start"
paragraph).
oror
e stare star
or
e star
oror
e stare star
cycle time can be modified (from 1 hour to 2 hours) depending on how grimy your oven is.
ting the pting the p
ting the p
ting the pting the p
yryr
yr
yryr
olol
ysis cysis c
ol
ysis c
olol
ysis cysis c
yy
cc
y
c
yy
cc
lele
le
lele
When the temperature inside the oven is high enough, the oven door is locked and the
automatically. From this moment on, no adjustments can be made to the cooking time, cooking end time or timer.
The door unlocks automatically and the
has sufficiently decreased.
When the buzzer emits a sequence of sounds and the word "end" is displayed, the pyrolysis cycle has finished.
• Press knob A to silence the buzzer.
• Turn knob B back to position 0 to remove the word "end" from the display.
3.3.
3.
3.3.
Caution:Caution:
Caution:
Caution:Caution:
• Keep children well away from oven surfaces; they may become very hot.
• Avoid scratching the enamel coating with sharp objects (knives, for example).
• Do not use abrasive products or detergents.
• When cleaning your oven, try to prevent any liquids from leaking into the door slots.
• If you look through the oven door, you may notice some particles light up when they come into contact with the
heating elements during pyrolysis: this is simply spontaneous combustion. It is perfectly normal and is not
dangerous.
After the pyrolysis cycle has finished, wait until the oven is completely cool and then, using a damp sponge,
remove the dust deposits left by the burning food residue.
To lessen pre-heating times and therefore save energy, we recommend you run a pyrolysis cycle as soon as you
have finished cooking.
indicator light switches off as soon as the temperature inside the oven
indicator lights up
- 44 -
Page 44

TROUBLESHOOTING
......
y y
our oour o
...
y
our o
......
y y
our oour o
• check whether you selected the correct cooking mode for the cooking required;
• check whether the temperature displayed (if you have adjusted it) is too high;
• check the degree of soil of the oven, and whether it needs to be cleaned: food residue encrusted onto the
enamel coating inside the oven becomes charred and creates both smoke and pungent smells.
......
the o the o
...
the o
......
the o the o
• the fan stops automatically when the temperature inside the oven drops sufficiently.
......
a type ERxx er a type ERxx er
...
a type ERxx er
......
a type ERxx er a type ERxx er
The oven is equipped with an auto-test system: if it detects an operational irregularity, the display shows a two-digit
code in the form of ERxx.
Contact your local retailer or an authorised technical assistance centre (see Technical handbook) and have the
following information ready:
• The commercial code and serial number of your appliance (these can be found on the guarantee certificate)
• The error code displayed.
vv
en fen f
v
en f
vv
en fen f
vv
en ren r
v
en r
vv
en ren r
an staan sta
an sta
an staan sta
eleases a lot ofeleases a lot of
eleases a lot of
eleases a lot ofeleases a lot of
ys on wys on w
ys on w
ys on wys on w
rr
r
rr
hen cooking is complete:hen cooking is complete:
hen cooking is complete:
hen cooking is complete:hen cooking is complete:
or code aor code a
or code a
or code aor code a
ppearppear
ppear
ppearppear
smok smok
smok
smok smok
e:e:
e:
e:e:
s on the displas on the displa
s on the displa
s on the displas on the displa
yy
y
yy
- 45 -
Page 45

- 46 -
Page 46

- 47 -
 Loading...