

Page 1

Consigli e raccomandazioni
• Questo apparecchio è stato concepito per un uso
non professionale, all’interno di un’abitazione.
• Prima di utilizzare l’apparecchio leggere attentamente
le avvertenze contenute nel presente libretto in quanto
forniscono importanti indicazioni riguardanti la sicurezza
di installazione, d’uso e di manutenzione. Conservare con
cura questo libretto per ogni ulteriore consultazione.
• Dopo aver tolto l’imballaggio assicurarsi dell’integrità
dell’apparecchio. In caso di dubbio , non utilizzare l’apparecchio, ma rivolgersi a personale prof essionalmente qualificato.
• Gli elementi dell’imballaggio (sacchetti in plastica, polistirolo espanso, viti, ecc.) non dev ono essere lasciati alla
portata dei bambini in quanto potenziali fonti di pericolo.
• L’installazione deve essere eff ettuata secondo le istruzioni del costruttore da personale professionalmente qualificato.
• Una errata installazione può causare danni a persone, animali o cose, nei confronti dei quali il costruttore
non può essere considerato responsabile.
• La sicurezza elettrica di questo apparecchio è assicurata soltanto quando lo stesso è correttamente collegato
all’impianto di messa a terra, come previsto dalle vigenti
norme di sicurezza elettrica. Controllare che questo requisito di sicurezza fondamentale sia sempre rispettato
e, in caso di dubbio , richiedere un controllo accurato dell’impianto da parte di personale professionalmente qualificato.
• Il costruttore non può essere considerato responsabile per eventuali danni causati dalla mancanza di messa a
terra dell’impianto.
• Prima di collegare l’apparecchio accertarsi che i dati
tecnici riportati sulla targhetta siano r ispondenti alle caratteristiche dell’impianto elettrico.
• Verificare che la portata elettrica dell’impianto e delle
prese di corrente siano adeguate alla potenza massima
dell’apparecchio indicata in targa. In caso di dubbio , rivolgersi a personale professionalmente qualificato .
• Questo apparecchio dovrà essere destinato solo all’uso per il quale è stato espressamente concepito. Ogni
altro uso (ad esempio: riscaldamento di ambienti) è da
considerarsi improprio e quindi pericoloso.
• Il costruttore non può essere considerato responsabile per eventuali danni deriv anti da usi impropri, erronei ed
irragionev oli.
• L’uso di un qualsiasi apparecchio elettrico compor ta
l’osservanza di alcune regole fondamentali. In particolare:
• non toccare l’apparecchio con mani umide;
• non usare l’apparecchio a piedi nudi;
• evitare l’uso di prolunghe;
• non tirare il cavo di alimentazione , o l’apparecchio
stesso, per staccare la spina dalla presa di corrente;
• non lasciare esposto l’apparecchio ad agenti atmosferici (pioggia, sole, ecc.);
• non permettere che l’apparecchio sia usato dai
bambini o da incapaci, senza sorveglianza.
• Prima di effettuare qualsiasi operazione di pulizia o di
manutenzione, disinserire l’apparecchio dalla rete di alimentazione elettrica, o staccando la spina, o spegnendo
l’interruttore dell’impianto.
• Nel caso in cui sul vetro si produca una incrinatu-
ra, scollegare immediatamente l’apparecchio. Per la
riparazione, rivolgersi esclusivamente ad un centro d’assistenza tecnica autorizzato e richiedere l’uso di ricambi
originali. Il mancato rispetto di queste condizioni può compromettere la sicurezza dell’apparecchio.
• Allorché si decida di non utilizzare più l’apparecchio,
si raccomanda di renderlo inoperante tagliandone il cavo
di alimentazione, dopo aver staccato la spina dalla presa
di corrente. Si raccomanda inoltre di rendere innocue quelle parti dell’apparecchio che potrebbero rappresentare un
pericolo, specialmente per i bambini che potrebbero servirsi dell’apparecchio per i loro giochi.
• Il piano in vetroceramica è resistente sia agli urti termici, sia agli urti meccanici. Tuttavia, esso può frantu-
marsi se colpito violentemente con un oggetto appuntito, quale un utensile. In questo caso, scollegare
l’apparecchio dalla rete di alimentazione e rivolgersi
ad un centro di assistenza tecnica autorizzato ad eseguire riparazioni.
• Non dimenticare che la temperatura della zona riscaldante resta piuttosto elevata per almeno 30 minuti dopo
lo spegnimento; fare attenzione a non appoggiare
inavvertitamente recipienti o oggetti su questa zona ancora calda.
• Non accendere le zone di riscaldamento se vi sono
fogli di alluminio o oggetti in plastica sul piano di cottura.
• Non avvicinarsi alle zone di riscaldamento quando sono
calde.
• Quando si utilizzano piccoli elettrodomestici accanto
al piano di cottura, controllare che il cavo di alimentazione non entri in contatto con le superfici calde.
• Assicurarsi che i manici delle pentole siano sempre
rivolti verso l’interno del piano di cottura per evitare che
vengano urtati accidentalmente.
• ATTENZIONE: Se presenti, non guardare a lungo
le zone di cottura alogene.
Primo utilizzo: la colla applicata sulle guarnizioni lascia alcune tracce di grasso sul v etro. Prima di utilizzare l’apparec-
chio, si raccomanda di eliminarle con un prodotto specifico per la manutenzione non abrasivo. Durante le prime ore di
funzionamento, è possibile che v enga a vv ertito un odore di gomma, che comunque scomparirà presto.
2
Page 2
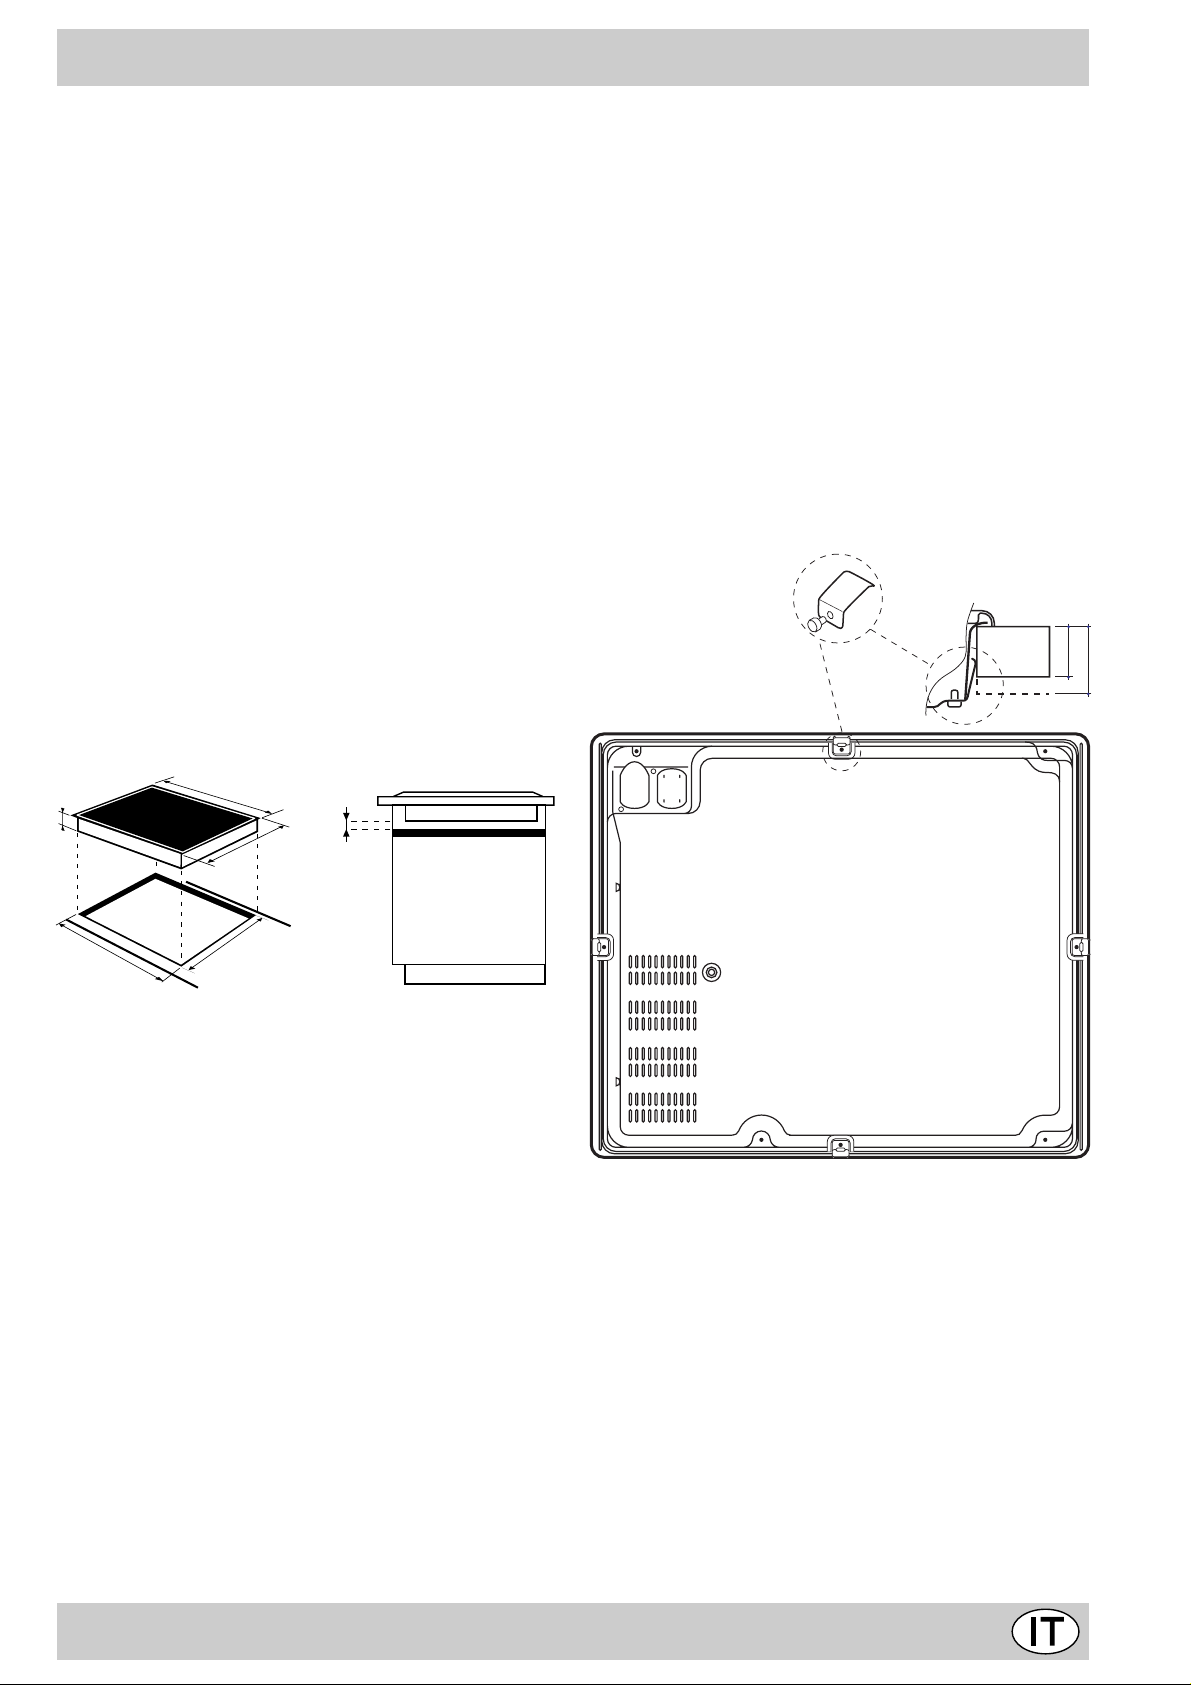
Installazione e fissaggio
Le istruzioni che seguono sono rivolte all’installatore qualificato affinché compia le operazioni di installazione,
regolazione e manutenzione tecnica nel modo più corretto e secondo le norme in vigore.
Importante: prima di qualsiasi operazione, disinserire elettricamente il piano cottura.
Installazione
• Il piano di cottura è destinato ad essere installato
su un mobile da cucina tramite la semplice rimozione
del vano corrispondente.
• Il materiale del piano di lavoro dev e resistere a una
temperatura di circa 100 °C.
• Il piano di cottura deve essere posizionato a una
distanza minima di 55 mm dalla parete retrostante o
da qualsiasi altra superficie verticale, per consentire
una adeguata aerazione e per evitare il
surriscaldamento delle superfici attorno all’apparecchio.
• Se si desidera installare il piano di cottura sopra un
forno, questo deve essere provvisto di un sistema di
raffreddamento a ventilazione f orzata.
• Evitare di installare il piano di cottura sopra una
lavasto viglie; all’occorrenza, frapporre un elemento di
separazione a tenuta stagna trai i due apparecchi.
Fissaggio
Molto importante: L’installazione del piano in
vetroceramica deve essere effettuata su una superficie
d’appoggio perfettamente piana. Le eventuali def ormazioni
provocate da un errato fissaggio potrebbero alterare le
caratteristiche e le prestazioni del piano di cottura.
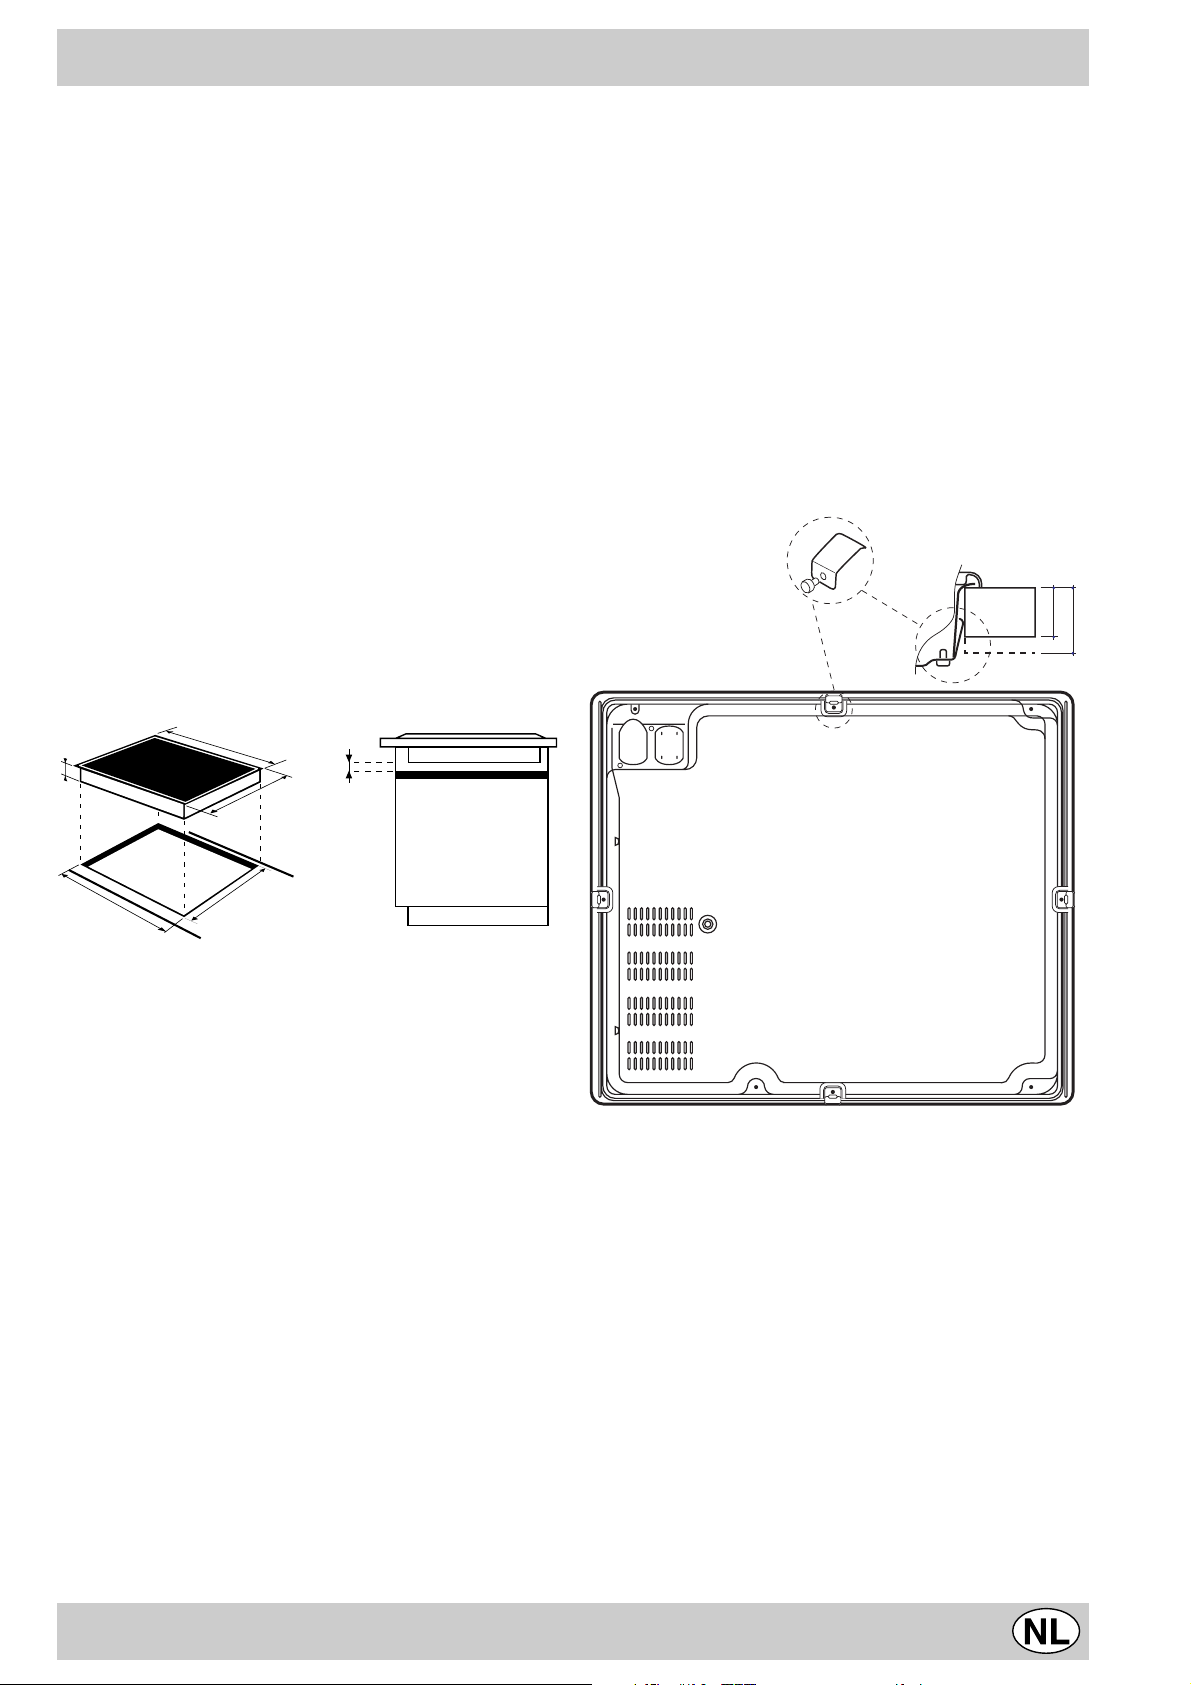
Le molle di fissaggio sono avvitate tramite viti (vedere lo
schema).
È indispensabile che queste viti rimangano accessibili.
Inserire il piano di cottura nel vano del mobile esercitando
una adeguata pressione sull’intero perimetro affinché il
piano di cottura aderisca perfettamente al top.
MONTAGGIO DELLE MOLLE SUL LATO INFERIORE
LATO ANTERIORE DEL
PIANO DI COTTURA
PIANO DI
LAVORO
30
40
48
560 +/- 1
574
490 +/- 1
504
10
Distanza da rispettare
fra il vano per
l'incasso
e il mobile
PIANO DI COTTURA ROVESCIATO
3
Page 3
Caratteristiche T ecniche
Collegamento elettrico
• La sicurezza elettrica di questo apparecchio è assicurata soltanto quando lo stesso è correttamente collegato all’impianto di messa a terra, come previsto dalle
vigenti norme di sicurezza elettrica. Controllare che
questo requisito di sicurezza fondamentale sia sempre rispettato e, in caso di dubbio, richiedere un controllo accurato dell’impianto da parte di personale professionalmente qualificato .
•
Il costruttore non può essere considerato responsabile per eventuali danni causati dalla mancanza di
messa a terra dell’impianto.
• Prima di collegare l’apparecchio accertarsi che i
dati tecnici riportati sulla targhetta siano rispondenti
alle caratteristiche dell’impianto elettrico.
• Verificare che la portata elettrica dell’impianto e
delle prese di corrente siano adeguate alla potenza
massima dell’apparecchio indicata in targa. In caso di
dubbio, rivolgersi a personale prof essionalmente qualificato.
Prima di qualsiasi intervento, disinserire elettricamente l’apparecchio.
Il collegamento del piano di cottura all’impianto deve essere effettuato tramite una scatola di connessione: nel
caso di collegamento diretto dell’apparecchio alla rete,
occorre prev edere un interruttore omnipolare, accessibile in caso di necessità, con distanza di apertura dei contatti uguale o superiore a 3 mm.
Collegamento monofase
Il piano è dotato di cavo di alimentazione già collegato e
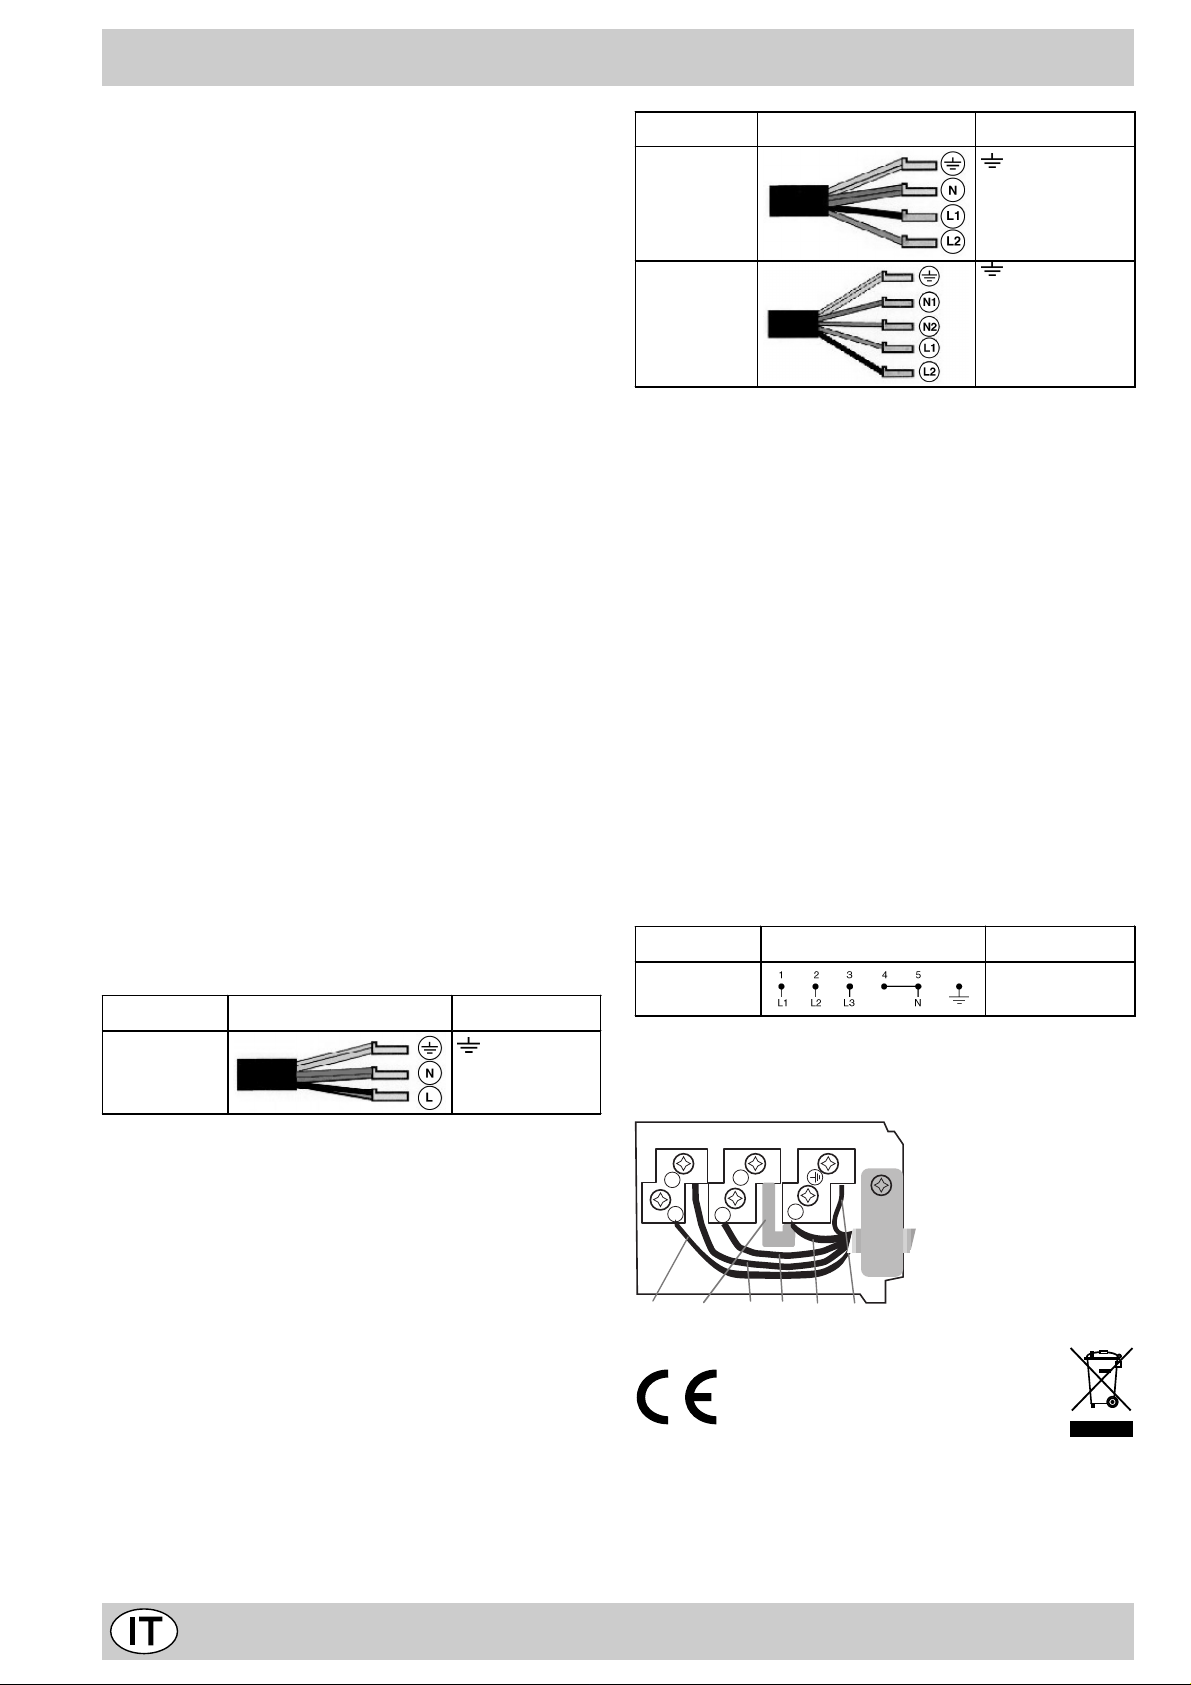
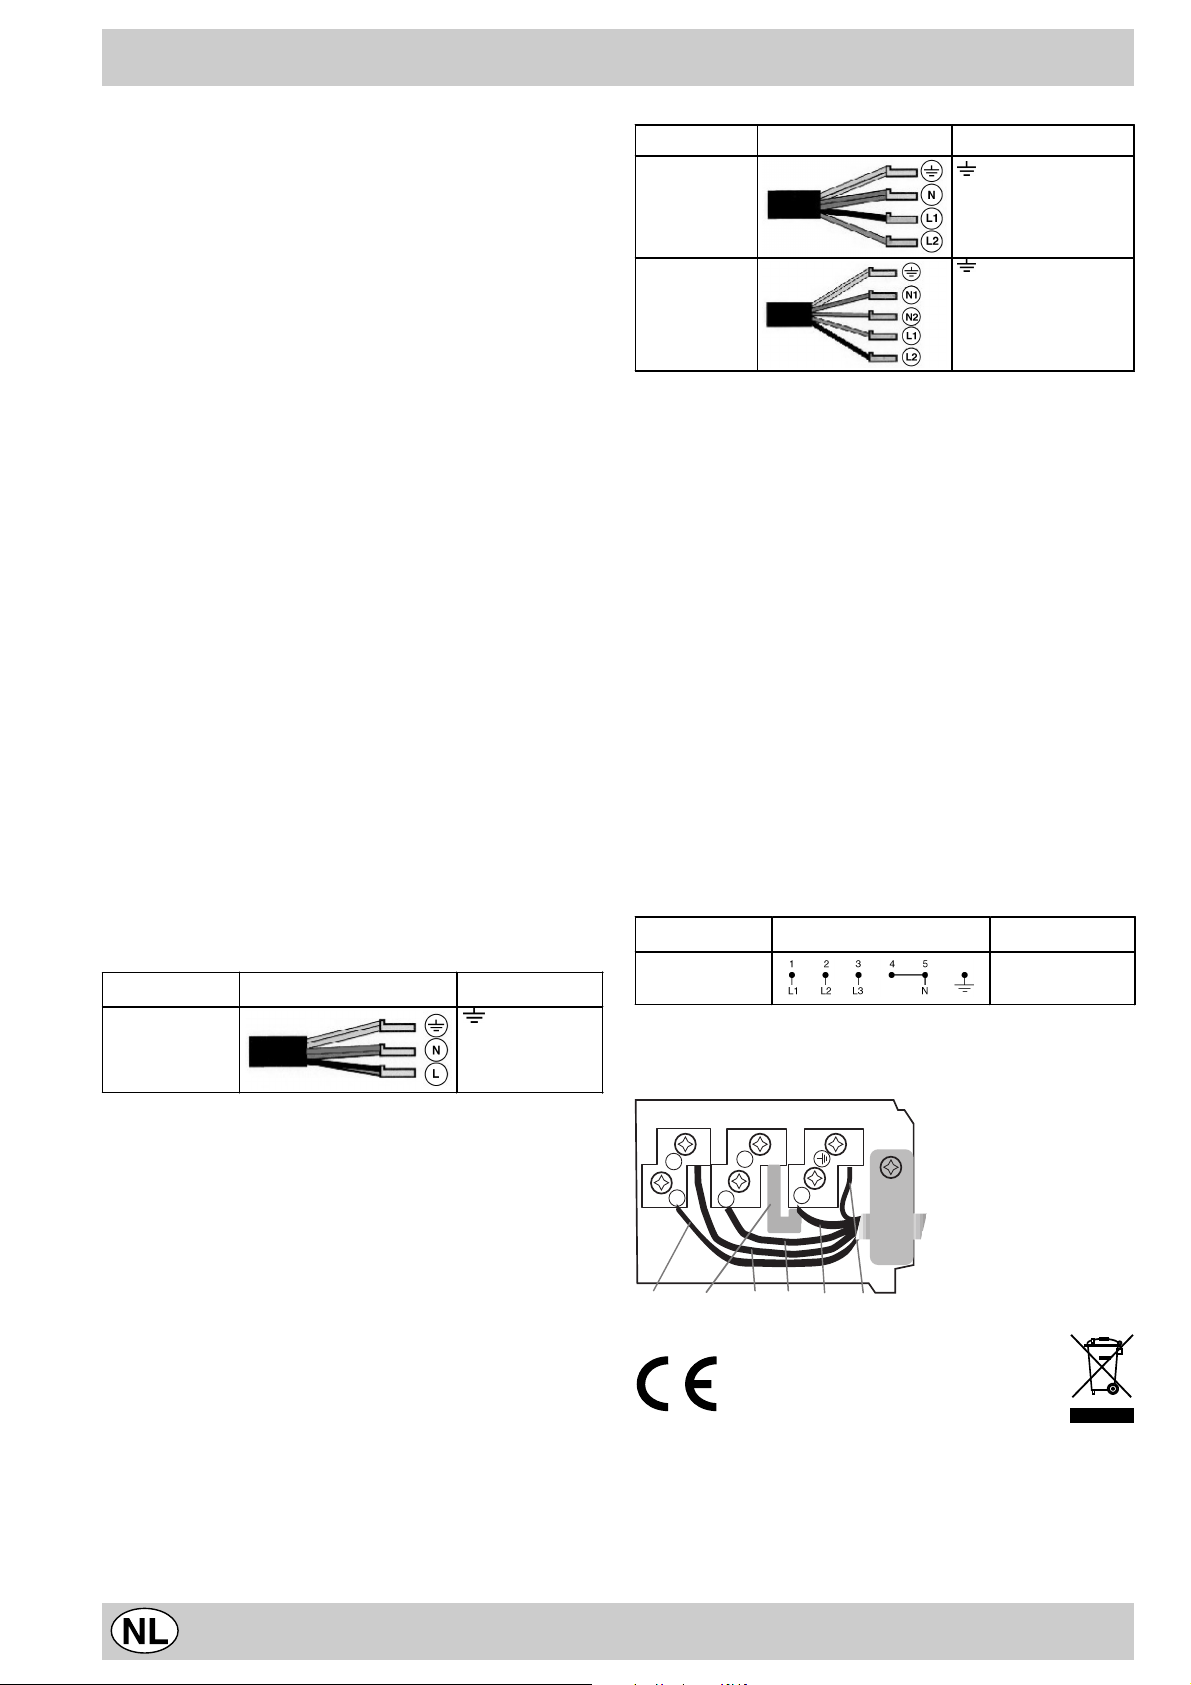
predisposto per il collegamento monofase. Eff ettuare l’allaccio dei fili in accordo con la tabella e i disegni che seguono:
Tensione tipo e
frequenza rete
230V 1+N ~
50 Hz
Cavo elettrico Collegamento fili
: giallo/verde;
N: i 2 fili blu insieme
L: marrone insieme
al nero
Tensione tipo e
frequenza rete
400V - 2+N ~
50 Hz
230V 3 ~
50Hz
400V - 2+2N ~
50 Hz
Cavo elettrico Collegamento fili
: giallo/verde;
N: i 2 fili blu insieme
L1: nero
L2: marrone
: giallo/verde;
N1: blu
N2: blu
L1: nero
L2: marrone
Se l’impianto elettrico corrisponde a una delle seguenti
caratteristiche:
Tensione tipo e frequenza di rete
• 400V 3 - N ~ 50 Hz
procedere come segue:
! L’eventuale cav o in dotazione non è utilizzabile per questi tipi di installazione.
1. Utilizzare un cavo di alimentazione appropriato, tipo
H05RR-F o di valore superiore, delle dimensioni adatte
(sezione cavo: 2,5 mm).
2. Servendosi di un cacciavite , far leva sulle linguette del
coperchio della morsettiera e aprirla (
Morsettiera
).
vedi immagine
3. Svitare la vite del serr acavo e le viti dei morsetti relativi
al tipo di allaccio necessario e posizionare i cavallotti di
collegamento secondo la tabella e i disegni che seguono.
4. P osizionare i fili in accordo con la tabella e i disegni che
seguono ed effettuare il collegamento stringendo a fondo
tutte le viti dei morsetti.
Tensione tipo e
frequenza rete
400V 3-N ~
50 Hz
Collegamenti elettrici Morsettiera
Trifas e 400
5. Fissare il ca vo di alimentazione nell’apposito fermacav o
e chiudere il coperchio.
Altri tipi di collegamento
Se l’impianto elettrico corrisponde a una delle seguenti
caratteristiche:
Tensione tipo e frequenza di rete
• 400V - 2+N ~ 50 Hz
• 230V 3 ~ 50 Hz
• 400V - 2+2N ~ 50 Hz
Separare i cavi ed eff ettuare il collegamento dei fili in ac-
cordo con la tabella e i disegni che seguono:
2
1
4
3
5
Trifase 400
Fase Cavallotto Neutro T erraFase
Fase
Questo apparecchio è stato costruito in conformità
alle seguenti normative comunitarie:
- 73/23/CEE del 19.02.73 (Bassa T ensione) e successive modifiche;
- 89/336/CEE del 03.05.89 (Compatibilità elettromagnetica) e successive modifiche;
4
Page 4
10
6
10
6
10
6
10
6
10
6
10
6
10
6
- 93/68/CEE del 22.07.93 (Bassa Tensione) e successive modifiche.
- 2002/96/CE
Avvertenza importante: In caso di installazione del piano
di cottura sopra un forno da incasso, l’allaccio elettrico del
piano e quello del forno devono essere realizzati
separatamente, sia per ragioni di sicurezza elettrica, sia par
facilitare le ev entuali operazioni di estrazione del f orno.
vede che gli elettrodomestici non debbano essere smaltiti
nel normale flusso dei rifiuti solidi urbani. Gli apparecchi
dismessi devono essere raccolti separatamente per
ottimizzare il tasso di recupero e riciclaggio dei materiali
che li compongono ed impedire potenziali danni per la
salute e l’ambiente. Il simbolo del cestino barrato è riportato su tutti i prodotti per ricordare gli obblighi di raccolta
separata.
Per ulteriori informazioni, sulla corretta dismissione degli
La direttiva Europea 2002/96/CE sui rifiuti di
apparecchiature elettriche ed elettroniche (RAEE), pre-
elettrodomestici, i detentori potranno rivolgersi al servizio
pubblico preposto o ai rivenditori.
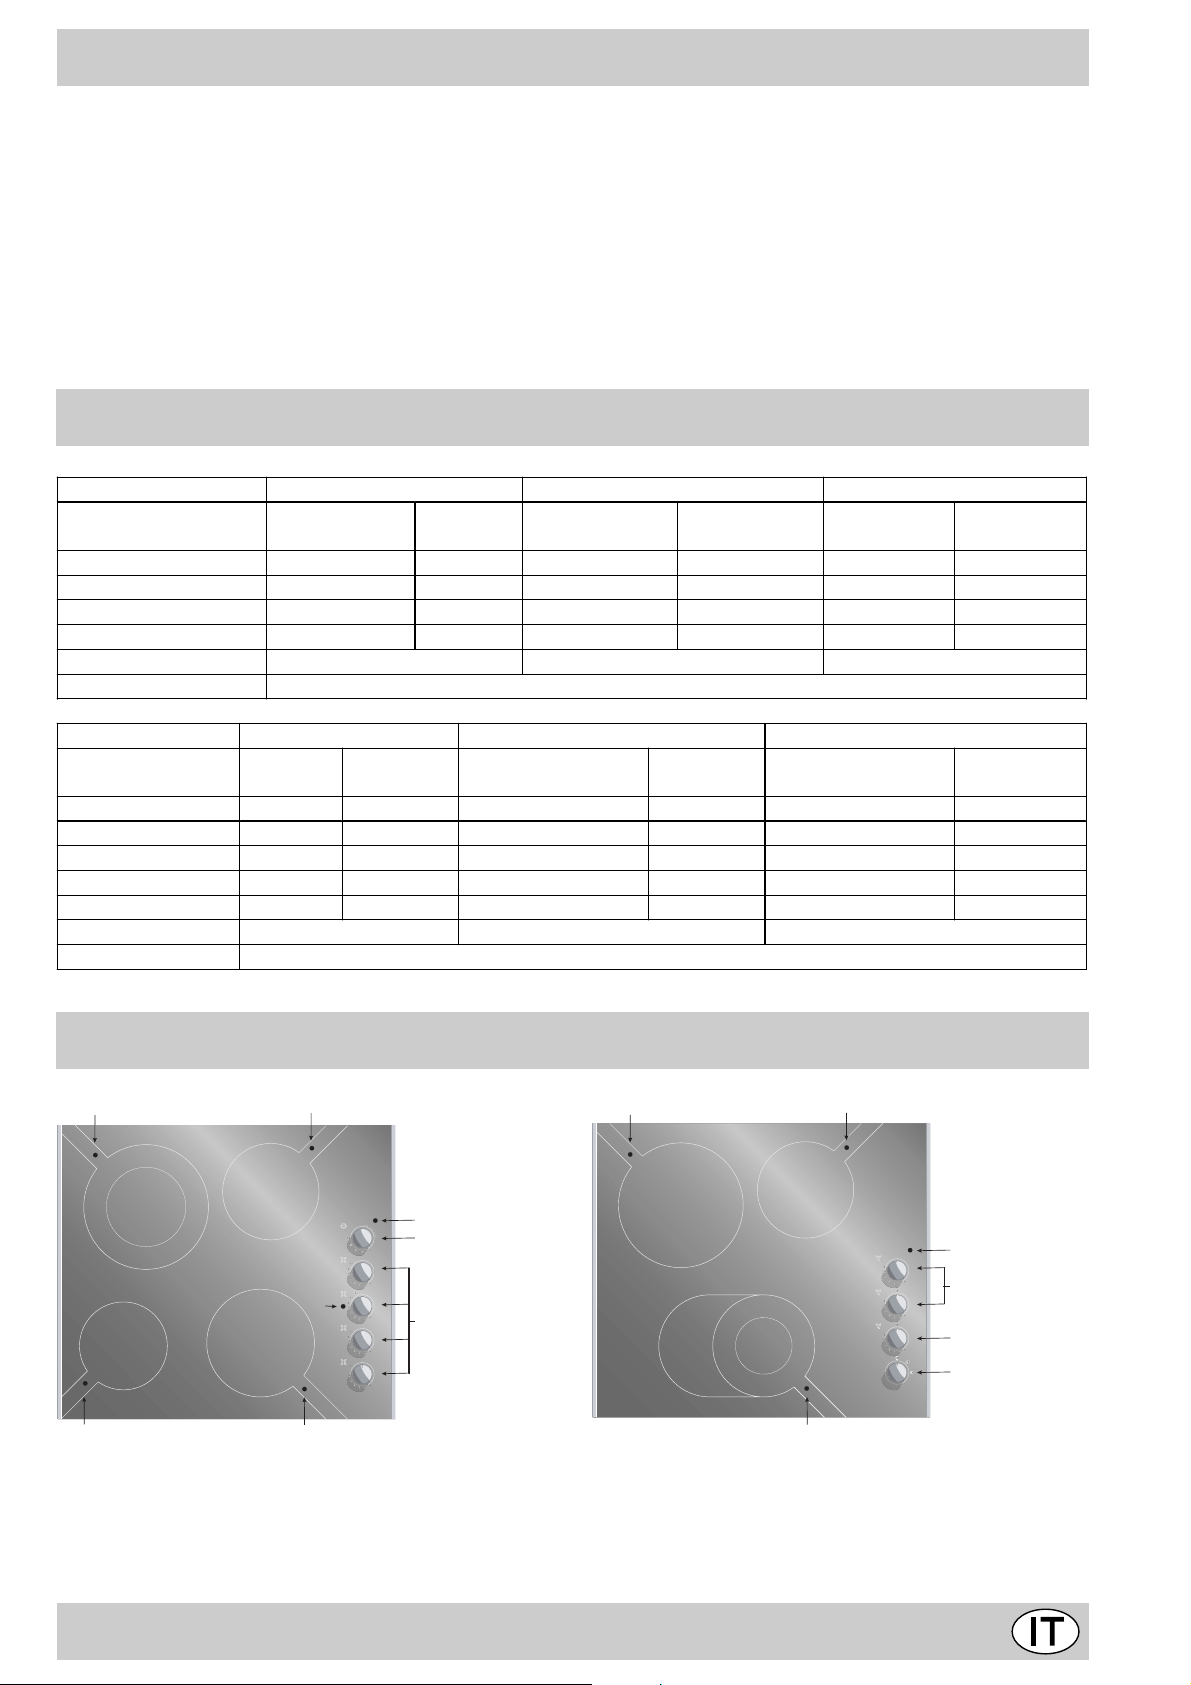
Descrizione delle zone di cottura
PIANI COTTURA TM 6321 TM 6220 TM 6130
Zone di cottura
Posteriore dx
Anteriore dx
Posterio re sx
Anteriore sx
Potenza
(in W)
R 1400 180 R 1400 180 R 1400 180
H 1800 200 H 1800 200 R 1800 200
H 1050/2500 230 H 2500 230 H 2500 230
R 1200 165 R 1200 165 R 1200 165
Potenza totale 6900 6900 6900
Diametro
(in mm)
Potenza
(in W)
Diametro
(in mm)
Potenza
(in W)
H = alogeno, R = radiante singolo, RO = radiante ovale
Diametro
(in mm)
PIANI COTTURA TM 6040 TM 6120 TM 6230
Zone di cottura
Posteriore dx
Anteriore dx
Posterio re sx
Anteriore sx
Centro Anteriore
Potenza
(in W)
R 1400 180 R 1400 165 R 1400 180
R 1800 200 R 1800 200
H 2500 250 H 2500 230 H 1050/2500 230
R 600 120 R 1200 165
Diametro
(in mm)
Potenza
(in W)
Diametro
(in mm)
RO 600/1600/2400 190x275
Potenza
(in W)
Potenza totale 6300 6300 6900
H = alogeno, R = radiante singolo, RO = radiante ovale
Descrizione del piano di cottura
D
Haloring
A
A
D
A
B
0
55
5
50
10
15
45
12
11
12
11
F
12
A
11
12
11
Haloring
E
20
25
0
1
2
3
4
5
0
1
2
3
4
5
C
0
1
2
3
4
5
0
1
2
3
4
5
D
Haloring
A
A
A
D
A
0
12
1
11
2
3
4
5
0
12
1
11
2
3
4
5
0
12
1
11
2
3
4
5
Diametro
(in mm)
B
C
G
H
D
A Zone di cottura
B Spia funzionamento
C Manopole di comando
D Spie calore residuo
E Contaminuti
D
D
F Spia di funzionamento della superficie grande per le
zone di cottura estendibili (concentriche o ovali): presente accanto a ogni zona di cottura estendibile
G Manopola di comando piastra ovale
H Manopola di comando estensione piastra ovale
5
Page 5
Le diverse funzioni presenti nel piano
Descrizione degli elementi riscaldanti
Gli elementi radianti sono composti da resistenze circo-
lari. Diventano rossi solo dopo alcune decine di secondi
dalla loro accensione.
Gli elementi alogeni misti. Il piano utilizza degli elementi composti da due lampade alogene e da una resistenza
circolare. Grazie a questa combinazione si ottiene una
distribuzione di temperatura ottimale su tutta la superficie
della zona di cottura, pur mantenendo tutti i vantaggi delle lampade alogene. Le lampade alogene hanno come
caratteristica principale l’emissione istantanea di una grande quantità di luce e di calore, in pratica:
• riscaldamento rapido simile a quello di un bruciatore a
gas
• uno spegnimento altrettanto rapido
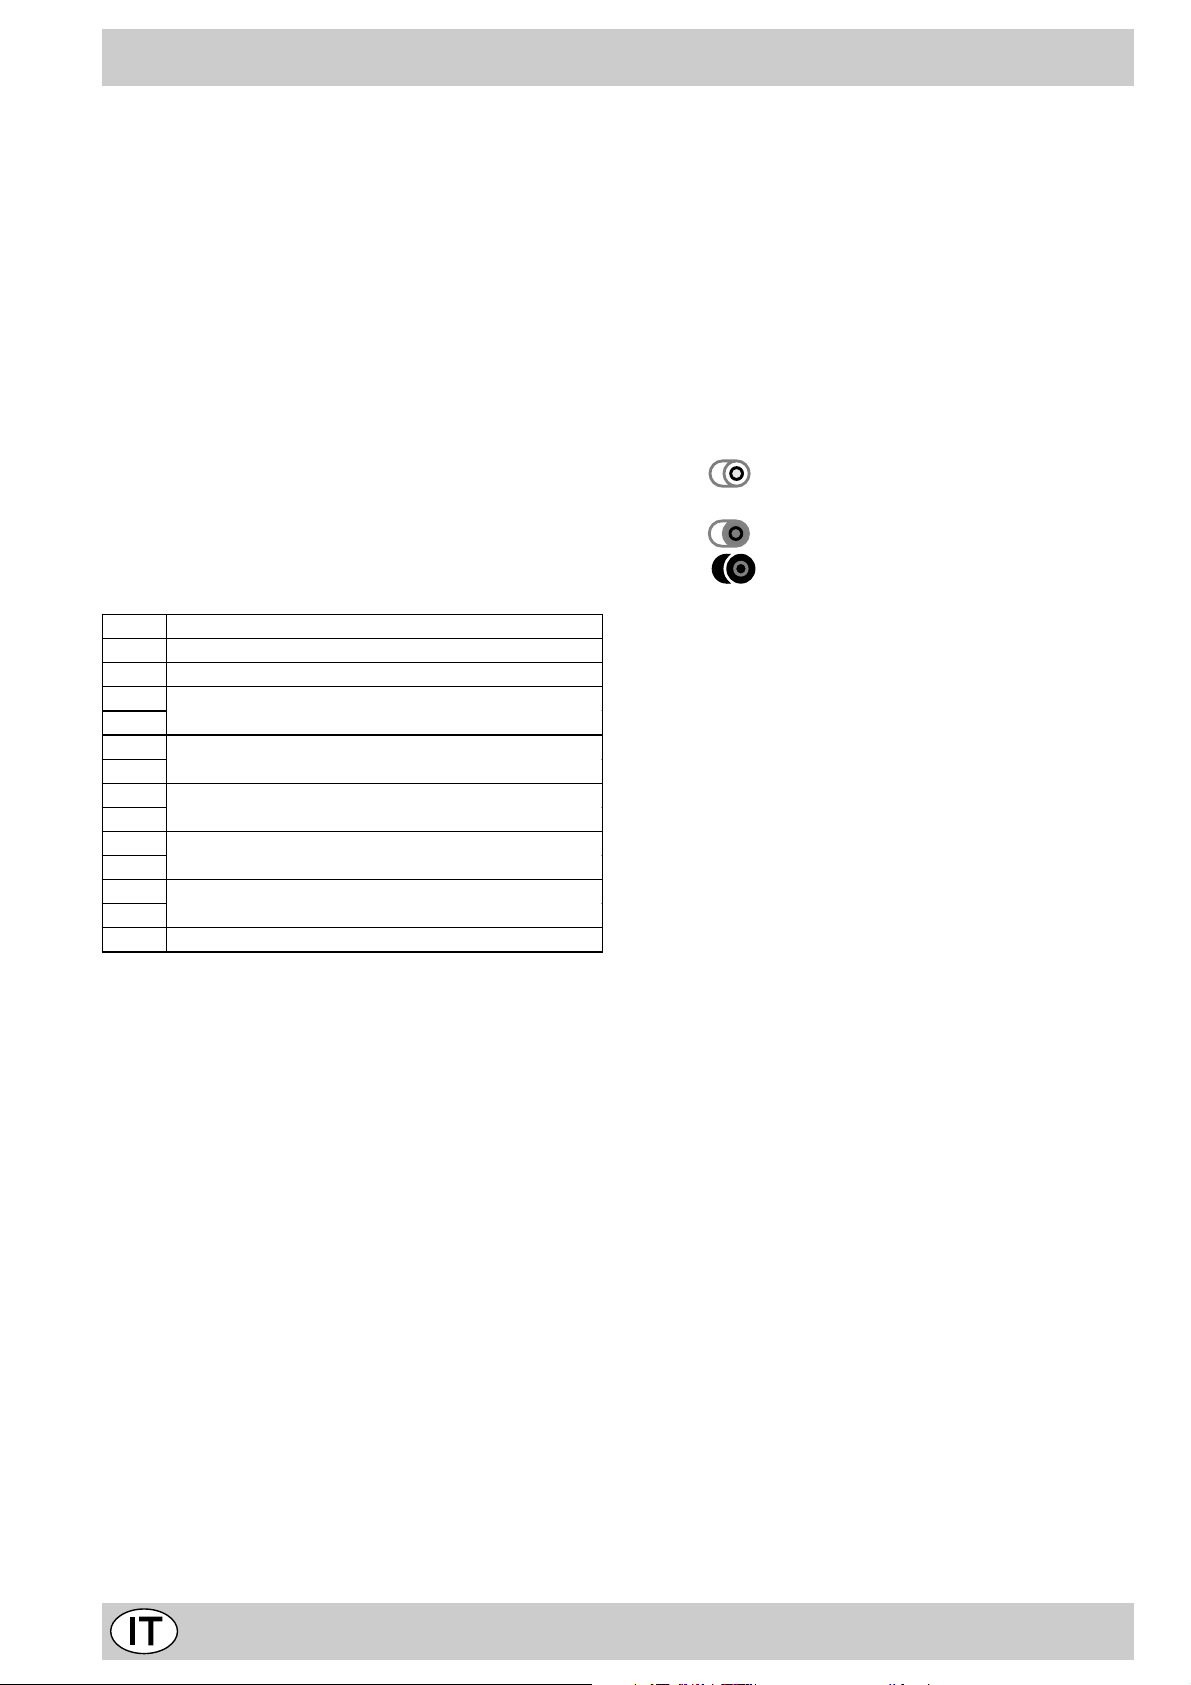
Il loro utilizzo è estremamente semplice in quanto analogo a quello degli altri elementi riscaldanti. F ate riferimento alla tabella 1.
T abella 1
Pos Regolazione delle zone di cottura
0 spenta
1 per fare sciogliere il burro o il cioccolato
2
per scaldare i liquidi
3
4
per creme e salse
5
6
carni lesse - blanquette - entremets
7
8
pasta - riso
9
10
bistecche - pesce - omelette
11
12 frittura
Le manopole di comando
Ciascuna zona di cottura è dotata di una manopola di comando che permette una regolazione continua di temperatura da un minimo di 1 ad un massimo di 12. Nella tabella 1 seguente sono riportate le corr ispondenze fra le
posizioni indicate sulla manopola e l’uso per il quale le
piastre sono consigliate.
Funzionamento delle zone di cottura estensibili ovali
(se il piano di cottura è dotato di zone estensibili ovali,
vedere la pagina precedente)
1. tramite la manopola "G" impostare la potenza desiderata;
2. posizionare la manopola "H" sui simboli:
a. per utilizzare la sola zona di cottura interna
più piccola.
b. per utilizzare la zona di cottura circolare.
c. per utilizzare l'intera z ona di cottura o v ale .
La spia di funzionamento (B)
Risulta accesa quando sia stata messa in funzione una
zona riscaldante.
La spia calore residuo (D)
Indica che, una o più zone di cottura, sono a temperatura
superiore a 60°C anche dopo lo spegnimento delle zone
di cottura. Alcuni modelli sono dotati di 4 spie calore residuo, una per ogni zona di cottura.
6
Page 6
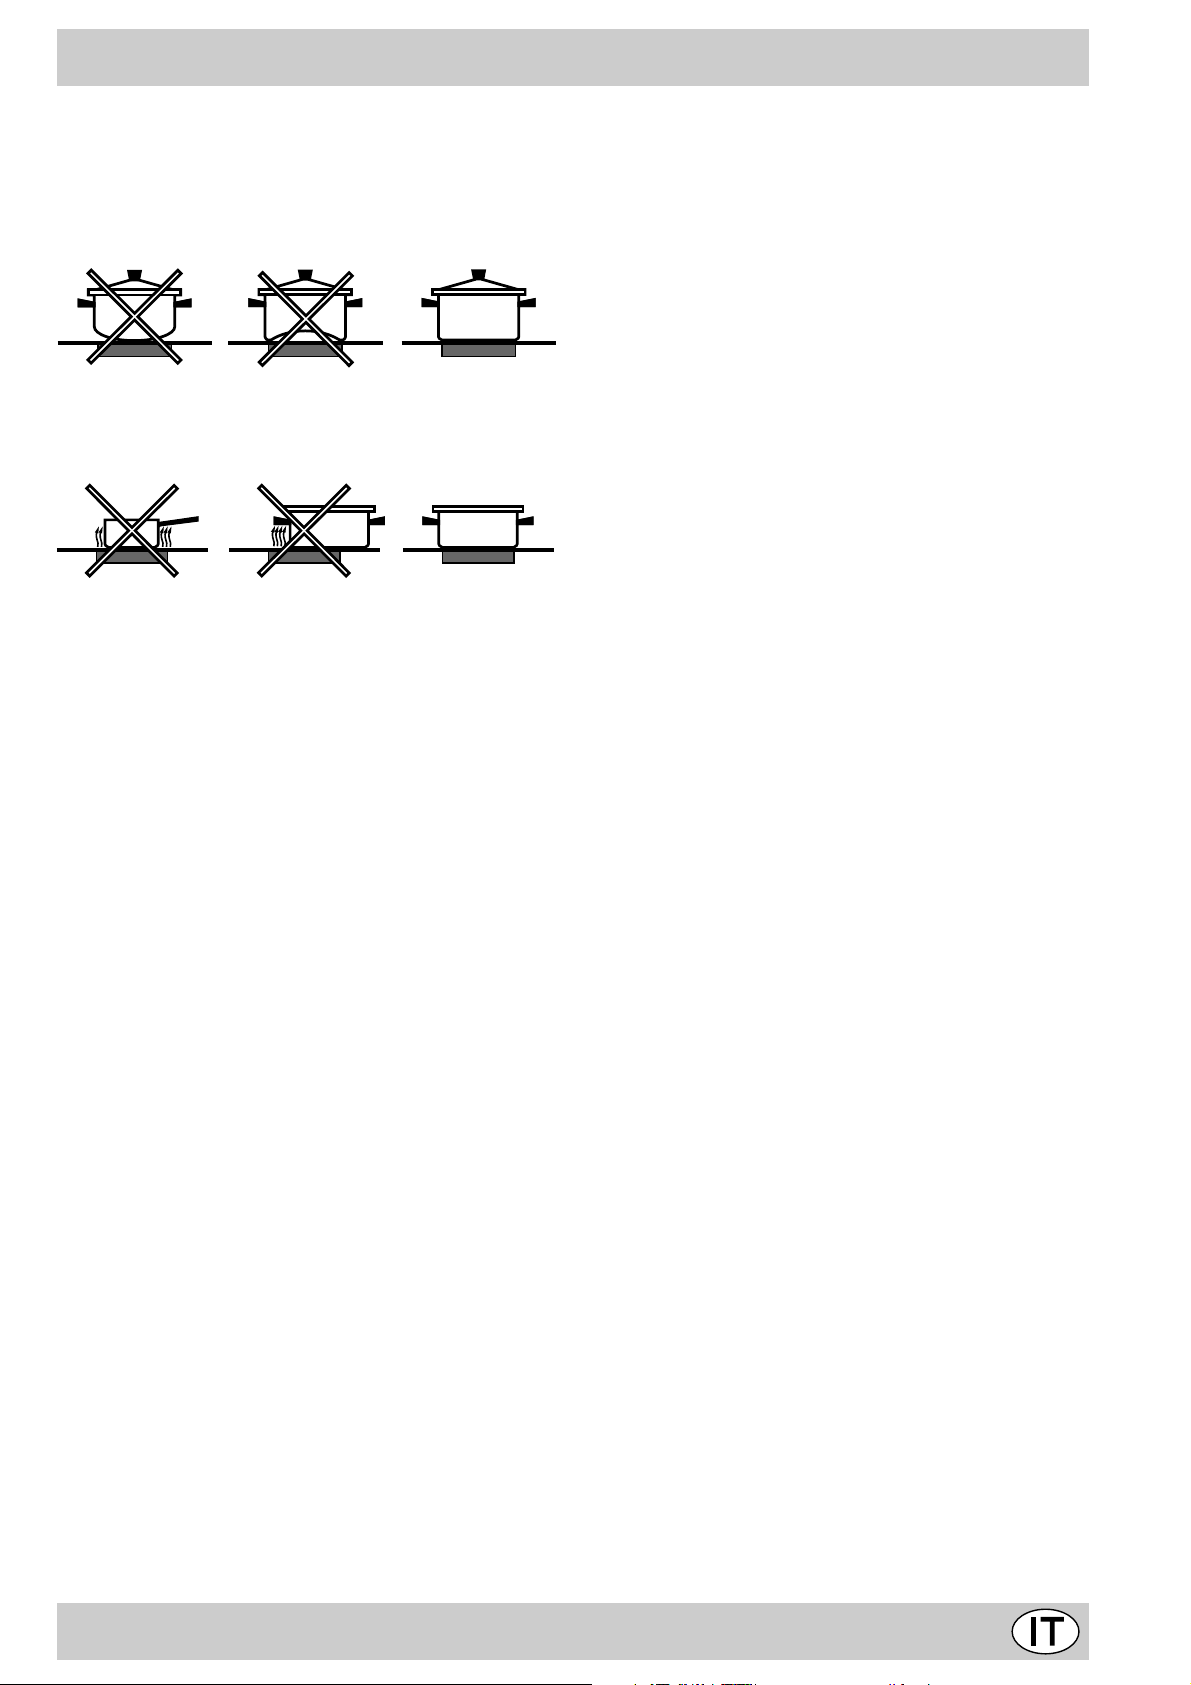
Pulizia e manutenzione
Consigli pratici per l’uso dell’apparecchio
Per ottenere le migliori prestazioni dal piano di cottura, è
indispensabile osservare alcune regole fondamentali durante la cottura e la preparazione dei cibi.
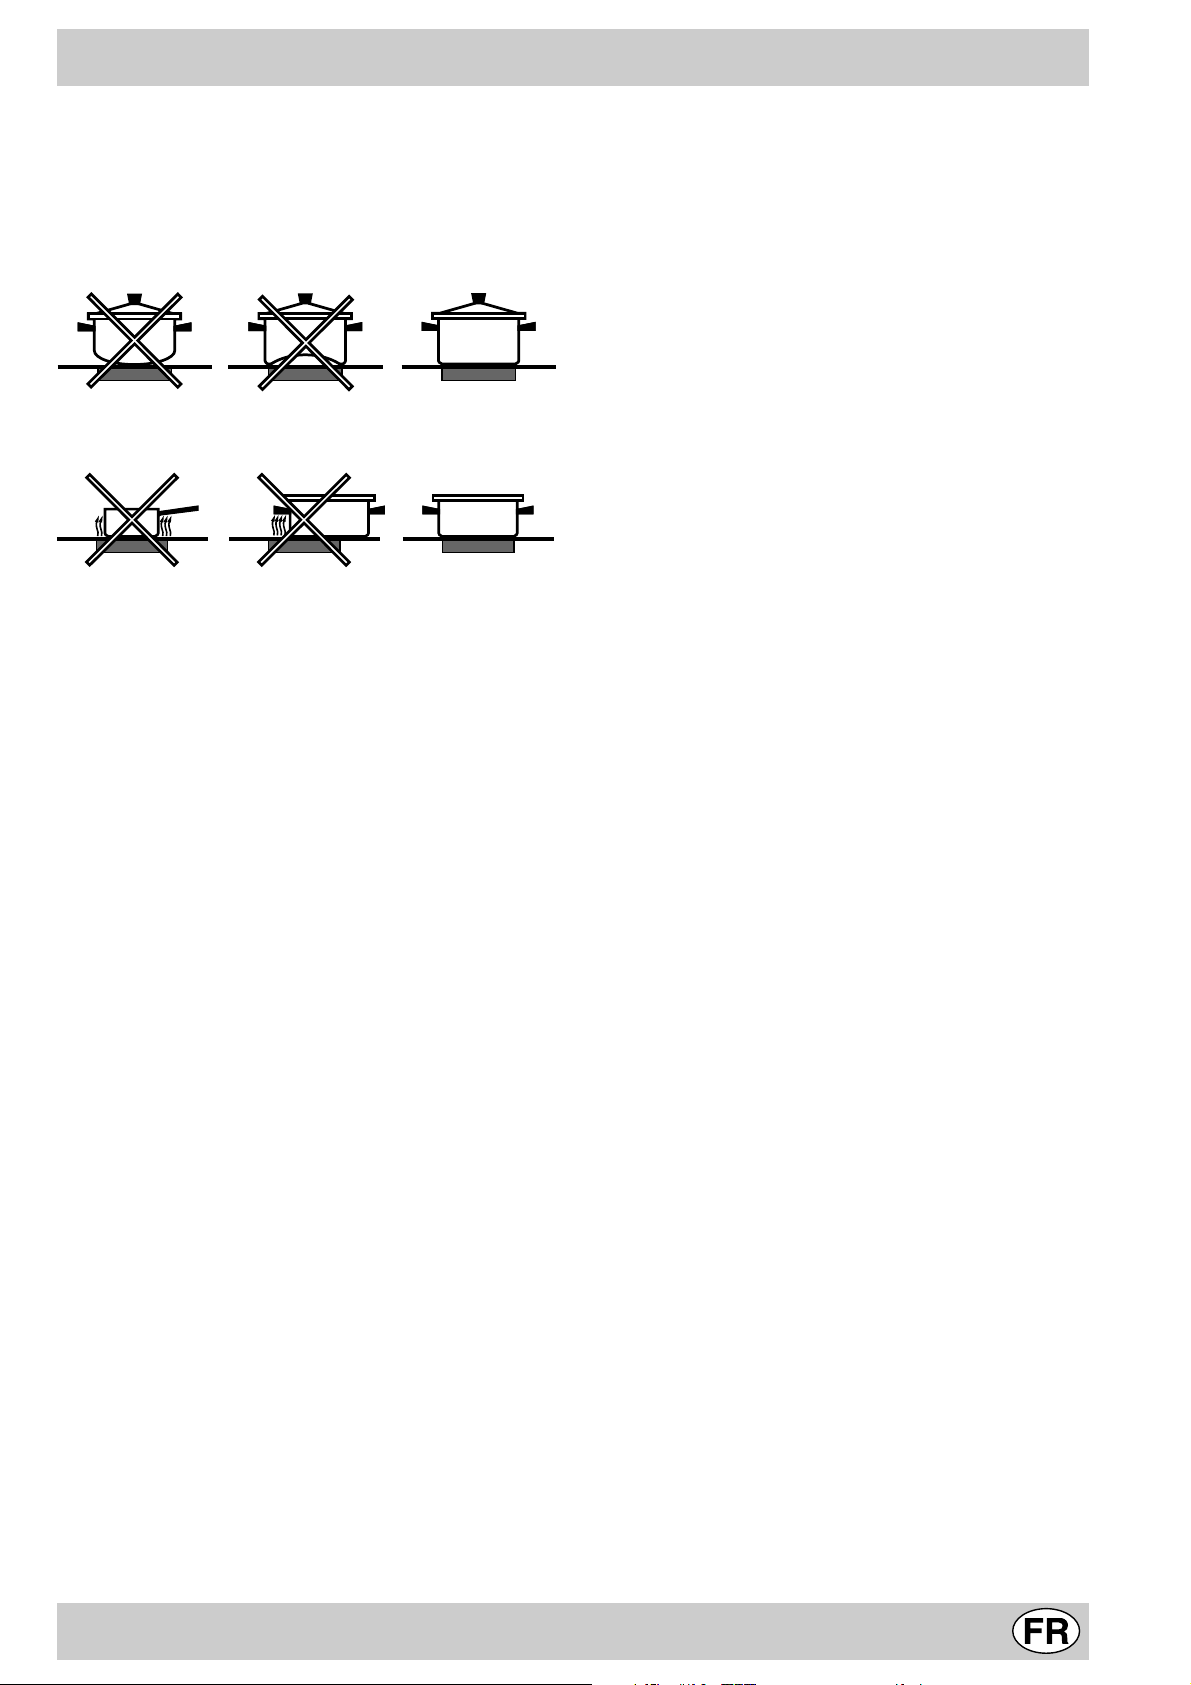
• Adoperare pentole con fondo piatto per essere certi
che aderiscano perfettamente alla zona riscaldante
• Adoperare sempre pentole di diametro sufficiente a
coprire completamente la zona riscaldante, in modo
da garantire lo sfruttamento di tutto il calore disponibile.
• Accertarsi che il fondo delle pentole sia sempre perfettamente asciutto e pulito, per garantire la corretta
aderenza e una lunga durata non solo delle zone di
cottura, ma anche delle pentole stesse.
• Evitare di utilizzare le stesse pentole utilizzate sui bruciatori a gas. La concentrazione di calore sui bruciatori a gas può deformare il fondo della pentola, che pertanto non consentirà di ottenere il risultato auspicato
quando utilizzata sul piano di cottura in vetroceramica.
• Non lasciare mai una zona di cottura accesa senza
pentola poiché il suo riscaldamento, raggiungendo rapidamente il livello massimo , potrebbe danneggiare gli
elementi riscaldanti.
• Il piano in vetroceramica è resistente sia agli urti termici, sia agli urti meccanici. Tuttavia, esso può frantumarsi se colpito violentemente con un oggetto appuntito. In questo caso, scollegare l’apparecchio dalla
rete di alimentazione e rivolgersi ad un centro di assistenza tecnica autorizzato ad eseguire riparazioni.
Tenere sempre pulito il piano di cottura. Prima di procedere alla manutenzione del piano, accertarsi che le zone
riscaldanti siano spente e raffreddate.
Telaio in acciaio inox (soltanto su alcuni modelli)
L’acciaio inossidabile può macchiarsi per effetto di un’acqua molto calcarea lasciata per un periodo di tempo prolungato a contatto dello stesso oppure a causa di prodotti
per la pulizia particolarmente aggressivi (contenenti fosforo). Si consiglia di sciacquare abbondantemente e
asciugare con cura dopo la pulizia del piano. In caso di
versamenti d’acqua, intervenire rapidamente asciugando
con cura.
Manutenzione del piano di cottura
Il piano in vetroceramica utilizzato come superficie riscaldante è perfettamente liscio e privo di porosità; inoltre, nelle normali condizioni di impiego, è resistente sia agli urti
termici, sia agli urti meccanici. Ai fini del corretto mantenimento di tutte le proprietà del piano di cottura, si consiglia
di procedere alla sua manutenzione nel modo seguente:
• per una manutenzione ordinaria, è sufficiente lavarlo con una spugna umida, asciugando quindi con
una carta assorbente per cucina.
• Se il piano è particolarmente sporco, strofinare con
un prodotto specifico per la pulizia delle superfici in
vetroceramica, sciacquare e asciugare.
• per rimuovere gli accumuli di sporco più consistenti servirsi di un apposito raschietto. Intervenire non appena possibile, senza attendere che l’apparecchio si
sia raffreddato, per evitare l’incrostazione dei residui.
Eccellenti risultati si possono ottenere usando una
spugnetta in filo d’acciaio inossidabile - specifica per
piani in vetroceramica - imbevuta di acqua e sapone.
• Una volta pulito , il piano può essere trattato con un
prodotto specifico per la manutenzione e la protezione: la pellicola invisibile lasciata da questo prodotto
protegge la superficie in caso di scolamenti durante la
cottura. Si raccomanda di eseguire queste operazioni
con l’apparecchio tiepido o freddo.
• Ricordarsi sempre di risciacquare con acqua pulita
e asciugare accuratamente il piano: i residui di prodotti potrebbero infatti incrostarsi durante la successiva
cottura.
Importanti raccomandazioni
• Evitare rigorosamente l’uso di detergenti abrasivi o corrosivi, quali i prodotti in bombolette spray
per barbecue e forni, gli smacchiatori e prodotti
antiruggine, i detersivi in polvere e le spugne con superficie abrasiva, in quanto possono graffiare
irrimediabilmente la superficie.
• Si raccomanda di tenere a debita distanza dal
piano di cottura qualsiasi oggetto che potrebbe fondere, ad esempio oggetti di plastica, zucchero o
prodotti con un elevato contenuto di zucchero. In
caso di versamento sul piano di cottura di questi materiali, rimuoverli immediatamente (finché la superfi-
cie è ancora calda) con un raschietto a lama di rasoio,
per evitare di rovinare la superficie .
• Il piano deve essere utilizzato esclusivamente
per operazioni di cottura. Non posare alcun oggetto
sul piano mentre non viene utilizzato. Non utilizzare il
piano come superficie di appoggio (per posate, pentole, strofinacci, ecc.), né come tagliere.
• Gli imballaggi in alluminio, la pellicola di alluminio , i
recipienti in plastica non devono essere mai lasciati
sulle superfici ancora tiepide o calde.
• Non utilizzare mai pulitori a vapore o ad alta pressione per la pulizia dell’apparecchio.
• Non posare oggetti metallici (coltelli, cucchiai, coperchi, ecc.) sul piano.
• Non riscaldare mai cibi in scatola ancora chiusa:
potrebbe esplodere.
Ogni danneggiamento del piano di cottura dovuto a simili
episodi di uso improprio si intenderà escluso dalla copertura della garanzia.
7
Page 7

Advice and recommendations
• This appliance was designed for non-professional,
household use.
• Before using the appliance, read the instructions in
the owner’s manual carefully since it contains all the
instructions you require to ensure safe installation, use
and maintenance. Keep this owner’s manual in a safe
place for future reference.
• When you have removed the packing, check whether
the appliance is intact. If you have any doubts, contact a qualified professional before using the appliance .
• Never leave the packing components (plastic bags,
polystyrene foam, nails, etc.) within the reach of children since these are a source of potential danger.
• The appliance must be installed by a qualified technician in compliance with the instructions provided by
the manufacturer.
• The latter denies all responsibility for improper installation which may harm persons and animals and damage property.
• The electrical safety of this appliance can only be
guaranteed if the latter is correctly and efficiently
earthed, in compliance with regulations on electrical
safety. Always ensure that this vital safety measure
has been taken. If you have any doubts, call in a qualified technician to check the electrical system thoroughly.
• The manufacturer denies all responsibility for damage
resulting from a system which has not been earthed
correctly.
• Before powe ring the appliance, check whether the technical characteristics featured on the appliance data
plate correspond with those of the mains electrical
system.
• Check that the current load of the mains supply and of
the power sockets is suitable for the maximum power
of the appliance, indicated on the appliance data plate.
If in doubt, contact a qualified professional.
• This appliance must only be used for the purpose for
which it was expressly designed. Any other use (such
as heating a room for example) is considered to be
improper and consequently dangerous.
• The manufacturer denies all responsibility for damage
resulting from improper or incorrect use of the appliance.
• Certain fundamental rules must be followed when using electrical appliances. The following are of particular importance:
• do not touch the appliance with wet or damp hands,
• never use the appliance when barefoot,
• never use extensions,
• never pull on the power supply cable or the appliance
itself to unplug it from the mains socket,
• never leave the appliance exposed to atmospheric
agents (rain, sun, etc.),
• do not allow children or persons who are not familiar
with the appliance to use it without supervision.
• Always unplug the appliance from the mains or switch
off the main switch before cleaning or performing any
cleaning or maintenance operations.
• If the surface of the glass cracks, unplug the appli-
ance immediately. For any repairs, contact only an
authorised after-sales service centre and demand original spare parts. Failure to comply with the above may
compromise the safety of the appliance.
• Cut the power supply cable after disconnecting it from
the power mains when you decide not to use the appliance any longer. Also make all potentially dangerous
parts of the appliance safe, above all for children who
could play with the appliance.
• The glass ceramic hob is resistant to thermal and
mechanical shocks. However, it may break due to a
shock caused by a sharp object, such as a tool for
example. In this case, unplug the appliance immediately and contact an authorised after-sales service centre to have it repaired.
• Remember that the heating area stays hot for at least
half an hour after being turned off; please refrain from
placing any cookware or other items on the cooking
zone while still hot.
• Do not turn on the heating zones if aluminium foil or
plastic items have been placed on the hob surface.
• Do not go near the heating zones when these are still
hot.
• If you use small electric appliances near the hob,
make sure their power supply cable does not come
into contact with the hot parts of the hob.
• Make sure all pan handles are always pointing inwards towards the centre of the hob to prevent any
accidental spills.
• WARNING: Do not look at the halogen lamps in
the cooking zones for long if they are present.
First use: the glue used on the hob seals may leave greasy traces on the glass surface. We recommend you wipe
these off before using the appliance, with the aid of a non abrasive cleaner. During the first few hours of use, you
may detect a smell of rubber, which will disappear quickly.
8
Page 8

Installation and fastening
The following instructions are intended for a qualified
fitter to guide him/her along the installation, adjustment
and technical maintenance procedures as correctly as
possible and in full compliance with the applicable norms
in force.
Important : unplug the hob before all operations.
Installation
• This hob can be built into a worktop simply by
cutting out the corresponding slot.
• The worktop must be made with a material designed to withstand a temperature of approximately
100°C.
• The hob should be positioned at least 40 mm away
from the back wall or any other vertical surface in
order to allow for correct ventilation and to prevent
the surfaces around the appliance from overheating.
• If you wish to install the hob on top of an oven, the
latter must be fitted with a cooling fan.
• Try to avoid installing the hob on top of a dishwasher; if this is unavoidable, place a watertight
separating element between the two appliances.
574
Fastening
Very important: It is vital that you ensure the glass
ceramic hob is built into a perfectly flat supporting surface. Deformations due to improper fastening could alter
the characteristics of the hob and compromise its performance.
The fastening springs are fastened by screws (see diagram).
It is vital that these screws be kept accessible at all
times.
Insert the hob into the cut-out slot, applying pressure all
along the perimeter of the hob frame so that the latter
adheres fully to the worktop.
REAR SPRING ASSEMBLY
FRONT OF HOB
KITCHEN
WORKTOP
30
40
48
560 +/- 1
504
490 +/- 1
10
Distance to
keep between the
cut-out slot and
the cabinet
HOB FROM BELOW
Page 9

Technical characteristics
Electrical connection
• The electrical safety of this appliance can only be
guaranteed if the latter is correctly and efficiently
earthed, in compliance with regulations on electrical
safety. Always ensure that this vital safety measure
has been taken. If you have any doubts, call in a
qualified technician to check the electrical system
thoroughly.
•
The manufacturer denies all responsibility f or damage resulting from a system which has not been
earthed correctly.
• Before powering the appliance, check whether the
technical characteristics featured on the appliance
data plate correspond with those of the mains electrical system.
• Check that the current load of the mains supply
and of the power sockets is suitable for the maximum power of the appliance, indicated on the appliance data plate. If in doubt, contact a qualified professional.
Disconnect the appliance from the electricity supply
before all operations.
Connect your hob to the electrical system by means of
a junction box: if the appliance is connected perma-
nently to the mains, an omnipolar circuit breaker, accessible if necessary, with a minimum contact opening
of 3 mm should be installed.
Single-phase connection
The hob is equipped with a preconnected electricity supply
cable, which is designed for single-phase connection.
Connect the wires according to the instructions given in
the following table and diagrams:
Voltage and
mains frequency
230V 1+N ~
50 Hz
Other types of connection
Electrical cable Wire connection
: yellow/green;
N: the two blue wires
together
L: brown and black
together
Voltage a nd
mains frequency
400V - 2+N ~
50 Hz
230V 3 ~
50Hz
400V - 2+2N ~
50 Hz
Electrical cable Wire connection
: yellow/green;
N: the two blue wires together
L1: black
L2: brown
: yellow/green;
N1: blue
N2: blue
L1: black
L2: brown
If the mains supply corresponds with one of the following:
Voltage and mains frequency
• 400V 3 - N ~ 50 Hz
proceed as follows:
! The cable pro vided is not suitable f or the following types
of installation.
1. Use a suitable supply cable, H05RR-F or higher, with
the right dimensions (cable section: 2.5 mm).
2. To open the terminal board, inser t a screwdriver into
the side tabs of the cover and open it (
board picture
).
see Ter minal
3. Loosen the cable clamp screw and the terminal board
screws according to the type of connection required and
position the connection supports as shown in the following table and diagrams.
4. Position the wires according to the following table and
diagrams and connect the appliance by tightening all
the screws for the springs as much as possible.
Voltage and
mains frequency
400V 3-N ~ ı 50
Hz
Electrical connections Terminal board
Three-phase 400
5. Secure the power supply cable by fastening the cable
clamp screw, then put the cover back on.
If the mains supply corresponds with one of the following:
Voltage and mains frequency
• 400V - 2+N ~ 50 Hz
• 230V 3 ~ 50 Hz
• 400V - 2+2N ~ 50 Hz
Separate the wires and connect them according to the
instructions given in the following table and diagrams:
2
1
4
3
5
Three-phase 400
Phase PhasePhase Neutral Earth
U-bolt
connection support
This appliance conforms with the following European
Community Directives:
- 73/23/EEC of 19/02/73 (Low V oltage) and subsequent
amendments;
10
Page 10
10
6
10
6
10
6
10
6
10
6
10
6
10
6
- 89/336/EEC of 03/05/89 (Electromagnetic
compatibility) and subsequent amendments;
- 93/68/EEC of 22/07/93 and subsequent amendments;
- 2002/96/EC
household electrical appliances must not be disposed
of in the normal unsor ted municipal waste stream. Old
appliances must be collected separately in order to
optimise the recovery and recycling of the materials they
contain and reduce the impact on human health and the
Warning: If the hob is fitted above a built-in oven, the hob
and the oven must be connected to the mains separately
for safety reasons and to simplify operations when it is
necessary to pull the oven out for some reason.
environment. The crossed out “wheeled bin” symbol on
the product reminds you of your obligation, that when
you dispose of the appliance it must be separately
collected.
Consumers should contact their local authority or retailer
The European Directive 2002/96/EC on Waste Electrical
and Electronic Equipment (WEEE), requires that old
for information concerning the correct disposal of their
old appliance.
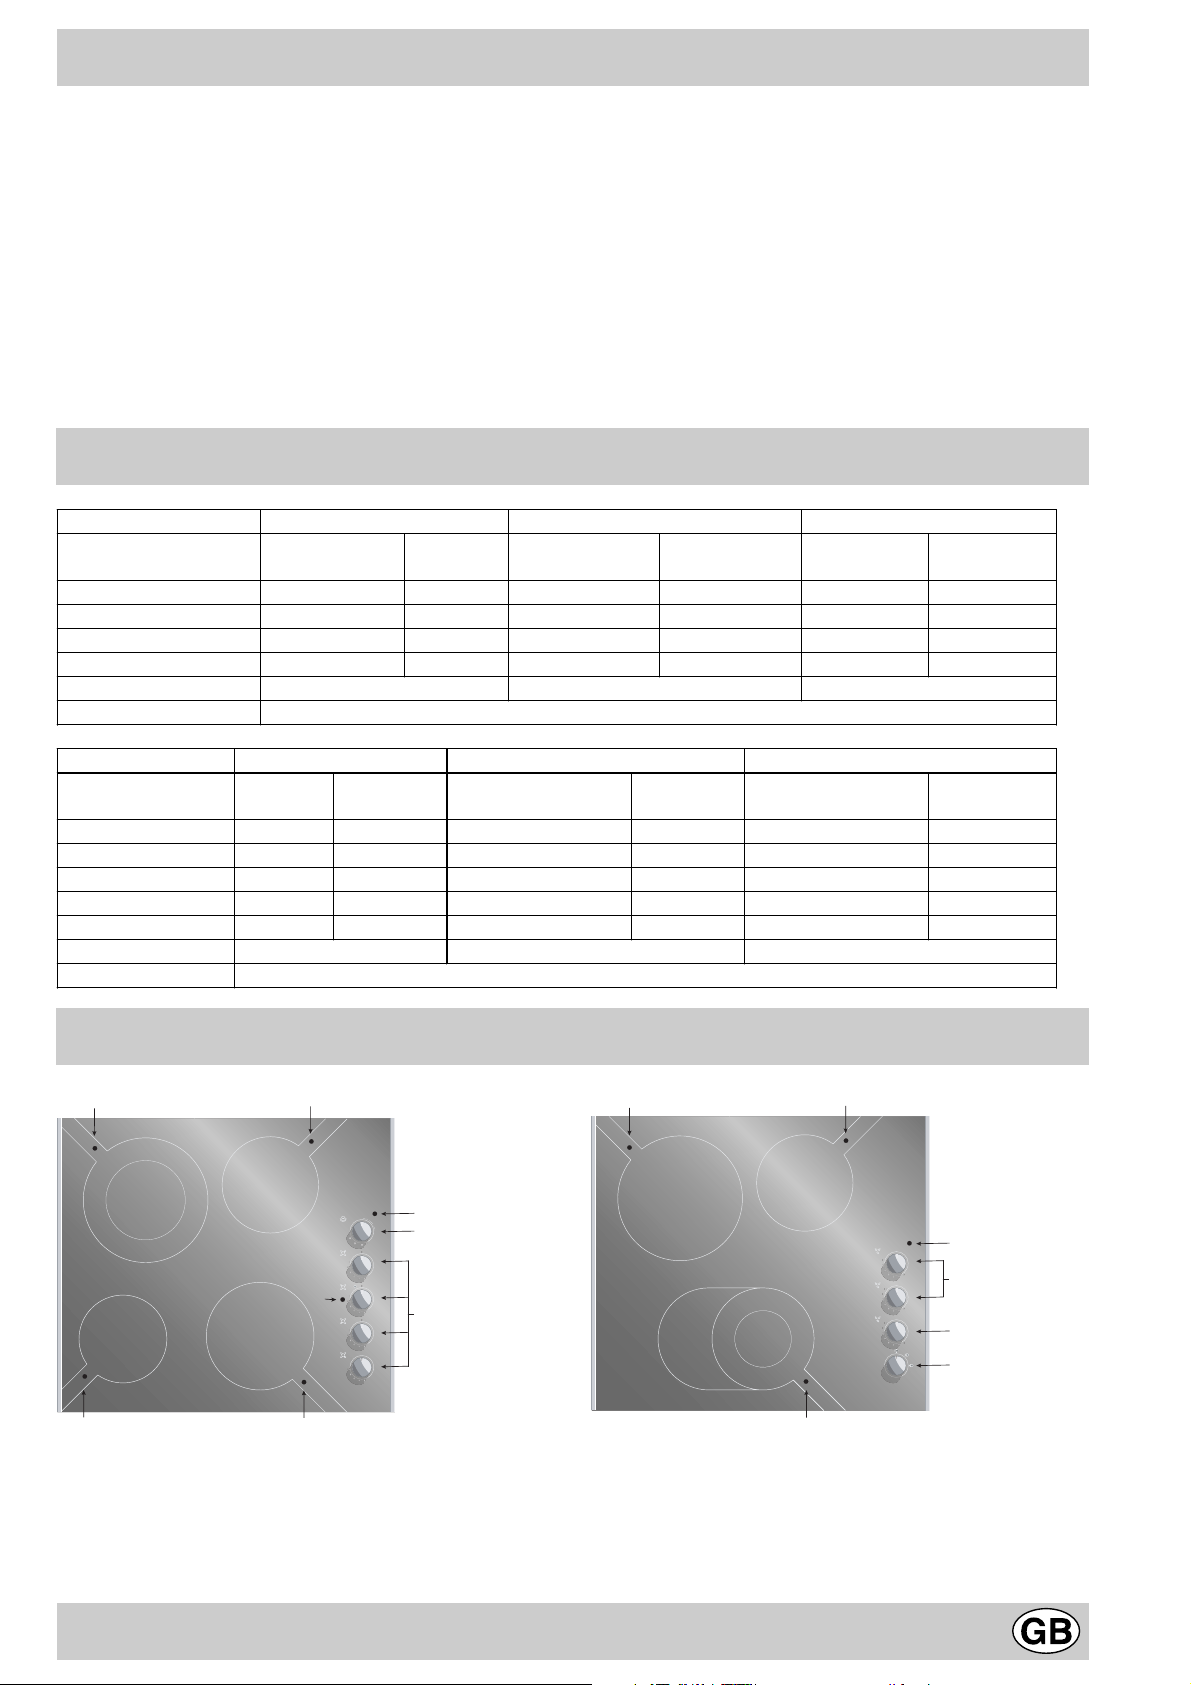
Cooking zone description
HOBS TM 6321 TM 6220 TM 6130
Cooking zones
Back Right
Front Right
Back Left
Front Left
Power
(W)
R 1400 180 R 1400 180 R 1400 180
H 1800 200 H 1800 200 R 1800 200
H 1050/2500 230 H 2500 230 H 2500 230
R 1200 165 R 1200 165 R 1200 165
Total power 6900 6900 6900
Diameter
(mm)
Power
(W)
Diameter
(mm)
H = halogen, R = radiant single, RO = radiant double
Power
(W)
Diameter
(mm)
HOBS TM 6040 TM 6120 TM 6230
Cooking zones
Back Right
Front Right
Back Left
Front Left
Front Centre
Power
(W)
R 1400 180 R 1400 165 R 1400 180
R 1800 200 R 1800 200
H 2500 250 H 2500 230 H 1050/2500 230
R 600 120 R 1200 165
Diameter
(mm)
Power
(W)
Diameter
(mm)
RO 600/1600/2400 190x275
Power
(W)
Total power 6300 6300 6900
H = halogen, R = radiant single, RO = radiant double
Description of the cooktop
D
Haloring
A
A
D
A
B
0
55
5
50
10
45
15
E
20
25
0
12
1
11
2
3
4
5
0
12
1
11
2
F
A
Haloring
3
4
5
C
0
12
1
11
2
3
4
5
0
12
1
11
2
3
4
5
D
Haloring
A
A
A
D
A
0
12
1
11
2
3
4
5
0
12
1
11
2
3
4
5
0
12
1
11
2
3
4
5
Diameter
(mm)
B
C
G
H
D
A Cooking zones
B Indicator light
C Control knobs
D Residual heat indicator lights
E Timer
D
D
F Surface operation indicator light for the extendable
cooking zones (concentric or oval): present next to
each extendable cooking zone
G Oval plate control knob
H Oval plate extension control knob
Page 11
The different functions of the hob
Description of the heating elements
The heating elements are circular in shape and turn
red in colour only 20-30 seconds after they have been
turned on.
Combined halogen and electrical heating elements.
The cooktop utilises heating elements which are made
up of two halogen lamps and a circular heating element. This combination provides ideal heat distribution
across the entire surface of the cooking area without
compromising the advantages of the halogen lamps.
The main characteristic of halogen lamps is that they
produce an instantaneous emission of a large quantity
of light and heat, which means:
• a rapid source of heat similar to that provided by gas
burners;
• an equally rapid elimination of the heat source.
Halogen lamps are extremely easy to use and their
operation is similar to that of other heating elements.
Please refer to the table 1.
Table 1
Pos Cooking zone setting
0off
1 to melt butter or chocolate
2
to heat liquids
3
4
for creams and sauces
5
6
stews - blanquette - desserts
7
8
pasta - rice
9
10
steak - fish - omelette
11
12 fried food
The control knobs
Each cooking area is equipped with a control knob to
regulate the temperature at any time from a minimum
of 1 to a maximum of 12. The table 1 provides information on the settings indicated on the knobs and the
corresponding, recommended uses.
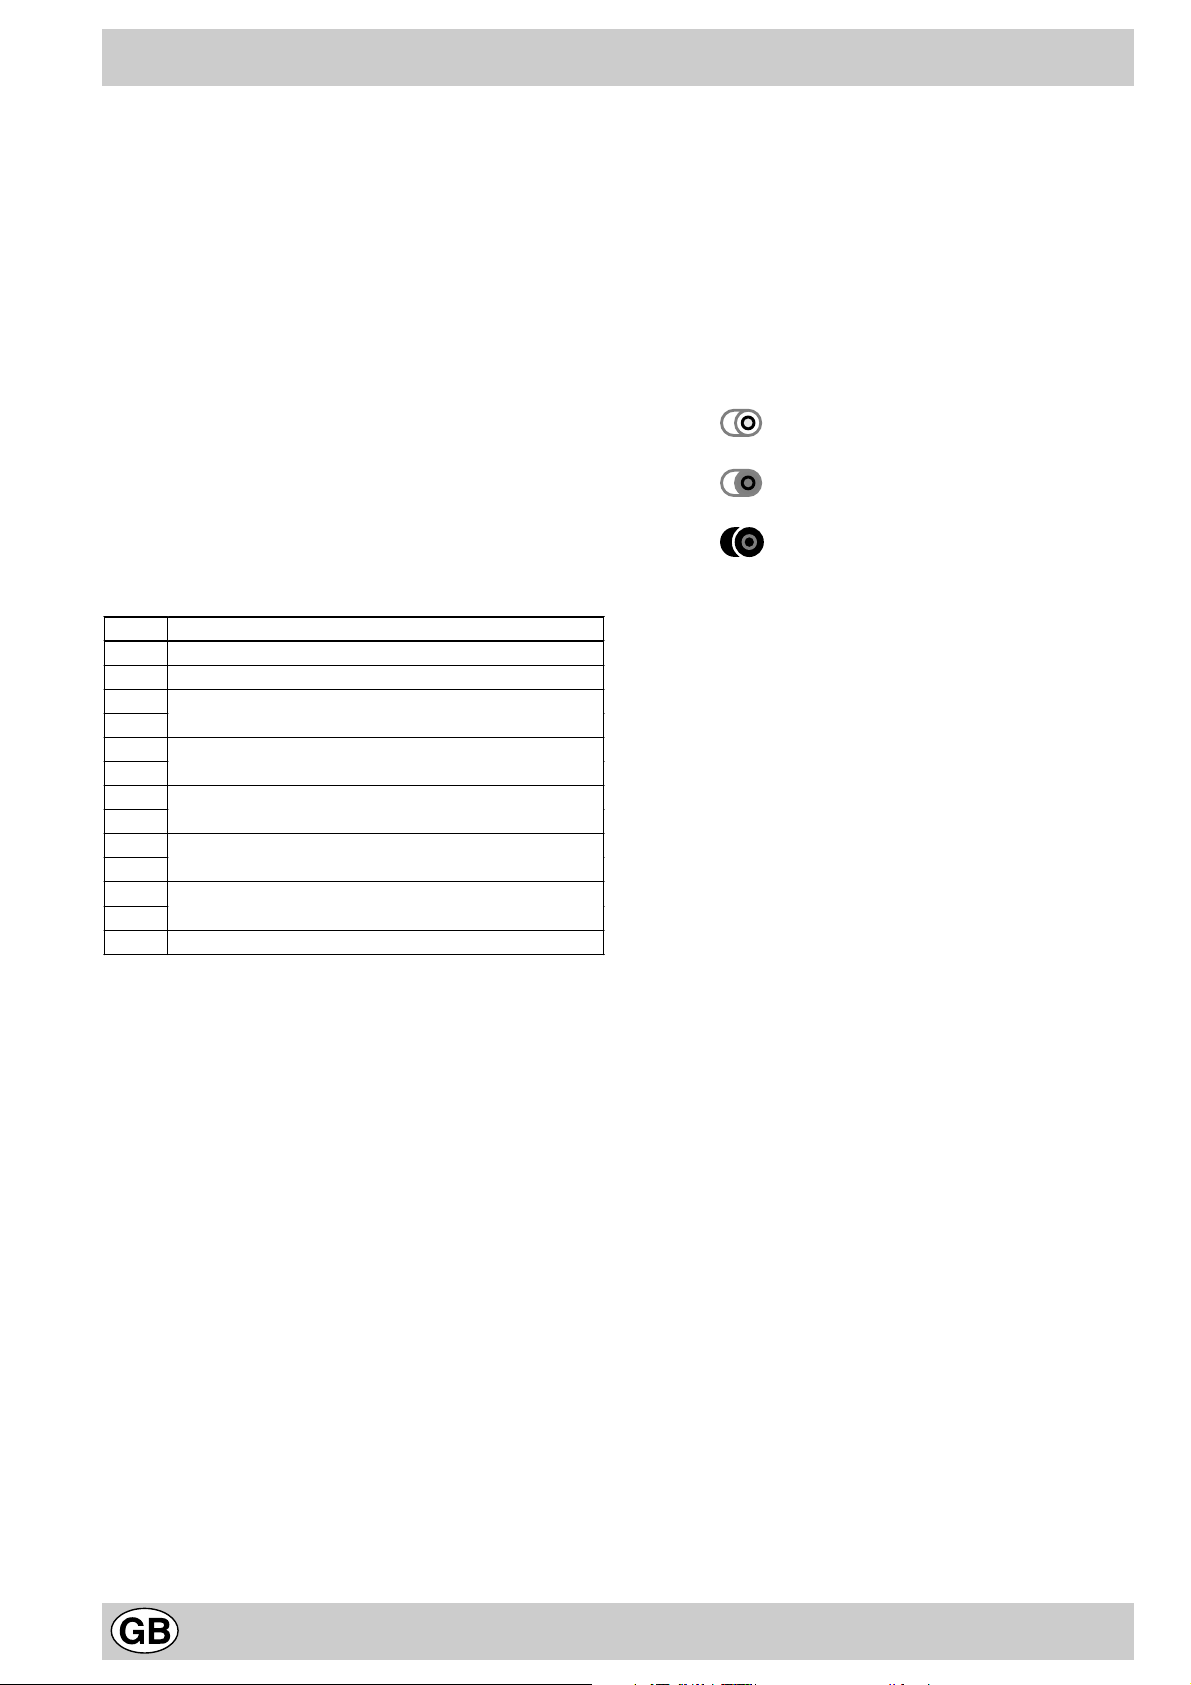
Oval extendable cooking zone operation
(if the hob is fitted with extendable oval zones, see previous page)
1. set the power using knob "G";
2. place the knob "H" on the following symbols:
a. per utilizzare la sola zona di cottura in-
terna più piccola.
b. per utilizzare la zona di cottura circola-
re.
c. per utilizzare l'intera zona di cottura
ovale.
The “ ON” indicator light (B)
This light comes on when one of the heating elements
has been turned on.
Residual heat indicator light (D)
This light indicates that the temperature of one or more
cooking areas is above 60°C, even thought the elements have been turned off. Some models come
equipped with four such indicator lights, one for each
of the four cooking areas.
12
Page 12
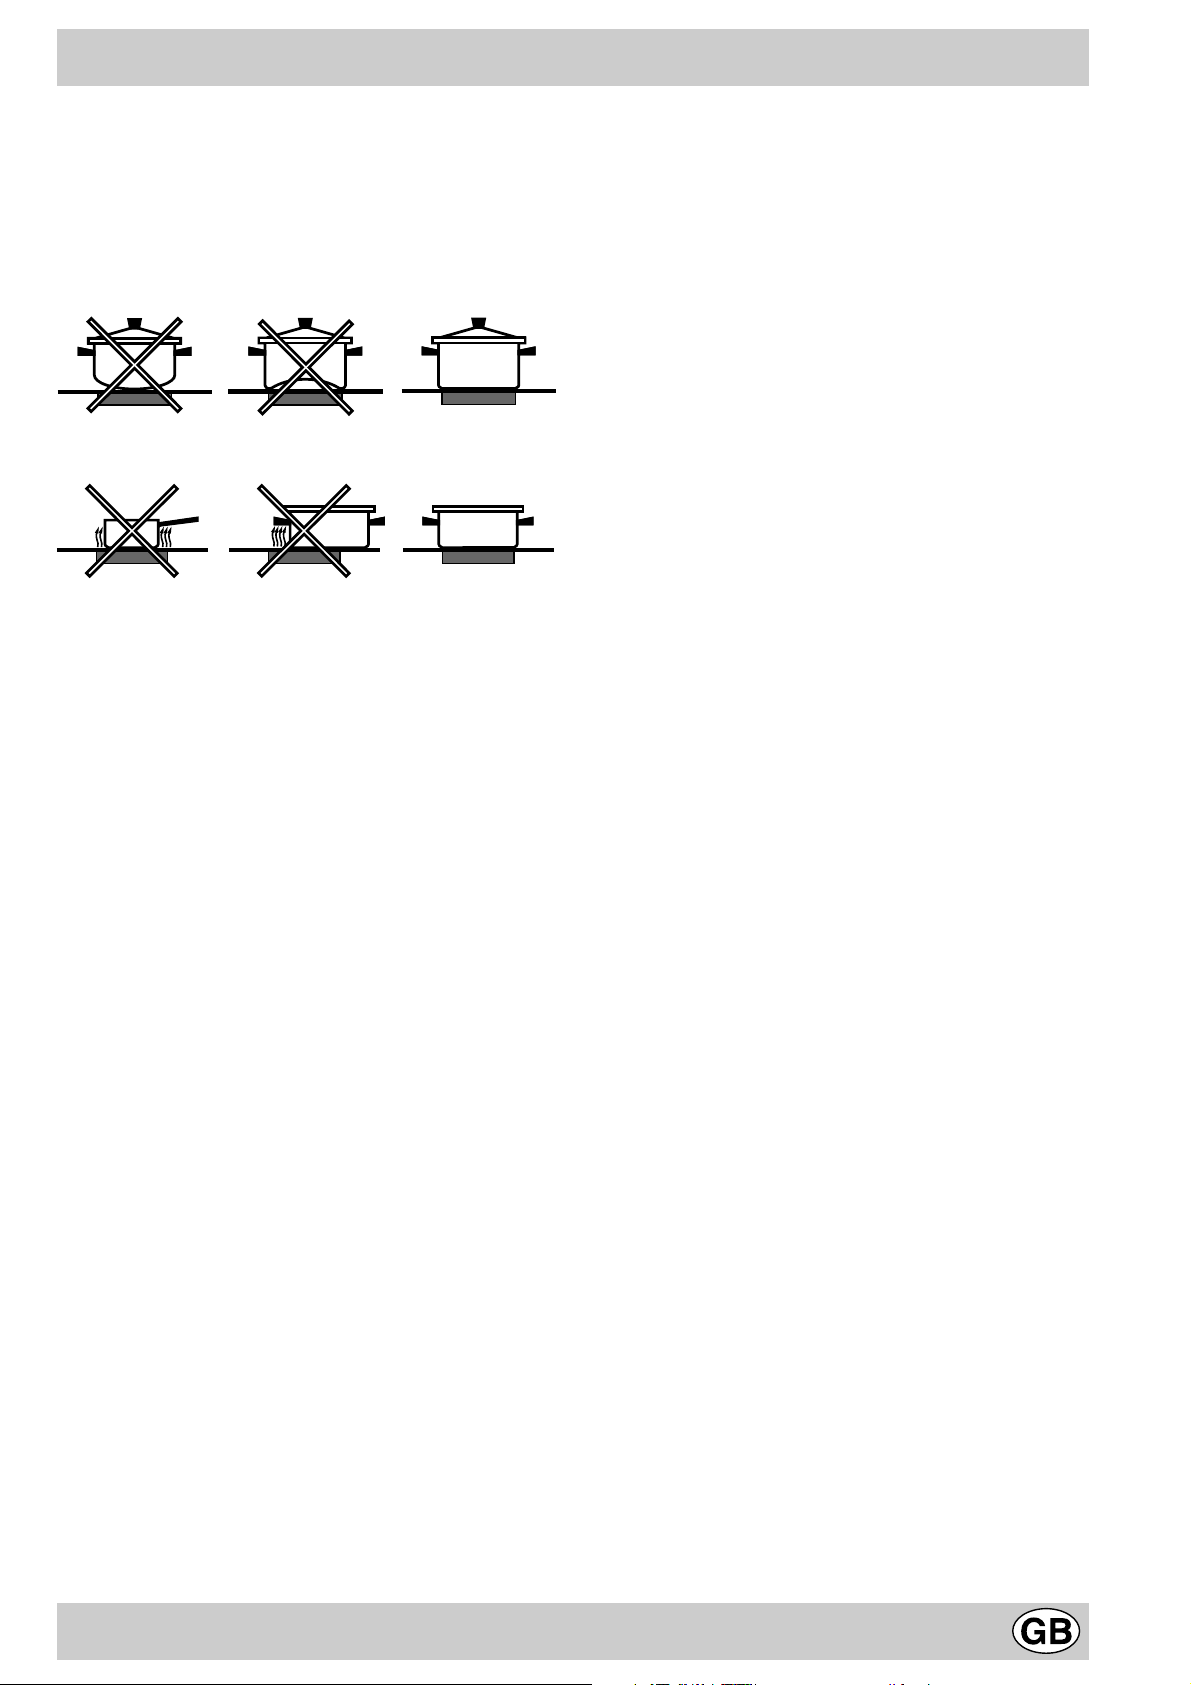
Maintenance and care
by incorrect use.
Advice on using your appliance
To get the best from your hob, it is vital that you follow a
few fundamental rules during cooking and when preparing food.
• Use pans with a flat bottom so they adhere fully to
the heating zone.
• Always use pans whose diameter covers the cooking
zone fully so that all the available heat can be used.
• Make sure the pan base is always clean and dry, to
guarantee good contact and long life for the cooking
zones and pans alike.
• Avoid using pans used normally on gas burners. The
concentration of heat on gas burners can warp the
bottom of the pan, consequently you would never
obtain the desired result when using the pan on the
glass ceramic hob.
• Never leave a cooking zone on without a pan on it as
the maximum heat level would be reached very
quickly, which could damage the heating elements.
• The glass ceramic hob is resistant to thermal and
mechanical shocks. However, it may break due to a
shock caused by a sharp object. In this case, unplug
the appliance immediately and contact an
authorised after-sales service centre to have it
repaired.
Always k eep your hob clean. Before proceeding with maintenance operations, check that all the cooking zones
are turned off and have cooled down completely.
Stainless steel frame (only on some models)
Stainless steel can stain as an effect of enduring contact with limescale in water or as an effect of highly
aggressive detergents (containing phosphorus). We recommend you rinse and dry it thoroughly after maintenance. It is preferable to remove any water spills immediately.
Hob care
The vitroceramic glass used for the heating surface is
smooth and poreless and it is also resistant to thermal
shocks and to mechanical shocks under normal conditions of use. In order to preserve these properties, we
recommend you care for your hob as follows:
• for ordinary maintenance, just wipe it with a damp
sponge and dry it thoroughly using paper towels.
• If the hob is dirty, rub clean using a special cleaner
suitable for vitroceramic glass, rinse off and dry
thoroughly.
• food residue and dirt can be removed using a special scraper. Do this as soon as possible, do not
wait for the hob to cool down in order to avoid
incrustations. For excellent results, use a special
stainless steel wool pad for vitroceramic glass
cleaning soaked in soapy water.
• When the hob is clean, you can apply a special
product for the care and protection of the same:
this type of product leaves an invisible film on the
surface of the hob to protect the same against any
spills and boiled-over food. It is best if you do this
when the hob is lukewarm or cold.
• Make sure you always rinse the hob with clean
water and dry it thoroughly: otherwise the cleaning
products could become encrusted onto the hob during subsequent cooking.
Recommendations
• Never use abrasive or corrosive substances,
such as aerosol cleaners for grills and ovens, stain
removers or rust removers, scouring powders and
abrasive sponges: even the delicate ones could
scratch the hob surface irreversibly.
• We recommend you keep all items which could
melt away from the hob, such as plastic utensils,
sugar or products with a high sugar content.
Should liquid boil over onto the hob surf ace, remo ve
it immediately (while the hob is still hot) using a
razor blade scraper, in order to avoid damaging the
surface.
• Use this hob exclusively for cooking. Do not place
items on the hob when the same is not in use. Do
not use the hob as a work surface (by placing lids,
saucepans or dishcloths on it, for example), nor as
a chopping board.
• Never leave aluminium wrappers, aluminium foil
and plastic cookware on the hob when hot or still
warm.
• Do not use steam cleaners or high pressure clean-
ers to clean your appliance.
• Do not place metal items on the hob (such as knives,
spoons, lids, etc.).
• Never heat up unopened tins: they could burst.
The guarantee does not cover damage to the hob caused
Page 13

Conseils et recommandations
• Cet appareil a été conçu pour une utilisation non
professionelle, à l’intérieur d’une habitation.
• Av ant d’utiliser cet appareil, lisez attentivement la notice
car elle contient des instructions très importantes
concernant la sécurité d’installation, d’usage et d’entretien.
Conservez soigneusement ce livret pour toute consultation
ultérieure.
• Après avoir déballé l’appareil, vérifiez s’il est intact. En
cas de doute, avant d’utiliser l’appareil, consultez une
personne qualifiée.
• Les éléments de l’emballage (sachets plastique,
polystyrène expansé, clous, etc..) ne doivent pas être
laissés à la portée des enfants car ils pourraient être
dangereux.
• L’installation doit être effectuée conformément aux
instructions du fabricant par un technicien qualifié.
• Le fabricant décline toute responsabilité en cas de
dommages provoqués à des personnes, à des animaux
ou à des biens du fait de l’installation incorrecte de
l’appareil.
• La sécurité électrique de cet appareil n’est assurée
que si ce dernier est correctement raccordé à l’installation
de mise à la terre, conformément aux normes sur la
sécurité électrique. Il est indispensab le de vérifier que cette
condition fondamentale de sécurité soit bien remplie. En
cas de doute, il faut s’adresser à une personne qualifiée
pour un contrôle minutieux de l’installation électrique.
• Le fabricant ne peut en aucun cas être considéré
responsable des dommages pouvant survenir si
l’installation de mise à la terre fait déf aut.
• Avant de connecter l’appareil, vérifiez si les
caractéristiques techniques figurant sur la plaquette
correspondent bien aux caractéristiques de l’installation
électrique.
• Vérifiez si la charge électrique de l’installation et des
prises de courant est apte à supporter la puissance max.
de l’appareil figurant sur la plaquette. En cas de doute,
adressez-vous à une personne qualifiée.
• Cet appareil doit être destiné à l’usage pour lequel il a
été conçu. Toute autre utilisation (comme par exemple le
chauffage d’une pièce) est impropre et, en tant que telle,
dangereuse.
• Le fabricant décline toute responsabilité en cas de
dommages provoqués par un usage impropre ou erroné.
• L’usage de tout appareil électrique implique le respect
de certaines règles fondamentales. A savoir:
• ne jamais toucher l’appareil avec les mains
mouillées ou humides,
• ne jamais utiliser l’appareil pieds nus,
• ne jamais utiliser de rallonges,
• ne jamais tirer sur le cordon d’alimentation ou
l’appareil pour débrancher la fiche de la prise de
courant,
• ne pas exposer l’appareil aux agents
atmosphériques (pluie, soleil, etc.),
• ne pas laisser utiliser l’appareil, sans surveillance,
par des enfants ou des personnes incapables de le
faire.
• Avant toute opération de nettoyage ou d’entretien,
déconnectez l’appareil en débranchant la fiche ou en
éteignant l’interrupteur de l’installation électrique.
• En cas de fêlure sur la surface du verre, coupez
immédiatement l’alimentation électrique. Pour la
réparation, adressez vous exclusivement à un centre de
Service Après-Vente agréé et demandez des pièces de
rechange d’origine. Le non-respect de ce qui précède peut
compromettre la sécurité de l’appareil.
• Si vous décidez de ne plus utiliser l’appareil, il est
recommandé de le rendre inopérant en coupant le cordon
d’alimentation, après l’avoir débranché de la prise de
courant. Nous recommandons viv ement de neutraliser les
parties de l’appareil susceptibles de représenter un
danger, surtout vis à vis des enfants qui pourraient s’en
servir pour jouer.
• La table vitrocéramique résiste aux chocs thermiques
et mécaniques. Cependant, elle peut se briser sous
l’effet d’un choc provoqué par un objet pointu, tel
qu’un outil par exemple. Dans ce cas, coupez
immédiatement l’alimentation et contactez un centre
de Service Après-Vente agréé pour la réparation.
• N’oubliez pas que la zone de chauffe reste chaude
pendant au moins une demi-heure après l’avoir éteinte;
veillez à ne pas poser par mégarde des récipients ou des
objets sur la zone encore chaude.
• N’allumez pas les zones de chauffe si des feuilles
d’aluminium ou des objets en matière plastique sont posés
sur la table de cuisson.
• Ne vous approchez pas des zones de chauffe
lorsqu’elles sont chaudes.
• Si vous utilisez de petits électroménagers près du plan
de cuisson, veillez à ce que le cordon d’alimentation ne
touche les parties chaudes.
• Faites attention à ce que les poignées des casseroles
soient toujours tournées vers l’intérieur de la table de
cuisson pour éviter de les heurter accidentellement.
• ATTENTION : Si des foyers halogènes équipent
votre appareil, ne les fixez pas des yeux trop
longtemps.
Première utilisation : la colle utilisée pour les joints laisse des traces grasses sur le v erre . Nous vous conseillons de
les éliminer avant d’utiliser l’appareil, à l’aide d’un produit d’entretien non abrasif. Pendant les premières heures
d’utilisation, une odeur de caoutchouc se dégage de l’appareil mais elle disparaît rapidement.
14
Page 14
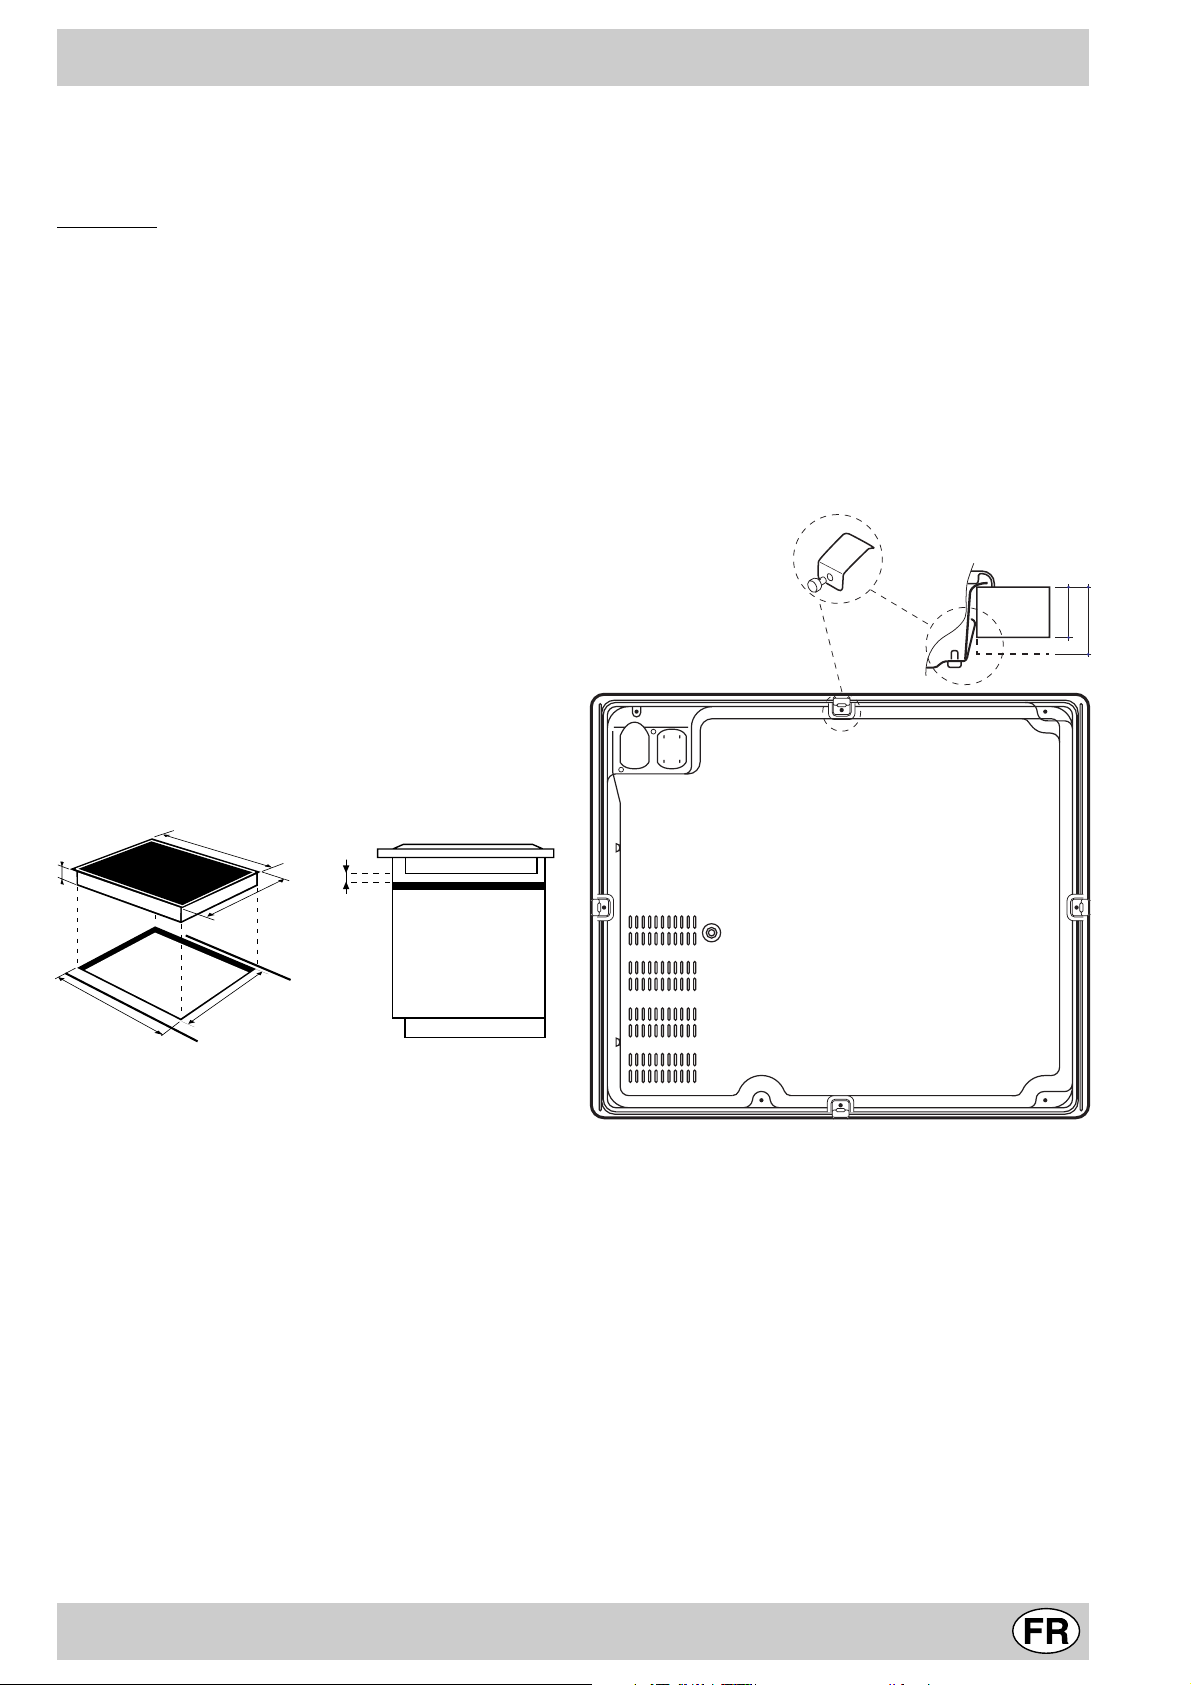
Installation et fixation
Les instructions qui suivent sont destinées à l’installateur
qualifié pour l’aider à effectuer les opérations d’installation,
de réglage et d’entretien technique le plus correctement
possible et dans le respect des normes en vigueur.
Important : avant toute opération, débranchez la table
de cuisson.
Installation
• La table de cuisson s'encastre dans le plan de travail
par simple découpage.
• Le matériau du plan de travail doit résister à une
température d'environ 100°C.
• La table de cuisson doit être positionnée à minimum
55 mm de distance par rapport au mur arrière ou à
toute autre surface verticale, pour permettre une bonne
aération et pour éviter la surchauffe des surfaces autour
de l’appareil.
• Si vous souhaitez installer la table au dessus d'un
four, celui-ci doit être équipé d'une ventilation forcée
de refroidissement.
• Evitez d'installer la table au dessus d'un lavevaisselle ou prévoyez une séparation étanche entre
les deux appareils.
Fixation
T rés important : Il est impératif d’assurer l’encastrement
de la table vitrocérame sur une surface d’appui
parfaitement plane.
Les déformations provoquées par une
mauvaise fixation risquent d’altérer les caractéristiques
du plan de cuisson ainsi que ses performances.
Les ressorts de fixation sont vissés par des vis (voir
dessin).
Il est impératif de laisser ces vis accessibles.
Insérez la table de cuisson dans le trou d’encastrement
en appuyant bien tout autour du cadre pour que la table
adhère parfaitement au plan de cuisson.
MONTAGE DES RESSORTS DE FOND
AVANT DE LA TABLE
PLAN DE
TRAVAIL
30
40
48
560 +/- 1
574
490 +/- 1
504
TABLE A L'ENVERS
10
Distance à respecter
entre la cuve
et le meuble
15
Page 15
Caractéristiques techniques
Raccordement électrique
• La sécurité électrique de cet appareil n’est assurée
que si ce dernier est correctement raccordé à
l’installation de mise à la terre, conformément aux
normes sur la sécurité électrique. Il est indispensable
de vérifier que cette condition fondamentale de sécurité
soit bien remplie. En cas de doute, il f aut s’adresser à
une personne qualifiée pour un contrôle minutieux de
l’installation électrique.
•
Le fabricant ne peut en aucun cas être considéré
responsable des dommages pouvant survenir si
l’installation de mise à la terre fait déf aut.
• Avant de connecter l’appareil, vérifiez si les
caractéristiques techniques figurant sur la plaquette
correspondent bien aux caractéristiques de l’installation
électrique.
• Vérifiez si la charge électrique de l’installation et
des prises de courant est apte à supporter la puissance
maximale de l’appareil figurant sur la plaquette. En cas
de doute, adressez-vous à une personne qualifiée .
Avant toute intervention, déconnectez l’appareil.
Vous devez raccorder votre table à l’installation par
l’intermédiaire d’un boîtier de connexion: si l’appareil
est raccordé en fixe, il faut prévoir un interrupteur
omnipolaire, accessible en cas de necessité, avec une
distance d’ouverture entre les contacts supérieure ou
égale à 3 mm.
Raccordement monophasé
Si l'installation électrique correspond à une des
caractéristiques suivantes :
Tension type et fréquence réseau
• 400V 3 - N ~ 50 Hz
procéder comme suit :
! Le câble éventuellement fourni n'est pas prévu pour ces
types d'installation.
1. Utiliser un câb le d'alimentation approprié, type H05RRF ou supérieur, aux dimensions adéquates (section câble
: 2,5 mm).
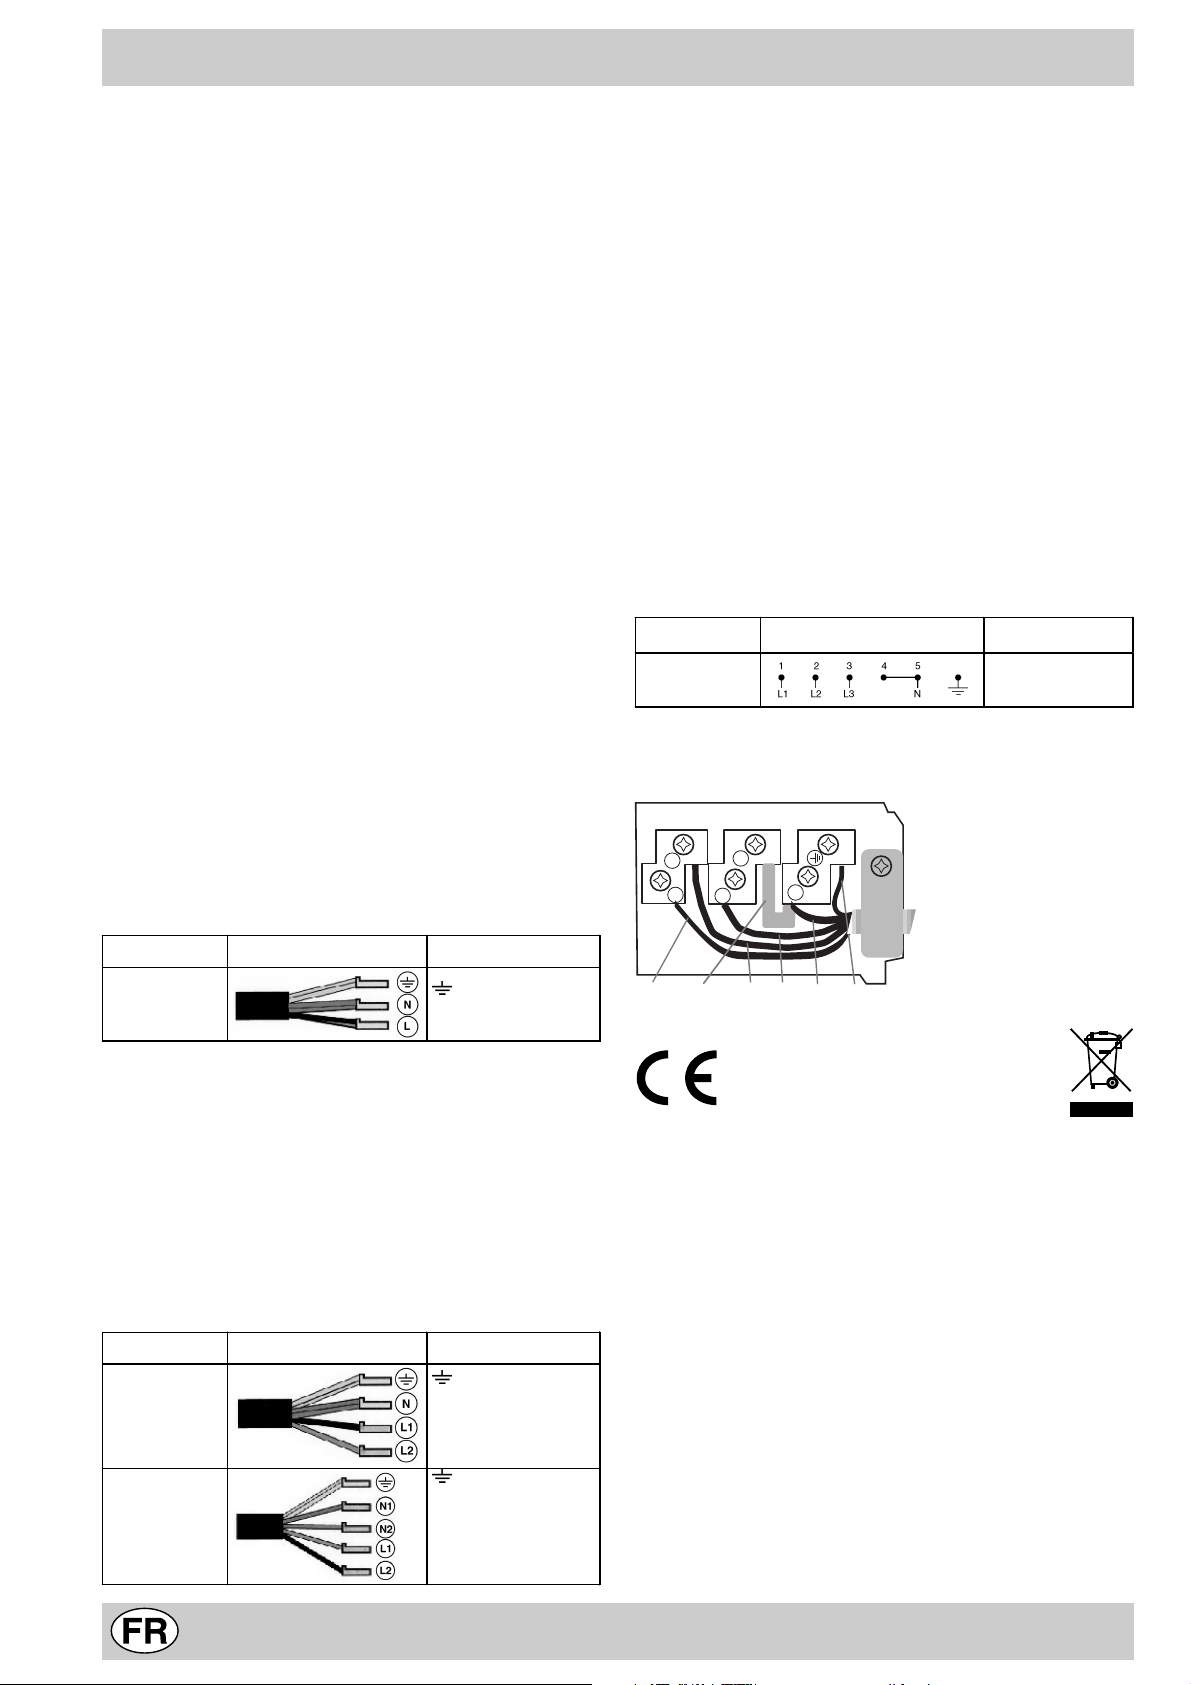
2. F aire le vier à l'aide d'un tournevis sur les languettes du
couvercle du bornier pour l'ouvrir (
voir figure Bornier
).
3. Dévisser la vis du serre-câble et les vis des bornes
correspondant au type de raccordement nécessaire et
positionner les cavaliers de raccordement conf ormément
aux indications du tableau et des figures ci-dessous.
4. Positionner les fils conformément aux indications du
tableau et des figures ci-dessous et procéder au
raccordement en serrant à fond toutes les vis des bornes.
Tensione tipo e
frequenza rete
400V 3-N ~
50 Hz
Collegamenti elettrici Morsettiera
Trifase 400
5. Fixer le câble d'alimentation dans le serre-câble
correspondant et fermer le couvercle.
La table est fournie déjà équipée d'un cordon
d'alimentation prévu pour raccordement monophasé.
Procéder au raccordement des fils en suivant les
indications du tableau et des dessins suivants :
Tension type et
fréquence réseau
230V 1+N ~
50 Hz
Cordon électrique Raccor dement fils
: jaune/vert;
N: les 2 fils bleus ensemble
L: le marron avec le noir
Autres types de raccordement
Si l'installation électrique correspond à une des
caractéristiques suivantes :
Tension type et fréquence réseau
• 400V - 2+N ~ 50 Hz
• 230V 3 ~ 50 Hz
• 400V - 2+2N ~ 50 Hz
Séparer les câbles et procéder au raccordement des fils
en suivant les indications du tableau et des dessins
suivants :
Tension type et
fréquence réseau
400V - 2+N ~
50 Hz
230V 3 ~
50Hz
400V - 2+2N ~
50 Hz
Cordon électrique Raccordement fils
: jaune/vert;
N: les 2 fils bleus ensemble
L1: noir
L2: marron
: jaune/vert;
N1: bleu
N2: bleu
L1: noir
L2: marron
2
1
4
3
5
T riphasé 400
Phase Cavalier Neutre TerrePhase
Phase
Cet appareil est conforme aux Directives
Communautaires suivantes:
- 73/23/CEE du 19/02/73 (Basse Tension) et
modifications successives;
- 89/336/CEE du 03/05/89 (Compatibilité
électromagnétique) et modifications successives;
- 93/68/CEE du 22/07/93 et modifications successives.
- 2002/96/EC
Attention: Si l’on installe la table de cuisson au dessus d’un
four encastré, le branchement électrique de la table et celui
du four doivent être faits séparément pour des raisons de
sécurité et pour simplifier les opérations servant à extraire le
four si besoin est.
16
Page 16
10
6
10
6
10
6
10
6
10
6
10
6
10
6
La Directive Européenne 2002/96/EC sur les Déchets des
Equipements Electriques et Electroniques (DEEE), exige
que les appareils ménagers usagés ne soient pas jetés
dans le flux normal des déchets municipaux. Les appareils
usagés doivent être collectés séparément afin d’optimiser
le taux de récupération et le recyclage des matériaux qui
l’environnement. Le symbole de la ‘ ‘poubelle barrée’ ’ est
apposée sur tous les produits pour rappeler les obligations
de collecte séparée.
Les consommateurs devront contacter les autorités
locales ou leur revendeur concernant la démarche à suivre
pour l’enlèvement de leur vieil appareil.
les composent et réduire l’impact sur la santé humaine et
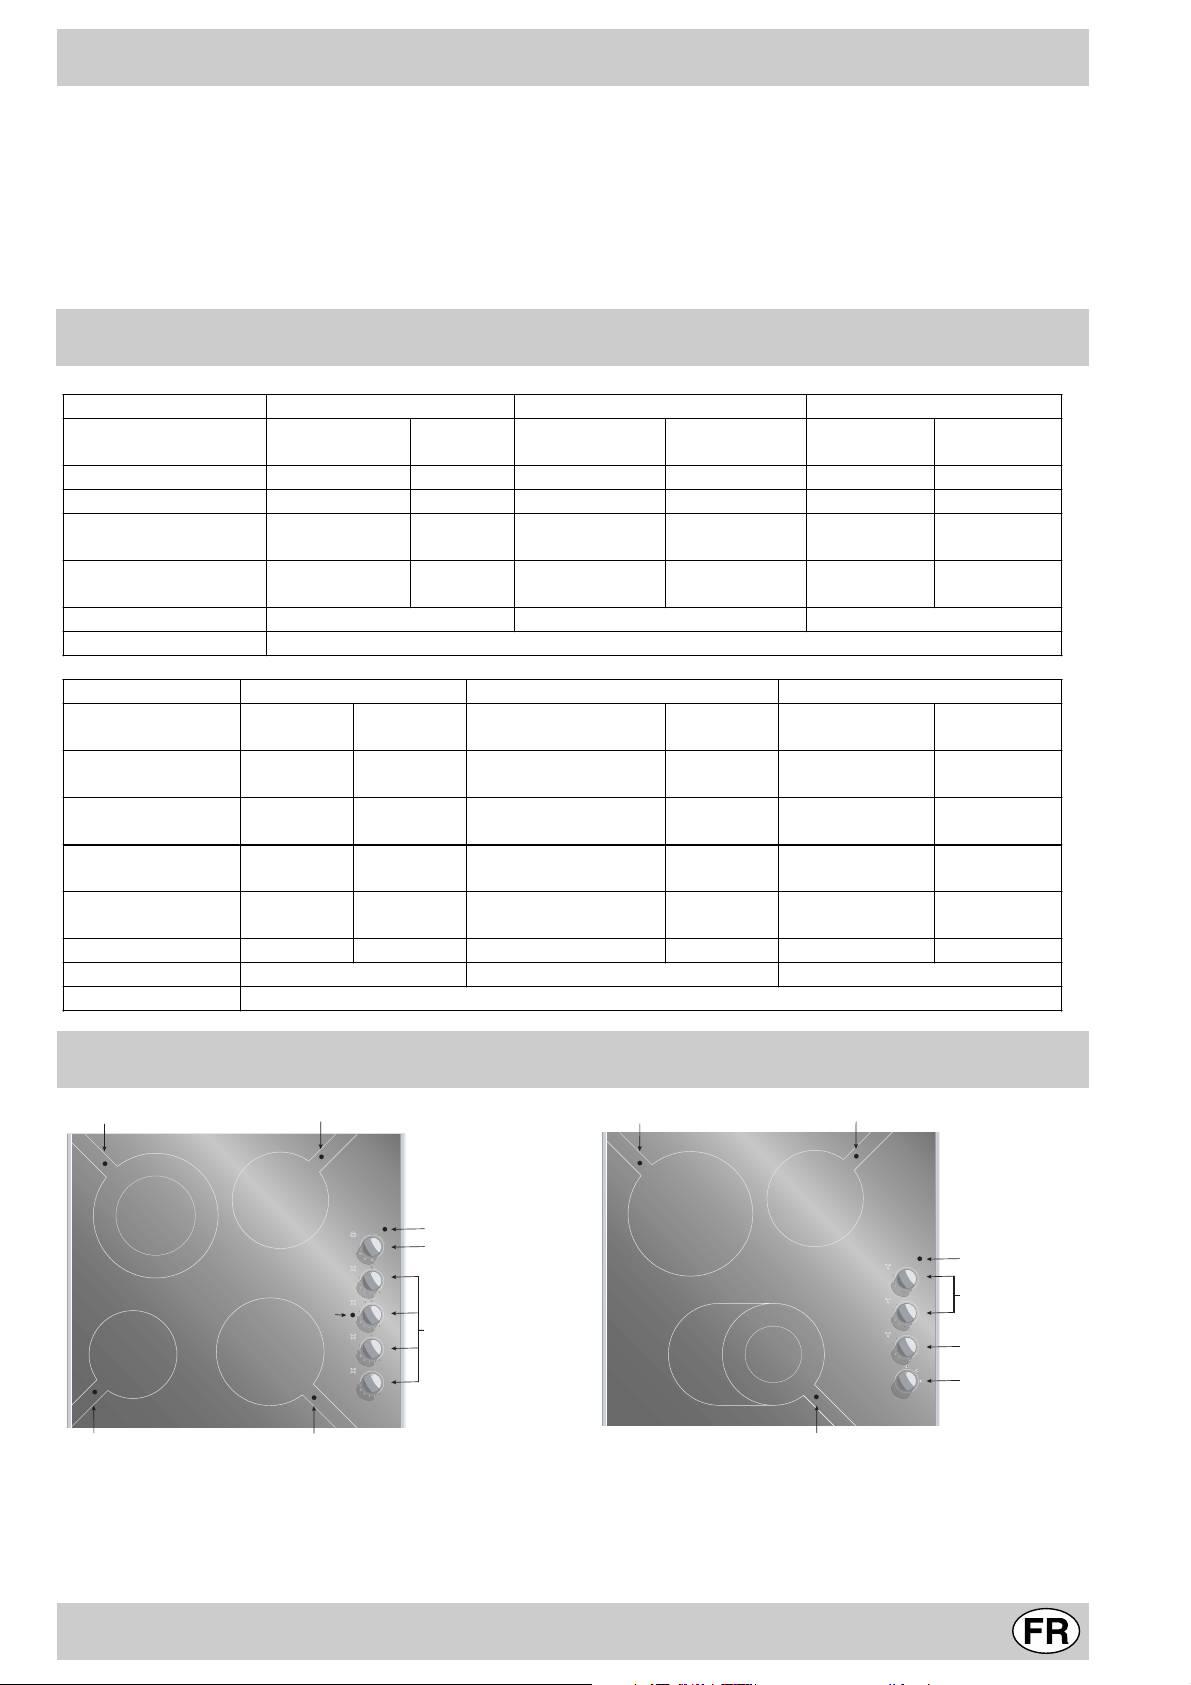
Description des foyers
TABLES TM 6321 TM 6220 TM 6130
Foyers Puissance
(en W)
Arrière droit (ARD)
Avant droit (AVD)
Arrière gauche
(ARG)
Avant gauche
(AVG)
R 1400 180 R 1400 180 R 1400 180
H 1800 200 H 1800 200 R 1800 200
H 1050/2500 230 H 2500 230 H 2500 230
R 1200 165 R 1200 165 R 1200 165
Puissance totale 6900 6900 6900
TABLES TM 6040 TM 6120 TM 6230
Foyers Puissance
(en W)
Arrière droit
(ARD)
Avant droit
(AVD)
Arrière gauche
(ARG)
Avant gauche
(AVG)
R 1400 180 R 1400 165 R 1400 180
R 1800 200 R 1800 200
H 2500 230 H 2500 230 H 1050/2500 230
R 600 120 R 1200 165
Avant
Puissance totale 6300 6300 6900
Diametré
(en mm)
Puissance
(en W)
H = halogène, R = radiant simple, RO =
Diametré
(en mm)
Puissance
(en W)
RO 600/1600/2400 190x275
H = halogène, R = radiant simple, RO =
Diametré
(en mm)
Diametré
(en mm)
Puissance
(en W)
radiant ovale
Puissance
(en W)
radiant ovale
Diametré
(en mm)
Diametré
(en mm)
D
Haloring
A
A
A
A
D
A Zones de chauffe
B Voy ant de fonctionnement
C Manettes de commande
D Voy ant chaleur résiduelle
E Minuterie
Description de la table de cuisson
D
45
12
11
12
11
F
12
11
12
11
Haloring
E
20
25
0
1
2
3
4
5
0
1
2
3
4
5
C
0
1
2
3
4
5
0
1
2
3
4
5
B
0
55
5
50
10
15
D
17
D
Haloring
A
A
A
F Voyant de fonctionnement de la grande surface pour
les foyers de cuisson extensibles (concentriques ou
ovales) : présent près de chaque foyer extensible
G Manette de commande foy er ov ales
H Manette de commande extensible foy er ov ales
D
A
B
0
12
1
11
2
3
4
5
C
0
12
1
11
2
3
4
5
0
12
1
11
2
3
G
4
5
H
D
Page 17
Les différentes fonctions de la table
Description des éléments chauffants
Les éléments radiants sont formés par des
résistances circulaires. Après allumage, ils deviennent
rouges après quelques dizaines de secondes.
Les éléments halogènes mixtes. La table utilise des
éléments composés par deux lampes halogènes et une
résistance circulaire. Grâce à cette combinaison, on
obtient une distribution optimale de la température sur
toute la surface de la zone de chauff e , sans renoncer
aux nombreux avantages des lampes halogènes . Les
lampes halogènes ont comme caractéristique principale
l’émission instantanée d’une grande quantité de lumière
et de chaleur, ce qui entraîne:
• une montée rapide de température tout à fait
semblable à celle d’un brûleur à gaz
• une extinction tout aussi rapide.
Leur emploi est extrêmement simple, absolument
analogue à celui des autres éléments chauffants.
Rapportez-vous au tableau 1.
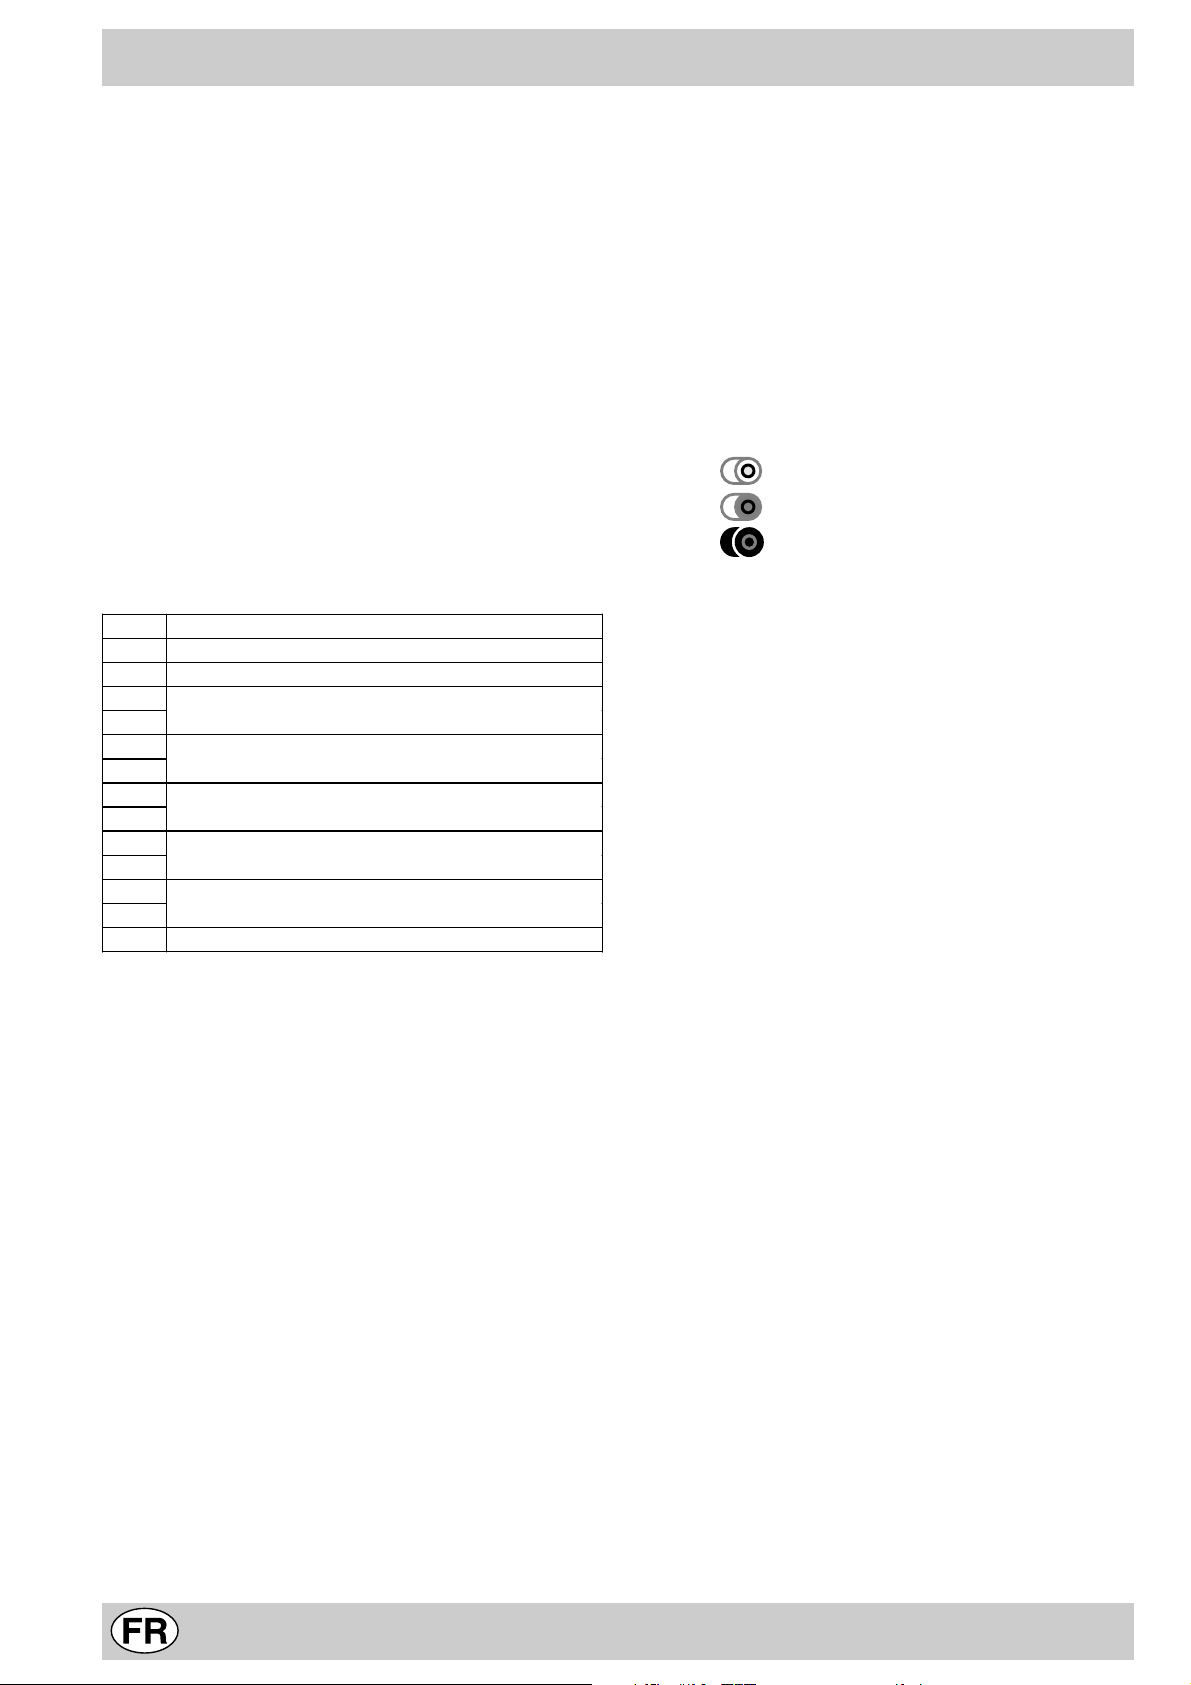
Tableau 1
Pos Règlage des zones de cuisson
0éteint
1 pour faire fondre le beurre, le chocolat
2
pour réchauffer les liquides
3
4
pour crèmes et sauces
5
6
pot au feu - blanquette - entremets
7
8
pâtes - riz
9
10
steack - poisson - omelette
11
12 friture
Les manettes de commande
Chaque zone de chauffe est dotée d’une manette pour
le réglage constant de la température (1 = position mini,
12 = position maxi). Le tab leau 1 ci-après illustre la
correspondance entre les positions indiquées sur la
manette et l’usage conseillé pour chaque zone de
cuisson.
Commande des foyers e xtensibles ov ales
(si la table de cuisson est équipée de foyers extensibles
ovales, v oir page précédente)
1. sélectionnez la puissance désirée à l'aide de la manette "G";
2. positionnez la manette "H" sur les symboles :
a. pour n'utiliser que le petit fo y er interne.
b. pour utiliser le fo y er circulaire .
c. pour utiliser tout le foyer ov ale.
Le voyant de fonctionnement (B)
Le voy ant s’allume lorsque l’une des zones de chauffe
est en marche.
Le voyant chaleur résiduelle (D)
Il signale qu’une ou plusieurs zones de chauffe ont une
température supérieure à 60°C et ce même après
extinction de ces dernières. Certains modèles sont
équipés de 4 voyants chaleur résiduelle , un pour
chaque zone de chauffe.
18
Page 18
Maintenance et entretien
Conseils pour l’utilisation de votre appareil
Pour obtenir les meilleures performances de votre table
de cuisson, il est important de suivre cer taines règles
fondamentales pendant la cuisson et pendant la
préparation des aliments.
• Utilisez des casseroles à fond plat pour qu’elles
adhèrent parfaitement à la zone de chauffe
• Utilisez toujours des casseroles dont le diamètre
couvre complètement la zone de chauffe de façon à
ce que toute la chaleur disponible puisse être utilisée.
• Veillez à ce que la base des casseroles soit toujours
bien sèche et propre, pour garantir un bon contact et
une longue durée de vie des foyers mais aussi des
casseroles.
• Evitez d’utiliser les casseroles que vous utilisez sur
les brûleurs à gaz. La concentration de la chaleur sur
les brûleurs à gaz peut déformer le fond de la casserole,
par conséquent vous n’obtiendrez jamais le résultat
voulu en l’utilisant sur la table de cuisson en
vitrocéramique.
• Ne laissez jamais une zone de cuisson allumée sans
casserole dessus parce que dans ce cas, le niveau
maximum de chaleur est atteint très rapidement et l’on
risque d’endommager les éléments chauffants.
• La table vitrocéramique résiste aux chocs mécaniques
et thermiques. Cependant, elle peut se briser sous
l’effet d’un choc prov oqué par un objet pointu. Dans ce
cas, coupez immédiatement l’alimentation et
contactez un centre de Service Après-Vente agréé pour
la réparation.
Gardez toujours propre votre table de cuisson. Avant de
procéder à son entretien, vérifiez si les zones de chauffes
sont bien éteintes et absolument froides.
Cadre en acier inox (sur certains modèles seulement)
L’acier inox peut se tâcher sous l’effet d’une eau très
calcaire qui resterait longtemps au contact de ce dernier
ou bien sous l’effet de détergents très agressifs (contenant
du phosphore). Nous conseillons de rincer abondamment
et de bien essuyer après entretien. Il est préférable
d’éliminer rapidement tout débordement d’eau s’il y a lieu.
Entretien de la table de cuisson
Le verre vitrocéramique utilisé pour la partie chauffante
est lisse et sans pores et résistant aux chocs thermiques
ainsi qu’aux chocs mécaniques dans des conditions
normales d’utilisation. Pour lui conserver toutes ses
propriétés, nous vous conseillons de l’entretenir de la façon
suivante:
• pour un entretien courant, il suffit de passer une
éponge humide, de sécher avec un essuie-tout en
papier.
• Si la table est sale, frottez av ec un produit d’entretien
adapté au verre vitrocéramique, rincez et essuyez.
• les salissures en relief s’enlèvent à l’aide d’un
grattoir . Opérez dès que possible, ne pas attendre que
l’appareil soit refroidi afin d’éviter une incrustation des
salissures. L’utilisation d’une éponge en fil d’acier
inoxydable - spécifique pour verre vitrocéramique imprégnée d’eau savonneuse donne d’excellents
résultats.
• Quand la table est propre, vous pouvez utiliser un
produit d’entretien et de protection: celui-ci laisse un
film invisible qui protège la surface lors d’éventuels
débordements. Opérez de préférence quand l’appareil
est tiède ou froid.
• Prenez soin de toujours bien rincer à l’eau claire et
de sécher la table: les résidus des produits peuvent
s’incruster lors d’une prochaine cuisson.
Recommandations
• Ne jamais utiliser des détergents abrasifs ou
corrosifs, tels que les bombes aérosols pour g rilloir
et fours, les détacheurs et dérouilleurs, les poudres à
récurer et éponges à surface abrasive: même doux,
ils provoquent des ra yures ineff açab les.
• Il est recommandé de tenir à l’écart du plan de
cuisson tout ce qui est susceptible de fondre, tels que
les objets en matières plastiques, sucre ou produits
à forte teneur en sucre. En cas de débordement sur
le plan de cuisson, il est nécessaire de l’enlever
immédiatement (pendant que la surface est encore
chaude) avec un gr attoir à lame de rasoir, afin d’éviter
les dégradations de la surface .
• La table ne doit servir que pour la cuisson. Ne
rien poser dessus en dehors de son utilisation. Ne pas
utiliser la table comme plan de dépose (couvert,
casserole, chiffon...), ni comme planche à découper.
• Les emballages en aluminium, le papier
d’aluminium, les récipients en matière plastique ne
doivent pas être placés sur les surfaces tièdes ou
chaudes.
• N'utilisez jamais de nettoyeur vapeur ou à haute
pression pour le nettoyage de v otre appareil.
• Ne pas déposer d'objet métalliques (couteau, cuiller,
couvercle,...) sur la table .
• Ne jamais chauffer de boîte de conserve fermée:
elle risque d'éclater.
Les dégradations du plan de trav ail dues à une mauvaise
utilisation ne sont pas couvertes par la garantie.
19
Page 19

Raadgevingen en tips
• Dit apparaat is vervaardigd voor niet-professio-
neel gebruik binnenshuis.
• Voordat u het apparaat gaat gebruiken wordt u verzocht de gebruiksaanwijzingen in deze handleiding
aandachtig te lezen aangezien zij belangrijke gegevens bevatten betreffende de veiligheid van de installatie, het gebruik en het onderhoud. Bewaar dit boekje
zorgvuldig voor eventuele verdere raadpleging.
• Na het verwijderen van de v erpakking moet men goed
kijken of het fornuis geheel gaaf is. In geval van twijfel
moet men het fornuis niet gebruiken en zich tot een
bevoegde installateur wenden.
• Het verpakkingsmateriaal (plastic zakken,
polystyrene, spijkers enz.) moet buiten het bereik van
kinderen worden gelegd, aangezien het potentieel gevaar kan veroorzaken.
• Het installeren moet uitgevoerd worden door een bevoegde installateur en volgens de instrukties van de
fabrikant.
• Een verkeerde aansluiting kan schade veroorzaken
aan personen, dieren of dingen en voor deze gevallen
kan de fabrikant niet verantwoordelijk worden gesteld.
• De elektrische veiligheid van dit apparaat is slechts
dan verzekerd als het op de juiste wijze is geaard zoals voorgeschrev en door de geldende normen voor elektrische veiligheid. Het is belangrijk zich hiervan te verzekeren en, in geval van twijfel, een controle te laten
uitvoeren door een bevoegde elektricien.
• De fabrikant kan niet aansprakelijk worden gesteld
voor schade die veroorzaakt is door nalatigheid betreffende het aarden van de installatie.
• Voordat u het apparaat gaat aansluiten moet u zich
ervan verzekeren dat de technische gegevens op het
typeplaatje corresponderen met de kenmerken van uw
elektrische net.
• Controleer dat het electrische vermogen van het net
en van de stopcontacten voldoende is voor het maximum vermogen van het apparaat zoals aangegeven
op het typeplaatje. In gev al van twijf el moet u zich w enden tot een bevoegde installateur.
• Dit apparaat mag uitsluitend gebruikt worden voor
het doel waarvoor het vervaardigd is. Ieder ander gebruik (b.v.: verwarming van het vertrek) is verkeerd
en dus gevaarlijk.
• De fabrikant kan niet aansprakelijk worden gesteld
voor eventuele schade die te wijten is aan onjuist, verkeerd en onredelijk gebruik.
• Het gebruik van ieder electrisch apparaat brengt met
zich mee het in acht nemen van zekere fundamentele
regels. In het bijzonder:
• raak het apparaat niet aan als uw handen vochtig
zijn;
• gebruik het apparaat niet als u blootsvoets bent;
• gebruik geen verlengsnoeren;
• trek niet aan het snoer of aan het apparaat zelf om
de stekker uit het stopcontact te trekken;
• stel het apparaat niet bloot aan de elementen (regen,
zon enz.);
• door kinderen of onbekwame personen
• Sluit altijd voordat u overgaat tot het reinigen of onderhoud eerst de stroom af door de stekker uit het
stopcontact te halen of met de schakelaar.
• In het geval dat er zich een barst in de glasplaat
voordoet, moet u het apparaat onmiddelijk uitschakelen. Voor eventuele reparaties moet u zich uitslui-
tend tot een bevoegde installateur wenden en originele onderdelen eisen. Het niet in acht nemen van deze
aanwijzingen kan de veiligheid van het apparaat in gevaar brengen..
• Als u het apparaat niet meer gebruikt moet u het onklaar maken door de kabel door te snijden nadat de
stekker uit het stopcontact is getrokken. Het is aan te
raden ook die onderdelen onklaar te maken die een
gevaar zouden kunnen opleveren, vooral voor kinderen die ermee zouden willen spelen.
• De glazen kookplaat is zowel vuurvast als resistent
tegen stoten. Toch kan hij barsten als hij hard ge-
troffen wordt door een puntig voorwerp. In dit geval sluit u de stroom af en wendt u zich tot een
bevoegde installateur.
• Denk eraan dat de temperatuur van de kookzones
nogal hoog blijft voor minstens 30 minuten nadat de
kookplaat is uitgeschakeld; plaats er dus niet per ongeluk voorwerpen of pannen op.
• Schakel de kookzones niet in als er aluminiumfolie of
plastic voorwerpen op liggen.
• Raak de kookzones niet aan als ze nog warm zijn.
• Als zich kleine elektrische keukenapparaten dichtbij
de kookplaat bevinden moet u erop letten dat de elektrische draden hiervan niet in contact komen met de
warme zones.
• Richt de handvaten van de pannen altijd naar de binnenkant van de kookplaat zodat er niet per ongeluk
tegen gestoten kan worden.
• BELANGRIJK: Als de kookplaat halogene kook-
zones heeft moet u vermijden er lang naar te kijken.
Het eerste gebruik : de lijm die gebruikt is voor de afdichtingen laat wat vetvlekjes achter op het glas. Voordat u de
kookplaat gaat gebruiken raden wij aan dat u deze verwijdert met een niet-schurend schoonmaakmiddel. Het is
mogelijk dat u de eerste uren van gebruik een lichte rubberlucht ruikt: deze verdwijnt spoedig.
20
Page 20
T
Installeren en bevestigen
Deze instrukties zijn voor de bevoegde installateur, zodat deze het installeren, regelen en onderhoud op de
juiste wijze uitvoert en volgens de geldende normen.
Belangrijk: sluit altijd eerst de stroom af voordat u overgaat tot onderhoud.
Installeren
• De kookplaat is bedoeld voor inbouw in een
keukenkastje door het eenvoudigweg verwijderen
van het betreffende kastje.
• Het materiaal van de aanrecht moet bestand zijn
tegen een temperatuur van ongeveer 100 °C.
• De afstand tussen de kookplaat en de muur erachter of ieder andere vertikale oppervlakte moet
minstens 40mm bedragen voor het toelaten van
voldoende ventilatie en om oververhitting van de
oppervlakken rondom het apparaat te vermijden.
• Als de kookplaat boven een oven wordt
geinstalleerd moet deze zijn voorzien van een geventileerd afkoelingssysteem.
• Installer de kookplaat niet boven een vaatwasser;
mocht dit echter onvermijdelijk zijn, breng dan een
luchtdicht scheidingselement tussen de twee apparaten aan.
Bevestigen
Zeer belangrijk: De keramiekplaat moet op een perfect
vlakke oppervlakte worden geïnstalleerd. Eventuele, door
onjuiste installatie veroorzaakte vervormingen zouden
de eigenschappen en de prestaties van de kookplaat
kunnen veranderen.
De bevestigingsklemmen worden met schroeven vastgezet (zie schema).
Deze schroeven moeten altijd bereikbaar zijn.
Plaats de kookplaat in de uitsparing van het kastje door
gelijke druk uit te oefenen op de hele omtrek zodat de
kookplaat perfect aansluit op de aanrecht.
MONTEREN VAN DE KLEMMEN AAN DE ONDERKANT
VOORKANT VAN DE KOOKPLAA
KOOKPLAAT
30
40
48
560 +/- 1
574
490 +/- 1
504
10
Afstand bewaren
tussen de lekplaat
en het keukenkastje
KOOKPLAAT OMGEKEERD
21
Page 21
Technische gegevens
Elektrische aansluiting
• De elektrische veiligheid van dit apparaat is
slechts dan verzekerd als het op de juiste wijze is
geaard zoals voorgeschreven door de geldende normen voor elektrische veiligheid. Het is belangrijk zich
hiervan te verzekeren en, in geval van twijfel, een
controle te laten uitvoeren door een bevoegde elektricien.
•
De fabrikant kan niet aansprakelijk worden gesteld
voor schade die veroorzaakt is door nalatigheid betreffende het aarden van de installatie.
• V oordat u het apparaat gaat aansluiten moet u zich
ervan verzekeren dat de technische gegevens op het
typeplaatje corresponderen met de kenmerken van
uw elektrische net.
• Controleer dat het electrische vermogen van het
net en van de stopcontacten voldoende is voor het
maximum vermogen van het apparaat zoals aangegeven op het typeplaatje. In geval van twijfel moet u
zich wenden tot een bevoegde installateur.
Voordat u enige ingreep gaat uitvoeren moet de
stroom van het apparaat worden afgesloten.
De aansluiting van de kookplaat aan het net moet worden uitgevoerd door middel v an een contactdoos: bij rechtstreekse aansluiting van het apparaat aan het net moet
een bereikbare veelpolige schakelaar worden aangebracht, met een afstand tussen de contactpunten van
minstens 3 mm;
Eenfasige aansluiting
De kookplaat is voorzien van een voedingskabel bestemd
voor een eenfasige aansluiting. Voer de draadverbinding
uit zoals aangegeven in de volgende tabel en tekeningen:
Spanningst yp e e n
netfrequentie
230V 1+N ~
50 Hz
Elektrische kabel Draadverbinding
: geel/groen;
N: de 2 blauwe
draden samen
L: bruin en zwart
samen
Spanningstype en
netfrequentie
400V - 2+N ~
50 Hz
230V 3 ~
50Hz
400V - 2+2N ~
50 Hz
Elektrische kabel Draadverbinding
: geel/groen;
N: de 2 blauwe draden samen
L1: zwart
L2: bruin
: geel/groen;
N1: blauw
N2: blauw
L1: zwart
L2: bruin
Als het elektrische net overeenkomt met een van de
volgende eigenschappen:
Spanningstype en netfrequentie
• 400V 3 - N ~ 50 Hz
ga dan als volgt te werk:
! De eventuele bijgeleverde kabel is niet geschikt voor
dit type installatie.
1. Gebruik een geschikte voedingskabel, type H05RR-F
of met een hogere waarde, met de juiste afmetingen (diameter kabel: 2,5 mm).
2. Licht de lippen aan de zijkant van het deksel van het
klemmenbord op met een schroevendraaier en open het
(
zie afbeelding Klemmenbord
).
3. Draai de schroef van de kabelklem en de schroeven
van de benodigde klemmetjes los en bevestig de
verbindingskabels volgens de aanwijzingen van de volgende tabel en afbeeldingen.
4. Plaats de draden zoals aangegeven in de volgende
afbeeldingen en tabel en stel een verbinding tot stand
door alle schroeven van de klemmetjes goed vast te
draaien.
Spanningstype en
netfrequentie
400V 3-N ~
50 Hz
Elektrische aansluitingen Klemmenbord
Driefasen 400
5. Bevestig de voedingskabel in de speciale kabelklem
en sluit het deksel af.
Andere soorten aansluitingen
Als het elektrische net overeenkomt met een van de
volgende eigenschappen:
Spanningstype en netfrequentie
• 400V - 2+N ~ 50 Hz
• 230V 3 ~ 50 Hz
• 400V - 2+2N ~ 50 Hz
Scheidt de kabels en voer de draadverbinding uit zoals
aangegeven in de volgende tabel en tekeningen:
2
1
4
3
5
Driefasen 400
AardeNeutraalFaseVerbindingskabel FaseFase
Deze apparatuur voldoet aan de volgende richtlijnen
van de gemeeschap:
- EEG/73/23 van 19.02.73 (Laagspanning) en
successievelijke modificaties;
- EEG/89/336 van 03.05.89 (Electromagnetische
compatibiliteit) en successievelijke modificaties;
22
Page 22
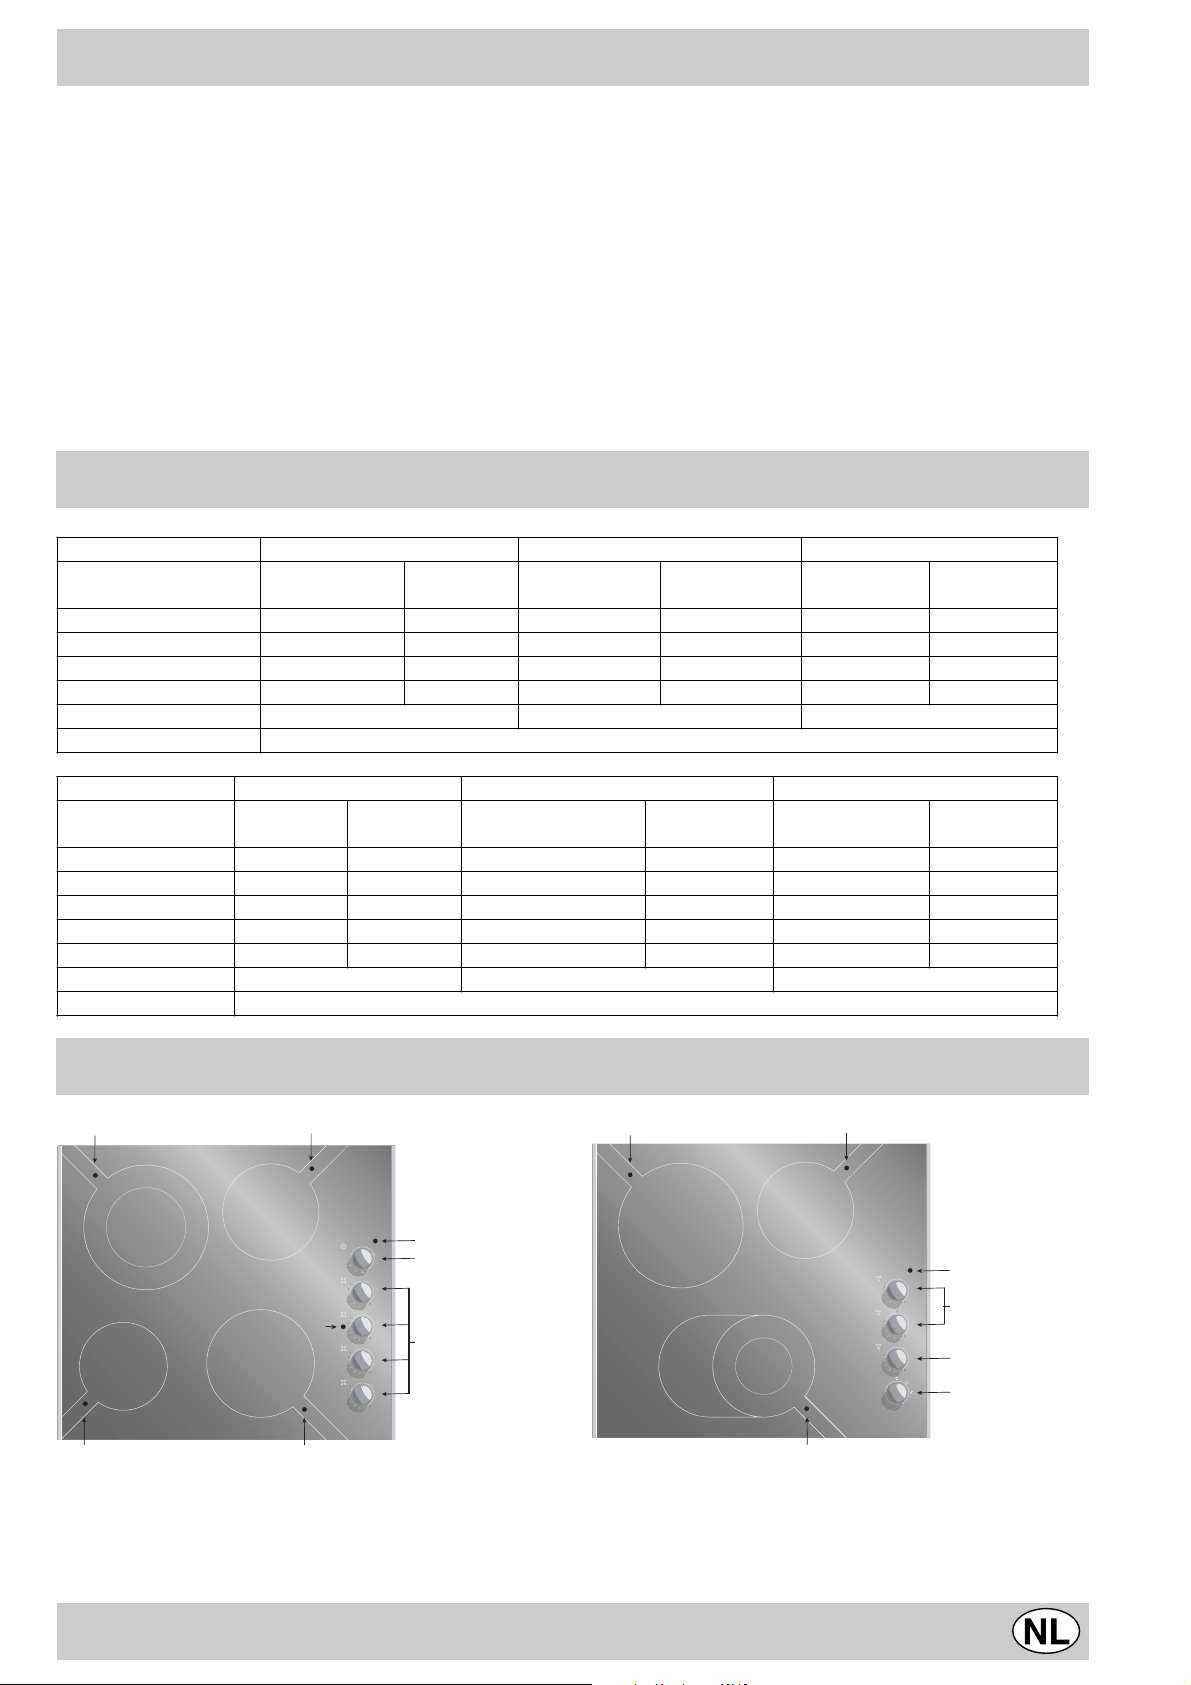
10
6
10
6
10
6
10
6
10
6
10
6
10
6
- EEG/93/68 van 22.07.93 (Laagspanning) en
successievelijke modificaties;
- 2002/96/EC
Belangrijk: In het geval dat de kookplaat boven een
inbouwoven wordt geïnstalleerd moet de elektrische
aansluiting van de kookplaat en die van de oven apart
worden uitgevoerd, zowel voor elektrische
veiligheidsredenen als voor het vergemakkelijken van
eventueel naar voren trekken van de oven.
dat oude huishoudelijke electrische apparaten niet mogen
vernietigd via de normale ongesorteerde afvalstroom.
Oude apparaten moeten apart worden ingezameld om
zo het hergebruik van de gebruikte materialen te
optimaliseren en de negatieve in vloed op de gez ondheid
en het milieu te reduceren. Het symbool op het product
van de “afvalcontainer met een kruis erdoor” herinnert u
aan uw verplichting, dat wanneer u het apparaat
vernietigt, het apparaat apart moet worden ingezameld.
Consumenten moeten contact opnemen met de locale
De Europese Richtlijn 2002/96/EC over Vernietiging van
Electrische en Electronische Apparatuur (WEEE), vereist
autoriteiten voor informatie over de juiste wijze van
vernietiging van hun oude apparaat.
Beschrijving van de kookzones
KOOKPLATEN TM 6321 TM 6220 TM 6130
Kookzones
Rechts achter
Rechts voor
Links achter
Links voor
Vermogen
(in W)
R 1400 180 R 1400 180 R 1400 180
H 1800 200 H 1800 200 R 1800 200
H 1050/2500 230 H 2500 230 H 2500 230
R 1200 165 R 1200 165 R 1200 165
Totaal vermogen 6900 6900 6900
Doorsnee
(mm)
Vermogen
(in W)
Doorsnee
(mm)
H =halogeen, R =enkele straal, RO = ovalen straal
Vermogen
(in W)
Doorsnee
(mm)
KOOKPLATEN TM 6040 TM 6120 TM 6230
Kookzones
Rechts achter
Rechts voor
Links achter
Links voor
Centrum Rechts
Vermogen
(in W)
R 1400 180 R 1400 165 R 1400 180
R 1800 200 R 1800 200
H 2500 230 H 2500 230 H 1050/2500 230
R 600 120 R 1200 165
Doorsnee
(mm)
Vermogen
(in W)
Doorsnee
(mm)
RO 600/1600/2400 190x275
Vermogen
(in W)
Totaal vermogen 6300 6300 6900
H =halogeen, R =enkele straal, RO = ovalen straal
Beschrijving van het kookvlak
D
Haloring
A
A
D
A
B
0
55
5
50
10
15
45
12
11
12
11
F
12
A
11
12
11
Haloring
E
20
25
0
1
2
3
4
5
0
1
2
3
4
5
C
0
1
2
3
4
5
0
1
2
3
4
5
D
Haloring
A
A
A
D
A
0
12
1
11
2
3
4
5
0
12
1
11
2
3
4
5
0
12
1
11
2
3
4
5
Doorsnee
(mm)
B
C
G
H
D
A Kookzones
B Controlelampje bedrijf
C Bedieningsknoppen
D Controlelampje resterende warmte
E Timer
D
D
F Controlelampje van de grote oppervlakte voor de
uitbreidbare kookzones (concentrische of ovalen):
aanwezig naast iedere uitbreidbare kookzone
G Bedieningsknop ovalen kookplaat
H Bedieningsknop uitbreiding ovalen kookplaat
23
Page 23
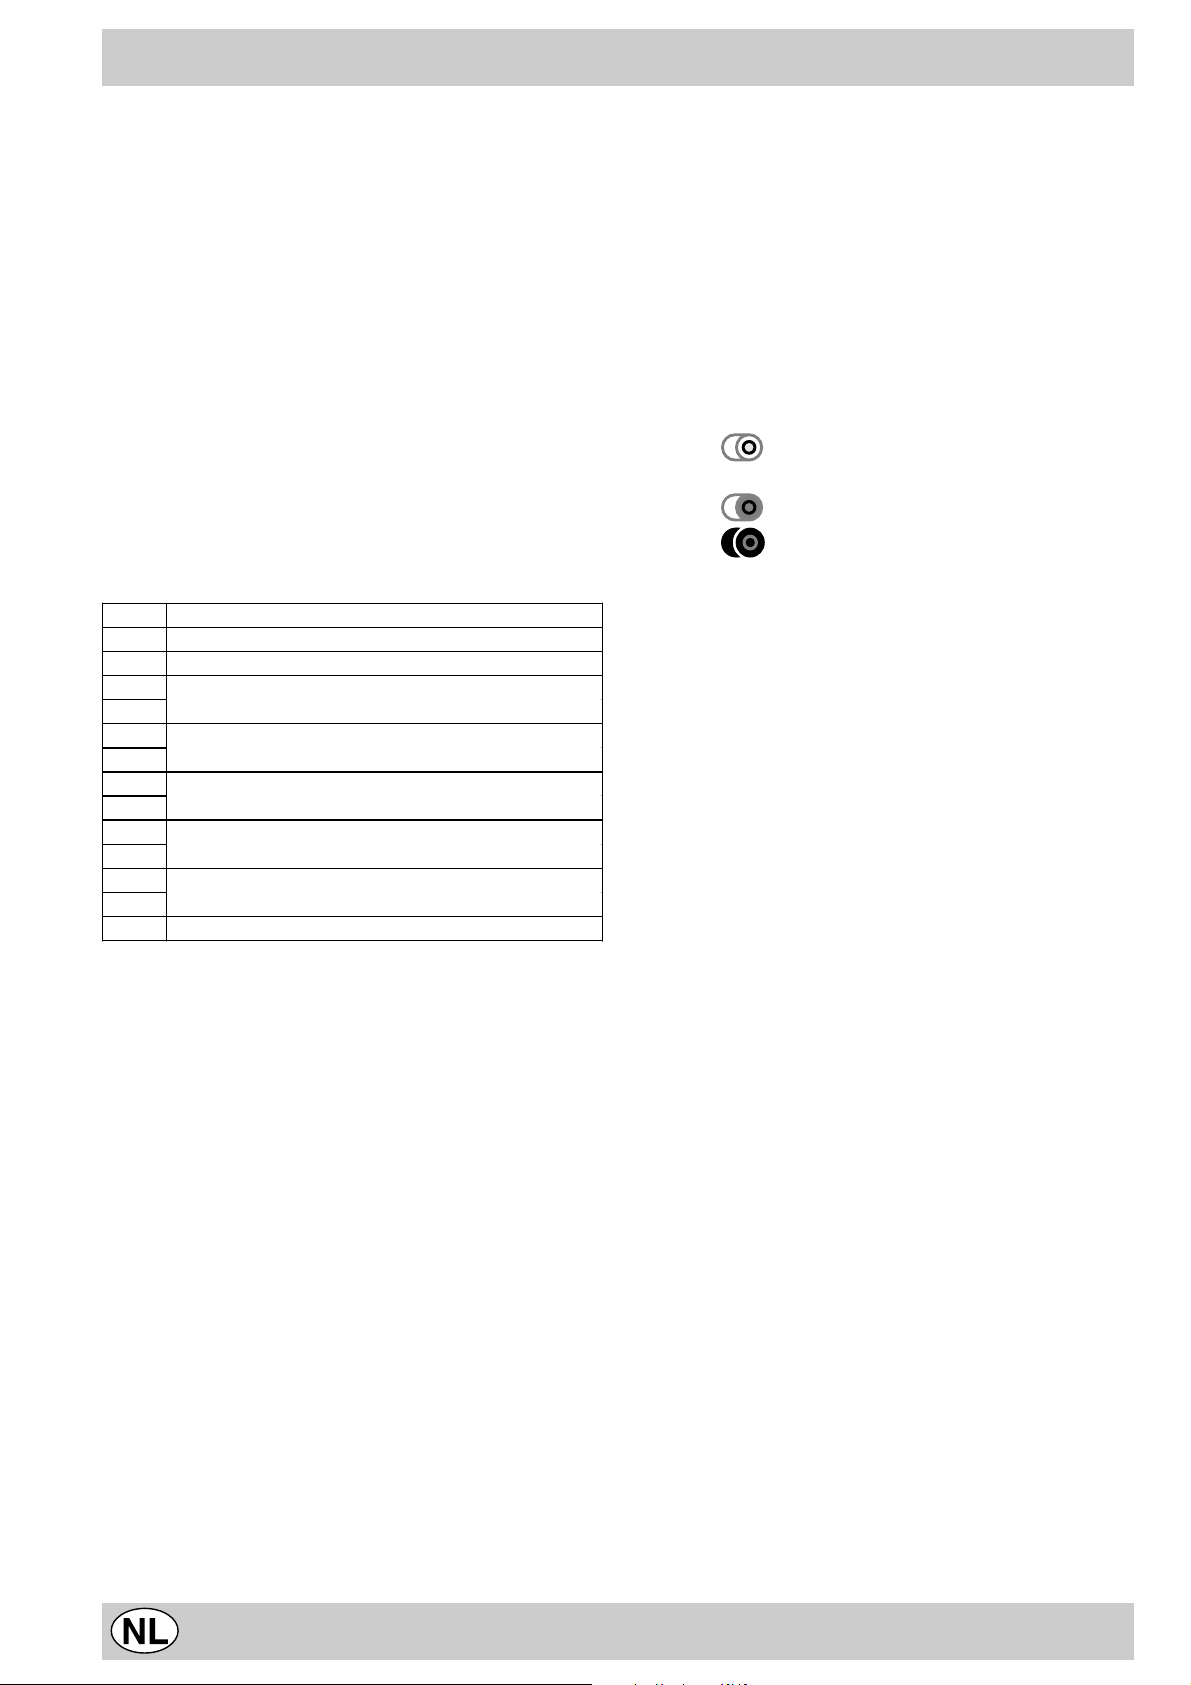
De verschillende kookvlakfuncties
Beschrijving van de verwarmings-elementen
De stralingsplaten bestaan uit cirkelvormige weer-
standen. Zij worden slechts rood na enkele tientallen
seconden na het aanschakelen.
De gemengde halogeenplaten. Het kookvlak gebruikt
elementen die zijn samengesteld uit twee halogeenlampen en een cirkelvormige weerstand. Dankzij deze
combinatie krijgt u een uitstekende temperatuursverdeling over de gehele oppervlakte van de kookzone
en houdt u het voordeel van de halogeenlampen. Het
voornaamste kenmerk van de halogeenlampen is het
onmiddelijk uitstralen van een grote hoeveelheid licht
en hitte, dus:
• snelle verwarming zoals op een gasbrander
• een even snelle uitschakeling
Het gebruik is uitermate eenvoudig aangezien het
analoog is aan het gebruik van de andere
verwarmingselementen. Zie tabel 1.
Tabel 1
Pos Regelen kookzones
0uit
1 boter of chocola smelten
2
vloeistoffen opwarmen
3
4
vla en sausen
5
6
vlees stoven - blanquette - entremets
7
8
pasta - rijst
9
10
biefstuk - vis - omelet
11
12 fritturen
De bedienings-knoppen
Ledere kookzone heeft zijn eigen knop die de temperatuur regelt van een minimum van 1 tot een maximum
van 12. In de volgende tabel 1 vindt u de verhoudingen
tussen de posities die zijn aangegeven op de knop en
het gebruik waarvoor de platen worden aangeraden.
Het functioneren van de uitbreidbare ovalen
kookzones
(lees de vorige bladzijde als uw kookplaat is voorzien
van uitbreidbare ovalen kookzones)
1. stel de gewenste stroomsterkte in met de knop "G";
2. zet de knop "H" op de symbolen:
a. voor gebruik van alleen de kleinere in-
terne kookzone.
b. voor gebruik van de ronde kookzone.
c. voor gebruik van de hele ovalen kook-
zone.
Controlelampje (B)
Dit gaat aan als één van de verwarmingszones in
werking wordt gesteld.
Controlelampje resterende warmte (D)
Dit geeft aan dat één of meer zones een temperatuur
hebben van meer dan 60°C ook na het uitschakelen
ervan. Enkele modellen hebben 4 controlelampjes voor
de resterende warmte, één per kookzone.
24
Page 24
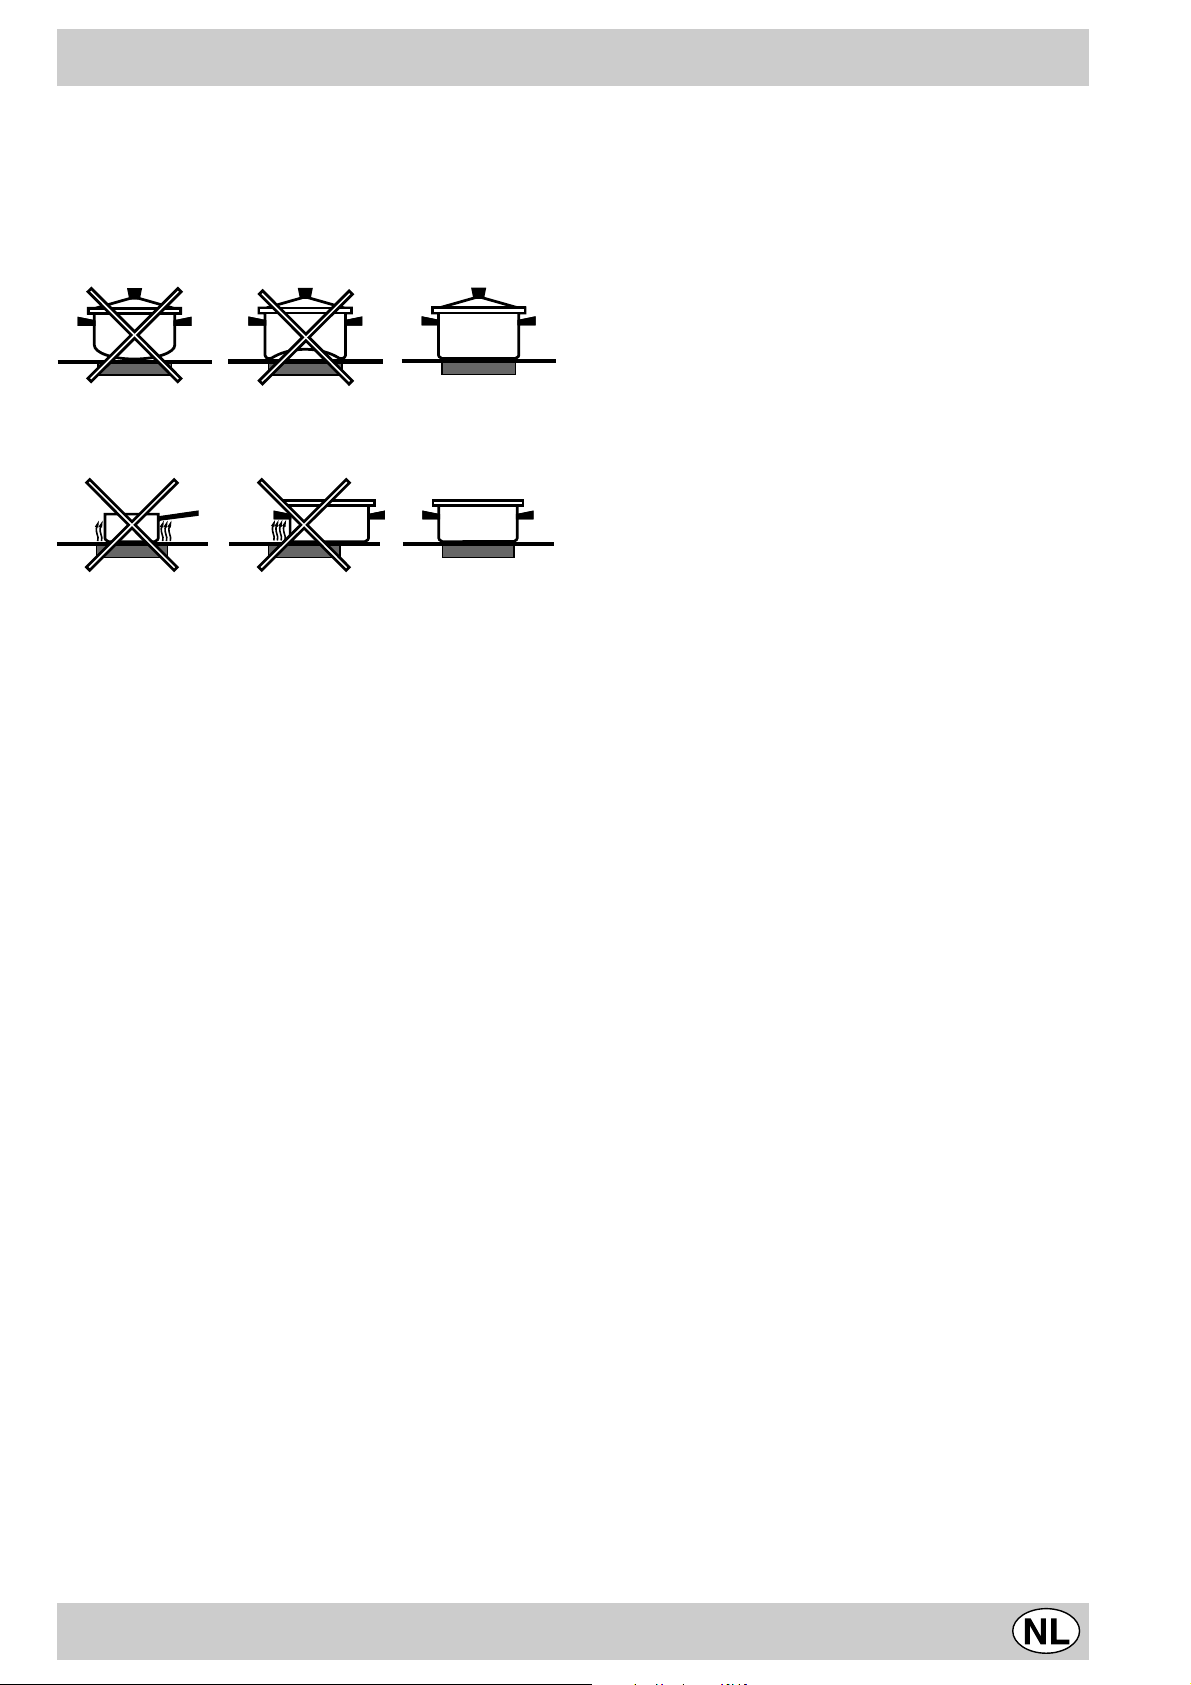
Reinigen en onderhoud
Praktische raadgevingen voor het gebruik van de
kookplaat
Voor het beste gebruik van de kookplaat moeten enkele
fundamentele regels in acht worden genomen gedurende
het koken en het klaarmaken van de gerechten.
• Gebr uik pannen met een platte bodem die perfect
aansluiten aan de verwarmingszone.
• Gebruik pannen die groot genoeg zijn om de kookplaat
geheel te bedekken teneinde alle beschikbare hitte te
benutten.
• Houd de bodem van de pan altijd schoon en droog zodat
hij goed aansluit aan de kookzone en zodat niet alleen
de kookzones een lange duurzaamheid genieten, maar
ook de pannen zelf.
• V ermijd dezelfde pannen te gebruiken die u ook op een
gasfornuis heeft gebruikt. De hitteconcentratie op de
gaspitten kan de bodem van een pan vervormen,
hetgeen niet de beste resultaten oplevert wanneer hij
op een keramiekplaat wordt gebruikt.
• Laat nooit een kookzone aan staan zonder een pan erop
aangezien de verhitting, die snel het maximum niveau
bereikt, de verwarmingselementen kan beschadigen.
• De glazen kookplaat is zowel vuurvast als resistent
tegen stoten. Toch kan hij barsten als hij hard getroffen
wordt door een puntig voorwerp. In dit geval sluit u de
stroom af en wendt u zich tot een be voegde installateur.
Houd de kookplaat altijd schoon. W acht tot de verwarmingszones uit zijn en afgekoeld voordat u overgaat tot onderhoud van de kookplaat.
Raamwerk van roestvrij staal (slechts bij enkele modellen)
Roestvrij staal kan vlekkerig worden als er langere tijd
kalkhoudend water op blijft liggen of als gev olg van gebruik
van bijtende schoonmaakmiddelen (fosforhoudend). Spoel
en droog altijd goed af na het reinigen van de kookplaat.
Droog geknoeid water altijd meteen zorgvuldig af.
Onderhoud kookplaat
De glasplaat die wordt gebruikt als verwarmingsvlak is perfect glad en niet poreus; bovendien is hij bij normale
gebruikscondities bestand tegen hitte en stoten. Voor correct onderhoud van alle onderdelen van de kookplaat raden wij aan als volgt te werk te gaan:
• voor normaal reinigen is het voldoende hem met een
vochtige spons te wassen en daarna met keukenpapier te drogen.
• Als de plaat erg vuil is moet hij worden schoongemaakt met een middel dat speciaal voor
keramiekplaten* is bedoeld; afspoelen en afdrogen.
• voor het verwijderen van hardnekkig vuil kunt u een
hiervoor bestemd schrapertje gebruiken. Doe dit zo
snel mogelijk zonder te wachten tot het apparaat koud
is geworden, om het hard worden van de resten te
vermijden Uitstekende resultaten kunnen ook worden bereikt met een speciaal roestvrij staalwolsponsje
voor keramiekplaten in een sopje gedoopt.
• Als de plaat is schoongemaakt kan hij worden behandeld met een speciaal product voor onderhoud en protectie: Het onzichtbare laagje dat dit product achterlaat beschermt de glasplaat in het geval van overkoken. Dit soort onderhoud moet worden uitgevoerd
als de plaat lauw of koud is.
• Vergeet niet de kookplaat altijd met schoon water af
te spoelen en nauwkeurig te drogen: restjes
schoonmaakmiddel kunnen hard worden gedurende
een volgende kookbeurt.
Belangrijke aanbevelingen
• Vermijd het gebruik van schuurmiddelen of bijtende middelen, z oals spray voor barbecue en o vens,
ontvlekkingsmiddelen en roestverwijderende
producten, vim en schuursponsen, aangezien deze
de plaat voorgoed kunnen krassen.
• Denk eraan voorwerpen die kunnen smelten op een
afstand van de kookplaat te houden, b.v. plastic
voorwerpen, suiker of producten met een hoog
suikergehalte. Als er iets van dit soort voedsel op de
kookplaat is geknoeid, verwijder het onmiddelijk (zo-
lang de plaat nog warm is) met een scheermesscherp
schrapertje, om te vermijden dat de plaat beschadigd
wordt.
• De kookplaat mag alleen voor koken worden gebruikt.
Zet geen voorwerpen op de plaat als deze niet in
gebruik is. Gebruik de plaat niet om dingen op te zetten (bestek, pannen, afdroogdoeken enz.) noch als
hakblok.
• Aluminium bakken of folie en plastic bakken mogen
nooit op de plaat blijven staan als deze nog lauw of
warm is.
• Gebruik nooit stoom- of hogedrukapparaten voor het
reinigen van de oven.
• Plaats geen metalen voorwerpen op de kookplaat
(bestek of deksels enz.).
• Verwarm nooit etenswaren in een afgesloten doos:
deze zou kunnen openbarsten.
Schade aan de kookplaat die veroorzaakt is door dergelijk
onjuist gebruik valt automatisch niet onder de garantie.
25
Page 25

Ratschläge und Empfehlungen
• Dieses Gerät ist für den nicht professionellen
Einsatz im privaten Haushalt bestimmt.
• Lesen Sie bitte vor Gebrauch des Gerätes die in
diesem Handbuch enthaltenen Hinweise aufmerksam
durch. Sie enthalten wichtige Angaben hinsichtlich der
Sicherheit bei der Installation, dem Gebrauch und der
Wartung. Bewahren Sie dieses Handbuch sorgfältig auf,
damit Sie es jederzeit zu Rate ziehen können.
• Überzeugen Sie sich nach Abnahme der Verpackung,
dass das Gerät auch nicht beschädigt wurde. Im
Zweifelsfall raten wir, das Gerät nicht zu benutzen und
sich an Fachpersonal zu wenden.
•
Das Verpackungsmaterial wie Plastikbeutel,
Schaumstoffe, Nägel us w . kann für Kinder gefährlich sein
und muss demnach aus ihrer Reichweite gehalten
werden.
• Die Installation ist von Fachpersonal und gemäß den
Anweisungen des Herstellers durchzuführen.
•
Eine unsachgemäße Installation kann zu Schäden an
Personen, Tieren oder Gegenständen führen, für die der
Hersteller nicht haftbar gemacht werden kann.
• Die elektrische Sicherheit dieses Gerätes ist nur dann
gewährleistet, wenn es sachgemäß und gemäß den
geltenden Sicherheitsvorschriften an eine Erdungsanlage
angeschlossen wird. Überprüfen Sie bitte, ob diese
grundlegende Sicherheitsanforderung erfüllt ist; im
Zweifelsfalle ist eine Kontrolle der Anlage durch
Fachpersonal anzuf ordern.
•
Der Hersteller kann für eventuelle, durch Fehlen einer
Erdungsanlage verursachte Schäden nicht
verantwortlich gemacht werden.
• Vor Anschluss des Gerätes kontrollieren Sie bitte,
dass die auf dem Typenschild angegebenen Daten mit
den Eigenschaften des Versorgungsnetzes
übereinstimmen.
• Vergewissern Sie sich, dass die elektrische Leistung
der Anlage und der Steckdosen der maximalen, auf dem
Typenschild angegebenen Höchstleistung des Gerätes
entspricht. Im Zweifelsfalle ziehen Sie bitte einen
Fachmann zu Rate.
• Dieses Gerät darf nur für den Zweck, für den es
geschaffen wurde, eingesetzt werden. Jede andere
Verwendung (zum Beispiel zum Beheizen von Räumen)
ist als unsachgemäß und gefährlich anzusehen.
•
Der Hersteller haftet nicht für eventuelle, durch
Erste Inbetriebnahme: Der auf die Dichtungen aufgetragene Leim könnte Fettspuren auf dem Glas hinterlassen.
Wir empfehlen Ihnen, diese vor Einsatz des Gerätes mit einem herkömmlichen Reinigungsmittel (einer nicht
scheuernden Poliercreme) zu entfernen. Während der ersten Betriebsstunden könnte der Geruch verbr annten Gummis
wahrzunehmen sein. Dies wird sich nach kurzer Zeit geben.
unsachgemäßen, falschen oder unangemessenen
Gebrauch verursachte Schäden.
• Die Verwendung eines jeden Elektrogerätes setzt die
Einhaltung einiger wichtiger Grundregeln voraus,
insbesondere folgender:
• Berühren Sie das Gerät nicht mit feuchten Händen.
• Benutzen Sie das Gerät nicht barfuß.
• Vermeiden Sie den Einsatz von Ver länger ungen.
• Ziehen Sie den Stecker nicht am V ersorgungskabel
oder gar an dem Gerät selbst aus der Steckdose.
• Setzen Sie das Gerät nicht der Witterung aus
(Regen, Sonne usw.).
• Lassen Sie das Gerät nicht ohne Beaufsichtigung
von Kindern oder unbefugten Personen benutzen.
• Vor jeder Reinigungs- und Wartungsarbeit ist das
Gerät entweder durch Herausziehen des Steckers oder
durch Betätigen des Hauptschalters der Hausanlage
stromlos zu machen.
• Sollte das Glas Ihres Glaskeramik-Kochfeldes
springen, ist das Gerät sofort vom Str omnetz trennen.
Wenden Sie sich zwecks eventueller Reparaturen
ausschließlich an eine anerkannte Kundendienststelle
und verlangen Sie den Einsatz von Originalersatzteilen.
Die Nichtbeachtung dieser Hinweise kann die Sicherheit
des Gerätes beeinträchtigen.
• Soll das Gerät nicht mehr verwendet werden,
empfehlen wir, dieses durch Durchschneiden des
Versorgungskabels, nach Herausziehen desselben aus
der Steckdose, unbrauchbar zu machen. Ferner raten
wir, jene Geräteteile zu vernichten, die vor allem für
Kinder, welche das unbrauchbare Gerät zum Spielen
benutzen könnten, eine Gefahr darstellen.
• Das Glaskeramikkochfeld ist sowohl gegen
Temperaturschocks als auch gegen mechanische
Schocks beständig. Dennoch kann es durch Stöße
bzw. Aufprall v on spitzen Gegenständen zerbrechen.
Nehmen Sie das Gerät in diesem Falle umgehend vom
Stromnetz und wenden Sie sich zwecks Reparatur
des Kochfeldes an eine zuständige
Kundendienststelle.
• Bitte berücksichtigen Sie, dass die Kochzonen noch
für mindestens 30 Minuten nach Ausschalten heiß
bleiben; achten Sie deshalb darauf, dass nichts
unbeabsichtigt auf diesen heißen Flächen abgelegt bzw.
abgestellt wird.
• Schalten Sie die Kochstellen nicht ein, wenn Alufolie
oder Gegenstände aus Plastik auf dem Kochfeld liegen
sollten.
• Stützen Sie sich nicht auf heiße Kochzonen.
• Sollten Sie kleinere Elektrogeräte in der Nähe des
Kochfeldes ben utzen, achten Sie bitte darauf , dass deren
Kabel keine heißen Oberflächen berühren.
• Stellen Sie Stieltöpfe und Pfannen immer so auf die
Kochstelle, dass ihre Griffe zur Mitte des Kochfeldes hin
zeigen, so verhindern Sie ein unbeabsichtigtes
Umstoßen derselben.
• ZUR BEACHTUNG: Schauen Sie nicht zu intensiv
auf die eingeschalteten Halogen-Kochzonen, soweit
vorhanden.
26
Page 26
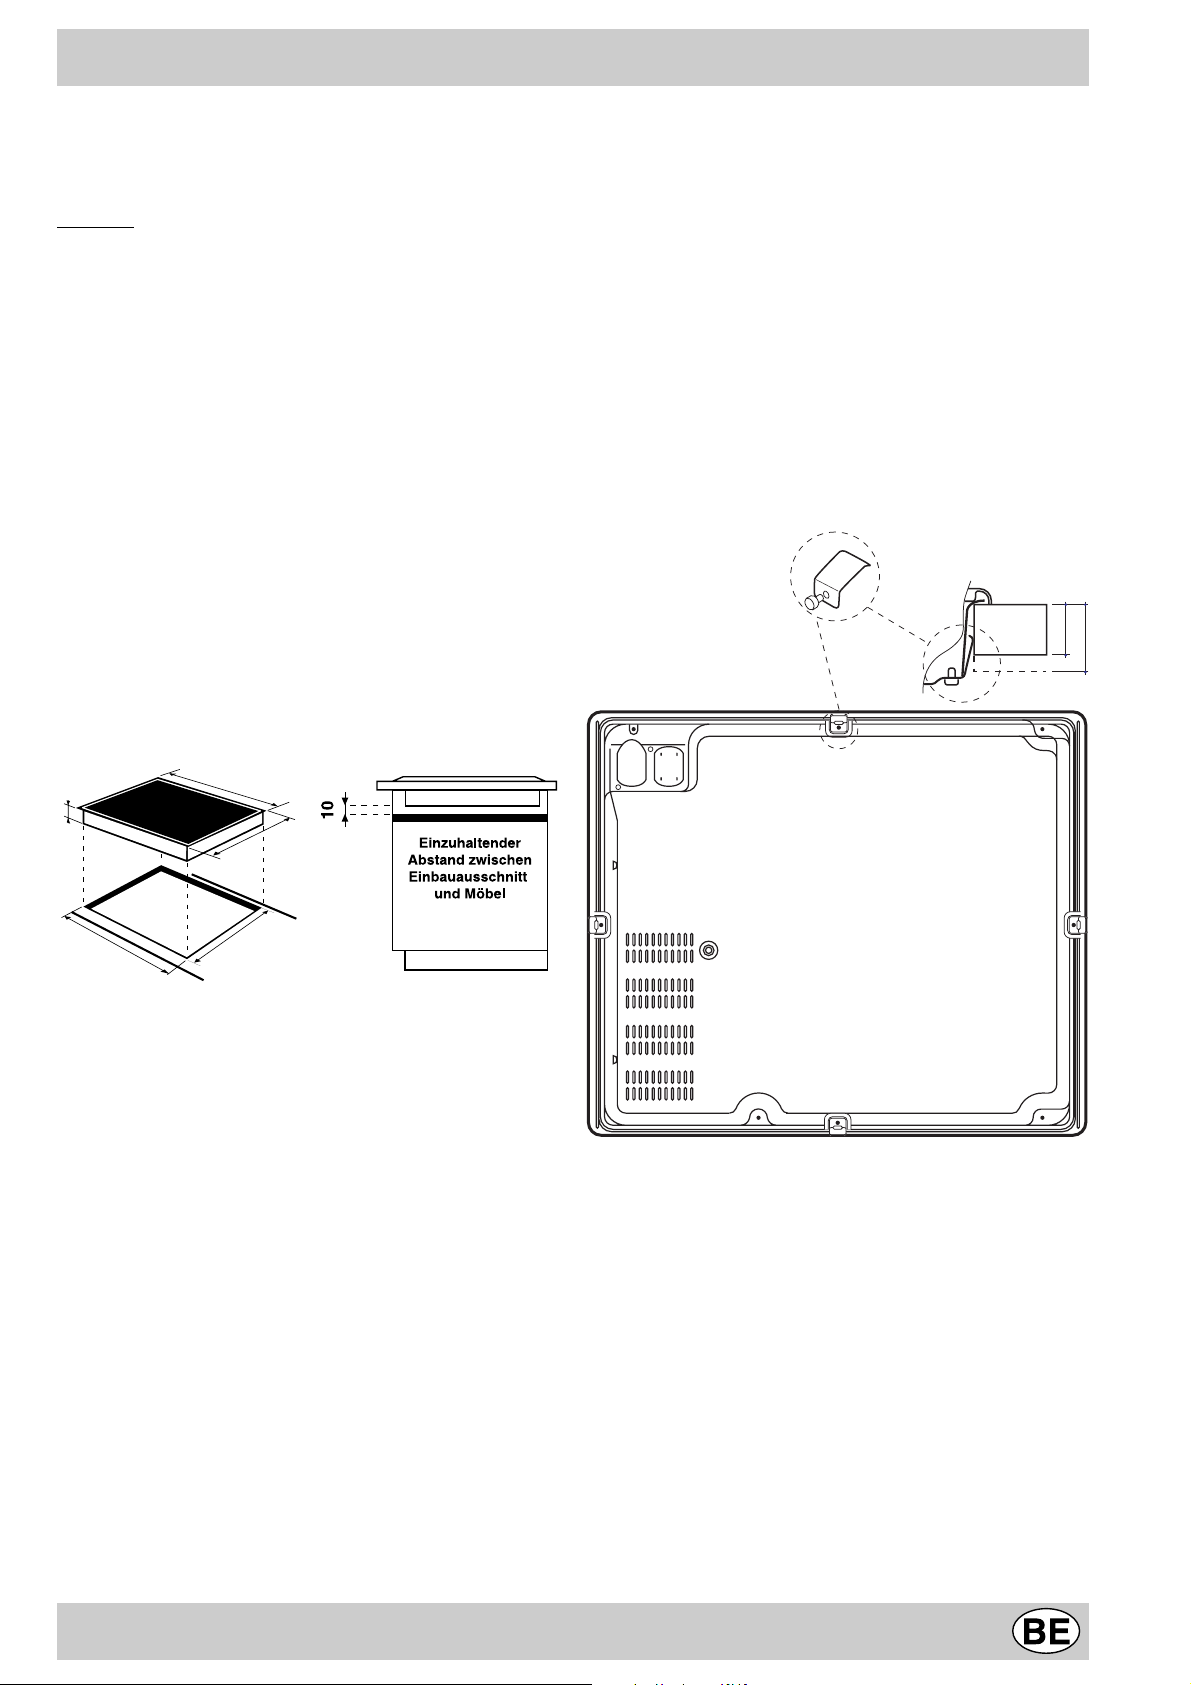
Installation und Befestigung
Die nachstehend aufgeführten Anweisungen sind an den
Fachinstallateur gerichtet und gelten als Leitlinien zur
korrekten technischen Installation, Einstellung und
Wartung gemäß den geltenden Richtlinien.
Wichtig: Vor jeder Reinigung und Pflege muss das
Kochfeld vom Stromnetz getrennt werden.
Installation
• Das Kochfeld wird auf einem Unterschrank
angebracht, an dem nur in der Arbeitsplatte ein
entsprechender Ausschnitt vorzunehmen ist.
• Das Material der Arbeitsplatte muss einer
Temperaturbelastung von 100°C standhalten.
• Das Kochfeld muss in einem Abstand von
mindestens 40 mm von der dahinter liegenden Wand
bzw. jeder anderen vertikalen Fläche angebracht
werden, um eine geeignete Belüftung zu gewährleisten
und ein Überhitzen der angrenzenden Flächen zu
vermeiden.
• Soll die Kochmulde über einem Bac k ofen installiert
werden, muss Letzterer mit einem Kühlsystem mit
Zwangsbelüftung ausgestattet sein.
• Die Kochmulde sollte nicht über einem
Geschirrspüler angebracht werden. Ist dies jedoch
nicht zu vermeiden, so ist zur Abdichtung ein
Trennelement zwischen den beiden Geräten
einzufügen.
574
Befestigung
Sehr wichtig: Das Glaskeramik-K ochf eld muss auf einer
perfekt ebenen Stütz- bzw. Auflagefläche installiert
werden.
hervorgerufene V erf ormungen könnten die Eigenschaften
und Leistungen des Kochfeldes beeinträchtigen.
Die Befestigungsklammern werden mittels Schrauben
angebracht (siehe Schema).
Diese Schrauben müssen jederzeit zugänglich sein.
Setzen Sie das Kochfeld durch leichtes Andrücken des
gesamten umlaufenden Randes in den Ausschnitt der
Arbeitsplatte, damit es vorschriftsmäßig auf der
gesamten Auflagefläche aufstützt.
MONTAGE DER KLAMMERN AN DER UNTERSEITE
Durch unsachgemäße Befestigung
VORDERSEITE DES
KOCHFELDES
ARBEITSFLÄCHE
30
40
48
560 +/- 1
504
UNTERSEITE DES KOCHFELDES
490 +/- 1
27
Page 27
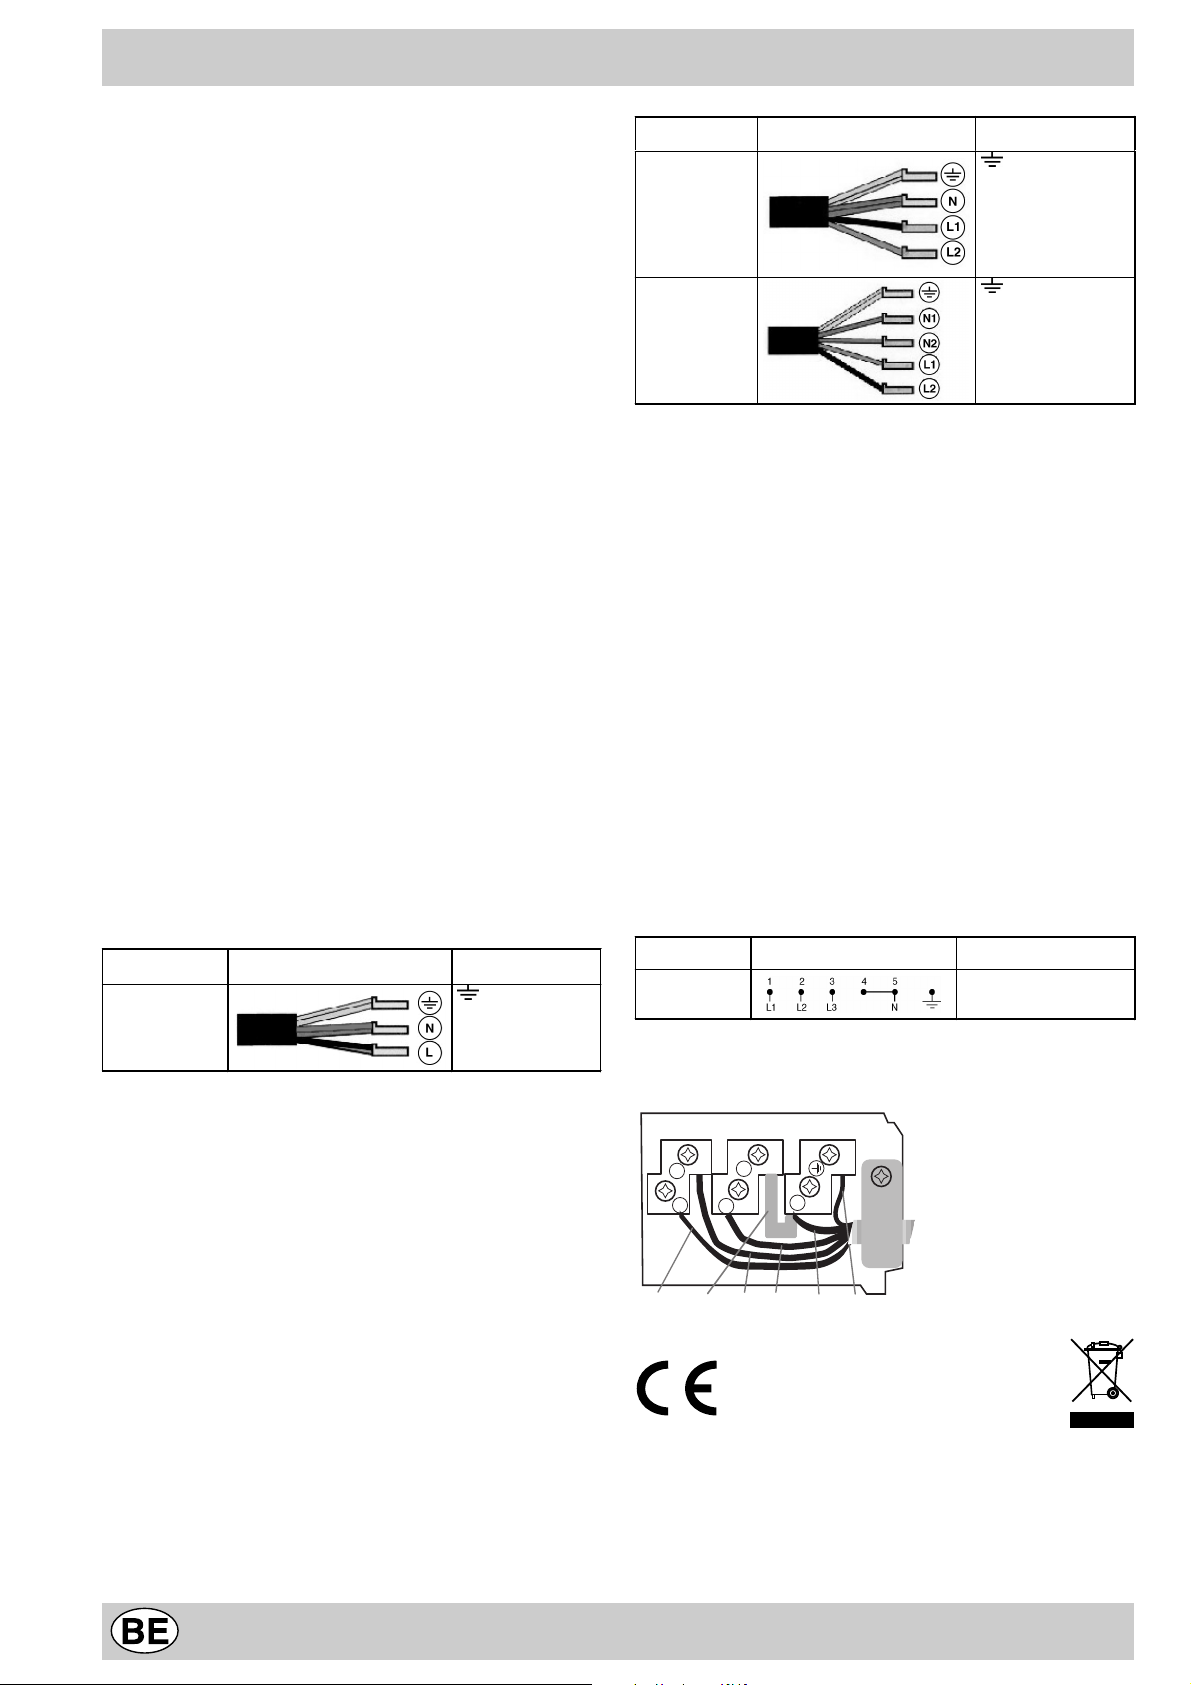
Technische Eigenschaften
Stromanschluss
• Die elektrische Sicherheit dieses Gerätes ist nur dann
gewährleistet, wenn es sachgemäß und gemäß den
geltenden Sicherheitsvorschriften an eine Erdungsanlage
angeschlossen wird. Die Gegebenheit dieser grundlegenden
Sicherheitsanforderung muss überprüft werden, im
Zweifelsfalle ist eine Kontrolle der Anlage durch
Fachpersonal anzuf ordern.
•
Der Hersteller kann für eventuelle, durch Fehlen einer
Erdungsanlage verursachte Schäden nicht verantwortlich
gemacht werden.
• Vor Anschluss des Gerätes k ontrollieren Sie bitte, dass
die auf dem Typenschild angegebenen Daten mit den
Eigenschaften des Versorgungsnetzes übereinstimmen.
• Vergewissern Sie sich davon, dass die elektrische
Leistung der Anlage und der Steckdosen der maximalen,
auf dem Typenschild angegebenen Höchstleistung des
Gerätes entspricht. Im Zweifelsfalle ziehen Sie bitte einen
Fachmann zu Rate .
Bei jeder Wartungs- oder Reinigungsmaßnahme ist das
Gerät vom Stromnetz zu trennen.
Der Anschluss des Kochfeldes an das Stromnetz m uss mittels
eines Anschlussgehäuses vorgenommen werden : soll das
Gerät direkt an das Stromnetz angeschlossen werden, ist
zwischen Stromnetz und Gerät ein leicht zugänglicher, allpoliger
Schalter mit einer Kontaktweite von mindestens 3 mm
zwischenzuschalten.
Einphasenanschluss
Das Kochfeld ist mit einem bereits angeschlossenen Netzkabel
ausgestattet und ist für einen Einphasenanschluss
voreingestellt. Schließen Sie die Drähte gemäß nachf olgender
T abelle und Zeichnungen an:
Netzspannu ng
und -frequenz
230V 1+N ~
50 Hz
Elektrokabel
Anschluss der
Drähte
: gelb/grün;
N: die 2 blauen
Drähte zusammen
L: braun zusammen
mit schwarz
Netzspannu ng
und -frequenz
400V - 2+N ~
50 Hz
230V 3 ~
50Hz
400V - 2+2N ~
50 Hz
Elektrokabel
Anschluss der
Drähte
: gelb/grün;
N: die 2 blauen Drähte
zusammen
L1: schwarz
L2: braun
: gelb/grün;
N1: blau
N2: blau
L1: schwarz
L2: braun
Sollte die Elektroanlage einer der nachfolgenden Eigenschaften
entsprechen:
Netzspannung und -frequenz
• 400V 3 - N ~ 50 Hz
dann verfahren Sie wie f olgt:
! Das eventuell mitgelieferte Netzkabel kann für diese
Installationsarten nicht verwendet werden.
1. Verwenden Sie ein geeignetes Versorgungskabel des Typs
H05RR-F, oder eines höheren Wertes, geeigneter Maße
(Kabelquerschnitt: 2,5 m).
2. Heben Sie unter Zuhilf enahme eines Schraubenziehers die
seitlichen Zungen des Klemmengehäusedeckels an und öffnen
Sie es (
siehe Abbildung Klemmengehäuse
).
3. Schrauben Sie die Schraube der Kabelklemme sowie die
Schrauben der Klemmen, die der erforderlichen Anschlussart
entsprechen, aus und positionieren Sie die Brücken in
Anlehnung an nachfolgende T abelle und Zeichnungen.
4. Ve rlegen Sie die Drähte gemäß nachstehenden Zeichnungen
und Tabelle und schließen Sie die Drähte an. Ziehen Sie die
Klemmenschrauben hierbei fest an.
Netzspannung
und -frequenz
400V 3-N ~ ı 50
Hz
Elektrischer Anschlu ss Klemmeng ehäu se
Dreiphasenanschluss 400
5. Bef estigen Sie das V ersorgungskabel in der entsprechenden
Kabelklemme und schließen Sie den Deckel.
Andere Anschlussarten
Sollte die Elektroanlage einer der nachfolgenden Eigenschaften
entsprechen:
Netzspannung und -frequenz
• 400V - 2+N ~ 50 Hz
• 230V 3 ~ 50 Hz
• 400V - 2+2N ~ 50 Hz
Trennen Sie die Drähte und schließen Sie sie gemäß
nachfolgender Tabelle und Zeichnungen an:
3
Phase
4
5
Dreiphasenanschluss 400
2
1
Phase Brücke Nullleiter ErdleiterPhase
Dieses Gerät entspricht den folgenden EG-Richtlinien:
- 73/23/EWG vom 19.02.73 (Niederspannung) und
nachfolgenden Änderungen;
- 89/336/EWG vom 03.05.89 (Niederspannung) und
nachfolgenden Änderungen;
- 93/68/EWG vom 22.07.93 (Niederspannung) und
28
Page 28
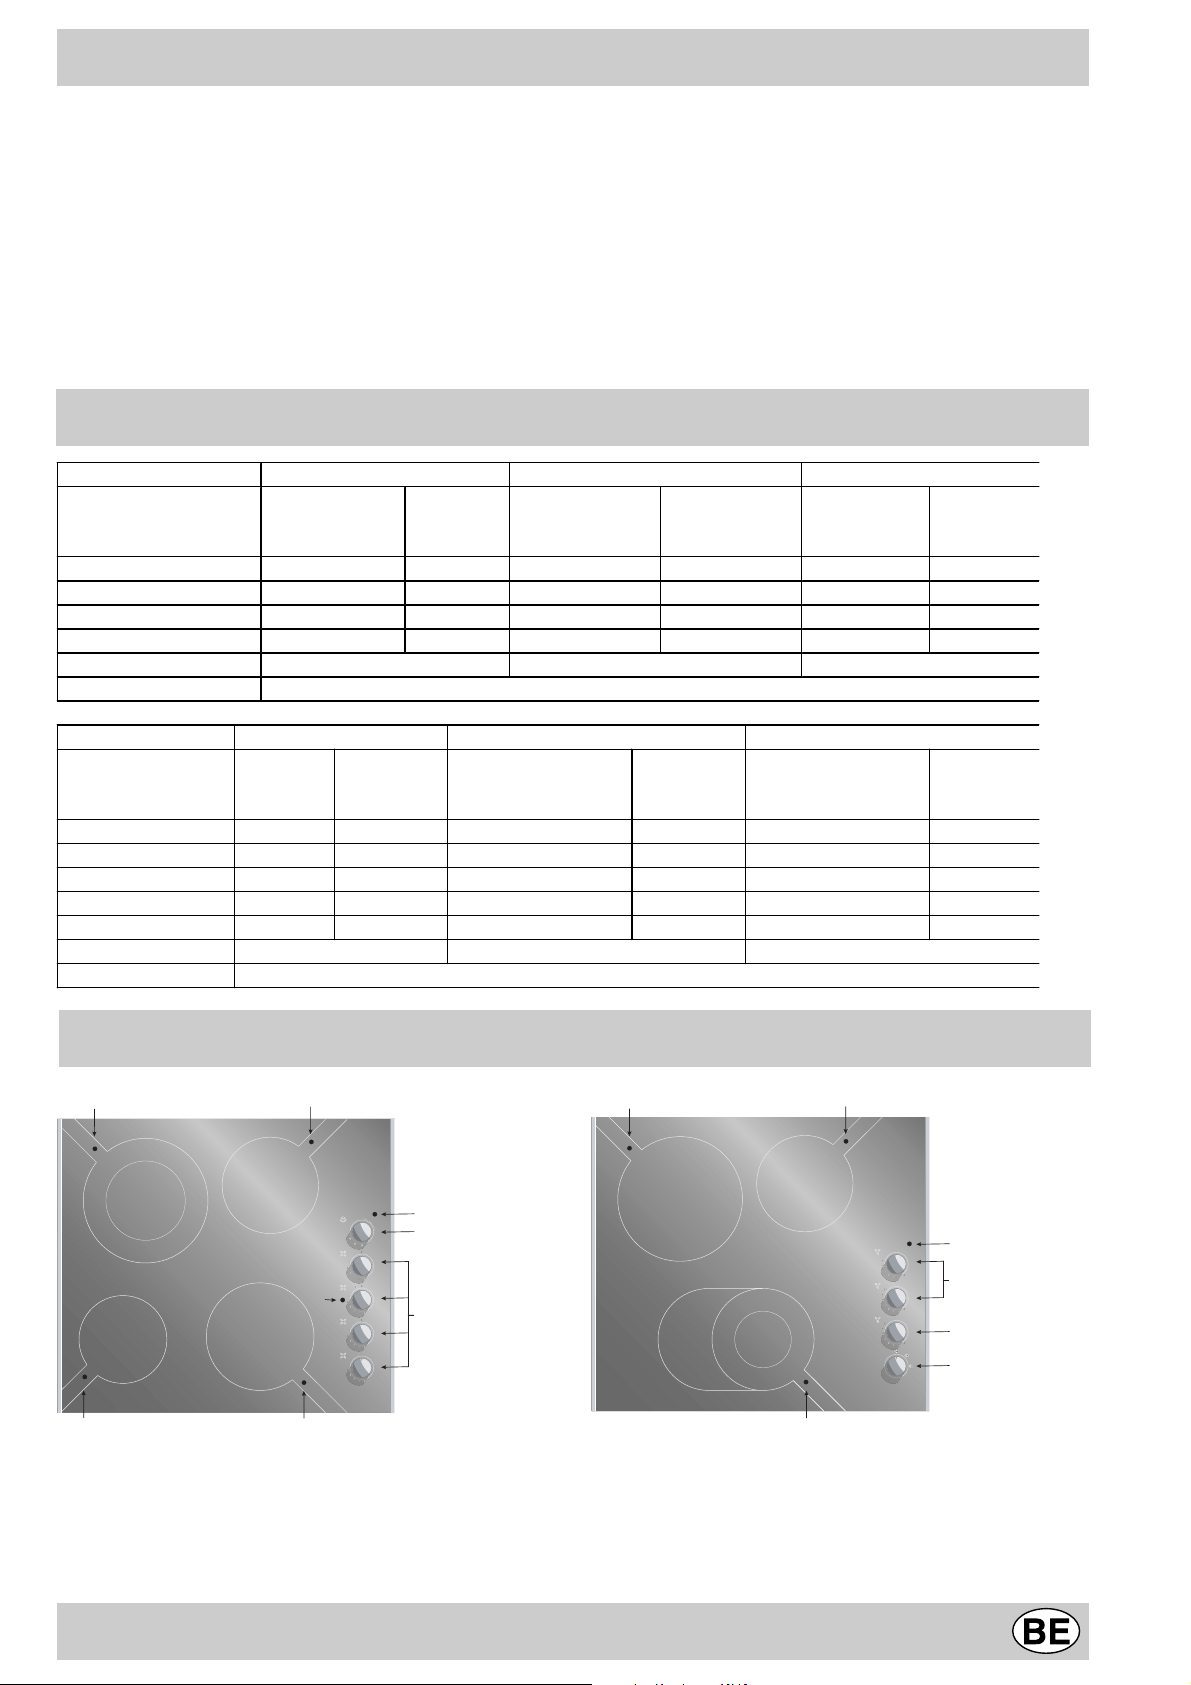
10
6
10
6
10
6
10
6
10
6
10
6
10
6
nachfolgenden Änderungen;
- 2002/96/EC
Wichtiger Hinweis: Wird das Kochfeld über einem
Einbaubackof en installiert, müssen die Elektroanschlüsse (der
des Kochfeldes und der des Bac kofens) getrennt vorgenommen
werden, und dies nicht nur aus Sicherheitsgründen, sondern
auch um den Backofen, falls nötig, leichter herausziehen zu
können.
Gemäß der Europäischen Richtlinie 2002/96/EC über Elektround Elektronik-Altgeräte (WEEE) dürfen Elektrohaushalts-
Altgeräte nicht über den herkömmlichen Haushaltsmüllkreislauf
entsorgt werden. Altgeräte müssen separat gesammelt werden,
um die Wiederverwertung und das Recycling der beinhalteten
Materialien zu optimieren und die Einflüsse auf die Umwelt
und die Gesundheit zu reduzieren. Das Symbol
„durchgestrichene Mülltonne“ auf jedem Produkt erinnert Sie
an Ihre Verpflichtung, dass Elektrohaushaltsgeräte gesondert
entsorgt werden müssen.
Endverbraucher können sich an Abfallämter der Gemeinden
wenden, um mehr Informationen über die korrekte Entsorgung
ihrer Elektrohaushaltsgeräte zu erhalten.
Beschreibung der Kochzonen
KOCHFELDER TM 6321 TM 6220 TM 6130
Durch-
messer
(in mm)
Leistung
(in W)
Kochzonen
Hinten rechts
Vorne rechts
Hinten links
Vorne links
Leistung
(in W)
R 1400 180 R 1400 180 R 1400 180
H 1800 200 H 1800 200 R 1800 200
H 1050/2500 230 H 2500 230 H 2500 230
R 1200 165 R 1200 165 R 1200 165
Gesamtleistung 6900 6900 6900
H = Halogen-Kochzone, R = einfache Strahlerkochzone, RO = ovale Strahlerkochzone
Durchmesser
(in mm)
Leistung
(in W)
Durch-
messer
(in mm)
KOCHFELDER TM 6040 TM 6120 TM 6230
Kochzonen
Hinten rechts
Vorne rechts
Hinten links
Vorne links
Mitte
Leistung
(in W)
Durchmesser
(in mm)
Leistung
(in W)
R 1400 180 R 1400 165 R 1400 180
R 1800 200 R 1800 200
H 2500 230 H 2500 230 H 1050/2500 230
R 600 120 R 1200 165
RO 600/1600/2400 190x275
Durch-
messer
(in mm)
Leistung
(in W)
Gesamtleistung 6300 6300 6900
H = Halogen-Kochzone, R = einfache Strahlerkochzone, RO = ovale Strahlerkochzone
Geräteansicht
D
Haloring
A
A
D
A
B
0
55
5
50
10
45
15
E
20
25
0
12
1
11
2
3
4
5
0
12
1
11
2
F
A
Haloring
3
4
5
C
0
12
1
11
2
3
4
5
0
12
1
11
2
3
4
5
D
Haloring
A
A
A
D
A
0
12
1
11
2
3
4
5
0
12
1
11
2
3
4
5
0
12
1
11
2
3
4
5
Durch-
messer
(in mm)
B
C
G
H
D
A Kochzonen
B Betriebskontrollleuchte
C Schaltknöpfe
D Restwärmeanzeigen
E Kurzzeitwecker
D
D
F Betriebsanzeigeleuchte der erweiterten
Kochzonenfläche (konzentrisch oder oval): befindlich
neben einer jeden erweiterbaren Kochzone
G Schaltknopf für die ovale Kochzone
H Schaltknopf zur Erweiterung der ovalen Kochzone
29
Page 29
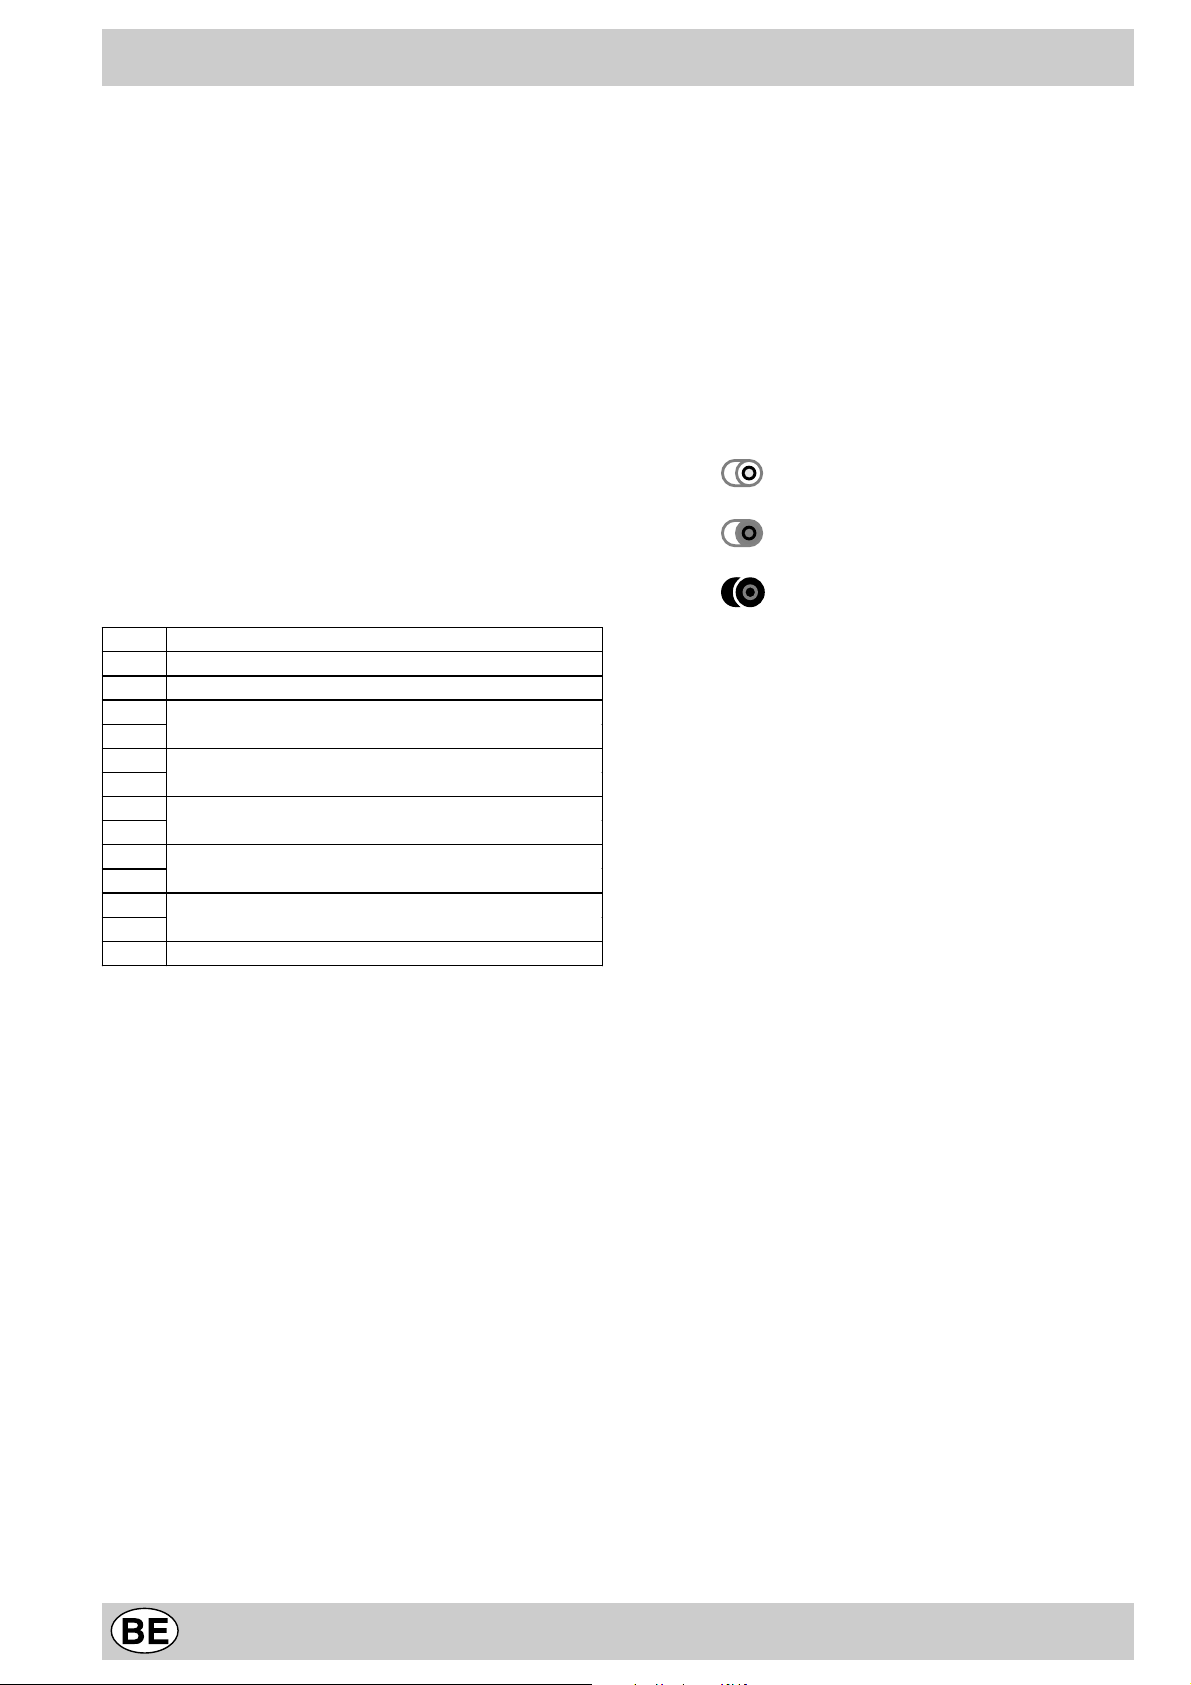
Die verschiedenen Funktionen der Kochmulde
Beschreibung der Heizelemente
Bei den Strahlerelementen handelt es sich um
kreisförmige Heizwiderstände, die nach Einschalten in
wenigen Sekunden glühend werden.
Die Kombi/Halogenstrahler, mit der die Kochmulde
ausgestattet ist, bestehen aus 2 Halogenlampen und
einem
kreisförmigen Heizwiderstand. Dank dieser
Kombination
wird eine äußerst optimale Wärmeverteilung auf der
gesamten Kochzone gewährleistet, die Vo rteile der
Halogenlampen bleiben unveränderlich erhalten.
Haupteigenschaft der Halogenlampen ist die
gleichzeitige
Ausstrahlung einer großen Licht- und Wärmemenge,
und
dies bedeutet:
• schnelles Aufheizen, wie das eines Gasbrenners
• und genau so rasches Abschalten.
Ihr Einsatz ist äußerst einfach, so wie der der anderen
Heizelemente. Beachten Sie hierzu die Tabelle.
Pos Einstellungen der Kochzonen
0 Ausgeschaltet
1 Schmelzen von Butter, Schokolade
2
Zum Erhitzen von Flüssigkeiten
3
4
Für Cremes und Soßen
5
6
Suppenfleisch, Kalbsragout, Süßspeisen
7
8
Nudeln, Reis
9
10
Koteletts, Fisch, Omeletts
11
12 Fritieren
Schaltknöpfe
Jede Kochzone ist mit einem entsprechenden
chaltknopf ausgestattet, der eine stufenlose
Einstellung der Temperatur von min.1 - max.12
gewährleistet. Zur korrekten Einstellung ziehen Sie
bitte die Tabelle 1 zu Rate.
Betriebsweise der erweiterbaren ovalen Kochzonen
(soweit das Kochf eld mit erweiterbaren ov alen Kochzonen
ausgerüstet ist; siehe vorhergehende Seite)
1. gewünschte Leistung mittels des Schaltknopfes "G"
einstellen;
2. den Schaltknopf "H" auf folgende Symbole drehen:
a. wenn nur die interne kleine Kochzone
eingeschaltet werden soll.
b. wenn die runde Kochzone eingeschaltet
werden soll.
c. wenn die gesamte ovale Kochzone
eingeschaltet werden soll.
Betriebskontrolleuchte (B)
Diese zeigt an, ob eine oder mehrere Zonen
eingeschaltet sind.
Restwärme-Kontrolleuchte (D)
Die auch bei ausgeschalteter Kochzone anzeigt, daß
eine oder mehrere Kochzonen noch eine Temperatur
von mehr als 60°C aufweisen. Einige Modelle sind mit
4 Restwärme-Kontrolleuchten bestückt, eine pro
Kochzone.
30
Page 30
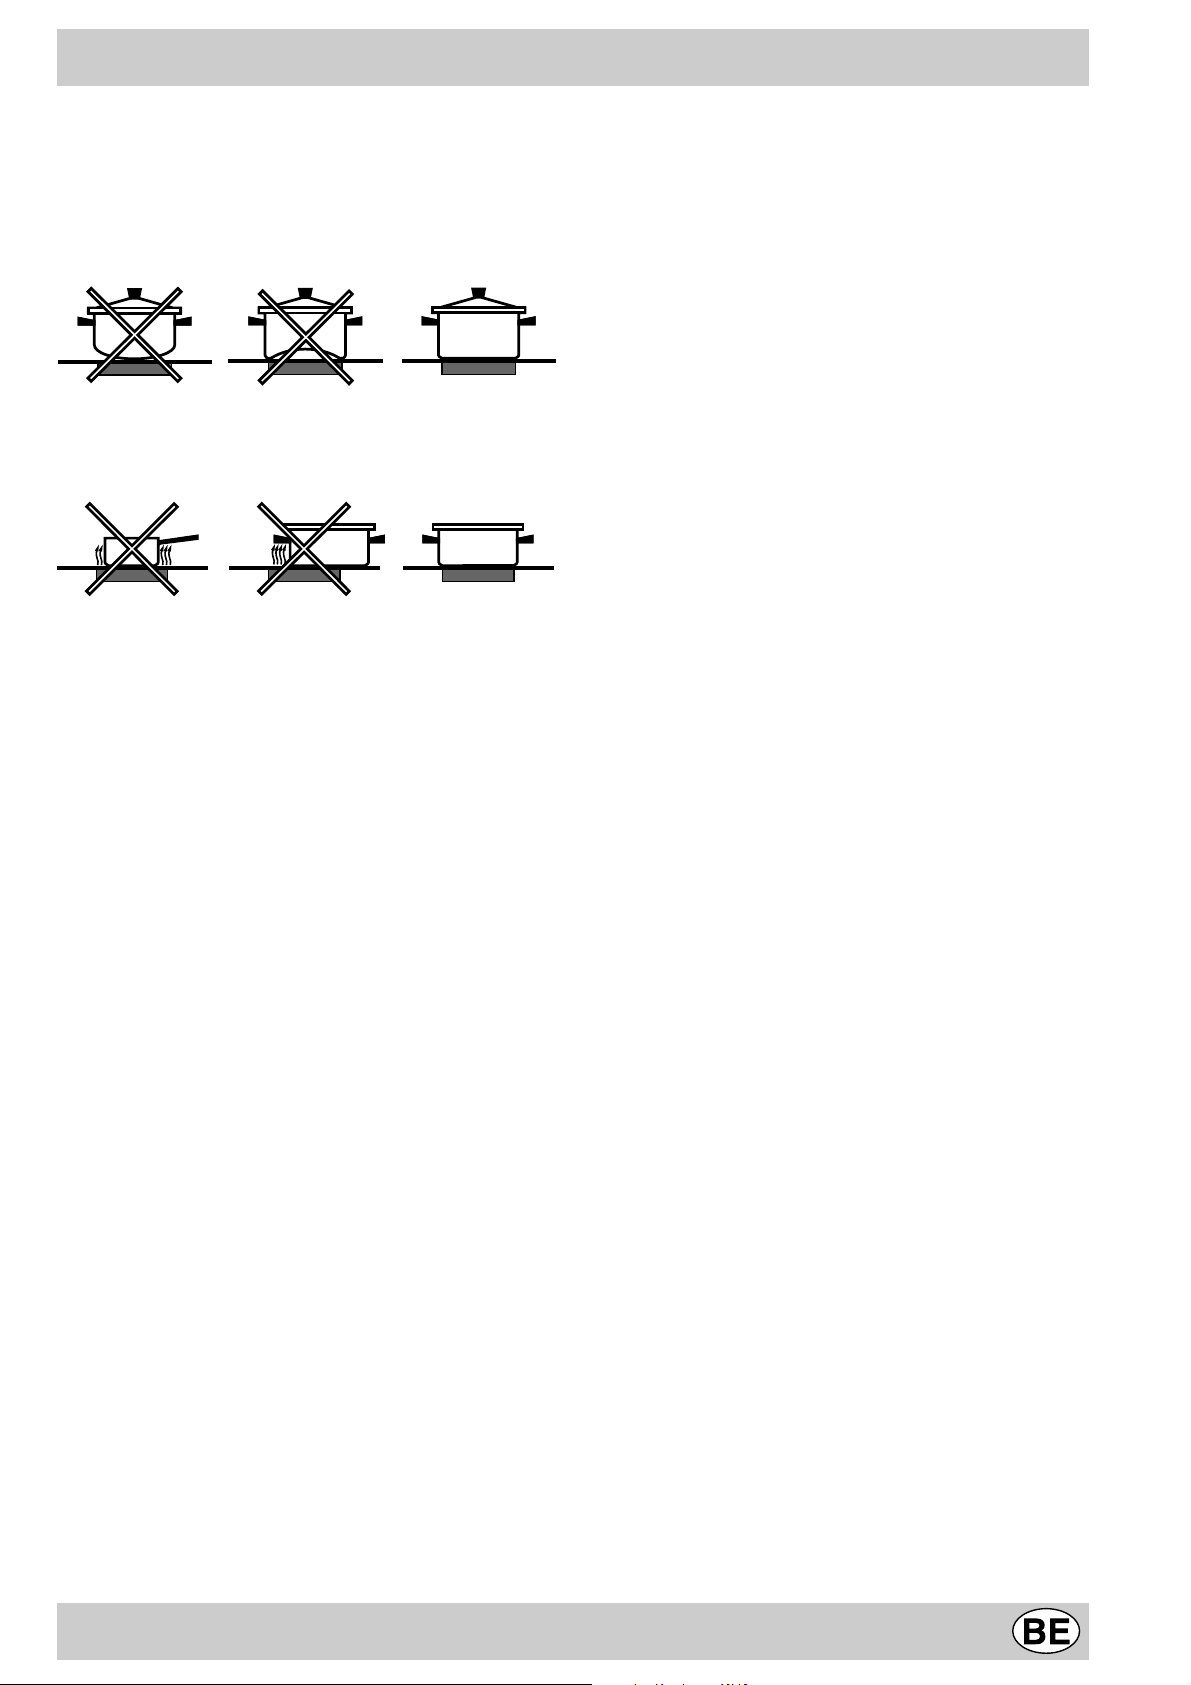
Reinigung und Pflege
Praktische Ratschläge zum Einsatz des Gerätes
Sie können Ihr Kochfeld optimal nutzen, wenn Sie beim
Kochen bzw. bei der Zubereitung von Speisen einige
grundlegende Regeln beachten.
• Verwenden Sie Kochgeschirr mit flachem Boden, um
sicherzustellen, dass dieser ganz auf der Heizfläche
aufliegt.
• Benutzen Sie stets Kochgeschirr, dessen
Durchmesser mit dem der Kochzone übereinstimmt,
d.h. dessen Boden die Kochzone ganz bedeckt, so
dass die gesamte Wärme genutzt wird.
• Achten Sie darauf, dass der Boden des K ochgeschirrs
trocken und sauber ist; nur so ist ein perfektes
Aufliegen des Geschirrbodens sowie eine lange
Lebensdauer von Kochzone und Geschirr
gewährleistet.
• Vermeiden Sie den Einsatz von Kochgeschirr, das
auch auf Gasflammen verwendet wird. Die äußerst
hohe Hitzekonzentration der Gasbrenner könnte die
Topfböden leicht verformen. Demnach würden bei
Verwendung desselben Geschirrs auf GlaskeramikKochfeldern die gewünschten optimalen Ergebnisse
niemals erreicht.
• Lassen Sie niemals eine Kochzone eingeschaltet,
wenn kein Topf darauf steht. Auf diese Weise würde
die Kochzone in kürzester Zeit auf Höchsttemperatur
gebracht, was Schäden an den Heizelementen zur
Folge haben könnte.
• Das Glaskeramikkochfeld ist sowohl gegen
Temperaturschocks als auch gegen mechanische
Schocks beständig. Dennoch kann es durch Stöße
bzw. Aufprall von spitzen Gegenständen zerbrechen.
Schalten Sie das Gerät in diesem Falle umgehend
vom Stromnetz und wenden Sie sich zwecks
Reparatur des Kochfeldes an eine zuständige
Kundendienststelle.
Halten Sie das Kochfeld stets sauber. Stellen Sie vor
der Reinigung sicher, dass die K ochzonen ausgeschaltet
und erkaltet sind.
Edelstahlrahmen
Auf den Edelstahlteilen könnten Flecken zurückbleiben,
sollte stark kalkhaltiges Wasser oder ein scharfes
(phosphorhaltiges) Spülmittel für längere Zeit darauf
stehenbleiben. Es ist ratsam, das Kochfeld nach der
Reinigung gut nachzuspülen und abzutrocknen. Wird
versehentlich Wasser darauf verschüttet, muss es sofort
sorgsam getrocknet werden.
Reinigung und Pflege des Kochfeldes
Die als Heizfläche eingesetzte Glaskeramikplatte ist
vollkommen glatt und porenfrei; sie ist sowohl gegen
Temperaturschocks als auch gegen mechanische
Schocks beständig. Damit ihre ursprünglichen
Eigenschaften erhalten bleiben, empfehlen wir folgende
Pflege:
• Zur täglichen Pflege genügt es, die Platte mit einem
feuchten Schwamm abzuwischen und mit
Küchenpapier abzutrocknen.
• Bei besonders starker Verschmutzung sollte ein
spezielles Reinigungsmittel für Glaskeramik
verwendet werden; anschließend ist die Platte mit
Wasser abzuspülen und sorgfältig abzutrocknen.
• Starke Verschmutzungen lassen sich mit einem
Schaber (Klingenschaber) entfernen. Sie sollten so
schnell wie möglich - und nicht erst nach Abkühlen
des Kochfeldes - entfernt werden, um zu vermeiden,
dass sich die Verschmutzungen festsetzen. Gute
Ergebnisse lassen sich auch mit einem -für
Glaskeramik geeigneten Spezialschwamm aus
Edelstahlwolle - und einer einfachen Spüllauge
erzielen.
• Nach der Reinigung kann das Kochfeld mit einem
Pflegeprodukt nachbehandelt werden: Der unsichtbare
Schutzfilm, den ein solches Produkt hinterlässt, schützt
die Oberfläche, falls Speisen überkochen. Es empfiehlt
sich, die Platte erst zu reinigen, wenn sie abgekühlt
ist.
• Achten Sie darauf, das Kochf eld nach der Reinigung
stets mit klarem W asser abzuspülen und anschließend
abzutrocknen. Reinigungsmittelrückstände könnten
sich nämlich bei der nächsten Benutzung des
Kochfeldes festsetzen.
Wichtige Empfehlungen
• Die Verwendung von Scheuermitteln sowie
scharfen oder chemischen Reinigungsmitteln, wie
Backofensprays, Fleckenentferner, Rostentfernungsmittel, Reiniger in Pulverform und
Scheuerschwämme, welche die Oberfläche des
Kochfeldes dauerhaft beschädigen würden, ist absolut
zu vermeiden.
• Halten Sie sämtliche Gegenstände, die schmelzen
könnten, wie Plastikteile oder Kunststoffe sowie
Zucker oder stark zuckerhaltige Speisen v on dem
Kochf eld fern. Sollten derartige Materialien dennoch
auf dem Kochfeld geschmolzen sein, müssen sie
sofort mit einem Schaber (Klingenschaber) von der
noch heißen Kochzone entfernt werden.
• Das Kochfeld ist ausschließlich zum Kochen
zu verwenden. Auch wenn das Gerät nicht benutzt
wird, dürfen keine Gegenstände darauf abgelegt
werden. Verwenden Sie das Kochfeld also nicht als
Ablage (z.B. für Besteck, Töpfe, Küchentücher usw.)
und auch nicht als Unterlage zum Schneiden.
• Aluverpackungen, Klarsichtfolie oder Behältnisse
aus Plastik dürfen niemals auf die heißen oder auch
nur noch lauwarmen Oberflächen gelegt bzw. gestellt
werden.
• Verwenden Sie zur Reinigung des Kochfeldes
keine Dampf- oder Hochdruckreinigungsgeräte.
• Legen Sie keine Metallgegenstände, wie Messer,
Gabeln, Löffel, Deckel usw. auf das Kochfeld:
• Wärmen Sie Dosengerichte niemals in der noch
geschlossenen Dose auf: sie könnte explodieren.
Alle auf eine solche unsachgemäße Behandlung des
Kochfeldes zurückzuführenden Schäden haben einen
31
sofortigen Ausschluss aus der Garantie zur Folge.
 Loading...