

XUB TAppp / XUB TSppp
Photo-electric sensors for transparent material
Détecteurs photoélectriques pour matériaux transparents
Photoelektronische Sensoren für transparente Objekte
Detectores fotoeléctricos para materiales transparentes
Interruttori fotoelettrici per materiali trasparenti
Detectores fotoeléctricos para materiais transparentes
1
STAB
2
OUT
TEACH
3
Out
(not signal)
1
Red Rouge Rot Rojo Rosso Vermello
Yellow Jaune Gelb Amarillo Giallo Amarelo
2
Green Vert Grün VerdeVerde Verde
Steady
1
Flashing Fast flashing
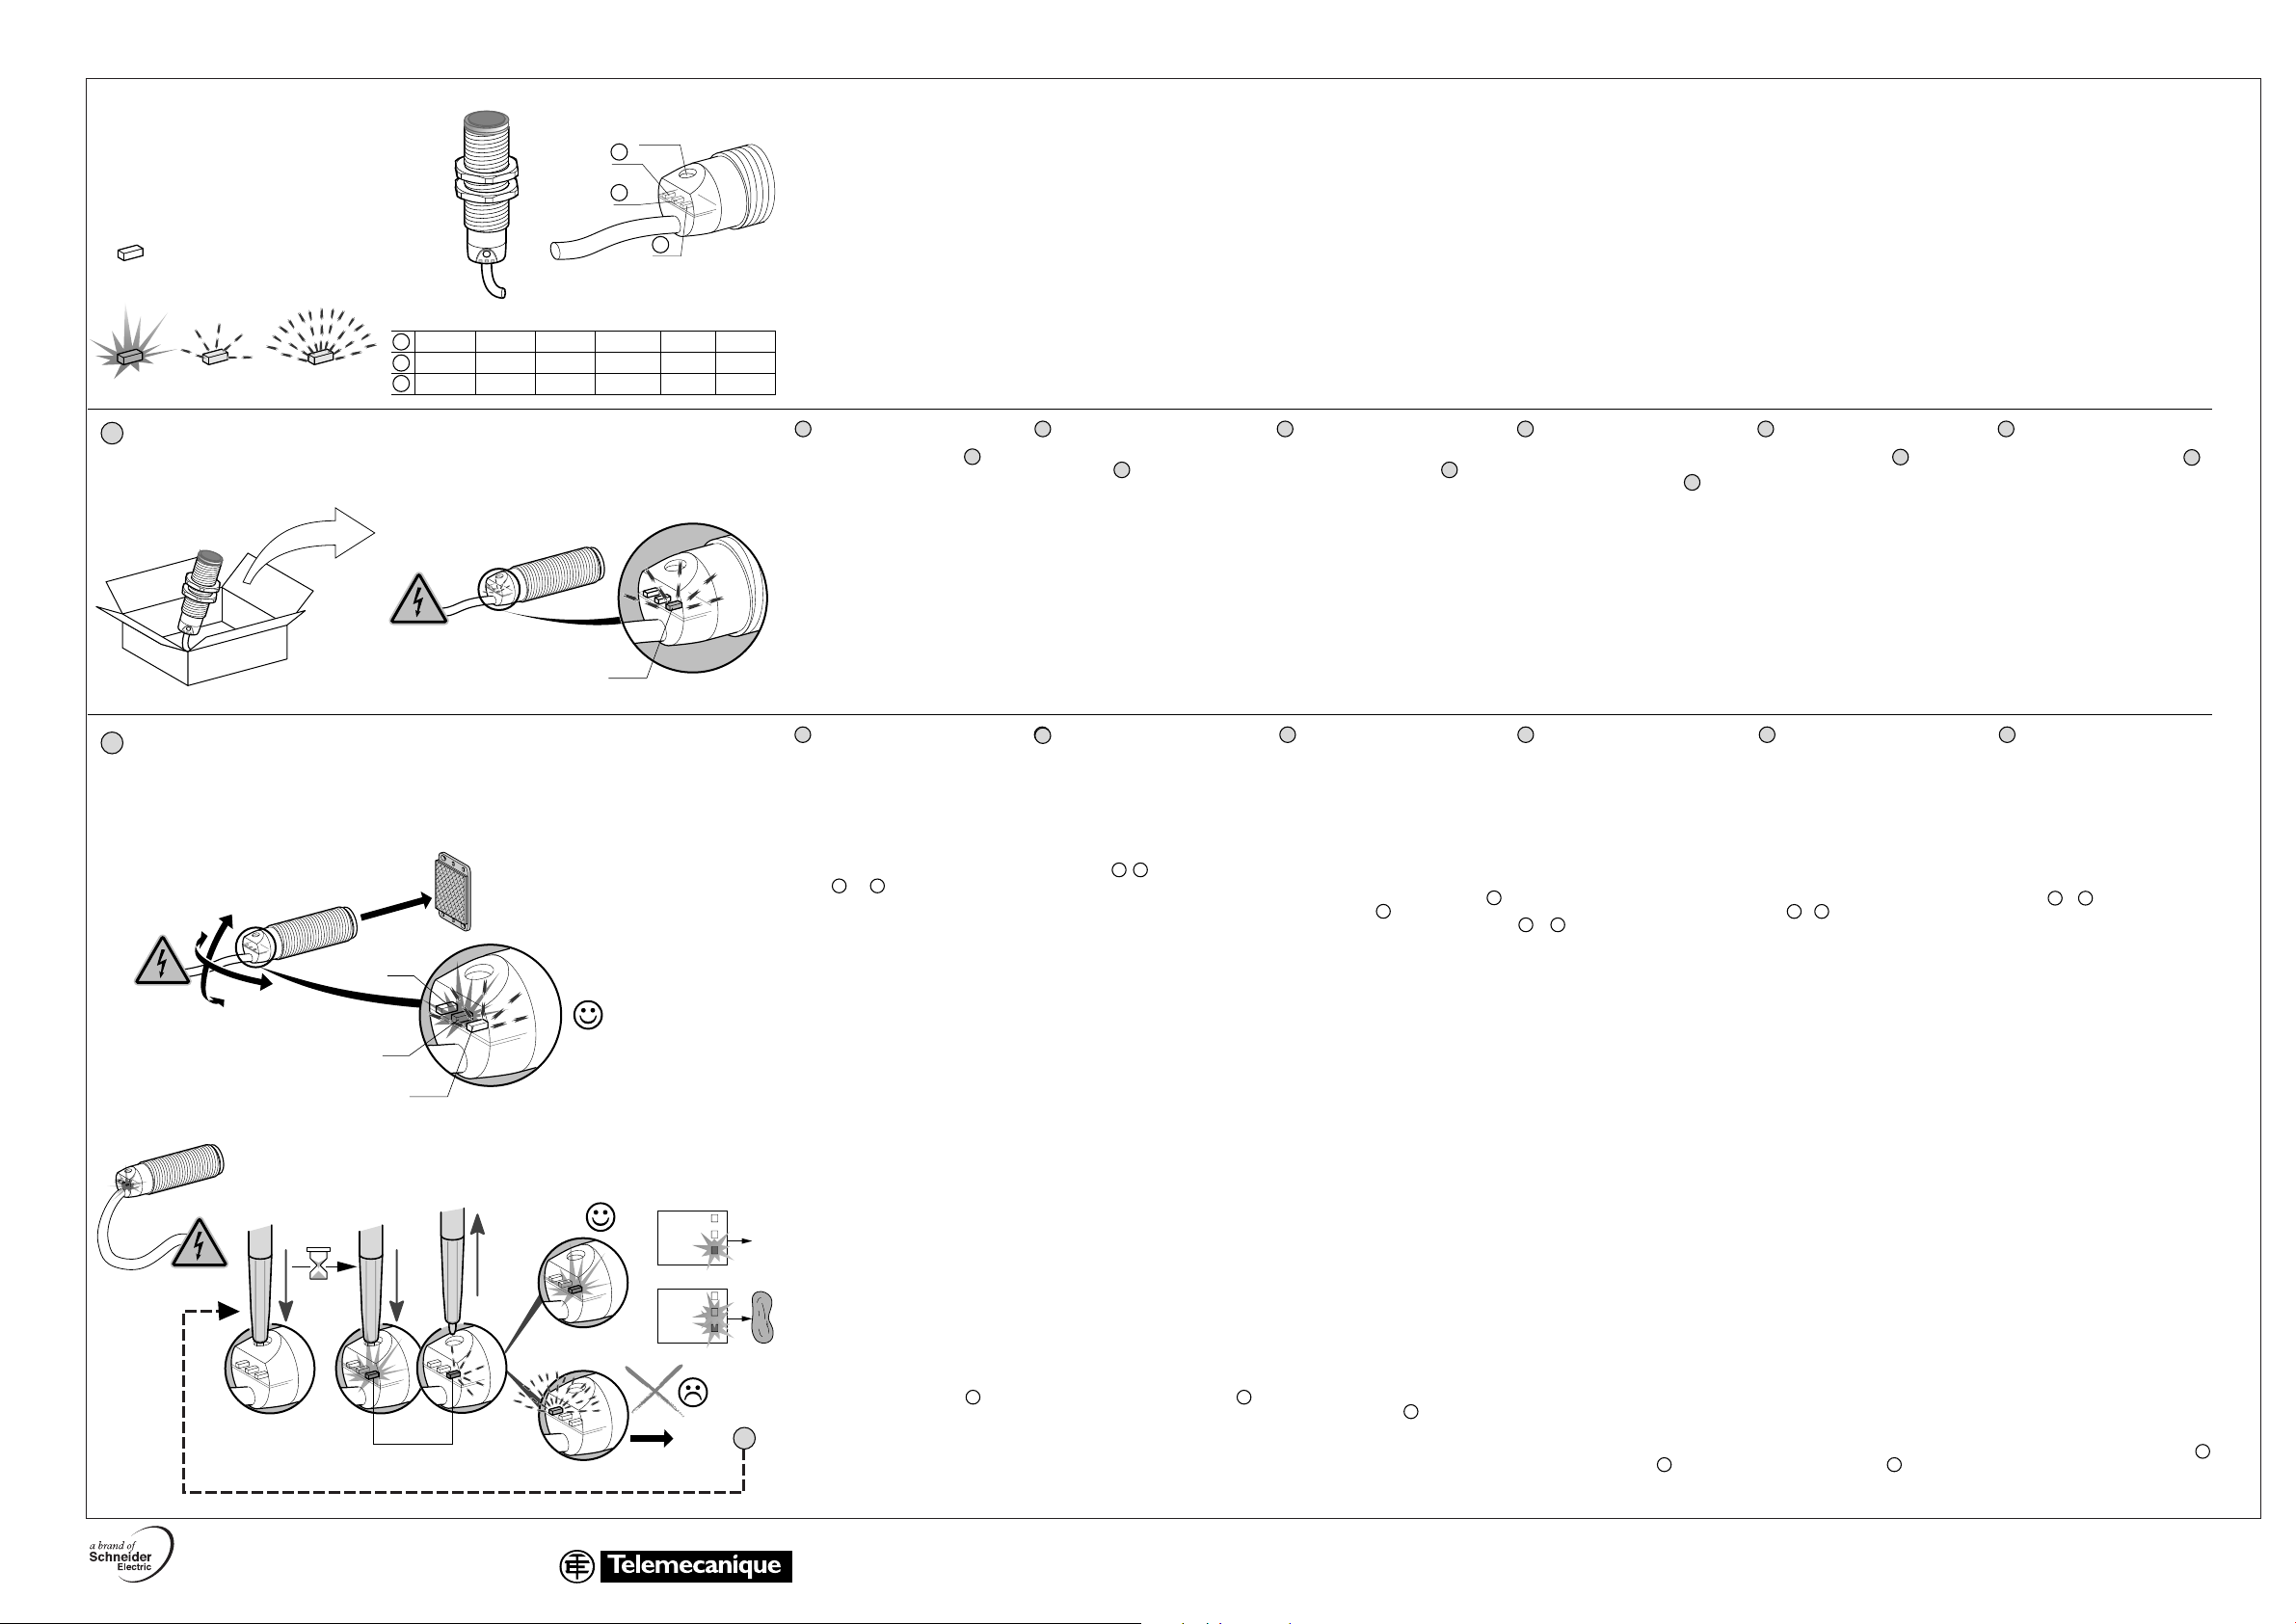
Factory setting: awaiting environment teach mode / Réglage usine : attente apprentissage de l'environnement /
Werkseitige Einstellung : Bereit für Teach-in der Umgebungsbedingungen / Preajuste de fábrica: En espera del
3
auto-aprendizaje del entorno / Regolazione di fabbrica : autoapprendimento preciso / Regulação de fábrica :
aguarda aprendizagem das condições de funcionamento.
RUN
GR flashing
Pow
er on
Please connect and install the sensor on
your equipment as per wiring instructions on
package label.
1
1°) Initial adjustment
Your detecto r is waiting for the
ENVIRONMENT TEACH MODE .
This is signaled by the flashing of the green
LED.
2
Raccordez et Installez le détecteur sur votre
équipement suivant les instructions de
câblage indiquées sur l'étiquette de l'emballage.
1
1°) Réglage initial
Le détecteur que vous avez sélectionné est
en attente d'APPRENTISSAGE DE L'ENVIRONNEMENT .
Cela est signalé par le clignotement de la
diode verte.
2
Nehmen Sie Installation und Anschluß des
Sensors gemäß den
Verdrahtungsanweisungen vor, die sich auf
dem Verpackungsetikett befinden.
1
1°) Werkseitige Einstellungen
Der von Ihnen gewählte Sensor wartet auf
das TEACH-IN der
UMGEBUNGSBEDINGUNGEN .
Dies wird durch die blinkende grüne LED
angezeigt.
2
Rogamos siga detalladamente las instrucciones de alimentación y cableado indicadas sobre la etiqueta del producto.
A continuación les indicamos las instrucciones a seguir para realizar un ajuste
correcto.
1
1°) Ajuste inicial
El detector indica mediante el parpadeo del
diodo verde que se encuentra en espera de
realizar el procedimiento de APRENDIZAJE
AUTOMÁTICO DEL ENTORNO .
2
Collegare ed installare il sensore sul vostro
impianto seguendo le istruzioni di cablaggio
indicate sull'etichetta dell'imballaggio.
1
1°) Regolazione iniziale
L'interruttore che avete scelto è in attesa di
AUTOAPPRENDIMENTO .
Ciò è segnalato dal lampeggiamento del
LED verde.
2
Instalar e ligar o detector, ao seu equipamento, de acordo com as instruções de
cablagem indicadas na etiqueta da embalagem.
1
1°) Regulação inicial
O detector que seleccionou está a aguardar
a APRENDIZAGEM DO AMBIENTE .
Isto é assinalado pelo piscar do díodo
verde.
2
GR
Environment teach mode: Object absent / Apprentissage de l'environnement : absence objet / Teach-in der
2
Umgebungsbedingungen : Objekt nicht vorhanden / Auto-aprendizaje del entorno: ausencia de objetos /
Autoapprendimento : Assenza oggetto / Aprendizagem das condições de funcionamento : Ausência do objecto.
2-1
Alignment / Alignement / Anordnung / Alineamiento / Allineamento / Alinhamento.
With accessory (reflector) / Avec accessoire (réflecteur) / Mit Zubehör (Reflektor) / Con accesorio ( Reflector) /
Con accessorio (riflettore) / Com acessório (reflector).
RD
Power on
YW
GR
Environment teach mode / Apprentissage de l'environnement / Teach-in der Umgebungsbedingungen /
2-2
Auto-aprendizaje del entorno / Autoapprendimento / Aprendizagem das condições de funcionamento.
GR
OK
Power on
3 s
GR
Flashing
flashing
RD
Fast
GR
Teach error
GR
=
YW
GR
OK
RESET
Environment teach mode
This sensor can operate in all standard
detection modes, with refl ecto r or
transmitter: Polarized Reflex, barrier.
Before performing the ENVIRONMENT
TEACH MODE procedure, you must align
the detector correctly.
Remove all objects from the detector's field
of vision.
Align the detector on the reflector using the
signals supplied by the yellow and red
diodes and :
2 1
- Yellow diode lit and red diode out:
Alignment correct,
A precise alignment of the sensor with the
reflector allows the adequate detection of
transparent objects with a complex optical
behavior.
Once the detector is aligned, it is ready for
the ENVIR ONME NT TEACH MODE
procedure.
To apply it:
- Remove all objects from the detector's
field of view.
- Press and hold the "teach" pushbutton.
- This first causes the green LED to go out
and then to light up again after about 3
seconds.
- Then release the "teach" pushbutton.
- The green LED flashes to indicate that the
detector is learning the environment.
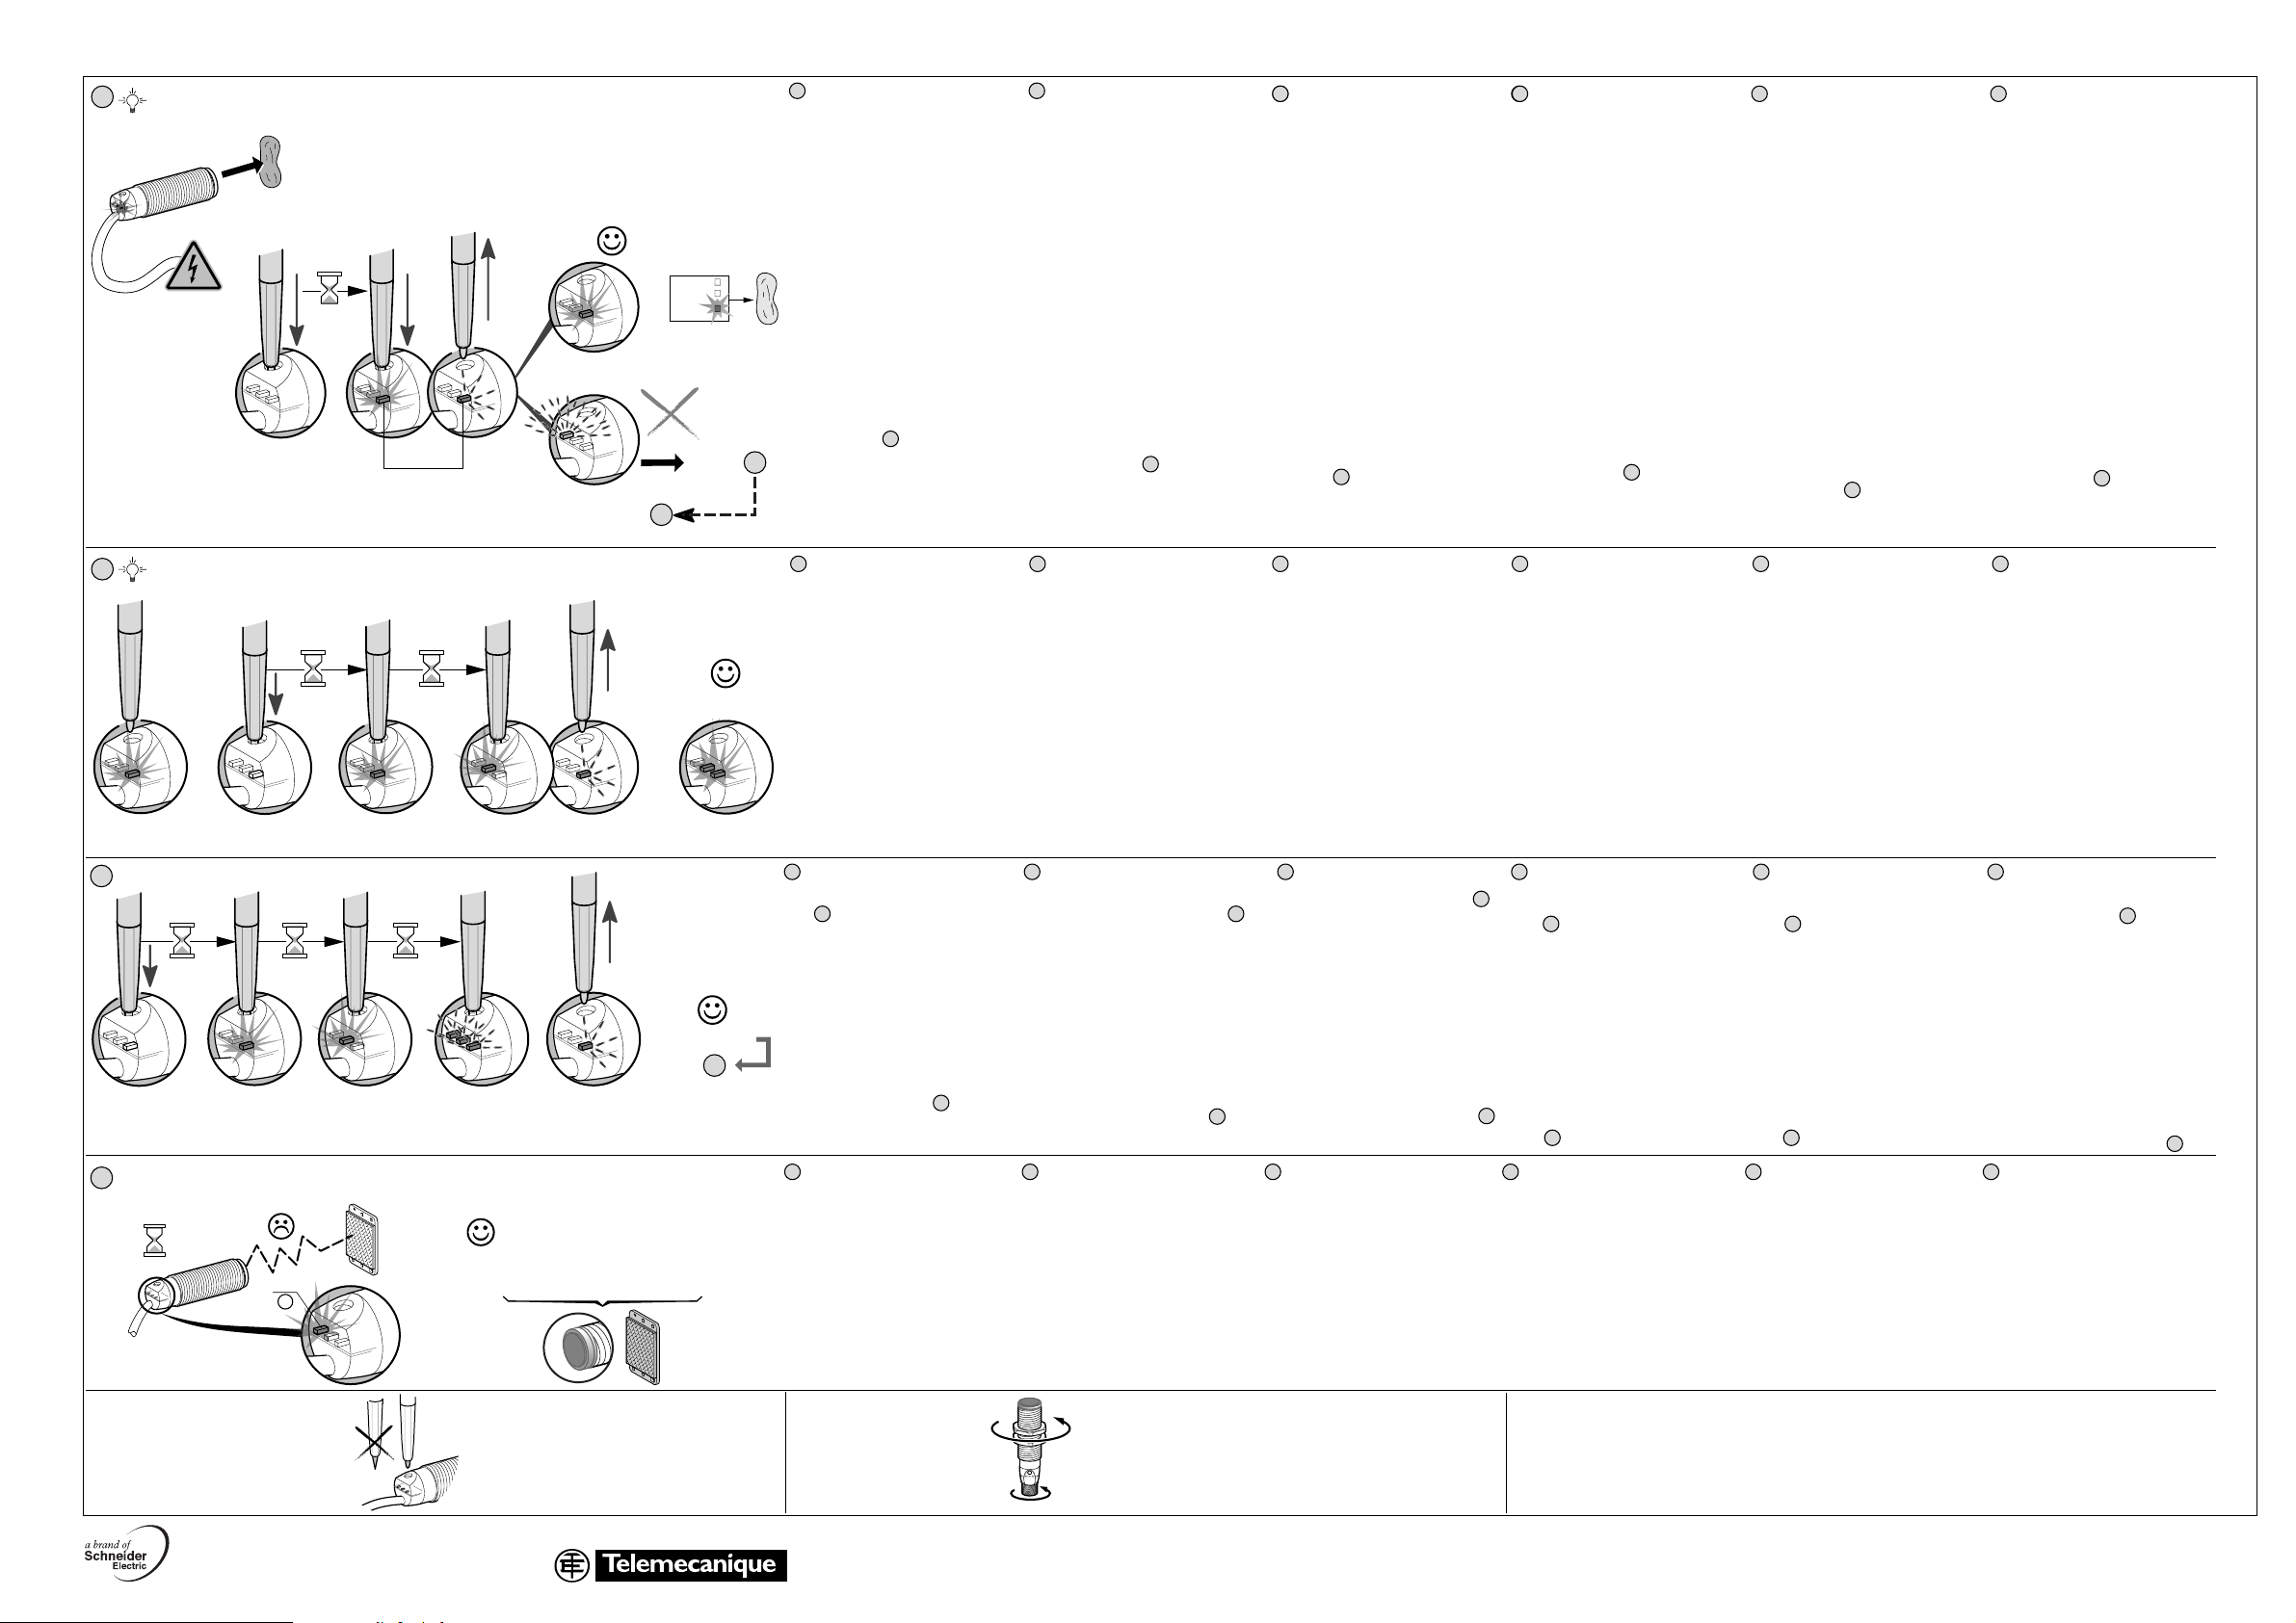
Then:
- If the green LED comes on, then the
detector has been taught the environment
and is ready to function.
p Any object (transparent or not) passing
through its detection field will be detected.
p The yellow diode indicates the state of the
output.
(on = output active).
- If the red LED flashes very quickly, then
the teach mode failed.
p The detector may be misaligned.
p An object passed within its detection field
during learning.
p Readjust the alignment conditions and
then repeat the ENVIRONMENT TEACH
MODE procedure after a RESET .
5
2 2 2 2 22
2
Apprentissage de l'environnement
Ce détecteur est reflex polarisé.
Avant de procéder à l'APPRENTISSAGE
DE L'ENVIRONNEMENT, il est nécessaire
de procéder à l'alignement correct du
détecteur.
Eliminez tout objet dans le champ de vision
du détecteur.
Alignez le détecteur sur le réflecteur en
utilisant les signaux fournis par les diodes
jaune et rouge , :
- Diode jaune a llumée e t diode rouge
éteinte : Alignement correct.
Un alignement précis du capteur avec le
réflecteur permet d'obtenir une détection de
bonne qualité sur des objets transparents
ayant un comportement optique complexe.
Vous avez procédé à l'alignement, le détecteur est prêt à réaliser l'APPRENTISSAGE
DE L'ENVIRONNEMENT.
Pour cela :
- Eliminez tout objet dans le champ de
vision du détecteur.
- Ap puyez et m aintenez le b outon
“teach” enfoncé.
- Cela déclenche d'abord l'extinction de la
diode verte puis après environ 3 secondes,
son allumage.
- Relâchez alors le bouton “teach”.
- La diode verte clignote pour indiquer que
l'apprentissage est en cours.
Ensuite :
- Si la diode verte s'allume, alors le détecteur a appris l'environnement, il est prêt à
fonctionner.
p Tout objet (transparent ou non) passant
dans son champ de détection sera détecté.
p La diode jaune indique l'état de la sortie.
(allumée = sortie active).
- Si la diode rouge clignote très rapidement,
c'est que l'apprentissage de l'environnement
a échoué.
p Le détecteur s'est peut-être désaligné.
p Un objet est passé dans son champ de
vision en cours d'apprentissage.
p Revoir les conditions d'alignement et
refaire un APPRENTISSAGE DE
5
L'ENVIRONNEMENT après un RESET .
221
Teach-in der Umgebungsbedingungen
Dieser Sensor funktioniert in allen
Erfassu ngs standardmodi, mit einem
Reflektor oder einem Sender, und ist eine
polari sie rte R eflexions-Lich tsc hra nke.
Vor de m TE ACH- IN DE R
UMGEBUNGSBEDINGUNGEN muss der
Sens or richtig angeord net werden.
Entfernen Sie alle Objekte im Sichtfeld des
Sensors.
Ordnen Sie den Sensor dem Reflektor
entsprechend an. Richten Sie sich dazu an
die gesendeten Signale der gelben LED
und der roten LED :
- Ge lbe LED leuchtet und rote LED
erloschen: Anordnung richtig.
Bei richtiger Anordnung des Sensors
entsprechend des Reflektors wird eine
qualitativ gute Erfassung transparenter
Objekte sichergestellt, die ein optisch
kom pl exes Verh al ten aufw ei sen.
Der Sensor ist angeordnet und kann das
TEACH- IN DER UMGEBUNGSBE DINGUNGEN vornehmen.
Dazu gehen Sie wie folgt vor:
- Entfernen Sie alle Objekte im Sichtfeld des
Sensors.
- Drücken Sie die "teach" - Taste und
halten Sie sie gedrückt.
- Dadurch erlischt die grüne LED und
beginnt ca. 3 Sekunden später zu leuchten.
- Lassen Sie die "teach"-Taste los.
- Die grüne LED blinkt um anzugeben, dass
der Sensor die Umgebung erfasst.
p Jedes Objekt (transparent oder nicht) im
Erfassungsfeld wird erfasst.
p Die gelbe LED gibt den Status des
Ausgangs an.
(leuchtet = Ausgang aktiviert).
- Wenn die rote LED sehr schnell blinkt,
dan n is t das Teach-in der
Umgebungsbedingungen fehlgeschlagen.
p Der Sensor kann falsch angeordnet sein.
p Ein Objekt hat sich in seinem Sichtfeld
während des Teach-i n bef und en.
p Üb erp rü fen Sie die
5
Anordnungsbedingungen und wiederholen
Sie nach dem RESET (Zurücksetzen)
das TEACH-IN DER UMGEBUNGSBEDINGUNGEN.
1
5
Aprendizaje automático del entorno
Este detector es capaz de funcionar en
todos los modos estándares de detección,
con reflector o transmisor: Réflex
polarizado, barrera.
Antes de proceder al APRENDIZAJE
AUTOMÁTICO DEL EN TORNO, es
necesario conseguir la alineación correcta
del detector.
Retire todo objeto del campo de visión del
detector.
Realice la alineación del detector sobre el
ref lector uti lizando la s señ ales
suministradas por los diodos amarillo y rojo
y :
2 1
- Diodos amarillo encendido y diodo rojo
apagado: Alineación correcta.
La alineación precisa del captador con el
reflector permite obtener una detección de
buena calidad de objetos transparentes con
un comportamiento óptico complejo.
Una vez realizada la alineación, el detector
está listo para realizar el APRENDIZAJE
AUTOMÁTICO DEL ENTORNO.
Para ello:
- Retire todo objeto del campo de visión del
detector.
- Pulse sostenidamente el botón “teach”.
- Esto provoca el apagado del diodo verde y
luego su p oste rior encendido tras
aproximadamente 3 segundos.
- Suelte entonces el botón "teach".
- El diodo verde parpadea para indicar que
el aprendizaje está en curso.
Entonces:
- Si el diodo verde se enciende, el detector
ha conseguido realizar un autoaprendizaje
del entorno correctamente y está listo para
trabajar.
p Todo objeto (transparente o no) que pase
por su campo de detección será detectado.
p El diodo amarillo indica el estado de la
salida. (Encendido = salida activa).
- Si el diodo rojo parpadea muy
rápidamente, entonces el aprendizaje
automático del entorno fracasó.
p El detector quizás esté desalineado.
p Un objeto ha pasado por el campo de
visión mientras se realizaba el aprendizaje.
p Revise las condiciones de alineación y
vuelva a realizar el procedimiento de
APRENDIZAJE AUTO MÁT ICO DEL
ENTORNO tras un RESET .
5 5
Autoapprendimento
Questo interruttore è in grado di funzionare
in tutte le modalità standard di rilevamento,
con riflettore o emettitore: riflessione
polarizzata, barriera.
Pr im a di pro ce dere a ll'
AUTOAPPRENDIMENTO, è necessario
proc edere al corr etto allin eamento
dell'interruttore.
Eliminare qualsiasi oggetto dal campo visivo
dell'interruttore.
Alli neare l'interruttor e sul rifle ttore
utilizzando i segnali forniti dai LED giallo e
rosso e :
2 1
- LED giallo acceso e LED rosso spento:
allineamento corretto.
Un allineamento preciso del sensore con il
riflettore permette di ottenere un rilevamento
di buona qualità su oggetti trasparenti con
comportamento ottico complesso.
Dopo aver effet tuat o l'a llineamento,
l'interruttore è pronto per l'AUTOAPPRENDIMENTO.
Per questo:
- Eliminare qualsiasi oggetto dal campo
visivo dell'interruttore..
- Premere e mantenere ben premuto il
pulsante "teach”.
- Questa operazione provoca dapprima lo
spegnimento del LED verde e poi, dopo
circa 3 secondi, la sua accensione.
- Rilasciare quindi il pulsante “teach”.
- Il LED verde lampeggia per indicare che
l'autoapprendimento è in corso.
In seguito:
- Se il LED verde si accende significa che
l'interruttore ha eseguito correttamente
l'autoapprendimento ed è pronto per
funzionare.
p Qualsiasi oggetto (trasparente o meno)
che passerà nel suo campo di rilevamento
verrà rilevato.
p Il LED giallo indica lo stato dell'uscita
(acceso = uscita attiva).
- Se il LED rosso lampeggia molto
rapidament e, significa che l'autoapprendimento è fallito.
p L'interruttore si è probabilmente messo
fuori allineamento.
p Un oggetto è passato nel suo campo
visivo durante l'apprendimento.
p Rivedere le condizioni di allineamento e
rifare un AUTOAPPRENDIMENTO dopo
aver eseguito un RESET .
Aprendizagem do ambiente
Este detector é capaz de funcionar em
todos os modos standard de detecção, com
reflector ou emissor: reflexo polarizado,
barragem.
Antes de efectuar a APRENDIZAGEM DO
AMBIENTE, é necessário levar a cabo o
alinhamento correcto do detector.
Elimine qualquer objecto no campo de visão
do detector.
Alinhe o detector com o reflector, utilizando
os sinais fornecidos pelos díodos amarelo e
vermelho e :
2 1
- Díodo amarelo aceso e díodo vermelho
apagado: Alinhamento correcto.
Um alinhamento exacto do sensor com o
reflector permite obter uma detecção de boa
qualidade com objectos transparentes tendo
um comportamento óptico complexo.
Concluiu o processo de alinhamento e o
detector está pronto para realizar a
APRENDIZAGEM DO AMBIENTE.
Para tal:
- Elimine qualquer objecto no campo de
visão do detector.
- Prim a e mantenha premido o b otão
“teach”.
- Isto faz com que o díodo verde se apague
e volte a acender-se passados cerca de 3
segundos.
- Liberte o botão "teach".
- O díodo verde começa a piscar para
indicar que a aprendizagem está a ser feita.
Em seguida:
- Se o díodo verde se acender, o detector
aprendeu o ambiente e está pronto a
funcionar.
p Qualquer objecto (transparente ou não)
que passe no campo de detecção será
detectado.
p O díodo amarelo indica o estado da saída.
(aceso = saída activa).
- Se o díodo vermelho começar a piscar
muito rapidamente, isso significa que a
aprendizagem do ambiente falhou.
p É possível que o detector se tenha
desalinhado.
p Um objecto passou no respectivo campo
de visão durante a aprendizagem.
p Deve rever as condições de alinhamento
e voltar a efectuar uma APRENDIZAGEM
DO AMBIENTE depois de um RESET .
e voltar a efectuar uma aprendizagem do
ambiente.
5
W9 1690196 01 11 A02
05 - 2007
1/2
XUB TAppp / XUB TSppp
3
4
5
6
Option: Object teach mode / Option : Apprentissage de l'objet / Option : Teach-in der Objekterfassung /
Opción: Auto-ajuste del objeto / Opzione : Apprendimento dell'oggetto /
Opção : Aprendizagem do tipo de objecto.
GR
3 s
Power on
Flashing
GR
Option: inversion of output / Option : Inversion de la sortie / Option : Invertieren des Ausgangs /
Opción: Inversión de la salida / Opzione : Inversione dell'uscita / Opção : Inversão da saída.
3 s3 s
OUTPUT
OFF
Reset
3 s3 s
GR
Option: Dirt compensation / Option: Compensation de l'encrassement /
Option:
Kompensierung von Verschmutzungen
Opzione: Compensazione dell'ostruzione / Opção : Compensação da sujidade
3 s
YW
RD + YW + GR
/ Opción: Compensación de la suciedad /
>
Red
1
OK
=
GR
OK
RD
Fast
flashing
Ultra fin
teach
YWGR GR
flashing
GR
GR
Cleaning (dry cloth, no alcohol)
Nettoyage (chiffon sec, pas d'alcool) /
Reinigung (trockenes Tuch, kein Alkohol)
Limpieza (paño seco, sin alcohol)
Pulizia (straccio asciutto, niente alcol)
Limpeza (pano seco, não utilizar álcool)
3
flashing
flashing
=
/
GR
RESET
OUTPUT
ON
RESET OK
1
/
/
3 3
Option : Object teach
After performing the environment teach
procedure, an object teach procedure can
be applied to refine the detection.
To teach an object:
- Position the object to detect before the
detector, in the exact detection position
desired.
- Press and hold the "teach" pushbutton.
- This successively causes:
p the green LED to go out,
p after approximately 3 seconds, to light up
again.
- Then release the "teach" pushbutton.
- The green LED flashes to indicate that the
detector is learning.
- If the green LED comes on, then the
detector has been taught the object's
position and is ready to function.
- The detection margin has been refined, it
is possible to detect a transparent object of
a complex shape.
- If the red LED flashes very quickly, then:
p the object was not placed before the
detector,
p the object is too transparent.
- Perform a RESET and repeat the operation from phase : Environment teach
mode.
Note: the fine teaching can be carried out
5
without an object. In this case, product
sensitivity is maximum
and require s a stable mechani cal
environment.
Option: output reversal
In the ENVIRONMENT TEACH MODE, the
detector output is automatically programmed to be activated in
the presence of the object: (NO).
It is possible to revert the output's operation.
To do this:
- Press and hold the "teach" pushbutton.
- This successively causes:
p the green LED to go out,
p after approximately 3 seconds, to light up
again,
p after approximately 3 seconds, the yellow
LED to light up,
- Then release the "teach" pushbutton.
p The green LED flashes to indicate that the
OUTPUT REVERSAL is in progress.
p The detector output's operation is reversed, it is activated in the absence of the
object: (NC).
It is possible to revert the output's operation
once again by repeating the OUTPUT
GRYW +
REVERSAL procedure.
5
Reset
In all cases, you can reset the detector to
return it to its initial operation as defined in
point .
1
To do this:
- Press and hold the "teach" pushbutton.
This successively causes:
p the green LED to go out,
p after approximately 3 seconds, to light up
again.
p after 3 seconds, the yellow LED to light up
p after 3 seconds, the green, yellow and red
LEDs to flash
- Then release the "teach" pushbutton.
p the green LED flashes to indicate that the
Reset is in progress,
p the detector has returned it to its initial
operation as defined in point .
6
Dirt compensation
After a long period of operation in an
industrial environment, the detector's optics
and the reflector may accumulate dirt,
which degrades the quality of detection of
transparent objects.
To compensate for this, the detector has an
automatic correction system.
\When this correction has reached its limits,
the red diode comes on to indicate that loss
of detection power is imminent.
The detector must then be cleaned.
2
Option : Apprentissage de l'objet
Après avoir effectué l'apprentissage de
l'environnement, il est possible de procéder
à l'apprentissage de l'objet pour affiner la
détection.
Pour effectuer l'apprentissage :
- Positionnez l'objet à détecter en face du
détecteur à l'endroit précis de détection
souhaitée.
- A ppuye z e t maintenez le b outon
“teach” enfoncé.
- Cela déclenche successivement :
p l'extinction de la diode verte,
p après environ 3 secondes, son alumage.
- Relâchez alors le bouton “teach”.
- La diode verte clignote pour indiquer que
l'apprentissage est en cours.
Ensuite, si la diode verte s'allume, alors le
détecteur a appris la position de l'objet; il est
prêt à fonctionner.
- La marge détection est af finée, il est
possible de détecter un objet transparent de
forme complexe.
- Si la diode rouge se met à clignoter très
rapidement, c'est que :
p vous n'avez pas positionné d'objet en face
du détecteur,
p l'objet est trop transparent.
- Effectuer un RES ET et re commencer
l'opération à la phase : Apprentissage de
l'environnement.
Note : l'apprentissage fin peut être effectué
sans objet. Dans ce cas, la sen-sibilité du
produi t est m aximal e et nécessite un
environnement mécanique stable.
1°) Option : Inversion de la sortie
4
Lors de l'APPENTISSAGE DE L'ENVIRONNEMENT, la sortie du détecteur est
automatiquement programmée pour être
activée en présence de l'objet : (NO).
Il est possible d'inverser le fonctionnement
de la sortie. Pour cela :
- Ap puyez et m aintenez le b outon
“teach” enfoncé.
- Cela déclenche successivement :
p l'extinction de la diode verte,
p après environ 3 secondes son allumage,
p après environ 3 secondes l'allumage de la
diode jaune.
- Relâchez alors le bouton “teach”.
p La diode verte clignote pour indiquer que
l'INVERSION DE LA SORTIE est en cours,
p Le fonctionnement de la sortie du
détecteur est inversé, elle est activée en
l'absence de l'objet : (NC).
Il est possible d'inverser à nouveau la sortie
en recommençant la procédure INVERSION
DE LA SORTIE.
5
Reset
Dans tous les cas vous pouvez “remettre à
zéro” le détecteur pour le ramener au fonctionnement initial tel que défini au point .
Pour cela :
- Ap puyez et m aintenez le b outon
“teach” enfoncé.
Cela déclenche successivement :
p l'extinction de la diode verte,
p après environ 3 secondes son allumage,
p après 3 secondes l'allumage de la diode
jaune,
p après 3 secondes le clignotement des 3
diodes verte, jaune, rouge
- Relâchez alors le bouton “teach”.
p la diode verte clignote, pour indiquer que
le Reset est en cours,
1
p le détecteur est revenu au fonction-
nement initial tel que défini au point .
6
Compensation de l'encrassement
Après une longue période de fonctionnement en environnement industriel,
l'optique du détecteur ainsi que le réflecteur
peuvent présente r un encras sement
pouvant détériorer la qualité de détection
d'objet transparent.
Pour compenser cela, le détecteur est doté
d'un système de correction automatique.
Lorsque cette correction atteint ses limites,
la diode rouge s'allume pour signaler
l'imminence d'une perte de détection.
Un nettoyage est alors nécessaire.
A
2
1
A < 15 Nm (134 lb.in) XUB pB (Brass)
A < 15 Nm (134 lb.in) XUB pS (Stainless steel)
3
Option: Teach-in des Objekts
Nach dem Teach-in der Umgebungsbedingungen kann das Teach-in des Objekts
durchgeführt werden,
um seine Erfassung zu verfeinern.
Dazu gehen Sie wie folgt vor:
- Positionieren Sie das zu erfassende
Objekt gegenüber dem Sensor an der
Stelle, an der es erfasst werden soll.
- Drüc ken Si e die "teach" -Taste und
halten Sie sie gedrückt.
- Dadurch werden hintereinander folgende
Vorgänge ausgelöst:
p Die grüne LED erlischt,
p Sie leuchtet nach ca. 3 Sekunden.
- Lassen Sie die "teach"-Taste los.
- Die grüne Diode blinkt um anzugeben,
dass das Teach-in durchgeführt wird.
Wenn anschließend die grüne LED leuchtet,
dann hat der Sensor die Position des
Objekts erfasst und ist betriebsbereit.
- Die Erfassungsspanne wird verfeinert: ein
transparentes Objekt einer komplexeren
Form kann erfasst werden.
- Wenn die rote LED sehr schnell blinkt,
dann:
p wurde das Objekt nicht gegenüber dem
Sensor positioniert,
p ist das Objekt zu transparent.
- Ein RESET durchführen und den Schritt
bei Phase wiederholen: Teach-in der
Umgebungsbedingungen.
Hinweis: das Teach-in kann ohne Objekt
durchgeführt werden. In diesem Fall ist die
Sensibilität des Produktes am höchsten und
erfordert eine mechanisch stabile Umgebung.
Option : Invertieren des Ausgangs
4 4 4 44
Beim TEACH-IN DER UMGEBUNGSDBEDIN
automatisch programmiert, um bei einem
anwesenden
Objekt aktiviert zu werden: (NO).
Der Betrieb des Ausgangs kann invertiert
werden. Dazu gehen Sie wie folgt vor:
- Drüc ken Si e die "teach" -Taste und
halten Sie sie gedrückt.
- Dadurch werden hintereinander folgende
Vorgänge ausgelöst:
p Die grüne LED erlischt,
p Sie leuchtet nach ca. 3 Sekunden,
p
Die gelbe LED leuchtet nach ca. 3 Sekunden
- Lassen Sie die "teach"-Taste los.
p Die grüne Diode blinkt um anzugeben,
dass der AUSGANG INVERTIERT wird,
p Der Betrieb des Sensorausgangs ist
invertiert. Der Ausgang wird bei fehlendem
Objekt aktiviert: (NC). Es ist möglich, den
Ausgang erneut zu invertieren, indem die
Prozedur INVERTIEREN DES AUSGANGS
wiederholt wird.
Reset
Sie könne n den Sensor jederzeit
"zurücksetzen", um zu den in Punkt .
festgelegten werkseitigen Einstellungen
1
zurückzukehren.
Dazu gehen Sie wie folgt vor:
- Drüc ken Si e die "teach" -Taste und
halten Sie die gedrückt.
Dadurch werden hintereinander folgende
Vorgänge ausgelöst:
p Die grüne LED erlischt,
p Sie leuchtet nach ca. 3 Sekunden,
p Die gelbe LED leuchtet nach 3 Sekunden,
p Die grüne, gelbe und rote LED blinken
nach 3 Sekunden
- Lassen Sie die "teach"-Taste los.
p Die grüne LED blinkt um anzugeben, dass
das Produkt zurückgesetzt wird.
p Der Sensor ist nun auf seine in Punkt .
festgeleg te we rks eit ige E ins tellung
zurückgesetzt.
6
Kompensierung von Verschmutzungen
Nach einer längeren Betriebsdauer in einer
industriellen Umgebung können die Optik
des Sensors und der Reflekt or
Verschmutzungen aufweisen, die die
Erfassung transparenter Objekte qualitativ
beeinträchtigen können.
Um dies zu kompensieren, ist der Sensor
mit einem automatischen Korrektursystem
ausgestattet. Wenn diese Korrektur ihre
Grenzwerte erreicht, leuchtet die rote LED,
um auf einen unmittelbar bevorstehenden
Verlust bei der Erfassung hinzuweisen.
In dem Fall ist e ine Re inig ung
erforderlich.
2
GUNGEN wird der Sensorausgang
33 3
Opción: Aprendizaje del objeto
Tras haber realizado el aprendizaje del
entorno, se puede proceder al aprendizaje
del objeto para afinar la detección.
Para realizar el aprendizaje :
- Posición el objeto que detectar ante el
detector en el lugar exacto de detección
deseado.
- Pulse sostenidamente el botón "teach".
- Ello dispara sucesivamente:
p el apagado de la diodo verte,
p tras aproximadamente 3 segundos, su
encendido.
- Suelte entonces el botón "teach".
- El diodo verte parpadea para indicar que
el aprendizaje está en curso.
Entonces, si el diodo verte se enciende, el
detector ha aprendido la posición del objeto
y está listo para trabajar.
- La margen de detección se ha afinado, es
posible detectar un objeto transparente de
forma compleja.
- Si el diodo rojo comienza a parpadear muy
rápidamente, significa que:
p no se ha posicionado el objeto ante el
detector,
p el objeto es demasiado transparente.
- Efectuar un RESET y repetir la operación
a partir de la fase : Aprendizaje del
entorno.
Nota: el aprendizaje fino puede realizarse
sin objeto. En este caso, la sensibilidad del
producto será máxima y requiere un entorno
mecánico estable.
Opción: Inversión de la salida
Durante el APRENDIZAJE DEL ENTORNO,
la salida del detector es automáticamente
programada para ser activada en presencia
de un objeto: (NO).
Es posible invertir el funcionamiento de la
salida. Para ello:
- Pulse sostenidamente el botón "teach".
- Ello dispara sucesivamente:
p la extinción del diodo verde,
p tras aproximadamente 3 segundos, su
encendido
p tras aproximadamente 3 segundos, el
encendido del diodo amarillo
- Suelte entonces el botón "teach".
p el diodo verde parpadea para indicar que
la INVERSIÓN DE LA SALIDA está en
curso,
p el funcionamiento de la salida del detector
está invertida, es activada en la ausencia de
objeto: (NC)
Es posible invertir nuevamente la salida
repitiendo el procedimiento INVERSIÓN DE
LA SALIDA.
55
Reset
En todos los casos puede hacer un "Reset"
del d etector para regresarlo al
1
funcionamiento inicial como se define en el
punto .
1
Para ello:
- Pulse sostenidamente el botón "teach".
Ello dispara sucesivamente:
p la extinción del diodo verde,
p tras aproximadamente 3 segundos, su
encendido,
p tras aproximadamente 3 segundos, el
encendido del diodo amarillo,
p tras aproximadamente 3 segundos, el
parpadeo de los 3 diodos, verde, amarillo y
rojo.
- Suelte entonces el botón "teach".
p el diodo verde parpadea para indicar que
el RESET está en curso,
p el detector ha regresarlo al
1
funcionamiento inicial como se define en el
punto .
1 1
6
Compensación de la suciedad
Tras un largo período de funcionamiento en
entorno industrial, la óptica del detector y el
reflector pueden ensuciarse lo que
deterioraría la calidad de detección de
objetos transparentes.
Para compensar esto, el detector está
dotado de un sistema de corrección
automática.
Cuando esta corrección alcanza sus límites,
el diodo rojo se enciende para señalar la
inminencia de una pérdida de detección.
En ese caso es necesaria una limpieza.
2
Note:
If replace repeat section 1, 2.
3
Opzione: Apprendimento dell'oggetto
Dopo aver eseguito l'autoapprendimento, è
possibile effettuare l'app rendimento
dell'oggetto per rendere il rilevamento più
preciso.
Per effettuare l'apprendimento:
- Posizionare l'oggetto da rilevare di fronte
all'interruttore nel punto esatto in cui volete
che venga rilevato.
- Premere e mantenere ben premuto il
pulsante "teach".
- Questa operazione provoca successivamente:
- lo spegnimento del LED verde,
- dopo circa 3 secondi, la sua accensione.
- Rilasciare quindi il pulsante "teach".
- Il LED verde lampeggia per indicare che
l'apprendimento è in corso.
In seguito, se il LED verde si accende,
significa che l'interruttore ha appreso la
posizione dell'oggetto ed è pronto per
funzionare.
- Il margine di rilevamento è stato migliorato
ed è quindi possibile rilevare un oggetto
trasparente di forma complessa.
- Se il LED rosso si mette a lampeggiare
molto rapidamente significa che:
- non avete posizionato l'oggetto di fronte
all'interruttore,
- l'oggetto è troppo trasparente.
- Effettuare un RESET e ricominciare l'operazione dalla fase : Autoappren-dimento.
Nota: l'apprendimento fine può essere
seguito senza oggetto. In questo caso, la
sensibilità del prodotto è massima e
necessita un ambiente meccanico stabile.
Opzione: Inversione dell'uscita
Nel corso dell'AUTOAPPRENDIMENTO,
l' us ci ta del l' in terr uttore v ie ne
automaticamente programmata per essere
attivata in presenza dell'oggetto: (NO)
É possibile invertire il funzionamento
dell'uscita. Per questo:
- Premere e mantenere ben premuto il
pulsante "teach".
- Questa operazione provoca successivamente:
p lo spegnimento del LED verde,
p dopo circa 3 secondi la sua accensione.
p dopo circa 3 secondi l'accensione del LED
giallo.
- Rilasciare quindi il pulsante "teach".
Il LED verde lampeggia per indicare che
l'INVERSIONE DELL'USCITA è in atto,
p Il funzionamento dell'uscita dell'interruttore
è invertito, la quale è attivata in assenza
dell'oggetto: (NC).
È possibile invertire di nuovo l'uscita
ricominciando la procedura INVERSIONE
DELL'USCITA.
Reset
In ogni caso potete sempre "reinizializzare"
l'interruttore per riportarlo allo stato di
funzionamento iniziale come definito al
punto .
1
Per questo:
- Premere e mantenere ben premuto il
pulsante "teach".
Questa operazione provoca successivamente:
p lo spegnimento del LED verde,
p dopo circa 3 secondi la sua accensione,
p dopo 3 secondi l'accensione del LED
giallo,
p dopo 3 secondi il lampeggiamento dei 3
LED verde, giallo e rosso.
- Rilasciare quindi il pulsante "teach".
p Il LED verde lampeggia, per indicare che il
RESET è in atto,
p l'interruttore è ritornato allo stato di
funzionamento iniziale come definito al
punto .
6
Compensazione dell'ostruzione
Dopo un lungo periodo di funzionamento in
ambiente industriale, l'ottica dell'interruttore
e il suo riflettore possono subire
un'ostruzione che può deteriorare la qualità
del rilevamento degli oggetti trasparenti.
Per poter compensare tale ostruzione,
l'interruttore è dotato di un sistema di
correzione automatica.
Quando tale correzione raggiunge i suoi
limiti, il LED rosso si accende per indicare la
perdita di rilevamento imminente.
S'impone quindi una pulizia.
2
3
Opção: Aprendizagem do objecto
Depois de ter efectuado a aprendizagem do
ambiente, é possível levar a cabo a
aprendizagem do objecto para afinar a
detecção.
Para efectuar a aprendizagem :
- Coloque o objecto a detectar em frente do
detector, no sítio exacto da detecção
pretendida.
- Prim a e mantenha premido o b otão
"teach".
- Isto desencadeia, sucessivamente:
p a extinção do díodo verde,
p passados cerca de 3 segundos, o
respectivo acendimento.
- Liberte o botão "teach".
- O díodo verde começa a piscar para
indicar que a aprendizagem está a ser feita.
Em seguida, se o díodo verde se acender, o
detector aprendeu a posição do objecto e
está pronto a funcionar.
- A margem de detecção está afinada, e é
possível detectar um objecto transparente
de forma complexa.
- Se o díodo vermelho voltar a piscar muito
rapidamente, isso significa que:
p não posicionou o objecto em frente do
detector,
p o objecto é demasiado transparente.
- Efectue um RESET e recomece a
operação na fase : Aprendizagem do
ambiente.
Nota: a aprendizagem fina pode ser
efectuada sem objecto. Neste caso, a
sensibilidade do produto é máxima e requer
um ambiente mecânico estável.
Opção: Inversão da saída
Aqua ndo da APRENDIZAGEM DO
AMBIENTE, a saída do detector é
automaticamente programada para ser
activada em presença do objecto: (NO).
É possível inverter o funcionamento da
saída. Para tal:
- Prim a e mantenha premido o b otão
"teach".
- Isto desencadeia, sucessivamente:
p a extinção do díodo verde,
p o respectivo reacendimento passados
cerca de 3 segundos,
p passados cerca de 3 segundos, acende-
se o díodo amarelo.
- Liberte o botão "teach".
- O díodo verde começa a piscar para indicar
que a INVERSÃO DA SAÍDA está a ser feita,
p O funcionamento da saída do detector
está invertido, e está activada na ausência
de objecto: (NC). É possível voltar a inverter
a saída, reiniciando o procedimento de
INVERSÃO DA SAÍDA.
55
Reset (Reinicializar)
Em qualquer caso, pode "reinicializar" o
detector para a configuração inicial, tal
como definido no ponto .
Para tal:
- Prim a e mantenha premido o b otão
"teach".
Isto desencadeia, sucessivamente:
p a extinção do díodo verde,
p o respectivo reacendimento passados
cerca de 3 segundos,
p passados cerca de 3 segundos, acende-
se o díodo amarelo.
p passados 3 segundos, os 3 díodos -
verde, amarelo, vermelho - começam a
piscar
- Liberte o botão "teach".
p o díodo verde começa a piscar para
indicar que o Reset está em curso,
p o detector regressou ao funcionamento
inicial, tal como definido no ponto .
6
Compensação da sujidade
Depois de um lo ngo período d e
funcionamento em ambiente industrial, a
óptica do detector, assim como o reflector,
podem acumular sujidade susceptível de
prejudicar a qualidade de detecção de
objectos transparentes.
Para compensar esse problema, o detector
está equipado com um sistema de
correcção automática. Quando a corr
ecção atinge os respectivos limites, o díodo
vermelho se acender para assinalar a
iminência de uma perda de detecção.
Nesse caso, é necessária uma limpeza.
2
1
1
A < 3 Nm XUB pA (PBT)
B
B < 2 Nm
W9 1690196 01 11 A02
05 - 2007
2/2
 Loading...