

schmersal SLG 425I Series,SLG425I-ER-0500-02-RF,SLG425I-ER-0900-04-RF,SLG425I-ER-0800-03-RF Operating Instructions Manual

Operating instructions
Safety light grid
Operating instructions. . . . . . . . . . . .pages 1 to 18
EN
Translation of the original operating instructions
Vous trouverez la version
FR
actuelle du mode d’emploi dans
votre langue nationale officielle
sur l’Internet,
www.schmersal.net.
U vindt de huidige versie van de
NL
gebruikshandleiding in uw
officiële landstaal op het Internet, www.schmersal.net.
EU公用語で書かれた最新の取扱
JP
説明書は,インターネッ
(www.schmersal.net) からダウ
ンロードできます。
Encontrará el manual de
ES
instrucciones actual en su
idioma oficial de la UE en
nuestra página de Internet
www.schmersal.net.
Il manuale d‘istruzioni aggior-
IT
nato nella vostra lingua (lingua
ufficiale UE) è scaricabile in
Internet all‘indirizzo
www.schmersal.net.
SLG 425I
4 Electrical connection
4.1 Wiring example Muting . . . . . . . . . . . . . . . . . . . . . . . . . . . . . . .14
4.2 Connector conguration Receiver, Emitter & Cable. . . . . . . . . .14
5 Set-up and maintenance
5.1 Check before start-up . . . . . . . . . . . . . . . . . . . . . . . . . . . . . . . .15
5.2 Maintenance . . . . . . . . . . . . . . . . . . . . . . . . . . . . . . . . . . . . . . .15
5.3 Regular check . . . . . . . . . . . . . . . . . . . . . . . . . . . . . . . . . . . . . . 15
5.4 Half-yearly inspection. . . . . . . . . . . . . . . . . . . . . . . . . . . . . . . . .15
5.5 Cleaning. . . . . . . . . . . . . . . . . . . . . . . . . . . . . . . . . . . . . . . . . . . 16
6 Diagnostic
6.1 LED status information. . . . . . . . . . . . . . . . . . . . . . . . . . . . . . . .16
6.2 Fault diagnostic . . . . . . . . . . . . . . . . . . . . . . . . . . . . . . . . . . . . . 17
6.3 Extended diagnostic. . . . . . . . . . . . . . . . . . . . . . . . . . . . . . . . . .17
7 Disassembly and disposal
7.1 Disassembly. . . . . . . . . . . . . . . . . . . . . . . . . . . . . . . . . . . . . . . .17
7.2 Disposal . . . . . . . . . . . . . . . . . . . . . . . . . . . . . . . . . . . . . . . . . . .17
8 Appendix
8.1 Contact. . . . . . . . . . . . . . . . . . . . . . . . . . . . . . . . . . . . . . . . . . . .17
8.2 EC Declaration of conformity . . . . . . . . . . . . . . . . . . . . . . . . . . .18
Content
1 About this document
1.1 Function . . . . . . . . . . . . . . . . . . . . . . . . . . . . . . . . . . . . . . . . . . . .1
1.2 Target group: authorised qualied personnel. . . . . . . . . . . . . . . . 1
1.3 Explanation of the symbols used . . . . . . . . . . . . . . . . . . . . . . . . .1
1.4 Appropriate use . . . . . . . . . . . . . . . . . . . . . . . . . . . . . . . . . . . . . .1
1.5 General safety instructions . . . . . . . . . . . . . . . . . . . . . . . . . . . . .2
1. About this document
1.1 Function
This operating instructions manual provides all the information you
need for the mounting, set-up and commissioning to ensure the safe
operation and disassembly of the safety switchgear. The operating
instructions must be available in a legible condition and a complete version in the vicinity of the device.
1.6 Warning about misuse . . . . . . . . . . . . . . . . . . . . . . . . . . . . . . . . .2
1.7 Exclusion of liability . . . . . . . . . . . . . . . . . . . . . . . . . . . . . . . . . . . 2
1.2 Target group: authorised qualified personnel
All operations described in this operating instructions manual must
2 Product description
2.1 Destination and use . . . . . . . . . . . . . . . . . . . . . . . . . . . . . . . . . . .2
be carried out by trained specialist personnel, authorised by the plant
operator only.
2.2 Ordering code . . . . . . . . . . . . . . . . . . . . . . . . . . . . . . . . . . . . . . .2
2.3 Special versions. . . . . . . . . . . . . . . . . . . . . . . . . . . . . . . . . . . . . . 2
2.4 Scope of delivery and accessories . . . . . . . . . . . . . . . . . . . . . . .2
2.4.1 Accessories included in delivery . . . . . . . . . . . . . . . . . . . . . . . . . 2
2.4.2 Optional accessories . . . . . . . . . . . . . . . . . . . . . . . . . . . . . . . . . .2
Please make sure that you have read and understood these operating instructions and that you know all applicable legislations regarding
occupational safety and accident prevention prior to installation and
putting the component into operation.
2.5 Technical data . . . . . . . . . . . . . . . . . . . . . . . . . . . . . . . . . . . . . . . 2
2.6 Response time (reaction time). . . . . . . . . . . . . . . . . . . . . . . . . . . 3
2.7 Safety classication . . . . . . . . . . . . . . . . . . . . . . . . . . . . . . . . . . .3
2.8 Functions . . . . . . . . . . . . . . . . . . . . . . . . . . . . . . . . . . . . . . . . . . .3
The machine builder must carefully select the harmonised standards to
be complied with as well as other technical specifications for the selection, mounting and integration of the components.
2.8.1 Factory setting . . . . . . . . . . . . . . . . . . . . . . . . . . . . . . . . . . . . . . .3
2.8.2 Restart interlock (manual reset). . . . . . . . . . . . . . . . . . . . . . . . . . 3
1.3 Explanation of the symbols used
2.8.3 Start interlock. . . . . . . . . . . . . . . . . . . . . . . . . . . . . . . . . . . . . . . . 3
2.8.4 Beam coding . . . . . . . . . . . . . . . . . . . . . . . . . . . . . . . . . . . . . . . . 4
2.8.5 Fixed blanking . . . . . . . . . . . . . . . . . . . . . . . . . . . . . . . . . . . . . . . 4
2.8.6 Testing . . . . . . . . . . . . . . . . . . . . . . . . . . . . . . . . . . . . . . . . . . . . .4
Information, hint, note:
This symbol is used for identifying useful additional information.
2.9 Operating mode muting . . . . . . . . . . . . . . . . . . . . . . . . . . . . . . . .4
2.9.1 Adequate and appropriate application . . . . . . . . . . . . . . . . . . . . .4
2.9.2 Muting sensors MS . . . . . . . . . . . . . . . . . . . . . . . . . . . . . . . . . . .5
2.9.3 Muting lamp . . . . . . . . . . . . . . . . . . . . . . . . . . . . . . . . . . . . . . . . .5
2.9.4 Signal sequence muting. . . . . . . . . . . . . . . . . . . . . . . . . . . . . . . .6
2.9.5 Conguration of the muting function . . . . . . . . . . . . . . . . . . . . . .6
Caution: Failure to comply with this warning notice could
lead to failures or malfunctions.
Warning: Failure to comply with this warning notice could
lead to physical injury and/or damage to the machine.
2.9.6 Saving the data . . . . . . . . . . . . . . . . . . . . . . . . . . . . . . . . . . . . . . 8
2.9.7 Muting applications . . . . . . . . . . . . . . . . . . . . . . . . . . . . . . . . . . .8
1.4 Appropriate use
The products described in these operating instructions are developed to
3 Mounting
3.1 General conditions. . . . . . . . . . . . . . . . . . . . . . . . . . . . . . . . . . . 10
3.2 Protection eld and approach . . . . . . . . . . . . . . . . . . . . . . . . . .10
execute safety-related functions as part of an entire plant or machine. It
is the responsibility of the manufacturer of a machine or plant to ensure
the correct functionality of the entire machinery or plant.
3.3 Alignment. . . . . . . . . . . . . . . . . . . . . . . . . . . . . . . . . . . . . . . . . . 10
3.4 Safety distance . . . . . . . . . . . . . . . . . . . . . . . . . . . . . . . . . . . . .11
3.4.1 Minimum distance to reecting surfaces . . . . . . . . . . . . . . . . . . 11
3.5 Dimensions . . . . . . . . . . . . . . . . . . . . . . . . . . . . . . . . . . . . . . . .12
x.000 / Juli 2012 / v.A. - 1012 14175-EN / C / 20 12-07-06 / AE -Nr. 164 8
EN
1

Operating instructions
Safety light grid
SLG 425I
The safety switchgear must be exclusively used in accordance with the
versions listed below or for the applications authorised by the manufacturer. Detailed information regarding the range of applications can be
found in the chapter "Product description".
1.5 General safety instructions
The user must observe the safety instructions in this operating instructions manual, the country-specific installation standards as well as all
prevailing safety regulations and accident prevention rules.
Further technical information can be found in the Schmersal
catalogues or in the online catalogue on the Internet: www.
schmersal.net.
The information contained in this operating instructions manual is provided without liability and is subject to technical modifications
The entire concept of the control system, in which the safety
component is integrated, must be validated to EN ISO 13849-2.
There are no residual risks, provided that the safety instructions as well
as the instructions regarding mounting, commissioning, operation and
maintenance are observed.
Additional measures could be required to ensure that the electro-sensitive device does not present a dangerous breakdown, when other forms
of light beams are available in a special application (e.g. use of wireless
control devices on cranes, radiation of welding sparks or effects of
stroboscopic lights).
1.6 Warning about misuse
In case of inadequate or improper use or manipulations of the
safety switchgear, personal hazards or damage to machinery or plant components cannot be excluded. The relevant
requirements of the standards EN ISO 13855 (successor of
EN 999) and EN ISO 13857 must be observed.
1.7 Exclusion of liability
We shall accept no liability for damages and malfunctions resulting from
defective mounting or failure to comply with this operating instructions
manual. The manufacturer shall accept no liability for damages resulting from the use of unauthorised spare parts or accessories.
For safety reasons, invasive work on the device as well as arbitrary repairs, conversions and modifications to the device are strictly forbidden;
the manufacturer shall accept no liability for damages resulting from
such invasive work, arbitrary repairs, conversions and/or modifications
to the device.
2. Product description
2.1 Destination and use
The SLC 425I is a non-contact, self-testing safety guard, which is used
for the protection of hazardous points, hazardous areas and machine
accesses. If one or more light beams are interrupted, the hazardous
movement must be stopped.
The user must evaluate and design the safety chain in accordance with the relevant standards and the required safety
level.
2.2 Ordering code
This operating instructions manual applies to the following types:
SLG425I-ER-➀-RF
No. Option Description
➀
0500-02 500 mm, 2-beam
0800-03 800 mm, 3-beam
0900-04 900 mm, 4-beam
Only if the information described in this operating instructions manual are realised correctly, the safety function and
therefore the compliance with the Machinery Directive is
maintained.
2.3 Special versions
For special versions, which are not listed in the order code, these
specifications apply accordingly, provided that they correspond to the
standard version.
2.4 Scope of delivery and accessories
2.4.1 Accessories included in delivery
Mounting kit MS-1030
The kit comprises 4 rotating mounting angles and 16 mounting screws
for fixing to the end caps.
2.4.2 Optional accessories
Centre fixing MS-1051
Consisting of 2 steel angles, 4 fixing screws and 4 T-slot nuts
Connecting cable for transmitter
Item number Designation Description Length
101207741 KA-0804 Female connector M12, 4-pole 5 m
101207742 KA-0805 Female connector M12, 4-pole 10 m
101207743 KA-0808 Female connector M12, 4-pole 20 m
Connecting cable for receiver
Item number Designation Description Length
101207728 KA-0904 Female connector M12, 8-pole 5 m
101207729 KA-0905 Female connector M12, 8-pole 10 m
101207730 KA-0908 Female connector M12, 8-pole 20 m
BUS converter NSR-0801
Converter for parametrization and diagnostics. Detailled information can
be found in the operating instructions manual of the NSR-0801.
Included in delivery: integrated connecting cable, PC-software USB
2.0 connection (L x W x H, 122 x 60 x 35 mm), indications of measurements without cable
MSD4 Vibration damper
Kit consisting of: 8 vibration dampers 15 x 20 mm, 8 M5 cylinder head
screws with hexagon socket, 8 spring washers
The MSD4 vibration damper kit must be used for damping vibrations
and oscillations on the SLG 425I. For applications with higher mechanical stresses, e.g. presses, punching machines, we recommend the
MSD4 kit. In this way, the availability of the SLG 425I is increased.
2.5 Technical data
Standards: EN 61496-1; CLC/TS 61496-2;
Material of the enclosure: Aluminium
Number of beams: 2, 3, 4 beams
Protection field heights: 500 mm, 800 mm, 900 mm
Detection ability for test bodies:
Distance between outermost beams:
EN ISO 13849; EN 62061
2 beams with resolution 500 mm *3
3 beams with resolution 400 mm *3
4 beams with resolution 300 mm *3
2
EN

Operating instructions
Safety light grid
SLG 425I
Response time: 2 - 4 beams:
15 ms (Standard)
2 - 4 beams: 20 ms
(beam coding A)
Range of the protection field: 0,3 m - 18 m
Rated operating voltage:24 VDC ±10% (PELV) supply unit to EN 60204
(power drop > 20 ms)
Operating current: 400 mA max. + 0.5 A
(OSSD load + output signal quality load)
Wave length of the sensor: 860 nm
Safety outputs (OSSD1, OSSD2): 2 x PNP-type semi-conductor,
short-circuit proof
Switching voltage HIGH¹: 15 … 28,8 V
Switching voltage LOW¹: 0 … 2 V
Switching current: 0 … 500 mA
Leakage current²: 1 mA
Load capacity: 2 µF
Load inductance: 2 H
Admissible conduction resistance between OSSD and load: 2.5 Ω
Supply cable: 1 Ω
Input restart interlock (manual reset)
Input voltage HIGH (active): 17 … 29 V
Input voltage LOW (inactive): 0 … 2.5 V
Input current HIGH: 3 … 10 mA
Input current LOW: 0 … 3 mA
Function: Start and restart interlock (manual reset),
fixed beam blanking and muting
Voltage: 24 VDC
Current: 500 mA
Signal times
Restart interlock (manual reset): 50 ms … 1.0 s signal transmission in
case of trailing edge
Start interlock: 250 … 1500 ms, adjustable
LED indications transmitter: Transmitting, status
LED indications receiver: OSSD ON, OSSD OFF, restart, signal
reception, blanking, multifunction
Connection: M12 Connector plug with metal thread,
receiver 8-pole, transmitter, 4-pole (male),
Muting sensors 2 pc. M8 3-pole,
Muting lamp M8 3 pole
Ambient temperature: −10° C … +50° C
Storage temperature: −25° C … +70° C
Interface: Diagnostics and function setting
Protection class: IP67 (IEC 60529)
Resistance to vibrations: 10 - 55 Hz to IEC 60068-2-6
Resistance to shock: 10 g; 16 ms; to IEC 60068-2-29
Year of construction: as of 2010 version 1.0
¹) To IEC 61131-2
²) In case of failure, the leakage current at the most flows to the OSSD
cable. The downstream control element must recognise this state as
LOW. A safety PLC must detect this state.
3
) resolution = beam distance + beam diameter 10 mm
2.8 Functions
The system consists of a receiver and a transmitter. For the described
functions, no further switching elements are required. For the diagnostics and function selection, a user-friendly PC-software is offered as
accessory. For the connection to a PC, the NSR-0801 BUS converter is
required (not included in delivery).
The system has the following features:
• Start interlock
• Restart interlock (manual reset)
• Beam coding
• Blanking of fixed protection field areas
• Muting
2.8.1 Factory setting
The system features many functions without needing any additional
devices. The following table gives an overview of the possible functions
and the factory settings configuration.
Function Factory setting Configuration
Restart interlock
(manual reset)
Fixed blanking not active With BUS converter NSR-0801
Muting active With BUS converter NSR-0801
Start interlock not active With BUS converter NSR-0801
Beam coding not active With BUS converter NSR-0801
2.8.2 Restart interlock (manual reset)
The restart interlock (manual reset) prevents an automatic enabling of
the outputs (OSSD's ON state) after switch-on of the operating voltage
or an interruption of the protection field.
The system switches the outputs only to ON state, when an external
command device (restart button) generates an enabling signal at the
restart input (receiver).
The command devices (enabling button) must be installed
outside of the hazardous area. The operator must have a
clear view on the hazardous area when actuating the enabling button.
In supply condition, the restart interlock (manual reset) is
not active. You must select an operating mode in order for
the outputs OSSD's to be enabled. If no type of protection is
selected, you will obtain the following signalisation through
the LED status indication in the receiver:
LED OSSD OFF (red) + LED restart (yellow) flashing
not active External wiring
and PC-software
and PC-software
and PC-software
and PC-software
2.6 Response time (reaction time)
The response time depends on the hight of the protected field, the
resolution, the number of light beams and the beam coding.
Beam
distance
[mm]
500 2 15 20 2.6
400 3 15 20 3.6
300 4 15 20 3.7
2.7 Safety classification
Standards: EN ISO 13849-1, EN 62061
PL: up to e
Control category: up to 4
PFH value: 7.42 x 10⁻⁹ / h
SIL: up to 3
Service life: 20 years
Beams
[Number]
Response
time
[ms]
Response time with
beam coding A
[ms]
Weight
[kg]
2.8.3 Start interlock
The start interlock prevents an automatic start of the machine when the
supply voltage is switched on. After enabling of the start interlock - by
the one-time interruption of the protection field -, this protective function
is deactivated until the next power reset.
The start interlock is not activated upon delivery. This function
is activated by means of the NSR-0801 BUS converter and a
PC or laptop.
EN
3

Operating instructions
E ER R
E RR E
Safety light grid
SLG 425I
2.8.4 Beam coding
The beam coding of the safety light grid must be adjusted, when
systems operating in each other's vicinity and a set-up as shown in the
image below (no interference) is impossible. When supplied, the beam
coding is not active. With beam coding A, a receiver can distinguish the
beams of the transmitter with the same beam coding A, which are destined to this particular receiver, from foreign beams. The beam coding A
must be set for each sensor (receiver and transmitter) individually. The
function is activated by means of the NSR-0801 BUS converter and a
PC or laptop.
If adjacent systems are operated without beam coding, the user is at risk.
no interference
Interference: beam coding required!
• The beam coding increases the safety and avoids mutual interference
of adjacent systems.
• The beam coding increases the immunity against optical interference
(e.g. sun light, welding sparks).
• The beam coding A is permanently shown by the transmitter and the
receiver by means of flashing LED's (refer to LED status information).
On adjacent systems, the beam coding A must be used.
The response time of the system is increased when beam
coding A is used. To this end, the safety distance must be
adjusted to the hazardous movement. Refer to chapter
Response time.
• The blanking of beams is not authorised for an SLG 425I
with 2 beams!
• The blanking of one beam at the most in the SLG 425I
3-beam version or the SLG 425I 4-beam version is authorised, provided that the protective function is taken into
account.
• The blanking of multiple beams is not authorised.
• The remaining lateral areas must be protected against intrusion by means of mechanical covers.
• The lateral covers must be fixed with the object. Partial covers are not authorised.
• The restart interlock (manual reset) function of the safety
light grid or the machine must be activated.
The function is activated by means of the NSR-0801 BUS
converter and a PC or laptop. The activation of the function
is signaled by the blanking LED ashing in the diagnostic
window of the receiver.
2.8.6 Testing
The system performs a complete self-test and safety test within 2 seconds after the operating voltage has been switched on. If the protection
field is not interrupted, the system switches to the ON condition.
In case of an error, the outputs at the receiver do not switch to the ON
state. The LED OSSD OFF starts flashing, thus emitting an error message. Further indications can be found in the chapter Fault diagnostic.
During operation, the system continuously executes a self-test. Safetyrelevant faults are detected within the cycle time and cause the outputs
to be switched off.
2.9 Operating mode muting
2.9.1 Adequate and appropriate application
The objective of the by-pass function is the safe distinction between
material and the presence of a person in front of the hazardous area. To
this effect, (2 or 4) additional sensors must be connected to provide for
a safe distinction between persons and the material to be transported.
To activate and parameterise the muting function, the
NSR-0801 BUS converter and the SLC4 PC software is
required.
2.8.5 Fixed blanking
The SLC 425I can blank stationary parts in the protection field.
The fixed blanking range is authorised for individual beams in case of
obstacles, taking the protective function into account.
4
Fixed blanking area
3
2
1
R1E1
Access to lateral areas must be prevented by means of
mechanical covers!
The first beam line, which realises the optical synchronisation and is
located immediately behind the diagnostic window, cannot be blanked.
The area of the fixed blanking must not be modified after the teach-in
process. Any change of the area or removal of the part from the protection field will be detected by the system. As a result, the outputs are
disabled (locked). This locking can be neutralised by executing a new
teach-in process in accordance with the actual beam interruptions.
Special mounting instructions for muting
All components must only be connected, wired and fitted by a specialist, who has sufficient electrical professional training and knowledge of
the harmonised safety regulations.
Testing and start-up by a qualified person, who has professional knowledge as well as in particular knowledge of the harmonised legal and
governmental regulations.
Instruction and training of the operators by an expert on the application.
4
EN

Operating instructions
+ 24VDC
MS 1
MS 2
MS 1
MS 2
+ 24VDC
Safety light grid
SLG 425I
After connection and fitting by an expert, the following instructions must
be respected and observed:
• Set-up of the sensors to the operating instructions SLG 425I. The muting function must not be started by a person unintentionally accessing
the hazardous area. The sensors must be set up so that a normal
approach by a body part, e.g. foot, leg, hand, arm movement does not
activate the muting mode.
• The selection of the operating parameters, e.g. simultaneity, muting
time, operating mode, special functions, etc. must be adjusted to the
application, e.g. termination of the muting cycle after passing through
the protection field.
• The muting cycle must be started automatically after the command device is enabled and be controlled by at least two independent signals
(sensors).
• The command device for the enabling and override function must be
set up so that the operator has a clear view on the entire hazardous
area. The mounting position must be selected so that the device cannot be actuated at the hazardous point.
• The muting state can be signalled through a muting lamp.
The muting function must only be used for automatic material
transport to protect the accesses to the hazardous area. In
this way, the material passes through the accesses and the
protection field of the SLG 425I without disabling the outputs.
This function is only authorised for the above-described application. For other applications, no warranty claims shall be
accepted.
This document includes information for the adequate and
proper by-passing of the protection field of an ESD and is
reserved to persons, who have the necessary expertise and
technical know-how. The users of this document must be able
to adequately and correctly evaluate the risks involved in this
operating mode.
A new muting process can only be started when the previous is terminated (all sensors not actuated). A safety distance of at least 50 mm
(belt speed V < 2.0 m/s) must be observed with regard to the protection
field, in order to ensure a safe signal evaluation by the control system.
Installation of the muting sensors
If 4 muting sensors are used, the switching outputs of the muting
sensors MS 1 and MS 3 as well as MS 2 and MS 4 must be wired in
parallel. MS 1 and MS 3 are connected to the MS1/MC female connector on the sensor connection plate. MS 2 and MS 4 to the MS 2 female
connector.
Sensor connection:
with 2
muting sensors
with 4
muting sensors
MS 1
SLG 425I sensor connection
MS 1
MS 3 MS 2
MS 2
MS 4
This document does not provide all technical know-how,
which is required in conjunction with this operating mode.
To this effect, the harmonised governmental and legal provisions regarding the technical know-how must be obeserved.
Definitions:
Muting: specific intended brief by-passing of the outputs of an
ESD in case of automatic material transport
Muting sensor:
Muting lamp: the muting lamp signals the muting state
Override: the function enables the material transport after an
Belt speed: the muting running time is stopped as long as the
2.9.2 Muting sensors MS
The MS muting sensor can be a mechanical, capacitive, inductive or
optoelectronic sensor. They have no particular requirements as failsafety is regarded. The set-up must be executed tamper-proof. When
reflexion light barriers are used, the sensors and reflectors must be
arranged alternately to avoid mutual interference. When optoelectronic
sensors are used, the switching outputs must be set to dark operation
(sensor actuated = 24 VDC).
The sensors must be arranged so that the transported material part is
detected without any interruption over the entire length. The sensors
must detect the material, not the carrier.
The distance of the sensors must not be too large, so that all activated muting sensors are actuated by the travelling material during a
cycle. The simultaneity (max. 3 sec.) of the switching outputs must be
observed.
sensor for the uniform recognition of material
exceptional stop of the muting cycle.
"belt stop" signal is active
SLG 425I sensor connection
The muting sensors must be arranged so that any unintentional access or penetration of a person into the hazardous
area is prevented. When positioning the muting sensors,
the distance and the height must be choses so that a clear
distinction is made between material and a person!
2.9.3 Muting lamp
The operating mode "muting" can be signalled through an external muting lamp. This lamp must be connected to the sensor connection plate
(ML) through a connection with a 3-pole connector socket. The muting
lamp is not monitored! I.e. the electrical connection and the included
illuminant are not checked by the control system of the SLG 425I.
The muting lamp signals the following operating modes:
Muting lamp Signal Note
ON Continuous signal Muting cycle active
OFF Muting cycle not active
Flashing 2 Hz Muting cycle error or over-
ride mode
If the muting lamps are flashing, the following failures can be present:
• Muting cycle time exceeded
• Belt stopping time exceeded
• Sequence or simultaneity of the signal conditions of the muting sensors not observed
EN
5

Operating instructions
t<3st<3s
MS1
MS2
Safety light grid
SLG 425I
Illuminant
For the muting lamp, a LED block with a lifetime of approx. 50 000
operating hours must be used as admissible illuminant. The utilisation
of MK2 type muting lamps is recommended.
2.9.4 Signal sequence muting
*1
MS 1
*2
*1
MS 2
*2
*1
ML
*2
*1
Muting
*2
t
*1: active
*2: inactive
MS1
Sensor group 1 Sensor group 2
Parameter setting: muting mode with 2 sensor groupes (4 muting sensors), direction detection 1, premature termination not active
MS3 MS2
MS4
Operating mode set-up for muting mode:
After the correct connection of the muting sensors and the NSR-0801,
the following parameters must be set by means of the PC software in
the "muting function" menu field in accordance with your application.
Operating mode and transport direction
First choose the operating mode and the transport direction (set-up and
number of the muting sensors).
Muting with 2 sensors, diagonal arrangement
• Muting variante with 2 crosswise arranged muting sensors
• Transport direction: material transport in both directions (factory setting)
• Selectable options: belt stop, reduced muting cycle, override, protection field area
The muting function is activated after first MS 1 (first sensor group) and
subsequently MS 2 (second sensor group) is actuated by the material
(direction detection 1). The material first actuates the proteciton field
of the SLG 425I, after that MS 3 (first sensor group) and finally the MS
4 (second sensor group). The muting cycle is cancelled, when MS 3
(second sensor group) is no longer actuated.
2.9.5 Configuration of the muting function
The parameters for the muting mode are set by means of the PC software: SLC 4 Kunde.exe
To this effect, the NSR-0801 BUS converter must be connected to the
SLG 425I and a PC or laptop. Please use the NSR-0801 BUS converter
manual for the connection.
6
EN

Operating instructions
Safety light grid
SLG 425I
Muting with 2 sensors, parallel arrangement
• Muting variante with 2 muting sensors
• Transport direction: out of the hazardous area, reduced muting cycle
(factory setting)
• Selectable options: belt stop, override, protection field area
The use of 2 parallel arranged sensors is only authorised for
outward material transport, i.e. the transport of material out
of the hazardous area. The muting sensors must be installed
inside the hazardous area.
Muting with 4 sensors, parallel arrangement
• Muting with each time 2 symmetrically arranged sensors before and
after the protection field of the SLG 425I.
• Transport direction: material transport in both directions selectable
• Selectable options: belt stop, reduced muting cycle, override, protection field area
Muting cycle time
The muting cycle time is the time expiring between the moment of
activation of the muting until the inward or outward material transport in
the hazardous area is completely terminated.
The muting cycle time depends on the length of the material, the belt
speed and the sensor arrangement.
The time must be defined so that the material can travel by all sensors
within the muting cycle time (enabling of all muting sensors). Before a
new muting cycle can be initiated, all sensors must be clear (no actuation).
The muting cycle time can be set from a few seconds up to multiple
hours. Longer muting cycle times can result in hazardous operating
conditions. The muting cycle time must take variations in the belt speed
as well as position and length tolerances of the material into consideration.
Reduced muting cycle
A normal muting cycle is terminated by a muting sensor in the following
way:
• Muting with 2 sensors, diagonal arrangement after enabling of muting
sensor MS 2
• Muting with 4 sensors, parallel arrangement after enabling of muting
sensor MS 3
For very long muting cycle times, this results in a time window with
bridged protection field, as long as the material is located between the
protection field and the muting sensor MS 2/MS 3.
By activating the function "reduced muting time", the muting cycle is
shortened/reduced. The muting cycle is terminated, when the material
has travelled by the protection field of the SLG 425I (protection field
clear).
This field is always activated when applied with 2 parallel arranged
muting sensors. For applications with 2 diagonally arranged MS or 4
parallel arranged MS, the function can be activated by means of the
software.
A new muting cycle can only be started, when all muting sensors are no
longer actuated.
Simultaneity of the sensors
The timeframe between the first and the second muting sensor is
monitored. In this way, a uniformly-shaped transport good can be distinguished from other switching times (passing by of a person) in case of
an adequate arrangement of the muting sensors.
The simultaneity setting must take variations in the belt speed, as well
as the position and length tolerances of the material into consideration.
The simultaneity of the sensors can be set between 1 to 3 seconds.
Setting the special functions is recommended. In this way, the
protective function and the availability of the muting application is
increased.
Restart interlock (manual reset)
The restart interlock (manual reset) prevents an automatic belt start
after voltage interruption or material jamming.
The restart interlock (manual reset) must be wired as shown in the wiring diagram (chapter 4). The function is active upon delivery.
The command device must be installed outside of the hazardous area,
so that the operator has a clear view on the area.
The command device must be actuated after any interruption of the
voltage or the protection field or fault of the muting cycle. Enabling is
only possible, when all muting sensors are not actuated. The signalling
for the actuation of the command device is realised by a status LED on
the receiver.
The function can be deactivated by removing the check mark in the
software. By doing this the following operating condition is created:
the outputs OSSD's are released, when all light beams and the muting
sensors are not interrupted (light path clear). The same applies after an
interruption of the voltage supply. A release through the command device is only required after a malfunction (muting cycle fault). The owner
then must secure this function through the application.
The deactivation of the "restart interlock (manual reset)" function can trigger an automatic muting cycle. In this way, persons can access/penetrate into the hazardous area. Persons
within the hazardous area are exposed to severe injuries.
Belt stop
The function can extend the muting cycle time in case of a belt stop or
material jamming, thus preventing a premature shutdown. In this way,
the muting function can be extended until the failure/belt stop is rectified. After that, the normal muting cycle can be completed.
The machine control makes the belt stop input available as signal. The
function is activated by switching on 24 VDC at pin 8 of the receiver. A
status change of the muting sensors (switching output) when the function is active, causes the muting function to be switched off.
The function is deactivated upon delivery. The belt stop time can be set
from 1 to 30 minutes.
Override
This function enables bridging the outputs of the SLG 425I in case of
failure (voltage interruption, material jamming). The function is limited in
time and exclusively reserved to the elimination of the material jamming
(muting sensor or protection field actuated).
The function is activated by means of the command device (restart
interlock enabling). The command device must be actuated in the sequence ON-OFF-ON. The time-related sequence for the start (ON-OFFON) with a minimum duration of 100 ms up to the maximum duration of
1.5 sec. must be observed. If the material jamming is eliminated (protection field and muting sensors no longer actuated), the outputs of the
SLG 425I are locked. To start a new muting cycle, the command device
(enabling of the restart interlock) must be actuated one time (ON-OFF).
The muting lamp starts flashing (2 Hz) to signal the interruption of the
muting cycle. The function is not activated upon delivery.
EN
7

Operating instructions
MS1
MS2 MS3 MS4
Safety light grid
Multiple interruption of the protection field during the muting cycle
This function increases the availability of the system in case of different
material qualities on one pallet.
Without the function "multiple interruption of the protection field", the
protection field is monitored during the active muting cycle and any nonactuation (no beam interrupted) immediately cancels the muting cycle.
This error function is triggered when all active beams of the protection field are not actuated for a period of time of over 20 ms e.g. due
to an irregular loading of the material on the carrier. If the function is
activated, no shutdown is triggered if the beams are not actuated during
the muting cycle. The correct termination is realised by the configuration or the muting sensors. The combination with the parameter setting
"reduced muting cycle" is not possible. These restrictions are marked in
the software and must be observed.
Activating the protection field
During a muting cycle, the entire protection field height of the SLG 425I
is bridged. This causes the risk that persons located on or beside the
material can get into the hazardous area.
The risk can be avoided by activating the remainder of the protection
field, if the conveyed material has a throughout identical height. In this
way, the presence of persons within the active protection field height is
detected!
Procedure:
Position the material onto the carrier so that the protection field of
the SLG 425I is actuated. If the material height is slightly varying, the
carrier can be slightly increased during the teaching process to avoid
false triggering. Now activate the teach sample field in the software.
The menu automatically switches to the beam view. The beams interrupted by the material are represented in red. The teaching process is
terminated with a mouse click on the "teach" field. You will return to the
main menu "muting".
Changing the protection field area
If the protection field height parameterised by means of the teach
process needs to be changed, the saved value must be deleted and
reparameterised.
Procedure:
Activating the entire protection field (the previous value is deleted)
Activating the teach sample (change to beam view)
Saving the new value (teach process) with teach
Mounting:
The first light beam (near the diagnostic window) must not be
interrupted! I.e. observe the downward cable connection.
SLG 425I
This saving procedure is recommended so that configuration changes
can be reproduced at a later moment. Click the (yes) button with your
mouse to confirm.
You now can save the configuration setting onto your PC or laptop.
2.9.7 Muting applications
Arrangement of the muting sensors
Muting lamp
MS1
Material
Belt
Reector
Reflektor
Muting sensor
Muting Sensor
SLG 425I-E/R
SLC 425I-E/R
Carrier
MS2
MS3
MS4
S
Belt
Material
S3
E
S2 S1 S1 S2
2.9.6 Saving the data
After the reconfiguration, the data to be saved are prepared by selecting the button "Save settings". To avoid any unintentional saving of
data, every intentional saving process must be confirmed within 10
seconds by clicking on the button "Confirm with this button within 10
seconds".
If it is not confirmed within this timeframe, the settings that were saved
before the change was made will be maintained without any change.
After the data transmission, the following confirmation is displayed. You
are simultaneously asked to save the configuration data in the form of
a text file.
8
SF = Protection field
S1 = distance of the inner MS to SF
S2 = distance between two MS
S3 = material length
MS 1 = Muting sensor 1
MS 2 = Muting sensor 2
MS 3 = Muting sensor 3
MS 4 = Muting sensor 4
S = Transmitter
E = Receiver
Minimum distances muting sensors
For the evaluation of the signals (MS) in the control system, a minimum
distance is required for the muting sensors.
The minimum signal length between the sensors, which are fitted
closest to the SLG 425I, must be at least 50 ms. This corresponds to a
minimum distance of 100 mm at a belt speed of 2.0 m/s.
The minimum signal length of the outer sensors must exceed 50 ms.
The signal running time between the muting sensors must be 3 seconds at the most (depending on the chosen setting).
EN

Operating instructions
Safety light grid
SLG 425I
The mounting distance of the inner sensors to the protection field of the
SLG 425I must be chosen as small as possible.
The sensors (transmitter/receiver) of the SLG 425I must be fixed as
close as possible to the conveyed material to avoid the creation of
gaps. Otherwise, there is a risk that persons can slip between the material and the MS arrangement into the hazardous area during the muting
cycle.
In case of different material widths, the gap between the sensors (transmitter/receiver) of the SLG 425I and the material must be protected with
an additional cover.
Muting with 2 sensors, parallel arrangement
The arrangement shows the muting application with two parallel arranged muting sensors. This arrangement enables the material to be
transported in only one direction, out of the hazardous area.
Schematic representation
Additional safety guard
Carrier
Belt
Material
S3
Hazardous point
MS2
MS1
S
E
Muting with 2 sensors, diagonal arrangement
The arrangement shows the muting application with two diagonally
(crosswise) arranged muting sensors. This arrangement enables the
material to be transported in both directions.
Schematic representation
Carrier
Additional safety guard
Hazardous point
S
Belt
Material
S3
S1 = distance MS 1 to SF
S2 = distance MS 2 to SF
S3 = material length
MS 1 = Muting sensor 1
MS 2 = Muting sensor 2
S = Transmitter
E = Receiver
VB = belt speed (m/s)
SF = Protection field
E
S2S1
MS1MS2
S2 S1
S1 = distance MS 1 to SF
S2 = distance MS 1 to MS 2
S3 = material length
MS 1 = Muting sensor 1
MS 2 = Muting sensor 2
S = Transmitter
E = Receiver
VB = belt speed (m/s)
SF = Protection field
S3 > S1+S2
S1 = belt speed VB (m/s) x 0,05 s
The muting cycle is as follows: MS2 - MS1 - SF - end
Selectable options: belt stop, override, protection field area
Factory setting: reduced muting cycle, i.e. the muting cycle is terminated
when the protection field is released.
This arrangement is only authorised when the muting sensors
are installed inside the hazardous area.
The intersection of the muting sensors must always be within
the hazardous area!
S3 > S1 + S2
S1 = belt speed VB (m/s) x 0,05 s
In the schematic diagram, the arrangement of the muting sensors is
represented with a larger distance to enable a uniform identification of
the sensor sequence. Please observe the smallest possible distance
of the MS to the transported material. The distance of MS 1 and MS
2 to the protection field of the SLG 425I must be chosen as small as
possible as well.
The muting cycle is as follows: MS1 - MS2 - SF - MS2 - end
Selectable options: belt stop, reduced muting cycle, override, protection
field area
Factory setting: material transport in both directions
The muting sensors must be arranged so that a uniform sequence of
the muting sensors is ensured.
EN
9

Operating instructions
MS1
MS2 MS3 MS4
Safety light grid
SLG 425I
Muting with 4 sensors, parallel arrangement
The arrangement shows the muting application with four parallel arranged muting sensors. This arrangement enables the material to be
transported in both directions.
Carrier
S
Belt
Material
S3
E
S2 S1 S1 S2
S1 = distance of the inner MS to SF
S2 = distance between two MS
S3 = material length
MS 1 = Muting sensor 1
MS 2 = Muting sensor 2
MS 3 = Muting sensor 3
MS 4 = Muting sensor 4
S = Transmitter
E = Receiver
VB = belt speed (m/s)
SF = Protection field
S3 > 2(S1 + S2)
S1 = belt speed VB (m/s) x 0,05 s
The muting cycle is as follows: MS1 - MS2 - SF - MS3 end
MS4 - MS3 - SF - MS2 end
Selectable options: belt stop, reduced muting cycle, override, protection
field area
Factory setting: material transport in both directions
The muting figure with each time 2 muting sensors shows a symmetrical arrangement before and after the protection field of the SLG 425I.
3. Mounting
3.1 General conditions
The following guidelines are provided as preventive warning notices
to ensure a safe and appropriate handling. These guidelines are an
essential part of the safety instructions and therefore must always be
observed and respected.
• The SLG must not be used on machines, which can be
stopped electrically in case of emergency.
• The safety distance between the SLG and a hazardous machine movement must always be observed and respected.
• Additional mechanical safety guards must be installed so that
the operator has to pass by the protection field to reach the
hazardous machine parts.
• The SLG must be installed so that the personnel always
must be within the detection zone when operating the machine. An incorrect installation can lead to serious injuries.
• Never connect the outputs to +24VDC. If the outputs are
wired to +24VDC, they are in ON state, as a result of which
they are unable to stop a hazardous situation occuring on the
application/machine.
• The safety inspections must be conducted regularly.
• The SLG must not be exposed to inflammable or explosive
gasses.
• The connecting cables must be connected in accordance
with the installation instructions.
• The fixing screws of the end caps and the mounting angle
must be firmly tightened.
• Additional measures could be required to ensure that the
electro-sensitive device does not present a dangerous
breakdown, when other forms of light beams are available in
a special application (e.g. use of wireless control devices on
cranes, radiation of welding sparks or effects of stroboscopic
lights).
3.2 Protection field and approach
The protection field consists only of the available individual beams with
a distance of 300, 400 or 500 mm. Additional protective devices must
ensure that hazardous machine movements can only be reached after
passing through the protection field.
The SLG must be installed to so that the hazardous area is completely
protected, if necessary by means of additional safety guards.
The safety distance before the hazardous point to the SLG safety
guard must be imperatively respected. The safety distance enables the
presence of persons within the hazardous area. Therefore, it must be
ensured that the hazardous movement can only take place, when no
persons are inside the hazardous area anymore. The legal and governmental provisions must be observed for the operation and use. These
provisions are usually region- and country-dependent.
The command devices (enabling button) must be installed
outside of the hazardous area sot hat any operation from
within the hazardous area is prevented. The operator must
have a clear view on the hazardous area, when actuating the
command device (enabling button).
3.3 Alignment
Procedure:
1. The transmitter and the receiver must be fitted parallel to each other
and at the same height.
2. Turn the transmitter and monitor the diagnostic window of the receiver. Fix the light grid, when the LED OSSD ON (green) is on and
the LED signal reception (orange) is off.
3. Determine the max. rotating angle to the left and to the right, at which
the LED OSSD ON (green) is on and tighten the mounting screws in
central position. Make sure that the LED signal reception (orange) is
not on or flashing.
10
EN

Operating instructions
8° 8°
a= 262 mm
D [m]
0 3 5 10
15 20
Safety light grid
SLG 425I
3.4 Safety distance
The safety distance is the minimum distance between the SLG 425I
and the hazardous point, which must be observed in order to ensure
that the hazardous point can only be reached after the hazardous
movement has come to standstill.
The protection using individual beams must be chosen so
that bodies or body parts larger than the selected resolution
(beam distance + beam diameter 10 mm) of the SLG 425I are
detected.
Calculation of the safety distance to EN ISO 13855 and
EN ISO 13857
The safety distance depends on the following elements:
• Run-on time of the machine (calculation by run-on time measurement)
• Response time of the machine and the safety light grid and the downstream relay (entire safety guard)
• Approach speed
• Resolution of the safety light grid
Calculation of the safety distance for the safety light grid:
S = (K 1600 mm/s x T ) + C
S = Safety distance [mm]
T = Run-on time of the machine + reaction time of the safety light grid
K = Approach speed 1600 mm/s
C = Safety supplement 850 mm
To calculate the minimum distances of the safety guards with
regard to the hazardous point, the EN ISO 13855 and EN
ISO 13857 must be observed.
If an overlap of the protection field is possible, take care to
the calculation of the safety distanca refering to additional
CRO according to the table A1 as per norm EN ISO 13855.
3.4.1 Minimum distance to reflecting surfaces
During the installation, the effects of reflecting surfaces must be taken
into account. In case of an incorrect installation, interruptions of the
protection field could possibly not be detected, which could lead to
serious injuries. The hereafter-specified minimum distances with regard
to reflecting surfaces (metal walls, floors, ceilings or parts) must be
imperatively observed.
Access direction
Transmitter
5° 5°
Limit of the hazardous point
optical axis
Obstacle
a=130mm
reecting body
(e.g. Material container)
Receiver
Example:
Reaction time of the SLG 425I = 10 ms
Run-on time of the machine T = 170 ms
S = 1600 mm/s * (170 ms + 10 ms) + 850 mm
S = 1138 mm
The following mounting heights must be observed:
Number of beams Mounting height above reference floor in
2 400, 900
3 300, 700, 1100
4 300, 600, 900, 1200
The safety distance between the safety light grid and the
hazardous point must always be respected and observed. If
a person reaches the hazardous point before the hazardous
movement has come to standstill, he/she is exposed to serious injuries.
Safety distance to the hazardous area
Transmitter
Direction from which the
hazardous area is accessed
mm
S
Hazardous
point
Table: Safety distance to reflecting surfaces a depending on the aperture angle
a [mm]
1000
900
800
700
600
500
400
300
200
100
Calculate the minimum distance to reflecting surfaces as a function of
the distance with an aperture angles of ± 2.5° degrees or use the value
from the table below:
Distance [m] between
transmitter and receiver
0.2 … 3.0 130
4 175
5 220
7 310
10 440
15 660
Formula: a = tan 2.5° x L [mm]
a = Minimum distance to reflecting surfaces
L = Distance between transmitter and receiver
Minimum distance a
[mm]
Receiver
Command device
Authorised operation
Mechanical protection
The formulae and calculation examples are related to the vertical set-up
(refer to drawing) of the safety light grid with regard to the hazardous
point. Please observe the applicable harmonised EN standards and
possible applicable national regulations.
EN
11

Operating instructions
C
C
Safety light grid
SLG 425I
3.5 Dimensions
All measurements in mm.
SLG425I-ER-0500-02-RF (2-beam version)
A B C L2 L1
Trans-
mitter
500 648 712 684 748 303 239 349
Re-
ceiver
Trans-
mitter
Re-
ceiver
Trans-
mitter
Re-
ceiver
L2
Receiver 161 / Transmitter 97
80
Receiver 150 / Transmitter 86
6.05
48.749.6
B
SLG425I-ER-0800-03-RF (3-beam version)
A B C L2 L1
Trans-
mitter
400 948 1012 948 1048 203 139 249
Re-
ceiver
Trans-
mitter
Re-
ceiver
Trans-
mitter
Re-
ceiver
L2
97
Receiver 161 / Transmitter 97
80
86
Receiver 150 / Transmitter 86
6.05
48.749.6
AA
B
A
51
31.5
42
L1
Legend
A = Beam distance
B = Mounting dimension
C = Total length
L1 = Mounting distance (mm) between floor and slotted hole centre
(short end cap)
L2 = Mounting distance (mm) between floor and slotted hole centre
(diagnostic window)
*All measurements ± 1 mm
51
31.5
42
L1
Legend
A = Beam distance
B = Mounting dimension
C = Total length
L1 = Mounting distance (mm) between floor and slotted hole centre
(short end cap)
L2 = Mounting distance (mm) between floor and slotted hole centre
(diagnostic window)
*All measurements ± 1 mm
12
EN

Operating instructions
C
20
Safety light grid
SLG 425I
SLG425I-ER-0900-04-RF (4-beam version)
A B C L2 L1
Trans-
mitter
300 1088 1152 1124 1188 203 139 209
B
97
Receiver 161 / Transmitter 97
AAA
ceiver
86
Receiver 150 / Transmitter 86
Re-
Trans-
mitter
Re-
ceiver
L2
80
Transmitter
6.05
Re-
ceiver
48.749.6
Accessories
Fixing kit MS-1030
The fixing kit consists of 4 steel angles and 16 fixing screws.
18,9
6,5
42
14,5
40
32
52
Centre fixing MS-1051 (optional accessory)
Mounting kit consists of 2 steel angles, 4 screws and 4 T-slot nuts for
central fixing
40
20
42
14,5 18,9
32
38
20
51
31.5
Legend
A = Beam distance
B = Mounting dimension
C = Total length
L1 = Mounting distance (mm) between floor and slotted hole centre
(short end cap)
L2 = Mounting distance (mm) between floor and slotted hole centre
(diagnostic window)
*All measurements ± 1 mm
42
L1
EN
13
Operating instructions
+ 24VDC
MS 1
MS 2
MS 1
MS 2
+ 24VDC
5
8
5
8
Safety light grid
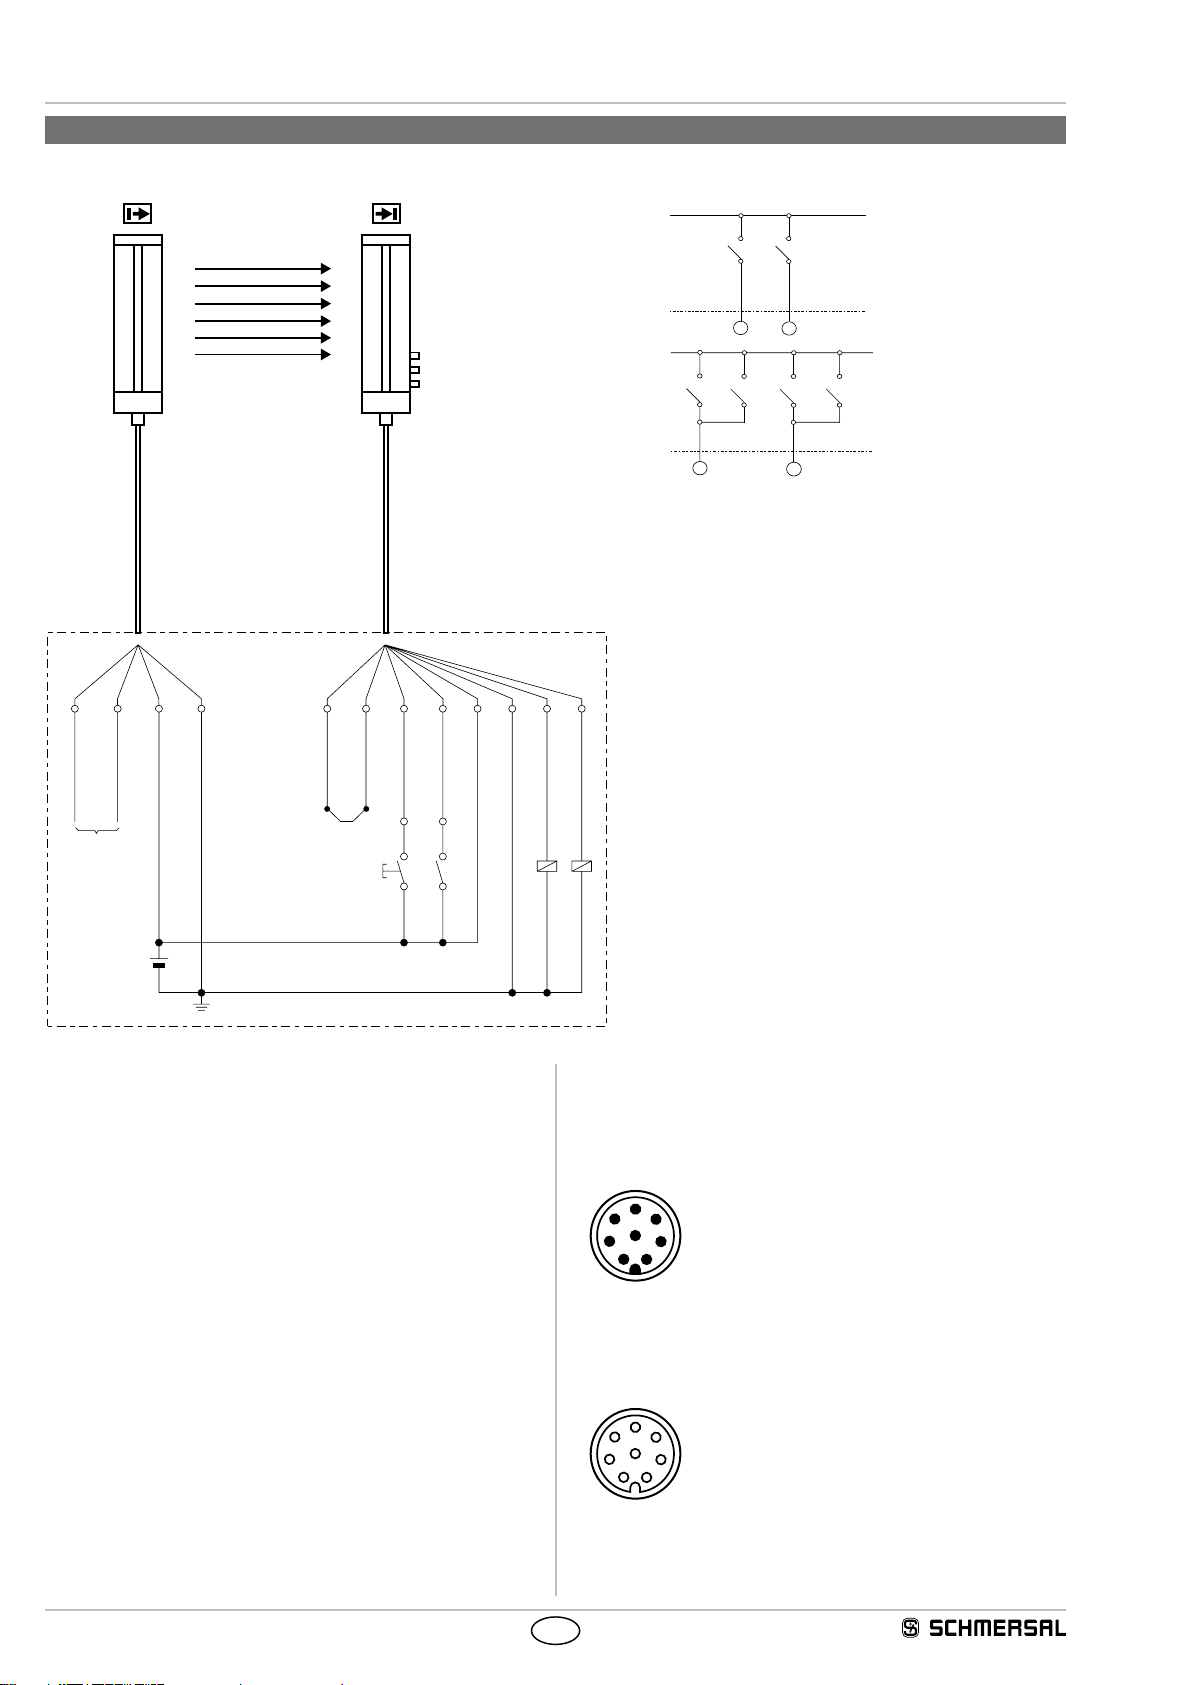
4. Electrical connection
4.1 Wiring example Muting
MS 1
MS 2
MS 1
MS 3 MS 2
SLG 425I
Sensor connection:
with 2 muting sensors
with 4 muting sensors
MS 4
5
1 342
DIAG IN (WH)
DIAG OUT (BK)
DIAG IN (WH)
DIAG OUT (BK)
Nur für Diagnose
Only for diagnostic
Bridge 1: Restart interlock (manual reset) active (bridge between DIAG
OUT and DIAG IN)
Legend
K1, K2: Relay for processing the switching outputs OSSD 1,OSSD 2
MK: Machine contact belt stop (optional)
S1: Command device button for enabling restart/override
E1: Power supply 24 VDC ± 10%
0 VDC (BU)
+24 VDC (BN)
+24 VDC (BN)
0 VDC (BU)
E 1
Erdung
Earth connection
6
DIAG IN (GY)
DIAG OUT (PK)
DIAG OUT (PK)
DIAG IN (GY)
Brücke 1
Bridge 1
1
Freigabe/Override (WH)
Release/Override (WH)
S 1
8
2
Bandstopp (RD)
+24 VDC (BN)
Belt stop (RD)
+24 VDC (BN)
MK
7
0 VDC (BU)
0 VDC (BU)
3
4
OSSD 1 (GN)
OSSD 2 (YE)
OSSD 2 (YE)
OSSD 1 (GN)
K 1 K 2
4.2 Connector configuration Receiver, Emitter & Cable
RECEIVER
SLG: connector
M12 / 8 pole male
6
7
1
Cable: Connector
M12 / 8 pole female
4
3
2
Signal
Designation Description
1 WH Release/Override Input
2 BN 24 VDC Power supply
3 GN OSSD 1 Safety output 1
4 YE OSSD 2 Safety output 2
5 GY Diagnostic IN Input diagnostic data
6 PK Diagnostic OUT Output diagnostic data
7 BU 0 VDC Power supply
8 RD Belt stop Input
14
4
3
2
EN
6
7
1

Operating instructions
Safety light grid
SLG 425I
TRANSMITTER
SLG: connector
M12 / 4 pole male
4
1
Cable: Connector
M12 / 4 pole female
3
2
Sensor connection field
3
2
4
1
The colour codes are only valid for the cable types mentioned
below "optional accessories".
Signal
Designation Description
1 BN 24 VDC Power supply
2 WH Diagnostic IN Input diagnostic data
3 BU 0 VDC Power supply
4 BK Diagnostic OUT Output diagnostic data
MS1 / MC MS2 ML
4. The double insulation between the light grid output and an external
potential is guaranteed.
5. The outputs OSSD1 and OSSD2 are not connected to +24 VDC.
6. The connected switching elements (load) are not connected to +24
VDC.
7. If two or more SLG are used within close range compared to each
other, an alternating arrangement must be observed. Any mutual
interference of the systems must be prevented.
Switch the SLG on and check the operation in the following way:
The component performs a system test during approx. 2 seconds after
the operating voltage has been switched on. After that, the outputs are
enabled (if the protection field is not interrupted). The LED "OSSD ON"
of the receiver is on.
In case of incorrect functioning, please follow the instructions
listed in the chapter Fault diagnostic.
5.2 Maintenance
Do not use the SLG before the next inspection is terminated.
An incorrect inspection can lead to serious and mortal injuries.
Conditions
For safety reasons, all inspection results must be archived. The operating principle of the SLG and the machine must be known in order to
be able conducting an inspection. If the fitter, the planning technician
and the operator are different persons, please make sure that the user
has the necessary information at his disposal to be able conducting the
maintenance.
MS1/MC = Muting sensor 1/machine contact MC
MS 2 = muting sensor 2
ML = Muting lamp
Muting sensors PIN No. Signal Description
4
3
Muting lamp PIN No. Signal Description
4
3
5. Set-up and maintenance
5.1 Check before start-up
Prior to start-up, the following items must be checked by the responsible person.
Wiring check prior to start-up
1. The voltage supply is a 24V direct current power supply, which meets
the CE Directives, Low Voltage Directives. A power downtime of 20
ms must be bridged.
2. Presence of a voltage supply with correct polarity at the SLG.
3. The connecting cable of the transmitter is correctly connected to the
transmitter and the connecting cable of the receiver correctly to the
receiver.
1 +24 VDC Power supply
1
3 0 V Power supply
4 +24 VDC Switching output sensor
3 0 V Power supply
4 +24 VDC Switching output muting
lamp
5.3 Regular check
A regular visual inspection and functional test, including the following
steps, is recommended:
1. The component does not have any visible damages.
2. The optics cover is not scratched or soiled.
3. Hazardous machinery parts can only be accessed by passing
through the protection field of the SLG.
4. The staff remains within the detection area, when works are con-
ducted on hazardous machinery parts.
5. The safety distance of the application exceed the mathematically
calculated one.
Operate the machine and check whether the hazardous movement
stops under the hereafter-mentioned circumstances.
6. Hazardous machine parts do not move when the protection field is
interrupted.
7. The hazardous machine movement is immediately stopped, when
the protection field is interrupted with the test rod immediately before
the transmitter, immediately before the receiver and in the middle
between the transmitter and the receiver.
8. No hazardous machine movement when the test rod is within the
protection field.
9 The hazardous machine movement comes to standstill, when the volt-
age supply of the SLG 425I is switched off.
5.4 Half-yearly inspection
The following items must be checked every six months or when a machine setting is changed.
1. Machine stops or does not inhibit any safety function.
2. No machine modification or connection change, which affects the
safety system, has taken place.
3. The outputs of the SLG are correctly connected to the machine.
4. The total response time of the machine does not exceed the response time calculated during the first putting into operation.
5. The cables, the connectors, the caps and the mounting angles are in
perfect condition.
EN
15

Operating instructions
Safety light grid
5.5 Cleaning
If the optics cover of the sensors is extremely soiled, the OSSD outputs
can be disabled. Clean with a soft cloth without exercising pressure.
The use of agressive, abrasive or scratching cleaning agents, which
could attack the surface, is prohibited.
6. Diagnostic
6.1 LED status information
Receiver Function LED colour Description
Multifunction
Blanking
Signal reception
Protection field
Restart
OSSD OFF
OSSD ON
Transmitter Function LED colour Description
Transmitting Status
Multifunction green Function display, beam coding
Blanking blue Protection field(s) inactive (blanking)
Signal reception orange Evaluation of the signal reception
Restart yellow Input for command device
OSSD OFF red Safety outputs signal condition OFF
OSSD ON green Safety outputs signal condition ON
Transmitting orange Transmitter active
Status green Function display, beam coding
SLG 425I
Protection field
Receiver
LED Status LED Description
OSSD ON ON Protection field clear
Flashing Diagnostic mode active
OSSD OFF ON Protection field interrupted, system or configuration error
Flashing Diagnostic mode active, error output refer to Fault diagnostic table
Restart ON Start or restart interlock (manual reset) active, signal expected at output WA
Signal reception ON/flashing Signal reception too low, check alignment and installation height between
transmitter and receiver
Cleaning the black profile cover
OFF Alignment between transmitter and receiver OK
Blanking 1 flashes Fixed blanking of the protection field(s)
Multifunction 1 flashes Muting (complete protection field)
2 flashes Muting (only teached protection field)
3 flashes Muting through BUS control
4 flashes reserved
5 flashes Beam coding A is active
Transmitter
LED Status LED Description
Transmitting ON Standard operation, transmitter active
Flashing Configuration error
Status Flashing Beam coding A is active
16
EN

Operating instructions
Safety light grid
6.2 Fault diagnostic
The light grid performs an internal self-test after the operating voltage is switched on and the protection field is enabled. When a fault is detected, a
corresponding flashing pattern is emitted at the receiver through the LED OSSD OFF (red). Every fault emission is followed by a one-second pause.
LED OSSD OFF Fault feature Action
OSSD OFF and LED restart
continuous flashing
1 flashes Error at sensor receiver Replace receiver
2 flashes Error contactor control OFF Check connections at contactor control input, refer to
3 flashes Error contactor control ON Check wiring at contactor control input, short-circuit at +UB and
4 flashes Errors at the OSSD outputs Check the wiring of the outputs, OSSD for short-circuit at +UB and
5 flashes Error configuration data Check the configuration settings by means of the NSR-0801 BUS
6 flashes Error blanking The receiver has detected blanked beams as beams without inter-
Wiring error for function selection
(Restart interlock (manual reset), automatic
mode)
Check connection at the receiver, bridge 1 or
bridge 2 must be wired (refer to Wiring)
Wiring, check wiring of the auxiliary contacts
mass. Power reset after fault rectification.
mass
converter
ruption, i.e. locking. Check the configuration settings by means of the
NSR-0801 BUS converter, repeat the teach process with blanking.
SLG 425I
6.3 Extended diagnostic
By means of the optional configuration software and the NSR-0801
BUS converter, an extended diagnostic can be executed. The software
provides the status information of the component and can represent the
individual light lines. This feature enables an optimal adjustment of the
light grid. The diagnostic mode is signalled by the OSSD ON and OSSD
OFF LED‘s at the receiver. In diagnostic mode, protective mode is
disabled, the ODDS outputs being locked. The change from diagnostic
mode to protective mode is automatically realised after Power Reset,
when the BUS converter is no longer integrated and the connecting
cable of the sensor is reconnected.
7. Disassembly and disposal
7.1 Disassembly
The safety switchgear must be disassembled in a de-energised condition only.
7.2 Disposal
The safety switchgear must be disposed of in an appropriate manner in
accordance with the national prescriptions and legislations.
8. Appendix
8.1 Contact
Consultancy / Sales:
K.A. Schmersal GmbH
Industrielle Sicherheitsschaltsysteme
Möddinghofe 30
D-42279 Wuppertal
Tel:+49 (0) 202 64 74 -0
Fax:+49 (0) 202 64 74- 100
You will also find detailed information regarding our product variety on
our website: www. schmersal.com
Repair handling / shipping:
Safety Control GmbH
Am Industriepark 11
D-84453 Mühldorf / Inn
Tel.: +49 (0) 8631-18796-0
Fax: +49 (0) 8631-18796-1
EN
17

Operating instructions
Safety light grid
Appendix
8.2 EC Declaration of conformity
EC Declaration of conformity
SLG 425I
Translation
of the original declaration of conformity
We hereby certify that the hereafter described safety components both in its basic design and construction conform to the applicable European Directives.
Name of the safety component / type:
Description of the safety component: Safety light grid
Harmonised EC-Directives: 2006/42/EC - EC-Machinery Directive
Applied standards: EN 61496-1:2004 + A1 2008
Person authorized for the compilation
of the technical documentation:
Notied body for the prototype test: TÜV Nord Cert GmbH
EC- test certicate: n° 44 205 10 555867 005
Safety Control GmbH
Am Industriepark 33
84453 Mühldorf / Inn
Germany
Internet: www.schmersal.com
SLG 425I
2004/108/EC - EMC-Directive
CLC/TS 61496-2:2006
EN ISO 13849-1:2008; PL e
EN 62061:2005; SIL 3
Ulrich Loss
Möddinghofe 30
42279 Wuppertal
Langemarckstr.20
45141 Essen
ID n°: 0044
Place and date of issue: Mühldorf, February 1, 2010
Authorised signature
Christian Spranger
Managing Director
SLG 425I-B-EN
The currently valid declaration of conformity can be downloaded from the internet at www.schmersal.net.
Safety Control GmbH
Am Industriepark 33
D-84453 Mühldorf / Inn
Telefon +49 - (0)86 31 - 187 - 9 60
Telefax +49 - (0)86 31 - 187 - 9 61
E-Mail: info@safetycontrol.com
Authorised signature
Klaus Schuster
Managing Director
18
EN
 Loading...