


ACOUSTIC AMPLIFICATION
JAM 400
SWISS MADE
schertler.com
400W BIAMPLIFIED AMP
MANUALE DI ISTRUZIONI
USER MANUAL
INSTRUCION MANUAL
MANUEL D’INSTRUCTIONS

IMPORTANT SAFETY INSTRUCTIONS
JAM 400
IL SIMBOLO CON UN FULMINE FRECCIA IN UN
TRIANGOLO EQUILATERO AVVERTE
L’UTILIZZATORE DELLA PRESENZA DI UNA
PERICOLOSA ALTA TENSIONE, SENZA ISOLAMENTO ELETTRICO. ALL’INTERNO
DELL’APPARECCHIO LA TENSIONE PUO’ ESSERE
SUFFICIENTEMENTE ALTA DA PROVOCARE
RISCHI DI SHOCK.
IL SIMBOLO CON UN PUNTO ESCLAMATIVO IN
UN TRIANGOLO EQUILATERO AVVERTE
L’UTILIZZATORE DELLA PRESENZA DI IMPORTANTI ISTRUZIONI PER L’USO E LA MANUTENZIONE DELL’APPARECCHIO.
ATTENZIONE
PER RIDURRE IL RISCHIO DI INCENDIO O SHOCK ELETTRICO NON
ESPORRE L’APPARECCHIO ALLA
PIOGGIA O ALL’UMIDITA’
Leggere le presenti istruzioni
Conservare le presenti istruzioni
Rispettare tutte le avvertenze
Seguire tutte le istruzioni
Non usare l’apparecchio vicino all’acqua
Pulire l’apparecchio solo con un panno asciutto
Non ostruire nessuna apertura di ventilazione,
installare in accordo con le istruzioni del produttore
THE LIGHTNING FLASH WITH ARROWHEAD
SYMBOL, WITHIN AN EQUILATERAL TRIANGLE,
IS INTENDED TO ALERT THE USER TO THE
PRESENCE OF UNINSULATED “DANGEROUS
VOLTAGE” WITHIN THE PRODUCT’S ENCLOSURE
THAT MAY BE OF A SUFFICIENT MAGNITUDE TO
CONSTITUTE A RISK OF ELECTRIC SHOCK TO
PERSONS.
THE EXCLAMATION MARK WITHIN AN EQUILATERAL TRIANGLE, IS INTENDED TO ALERT THE USER
TO THE PRESENCE OF IMPORTANT OPERATING
AND MAINTENANCE INSTRUICTONS IN THE
LITERATURE ACCOMPANYING THE APPLIANCE.
WARNING
TO REDUCE THE RISK OF FIRE OR
ELECTRICAL SHOCK DO NOT
EXPOSE THE APPLIANCE TO RAIN
OR HUMIDITY
Read these instructions
Keep these instructions
Observe all precautions
Follow the instructions
Do not use the appliance close to water
Clean the appliance using a dry cloth only
Avoid obstructing the ventilation vents. Install
following the manufacturer’s instructions
Non installare l’apparecchio vicino a sorgenti di
calore come radiatori, stufe o altri apparati (inclusi
Non disattivare la protezione di sicurezza di una
spina fornita di terra. Una spina fornita di terra ha 2
contatti più un terzo contatto per la terra. Questo
terzo contatto è presente per la vostra sicurezza. Se la
spina fornita con l’apparecchio non si adatta alla
vostra presa di corrente, chiamare un elettricista per
la sostituzione della presa di corrente obsoleta
Fare in modo che sia impossibile camminare sul cavo
di alimentazione, evitare che il cavo venga forzato
particolarmente all’altezza della spina, della vaschetta di rete e del punto in cui esso esce dall’apparecchio
produttore
Usare solo col carrello, asta, treppiedi, sostegno o
all’apparecchio. Se si usa un carrello, usare cautela nel
muovere l’insieme carrello-apparecchio, per evitare
danni alla persona causati dal blocco di una ruota e
conseguente rovesciamento del carrello e caduta
dell’apparecchio
Do not install close to heat sources such as radiators,
heat registers, stoves or other heat-producing
This apparatus must be grounded. If it should
malfunction or break down, grounding provides a
path of least resistance for electrical current,
reducing the risk of electric shock. This product is
equipped with a cable having an equipment
grounded conductor and a grounding plug. The plug
must be connected to an appropriate outlet that is
properly installed and grounded in accordance with
all local codes and ordinances
Protect the power cable from being walked on or
pinched particularly at plugs, convenience receptacles, and the point where they exit from the apparatus
Use only devices and accessories recommended by
the manufacturer
Use only with the trolley, stand, tripod, bracket or
apparatus. When a trolley is used, use caution when
moving the trolley/apparatus combination to avoid
injury from tip-over
WWW.SCHERTLER.COM
Scollegare l’apparecchio dalla rete elettrica durante
temporali o in caso di un lungo periodo di inattività
Far riferimento al servizio di assistenza tecnica.
Richiedere l’intervento quando l’apparecchio risulta
danneggiato e, in ogni caso, quando il cavo di
alimentazione o la presa sono danneggiati, o quando
del liquido è penetrato nell’apparecchio, o
l’apparecchio è stato esposto a pioggia o umidità
eccessiva, quando non funziona normalmente o è
caduto
Unplug this apparatus during lightning storms or
when unused for long periods of time
Servicing is required when the apparatus has been
damaged in any way, such as power-supply cable or
plug damaged, liquid has been spilled or objects
have fallen into the apparatus, the apparatus has
been exposed to rain or moisture, does not operates
normally or has been dropped

IMPORTANT SAFETY INSTRUCTIONS
DAS SYMBOL MIT EINEM PFEILBLITZ IN
EINEM GLEICHSEITIGEN DREIECK WARNT
DEN BENUTZER VOR GEFÄHRLICHER HOCHSPANNUNG OHNE ELEKTRISCHE ISOLIERUNG. IM INNERN DES GERÄTS KANN DIE
SPANNUNG HOCH GENUG SEIN, UM EINEN
STROMSCHLAG ZU VERURSACHEN.
DAS SYMBOL MIT EINEM AUSRUFEZEICHEN IN
EINEM GLEICHSEITIGEN DREIECK WEIST DEN
BENUTZER AUF WICHTIGE ANWEISUNGEN ZUR
BENUTZUNG UND WARTUNG DES GERÄTS HIN.
ACHTUNG
UM DIE GEFAHR EINES BRANDS ODER
EINES STROMSCHLAGS ZU VERMINDERN, DAS GERÄT NICHT REGEN ODER
FEUCHTIGKEIT USSETZEN
Die vorliegenden Anweisungen lesen
Die vorliegenden Anweisungen aufbewahren
Alle Hinweise beachten
Alle Anweisungen befolgen
Das Gerät nicht in Wassernähe benutzen
Das Gerät nur mit einem trockenen Tuch reinigen
den Anleitungen des Herstellers installieren
LE SYMBOLE COMPORTANT UN ECLAIR
INSERE DANS UN TRIANGLE EQUILATERAL
AVERTIT L'UTILISATEUR DE LA PRESENCE
D'UNE HAUTE TENSION DANGEREUSE, SANS
ISOLATION ELECTRIQUE. A L'INTERIEUR DE
L'APPAREIL LA TENSION PEUT ETRE SUFFISAMMENT ELEVEE POUR PROVOQUER DES
RISQUES DE CHOC.
LE SYMBOLE AVEC UN POINT EXCLAMATIF DANS
UN TRIANGLE EQUILATERAL AVERTIT L'UTILISATEUR DE LA PRESENCE D'IMPORTANTES
INSTRUCTIONS POUR L'UTILISATION ET LA
MAINTENANCE DE L'APPAREIL.
ATTENTION
POUR REDUIRE LE RISQUE D'INCENDIE
OU DE CHOC ELECTRIQUE NE PAS
EXPOSER L'APPAREIL A LA PLUIE OU A
L'HUMIDITE
Lire les instructions suivantes
Conserver les instructions présentes
Respecter tous les avertissements
Suivre toutes les instructions
Ne pas utiliser l'appareil près de l'eau
Nettoyer l'appareil exclusivement avec un linge sec
Ne pas obstruer l'ouverture de la ventilation, installer
en respectant les instructions du fabricant
JAM 400
Das Gerät nicht in der Nähe von Wärmequellen wie
Heizkörpern, Öfen oder anderen Geräten
(einschließlich Verstärker), die Wärme erzeugen,
installieren
Den Sicherheitsschutz eines Steckers mit Schutzkontakt nicht deaktivieren. Ein Stecker mit Schutzkontakt
besitzt zwei Kontakte plus einen dritten Kontakt für
die Erdung. Dieser dritte Kontakt dient Ihrer
Sicherheit. Wenn der mit dem Gerät gelieferte
Stecker nicht in Ihre Stromsteckdose passt, rufen Sie
bitte einen Elektriker, um die veraltete Steckdose
auszuwechseln
So vorgehen, dass nicht auf dem Speisekabel gegangen werden kann. Vermeiden, dass das Kabel
besonders in Höhe des Steckers, des Steckdosengehäuses und an der Stelle, an der es aus dem Gerät
tritt, geklemmt wird
Nur vom Hersteller angegebene Vorrichtungen und
Zubehörteile verwenden
Nur mit vom Hersteller angegebenem oder mit dem
Gerät verkauftem Wagen, Stange, Stativ, Ständer
oder Tisch benutzen. Wenn ein Wagen benutzt
wird, ist bei der Bewegung des Ganzen,Wagen und
Gerät, vorsichtig vorzugehen, um Schäden an
Personen zu vermeiden, die durch Blockierung eines
Rads und daraus entstehendes Umkippen des
Wagens und Fallen des Geräts verursacht werden
können
Ne pas installer l'appareil près des sources de chaleur
comme radiateurs, poêles ou autres appareils (y
Ne pas déconnecter la protection de sécurité d'une
deux contacts plus un troisième contact pour la terre.
Ce troisième contact est présent pour votre sécurité.
votre prise de courant, appeler un électricien pour
substituer la prise de courant obsolète
Prédisposer de manière qu'il soit impossible de
marcher sur le câble d'alimentation, éviter que le
câble soit lofé particulièrement à la hauteur de la
sort de l'appareil
Utiliser exclusivement des dispositifs et accessoires
Utiliser seulement avec le chariot, la tige, le trépied,
avec l'appareil. Si on utilise un chariot, avoir soin de
déplacer l'ensemble chariot-appareil, pour éviter des
dommages à la personne causés par le blocage d'une
roue et le renversement du chariot entraînant la
chute de l'appareil
Das Gerät bei Gewitter oder wenn es lange Zeit nicht
benutzt wird, vom Stromnetz trennen
Wenden Sie sich bei Problemen immer an den techni-
wenn das Gerät beschädigt ist, und auf jeden Fall,
wenn das Speisekabel oder die Steckdose Schäden
aufweisen, wenn Flüssigkeit in das Gerät eingedrungen ist oder das Gerät Regen oder übermäßiger
Feuchtigkeit ausgesetzt wurde, wenn es nicht normal
funktioniert oder heruntergefallen ist
Débrancher l'appareil du réseau électrique pendant
les orages ou en cas de période prolongée d'inactivité
Se référer au Service d'Assistance technique. Solliciter
l'intervention si l'appareil résulte endommagé et, de
sont endommagés, si du liquide a pénétré à
l'intérieur de l'appareil, si l'appareil a été exposé à la
pluie ou à l'humidité excessive, lorsqu'il ne fonctionne pas normalement ou qu'il est tombé
WWW.SCHERTLER.COM

DESCRIZIONE
Il JAM 400 è il risultato del desiderio della Schertler di dare ai musicisti il sistema di amplificazione
più compatto, flessibile e potente oggi sul mercato. Eroga 400 Watt RMS grazie ad un amplificatore digitale
Bang&Olufsen. Il mixer è aggiornato di caratteristiche specifiche che ne migliorano le prestazioni: il filtro
anti larsen regolabile, il selettore per la Phantom, un’uscita per il subwoofer. Il timbro tipico dei combo Schertler
è immediatamente riconoscibile e la resa acustica rimane presente, calda e pulita sia al minimo che al massimo del volume. Con questo amplificatore Schertler dà un ulteriore prova delle sue capacità di catturare il suono in amplificatori compatti, eleganti ed efficaci.
DESCRIPTION
The JAM 400 is the result of Schertler's desire to provide the musician with the most compact, flexible and powerful amplification system on the market today. This highly portable cabinet provides enough facilities for the
most demanding of performers and includes advanced features such as switchable subwoofer output, variable anti-feedback control, phantom power and multiple digital effects. A range of XLR, Jack and Phono
inputs provides complete versatility and the potential for solo artists, duo's and ensembles to perform with
a single lightweight amplifier. A full 400 watts of Class D switching output (ICEpower® by Bang &
Olufsen ICEpower) is provided and the incredible dynamics and detailed image that have made the Jam 150
so sought after are further enhanced in this model. With the integrated switchable crossover it is also possible to add an active subwoofer to create a full 3 way active system capable of providing huge reserves of
power for any musical situation.
BESCHREIBUNG
Die JAM 400 ist das Resultat von Schertler Wunsch, heute den Musiker mit dem kompaktesten, flexiblen und
starke Klangsystem auf dem Markt zu versorgen. Er liefert 400 Watt dank eines Class D switching
(ICEpower® by Bang & Olufsen ICEpower) Verstärkers. Das Mischpult wurde mit besonderen Eigenschaften
bereichert, die seine Leistungen verbessern: ein regulierbarer Anti-Larsen-Filter, ein Wähler für Phantom,
ein Ausgang für den Subwoofer. Ein Sortiment von XLR, Jack und Phono gibt ein, versorgt Solokünstler mit
vollständiger Vielseitigkeit und dem Potential, Duos und Ensembles, um mit einem einzelnen leichten
Combo aufzutreten. Mit diesem Verstärker liefert Schertler einen weiteren Beweis für seine Fähigkeit,
den Klang in kompakten, eleganten und leistungsfähigen Verstärkern einzufangen.
DESCRIPTION
JAM 400 est le résultat de l'effort de Schertler pour fournir au musicien système de sonorisation le plus compact,
flexible et puissant du marché. Il dispense 400 Watt RMS grâce à un amplificateur numérique Class D
switching (ICEpower® by Bang & Olufsen ICEpower). Le mixer a été mis à jour avec des caractéristiques
spécifiques qui améliorent ses prestations: un filtre larsen réglable, un sélecteur pour la Phantom, une
sortie pour le subwoofer. Une série d'entrées XLR, Jack et RCA fournit complet éclectisme à solistes, duo et
petits orchestres qu'ils désirent jouer avec un seul, léger, amplificateur . Avec cet amplificateur Schertler
donne une ultérieure preuve de ses capacités de capturer le son dans des amplificateurs compacts,
élégants et efficaces.

TECHNICAL SPECIFICATIONS
Frequency response 40Hz-20kHz
Sensitivity (1W-1m) 97dB
SPL max 123dB
Woofer 2x8”
Horn 1”
Crossover Electronic
24dB/octave
Box Bass reflex
Construction Plywood
System – Format 2-way
Bi-amp
Max Power out 400W RMS
Weight 21kg
Dimensions 37x43x49cm
Connections Mic In 1: XLR / Jack, Mic In 2: XLR / Jack, Mic In 3: XLR / Jack Line In 4/5: Jack,
Line in 6/7: Jack, Line In 8/9: RCA
Line Out: XLR, Rec Out L/R: RCA, SW Out: Jack, AUX Out: Jack, AUX Ret L/R: Jack
Controls Ch 1/2/3/4/5: Gain, High, Mid, Low, Eff, Volume
Ch 6/7: Gain, High, Mid, Low, Eff, Volume, Acoustic Filter, Freq., dB
Ch 5/6: High, Low, Volume
Rec Out Vol, Eff Rtn, Aux Rtn, Master
Phantom Power, SW Out, Effect Select
Effect 1 Delay, 7 Reverbs (by Alesis)
Send & Return External Effect
REAR
A
C
A. GND/LIFT: interruttore della messa a terra del
circuito elettrico. Invertire la posizione in caso di ronzii
generati dalla rete elettrica
B
A. GND/LIFT: Erdungsschalter des Elektrokreislaufs
Bei Geräuschen aus dem Stromnetz die Position
umkehren
B. OFF/ON: interruttore generale
C. POWER IN: presa per il cavo di alimentazione (in
dotazione) da collegare alla rete elettrica
A. GND/LIFT: ground lift switch to disable the ground
connection. Invert the position in the event of hums
generated by the electrical network
B. OFF/ON: main switch
C. POWER IN: socket for power supply cable
(provided), for connection to the electrical network
B. OFF/ON: Hauptschalter
C. POWER IN: Stecker für das (mitgelieferte) Netzka-
bel, das an den Strom angeschlossen wird
A. GND/LIFT: interrupteur de mise à la terre du circuit
électrique. Inverser la position en cas de bruits parasites causés par le réseau
B. OFF/ON: interrupteur général
C. POWER IN: prise pour le câble d'alimentation
(fourni) à raccorder à une prise électrique

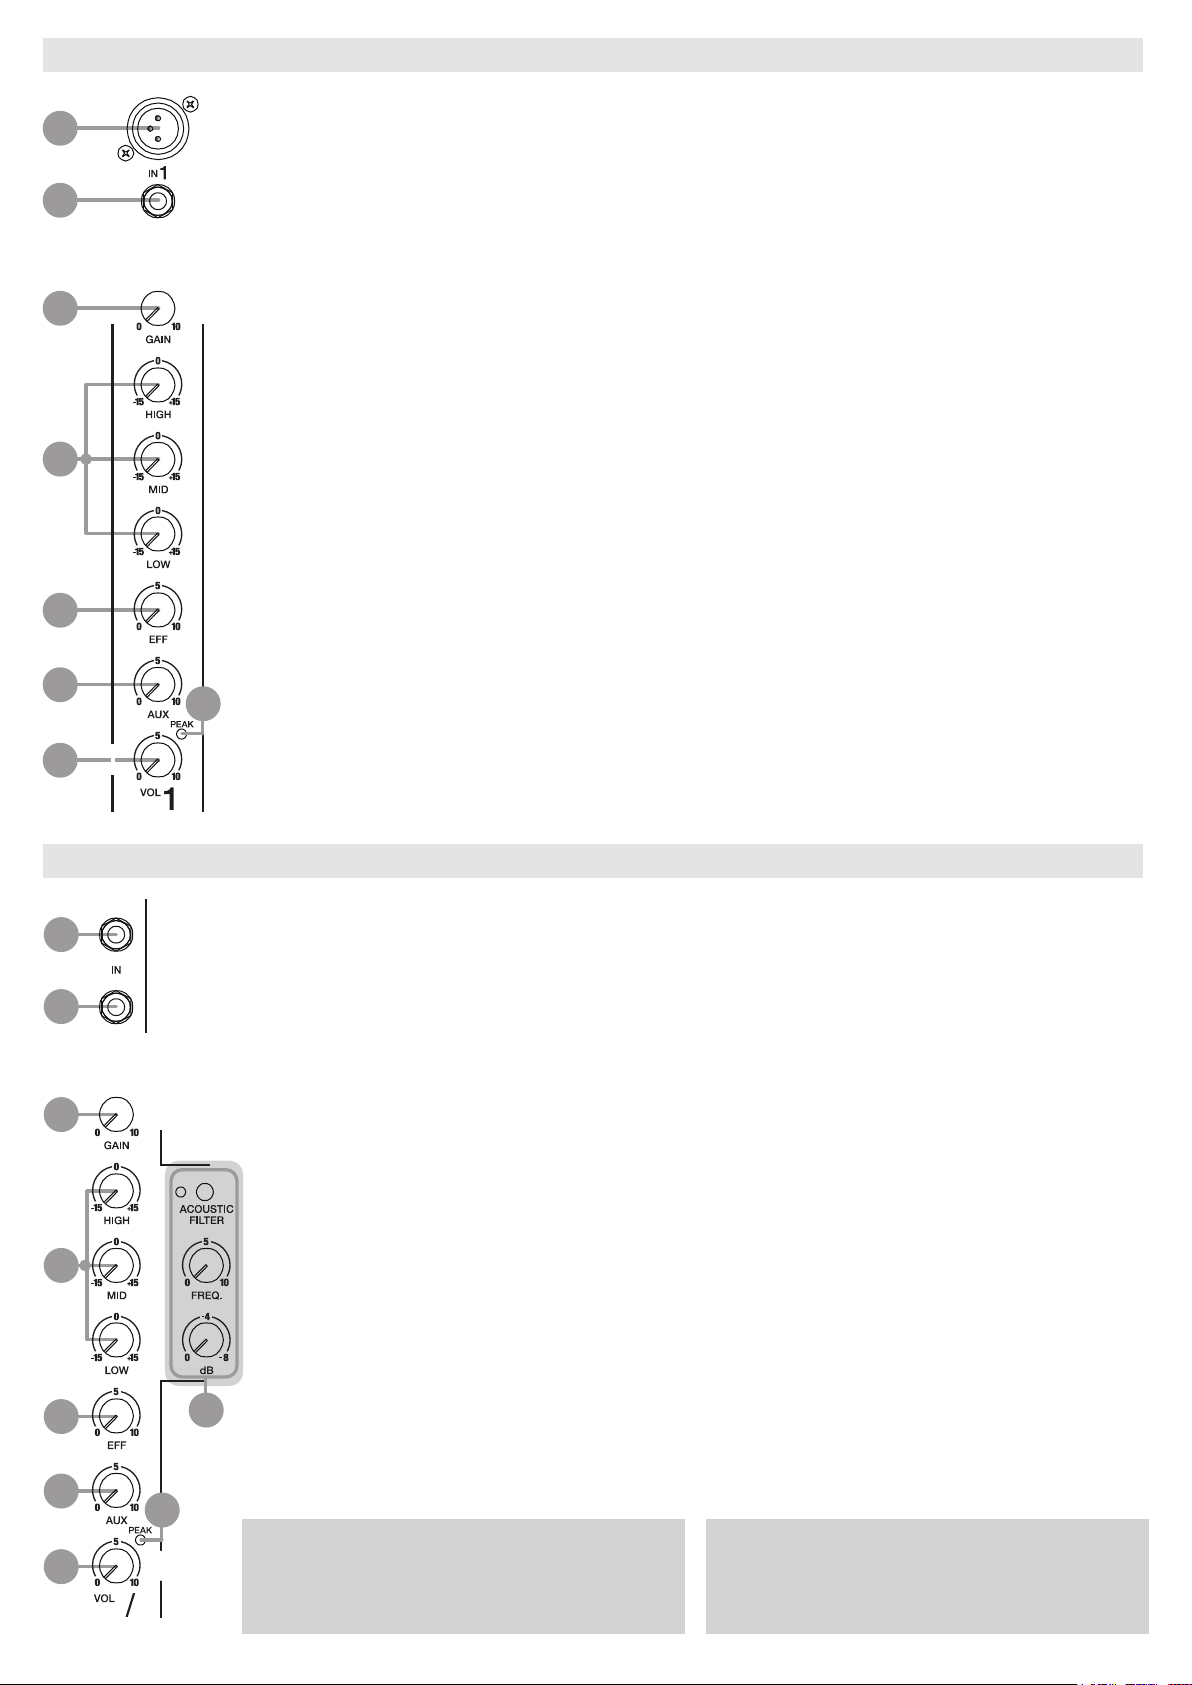
CH 1 / CH 2 / CH 3
1
2
3
4
5
6
1. MIC IN: ingresso XLR bilanciato elettroni-
camente con impedenza di 1kΩ per il collegamento di microfoni o strumenti piezo amplificati (a bassa impedenza)
2. LINE IN: ingresso microfonico sbilanciato
JACK per collegamento di microfoni o strumenti piezo amplificati (ad alta impedenza), utilizzabile unitamente all’ingresso MIC IN XLR (1)
3. GAIN: controllo di guadagno degli ingressi.
Per una giusta regolazione, aumentare
gradualmente il Gain finchè il led PEAK (7) si
accende, quindi tornare leggermente indietro
fino a quando non è di nuovo spento
4. HIGH, MID, LOW: controllo delle frequenze alte, medie e basse. Con il potenziometro al
centro, il controllo di tono non agisce. Ruotandolo, si può ottenere un’esaltazione o attenuazione massima di 15dB
5. EFF: controllo del livello di effetto per il
singolo canale. Questo controllo è dipendente
da EFF RTN (29)
6. AUX: controllo del livello di segnale da
mandare all’uscita AUX OUT (21). Questo
7
controllo agisce prima del VOL (8) dei canali
1. MIC IN: electronically balanced XLR input
with 1kΩ impedance for connecting microphones or instruments with piezo pickups or other
low impedance/low level signals
2. LINE IN: unbalanced microphonic JACK
input for connecting microphones or instruments with high output signal, can be used
with the MIC IN XLR input (1)
3. GAIN: input gain control. To correctly
adjust the Gain, gradually increase until the
PEAK led (7) turns on, then turn it back slightly
until the light goes off again
4. HIGH, MID, LOW: chigh, mid and low
frequency control. When the potentiometer
knob is set to its centre position, tone control
has no effect. Turning the knob allows for
boosting/cutting the signal by up to 15 dB
5. EFF: effect level control for the single channel. This control is dependent upon the EFF
RTN (29) control
6. AUX: control to set the level of the signal
going to the AUX OUT (21). It works as a preVOL (8) control
8
9
10
11
12
7. PEAK: led indicatore di segnale distorto
5. VOL: volume del canale
CH 4/5 / CH 6/7
9. 10. LINE IN: ingressi di linea ad alta sensibilità
ed alta impedenza, possono essere utilizzati anche
per microfoni sbilanciati. La sensibilità di questi
ingressi resta costante anche se utilizzati insieme
11. GAIN: controllo di guadagno degli ingressi. Per una giusta regolazione, aumentare
gradualmente il Gain finchè il led PEAK (7) si
accende, quindi tornare leggermente indietro
fino a quando non è di nuovo spento
12. HIGH, MID, LOW: controllo delle
frequenze alte, medie e basse. Con il potenziometro al centro, il controllo di tono non agisce.
Ruotandolo, si può ottenere un’esaltazione o
attenuazione massima di 15dB
13. EFF: controllo del livello di effetto per il
singolo canale. Questo controllo è dipendente
da EFF RTN (29)
7. PEAK: signal distortion led indicator
5. VOL: volume of the channel
9. 10. LINE IN: high sensitivity, high impedance,
unbalanced inputs for instruments or microphones.
They can be used together
11. GAIN: input gain control. To correctly
adjust the Gain, gradually increase until the
PEAK led (7) turns on, then turn it back slightly
until the light goes off again
12. HIGH, MID, LOW: chigh, mid and low
frequency control. When the potentiometer
knob is set to its centre position, tone control
has no effect. Turning the knob allows for
boosting/cutting the signal by up to 15 dB
13. EFF: effect level control for the single
channel. This control is dependent upon the
EFF RTN (29) control
13
14
16
15
14. AUX: controllo del livello di segnale da
mandare all’uscita AUX OUT (21). Questo
controllo agisce prima del VOL (8) dei canali
17
15. PEAK: led indicatore di segnale distorto
16. VOL: volume del canale
33. ACOUSTIC FILTER (solo CH 6/7): filtro per
l’eliminazione di eventuali feedback. Il pulsante
permette di attivare la funzione (led acceso),
mentre è possibile selezionare la frequenza e la
soglia di intervento mediante i potenziometri
14. AUX: control to set the level of the signal
going to the AUX OUT (21). It works as a preVOL (8) control
15. PEAK: signal distortion led indicator
16. VOL: volume of the channel
33. ACOUSTIC FILTER (CH 6/7 only): filter for
eliminating any feedback. The button allows for
activating the function (LED on), while the intervention frequency and threshold can be selected
using the potentiometer knobs
CH 1 / CH 2 / CH 3
1
2
3
4
5
6
1. MIC IN: Ausgewogener Mikrofoneingang
mit einer Impedanz von 1kΩ für den Anschluss
von Mikrofonenoder oder Instrumente mit
Piezo Tonabnehmern
2. LINE IN: Unausgewogener Eingang mit
einer Impedanz von 10kΩ für den Anschluss
von Mikrofonen oder Instrumenten mit hohem
Ausgangssignal
3. GAIN: Einstellung des Verstärkungsfaktors
der Eingänge. Für eine korrekte Einstellung
muss das Gain nach und nach erhöht werden,
bis diePeak-LED (7) aufleuchtet. Dann etwas
zurückdrehen, bis sie nicht mehr aufleuchtet
4. HIGH, MID, LOW: Steuerung der hohen,
mittleren und niedrigen Frequenzen Steht der
Potenziometer in der Mitte, wirkt die Tonkontrolle nicht Dreht man diesen Schalter, erhält
man eine Verstärkung/Dämpfung bis maximal
15dB
5. EFF: Effektstärkesteuerung für die einzelnen Kanäle Diese Steuerung hängt vom EFF
RTN (29) ab
6. AUX: Der Knopf regelt das Signal, zum AUX
OUT (21) zu senden. Dieses Signal wird vor
7
der Lautstärkeregelung genommen
1. MIC IN: entrée micro balancée électroniquement avec impédance de 1 kΩ pour le
raccordement de micros ou tous autres transducteurs de basse impédance
2. LINE IN: entrée ligne asymétrique pour
connectique JACK. Est optimisée pour microphones ou tous autres transducteurs de haute
impédance
3. GAIN: Contrôle de gain des entrées. Pour
un bon réglage, augmenter progressivement le
Gain jusqu’à ce que la led Peak (7) s’allume,
revenirensuite légèrement en arrière jusqu’à
ce qu’elle s’éteigne à nouveau
4. HIGH, MID, LOW: contrôle des hautes,
moyennes et basses fréquences. La commande de tonalité n'agit pas lorsque le potentiomètre se trouve au centre. En le tournant,
l'on peut obtenir une augmentation ou atténuation max de 15 dB
5. EFF: contrôle du niveau d’effet pour la
piste. Cette commande dépend de la fonction
EFF RTN (29)
6. AUX: ajuste le niveau de signal à envoyer
aux AUX OUT (21). Ce contrôle fonctionne
avant le contrôle principal de chaque canal
8
9
10
11
12
7. PEAK: LED-Anzeige des verzerrten Signals
5. VOL: Lautstärkeregler für die Kanäle
CH 4/5 / CH 6/7
9. 10. LINE IN: hochempfindliche asymmetrische
änge, für instrumente mit hoher Impedanz
Eing
und Mikrophonen
11. GAIN: Einstellung des Verstärkungsfaktors der Eingänge. Für eine korrekte
Einstellung muss das Gain nach und nach
erhöht werden, bis diePeak-LED (7)
aufleuchtet. Dann etwas zurückdrehen, bis sie
nicht mehr aufleuchtet
12. HIGH, MID, LOW: Steuerung der hohen,
mittleren und niedrigen Frequenzen Steht der
Potenziometer in der Mitte, wirkt die Tonkontrolle nicht Dreht man diesen Schalter, erhält
man eine Verstärkung/Dämpfung bis maximal
15dB
13. EFF: Effektstärkesteuerung für die einzelnen Kanäle Diese Steuerung hängt vom EFF
RTN (29) ab
7. PEAK: led indicatrice de signal déformé
5. VOL: commande de volume pour la piste
9. 10. LINE IN: entrées line haute sensitivité,
asymétrique à haute impédance pour la connexion
à des instruments ou microphone
11. GAIN: Contrôle de gain des entrées. Pour
un bon réglage, augmenter progressivement le
Gain jusqu’à ce que la led Peak (7) s’allume,
revenirensuite légèrement en arrière jusqu’à
ce qu’elle s’éteigne à nouveau
12. HIGH, MID, LOW: contrôle des hautes,
moyennes et basses fréquences. La commande de tonalité n'agit pas lorsque le potentiomètre se trouve au centre. En le tournant,
l'on peut obtenir une augmentation ou atténuation max de 15 dB
13. EFF: contrôle du niveau d’effet pour la
piste. Cette commande dépend de la fonction
EFF RTN (29)
13
14
16
15
14. AUX: Der Knopf regelt das Signal, zum
AUX OUT (21) zu senden. Dieses Signal wird
vor der Lautstärkeregelung genommen
17
15. PEAK: LED-Anzeige des verzerrten Signals
16. VOL: Lautstärkeregler für die Kanäle
33. ACOUSTIC FILTER (CH 6/7 allein): Filter
für die Ausschaltung eventueller Feedbacks. Mit
der Taste wird die Funktion (LED ein) ausgewählt,
mit dem Potentiometer kann die Eingriffsfrequenz
und die Schwelle eingestellt werden
14. AUX: ajuste le niveau de signal à envoyer
aux AUX OUT (21). Ce contrôle fonctionne
avant le contrôle principal de chaque canal
15. PEAK: led indicatrice de signal déformé
16. VOL: commande de volume pour la piste
33. ACOUSTIC FILTER (CH 6/7 seulement):
filtre permettant l’élimination des éventuelles
réactions. Ce bouton permet d’activer la fonction
(LED allumé), tandis que les potentiomètres
permet de sélectionner la fréquence et la seuil

17
CH 8/9
18
19
17. LINE IN 5/6: ingressi di linea sbilanciati
con connettori RCA ed impedenza di 10kΩ per
il collegamento di apparecchi ad alto segnale di
uscita come iPod, computer, tastiere
18. HIGH, LOW: controllo delle frequenze
alte e basse. Con il potenziometro al centro, il
controllo di tono non agisce. Ruotandolo, si
può ottenere un’esaltazione/attenuazione
massima di 15dB
19. VOL: volume del canale
MASTER
20. SW OUT: uscita per il collegamento di un
subwoofer esterno, fornisce solo le frequenze
inferiori a 120Hz
17. LINE IN 5/6: unbalanced line inputs with
RCA connectors and 10kΩ impedance for
connecting devices with high output signal
such as iPods, computers or keyboards
18. HIGH, LOW: high and low frequency
control. When the potentiometer knob is set to
its centre position, tone control has no effect.
Turning the knob allows for boosting/cutting
the signal by up to 15 dB
19. VOL: volume of the channel
20. SW OUT: output for connection to an
external subwoofer, only frequencies under
120Hz come out from here
20 21 22
23
24
28
29
30
21. AUX OUT: uscita per il collegamento di un
effetto esterno o di un monitor
22. LINE OUT: uscita generale bilanciata
elettronicamente con connettore XLR per il
collegamento ad impianti esterni. Il volume di
uscita non è dipendente dal MASTER (31)
25
23. REC OUT L/R: uscite per il collegamento
ad apparecchi esterni quali registratori. Il
volume di uscita è controllabile attraverso il
potenziometro REC OUT VOL (24) ed indipen-
26
dente dal MASTER (31)
24. REC OUT VOL: controllo del volume per le
uscite REC OUT L/R (23). Questo controllo è
27
indipendente dal MASTER (31)
25. AUX RET L/R: ingressi per il ritorno di un
effetto esterno, utilizzabili anche come ingressi
ausiliari
26. SW OUT: pulsante per l’esclusione delle
frequenze inferiori a 120Hz dal JAM, da utilizzare
quando viene collegato un subwoofer esterno
all’uscita SW OUT (20)
27. PHANTOM: lo switch permette di attivare
e disattivare la phantom power per
l’alimentazioni di microfoni a condensatore.
Quando la phantom è attivata, il led è acceso
21. AUX OUT: output for connection to an
external effect or to a monitor
22. LINE OUT: electronically balanced general output with XLR connector for connection to
external devices. the output volume is not
dependent upon the MASTER (31) control
23. REC OUT L/R: outputs with RCA connectors for connecting external devices such as
recorders. The output volume can be adjusted
through the REC OUT VOL (17) pot and is independent from the MASTER (20) control
24. REC OUT VOL: volume control for REC
OUT L/R (23) outputs. This control is independent from the MASTER (31) control
25. AUX RET L/R: inputs for the return of an
external effect, they can be used as auxiliary
inputs too
26. SW OUT: switch to exclude frequencies
under 120Hz from the JAM, to be used when
an external subwoofer is connected to the SW
OUT (20)
27. PHANTOM: the switch allows for activating
and deactivating the phantom power for powering condenser microphones. When the phantom power is activated, the LED is turned on
31
28. EFFECT SELECT: il pulsante permette di
selezionare uno dei quattro effetti interni
(indicati dai rispettivi led)
29. EFF RTN: controllo generale del livello
dell’effetto
30. AUX RTN: volume AUX RET L/R (25)
31. MASTER: volume generale
28. EFFECT SELECT: this button allows for
selecting one of the four internal effects
(indicated by their respective LEDs)
29. EFF RTN: overall effect level control
30. AUX RTN: AUX RET L/R (25) volume
31. MASTER: general volume

17
CH 8/9
18
19
17. LINE IN 5/6: Unausgewogene Leitung-
seingänge mit RCA-Anschlüssen und einer
Impedanz von 10kΩ für den Anschluss von
Geräten mit hohen Ausgangssignalen wie iPod,
Computer, Tastaturen
18. HIGH, LOW: Steuerung der hohen und
niedrigen Frequenzen Steht der Potenziometer
in der Mitte, wirkt die Tonkontrolle nicht Dreht
man diesen Schalter, erhält man eine
Verstärkung/Dämpfung bis maximal 15dB
19. VOL: Lautstärkeregler für die Kanäle
MASTER
20. SW OUT: Steker Ausgangs für externe
Subwoofer. Dieses Ausgang sendet nur
Niedrigfrequenzen unter 120Hz
17. LINE IN 5/6: entrées de ligne balancées
avec prises RCA et impédance de 10 kΩ pour le
raccordement des appareils offrant un niveau
de sortie élevée (iPod, ordinateur, clavier)
18. HIGH, LOW: contrôle des hautes et
basses fréquences. La commande de tonalité
n'agit pas lorsque le potentiomètre se trouve
au centre. En le tournant, l'on peut obtenir une
augmentation/atténuation maximale de 15dB
5. VOL: commande de volume pour la piste
20. SW OUT: cette sortie produit uniquement
des fréquences basses en dessous de 120Hz
pour un subwoofer externe
20 21 22
23
24
28
29
30
21. AUX OUT: Steker Ausgangs für externe
Effektgeräte oder Monitor
22. LINE OUT: Allgemeiner elektronisch
ausgewogener Ausgang mit XLR-Anschluss für
den Anschluss an externe Anlagen. Die
Ausgangslautstärke ist nicht vom MASTER (31)
25
23. REC OUT L/R: Ausgänge mit RCA-
Anschlüssen für den Anschluss an externe Geräte
wie Aufnahmegeräte. Die Ausgangslautstärke
kann über den Potenziometer REC OUT (24) und
26
unabhängig vom MASTER (31) eingestellt werden
24. REC OUT VOL: Steuerung der Lautstärke
für die Ausgänge REC OUT L/R (23). Diese
27
Steuerung ist unabhängig vom MASTER (31)
25. AUX RET L/R: Eingangs für externe
Effektgeräte oder andere Geräte benutzt
werden
26. SW OUT: um bei Verbindung zu einem externen Subwoofer benutzt zu werden, durch das
Drücken von Ihnen diesem Knopf verhindern Sie
JAM 400 unter 120Hz von spielenden Häufigkeiten
27. PHANTOM: Mit dem Switch kann die
Phantomspeisung für Kondensatormikrofone
ein-und ausgeschaltet werden. Wenn die Phantomspeisung eingeschaltet ist, leuchtet die LED
21. AUX OUT: sortie pour connexion à un
moniteur ou périphérique effets esternes
22. LINE OUT: sortie générale balancée élec-
troniquement avec prise XLR pour le raccorde-
ment aux installations externes. Le volume de
sortie ne dépend pas du MASTER (31)
23. REC OUT L/R: sorties avec prises RCA
pour le raccordement aux appareils externes
tels que les enregistreurs. Le volume de sortie
peut être contrôlé à l’aide du potentiomètre REC
OUT (24) et est indépendant du MASTER (31)
24. REC OUT VOL: contrôle du volume pour
les sorties REC OUT L/R (23). Cette commande
dépend du MASTER (31)
25. AUX RET L/R: entrées pour retour
d’effects esternes ou entrées auxiliaires pour
autres sources signal
26. SW OUT: a utiliser en cas de connexion à
un subwoofer (cf SW OUT). Ce bouton empéchez le JAM de jouer les frèquencies
au-dessous de 120Hz
27. PHANTOM: le commutateur permet
d’activer et de désactiver l’alimentation fantôme des micros à condensateur. Le témoin
s’allume lorsque l’alimentation fantôme est active
31
28. EFFECT SELECT: Mit dieser Taste kann
einer der vier internen Effekte ausgewählt
werden (mit der jeweiligen LED gekennzeichnet)
29. EFF RTN: Allgemeine Steuerung der
Effektstärke
30. AUX RTN: Allgemeine AUX RET L/R (25)
31. MASTER: Allgemeine Lautstärke
28. EFFECT SELECT: ce bouton permet de
sélectionner l’un des quatre effets internes
(indiqués par les LED correspondants)
29. EFF RTN: contrôle général du niveau
d’effet
30. AUX RTN: volume AUX RET L/R (25)
31. MASTER: volume général

WARNINGS
JAM 400
AVVERTENZE
ATTENZIONE
Conservare questo manuale per usi futuri
Prestare attenzione a non versare liquidi
nell’apparecchio e non utilizzare in condizioni di
eccessiva umidità
Non installare l’apparecchio vicino a forti sorgenti di
calore e alle radiazioni dirette del sole e in ambienti
polverosi
Assicurarsi che la tensione di rete non superi i valori
indicati nella parte posteriore dell’apparecchio
Non utilizzare l’apparecchio se il cavo di alimentazione non si presenta in perfette condizioni (se necessario sostituirlo)
In caso di sostituzione del cavo di alimentazione:
l’operazione
perfettamente equivalente
Per evitare disturbi indotti non installare
l’apparecchio in prossimità di trasformatori, televisori, trasmettitori RF, motori elettrici e altre sorgenti di
energia elettrica
Leggere attentamente il presente
manuale e seguire le avvertenze
prima di utilizzare l’apparecchio
deve essere compiuta da personale
PRECAUTIONS
WARNING
Keep this manual for possible future needs
Pay attention not to pour liquids onto the device and
do not operate in conditions of excessive humidity
Do not install the device close to sources of excessive
heat, do not expose it to direct solar radiation and do
not position it without protection in a dusty environment
Be sure that the mains voltage does not exceed the
value indicated on the back panel
Do not use the device if the mains cable or the plug
aren’t in a perfect condition (if necessary, replace it)
If the mains cable has to be replaced, the operation
the cable exclusively with one that is an exact
substitute
In order to avoid interference, do not install the
device close to power transformers, TV sets, RF
transmitters, electric motors or any source of electric
energy
Read carefully this manual and follow
these precautions before operating
the device
Evitare di puntare i microfoni verso gli altoparlanti:
può danneggiarli
Per evitare spiacevoli e costosi inconveniente,
utilizzare solo cavi originali
Per disconnettere l’apparecchio dalla rete elettrica
occorre scollegare il cavo dalla presa di rete
Per la pulizia non utilizzare solventi o alcool. Questi
In caso di malfunzionamento di qualunque parte del
sistema, chiamare il più vicino centro di assistenza o
un centro specializzato e autorizzato. Evitare di
re di calore non deve essere mai coperto da panni o
mobili. Assicurarsi di lasciare spazio fra i dissipatori di
Do not point microphones against speakers: this
cause damage
In order to avoid unpleasant and costly inconveniences, use only original connecting cables
To completely disconnect this apparatus from the AC
mains, disconnect the power supply cord plug from
the AC socket
When cleaning, do not use solvents (e.g. acetone or
and the serigraphy
Do not attempt to service this product. In case of
malfunction of any part of the system call the nearest
technical assistance centre or a specialized technical
centre
For good ventilation, The heat sink should never be
covered or obstructed by blankets, sofas or similar
between the heat sink and any other surface
WWW.SCHERTLER.COM
o altro vicino all’apparecchio
L’unità non deve essere esposta a gocciolamento o
spruzzi di acqua. Non posizionare oggetti contenenti
liquidi sull’apparecchio
L’unità deve essere collegata ad una presa di corrente
Una volta installato l’apparecchio accertarsi che la
presa e la spina dell’alimentazione siano facilmente
accessibili
or near the device
The device should not be exposed to water, even in
small amounts. No object containing liquids should
be placed on or near the device
The device should only be connected to a mains
socket outlet equipped with protection ground
system
When the device is installed, be sure the mains socket
and the plug of the mains cable are easily accessible

WARNINGS
HINWEISE
ACHTUNG
Bewahren Sie diese Bedienungsanleitung für einen
zukünftigen Gebrauch auf
Achten Sie darauf, dass keine Flüssigkeiten in das
Gerät gelangen und benutzen Sie es nicht bei
übermäßig hoher Luftfeuchtigkeit
Installieren Sie das Gerät nicht in der Nähe von
intensiven Wärmequellen, an Orten, wo es den
direkten Sonnenstrahlen ausgesetzt ist oder in
staubigen Bereichen.
Vergewissern Sie sich, dass die Netzspannung die auf
der Rückseite des Geräts angegebenen Werte nicht
übersteigt.
Verwenden Sie das Gerät nur, wenn sich das Netzka-
muss dieses ersetzt werden)
Achtung beim Ersetzen des Netzkabels: Dieser
Vorgang ist von Fachpersonal auszuführen. Das
Kabel darf lediglich mit einem absolut gleichwertigen ersetzt werden
Um Störungen zu vermeiden, sollte das Gerät nicht in
der Nähe von Transformatoren, Fernsehgeräten,
RF-Sendern, Elektromotoren und anderen Quellen
elektrischer Energie aufgestellt werden
Lesen Sie diese Bedienungsanleitung
aufmerksam durch und beachten Sie die
Hinweise, bevor Sie das Gerät in Betrieb
nehmen
AVERTISSEMENTS
ATTENTION
Conserver ce manuel pour de futures utilisations
Avoir soin de ne pas verser de liquides dans l'appareil
et de ne pas l'utiliser en condition d'humidité excessive
Ne pas installer l'appareil près de sources de chaleur,
aux radiations directes du soleil et dans un endroit
poussiéreux
S'assurer que la tension du réseau ne dépasse pas les
valeurs indiquées dans la partie arrière de l'appareil
Ne pas utiliser l'appareil si le câble d'alimentation ne
se présente en parfaite conditions ( si nécessaire le
substituer)
En cas de substitution du câble d'alimentation:
l'opération doit être réalisée par un personnel
parfaitement équivalent
Pour éviter des perturbations induites ne pas installer
l'appareil près de transformateurs, téléviseurs,
émetteurs RF, moteurs électriques et autres sources
d'énergie électrique
Lire avec attention le manuel présent
et suivre les avertissements avant
d'utiliser l'appareil
JAM 400
Vermeiden Sie es, die Mikrofone in Richtung der
Lautsprecher aufzustellen: dies könnte unangeneh-
verursachen
Um ärgerliche und kostspielige Reparaturarbeiten zu
vermeiden, verwenden Sie bitte ausschließlich
Originalkabel
Um das Gerät vom Stromnetz zu trennen, muss der
Kabelstecker aus der Netzsteckdose gezogen werden
Zur Reinigung dürfen keine Lösungsmittel oder
Alkohol verwendet werden, da hierdurch der Lack
und die Serigraphie beschädigt werden können
Sollten in irgendeinem Teil des Systems Funktionsfehler auftreten, dann wenden Sie sich bitte an die
nächste Kundendienststelle oder an eine vom
allgemein zuständigen Reparateuren anvertraut
werden
Damit eine ausreichende Kühlung gewährleistet ist,
niemals durch Möbel oder Textilien abgedeckt
werden. Vergewissern Sie sich, dass zwischen dem
genügend Raum freigelassen wird
Eviter de placer les micros en direction des enceintes
mager
Pour éviter des inconvénients désagréables et
coûteux, utiliser exclusivement des câbles originaux
Pour déconnecter l'appareil du réseau électrique il
faut débrancher le câble de la prise du réseau
Pour le nettoyage ne pas utiliser ni solvants ni alcool.
Ces produits peuvent endommager le vernissage et
les sérigraphies
En cas de dysfonctionnement de n'importe quelle
partie du système, appeler le Centre d'Assistance le
plus proche ou bien un Centre spécialisé et autorisé
spécialisés
de chaleur ne doit être jamais recouvert de linges ou
d'objets. S'assurer le laisser l'espace entre les dissipa-
Verwenden sie in der Nähe des Geräts keinerlei freien
Flammen, wie z.B. Feuerzeuge, Kerzen oder
ähnliches.
Das Gerät darf nicht Wassertropfen oder Wasserspritzer ausgesetzt werden. Stellen Sie auf das Gerät
keinerlei Gegenstände, die Flüssigkeit enthalten
Das Gerät muss an eine ordnungsgemäß geerdete
Steckdose angeschlossen werden
Nach dem Aufstellen des Geräts vergewissern Sie
sich, dass sowohl die Steckdose als auch der Netzstecker leicht zugänglich sind
bougies etc. près de l'appareil
L'unité ne doit pas être exposée à égouttement ou
jets d'eau. Ne pas placer des objets contenant des
liquides sur l'appareil
L'unité doit être reliée à une prise de courant munie
WWW.SCHERTLER.COM
prise de l'alimentation soient facilement accessibles

ALL SCHERTLER® PRODUCTS ARE COVERED BY A LIMITED TWO-YEAR WARRANTY (FROM THE DATE OF PURCHASE) AGAINST MANUFACTURES
DEFECTS. DETAILS CAN BE OBTAINED FROM YOUR LOCAL DEALER/REPRESENTATIVE. SCHERTLER SA STRONGLY BELIEVES IN “COMMON SENSE”
AND THUS, MISUSE OF OUR PRODUCTS ARE NOT COVERED UNDER RIGHTS OBTAINED THROUGH OUR WARRANTY POLICY OR THAT OF INTERNATIONALLY RECOGNIZED TERMS AND CONDITIONS.
SCHERTLER SA IS CONSTANTLY AIMING TO IMPROVE ITS RANGE OF PRODUCTS THEREFORE, SCHERTLER SA RESERVES THE RIGHT TO AMEND
PRODUCT SPECIFICATIONS WITHOUT NOTICE.
THE SCHERTLER® NAME/LOGO ARE REGISTERED TRADE-NAMES/ TRADEMARKS OF SCHERTLER SA, SWITZERLAND.
All SCHERTLER® PRODUCTS ARE OF PROPRIETARY TECHNOLOGY AND COVERED BY ONE OF MORE WORLDWIDE PATENTS.
 Loading...