

Page 1
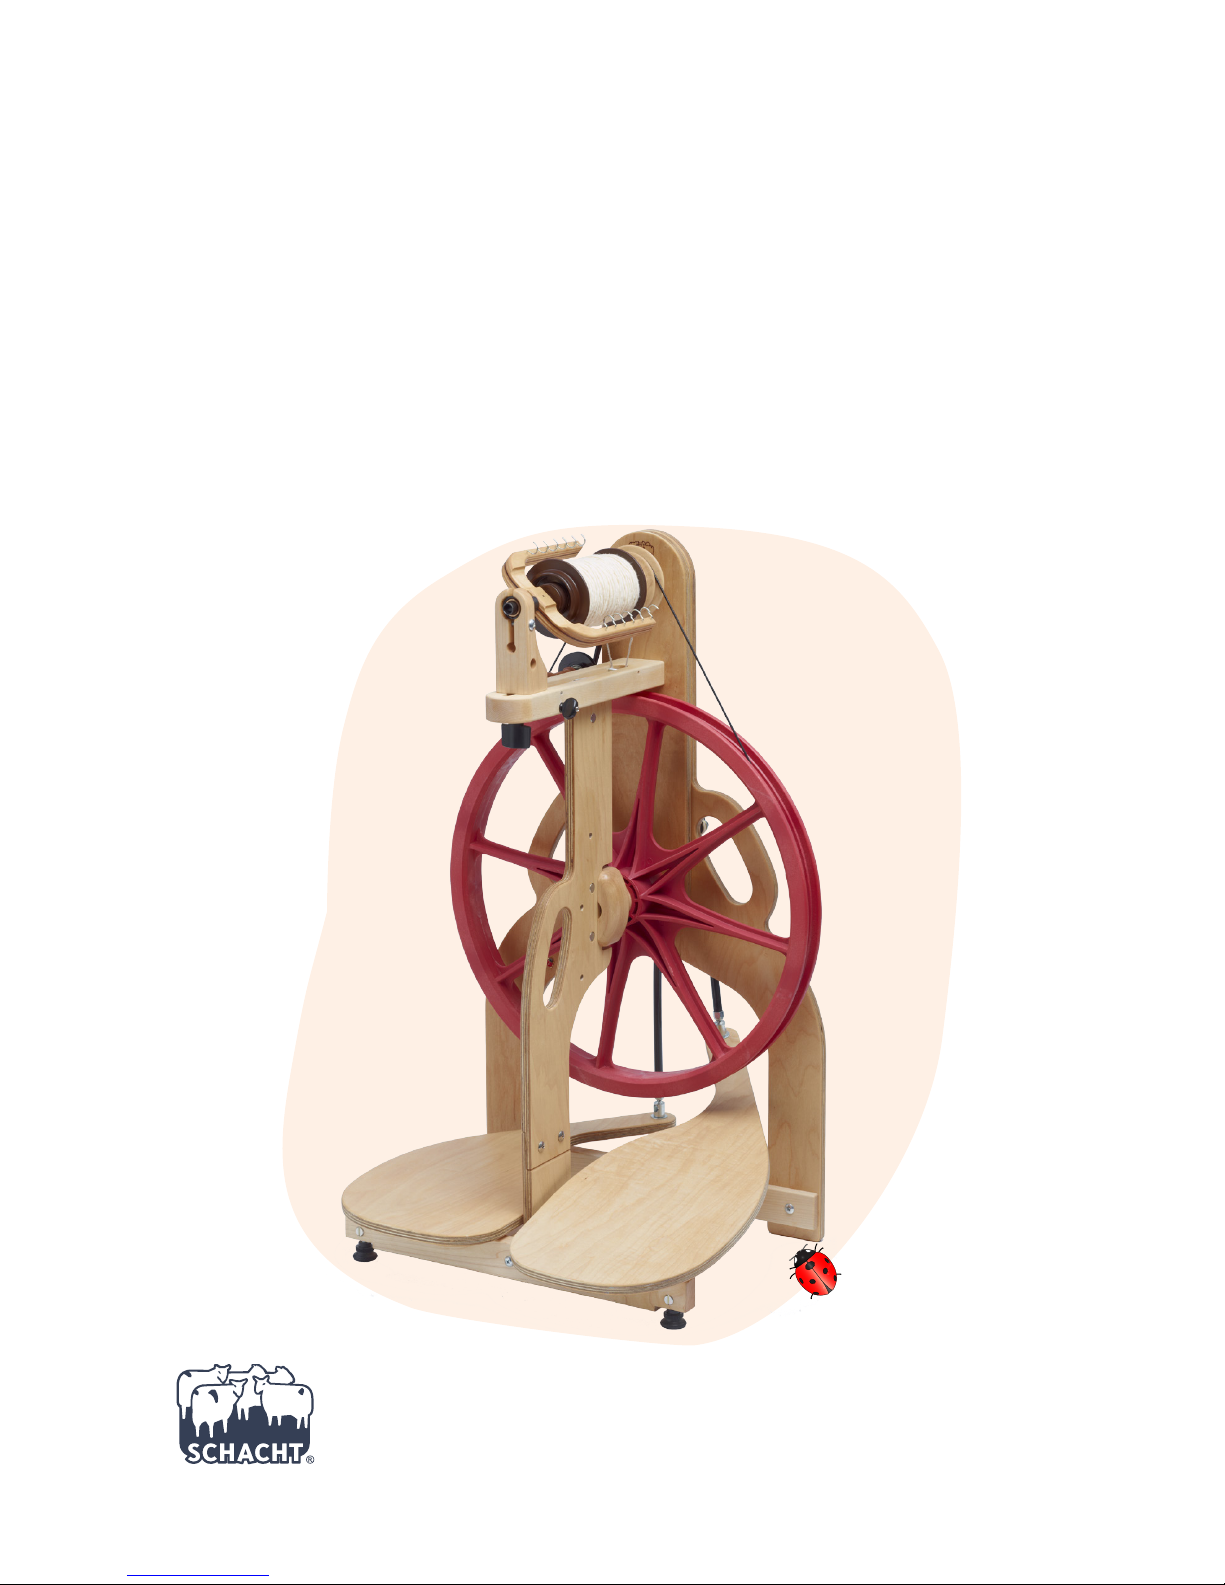
LADYBUG
SPINNING WHEEL
InstructIons, MaIntenance and Warranty
gfm
Find out more at schachtspindle.com
Schacht Spindle Company 6101 Ben Place Boulder, CO 80301
p. 303.442.3212 800.228.2553 f. 303.447.9273
© 2017 Schacht Spindle Company, Inc.
04.17
Page 2
2
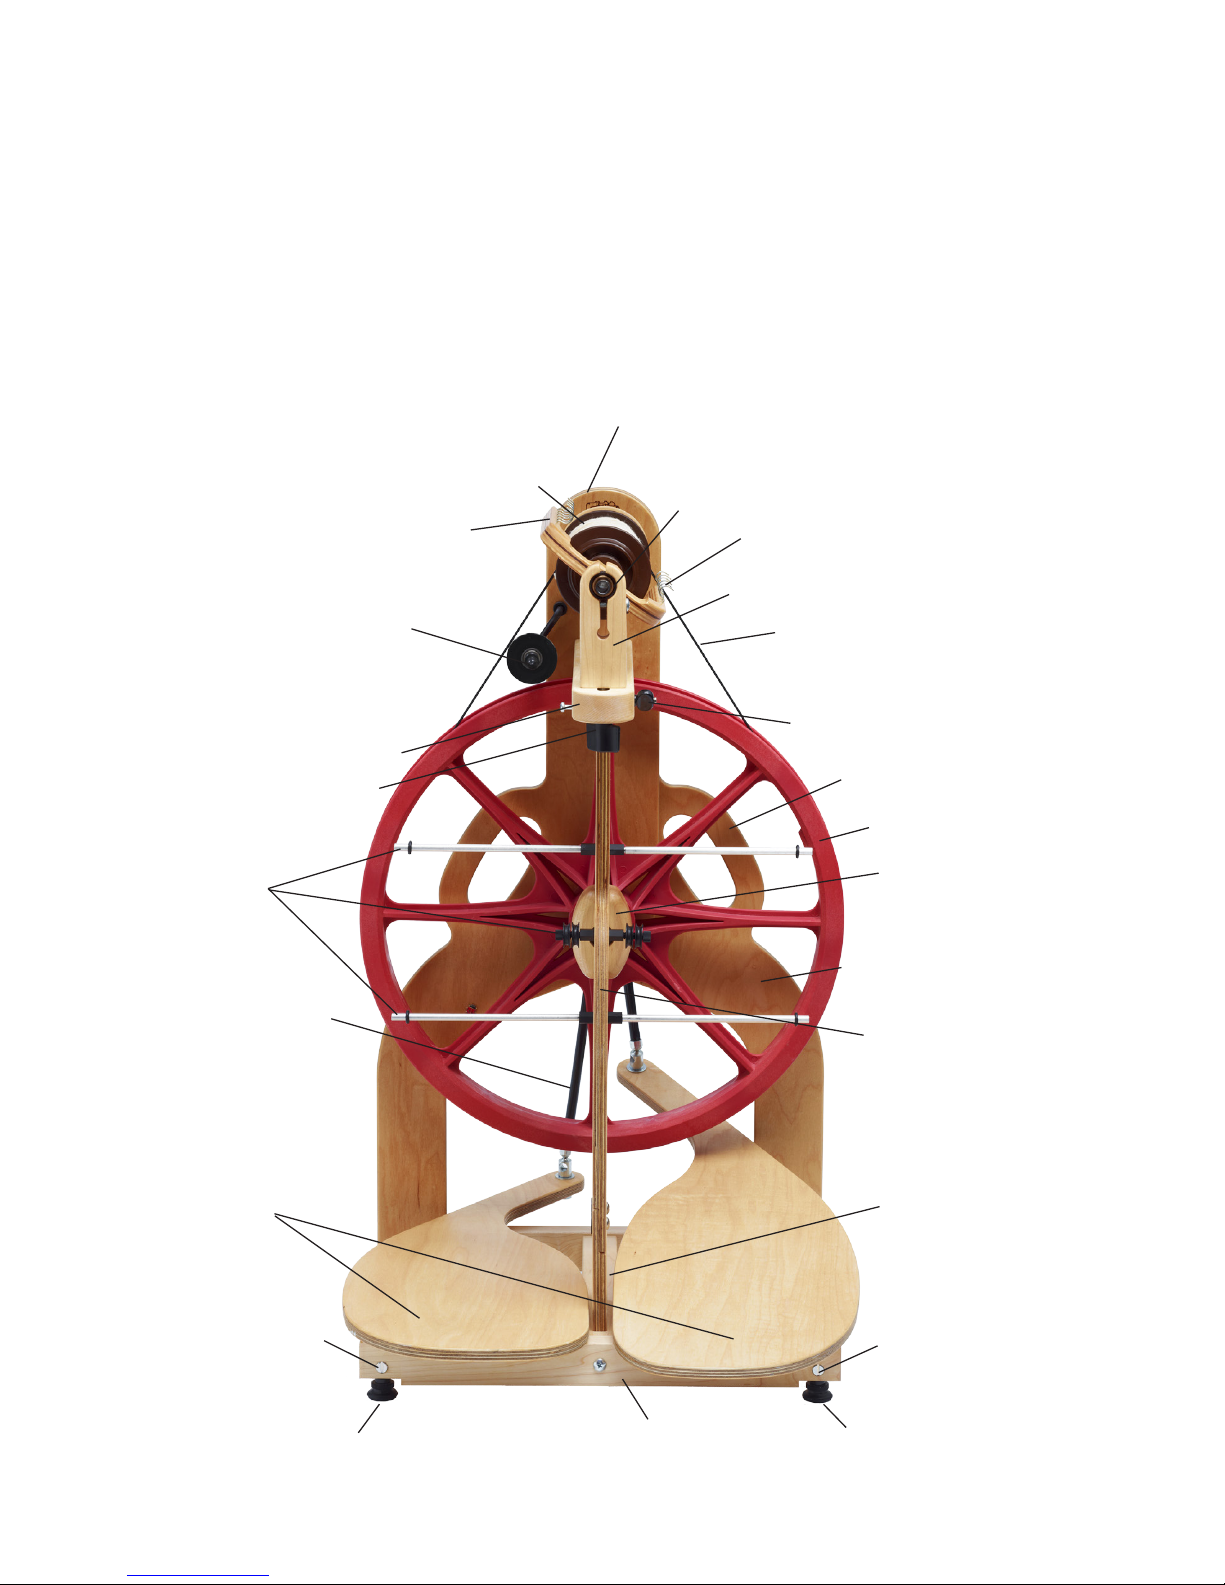
bobbin
flyer
flyer hooks
drive band tensioner
front maiden knob
footman
orifice and orifice bearing
mother-of-all
drive band
scotch tension knob
carrying handle
drive wheel
drive wheel hub
rear leg
front leg
front leg adjuster
treadle bar
treadle
front leg adjuster
rear maiden
front maiden
center brace
optional
lazy kate
barrel nut
barrel nut
Page 3

3
Thank you for choosing the
Ladybug Spinning Wheel. We hope
you will have many pleasurable years
together creating wonderful yarn.
Please DO read the instructions, even
if you usually don’t. Happy Spinning!
WHERE’S MY LADYBUG?
Somewhere on your Ladybug
Spinning Wheel you’ll find your very
own ladybug. She’s there cheering
you on, going to spin-ins with you, or
just keeping you company as you spin
quietly at home. Because we’ve put the
ladybug in a different place on every
wheel, you can be assured that there
is not another wheel in the world that
will be exactly like yours.
UNPACKING YOUR WHEEL
■ Remove the accessory box.
■ Remove the treadle assembly by
tipping the wheel back to allow the
treadle assembly to slide past. Remove
packing materials.
■ Lift the wheel straight up and out of
the box.
■ Remove any remaining packing
material.
Be careful not to cut the drive band
or Scotch tension brake band when
removing plastic wrap from the wheel.
CONTENTS
■ 1 flyer assembly (1 bobbin and
medium whorl attached)
■ 2 bobbins
■ 1 fast whorl (attached to back of
wheel)
■ 1 threading hook
■ 1 plastic drive band (attached)
■ 1 Scotch tension brake band
(attached)
■ 1 Scotch tension knob
■ 1 cotton drive band for double-drive
spinning
HARDWARE FOR ATTACHING
TREADLE BAR TO FRONT LEG:
1 - 2" trusshead machine screw
HARDWARE FOR ATTACHING THE
FOOTMEN:
2 - bolts (5/16" fine)
2 - 1/4" lock nuts
4 - 1/4" washers
REQUIRED TOOLS
■ Phillips screwdriver
■ regular screwdriver
■ 1/2" wrench
LADYBUG SPINNING WHEEL
InstructIons, MaIntenance and Warranty
Page 4
4
ASSEMBLING YOUR
LADYBUG
It will be easiest to assemble your
wheel on a table. Cover the table to
protect it from scratches.
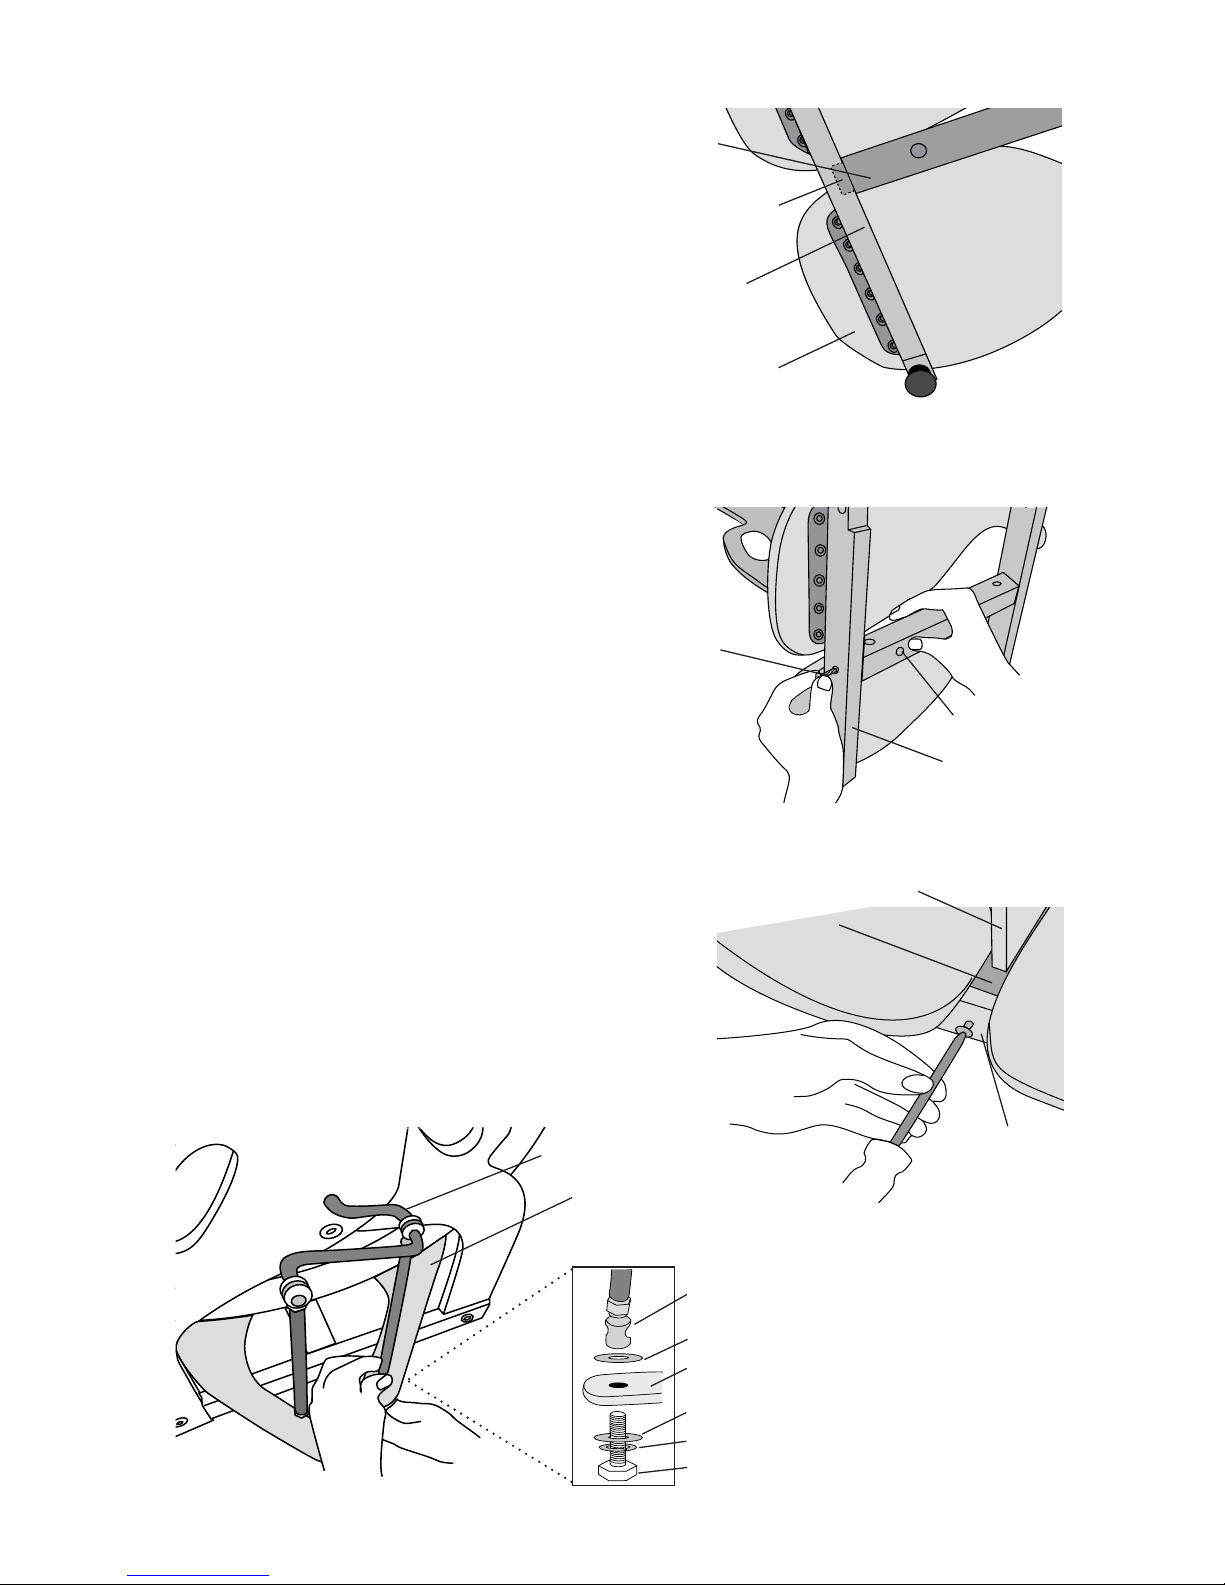
STEP 1: INSTALL THE TREADLE BAR
WITH ATTACHED TREADLES
■ Place the mortise (hole) in the trea-
dle bar onto the tenon of the center
brace (1A).
■ Insert the 2" machine screw into
the front treadle bar and hand tighten
until you feel it engage with the barrel
nut (1B).
■ Use a Phillips screwdriver to finish
tightening the screw.
STEP 2: ATTACH THE FOOTMEN TO
THE TREADLES
■ Turn the wheel around so that you
are working from the back.
■ Position the crank as shown in the
diagram.
■ Attach the interior footman to the
shortest treadle.
■ Insert the bolt with a lock washer
and one washer into the hole from
the bottom of the treadle (see inset at
right). Add a second washer on top of
the treadle.
barrel nut
screw
center
brace
treadle bar
treadle
treadle bar
tenon
crank position
bolt
treadle
1A
1B
front leg
center brace
treadle bar
1C
treadle
footman
linkage
washer
2A
washer
lock washer
Page 5
5
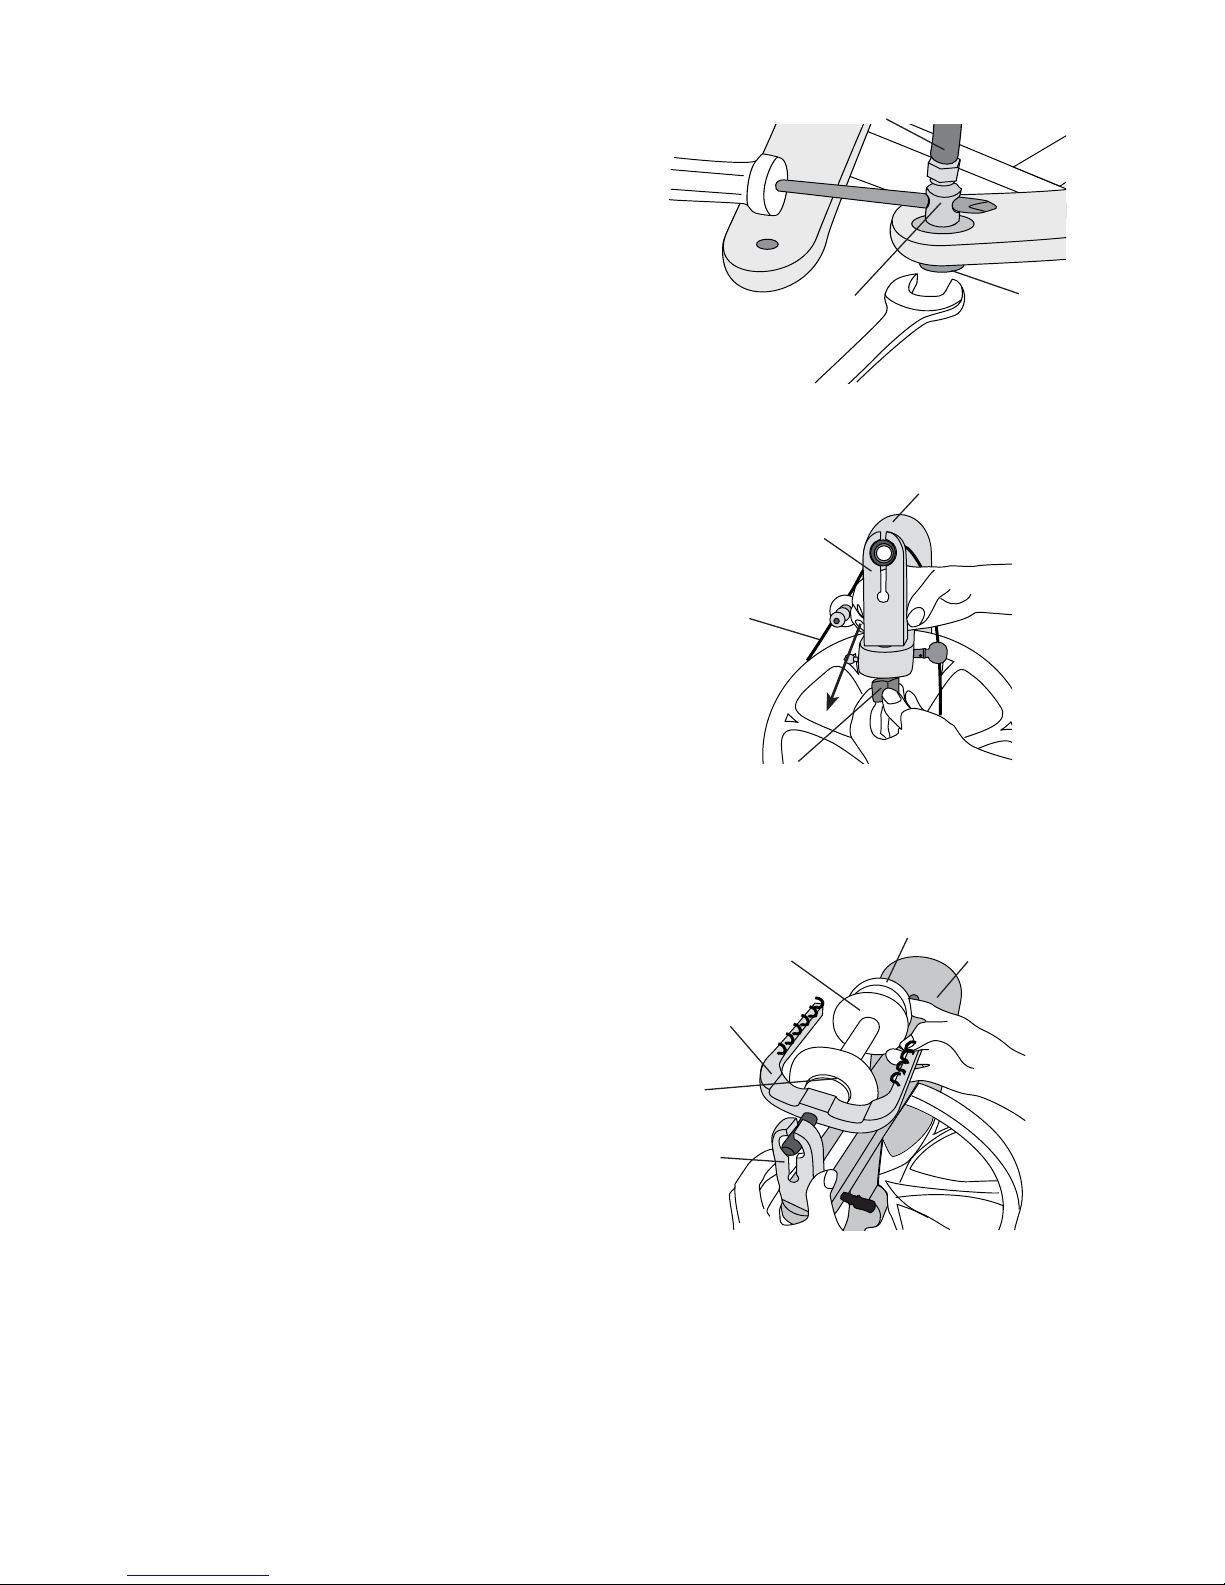
■ Line up the threads of the footman
linkage with the bolt and hand tighten.
■ To secure, place the Phillips screw-
driver into the linkage hole to keep it
from turning and tighten the bolt with
a ½" wrench.
■ Repeat for the other footman.
STEP 3: INSTALL THE SCOTCH
TENSION BRAKE ASSEMBLY AND
FLYER ASSEMBLY
■ Place the black drive band on the
rear maiden.
■ Loosen the front maiden knob and
slide the front maiden as far forward
as it will go (3A).
■ Slide the flyer orifice shaft into the
front bearing.
■ Place the brake band loop over the
large end of the bobbin.
■ Place the black drive band around
the drive wheel and one of the grooves
in the whorl.
■ Locate the rear bearing and slide
the front maiden forward so that the
flyer shaft end is inserted into the rear
bearing (3B).
■ Slide the front maiden back as far as
it will go and tighten the front maiden
knob. There should be a little play in
the back-front flyer movement.
■ Turn the Scotch tension knob to
take up the slack in the cord, allowing
the cord to wind around the shaft of
the peg.
■ To increase the amount of take-up
of your yarn onto the bobbin, adjust
the Scotch tension knob.
■ To decrease the amount of take-up,
adjust the peg in the other direction.
Note: The large end of the bobbin
should be next to the whorl when using Scotch tension.
footman
footman linkage
bolt
2B
front
maiden
front maiden knob
drive band
rear maiden
3A
whorl
bobbin
(large end)
flyer
front
maiden
rear
maiden
bobbin
(small end)
3B
Page 6
6
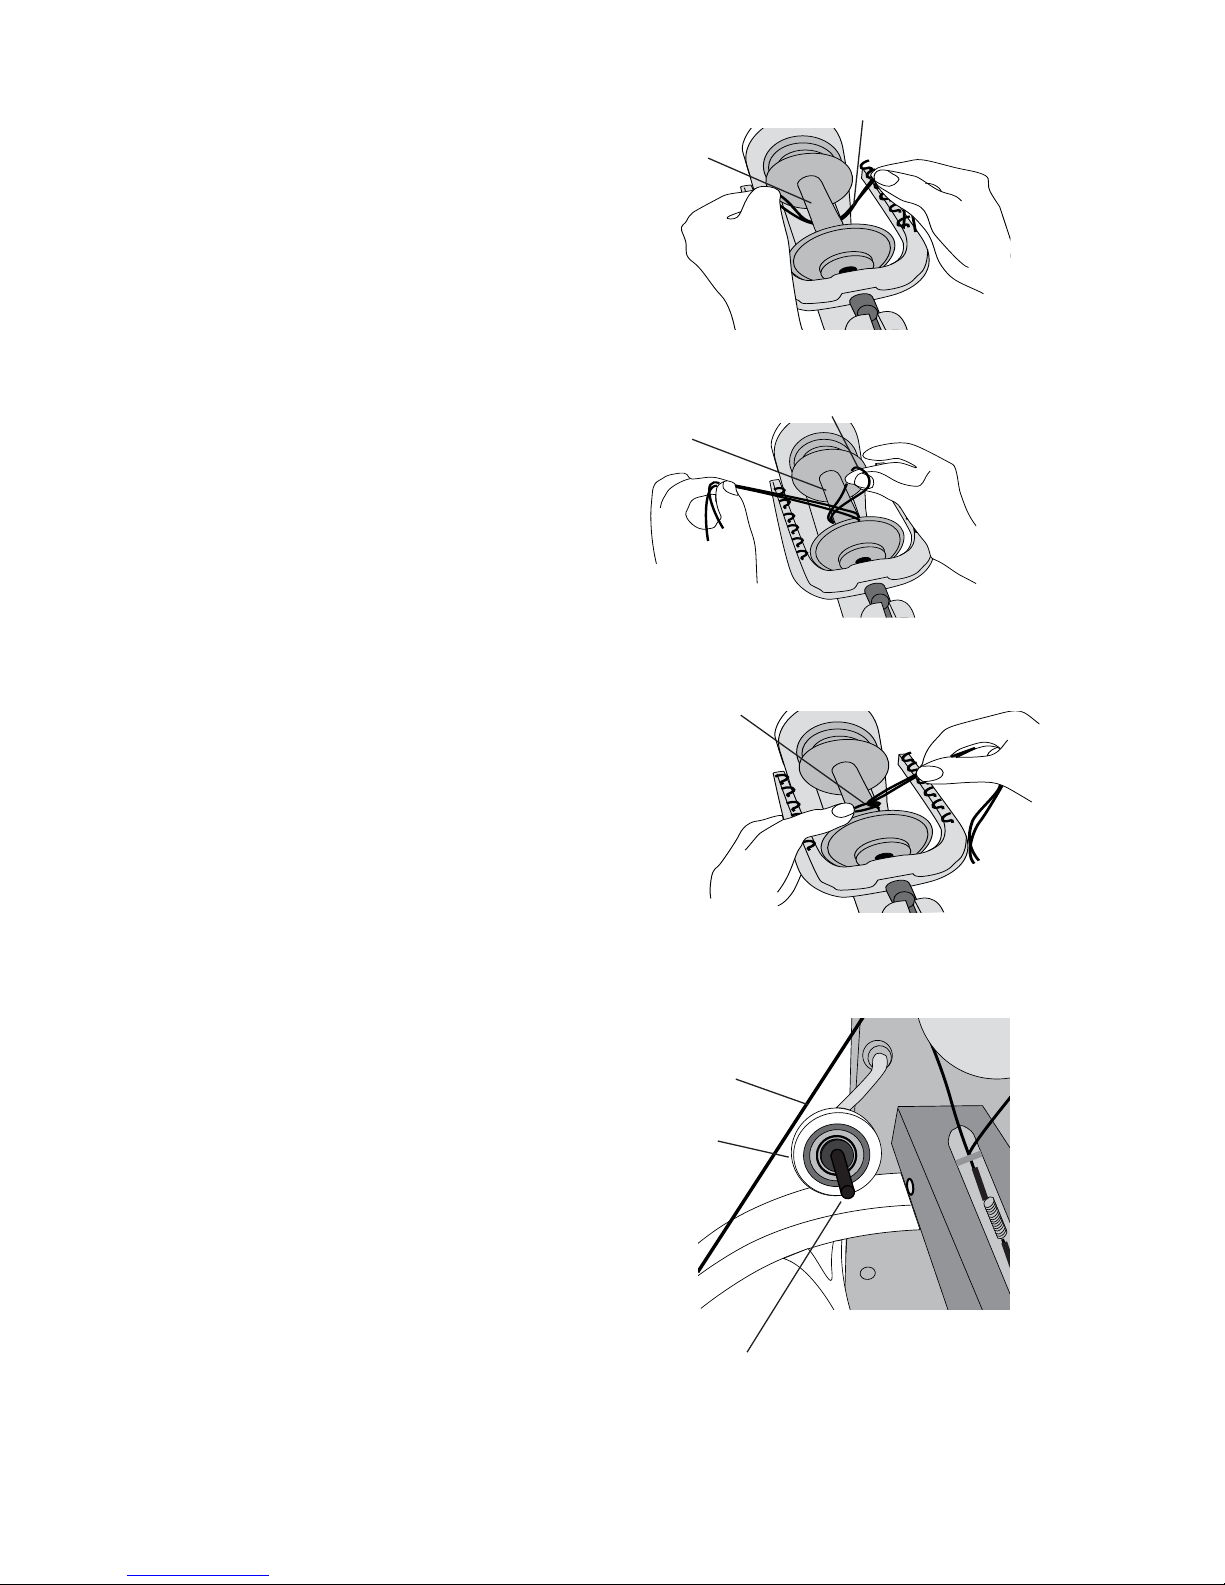
STEP 4: ATTACH YARN LEADER TO
THE BOBBIN CORE
■ Cut a 24" length of strong yarn and
fold it in half.
■ Place the folded yarn under the bob-
bin core (4A).
■ Thread the cut ends through the
loop, encircling the core (4B).
■ Pull the cut ends to tighten (4C).
CHANGING BOBBINS AND
WHORLS
■ Place the drive band on top of the
rear maiden.
■ Unscrew the front maiden knob and
slide the front maiden forward as far
as it will go.
■ Holding the flyer assembly firmly
in the front maiden, remove the flyer
shaft from the rear bearing.
■ Lift the Scotch tension brake band
off the bobbin and lay it to one side.
■ Remove the flyer orifice from the
front maiden.
■ Remove the whorl and then slide off
the bobbin.
DRIVE BAND TENSIONER
You will rarely need to tension the
drive band when spinning in Scotch
tension mode.
Your drive band has a memor y
and can be used for a wide range of
whorls.
When using the high speed whorl,
if you find that your drive band is
slipping, you can apply tension to the
drive band by engaging the tensioner
(5). Simply slide the drive band into
the groove of the pulley and pull up on
the handle to increase the tension on
the drive band.
bobbin
core
yarn leader
yarn leader
bobbin
core
yarn
leader
loop
4A
4B
4C
drive band
drive band tensioner handle
pulley
5
Page 7
7
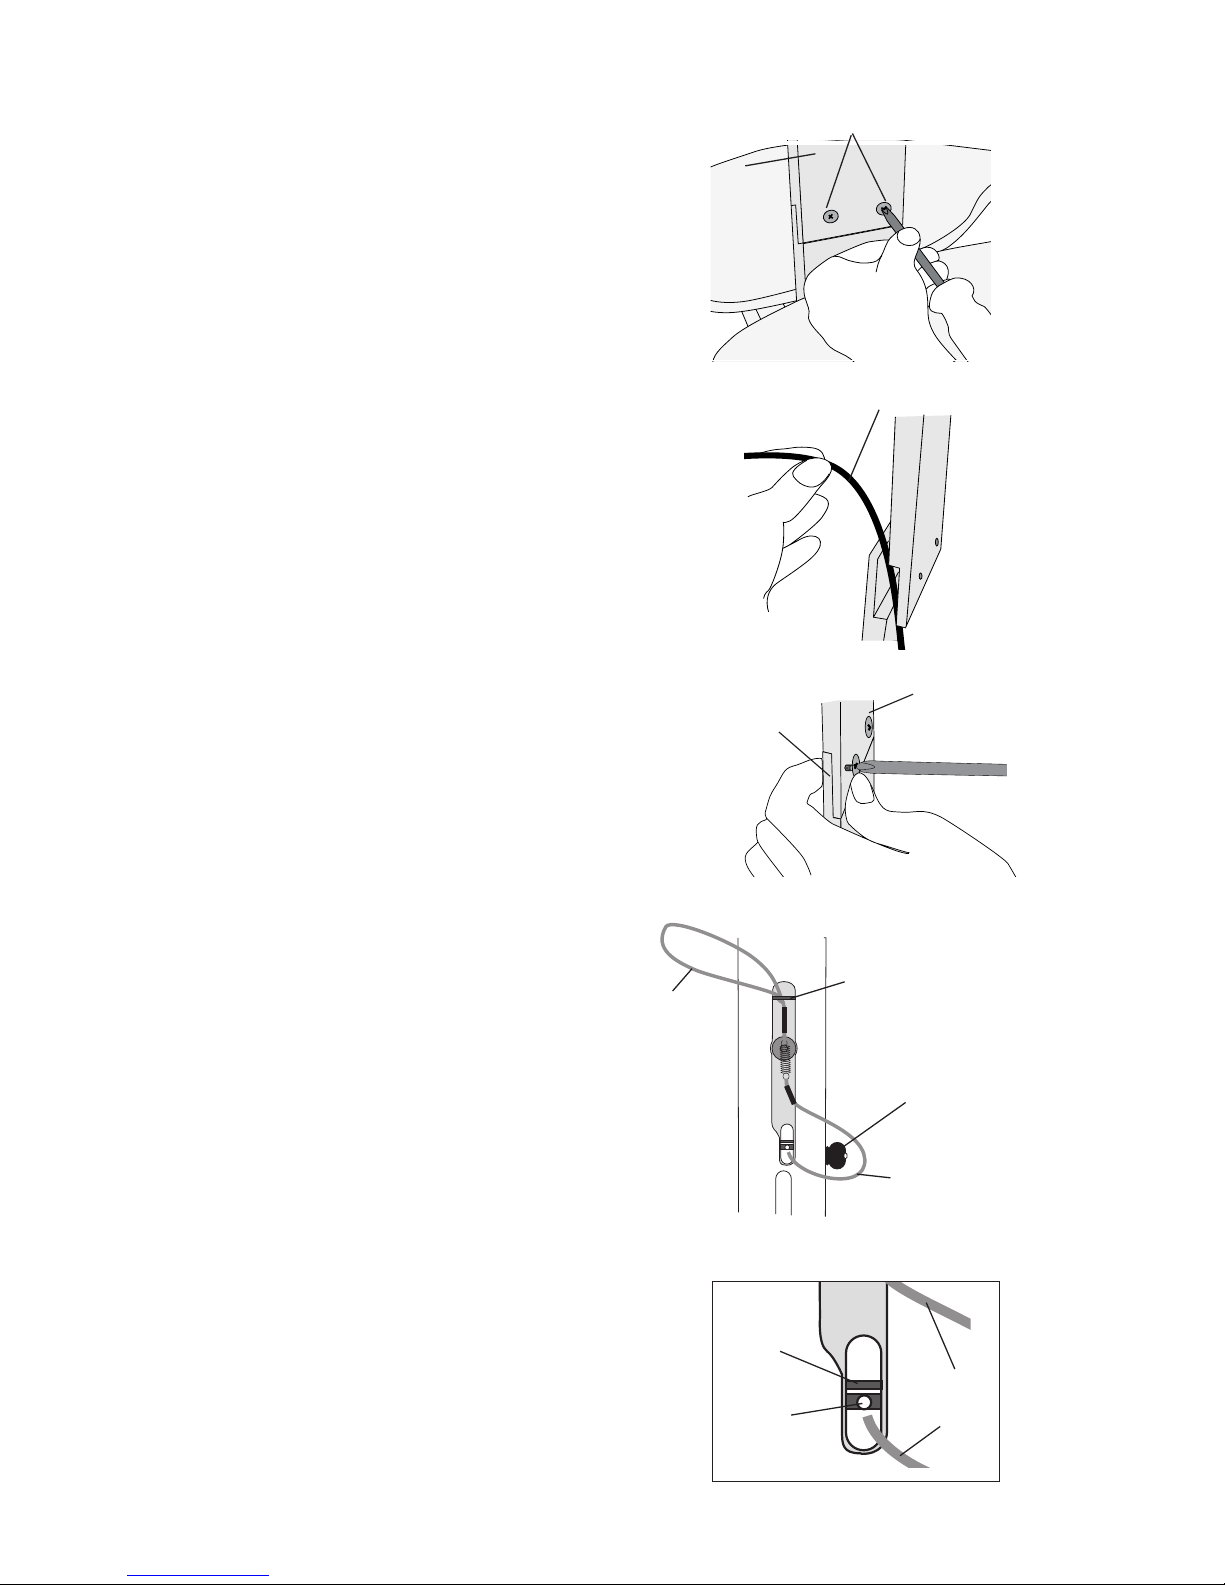
INSTALLING A NEW DRIVE BAND
■ Remove the flyer assembly (see
instructions for changing bobbins and
whorls).
■ Remove the two Phillips head
screws from the lower side of the front
leg (6A).
■ Separate the leg slightly and slip
the new drive band through the space
(6B).
■ Check the alignment of the overlap,
and while pressing on the inserts on
the other side with your finger, replace
the screws, making sure that the fit is
tight (6C).
INSTALLING A NEW SCOTCH
TENSION BRAKE BAND
■ Remove the flyer and old Scotch
tension brake band, if any.
■ Slide the loop end of the new Scotch
tension brake band under the rear bar,
laying the loop to one side (7A). Use
your threading hook to pull the loop
up if needed.
■ Adjust the Scotch tension knob so
that the hole in the shaft is visible
(7B). Pull the straight end of the cord
over the front bar and into the hole.
Tie a double knot in the end of the
cord to secure it.
■ Turn the Scotch tension knob to
take up the slack in the cord, allowing
the cord to wind around the shaft of
the peg.
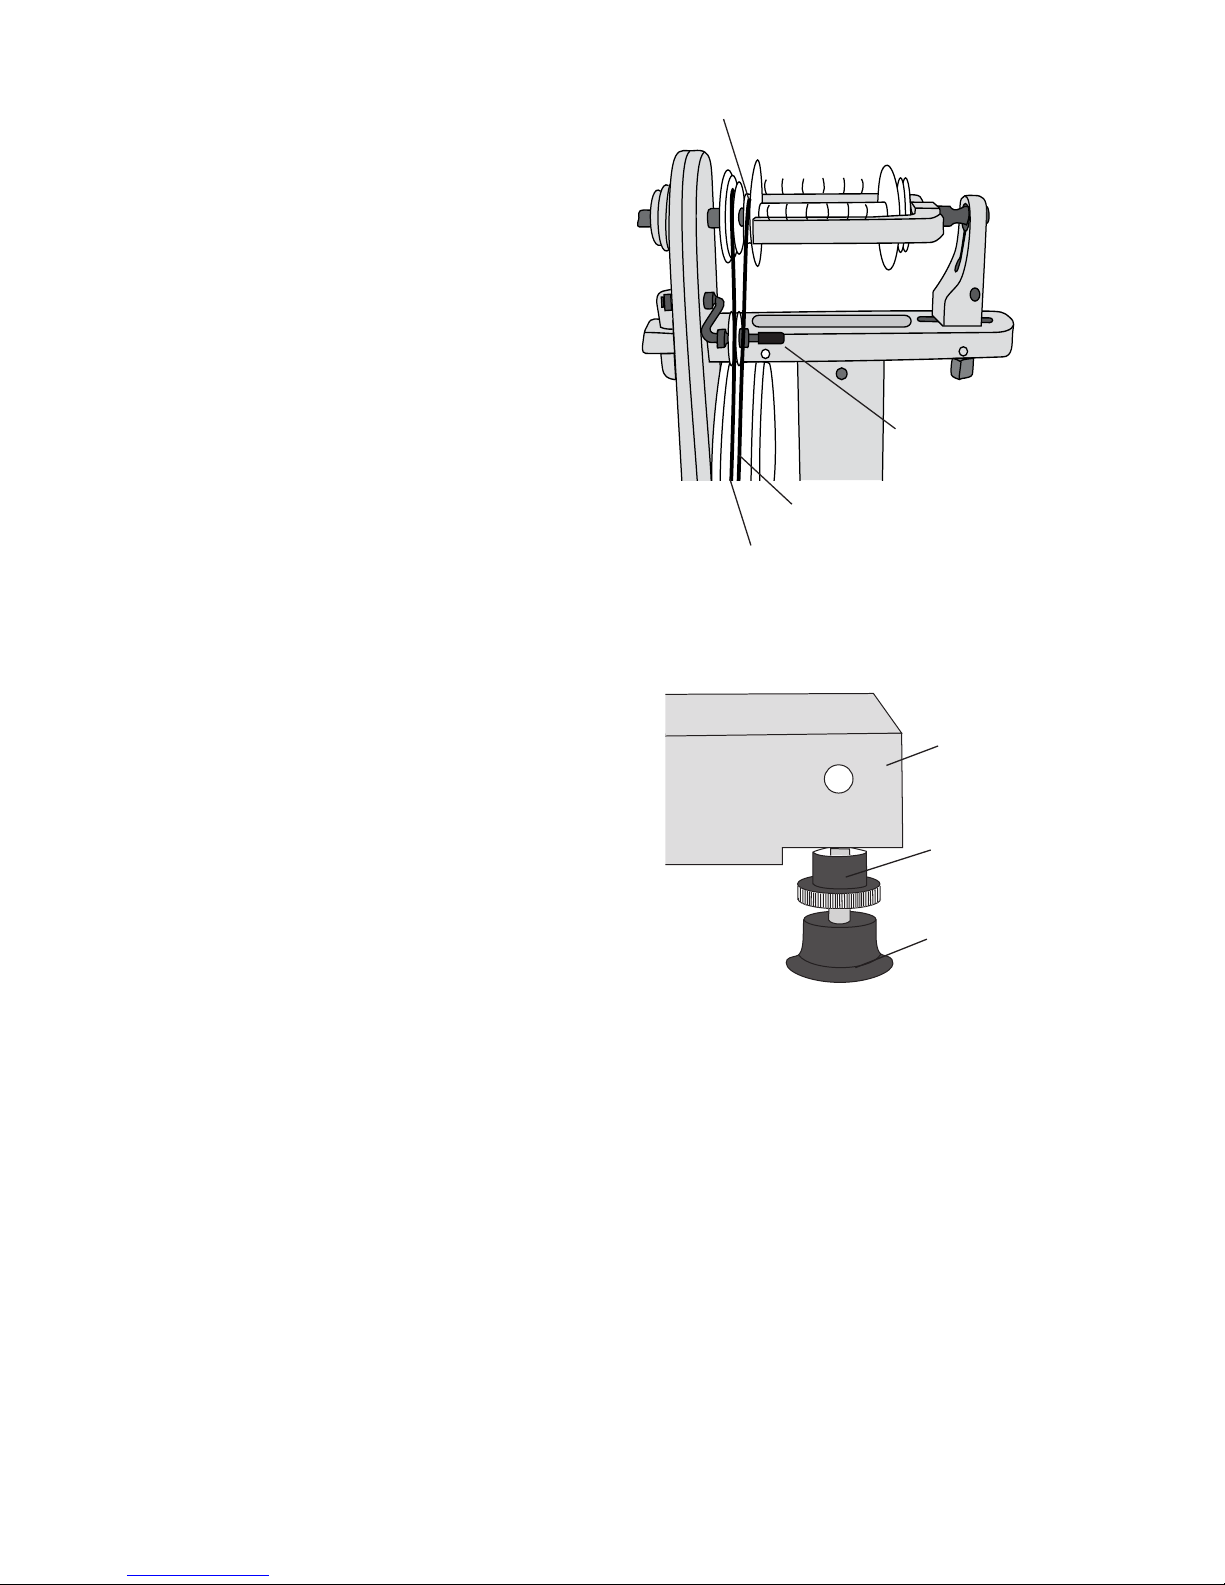
SPINNING IN DOUBLE DRIVE
■ You can set your wheel up in double
drive mode (8).
■ Take off the plastic drive band and
either remove it from the wheel or
wind it around the front leg.
■ Turn the bobbin around so that the
small pulley is next to the whorl.
drive band
phillips head screws
front leg
overlap
front leg
6A
6B
6C
7B
front
bar
hole
in shaft
straight
end of
string
rear bar
scotch tension
knob
straight
end
loop end
7A
Page 8
8
■ Place the cotton drive band string
around the whorl, drive wheel, and
small end of the bobbin. Place the
drive band segment on the whorl over
the pulley wheel of the drive band
tensioner. The drive band segment on
the bobbin should run underneath the
drive band tensioner. Secure the drive
band string with a square knot.
■ To increase tension (for faster draw-
on) on the drive band, pull up on the
tensioner. To decrease the tension on
the drive band, push down on the tensioner.
■ When using double drive the yarn
will wind onto the bobbin in the opposite direction than when using Scotch
tension mode. This does not affect
your spinning, but it is good to know
this in case you should change spinning modes in the middle of a bobbin.
ADJUSTING THE FRONT FEET
We have set the front feet height at
the factory, but if you find that your
wheel is unstable or rocking during
spinning you can adjust the front feet
(9). Simply loosen the lock nut and
screw the foot up or down as needed,
then retighten the lock nut.
CARRYING HANDLES
Your Ladybug features three carr ying handles: one on the front leg and
one on each rear leg. Simply pick up
your Ladybug by whichever handle is
most comfortable and carr y the wheel
as you would a briefcase.
small pulley
cotton drive band segment
over drive band tensioner
drive band tensioner
8
lock nut
foot
treadle bar
9
cotton drive band segment
under drive band tensioner
Page 9

9
OILING YOUR WHEEL
Your spinning wheel is a machine
with moving parts. For maximum performance and longevity, it is important
to lubricate these parts. Use 20- or
30-weight motor oil sparingly (a few
drops is usually sufficient) on the flyer
shaft every time you sit down to spin
and about every hour thereafter.
Obenauf’s Heavy Duty Leather
Protector can be used to lubricate the
leather treadle hinges.
No oil or lubricant should be used
in the spinning wheel hub or on the
plastic drive wheel.
If a squeak develops elsewhere on
the wheel, try a few drops of oil in this
area.
MAINTENANCE
Your wheel will work best if it is
maintained. We suggest you follow
a regular schedule of care to ensure
your Ladybug lives a long life.
■ Clean excess fibers from all parts of
your wheel.
■ Periodically lubricate the moving
parts.
■ Touch up and refinish worn areas of
your wheel.
■ Periodically check the screws for
tightness.
STORAGE
Try to keep your wheel in a dry,
moderate climate and avoid extreme
temperatures—store away from direct
sunlight.
CLEANING
For the wood parts, we do not recommend furniture oils or other waterbased cleaning products. Generally, all
that is needed to clean your wheel is a
clean cloth and paint thinner or similar
non-water- based product to wipe off
the dirt (once a year should do it).
You can re-oil as needed with Deft or
Watco Danish oil (be sure to follow
the directions on the can). Steel wool,
grade 00, may also be used to clean
your wheel.
For the plastic drive wheel, a damp
cloth will take care of most dust and
dirt.
RECOMMENDED FLYER WHORLS
You may use any of the available
whorls with your Ladybug. The high
speed bobbin is needed when you
use the high or super high whorls in
double drive.
Whorl Ratio
Extra Slow 3.2:1 & 3.6:1
Slow 4.7:1 & 5.5:1
Medium 6.5:1 & 8:1
Fast 9:1 & 10.5:1
High 11.5:1 & 14:1
Super High 12:1 & 14.5:1
WHICH FLYER WHORL SHOULD
I USE?
The type of fiber you are spinning
and the kind of yarn you want to produce will determine which flyer whorl
to use. Choosing a compatible whorl
for the task at hand will go a long
way towards helping you comfortably
create the yarn you want. If you feel
that your wheel is tugging the fiber
out of your hand or not drawing on
fast enough, then you need to either
change whorls, adjust the take-up, or
treadle slower. The goal is to make
your wheel do what you want it to
do. Paying attention to your spinning
comfort will help you make the neces-
Page 10
10
SPINNING RESOURCES
Books
The Intentional Spinner by Judith
MacKenzie
Spin Control: Techniques for
Spinning the Yarn You Want by Amy
King
Start Spinning by Maggie Casey
DVDs
The Gentle Art of Plying by Judith
MacKenzie
Popular Wheel Mechanics by Judith
MacKenzie
Start Spinning: The Video by
Maggie Casey
Know Your Wheel by Alden Amos
and Cindy Lair with Linda Ligon
sary adjustments. When everything
is in harmony, you will be able to spin
comfortably for long periods of time
and spin the yarn you want to create.
Your spinning wheel comes with
two flyer whorls: medium and fast.
The general rules to remember are:
the larger (slower) the whorl, the
thicker the yarn, the less the twist
and take-up.
In Scotch tension mode, the
amount of take-up is controlled by
the amount of tension you put on
the brake band spring and string.
The greater the tension, the greater
(faster) the take-up.
In double drive mode you do not
use the Scotch tension brake band.
All of the drive band tension adjustments are made by moving the drive
band tensioner up or down. •
TENSIONED LAZY KATE
We offer a tensioned Lazy Kate
as a separate accessory (shown at
right). Rods are placed through
holes in the sides of the front leg
and tensioned with pulleys. The
Lazy Kate accommodates up to
four bobbins. Because our Lazy
Kate attaches to the wheel, it is
easy to take with you.
Page 11
11
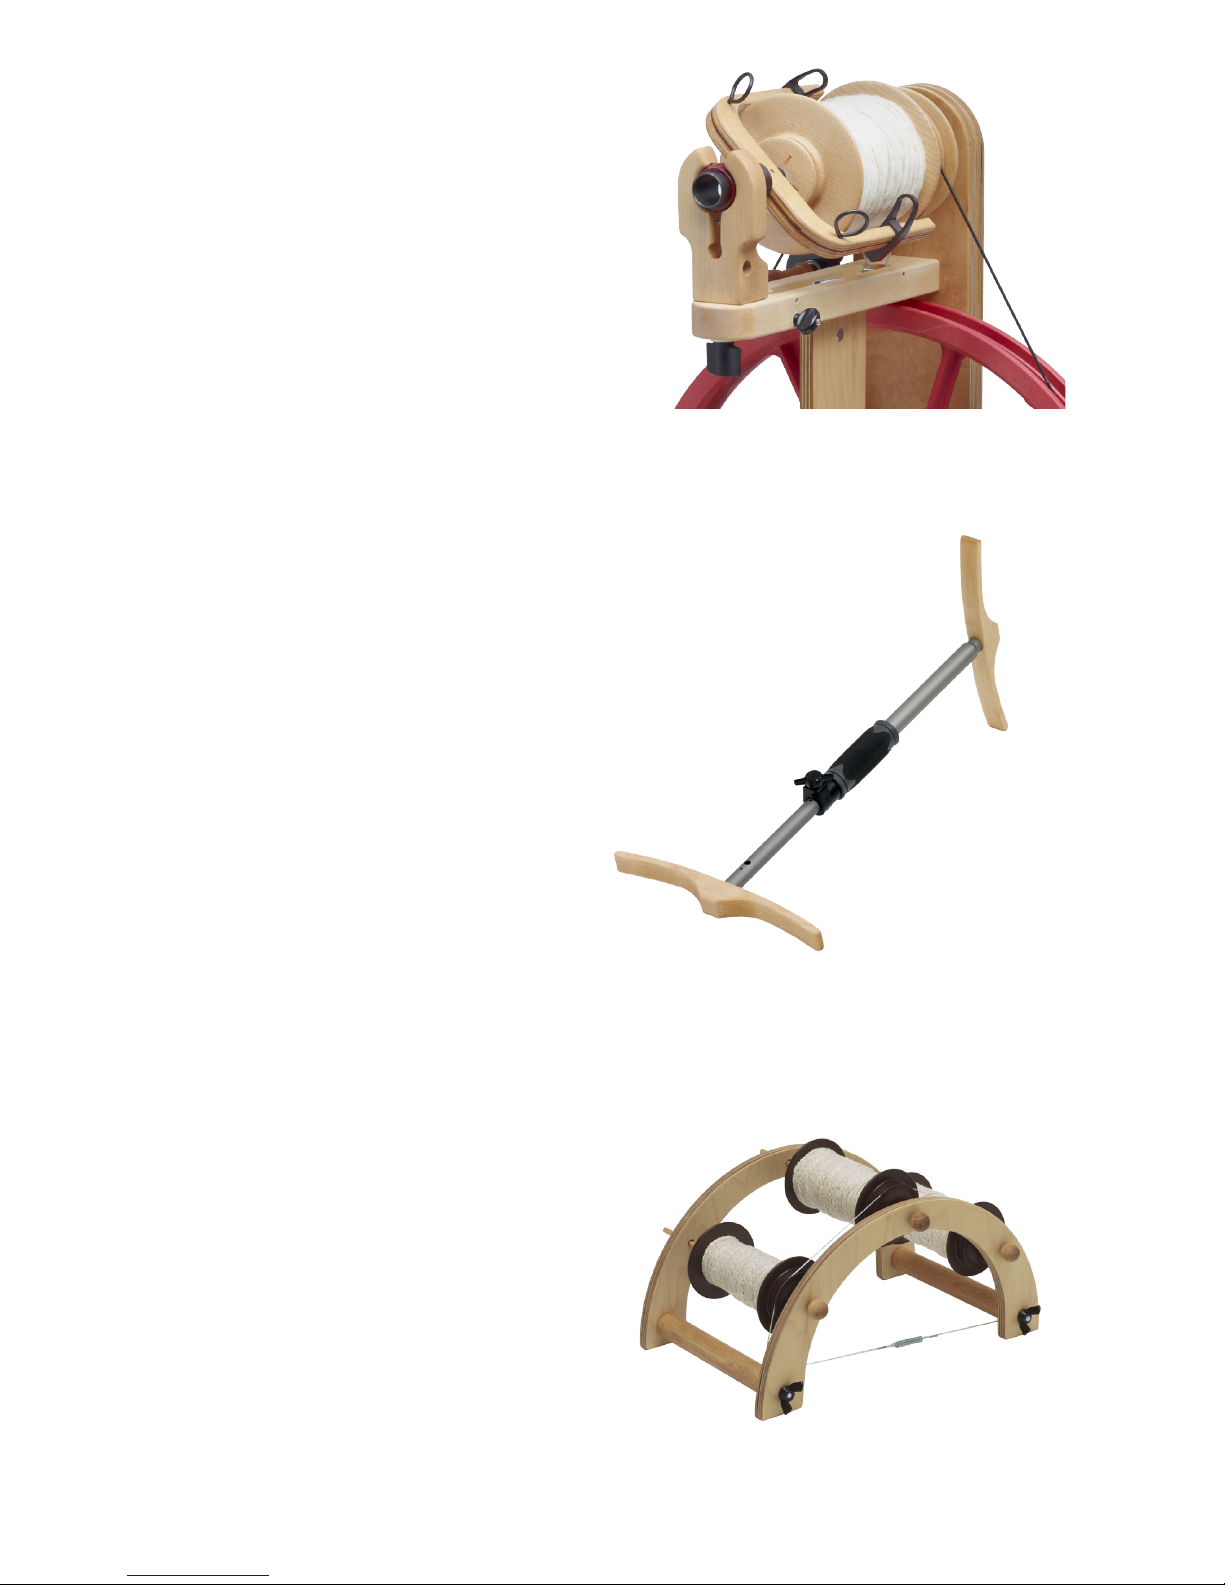
LADYBUG BULKY PLYER FLYER
Add plying and bulky yarn capabilities to your Schacht Ladybug
Spinning Wheel. Features include a
generously-sized 7/8" orifice, large
capacity bobbin (about 8 oz), sliding
flyer hooks with incremental stops,
and large round guide hooks. The
Bulky Plyer Flyer comes with its own
special front maiden, bulky flyer, and
bulky bobbin.
SCHACHT NIDDY NODDY
Our niddy noddy is not only unique
and handsome in style, but also gives
superior functionality. Here are the
features we know you as a handspinner will love and appreciate:
■ Balanced and lightweight for
smooth winding
■ Quick and easy to remove full
skeins
■ Adjusts to 2 yard or 1 ½ yard
skeins
■ Folds flat for storage or transport
■ Comfortable soft hand grip
■ Beautifully designed in maple or
cherr y
SCHACHT COLLAPSIBLE KATE
Some spinners prefer a freestanding lazy kate. Our tensioned lazy kate
is easy to disassemble to take with
you and can hold both regular and
bulky bobbins.
Page 12
12
TWO YEAR LIMITED WARRANTY
Your new Schacht Spindle
Company Ladybug Spinning Wheel
is warranted to the original consumer purchaser by Schacht Spindle
Company, Inc. to be free of defects in
material and workmanship. Schacht
Spindle Company’s obligation under
this Warranty shall be limited to the
repair or replacement of any part
or parts that may prove defective
within two (2) years following the
date of the original new purchase
by the consumer, and that Schacht
Spindle Company’s examination shall
disclose to our satisfaction to be thus
defective.
If a problem with this product
develops during the warranty period,
first contact the dealer from whom
you made the purchase. If you need
further assistance, please contact
our Customer Service Department
at Schacht Spindle Co., Inc. At our
option, it may be required that the
product be returned to our factory
freight prepaid for inspection and
repair and/or replacement.
This Warranty covers normal
consumer use and does not cover
damage that occurs in shipment or
damage that results from alteration,
accident, misuse, abuse, or neglect.
This Warranty gives you specific
legal rights, and you may also have
other rights, which vary from state
to state.
This Warranty is not valid for
products that have served as dealer
floor models that have outlived the
term of this Warranty.
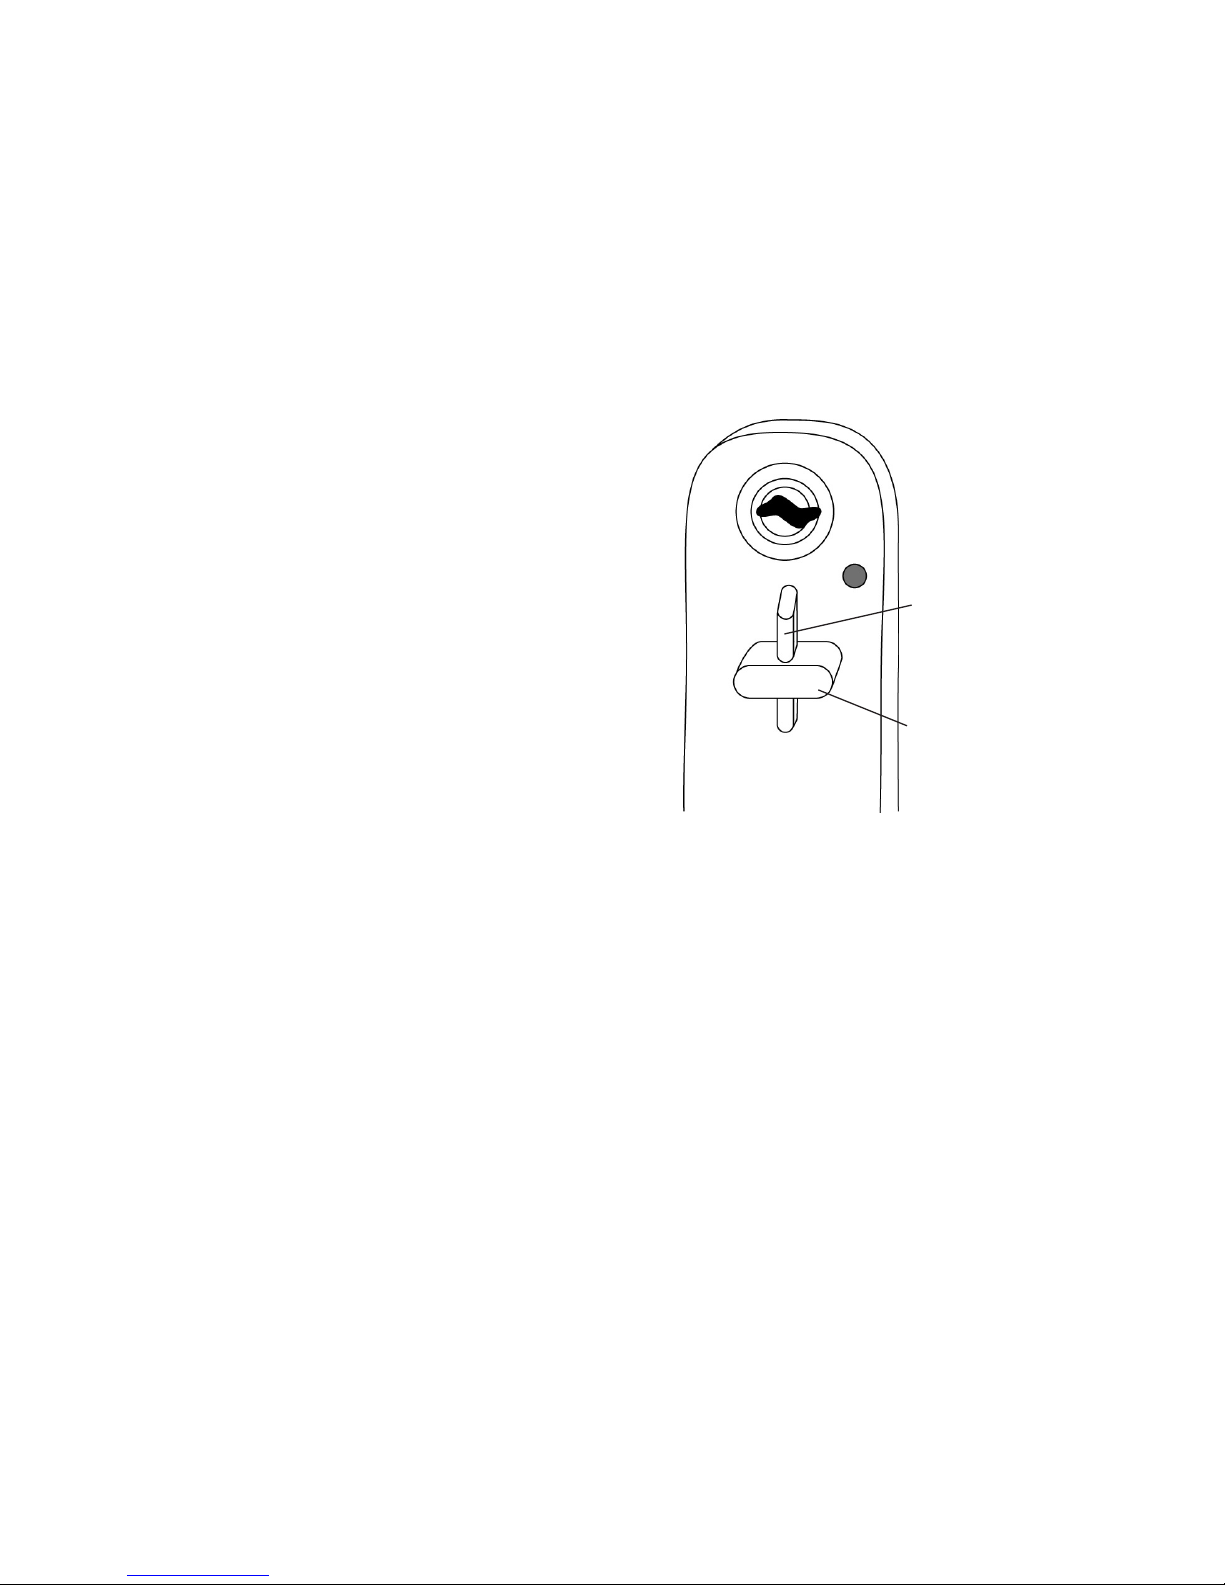
end of
mother-of-all
wood wedge
WHERE’S MY SERIAL NUMBER?
The serial number of your wheel is
stamped on the end of the mother-ofall that extends through the back legs
and is secured by the wood wedge.
The first six digits of the serial
number are the date of assembly. The
remaining digits are a sequence number.
 Loading...