

Page 1

SCEPTRE X42 HDTV User Manual
Dear Sceptre Customer,
Congratulations on your new SCEPTRE X42 High Definition LCD Television
purchase. Thank you for your support. To ensure safety and many years of
trouble free operation of your TV, please read the manual carefully before
making any adjustments, and keep them in a safe place for future reference.
This TV is built with precision and features a number of exciting technologies
such as Faroudja DCDi™ Cinema processing technology, SRS TruSurround
XT™ sound enhancement technology, motion adaptive digital noise reduction,
and adaptive contrast. We hope you enjoy your new SCEPTRE X42 High
Definition LCD Television.
For technical assistance, please call 1800-788-2878 and select option 3 or
email our tech support group at
For all other inquiries, please call 1800-788-2878 and select option 4 or email
our customer service group at
We recommend you register your SCEPTRE X42 HDTV with the enclosed
registration card and mail it in. For peace of mind and to protect your investment
beyond the standard warranty, SCEPTRE offers a two year extended warranty
service for your TV. This plan gives additional coverage once your standard
warranty period runs out. Please call our customer service group to purchase
the extended warranty.
monitor-ts@sceptre.com.
cs@sceptre.com.
- 1 -
www.SCEPTRE.com
Page 2

SCEPTRE X42 HDTV User Manual
IMPORTANT INFORMATION
- 2 -
www.SCEPTRE.com
Page 3

IMPORTANT INFORMATION
THIS PRODUCT HAS BEEN TESTED FOR COMPLIANCE WITH REGULATORY
SAFETY CERTIFICATIONS
This product is designed and manufactured to operate within defined design limits, and
misuse may result in electric shock or fire. To prevent the product from being damaged,
the following rules should be observed for the installation, use and maintenance of the
product. Read the following safety instructions before operating the display. Keep these
instructions in a safe place for future reference.
• To avoid the risk of electric shock or component damage, switch off the power before
connecting other components to the X42 LCD TV.
• Unplug the power cord before cleaning the X42 LCD TV. Please use the included
custom bezel cleaning cloth for cleaning the bezel of the X42 LCD TV only. Do not
use a liquid or a spray cleaner for cleaning the product. Do not use abrasive cleaners.
• Always use the accessories recommended by the manufacturer to insure
compatibility.
• When moving the X42 LCD TV from an area of low temperature to an area of high
temperature, condensation may form on the housing. Do not turn on the X42 LCD TV
immediately after this to avoid causing fire, electric shock or component damage.
• Do not place the X42 LCD TV on an unstable cart, stand, or table. If the X42 LCD TV
falls, it can injure a person and cause serious damage to the appliance. Use only a
cart or stand recommended by the manufacturer or sold with the X42 LCD TV.
• Any heat source should maintain a distance of at least 5 feet away from the X42 LCD
TV, i.e. radiator, heater, oven, amplifier etc. Do not install the product too close to
anything that produces smoke or moisture. Operating the product close to smoke or
moisture may cause fire or electric shock.
• Slots and openings in the back and bottom of the cabinet are provided for ventilation.
To ensure reliable operation of the X42 LCD TV and to protect it from overheating, be
sure these openings are not blocked or covered. Do not place the X42 LCD TV in a
bookcase or cabinet unless proper ventilation is provided.
• Never push any object into the ventilation slots of the X42 LCD TV. Do not place any
objects on the top of the Product. It could short circuit parts causing a fire or electric
shock. Never spill liquids on the X42 LCD TV.
• Do not use the X42 LCD TV in a portrait format (by rotating 90 degrees) under high
temperature environment (25°C or higher), since this would retard heat dissipation
and would eventually damage the TV.
• The X42 LCD TV should be operated only from the type of power source indicated on
the label. If you are not sure of the type of power supplied to your home, consult your
dealer or local power company.
• The power cable must be replaced when using different voltage from that specified in
the User Manual. For more information, contact your dealer.
• The X42 LCD TV is equipped with a three-pronged grounded plug, a plug with a third
(grounding) pin. This plug will fit only into a grounded power outlet as a safety feature.
SCEPTRE X42 HDTV User Manual
- 3 -
www.SCEPTRE.com
Page 4

SCEPTRE X42 HDTV User Manual
If your outlet does not accommodate the three-wire plug, have an electrician install
the correct outlet, or use an adapter to ground the appliance safely. Do not defeat the
safety purpose of the grounded plug.
• Do not overload power strips and extension cords. Overloading can result in fire or
electric shock.
• The wall socket should be installed near the equipment and should be easily
accessible.
• Only the marked power source can be used for the product. Any power source other
than the specified one may cause fire or electric shock.
• Do not touch the power cord during thunderstorms. To avoid electric shock, avoid
handling the power cord during electrical storms.
• Unplug the unit during a lightning storm or when it will not be used for a long period of
time. This will protect the X42 LCD TV from damage due to power surges.
• Do not attempt to repair or service the product yourself. Opening or removing the
back cover may expose you to high voltages, the risk of electric shock, and other
hazards. If repair is required, please contact your dealer and refer all servicing to
qualified service personnel.
• Keep the product away from moisture. Do not expose this appliance to rain or
moisture. If water penetrates into the product, unplug the power cord and contact your
dealer. Continuous use in this case may result in fire or electric shock.
• Do not use the product if any abnormality occurs. If any smoke or odor becomes
apparent, unplug the power cord and contact your dealer immediately. Do not try to
repair the product yourself.
• Avoid using dropped or damaged appliances. If the product is dropped and the
housing is damaged, the internal components may function abnormally. Unplug the
power cord immediately and contact your dealer for repair. Continued use of the
product may cause fire or electric shock.
• Do not install the product in an area with heavy dust or high humidity. Operating the
product in environments with heavy dust or high humidity may cause fire or electric
shock.
• Hold the power connector when removing the power cable. Pulling the power cable
itself may damage the wires inside the cable and cause fire or electric shocks. When
the product will not be used for an extended period of time, unplug the power
connector.
• To avoid risk of electric shock, do not touch the connector with wet hands.
• Insert batteries in accordance with instructions while using the remote control.
Incorrect polarities may cause damage and leakage of the batteries, operator injury
and contamination the remote control.
• If any of the following occurs please contact the dealer:
o The power connector fails or frays.
o Liquid sprays or any object drops into the X42 LCD TV.
o The Display is exposed to rain or other moisture.
o The Display is dropped or damaged in any way.
o The performance of the Display changes substantially.
• Operating environment: Temperature: 5°C ~ 35°C, Humidity: 10% to 90% non-
condensing, Altitude: 0~10,000 ft.
- 4 -
www.SCEPTRE.com
Page 5

SCEPTRE X42 HDTV User Manual
IMPORTANT INFORMATION
Television Antenna Connection Protection
External Television Antenna Grounding
If an outside antenna or cable system is to be connected to the LCD TV, make
sure that the antenna or cable system is electrically grounded to provide some
protection against voltage surges and static charges. Article 810 of the National
Electrical Code, ANSI/NFPSA 70, provides information with regard to proper
grounding of the mast and supporting structure, grounding of the lead-in wire to
an antenna discharge unit, size of the grounding conductors, location of antenna
discharge unit, connection to grounding electrodes, and requirements of the
grounding electrode.
Lightning Protection
For added protection of the LCD TV during a lightning storm or when it is left
unattended or unused for long periods of time, unplug the LCD TV from the wall
outlet and disconnect the antenna or cable system.
Power Lines
Do not locate the antenna near overhead light or power circuits, or where it could
fall into such power lines or circuits.
- 5 -
www.SCEPTRE.com
Page 6

SCEPTRE X42 HDTV User Manual
Opening the Package
The SCEPTRE X42 is packaged in a carton. Any standard accessories are
packed separately in another carton. The weight of the LCD display is
approximately 61.6 lbs. Due to the size and weight of the product, it is suggested
that it must be handled by a minimum of 2 or more persons. Since the glass can
be easily scratched or broken, please handle the product gently. Never place the
unit on a surface with the glass facing downwards unless it is on protective
padding. When opening the carton, check that the product is in good condition
and that all standard accessories and items are included. Save the original box
and all packing materials for future shipping needs.
Package Contents
SCEPTRE X42 HDTV Display x 1
User Manual x 1
Power Cord x 1
Warranty / Registration Card x 1
X42 Remote Control (AAA Batteries included) x 1
Audio Cable (Red, and White Connectors) x 1
Component Cable (Green, Blue, and Red Connectors) x 1
Custom Bezel Cleaning Cloth (FOR DRY CLEANING ONLY)
- 6 -
www.SCEPTRE.com
Page 7
SCEPTRE X42 HDTV User Manual
Installation
Please read the user manual carefully before performing the installation. The power consumption of
the display is approximately 250 watts. Please use the power cord designated for the product. When
an extension cord is required, use one with the correct power rating. The cord must be grounded and
the grounding feature must not be defeated. The product should be installed on a flat surface to avoid
tipping. Space should be maintained between the back of the product and the wall for proper
ventilation. If you would like to mount the TV onto the wall, please see page 7, 8, and, 14 for
additional information. Avoid installing the product in the kitchen, bathroom or other places with high
humidity dust or smoke, so as not to shorten the service life of the electronic components. Please
ensure the product is installed with the screen in landscape orientation. Any 90° clockwise or
counterclockwise installation may induce poor ventilation and successive component damage.
Removing the Base for Wall Mounting
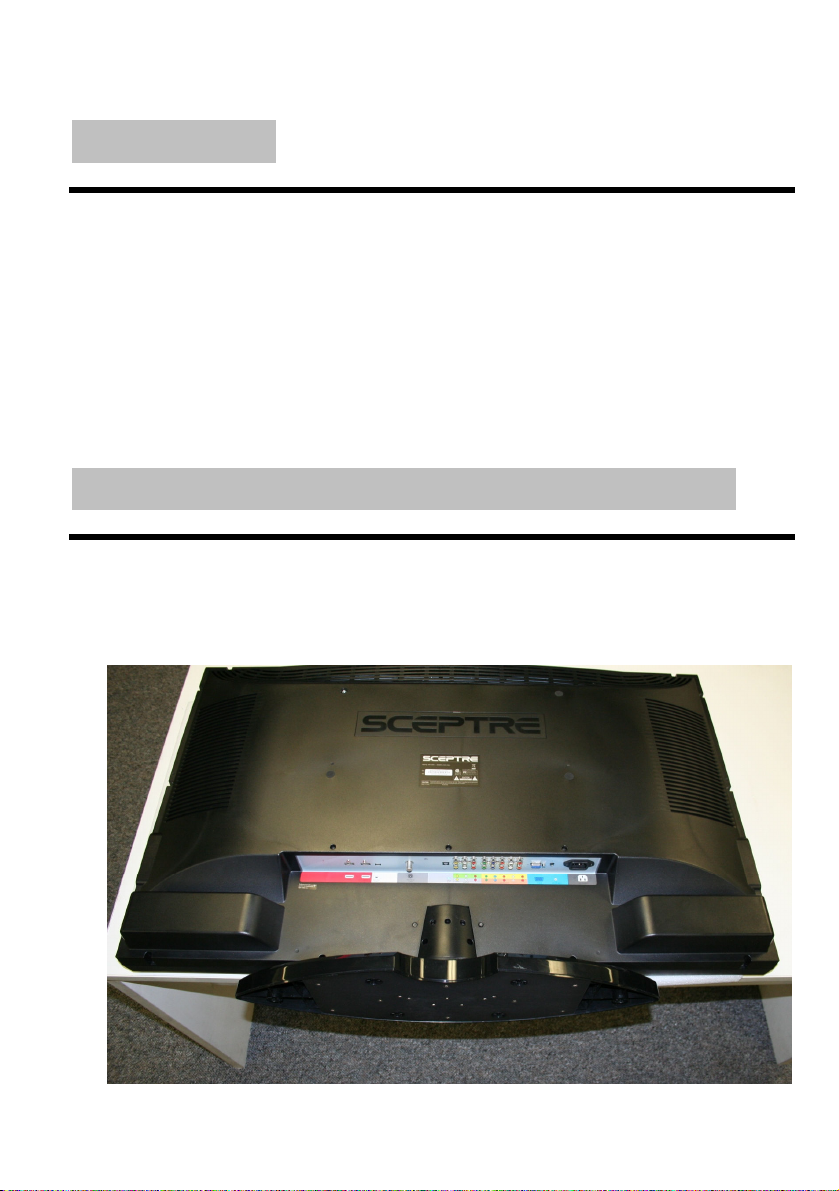
1. Please handle the TV with two or more people. Please locate a large flat surface (i.e. table) and
put a soft cloth (i.e. blanket) on the surface. Please set the TV facing down on the flat surface
so the panel does not get damaged.
- 7 -
www.SCEPTRE.com
Page 8
SCEPTRE X42 HDTV User Manual
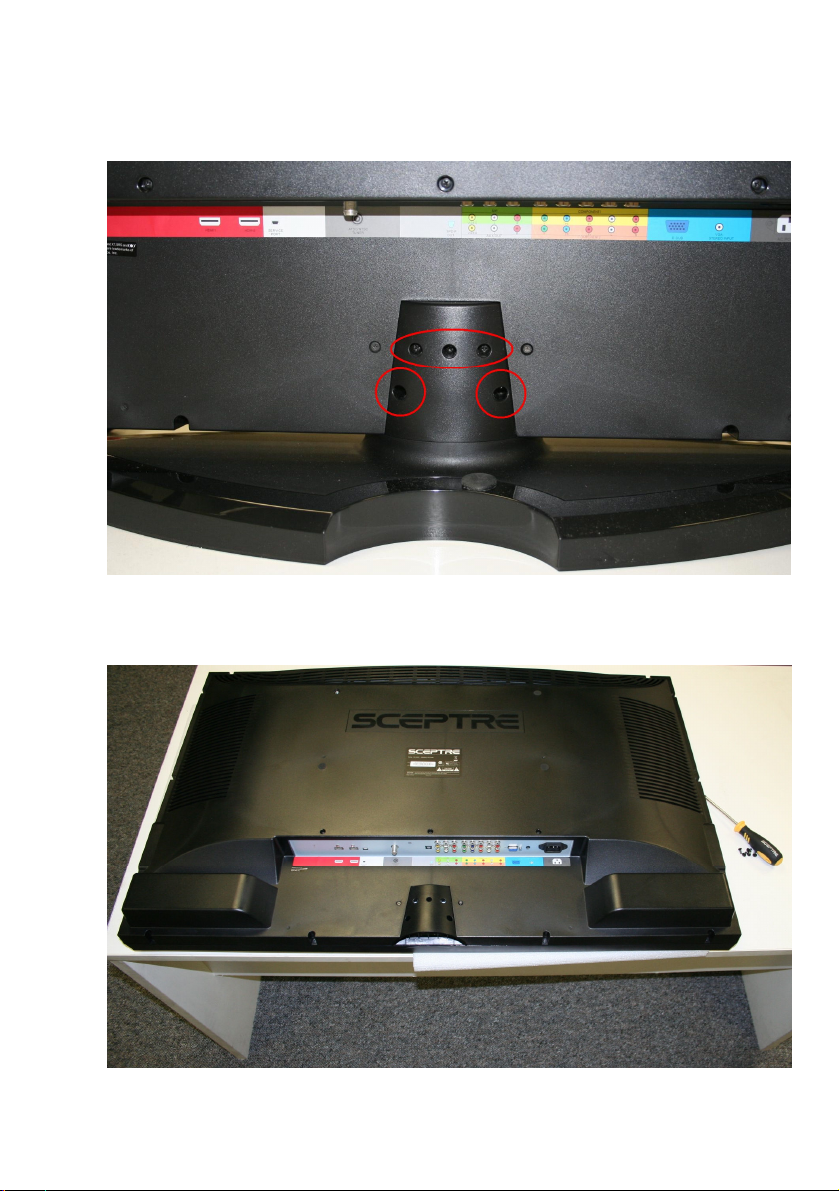
2. Take a look at the neck that’s connecting the base to the TV. There should be 5 screws on the
neck and 2 screws on the side. Remove the 5 screws on the neck and the base will slide off.
3. Once you have taken off the base, please save it along with the 5 screws in a safe place so that
they will not be lost when you want to re-attach the base.
- 8 -
www.SCEPTRE.com
Page 9

Table of Contents
IMPORTANT INFORMATION.................................................................. 2
IMPORTANT INFORMATION.................................................................. 3
IMPORTANT INFORMATION.................................................................. 5
Television Antenna Connection Protection .......................................... 5
Opening the Package .............................................................................. 6
Package Contents ................................................................................... 6
Installation ............................................................................................... 7
Removing the Base for Wall Mounting..................................................... 7
Table of Contents .................................................................................... 9
Identifying Front and Rear Panel ........................................................... 11
Front View ......................................................................................... 11
Side Connection View........................................................................ 12
Side View Control Buttons ................................................................. 13
Rear View Mounting Pattern.............................................................. 14
Rear View Connections ..................................................................... 15
SCEPTRE X42 Remote Control ............................................................ 17
Top Section ....................................................................................... 18
Mid Section........................................................................................ 19
Bottom Section .................................................................................. 20
Installing Batteries to the Remote.......................................................... 21
Which Port Should I Use ?..................................................................... 22
Knowing Your Cables ............................................................................ 24
Switching Sources for Ports................................................................... 26
Connecting Your Antenna or Cable to TV.............................................. 27
If You Have Digital Cable without Cable Box or Antenna…................ 27
If You Have Cable or Antenna through VCR… .................................. 28
If You have Cable or Antenna… ........................................................ 29
Connecting Your DVD Player to the TV................................................. 30
If You Want the Best Connection with HDMI… .................................. 30
If You Want the Better Connection with Component…....................... 31
If You Want the Fair Connection with Composite… ........................... 32
Connecting Your Satellite or Cable Set-top box to the TV...................... 33
If You Want the Best Connection with HDMI… .................................. 33
If You Want the Better Connection with Component…....................... 34
SCEPTRE X42 HDTV User Manual
- 9 -
www.SCEPTRE.com
Page 10

SCEPTRE X42 HDTV User Manual
If You Want the Fair Connection with Composite… ........................... 35
Connecting an External Surround Sound Receiver................................ 36
If You Want the Best Connection with Coaxial SPDIF (digital)…........ 36
If You Want the Good Connection with RCA Audio (analog)… .......... 37
Connecting a PC ................................................................................... 38
Connecting Game Consoles to the TV................................................... 39
For your PS3….................................................................................. 39
For Your Xbox 360…......................................................................... 40
Ready to Watch Some TV? ................................................................... 41
If You’ve Connected Antenna or Cable to the TV… ........................... 41
OSD (On Screen Display) Controls........................................................ 43
Via Remote Control ........................................................................... 43
Via TV Side Panel Buttons................................................................. 44
OSD (On Screen Display) Options ........................................................ 45
Channel Main Option......................................................................... 46
Picture Main Option ........................................................................... 52
Function Main Option......................................................................... 70
Detailed Explanations............................................................................ 93
Info Banner Explained ....................................................................... 93
Aspect Ratio Explained...................................................................... 96
Picture In Picture / Picture By Picture Explained................................ 99
Favorite Channels............................................................................ 101
Closed Captioning (digital and analog) Explained ............................ 102
Rating Explained ............................................................................. 103
Glossary .......................................................................................... 105
How do I clean the TV ?................................................................... 106
Trouble Shooting ................................................................................. 107
Call Us If You Need Help!.................................................................... 111
Specification ........................................................................................ 112
LIMITED PRODUCT WARRANTY ...................................................... 115
Trademarks ......................................................................................... 118
Disclaimer & Copyright Information...................................................... 118
FCC Compliance Statement ................................................................ 119
- 10 -
www.SCEPTRE.com
Page 11

SCEPTRE X42 HDTV User Manual
Identifying Front and Rear Panel
Front View
INDICATOR LIGHT – The light is red when power is plugged in but the TV is not
turned on. The light turns blue when the TV is turned on.
REMOTE SENSOR – The remote sensor receives all the commands from the
remote control.
- 11 -
www.SCEPTRE.com
Page 12
Side Connection View
SCEPTRE X42 HDTV User Manual
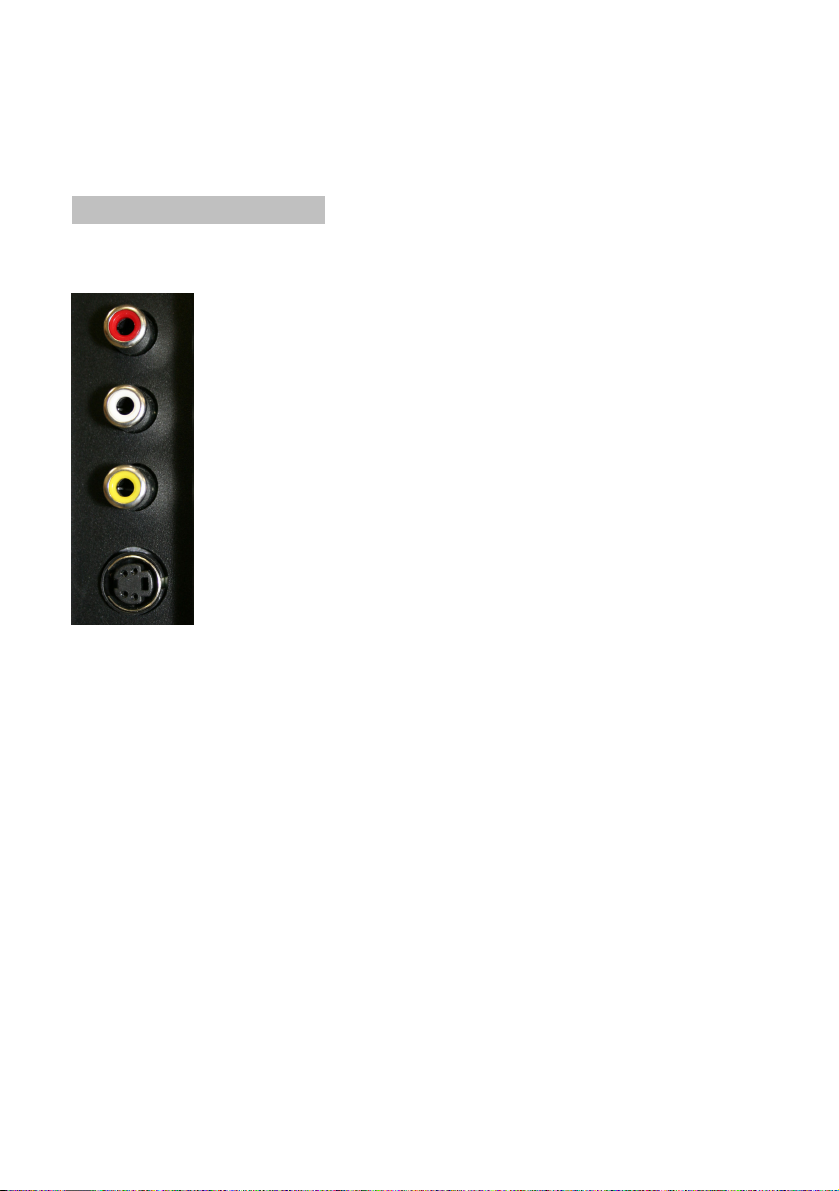
Composite 2 – Connects to devices that use composite video cables such as
VCR or camcorder or video game consoles. The S-Video connector is
associated with AV3’s video. Please connect the video portion with either the
yellow connector or the S-Video connector. Do NOT connect both video
connectors. Use the SOURCE button to select AV2 on your MAIN SOURCE if
you are using the yellow plug for video, use the SOURCE button to select AV3
on your MAIN SOURCE if you are using the S-Video connector to view this
connection.
- 12 -
www.SCEPTRE.com
Page 13

SCEPTRE X42 HDTV User Manual
Side View Control Buttons
POWER – Turn on the TV by pressing the button once. Press the button again
to turn off the TV.
SOURCE – This button switches between all the different sources of the TV.
The switching sequence is as follows : TV (cable or air), AV1 (CVBS), AV2
(CVBS), AV3 (S-Video), YPbPr1, YPbPr2, HDMI1, HDMI2, and VGA. When the
OSD is active, this button acts as the enter button and confirms the menu
selection.
MENU – This button activates the On Screen Display (OSD). If a sub-menu is
active, pressing this button will return selection to the previous menu level.
CH(▲/▼) – These buttons change the TV channel up or down. If the OSD is
active, these buttons function as up or down controls for the menu.
VOL(+/-) – These buttons increase or decrease the TV’s volume. If a sub-menu
is active, pressing these buttons will move the selection left or right.
- 13 -
www.SCEPTRE.com
Page 14

Rear View Mounting Pattern
SCEPTRE X42 HDTV User Manual
Mounting Specification : 400mm x 200mm using screw size M6.
Length of screw should not exceed 12mm.
- 14 -
www.SCEPTRE.com
Page 15
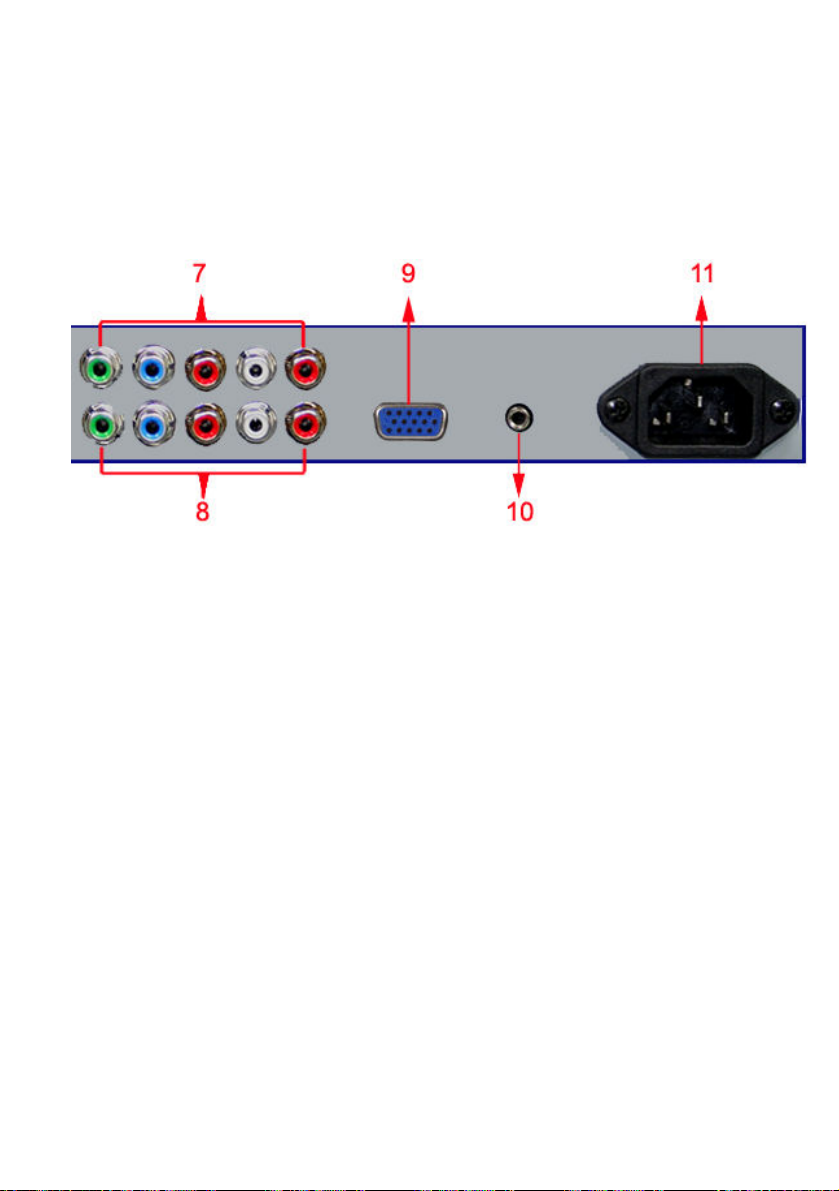
Rear View Connections
SCEPTRE X42 HDTV User Manual
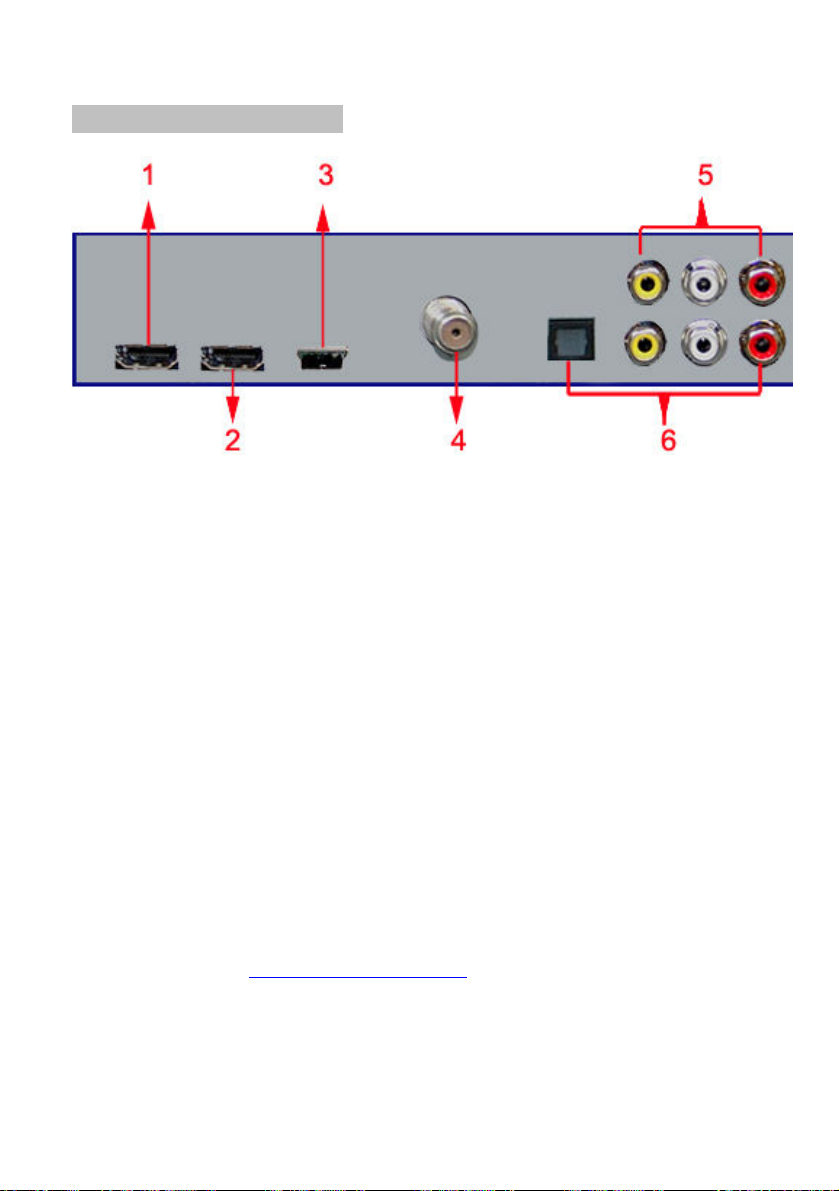
The following descriptions are for connections from left to right.
1. HDMI 1 – Connects to devices that use HDMI cable, such as Blu-ray or HD DVD player
or HD cable / satellite set-top box. This connection port receives pure digital audio and
high definition signal through one single cable. This port also can accept a HDCP video
device for video or PC for monitor display usage. Use the SOURCE button to select
HDMI1 on your MAIN SOURCE to view this connection. Please note : when using HDMI,
your sound signal must be PCM for the TV to decode digital audio. When using this
source for PC display, you must connect the audio cable to VGA Stereo Input for audio.
2. HDMI 2 – Connects to devices that use HDMI cable, such as Blu-ray or HD DVD player,
or HD cable / satellite set-top box. This connection port receives pure digital audio and
high definition signal through one single cable. This port also can accept a HDCP video
device for video or PC for monitor display usage. Use the SOURCE button to select
HDMI2 on your MAIN SOURCE to view this connection. Please note : when using HDMI,
your sound signal must be PCM for the TV to decode digital audio. When using this
source for PC display, you must connect the audio cable to VGA Stereo Input for audio.
3. SERVICE – This port is for factory service by Sceptre’s technicians only.
4. ATSC/NTSC – This connection is for digital or analog cable without the cable box or
over-the-airwave antennas. The tuner is a hybrid tuner that tunes to both analog and
digital channels. This connection uses coaxial RF cable. For over-the airwave digital
stations please check
on your MAIN SOURCE to view this connection.
5. COMPOSITE 1 (upper) – Connects to devices that use composite video cables such
as VCR or camcorder or video game consoles. Please connect the video portion with the
yellow connector. Use the SOURCE button to select AV1 on your MAIN SOURCE to view
this connection.
http://www.antennaweb.org. Use the SOURCE button to select TV
- 15 -
www.SCEPTRE.com
Page 16
SCEPTRE X42 HDTV User Manual
6. LINE OUT (lower) – This connection port is used for sending out audio signals to other audio
devices such as stereo/surround sound receivers and sending out video signals to other video device
such as TV monitor or VCR. The black square (OPTICAL SPDIF OUT) connector sends out either
bit-stream or PCM digital sound signal to a home theater receiver with digital input. The yellow (AV
OUT) connector sends out the video signal. The red (R) and white (L) connectors send out the audio
signal. This connection port uses RCA audio cable for sound, composite cable for video, and an
optical audio cable for digital audio out. Please note : You can only use the red/white connection or
the single black square connection. Do NOT connect both.
The following descriptions are for connections from left to right.
7. COMPONENT 1 (upper) – These connection ports are for DVD players, or satellite / cable set-top
boxes that use component cables. From left to right, connect green, blue, and red for video, and then
connect white for left channel audio, red for right channel audio. Use the SOURCE button to select
YPbPr1 to view this connection.
8. COMPONENT 2 (lower) – These connection ports are for DVD players, or satellite / cable set-top
boxes that use component cables. From left to right, connect green, blue, and red for video, and then
connect white for left channel audio, red for right channel audio. Use the SOURCE button to select
YPbPr2 to view this connection.
9. VGA – This connection port connects to a PC for video using VGA cable. Be sure to connect your
audio cable to the VGA Stereo input if you want sound out of VGA video source. Use the SOURCE
button to select VGA on your MAIN SOURCE to view this connection.
10. VGA STEREO INPUT – This connection port is for people who want to provide audio to the TV
when using a PC or a DVI video device. Use a 3.5mm mini-jack audio cable (headphone jack) to
provide audio for a HDCP enabled DVI video device or PCs with VGA or DVI connection.
11. AC IN - This connection is for providing power to the TV. This connection uses a standard
computer power cord.
Please Note:
• This TV features a power saving function which will turn off the TV automatically after 15
minutes of idling on a connection with no signal. This feature is present on all connection.
- 16 -
www.SCEPTRE.com
Page 17

SCEPTRE X42 HDTV User Manual
SCEPTRE X42 Remote Control
This remote control follows SONY’s universal remote code.
- 17 -
www.SCEPTRE.com
Page 18
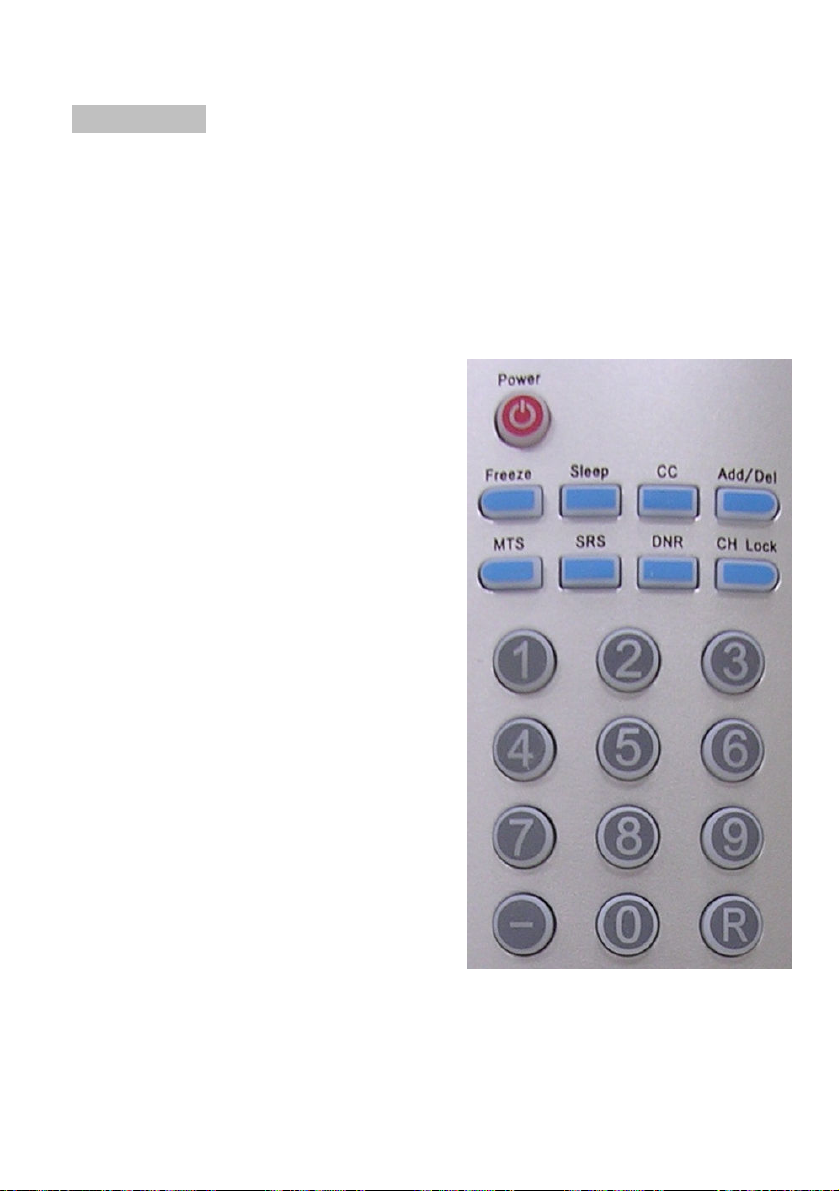
Top Section
POWER – This button turns the TV
on or off.
FREEZE – This button freezes the
video. Press the button again to
unfreeze the screen.
SLEEP – This button enables the
sleep function where the TV turns
itself off after the designated time.
CC – This button turns on the
closed captioning system of the
television. Please Note : CC only
works under the sources TV, AV1,
and AV2.
ADD / DEL – This button adds or
deletes the current channel from the
channel list. When you use CH+ or
CH-, the deleted channel will be
skipped over.
MTS – This button switches
between the main audio and the
(SAP) second audio programming.
SRS – This button enables the SRS
surround sound making the TV
speakers audio sound like they are
surrounding you.
DNR – This button enables the
digital noise reduction on the TV,
making the picture look smoother.
CH Lock – This button locks the
current channel you are on, so that
kids cannot view the locked channel
unless unlocked by a password.
You’ll also need to input a password
when locking the channel.
0-9 – These buttons allow you to
access the channels directly. When
accessing a digital channel you
would use these buttons in junction
with the ( – ) button to switch
channels.
www.SCEPTRE.com
SCEPTRE X42 HDTV User Manual
( – ) – This button allows you to
access digital channels directly
when used in junction with the
number buttons 0-9.
R – This button allows you to jump
between your current channel and
the last channel you were on.
- 18 -
Page 19

Mid Section
PICTURE – This button selects
different optimized picture settings
for the TV.
SOUND – This button selects
different optimized sound settings
for the TV.
VOL(+/-) – These two buttons
increase or decrease the volume of
the TV.
CH(+/-) – These two buttons change
the TV channel up or down.
MUTE – This button stops the TV
from producing any sound.
ASPECT – This button changes the
TV between different display modes.
GUIDE – This button turns on the
electronic program guide that is
received from over the airwave
antenna.
MENU – This button turns on the on
screen display menu (OSD).
▲▼◄► – These buttons allow you
to navigate inside the OSD menu.
↵↵↵↵ –
This button allows you to select
functions inside the OSD menu and
also acts as the ENTER button for
changing channels.
SOURCE – This button switches the
input sources. Once pressed use
↵↵↵↵
the ▲▼◄► and
the source you want to switch to.
EXIT – This button allows you to
quit from the OSD menu.
key to select
www.SCEPTRE.com
SCEPTRE X42 HDTV User Manual
- 19 -
Page 20

Bottom Section
AUDIO – This button switches the
audio of the TV in between your
picture in picture or picture on
picture windows.
VIDEO – This button switches the
video from the picture in picture
window to the main screen, vice
versa.
SIZE – This button changes the size
of the picture in picture window.
POS – This button changes the
position of the picture in picture
window.
ON/OFF – This button turns on and
off the picture in picture window and
the picture on picture window.
SOURCE – This button changes the
input source of the picture in picture
window and the picture on picture
window.
▼▲ – These button changes the
channel up or down from your
favorites channel list.
ADD / DEL – This button adds or
deletes the current channel from the
favorites channel list.
LED ON / OFF – This button turns
the backlight for the number pad on
or off.
INFO – This button shows you your
current channel information, display
input, and resolution.
www.SCEPTRE.com
SCEPTRE X42 HDTV User Manual
- 20 -
Page 21

SCEPTRE X42 HDTV User Manual
Installing Batteries to the Remote
Please insert two AAA batteries into the remote control. Make sure that you
match the (+) and (-) symbols on the batteries with the (+) and (-) symbols inside
the battery compartment. Afterwards, re-attach the battery cover.
Please note:
• Only use AAA batteries.
• Do not mix new and old batteries. This may result in cracking or leakage that
may pose a fire risk or lead to personal injury.
• Inserting the batteries incorrectly may also result in cracking or leakage that
may pose a fire risk or lead to personal injury.
• Dispose the batteries in accordance with local laws and regulations.
• Keep the batteries away from children and pets.
• If the remote control is not used for a long time, remove the batteries.
• Keep the remote control away from moisture, sunlight, and high
temperatures.
- 21 -
www.SCEPTRE.com
Page 22

SCEPTRE X42 HDTV User Manual
Which Port Should I Use ?
Port Quality
& Name
Best
HDMI 1, 2
(Digital HD
Capable)
Best/Fair
ATSC/NTSC
(Digital HD
Capable)
Best
VGA
(HD Capable)
Better
YPBPR 1 & 2
(HD Capable)
Good
AV 3
(Non-HD)
Fair
AV 1 & 2
(Non-HD)
Port Picture
- 22 -
www.SCEPTRE.com
Cable Used
Resolution
1080p,
1080i, 720p,
480p, 480i
Coaxial RF
1080i, 720p,
480p, 480i
1920x1080
(scaled)
1360x768 or
Component
1080p,
1080i, 720p,
480p, 480i
S-Video
480i only
Composite
480i only
HDMI
VGA
lower
&
Devices that use
this Port
Blu-ray DVD
Player, HD-DVD
Player, HD Cable
or HD Satellite Settop Box, HDCP
devices, PC
Antenna or Digital
Cable with out the
cable box
PC or MAC with
VGA connection
DVD Player, Video
Game Console,
High Definition
Cable or Satellite
Set-top Box
Non High Definition
Cable or Satellite
Set-top Box, SVideo VCR
Non High Definition
Cable or Satellite
Set-top Box, VCR,
Old Game Console,
Camcorder
Page 23

SCEPTRE X42 HDTV User Manual
What Port Should I Use ? (continued)
Port Quality,
Type & Name
Good
VGA STEREO
INPUT
(Audio)
Best
LINE OUT
(Digital Audio)
Not Available
Good
LINE OUT
(Audio)
Fair
LINE OUT
(Non-HD)
Port Picture
Resolution
RCA Audio
Composite
Cable
Used &
3.5mm
mini-jack
Optical
SPDIF
Service
Port
480i only
Devices
that use
this Port
HDCP
devices,
PC, MAC
Receiver
with Digital
Surround
Sound
Decoding
This port is
for Sceptre
technicians
only.
Any Stereo
or Better
Receiver,
VCR, or
DVR
VCR, or
DVR
- 23 -
www.SCEPTRE.com
Page 24

SCEPTRE X42 HDTV User Manual
Knowing Your Cables
Cable Name
Cable Picture
HDMI
Coaxial RF
VGA
Component
S-Video
- 24 -
www.SCEPTRE.com
Page 25

SCEPTRE X42 HDTV User Manual
Knowing Your Cables (continued)
Cable Name
Cable Picture
Composite
3.5 mm Mini-jack
RCA Audio
AC Power
Optical SPDIF
- 25 -
www.SCEPTRE.com
Page 26

SCEPTRE X42 HDTV User Manual
Switching Sources for Ports
The X42 offers multiple ways of connecting your devices to the TV; the chart
below will help you understand which source you switch to for each of the ports.
Port Picture
Cable Used
Source Name to Switch to
HDMI or
HDMI-DVI
COAXIAL RF
HDMI 1 or HDMI 2
TV (CABLE / AIR)
COMPONENT
VGA
S-VIDEO
COMPOSITE
VGA
YPBPR 1 or YPBPR 2
AV 3 (S-VIDEO)
AV 1 (CBVS) or
AV 2 (CVBS)
- 26 -
www.SCEPTRE.com
Page 27

SCEPTRE X42 HDTV User Manual
Connecting Your Antenna or Cable to TV
If You Have Digital Cable without Cable Box or Antenna…
1. Make sure the power of X42 LCD HDTV is turned off.
2. Connect the Coaxial RF cable from your antenna or digital cable to
3. Turn on X42 LCD HDTV.
4. Select TV (Air) for antenna or TV (Cable) for digital cable from either
5. Use the On Screen Display to scan for channels.
Please Note :
the ATSC/NTSC port off the back of your X42 LCD HDTV.
your remote control’s source button or source button on the right side
of the TV.
• Not all broadcasts are in High Definition (HD). Please refer to
your local broadcasting stations for more information.
• The X42 LCD HDTV’s tuner is designed for HDTV therefore
requires a stronger signal than normal TVs. If you cannot
achieve that signal level with your antenna or cable, your X42
LCD HDTV might lose picture or sound.
- 27 -
www.SCEPTRE.com
Page 28

SCEPTRE X42 HDTV User Manual
If You Have Cable or Antenna through VCR…
1. Make sure the power of X42 LCD HDTV is turned off.
2. Make sure there is an antenna or cable connection to the VCR
already.
3. Use a Coaxial RF cable and connect from your VCR’s Antenna Out
or Output to TV to the ATSC/NTSC port off the back of your X42
LCD HDTV.
4. Turn on X42 LCD HDTV.
5. Select TV (Air) for antenna or TV (Cable) for digital cable from either
your remote control’s source button or source button on the right side
of the TV.
6. Use the On Screen Display to scan for channels.
Please Note :
• Some VCRs require you to turn it on before its output will
have a signal to the TV. Please consult your VCR manual
for further reference.
• Not all broadcasts are in High Definition (HD). Please refer
to your local broadcasting stations for more information.
• The X42 LCD HDTV’s tuner is designed for HDTV therefore
requires a stronger signal than normal TVs. If you cannot
achieve that signal level with your antenna or cable, your
X42 LCD HDTV might lose picture or sound.
- 28 -
www.SCEPTRE.com
Page 29

SCEPTRE X42 HDTV User Manual
If You have Cable or Antenna…
1. Make sure the power of X42 LCD HDTV is turned off.
2. Connect the Coaxial RF cable from your antenna or cable to the
ATSC/NTSC port off the back of your X42 LCD HDTV.
3. Turn on the X42 LCD HDTV.
4. Select TV (Air) for antenna or TV (Cable) for cable from either your
remote control’s source button or source button on the right side of
the TV.
5. Use the On Screen Display to scan for channels.
Please Note :
• Not all broadcasts are in High Definition (HD). Please refer to
your local broadcasting stations for more information.
• The X42 LCD HDTV’s tuner is designed for HDTV therefore
requires a stronger signal than normal TVs. If you cannot
achieve that signal level with your antenna or cable, your X42
LCD HDTV might lose picture or sound.
- 29 -
www.SCEPTRE.com
Page 30

SCEPTRE X42 HDTV User Manual
Connecting Your DVD Player to the TV
If You Want the Best Connection with HDMI…
1. Make sure the power of X42 LCD HDTV and your DVD player is turned
off.
2. Connect a HDMI cable to the HDMI port of your DVD player and the
other end to the HDMI port off the back of your X42 LCD HDTV.
3. Turn on the X42 LCD HDTV and your DVD player.
4. Use the remote control’s source button or the source button on the right
side of the TV to switch to HDMI 1.
Please Note :
• Please reference the DVD player’s manual as well, to make sure
the DVD player is configured to output correctly to the TV.
• This TV does not decode Bitstream digital audio, therefore you’ll
need to make sure your DVD is setup for PCM digital audio
through HDMI.
• If HDMI 1 is already occupied, please use HDMI 2 as your
connection port and switch source to HDMI 2.
- 30 -
www.SCEPTRE.com
Page 31

SCEPTRE X42 HDTV User Manual
If You Want the Better Connection with Component…
1. Make sure the power of X42 LCD HDTV and your DVD player is turned
off.
2. Obtain a Component Cable. Connect the green color connector to both
your DVD player and Component 1’s green connector port off the back of
your X42 LCD HDTV.
3. Connect the blue color connector to both your DVD player and
Component 1’s blue connector port off the back of your X42 LCD HDTV.
4. Connect the red color connector to both your DVD player and
Component 1’s red connector port off the back of your X42 LCD HDTV.
5. Obtain a RCA Audio Cable. Connect the white color connector to both
your DVD player and Component 1’s white connector port off the back of
your X42 LCD HDTV to the right side of your green, blue, red component
connection.
6. Connect the red color connector to both your DVD player and
Component 1’s red connector port off the back of your X42 LCD HDTV to
the right side of your green, blue, red component connection.
7. Turn on the X42 LCD HDTV and your DVD player.
8. Use the remote control’s source button or the source button on the right
side of the TV to switch to YPbPr 1.
Please Note :
• If Component 1 is already occupied, please use Component 2 as
your connection port and switch to source YPbPr 2.
• Please reference the DVD player’s manual as well, to make sure
the DVD player is configured to output correctly to the TV.
- 31 -
www.SCEPTRE.com
Page 32

SCEPTRE X42 HDTV User Manual
If You Want the Fair Connection with Composite…
1. Make sure the power of X42 LCD HDTV and your DVD player is turned
off.
2. Obtain a Yellow Video Cable. Connect the Yellow Video connector to
both your DVD player and Composite 1’s Yellow Video connector port off
the back of your X42 LCD HDTV.
3. Obtain a RCA Audio Cable. Connect the white color connector to both
your DVD player and Composite 1’s white connector port off the back of
your X42 LCD HDTV.
4. Connect the red color connector to both your DVD player and Composite
1’s red connector port off the back of your X42 LCD HDTV.
5. Turn on the X42 LCD HDTV and your DVD player.
6. Use the remote control’s source button or the source button on the right
side of the TV to switch to AV 1 (CVBS).
Please Note :
• If Composite 1 is already occupied, please use Composite 2 as
your connection port and switch source to AV 2 (CVBS).
• Please reference the DVD player’s manual as well, to make sure
the DVD player is configured to output correctly to the TV.
- 32 -
www.SCEPTRE.com
Page 33

SCEPTRE X42 HDTV User Manual
Connecting Your Satellite or Cable Settop box to the TV
If You Want the Best Connection with HDMI…
1. Make sure the power of X42 LCD HDTV and your set-top box is turned
off.
2. Connect a HDMI cable to the HDMI output of your set-top box and the
other end to the HDMI port off the back of your X42 LCD HDTV.
3. Turn on the X42 LCD HDTV and your set-top box.
4. Use the remote control’s source button or the source button on the right
side of the TV to switch to HDMI 1.
Please Note :
• Please reference the set-top box’s manual, to make sure the set-
top box is configured to output correctly to the TV.
• If HDMI 1 is already occupied, please use HDMI 2 as your
connection port and switch source to HDMI 2.
• This TV does not decode Bitstream digital audio, therefore you’ll
need to make sure your DVD is setup for PCM digital audio
through HDMI.
• Sceptre’s X42 LCD HDTV supports SONY’s universal remote
code. Please look up SONY’s codes in your universal
remote’s hand book.
- 33 -
www.SCEPTRE.com
Page 34

SCEPTRE X42 HDTV User Manual
If You Want the Better Connection with Component…
1. Make sure the power of X42 LCD HDTV and your set-top box is turned off.
2. Obtain a Component Cable. Connect the green color connector to both your settop box and Component 1’s green connector port off the back of your X42 LCD
HDTV.
3. Connect the blue color connector to both your set-top box and Component 1’s
blue connector port off the back of your X42 LCD HDTV.
4. Connect the red color connector to both your set-top box and Component 1’s red
connector port off the back of your X42 LCD HDTV.
5. Obtain a RCA Audio Cable. Connect the white color connector to both your settop box and Component 1’s white connector port off the back of your X42 LCD
HDTV to the right side of your green, blue, red component connection.
6. Connect the red color connector to both your set-top box and Component 1’s red
connector port off the back of your X42 LCD HDTV to the right side of your green,
blue, red component connection.
7. Turn on the X42 LCD HDTV and your set-top box.
8. Use the remote control’s source button or the source button on the right side of
the TV to switch to YPbPr 1.
Please Note :
• If Component 1 is already occupied, please use Component 2 as your
connection port and switch to source YPbPr 2.
• Please reference the set-top box’s manual as well, to make sure the set-top box
is configured to output correctly to the TV.
• Sceptre’s X42 LCD HDTV supports SONY’s universal remote code. Please
look up SONY’s codes in your universal remote’s hand book.
- 34 -
www.SCEPTRE.com
Page 35

SCEPTRE X42 HDTV User Manual
If You Want the Fair Connection with Composite…
1. Make sure the power of X42 LCD HDTV and your set-top box is
turned off.
2. Obtain a Yellow Video Cable. Connect the Yellow Video connector to
both your set-top box and Composite 1’s Yellow Video connector
port off the back of your X42 LCD HDTV.
3. Obtain a RCA Audio Cable. Connect the white color connector to
both your set-top box and Composite 1’s white connector port off the
back of your X42 LCD HDTV.
4. Connect the red color connector to both your set-top box and
Composite 1’s red connector port off the back of your X42 LCD
HDTV.
5. Turn on the X42 LCD HDTV and your set-top box.
6. Use the remote control’s source button or the source button on the
right side of the TV to switch to AV 1 (CVBS).
Please Note :
• If Composite 1 is already occupied, please use Composite 2 as
your connection port and switch source to AV 2 (CVBS).
• Please reference the set-top box’s manual as well, to make sure
the set-top box is configured to output correctly to the TV.
• Sceptre’s X42 LCD HDTV supports SONY’s universal remote
code. Please look up SONY’s codes in your universal
remote’s hand book.
- 35 -
www.SCEPTRE.com
Page 36

SCEPTRE X42 HDTV User Manual
Connecting an External Surround Sound
Receiver
If You Want the Best Connection with Coaxial SPDIF
(digital)…
1. Make sure the power of X42 LCD HDTV and your receiver is turned
off.
2. Obtain a Optical SPDIF cable, connect it to your receiver’s optical
SPDIF digital input and the Optical SPDIF connection an the LINE
OUT port off the back of the X42 LCD HDTV.
3. Turn on the X42 LCD HDTV and your receiver.
Please Note :
• If you want pure digital stream for your receiver to decode,
you must also configure the TV’s OSD Sound->Digital Audio
Out function. Make sure the option is on Bit Stream.
• If your receiver is making static noises when receiving Bit
Stream, you must use the PCM option instead.
• Please reference the receiver’s manual as well, to make
sure the receiver is configured to receive signals correctly
from the TV.
- 36 -
www.SCEPTRE.com
Page 37

SCEPTRE X42 HDTV User Manual
If You Want the Good Connection with RCA Audio (analog)…
1. Make sure the power of X42 LCD HDTV and your receiver is turned
off.
2. Obtain a RCA Audio cable, connect it to your receiver’s RCA audio
analog input and the RCA Audio connection on the LINE OUT port
off the back of the X42 LCD HDTV.
3. Turn on the X42 LCD HDTV and your receiver.
Please Note :
• Please reference the receiver’s manual as well, to make
sure the receiver is configured to receive signals correctly
from the TV.
- 37 -
www.SCEPTRE.com
Page 38

Connecting a PC
SCEPTRE X42 HDTV User Manual
1. Make sure the power of X42 LCD HDTV and your PC is turned off.
2. Obtain a 15-pin D-Sub VGA cable, connect to the VGA output of
your PC and the other end to the VGA port off the back of your X42
LCD HDTV.
3. Obtain a 3.5 mm Mini-jack, connect to the audio out of your PC and
the other end to the VGA Stereo Input port.
4. Turn on the power of the X42 LCD HDTV and your PC.
5. Use the remote control’s source button or the source button on the
right side of the TV to switch to VGA.
Please Note :
• For the best picture, please set your PC resolution to
1360x768 at 60 Hz. Please refer to the PC or graphic card’s
manual for further instructions on how to set your resolution
and refresh rate.
• You can also use your PC’s DVI port the same way as you
use the VGA port.
• Please refer to your PC manual for video output
requirements of the video card.
• The VGA port of the TV features a power saving mode which
will automatically turn off the TV, if there’s no signal provided
for more than 15 minutes.
- 38 -
www.SCEPTRE.com
Page 39

SCEPTRE X42 HDTV User Manual
Connecting Game Consoles to the TV
For your PS3…
1. Make sure the power of X42 LCD HDTV and your Playstation 3 is turned
off.
2. Connect a HDMI cable to the HDMI output of your Playstation 3 and the
other end to the HDMI port off the back of your X42 LCD HDTV.
3. Turn on the X42 LCD HDTV and Playstation 3.
4. Use the remote control’s source button or the source button on the right
side of the TV to switch to HDMI 1.
Please Note :
• Please reference the Playstation 3’s manual, to make sure the
PS3 is configured to output correctly to the TV. PS3 by default
outputs to composite only. With newer firmwares PS3’s HDMI
should also output a signal. Please call up PS3’s tech support
for further troubleshooting.
• This TV does not decode Bitstream digital audio, therefore you’ll
need to make sure your DVD is setup for PCM digital audio
through HDMI.
• If HDMI 1 is already occupied, please use HDMI 2 as your
connection port and switch source to HDMI 2.
- 39 -
www.SCEPTRE.com
Page 40

For Your Xbox 360…
SCEPTRE X42 HDTV User Manual
1. Make sure the power of X42 LCD HDTV and your Xbox 360 is turned off.
2. Obtain the Xbox360 Component Cable. Connect the green color
connector to Component 1’s green connector port off the back of your
X42 LCD HDTV.
3. Connect the blue color connector to Component 1’s blue connector port
off the back of your X42 LCD HDTV.
4. Connect the red color connector to Component 1’s red connector port off
the back of your X42 LCD HDTV.
5. Connect the white color connector Component 1’s white connector port
off the back of your X42 LCD HDTV to the right side of your green, blue,
red component connection.
6. Connect the red color connector to Component 1’s red connector port off
the back of your X42 LCD HDTV to the right side of your green, blue, red
component connection.
7. Connect the gray head to your Xbox 360 and make sure the switch on
the head is switched to HD.
8. Turn on the X42 LCD HDTV and your Xbox 360.
9. Use the remote control’s source button or the source button on the right
side of the TV to switch to YPbPr 1.
Please Note :
• Make sure to not confuse the red connector for video with the
red connector for audio, they are on separate rows on the Xbox
360’s connector.
• If Component 1 is already occupied, please use Component 2 as
your connection port and switch to source YPbPr 2.
• Please reference the Xbox 360’s manual as well, to make sure
the Xbox 360 is configured to output correctly to the TV.
- 40 -
www.SCEPTRE.com
Page 41

SCEPTRE X42 HDTV User Manual
Ready to Watch Some TV?
Starting up the X42 LCD HDTV
1. Make sure your power cable is connected and the standby red light in
the front of the TV is lit up.
2. Check all your connection cables off the side or the back of your TV and
also your AV devices. Make sure they are all connected securely.
3. Turn on your TV and other AV devices if necessary.
4. Select the correct source according to the Connecting pages.
If You’ve Connected Antenna or Cable to the TV…
If an antenna or cable is connected to your TV’s ATSC/NTSC port, you will need
to use the source button on the remote control or the source button on the right
side of the TV to switch to TV (Cable / Air) and auto-scan for channels.
1. Open up the OSD by pressing the MENU button on the remote control.
2. Make sure CHANNEL main option is highlighted in yellow; if not please
use the ▲ or ▼ buttons to select CHANNEL then press the ► direction
button to switch to TUNER MODE function.
- 41 -
www.SCEPTRE.com
Page 42

SCEPTRE X42 HDTV User Manual
↵↵↵↵
3. Press the
4. Press the ▲ or ▼ buttons to select the options AIR or CABLE.
5. If you have an antenna connected to the X42 LCD HDTV, please select
AIR as your option by pressing the
6. If you have cable connected to your X42 LCD HDTV, please select
CABLE as your option by pressing the
will pop up. Please use the ▲ or ▼ buttons to select AUTO as your
cable option and press
button to go into TUNER MODE function.
↵↵↵↵
button.
↵↵↵↵
button. An additional option
↵↵↵↵
to confirm the selection.
7. Once you have made the selection, the OSD will return you back to
CHANNEL main options. Press the ▼ button to highlight the AUTO
↵↵↵↵
SCAN function and press
8. Once the scanning is done, you can watch the TV.
Please Note :
• Not all broadcasts are in High Definition (HD). Please refer to
your local broadcasting stations for more information.
• The X42 LCD HDTV’s tuner is designed for HDTV therefore
requires a stronger signal than normal TVs. If you cannot
achieve that signal level with your antenna or cable, your X42
LCD HDTV might lose picture or sound.
twice to start scanning for channels.
- 42 -
www.SCEPTRE.com
Page 43

SCEPTRE X42 HDTV User Manual
OSD (On Screen Display) Controls
Via Remote Control
In order to adjust most of the options inside the On Screen Display (OSD), the
picture below shows all the buttons used on the remote control.
▲ – This button functions as up direction in the OSD.
▼ – This button functions as down direction in the OSD.
◄ – This button functions as left direction in the OSD.
► – This button functions as right direction in the OSD.
↵↵↵↵
– This button changes the channel in conjunction with the number pad and
also functions as enter for selecting options in the OSD.
– This button opens the OSD and also exits the OSD by going to the
previous level of the OSD.
– This button exits the OSD entirely.
- 43 -
www.SCEPTRE.com
Page 44

SCEPTRE X42 HDTV User Manual
Via TV Side Panel Buttons
In order to provide more than one type of OSD control buttons, the side panel’s
buttons have also been made functional for adjusting the OSD.
MENU – This button opens the OSD.
CH(▲) – This button changes the channel to a higher number and also functions
as up direction in the OSD.
CH(▼) – This button changes the channel to a lower number and also functions
as down direction in the OSD.
VOL(+) – This button decreases the volume and functions as left direction in the
OSD.
VOL(-) – This button decreases the volume and functions as right direction in the
OSD.
- 44 -
www.SCEPTRE.com
Page 45

SCEPTRE X42 HDTV User Manual
OSD (On Screen Display) Options
- 45 -
www.SCEPTRE.com
CHANNEL – This main option has
functions for the ATSC/NTSC port,
such as scanning channels, editing
channels, checking signal
strength….etc.
PICTURE – This main option has
functions for changing the picture
settings for all ports, such as tint,
contrast, sharpness, and dynamic
noise reduction.
SOUND – This main option has
functions for changing sound
settings for all ports, such as digital
audio out, treble, bass….etc.
FUNCTION – This main option has
functions for only composite and
ATSC/NTSC port. Some of the
functions are closed captioning and
channel blocking for parents.
SETUP – This main option has
functions for all ports, such as
power on / off time, sleep, menu
language, menu opacity, emergency
alert for emergency broadcasting
system.
Page 46

SCEPTRE X42 HDTV User Manual
Channel Main Option
This option chooses various antenna and cable functions. Extra functions
include signal strength for digital signals and changing input via External Input
function.
TUNER MODE – This function allows users to choose what connection the TV is
accepting.
1. Press MENU to open the OSD and highlight CHANNEL.
2. Press
3. Once in TUNER MODE, press ► again to select either AIR or CABLE.
4. Use ▲ or ▼ to select which connection you have then press ↵↵↵↵ to finalize
Please Note :
↵↵↵↵
or ► to move to the functions and highlight TUNER MODE.
the selection.
• If you are choosing cable, the default scanning mode is AUTO.
Unless you know what cable system your cable company uses,
please leave the tuner mode at AUTO.
- 46 -
www.SCEPTRE.com
Page 47

SCEPTRE X42 HDTV User Manual
AUTO SCAN – This function scans all the channels available from the
ATSC/NTSC port.
1. Press MENU to open the OSD and highlight CHANNEL.
2. Press
3. Once in TUNER MODE, press ▼ to select AUTO SCAN.
4. Press
Please Note :
↵↵↵↵
or ► to move to the functions and highlight TUNER MODE.
↵↵↵↵
twice to enter and begin scanning for channels.
• Not all broadcasts are in High Definition (HD). Please refer to
your local broadcasting stations for more information.
• The X42 LCD HDTV’s tuner is designed for HDTV therefore
requires a stronger signal than normal TVs. If you cannot
achieve that signal level with your antenna or cable, your X42
LCD HDTV might lose picture or sound.
- 47 -
www.SCEPTRE.com
Page 48

SCEPTRE X42 HDTV User Manual
CHANNEL EDIT – This function allows users to add, delete, or add to favorites,
the TV’s scanned in channels.
1. Press MENU to open the OSD and highlight CHANNEL.
2. Press
3. Once in TUNER MODE, press ▼ repeatedly to select CHANNEL EDIT.
4. Press
↵↵↵↵
or ► to move to the functions and highlight TUNER MODE.
↵↵↵↵
twice to enter start editing the scanned in channels.
- 48 -
www.SCEPTRE.com
Page 49

SCEPTRE X42 HDTV User Manual
5. You will be able to edit the channels by either deleting the channel or
adding the channel to the favorites list.
a. You can delete the channel by removing the
column.
i. Match the channel you want to remove with the ▲▼◄►
from the ADD
buttons in the ADD column then press
you will not be able to browse that channel until you go
back into channel edit and add the
ii. Press the MENU button to save and exit.
b. You can add the channel to your favorite list by adding a
the FAV. column.
i. Match the channel you want to add to favorites with the
▲▼◄► buttons in the FAV. column then press
you do this, the channel will be part of the sequential
cycling list of the FAVORITE ▲▼ button on the remote
control. You can go back into channel edit and remove
the
♥ to remove the channel from your favorite list.
ii. Press the MENU button to save and exit.
↵↵↵↵. If you do this,
back.
- 49 -
www.SCEPTRE.com
♥ in
↵↵↵↵
. If
Page 50

SCEPTRE X42 HDTV User Manual
SIGNAL STRENGTH – This function allows users to view their digital channel’s
signal strength.
1. Press MENU to open the OSD and highlight CHANNEL.
2. Press
3. Once in TUNER MODE, press ▼ repeatedly to select SIGNAL
Please Note :
↵↵↵↵
or ► to move to the functions and highlight TUNER MODE.
STRENGTH.
• This function is only available if you are on a digital channel.
This function will not work under analog channels.
• When using this function, the OSD menu will not auto exit.
- 50 -
www.SCEPTRE.com
Page 51

SCEPTRE X42 HDTV User Manual
EXTERNAL INPUT – This function allows users to change the current source to
another.
1. Press MENU to open the OSD and highlight CHANNEL.
2. Press
3. Once in TUNER MODE, press ▼ repeatedly to select EXTERNAL
4. Press
↵↵↵↵
or ► to move to the functions and highlight TUNER MODE.
INPUT.
↵↵↵↵
to select the function and use ◄ or ► to change the source of
your choice and press
↵↵↵↵
to finalize your selection.
- 51 -
www.SCEPTRE.com
Page 52

SCEPTRE X42 HDTV User Manual
Picture Main Option
This option allows users to adjust the TV’s picture sharpness, color, tint, and
other various functions.
PICTURE MODE – This function allows you to select the various picture modes
of the TV from custom, standard, mild, to vivid.
1. Press MENU to open the OSD and highlight PICTURE by pressing the ▼ button.
2. Press ↵↵↵↵ or ► to move to the functions and highlight PICTURE MODE.
3. Press ↵↵↵↵ or ► to select PICTURE MODE function.
4. Use ▲ or ▼ to select which picture mode you want.
5. Press ↵↵↵↵ to confirm your selection.
Please Note :
• CUSTOM allows you to adjust all the settings to your personal
preference.
• STANDARD is for watching regular TV.
• MILD is for watching movies.
• VIVID is for watching sports and HDTV programming.
• MULTIMEDIA is for playing games on game console machines.
• RECALL is not a picture mode but a function to restore any changes
under CUSTOM picture mode back to its original factory settings.
- 52 -
www.SCEPTRE.com
Page 53

SCEPTRE X42 HDTV User Manual
BACKLIGHT – This function adjusts the LCD lamp’s current. The current affects
the brilliance of the picture.
1. Press MENU to open the OSD and highlight PICTURE by pressing the
▼ button.
2. Press
3. Press ▼ repeatedly to select BACKLIGHT CONTROL function and press
4. Use ◄ or ► to adjust the backlight level.
Please Note :
↵↵↵↵
or ► to move to the functions and highlight PICTURE MODE.
↵↵↵↵
.
• The backlight level does not affect the brightness or the contrast
of the picture. It just affects the brilliance of the picture.
• This function can be reset back to the default via the RECALL
subfunction under PICTURE MODE.
- 53 -
www.SCEPTRE.com
Page 54

SCEPTRE X42 HDTV User Manual
BRIGHTNESS – This function adjusts the black level in a picture.
1. Press MENU to open the OSD and highlight PICTURE by pressing the ▼ button.
2. Press ↵↵↵↵ or ► to move to the functions and highlight PICTURE MODE.
3. Press ▼ to select BRIGHTNESS function and press ↵↵↵↵.
4. Use ◄ or ► to adjust the brightness level.
Please Note :
• This function can be reset back to default via the RECALL
subfunction under PICTURE MODE.
• If the brightness is too high, the picture will look washed out, if the
brightness is too low the picture will not have much detail in dark
spots of the picture.
- 54 -
www.SCEPTRE.com
Page 55

SCEPTRE X42 HDTV User Manual
CONTRAST – This function adjusts the white levels in a picture.
1. Press MENU to open the OSD and highlight PICTURE by pressing the ▼ button.
2. Press ↵↵↵↵ or ► to move to the functions and highlight PICTURE MODE.
3. Press ▼ repeatedly to select CONTRAST function and press ↵↵↵↵.
4. Use ◄ or ► to adjust the contrast level.
Please Note :
• This function can be reset back to default via the RECALL
subfunction under PICTURE MODE.
• If the contrast is too high, the picture will not have any details in
bright parts of the picture. If the contrast is too low, the picture will
look washed out.
- 55 -
www.SCEPTRE.com
Page 56

SCEPTRE X42 HDTV User Manual
SATURATION – This function adjusts how strong your picture’s colors are going
to be.
1. Press MENU to open the OSD and highlight PICTURE by pressing the ▼ button.
2. Press ↵↵↵↵ or ► to move to the functions and highlight PICTURE MODE.
3. Press ▼ repeatedly to select SATURATION function and press ↵↵↵↵.
4. Use ◄ or ► to adjust the saturation level.
Please Note :
• This function can be reset back to default via the RECALL
subfunction under PICTURE MODE.
- 56 -
www.SCEPTRE.com
Page 57

SCEPTRE X42 HDTV User Manual
TINT – This function adjusts your picture’s overall color with everything looking
green on one end and everything looking red on the other.
1. Press MENU to open the OSD and highlight PICTURE by pressing the ▼ button.
2. Press ↵↵↵↵ or ► to move to the functions and highlight PICTURE MODE.
3. Press ▼ repeatedly to select TINT function and press ↵↵↵↵.
4. Use ◄ or ► to adjust the tint level.
Please Note :
• This function can be reset back to the default via the RECALL
subfunction under PICTURE MODE.
- 57 -
www.SCEPTRE.com
Page 58

SCEPTRE X42 HDTV User Manual
SHARPNESS – This function adjusts how sharp objects in your pictures are.
1. Press MENU to open the OSD and highlight PICTURE by pressing the ▼ button.
2. Press ↵↵↵↵ or ► to move to the functions and highlight PICTURE MODE.
3. Press ▼ repeatedly to select SHARPNESS function and press ↵↵↵↵.
4. Use ◄ or ► to adjust the sharpness level.
Please Note :
• This function can be reset back to the default via the RECALL
subfunction under PICTURE MODE.
• If the sharpness is adjusted too high, the picture will look overly
pixilated. If the sharpness is adjusted too low, the picture will look
blurry.
- 58 -
www.SCEPTRE.com
Page 59

SCEPTRE X42 HDTV User Manual
COLOR TEMP. – This function adjusts the white color’s overall balance of white
colors in a picture. The function changes the white color’s overall balance in
large increments.
1. Press MENU to open the OSD and highlight PICTURE by pressing the
▼ button.
2. Press
3. Press ▼ repeatedly to select COLOR TEMP. function and press ↵↵↵↵.
4. Use ◄ or ► to adjust the color temperature level.
5. Press
Please Note :
↵↵↵↵
or ► to move to the functions and highlight PICTURE MODE.
↵↵↵↵
to finalize your selection.
• This function can be reset back to the default via the
RECALL subfunction under PICTURE MODE.
• COOL – This option will produce a picture with overall bluish
color.
• NORMAL – This option will produce a picture with normal
white color.
• WARM – This option will produce a picture with overall
reddish color.
- 59 -
www.SCEPTRE.com
Page 60

SCEPTRE X42 HDTV User Manual
NOISE REDUCTION – This function reduces the amount of pixilation on the TV
so the video will look smooth and natural. This function has 2 subfunctions,
digital noise reduction and temporal noise reduction.
1. Press MENU to open the OSD and highlight PICTURE by pressing the
▼ button.
2. Press
3. Press ▼ repeatedly to select NOISE REDUCTION function and press
4. Use ◄ or ► to turn the DNR (digital noise reduction) on or off.
5. Press ▼ then use ◄ or ► to turn TNR (temporal noise reduction) on or
6. Press
Please Note :
↵↵↵↵
or ► to move to the functions and highlight PICTURE MODE.
• Digital Noise Reduction blends adjacent pixels together so that
pictures do not look blocky, but because of the blurring the
picture would lose some detail.
off.
• Temporal Noise Reduction blends adjacent pixels together so
that pictures do not look blocky, this type of filter is best for
action pictures such as sporting events or action movies.
↵↵↵↵
to finalize your selection.
• This function can be reset back to the default via the RECALL
subfunction under PICTURE MODE.
- 60 -
www.SCEPTRE.com
↵↵↵↵
.
Page 61

SCEPTRE X42 HDTV User Manual
Advanced – This function offers advanced options that enhance the TV’s
performance and clarity.
1. Press MENU to open the OSD and highlight PICTURE by pressing the ▼ button.
2. Press ↵↵↵↵ or ► to move to the functions and highlight PICTURE MODE.
3. Press ▼ repeatedly to select ADVANCED and press ↵↵↵↵.
4. Use ▲, ▼, ◄ or ► to modify each option.
• Adaptive Contrast – This type of contrast enhances dark colors in bright
pictures and enhances bright colors in dark pictures therefore making
details in both bright and dark pictures more vivid and detailed.
• CCS (Cross Color Supression) – This subfunction filters and corrects
video signals that are corrupted from old VHS, DVD, analog cable, or
antennas, therefore making the picture’s colors and lines more accurate.
• Flesh Tone Adjustment – This subfunction strengthens the human flesh
colors in a picture.
• Blue Stretch – This subfunction strengthens the blue colors in a picture.
• RGB – This subfunction adjusts the white color’s overall balance of white
colors in a picture. Each color, red, green, and blue will fine tune the
overall white color’s balance in small increments.
5. Press ↵↵↵↵ to finalize your selection.
Please Note :
• This function can be reset back to the default via the RECALL
subfunction under PICTURE MODE.
- 61 -
www.SCEPTRE.com
Page 62

SCEPTRE X42 HDTV User Manual
Sound Main Option
This option allows users to adjust the TV’s sound functions, including sound
mode, auto volume level, digital audio out..etc.
SOUND MODE – This function allows you to select various sound modes among
custom, standard, movies, music, and speech.
1. Press MENU to open the OSD and highlight SOUND by pressing the ▼ button.
2. Press ↵↵↵↵ or ► to move to the functions and highlight SOUND MODE.
3. Press ↵↵↵↵ or ► to select SOUND MODE function.
4. Use ▲ or ▼ to select which sound mode you want.
5. Press ↵↵↵↵ to confirm you selection.
Please Note :
• This function can be reset back to the default via the RECALL
subfunction under SOUND MODE.
• CUSTOM allows you to adjust the sound levels to your personal
preference.
• STANDARD is for normal TV programs.
• MOVIES – is for watching movies.
• MUSIC – is for watching MTVs and concerts.
• SPEECH – is for watching news.
• RECALL – is not a sound mode but a function to reset CUSTOM sound
mode back to its default settings.
- 62 -
www.SCEPTRE.com
Page 63

SCEPTRE X42 HDTV User Manual
TREBLE – This function adjusts the level of high pitch sound in a TV.
1. Press MENU to open the OSD and highlight SOUND by pressing the ▼
button.
2. Press
3. Press ▼ repeatedly to select TREBLE.
4. Press
5. Use ◄ or ► to adjust the level.
Please Note :
↵↵↵↵
or ► to move to the functions and highlight SOUND MODE.
↵↵↵↵
or ► to select the function.
• This function can be reset back to the default via the RECALL
subfunction under SOUND MODE.
- 63 -
www.SCEPTRE.com
Page 64

SCEPTRE X42 HDTV User Manual
BASS – This function adjusts the level of low pitch sound in a TV.
1. Press MENU to open the OSD and highlight SOUND by pressing the ▼
button.
2. Press
3. Press ▼ repeatedly to select BASS.
4. Press
5. Use ◄ or ► to adjust the level.
Please Note :
↵↵↵↵
or ► to move to the functions and highlight SOUND MODE.
↵↵↵↵
or ► to select the function.
• This function can be reset back to the default via the RECALL
subfunction under SOUND MODE.
- 64 -
www.SCEPTRE.com
Page 65

SCEPTRE X42 HDTV User Manual
BALANCE – This function adjusts the balance of sound from left to right.
1. Press MENU to open the OSD and highlight SOUND by pressing the ▼
button.
↵↵↵↵
2. Press
3. Press ▼ repeatedly to select BALANCE.
4. Press
5. Use ◄ or ► to adjust the level.
Please Note :
or ► to move to the functions and highlight SOUND MODE.
↵↵↵↵
or ► to select the function.
• This function can be reset back to the default via the RECALL
subfunction under SOUND MODE.
- 65 -
www.SCEPTRE.com
Page 66

SCEPTRE X42 HDTV User Manual
AVL (Auto Volume Level) – This function will enable an automatic balancing of
sound when certain channels suddenly become over bearing.
1. Press MENU to open the OSD and highlight SOUND by pressing the ▼
button.
2. Press
3. Press ▼ repeatedly to select AVL.
4. Press
5. Use ◄ or ► to enable or disable the auto volume level.
Please Note :
↵↵↵↵
or ► to move to the functions and highlight SOUND MODE.
↵↵↵↵
or ► to select the function.
• This function can be reset back to the default via the RECALL
subfunction under SOUND MODE.
- 66 -
www.SCEPTRE.com
Page 67

SCEPTRE X42 HDTV User Manual
SRS – This function will enable a virtual surround sound field that presents an
expansive three dimensional sound field making the listener feel like there are
“phantom” speakers that appear to extend all around the listener.
1. Press MENU to open the OSD and highlight SOUND by pressing the ▼
button.
2. Press
3. Press ▼ repeatedly to select SRS.
4. Press
5. Use ◄ or ► to on or off SRS.
Please Note :
↵↵↵↵
or ► to move to the functions and highlight SOUND MODE.
↵↵↵↵
or ► to select the function.
• SRS surround sound depends on the room you are in. If there
are too many objects between the TV and the listener or the
walls are using sound absorbing material, the surround sound
effects will be diminished or disabled.
- 67 -
www.SCEPTRE.com
Page 68

SCEPTRE X42 HDTV User Manual
PREFERED AUDIO LANGUAGE – This function is for MTS (multi-channel
television sound). It will change the spoken language of a TV program via SAP
(secondary audio programming). The TV station will need to support the TV
program in different languages in order for this function to work.
6. Press MENU to open the OSD and highlight SOUND by pressing the ▼
button.
7. Press
8. Press ▼ repeatedly to select AUDIO LANGUAGE.
9. Press
10. Use ◄ or ► to switch between the languages.
Please Note :
↵↵↵↵
or ► to move to the functions and highlight SOUND MODE.
↵↵↵↵
or ► to select the function.
• This function can be reset back to the default via the RECALL
subfunction under SOUND MODE.
• This function is not always available. It is based upon the
support of your local TV broadcasting station’s signal. If the TV
station does not support MTS/SAP, you will not be able to
receive any alternative audio language. Please check with your
local broadcasting stations for more information.
- 68 -
www.SCEPTRE.com
Page 69

SCEPTRE X42 HDTV User Manual
DIGITAL AUDIO OUT – This function enables the TV to output sound in 2 digital
formats, PCM, and Bit Stream for digital home theater receivers.
1. Press MENU to open the OSD and highlight SOUND by pressing the ▼
button.
2. Press
3. Press ▼ repeatedly to select DIGITAL AUDIO OUT.
4. Press
5. Use ◄ or ► to select between the two options PCM and BITSTREAM.
Please Note :
↵↵↵↵
or ► to move to the functions and highlight SOUND MODE.
↵↵↵↵
or ► to select the function.
• PCM & BIT STREAM are two formats of digital sound. If you
have a digital home theater system, you should use BIT
STREAM for your digital audio out.
• Not all TV programming will give you digital surround sound.
The sound signal is based on the TV broadcasting station’s
support. Please check with your local broadcasting stations for
more information.
• This function can be reset back to the default via the RECALL
subfunction under SOUND MODE.
- 69 -
www.SCEPTRE.com
Page 70

SCEPTRE X42 HDTV User Manual
Function Main Option
This option allows users to turn on TV program filters for children, and also closed
captioning support options. To use this option you will need to enter in the password first.
The password is “0000”.
AUTO LOCK – This function helps parents filter TV programming by either locking
channels by choice or blocking channels based on the ratings that TV stations submit
through the signal.
- 70 -
www.SCEPTRE.com
Page 71

SCEPTRE X42 HDTV User Manual
1. SET BLOCKING – This subfunction turns blocking from CHANNEL
BLOCKING on or off.
a. Press MENU to open the OSD and highlight FUNCTION by pressing
b. Press
c. Press
d. Use
e. Enter “0000” as the default password.
f. Press
g. Use ▲ or ▼ to choose the option you want and press
Please Note :
the ▼ button.
↵↵↵↵
or ► to select the option and highlight AUTO LOCK.
↵↵↵↵
to select the function.
↵↵↵↵
or ► to select SET BLOCKING.
↵↵↵↵
to select the function.
↵↵↵↵
to select.
• Turning the subfunction on will enable the CHANNEL
BLOCKING FUNCTION. Turning the subfunction off will disable
the CHANNEL BLOCKING FUNCTION.
• You can also disable the function by pressing in the password.
- 71 -
www.SCEPTRE.com
Page 72

SCEPTRE X42 HDTV User Manual
2. BLOCK CHANNEL – This subfunction blocks channels by selecting them
off a channel list.
a. Press MENU to open the OSD and highlight FUNCTION by
pressing the ▼ button.
↵↵↵↵
b. Press
c. Press
d. Press ▼ to select CHANNEL BLOCKING.
e. Press
f. Highlight the channel you want to lock by using ▲ or ▼ buttons.
g. Lock or unlock the channel by pressing the
Please Note :
• You can also block the channels by using the CH LOCK
• This function will only work if SET BLOCKING subfunction is
• You can disable the function during channel browsing when
• The default auto lock password is “0000”.
• When a channel is blocked you can only change the channel
or ► to select the functions and highlight AUTO LOCK.
↵↵↵↵
to select the function.
↵↵↵↵
to select the function.
↵↵↵↵
button.
i. If a channel is locked it would have the
ii. If a channel is unlocked it would have the
button on the remote control.
turned on.
it asks you for the auto lock password.
by the CH+ or CH- buttons.
symbol.
symbol.
- 72 -
www.SCEPTRE.com
Page 73

SCEPTRE X42 HDTV User Manual
3. BLOCK BY RATING – This subfunction blocks channels by reading each
channel’s TV program or movie rating.
a. Press MENU to open the OSD and highlight FUNCTION by pressing
the ▼ button.
↵↵↵↵
b. Press
c. Press
a. Press ▼ until you see BLOCK BY RATING and use
BLOCK BY RATING.
b. You can block movies by selecting the ratings under MPAA and TV
shows under TV Parental Guidelines.
Please Note :
or ► to select the functions and highlight AUTO LOCK.
↵↵↵↵
to select the function.
↵↵↵↵
to select
i. Use ▲▼◄► to move to the ratings you want to block.
↵↵↵↵
ii. Press
have the
• This type of filtering for children watching TV will not always
work since the ratings signal is dependent on whether the
TV station sends the signal or not and whether the TV
receives the ratings signal or not. For better assurance
please use the CHANNEL BLOCKING subfunction.
to block or unblock. If a rating is locked it would
symbol. If a rating is unlocked it would have the
symbol.
- 73 -
www.SCEPTRE.com
Page 74

SCEPTRE X42 HDTV User Manual
4. DTV RATING – This subfunction gathers all digital channels’s
programming rating.
a. Press MENU to open the OSD and highlight FUNCTION by pressing
the ▼ button.
b. Press
c. Press
d. Press ▼ until you see DTV RATING and use
e. Press
Please Note :
↵↵↵↵
or ► to select the functions and highlight AUTO LOCK.
↵↵↵↵
to select the function.
↵↵↵↵
to select it.
↵↵↵↵
again to begin scanning for DTV ratings.
• This type of ratings for children watching TV will not always
work since the ratings signal is dependent on whether the
TV station sends the signal or not and whether the TV
receives the ratings signal or not. For better assurance
please use the CHANNEL BLOCKING subfunction.
- 74 -
www.SCEPTRE.com
Page 75

SCEPTRE X42 HDTV User Manual
5. SETUP CODE – This subfunction sets the password.
a. Press MENU to open the OSD and highlight FUNCTION by pressing
the ▼ button.
↵↵↵↵
b. Press
c. Press
d. Press ▼ until you see SETUP CODE and use
e. Input “0000” as your password and input your new password.
Please Note :
or ► to select the functions and highlight AUTO LOCK.
↵↵↵↵
to select the function.
↵↵↵↵
to select it.
• There is no way of resetting the password.
• If you’re going to change the password, please write it down
and keep it in a safe place just in case you forget.
- 75 -
www.SCEPTRE.com
Page 76

SCEPTRE X42 HDTV User Manual
CAPTION – This function shows closed caption of TV programs.
1. Press MENU to open the OSD and highlight FUNCTION by pressing the
▼ button.
↵↵↵↵
2. Press
3. Press ▼ until you see CAPTION and use
4. Use ▲▼◄► to select the option you want.
5. US stations usually use CC1 for analog and CS1 for digital closed
captioning.
6. Other CC and CS services do not apply to TV captioning inside US.
7. TT refers to text boxes that display the TV channel’s extra information.
Please Note :
• Analog and digital closed captioning will automatically switch for you
• Not all TV programs support closed captioning. This function
• TT box information may or may not display any related info to the TV
• Closed Captioning for this TV only works under sources TV, AV1,
or ► to select the functions and highlight AUTO LOCK.
↵↵↵↵
to select it.
when you switch channels.
depends on the TV station to support the signal with captioning. For
more information please contact your TV broadcasting stations.
program you are watching
and AV2.
- 76 -
www.SCEPTRE.com
Page 77

SCEPTRE X42 HDTV User Manual
CAPTION OPTION – This function locks or unlocks options you can use to
adjust the way your digital caption is displayed.
1. Press MENU to open the OSD and highlight FUNCTION by pressing the
▼ button.
↵↵↵↵
2. Press
3. Press ▼ until you see CAPTION OPTION and use
4. Use ◄ or ► to select the option you want.
5. DEFAULTS locks up the functions CC BACKGROUND and CAPTION
TEXT.
6. OPTIONS unlocks the functions CC BACKGROUND and CAPTION
TEXT.
Please Note :
or ► to select the functions and highlight AUTO LOCK.
↵↵↵↵
to select it.
• Only digital station’s closed captioning will be affected by this
function. If you are on an analog TV channel, the caption will
remain the same as before.
• Closed Captioning for this TV only works under sources TV, AV1,
and AV2.
- 77 -
www.SCEPTRE.com
Page 78

SCEPTRE X42 HDTV User Manual
CC BACKGROUND – This function adjusts digital channel’s closed captioning
background.
1. Press MENU to open the OSD and highlight FUNCTION by pressing the
▼ button.
2. Press
3. Press ▼ until you see CC BACKGROUND and use
4. Use ▲▼◄► to select the option you want.
5. The normal closed captioning defaults to a solid black background with
6. COLOR adjusts the background color.
7. OPACITY adjusts how transparent or solid you want the background
Please Note :
↵↵↵↵
or ► to select the functions and highlight AUTO LOCK.
↵↵↵↵
to select it.
white color text.
color to be.
• This function only works under digital channels. If you are on an
analog channel this function will default to the regular black
background with white text.
• Closed Captioning for this TV only works under sources TV, AV1,
and AV2.
- 78 -
www.SCEPTRE.com
Page 79

SCEPTRE X42 HDTV User Manual
CAPTION TEXT – This function adjusts digital channel’s closed captioning text
styles.
1. Press MENU to open the OSD and highlight FUNCTION by pressing the ▼
button.
2. Press ↵↵↵↵ or ► to select the functions and highlight AUTO LOCK.
3. Press ▼ until you see CAPTION TEXT and use ↵↵↵↵ to select it.
4. Use ▲▼◄► to select the options you want.
5. The normal closed captioning defaults to a solid black background with white
color text.
6. CAPTION SIZE changes the font size of the text.
7. CAPTION STYLE changes the font style of the text.
8. TEXT COLOR changes the font color of the text.
9. TEXT OPACITY changes the caption text from transparent to solid.
10. EDGE STYLE enhances a caption text’s visibility by adding a 3 dimensional
detail to the text. There are various options to this subfunction.
11. EDGE COLOR changes the 3 dimensional effect’s color.
12. ITALIC makes the caption text look slanted.
13. UNDERLINE puts a line across the bottom of the caption text.
Please Note :
• These options only work under digital channels. If you are on an analog
channel this function will default to the regular black background with
white text.
• Closed Captioning for this TV only works under sources TV, AV1, and
AV2.
- 79 -
www.SCEPTRE.com
Page 80

SCEPTRE X42 HDTV User Manual
GUIDE – This function shows you detailed information about your current digital
channel’s programming and the entire day’s program list.
1. Press MENU to open the OSD and highlight FUNCTION by pressing the
▼ button.
2. Press ↵↵↵↵ or ► to select the functions and highlight AUTO LOCK.
3. Press ▼ until you see GUIDE and use ↵↵↵↵ twice to select it.
- 80 -
www.SCEPTRE.com
Page 81

SCEPTRE X42 HDTV User Manual
4. Inside the GUIDE you can select the programming of the TV station by
time, and RESERVE it for future viewing by pressing the ↵↵↵↵ key. When
you press ↵↵↵↵ a clock sign will appear next to the programming. This
signifies that this program will now be reserved for viewing. When the
time comes, the TV will prompt you 30 seconds ahead for switching to
that channel. If you choose YES the TV will switch to the channel for you,
if you choose NO, then the TV will stay on the current channel and
remove the reservation from the reserve list.
Please Note :
• The guide only works under ANTENNA connection of TV tuner.
It will not work with any other connection.
- 81 -
www.SCEPTRE.com
Page 82

SCEPTRE X42 HDTV User Manual
RESERV. LIST – This function is an actual function that’s used while you have GUIDE
turned on. You can reserve up to 5 programs that you want to watch in the future and the
TV will automatically switch to that channel when the time comes.
1. Press MENU to open the OSD and highlight FUNCTION by pressing the ▼
button.
2. Press ↵↵↵↵ or ► to select the functions and highlight AUTO LOCK.
3. Press ▼ until you see RESERV. LIST and use ↵↵↵↵ twice to select it.
Please Note :
• The reserve list only works under ANTENNA connection of TV tuner. It
will not work with any other connection.
• If you did not reserve a program, the TV will tell you that the list is empty.
• You can only select a maximum of 5 reserve programming.
• This function will only work, when the TV is turned ON.
- 82 -
www.SCEPTRE.com
Page 83

SCEPTRE X42 HDTV User Manual
Setup Main Option
This main option has functions that allows users to power the TV on or off at a
specific time and date, adjusting PC resolutions for VGA cards, and changing
time and date for the TV.
DATE / TIME – This function adjusts the time and date.
1. Press MENU to open the OSD and highlight SETUP by pressing the ▼ button.
2. Press ↵↵↵↵ or ► to select the functions and highlight DATE/TIME.
3. Press ↵↵↵↵ to select the function.
4. Press ↵↵↵↵ to select SETTING.
5. Use ▲▼◄► to select the options.
6. MANUAL allows you to choose your own time and date.
7. AUTO makes the TV receive time from TV station’s broadcasting signals.
8. You can select the time zone of your TV and also whether you observe daylight
savings time or not.
Please Note :
• The AUTO DATE/TIME feature only works under digital antenna
channels. If you are on an analog antenna, analog cable, or digital
cable channel, you will have to manually set the time.
- 83 -
www.SCEPTRE.com
Page 84

SCEPTRE X42 HDTV User Manual
POWER ON TIME – This function automatically turns the TV on to a specific
channel at a set specific time and date.
1. Press MENU to open the OSD and highlight SETUP by pressing the ▼
button.
↵↵↵↵
2. Press
3. Press ▼ to select POWER ON TIME and press
4. Use ▲▼◄► to select the options.
5. You choose the time, date, and channel.
6. After you have finished setting up the time, date, and channel, please
choose if you want this option to turn on the TV daily or once only.
7. Select ACTIVATE and press
or ► to select the functions and highlight DATE/TIME.
↵↵↵↵
.
↵↵↵↵.
Please Note :
• This function is only for turning on the TV. If you do not setup
POWER OFF TIME function, the TV will never turn itself off. If
you are going on vacation for a long time, please do not forget to
set the function POWER OFF TIME.
- 84 -
www.SCEPTRE.com
Page 85

SCEPTRE X42 HDTV User Manual
POWER OFF TIME – This function automatically turns the TV off at a set specific
time and date.
1. Press MENU to open the OSD and highlight SETUP by pressing the ▼
button.
↵↵↵↵
2. Press
3. Press ▼ repeatedly until you select POWER OFF TIME and press
4. Use ▲▼◄► to select the options.
5. You choose the time, and date.
6. After you have finished setting up the time, and date, please choose if
you want this option to turn on the TV daily or once only.
7. Select ACTIVATE and press
or ► to select the functions and highlight DATE/TIME.
↵↵↵↵.
- 85 -
www.SCEPTRE.com
↵↵↵↵
.
Page 86

SCEPTRE X42 HDTV User Manual
SLEEP – This function makes the TV turn itself off after a set number of minutes.
1. Press MENU to open the OSD and highlight SETUP by pressing the ▼
button.
↵↵↵↵
2. Press
3. Press ▼ repeatedly until you select SLEEP and press
4. Use ◄ or ► to select how many minutes you want the TV to be on and
press
5. Once selected the TV will begin counting the minutes immediately.
or ► to select the functions and highlight DATE/TIME.
↵↵↵↵
.
↵↵↵↵
.
- 86 -
www.SCEPTRE.com
Page 87

SCEPTRE X42 HDTV User Manual
MENU LANGUAGE – This function changes the entire OSD’s language.
1. Press MENU to open the OSD and highlight SETUP by pressing the ▼
button.
↵↵↵↵
2. Press
3. Press ▼ repeatedly until you select MENU LANGUAGE and press
4. Use ◄ or ► to select language you want the TV to display the OSD in
and press
5. Once selected the TV will display the language of your choice.
or ► to select the functions and highlight DATE/TIME.
↵↵↵↵
.
- 87 -
www.SCEPTRE.com
↵↵↵↵
.
Page 88

SCEPTRE X42 HDTV User Manual
MENU OPACITY – This function changes the OSD menu’s visual from
transparent to solid.
1. Press MENU to open the OSD and highlight SETUP by pressing the ▼
button.
2. Press
3. Press ▼ repeatedly until you select MENU OPACITY and press
4. Use ◄ or ► to select how transparent or solid you want to display the
↵↵↵↵
or ► to select the functions and highlight DATE/TIME.
OSD in and press
↵↵↵↵
.
- 88 -
www.SCEPTRE.com
↵↵↵↵
.
Page 89

SCEPTRE X42 HDTV User Manual
EMERGENCY ALERT – This function adjusts options regarding your local
emergency broadcasting service.
1. Press MENU to open the OSD and highlight SETUP by pressing the ▼
button.
↵↵↵↵
2. Press
3. Press ▼ repeatedly until you select EMERGENCY ALERT and press
4. Use ▲▼◄► to select if you want to display medium or low emergency
alerts in your local area and press
Please Note :
or ► to select the functions and highlight DATE/TIME.
↵↵↵↵
.
• This function is dependent on your local TV station’s support. If
your local TV stations do not support such function,
EMERGENCY ALERT will not work.
- 89 -
www.SCEPTRE.com
↵↵↵↵
.
Page 90

SCEPTRE X42 HDTV User Manual
PC SETUP – This function is for people who use the X42 LCD HDTV’s VGA port
as a PC monitor only. The function adjusts the position and syncs the signal of
the PC.
1. Press MENU to open the OSD and highlight SETUP by pressing the ▼
button.
2. Press ↵↵↵↵ or ► to select the functions and highlight DATE/TIME.
3. Press ▼ repeatedly until you select PC and press ↵↵↵↵.
4. Use ▲ or ▼ to select the subfunction you want and press ↵↵↵↵.
5. AUTO ADJUST is a typical LCD monitor’s auto adjust function. It syncs
to the signal of the VGA card and auto adjusts the clock and phase of the
signal so your picture comes out clear and centered.
6. AUTO COLOR is a subfunction where the TV balances the color of the
screen for you so that all colors on screen are displayed accurately.
7. TRACKING consists of PHASE and CLOCK.
• PHASE adjusts the video signal in a small increment to sync with
the PC.
• CLOCK adjusts the video signal in a large increment to sync with
the PC.
- 90 -
www.SCEPTRE.com
Page 91

SCEPTRE X42 HDTV User Manual
8. POSITION moves the picture left or right, up or down.
Please Note :
• The X42 LCD HDTV’s best PC resolution is 1360x768 at 60hz.
•
Always try to use AUTO ADJUST over manual adjustments
• The VGA port of the TV features a power saving mode which will
automatically turn off the TV, if there’s no signal provided for
more than 15 minutes.
- 91 -
www.SCEPTRE.com
.
Page 92

SCEPTRE X42 HDTV User Manual
MENU TIMEOUT – This function adjusts how long the menu will be on the
screen when you’re not using it.
1. Press MENU to open the OSD and highlight SETUP by pressing the ▼
button.
2. Press
3. Press ▼ repeatedly until you select MENU TIMEOUT and press
4. Use ▲ or ▼ to select how long you want the OSD to display when it is
5. Please finalize the selection by pressing
idle.
↵↵↵↵
or ► to select the functions and highlight DATE/TIME.
↵↵↵↵
.
- 92 -
www.SCEPTRE.com
↵↵↵↵
.
Page 93

SCEPTRE X42 HDTV User Manual
Detailed Explanations
Info Banner Explained
The info banner is a banner that shows TV programming info on the top portion
of your TV. This function is only available when you use the ATSC/NTSC tuner
port.
The info banner’s left side shows you typical programming information such as
TV station name, number, program name, date, and times the show starts and
ends.
- 93 -
www.SCEPTRE.com
Page 94

SCEPTRE X42 HDTV User Manual
The info banner’s right side shows you the TV’s display information such as HD
(High Definition) or SD (regular TV) mode, stereo sound, closed captioning, and
digital surround sound.
• HD or SD – If highlighted this symbol shows you whether the
channel you are watching is in HD (High Definition) or Standard
Definition (regular TV).
• ((S)) – If Highlighted this symbol shows you that the channel you
are watching is in stereo sound.
- 94 -
www.SCEPTRE.com
Page 95

SCEPTRE X42 HDTV User Manual
• If highlighted this symbol shows you are using the SAP
(secondary audio programming) function from the TV
channel. You can do so via the MTS button on the remote
control. Please Note : This function is always active under
analog stations whether the station supports this function or not.
• CC – If highlighted, this symbol tells you that this channel
supports closed captioning.
• 5.1 CH – If highlighted this symbol tells you that this channel
supports 5.1 channel digital surround sound.
- 95 -
www.SCEPTRE.com
Page 96

SCEPTRE X42 HDTV User Manual
• TV-MA ALL – This is a type of TV rating. This section tells you
the TV ratings of the program you are watching. Please refer to
ratings explained for more information on ratings.
• This symbol and the indicator bar show you how strong
your current channel’s signal is. This function is only
available under digital channels.
Aspect Ratio Explained
The TV will display the TV channel’s signal format automatically. There are
mainly two types of signal format, 16:9 and 4:3.
1. 16:9
This mode will stretch the picture to a widescreen ratio. If you have a perfect
16:9 ratio picture you will not see any black bars. If you are watching a
widescreen movie in 1.85:1 or 2.35:1 ratio, you will still get black bars on the
top and bottom of the screen. If you use this mode on 4:3 pictures they will
be stretched and distorted horizontally.
- 96 -
www.SCEPTRE.com
Page 97

SCEPTRE X42 HDTV User Manual
2. 4:3
Most analog TV channels have 4:3 signal formats. If the original 4:3 aspect
ratio (1.33:1 source) is preserved, black bars are added to the left and right
of the display image. This aspect keeps that aspect ratio and shows you the
black bars on the side.
3. Zoom 1
When watching a 4:3 aspect ratio TV or movie, this mode zooms in to cut off
most of the black bars on the side while preserving the 16:9 ratio. Because
of the zoom, the top and bottom are cut off as well.
- 97 -
www.SCEPTRE.com
Page 98

SCEPTRE X42 HDTV User Manual
4. Zoom 2
This mode performs the same as Zoom1 except the level of zoom is
increased.
5. Panaroma
When watching a 4:3 aspect ratio TV or movie, there will be black bars on
the side, you can remove this by using 16:9 aspect but the entire picture will
be distorted horizontally. This mode will only distort the two sides of the TV
(where the black bars used to be) but in the center the picture will still be
proportional. This mode will fill the entire screen but most of your picture will
be proportional. Please Note : When in HD mode aspect ratios will not work
because it is controlled by the signal.
- 98 -
www.SCEPTRE.com
Page 99

SCEPTRE X42 HDTV User Manual
Picture In Picture / Picture By Picture Explained
This television features Picture In Picture (PIP) and Picture By Picture (PBP)
options, however the TV is NOT designed for viewing 2 TV channels at the same
time. If you want something like that, you’ll need an external Tuner box such as
a satellite set-top box or cable box. With the external box plugged into the TV,
and also an antenna plugged into the TV tuner, you can get your local stations
via the source TV, and your cable or satellite channels via another source.
PIP Window is a smaller picture window on one of the 4 edges of the TV
showing you another source that the TV is connecting to.
PBP Window is a picture window that takes up half of the screen. The other half
is the main picture.
- 99 -
www.SCEPTRE.com
Page 100

SCEPTRE X42 HDTV User Manual
ON/OFF – To turn on the PIP or PBP, press the ON/OFF button. When you
press the ON/OFF button once, PIP will turn on, press the ON/OFF button again
and PIP will turn into PBP.
SOURCE – To switch sources in the PIP or PBP window, press the source
↵↵↵↵
button and use the ▲▼◄►
PBP window to switch to.
POS – Press this button to switch the position of the PIP or PBP window.
SIZE – Press this button to switch the size of the PIP window.
AUDIO SWAP (yellow) – Press this button to interchange the audio between the
PIP/PBP and the main picture.
VIDEO SWAP (yellow) – Press this button to replace the main picture with the
PIP window’s picture or vice versa.
PIP/PBP Switch List
1. TV (Air/Cable) Switches With
• AV1, AV2 (CVBS), AV3 (S-Video), YPbPr1, YPbPr2, VGA, HDMI1,
HDMI2
2. AV1 Switches With
• TV (Air/Cable), AV2 (CVBS), AV3 (S-Video), YPbPr1, YPbPr2,
VGA, HDMI1, HDMI2
3. AV2 (CVBS) Switches With
• TV (Air/Cable), AV1, YPbPr1, YPbPr2, VGA, HDMI1, HDMI2
4. AV3 (S-Video) Switches With
• TV (Air/Cable), AV1, YPbPr1, YPbPr2, VGA, HDMI1, HDMI2
buttons select the source you want your PIP or
- 100 -
www.SCEPTRE.com
 Loading...