


Table Of Contents
Important Notice…………………………………………………………………………..1
Important Safety Instructions……………………………………………………………...2
Cleaning the LCD TV……………………………………………………………………..5
Cautions…………………………………………………………………………………...6
Before Using
Descriptions and accessories……………………………………………………………....7
Installation and connections
Connecting the speakers…………………………………………………………………..9
Connecting the Audio/Video equipments………………………………………………...10
Connecting the antenna or cable system…………………………………………………10
Connecting the PC system………………………………………………………………..11
Connecting the AC power cord…………………………………………………………..11
Operation
Turning on the LCD TV………………………………………………………………….12
Control Keys……………………………………………………………………………...13
Remote controller………………………………………………………………………...14
On Screen Display (OSD) Menu
PC signals
VGA input………………………………………………………………………………..15
DVI input………………………………………………………………………………...16
TV signals
DTV (ATSC) input………………………………………………………………………17
TV (NTSC) input………………………………………………………………………..18
Video signals
AV1, AV2, Component (Y Pb Pr), HDMI, and HDCP inputs…………………………...19
Other Information
Troubleshooting…………………………………………………………………………20
Specifications……………………………………………………………………………21
1

Important Notice
1. Press “0000” for the password for both DTV OSD menu and the Rating menu.
2. Please save all the carton box and packing materials for future transportation or
handling.
3. This TV’s Remote does not have a code for universal remotes.
2

Important Safety Instructions
1. Read Instructions – All the safety and operating instructions should be read
before the device is operated.
2. Retain Instructions – The safety and operating instructions should be retained for
future reference.
3. Heed Warnings – All warnings on the device and in the operating instructions
should be adhered to.
4. Follow Instructions – All operating and use instructions should be followed.
5. Cleaning – Unplug the device from the wall outlet before cleaning. The device
should be cleaned only as recommended by the manufacturer.
6. Attachments – Do not use attachments not recommended by the device
manufacturer as they may cause hazards.
7. Water and Moisture – Do not use this device near water- for example, near a bath
tub, wash bowl, kitchen sink, or laundry tub; in a wet basement; or near a
swimming pool; and the like.
8. Accessories – Do not place the device on an unstable cart, stand, tripod, bracket,
or table. The device may fall, causing serious injury to a child or adult, and
serious damage to the device. Use only with a cart, stand, tripod, bracket, or table
recommended by the manufacturer, or sold with the device. Any mounting of the
device should follow the manufacturer ’s instructions, and should use a mounting
accessory recommended by the manufacturer.
9. An device and cart combination should be moved with care. Quick stops,
excessive force, and uneven surfaces may cause the device and cart combination
to overturn.
10. Ventilation – Slots and openings in the cabinet are provided for ventilation and to
ensure reliable operation of the device and to protect it from overheating, and
these openings must not be blocked or covered. The openings should never be
blocked by placing the device on a bed, sofa, rug, or other similar surface. The
device should not be placed in a built-in installation such as a bookcase or rack
unless proper ventilation is provided. There should be free space of at least 20
cm (8 in.) and an opening behind the device.
11. Power Sources – The device should be operated only from the type of power
source indicated on the marking label. If you are not sure of the type of power
supply to your home, consult your local dealer.
12. Grounding or Polarization – The device may be equipped with a polarized
3

alternating current line plug ( a plug having one blade wider than the other). This
plug will fit into the power outlet only one way. This is a safety feature. If you
are unable to insert the plug fully into the outlet, try reversing the plug. If the
plug should still fail to fit, contact your electrician to replace your obsolete outlet.
Do not defeat the safety purpose of the polarized plug.
13. Power cord Protection - Protect the power cord from being walked on or pinched
particularly at plugs, convenience receptacles, and the point where they exit from
the device.
14. Lightning – For added protection for the device during a lightning storm, or
when it is left unattended and unused for long periods of time, unplug it from the
wall outlet and disconnect the antenna or cable system. This will prevent damage
to the device due to lightning and power-line surges.
15. Overloading – Do not overload wall outlets, extension cords, or integral
convenience receptacles as this can result in a risk of fire or electric shock.
16. Object and Liquid Entry – Never push objects of any kind into the device
through openings as they may touch dangerous voltage points or short-out parts
that could result in a fire or electric shock. Never spill liquid of any kind on the
device.
17. Servicing – Do not attempt to service the device yourself as opening or removing
covers may expose you to dangerous voltage or other hazards. Refer all servicing
to qualified service personnel.
18. Damage requiring Service – Unplug the device from the wall outlet and refer
servicing to qualified service personnel under the following conditions:
A. When the power cord or plug is damaged.
B. If liquid has been spilled, or objects have fallen into the device.
C. If the device has been exposed to rain or water.
D. If the device does not operate normally by following the operating
instructions.
E. If the device has been dropped or damaged in any way, and
F. When the device exhibits a distinct change in performance – this indicates
a need for service.
19. Wall Mounting – The device should be mounted to a wall only as recommended
by the manufacturers.
20. Heat – The device should be situated away from heat sources such as radiators,
heat registers, stoves, or other devices that produce heat.
4

21. To reduce the risk of electric shock, do not remove back cover. No user
serviceable parts inside. Refer servicing to qualified service personnel.
22. The device must be connected to a mains socket outlet with a protected earth
connection.
23. When transporting the LCD TV, never carry it by holding onto the speakers. Be
sure to always carry the unit by two people holding it with two hands.
24. Replacement Parts – When replacement parts are required, be sure the service
technician has used replacement parts specified by the manufacturer or have the
same characteristics as the original part. Unauthorized substitutions may result in
fire, electric shock, or other hazards.
25. Safety Check – Upon completion of any service or repairs to the device, ask the
service technician to perform safety checks to determine that the device is in
proper operation condition.
26. Warranty Claim – You can find the serial number on the rear panel of this unit. In
case of warranty claim, please use the included warranty card and report this
number.
Cleaning the LCD TV
1. Wipe the LCD TV with soft or dry cloth.
2. Do not use solvent or methylbenzene. Harsh chemicals may damage your LCD
TV.
3. Make sure the LCD TV is unplugged before you clean it.
Warning
BEFORE PLUGGING IN THE UNIT FOR THE FIST TIME, READ THE
FOLLOWING SECTION CAREFULLY.
The voltage of the available power supply differs according to country or region. Be
sure that the power supply voltage of the area where this unit will be used meets the
required voltage (e.g., AC 230V, 50Hz, or AC 120V, 60Hz) written on the rear panel.
5

FCC Compliance Statement
This device complies with Part 15 of the FCC Rules. Operation is subject to the
following conditions: (1)this device may not cause harmful interference, and (2)this
device must accept any interference received, including interference that my cause
undesired operation.
Note: This equipment has been tested and found to comply with the limits for a Class
B digital device, pursuant to part 15 of the FCC Rules. These limits are designed to
provide reasonable protection against harmful interference in a residential installation.
This equipment generates uses and can radiate radio frequency energy and, if not
installed and used in accordance with the instructions, may cause harmful
interference to radio communications. However, there is no guarantee that
interference will not occur in a particular installation. If this equipment does cause
harmful interference to radio or television reception, which can be determined by
turning the equipment off and on, the user is encouraged to try to correct the
interference by one or more of the following measures:
*Reorient or relocate the receiving antenna.
*Increase the separation between the equipment and the receiver.
*Connect the equipment into an outlet on a circuit different from that to which the
receiver is connected.
Caution: To comply with the limits for an FCC Class B computing device, always use
the signal cord and power cord supplied with this unit. The Federal communications
Commission warns that changes or modifications to the unit not expressly approved
by the party responsible for compliance could void the user’s authority to operate the
equipment.
6
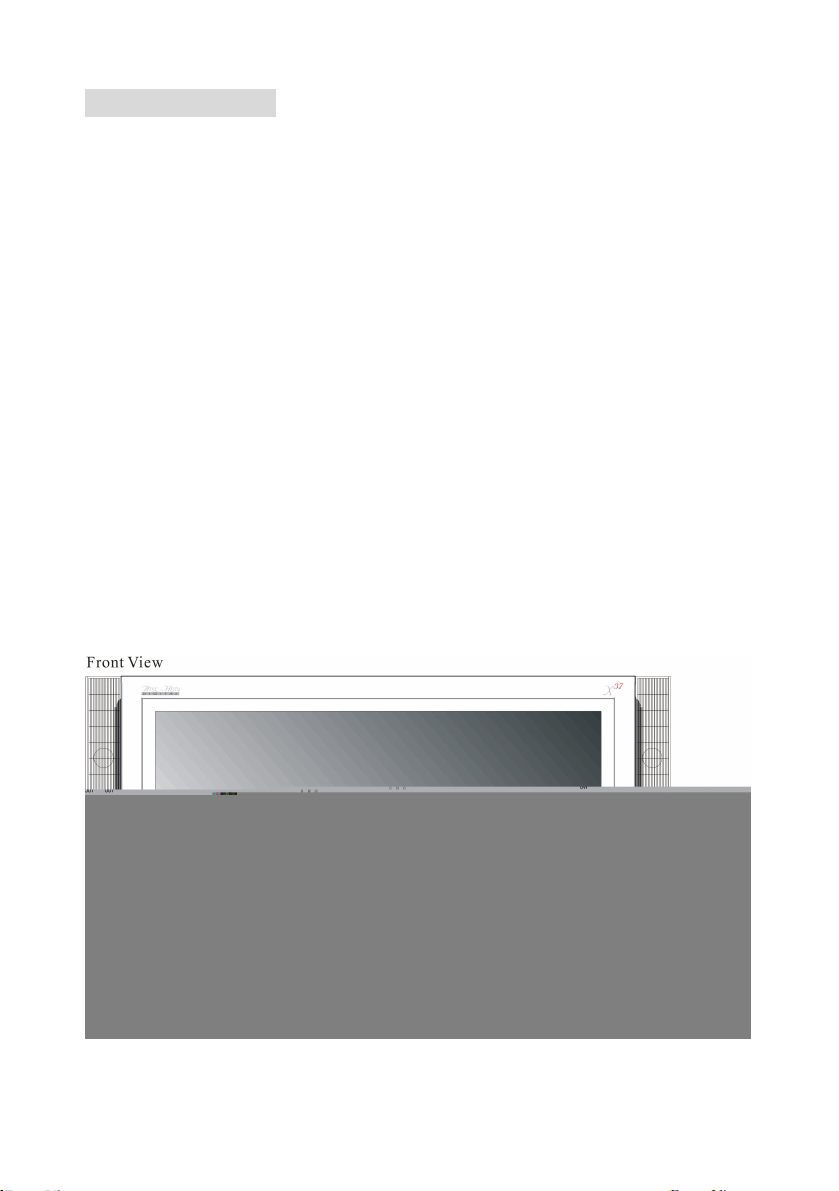


Control Keys
CH Press “CH” buttons to switch between preprogrammed channels. If you
are using DTV to view your television you can also use EPG button to
navigate your channels.
+ VOL Press “VOL” buttons to adjust the audio volume.
SOURCE PC Press is button to select among the following PC or DTV inputs – DTV,
HDMI, HDCP, DVI, VGA. Please note HDMI, HDCP, and DVI are
physically shared under the same HDMI port.
SOURCE AV Press this button to select among the following Video inputs – TV,
AV1, AV2, Component(YPbPr)
TV Info Explained
Non DTV On the upper left hand corner there’s always a “M: “ and a “S: ”. “M:
“ represents the main display while “S: “ represents the sub-display also known as
PIP window. “S: “ is usually off because a PIP window is not present.
rd
DTV On the top 1/3
displayed would include what program you’re watching, what time slot is the
program playing in and what format is the program being displayed in.
of the screen a information bar would appear, the information
12

Source PC & AV Explained
DTV For ATSC tuner use only. ATSC tuner is a high definition over the airwave tuner
that uses a high definition antenna to tune to local channels. If your local channel
broadcasts in high definition this tuner will display high definition picture on the
TV.
HDMI HDMI stands for High Definition Multimedia Interface. This type of connection
is designed so that 1 single cable can handle both high definition digital video and
audio at the same time. To view video and listen to audio with this source you
must have a HDMI to HDMI cable. This type of connection is primarily used by
satellite or digital cable boxes and up conversion DVD players.
HDCP HDCP stands for High-bandwidth Digital Content Protection. This type
of function is designed so high definition video cannot be copied while hooked up
to a recording device. HDCP is enabled in HDMI and in HDCP DVI mode.
This type of connection is primarily used by satellite or digital cable boxes and up
conversion DVD players. Please note to get sound out of HDCP mode you must
connect an audio cable from your audio video device to the audio port labeled
“PC Audio In”.
DVI DVI stands for Digital Video Interface. This type of connection is designed so
video can be digitally transferred to the television therefore display the colors of
any video more accurately and vividly. This interface can be used by both PC
and video displaying devices such as DVD player, satellite box, or digital cable
box…etc. Please note to get sound out of HDCP mode you must connect an
audio cable from your audio video device to the audio port labeled “PC Audio
In”.
13

VGA VGA stands for Video Graphics Array. This type of connection is designed so
people can use their PCs on the 37” LCD/TV. This type of connection is
primarily used by personal computers. Please note to get sound out of HDCP
mode you must connect an audio cable from your audio video device to the audio
port labeled “PC Audio In”.
TV This connection is for TV tuner only. TV tuner is actually a NTSC standard
tuner, which can scan over the airwave UHF/VHF or Analog Cable (cable directly
hooked up into the TV) TV stations and display them at standard definition
(regular TV video resolution). This connection is primarily used by non-HD
antennas or analog cables.
AV1 This connection is for common audio video devices that use RCA (red yellow
white) cable. This connection is primarily used by VCR, DVD player, DV
camcorder, and video game consoles (XBOX, PS2, Gamecube).
AV2 This connection is a duplicate for AV1.
Component(YpbPr) This connection designed so enhanced definition to high definition
audio video devices can be connected to the port via 3 wires, red,
green, and blue. Older audio video devices that display high
definition video use this port. This connection is primarily used by
DVD player, satellite box, digital cable box, and video game
consoles (XBOX, PS2, Gamecube).
14

Turning on the LCD Display unit
1. Press the Power Switch located on the rear lower right of the unit to turn the power on.
2.
Press the Power button on the front lower right of the unit to switch between on and
standby modes.
For Analog Cable and Antenna Users
Note: The following instruction set is for TV tuner antenna, analog cable users only. When
using the TV for the first time, you must perform the channel scan to get all correct channels by
doing the following:
1. Press the “SOURCE AV” button on the remote controller to select the TV input signal
labeled either “Cable ###” or “Air ###”. # represents numbers
2. Press MENU button to activate the On Screen Display (OSD) menu
3. Press “VOL +/-“ button to select the “TV SETUP” function group
4. Press “CH +/-“ button to select correct “Cable/Air” signal source
5.
Press “CH +/-“ button to select “CH-SCAN” function and then press
For HDTV Antenna ATSC Tuner Users
Note: The following instruction set is for ATSC Tuner HD antenna users only. Only perform
the following instruction set when you have connected a HD antenna to the ATSC tuner.
ATSC tuner does not guarantee HD picture quality. HD picture still depends on the method
which your local channels broadcast their TV signal.
1. Make sure your HDTV antenna is connected to the ATSC Tuner port NOT the tuner
labeled TV Tuner.
2. Press the “SOURCE PC” button on the remote controller to select the TV input signal
labeled “DTV”
3. Press MENU button to activate the On Screen Display (OSD) menu
15

4. Press “VOL+/-“ button to select the “DTV” function group
5. Press “ ”(button in the center of VOL +/- & CH +/-) to enter the DTV sub functions.
6. Enter “0000” for the password to enter “Channels” function
7. Press “CH +/-“ button to select “Channel Scan” function and then press“←”(button in
the center of VOL +/- & CH +/-) to perform channel scanning to obtain all available
channels.
8. To navigate in between channels you can only use the “CH +/-“ buttons or the “EPG”
button.
9.
Pressing the “EPG” button more than once will toggle in between regular channel
program and sub channel program.
For Set-top Box Users (including Digital Cable, Satellite, other video
displaying devices)
Note : The following instruction set is for set-top box users (including digital cable, satellite
box, other video devices)
1. Make sure your video cables are connected correctly to the back of the television color
matching all ports.
2. Press the “SOURCE AV” or “SOURCE PC” button on the remote controller to select the
TV input signal which you’ve connected to if you have connected to AV1, AV2, HDMI,
HDCP, DVI, VGA, or Component(YPbPr).
3.
Please Consult your set-top box’s manual with regards on how to turn on the device and
browse channels.
16

Remote Controller
1.POWER
To turn on the LCD Display unit or enter standby
2.MUTE
Press the button to turn off the audio volume. Press the button again or
press volume +/- to restore the previous volume level
3.ASPECT( aspect ratio of picture display)
To select on of the available screen aspect ratio – Auto,16:9 ,4: 3, Zoom
Full, Zoom Subtitle
4.AUDIO(PIP Swap)
Listen to the audio from the sub-picture.
5.VIDEO(PIP Swap)
Swap between main picture and the sub-picture.
6.PIP SOURCE
Select the input source for the sub-picture.
7.SIZE (PIP)
Select the window size for the sub-picture (1/4, 1/9, or 1/16 of the entire
screen size)
8.POS (PIP)
Select the position for the sub-picture window (four corners of the
screen)
9.FAVORITE (Channels)
Choose the pre-selected favorite channels. Total of nine channels can be
stored as the Favorite channels.
Note: Before the Favorite (channels) can be used, one must pre-select the
channels and store into the Favorite channel list. Go to the channel you
preferred to watch, press MENU button to enter the OSD (On Screen
Display) menu to store the channel in to the Favorite channel list.
10.SOURCE PC
Select different PC/DTV input sources – DTV, HDMI, HDCP, DVI, and
VGA.
11.SOURCE AV
Select different video input signal sources – TV Tuner, AV1, AV2, and
Component.
12.SOUND
Select different Sound Effect modes – User, Pop, Soft, Dialogue, and
Cinema.
Note: When the preset mode is selected, one can not access those audio
adjustment functions listed on the OSD menu.
13.PICTURE
Select different preset picture modes – User, Standard, Nature, Sports,
and Cinema.
Note: When the preset mode is selected, one can not access those video
adjustment functions listed on the OSD menu.
14.MENU
Press the MENU button to activate the OSD (On Screen Display) main
menu. Press again to quit the main menu.
15.MTS
To select STEREO, MONO, or SAP.
When OSD menu is shown, press this button to enter (confirm) the
sub-menu.
19.EXIT
Press this button to exit from the sub-menu to the previous menu.
20.EPG
When DTV program (channel) is selected, press this button to display the Electronic Program Guide (EPG).
21. 0 – 9, 100/-
Select channels from 1 to 99, press the desired channel numbers. If the channel number is 100 or greater, first press the button “100/-“.
17.CH +/-
Press these two buttons to scroll through the channels. If the OSD Menu
is shown on the screen, press these buttons to scroll through the menu
items vertically.
18.VOL +/-
Press these two buttons to adjust the speaker volume level. If the OSD
Menu is shown on the screen, press these buttons to scroll through the
menu items horizontally.
17

22.CCD (Closed Caption Display)
Press CCD to display closed caption information. Press repeatedly to scroll through OFF, CC1, CC2, CC3, CC4, TT1, TT2, TT3, and TT4
23.R (RETURN)
Press this button to return to previous channel.
24.SLEEP
Press repeatedly to cycle through the available sleep timer options – Off/30/60/90/120 minutes.
25.INFO
Display related information on current channels or PC modes.
Picture In Picture Explained
Picture In Picture is a display mode where 1 TV can display 2 different types of video sources
simultaneously. This is done with 1 small window at a corner of the TV displaying 1 video
source while the other video source is displayed on the entire screen. The “Picture In Picture”
function for this television is NOT designed for viewing 2 TV stations at the same time, but
rather viewing analog and digital video sources at the same time. For example playing your
DVD movie through component(YPbPr) port but also having the small window to display your
TV tuner channels to keep up with news. The general rule of PIP is any Source PC sources
can be used in PIP when you’re on any Source AV sources and vice versa. None of the
Source PC sources can be used in PIP when you’re already in one of the Source PC sources.
18

OSD (On Screen Display) Menu
The OSD Menu varies based on different input signal sources. The OSD menus provide
different control functions, which allow users to optimize the picture/audio performances for
each of the input signal sources.
How to operate the OSD Menu:
1. Press the MENU button on the remote controller to pop up the OSD menu. Press the
MENU button again to quit the OSD menu.
2. Press VOL +/- to select the GROUP items which listed horizontally on the ODS menu.
3. Press CH +/- to scroll through the function items vertically.
4. Press to enter the sub-menu. Press VOL +/- to adjust the setting.
5.
Press EXIT to go back to the previous menu.
OSD Menu (VGA input)
When VGA input is selected, the following OSD menu will be displayed when the MENU
button is pressed.
Group Menu Functions Under the Group Items
Geometry Auto, H-position, V-position, Clock, Phase, Recall
Picture Contrast, Black Level, Color, Temp., R Gain, G Gain, B Gain, Recall
Audio Bass, Treble, Balance, Loudness, AVC, Surround, Recall
System Language, Lamp
19

Function Descriptions
Auto Auto fine tuning picture clock and position
Recall Reset the parameters to original factory settings
Black Level Changes the level of blackness in black colors on the TV image
Color Temp. Select color temperature among High, Middle, Low, or User modes
Sharpness Make the picture sharper
Loudness Compensate Bass and Treble strength
AVC Suppress a pop sound resulted from changing TV program
Surround Select sound field from Off, Narrow, or Wide
Language Choose the language between English and French for the OSD menu
VGA Input Functions FOR EXPERTS ONLY
The following functions should NOT be tampered with under normal circumstances.
Function Descriptions
H-position Adjusts the display position left or right / Normally use Auto Adjust
V-position Adjusts the display position up or down / Normally use Auto Adjust
Clock Adjusts the clock frequency to match video card / Normally use Auto Adjust
Phase Adjusts the phase frequency to match video card / Normally use Auto Adjust
Contrast Adjusts the contrast between bright / dark graphics and text
R-Gain Adjusts how much red color is in the display
G-Gain Adjusts how much green color is in the display
B-Gain Adjusts how much blue color is in the display
Bass Adjusts the bass level of your TV speakers
Treble Adjusts the treble level of your TV speakers
Balance Adjusts the balance (left to right) of your TV speakers
Lamp Adjusts how bright the you want the LCD to display it’s images
20

OSD Menu (DVI input)
When DVI input is selected, the following OSD menu will be displayed when the MENU
button is pressed.
Group Menu Functions Under the Group Items
Picture Contrast, Black Level, Color, Temp., R Gain, G Gain, B Gain, Recall
Audio Bass, Treble, Balance, Loudness, AVC, Surround, Recall
System Language, Lamp
Please note that under DVI most functions inside picture will not be functional. Please refer
to VGA Input for similar functions.
OSD Menu (DTV input)
When DTV input is selected, the following OSD menu will be displayed when the MENU
button is pressed.
21

Function Descriptions
THIS FEATURE. PLEASE REMEMBER YOUR NEW PASSWORD OR
Color Adjust Picture Chrominance Gain/Ratio
Tint Adjust Picture Chrominance angle(or skin color)
Vivid Color Make color brighter without over-saturation
Skin Tone Make the skin color brighter without affecting other colors
Green Strengthen Green (grass color) color without affecting other colors
Blue Strengthen Blue (sky color) color without affecting other colors
(Noise) Not available under DTV input
Gamma Adjust screen visual transformation
Enter Sub-Menu Enter DTV (ATSC) OSD menu
Note: When enter the DTV OSD menu, press “0000” as the password.
Group Menu Functions Under Group Items
Channel Edit, Auto Scan, Manual Scan
Lock Rating, Password, Reset DTV
Setup Sound, Opacity, I-plate, Time Zone, About
Caption Font Size, Font Style, Font Color, Font Opacity, Edge Style, Edge Color
Function Descriptions
Edit Displays a list of channels you can toggle between favorites and blocking
Auto Scan Automatically scans for all channels via HDTV antenna
Manual Scan Manually input a channel number for scanning (NOT RECOMMENDED)
Rating Toggles the rating chart to block children from viewing violent TV
Changes the password. WARNING THERE IS NO WAY TO RESET
Password
Reset DTV
DON’T CHANGE THE PASSWORD.
Resets all options including scanned channels.
22

Sound This feature is hardware disabled.
Opacity Adjusts how transparent the info bar is.
I-plate Adjusts the display time for the info bar.
Time Zone
About Information regarding the ATSC tuner hardware.
Font Size Adjusts the size of fonts for closed captions.
Font Style Adjusts the style of fonts for closed captions.
Font Color Adjusts the color of fonts for closed captions.
Font Opacity Adjusts the transparent effect for the closed captions.
Edge Style Adjusts the border style.
Edge Color Adjusts the border color
Toggles between daylight savings time and regular time. Time is received
thru antenna.
OSD Menu (TV input)
When TV (NTSC) input is selected, the following OSD menu will be displayed when the
MENU button is pressed.
Group Menu Functions Under the Group Items
Video Contrast, Brightness, Color, Tint, Recall
Advanced Vivid Color, Skin Tone, Green, Blue, Noise, Gamma, Recall
Audio Bass, Treble, Balance, Loudness, AVC, Surround, Recall
System Language, Lamp, DCI, Rating
23

TV Setup Cable/Air, CH-Scan, CH-Add, CH-Del, Favorite CH
Function Descriptions
Rating To block/unblock the TV program according to MAPP or TV Guide Line
Cable/Air Select cable signal or terrestrial signal(via antenna)
CH -Scan Scan all available channels to establish a channel list
CH Add. Add currently viewing channel to the channel list
CH Del. Delete currently viewing channel from the channel list
Favorite CH Select channels and store into the favorite channel list
(up to 9 channels)
Please Note : To block or unblock the TV program, enter the “Rating” sub-menu, and then
press “0000” to access the menu. Press (enter) to toggle between “B”(prohibited, not
allowed to watch this program) and “U”(prohibited, allowed to watch this program).
To use the “Favorite CH” function, turn to the desired channel first, and then enter the
“Favorite CH” sub-menu. Enter 1 ~ 9 to store the channel at the desired position of the list.
Press to number to erase the channel from the favorite channel list. Please consult VGA Input
functions and DTV functions regarding similar functions.
OSD Menu (AV1, AV2, Component, HDMI, & HDCP inputs)
When AV1, AV2, Component, HDMI, or HDCP input is selected, the following OSD menu
will be displayed when the MENU button is pressed.
24

Group Menu Functions Under the Group Items
Video Contrast, Brightness, Color, Tint, Recall
Advanced Vivid Color, Skin Tone, Green, Blue, Noise, Gamma, Recall
Audio Bass, Treble, Balance, Loudness, AVC, Surround, Recall
System Language, Lamp, DCI, Rating
Function Descriptions
DCI Dynamic Contrast Improvement
Rating Program lock according to MPAA or TV Guide Line
Noise Adjusts the TV picture’s pixelation; fuzziness
Please consult VGA Input functions and DTV functions regarding similar functions.
25

Troubleshooting
source pc or source av button and cycle
The following table contains the common problems and the solutions to these problems. Please
check this list before you contact technicians.
Problems Reasons
No picture
5, Are you using the ATSC tuner
6. Still no video
Abnormal colors Is the signal cable connected correctly?
Picture too dark
Audio only, no
picture
2. Is the TV signal too weak?
Picture only, no
audio
2. Is the audio volume set at the lowest level?
3. Is audio signal cable not connected?
4. Is the TV signal cable too weak?
Remote
controller does
not work
1. Did you connect the power cord? 1. Connect power cord correctly.
2. Did you turn on the power?
3. Is the signal cable connected correctly? 3. Connect signal cable correctly.
4. Is the selected input signal source connected?
Are brightness and contrast set at the lowest
level?
1. Is input signal cable connected correctly?
1. Is signal cable connected correctly? 1. Connect signal cable correctly.
1. Is the battery dead? 1. Change battery.
2. Is there any interference from static or
thunder?
2. Turn on power
4. Select the input signal source with
proper cable connection. If you have
cable select cable inside TV OSD, or
else select Air. If you have HD
antenna, make sure it is connected to
the ATSC tuner instead of the NTSC
tuner
5. Adjust your HDTV antenna,
sometimes if the HD signal is not
complete thru the antenna, the image
will not be displayed.
6. Check your source by pressing the
thru all the input ports.
Properly connect the signal cable. Color
cables should match the colored port
ic. Red to red, green to green and blue
to blue
Adjust brightness and contrast.
1. Check the signal cable connection.
Make sure your video cable is in the
right group as the audio cable.
2. TV-RF signal must not be lower than
50 dB.
2. Adjust volume to proper level.
3. Connect audio cable correctly.
4. TV-RF signal must not be lower than
50 dB.
2. Turn off power for 10 seconds, and
then turn the power back on
26

>HDMI cable. If you’re using the cable
we’ve included in the box, then you should set your source to HDCP or DVI.
Problems Possible solutions
Can not receive UHF
Can not receive sufficient
channels through antenna
No colors
Blinking picture accompanied
By ghost image
Broken lines or segments
Certain TV channels are
blocked
Can not access a picture or
audio menu
Cannot view 2 channels at the
same time with PIP
No Universal Remote Code This television is not designed with a universal remote code.
TV has colors of lines across
the screen
TV is turned on, stand by light
is green but no picture
No Picture on PC (DVI port)
No Sound on PC Make sure your green connector head audio cable is connected.
Satellite / Digital Cable box
says HDCP not compatible
Satellite / Digital Cable box
has no video on HDMI port
Change the signal line to other input-end, make sure your antenna is capable
of receiving UHF.
Please use the channel scanning function to increase the number of channels
Please adjust the color setup, and make sure your signal cable is tightly
connected.
Check the connection of antenna/signal cable
Adjust antenna. Keep the TV away from noise sources such as
neon lights, and hair dryer.
Please use the channel scanning function or v-chip function to unblock.
Make sure your Picture / Sound are both on “User Mode” by pressing the
“Picture” button until the upper left hand corner says “User Mode”. Please
do the same regarding “Sound” button
The PIP function is not designed to view 2 channels at the same time.
This is a big LCD screen, it takes time for electricity to charge up to power
the screen and takes time for the large screen to deplete all it’s residual
electricity. Please do not turn the TV on and off really quickly. Between
the time which you turn off the TV and the time which you turn it on, there
should be at least 50 seconds to 70 seconds.
This is a big LCD screen, and needs time to warm up to show the picture,
please wait for 15-30 seconds for the picture to show up.
Is your video card’s DVI port turned off by default? Go into your video
card’s advance menu to make sure 2
Reboot your satellite / digital cable box by turning them off then unplugging
the power cord. Wait for at least 1-3 minutes and plug them back into the
wall and turn on the power.
Make sure you’re using the HDMI-
nd
monitor / DVI port is turned on
27

Specifications
2 digit channels and change channel within
Display
panel
Resolution: 1920 x 1080
(1)video PIP/POP PIP only
(2)audio Tone bass, treble, balance
(3)general channel auto scan yes
Active Area / Screen Size 819.36(H) x 460.89(V)mm (diagonal 37.01 inches)
Aspect Ratio Widescreen 16:9
Pixel Pitch 0.1555(H) x RGB x 0.4665(V)mm
Max. of Pixels 1920(H) x 1080(V)
Brightness 600cd/m2(Typical)
Contrast 1000:1(Typical)
Response Time 8ms(gray to gray)
Viewing Angle Typical 170 Degree(Horizontal/Vertical)
Lamp Life of Backlight > 60000hrs
de-interlace 3D
frame conversion yes
frame recover 3:2, 2:/2
noise reducing core technology 3D
aspect ratio 4:3, 16:9, zoom full, zoom full sub-title
color enhancement Vivid color, Skin, G,B
dynamic contrast yes( Tuner/Video decoder )
sharpness DLTI/DCTI
gamma 10bit / 5 curves
lamp adjust yes
picture mode user/standard/nature/Sport/movie
video adjust contrast/brightness/color/hue
3 levels of color Temp. for VGA high/middle/low
AVC(Auto Volume Control) yes
loudness yes
Pseudo surround yes
sound mode 4 modes
quick channel change
sleep timer off/30mins/60mins/90mins/120mins
standby power under 1W
timing support-Video 480i/480p/576i/576p/720p/1080i/1080p
PC timing 1920*1080@60Hz(native)
1280*1024@60Hz
1280*720@60Hz
1024*768@60/70/75Hz
800*600@56/60/72/75Hz
640*480@60/72/75Hz
28

640*400@70/85Hz
(4)power supplier input 90-264VAC, 50/60Hz
output 24V/12V/5V/5Vstb, 320W Max.
(5)NTSC/PAL NTSC Sound: Mono/Stereo/SAP
Favorite Channel
V-chip
Closed caption(CC1-CC4, Text 1-Text 4)
PAL sound:Mono/Stereo/Dual1/Dual2
Channel Edit Function
Support CNI(Channel Name
Teletext: 10 pages (Option-250 pages)
SCART support SRGB, Composite video,
(6)I/O NTSC(ASIA) AV1
AV2
Component1
VGA(option)
DVI/HDMI(option)
AV out - Line out
Sub woofer out
Head phone
NTSC(Japan) AV1
AV2
VGA(option)
DVI/HDMI(option)
AV out - Line out
Sub woofer out
Head phone
PAL-Pan Euro AV1
SCART1(decoder)
SCART2(Full with manual selection)
Component1
VGA(option)
DVI/HDMI(option)
Sub woofer out
Head phone
29
 Loading...